

Page 1
INSTRUCTION MANUAL
C
M
Y
CM
MY
CY
CMY
K
®
Page 2
F
G
E
C
M
Y
CM
MY
CY
CMY
K
D
C
O
K
L
M
I
H
N
B
A
J
Page 3
1 2
C
M
Y
CM
MY
CY
CMY
K
3 4
5
6
Page 4

7 8
C
M
Y
CM
MY
CY
CMY
K
9
10
11 12
Page 5

13 14
C
M
Y
CM
MY
CY
CMY
K
15
16
Page 6

GB
INSTRUCTIONS FOR SAFE USE
This appliance should only be used for domestic cleaning, as described
in this user guide. Please ensure that this guide is fully understood before
operating the appliance.
Always switch o and remove the charger from the socket before
cleaning the appliance or any maintenance task.
This appliance can be used by children aged from 8 years and above and
persons with reduced physical, sensory or mental capabilities or lack
of experience and knowledge if they have been given supervision or
instruction concerning use of the appliance in a safe way and understand
the hazards involved. Children shall not play with the appliance. Cleaning
and user maintenance shall not be made by children without supervision.
If the power cord is damaged stop using the appliance immediately.
To avoid a safety hazard, an authorised Hoover service engineer must
replace the power cord.
Keep hands, feet, loose clothing and hair away from rotating brushes.
Use only the original charger supplied with the appliance.
Check that your supply voltage is the same as that stated on the charger.
If the appliance is to be disposed of the batteries must rst be removed.
The appliance must be disconnected from the supply mains when
removing the battery. Dispose of the batteries safely. Run the appliance
until it stops because the batteries are fully discharged. Used batteries
should be taken to a recycling station and not disposed of with household
waste. To remove the batteries, please contact the Hoover Customer
Centre or proceed according to the following instructions.
NOTE: Should you experience any diculty in dismantling the unit or for
more detailed information on treatment, recovery and recycling of this
appliance, please contact your local city oce or your household waste
disposal service.
When charging the appliance, the power switch must be o.
Never charge the batteries in temperatures above 37°C or below 0°C.
It is normal for the charger to become warm to the touch when charging.
Use only attachments, consumables or spares recommended or supplied
by Hoover.
Static electricity: some carpets can cause a small build up of static
electricity. Any static discharge is not hazardous to health.
1
Page 7

GB
Do not use your appliance out of doors or on any wet surface or for
wet pick up.
Do not pick up hard or sharp objects, matches, hot ashes, cigarette
ends or other similar items.
Do not spray with or pick up ammable liquids, cleaning uids,
aerosols or their vapours.
Do not run over the power cord when using your appliance or remove
the plug by pulling on the power cord.
Do not continue to use your appliance or charger if it appears faulty.
Hoover service: To ensure the continued safe and ecient operation
of this appliance we recommend that any servicing or repairs are
only carried out by an authorised Hoover service engineer.
Do not use the appliance to clean animals or people.
Do not replace the batteries with non-rechargeable batteries.
The Environment
The symbol on this appliance indicates that this appliance may not be treated as household
waste. Instead it must be handed over to the applicable collection point for the recycling of
electrical and electronic equipment. Disposal must be carried out in accordance with local
environmental regulations for waste disposal. For more detailed information about treatment,
recovery and recycling of this appliance, please contact your local city oce, your household
and waste disposal service or the shop where you purchased the appliance.
This appliance complies with the European Directives 2006/95/EC, 2004/108/EC and
2011/65/EU.
HOOVER Limited, Pentrebach, Merthyr Tydl, Mid Glamorgan, CF48 4TU, UK
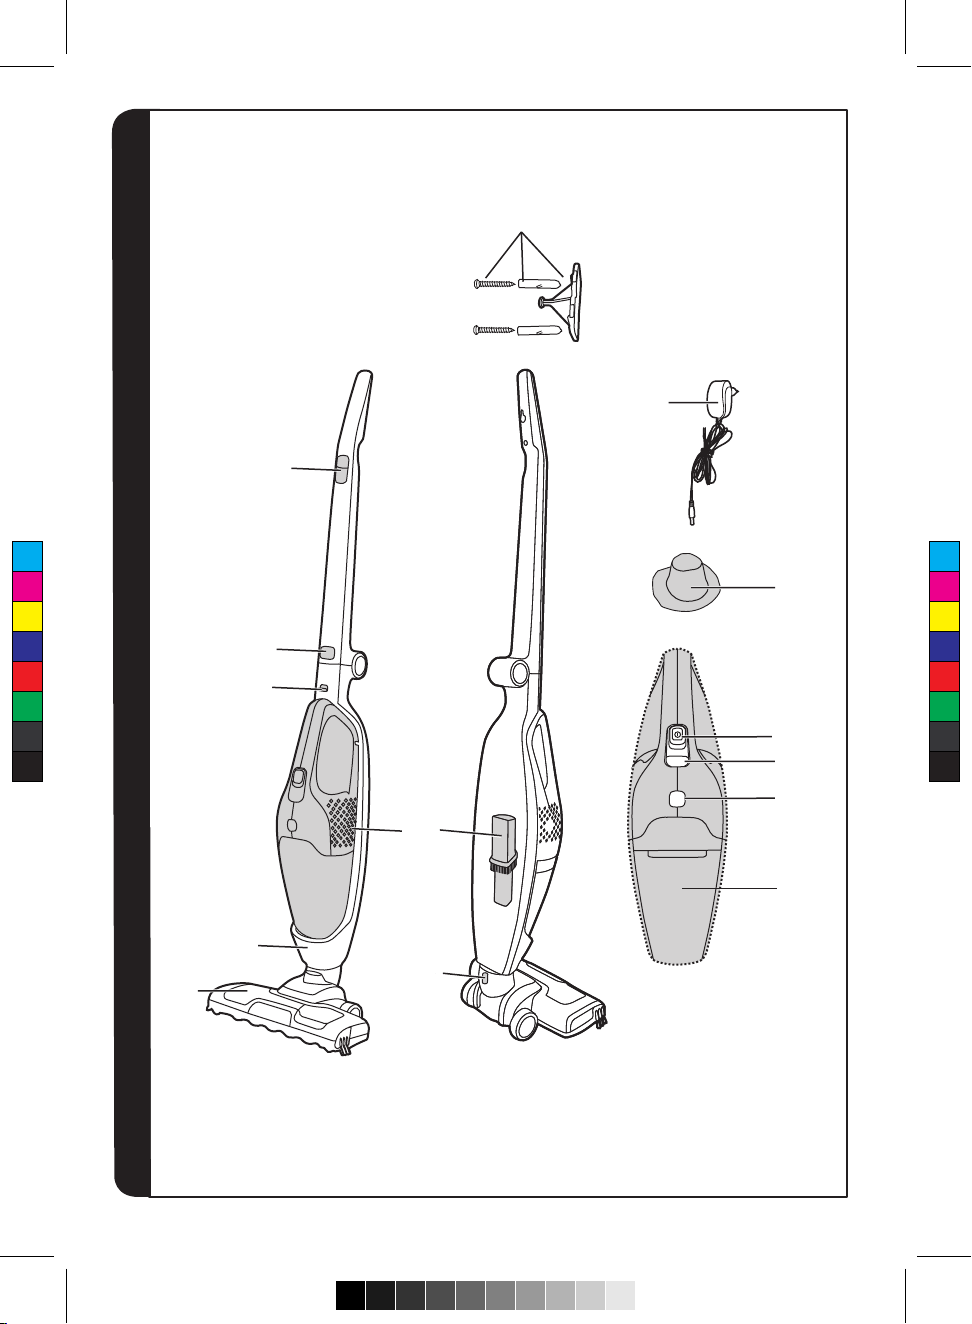
PRODUCT COMPONENTS
Main Cleaner
A. Carpet and Floor Nozzle
B. Main Body
C. Handheld Release Button
D. Handle Release Button
E. On/O Switch
F. Product Holder
G. Charger
H. Handheld Unit
I. Crevice Tool / Dusting Brush
J. Nozzle Release Button
Handheld Cleaner
K. On/O Switch
L. Charging/Power Indicator
M. Dust Container Release Button
N. Dust Container
Filter
O. Cloth Filter
PREPARINg yOUR ClEANER
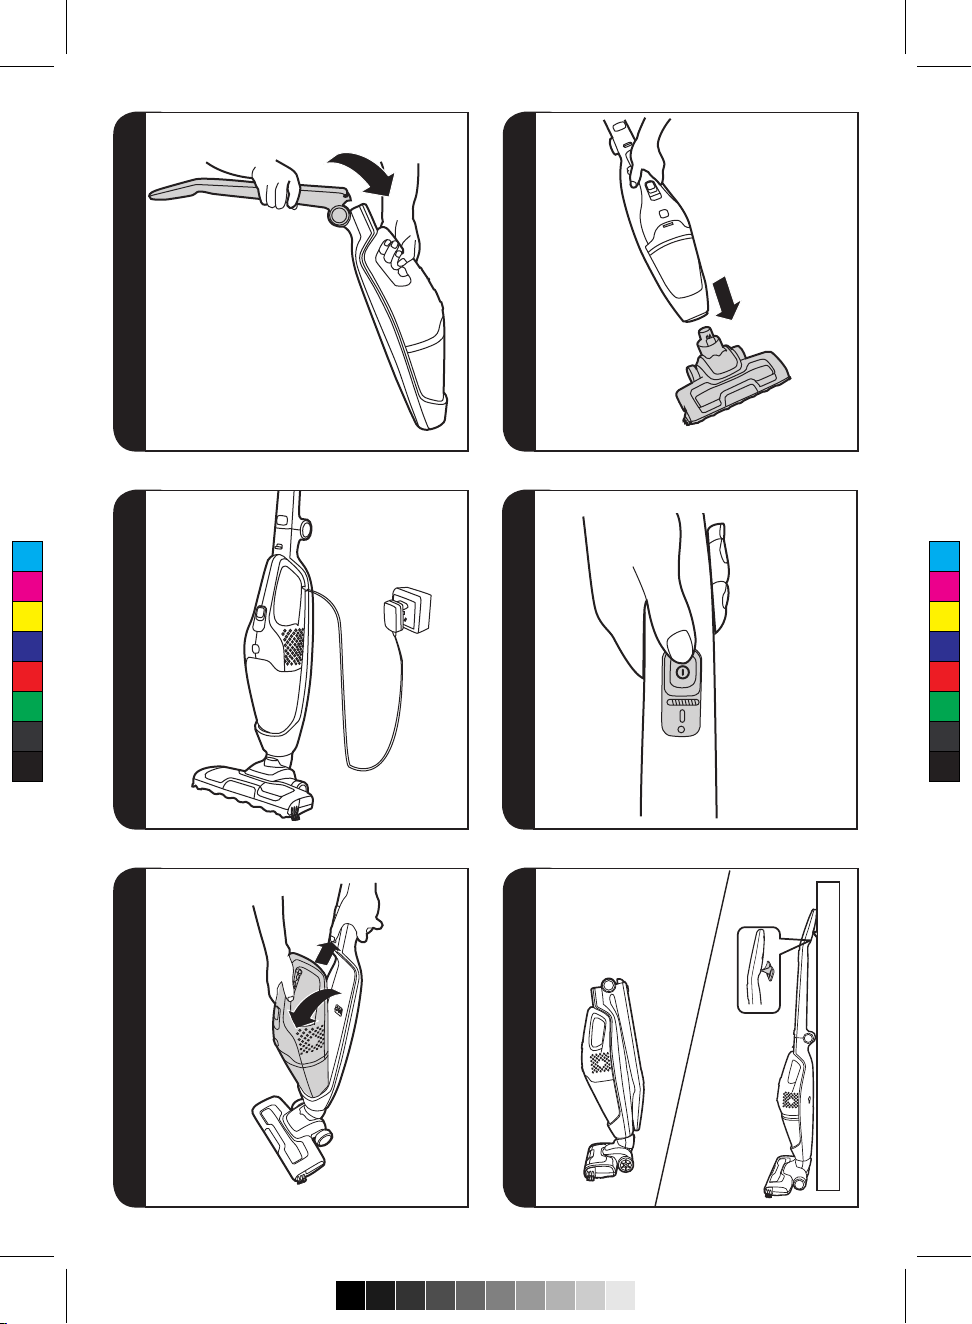
1. Unfold the handle from the main body until it locks in place. [1]
2. Line up the nozzle with the main body and rmly push into the main body until the nozzle locks in
place. [2]
3. For rst use, charge your cleaner for 5Hrs and completely discharged. After rst use the normal
charging time is 4Hrs.
4. The indicator light will blink when charging and remain lit when fully charged.[3]
5. Fix the Product Holder to your wall using the screw and holder provided.
* Certain Models Only
2
Page 8

USINg yOUR ClEANER
Main Cleaner
Turn the cleaner on by sliding the On/O switch[E] to the required settings:[4]
• HARD FLOOR: First position of On/O switch, the agitator and nozzle LED lights are OFF.
• CARPET: Second position of On/O switch, the agitator and nozzle LED lights are ON.
Handheld Cleaner
1. Push the handheld release button upward, lift the handheld unit from the main body.[5]
2. Turn the handheld cleaner on by sliding the On/O switch [K] forward.
Charging/Power Indication*
This cleaner is equipped with a LED display. When the product is working, the display will report the
following indication:
BATTERY LEVEL INDICATOR:
• 3 points = Fully Charged • 2 points = 2/3 charge • 1 point = 1/3 charge
DISCHARGE INDICATOR: When the batteries are fully discharged, the indicator will ash for around 20
seconds before cleaner switches o automatically.
Crevice Tool / Dusting Brush
The accessory is stored at the rear of the main body. It ts directly onto the handheld unit.
IMPORTANT: During storage and charging, secure your appliance handle into the product holder. [6]
ClEANER MAINTENANCE
Emptying the Dust Container
1. Push the handheld unit release button upwards, lift the handheld unit from main body.
2. Press the dust container release button and remove the dust container. [7]
3. Lift the lter from the dust container. [8]
4. Turn the dust container upside down over a bin to instantly empty it. [9]
5. Reassemble the handheld unit and return to the cleaner main body.
Cleaning the Filter
1. Push the handheld release button upwards, lift the handheld unit from cleaner main body.
2. Press the dust container release button and remove the dust container.
3. Remove the lter from the dust container and clean.
4. Wash the lter in lukewarm water and leave to dry for 24 hours. Once thoroughly dry return to
the dust container.[10, 11]
5. If required, wash the dust container in lukewarm water. Ensure it is fully dry before returning
to the main body of the cleaner.
6. Reassemble the handheld unit and return to the cleaner main body. [12,13]
NOTE: Do not use hot water or detergents when cleaning the lters. In the unlikely event of the lters
becoming damaged, t a genuine Hoover replacement. Do not try use the product without a lter tted.
IMPORTANT: For optimum performance, always keep your lter clean. We recommend that the lter
should be washed at least once a month.
Changing and Cleaning the Agitator
IMPORTANT: Always switch o the cleaner before changing the agitator.
1. Using a coin turn the lock to the open position. [14]
2. Remove the Agitator cover.
3. Remove the Agitator.
4. Replace with the new Agitator or clean it. This can only t in one direction. [15]
5. Re- t the Agitator cover and lock with a coin.
GB
* Certain Models Only
3
Page 9

Battery Replacement
For reasons of safety the Lithium-Ion batteries in this cleaner are only replaceable by a Hoover Service
engineer. When the batteries fail to maintain charge, please contact the Hoover Customer Service Centre
to arrange a replacement.
End of Product Life Battery Disposal
If the cleaner is to be disposed o the batteries should be removed. Used batteries should be taken to
a recycling station and not disposed whit household waste. To remove the batteries, please contact the
Hoover Customer Service Centre or proceed according to the following instructions:
IMPORTANT: Always fully discharge the batteries before removal and ensure charger is unplugged.
1. Run the unit until the batteries are completely empty.
2. Release the handheld unit from the main body of the cleaner.
3. Press the dust container release button and remove the dust container.
4. Remove 6 screws and open the unit. [16]
5. Remove the motor /battery housing and disconnect the cables.
6. Remove the batteries from the housing.
NOTE: Should you experience any diculties in dismantling the unit or for more detailed information
about treatment, recovery and recycling of this product, please contact your local city oce, your
household waste disposal service.
TROUblE ShOOTINg
Should you have any problem with you cleaner, follow this simple check list before calling the Hoover
Customer Service Centre:
A. Cleaner does not switch on.
Check if the cleaner is charged.
B. Loss of suction or no suction
Empty the dust container and wash the lter
Remove nozzle and check for any blockages in the duct.
C. Batteries cannot be charged.
This may be a result of very long storage periods (over half year).
Contact Hoover customer service to arrange battery replacement.
If the problem persists contact the Hoover customer service centre.
GB
INFORMATIONS IMPORTANTES
Always replace parts with genuine Hoover spares. These are available from your local Hoover dealer or
direct from Hoover. When ordering parts always quote your model number.
Consumables
• Pre motor Cloth Filter S120 35601696
• Agitator Y35 35601695
Your guarantee
The guarantee conditions for this appliance are as dened by our representative in the country in which
it is sold. Details regarding these conditions can be obtained from the dealer from whom the appliance
was purchased. The bill of sale or receipt must be produced when making any claim under the terms of
this guarantee.
Subject to change without notice.
4
Page 10

C
M
Y
CM
MY
CY
CMY
K
®
Hoover Limited Pentrebach
Merthyr Tydfil
Mid Glamorgan
CF48 4TU
Hoover Customer Helpine
03444 995599
PRINTED IN P.R.C
48017734
 Loading...