

Page 1

©2014 Techtroni c Floor Care Tech nology Lim ited. All Ri ghts Reser ved. Dist ributed by Roy al Applian ce Mfg. Co. Gl enwillow, Oh 44139 #961151144 ID112284-R0
IMPORTANT: Read carefully before assembly and use.
Instruction manual
Page 2
Welcome to
Hoover
ownership.
It’s Guaranteed.
Hoover will replace your batter y under our 5 year LithiumLifeTM limited
warranty. See Warrant y for complete details for battery and product.
It takes only seconds, and there is no
charge. To register your FloorMate®
Cordless and receive service reminders,
text "floormatecordless" to 72105
(Messa ge and data ra tes may appl y. For full term s and condit ions,
visit Hoover.com/floormatecordless. Text “HELP” for help.))
Hoover.com/floormatecordless (8 88) 67 9-2121
Make it official.
Page 3

Safety Instructions
Your LithiumLife
™
Battery
Getting Started
Filling Your FloorMate
Cordless Clean Water Solution Tank
Using your FloorMate
Cordless
Emptying Your FloorMate
Cordless Dirty Water Tank
Keep Your FloorMate
Cordless Running Properly
Need Help?
Warranty
1
4
5
6
7
8
9
12
13
Your FloorMate
Cordless Guide:
Page 4

IMPORTANT SAFETY INSTRUCTIONS
SAVE THESE INSTRUCTIONS
When using an electrical appliance, basic precautions should always be
followed, including the following:
READ ALL INSTRUCTIONS BEFORE USING THIS APPLIANCE.
THIS PRODUCT IS INTENDED FOR HOUSEHOLD USE ONLY.
IF USED COMMERCIALLY WARRANTY IS VOID.
WARNING: TO REDUCE THE RISK OF FIRE,
ELECTRIC SHOCK, DAMAGE OR INJURY:
•Fully assemble before operating.
• Do not store or charge batter y outdoors or on wet surfaces. Do not allow
charger to get wet.
•Use indoors only.
• Do not allow to be used as a toy. Not intended for use by children age 12
and under. Close supervision is necessary when used near children. To
avoid injury or damage, keep children away from product, and do not allow
children to place fingers or other objects into any openings.
• Use only as described in this manual. Use only Hoover
®
recomended
attachments and products.
• Do not use charger with damaged cord or plug. If appliance or charger
is not working as it should, has been dropped, damaged, left outdoors, or
dropped into water, take it to a service center prior to continuing use.
• Do not pull or carry charger by cord, use cord as a handle, close a door
on cord, or pull cord around sharp edges or corners. Do not place product
on cord. Do not run appliance over cord. Keep cord away from heated
surfaces.
• Do not unplug charger by pulling on cord. To unplug charger, grasp the
plug, not the cord.
• Do not handle charger including charger plug and charger terminals, or
appliance with wet hands.
• Do not put any object into openings. Do not use with any opening blocked;
keep free of dust, lint, hair, and anything that may reduce air flow.
• Keep hair, loose clothing, fingers, and all parts of body away from openings
and moving parts.
• Use extra care when cleaning on stairs. To avoid personal injury or damage,
and to prevent the cleaner from falling, always place cleaner at bottom of
stairs on floor. Do not place cleaner on stairs or furniture, as it may result in
injury or damage.
• Do not use to pick up flammable or combustible liquids, such as gasoline, or
fine wood sandings, or use in areas where they may be present.
• Do not pick up anything that is burning or smoking, such as cigrettes,
matches, or hot ashes.
•Do not use without Filters and/or Tanks in place.
•Do not clean over floor electrical outlets.
•Do not attempt to short circuit the battery or charger terminals.
•Use only Hoover® cleaning products intended for use with this
machine. (see the "cleaning products" section of the manual).
1
Page 5

CAUTION: TO REDUCE THE RISK OF DAMAGE:
• Avoid picking up hard, sharp objects with this product, as they may
cause damage.
• Store appropriately indoors in a dry place. Do not expose machine to
freezing temperatures.
•Do not use sharp objects to clean out hose as they can cause damage.
• To assist in reducing drying time, be certain the area is well ventilated when
using detergents and other cleaners with this machine.
• Check and follow flooring manufacturers warranty and recommendations
regarding the use of a hard floor cleaning machine prior to using this product
on your sealed hard floors.
•Do not store extractor with solution in tanks.
• With brushes on, do not allow cleaner to sit in one location for an extended
period of time, as damage to floor can result.
• Water will drip from the brushes and underside of the product after use and
may puddle. To avoid damage to wood and laminate flooringand to avoid
potential slip hazard,after use (a) do not leave the product on wood and
laminate surfaces and remove to a hard surface and (b) place unit on
absorbent material(such as a towel) to soak up drips.
• Do not incinerate the charger, batter y, or appliance even if it is severely
damaged. The batteries can explode in a fire.
•Do not attempt to short circuit the battery or charger terminals.
• This product includes rechargeable lithium-ion batteries. Do not expose
batteries to high temperatures, as they may catch fire and/or explode.
•Do not expose battery to crushing, incineration or similar actions.
• Do not dispose of battery in a fire or trash compactor. See batter y disposal
section for directions.
•Do not attempt to disassemble battery.
• Unplug the charger from the outlet before any routine cleaning or
maintenance.
• Leaks from batter y cells can occur under extreme conditions. If any liquid
gets on the skin wash quickly with soap and water. If any liquid gets into the
eyes, do not rub eyes, immediately flush them with clean water continuously
for a minimum of 15 minutes. Seek medical attention immediately.
• Use only the charger (Hoover Part #BH03210) supplied by Hoover
®
to
recharge.
• Use only the batter y (Hoover Part #BH03100 or BH03120) supplied by
Hoover
®
. Other batteries may burst causing serious personal injury
or damage.
•Do not touch or insert objects into battery pack or charger terminals.
• The charger is for indoor use only. Be sure to always keep the batter y and
charger in a dry place.
WARNING: This product contains chemicals known to the
State of California to cause cancer, birth defects or reproductive harm.
WASH HANDS AFTER HANDLING.
2
Page 6

3
LITHIUM-ION BATTERIES
The battery must be collected, recycled or disposed of in an
environmentally sound manner. The EPA certified RBRC Battery
Recycling Seal on the lithium-ion (Li-ion) battery indicated
Techtronic Industries, a corporate affiliate of Hoover, Inc., is
voluntarily participating in an industry program to collect and
recycle these batteries at the end of their useful life, when taken
out of service in the United States or Canada. The RBRC program
provides a convenient alternative to placing used Li-ion batteries
into the trash or the municipal waste stream, which may be
illegal in your area. Please visit www.rbrc.org/call2recycle/
for information on Li-ion battery recycling and disposal bans/
restrictions in your area. Hoover, Inc., involvement in this program
is part of our commitment to preserving our environment and
conser ving our natural resources.
WARNING: TO REDUCE THE RISK OF ELECTRIC
SHOCK, THE CHARGER HAS A POLARIZED PLUG (ONE BLADE
IS WIDER THAN THE OTHER). THIS PLUG WILL FIT IN A
POLARIZED OUTLET ONLY ONE WAY. IF THE PLUG DOES NOT
FIT FULLY IN THE OUTLET, REVERSE THE PLUG. IF IT STILL DOES
NOT FIT, CONTACT A QUALIFIED ELECTRICIAN TO INSTALL THE
PROPER OUTLET. DO NOT CHANGE THE PLUG IN ANY WAY.
BATTERY DISPOSAL
WARNING:
RISK OF EXPLOSION OR
EXPOSURE TO TOXIC MATERIAL
CAUTION: The battery used in this device may present a
risk of fire or chemical burn if mistreated. Do not disassemble, heat above
manufacturer’s maximum temperature limit (60°C/140°F), or incinerate.
Replace battery with Hoover® battery Part #BH03100 or BH03120 only.
Use of another battery may present a risk of fire or explosion. Dispose
of used battery promptly. Keep away from children. Do not disassemble
and do not dispose of in fire. Do not attempt to disassemble the battery or
remove any component projecting from the battery terminals. The battery
and charger have no user serviceable parts. Fire or injury may result. Prior
to disposal, protect exposed terminals with heavy insulating tape to
prevent shorting.
Page 7
4
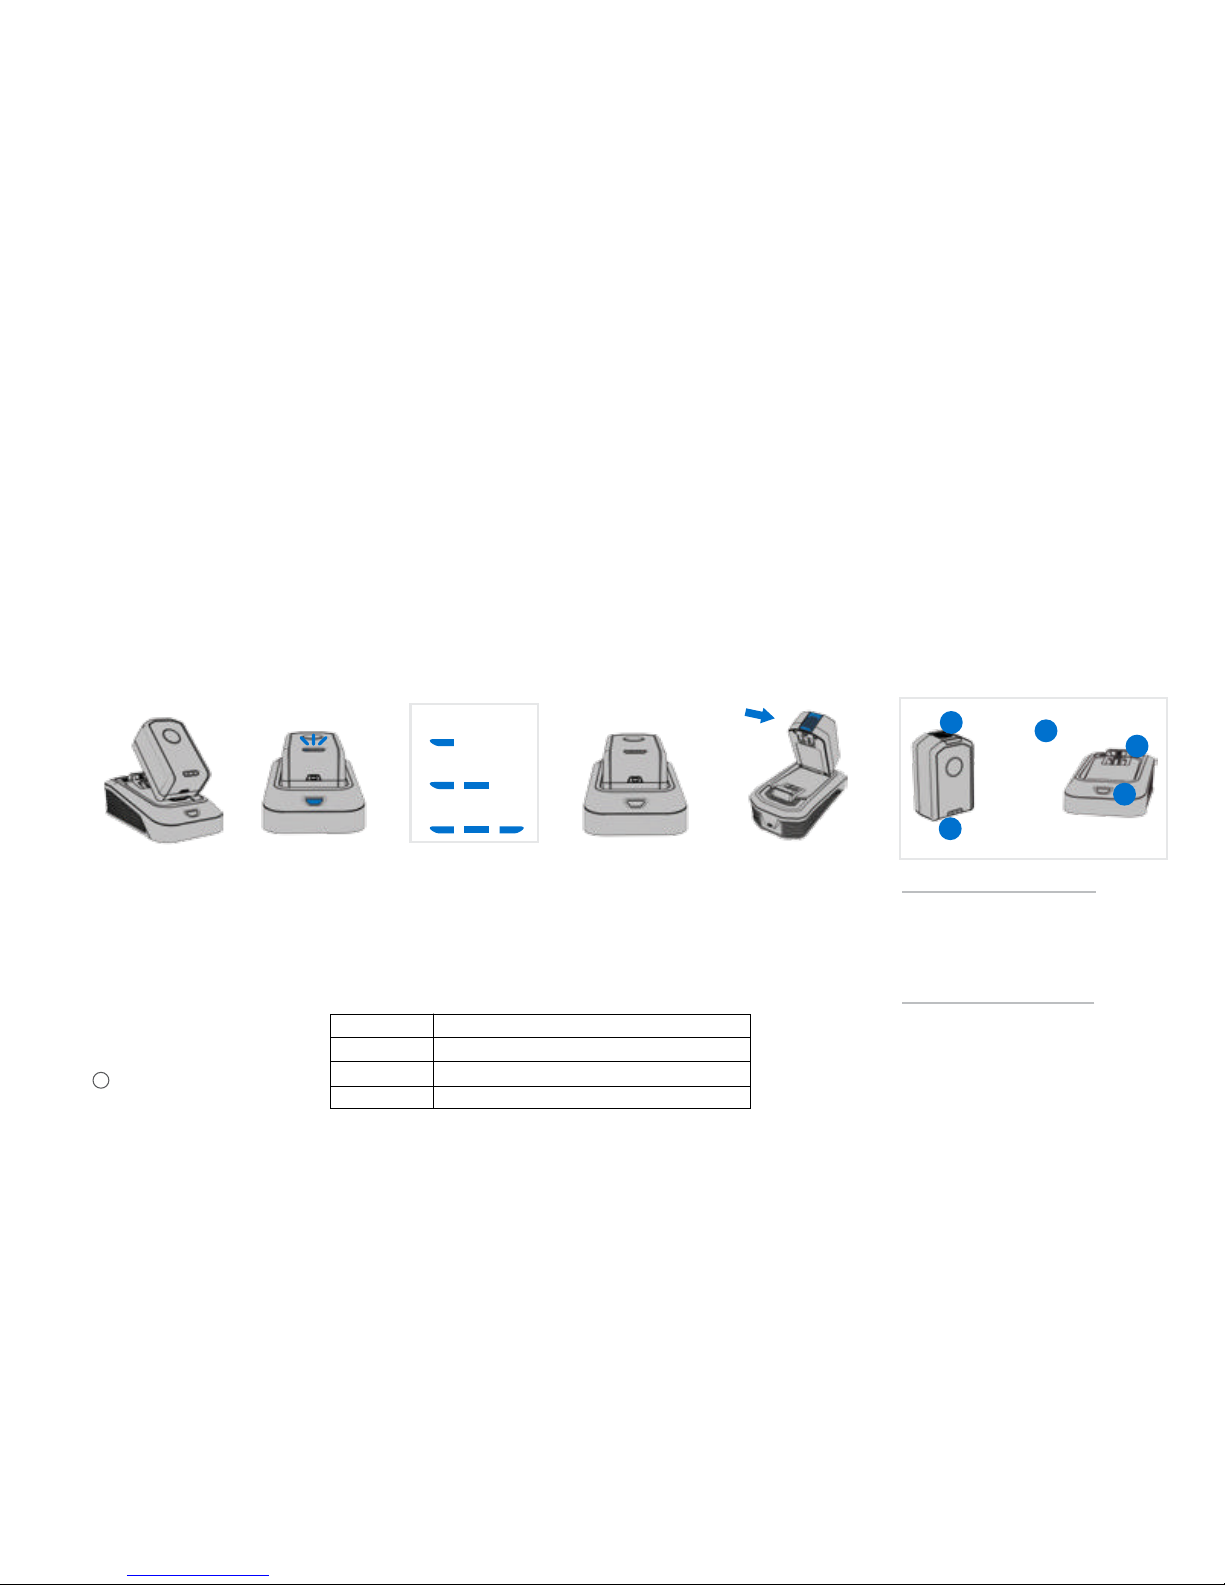
Getting started with your LithiumLife™ or LithiumLife™ Extended Runtime battery
To bring the batter y
to full life, place the
battery onto the
cha rger.
LithiumLife
™
battery
does not come fully
charged.
When charging, the
charger light will turn
solid blue and the blue
LEDs on the battery
will light up to inidcate
charging progress.
The charger light will
turn off when fully
charged.
If the charger LE D
flashes red, an error
has occurred.
Remove and replace.
To remove the battery,
press the blue
release but ton and
lift t he batter y while
holding down on t he
charger base.
Charging the battery Removing the battery
Battery
1. Blue Release Button
2. LED Charge Level Indicator
3. Charge Level Check Button
Charger
4. Batter y Cavity
5. LED Indicator
1
3
4
2
5
25% Charge d
50% Charged
75% Charged
It’s ready when you are.
You can lea ve your batt ery on the c harger–
even af ter it’s char ged. Refere nce the char t
on page 12 to fi nd the charg e time for your
bat tery and ch arger mode l.
It cleans powerfully at any charge level.
Whet her it’s 25% charg ed or 100% full , get
fade -free po wer until the e nd of the char ge.
It’s versatile.
This ba ttery a nd charger ar e compatib le
with t he rest of our L ithiumLi fe™ family.
Runtime.
Runti me will vary b ased on the p articul ar
combi nation of Li thiumLif e
™
bat tery mode l and
FloorMate
or AirTM Cordl ess cleane r products . If
using a L ithiumLi fe™
bat tery mode l differe nt than
the ba ttery th at came wit h your Air
TM
Cordl ess
produ ct, runtim e differe nces will occ ur.
To check the charge
level of your bat tery,
press the Charge
Level Check Button.
What does it mean when charger light is...
Solid
Blue Bat tery Charg ing Progress : 1-3 LEDs
Fully Ch arged
Leave B attery o n Cha rger. It's too ho t or cold to charge .
Call us at 1- 888-679 -2121
Off
Flash ing Blue
Flash ing Red
* Images may differ from
actual product.
NOTE: All LithiumLife
™
batterie s are
compatible with the entire FloorMate
and Air
™
Cordle ss family of pro ducts.
See us do it:
hooverhelp.com/FloorMateCordless25
▲
Page 8
5
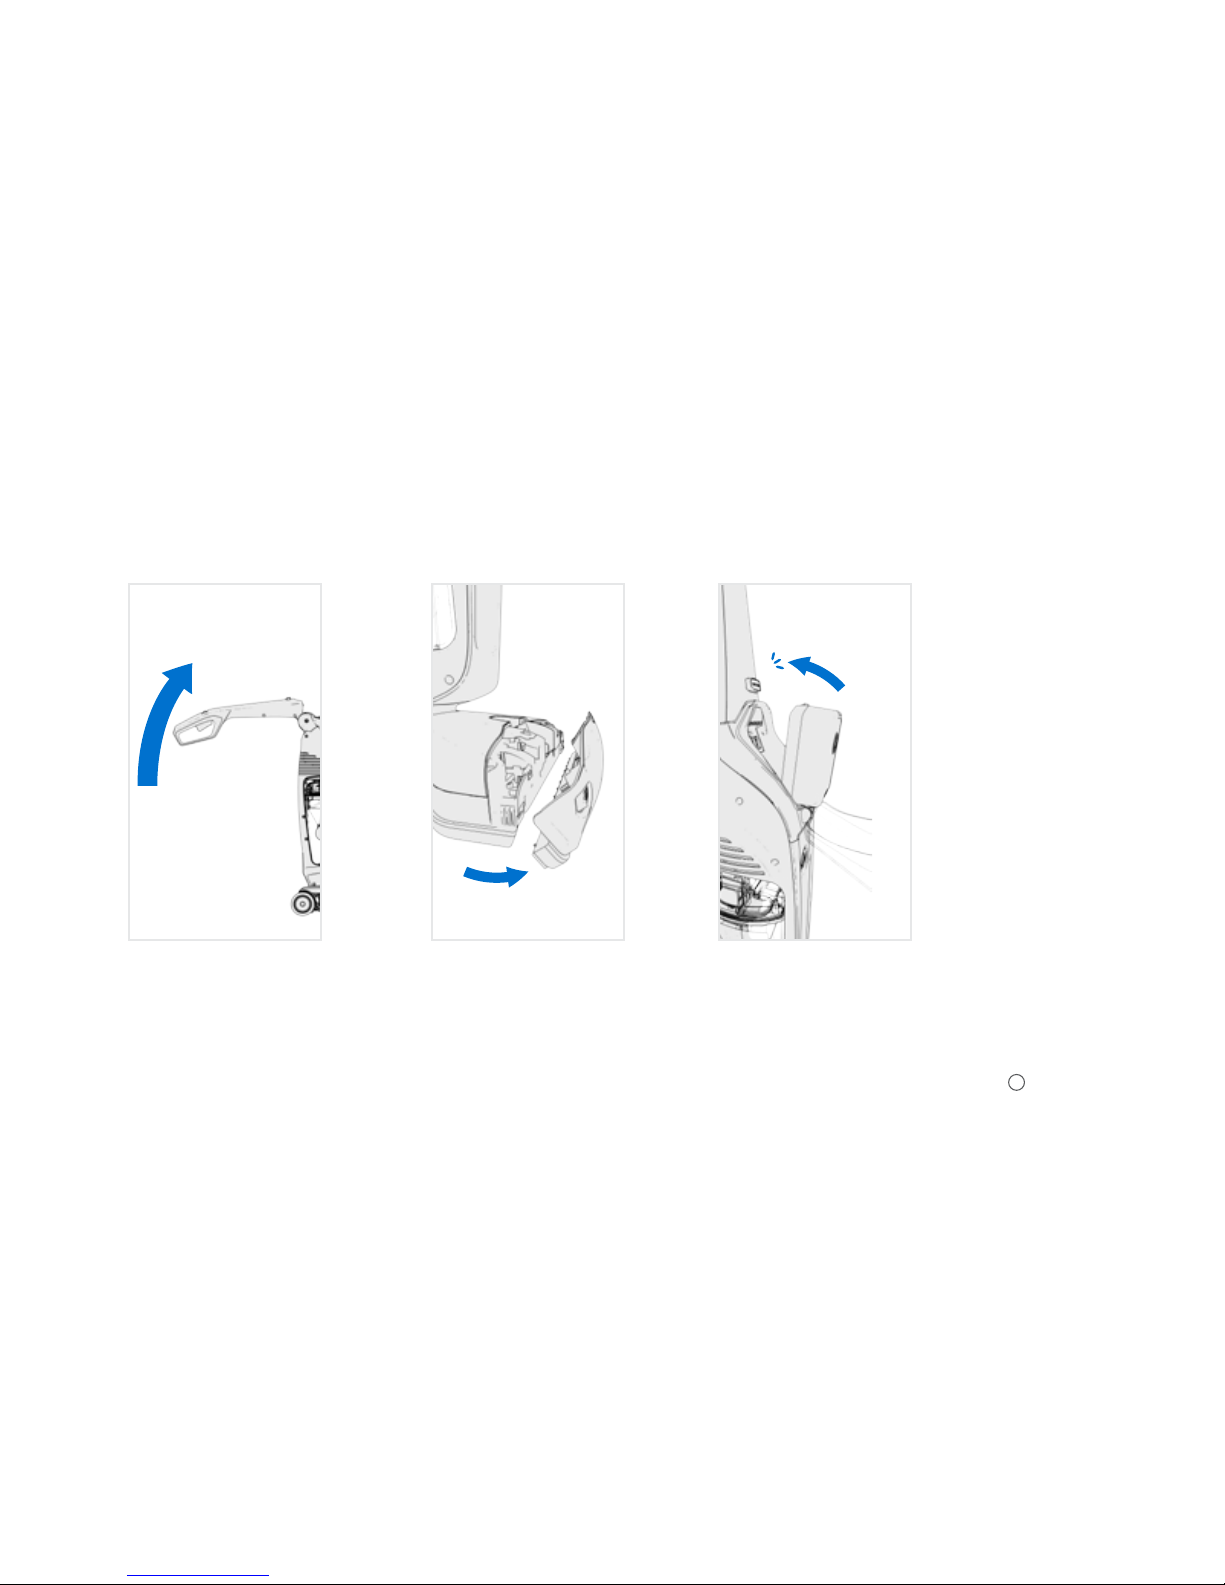
Set battery here and click
into place.
Align nozzle at the base
and tilt it up until the nozzle
release latch clips into place.
Rotate the handle
up until it locks.
1
3
2
Getting started with your FloorMate
Cordless hard floor cleaner
Battery does not come
fullycharged.
See us do it:
hooverhelp.com/FloorMateCordless2
▲
Page 9
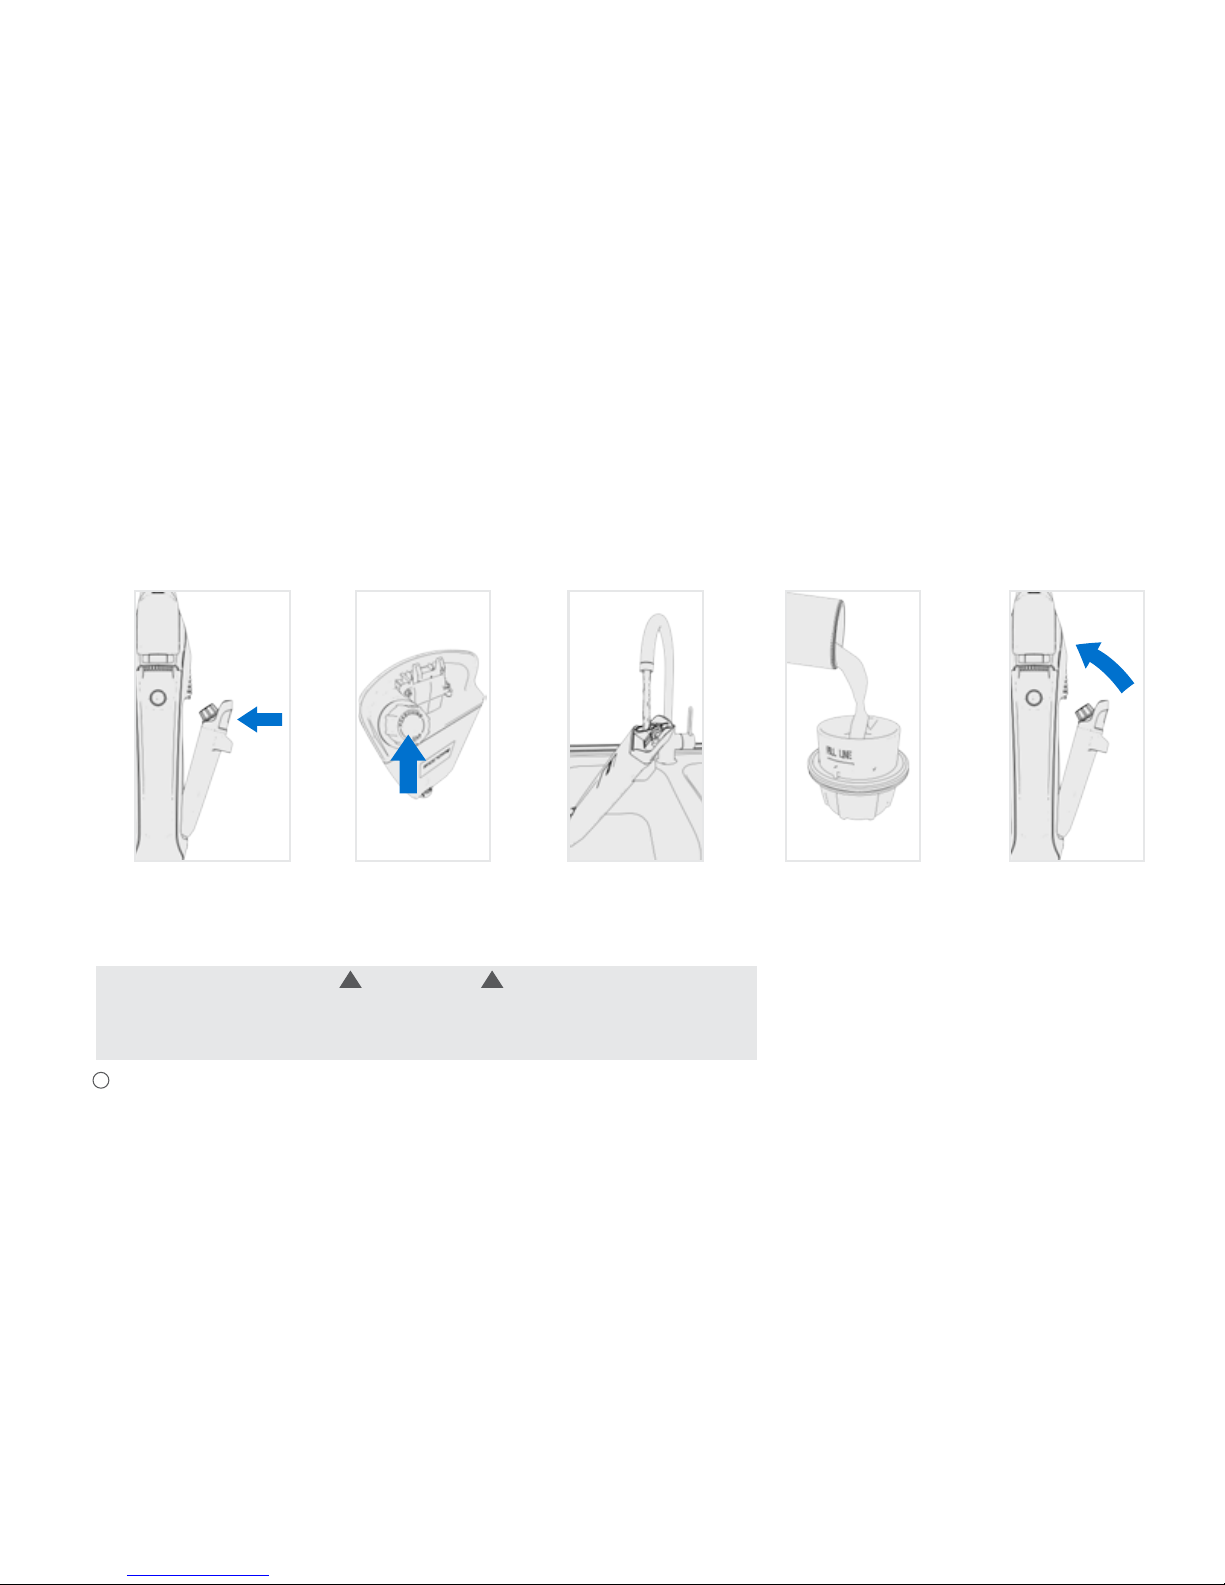
Filling your FloorMate® Cordless clean water solution tank
Twist the cap
counter-clockwise
and lift up to
remove.
Fill with hot tap
water up to the
fill line.
Replace cap and
snap the tank
back into its
original position.
Squeeze here and
pivot the tank out.
Use your cap as
a measuring cup.
Fill with Hoover®
2X Multi-Floor Plus
Cleaning Solution
once and pour into
the solution tank.
1
2 3
54
Always refer to the floor
surface manufacturer's
guidelines.
6
NOTE: When facing your FloorMate® Cordless, the clean water tank is on the right.
CAUTION
To prevent damage to wood floors follow manufacture's cleaning recommendations. If using cleaner
on sealed wood floors, inspect floor surface for worn finish, bare wood or separated joints. Do not use
Hoover 2x multi-floor plus cleaning solution to clean sealed wood floors if any of these conditions exist.
!!
FRONT
RIGHT
FRONT
RIGHT
See us do it:
hooverhelp.com/FloorMateCordless3
▲
Page 10
Using your FloorMate®
Cordless
Step here and
pull the handle
back to start.
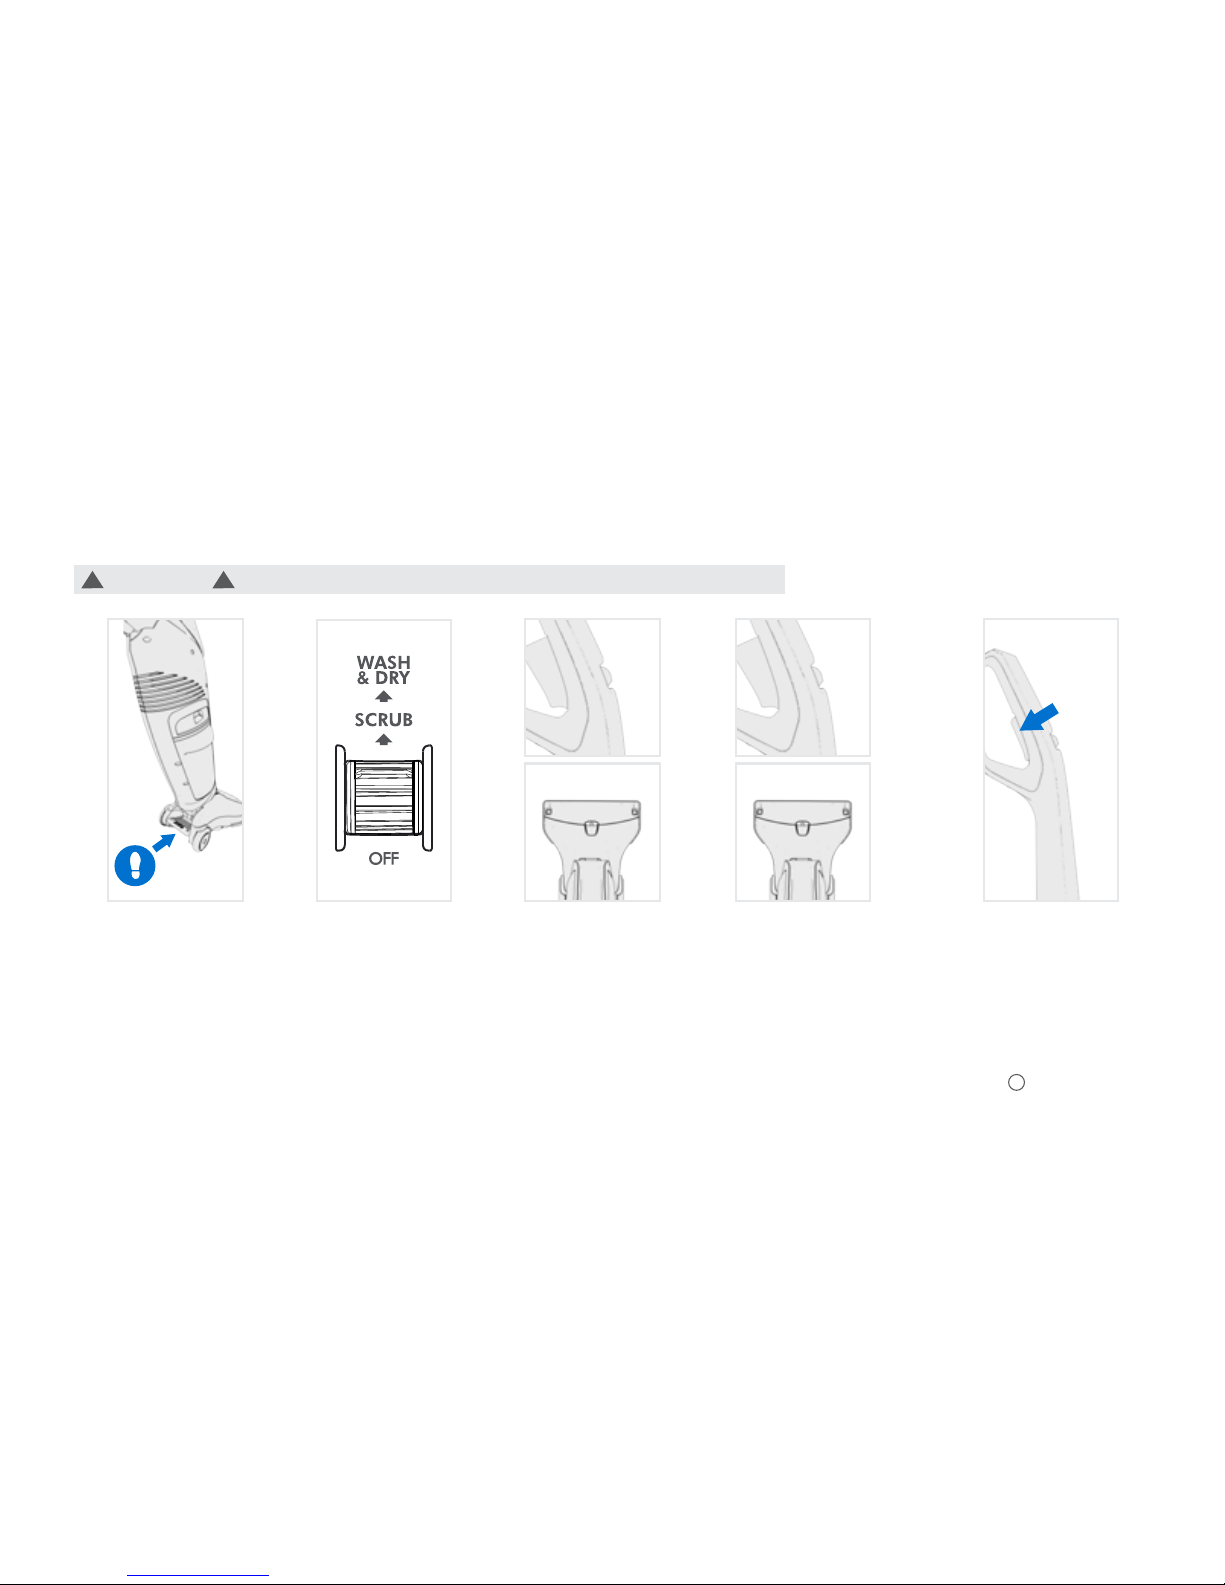
Wash & Dry Mode
maintains suction to
let you wash when you
move forward and dry
when you pull back.
Overlap strokes by 1 in.
to help prevent streaking.
Roll this switch
forward to turn On.
Squeeze this trigger to
use solution as needed.
Use Scrub Mode
to wash without
suction, then switch
to Wash & Dry
Mode to pick up
excess water
and solution.
1
2 4
3
5
7
NOTE: FloorMate
Cordless will run for an average
of 30 minutes when used in "Wash & Dry Mode"
70% and "Scrub Mode" 30% of the time.
CAUTION Scrub mode not recommended for engineered or sealed hardwood floors.
!!
See us do it:
hooverhelp.com/FloorMateCordless4
▲
Page 11
CAUTION Water will drip from the brushes and underside of the
product after use and may puddle. To avoid damage to wood and laminate
flooring and to avoid potential slip hazard,after use (a) do not leave the product
on wood and laminate surfaces and remove to a hard surface and (b) place unit
on absorbent material(such as a towel) to soak up drips.
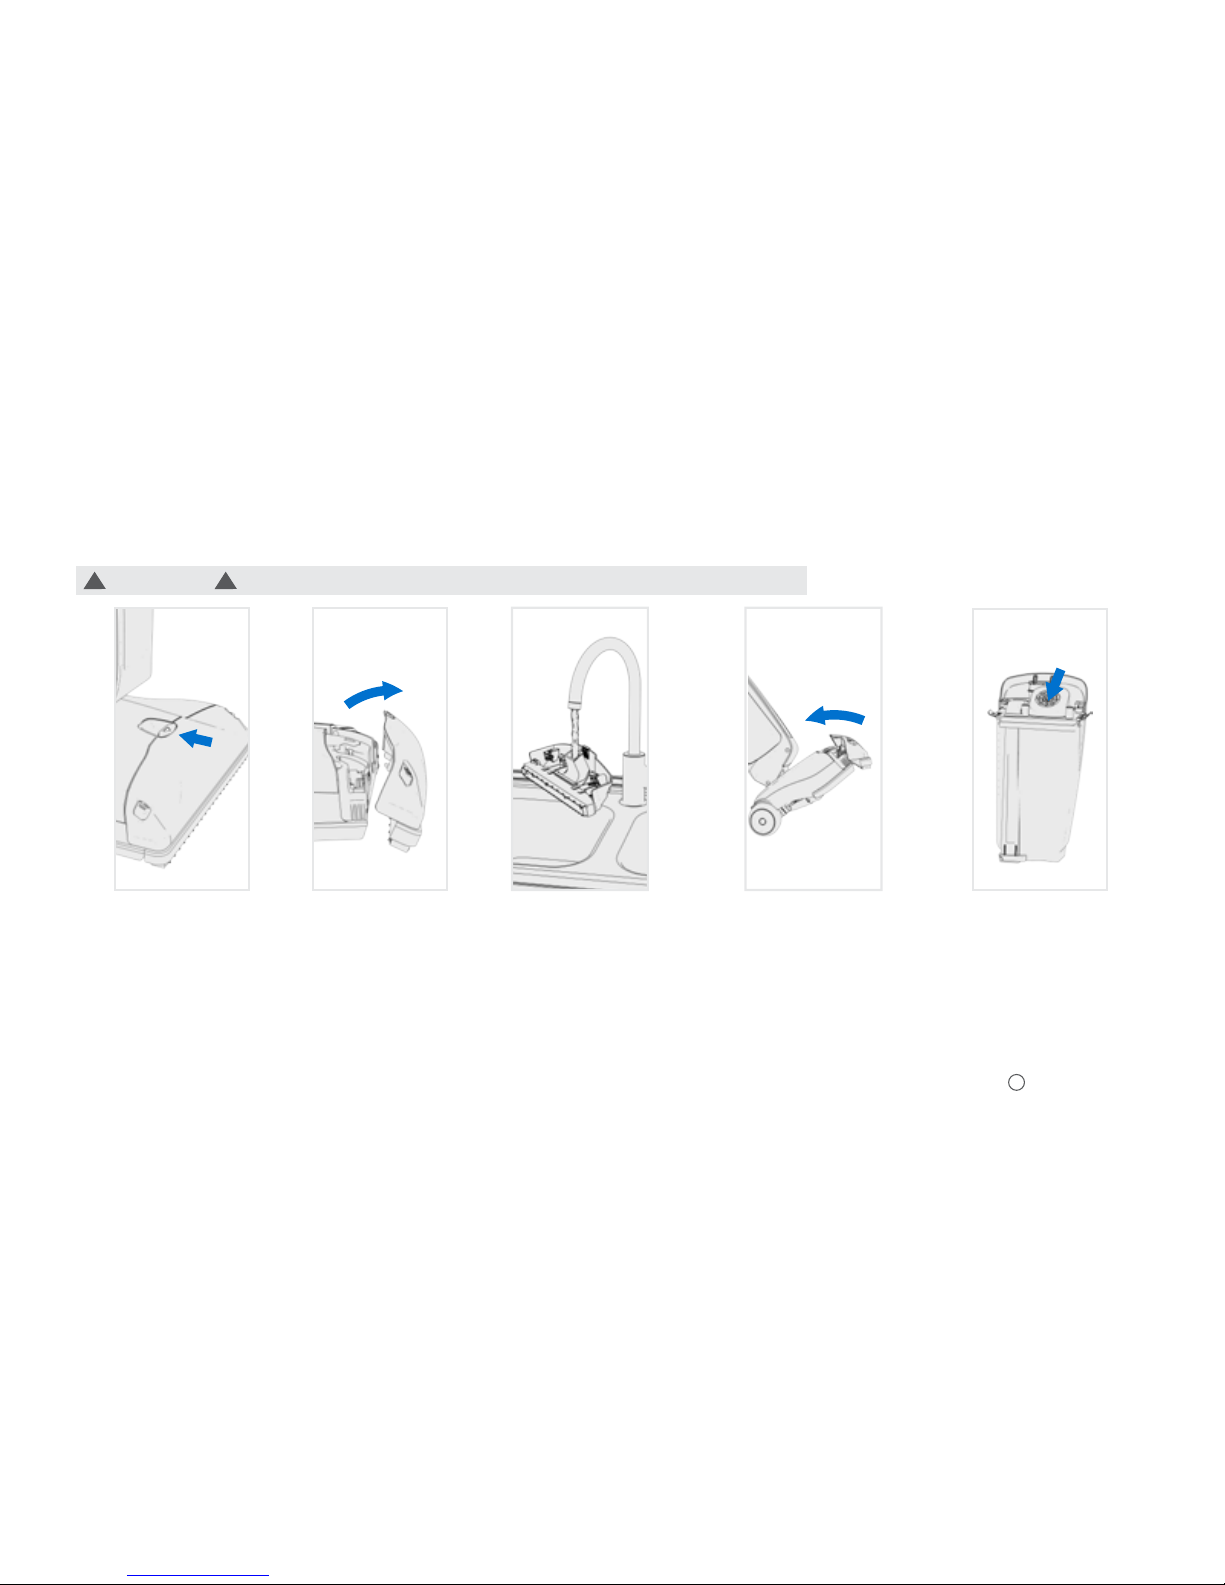
Emptying your FloorMate® Cordless dirty water tank and filter
Press this button and
pivot the tank out.
Empty water into
sink or toilet. Check
foam filter for debris
and rinse as needed.
Replace the tank lid
and latch both tabs into
the locked position.
Snap the tank
back into its
original position.
Release these tabs
and pull the tank lid
up to remove.
1
2 3
4
5
8
NOTE:
An automatic suction shut-off is built into the dirty water tank
to prevent overflowing. When the shut-off activates, the cleaner will
not pick up water or debris and the motor sound will change. The
dirty water tank is full and must be emptied.
WARNING To reduce the risk of personal injury -
Remove battery pack before cleaning or servicing.
!!
!!
FRONT
LEFT
FRONT
LEFT
See us do it:
hooverhelp.com/FloorMateCordless22
▲
Page 12
Keep your FloorMate Cordless running properly: nozzle/filter
Pull the nozzle
firmly here
to release.
Rotate the
nozzle out to
remove.
Rinse under running
water and remove
debris from the
squeegee. Wipe
with a damp cloth.
Tilt the cleaner back
and pivot the nozzle
back into place.
Check foam filter for
debris. Rinse if needed.
1 2 3 4 5
9
CAUTION To reduce the risk of injury from moving parts - remove battery pack before servicing.
!!
See us do it:
hooverhelp.com/FloorMateCordless23
▲
Page 13
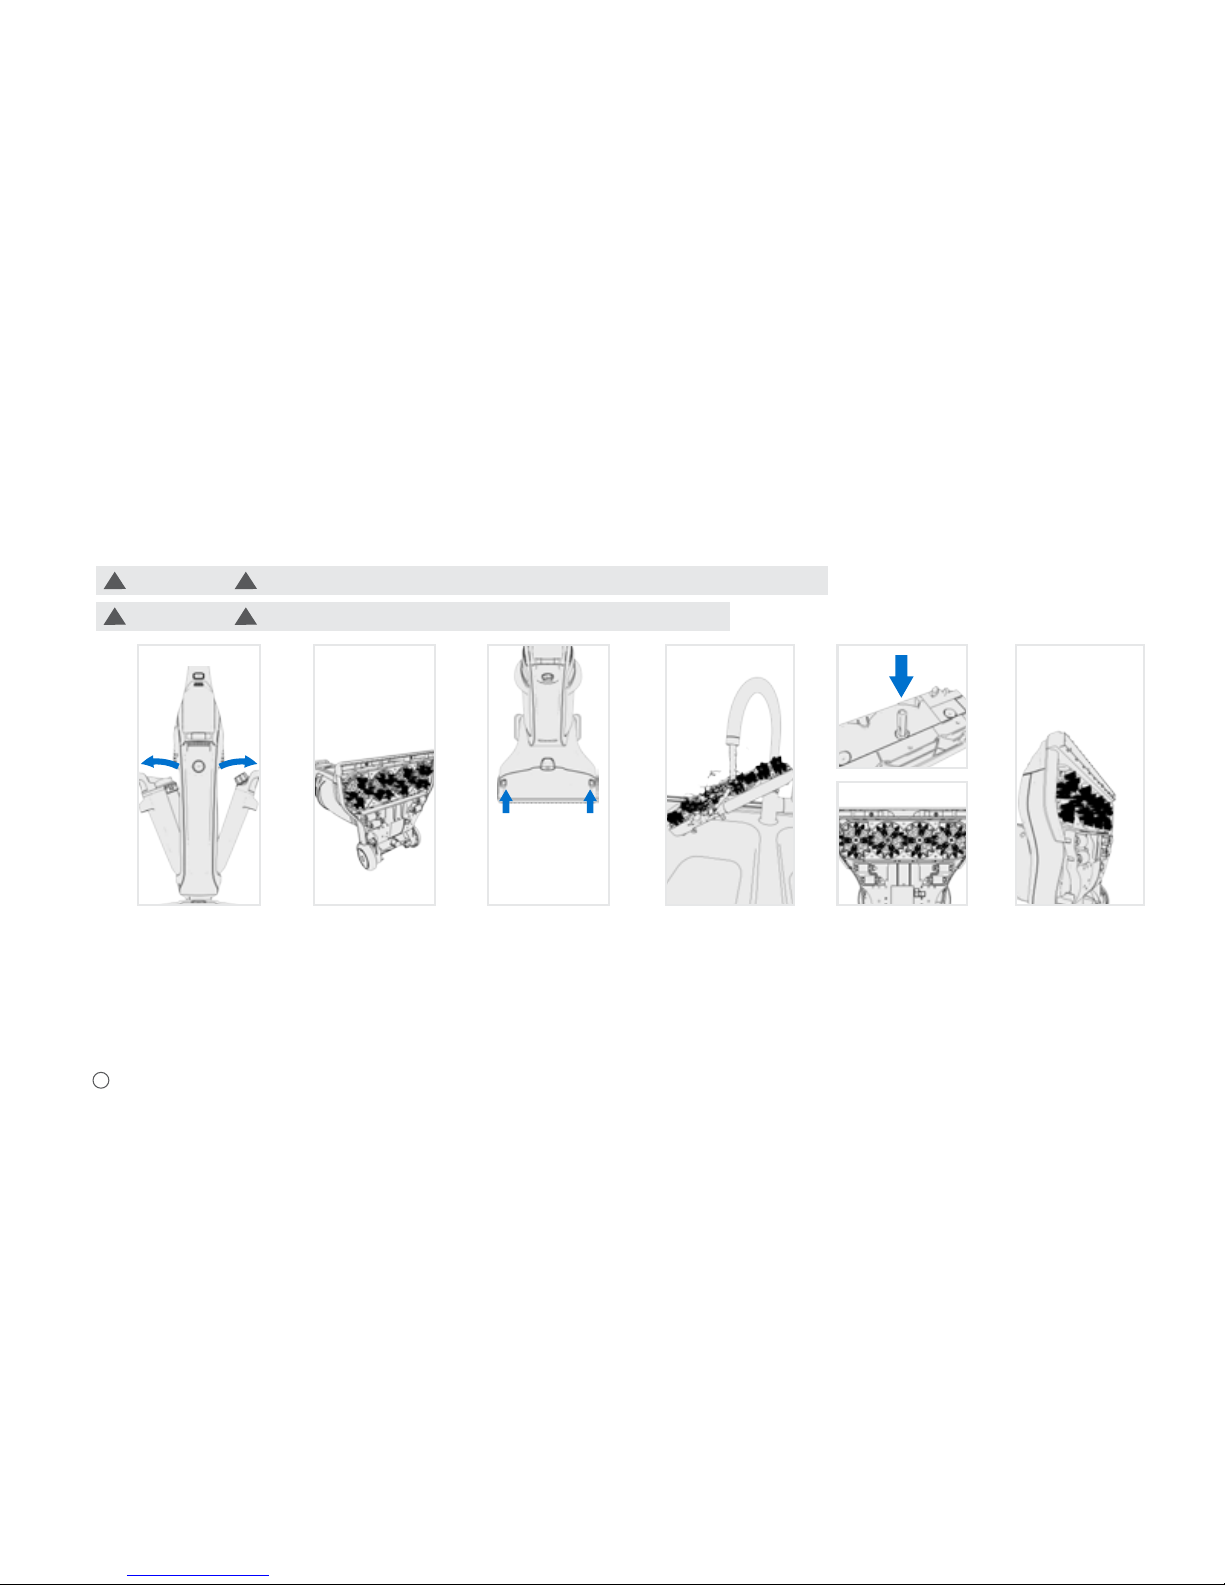
Keep your FloorMate Cordless running properly: brushes
Remove both
tanks to
prevent spillage.
Push the release
buttons and
remove the brush
assembly.
Wash with a
mild detergent
and rinse. Do
not use a solventbased detergent.
Lower handle
and tilt
nozzle up.
Align brush post
with the hole on
the bottom of the
cleaner and turn
the brushes slightly
until it fits easily.
Press the brush in
firmly until it snaps
into place.
1
2 3
4 5 6
10
LUBRICATION
The motor is equipped with bearings which contain
sufficient lubrication for it's lifetime. The addition of lubricant
could cause damage. Do not add lubricant to motor.
CAUTION To reduce the risk of injury from moving parts - remove battery pack before servicing.
CAUTION Do not use a solvent-based detergent while cleaning brush assembly.
!
!
!
!
See us do it:
hooverhelp.com/FloorMateCordless24
▲
Page 14

11
Storing your FloorMate Cordless
Cleaning Products:
• Turn cleaner off.
• Empty and rinse both water tanks and allow to air dry.
• Make sure nothing is pressing on the nozzle squeegee.
• Do not store on a wood surface unless the cleaner is completely dry.
• Store indoors in a dry place. Do not expose cleaner to freezing temperatures.
• Water will drip from the brushes and underside of the cleaner after use and may puddle. To avoid damage
to wood and laminate flooring and to avoid potential slip hazard, do not leave product on wood and laminate
surfaces after use and remove to a hard surface. Place cleaner on absorbent material to soak up drips.
• Use Hoover
2x Multi-Floor Plus Cleaning Solution.
32 oz - AH30425
64 oz - AH30420
Page 15

Need Help?
12
WARNING
To reduce the risk of personal injury, remove battery pack
before cleaning or ser vicing.
! !
My FloorMate Cordless won't turn on.
Your battery may not be charged. Check the Charge Level Indicator and
charge the battery if it’s low. Reference the chart below to find the charge
time for your model.* The LithiumLife™ battery does not come fully charged.
My FloorMate Cordless isn’t picking up water.
Your dirty water tank may be full and the automatic suction shut-off was
activated to prevent overflowing. The motor sound will change when the
shut-off activates. Remove the dirty water tank and empt y into the sink.
You may be in Scrub Mode. Switch to Wash & Dry Mode.
If your filter was dirty…
Your filter may also be dirty. Rinse the dirty water tank filter under running water
to remove any debris.
My FloorMate® Cordless is puddling water behind it while
I’m cleaning.
Your clean water tank may not be installed properly. Refer to page 6 for
directions. You may be in Scrub Mode. Switch to Wash & Dry Mode. One
of the tanks may not be installed properly.
My FloorMate® Cordless won’t release solution.
Your clean water solution tank may be empty. Check the tank and fill as necessary.
Refer to page 6 for directions.
The brushes on my FloorMate® Cordless aren't spinning.
Your FloorMate Cordless is equipped with stall protection to protect your
brushes. If the brushes are not spinning, turn the product off, wait one minute,
and then turn the product back on. If the brushes still do not spin, then see an
authorized service representative.
Any other servicing should be done by an authorized service representative. If
appliance is not working as it should, has been dropped, damaged, left outdoors,
or dropped into water, take it to a service center prior to continuing use.
*See th e full line of L ithiumLi fe™ products at Hoover.com.
LithiumLife
™
Battery
Battery
Model
Charger
Model
BH03100
LithiumLife
™
Exte nded Runtim e
LithiumLife
™
LithiumLife
™
LithiumLife
™
Exte nded Runtim e
BH03220
9 hours
18 hours
1.5 hours
3 hours
BH03120
BH03100
BH03200
BH03120
Charge Time
(approximate)
QUESTIONS OR CONCERNS?
Contac t Us: (888) 679-2121
For a Comp lete Trouble shooting G uide, see: Ho overhelp.c om/FloorMa teCordle ss
Twitter: @HooverUSA
Facebook: facebook.com/hoover
Do not return to s tore. See bac k of product f or model numb er.
Page 16

ANY SERVICI NG SHOULD BE DONE BY AN AUTHORIZED SERV ICE
REPRES ENTATIVE Call (888) 679-2121 USA & Canada
In the event that further assistance is required, visit an aut horized ser vice center. Find
one nearest you by visit ing our website at ww w.hoover.com. Costs of any transporttion
to and from any place of repair are to be paid by the owner. Always identify your
produc t by the model number and manufacturing code when requesting information
or ordering replacement parts. (The model number and manufacturing code for the
cleaner appears on the bot tom of charger and side of bat tery.)
LIMITED FIVE YEAR WARRANTY PERIOD ON BATTERY
LIMITED TWO YEAR WARRANTY PERIOD ON PRODUCT
WHAT THIS WARRANTY COVERS
When used and maintained in normal household use and in accordance wit h the
Owner’s Guide, your Hoover
FloorMate produc t and batter y are warranted against
original defects in material and workmanship. The Warrant y Period for the FloorMate
produc t, exclusive of the LithiumLife™ battery is two (2) years. The Warranty Period for
the LithiumLife™ Extended Runtime battery itself is five (5) years. During the applicable
Warrant y Period, Hoover® will provide labor and parts, at no cost to you, to correct any
such defect in your FloorMate produc ts and will provide a replacement battery at no
cost to you, to correct defect s in the LithiumLife™ battery that came wit h your FloorMate
produc t purchased in t he United States, U. S. Militar y Exchanges and Canada.
HOW TO MAKE A WARRANTY CLAIM
If this product is not as warranted, take or send t he product to a Hoover
®
Authorized
Warrant y Service D ealer along with proof of purc hase. If the ba tteries are not as
warranted, ei ther take or send the batteries along with proof of purchase to a Hoover
®
authorized dealer or contact Hoover® services at (888) 679-2121. For an automated
referral to authorized service outlets in the U.S .A., phone: (888) 679-2121or visit
Hoover® online at ww w.hoover.com.
WHAT THIS WARRANTY DOES NOT COVER
This war ranty does not cover belts, filters, spinscrub brushes use of the produc t in any
commercial operation (such as maid, janitorial and equipment rental services), improp er
maintenance of the product, damage due to misuse, acts of G od, nature, vandalism
or other acts b eyond the control of Hoover
®
, owner’s acts or omissions, use outside the
country in which the product was initially purchased and resales of the product by the
original owner. This war ranty does not cover pick up, deliver y, transpor tation or house
calls. However, if you mail your product to a Hoover Sales and Service Center for
warranty service, cost of shipping will be paid one way. Please call the Hoover® Services,
(888) 679-2121, on how to ship this product. This warranty does not apply to products
purchased outside the United States (including its territories and possessions), a U.S.
Military E xchange and Canada.
OTHER IMPORTANT TERMS
This war ranty is not transferable and may not be assigned. This Warrant y shall be
governed and construed under the laws of the state of Ohio. The Warranty Period will
not be extende d by any replacement of ba tteries or p arts or repair per formed under
this Warranty.
THIS WARR ANTY IS THE EXCLUSIVE WARRANTY AN D REMEDY ALL OTHER
WARRANTIES, EXPRESSED OR IMPLI ED, INCLUDING WARRANTIES O F
MERCHANTABILIT Y OR FITNESS FOR PARTICULAR PURPOSE, ARE DISCL AIMED.
IN NO EVENT WILL HOOVER
®
BE LIAB LE FOR ANY SPEC IAL, INDIRECT, INCIDENTAL
OR CONSEQUENTIAL DAMAGES O F ANY KIND OR NATURE TO OWNER OR
ANY PART Y CLAIMING THROUGH OWNER, WHETHER BASED IN CONTRAC T,
NEGLIGENC E, TORT OR STRICT PRODUCTS LIABILITY OR ARISING FROM ANY
CAUSE WHATSOEVER.
Some states do not allow the exclusion of consequential damages, so the above
exclusion may not apply to you. This warranty gives you specific rights; you may
also have others that vary f rom state to state.
SERVICE & WARRANTY FOR HOOVER® FLOORMATE CORDLESS PRODUCT & BATTERY
SERVICE INFORMATION
13
Page 17

Devenez officiellement propriétaire.
• Visitez le hoover.com/FloorMateCordless
• Composez le 888 679-2121
• Ça ne prendra que quelques secondes, et c’est sans frais.
Pour enregistrer votre appareil FloorMate
MD
sans fil et
recevoir les avis de service, textez « floormatecordless »
au 72105.
(Des frais de message et de transfert de données peuvent
s’appliquer. Pour connaître toutes les conditions, visitez le Hoover.com/
floor matecordless. Textez « HELP » pour obtenir de l’aide.)
C’est garanti.
Hoover
MD
remplacera vos batteries conformément à sa garantie
limitée LithiumLife
MC
de 5 ans. Consultez la garantie pour obtenir
plus de détails.
Consignes de sécurité
Batterie LithiumLife
MC
Premiers pas
Remplir le réservoir d’eau claire de votre FloorMate
MD
sans fil
Utiliser votre FloorMate
MD
sans fil
Vider le réservoir d’eau souillé de votre FloorMate
MD
sans fil
Maintenir votre FloorMate
MD
sans fil en bon état de marche
Aide
Garantie
15
18
19
19
20
21
22
24
25
Votre guide:
Guide d’utilisation IMPORTANT : Lire ces instructions attentivement avant d’assembler et d’utiliser l’appareil.
FRANÇAIS
Page 18

CONSIGNES DE SÉCURITÉ IMPORTANTES
CONSERVEZ CES INSTRUCTIONS
Lorsque vous utilisez des appareils électriques, veuillez toujours respecter entre
autres les consignes de sécurité élémentaires suivantes :
VEUILLEZ LIRE TOUTES LES INSTRUCTIONS AVANT D’UTILISER CET
APPAREIL. CE PRODUIT EST DESTINÉ À UN USAGE DOMESTIQUE
SEULEMENT. LA GARANTIE EST NULLE SI L’APPAREIL EST UTILISÉ À
DES FINS COMMERCIALES.
AVERTISSEMENT : POUR RÉDUIRE LE RISQUE
D’INCENDIE, DE DÉCHARGE ÉLECTRIQUE, DE DOMMAGE OU
DE BLESSURE :
•Assemblez entièrement l’appareil avant de l’utiliser.
• Évitez de ranger ou de recharger la batterie à l’extérieur ou sur des surfaces
mouillées. N’exposez pas le chargeur à l’eau ou à l’humidité.
•Utilisez l’appareil à l’intérieur seulement.
• Ne permettez pas aux enfants de jouer avec l’appareil. Cet appareil ne doit
pas être utilisé par des enfants de moins de 12 ans. Exercez une surveillance
étroite lorsque l’appareil est utilisé à proximité d’enfants. Gardez l’appareil
hors de la portée des enfants et ne laissez pas ces derniers introduire leurs
doigts ou d’autres objets dans aucune ouverture afin d’éviter les blessures ou
les bris.
• Utilisez uniquement l’appareil aux fins décrites dans ce manuel. N’utilisez que
des accessoires et des produits recommandés par Hoover
MD
.
• N’utilisez pas le chargeur si la fiche ou le cordon est endommagé. Si l’appareil
ou le chargeur ne fonctionnent pas adéquatement, s’ils sont tombés sur le sol ou
dans l’eau, s’ils sont endommagés ou ont été laissés à l’extérieur, apportez-les
à un centre de service pour les faire inspecter avant de continuer à les utiliser.
• Ne tirez pas ni ne transportez le chargeur par le cordon, n’utilisez pas le
cordon comme une poignée, ne coincez pas le cordon dans l’embrasure
d’une porte et ne l’appuyez pas contre des arêtes tranchantes ou des coins.
Ne placez pas l’appareil sur le cordon. Ne faites pas rouler l’appareil sur le
cordon. Tenez le cordon éloigné des surfaces chaudes.
• Ne débranchez pas le chargeur en tirant sur le cordon. Pour débrancher le
chargeur, tirez sur la fiche.
• Ne manipulez pas le chargeur, y compris la fiche et les bornes, ni l’appareil si
vous avez les mains mouillées.
• N’insérez aucun objet dans les ouvertures. N’utilisez pas l’appareil si les
ouvertures sont obstruées. Assurez-vous qu’elles sont exemptes de poussière,
de mousse, de cheveux ou de tout ce qui pourrait réduire le débit d’air.
• Gardez les cheveux, les vêtements amples, les doigts et toute autre partie du
corps à l’écart des ouvertures et des pièces en mouvement.
• Redoublez de prudence lorsque vous utilisez l’appareil sur des escaliers.
Pour éviter tout dommage ou blessure et empêcher l’appareil de tomber,
placez toujours ce dernier au bas des escaliers, sur le plancher. Ne placez
pas l’appareil sur les marches d’un escalier ou sur un meuble, car cela peut
entraîner des dommages ou des blessures.
• N’utilisez pas l’appareil pour aspirer des liquides inflammables ou
combustibles, comme de l’essence, ou de la sciure de bois, ni dans des endroits
où de telles substances peuvent être présentes.
15
Page 19

• N’utilisez pas l’appareil pour aspirer quoi que ce soit qui brûle ou dégage de
la fumée comme des cigarettes, des allumettes ou des cendres chaudes.
•N’utilisez pas l’appareil sans avoir installé les filtres et les réservoirs.
•Ne déplacez pas l’appareil sur des prises de courant au sol.
•Ne tentez pas de court-circuiter la batterie ou les bornes du chargeur.
•N’utilisez que les produits nettoyants Hoover
MD
conçus pour cette machine.
(Voir la section « Produits nettoyants » du manuel.)
MISE EN GARDE : POUR RÉDUIRE LES RISQUES
DE DOMMAGE :
• Évitez d’utiliser l’appareil pour ramasser des objets durs ou aux arêtes
tranchantes, car ils pourraient endommager l’appareil.
• Rangez l’appareil adéquatement à l’intérieur et dans un endroit sec.
N’exposez pas l’appareil à des conditions de gel.
•N’utilisez pas d’objet aux arêtes tranchantes pour nettoyer le tuyau, car cela
risquerait de l’endommager.
• Pour réduire le temps de séchage, assurez-vous que l’endroit est bien aéré
lorsque vous utilisez des détergents et d’autres produits nettoyants avec
cet appareil.
• Consultez et suivez la garantie et les recommandations des fabricants à
propos de l’utilisation d’un appareil de nettoyage sur un plancher en dur avant
d’utiliser cet appareil sur votre parquet dur verni.
•N’entreposez pas cet appareil en laissant de la solution dans les réservoirs.
• Lorsque les brosses sont installées, ne laissez pas l’appareil trop longtemps
au même endroit, car vous risqueriez d’endommager le plancher.
• Après l’utilisation, de l’eau s’égoutte près des brosses et sous l’appareil et peut
créer une flaque. Pour éviter d’endommager les parquets en bois et les
planchers lamellés et pour éviter les risques de chute, observez les consignes
suivantes après l’utilisation : a) ne laissez pas l’appareil sur les surfaces en bois
ou lamellées, mais déplacez-le plutôt sur une surface dure; b) placez l’appareil
sur un matériau absorbant (tel qu’une serviette) pour recueillir
le liquide.
• N’incinérez pas le chargeur, la batterie ou l’appareil mêmes s’ils sont
gravement endommagés. La batterie peut exploser au feu.
•Ne tentez pas de court-circuiter la batterie ou les bornes du chargeur.
• Ce produit contient une batterie au lithium-ion rechargeable. N’exposez
pas la batterie à des températures élevées, car elle pourrait s’enflammer
et exploser.
• Évitez d’écraser et d’incinérer la batterie ou de la soumettre à des
actions similaires.
• Ne jetez pas la batterie au feu ou dans un compresseur à déchets. Consultez
la section sur l’élimination de la batterie pour obtenir des instructions.
•Ne tentez pas de démonter la batterie.
• Débranchez le chargeur de la prise avant de procéder à tout nettoyage
ou entretien de routine.
• La batterie peut fuir si elle est soumise à des conditions extrêmes. Si l’électrolyte
entre en contact avec votre peau, lavez aussitôt les parties touchées avec
de l’eau et du savon. En cas de contact avec les yeux, ne frottez pas. Rincez
immédiatement vos yeux à l’eau propre pendant au
moins 15 minutes et consultez un médecin sans attendre.
• Pour recharger l’appareil, utilisez uniquement le chargeur (pièce no BH03210)
fourni par Hoover
MD
.
• Utilisez uniquement la batterie (pièce no BH03100 ou BH03120) fournie par
Hoover
MD
. Un autre t ype de batterie pourrait exploser et causer des blessures
ou des dommages.
16
Page 20

• Ne touchez pas aux bornes du chargeur et du bloc-piles et n’y insérez
pas d’objets.
• Le chargeur est conçu pour être utilisé à l’intérieur seulement. Assurez-vous
de toujours conserver la batterie et le chargeur dans un endroit sec.
AVERTISSEMENT : Ce produit contient des
produits chimiques reconnus par l’État de la Californie comme pouvant
causer le cancer, des anomalies congénitales ou d’autres dommages
au système reproductif. LAVEZ-VOUS LES MAINS APRÈS AVOIR
MANIPULÉ L’APPAREIL.
AVERTISSEMENT : POUR RÉDUIRE LE RISQUE
DE DÉCHARGE ÉLECTRIQUE, LE CHARGEUR EST MUNI D’UNE
FICHE POLARISÉE (L’UNE DES BROCHES EST PLUS LARGE QUE
L’AUTRE). CETTE FICHE NE PEUT ÊTRE BRANCHÉE QUE DANS
UN SEUL SENS À UNE PRISE POLARISÉE. SI LA FICHE NE
S’INSÈRE PAS ENTIÈREMENT DANS LA PRISE, RETOURNEZLA. SI VOUS NE POUVEZ TOUJOURS PAS L’INSÉRER,
COMMUNIQUEZ AVEC UN ÉLECTRICIEN QUALIFIÉ POUR
FAIRE INSTALLER UNE PRISE APPROPRIÉE. NE MODIFIEZ
LA FICHE EN AUCUN CAS.
AVERTISSEMENT SUR LA
MISE AU REBUT DE LA
BATTERIE :
RISQUE D’EXPLOSION OU
D’EXPOSITION À DES MATIÈRES TOXIQUES.
BATTERIE AU LITHIUM-ION
La batterie doit être recueillie, recyclée ou éliminée dans le respect de
l’environnement. Le sceau de recyclage des batteries au lithium-ion de la
RBRC certifié par l’EPA indique que Techtronic Industries, société affiliée
à Hoover, Inc., participe volontairement à un programme de collecte
et de recyclage des batteries usagées au Canada et aux États-Unis. Le
programme de recyclage de la RBRC offre une solution de rechange
pratique qui permet d’éviter que les batteries soient jetées à la poubelle
ou dans les ordures ménagères municipales, ce qui pourrait être illégal
dans votre région. Visitez le www.rbrc.org/call2recycle/ pour obtenir
de plus amples renseignements sur le recyclage des batteries au lithiumion ainsi que sur les interdictions et les restrictions relatives à l’élimination
de ces batteries dans votre région. La participation de Hoover, Inc. à ce
programme témoigne de son engagement à protéger l’environnement et
les ressources naturelles.
MISE EN GARDE : La batterie utilisée dans cet
appareil peut présenter un risque d’incendie ou de brûlure chimique
si elle n’est pas manipulée adéquatement. Ne la démontez pas, ne la
chauffez pas au-delà de la température maximale établie par le fabricant
(60 °C/140 °F) et ne l’incinérez pas. Remplacez la batterie par une
batterie HooverMD no BH03100 ou BH03120 uniquement. L’utilisation
d’une autre batterie pourrait causer un incendie ou une explosion. Jetez
rapidement toute batterie usagée. Gardez la batterie hors de la portée
des enfants. Ne démontez pas la batterie et ne la jetez pas au feu. Ne
tentez pas de démonter la batterie ou de retirer tout composant en saillie
des bornes de la batterie. Ne tentez pas de remplacer des pièces de la
batterie ou du chargeur. Cela pourrait provoquer un incendie ou une
explosion. Avant de jeter la batterie, protégez les bornes exposées à
l’aide d’un épais ruban isolant pour éviter les courts-circuits.
17
Page 21

Premiers pas avec la batterie LithiumLifeMC ou la batterie longue duree Lithium Life
MC
Pour chargercomplètement
la bat terie, placez-la sur
le chargeur.
La bat terie LithiumLife
MC
n’est pas complètement
chargée au moment
de l’achat.
Si le voyant du chargeur
clignote en roug e, une
erreur s’est produite.
Retirez la batterie et
remet tez-la en place sur
le chargeur.
Pendant la charge, la
lumière du chargeur
s’allumera en bleu de
manière constante, et
les ampoules LE D de la
batterie s’allumeront pour
indiquer la progression
de la charge.
Le voyant du chargeur
s’éteint lors que la
batterie e st
complètement chargée.
Pour retirer la ba tterie,
appuyez sur le bouton
bleu de dégagement
et soulevez la batterie
tout en maintenant en
place la base
du chargeur.
Recharge de la batterie
Retrait de la batterie
Batterie
1. Bouton bleu de dégagement
2. Indicateur de niveau de charge à DEL
3. Bouton d’indicateur de charge
Chargeur
4. Socle de la batterie
5. Indicateur DEL
Chargée à 25 %
Chargée à 50%
Chargée à 75%
Elle est prête quand vous l’êtes.
La bat terie peut rester sur le chargeur,
même après avoir été rechargée à plein.
Le tableau page 12 détaille le temps de
charge pour votre modèle de batterie
et chargeur.
Elle offre une puissance de
nettoyage constante, quel
que soit le niveau de charge.
Que la ba tterie soi t chargée à 25% ou
à 100 %, vous profit ez d’une puissance
sans épuisement graduel jusqu’à la fin
de la charge.
Elle est polyvalente.
La bat terie et le chargeur sont compatibles
avec tous les autres produits de la gamme
LithiumLife
MC
.
Autonomie.
La durée d’autonomie par charge de batterie
peut var ier en fonction de la combinaison du
modèle de bat terie LithiumLife et du modèle
du produit de la gamme Air
MC
Cordle ss ou
FloorMate
MD
Cordle ss. L’utilisat ion d’un
modèle de bat terie LithiumLife
MC
diff érent du
modèle d’origine vendu avec le produit A ir
Cordle ss peut générer des différences dans la
durée d’autonomie associée à c haque charge.
Pour véri fier le niveau
de charge de la ba tterie,
appuyer sur le bouton
d’indicateur de charge
sur la batterie.
REMARQUE : Toutes les batteries
LithiumLifeMC sont compatibles avec
FloorMate
MD
Cordless et avec la famille
entière des produits Air
MC
Cordless.
*Les images peuvent différer du produit réel.
Bleu fi xe
Éteint
Bleu clignotant
Rouge clignotant
Voir notre démonstration :
hooverhelp.com/FloorMateCordless25
▲
Que signifie lorsque le voyant du chargeur est...
Recha rge en cours : de 1 à 3 barre s
Batterie entièrement chargée
Laiss ez la batter ie sur le charge ur. Elle est trop
chaud e ou froide pour p ermettr e la rec harge.
Commu niquez avec nou s en com posant le
1 888 679-2121.
18
Page 22

Insérez la batterie à
l’endroit indiqué et
enclenchez-la.
La batterie n’est pas
complètement rechargée
au moment de l’achat.
Alignez la tête de
nettoyage à la base et
inclinez-la jusqu’à ce que
le loquet de blocage de
la tête se fixe en place.
Faites tourner la
poignée jusqu’à ce
qu’elle se verrouille.
1
1
3
3 4 5
2
2
Premiers pas avec votre nettoyeur de plancher en dur FloorMate
MD
sans fil
Voir notre démonstration :
hooverhelp.com/FloorMateCordless3
Voir notre démonstration :
hooverhelp.com/FloorMateCordless2
▲▲
Remplir le réservoir d’eau claire de votre FloorMateMD sans fi
REMARQUE : Lorsque vous êtes devant votre FloorMateMD sans fil, le réservoir d’eau claire se trouve à la droite.
Faites tourner le
bouchon dans le
sens contraire
des aiguilles d’une
montre et soulevez-le
pour le retirer.
Remplissez avec de
l’eau chaude du robinet
jusqu’à la ligne.
Replacez le
bouchon et
enclenchez le
réservoir à sa
position initiale.
Appuyez à
l’endroit indiqué
et faites pivoter
le réservoir.
Utilisez votre bouchon
comme tasse à mesurer.
Remplissez une fois
le bouchon de solution
nettoyante Hoover
MD
2X Multi-Floor Plus
et versez-la dans le
réservoir.
Consultez toujours les
indications du fabr icant
de la sur face de plancher.
MISE EN GARDE
Suivez les recommandations du fabricant du produit nettoyant pour éviter d’endommager les parquets
en bois. Si vous utilisez l’appareil sur un parquet en bois verni, inspectez la surface du bois pour y détecter
des traces de détérioration du vernis ou de bois non vernis ou de mauvais joints. Si vous faites un tel constat,
n’utilisez pas lasolution nettoyante Hoover
MD
2x multi-floor plus pour nettoyer le parquet en bois verni.
!!
19
Page 23

Utiliser votre FloorMate
MD
sans fil
MISE EN GARDE Le nettoyage à la brosse n’est pas recommandé sur les planchers d’ingénierie ni sur les parquets en bois dur verni.
!!
Posez votre
pied à l’endroit
indiqué et tirez
la poignée vers
l’arrière pour
commencer.
Le mode de lavage et
de séchage maintient
la succion afin de vous
permettre de laver lorsque
vous faites avancer
l’appareil et de sécher
lorsque vous le tirez vers
vous. Faites chevaucher
les passages d’environ 2,5
cm (1 po), afin d’éviter de
laisser des traces.
Déplacez l’interrupteur
indiqué ci-dessus vers
l’avant pour démarrer
l’appareil.
Appuyez sur la détente
indiquée ci-dessus
pour utiliser la solution,
au besoin.
Utilisez le mode de
nettoyage à la brosse
pour nettoyer sans
succion, puis passer
au mode de lavage
et de séchage pour
ramasser l’excédent
d’eau et de solution.
1
2
4
3
5
REMARQUE : L’appareil FloorMateMD sans fil
fonctionne durant environ 30 minutes lorsqu’il est
utilisé en mode de lavage et de séchage 70 % du
temps et en mode de nettoyage à la brosse 30 %
du temps.
Voir notre démonstration :
hooverhelp.com/FloorMateCordless4
▲
20
Page 24

MISE EN GARDE Après l’utilisation, de l’eau s’égoutte près des brosses et
sous l’appareil et peut créer une flaque. Pour éviter d’endommager les parquets en bois et
les planchers lamellés et pour éviter les risques de chute, observez les consignes suivantes
après l’utilisation : a) ne laissez pas l’appareil sur les surfaces en bois ou lamellées, mais
déplacez-le plutôt sur une surface dure; b) placez l’appareil sur un matériau absorbant
(tel qu’une serviette) pour recueillir le liquide.
Vider le réservoir d’eau souillé et le filtre de votre FloorMateMD sans fil
AVERTISSEMENT Pour réduire les risques de
blessure,retirez le bloc-piles avant d’effectuer le nettoyage
ou l’entretien.
!!
!!
Appuyez sur le
bouton indiqué
ci-dessus et faites
pivoter le réservoir
pour le retirer.
Videz l’eau dans un
évier ou une toilette.
Vérifiez le filtre en
mousse pour y détecter
la présence de débris
et rincez-le, au besoin.
Remettez le couvercle
du réservoir en place
et replacez les deux
languettes en position
verrouillée.
Enclenchez le
réservoir dans sa
position initiale.
Relâchez les
languettes indiquées
ci-dessus et tirez
sur le couvercle
du réservoir pour
le retirer.
1 2 3 4 5
REMARQUE : Le réservoir d’eau souillé est doté d’un dispositif
d’arrêt automatique de la succion pour éviter les débordements.
Lorsque le dispositif s’active, l’appareil cesse de ramasser l’eau et les
débris et le son du moteur change. Le réservoir d’eau souillé est plein
et doit être vidé.
Voir notre démonstration :
hooverhelp.com/FloorMateCordless22
▲
21
Page 25

Maintenir votre FloorMateMD sans fil en bon état de marche :
Tête de nettoyage/filtre
MISE EN GARDE Pour réduire les risques de blessures avec les accessoires, retirez le bloc-piles avant d’effectuer l’entretien.
!!
Tirez fermement sur la tête
de nettoyage à l’endroit
indiqué ci-dessus pour
la détacher.
Faites tourner la
tête de nettoyage
pour la retirer.
Rincez le racloir à
l’eau courante et
retirez les débris.
Nettoyez à l’aide
d’un linge humide.
Inclinez la tête de
nettoyage et faites-la
pivoter pour la
remettre en place.
Vérifiez le filtre en
mousse pour y détecter
la présence de débris.
Rincez au besoin.
1 2 3 4 5
Voir notre démonstration :
hooverhelp.com/FloorMateCordless24
Voir notre démonstration :
hooverhelp.com/FloorMateCordless23
▲
▲
Maintenir votre FloorMateMD sans fil en bon état de marche : brosses
MISE EN GARDE Pour réduire les risques de blessures avec les accessoires, retirez le bloc-piles avant d’effectuer l’entretien.
MISE EN GARDE N’utilisez pas un détergent à base de solvant pour nettoyer l’ensemble de brosses.
!
!
!
!
Retirez les deux
réservoirs afin
d’éviter de
renverser de l’eau.
Appuyez sur
les boutons de
détente et retirez
l’ensemble de
brosses.
Nettoyez à
l’aide d’un
détergent
doux et rincez.
N’utilisez pas
un détergent à
base de solvant.
Abaissez la
poignée et
soulevez la tête
de nettoyage.
Alignez les brosses
et le trou au bas de
l’appareil et tournez
légèrement les
brosses jusqu’à ce
qu’elles s’insèrent
de façon naturelle.
Appuyez fermement
sur l’ensemble de
brosses jusqu’à ce
qu’il se verrouille en
place.
1 2 3
4 5 6
LUBRIFICATION
Le moteur est doté de roulements suffisamment lubrifiés pour la durée de vie de
l’appareil. L’ajout de lubrifiant pourrait causer des dommages. N’ajoutez pas
de lubrifiant dans le moteur.
22
Page 26

Ranger votre FloorMateMD sans fil
Produits nettoyants :
• Éteignez l’appareil.
• Videz et rincez les deux réservoirs d’eau et laissez-les sécher à l’air.
• Assurez-vous que rien n’exerce une pression sur le racloir de la tête de nettoyage.
• N’entreposez pas l’appareil sur une surface en bois à moins qu’il soit entièrement sec.
• Entreposez l’appareil à l’intérieur dans un endroit sec. N’exposez pas l’appareil à des conditions de gel.
• De l’eau s’égoutte près des brosses et sous l’appareil et peut créer une flaque. Pour éviter d’endommager les parquets en bois
et les planchers lamellés et pour éviter les risques de chute, ne laissez pas l’appareil sur les surfaces en bois ou lamellées après
l’utilisation, mais déplacez-le plutôt sur une surface dure. Placez l’appareil sur un matériau absorbant pour recueillir le liquide.
• Utilisez la solution nettoyante HooverMD 2x Multi-Floor Plus.
32 oz - AH30425
64 oz - AH30420
23
Page 27

Aide
AVERTISSEMENT
Afin de réduire le risque de blessures corporelles, retirez le bloc-piles
avant le nettoyage ou l’entretien.
! !
Mon FloorMateMD sans fil ne démarre pas.
Votre bat terie n’est peut -être pas recharg ée. Vérifiez l’ indicateur d e charge et rechargez
la bat terie si le niveau est bas. Consultez le tableau ci -dessous afin de déterminer la durée
de charge de votre modèle.
*
La bat terie LithiumLifeMC n’est pas entièrement rechargée
à l’achat.
Mon FloorMate
MD
sans fil ne ramasse pas l’eau.
Le réservoir d’eau souillé est peut -être plein, auquel cas le dispositif d’arrêt de la succion
s’active pour prévenir les débordements. Le son du moteur change lorsque le dispositif
d’arrêt est activé. Retirez le réservoir d’eau souillé et videz-le dans un évier.
Vous êtes peut- être en mode brossage. Passez au mode de net toyage et de séchage.
Si votre filtre est encrassé, voir ci-dessous.
Votre filtre est peut-être encrassé. Rincez le filt re du réservoir d’eau souillé à l’eau
courante et ret irez tout débris.
Mon FloorMate
MD
sans fil laisse des accumulations d’eau pendant
le nettoyage.
Le réservoir d’eau claire n’est peut-être pas installé convenablement. Consultez la page 6
pour obtenir des indications. Vous êtes peu t-être en mode brossage. Passez au mode d e
nettoyage et d e séchage. Un des réservoirs n’est peut-être pas installé convenablement.
Mon FloorMate
MD
sans fil ne libère pas de solution.
Le réser voir d’eau claire est peut- être vide. Vérifiez le réser voir et remplissez-le au besoin.
Consultez la page 6 pour obtenir des indications .
Les brosses de mon FloorMate
MD
sans fil ne tournent pas.
Votre FloorMate
MD
sans fil est équipé d’un dispositif de protec tion contre le calage pour
protéger les brosse s. Si les brosses ne tournent pas, éteignez l’appareil, at tendez une
minute et redémarrez l ’appareil. Si les brosses ne tournent toujours pas, consultez un
représ entant de ser vice autorisé.
Toute autre tâche d ’entretien doit être confiée à un représentant de ser vice autoris é.
Cessez d’utilis er l’appareil s’il ne fonctionne pas comme prévu, s’il a été échappé sur le
sol ou dans l’eau, s’il est endommagé ou s’il a ét é laissé à l’extér ieur et apportez-le au
centre de réparations.
*Consu ltez la gamm e complète d es produits L ithiumLi feMC au Hoover.com.
DES QUESTIONS OU DES PRÉOCCUPATIONS?
Commun iquez avec nou s : 888 679-2121
Pour obte nir le guide c omplet de dé pannage, re ndez-vous a u : Hooverhel p.com/Floo rMateCord less
Twitte r : @HooverU SA
Facebook : facebook.com/hoover
Ne retournez pas le produit en magasin. Le nu méro de modè le
est indi qué à l’arriè re du produit.
Modèle de
Batterie
Modèle de
Chargeur
Batterie
LithiumLife
MC
BH03100
LithiumLife
MC
Durée Rallongée
LithiumLife
MC
LithiumLife
MC
LithiumLife
MC
Durée Rallongée
BH03220
9 heures
18 heures
1.5 heures
3 heures
BH03120
BH03100
BH03200
BH03120
Temps de charge
(Environ)
24
Page 28

TOUTE TÂCHE D’ENTRETIEN DOIT ÊTRE CONFIÉE À UN REPRÉSENTANT DE SERVICE
AUTORISÉ . Appelez au 888 679-2121 (É.-U. et Canada).
Si vous av ez besoin d’aide s upplément aire, visitez un cent re de service auto risé. Trouvez le
centr e le plus près de chez vous en visit ant notre sit e Web à www.hoover.com. L es frais de
trans port à destination et en p rovenance de l ’empla cement de rép aration son t payés par le
propr iétaire. Ind iquez toujour s le numéro de modèle et l e code de fabr ication de votre produit
lorsq ue vous demand ez des renseig nements ou qu e vous command ez des pièces de recha nge.
(Le numéro de modèle et l e code de fabr ication de l ’appareil de ne ttoyage se trouven t au bas
du chargeur et s ur le côté de la ba tterie.)
GARANTIE LIMITÉE DE CINQ ANS SUR LA BATTERIE.
GARANTIE LIMITÉE DE DEUX ANS SUR L’APPAREIL.
COUVERTURE DE LA GARANTIE
Votre app areil Hoover FloorMate est gar anti contre l es défauts d e fabrication et de m ain
d’oeuvre s’il est u tilisé à des fi ns domesti ques normal es et conform ément au manu el du
propr iétaire. La pé riode de gara ntie de l’appar eil FloorMat e
, à l’exclusi on de la batterie
LithiumLife
MC
, est de deux (2) ans. L a période de g arantie de la batterie à du rée de vie prolo ngée
LithiumLife
MC
est de cinq (5) ans . Au cours de la pé riode de garantie, H ooverMD fourn ira sans
frais l a main-d ’œuvre e t les pièces né cessaire s à la réparatio n de tels défauts de vos produi ts
FloorMate
et elle f ournira sans frais une bat terie de rec hange afin de r emplacer un e batterie
LithiumLife
MC
défectueu se qui a été four nie avec le prod uit FloorMat e que vous a vez acheté aux
État s-Unis ou a u Canada, ou bi en dans le cadre d u programme am éricain d’ échanges m ilitaires .
RÉCLAMATION AU TITRE DE LA GARANTIE
Si le pro duit n’est pas dans l ’état prévu par la ga rantie, appo rtez ou envoyez le produi t chez un
fourn isseur auto risé de ser vice sous garantie H oover
MD
avec une preuve d ’acha t. Si les bat teries
ne sont p as dans l’ét at prévu par la g arantie, app ortez-l es ou envoyez-l es, avec une preuve
d’achat , chez un fourni sseur de ser vices auto risé Hoover
MD
ou communiquez avec le s service s
Hoover
MD
au 888 679-2121. Pour obt enir la liste d es points de se rvice aut orisés aux É. -U.,
composez le num éro du serv ice automat isé au 888 679-2121 ou visitez Hoover
MD
en lign e au
www.hoove r.com.
ÉLÉMENTS NON COUVERTS PAR LA GARANTIE
La prés ente garant ie ne couvre pas les cou rroies, les fi ltres et les r ouleaux-bross es pour toute
utili sation du pro duit dans des condit ions commerc iales (par exem ple dans le cad re de services
ménag ers, de conci ergerie et de locat ion d’équi pement), l’ent retien inad équat du produit, les
domma ges liés à une ma uvaise utilisati on, à des cas for tuits ou à des catas trophes naturelles, au
vandal isme, à tout autre act e hors du contrôle de Hoover
MD
, ou à tout a cte ou néglig ence de
la par t du propriét aire, toute ut ilisation d ans un pays aut re que celui où le p roduit a été ac heté
initi alement et to ut produit reve ndu par son prop riétaire or iginal. La pr ésente gara ntie ne couvre
pas le ramassage, la livraison, le t ransport, ni les réparat ions à domicil e. Toutefois, s i vous
envoyez vot re produit par courr ier à un point de vente ou à u n centre de ser vices Hoov er pour
une réparati on sous garant ie, les frais d e livraison de retour seront payés . Veuil lez communiqu er
avec le s service s Hoover
MD
au 888 679-2121 pour savoir comme nt expédier ce produi t. Seuls
les pro duits achet és aux États -Unis (y com pris ses ter ritoires et s es possess ions), au Canad a ou en
vert u du programme a méricain d’éch anges milit aires sont visés par c ette garan tie.
AUTRES CONDITIONS IMPORTANTES
La prés ente garant ie n’est pa s transférable et ne p eut pas être cé dée. La prése nte garanti e sera
régie e t interprét ée selon les lo is de l’État d e l’Ohio. La pér iode de garantie ne pe ut pas être
prolongée pa r une réparat ion ou un rempla cement des ba tteries o u des pièces exé cutés en ver tu
de la pré sente garantie, quels qu’ils soient.
CET TE GARANT IE EST VOTRE SEUL RE COURS ET VOTRE SE ULE VOIE DE DROIT. TOUTES
AUTRES GA RANTIES, E XPRESSES OU TAC ITES, Y COMPRIS LES GAR ANTIES DE QUA LITÉ
MARCHAND E OU D’ADAP TATION À UN USAGE PAR TICULIER , SONT DÉCLI NÉES. EN
AUCUN TE MPS, HOOVER
MD
NE POU RRA ÊTRE TE NUE RESPONSABLE D E TOUS LES
DOMMAGES- INTÉRÊ TS SPÉCIAUX , INDIRECTS, ACCI DENTELS OU ACCESSO IRES
D’AUCUNE SO RTE OU D’AUCUNE NATUR E ENVERS LE PRO PRIÉTAIRE OU DE TOUTES
PARTIES R ÉCLAMA NT AU NOM DU PROPRIÉTAIRE, QUE C E SOIT PAR CONTR AT,
NÉGLI GENCE, TORT O U RESPONSAB ILITÉ STRICTE DES PRODU ITS OU SURVEN US PAR
QUELQU E CAUSE QUE CE SOIT.
Cert ains États n e permettent pas l ’exclus ion des domma ges consécu tifs. Par conséqu ent,
l’exclusi on précéden te pourrait n e pas être applicabl e dans votre cas . La présente
garantie vous d onne des droits préc is. Vous pouvez ég alement avoir d’autres droits,
lesqu els varient d ’un Éta t à l’aut re.
ENTRETIEN ET GARANTIE DU HOOVERMD FLOORMATEMD SANS FIL ET DE SA BATTERIE
RENSEIGNEMENTS RELATIFS À L’ENTRETIEN
25
Page 29

Para siempre.
• Visite
Hoover.com/FloorMateCordless
• Llame al 1-888-679-2121
• Solo toma unos segundos y es gratis. Para registrar su
aspiradora inalámbrica FloorMate® y recibir
recordatorios sobre servicios de mantenimiento, envíe
un mensaje de texto con la frase "floormatecordless" al
72105.
(Pueden aplicarse tarifas de datos y mensajes . Para conocer los
términos y condiciones completos, visite el sitio Hoover.com/Air CordlessLift).
Podemos garantizarlo.
Hoover
®
reemplazará sus baterías conforme a nuestra garantía
limitada por 5 años de LithiumLife
TM
. Consulte la Garantía para
ver los detalles completos.
Guía del usuario IMPORTANTE: Lea atentamente antes de ensamblar y usar.
ESPAÑOL
Instrucciones de seguridad
Su batería LithiumLife
™
Cómo comenzar
Llenado del tanque de solución con agua limpia de su aspiradora
inalámbrica FloorMate
Uso de su aspiradora inalámbrica FloorMate
Vaciado del tanque con agua sucia de su aspiradora inalámbrica FloorMate
Mantenimiento correcto de su aspiradora inalámbrica FloorMate
¿Necesita ayuda?
Garantía
27
30
31
31
32
33
34
36
37
Su guía:
Page 30

Cuando se utilizan aparatos eléctricos, siempre deben seguirse precauciones
básicas, incluidas las siguientes:
LEA TODAS LAS INSTRUCCIONES ANTES DE UTILIZAR ESTE
APARATO. ESTE PRODUCTO TIENE COMO FIN SU USO DOMÉSTICO
SOLAMENTE. SI SE LO UTILIZA CON FINES COMERCIALES, LA
GARANTÍA QUEDARÁ ANULADA.
ADVERTENCIA: PARA DISMINUIR EL RIESGO DE
INCENDIO, DESCARGA ELÉCTRICA, DAÑOS O LESIONES, RESPETE
LAS SIGUIENTES MEDIDAS:
•Arme la aspiradora por completo antes de ponerla en funcionamiento.
• No almacene la unidad en exteriores o en superficies mojadas, ni cargue la
batería en dichas condiciones. Evite que el cargador se moje.
•Utilice la unidad en interiores solamente.
• Evite que se la utilice como un juguete. La unidad no tiene como fin el uso por
parte de niños de 12 años o menos. Cuando se la utilice cerca de niños, será
necesario hacerlo bajo una estricta supervisión. Para evitar lesiones o daños,
mantenga a los niños alejados del producto y no permita que introduzcan sus
dedos ni objetos en ninguna de las aberturas del producto.
• Utilícela únicamente según el uso descripto en este manual. Utilice únicamente
los accesorios y productos Hoover
®
recomendados.
• No utilice el cargador si el cable o el enchufe se encuentran dañados. Si el
aparato o el cargador no funcionan como deben; si se han caído, han sido
dañados, dejados a la intemperie o sumergidos en agua, llévelos a un
Centro Técnico antes de continuar usándolos.
• No extraiga ni transporte el cargador tomándolo por el cable; no tire del cable,
no cierre una puerta con él ni lo enrosque alrededor de bordes o esquinas
filosas. No apoye el producto sobre el cable. No pase el aparato por encima
del cable. Mantenga el cable lejos de las superficies calientes.
• No desenchufe el cargador tirando del cable. Para desenchufarlo, agarre el
enchufe, no el cable.
• No manipule el cargador (incluido el enchufe y los terminales) ni el aparato con
las manos mojadas.
• No coloque ningún objeto en las aberturas. No utilice la unidad si alguna de
sus aberturas se encuentra bloqueada. Manténgala libre de polvo, pelusas,
cabello y cualquier otro elemento que pueda disminuir el flujo de aire.
• Evite que el cabello, la ropa suelta, los dedos y cualquier otra parte de su
cuerpo entren en contacto con las aberturas y las piezas móviles de la unidad.
• Extreme las precauciones cuando utilice la aspiradora para limpiar escaleras.
Para evitar lesiones o daños físicos, y a fines de evitar que la aspiradora se
caiga, siempre colóquela al pie de las escaleras, sobre el suelo. No coloque la
aspiradora sobre las escaleras ni sobre un mueble, ya que pueden generarse
lesiones o daños.
• No utilice la unidad para aspirar líquidos combustibles o inflamables, tales
como gasolina o restos de madera lijada, ni la utilice en áreas en las que dichas
sustancias puedan estar presentes.
• No aspire nada que se encuentre en combustión o emitiendo humo, como
cigarrillos, fósforos o cenizas calientes.
•No utilice la unidad si no tiene colocados los filtros o los tanques.
• No pase la aspiradora por encima de tomacorrientes colocados
en el suelo.
INSTRUCCIONES DE SEGURIDAD IMPORTANTES
CONSERVE ESTAS INSTRUCCIONES
27
Page 31

•No intente cortocircuitar la batería ni los terminales del cargador.
• Utilice únicamente los productos de limpieza Hoover® designados para su uso
con esta máquina. (Consulte la sección de "Productos de limpieza" en
este manual).
PRECAUCIÓN: PARA DISMINUIR EL RIESGO DE
DAÑOS:
• Evite aspirar objetos duros y filosos con este producto, ya que pueden dañarlo.
• Almacénelo apropiadamente en interiores, en un lugar seco. No exponga
la máquina a temperaturas muy frías.
• No utilice objetos filosos para limpiar la manguera, ya que pueden dañar
la unidad.
• Para disminuir el tiempo de secado, asegúrese de que el área esté bien
ventilada cuando utilice detergentes y otros limpiadores con esta máquina.
• Revise y cumpla las recomendaciones y lo indicado en la garantía de los
fabricantes de suelos, respecto del uso de una máquina de limpieza en
pisos de madera dura, antes de utilizar este producto en sus pisos de
madera dura sellada.
•No almacene el extractor con solución en los tanques.
• Cuando los cepillos estén funcionando, evite dejar la aspiradora apoyada
en un lugar por mucho tiempo. Esto puede dañar el suelo.
• Luego de su uso, goteará agua de los cepillos y por debajo del producto, lo
que puede formar un charco. Para evitar dañar la madera y el suelo laminado,
y para evitar un potencial riesgo de resbalamiento, luego de usar la unidad:
(a) no la deje sobre las superficies de madera y laminado, y llévela a una
superficie dura; y (b) coloque la unidad sobre material absorbente (como una
toalla) para absorber las gotas.
• No incinere el cargador, la batería ni el aparato, aun si estuvieran muy
dañados. Las baterías pueden explotar y provocar un incendio.
•No intente cortocircuitar la batería ni los terminales del cargador.
• Este producto incluye baterías recargables de iones de litio. No exponga las
baterías a altas temperaturas, ya que pueden prenderse fuego o explotar.
•No aplaste ni incinere la batería, ni la someta a acciones similares.
• No deseche la batería en un incinerador ni en un compactador de desechos.
Consulte la sección sobre desecho de la batería para obtener instrucciones.
•No intente desarmar la batería.
• Desenchufe el cargador del tomacorriente antes de llevar a cabo una rutina
de limpieza o mantenimiento en la unidad.
• En condiciones extremas, pueden producirse pérdidas en las celdas de la
batería. Si la piel entrara en contacto con el líquido, lávese rápidamente con
jabón y agua. Si el líquido le entrara en los ojos, no los frote. Enjuáguelos de
inmediato con agua limpia, en forma continua durante, al menos, 15 minutos.
Consulte a un médico de inmediato.
• Para recargar la unidad, utilice únicamente el cargador (N.° de pieza Hoover
BH03210) provisto por Hoover
®
.
• Utilice únicamente la batería (Hoover Pieza N.º BH03100 o BH03120)
provista por Hoover
®
. Otras baterías pueden explotar y causar lesiones o
daños físicos graves.
• No toque el bloque de batería ni los terminales del cargador, ni inserte objetos
en ellos.
• El cargador es para uso en interiores solamente. Siempre asegúrese de
guardar la batería y el cargador en un lugar seco.
ADVERTENCIA: Este producto contiene químicos
reconocidos por el Estado de California por causar cáncer, defectos
de nacimiento o daños reproductivos. LÁVESE LAS MANOS LUEGO
DE MANIPULARLO.
28
Page 32

BATERÍAS DE IONES DE LITIO
La batería debe ser recolectada, reciclada o desechada en forma
favorable al medio ambiente. El Sello de reciclado de la batería RBRC
certificado por EPA (Agencia de Protección Ambiental) en la batería
de iones de litio (Li-ion) indica que Techtronic Industries, una afiliada
corporativa de Hoover, Inc. se encuentra participando voluntariamente
en un programa industrial para recolectar y reciclar estas baterías al
final de sus vidas útiles, cuando son retiradas de servicio en los Estados
Unidos o Canadá. El programa RBRC proporciona una conveniente
alternativa a la colocación de las baterías de iones de litio usadas en
la basura o en el flujo de desechos municipales, lo que puede ser ilegal
en su área. Visite el sitio www.rbrc.org/call2recycle/ para obtener
información sobre el reciclaje de las baterías de iones de litio y las
restricciones/prohibiciones sobre desechos en su área. La participación
de Hoover, Inc. en este programa forma parte de nuestro compromiso
por preservar el medio ambiente y conservar los recursos naturales.
ADVERTENCIA: PARA REDUCIR EL RIESGO
DE DESCARGA ELÉCTRICA, EL CARGADOR TIENE UN ENCHUFE
POLARIZADO (UNA CLAVIJA ES MÁS ANCHA QUE LA OTRA).
ESTE ENCHUFE CABE EN UN TOMACORRIENTE POLARIZADO
DE UNA SOLA MANERA. SI NO ENCAJA POR COMPLETO
EN EL TOMACORRIENTE, INVIERTA EL ENCHUFE. SI AÚN
NO ENCAJA, CONTACTE A UN ELECTRICISTA CUALIFICADO
PARA QUE INSTALE EL TOMACORRIENTE CORRESPONDIENTE.
NO REALICE NINGÚN TIPO DE MODIFICACIÓN EN EL
ENCHUFE.
ADVERTENCIA SOBRE EL
DESECHO DE LA BATERÍA:
RIESGO DE EXPLOSIÓN O EXPOSICIÓN A
MATERIAL TÓXICO
PRECAUCIÓN: La batería utilizada con este dispositivo
puede representar riesgos de incendios o quemaduras químicas si se la
manipula incorrectamente. No la desarme ni incinere, ni la caliente a
temperaturas superiores al límite máximo de temperatura establecido
por el fabricante (60 °C/140 °F). Reemplace la batería únicamente con
la batería Hoover®, N.º de piezas BH03100 o BH03120. El uso de otra
batería puede representar riesgos de incendios o explosiones. Deseche
la batería usada rápidamente. Manténgala alejada de los niños. No la
desarme ni la deseche prendiéndola fuego.
No intente desarmar la batería ni extraer cualquier componente que
sobresalga de los terminales de aquella. La batería y el cargador no
contienen piezas a las que el usuario pueda realizarles un servicio de
mantenimiento. Pueden generarse incendios o lesiones. Antes de desecharla,
proteja los terminales expuestos con cinta aislante gruesa para evitar que
se produzcan cortocircuitos.
29
Page 33

Cómo comenzar con su batería LithiumLife™ o batería LithiumLife™ de desempeño extendido
Para hacer funcionar la
bater ía, colóquela en
el cargador.
La batería LithiumLife
™
no viene completamente
cargada.
Si el LED del cargador
emite una luz roja
parpadeante, significa
que se ha producido un
error. Ex traiga la batería
y vuelva a colocarla.
Mientras cargando
la luz del cargador
prenderá con un color
azúl y mantenerse
prendido, y las luces
“LED” de la batería
se prenderán para
indicar el progreso
de la carga.
La luz del cargador se
apagará cuando la
bater ía esté
completamente cargada.
Para extraer la batería,
presione el botón de
liberación azul y levante
la batería, mientras
mantiene presionada
hacia abajo la base
del cargador.
Carga de la batería
Extracción de la batería
Batería
1. Botón de liberación azul
2. Indicador LED de nivel de carga
3. Botón indicador de carga
Cargador
4. Cavidad de la batería
5. Indicador LED
25 % de carga
50 % de carga
75 % de carga
Estará lista cuando usted lo esté.
Puede dejar su batería puesta en el
cargador – aún después de que se haya
cargado. Refiere a la tabla en la página
12 para el tiempo de carga de su modelo
de batería y cargador.
Permite que la aspiradora limpie
en forma potente, con cualquier
nivel de carga.
Ya sea que la ba tería tenga un 25% de
carga o esté completamente cargada en un
100%, la aspiradora recibirá alimentación
constante hasta que se termine la carga.
Es versátil.
Esta batería y este cargador son compatibles
con el resto de nuestra familia de productos
LithiumLife
™
.
Desempeño.
El tiempo de desempeño por carga var iará
según la combinación específica de su
modelo de batería “LithiumLife
™
” y su product
de limpieza “FloorMate
Cordle ss “ o de la
linea “Air
™
Cordle ss”. Si usa un modelo de
batería “LithiumLife™” distinto al modelo
orininalmente emp acado con su product
“Ai r™ Cordle ss” habrán diferencias en el
tiempo de desempeño por carga.
Para averiguar e l nivel
de carga de su batería
aprete el botón del
indicador de carga en
la batería.
*Las imágenes pueden diferir
del producto real.
Significados de los distintos si la luz del cargador es/está...
Azu l y fij a
Proce so de carga de la ba tería: 1-3 LED
Carga completa
Deje la b atería en el carg ador. Está dem asiado cali ente
o demas iado fría para c argarla.
Lláme nos al 1-888 -679-2121.
Apagada
Azu l y par padeante
Roja y par padeante
REMARQUE : Toda batería “LithiumLife
™
”
es compatibl e con “FloorMate
Cordless”
y con la familia entera de productos
“Ai r
™
Cordless”.
Vea una demostración de cómo hacerlo:
hooverhelp.com/FloorMateCordless25
▲
30
Page 34

Cómo comenzar con su aspiradora inalámbrica FloorMate
para pisos
de madera dura
Coloque la batería aquí y compruebe que
quede fija en su lugar.
La batería no viene completamente cargada.
Alinee la boquilla en la base e
inclínela hacia arriba hasta que el
gancho de liberación se enganche
en su lugar.
Gire el mango hacia arriba
hasta que quede bloqueado.
1
3
2
Llenado del tanque de solución con agua limpia de su aspiradora
inalámbrica FloorMate®
NOTA: Al mirar de frente a su aspiradora inalámbrica FloorMate®, verá que el tanque de agua limpia se encuentra en el lado derecho.
Gire la tapa hacia la
izquierda y levántela
para extraerla.
Llene con agua
caliente hasta llegar
a la línea de llenado.
Vuelva a
colocar la tapa
y coloque el
tanque a presión
nuevamente en su
posición original.
Presione aquí
y gire el tanque
hacia afuera.
Utilice su tapa como
medida. Llénela
con la solución de
limpieza Hoover® 2X
Multi-Floor Plus una
vez y viértala en el
tanque de solución.
1 2 3 54
Siempre consulte los lineamientos
del fabricante para las superfi cies
de los pis os.
PRECAUCIÓN
Para evitar daños en los pisos de madera, siga las recomendaciones de limpieza de fábrica. Si va a
utilizar la aspiradora en pisos de madera sellada, revise la superficie del piso para verificar que el
acabado no esté desgastado, que no haya madera sin recubrimiento o que haya uniones separadas.
Si encuentra alguna de las condiciones mencionadas, no utilice la solución de limpieza Hoover 2x
Multi -Floor Plus para limpiar pisos de madera sellada.
!!
Vea una demostración de cómo hacerlo:
hooverhelp.com/FloorMateCordless3
Vea una demostración de cómo hacerlo:
hooverhelp.com/FloorMateCordless2
▲▲
31
Page 35

Uso de su aspiradora inalámbrica FloorMate®
PRECAUCIÓN No se recomienda el modo de pulido para pisos de madera dura sellada o pisos de ingeniería.
!!
Párese aquí y
tire del mango
hacia atrás
para comenzar.
El modo lavar y secar
mantiene la succión para
permitirle lavar cuando
mueve la unidad hacia
adelante y secar cuando
la mueve hacia atrás.
Para evitar rayar el suelo,
intercale pasadas de a 1
pulg. (25,40 mm).
Gire este interruptor
hacia adelante
para encenderla.
Apriete este gatillo
para utilizar la
solución, según
sea necesario.
Utilice el modo de
pulido para lavar
sin succionar. Luego,
cambie al modo de
lavar y secar para
retirar el exceso de
agua y solución.
1
2
4
3
5
NOTA: La aspiradora inalámbrica FloorMate
funcionará durante 30 minutos en promedio cuando
la utilice en el modo "lavar y secar" (en un 70 % del
tiempo) y en modo "pulir" (en un 30 % del tiempo).
Vea una demostración de cómo hacerlo:
hooverhelp.com/FloorMateCordless4
▲
32
Page 36

PRECAUCIÓN Luego de su uso, goteará agua de los cepillos y
por debajo del producto, lo que puede formar un charco. Para evitar dañar
la madera y el suelo laminado, y para evitar un potencial riesgo de
resbalamiento, luego de usar la unidad: (a) no la deje sobre las superficies
de madera y laminado, y llévela a una superficie dura; y (b) coloque la
unidad sobre material absorbente (como una toalla) para absorber las gotas.
Vaciado del tanque con agua sucia de su aspiradora inalámbrica FloorMate®
ADVERTENCIA Para evitar el riesgo de lesión física:
Extraiga la batería antes de limpiar la unidad o realizarle un
servicio de mantenimiento.
!
!
!!
Presione este botón
y gire el tanque
hacia afuera.
Vacíe el agua en el
fregadero o inodoro.
Verifique que el filtro
de goma espuma no
tenga residuos y, de ser
necesario, enjuáguelo.
Vuelva a colocar la
tapa del tanque y
enganche ambas
lengüetas en posición
de bloqueo.
Vuelva a sujetar a
presión el tanque
en su posición
original.
Libere estas
lengüetas y tire de
la tapa del tanque
para extraerla.
1 2 3
4
5
NOTA: El tanque de agua sucia viene con un dispositivo
integrado de apagado automático de la succión, para
evitar que se rebalse. Cuando dicho dispositivo se active, la
aspiradora no aspirará agua ni residuos y el sonido del motor
cambiará. El tanque de agua sucia está lleno y debe vaciarse.
Vea una demostración de cómo hacerlo:
hooverhelp.com/FloorMateCordless22
▲
33
Page 37

Mantenimiento correcto de su aspiradora inalámbrica FloorMate:
Boquilla/filtro
PRECAUCIÓN Para disminuir el riesgo de lesiones por piezas móviles, extraiga la batería antes de realizar un servicio de mantenimiento.
!!
Tire con firmeza de
la boquilla desde
aquí para liberarla.
Gire la boquilla
hacia afuera para
extraerla.
Enjuáguelo en agua
corriente y elimine
los residuos de la
escobilla de goma.
Frótelo con un trapo
mojado.
Incline la aspiradora
hacia atrás y gire la
boquilla nuevamente
en su lugar.
Verifique que el filtro
de goma espuma no
tenga residuos. De ser
necesario, enjuáguelo.
1 2 3 4 5
Mantenimiento correcto de su aspiradora inalámbrica FloorMate: Cepillos
Extraiga ambos
tanques para
evitar que se
derramen.
Presione los botones
de liberación y
extraiga la unidad
del cepillo.
Lave con un
detergente
suave y enjuague.
No utilice un
detergente a
base de solvente.
Baje el mango e
incline la boquilla
hacia arriba.
Alinee el tubo
del cepillo con el
orificio en la base
de la aspiradora y
gire levemente los
cepillos hasta que
encaje fácilmente.
Presione con
firmeza el cepillo
hacia adentro
hasta que quede
sujeto a presión
en su lugar.
1
2 3
4 5
6
LUBRICACIÓN
El motor viene equipado con cojinetes que contienen suficiente
lubricación para toda su vida útil. La adición de lubricante podría
dañarlos. No le agregue lubricante al motor.
PRECAUCIÓN Para disminuir el riesgo de lesiones por piezas móviles, extraiga la batería antes de realizar un servicio de mantenimiento.
PRECAUCIÓN No utilice un detergente a base de solvente cuando limpie la unidad del cepillo.
!
!
!
!
Vea una demostración de cómo hacerlo:
hooverhelp.com/FloorMateCordless24
Vea una demostración de cómo hacerlo:
hooverhelp.com/FloorMateCordless23
▲▲
34
Page 38

Almacenamiento de su aspiradora inalámbrica FloorMate
Productos de limpieza:
• Apague la aspiradora.
• Vacíe y enjuague ambos tanques de agua, y déjelos secar al aire libre.
• Asegúrese de que no haya nada que presione la escobilla de goma de la boquilla.
• No almacene la unidad en una superficie de madera, a menos que la aspiradora esté completamente seca.
• Almacene la unidad en interiores, en un lugar seco. No exponga la aspiradora a temperaturas muy frías.
• Luego de su uso, goteará agua de los cepillos y por debajo de la aspiradora, lo que puede formar un charco. Para evitar
dañar los pisos de madera y laminados, y para evitar un potencial riesgo de resbalamiento, no deje el producto sobre
superficies de madera y laminado luego de su uso y llévela a una superficie dura. Coloque la aspiradora sobre material
absorbente para que este absorba las gotas.
• Utilice solución de limpieza Hoover
2x Multi-Floor Plus.
32 oz (907,18 g) - AH30425
64 oz (1814,4 g) - AH30420
35
Page 39

La aspiradora FloorMate inalámbrica no enciende.
Puede que la batería no esté cargada. Verifi que el Indicador de nivel de carga y
recargue la batería si el nivel fuera bajo. Consulte la tabla siguiente para encontrar
el tiempo de carga de su modelo de batería.
*
La batería LithiumLife™ no viene
totalmente cargada.
La aspiradora inalámbrica FloorMate no aspira agua.
Es posible que el tanque de agua sucia esté lleno y el dispositivo de apagado
automático de succión se ha ya activado para evitar que rebalse. El sonido del motor
cambiará cuando se ac tive dicho disposit ivo. Extraiga el tanque de agua sucia y
vacíelo en un fregadero.
Tal vez se encuentra en modo de pulido. Cambie al modo "lavar y secar".
Si el filtro estuviera sucio...
Su filt ro también puede estar sucio. Enjuague el fi ltro del tanque de agua sucia bajo el
chorro de agua corriente para eliminar todo tipo de residuos.
La aspiradora inalámbrica FloorMate® deja un charco de agua detrás
mientras limpio.
Es posible que su tanque de agua limpia no esté instalado correct amente. Consulte la
página 6 para obtener instrucciones. Tal vez se encuentra en modo de pulido. Cambie al
modo "la var y secar". Es posible que uno de los tanques no esté instalado correc tamente.
La aspiradora inalámbrica FloorMate® no libera solución.
Es posible que su tanque de solución con agua limpia esté vacío. Revise el tanque y llénelo,
según sea necesario. Consulte la página 6 para obtener instrucciones.
Los cepillos en la aspiradora inalámbrica FloorMate® no giran.
La aspiradora inalámbrica FloorMate viene equipa da con protección
antiestancamiento para proteger a sus cepillos. Si los cepillos no giran, apague el
produc to. Espere un minuto y, luego, vuelva a encenderlo. Si los cepillos siguen sin girar,
entonces, deberá consultar con un representante de mantenimiento autorizado.
Todo otro servicio de mantenimiento deberá ser realizado por personal técnico autorizado.
Si el aparato no funciona como debe, si se ha caído, dañado o dejado a la intemperie, o si
se ha sumergido en agua, llévelo a un Centro técnico antes de cont inuar usándolo.
¿Necesita ayuda?
ADVERTENCIA
Para disminuir el riesgo de lesiones físicas, extraiga la batería antes
de limpiar o realizar un servicio de mantenimiento en la unidad.
! !
*Consu lte la línea c ompleta de p roductos Li thiumLif e™ en Hoover.com.
¿PREGUNTAS O DUDAS?
Contác tenos: (888) 679- 2121
Para cons ultar la Guía c ompleta de r esolució n de problema s, visite el s iguiente s itio: Hoover help.com/F loorMate Cordless
Twitter: @HooverUSA
Facebook: facebook.com/hoover
No devue lva la unidad a la tienda . Consu lte el revers o del produc to para ver el núm ero de model o.
Modelo de
Batería
Batería
LithiumLife
TM
BH03100
LithiumLife
™
Duración Extendida
LithiumLife
™
Duración Extendida
LithiumLife
™
LithiumLife
™
BH03220
9 horas
18 horas
1.5 horas
3 horas
BH03120
BH03100
BH03200
BH03120
Modelo de
Cargador
Tiempo de carga
(Aproximadamente)
36
Page 40

PERSON AL TÉCNICO AUTORIZADO DEBERÁ REALIZAR TODO TIPO DE
MANTENIMIENTO. Llame al (888) 679-2121 en los EE. UU. y Canadá.
En caso de necesitar más ayuda, diríjase a un Centro Técnico autor izado. Encuentre el
más cerc ano a su domicilio visitando nuestro sitio web ww w.hoover.com. El propietario
del producto deberá abonar los gastos derivados del transpor te desde y hacia el lugar
de reparación. Siempre identifi que su producto de acuerdo al número del modelo y
el código de fábrica cuando solicite información o realice el pedido de las piezas de
repuesto. (El número de modelo y el código de fabricación de la aspiradora aparecen
en la base del cargador y en el lateral de la batería).
PERÍODO DE GARANTÍA LIMITADA POR CINCO AÑOS IMPRESO SOBRE LA BATERÍA
PERÍODO DE GARANTÍA LIMITADA POR CINCO AÑOS IMPRESO SOBRE EL PRODUCTO
COBERTURA DE LA GARANTÍA
En casos de uso y mantenimiento domésticos en condiciones normales, y conforme al
Manual d el propietario, su producto FloorMate de Hoover tiene garantía contra fallas
de fábr ica en los materiales y fallas por mano de obra. El período de la garantía respecto
del producto FloorMate, con exclusión de la batería LithiumLife™ es de dos (2) años. El
período de la garantía respecto de la batería LithiumL ife™ por sí sola con tiempo de
funcionamiento extendido es de cinco (5) años. Durante el Plazo de la garantía, Hoover®
proporcionará la mano de obra y los repuestos, sin ningún costo, a los fines de reparar
cualquier falla de los produc tos FloorMate, y proporcionará una batería d e repuesto
gratis, para reparar las fallas de la batería LithiumLi fe™ incluida con su producto adquirido
en los Estados Unidos, Tiendas de intercambios militares de los E E. UU. y Canadá.
CÓMO REALIZAR UN RECLAMO POR LA GAR ANTÍA
Si este produc to no presentara las características garantizadas, llévelo o envíelo a un
Distr ibuidor Técnico Ofic ial autoriza do de Hoover®, junto con el comprobante de compra.
Si las baterías no pres entaran las características garantizadas, llévelas o envíelas junto
con el comprobante de compra a un Distribuidor autoriza do de Hoover® o póngase en
contacto con el Ser vicio de Atención al Cliente de Hoover® al (888) 679-2121.
Para ser redirigido en forma automática a un Centro de ser vicios autorizado en los EE .
UU., llam e al: (888) 679-2121 o visite el sitio en línea de Hoover
®
en ww w.hoover.com.
NO CUBIERTO POR LA PRESENTE GARANTÍA
La presente garantía no cubre las correas, los filt ros y los cepillos giratorios pulidores, el
uso del producto en operaciones comerciales (tales como ser vicios de contratación de
equipamiento y limpieza), el mantenimiento incor recto del producto, los daños derivados
de su mal uso, casos fortuitos o hechos de la naturaleza, vandalismo u otros actos fuera
del control de Hoover®. La garantía tampoco cubre los actos u omisiones del propietario, su
uso fuera del país de compra original y las reventas del produc to por parte del propietar io.
Esta garantía no cubre la recolección, la entrega, el transpor te ni el servicio a domicilio
del producto. No obstante, si envía el producto por correo postal al Centro Técnico y de
Ventas de Hoover para obtener el servicio de la garantía, el envío tendrá un costo de ida
solamente. Póngase en contacto con el Centro Técnico de Hoover® al (888) 679-2121 para
informarse sobre las formas de envío de este producto. Es ta garantía no se aplica a los
produc tos adquiridos fuera de los Es tados Unidos, incluidos sus territorios y posesiones,
Tiend as de intercambios militares de los EE. UU., y Canadá.
OTROS TÉRMINOS IMPORTANTES
Esta garantía no es transferible y no podrá ser cedida. Es ta garantía se regirá e
interpretará de conformidad con las leyes del Estado de Ohio. El Plazo de la garantía
no se prolongará por el reemplazo de las baterías o piezas, ni por cualquier reparación
realizada conforme a esta garantía.
ESTA GARA NTÍA TIENE PREVALENCIA E XCLUSIVA COMO TAL Y COMO RECURSO
LEGAL. SE RECHAZ ARÁN TODAS LAS DEMÁS GARANTÍAS, EXPRESAS O IMPLÍC ITAS,
INCLUIDAS LAS GARANTÍAS DE APTITUD PARA L A VENTA O ADECUACIÓN A FINES
ESPECÍFICOS. EN NINGÚN SUPUESTO HOOVER
®
SERÁ RESPONSABLE POR DAÑ OS
ESPECIALES, INDI RECTOS, INCIDENTALES O EMERG ENTES DE NINGUNA CLASE
RECL AMADOS POR EL PROPIETARIO O CUALQUIER PARTE P OR INTERMEDIO DE ESTE,
YA SEA EN VIRTUD DE U N CONTRATO, POR NEGLIGENCIA, HECHO ILÍCITO CIVIL O
RESPONSABI LIDAD OBJETIVA, NI P OR CUALQUIER OTR A CAUSA.
En algunos estados, la exclusión de los daños mediatos no está permitida, de modo
que la exclusión precedente puede no s erle aplicable. Esta garantía le otorga derechos
específicos. También puede tener otros derechos, que varían según el estado.
MANTENIMIENTO Y GARANTÍA DEL PRODUCTO INALÁMBRICO Y LA BATERÍA FLOORMATE DE HOOVER®
INFORMACIÓN SOBRE EL MANTENIMIENTO
37
Page 41

38
Notes
Page 42

Hoover.com
Find us on:
youtube.com/hoover
facebook.com/hoover
twitter.com/hooverusa
#RethinkCleaning
 Loading...