

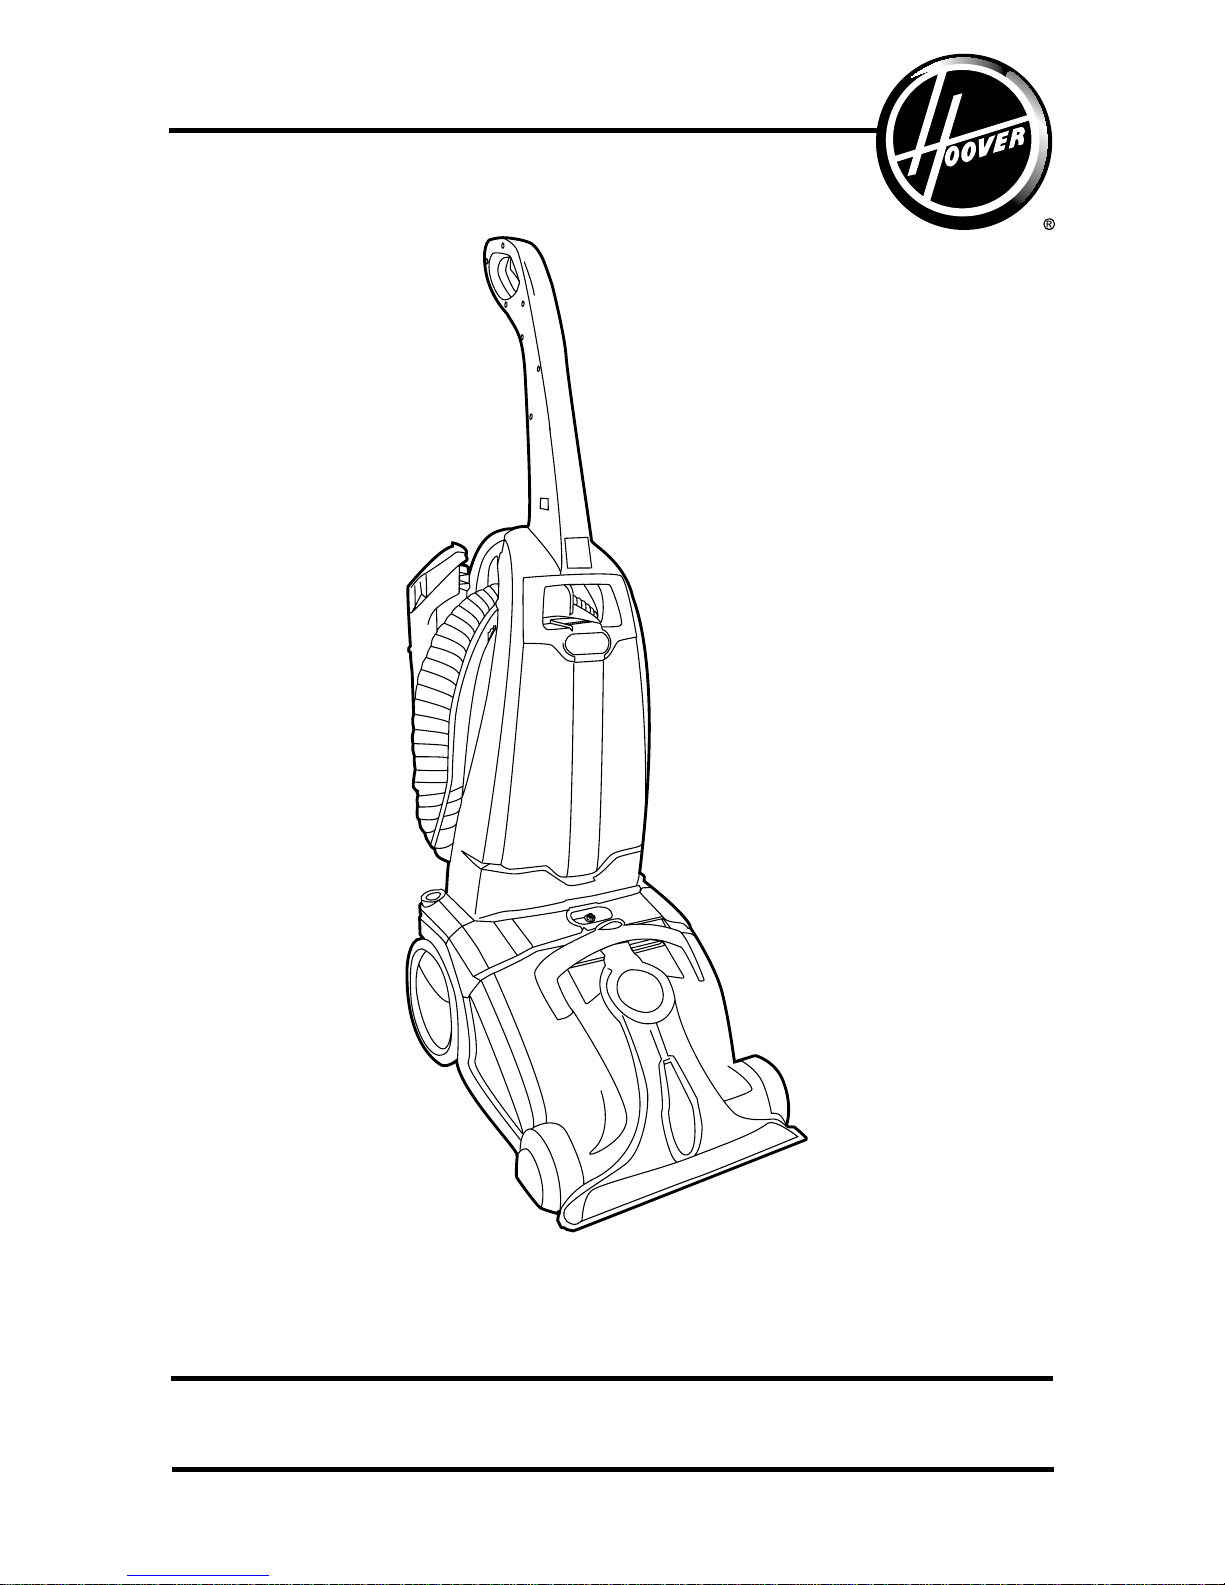
Hoover fh50800 Owner's Manual
www.hoover.com
OWNER’S MANUAL
Operating and Servicing Instructions
©2011 Techtronic Floor Care Technology Limited. All rights reserved. #9611 51008 ID103136-R0
IMPORTANT: READ CAREFULLY BEFORE ASSEMBLY AND USE.
Questions or concerns? For assistance, please call Customer Service at
1-800-944-92 00 Mon- Fr i 8 a m-7pm EST bef o r e r et u r n i ng this product to th e store.
THIS PRODUCT IS INTENDED FOR HOUSEHOLD USE ONLY.
IF USED COMMERCIALLY WARRANTY IS VOID.
Español - página E1

2
CONTENTS
Thank you for choosing a HOOVER® product.
Please enter the complete model and Manufacturing
Code in the spaces provided.
Model
MFG. Code
Hint: Attach your sales receipt to this owner’s manual.
Verification of date of purchase may be required for
warranty service of your HOOVER
®
product.
Be sure to register your product online at Hoover.com or
call 1-800-263-6376 to register by phone.
MANUFACTURING CODE
If you need assistance:
Visit our website at hoover.com. Follow the authorized dealer locator link to find the Hoover® authorized
dealer nearest you or call 1-800-944-9200 for an automated referral of Hoover® authorized dealer
locations (U.S. only) or to speak with a customer service representative; Mon- Fri 8am- 7pm EST.
Please do not return this product to the store.
(label located on lower back of cleaner)
Important Safety Instructions ................................................................................ 3
Cleaner Assembly .................................................................................................... 5
How To Use ............................................................................................................... 6
Cleaner Description .............................................................................................6
Before You Begin ............................................................................................... 6
Remove and Replace Clean Water Solution Tank ..............................................7
Carpet Cleaning ..................................................................................................8
Above Floor Cleaning/Attachments .....................................................................8
Cleaning Carpeted Stairs ....................................................................................9
Maintenance ..............................................................................................................10
DIrty Water Tank ..................................................................................................10
Cleaning Filter .....................................................................................................11
Belt ......................................................................................................................11
Storage ................................................................................................................12
Troubleshooting .......................................................................................................12
Service.......................................................................................................................13
Cleaning Products .................................................................................................... 13
Warranty ....................................................................................................................14

3
IMPORTANT SAFETY INSTRUCTIONS
SAVE THESE INSTRUCTIONS
When using an electrical appliance, basic precautions should always be
followed, including the following:
READ ALL INSTRUCTIONS BEFORE USING THIS APPLIANCE.
WARNING: TO REDUCE THE RISK OF FIRE,
ELECTRIC SHOCK OR INJURY:
• Fully assemble before operating.
• Operate cleaner only at voltage specified on data plate on lower back of cleaner.
• Do not leave appliance when plugged in. Unplug from outlet when not in use and
before cleaning or servicing.
• Use indoors only.
• Do not immerse. Use only on carpet moistened by cleaning process.
• Use only HOOVER® cleaning products intended for use with this machine (See the
“Cleaning Products” section of this manual).
• Do not allow to be used as a toy. Not intended for use by children age 12 and under.
Close supervision is necessary when used near children. To avoid injury or damage,
keep children away from product, and do not allow children to place fingers or other
objects into any openings.
• Use only as described in this manual. Use only manufacturer’s recommended
attachments and products.
• Do not use with damaged cord or plug. If appliance is not working as it should, has
been dropped, damaged, left outdoors, or dropped into water, take it to a service
center prior to continuing use.
• Do not pull or carry by cord, use cord as a handle, close a door on cord, or pull cord
around sharp edges or corners. Do not place product on cord. Do not run appliance
over cord. Keep cord away from heated surfaces.
• Do not unplug by pulling on cord. To unplug, grasp the plug, not the cord.
• Do not handle plug or appliance with wet hands.
• Do not put any object into openings. Do not use with any opening blocked; keep free
of dust, lint, hair, and anything that may reduce air flow.
• Keep hair, loose clothing, fingers, and all parts of body away from openings and
moving parts.
• Turn off all controls before unplugging.
• Use extra care when cleaning on stairs. To avoid personal injury or damage, and to
prevent the cleaner from falling, always place cleaner at bottom of stairs or on floor.
Do not place cleaner on stairs or furniture, as it may result in injury or damage.
• Do not use to pick up flammable or combustible materials, such as gasoline, or fine
wood sandings, or use in areas where they may be present.
• Do not pick up anything that is burning or smoking, such as cigarettes, matches,
or hot ashes.
• Connect to a properly grounded outlet only. See Grounding Instructions.
• Do not use without tanks or filters in place.
• Do not clean over floor electrical outlets.
• WARNING: This product contains chemicals known to the State of California
to cause cancer, birth defects or reproductive harm.
WASH HANDS AFTER
HANDLING.
4
D
F
E
G
D
GROUNDING
OUTLET BOX
B
A
C
GROUNDING INSTRUCTIONS
This appliance must be grounded. If it should malfunction or breakdown, grounding
provides a path of least resistance for electric current to reduce the risk of electric
shock. This appliance is equipped with a cord having an equipment-grounding
conductor (C) and grounding plug (A). The plug must be inserted into an appropriate
outlet (B) that is properly installed and grounded in accordance with all local codes
and ordinances.
WARNING: Improper connection of the equipment-grounding conductor can
result in the risk of electric shock. Check with a qualified electrician or service person if
you are in doubt as to whether the outlet is properly grounded. Do not modify the plug
provided with the appliance - if it will not fit the outlet, have a proper outlet installed
by a qualified electrician. This appliance is for use on a nominal 120-volt circuit and
has a grounding plug that looks like the plug (A) illustrated in Fig. 1. A temporary
adapter (D) may be used to connect this plug to a 2-pole receptacle (E) if a properly
grounded outlet is not available (Fig. 2). The temporary adapter should be used only
until a properly grounded outlet (B) can be installed by a qualified electrician (Fig. 1).
The green colored rigid ear, lug, or the like (F) extending from the adapter must be
connected to a permanent ground (G) such as a properly grounded outlet box cover
(Fig. 2). Whenever the adapter is used, it must be held in place by a metal screw.
NOTE: In Canada, the use of a temporary adapter is not permitted by the Canadian
Electrical Code.
2
1
CAUTION - TO REDUCE THE RISK OF DAMAGE:
• Avoid picking up hard, sharp objects with this product, as they may cause damage.
• Store appropriately indoors in a dry place. Do not expose machine to freezing
temperatures.
• Do not use sharp objects to clean out hose as they can cause damage.
• To assist in reducing drying time, be certain the area is well ventilated when using
detergents and other cleaners with this machine.
• To help prevent matting and resoiling, avoid contact with carpets until they are dry.
Keep children and pets away from carpets until they are completely dry.
• Do not store carpet cleaner with solution in tanks.
• With brushes on, do not allow cleaner to sit in one location for an extended period of time,
as damage to floor can result.
• DO NOT USE THIS EXTRACTOR ON HARD FLOORS. USING THIS MACHINE ON HARD
FLOORS MAY SCRATCH OR DAMAGE YOUR FLOOR.
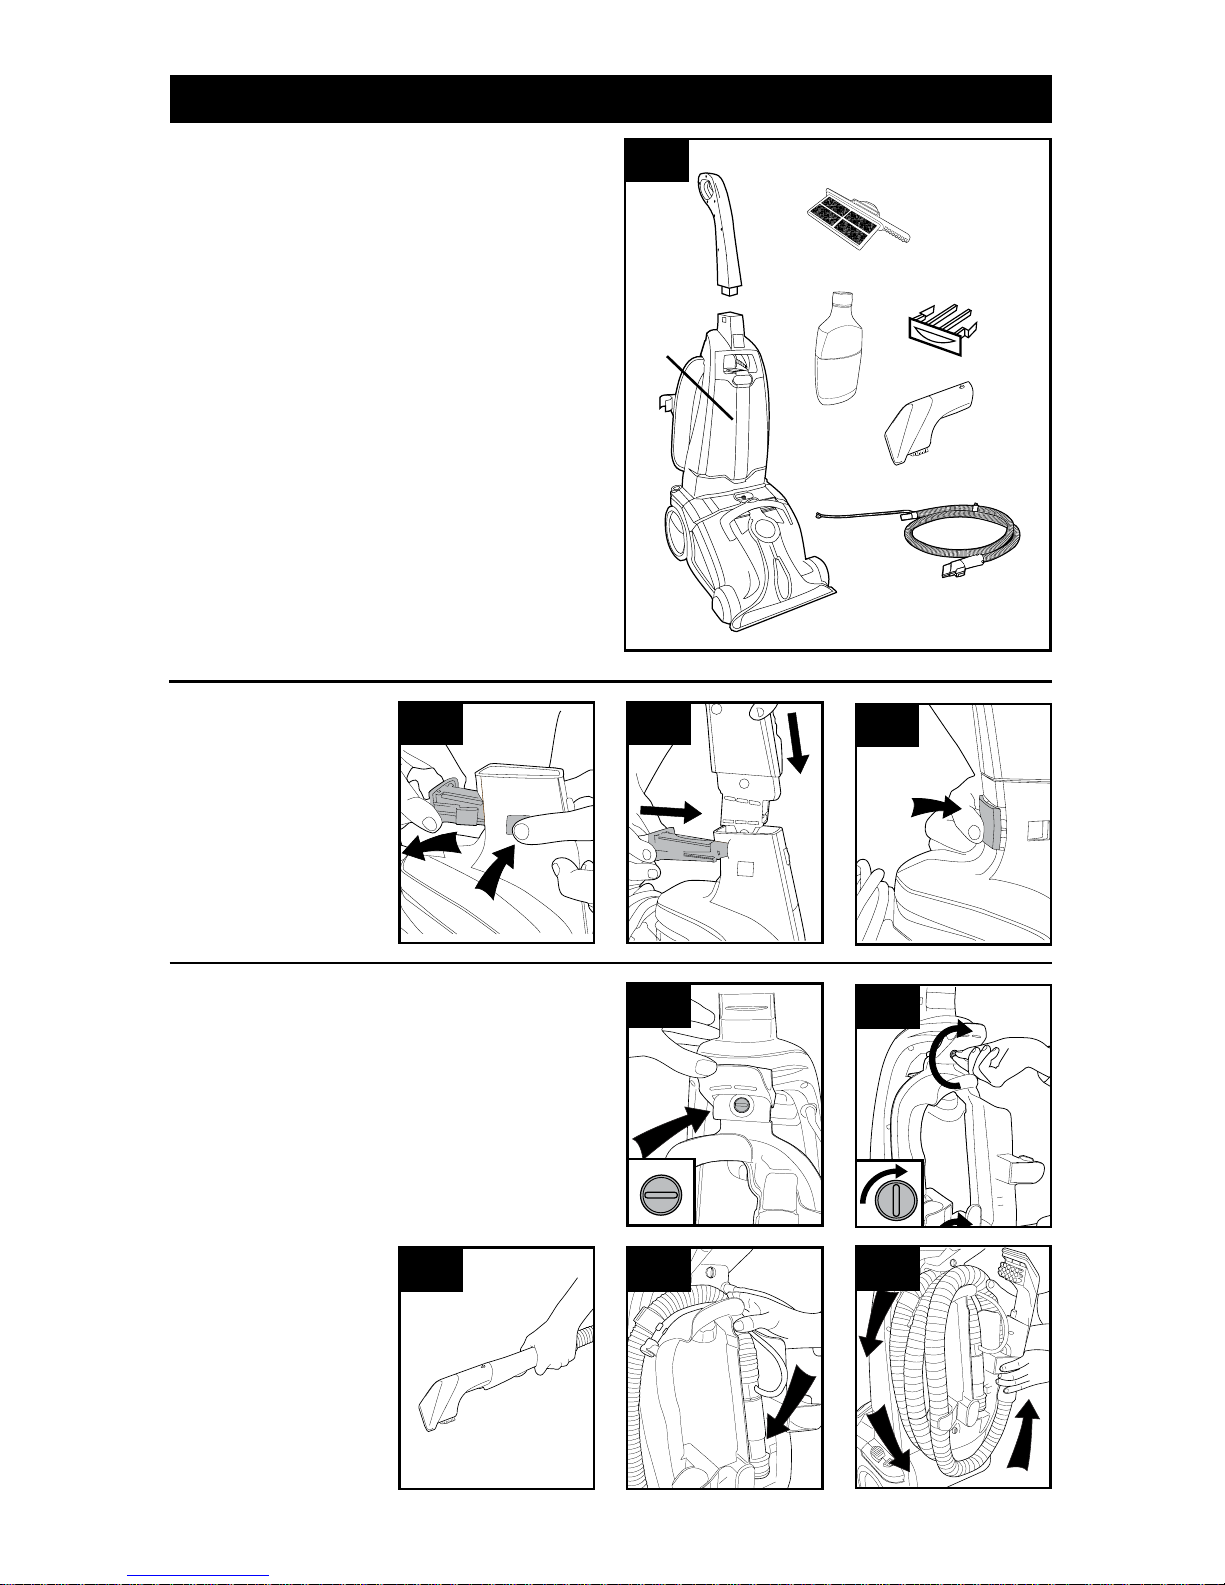
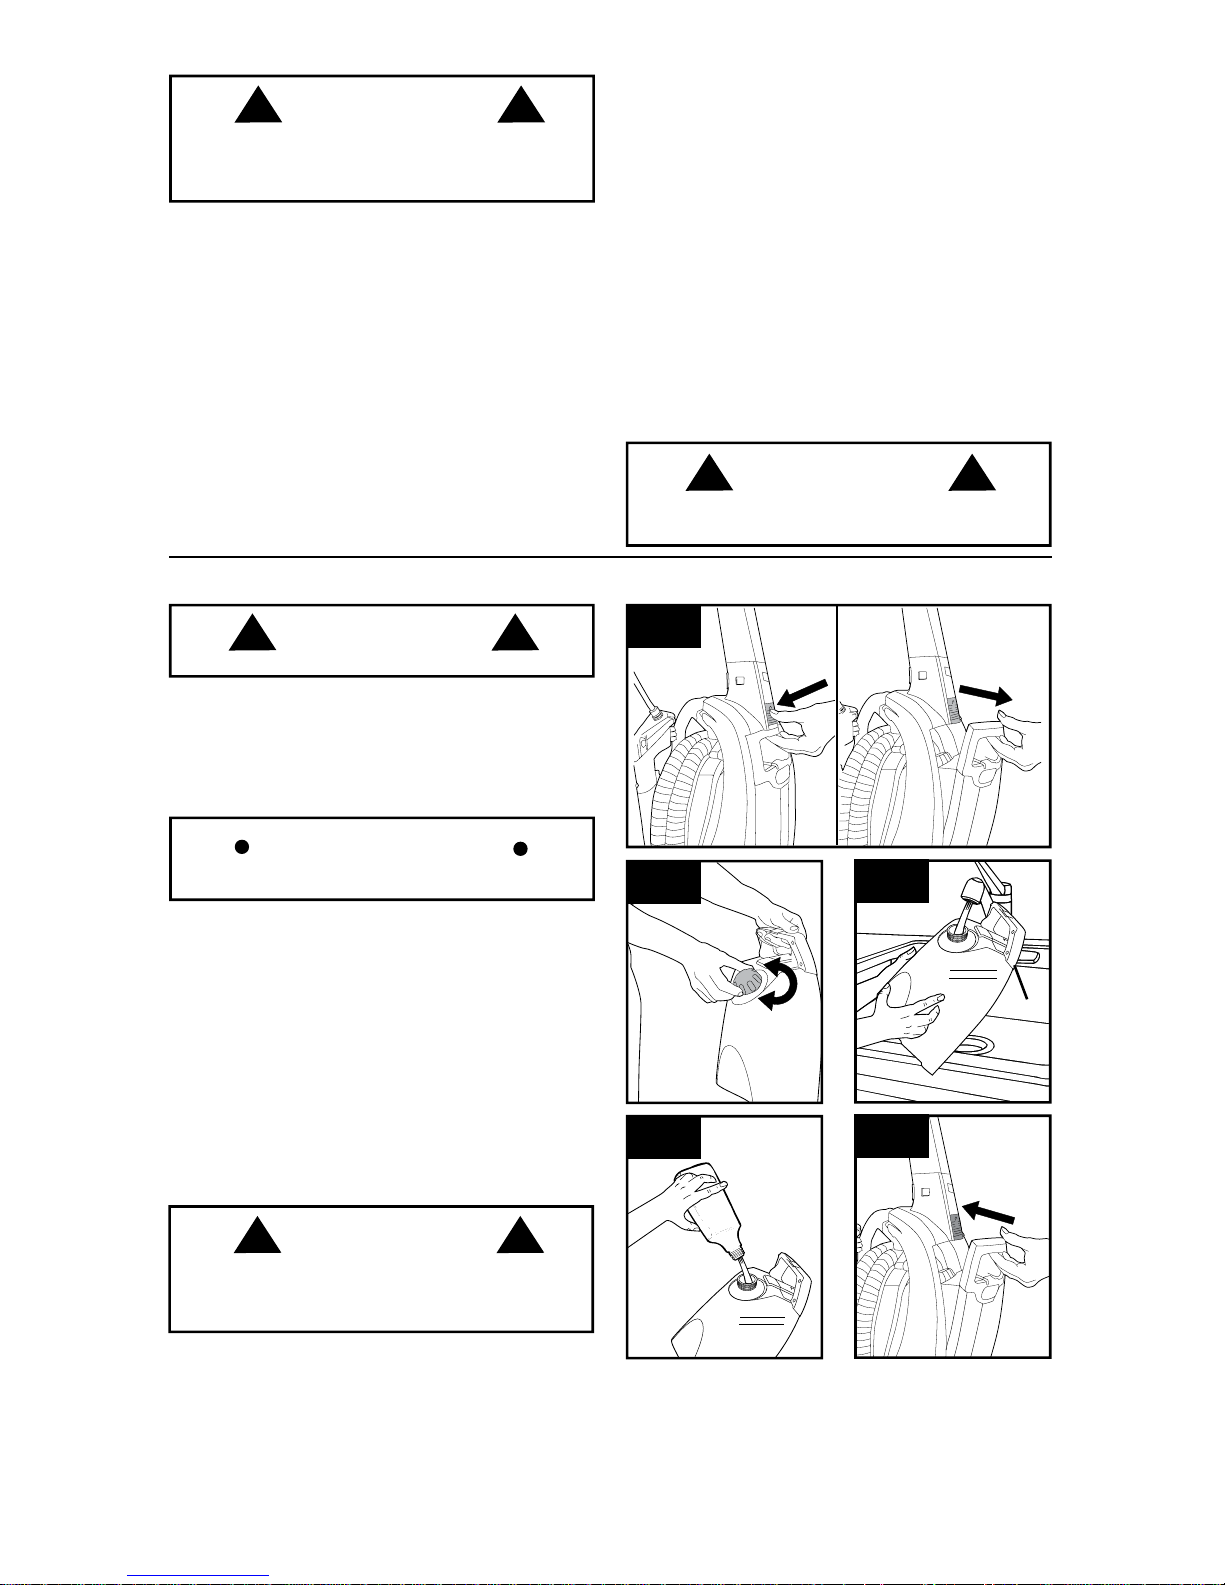
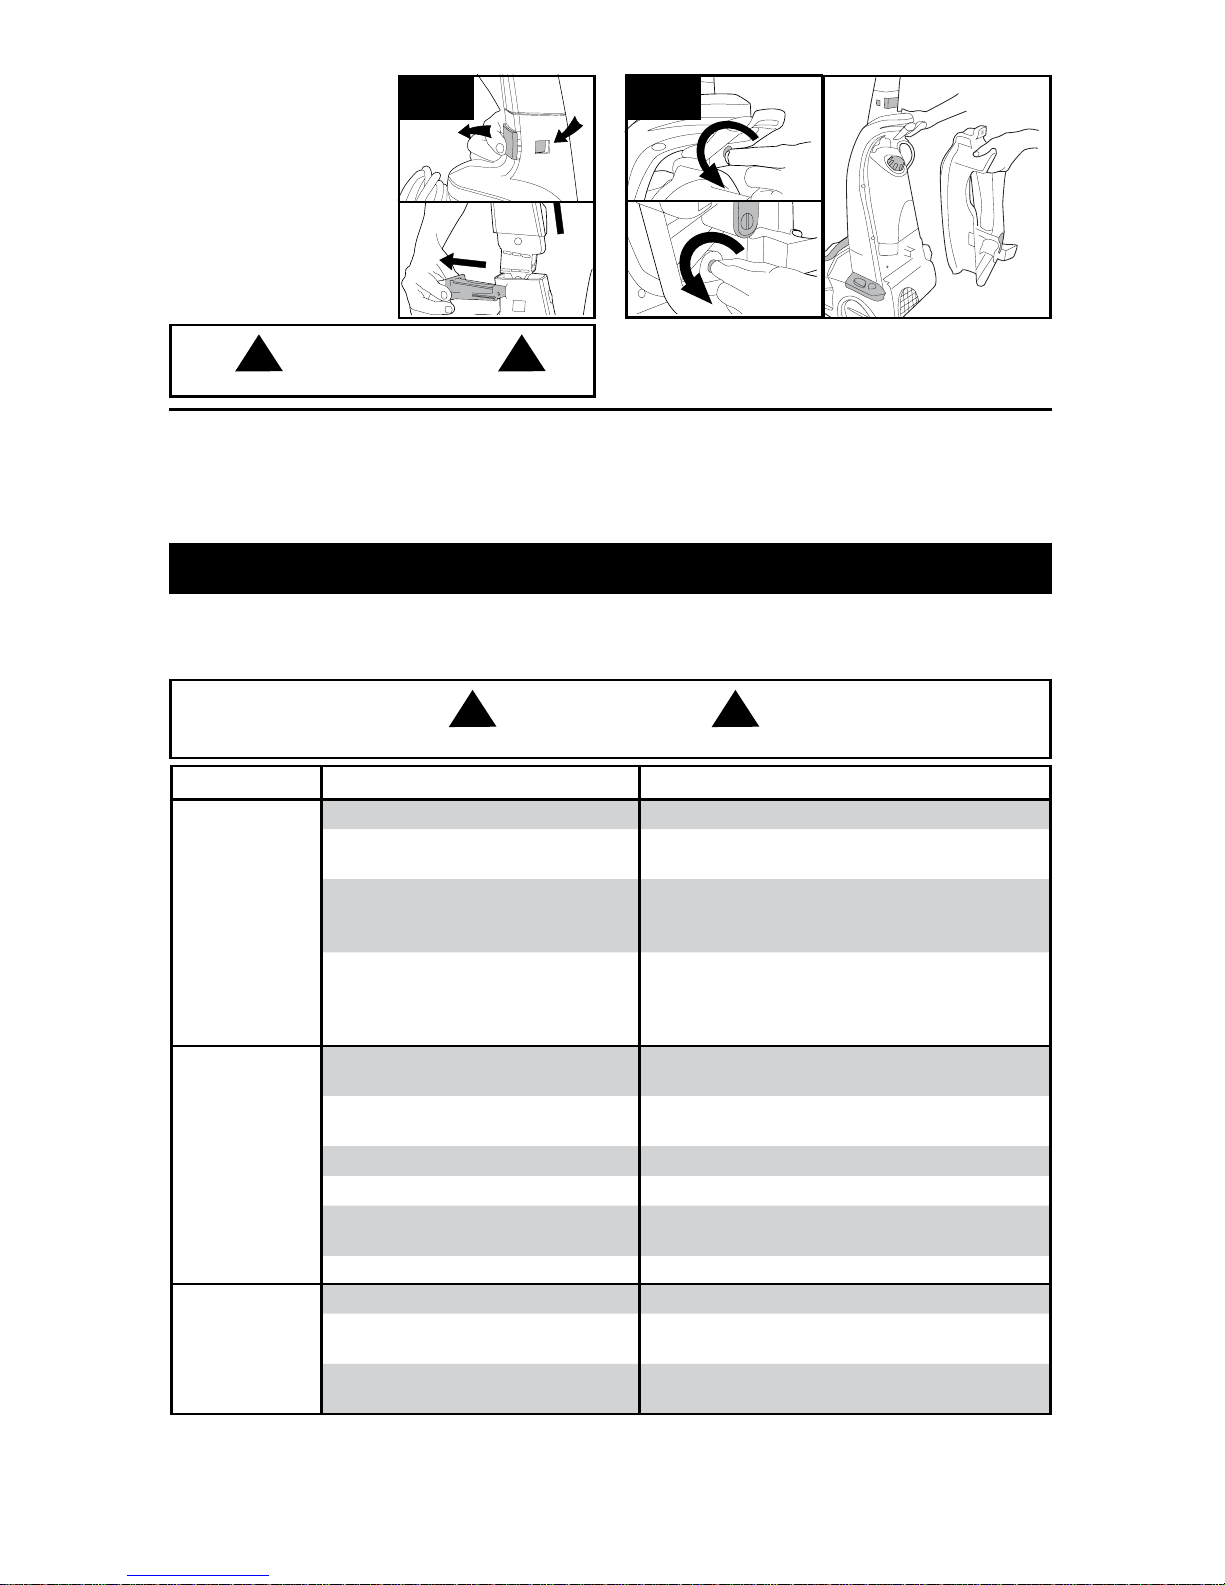
1. CLEANER ASSEMBLY
1.2 Locate orange lock-
ing pin and press in
points shown to remove.
1.3 Insert handle and
re-fit locking pin.
1.4 Locking pin will
‘click’ when in place.
ATTACH HANDLE
CARTON CONTENTS
Remove all parts from carton and identify each item
shown.
Make sure all parts are located before disposing of
packing materials.
Accessories not included with your model may be
purchased separately by visiting www.hoover.com.
1.5
1.2
5
A. Handle
B. Body
C. Clean Water Tank
D. Hose
E. Upholstery T ool
F. Handle Locking Pin
G. Hoover Deep Cleaning Solution
H. Float Chamber Filter
2.1
1.3
1.4
1.6
b
A
C
e
F
G
H
d
1.8
1.9
1.7
TOOL CADDY AND HOSE
1.5 Locate orange locking tabs on the back of
cleaner and ensure they are horizontal. Attach
caddy to unit top first.
1.6 Rotate tabs 90° clockwise to lock caddy onto unit.
1.7 Connect Upholstery Tool to hose by sliding onto
the connector until it locks securely.
1.8 Fit hose connector end in first.
1.9 Wrap hose around
caddy tightly anticlockwise.
Clip in the last wrap of
the hose and Upholstery
Tool as shown.
6
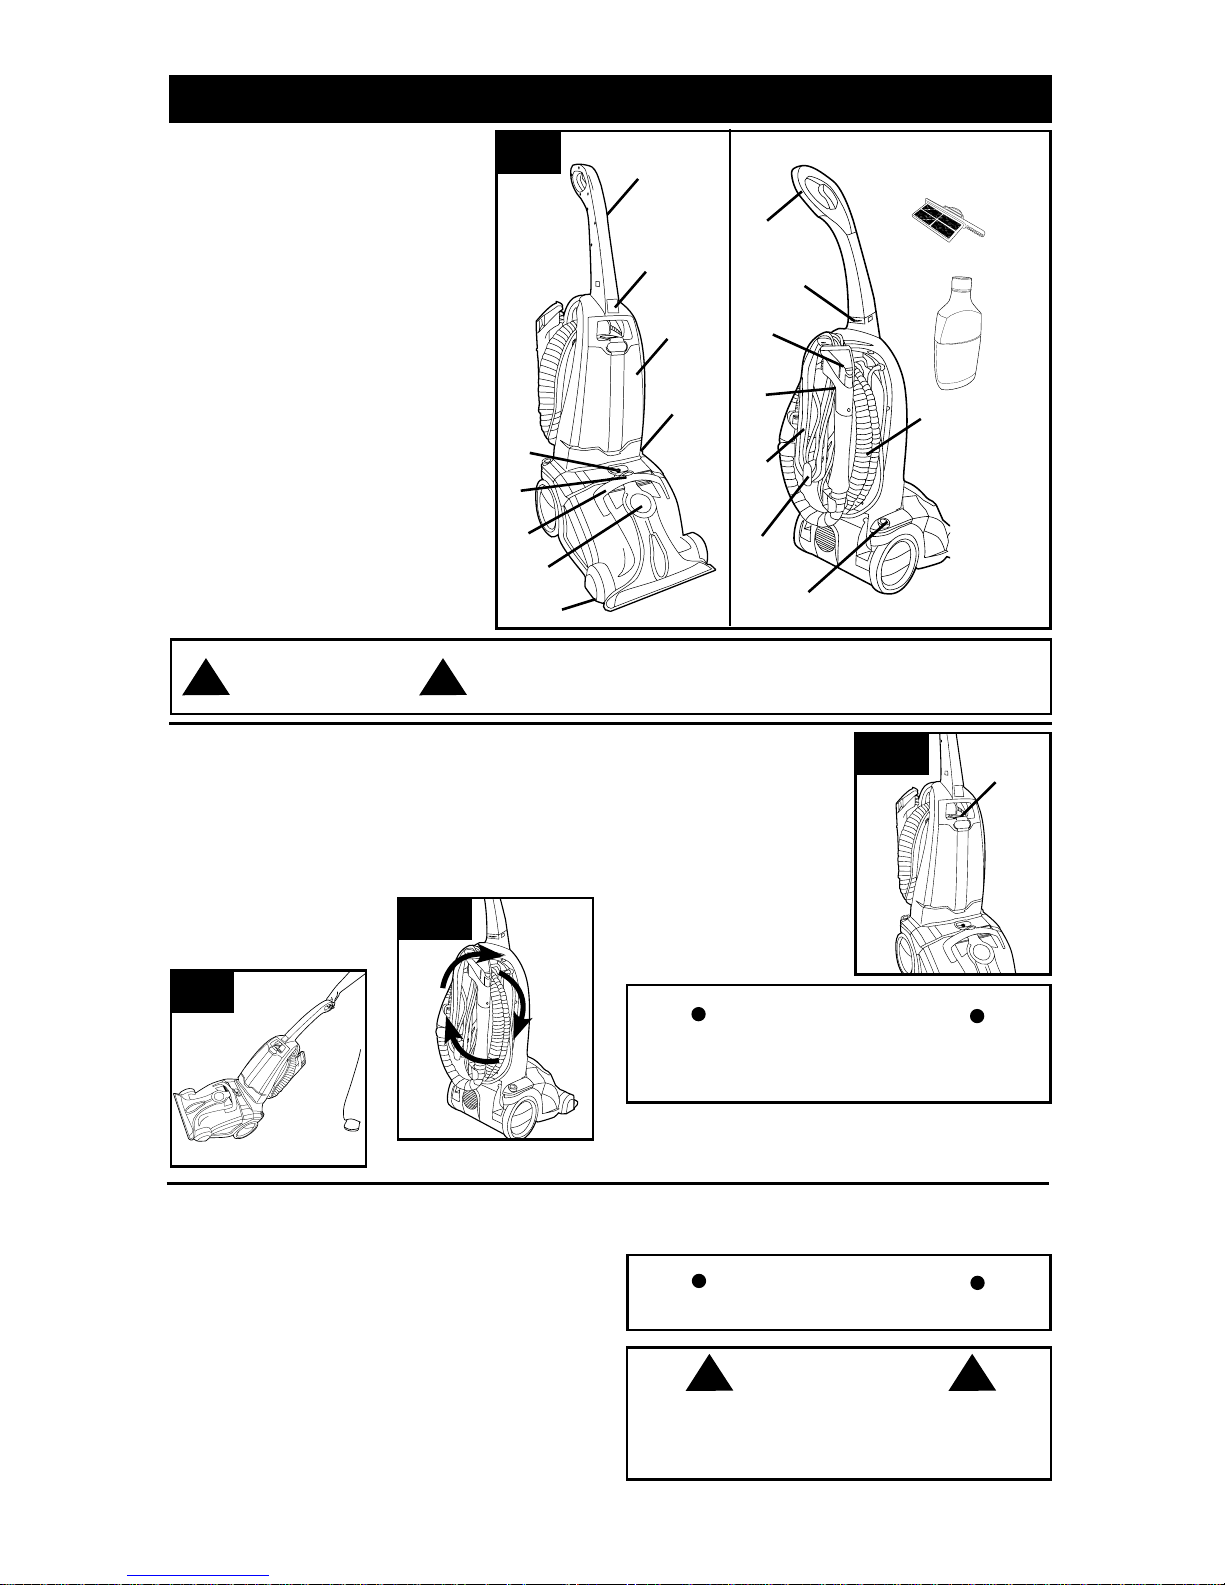
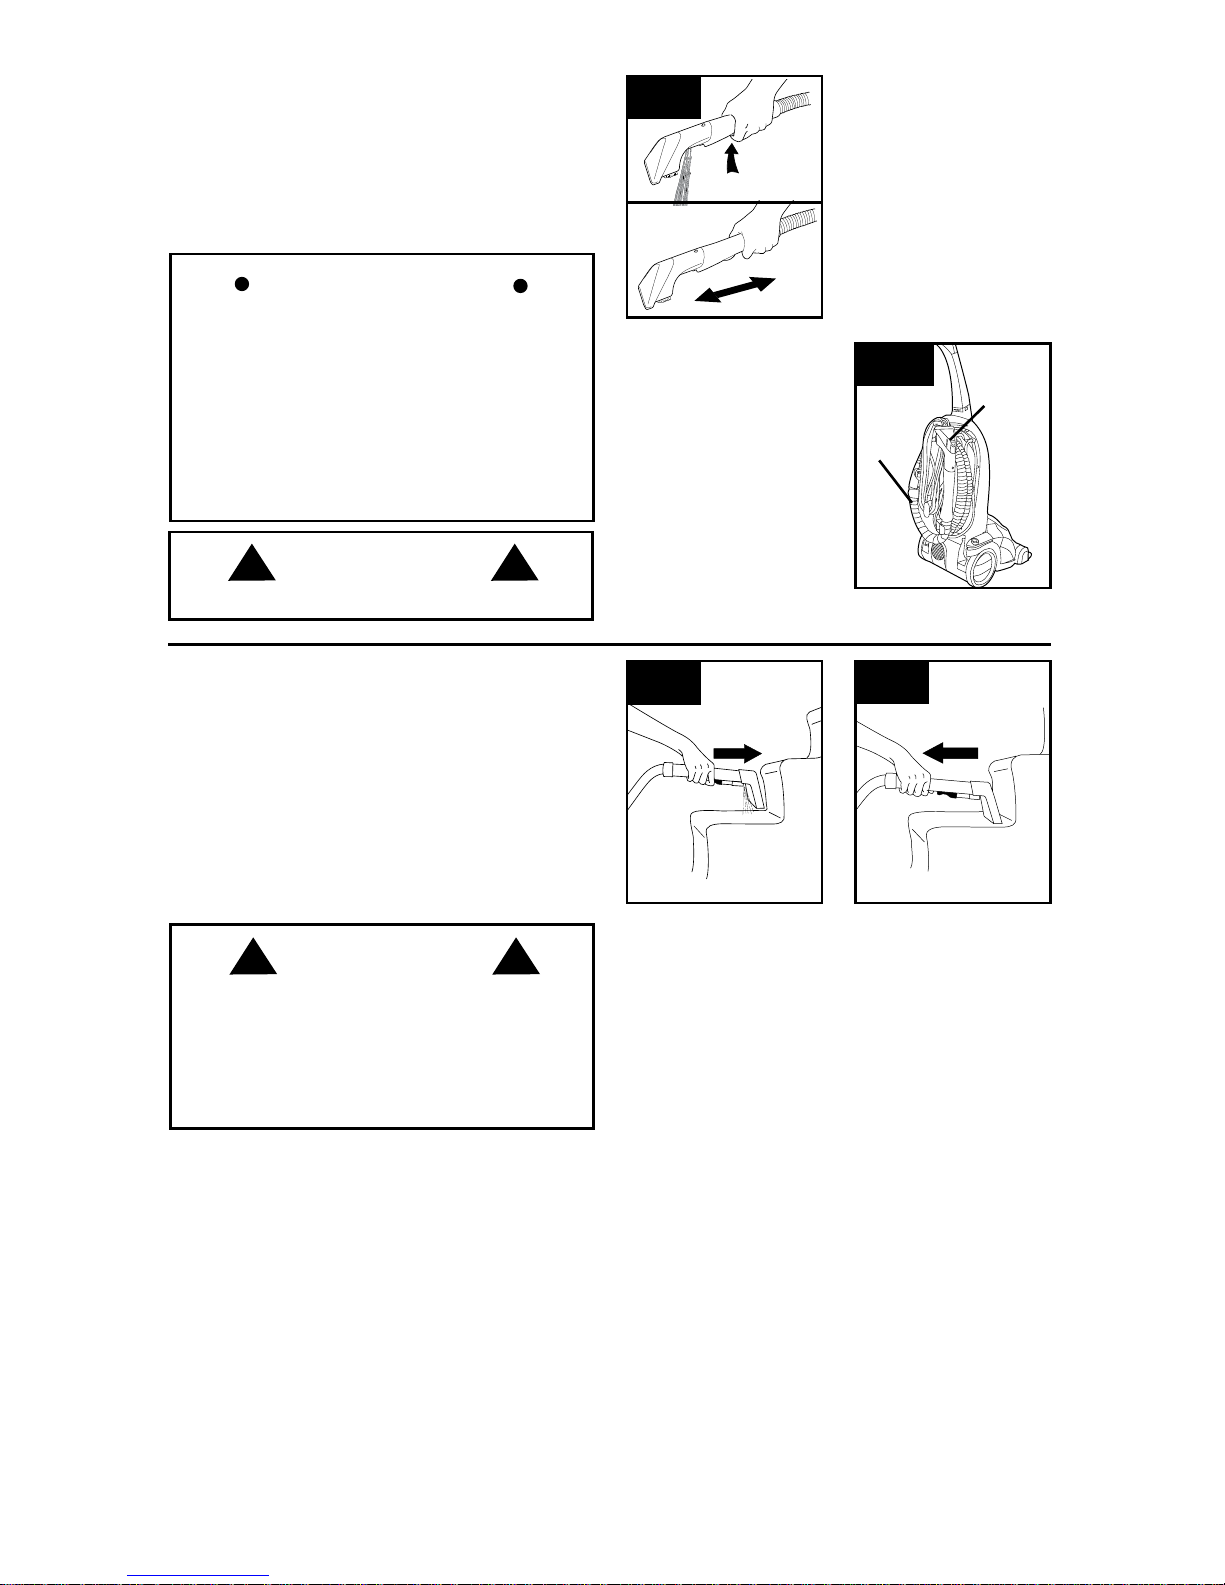
2. HOW TO USE
CLEANER DESCRIPTION
1. Handle
2. Solution Trigger
3. Clean Water Tank Release Button
4. Clean Water Tank
5. Recline Pedal (on side not shown)
6. Solution Tube Port
7. Dirty Water Tank Release Lever
8. Dirty Water Tank Carry Handle
9. Hose Port
10. Rotating Brushroll (Hidden)
11. On/Off Pedal
12. Power Cord Release Lock
13. Power Cord
14. Hose
15. Upholstery Tool
16. Upholstery Tool Solution Trigger
17. Handle Locking Pin
18. Hoover Deap Cleaning Solution
19. Float Chamber Filter
TRANSPORTING
CLEANER
2.2 To move your carpet
cleaner from room to
room put handle in
upright and locked
position tilt carpet
cleaner back on wheels
and push forward.
2.2
2.1
CARRY HANDLE
2.4
2.4 The carpet cleaner
may also be lifted by
placing a hand under
the upper Clean Water
Solution Tank handle
(C).
IMPORTANT
Do not transport the carpet cleaner with either
the Clean Water Solution Tank or Dirty Water
Tank full.
C
1
2
3
4
5
6
7
8
9
10
11
12
13
14
15
16
17
18
19
1. V acuum carpet thoroughly . Use a Hoover
®
vacuum
cleaner with a revolving brushroll for best results.
2. Remove as much furniture from the room as
possible. If unable to remove the furniture, place
plastic or foil under and around the legs until the
carpet has dried completely.
Check for Color Fastness
Before cleaning carpet/upholstery, test for color
fastness. Dampen a white cloth with solution. Test a
small area in a closet or under a cushion. Gently rub
the cloth over the area. Check each color for color
IMPORTANT
Do not use the carpet cleaner as a dry vacuum.
BEFORE YOU BEGIN CLEANING
bleeding. If the cloth remains clean, it should be
safe to clean the carpet/upholstery.
CAUTION
! !
DO NOT USE THIS EXTRACTOR ON HARD FLOORS. USING
THIS MACHINE ON HARD FLOORS MA Y SCRA TCH OR DAMAGE
YOUR FLOOR.
CAUTION
! !
DO NOT USE THIS EXTRACTOR ON HARD
FLOORS. USING THIS MACHINE ON HARD
FLOORS MAY SCRATCH OR DAMAGE YOUR
FLOOR.
CORD STORAGE
2.3 For convienient
storage, wrap cord
around cord hooks.
Attach the plug end to
cord.
2.3
7
Water Fill
Detergent Fill
Water Fill
Detergent Fill
2.5
2.6
2.8
2.7
2.9
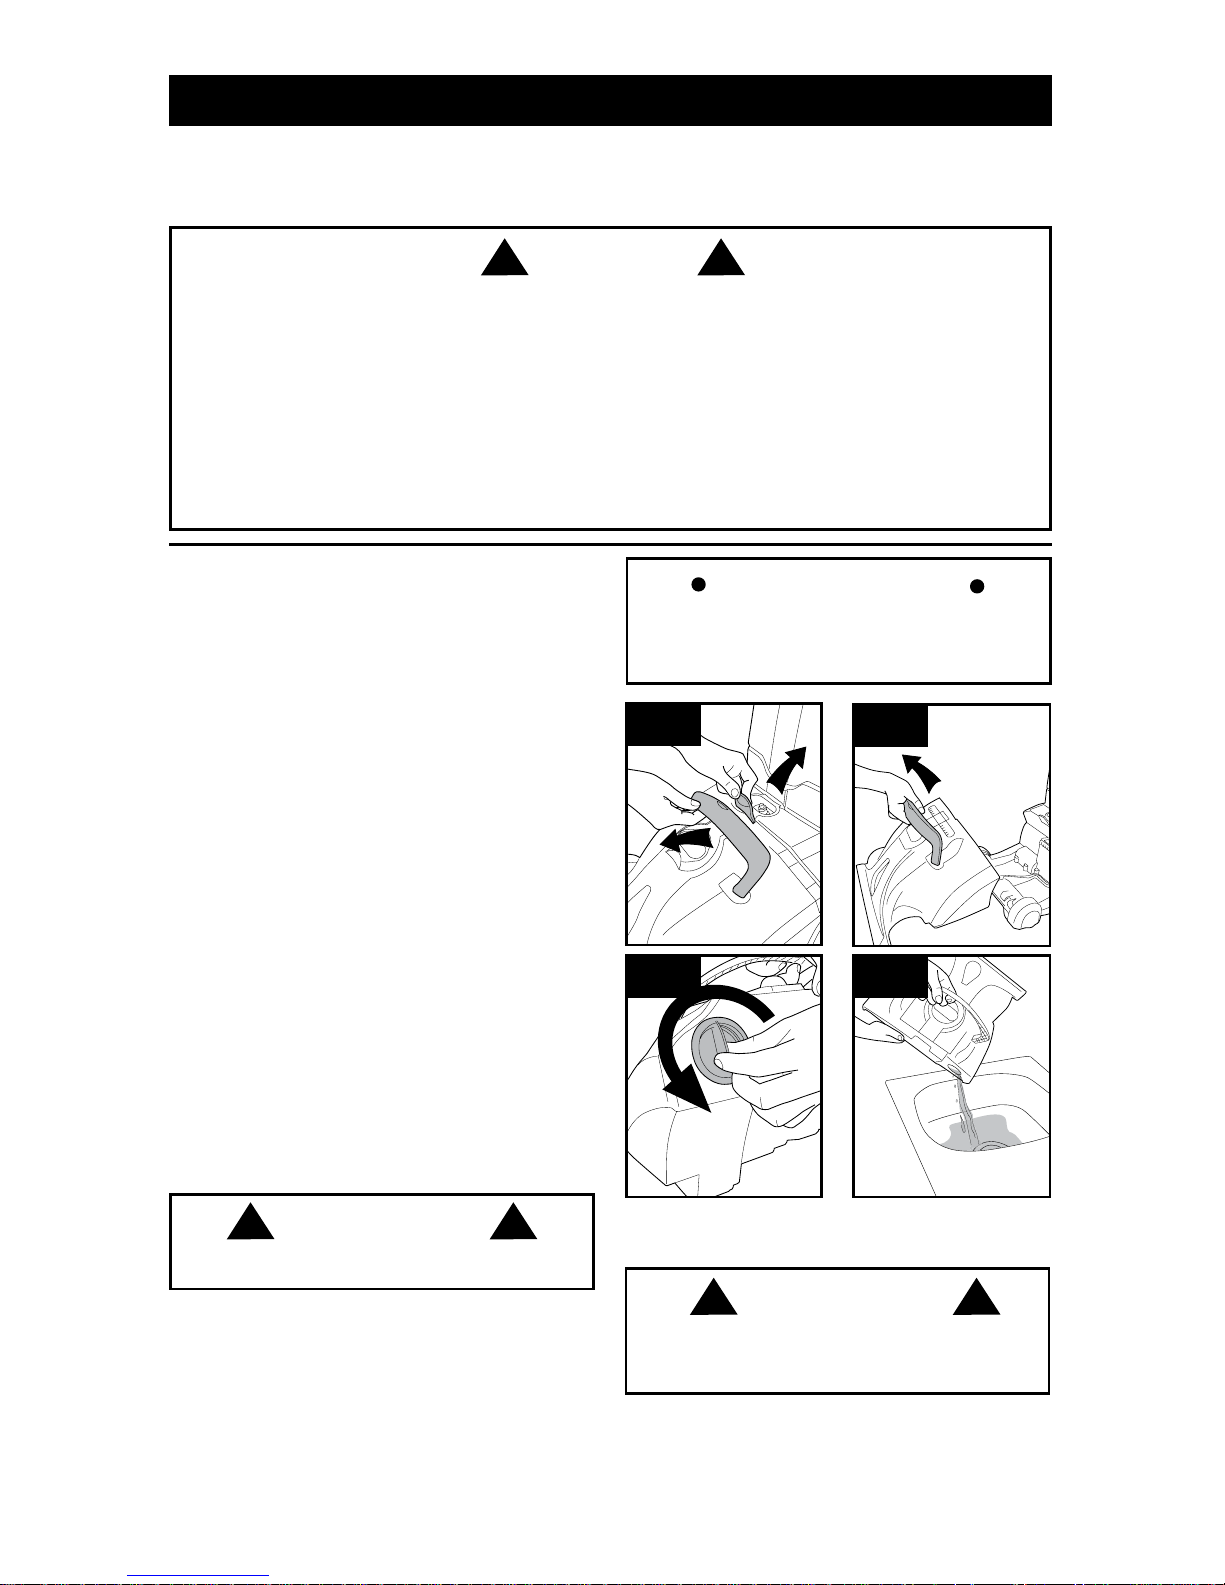
REMOVE AND REPLACE CLEAN WATER SOLUTION TANK
A b
7. Before cleaning, determine where you will start
and end, making sure not to walk over previously
cleaned areas.
AFTER CLEANING
• Allowcarpettodrycompletely.Trynottowalkon
the carpet until it is dry.
• If you need to walkon the carpet, place white
towels on the areas you want to walk.
• Ifthecarpetisnotdryandthefurnituremustbe
placed back in the room, use plastic or foil under the
furniture to prevent staining the carpet.
• Thoroughlycleanthedirtywatertankwithhottap
water. See page 10.
Store appropriately indoors in a dry place. Do
not expose machine to freezing temperatures.
2.5 Press clean Clean Water Solution Tank button
(Diagram A). Tilt Clean Water Solution Tank away
from cleaner and remove (Diagram B).
2.6 Unscrew cap from back side of Clean Water
Solution Tank and remove.
C
Helpful Hints for Cleaning Carpet
1. Do not oversaturate carpet with cleaning solution
while using the carpet cleaner.
2. For heavily soiled areas, additional applications
may be necessary.
3. Allow plenty of time to dry carpet thoroughly.
4. Wipe cleaning solution from woodwork and wood
to prevent any damage.
5. Try not to walk on carpet until it is completely dry.
6. After carpet is thoroughly dry, vacuum the carpet
using a cleaner with a revolving brushroll.
Use only Hoover® cleaning products intended for
use with this machine. (see the “Cleaning
Products” section of this manual).
WARNING
! !
CAUTION
! !
Do not fill with water above 140o F (60o C)
CAUTION
! !
Use only Hoover® cleaning products intended for
use with this machine. (see the “Cleaning
Products” section of this manual).
WARNING
! !
IMPORTANT
Fill with clean water BEFORE adding detergent.
2.7 Tilt tank in sink to avoid leakage from breather
hole (C). Fill with water until “Water Fill” line
indicated on the side of the tank is reached.
2.8 Next, locate your bottle of Hoover® Deep
Cleansing detergent. Fill the rest of the Clean
Water Tank with solution to “Detergent Fill” line
indicated on the side of the tank is reached. Once
filled, replace cap on tank. noTe: Filling tank with
detergent before water is not recommended and
may cause foaming.
2.9 Place bottom of Clean Water Solution Tank into
cleaner and position until the lever snaps into place.

CAUTION
! !
8
2.13
ABOVE FLOOR CLEANING/
ATTACHMENTS
2.14
2.112.10
CARPET CLEANING
2.10 Plug cord into electrical outlet. Step on handle
release pedal, to put unit in cleaning position.
2.11 Press the ON/OFF pedal and turn “ON”.
2.12 While depressing solution spray trigger (A),
slowly push unit forward. Release trigger and pull
unit backward (B) in the same path to remove dirty
water and solution from carpet. (For heavily soiled
areas, repeat if necessary).
IMPORTANT
If the sound of the motor changes to a high
pitch, this indicates the dirty water tank is full
and must be emptied.
noTe: For best cleaning results use a steady,
forward and backward motion. Cleaning should be
done at half the speed or less of dry vacuuming. For
heavily soiled areas, repeat if necessary.
2.13 Put cleaner in its upright position. Connect the
upholstery attachment to the trigger adaptor.
2.14 Open the dirty water tank door and insert the
hose adaptor into the dirty water tank and turn
clockwise to lock in place.
2.15 Connect the base water supply connector into
the fitting on the lower left side of handle facing
cleaner.
2.12
A
b
CAUTION
! !
Do not clean over floor electrical outlets.
Not to be used for grooming a pet.
2.15
IMPORTANT
To avoid saturating carpet, do not use more
than 4 wet strokes over one area. Always end
with dry strokes.
IMPORTANT
Water will drip from the brushes and underside of
the product after use and may puddle. To
avoid damage to wood and laminate flooring
and to avoid potential slip hazard, after use (a)
do not leave the product on wood and laminate
surfaces (b) and place unit on absorbent
material (such as a towel) to soak up drips.
b
9
IMPORTANT
DO NOT oversaturate the upholstery.
FOR BEST CLEANING RESULTS USE
STEADY, MODERATE, FORWARD AND
BACKWARD MOTION. Make sure upholstery is
dry before use.
If the hose attachment door is not closed
completely, there will be no suction through the
nozzle and the unit will not operate properly.
2.17 Place hose (A)
and upholstery attachment (B) into their
storage locations.
Store for next use.
2.17
STORING TOOLS
A
b
Using the Upholstery Tool
2.16 Press power pedal to turn on. While depressing
solution spray trigger, push attachment forward.
Release trigger and pull attachment backward in
the same path to remove dirty water and solution
from upholstery. (For heavily soiled areas, repeat if
necessary.)
2.16
CAUTION
! !
Not to be used for grooming a pet.
Read “Before You Begin Cleaning” instructions on
page 6.
Place handle in upright position. Brushroll will not
rotate while handle is in upright position.
Fill clean water tank according to instructions.Fill
detergent container with HOOVER
®
Deep Cleansing
detergent.
Do not point tools toward people or pets.
CLEANING CARPETED STAIRS
WARNING
! !
Use extra care when cleaning on stairs. To avoid
personal injury or damage, and to prevent the
cleaner from falling, always place cleaner at
bottom of stairs or on floor. Do not place cleaner
on stairs or furniture, as it may result in injury or
damage.
Dry hands and plug cleaner into a properly grounded
outlet.
Turn cleaner ON.
2.18 Pre-spray the carpeted stair by holding the tool
about one inch above the carpet and push it forward
while pressing the trigger (equals one wet stroke).
Position tool against the riser and slightly press it
into carpet pile. Press the trigger and pull the tool
slowly over the carpet (second wet stroke). Release
trigger at end of stroke.
2.19 Lift tool, and position it against riser. Pull tool
slowly over carpet without pressing trigger (dry
stroke).
Overlap strokes by 1/2 inch to help prevent
streaking.
It is best to alternate wet and dry strokes as
described above. End with more dry strokes to aid
in faster drying of carpet.
To avoid saturating carpet, do not use more than
4 wet strokes over any one area. Always end with
dry strokes.
If additional cleaning is necessary, wait until the
carpet is completely dry before using the tool again.
Empty Dirty Water Tank when the motor sound
becomes higher pitched and there is a loss in suction.
When finished cleaning, empty Clean Water Tank,
wash and rinse dirty Water Tank and let air dry.
2.18
2.19
10
Familiarize yourself with these home maintenance tasks as proper use and care of your cleaner will ensure
continued cleaning effectiveness.
Any other servicing should be done by an authorized service representative.
A Thermal Protector has been designed into your cleaner to protect it from overheating. When the
thermal protector activates the cleaner will stop running.
If this happens proceed as follows:
1. Turn cleaner OFF and unplug it from the electrical outlet.
2. Empty dirty water tank and clean filters.
3. Inspect and remove any blockages. Blockages may occur at the cleaner inlet, hose, and brushroll.
4. When cleaner is unplugged and motor cools for 30 minutes, the thermal protector will deactivate
and cleaning may continue.
If the thermal protector continues to activate after following the above steps, your cleaner
needs servicing.
NOTICE
! !
3. MAINTENANCE
Your carpet cleaner is equipped with a shut off
valve within your dirty water tank. When the dirty
water tank becomes full, the float (viewed from top
of tank) will rise, shutting off the air flow thru the
nozzle.
noTe: The float in your carpet cleaner , located in the
dirty water tank, will shut off the suction when the
dirty water tank is full. For best results, use smooth,
steady motion keeping the nozzle flat against the
carpeting. Tipping the cleaner and breaking the seal
of the nozzle and carpeting will cause the float to rise
and shut off the suction. Once the float is activated,
empty the dirty water tank. If the dirty water tank does
not appear full, turn the power switch off and wait for
the float to settle and reset. If the float repeatedly
shuts off the suction, empty the dirty water tank. For
best results, use only Hoover
®
Deep Cleansing
detergent. Other Solutions may generate excessive
foam which will cause the float to rise prematurely
and shut off the suction. Add Hoover
®
Deep
Cleansing detergent to the fill line indicated on the
Clean Water Solution Tank after adding clean water.
A higher concentration of shampoo may cause
excessive foaming.
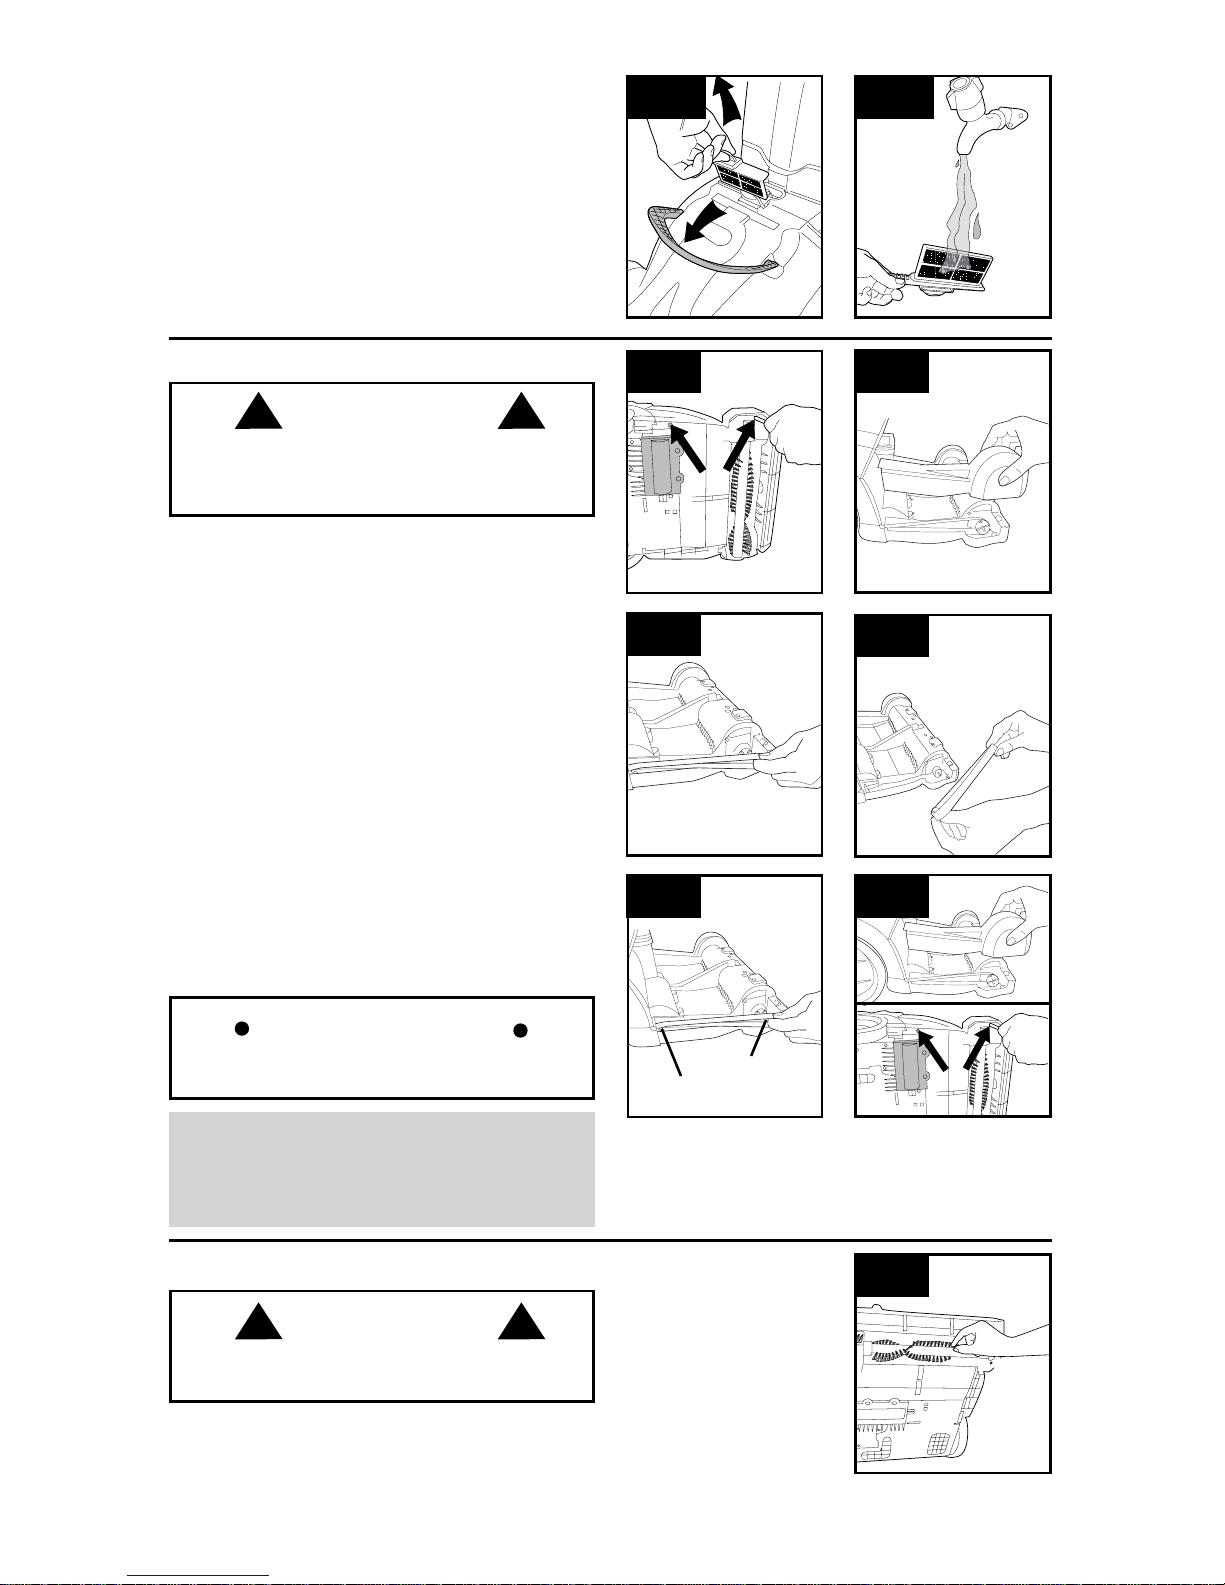
How to Empty
DIRTY WATER TANK
IMPORTANT
You will hear a noticeable change in the pitch of
the cleaner. This indicates a need to empty the
dirty water tank.
3.1
3.2
3.3 3.4
WARNING
! !
To reduce the risk of personal injury - unplug
cleaner before cleaning or servicing.
3.1 Grasp top of dirty water tank handle and push
latch to release.
3.2 Grasp handle and pull tank out of base.
3.3 Remove dirty water tank pour spout cap.
3.4 To empty dirty water tank, grasp handle with one
hand and nozzle with the other and empty into sink.
Replace dirty water tank pour spout cap. Rinse dirty
water tank and filter with hot tap water. Wipe and
let dry thoroughly before storing to prevent mildew
from forming.
Use only Hoover® cleaning products intended for
use with this machine. (see the “Cleaning
Products” section of this manual).
WARNING
! !
11
3.10
IMPORTANT
Rotate brushroll manually to make sure belt is
not twisted or pinched.
BELT: How to Remove and Replace
3.6
3.7
3.8
3.9
To reduce the risk of injury from moving parts -
unplug before servicing.
DO NOT OPEN MOTOR COVER.
Belt: What to Buy
For Belt replacement, please call 1-800-9449200 or visit our website at www.hoover.com to
locate a dealer nearest you. Belt part #440002313.
How to Remove
Before servicing, remove Dirty Water tank and
Solution tank to avoid spillage
3.6 Turn cleaner on its side to expose nozzle base.
To remove belt cover, use Phillips screwdriver to
remove the two screws. Arrows show location of
screws.
3.7 Grasp belt cover near brushroll and lift out.
3.8 Grasp brushroll with one hand, using other hand
to keep tension on belt when removing. Lift up when
pulling out.
How to Replace
3.9 Remove belt. Dispose of old belt.
3.10 Place new belt on motor shaft (A), then stretch
belt over brushroll pully.
3.1 1 Replace belt cover (C) and secure by replacing
the two screws (D).
3.5 Rotate dirty water tank handle down,
grasp filter tab and remove.
3.6 Rinse under water to remove debris
(below 140
o
F/60oC). Allow to dry completely
before replacing or storing away your
machine.
3.5
CLEANING FILTER
3.5
A
b
3.11
C
d
REMOVING BLOCKAGES FROM BRUSHROLL
3.12 Remove any debris
and/or hair from brushroll.
3.12
CAUTION
! !
To reduce the risk of injury from moving parts -
unplug before servicing.
CAUTION
! !
12
PROBLEM POSSIBLE CAUSE POSSIBLE SOLUTION
Cleaner won’t
run
1. No voltage in wall.
1. Chec k fuse or brea ke r i n h o me.
2. Blow n f u s e o r t ripped b r e a ke r. 2. Chec k fuse or brea ke r i n h o me. Replac e
fuse/reset breaker in home.
3. Unit cuts out during use.
3. Take to servi ce center. To find neares t
location, vis i t our website a t www.hoover.com
or call 1-800-944-9200.
4. Thermal protector has tripped.
4. Disc onnect t h e unit from th e wa l l socket,
allow to cool for 3 0 m i n u te s , clean the f ilter
and emp ty the dirty wa te r tank and c h e ck
hose, brushroll for blockages.
Cleaner won’t
pick-up or low
suction
1. Dirty Water Tank Door not
installed.
1. Insert Dirty Water Tank Door - Pg. 9.
2. Dirty Water Tank is not installed
correctly.
2. Review Placing Dirty Water Tank in base of
cleaner - Pg. 10.
3. Dirty Water Tank is full. 3. Empty Dirty Water Tank - Pg. 10.
4. Dirty water passage clogged. 4. Clean Dirty Water Tank - Pg. 10.
5. Foam filter is dirty. 5. Clean filter. Review Emptying & Cleaning the
Dirty Water Tank - Pg. 10.
6. Blockage in hose or brushroll.
6. Check for blockage and remove - Pg. 11.
Water escaping from
Cleaner
1. Dirty Water Tank is full.
1. Empty Dirty Water Tank - Pg. 10.
2. Dir ty Water tank i s not insta l l ed
correctly.
2. Review Pl a cing Dirty Water Tank in base of
clean e r - Pg. 11.
3. Clean Water S olution Tank not
installed properly.
3. Review Clean Water Solu t i o n Tank
Insta l l a t ion - Pg. 8.
4. TROUBLESHOOTING
If a minor problem occurs, it usually can be solved quite easily when the cause is found by using the
checklist below.
Any other servicing should be done by an authorized service representative.
WARNING
! !
To reduce the risk of personal injury - unplug cleaner before cleaning or servicing.
STORAGE
• Empty andrinse out
clean and dirty water
tanks and leave to air
dry before replacing.
• You can remove the
handle (3.13) and tool
caddy for convenient
storage (3.14).
3.13 3.14
Do not store carpet cleaner with solution in tanks.
CAUTION
! !
LUBRICATION
The motor is equipped with bearings which contain sufficient lubrication for the life of the motor.
The addition of lubricant could cause damage.
do not add lubricant to motor bearings.

13
To obtain approved Hoover
®
service and genuine Hoover® parts, locate the nearest Authorized Hoover
®
Warranty Service Dealer (Depot) by:
•CheckingtheYellowPagesunder“VacuumCleaners”or“Household”.
•Visitourwebsiteathoover.com(U.S.Customers)orhoover.ca(Canadiancustomers).
Follow the service center link to find the service outlet nearest you.
•Foranautomatedreferralofauthorizedserviceoutletlocationscall1-800-944-9200.
Do not send your vacuum to Hoover
®
, Inc., Company in Glenwillow for service. This will only result in delay.
If you need further assistance:
To speak with a customer service representative call 1-800-944-9200; Mon-Fri 8am-7pm EST.
Always identify your vacuum by the complete model number when requesting information or ordering parts.
(The model number appears on the bottom of the vacuum.)
PLEASE DO NOT RETURN THIS PRODUCT TO THE STORE.
5. SERVICE
To reduce the risk of fire and electric shock due to internal component damage, use only Hoover® cleaning
products intended for use with the appliance as noted below:
Hoover® deep Cleansing
WARNING:
6. CLEANING PRODUCTS
PROBLEM POSSIBLE CAUSE POSSIBLE SOLUTION
Cleaner won’t
dispense
1. Clean Water Solut ion Tank not
installed properly.
1. Review Clean Water S o l u t ion Tank
Insta l l a t ion - Pg. 8.
2. Need s servi ce. 2. Take to servi ce center. To find neares t
location, vis i t our website a t www.hoover.com
or call 1-800-944-9200.
Cleaner
attachments
won’t pick up
1. Hose is clogged.
1. Remove hose and tools; remove obstruct ion.
2. Hose inlet clogged. 2. Remove hose and clean inlet - Pg. 9.
3. Dirty Water Tank is full. 3. Empt y D i rty Water Tank - Pg. 10.
 Loading...