

Page 1
IMPORTANT: Read carefully before assembly and use.
Designed in the USA. Made in China. ©2018 Techtronic Floor Care Technology Limited. All Rights Reserved.
Distributed by, Royal Appliance Mfg. Co. Charlotte, NC 28262. All Rights Reserved. 961152077-R0
CARPET CLEANER
USER MANUAL
POWERDASH
TM
Page 2

2
IT’S GUARANTEED.
Get cleaning confidence for up to 1 year with the Hoover®
limited warranty. See war ranty for complete details.
Register your carpet cleaner by:
Calling 1-800-944-9200Visiting Hoover.com or Hoover.ca
Make it ocial.
Welcome to
Hoover
®
ownership.
Page 3

3
Table of Contents
Safety Instructions ....................................................................................................................... 4
Carton Contents ............................................................................................................................ 6
Product Guide ................................................................................................................................ 7
How to Assemble Your PowerDash™ ......................................................................................... 8
Before You Begin Cleaning
.......................................................................................................... 9
Getting Started with your PowerDash™ ....................................................................................10
Maintenance .................................................................................................................................. 12
Hoover Cleaning Solution Guide ..................................................................................................19
Troubleshooting ............................................................................................................................21
Warranty ....................................................................................................................................... 22
French .............................................................................................................................................25
Spanish ...........................................................................................................................................49
Page 4

4
IMPORTANT SAFETY INSTRUCTIONS SAVE THESE INSTRUCTIONS
from falling, always place cleaner at bottom of stairs or
on floor. Do not place cleaner on stairs or furniture, as it
may result in injury or damage.
• Do not use to pick up flammable or combustible liquids,
such as gasoline, or fine wood sandings, or use in areas
where they may be present.
• Connect to a properly grounded outlet only. See
Grounding Instructions.
• Do not pick up anything that is burning or smoking, such
as cigarettes, matches, or hot ashes.
• Do not use without filters and tanks in place.
• Do not clean over floor electrical outlets.
When using an electrical appliance, basic precautions
should always be followed, including the following:
READ ALL INSTRUCTIONS BEFORE USING THIS APPLIANCE.
WARNING:
TO REDUCE THE RISK OF FIRE, ELECTRIC SHOCK, DAMAGE OR
INJURY:
• Fully assemble before operating.
• Operate vacuum only at voltage specified on data label
on back of vacuum canister.
• Do not leave appliance when plugged in. Unplug from
outlet when not in use and before cleaning or servicing.
• Do not use outdoors.
• Do not immerse. Use only on carpet moistened by
cleaning process.
• To Reduce the Risk of Fire and Electric Shock due to
internal component damage, use only HOOVER cleaning
fluid intended for use with this appliance. See the
Cleaning Fluid section section (page 19) of this manual.
• Do not allow to be used as a toy. Not intended for use by
children age 12 and under. Close supervision is
necessary when used near children. To avoid injury or
damage, keep children away from product, and do not
allow children to place fingers or other objects into any
openings.
• Use only as described in this manual. Use only
manufacturer’s recommended attachments and
products.
• Do not use with damaged cord or plug. If appliance is not
working as it should, has been dropped, damaged, left
outdoors, or dropped into water, take it to a service
center prior to continuing use.
• Do not pull or carry by cord, use cord as a handle, close
a door on cord, or pull cord around sharp edges or
corners. Do not place product on cord. Do not run
appliance over cord. Keep cord away from heated
surfaces.
• Do not unplug by pulling on cord. To unplug, grasp the
plug, not the cord.
• Do not handle plug or appliance with wet hands.
• Do not put any object into openings. Do not use with any
opening blocked; keep free of dust, lint, hair and
anything that may reduce air flow.
• Keep hair, loose clothing, fingers, and all parts of body
away from openings and moving parts.
• Turn off all controls before unplugging.
• Use extra care when cleaning on stairs. To avoid
personal injury or damage and to prevent the cleaner
WARNING: This product contains chemicals known to the
State of California to cause cancer, birth defects or reproductive
harm. WASH HANDS AFTER HANDLING.
Page 5
5
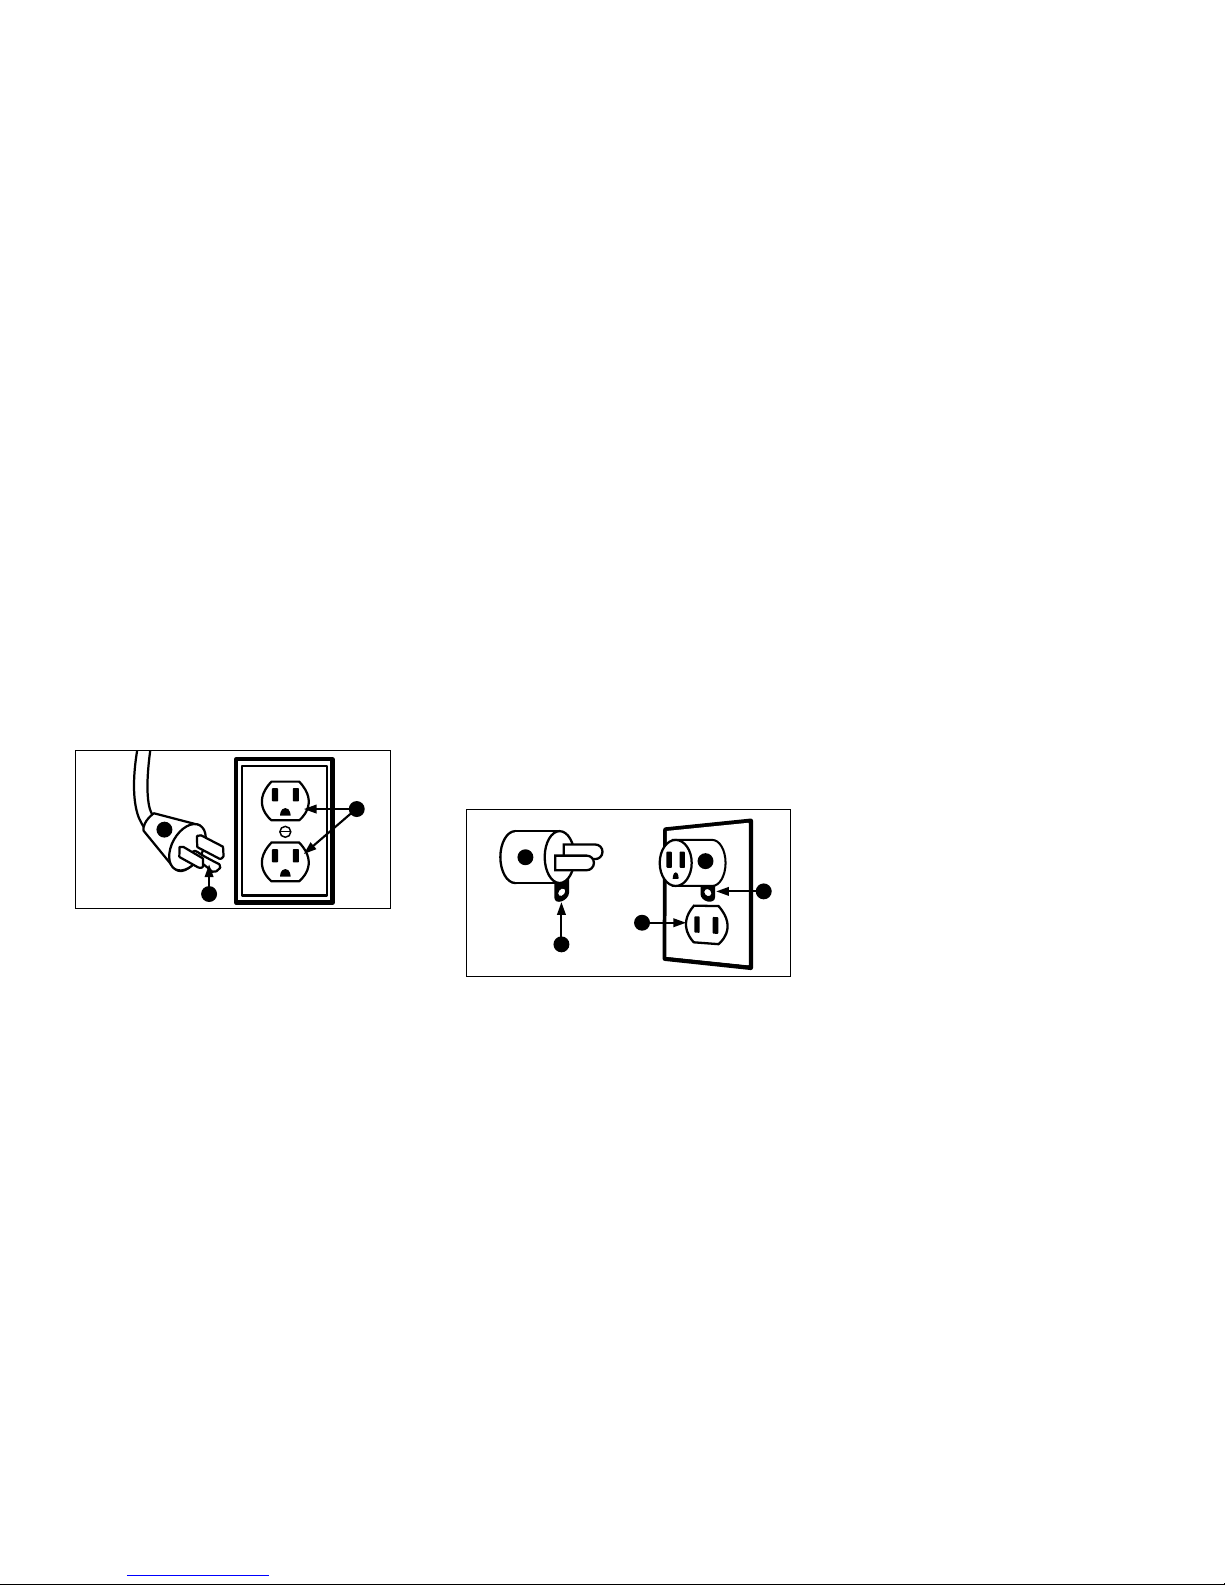
GROUNDING INSTRUCTIONS:
This appliance must be grounded. If it should malfunction
or breakdown, grounding provides a path of least
resistance for electric current to reduce the risk of electric
shock. This appliance is equipped with a cord having an
equipment-grounding conductor (C) and grounding plug
(A). The plug must be inserted into an appropriate outlet
(B) that is properly installed and grounded in accordance
with all local codes and ordinances.
WARNING:
Improper connection of the equipment-grounding
conductor can result in the risk of electric shock. Check
with a qualified electrician or service person if you are
in doubt as to whether the outlet is properly grounded.
Do not modify the plug provided with the appliance - if it
will not fit the outlet, have a proper outlet installed by a
qualified electrician. This appliance is for use on a
nominal 120-volt circuit and has a grounding plug that
looks like the plug (A) illustrated in Fig. 1. A temporary
adapter (D) may be used to connect this plug to a 2-pole
receptacle (E) if a properly grounded outlet is not
available (Fig. 2). The temporary adapter should be used
only until a properly grounded outlet (B) can be installed
by a qualified electrician (Fig. 1). The green colored rigid
ear, lug, or the like (F) extending from the adapter must
be connected to a permanent ground (G) such as a
properly grounded outlet box cover (Fig. 2). Whenever the
adapter is used, it must be held in place by a metal screw.
NOTE: In Canada, the use of a temporary adapter is not
permitted by the Canadian Electrical Code.
CAUTION:
TO REDUCE THE RISK OF DAMAGE:
• Avoid picking up hard, sharp objects with this product,
as they may cause damage.
• Store appropriately indoors in a dry place. Do not expose
machine to freezing temperatures.
• Do not use sharp objects to clean out hose as they can
cause damage.
• To assist in reducing drying time, be certain the area is
well ventilated when using detergents and other
cleaners with this machine.
• To help prevent matting and resoiling, avoid contact
with carpets until they are dry. Keep children and pets
away from carpets until they are completely dry.
• Do not store extractor with solution in tanks.
• With brushes and brush roll on, do not allow cleaner to
sit in one location for an extended period of time, as
damage to the floor can result.
• Do not use this extractor on hard floors. Using this
machine on hard floors may scratch or damage your
floor.
• Water will drip from the brushes and underside of the
product after use and may puddle. To avoid damage to
wood and laminate flooring and to avoid potential slip
hazard, after use (a) do not leave the product on wood
and laminate surfaces and remove to a hard surface and
(b) place unit on absorbent material (such as a towel) to
soak up drips.
D
D
A
1
2
C
F
E
G
B
Page 6
6
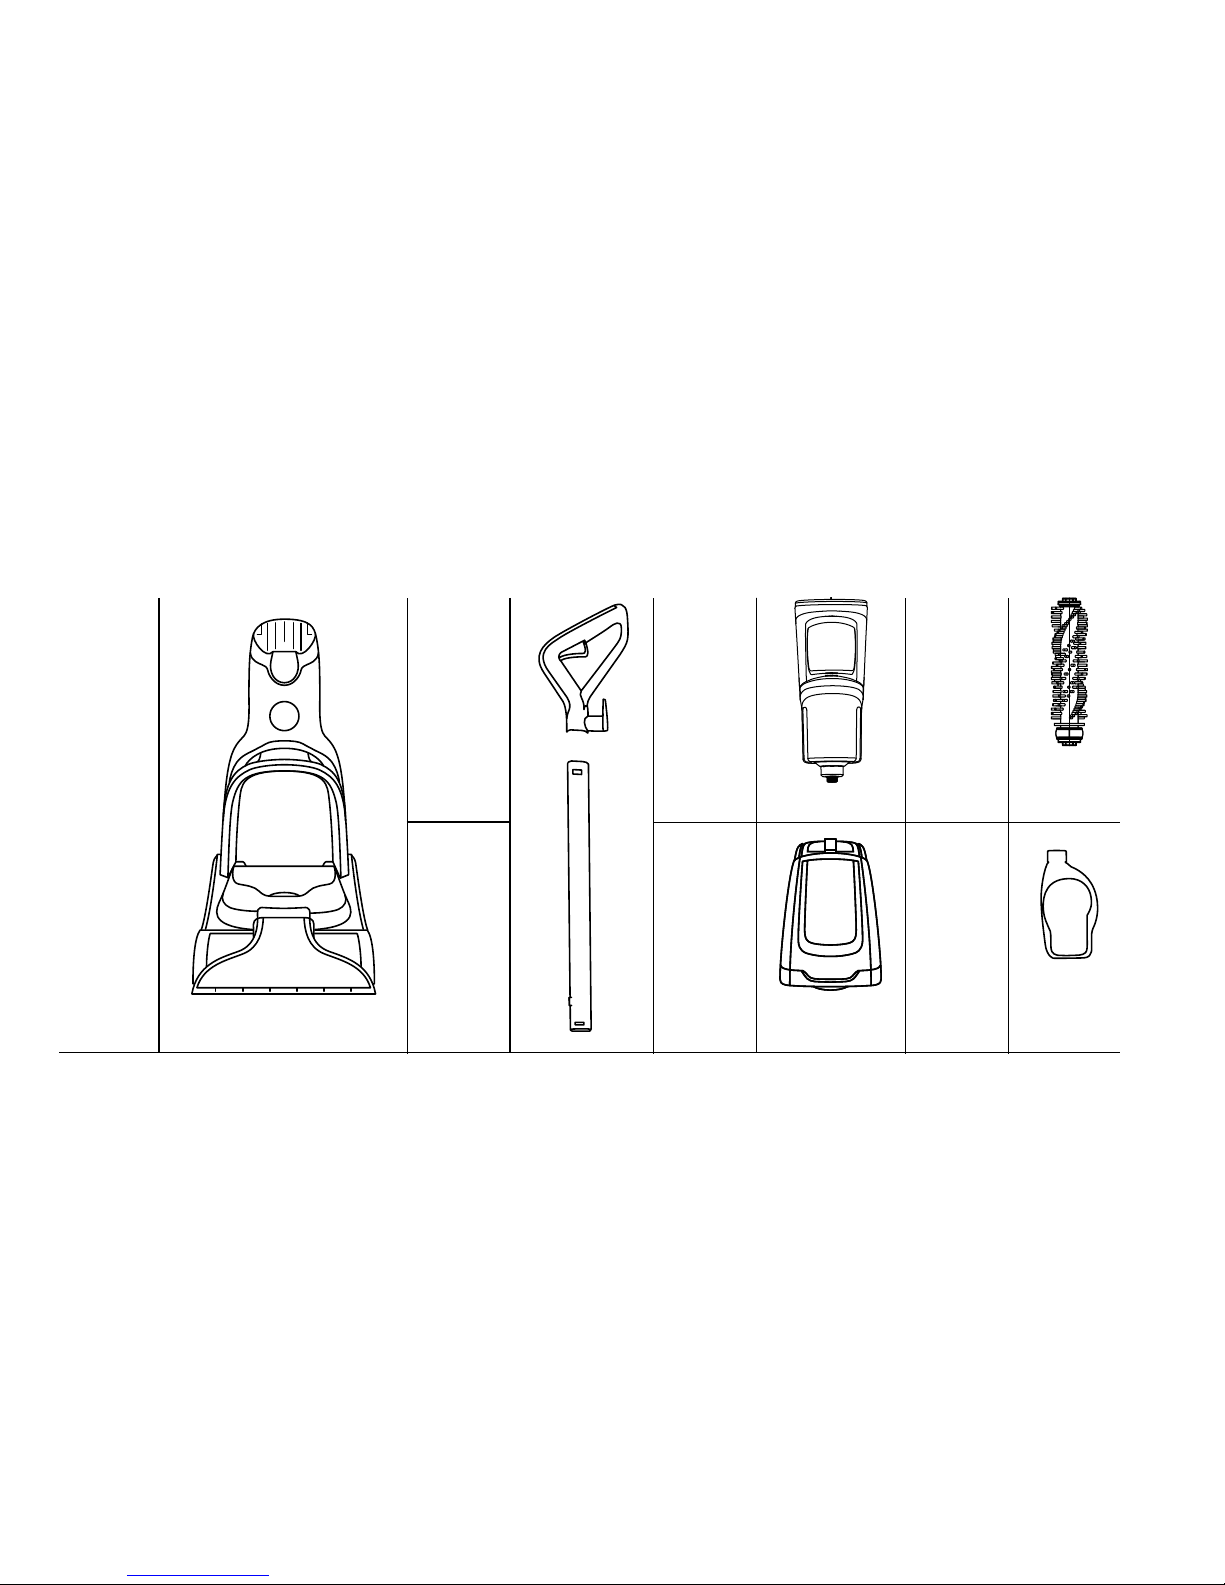
PowerSpin
Brush Roll
Sample Bottle
of Cleaning
Solution
Carpet Cleaner
Upper Handle
Pole
Dirty Water
Tank
Upper Handle Clean Water
Tank
Carton Contents
Page 7
7
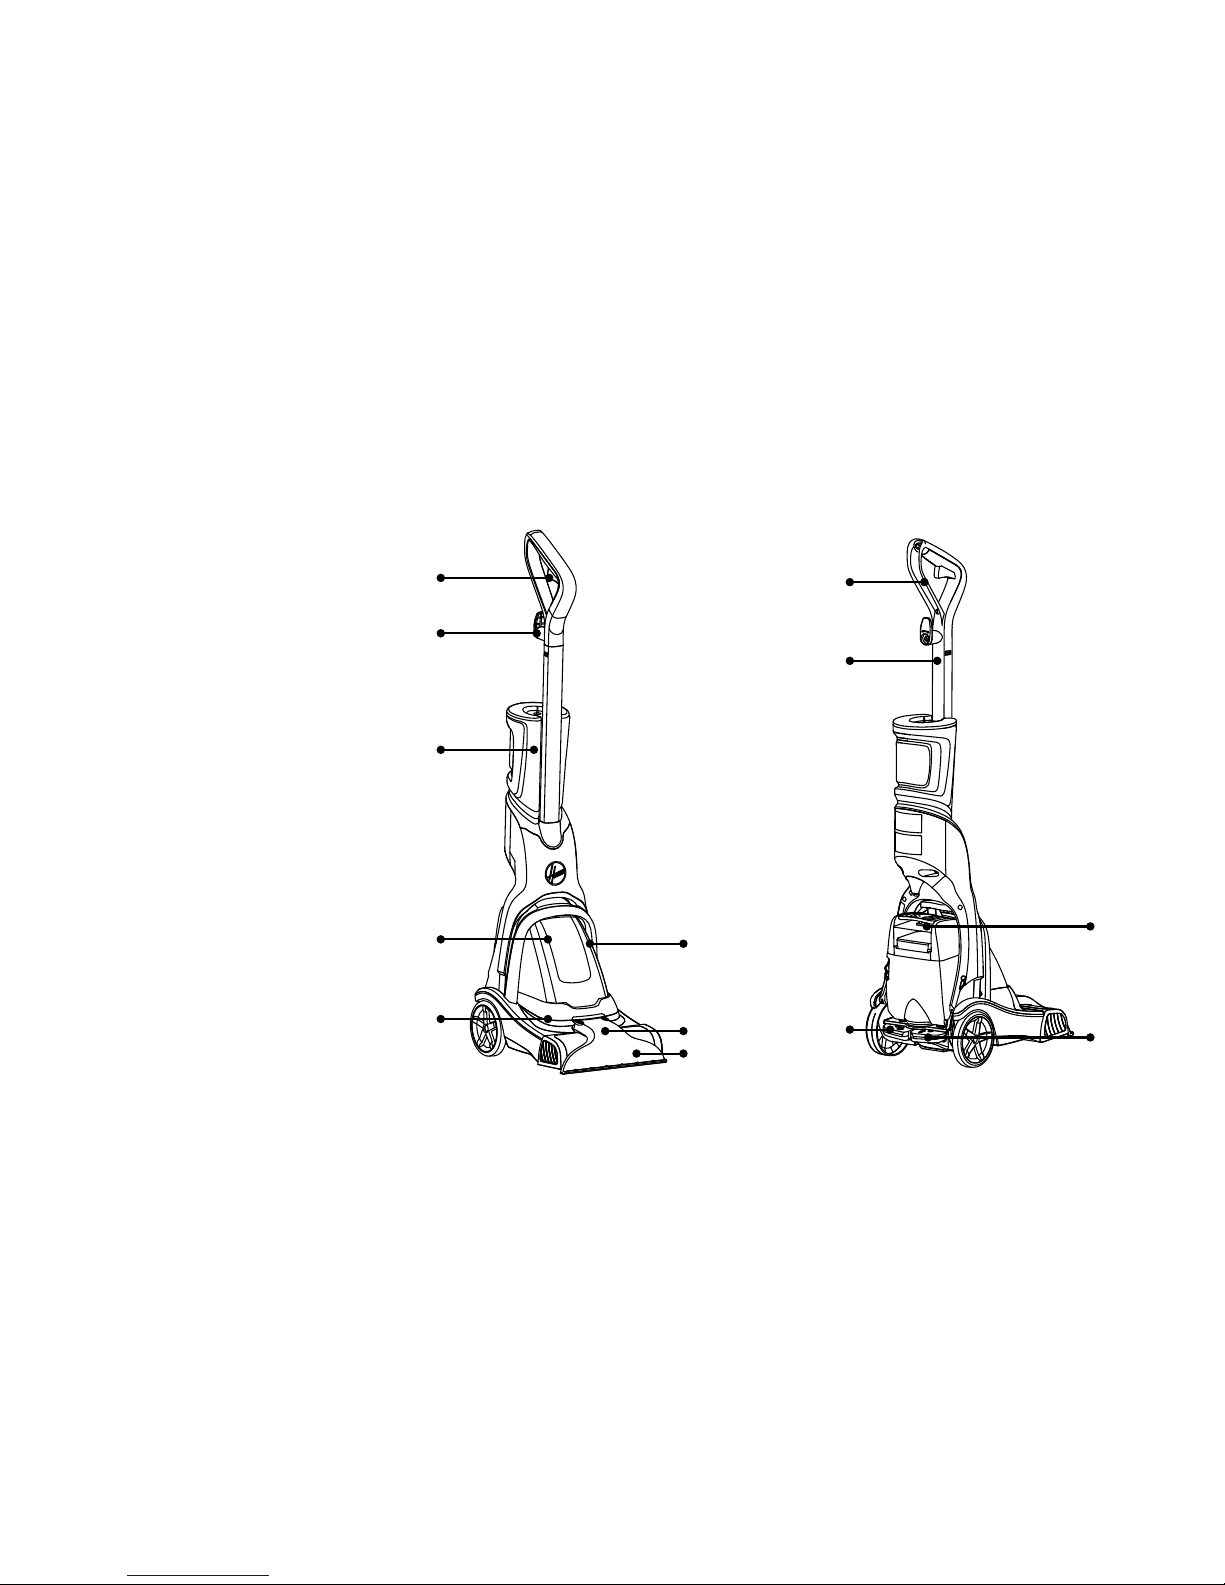
Product Guide
1.
Water/Solution Trigger
2.
Cord Wrap
3.
Clean Water Tank
4.
Dirty Water Tank
5.
Filter (Under Dirty Water Tank)
6.
Quick Pour Spout
7.
Removable Nozzle
8.
PowerSpin Brush
9.
Upper Handle
10.
Upper Handle Pole
11.
On/O Pedal
12.
Dirty Water Tank Handle Release
(NOT A CARRY HANDLE!)
13.
Handle Release Pedal
1
9
4
11
5
6
12
7
13
8
2
10
3
Page 8
8
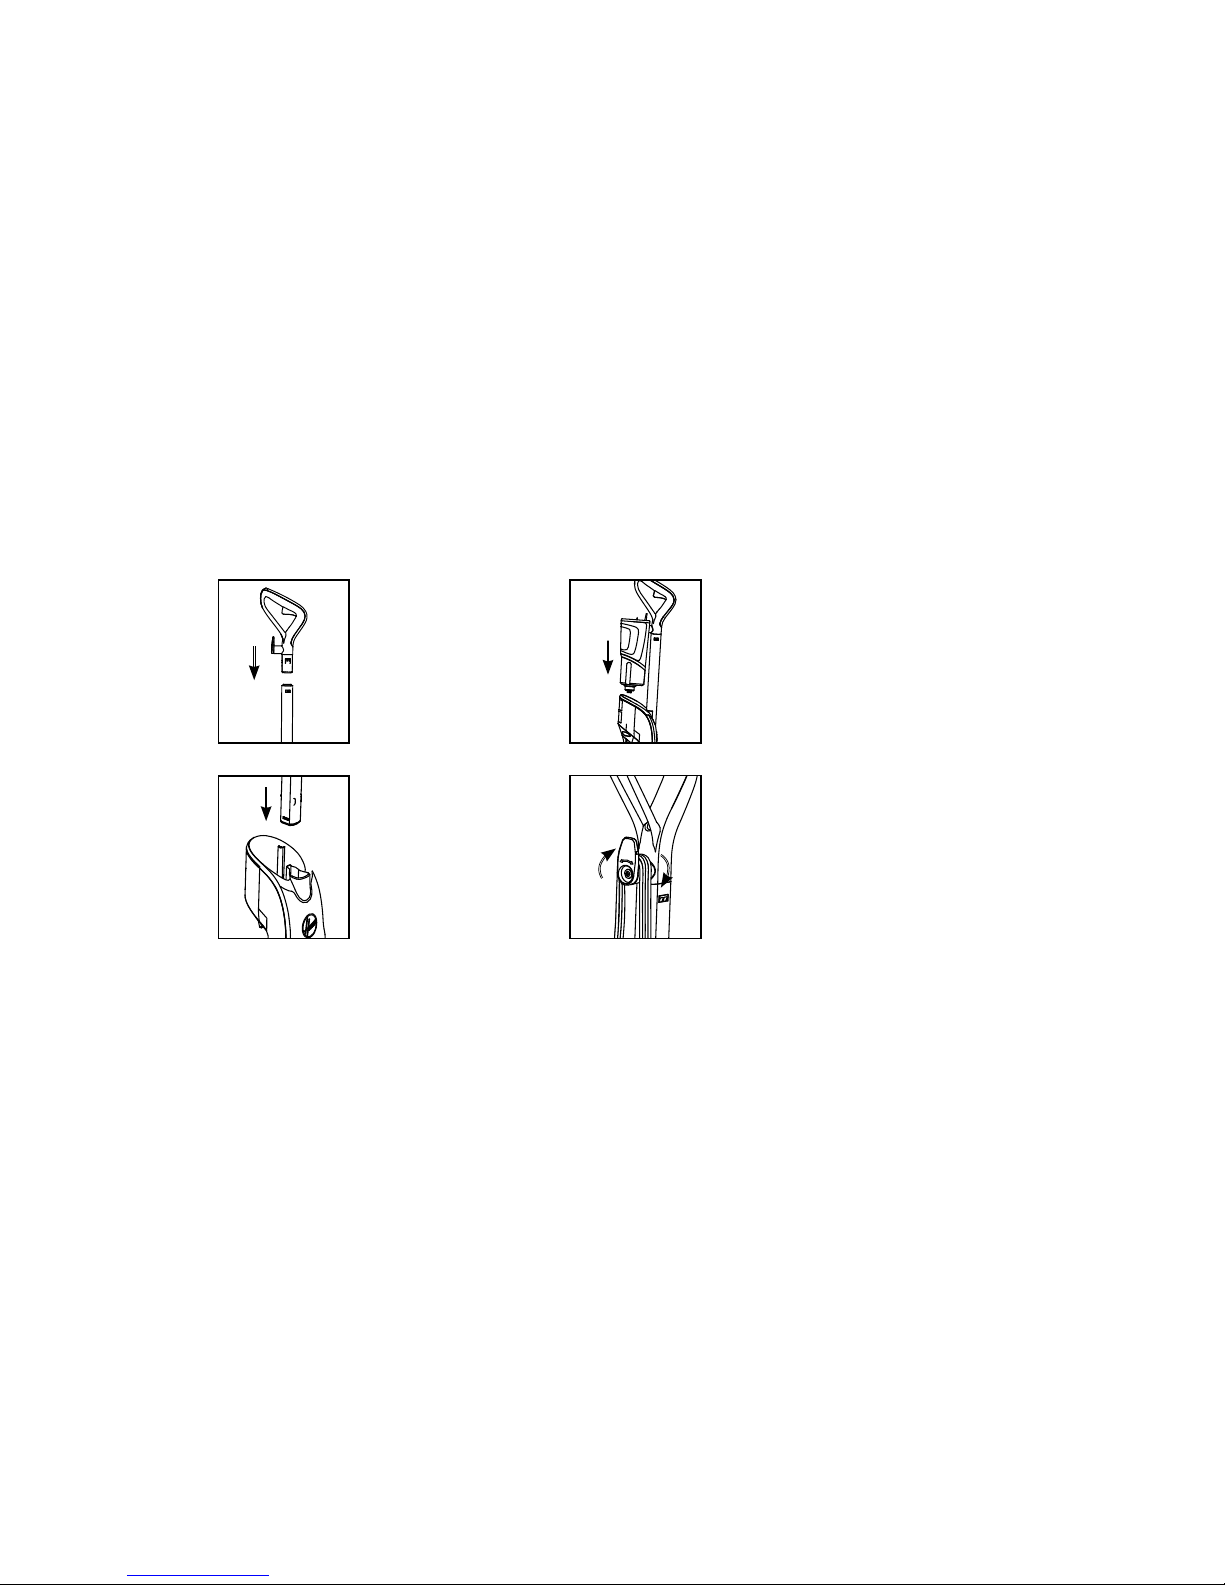
How to Assemble
Insert the upper Handle
Pole into the base until
you hear a “CLICK”.
Insert the Upper Handle
into the Upper Handle
Pole until you hear a
“CLICK”.
Wrap the power cord
around the cord hooks for
convenient storage.
1
4
2
3
Slide the Clean Water
Tank securely into place
on the back of the unit.
Push down firmly.
Page 9

9
Before You Begin Cleaning:
Vacuum carpet and upholstery thoroughly
with a Hoover vacuum before use.
Don’t use the carpet cleaner as a traditonal
vacuum cleaner.
Use your Hoover carpet cleaner only if
upholstery fabric is marked with a “W” (for
“wet” clean) or “S/W” (for “solvent/dry” or
“wet” clean). Don’t clean fabric marked “S”
(“solvent/dry” clean only).
Test for colorfastness in a small, hidden
area. Gently rub surface with a dampened
white cloth. Wait ten minutes and check
for color removal or bleed with a white
paper towel.
Move furniture out of area to be cleaned.
Place aluminum foil or wax paper under
legs of furniture too heavy to move to
prevent wood finishes from staining carpet.
Pin up furniture skirts and draperies.
Pretreat spots and heavy trac areas with
a Hoover® Cleaning Solution*. See the
“Cleaning Solutions” section.
*Available at additional cost if not included
with your model.
NOTE: To prevent staining, use
plastic or aluminum foil to protect
wood or metal surfaces from
possible water spray.
NOTE: To avoid damage to wood
floors underneath area rugs or
carpet, place waterproof material
(ex: plastic) underneath them
before cleaning.
For best results, pretreat stains with a
Hoover spot treatment (see Hoover Cleaning
Solution Guide, pg. 19) to help loosen and
remove even the most stubborn stains.
Pretreating:
Page 10
10
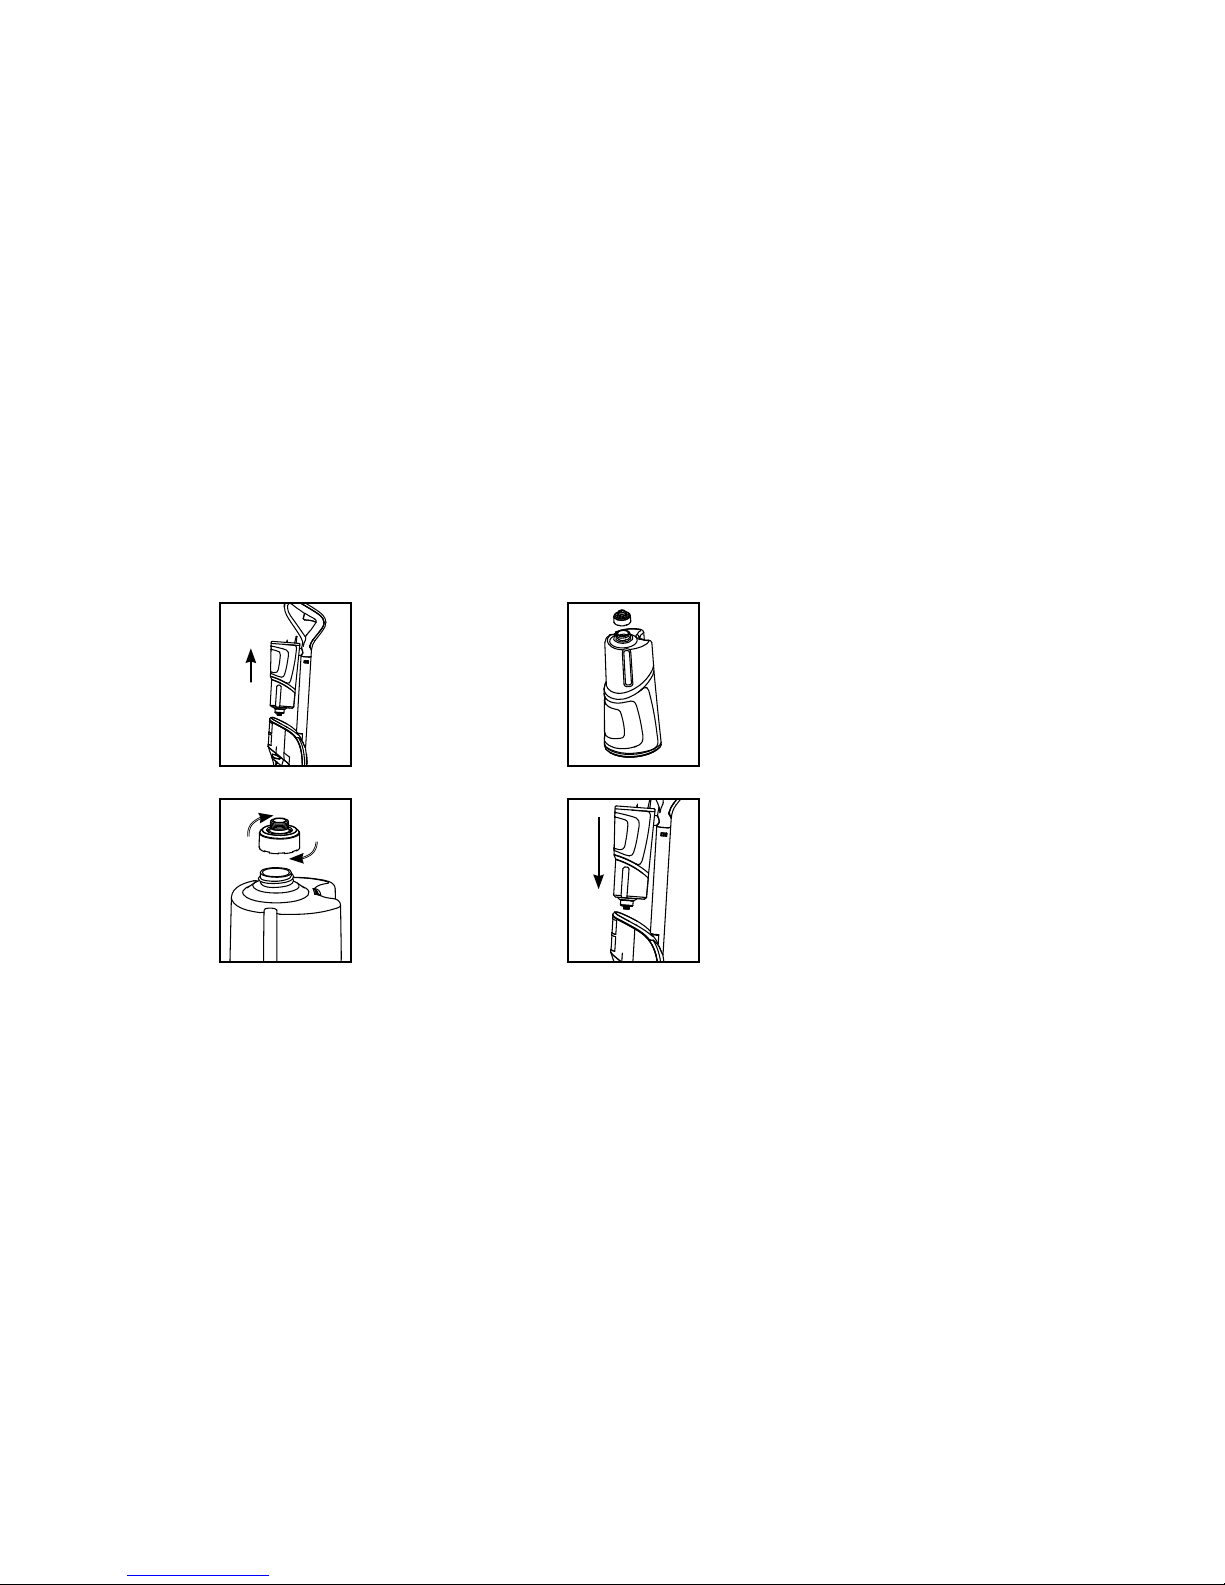
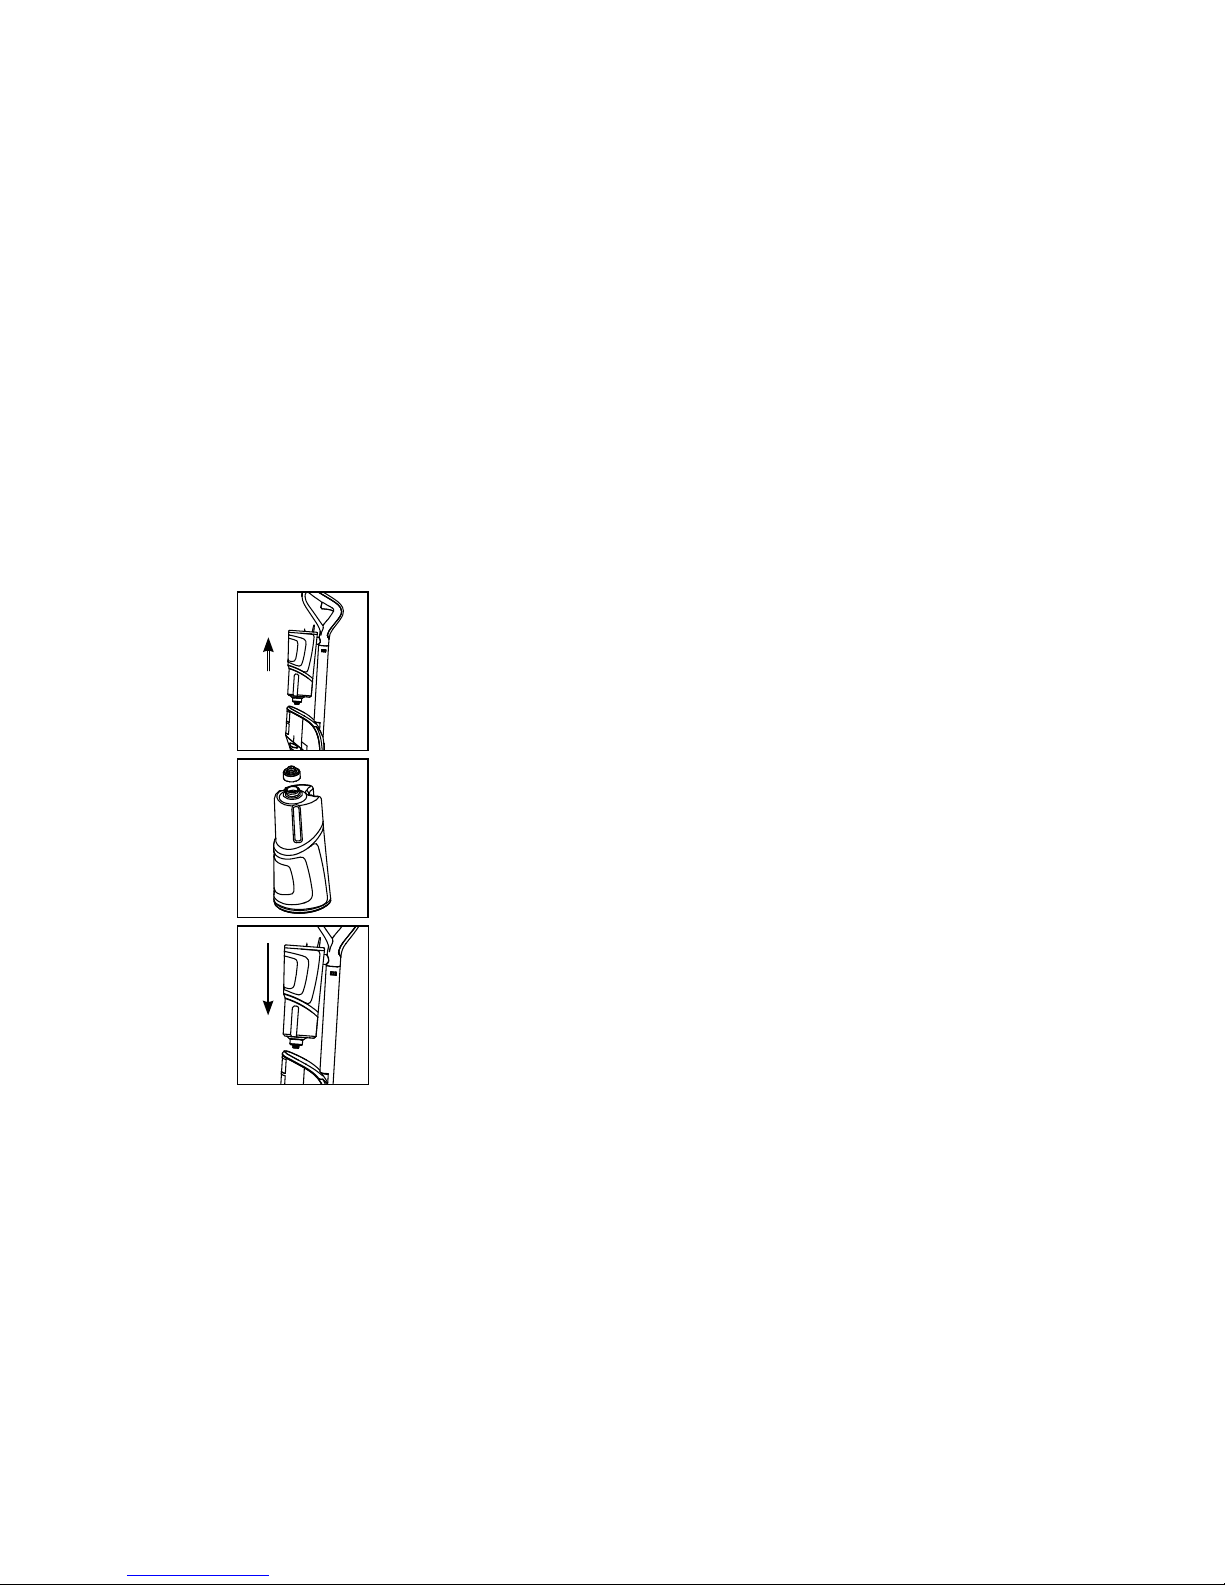
Getting Started With Your PowerDash™ Carpet Cleaner:
Remove the Clean
Water Tank from the
back of the unit.
Replace and tighten cap.
Slide the Clean Water
Tank back into the unit.
Push down firmly.
1
4
Fill the Clean Water Tank
Remove the cap from
the bottom and add
warm water to the
Water fill line.
2
Add Hoover® cleaning
solution to the Solution
fill line.
3
Page 11
11
Getting Started With Your PowerDash™ Carpet Cleaner:
Plug power cord into
electrical outlet.
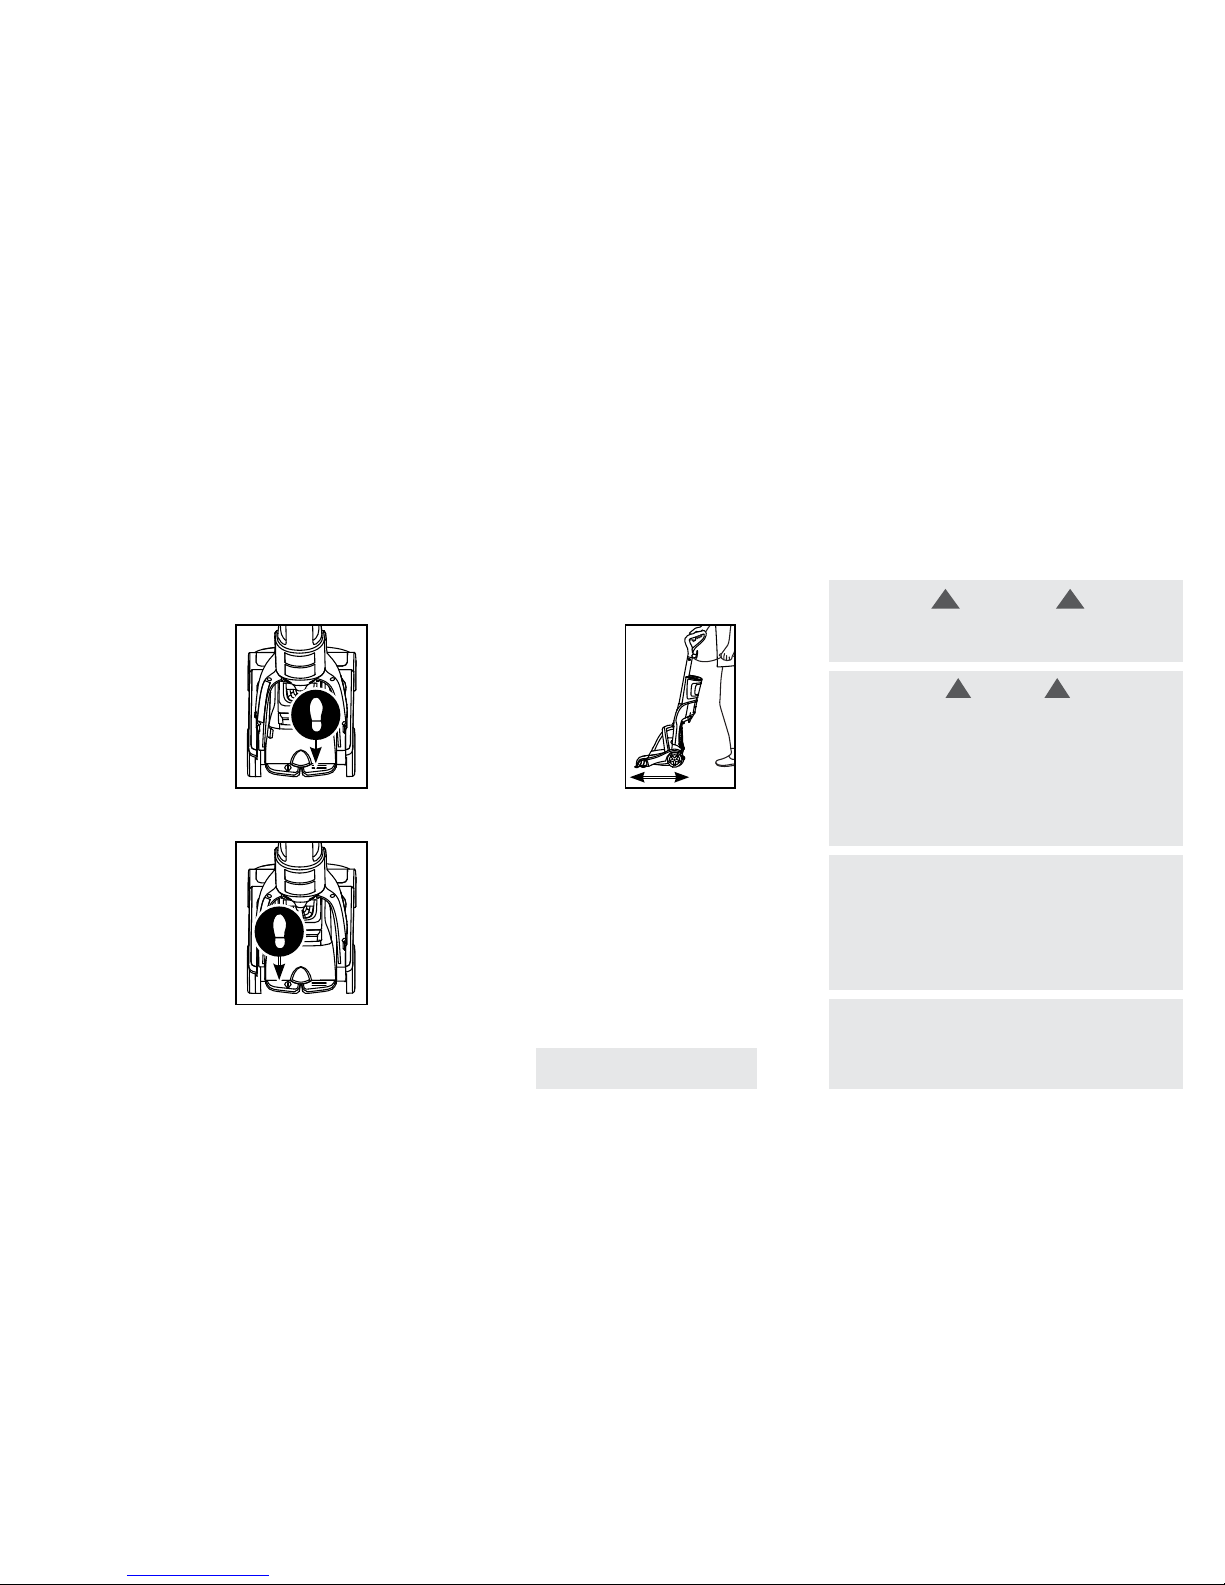
How to Clean Carpets with your PowerDash™:
Step on the Handle
Release Pedal to recline
the unit for cleaning
position.
Step on ON/OFF
Pedal to turn ON.
3
*follow these steps for best results
Squeeze trigger for a slow
forward and backward
wet stroke*.
1
4
2
5
Release trigger for a slow
forward and backward dry
stroke*.
Continue using dry strokes until little water is visible
passing through the nozzle.
For best results, Hoover recommends rinsing carpet
with water only. This removes residual carpet cleaning
solution. Fill Solution Tank with water and repeat. For
heavily soiled areas, repeat. Avoid saturating carpet.
CAUTION
Do not clean over floor electrical outlets. Water will drip
from the brushes and underside of the product after use
and may puddle. To avoid damage to wood and laminate
flooring and to avoid potential slip hazard, after use (a)
do not leave the product on wood and laminate surfaces
and move to a hard surface and (b) place unit on an
absorbent material (such as a towel) to soak up drips.
!!
NOTE: Empty Dirty Water Tank when the motor sound
becomes higher pitched and there is a loss in suction
(see “Automatic shut-o”). You will also see the float
rise and shut o suction at the same time.
IMPORTANT
For full suction, it is important that the Dirty Water Tank
is properly secured before cleaning.
! !
Page 12
12
Maintenance
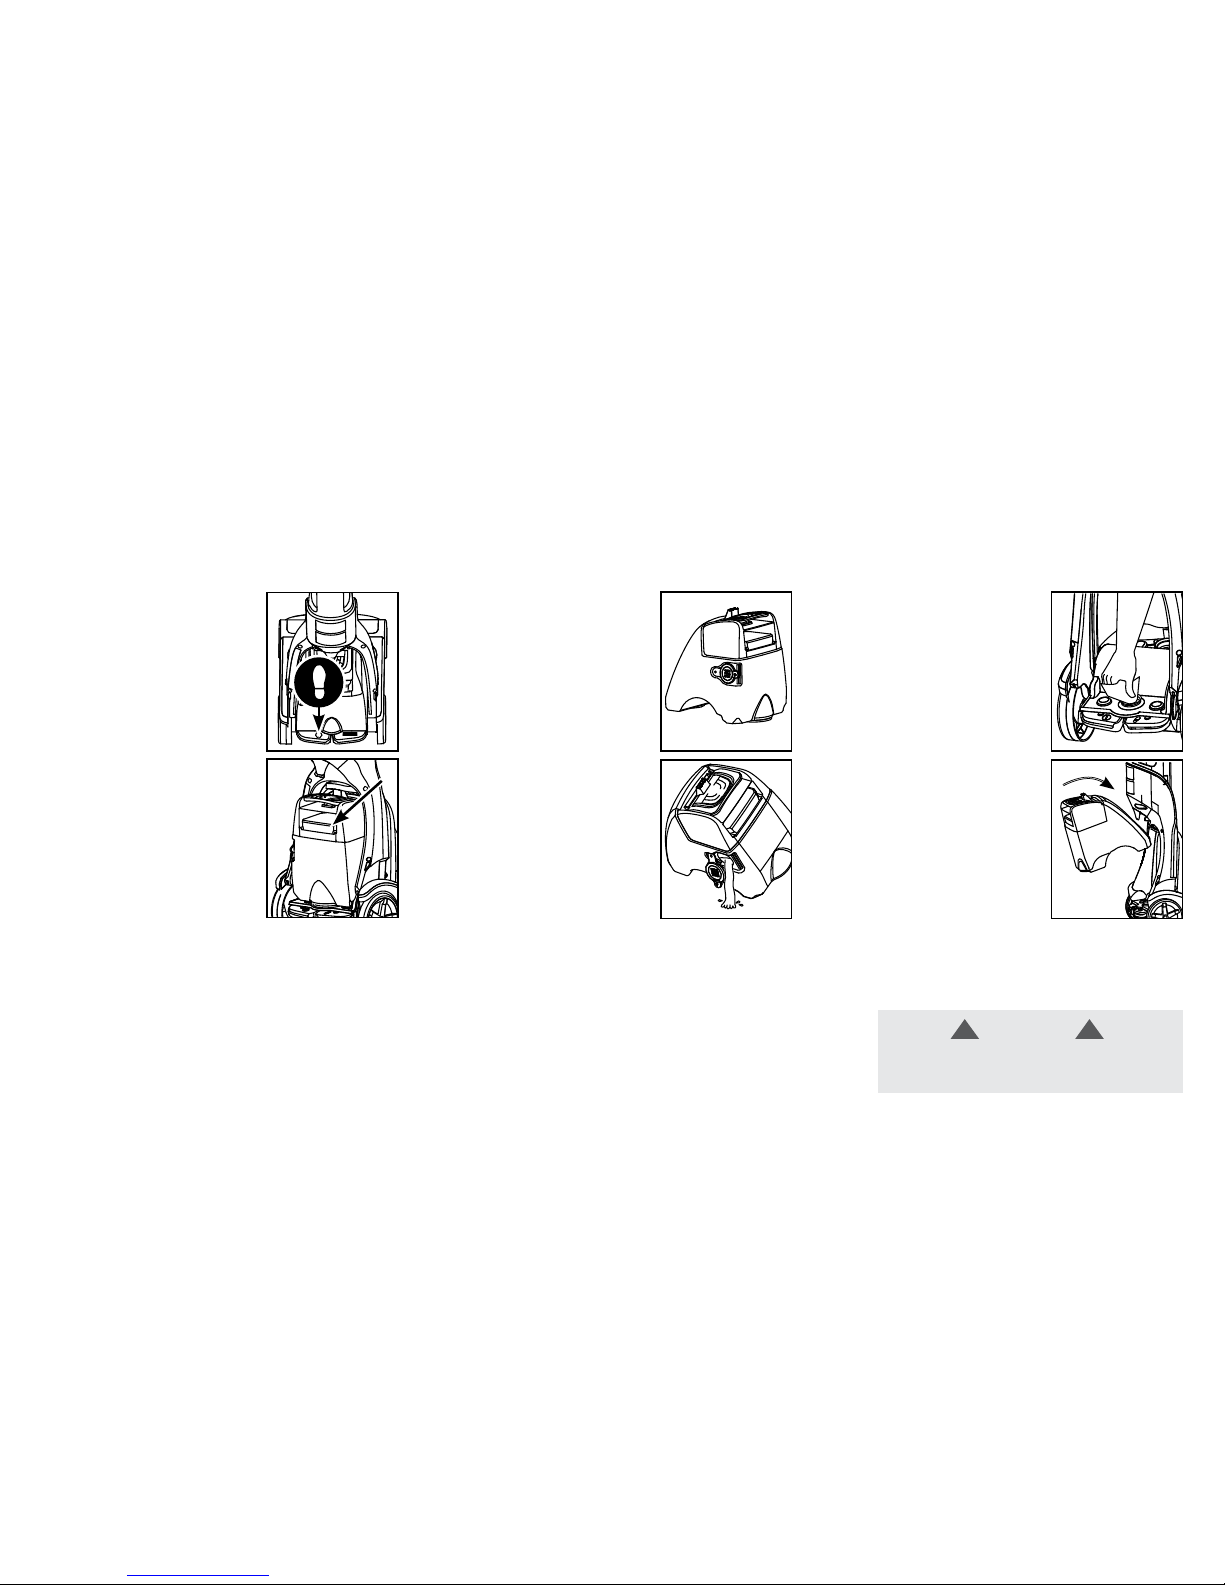
How to Empty and Clean your Tanks:
Dirty Water Tank:
Turn the cleaner o and unplug
from electrical outlet.
Carry Dirty Water Tank in an
upright position and place on
a flat surface.
Prior to replacing tank, check and
clean filter as needed.
1
3 6
2
4
5
7
Press latch and remove Dirty
Water Tank from the back of
the unit.
Open Quick Pour Spout and empty.
Replace and close the Quick Pour
Spout.
Replace Dirty Water Tank by tilting
back then rocking it forward to
snap into place.
IMPORTANT
For full suction, it is important that the Dirty
Water Tank is properly secured before cleaning.
! !
Page 13
13
Maintenance
How to Empty and Clean your Tanks:
Clean Water Tank:
Remove tank from the unit.
Replace the tank once it is
clean and dry.
1
3
2
Unscrew cap. Empty tank,
rinse and allow to air dry.
Page 14
14
Maintenance
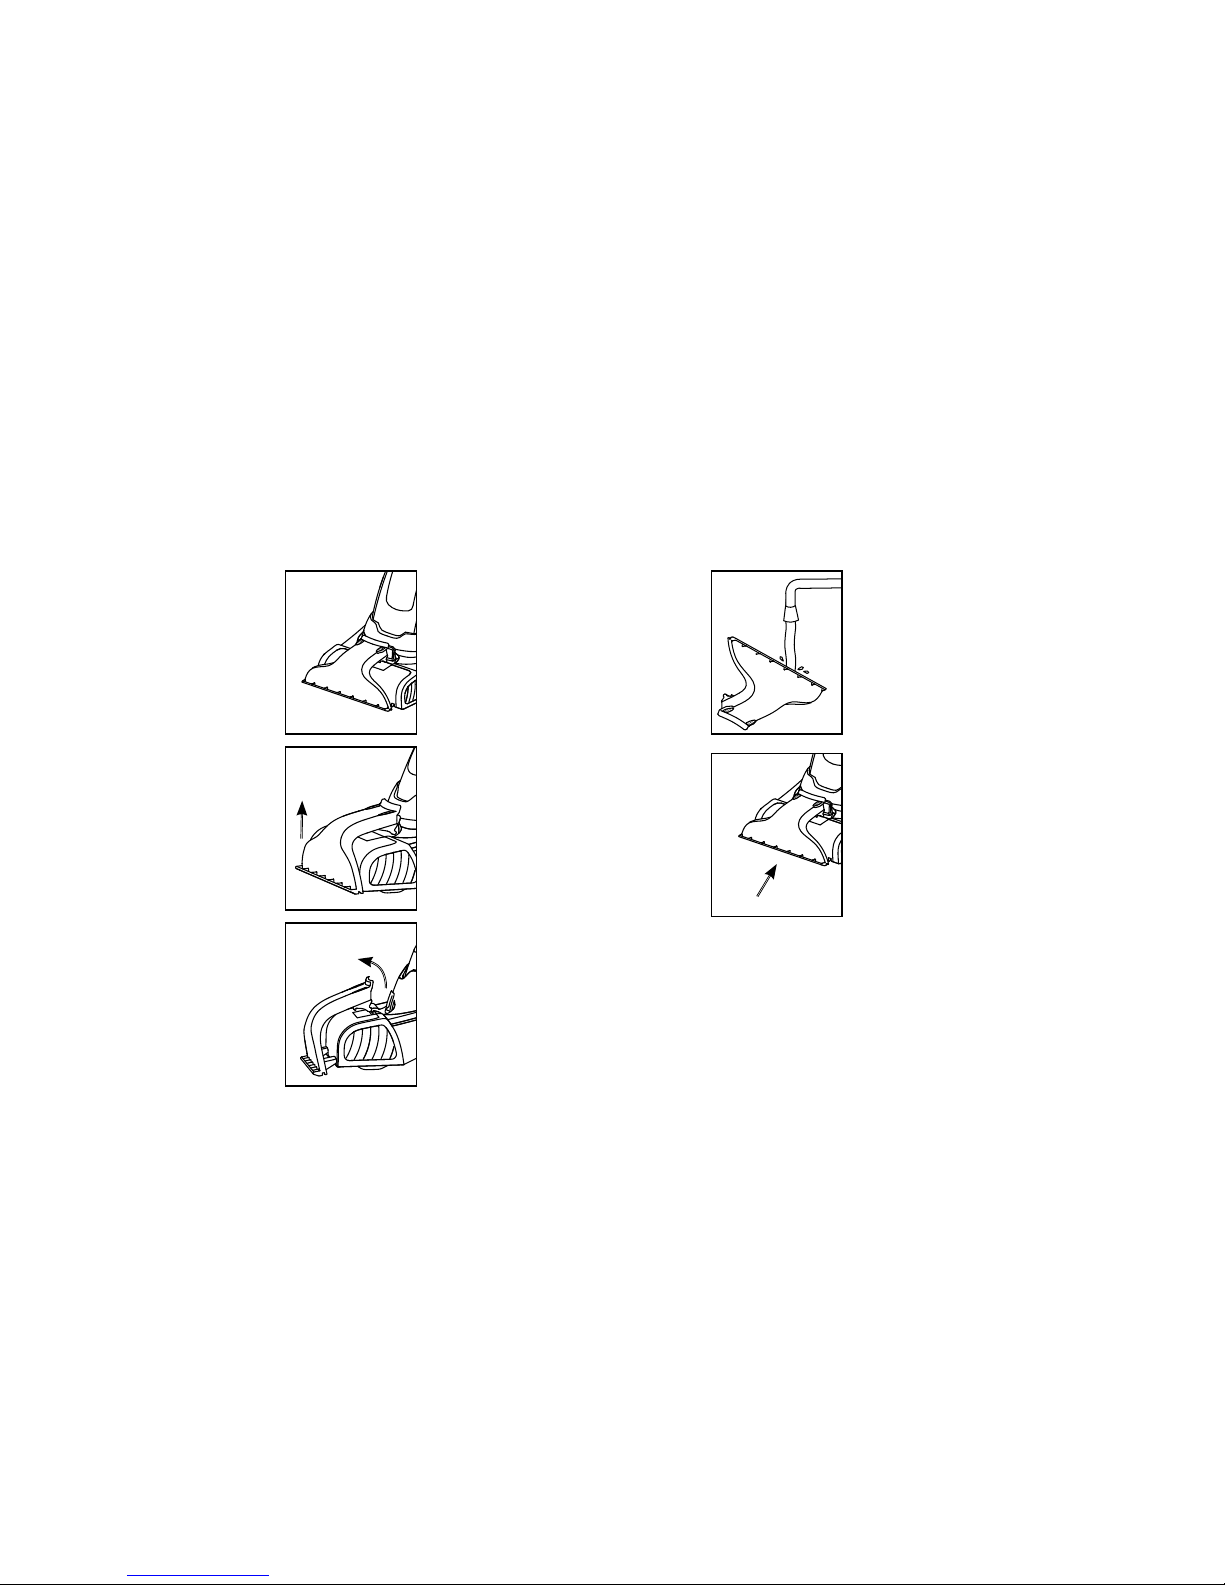
How to Clean Nozzle
To prevent possible leaking, remove
tanks from the unit.
Grip the top of the nozzle and
pull up to remove. Lift the unit up
slightly to remove nozzle.
Replace the nozzle by aligning the
tabs at the bottom of the nozzle
to the foot.
1
3
5
2
4
6
Unit should be in upright position.
Rinse the nozzle under running
water to remove any dirt or debris.
Allow it to dry.
Snap nozzle into place.
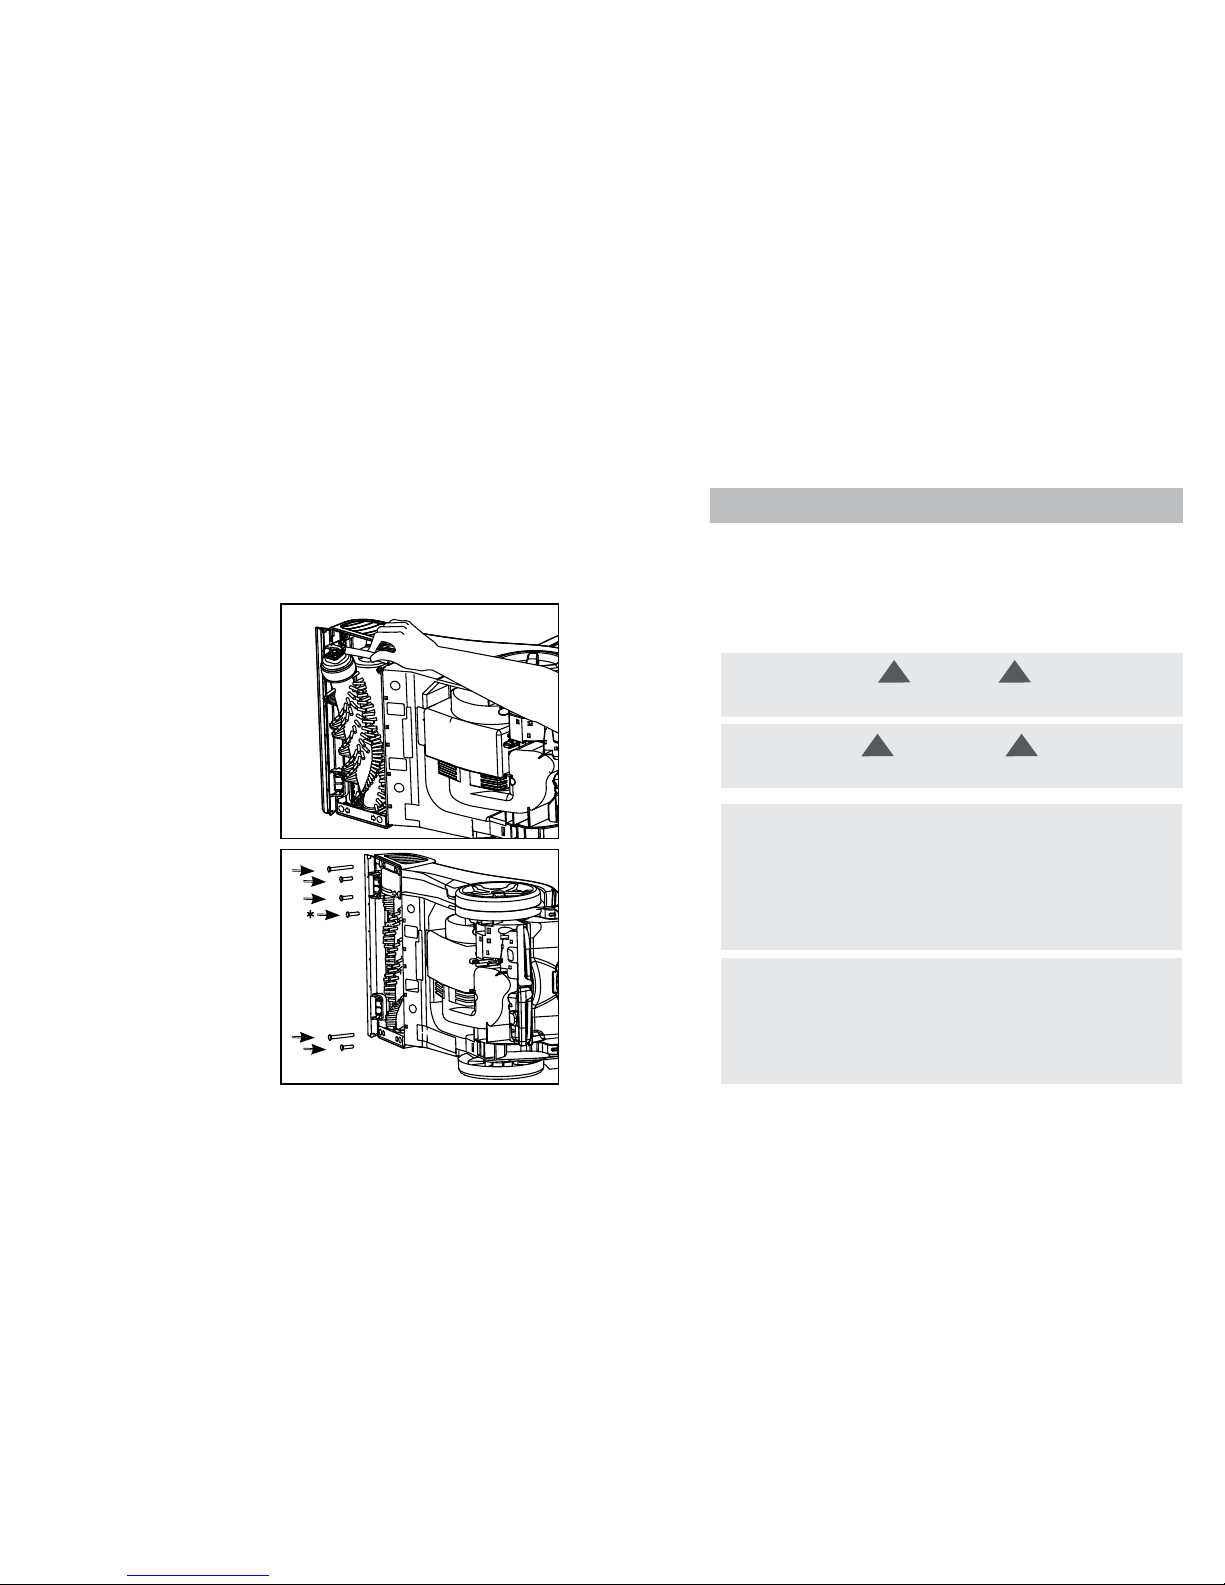
Page 15
15
Turn unit o and unplug from
electrical outlet.
To remove belt covers, use Philips
screwdriver to remove 6 screws.
Arrows show location of screws.
Pull brushroll toward user to
remove from unit.
1
3
5
2
4
6
Flip cleaner on its side to expose
bottom of cleaner.
Remove belt covers from unit.
Remove belt. Dispose of old belt.
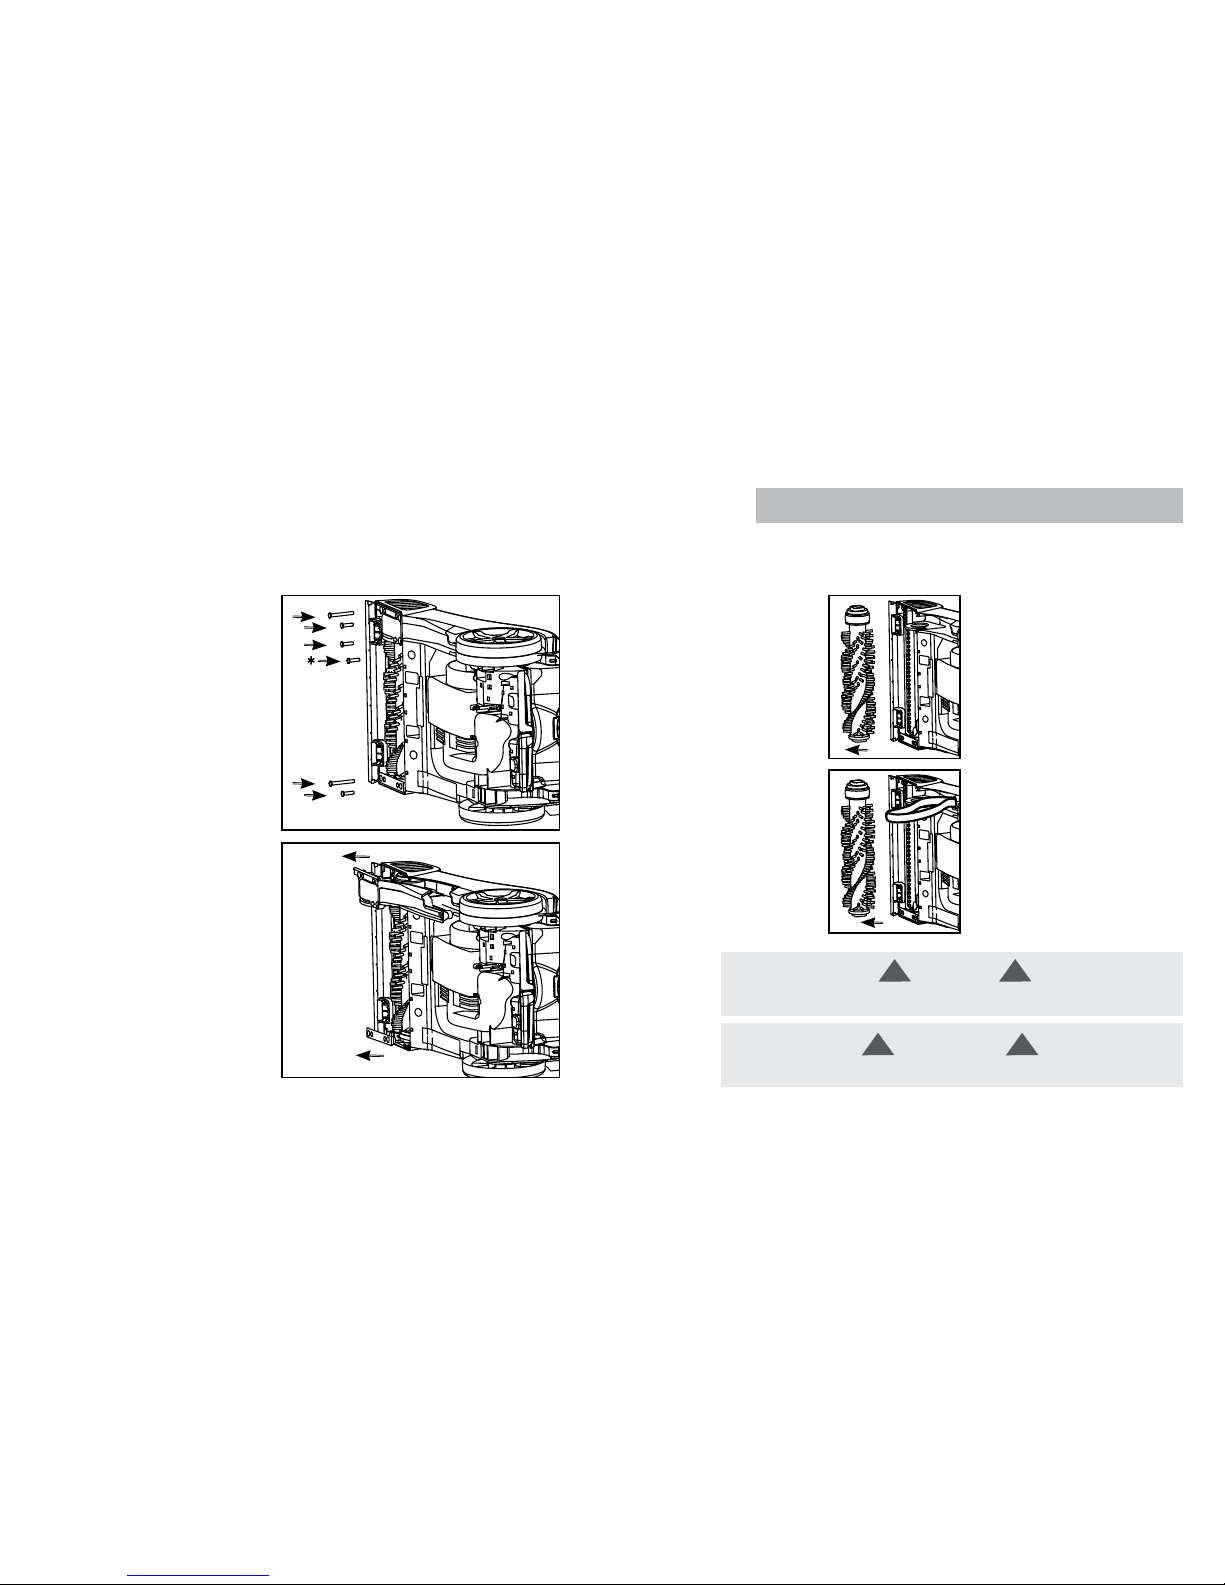
Maintenance
Belt Maintenance
HOW TO REMOVE
BELT PART #: 440012733 – TO BUY, VISIT HOOVER.COM
*in fro nt of whee l
IMPORTANT
Rotate brushrolls manually to make sure belt is not twisted or pinched.
! !
CAUTION
To reduce the risk of injury from moving parts, unplug before servicing.
!
!
Page 16

16
BELT PART #: 440012733 – TO BUY, VISIT HOOVER.COM
IMPORTANT
Rotate brushrolls manually to make sure belt is not twisted or pinched.
! !
Place new belt on motor shaft.
Position non-belt side end cap
of brushroll into pocket.
Replace belt covers and secure
by replacing all 6 screws.
1
3
5
2 4
Slip brushroll through belt. Carefully stretch belt to locate
other end cap into pocket,
making sure that the end caps
are in their correct orientation.
Maintenance
Belt Maintenance
HOW TO REPLACE
CAUTION
To reduce the risk of injury from moving parts, unplug before servicing.
! !
*in fro nt of whee l
Page 17
17
Turn unit o and unplug from
electrical outlet.
To remove belt covers, use Philips
screwdriver to remove 6 screws.
Arrows show location of screws.
Pull brushroll toward user to
remove from unit.
1
3
5
2
4
6
Flip cleaner on its side to expose
bottom of cleaner.
Remove belt cover from unit.
Rinse brushroll and all to dry.
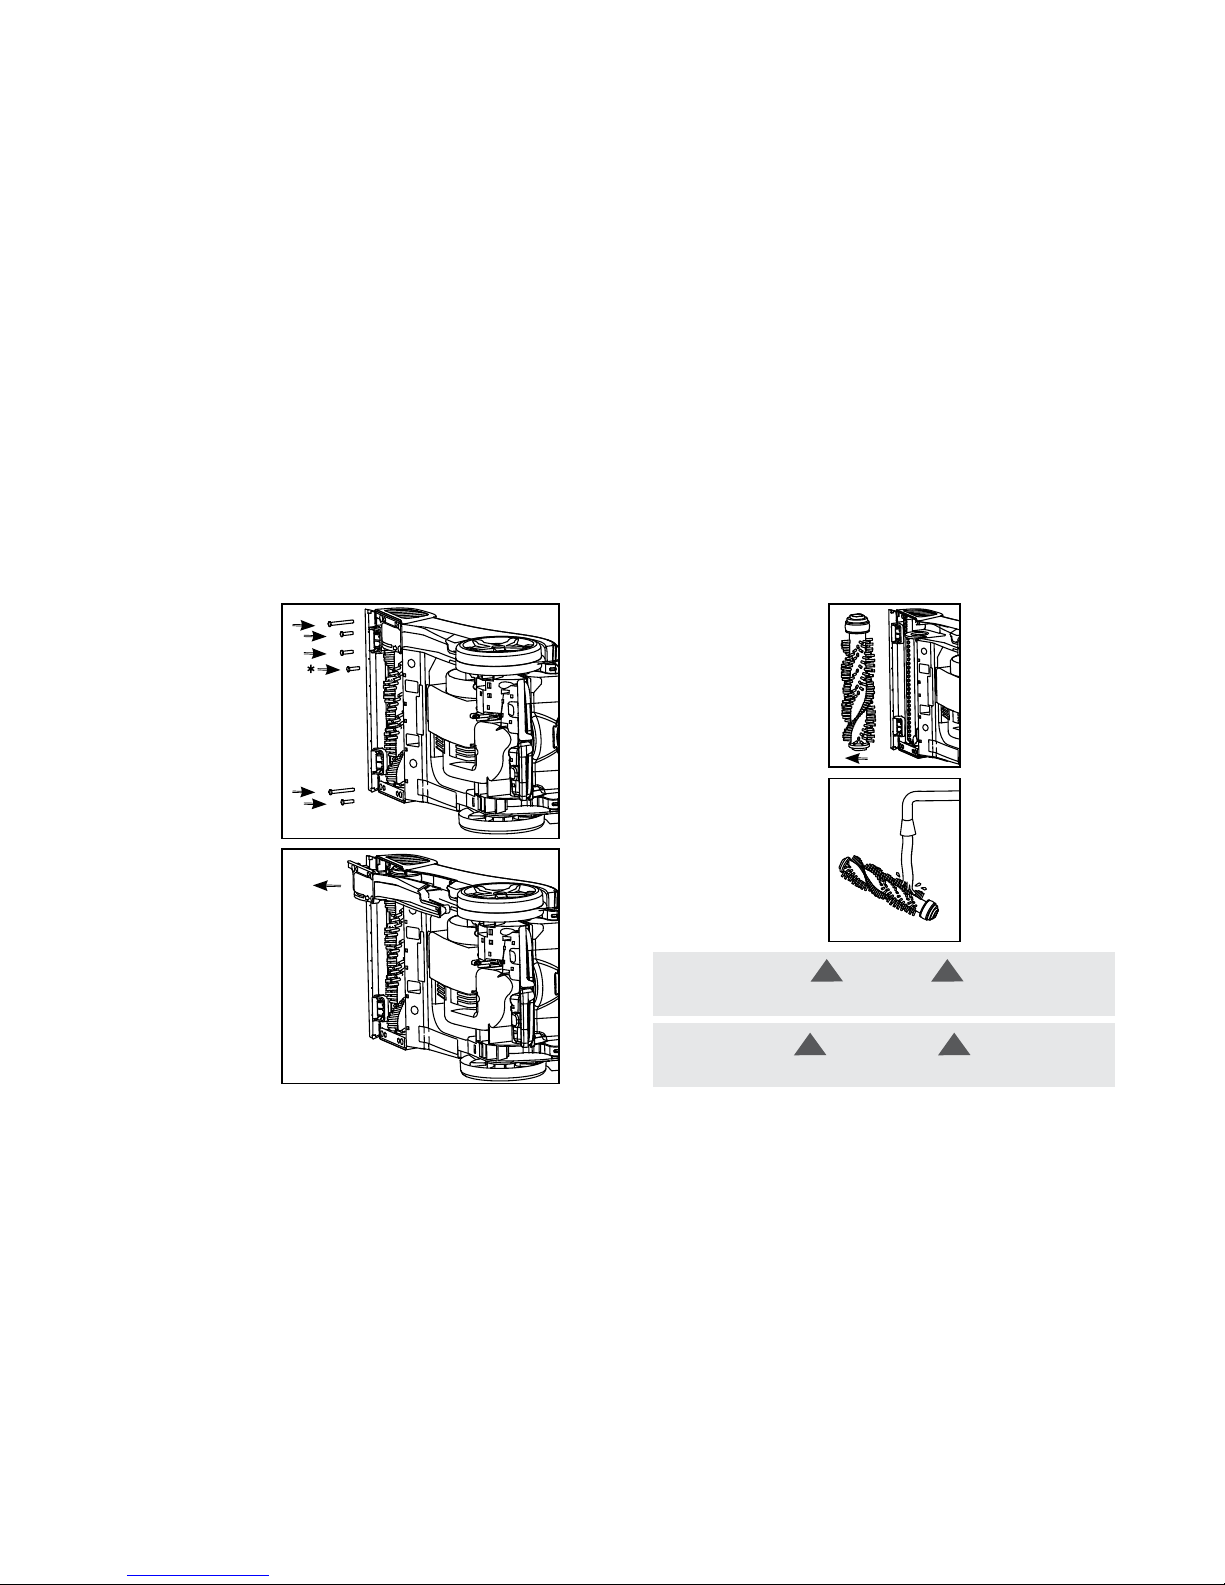
Maintenance
How to Remove and Clean Brushroll
HOW TO REMOVE
*in fro nt of whee l
IMPORTANT
Rotate brushrolls manually to make sure belt is not twisted or pinched.
! !
CAUTION
To reduce the risk of injury from moving parts, unplug before servicing.
!
!
Page 18
18
BRUSHROLL PART #: 440012796 – TO BUY, VISIT HOOVER.COM
Slip brushroll through belt.
Replace belt cover and secure by
replacing all 6 screws.
1
3
2
With belt in place, pull and slide
brushroll into unit, making sure that
the brushroll end caps are in correct
orientation.
Maintenance
How to Remove and Clean Brushroll
HOW TO REPLACE
LUBRICATION
The motor is equipped with bearings that contain sucient lubrication for the
life of the motor.
The addition of lubricant could cause damage. Therefore, do not add lubricant
to motor bearings.
*in fro nt of whee l
IMPORTANT
Rotate brushrolls manually to make sure belt is not twisted or pinched.
! !
CAUTION
To reduce the risk of injury from moving parts, unplug before servicing.
! !
STORAGE
Before storing: Empty Clean Water Tank and let air dry. Replace on cleaner.
Empty Dirty Water Tank, rinse tank and lid thoroughly with clean water and let
air dry.
Allow brushes and underside of carpet cleaner to air dry thouroughly before
storing carpet cleaner on a carpeted or wood surface.
Page 19
19
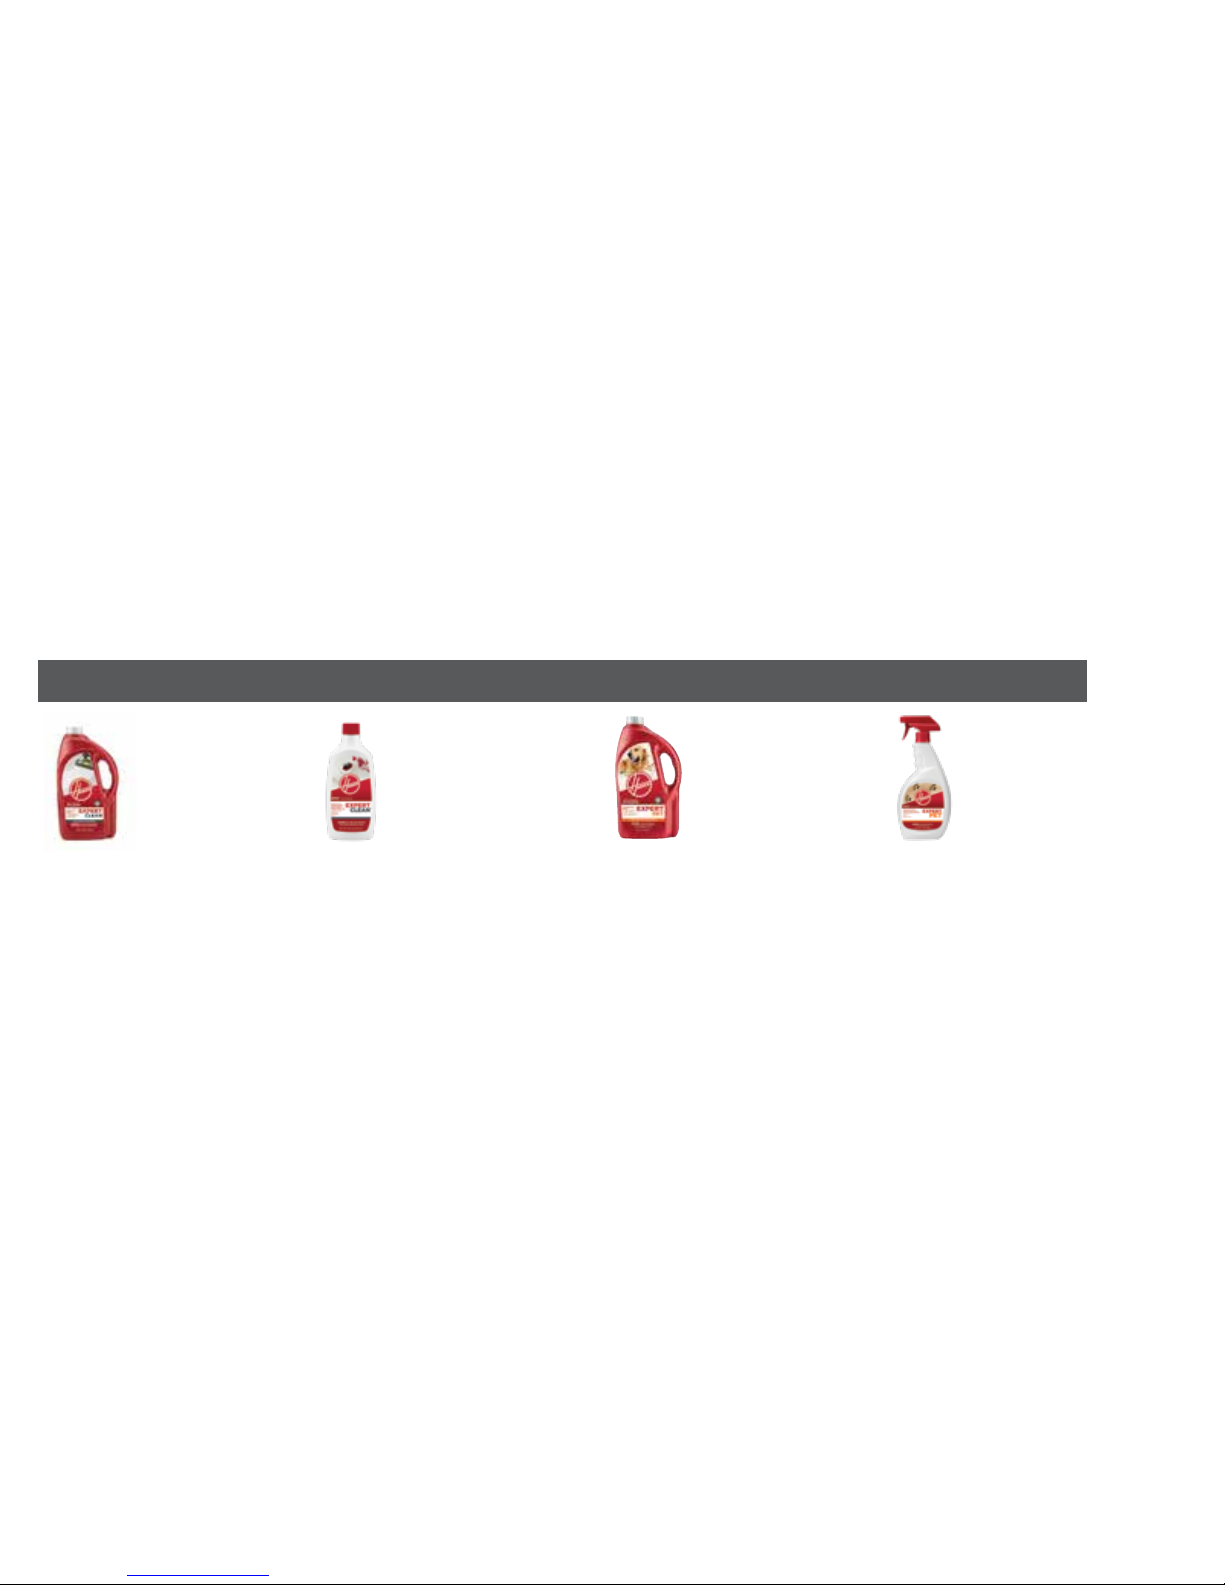
Hoover® Cleaning Solution Guide
Use only Hoover cleaning solutions to prevent potential harm to your carpet cleaner and keep your w arranty.
EXPERT CARPET SOLUTIONS: PROFESSIONAL GRADE
EXPERT CLEAN™ SPOT
TREATMENT GEL
Professional grade targeted gel removes tough
stain s like ground -in dirt, a llergens , chocolat e
and wine.
EXPERT PET™
SPOT TREATMENT SPRAY
Professional grade targeted enzyme
spra y removes to ugh stains li ke dirt,
oils, u rine and res idual odor.
For bes t results, use your Carpet Cleaner + Spot Treatment + Solutions.
Hoover has a full line of Detergents and Spot Treatments to complement your Hoover carpet cleaner and the specific condition of your carpet . To prevent project interruption, keep Detergent on hand and store
with your carpet cleaner. Sp ot Treatment may be used as a pretreatment immediately before you clean your carpets, or as an independent treatment between cleaning your carpets.
EXPERT CLEAN™ CARPET
WASHER DETERGENT
Powerful, profess ional strength cleaner
lif ts dirt and re moves alle rgens for our
deepest, extreme clean.
EXPERT PET™ CARPET
WASHER DETERGENT
Powerful, professional strength enzymes
break down biological stains, dirt and
odor fo r a truly deep c lean.
Page 20

20
CLEAN PLUS™
CARPET WASHER DETERGENT
Power ful clea ner for ever yday dirt an d
grime.
MULTI-FLOOR PLUS™
HARD FLOOR SOLUTION
Power ful hard fl oor cleanin g solution
remov es every day dirt and gr ime.
PET PLUS™
CARPET WASHER DETERGENT
Power ful clea ner enhance d with enzy mes
to tac kle pet mess es and elimin ate odor.
STEAM PLUS™ HARD FLOOR
SOLUTION
Power ful hard fl oor cleanin g solution c ombines
with s team to safe ly wash hard fl oors.
PET PLUS™
SPOT SPRAY
Power ful spot sp ray enhanc ed with
enzy mes to tack le pet messe s and
eliminate odor.
CLEAN PLUS™
SPOT SPRAY
Power ful spot sp ray for eve ryday
dirt a nd grime.
TILE & GROUT PLUS™
HARD FLOOR SOLUTION
Power ful hard fl oor cleanin g solution
clean s and revit alizes til e and grout
surfaces.
PRO PLUS™
CARPET WASHER DETERGENT
Professional strength carpet & upholster y
solution removes stubborn stains and odors.
PLUS CARPET SOLUTIONS
HARD FLOOR SOLUTIONS
Page 21

21
If you need further assistance:
If your product needs servicing
within the warranty period, please
contact Customer Service at
1-800-944-9200; Mon-Fri
7am-6pm EST. Always identify
your carpet washer by the
complete model number when
requesting information or ordering
parts. (The model number of the
carpet washer is located on the
data plate).
PLEASE DO NOT RETURN THIS
CLEANER TO THE STORE.
QUESTIONS OR CONCERNS?
Contact Us:
1-800-944-9200
If you have any questions or, visit Hoover.com
or connect with us:
Twitter: @HooverUSA
Facebook: facebook.com/hoover
Do not return to store. See back of product for
model number.
Need Help?
Troubleshooting:
Any other servicing should be done by
an authorized service representative.
USE TROUBLESHOOTING GUIDE
AS A FIRST STEP TO RESOLVE ANY
PROBLEMS YOU MAY BE EXPERIENCING.
If appliance is not working as it
should, has been dropped, damaged,
left outdoors, or dropped into water,
call Customer Service at 1-800-9449200 for further instruction before
continuing use.
WARNING
To reduce the risk of personal injury -
Unplug before cleaning or servicing.
WARNING
To reduce risk of fire and electric shock due to internal component damage, use only Hoover cleaning products intended for use with the appliance as noted.
! !
Page 22

22
PROBLEM POSSIBLE CAUSE POSSIBLE SOLUTION
Cleaner won’t run 1. Not firmly plugged in 1. Plug unit in firmly
2. No voltage in wall plug 2. Check fuse or breaker in home
3. Blown fuse or tripped breaker 3. Replace fuse or reset breaker in home
4. Fuse in cleaner blown 4. Take to service center
Low suction 1. Dirty Water Tank full⁄automatic shut
off engaged
1. Remove and empty Dirty Water Tank.
See "How to Empty" page 12
2. Dirty Water Cap or Plug not on
correctly
2. Tighten
3. Dirty Water Tank Debris Filter Clogged 3. See "How to Clean" page 12
4. Blockage in nozzle 4. See "How to Clean" page 13
5. Recovery Tank not properly secured 5. Replace Recovery Tank and secure
recovery tank latch
6. Clogged Filter 6. Clean it
Clean water won't
dispense
1. Clean Water Tank not firmly in place 1. Make sure tank is securely locked in
position
2. Clean Water Tank or solution
container empty
2. Refill container according to cleaning
instructions
3. Ensure trigger is being pulled
Brushes won't
rotate during floor
cleaning
Check for jams and⁄or broken belt
Page 23

23
ANY SERVICING SHOULD BE DONE BY AN AUTHORIZED SERVICE REPRESENTATIVE CALL
1-800-944-9200 USA & CANADA
In the event that further as sistance is r equired, visit an authori zed servic e center. Find one neare st
you by visiting our website at www.hoover.com. C osts of any transportation to and from any
place of repair are to be paid by the owner. Always identify your product by t he model number
and manufacturing code when requesting information or ordering replacement parts.(The model
number and manufact uring code are on the back of the product).
LIMITED ONE YE AR WARRANT Y (DOMESTIC USE)
WHAT THIS WARRANTY COVERS
When used and maintained in normal household use and in acc ordance with the Owner’s Manual,
your HOOVER ® product is warranted against or iginal defects in material and workmanship a full
year fr om date of purchase (the “War ranty Period”). During t he Warranty Period, Hoover® will
provide labor and par ts at no cost to you to correct any such defect in produc ts purchased in the
United States, U.S. Milit ary Exchanges and Canada.
HOW TO MAKE A WARRANTY CLAIM
If this produc t is warranted, take or send the product to either a Hoover® Sales and S ervice Center
or Hoover® Author ized Warranty Service Dealer along with proof of purchase. For an automate d
refer ral to author ized service outlets in the U.S.A ., phone: 1-800-94 4-9200 OR visit Hoover® online
at www.hoover.com. For additional assistance or information concerning this Warranty or the
availability of warranty service outlets, call the Hoov er® Consumer Response Center, Phone 1-800944-9200, Mon-Fri 8am-7pm EST. In C anada, contact Hoover® Canada, Carson B uilding, 100 Car son
St., Etobicoke, Ontario M8W 3R9, Phone: 1-800-944-9200,
Mon-Fri 8am-7pm EST.
WHAT THIS WARRANTY DOES NOT COVER
This warranty does not cover: use of the product in a commercial operation (such as maid,
janitorial and equipment rental services), filter, brushroll and belt, improper maintenance of the
product, damage due to misuse, acts of God, nature, vandalism or other acts beyond the control
of Hoover®, owner’s ac ts or omissions, use outside the countr y in which the product was initially
purchased and resales of the product by t he original owner. This w arranty does not cover pick up,
delivery, tr ansportation or house calls, however, if you mail your product to a Hoover® Sale s and
Service Center f or warranty service, cost of shipping will be paid one way.
This warranty does not apply to product s purchased outside the Uni ted States, including its
territories and possessions, outside a U.S. Mil itary Exc hange and outside of Canada. This warranty
does not cover products purchased from a par ty that is not an authorized retailer, dealer, or
distr ibutor of Hoover® products.
OTHER IMPORTANT TERMS
This warranty is not transfer able and may not be assigned. T his Warranty shall b e governed and
construed under the laws of the state of Ohio. The Warranty Period will not be extended by any
replacement or repair performed under this Warranty.
THIS WARRANT Y IS THE EXCLUSIV E WARRANT Y AND REMEDY PROV IDED BY HOOVER®. ALL OTHER
WARRANTIES, E XPRESSED OR IMP LIED, INCLUDING WARRAN TIES OF MERC HANTABIL ITY OR FITNES S
FOR PARTICULAR PURP OSE, ARE DISCL AIMED. IN NO EVENT WILL HOOVER® BE L IABLE FOR A NY
SPECIAL , INDIRECT, INCIDENTAL OR CONSEQUENT IAL DAMAGES OF ANY KIND OR NATURE TO OWNER
OR ANY PA RTY CLAIMING THROUGH OWNER, WHET HER BASED IN CONTRACT, NEGLIGENCE, TORT
OR STRICT P RODUCTS LIABILIT Y OR ARISING FROM ANY CAUSE WHATSOEVER. Some states do not
allow the exclusion of consequential damages, so the above exclusion may no t apply to you. This
warranty gives you specific rights; you may also have others that vary from state to state.
SERVICE & WARRANTY
SERVICE INFORMATION
Page 24

24
CARPET CLEANER
GUIDE D’UTILISATION
POWERDASH
TM
IMPORTANT : Lisez attentivement le présent guide d’utilisation avant
d’assembler et d’utiliser l’appareil.
Conçu aux États-Unis. Fabriqué en Chine. © Techtronic Floor Care Technology Limited, 2018. Tous droits réservés. Distribué par Royal
Appliance Mfg. Co. Charlotte, NC 28262 Tous droits réservés. 961152078-R0
Page 25

25
C’EST GARANTI.
Nettoyez en toute confiance pendant un (1) an grâce à la garantie
limitée de HooverMD. Consultez la garantie pour obtenir tous les détails.
Enregistrez votre nettoyeur de tapis chez:
Appelez au 1 800 944-9200Visitez le site Hoover.com ou Hoover.ca
Devenez ociellement propriétaire.
Bienvenue chez
HooverMD.
Page 26

26
Table des matières
Consignes de sécurité .................................................................................................................. 28
Contenu de l’emballage ...............................................................................................................30
Guide produit ................................................................................................................................. 31
Assemblage de votre PowerDash
MC
............................................................................................. 32
Avant de commencer le nettoyage ............................................................................................. 33
Soyez prêt à utiliser votre PowerDash
MC
.....................................................................................34
Entretien ......................................................................................................................................... 36
Guide sur les solutions nettoyantes Hoover .............................................................................43
Dépannage ..................................................................................................................................... 45
Garantie ..........................................................................................................................................46
Page 27

27
CONSIGNES DE SÉCURITÉ IMPORTANTES À CONSERVER
• Redoublez de prudence lorsque vous utilisez l’appareil dans un
escalier. Pour éviter tout dommage ou blessure et empêcher
l’appareil de tomber, placez toujours ce dernier au bas des
escaliers ou sur le plancher. Ne placez pas l’appareil sur les
marches d’un escalier ou sur un meuble, car cela peut entraîner
des dommages ou des blessures.
• N’utilisez pas l ’appareil pour aspirer des liquides inflammables ou
combustibles, comme de l’essence, ni de la sciure de bois, ni dans
des endroits où de telles substances peuvent être présentes.
• Branchez l’appareil uniquement dans une prise correctement mise
à la terre. Consultez les instructions de mise à la terre.
• N’utilisez pas l ’appareil pour aspirer quoi que ce soit qui brûle ou
dégage de la fumée comme des cigarettes, des allumettes ou des
cendres chaudes.
• N’utilisez pas l’appareil sans avoir installé les filtres et les réservoir s.
• Ne déplacez pas l’appareil sur des prises de courant au sol.
Lorsque vous utilisez des appareils électriques, veuillez
toujours respecter entre autres les consignes de sécurité
élémentaires suivantes:
VEUILLEZ LIRE TOUTES LES INSTRUCTIONS AVANT D’UTILISER
CET APPAREIL.
AVERTISSEMENT:
POUR RÉDUIRE LE RISQUE D’INCENDIE, DE DÉCHARGE
ÉLECTRIQUE, DE DOMMAGE OU DE BLESSURE:
• Assemblez entièrement l’appareil avant de l’utiliser.
• Faites seulement fonctionner l’appareil à la tension indiquée sur
la plaque signalétique située à l’arrière de l’aspirateur-chariot.
• Ne laissez pas l’appareil en marche sans surveillance.
Débranchez la fiche de la prise de courant dès la fin de
l’utilisation et avant le nettoyage ou l’entretien.
• N’utilisez pas l ’appareil à l’extérieur.
• N’immergez pas l’appareil. Ne l’utilisez que sur des tapis
humidifiés par le processus de nettoyage.
• Pour réduire les risques d’incendie et de décharge électr ique causés
par des composants internes endommagés, utilisez uniquement
les produits nettoyants HOOVER conçus pour cet appareil.
Consultez la sec tion Produits net toyants (page 43) de ce manuel .
• Ne permettez pas aux enfants de jouer avec l ’appareil. Cet
appareil ne doit pas être utilisé par des enfants de moins de
12ans. Exercez une sur veillance étroite lorsque l’appareil est
utilisé à proximité d’enfants. Gardez l’appareil hors de la portée
des enfants et ne laissez pas ces derniers introduire leurs doigts
ou d’autres objets dans aucune ouverture afin d’éviter les blessures
ou les bris.
• Utilisez l’appareil uniquement aux fins décrites dans le présent
guide. Utilisez uniquement les accessoires et produits
recommandés par le fabricant.
• N’utilisez pas l ’appareil lorsque le cordon ou la fiche est
endommagé. Cessez d’utiliser l’appareil s’il ne fonctionne pas
comme prévu, s’il a été échappé sur le sol ou dans l’eau, s’il est
endommagé ou s’il a été laissé à l’extérieur et appor tez-le au
centre de réparations.
• Ne tirez pas et ne transpor tez l’appareil par son cordon, n’utilisez
pas le cordon comme une poignée, ne coincez pas le cordon dans
l’embrasure d’une por te et ne le tirez pas contre des arêtes ou des
cornières tranchantes. Ne placez pas l’appareil sur le cordon. Ne
faites pas rouler l’appareil sur le cordon. Tenez le cordon éloigné
des surfaces chaudes.
• Ne débranchez pas l’appareil en tirant le cordon. Débranchez
l’appareil en tenant la f iche et non le cordon.
• Ne manipulez pas la fiche ou l ’appareil avec des mains mouillées.
• N’insérez aucun objet dans les ouvertures. N’utilisez pas l’appareil
si les ouvertures sont obstruées. Assurez-vous qu’elles sont
exemptes de poussière, de mousse, de cheveux ou de tout ce qui
pourrait réduire le débit d’air.
• Gardez les cheveux, les vêtements amples, les doigts et toute autre
partie du corps à l’écart des ouver tures et des pièc es en mouvement.
• Éteignez toutes les commandes avant de débrancher l’appareil.
AVERTISSEMENT:
Ce produit contient des produits chimiques
reconnus par l’État de la Californie comme pouvant causer le
cancer, des anomalies congénitales ou des dysfonctions du système
reproducteur.
BIEN SE LAVER LES MAINS APRÈS LA MANIPULATION.
Page 28

28
INSTRUCTIONS DE MISE À LA TERRE:
Cet appareil doit être mis à la terre. S’il devait mal
fonctionner ou être endommagé, la mise à la terre fournira
au courant électrique une résistance moindre afin de réduire
le risque de décharge électrique. Cet appareil est muni d’un
cordon électrique comportant un conducteur de protection
(C) et une fiche de mise à la terre (A). La fiche doit être
insérée dans une prise appropriée (B) qui est bien installée
et mise à la terre conformément à tous les codes et
règlements locaux.
AVERTISSEMENT:
Le branchement inapproprié du conducteur de protection peut
entraîner des risques de décharge électrique. Consultez un
électricien ou un technicien qualifié si vous n’êtes pas certain
que la prise est bien mise à la terre. Ne modifiez pas la fiche
fournie avec l’appareil. Si elle ne s’insère pas dans la prise,
communiquez avec un électricien qualifié pour faire installer
une prise appropriée. Cet appareil a été conçu pour être utilisé
sur un circuit d’une tension nominale de 120 V. Il est équipé
d’une fiche de mise à la terre semblable à la fiche (A) illustrée
à la figure 1. Un adaptateur temporaire (D) peut être utilisé pour
brancher cette fiche à une prise à deux alvéoles (E), si une
prise correctement mise à la terre n’est pas disponible (figure
2). L’adaptateur temporaire doit uniquement être utilisé en
attendant qu’une prise correctement mise à la terre (B) soit
installée par un électricien qualifié (figure 1). La languette
rigide verte (F), ou ce qui lui ressemble, attachée à l’adaptateur
doit être reliée à une mise à la terre permanente (G), telle que
le couvercle d’une boîte de sortie correctement mise à la terre
(figure 2). Lorsque l’adaptateur est utilisé, il doit être maintenu
en place à l’aide d’une vis à métaux. REMARQUE: Au Canada,
l’utilisation d’un adaptateur temporaire n’est pas autorisée par
le Code canadien de l’électricité.
MISE EN GARDE :
POUR RÉDUIRE LES RISQUES DE DOMMAGE :
• Évitez d’utiliser l’appareil pour ramasser des objets durs ou aux
arêtes tranchantes, car ils pourraient endommager l’appareil.
• Rangez l’appareil adéquatement à l’intérieur et dans un endroit
sec. N’exposez pas l’appareil à des conditions de gel.
• N’utilisez pas d’objet aux arêtes tranchantes pour nettoyer le
tuyau, car cela risquerait de l’endommager.
• Pour réduire le temps de séchage, assurez-vous que l’endroit est
bien aéré lorsque vous utilisez des détergents et d’autres
produits nettoyants avec cet appareil.
• Afin d’éviter le matage et le retour des salissures, évitez tout
contact avec les tapis tant que ceux-ci ne sont pas
complètement secs. Tenez les enfants et les animaux à distance
des tapis tant que ceux-ci ne sont pas complètement secs.
• N’entreposez pas cet appareil en laissant de la solution dans les
réservoirs.
• Lorsque le rouleau-brosse est en marche, ne laissez pas
l’appareil trop longtemps au même endroit, car vous risqueriez
d’endommager le plancher.
• N’utilisez pas cet appareil sur des planchers durs. Ce faisant,
vous pourriez égratigner ou endommager votre plancher.
• Après l’utilisation, de l’eau s’égoutte près des brosses et sous
l’appareil et peut créer une flaque. Pour éviter d’endommager les
parquets en bois et les planchers lamellés et pour éviter les
risques de chute, observez les consignes suivantes après
l’utilisation: a) ne laissez pas l’appareil sur les surfaces en bois
ou lamellées, mais déplacez-le plutôt sur une surface dure; b)
placez l ’appareil sur un matériau absorbant (tel qu’une serviette)
pour éponger tout excédent d’eau.
A
1
C
D
D
2
F
E
G
B
Page 29

29
Rouleau-brosse
PowerSpin
Bouteille
de solution
nettoyante
échantillon
Shampouineuse
Alvéole de
la poignée
supérieure
Réservoir
d’eau sale
amovible
Poignée
supérieure
Réservoir d’eau
propre
Contenu de l’emballage
Page 30

30
Guide produit
1.
Détente d’eau/solution
2.
Enrouleur de cordon
3.
Réservoir d’eau propre
4.
Réservoir d’eau sale amovible
5.
Filtre (Sous le réservoir d’eau sale)
6.
Bouchon verseur rapide
7.
Buse amovible
8.
Brosse PowerSpin
9.
Poignée supérieure
10.
Alvéole de la poignée supérieure
11.
Pédale marche/arrêt
12.
Dégagement de la poignée du
réservoir d’eau sale (PAS UNE POIGNÉE
DE TRANSPORT)
13.
Pédale de dégagement de la poignée
1
9
4
11
5
6
12
7
13
8
2
10
3
Page 31

31
Assemblage
Insérez l’alvéole de la
poignée supérieure dans
la base jusqu’à entendre
un cliquetis.
Insérez la poignée
supérieure dans l’alvéole
de la poignée supérieure
jusqu’à entendre un
cliquetis.
Enroulez le cordon
d’alimentation autour des
crochets pour faciliter
l’entreposage.
1
4
2
3
Faites glisser le réservoir
d’eau propre jusqu’à
ce qu’il s’enclenche à
l’arrière de l’appareil.
Poussez fermement.
Page 32

32
Avant de commencer le nettoyage:
Tout d’abord, utilisez un aspirateur
Hoover pour bien nettoyer vos tapis et
revêtements en tissu.
N’utilisez pas le nettoyeur à tapis en guise
d’aspirateur classique.
N’utilisez votre nettoyeur à tapis que
si le tissu de revêtement porte le code
«W» (nettoyage à base d’eau) ou «S/W»
(nettoyage à base de solvant ou à sec ou
à base d’eau). Ne nettoyez pas de tissu
portant le code «S» (nettoyage à base de
solvant ou à sec seulement).
Testez d’abord la stabilité des couleurs
dans un petit endroit caché. Frottez
doucement la surface à l’aide d’un chion
blanc humide. Attendez dixminutes et
vérifiez si la couleur s’est estompée ou a
déteint au moyen d’un essuie-tout blanc.
Sortez les meubles de la zone à
nettoyer. Placez des morceaux de papier
d’aluminium ou de papier ciré sous les
pattes des meubles trop lourds pour être
transportés afin d’éviter de tacher le
tapis avec les surfaces en bois. Relevez
les jupes de meubles et draperies, et
épinglez-les en place.
Prétraitez les taches et les zones de trafic
dense en utilisant une solution nettoyante
HooverMD*. Consultez la section sur les
solutions nettoyantes.
*En vente séparément si non comprise avec
votre modèle.
REMARQUE: Pour éviter de
provoquer des taches, utilisez des
morceaux de film plastique ou de
papier d’aluminium pour protéger
les surfaces en bois ou en métal
des éventuelles éclaboussures.
REMARQUE: Pour éviter
d’endommager les planchers de
bois sous les tapis, placez un
matériau imperméable (p.ex.:
plastique) entre les tapis et le
plancher avant de nettoyer.
Pour obtenir des résultats optimaux,
prétraitez les taches en utilisant un
détachant Hoover (reportez-vous au guide
des solutions nettoyantes Hoover, à la
page42) pour aider à déloger et à éliminer
les taches les plus tenaces.
Prétraitement:
Page 33

33
Premiers pas avec votre nettoyeur de tapis PowerDashMC:
Retirez le réservoir
d’eau propre situé à
l’arrière de l’appareil.
Remettez le capuchon
et serrez-le. Faites
glisser le réservoir d’eau
propre jusqu’à ce qu’il
s’enclenche à l’arrière
de l’appareil. Poussez
fermement.
1
4
Remplissez le réservoir d’eau propre.
Retirez le bouchon du
dessous et ajoutez de
l’eau chaude jusqu’à la
ligne de remplissage
d’eau.
2
Ajoutez la solution de
nettoyage HooverMD
jusqu’à la ligne de
remplissage de la
solution.
3
Page 34

34
Premiers pas avec votre nettoyeur de tapis PowerDashMC:
Branchez le cordon
d’alimentation dans une
prise de courant.
Comment nettoyer les tapis avec votre PowerDashMC:
Appuyez sur la pédale
de dégagement de la
poignée pour incliner
l’appareil en position de
nettoyage.
Appuyez sur la pédale
MARCHE/ARRÊT pour
allumer l’appareil.
3
*Suivez ces étapes pour obtenir de meilleurs résultats
Appuyez sur la gâchette
pour un passage humide
lent vers l’avant et vers
l’arrière*.
1
4
2
5
Relâchez la détente pour
un passage à sec lent vers
l’avant et vers l’arrière*.
Continuez d’eectuer des passages à sec jusqu’à ce que vous ne
voyiez presque plus d’eau passer dans la buse.
Pour obtenir des résultats optimaux, Hoover vous recommande
de rincer les tapis à l’eau seulement. Cela permet d’éliminer les
résidus de solution nettoyante pour tapis. Remplissez le réservoir
de solution d’eau et répétez. Pour les endroits très sales, répétez.
Évitez de saturer le tapis.
MISE EN GARDE
Ne déplacez pas l’appareil sur des prises de courant au sol.
Après l’utilisation, de l’eau s’égoutte près des brosses et sous
l’appareil et peut créer une flaque. Pour éviter d’endommager
les parquets en bois et les planchers lamellés et pour éviter
les risques de chute, observez les consignes suivantes après
l’utilisation: a) ne laissez pas l’appareil sur les surfaces en
bois ou lamellées, mais déplacez-le plutôt sur une surface
dure; b) placez l’appareil sur un matériau absorbant (tel
qu’une serviette) pour éponger tout excédent d’eau.
!!
REMARQUE: Videz le réservoir d’eau sale lorsque le son du
moteur devient plus aigu et que vous ressentez une perte
de succion (consultez la section sur l’arrêt automatique de
l’appareil). Vous verrez aussi le flotteur s’élever et couper la
succion en même temps.
IMPORTANT
Pour que l’appareil ore une succion totale, il est important que
le réservoir d’eau sale soit bien assujetti avant le nettoyage.
! !
Page 35

35
Entretien
Comment vider et nettoyer vos réservoirs:
Réservoir d’eau sale:
Éteignez l’appareil et débranchezle de la prise de courant.
Transportez le réservoir d’eau sale
en position verticale et placez-le
sur une surface plane.
Avant de replacer le réservoir,
vérifiez le filtre et nettoyez-le si
nécessaire.
1
3 6
2
4
5
7
Appuyez sur le loquet et retirez
le réservoir d’eau sale situé à
l’arrière de l’appareil.
Ouvrez le bouchon verseur rapide
et videz-le.
Remplacez et fermez le bec
verseur rapide.
Replacez le réservoir d’eau sale
en l’inclinant vers l’arrière et en
le balançant vers l’avant pour le
mettre en place.
IMPORTANT
Pour que l’appareil ore une succion totale, il est important
que le réservoir d’eau sale soit bien assujetti avant le nettoyage.
! !
Page 36

36
Entretien
Comment vider et nettoyer vos réservoirs:
Réservoir d’eau propre:
Retirez le réservoir de
l’appareil.
Replacez le réservoir une
fois qu’il est propre et sec.
1
3
2
Dévissez le bouchon. Videz
le réservoir, rincez-le et
laissez-le sécher à l’air
libre.
Page 37

37
Entretien
Comment nettoyer la buse
Pour empêcher les éventuelles fuites,
retirez les réservoirs de l’appareil.
Saisissez le haut de la buse et
tirez-la vers le haut pour la retirer.
Soulevez légèrement l’appareil pour
retirer la buse.
Replacez la buse en alignant les
languettes situées en bas de la
buse jusqu’au pied.
1
3
5
2
4
6
L’appareil doit être en position
verticale.
Rincez la buse à l’eau courante pour
enlever la poussière et les débris.
Laissez sécher.
Enclenchez la buse.
Page 38

38
Éteignez l’appareil et débranchez-le
de la prise de courant.
Pour retirer les couvercles de
courroie, utilisez un tournevis
Philips pour retirer les 6vis. Les
flèches indiquent l’emplacement
des vis.
Tirez le rouleau-brosse vers
l’utilisateur pour le retirer de
l’appareil.
1
3
5
2
4
6
Faites basculer le nettoyeur sur le
côté pour exposer le bas du nettoyeur.
Retirez les couvercles de courroie
de l’appareil.
Retirez la courroie. Mettez
l’ancienne courroie au rebut.
Entretien
Entretien de la courroie
COMMENT L’ENLEVER
COURROIE N°: 440012733 – POUR ACHETER, VISITEZ LE SITE HOOVER.COM
* En fac e de la roue
IMPORTANT
Faites pivoter les rouleaux-brosses manuellement pour s’assurer que la courroie n’est pas pincée ou pliée.
! !
MISE EN GARDE
Débranchez l’appareil avant d’en eectuer l’entretien afin de réduire le risque de blessures présenté par les pièces en mouvement.
!
!
Page 39

39
Placez une nouvelle courroie
sur l’arbre du moteur.
Positionnez l’embout côté
sans courroie du rouleaubrosse dans la pochette.
Replacez les couvercles de
courroie et fixez les 6vis.
1
3
5
2 4
Faites glisser le rouleaubrosse à travers la courroie.
Étirez soigneusement la
courroie pour localiser l’autre
embout dans la pochette
en vous assurant que les
embouts sont bien orientés.
Entretien
Entretien de la courroie
COMMENT LA REMPLACER
* En fac e de la roue
COURROIE N°: 440012733 – POUR ACHETER, VISITEZ LE SITE HOOVER.COM
IMPORTANT
Faites pivoter les rouleaux-brosses manuellement pour s’assurer que la courroie n’est pas pincée ou pliée.
! !
MISE EN GARDE
Débranchez l’appareil avant d’en eectuer l’entretien afin de réduire le risque de blessures présenté par les pièces en mouvement.
! !
Page 40

40
Éteignez l’appareil et débranchez-le
de la prise de courant.
Pour retirer les couvercles de
courroie, utilisez un tournevis
Philips pour retirer les 6vis. Les
flèches indiquent l’emplacement
des vis.
Tirez le rouleau-brosse vers
l’utilisateur pour le retirer de
l’appareil.
1
3
5
2
4
6
Faites basculer le nettoyeur sur le
côté pour exposer le bas du nettoyeur.
Retirez le couvercle de courroie de
l’appareil.
Rincez le rouleau-brosse et
laissez-le sécher.
Entretien
Comment retirer et nettoyer le rouleau-brosse
COMMENT L’ENLEVER
* En fac e de la roue
IMPORTANT
Faites pivoter les rouleaux-brosses manuellement pour s’assurer que la courroie n’est pas pincée ou pliée.
! !
MISE EN GARDE
Débranchez l’appareil avant d’en eectuer l’entretien afin de réduire le risque de blessures présenté par les pièces en mouvement.
!
!
Page 41

41
ROULEAU-BROSSE N°: 440012796 – POUR ACHETER, VISITEZ LE SITE HOOVER.COM
Faites glisser le rouleau-brosse à
travers la courroie.
Replacez le couvercle de courroie
et fixez les 6vis.
1
3
2
Une fois la courroie en place,
tirez sur le rouleau-brosse et
faites-le glisser dans la buse en
vous assurant que les embouts du
rouleau-brosse sont bien orientés.
Entretien
Comment retirer et nettoyer le rouleau-brosse
HOW TO REPLACE
TOO MUCH
INFO FOR 1
PAGE.
RANGEMENT
Avant le rangement: Videz le réservoir d’eau propre et laissez-le sécher à l’air libre.
Replacez-le sur le nettoyeur. Videz le réservoir d’eau sale, rincez le réservoir ainsi que son
couvercle à l’eau propre et laissez-les sécher à l’air libre.
Laissez les brosses et le dessous du nettoyeur de tapis sécher complètement à l’air libre
avant de ranger le nettoyeur de tapis sur une surface tapissée ou en bois.
LUBRIFICATION :
Le moteur est doté de roulements susamment lubrifiés pour la durée de vie du moteur.
L’ajout de lubrifiant pourrait causer des dommages.
C’est pourquoi vous ne devez pas ajouter de lubrifiant dans les roulements du moteur.
* En fac e de la roue
IMPORTANT
Faites pivoter les rouleaux-brosses manuellement pour s’assurer que la courroie n’est pas pincée ou pliée.
! !
MISE EN GARDE
Débranchez l’appareil avant d’en eectuer l’entretien afin de réduire le risque de blessures présenté par les pièces en mouvement.
!
!
Page 42

42
Guide des solutions nettoyantes Hoover
MD
SOLUTIONS EXPERTES POUR TAPIS : QUALITÉ PROFESSIONNELLE
EXPERT CLEAN™ SPOT
TREATMENT GEL
Nettoyant puissant de qualité professionnelle
pour so ulever la sa leté et élim iner les
allergènes orant le meilleur nettoyage en
profondeur.
EXPERT PET™
SPOT TREATMENT SPRAY
Gel en va porisat eur de qualit é
professionnelle pour cibler et éliminer
les ta ches rebel les comme la s aleté,
les hui les, l’uri ne et les odeur s
résiduelles.
EXPERT CLEAN™ CARPET
WASHER DETERGENT
Nettoyant puissant de qualité
professionnelle pour soulever la saleté
et élim iner les
allergènes orant le meilleur nettoyage
en profondeur.
EXPERT PET™ CARPET
WASHER DETERGENT
Puissant détergent de qualité
professionnelle avec enzymes pour
décomposer les taches biologiques,
la sal eté et les ode urs pour un
nettoyage vraiment profond.
Utilisez les solutions de nettoyage de HOOV ER pour éviter d’endommager votre shampouineuse à tapis et éviter l’annulation de votre garantie.
Utilisez votre shampouineuse à t apis + le traitement de t aches + une solution afin d’obtenir des résult ats optimaux.
Hoover ore une gamme complète de détergents et de traitements de taches adaptée à votre shampouineuse à tapis et les condit ions partic ulières de vot re tapis. Pour éviter l’arrêt de la pulvér isation, gar dez
le détergent à portée de main e t rangez-le avec vot re shampouineuse à tapis. Le traitement pour tache peu t être utilisé comme prétr aitement immé diatement avant de procéder au nettoyage de vos tapis ou à
utiliser comme traitement avant le prochain netto yage de tapis.
Page 43

43
CLEAN PLUS™
CARPET WASHER DETERGENT
Nettoyant puissant pour la saleté
quotidienne.
MULTI-FLOOR PLUS™
HARD FLOOR SOLUTION
Solution nettoyante puissante pour
planchers durs pour nettoyer la saleté
quotidienne.
PET PLUS™
CARPET WASHER DETERGENT
Nett oyant puis sant amélio ré avec des
enzy mes pour ven ir à bout des ta ches liées
aux ani maux de comp agnie et élimi ner les
odeurs.
STEAM PLUS™ HARD FLOOR
SOLUTION
Solu tion puiss ante de nett oyage à la vap eur
sûre po ur les planc hers durs.
PET PLUS™
SPOT SPRAY
Puis sant netto yant pour le s taches et
saletés quotidiennes et les taches rebelles.
CLEAN PLUS™
SPOT SPRAY
Spra y puissant p our les tache s
du quotidien.
TILE & GROUT PLUS™
HARD FLOOR SOLUTION
Puissante solution nettoyante pour
planchers durs pour nettoyer et
revi taliser le s surfac es de carre aux et
le coul is.
PRO PLUS™
CARPET WASHER DETERGENT
Puis sant netto yant améli oré avec enz ymes
qui s’at taque aux dég âts d’animau x et
élimin e les odeurs .
SOLUTION PLUS CARPET
SOLUTIONS POUR PLANCHERS DURS
Page 44

44
Pour obtenir de l’aide supplémentaire:
Si votre produit nécessite un service
d’entretien au cours de la période
de garantie, veuillez communiquer
avec le service à la clientèle
au 1800944-9200, entre 7h et
18h (HNE) du lundi au vendredi.
Identifiez toujours votre appareil
à l’aide du numéro de modèle
complet lorsque vous demandez
des renseignements ou commandez
des pièces. (Le numéro de modèle
du nettoyeur de tapis est inscrit sur
la plaque signalétique.)
VEUILLEZ NE PAS RETOURNER CE
PRODUIT AU MAGASIN.
DES QUESTIONS OU DES PRÉOCCUPATIONS?
Communiquez avec nous:
+1800944-9200
Si vous avez des questions, visitez le site
Hoover.com ou suivez-nous
Twitter: @HooverUSA
Facebook: facebook.com/hoover
Ne retournez pas le produit en magasin. Le
numéro de modèle du produit est indiqué à
l’arrière de l’appareil.
Dépannage?
Dépannage :
Toute autre tâche d’entretien doit être
confiée à un représentant de service
autorisé.
UTILISEZ D’ABORD LE GUIDE DE DÉPANNAGE
POUR RÉSOUDRE LES PROBLÈMES.
Si l’appareil ne fonctionne pas comme
prévu, s’il est tombé sur le sol ou dans
l’eau, s’il est endommagé ou a été laissé à
l’extérieur, communiquez avec le service à
la clientèle au 1800944-9200 pour obtenir
de plus amples renseignements avant de
poursuivre l’utilisation.
AVERTISSEMENT
Débranchez l’appareil avant de le
nettoyer ou de faire l’entretien afin
de réduire le risque de blessures.
AVERTISSEMENT
Pour réduire les risques d’incendie et de décharge
électrique causés par des composants internes
endommagés, utilisez uniquement les produits nettoyants
Hoover conçus pour cet appareil, comme il est indiqué.
! !
Page 45

45
PROBLÈME CAUSE POSSIBLE SOLUTION
L’appareil ne fonctionne pas. 1. La prise est mal branchée. 1. Insérez entièrement la fiche dans la prise de courant.
2. Pas de tension à la prise murale. 2. Vérifiez les fusibles ou les disjoncteurs du domicile.
3. Fusible grillé ou disjoncteur déclenché. 3. Remplacez le fusible ou enclenchez le disjoncteur du domicile.
4. Le fusible du nettoyeur est grillé. 4. Apportez la au centre de service.
La succion est faible. 1. Réservoir d’eau sale plein⁄arrêt automatique déclenché. 1. Enlevez le réservoir d’eau sale et videz-le. Reportez-vous au
chapitre «Comment vider l’appareil» à la page36.
2. Le couvercle ou la fiche du réservoir d’eau sale n’est pas
installé(e) correctement.
2. Serrez
3. Dirty Water Tank Debris Filter Clogged 3. Reportez-vous au chapitre «Comment
nettoyer» à la page36.
4. Obstruction dans la buse. 4. Reportez-vous au chapitre «Comment
nettoyer» à la page37.
5. Réservoir de récupération mal fixé. 5. Replacez le réservoir de récupération et fixez le loquet du
réservoir de récupération.
6. Filtre obstrué. 6. Nettoyez-le.
L’appareil ne distribue pas d’eau. 1. Le réservoir d’eau propre n’est pas bien mis en place. 1. Assurez-vous que le réservoir est bien verrouillé en place.
2. Le réservoir d’eau propre et le contenant de solution sont vides. 2. Remplissez le contenant conformément aux instructions de
nettoyage.
3. Assurez-vous que la détente est appuyée.
Les brosses ne tournent pas pendant
le nettoyage du plancher.
Vérifiez qu’il n’y a pas de blocage et⁄ou que la courroie n’est pas
brisée.
Page 46

46
TOUTE TÂCHE D’ENTRE TIEN DOIT ÊTRE CONFIÉE À UN REPRÉSENTANT DE SERVICE AUTORISÉ. APPELEZ
AU 1800944-9200 (É.-U. ET CANADA).
Si vous avez besoin d’aide supplémentaire, visitez un centre de service au torisé. Trouvez le centre le plus
près de chez vous en visitant notre site Web à w ww.hoover.com. Les frais de transpor t à destination et
en provenance de l’emplacement de r éparation sont payés par le propriétaire. Identifiez toujours votre
produi t par le numéro de modèle et le code de fabr ication lorsque vous demandez des informations ou que
vous commandez des pièces de rechange. (Le numéro de modèle et le code de f abrication de l’aspirateur
se trouvent à l ’arrière de l’appareil.)
GARANTIE LIMITÉE D’UN AN (USAGE DOMESTIQUE)
COUVERTURE DE LA GARANTIE
Lorsqu’ils sont utilisés et entretenus dans des conditions normales d’utilisation et d’entretien
domestiques, comme il est stipul é dans le guide de l’utilisateur, votre produit HOOV ERMD est garanti contre
les déf auts de fabrication et de main-d ’œuvre pendant un (1)an à partir de la date d’ac hat (ci-après la
«Période de gar antie»). Pendant la période de garantie, Hoover fournir a la main-d’œuvre et les pièc es
gratuitement afin de corriger une telle défectuosité pour les produits achetés aux États-Unis dans les
boutiques d’échanges militaires américaines et au Canada.
RÉCLAMATION AU TITRE DE L A GARANTIE
Si le produit es t garanti, apportez ou envoyez le produit à un centre de vente et de service HooverMD ou chez
un fournisseur autorisé de ser vice sous gar antie HooverMD avec une preuve d’achat. Pour obtenir la liste
des points de service autorisés aux É .-U., composez le numéro du s ervice aut omatisé au 1-80 0-944-9200
OU visitez HooverMD en ligne au www.hoover.com. Pour obtenir du soutien ou d’autres renseignements au
sujet de l a garantie ou pour connaître les centres de ser vice orant les réparations au titre de la garantie,
communiquez avec le service à la clientèle Hoo verMD au 180094 4-9200, entre 8h et 19h (HNE) du lundi
au vendr edi. Au Canada, communiquez avec HooverMD Canada, édifice Carson , 100, rue Cars on, Etobicoke
(Ontario), M8W 3R9. Téléphone: 180094 4-9200, entre 8h et 19h (HNE) du lundi au vendr edi.
ÉLÉMENTS NON COUVERTS PAR LA GA RANTIE
La pré sente garant ie ne couvre p as: l’utilis ation du produi t à des fins commercial es (comme par le s
femme s de chambre, le s concierge s et les serv ices de location d’ équipement ), le filtre, le ro uleau-bro sse,
la cour roie, un entr etien inadéquat du produit , les bris causés par la mauvaise u tilisatio n, les cas for tuits,
les catast rophes natur elles, le va ndalisme et au tres actes h ors du contrô le de HooverMD, les agissements
ou omis sions du propr iétaire, l’utilisatio n à l’extérie ur du pays d’acha t et de revente d ’origine du produit
par le pr emier acheteur. La pré sente garant ie ne couvre p as le ramass age, la livr aison, le transport, ni les
répar ations à domic ile. Toutefois , si vous envoyez votre prod uit par courr ier à un centre de vente et de ser vice
HooverMD pour une r éparation s ous garantie , les frais de l ivraison de r etour seront payés.
Cette gara ntie ne couvr e pas les produits ac hetés à l’ext érieur des États-Unis, y c ompris ses te rritoires et
poss essions, ho rs des boutiq ues d’écha nges militaires et à l ’extérieur d u Canada. Ce tte garanti e ne couvre
pas les produi ts achetés à un e partie n’étant pa s un détaillan t, un conces sionnaire ou un d istribute ur autorisé
des produits HooverMD.
AUTRES CONDITIONS IMPORTANTES
La pré sente garant ie n’est pas tran sférable et n e peut pas être cédée. La pr ésente garantie se ra régie
et inter prétée sel on les lois de l’État d e l’Ohio. La p ériode de gar antie ne sera pas prol ongée après tout
rempl acement ou tou te réparation au titre de la présente gar antie.
CET TE GAR ANTIE ES T VOTRE UNIQU E RECOURS E T VOIE DE DROIT F OURNIS PAR HOO VERMD. TOU TES AUTRES
GARANTIES, EXPRESSES OU TACITES, INCLUANT LES GARANTIES DE QUALITÉ MARCHANDE OU D’ADAPTATION
À UN USAGE PART ICULIER , SONT DÉCLINÉES. EN AUCUN TE MPS, HOOVERMD NE P OURRA ÊT RE TENUE
RESP ONSABLE D E TOUS LES DOM MAGES-INTÉ RÊTS SPÉ CIAUX, IND IRECTS, A CCIDENT ELS OU ACCESSOIRES
D’AUCUN E SORTE OU D’AUCUNE NAT URE ENVER S LE PROPRIÉ TAIRE OU DE TOU TES PART IES RÉCLA MANT AU
NOM DU PR OPRIÉTAIR E, QUE CE SOIT PAR CONTR AT, NÉGLI GENCE, TORT OU RE SPONSAB ILITÉ ST RICTE DES
PRODUITS OU SURVENUS PA R QUELQUE CA USE QUE CE SOI T. Certains États ne perme ttent pas l ’exclu sion des
dommag es consécu tifs. Par conséq uent, l’excl usion précé dente pourrait ne pa s être applic able dans votr e
cas. L a présente garant ie vous donne des droit s précis. Vous pouve z également av oir d’autres dr oits, lesq uels
varie nt d’une provin ce à l’autre.
ENTRETIEN & GARANTIE
RENSEIGNEMENTS SUR L’ENTRETIEN
Page 47

47
NOTES:
Page 48

48
CARPET CLEANER
MANUAL DEL USUARIO
POWERDASH
TM
IMPORTANTE: Lea este manual con atención antes
de ensamblar y usar este aparato.
Diseñado en EE. UU. Hecho en China.© 2018 Techtronic Floor Care Technology Limited. Todos los derechos reservados.
Distribuido por Royal Appliance Mfg. Co. Charlotte, NC 28262. Todos los derechos reservados. 961152078-R0
Page 49

49
TIENE GARANTÍA.
Obtenga confianza al limpiar con la garantía limitada de hasta 1 año de Hoover.
Consulte la garantía para conocer los detalles completos.
Registre su limpiadora de alfombras:
Llamando al 1-800-944-9200Visitando Hoover.com o Hoover.ca
Hágalo oficial.
Bienvenido a la
propiedad de Hoover®.
Page 50

50
Índice
Instrucciones de seguridad ......................................................................................................... 52
Contenido de la caja ..................................................................................................................... 54
Guía del producto ..........................................................................................................................55
Ensamblaje de su PowerDash™..................................................................................................56
Antes de comenzar la limpieza ...................................................................................................57
Pasos iniciales de su PowerDash™ ............................................................................................ 58
Mantenimiento ...............................................................................................................................60
Guía de soluciones de limpieza de Hoover ................................................................................67
Resolución de problemas ............................................................................................................ 68
Garantía ..........................................................................................................................................70
Page 51

51
INSTRUCCIONES DE SEGURIDAD IMPORTANTES CONSERVE ESTAS INSTRUCCIONES
sobre el suelo. No coloque la aspiradora sobre las escaleras ni
sobre un mueble, ya que pueden generarse lesiones o daños.
• No utilice la unidad para aspirar líquidos combustibles o
inflamables, tales como gasolina o restos de madera lijada,
ni la utilice en áreas en las que dichas sustancias puedan
estar presentes.
• Conecte el aparato solamente a un tomacorriente que tenga
la debida puesta a tierra. Consulte la sección Instrucciones
de puesta a tierra.
• No aspire nada que se encuentre en combustión o emita
humo, como cigarrillos, fósforos o cenizas calientes.
• No utilice la unidad si esta no tiene colocados los filtros y los
tanques.
• No limpie por encima de los tomacorrientes de piso.
Cuando se utilizan aparatos eléctricos, se deben seguir
siempre precauciones básicas, incluidas las siguientes:
LEA TODAS LAS INSTRUCCIONES ANTES DE UTILIZAR ESTE APARATO.
ADVERTENCIA:
PARA DISMINUIR EL RIESGO DE INCENDIO, DESCARGA ELÉCTRICA,
DAÑOS O LESIONES, RESPETE LAS SIGUIENTES MEDIDAS:
• Arme la unidad por completo antes de ponerla en
funcionamiento.
• Hágala funcionar únicamente con el voltaje especificado en
la etiqueta de datos que se encuentra en la parte trasera del
contenedor de la aspiradora.
• No descuide el aparato cuando esté enchufado.
Desenchúfelo del tomacorriente cuando no esté en uso y
antes de realizarle limpieza o servicio de mantenimiento.
• No utilice la aspiradora en exteriores.
• No la sumerja. Utilícelo únicamente en alfombras
humedecidas por el proceso de limpieza.
• Para reducir el riesgo de incendio y descarga eléctrica
debido a daño de los componentes internos, utilice
únicamente productos de limpieza HOOVER con fines de uso
para el aparato. Consulte la sección “Productos de limpieza”
(página 67) de este manual.
• Evite que se lo utilice como un juguete. Los niños de 12 años
o menos no deben utilizar la unidad. Cuando se lo utilice
cerca de niños, será necesario hacerlo bajo una estricta
supervisión. Para evitar lesiones o daños, mantenga a los
niños alejados del producto y no permita que introduzcan
los dedos ni objetos en ninguna de las aberturas del
producto.
• Utilice la unidad únicamente según el uso descrito en este
manual. Utilice solamente los accesorios y productos
recomendados por el fabricante.
• No lo utilice si el cable o el enchufe se encuentran dañados.
Si el aparato no funciona como debe, si se ha caído, dañado o
dejado a la intemperie, o si se ha sumergido en agua, llévelo
a un centro técnico antes de continuar usándolo.
• No tire del aparato ni lo transporte tomándolo por el cable, no
use el cable como una manija, no cierre una puerta sobre el
cable ni lo enrosque alrededor de bordes o esquinas filosas. No
apoye el producto sobre el cable. No pase el aparato por encima
del cable. Mantenga el cable lejos de las superficies calientes.
• No lo desenchufe tirando del cable. Para desenchufarlo,
agarre el enchufe, no el cable.
• No manipule el enchufe ni el aparato con las manos mojadas.
• No coloque ningún objeto en las aberturas. No utilice la
unidad si alguna de sus aberturas se encuentra bloqueada.
Manténgala libre de polvo, pelusas, cabello y cualquier otro
elemento que pueda disminuir el flujo de aire.
• Evite que el cabello, la ropa suelta, los dedos y cualquier otra
parte del cuerpo entren en contacto con las aberturas y las
piezas móviles de la unidad.
• Apague todos los controles antes de desenchufarlo.
• E xtreme las precauciones cuando limpie en escaleras. Para
evitar lesiones o daños físicos, y a f in de evitar que la
limpiadora se caiga, colóquela siempre al pie de las escaleras o
ADVERTENCIA:
Este producto contiene químicos reconocidos
por el estado de California como causantes de cáncer, defectos de
nacimiento u otros daños en el aparato reproductor.
LÁVESE LAS
MANOS LUEGO DE MANIPULARLO.
Page 52

52
INSTRUCCIONES DE PUESTA A TIERRA:
Este aparato debe conectarse a tierra. Si existe un mal
funcionamiento o una rotura, la puesta a tierra proporciona
una vía con la menor resistencia para la corriente eléctrica a
fin de reducir el riesgo de descarga eléctrica. El aparato viene
equipado con un cable que presenta un conductor de puesta a
tierra del equipo (C) y un enchufe de puesta a tierra (A). El
enchufe se debe insertar en un tomacorriente apropiado (B)
que esté correctamente instalado y puesto a tierra, de
conformidad con todos los códigos y las ordenanzas locales.
ADVERTENCIA:
La conexión incorrecta del conductor de puesta a tierra del
equipo puede generar riesgo de descarga eléctrica. Consulte
con un electricista o técnico calificado si tiene dudas sobre
la puesta a tierra correcta del tomacorriente. No modifique el
enchufe incluido en el aparato: si no encaja en el tomacorriente,
solicite la instalación de un tomacorriente correspondiente a un
electr icista calificado. E ste aparato tiene c omo fin su uso en un
circuito
de 120 voltios nominales y cuenta con un enchufe de puesta a tierra
que se parece al enchufe (A) de la Fig. 1. Par a conectar este enchufe
a un receptáculo de 2 polos (E), en caso de que no haya un
tomacorriente correctamente puesto a tierra (Fig. 2), se puede utilizar
un adaptador temporario (D). Dicho adaptador debe utilizarse solo
hasta que un electr icista calificado instale el correspondiente
tomacor riente puesto a tierra (B) (Fig. 1). La oreja rígida de color
verde, el terminal o algo similar (F) que se extiende del adaptador se
debe conectar a una puesta a tierra permanente (G), como la cubierta
de la tapa del tomacorriente debidamente puesta a tierra (Fig. 2).
Toda vez que utilice el adaptador, deberá ser sostenido en su lugar
con un tornillo de metal. NOTA: En Canadá, el Código Eléctrico
Canadiense no permite el uso de un adaptador temporal.
PRECAUCIÓN:
PARA DISMINUIR EL RIESGO DE DAÑOS:
• Evite aspirar objetos duros y filosos con este producto, ya que
pueden dañarlo.
• Almacénelo apropiadamente en interiores, en un lugar seco. No
exponga la máquina a temperaturas bajo cero.
• No utilice objetos filosos para limpiar la manguera, ya que
pueden dañar la unidad.
• Para ayudar a reducir el tiempo de secado, asegúrese de que el
área esté bien ventilada cuando utilice detergentes y otros
limpiadores con esta máquina.
• Para ayudar a prevenir el apelmazamiento y las manchas, evite
el contacto con las alfombras hasta que estén secas. Mantenga
a los niños y a las mascotas alejadas de las alfombras hasta
que estén completamente secas.
• No guarde el ex tractor con solución en los tanques.
• Con el cepillo y el cepillo giratorio encendidos, evite dejar la
limpiadora apoyada en un lugar por mucho tiempo, ya que esto
puede dañar el piso.
• No use el extractor en pisos duros. El uso de esta máquina en
pisos duros puede rayar o dañar sus pisos.
• Después del uso, goteará agua desde los cepillos y por la parte
inferior del producto que puede acumularse. Para evitar daños
en pisos de madera y laminados y posibles riesgos de caídas,
después de cada uso (a) no deje el producto sobre super ficies
de madera y laminado y muévalo a una superficie sólida y (b)
coloque la unidad sobre material absorbente (como una toalla)
para secar el goteo.
A
1
C
2
D
D
F
E
G
B
Page 53

53
Cepillo
giratorio
PowerSpin
Botella con
muestra de
solución para
limpieza
Limpiadora de
alfombras
Soporte
del mango
superior
Tanque de
agua sucia
Mango superior Tanque de agua
limpia
Contenido de la caja
Page 54

54
Guía del producto
1.
Gatillo para agua/solución
2.
Enrolle de cable
3.
Tanque de agua limpia
4.
Tanque de agua sucia
5.
Filtro (debajo del tanque de agua sucia)
6.
Vertedor rápido
7.
Boquilla extraíble
8.
Cepillo PowerSpin
9.
Mango superior
10.
Soporte del mango superior
11.
Pedal de encendido/apagado
12.
Mango de liberación del tanque de
agua sucia (¡NO UN MANGO PARA
TRANSPORTAR!)
13.
Pedal para soltar el mango
1
9
4
11
5
6
12
7
13
8
2
10
3
Page 55

55
Ensamblaje
Inserte el soporte del
mango superior en la
base hasta escuchar un
“CLIC”.
Inserte el mango superior
en el soporte del mango
superior hasta escuchar
un “CLIC”.
Enrolle el cable en
los ganchos guarda
cables, para facilitar el
almacenamiento de la
limpiadora.
1
4
2
3
Deslice el tanque de
agua limpia hasta
encastrar en su lugar
en la parte posterior
de la unidad. Presione
firmemente hacia abajo.
Page 56

56
Antes de comenzar la limpieza:
Antes de su usar la limpiadora, aspire la
alfombra y la tapicería a fondo, con una
aspiradora Hoover,.
No use la aspiradora de alfombras como
aspiradora en seco.
Utilice su limpiadora de alfombras Hoover
solo si la tela del tapizado está marcada
con una “H” (para limpieza “Húmeda”) o
con “S/H” (para limpieza con “Solvente/
Seca” o “Húmeda”). No limpie la tela si
está marcada con una “S” (únicamente
limpieza al “solvente/seco”).
Pruebe la resistencia al color en una
superficie pequeña que no esté a la vista.
Fregue suavemente la superficie con un
trapo blanco humedecido. Espere diez
minutos y pruebe la remoción del color o
la purga con una toalla de papel blanca.
Mueva los muebles del área que se
va a limpiar. Coloque papel aluminio
o encerado debajo de las patas de los
muebles que sean muy pesados para
mover, para prevenir que el acabado de
la madera manche la alfombra. Fije los
tapizados y cortinas.
Trate previamente las manchas y las
áreas de tráfico pesado con una solución
de limpieza Hoover®*. Vea la sección
“Soluciones de limpieza”.
*Disponible con un costo adicional, si no
está incluida con su modelo.
NOTA: Para prevenir las manchas,
use un envoltorio de plástico o
de aluminio para evitar que las
superficies se rocíen con agua.
NOTA: Para evitar daños en pisos
de madera debajo de esteras
o alfombras, coloque debajo
algún material impermeable (por
ejemplo: plástico) antes de realizar
la limpieza.
Para obtener mejores resultados de limpieza, trate las manchas previamente con un
tratamiento para manchas Hoover (consulte
la Guía de soluciones para limpieza Hoover
en la pág. 66) y ayude a aflojar y remover
incluso las manchas más rebeldes.
Tratamiento previo:
Page 57

57
Pasos iniciales de su limpiadora de alfombras PowerDash™:
Quite el tanque de
agua limpia de la
parte posterior de la
unidad.
Vuelva a colocarlo y
ajuste la tapa. Deslice el
tanque de agua limpia
nuevamente en la unidad.
Presione firmemente
hacia abajo.
1
4
Llene el tanque de agua limpia.
Quite el tapón de la
parte inferior y agregue
agua tibia hasta la línea
de llenado de agua.
2
Agregue la solución de
limpieza Hoover® hasta
la línea de llenado de
solución.
3
Page 58

58
Pasos iniciales de su limpiadora de alfombras PowerDash™:
Enchufe el cable de
alimentación en el
tomacorriente.
Limpieza de alfombras con su PowerDash™:
Pise el Pedal para Soltar
el Mango, para reclinar la
lavadora para la posición
de limpieza.
Pise el pedal de encendido/
apagado para encenderla.
3
*Siga estos pasos para obtener mejores resultados.
Presione el gatillo para
avanzar y retroceder
lentamente con una
pasada húmeda*.
1
4
2
5
Libere el gatillo para avanzar
y retroceder lentamente con
una pasada seca*.
Siga realizando pasadas secas hasta que vea que pase
poca agua a través de la boquilla.
Para obtener mejores resultados, Hoover recomienda
enjuagar la alfombra solo con agua limpia. Esto elimina
la solución de limpieza que quede como residuo. Llene el
tanque con agua y repita el procedimiento. Para áreas muy
sucias, repita el procedimiento. Evite saturar la alfombra.
PRECAUCIÓN
No limpie por encima de los tomacorrientes de piso. Después
del uso, goteará agua desde los cepillos y por la parte
inferior del producto que puede acumularse. Para evitar
daños en pisos de madera y laminados y posibles riesgos
de caídas, después de cada uso (a) no deje el producto
sobre superficies de madera y laminado y muévalo a una
superficie sólida y (b) coloque la unidad sobre material
absorbente (como una toalla) para secar el goteo.
!!
NOTA: Vacíe el Depósito de Agua Sucia cuando el sonido del
motor se haga más agudo y disminuya la aspiración (consulte
la sección “Apagado automático”). También verá que el flotador
se elevará y desactivará la aspiración, al mismo tiempo.
IMPORTANTE
Para que la aspiración sea buena, es importante que el
Depósito de Agua Sucia esté bien colocado, antes de
comenzar la limpieza.
! !
Page 59

59
Mantenimiento
Vaciado y limpieza de sus tanques:
Tanque de agua sucia:
Apague la limpiadora y
desenchúfela del tomacorriente.
Transporte el tanque de agua sucia
en posición vertical y colóquelo en
una superficie plana.
Antes de volver a colocar el
tanque, controle y limpie el filtro
según sea necesario.
1
3 6
2
4
5
7
Presione la traba y quite el
tanque de agua sucia de la parte
posterior de la unidad.
Abra el vertedor rápido y vacíelo.
Reemplace y cierre el tapón de
acceso de limpieza.
Vuelva a colocar el tanque de
agua sucia, inclinándolo hacia
atrás y luego balanceándolo
hacia adelante para encastrar en
su lugar.
IMPORTANTE
Para que la aspiración sea buena, es importante que el
Depósito de Agua Sucia esté bien colocado, antes de
comenzar la limpieza.
! !
Page 60

60
Mantenimiento
Vaciado y limpieza de sus tanques:
Tanque de agua limpia:
Quite el tanque de la unidad.
Vuelva a colocar el tanque
una vez que esté limpio
y seco.
1
3
2
Desenrosque el tapón. Vacíe
el depósito, enjuáguelo y
déjelo secar al aire.
Page 61

61
Mantenimiento
Limpieza de la boquilla
Para evitar posibles goteos, quite y
vacíe los tanques de la unidad.
Tome la parte superior de la
boquilla y tire hacia arriba para
extraerla. Levante la unidad
levemente para quitar la boquilla.
Vuelva a colocar la boquilla,
alineando las lengüetas en la parte
inferior de la boquilla con el pie.
1
3
5
2
4
6
La unidad debe estar en posición
vertical.
Enjuague la boquilla con agua
corriente para remover la suciedad
y los residuos. Permita que se seque.
Presione la boquilla para que
encaje en su lugar.
Page 62

62
Apague la unidad y desenchúfela
del tomacorriente.
Para quitar las cubiertas de la
correa, use un destornillador
Philips para quitar los 6tornillos.
Las fechas muestran la ubicación
de los tornillos.
Tire del cepillo giratorio hacia el
usuario para extraerlo de la unidad.
1
3
5
2
4
6
Voltee la limpiadora de lado para
exponer su parte inferior.
Quite las cubiertas de la correa de
la unidad.
Quite la correa. Deseche la correa
vieja.
Mantenimiento
Mantenimiento de la correa
EXTRACCIÓN
N.º DE PIEZA DE LA CORREA: 440012733 – PARA COMPRAR, VISITE HOOVER.COM
*fre nte a la rue da
IMPORTANTE
Gire manualmente los cepillos giratorios para asegurarse de que la correa no esté torcida o pellizcada.
! !
PRECAUCIÓN
Para reducir el riesgo de lesión derivado de las piezas móviles, desconecte el aparato antes de realizarle el servicio de mantenimiento.
!
!
Page 63

63
N.º DE PIEZA DE LA CORREA: 440012733 – PARA COMPRAR, VISITE HOOVER.COM
Coloque una nueva correa en el
eje del motor.
Coloque el tapón del lado sin
correa del cepillo giratorio en
el bolsillo.
Vuelva a colocar la cubierta
de la correa y fíjela con los
6tornillos.
1
3
5
2 4
Deslice el cepillo giratorio por
la correa.
Estire con cuidado la correa
para colocar el otro tapón en
el bolsillo, asegurándose de
que los tapones estén en su
orientación correcta.
Mantenimiento
Mantenimiento de la correa
RECOLOCACIÓN
*fre nte a la rue da
IMPORTANTE
Gire manualmente los cepillos giratorios para asegurarse de que la correa no esté torcida o pellizcada.
! !
PRECAUCIÓN
Para reducir el riesgo de lesión derivado de las piezas móviles, desconecte el aparato antes de realizarle el servicio de mantenimiento.
! !
Page 64

64
Apague la unidad y desenchúfela
del tomacorriente.
Para quitar las cubiertas de la
correa, use un destornillador
Philips para quitar los 6tornillos.
Las fechas muestran la ubicación
de los tornillos.
Tire del cepillo giratorio hacia el
usuario para extraerlo de la unidad.
1
3
5
2
4
6
Voltee la limpiadora de lado para
exponer su parte inferior.
Quite la cubierta de la correa de
la unidad.
Enjuague el cepillo giratorio y
déjelo secar.
Mantenimiento
Extracción y limpieza del cepillo giratorio
EXTRACCIÓN
*fre nte a la rue da
IMPORTANTE
Gire manualmente los cepillos giratorios para asegurarse de que la correa no esté torcida o pellizcada.
! !
PRECAUCIÓN
Para reducir el riesgo de lesión derivado de las piezas móviles, desconecte el aparato antes de realizarle el servicio de mantenimiento.
!
Page 65

65
N.º DE PIEZA DEL CEPILLO GIRATORIO: 440012796 – PARA COMPRAR, VISITE HOOVER.COM
Deslice el cepillo giratorio por la
correa.
Vuelva a colocar la cubierta de la
correa y fíjela con los 6tornillos.
1
3
2
Con la correa en su lugar, tire y
deslice el cepillo giratorio hacia la
unidad, asegurándose de que los
tapones del cepillo giratorio estén
en su orientación correcta.
Mantenimiento
Extracción y limpieza del cepillo giratorio
RECOLOCACIÓN
ALMACENAMIENTO
Antes de guardar: Vacíe el tanque de agua sucia y déjelo secar al aire. Vuelva a colocarlo en la
limpiadora. Vacíe el Depósito de Agua Sucia, enjuague el depósito y la tapa minuciosamente con agua
limpia y déjelos secar al aire.
Deje que los cepillos y la parte inferior de la limpiadora de alfombras se sequen al aire
completamente, antes de guardar la limpiadora en una superficie alfombrada o de madera.
LUBRICACIÓN
El motor está equipado con rodamientos que contienen suficiente lubricación para la vida útil del motor.
La adición de lubricante podría causar daños. Por lo tanto, no añada lubricante a rodamientos del motor.
*fre nte a la rue da
IMPORTANTE
Gire manualmente los cepillos giratorios para asegurarse de que la correa no esté torcida o pellizcada.
! !
PRECAUCIÓN
Para reducir el riesgo de lesión derivado de las piezas móviles, desconecte el aparato antes de realizarle el servicio de mantenimiento.
!
Page 66

66
Guía de soluciones para limpieza Hoover
SOLUCIONES PARA ALFOMBRAS EXPERT: CALIDAD PROFESIONAL
EXPERT CLEAN™ SPOT
TREATMENT GEL
El gel e specífico d e calidad pr ofesiona l elimina
las manchas profundas, como suciedad
percudida, alérgenos, chocolate y vino
EXPERT PET™
SPOT TREATMENT SPRAY
Potentes enzimas de fuerza
profesional que deshacen las
manch as, la sucie dad y los olor es
biológicos para una limpieza
realmente profunda
EXPERT CLEAN™ CARPET
WASHER DETERGENT
Potente limpiador de fuerza profesional
que rec olecta la s uciedad y el imina
los alé rgenos par a una limpiez a más
prof unda y extre ma
EXPERT PET™ CARPET
WASHER DETERGENT
Potentes enzimas de fuerza profesional
que des hacen las ma nchas, la s uciedad
y los olores biológicos para una limpieza
realmente profunda
Use únic amente las soluciones par a limpieza HOO VER y evite potenciales daños en su lavadora de alfombras y conser ve la garantía.
Para obtener mejore s resultados, use su limpiador de alfombr as junto con el tr atamiento para manchas y las soluciones.
Hoover cuenta con una extensa línea de detergentes y tratamientos para mancha s que se complementan c on su limpiador de alfombras Hoover y c on la condición específic a de su alfombra. Para evitar la
interrupción de la tarea, mantenga cer ca el detergente y almacénelo junto a su limpiador de alfombras. Puede usar el tratamiento para manchas c omo pretrat amiento inmediatamente ant es de limpiar sus
alfombras, o como tratamiento independiente entre l impieza de las alfombras.
Page 67

67
CLEAN PLUS™
CARPET WASHER DETERGENT
Potente limpiador para suciedad
y mugre diarias.
MULTI-FLOOR PLUS™
HARD FLOOR SOLUTION
Potente solución para limpieza de
piso s duros que elim ina la sucie dad diaria
y la mugr e.
PET PLUS™
CARPET WASHER DETERGENT
Solución para alfombras y tapizados de fuerza
profesional que elimina las manchas
difíciles y los olores.
STEAM PLUS™ HARD FLOOR
SOLUTION
Potente solución para limpieza
de piso s duros que se c ombina
con vapor para una limpieza
segur a de pisos dur os.
PET PLUS™
SPOT SPRAY
Potente limpiador de manchas
para s uciedad dia ria y para man chas
profundas.
CLEAN PLUS™
SPOT SPRAY
Poten te aerosol p ara mancha s para
suciedad y mugre diarias.
TILE & GROUT PLUS™
HARD FLOOR SOLUTION
Potente solución para limpieza de
piso s duros que limp ia y renueva l as
super ficies de mo saicos y jun tas.
PRO PLUS™
CARPET WASHER DETERGENT
Solución para alfombras y tapizados de
fuerza profesional que elimina las manchas
dificiles y los olores.
SOLUCIONES PARA ALFOMBRAS PLUS
SOLUCIONES PARA PISOS DUROS
Page 68

68
Si necesita más ayuda:
Si su producto necesita
mantenimiento durante el período
de garantía, llame al Servicio al
cliente al teléfono 1-800-944-9200
de lunes a viernes de 7a.m. a
6p.m. (hora estándar del este).
Siempre identifique su limpiador
de alfombras con el número
completo de modelo cuando solicite
información o realice el pedido de
las piezas de repuesto. (El número de
modelo de la lavadora de alfombras
está ubicado en la placa de datos).
NO DEVUELVA ESTA LIMPIADORA A
LA TIENDA.
¿TIENE PREGUNTAS O INQUIETUDES?
Contáctenos:
1-800-944-9200
Si tiene alguna pregunta, visite Hoover.com o
conéctese con nosotros:
Twitter: @HooverUSA
Facebook: facebook.com/hoover
No devuelva la unidad a la tienda. Vea la parte
posterior del producto para consultar el número
de modelo.
¿Necesita ayuda?
Resolución de problemas:
Cualquier otro mantenimiento lo debe
realizar un representante de servicio
autorizado.
UTILICE LA GUÍA DE RESOLUCIÓN DE
PROBLEMAS COMO PRIMER PASO PARA
RESOLVER CUALQUIER PROBLEMA QUE
PUEDA TENER.
Si el aparato no funciona como debe, si se
ha caído, dañado o dejado a la intemperie,
o si se ha sumergido en agua, llame al
Servicio al cliente al teléfono 1-8009449200 para obtener más instrucciones
antes de continuar usándolo.
ADVERTENCIA
Para reducir el riesgo de lesión derivado de las
piezas móviles, desconecte el aparato antes de
realizarle el servicio de mantenimiento.
ADVERTENCIA
Para reducir el riesgo de incendio y descarga eléctrica debido a daño de los componentes internos, utilice únicamente productos de limpieza Hoover con fines de uso para el aparato, como se indica.
! !
Page 69

69
PROBLEMA CAUSA POSIBLE SOLUCIÓN POSIBLE
La aspiradora no funciona. 1. No está firmemente enchufada. 1. Enchúfela firmemente.
2. No hay voltaje en el tomacorriente. 2. Revise el fusible o el disyuntor del hogar.
3. Fusible quemado o disyuntor activado. 3. Reemplace el fusible o restablezca el disyuntor
del hogar.
4. Se quemó el fusible de la limpiadora.
4. Llévela al centro de reparación.
Poca aspiración 1. El Depósito de Agua Sucia está lleno ⁄ El apagado
automático está activado.
1. Retire y vacíe el Depósito de Agua Sucia. Consulte
“Vaciado” en la página 60.
2. La tapa del tanque de agua sucia no está colocada
correctamente.
2. Ajueste
3. El filtro de desechos del tanque de agua sucia está tapado. 3. Consulte “Cómo limpiarla” en la página 60.
4. La boquilla está obstruida. 4. Consulte “Cómo limpiarla” en la página 61.
5. El Depósito de Recuperación no está colocado
adecuadamente.
5. Vuelva a colocar el tanque de recuperación y fije
la traba del tanque de recuperación.
6. El filtro está tapado. 6. El filtro está tapado.
No se dispensa agua limpia. 1. El Depósito de Agua Limpia que no
está bien colocado.
1. Asegúrese que el depósito esté bien colocado.
2. El Depósito de Agua Limpia o el recipiente de la solución
está vacío.
2. Vuelva a llenar el recipiente, de acuerdo con las
instrucciones de limpieza.
3. Asegúrese de tirar del gatillo.
Los cepillos no giran durante
la limpieza de suelos.
Verifique si hay atascos y si la correa está rota.
Page 70

70
TODO SERVICIO DE MANTENIMIENTO DEBE SER REALIZADO POR UN REPRESENTANTE DE SERVICIO
TÉCNICO AUTORIZADO. LLAME AL 1-800-944-9200. EE.UU. Y CANADÁ.
En caso de que necesite asistencia adicional, visite un centro de servicio autorizado. Encuentre el más
cercano en nuestro sitio web: ww w.hoover.com . El propietario deberá pagar todos los costo s de transpor te
desde y hasta c ualquier lugar de reparación. Siempre identifique su product o de acuerdo al número del
modelo y el código de fábrica cuando solicite inf ormación o realice el pedido de las piezas de repuesto. (El
número de modelo y el código de fabricación s e encuentran en la par te trasera del producto).
GARANTÍA LIMITADA DE DOS AÑOS (USO DOMÉSTIC O)
COBERTURA DE LA GARANTÍA
En casos de uso y mantenimiento domésticos en condiciones normales y conf orme al Manual del
propietario, su producto HOOV ER® tiene garantía c ontra fallas de fábrica en los materiales y fallas por mano
de obra durante un año completo desde la fecha de compra (el “ Plazo de la gar antía”). Durante el plazo de la
garantía, Hoover ® le proporcionará la mano de obra y los repuestos, sin ningún costo, a los fines de reparar
cualquier falla del produc to adquirido en los Estados Unidos, en tiendas de interc ambios militares de los EE.
UU. y en Canadá.
¿CÓMO HACER UN RECLAMO DE LA GARANTÍA?
Si este producto present a garantía, llévelo o envíelo al Centro de v entas y serv icio de Hoover ® o al
distribuidor de servicio autorizado de garantía de Hoover® más cercanos junto con el comprobante de
compra. Par a ser redirigido en for ma automática a un Centro de s ervicios autorizado en los EE.UU., llame
al: 1-80 0-944-92 00 O visite Hoover® en línea en: ww w.hoover.com. Para obtener más ay uda o informac ión
sobre esta garantía o la disponibilidad de los centros de ser vicios contemplados en la garantía, llame
al Centro de respuesta al consumidor de Hoover ®, al 1-800944-9200, de lunes a vier nes de 8:00a.m. a
7:00p.m. (hora estándar del este). En C anadá, comuníques e con Hoover® Canada, Carson Building, 100
Carson St., Etobicoke, Ontar io M8W 3R9, teléfono: 1-80 0-944- -9200, de lunes a vierne s de 8 a.m. a 7 p.m.,
hora estándar del este.
¿QUÉ ES LO QUE NO CUBRE ESTA GARANTÍA?
La presente garantía no cubre los siguientes supuestos: el uso del pr oducto en oper aciones comerciales
(tales como servicios de contr atación de equipamiento, de mantenimiento y de limpieza); el filtro, el
cepillo giratorio y l a correa; el mantenimiento incorrecto del producto; los daños derivados de su mal uso;
casos fortuitos o hechos de la naturaleza; vandalismo u otros actos fuer a del control de Hoover®; actos u
omisiones del propietario; su uso f uera del país de compra original; y las reventas del producto r ealizadas
por el propietario or iginal. Esta garantía no cubre lo s servicios de recolección, entrega, transporte ni visitas
a domicilio. No obstante, si envía el produc to por correo post al al Centro técnico y de ventas de Hoover®
para obtener el servicio de la garantía, el envío tendr á un costo de ida solamente.
Esta garant ía no se aplica a los productos adquiridos fuera de los Estados Unidos, incluidos sus ter ritorios
y posesiones, fuera de los intercambios militares de los EE.UU. y f uera de Canadá. Esta garantía no cubre
los productos adquiridos a un terc ero no autorizado c omo minorist a, concesionario o distr ibuidor de los
productos Hoover®.
OTROS TÉRMINOS IMPORTANTES
Esta garant ía no es transf erible y no puede asignarse. Esta G arantía se regirá e interpr etará de conf ormidad
con las leyes del est ado de Ohio. El Pl azo de la garantía no se prolongará por ningún reemplazo o r eparación
realizados conforme a esta garantía.
ESTA GA RANTÍ A REPRESE NTA LA GAR ANTÍA Y EL R ECURSO LEGAL E XCLUSIVOS, PR OPORCION ADOS POR HOO VER®.
TODA S LAS DEMÁ S GARAN TÍAS, EXPRE SAS O IMPLÍCITAS , SERÁN RE CHAZA DAS, INCLU IDAS LAS GARA NTÍAS DE
APT ITUD PARA L A COMERC IALIZA CIÓN O ADECU ACIÓN A FINE S ESPECÍFICOS . EN NINGÚN CA SO, HOOVER ® SERÁ
RESP ONSABLE P OR LOS DAÑO S ESPECIA LES, INDIRE CTOS, INC IDENTALE S O CONSECUE NTES DE NING ÚN TIPO QUE
SUFR A EL PROPIE TARIO O CUALQUIER PA RTE QUE RECLAME POR IN TERMEDIO DE EST E, YA SEA CON B ASE EN UN
CONT RATO, POR NE GLIGENCI A, HECHO ILÍCIT O CIVIL O RES PONSABILIDA D OBJETI VA, NI POR NINGUNA OT RA CAUSA .
Algunos est ados no permi ten la exclusi ón de los daños c onsecuentes, por lo que la e xclusión anterior p uede no
aplic arse a usted. Esta g arantía le otorga derecho s específic os. También puede tener otros derech os, que varían
según el estado.
MANTENIMIENTO Y GARANTÍA
INFORMACIÓN DE SERVICIO
Page 71

71
NOTAS:
Page 72

72
NOTAS:
 Loading...