

Page 1
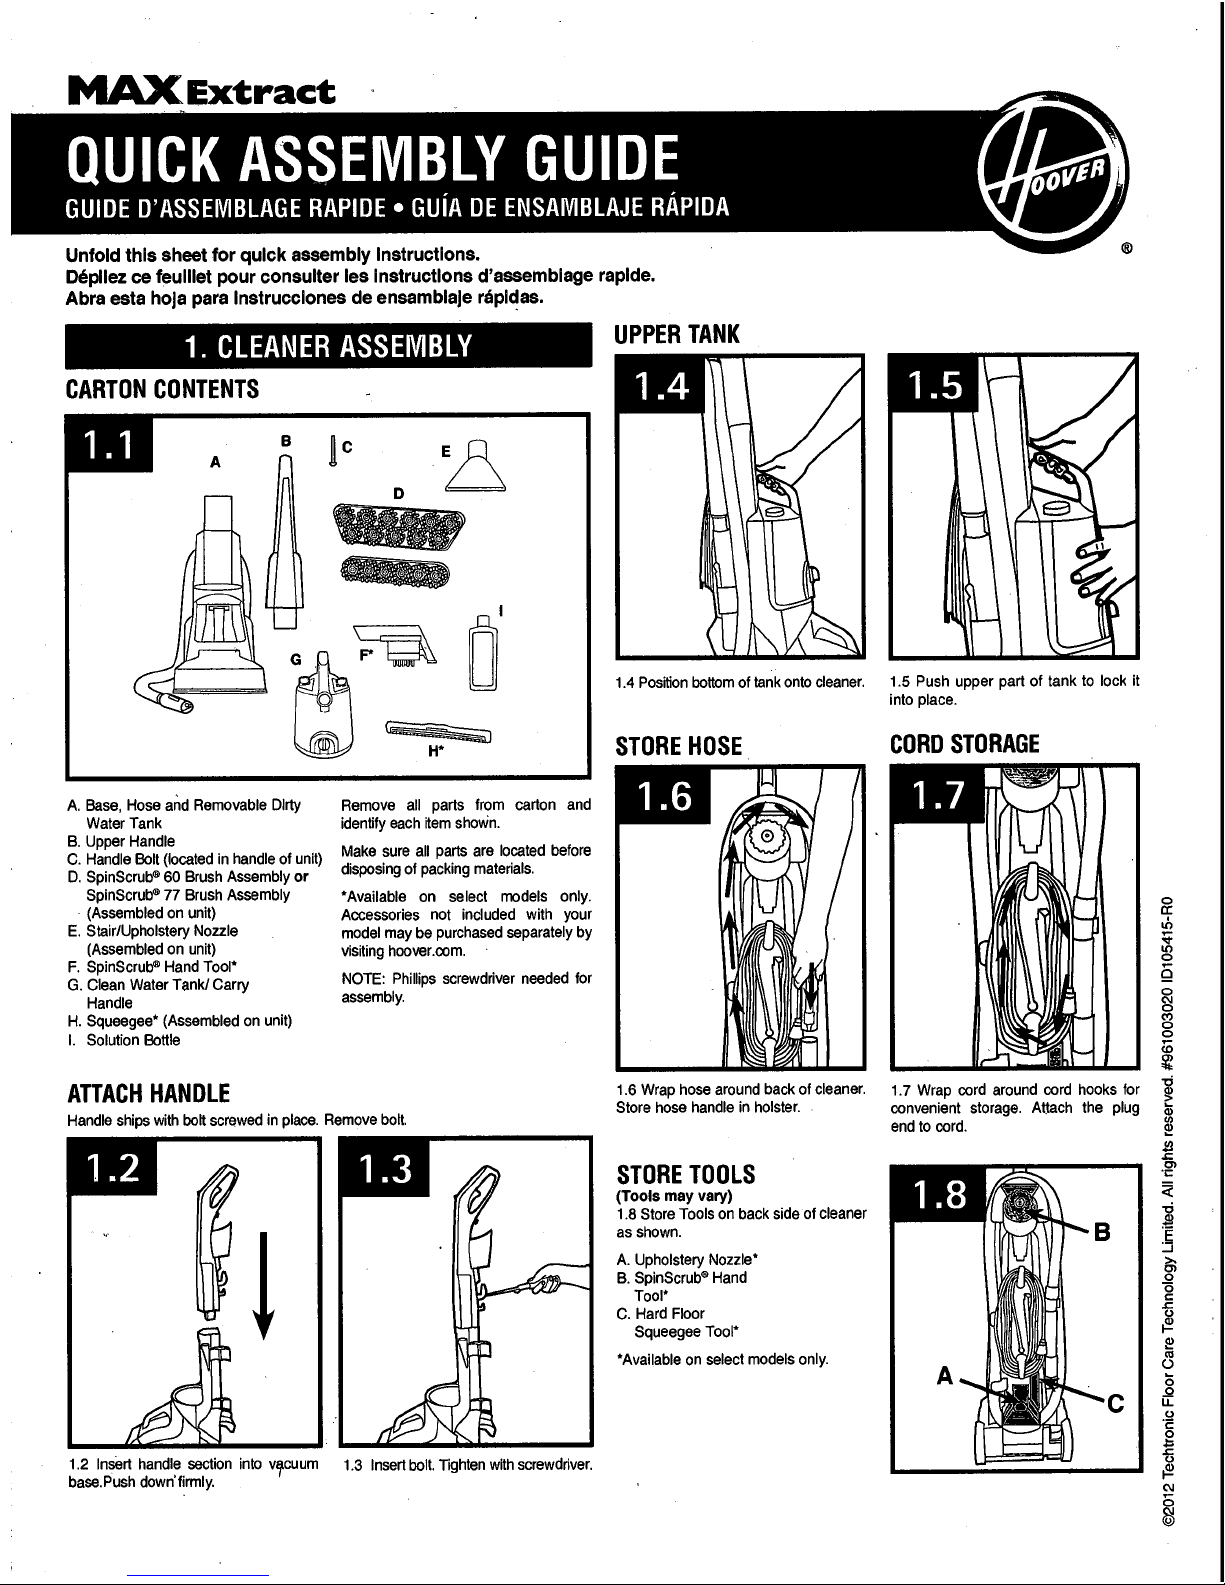
1. CLEANER ASSEMBLY
CARTON CONTENTS
UPPER TANK
1.4 Position bottom of tank onto cleaner.
STORE HOSE
A.
Base, Hose and Removable Dirty
Water Tank
B.
Upper Handle
C.
Handle Bolt (located in handle of unit)
D.
SpinScrub® 60 Brush Assembly
or
SpinScrub® 77 Brush Assembly
(Assembled on unit)
E.
Stair/Upholstery Nozzle
(Assembled on unit)
F.
SpinScrub® Hand T
oo
l*
G.
Clean Water Tank! Carry
Handle
H.
Squeegee*
(Assembled on unit)
I.
Solution Bottle
Remove all parts from carton and
identify each item shown.
Make sure all parts are located before
disposing of packing materials.
Available on select models only.
Accessories not included with your
model may be purchased separately by
visiting hoover.com
.
NOTE: Phillips screwdriver needed for
assembly.
ATTACH HANDLE
Handle ships with bolt screwed in place. Remove bolt.
MAX
Extract
QUICK ASSEMBLY GUIDE
GUIDE D'ASSEMBLAGE RAPIDE • GUIA DE ENSAMBLAJE RAPIDA
Unfold this sheet for quick assembly Instructions.
Dépllez ce feulliet pour consulter lea Instructions d'assembiage rapide.
Abra esta hoja pars instrucciones de ensamblaje rápidas.
1.5 Push upper part of tank to lock it
into place.
CORD STORAGE
©20
12
Tec
htro
n
ic
Floor
Care
Tec
hno
logy
Lim
ite
d.
Al
l r
ig
hts
r
es
er
v
e
d.
#961
0030
20
1
D1
05415-
RC
1.2 Insert handle section into vcuum
base.Push down firmly.
1.6 Wrap hose around back of cleaner.
Store hose handle in holster.
STORE TOOLS
(Tools may vary)
1.8 Store Tools on back side of cleaner
as shown.
A.
Upholstery No
zz
le*
B.
SpinScrub
®
Hand
Tool*
C.
Hard Floor
Squeegee Tool*
Available on select models only.
1.7 Wrap cod around cord hooks for
convenient storage. Attach the plug
end to cord.
1.3 Insert bolt. Tighten with screwdriver.
Page 2

HANDLE RELEASE PEDAL
ON-OFF SWITCH
•
iii
01
W
-E-ii
•
IMPORTANT
The tank pivots towards the back of
the unit. Push the top of the tank and
tank handle while supporting the back
of the unit with your other hand.
S
2.1 To turn cleaner ON, push button
down.
To turn cleaner OFF, push button again.
2.3 To remove tank, press down on tank
handle button and pull forward.
2.2 Step on pedal (A) to lower handle to
operating position. Handle does not
lock into a single position but floats" to
allow convenient operation.
2.4 Fill tank (E) with hot tap water.
The use of hot water opposed to
cold, significantly improves cleaning
performance, on most dirt and stains.
2.5 Fill detergent container (F) with
Hoover® MaxExtractTM Carpet &
Upholstery Detergent or any other
Hoover detergent. Replace container
cops and tighten. Completely fill
Detergent Tank when using standard
solution.
Check tank to make sure it is securely
latched.
2.7 There may be a small amount of
water (indicated by arrow) on the base
when the tank is removed from the unit.
This is a normal condition.
2.9 Remove Quick Pour Spout Cap
and Empty Dirty Water Tank.
2. HOW TO OPERATE
2.6 Position bottom of tank onto cleaner
and push upper part of tank to lock it
into place.
2,8 Pull Dirty Water Tank from unit.
THE TANKS:
CLEAN WATER! SOLUTION TANK
(upper tank)
How to Fill
Turnoff and unplug cleaner from electrical outlet.
DIRTY WATER TANK
(lower tank)
The Dirty Water Tank holds the dirty solution that is picked up from the surface
being cleaned.
How to Empty
Turn cleaner off and unplug from electrical outlet.
A CAUTION A
Do not fill with water above 140°F
(60°C).
A CAUTION A
Detergents contain Anionic and
Nonionic Surfactants. Avoid contact
with eyes and skin. In case of
contact with eyes, flush with cold
water for 15 minutes. In case of
contact with skin, wash with water.
If irritation persists, call a physician.
A WARNING ,&
Use only HOOVER® cleaning
products intended for use with
this machine. (See the Cleaning
Products" section in this manual for
details) They are specially formulated
for use with your cleaner. Non-
Hoover cleaning solutions may harm
the machine and void the warranty.
A CAUTION A
Do not carry cleaner with this tank's handle - personal injury may occur.
Page 3

2.10 To clean tank, unlatch clean out
cover latch (A) and remove cover (B).
Rinse inside and dry.
Replace Dirty Water Tank on unit.
Pull Trigger = WET
Release Trigger = DRY
Www.I®oveicom
I IIIIIIII!IIIIIII
flfl
IH1IlE
TNWlflNI
I IlIItIIIII
R609 FINISHING MACHINE
x
MACHINE POUR P1010 lAO
SOLS/UJHThjIORA
MOOEAIUDUEIE/M000LO
XXIOOOX
IOCIC V
HL XL
U,IEIIOffdEI000®
xw
HUU*OHelDUflhI,POIOWEPJllPGI000ITlcO
MFcoi
XX
R.
'
'I.
Pgn.aoI
Iz ire Ii
M..11
da hdaIleatW.
PIeIae
azjhdmt reliegRe
Cl
mieCil del eireeidaC.
Rlilkeatadby V!Il,l.e.AImn.1lI.w0H44131
MANUFACTURING CODE
(Label located on
lower handle of
cleaner)
3. CLEANING CARPET
IMPORTANT
Before you begin cleaning: Vacuum thorouahlv- For carpet, use a HOOVER®
vacuum cleaner with an agitator for best results.
3.1 Set Wash/Rinse Setting switch to Wash. Turn cleaner ON.
3.2 Squeeze trigger to apply cleaning solution and slowly push cleaner forward (equals one wet stroke).
Continue to squeeze trigger and slowly pull cleaner back toward you (second wet stroke).
3.3 If you would like to rinse the carpet with water only, set Wash/Rinse Setting switch to RINSE. Repeat cleaning motion. In
this setting, rinsing will be done on both forward and reverse strokes.
IMPORTANT
I To assure proper rinsing, it is important to keep the cleaner on the same path
backward as forward.
THANK YOU FOR CHOOSING A HOOVER PRODUCT
Please enter the complete model and Manufacturing Code in the spaces provided.
MODEL
MFG. CODE
Hint: Attach your sales receipt to this owner's manual. Verification of date of purchase may be
required for warranty service of your HOOVER® product.
Be sure to register your product online at Hoover.com
or call 1-800-944-9200 to register by phone.
If you need assistance:
Visit our website at hoover.com
. Follow the authorized dealer locator link to find the Hoover®
authorized dealer nearest you or call 1-800-944-9200 for an automated referral of Hoover®
authorized dealer locations (U.S. only) or to speak with a customer service representative;
Mon- Fri 8am- 7pm EST.
PLEASE DO NOT RETURN THIS PRODUCT TO THE STORE.
SEE YOUR OWNER'S MANUAL FOR COMPLETE INSTRUCTIONS.
All your filters, belts and accessories can be purchased on-line at hoover.com!
Utiliser les Instructions numérotées
de cette section francalse avec lea
Illustrations numérotées correspon-
dames de Is section anglalse de Ce
gulde
1. ENSAMBLADO DE
LA ASPIRADORAN
CONTENU DE L'EMBALLAGE
A.
Base, tuyau et reservoir d'eau sale
amovible.
B.
Poignée supérieure
C.
Boulon du manche (situé dons la
poignee de lappareil)
D.
Assemblage de la brosse 66
SpiflScrubMD/ Assemblage de Ia
brosse 70 SpinScrubTM°
(assemble a l'appareil)
E.
Buse pour escaliers/meubles
(assemble a l'appareil)
F.
Accessoire portatif SpinSôrub®*
G.
Reservoir d'eau propre supérieur /
Poignee de transport
H.
Plancher*
(assemble a l'appareil)
I.
Boutellie de detergent
Retirer toutes les pieces de
l'emballage.
Avant d'eliminer les materiaux
d'emballage, sassurer qu'aucune des
pieces illustrees ne manque.
Seulementsurcertains. Les accessoires
non compris avec votre modèle peuvent
être achetés séparément sur Is site
www.hoover.com
.
NOTA : Utlilseruntoumeviscruciforme
(Philips) pour
effectuer l'assemblage.
FIXER LE MANCHE
Le manche est livré avec Is boulon
vissé en place. Retirer Is boulon.
1.2 Insérer Is manche dans la base
de laspirateur. Appuyer fermement.
1.3 Insérer Ic boulon.
Resserrer avec un tournevis.
REPLACER LE
RESERVOIR SUPERIEUR
1.4 Placer Is bas du reservoir sur
l'aspirateur.
1.5 Pousser la partie superieure du
reservoir pour la verroulller an place.
RANGER LE TUYAU
1.6 Enrouler Ic tuyau derriere l'appareil.
Insérer la poignee du tuyau dons
l'orifice.
STOCKAGE DE CORDE
1.7 Enrouler Is cordon autour des
crochets pour Is ranger facitement.
Fixer l'extrémlté de la fiche au cordon
RANGEMENT DES
ACCESSOIRES EN
OPTION
1.8 Ranger les accessoires a l'arrière
de la shampoulneuse, tel qu'illustre.
A.
Buse pour escaliers/
meuble
s* Accessoire
pour planchers sans
moquette
B.
Accessoire portatif
SpinScrub
0
®
C.
Racloir pour
planchers durs
Seulement sur certains.
Page 4

X xxxo( xxxxx U
T.4UUII0 Ru,
Cm
ThchleIoffU.1t.d
VACUUM COAIEWA$PI RATE OVAIPO.ADOMA
MUUEIIMODhEIMODUfl
XXXXXXX
A
xxxx,x
IAAWU1POSflUU
h.OAi4llA
CODE DE FABRICATION
(Le
numéro de modèle figure sur Is
panIc Infénleure
du manche de I'appareil.)
MERCI D'AVOIR CHOISI UN
PROM T HOOVERTM
0
Veuillez inscrire les numéros do modèle et do série COMPLETS dans les
espaces fournis a cot
effet
MODELE
CODE DE FABRICATION
Conseil: II est recommandé do joindre votre recu do caisse au guide do
lutilisateur, car une verification do la date dachat pout étre
effectuée
avant
toute reparation couvorte par la garantie do votre produit HOOVERMD.
Noubliez pas denrogistrer votre produit on ligne
a
ladresse Hoover.com
ou par téléphone, au .1-800-944-9200
Pour
obtenlr de I'asslstance:
Visitez notre site web
a
ladresse www.hoover.ca
. Cliquez sur le lien du localisa-
tour do marchands autorisés
HooverMo
pour trouver le marchand 10 plus pres do
chez vous, ou composez Is 1 800 944 9200 pour écouter in message indiquant
les adresses dos marchands autorisés
HooverMD
(e.-U. Seulement) ou pour
parlor
a
un représentant du service
a
la clientele (do 8 h
a
19 h, hne du lundi
au vendredi).
VEUILLEZ NE PAS RETOURNER CE PRODUIT AU MAGASIN.
REPORTEZ-VOUS AU MANUEL DU PROPRIETAIRE
POUR OBTENIR DES INSTRUCTIONS COMPLETES.
bus vos filtres, courroies et accessoires peuvent ëtre achetés
on ligne
a
hoover.com!
2. UTILISATION
INTERRUPTEUR ON/OFF
(marchefarrêt)
2.1 Pour mettre i'aspirateur en marche
(ON), pousser i'interrupteur vers Is bas.
Pour éteindre i'aspir- ateur (OFF),
pousser i'interrupteur vers Is haut.
PEDALE DE DEBLOCAGE
DU MANCHE
2.2 Poser sur Is pédale (A) pour
abaisser Is manche en position
do
fonctionnement. Le manche ne
sencienche pas dans une seule
position I ixe, U dispose dun certain jeu
facilitant lutilisation.
LES RESERVOIRS:
RESERVOIR D'EAU
(reservoir supérieur)
Remplissage
2.3 Pour retirer Is reservoir, appuyer sur
Is bouton do la poignee du reservoir,
puis firer vers lavant.
MISE EN GARDE:
No pas remplir deau
plus chaude qua 140°F (60 °C).
2.4 Remplir le reservoir (E) d'eau chaude
du robinet.
2.5 Remplir le contenant de detergent
(F) avec Is solution nettoyante
MaxExtractMc de HooverMD pour les
moquettes et les tissus darneublement
ou avec tout autre detergent de Hoover.
Replacer les bouchons des contenants
at les serrer. Si un detergent ordinaire
est utilisé, remplir le réservoirà detergent
complétement.
2.6 Placer le bas du reservoir sur
lappareil, et pousser la partie superieure
du reservoir pour Is verrouiller en place.
IMPORTANT
Le reservoir pivoto vers
l'arriOre de lappareil. Pousser sur le
haut du reservoir et sur sa poignee tout
an soutenant l'arriére do laspirateur
avec lautre main.
AVERTISSEMENT:
Nutiliser qua les
produits nettoyants de HOOVER MD
conçus pour cat appareil. (Consulter la
section" Produits nettoyants du present
guide pour obtenir do plus amples
renseignements.) Ces produits sont
specialement conçus pour être utilisés
avec cat appareil do nettoyage. Ces
produds sont spécialement conçus pour
être ulilisés avec votre aspirateur. Los
solutions nettoyantes dautres marques
peuvent causer des dommages
a
lappareil et entrainer lannulation de la
garantie.
Sassurer quo le reservoir est
solidement fixé en place.
2.7 Ii est possible quil y aft une petite
quantite d'eau (indiquee par des fléches)
sur Is base quand vous retirez le
reservoir do l'appareil, Cela est normal.
MISE EN GARDE:
Les detergents
contiennent des surfactants anion-
iques et non ioniques. Eviter tout con-
tact avec les yeux et Is peau. En cas
do contact oculaire, rincer les yeux
a
I'eau froide pendant 15 minutes. En
cas do contact avec Is peau, layer
la peau
a
l'oau. Si lirritation persiste,
consulter un médecin.
RESERVOIR DE
RECUPERATION
(reservoir inferleur)
MISE EN GARDE:
No pas transporter
lappareil par la poignee - do ce res-
ervoir, sans quoi vous pourrioz vous
blesser.
Comment le nettoyer
Etoindre laspirateur at Is débranchor
do Ia prise électrique.
2.8 Retirer le reservoir deau sale do
lappareil.
2.9 Vider le reservoir d'eau sale an
rotirant le bouchon du bec
a
versement
rapide.
2.10 Pour nettoyer 10 reservoir, soulever
10 loquet du couvercle (A) do nettoyage
et retiror 10 couvercle (B). Rincer
Iintérieur et laissor sécher.
Fixer le reservoir
a
eau sale.
3. NETTOYAGE DE
MOQUETTES
IMPORTANT:
Ne pas nettoyer
au-dessus do prises electriques
situées au 501.
POUR, LES MODELES SANS
FONC110N D'AUTO-RINcAGE
3.1 Mettre l'interrupteur do reglage du
mode do rinçage
a
Wash/Rinse (lavage
rincage).
3.2 Serrer la géchette pour vaporiser Is
solution nettoyante et pousser lentement
l'aspirateur vers lavant (equivaut a un
passage humide).
Continuer do serrer la gâchette et
ramener lentoment laspirateur vers
vous (deuxiéme passage humide).
POUR LES MODELES AVEC
FONCTION D'AuTORINcAGE
(Seulement sur certains)
3.1a Mettre I'interrupteur do reglage du
mode de rincage
a
Wash/Rinse. (lavago
rinçage) (Auto
RinseMc
en option).
3.2a Serrer la gachette pour vaporiser
Is solution nettoyante et pousser
lentemont laspiratour vers l'avant
(equivaut a un passage humide).
Continuer do serrer la gachette at
ramener lentemont laspirateur vers
vous (deuxième passage humide).
Laspirateur rince Is moquette au
deuxieme passage (en mode Auto
Rinse seulement).
IMPORTANT:
Pour vous assurer dun
rinçage adequat ii est important de
passer vers avant et vers l'arriére sur
la memo surface.
Use estas instrucciones en ospanol
junto con las figuras paso-a-paso
provistas en 01 manual do Ingles.
1. ENSAMBLADO DE
LA ASPIRADORA
CONTENIDO DE LA CAJA
A.
Base manguera y tanque do agua
sucia desmontablo.
B.
Mango superior
C.
Porno del mango (ubicado en el
mango del producto)
D.
SpinScrub
®
60 Brush Assembly or
SpinScrub® 77 Brush Assembly
(Montado an
01
producto)
E.
Boquilla para escaleras/tapizados
(Montado an 01 producto)
F.
SpinScrub® cepillos del accesorio°
G.
Tanque de agua limpia superior/
Mango de transporto
H.
Suelos duros° (Montado en el
producto)
°Disponible solo en algunos modelos.
Los accesorios no incluidos con su
modelo pueden comprarse per sepa-
rado visitando www.hoover.com
.
I.
Botella do solución
Retire todas las piozas de Is caja 0 den-
tifique coda artIculo que so muestra.
Asegürese do ubicar todas las plazas
antes do oliminar 01 embalaje.
NOTA: Se neceslta
un destornllla-
dor Phillips para el ensambiado
PARACOLOCAREL
MANGO
El mango so envia con Is tuerca atornil-
lada en su lugar. DesatornIllela.
1.2 Introduzca la sección del mango en
la base de la aspiradora. Empujo hacia
abajo con fuorza.
1.3 Porno del mango. Con in destor-
nillador, apriete bien los tornillos.
REEM PLACE EL TANQUE
SUPERIOR
1.4 Coloque la porte inferior del tanque
sobre la limpiadora.
1.5 Empuje la parts superior del tanque
para quo quedo fija en su lugar.
GUARDE LA MANGUERA
1.6 Enrolle la manguera alrededor de la
parto posterior de la limpiadora. Guards
01 mango de la manguera an su funda.
Page 5

CODIGO DE FABRICACION
(El nUmero de modelo se encuentra
en Is parte Inferior del mango de Is
llmpladora)
GRA C/AS P01? HABER EL EQ/DO UN
PRODUCTO HOOVER.
Anote los nimeros completos de COdigo de fabricaclOn an los espacios provistos.
MODELO
CÔDIGO DE FABRICACION
Consejo: Adjunte su recibo de compra a este Manual del propietario. Para
obtener el servicio de garantla de su producto HOOVER® puede requerirse Is
verlficaciOn de Is fecha de compra.
Inscriba su producto en lines en Hoover.com
,
0
llame al 1-800-944-9200 si
prefiere hacerlo por teléfono.
SI necesita ayuda:
Visits nuestro sitio web en www.hoover.com
. Haga clic en el enlace que permite
localizar los vendedores autorizados hoover para encontrar el vendedor más
cercano, o marque el 1-800-944-9200 pare escuchar un mensaje Indicando Is
direcciOn de los vendedores autorizados Hoover® (sOlo an ee. Uu.) 0 para
hablar con un representante de atenciOn al cliente (de 8 am a 7 pm, hors
estándar del este, de lunes a viernes).
POR FAVOR, NO DEVUELVA ESTE PRODUCTO A LA TIE NDA.
VEA LAS INSTRUCCIONES COMPLETAS EN EL
MANUAL DEL PROPIETARIO.
Puede comprar todOs los filtros, bandas y accesorios en Ilnea
en hoover. corn!
ALMACENAJE DE LA
CUERDA
1.7 Enrolle el cordon alrededor de
los ganchos para el cordOn, para un
almacenamiento cOmodo. Conecte el
extremo del enchufe al cordOn.
GUARDE LOS
ACCESORIOS
1.8 Guards los accesorios en Is parte
posterior de la limpiadora, como se
muestra.
A.
Boquilla para
escalerasitapizados*
B.
AccesOrlo de mano
SpinScrub®*
C.
Accesorio escurridor
para suelos duros
Los accesorios no Incluidos con su
modelo.
IMPORTANTE:
El tanque gira hacia Is
parte posterior de Is unidad. Empuje Is
parte superior del tanque y el mango del
tanque mientras sujeta Is parte posterior
de Is unidad con Is otra mano.
Use sOlo los productos de limpieza
HOOVER® diseñados para usar con
esta maquina. (yea Is secciOn
"Productos de limpieza" de este manual
para obtener más detalles). EstOn
formulados especialmente para usar
con su limpiadora. Productos de limpieza
que no son Hoover. Las soluciones de
limpieza que no sean Hoover® pueden
dañar Is maquina y anular Is garantla.
2.7 Revise el tanque para asegurarse
de que estO bien trabado.
Es posible que hays una pequena
cantidad de agua (indicada con flechas)
en Is base cuando se retira el tanque
de Is unidad. Esto es normal.
PARA MODELOS CON FUNCION DE
AUTO-ACLARADO
(Disponible sOio en
algunos modelos)
3.1 Coloque el Interruptor de posiciOn
Wash/Rinse (Enjuague) an WASH/Auto
Rinse (LAVADO-Enjuague) (o Auto-
Rinse opcional). Encienda Is aspiradora
Oprima el gatillo para aplicar Is soluciOn
de limpieza y empuje lentamente Is
aspiradora hacia adelante (equivale a
una pasada himeda).
3.2 Continue oprimiendo el gatillo y tire
lentamente de Is aspiradora hacia atrOs
en direcciOn a usted (segunda pasada
hLmeda). La aspiradora enjuaga Is
alfombra en Is pasada hacia atrás.
IMPORTANTE:
Para asegurar un
enjuague apropiado, as importante
mantener Is aspiradora en el mismo
trayecto hacia atrâs y hacia delante.
2. FUNCIONAMIENTO
INTERRUPTOR PARA
ENCENDER/APAGAR
2.1 Para encender Is aspiradora, empuje
el interruptor hacia abajo.
Para apagar Is aspiradora, empuje el
interruptor hacia arriba.
PEDAL PARA SOLTAR EL
MANGO
2.2 Pise el pedal (A) para bajar el ass a
Is posiciOn de funcionamiento. El ass no
queda trabada en una posiclOn sola,
sino que oscila para permitir un
funclonamlento adecuado.
LOS TANQUES:
TANQUE DE AGUA
LIMPIA
(tanque superior)
Cómo Ilenar
Desenchufe Is aspiradora de Is toma
de corriente eléctrica.
2.3 Para retirar el tanque, presione
hacia abajo el botOn del mango del
tanque y tire hacia adelante.
2.4 Llene el tanque (E) con agua
caliente del grifo.
PRECAUCIÔN:
No lo Ilene con agua
que fangs una temperatura superior a
los 140 F (60
CC).
2.5 Llene el contenedor para detergente
(F) con detergente para moquetas y
tapi2ados MaxExtractTM de Hoover o
cualquier otro detergente de Hoover.
Vuelva a colocar las tapas del
contenedor y aprietelas. Siga las
instrucciones en el frasco del detergente
para soluciones concentradas. Uene
completamente el Tanque del
Detergents cuando use Is soluciOn
estándar. Al usar el detergente
concentrado (2x), Ilene con detergente
hasta Is lines y Ilene con agua el resto
del tanque.
2.6 Coloque la,parte inferior del tanque
en Is limpiadora y empuje Is parte
superior del tanque pare que quede fija
en su lugar.
PRECAUCION:
Los detergentes con-
tienen surfactantes aniOnicos y no lOni-
cos. Evite el contacto con los ojos y Is
piel. En caso de contacto con los ojos,
enjuaguelos con agua Iris durante 15
minutos. En caso de contacto con Is
piel, lávela con agua. Si Is irritaciOn per-
siste, Ilame a un medico.
TANQUE DE
RECUPERACION
(tanque Inferior)
PRECAUCIÔN:
No use Is empunadura
do este tanque para transportar Is
limpiadora - riesgo de herida.
Como vaciarlo
Apague Is aspiradora y desenchüfela
de Is toma de corriente eléctrica.
2.8 Tire el tanque de agua sucia de Is
unidad.
2.9 Quite Is taps con pico vertedor y
vacie el tanque de agua sucia.
2.10 Para limpiar el tanque,
desenganche Is traba de Is taps de
vaciado y retire la tapa. Enjuague por
dentro y seque.
Reemplace el depOsito de agua sucia
del producto.
3. LIMPIEZA DE
ALFOMBRAS
IMPORTANTE:
No limpie las partes del
piso an las que haya tomacorrientes.
PARA MODELOS SIN LA OPCIÔN DE
ENJUAGUE AUTOMA11CO
3.1 Coloque el Interruptor do posiciOn
Wash/Rinse (Enjuague) en WASH
(LAVADO-Enjuague). Encienda Is
aspiradora.
Oprima el gatillo para aplicar Is soluciOn
do limpieza y empuje lentamente Is
aspiradora hacia adelante (equivale a
una pasada hümeda).
3.2 Continue oprimiendo el gatillo y tire
lentamente de Is aspiradora hacia atrás
en direcciOn a usted (segunda pasada
hümeda). La aspiradora enjuaga Is
alfombra en la pasada hacia atrás.
 Loading...