

®
®
Review this manual before
operating the cleaner.
Lire attentivement ces instructions
avant d’utiliser l’appareil.
hoover.com
hoover.ca
Owner’s Manual
ENGLISH ➜ pp. 1-15
ESPAÑOL ➜ pág 16-24
FRANÇAIS ➜ p. 25-32
Cyclonic Upright
Vacuum Cleaner
Aspirateur vertical
cyclonique
Contents
Assembling Cleaner..........................3-4
Carton Contents................................3
How To Use........................................5-8
Cleaner Descriptions ........................5
Cleaning Tools................................7-8
If You Have a Problem........................14
Important Safeguards ..........................2
Lubrication ..........................................14
Maintenance ....................................8-13
Authorized Service ..........................14
Cleaning Filters............................9-10
Clearing Blockages ........................15
Emptying Dirt Cup..........................8-9
Replacing Agitator Brush Roll..11-12
Replacing Belt ............................10-11
Replacing Powered Hand Tool
Agitator Brush Roll ......................12
Replacing Power Hand Tool Belt ..13
Replacing Headlight ........................10
Thermal Protector ..............................14
Warranty ..............................................15
Parts & accessories mail reorder
form ..................................................33
Important Safeguards!
When using an electrical appliance, always follow basic precautions, including the following:
READ ALL INSTRUCTIONS BEFORE USING THIS APPLIANCE
WARNING:To reduce the risk of fire, electric shock, or injury:
• Do not use outdoors or on wet surfaces.
• Close supervision is necessary when any appliance is used by or near children. Do not allow vacuum cleaner to be used as a
toy or to run unattended at any time.
• Keep hair, loose clothing, fingers, feet and all parts of body away from openings, rotating agitator and other moving parts.
• Do not pick up anything that is burning or smoking, such as cigarettes, matches, or hot ashes.
• Do not use to pick up flammable or combustible materials such as gasoline or fine wood sandings or use in areas where they
may be present.
• Always turn off this appliance before connecting or disconnecting hose.
• Unplug cleaner before connecting the powered hand tool.
• Do not use without dirt cup or filters in place. Empty cup and clean filter frequently when picking up very fine materials such
as powder.
• Use extra care when cleaning on stairs.
• Do not put any object into openings. Do not use with any opening blocked; keep free of dust, lint, hair, or anything that may
reduce air flow.
• Always disconnect cord from electrical outlet before servicing the cleaner.
• Unplug cleaner when not in use. Turn off all controls before unplugging.
• Do not unplug by pulling on cord. To unplug, grasp the plug, not the cord. Never handle plug or appliance with wet hands.
• The use of an extension cord is not recommended.
• Do not use with damaged cord or plug. If appliance is not working as it should, has been dropped, damaged, left outdoors, or
dropped into water, take it to a Hoover Sales and Service Center or Authorized Hoover Warranty Service Dealer (Depot).
• Do not pull or carry by cord, use cord as a handle, close door on cord or pull cord around sharp edges or corners. Do not run
appliance over cord. Keep cord away from heated surfaces.
• Use vacuum cleaner only for its intended use as described in the instructions. Use only attachments recommended by
Hoover; others may cause hazards.
• Hold plug when rewinding cord onto cord reel. Do not allow plug to whip when rewinding.
WARNING:
• This product contains chemicals known to the State of California to cause cancer and reproductive toxicity.
Wash hands after
handling.
• Do not operate cleaner in bare feet or when wearing open toe shoes or sandals.
• Avoid picking up hard, sharp objects with the cleaner. They may damage the cleaner.
Save these instructions!
Thank you for choosing
a HOOVER®product
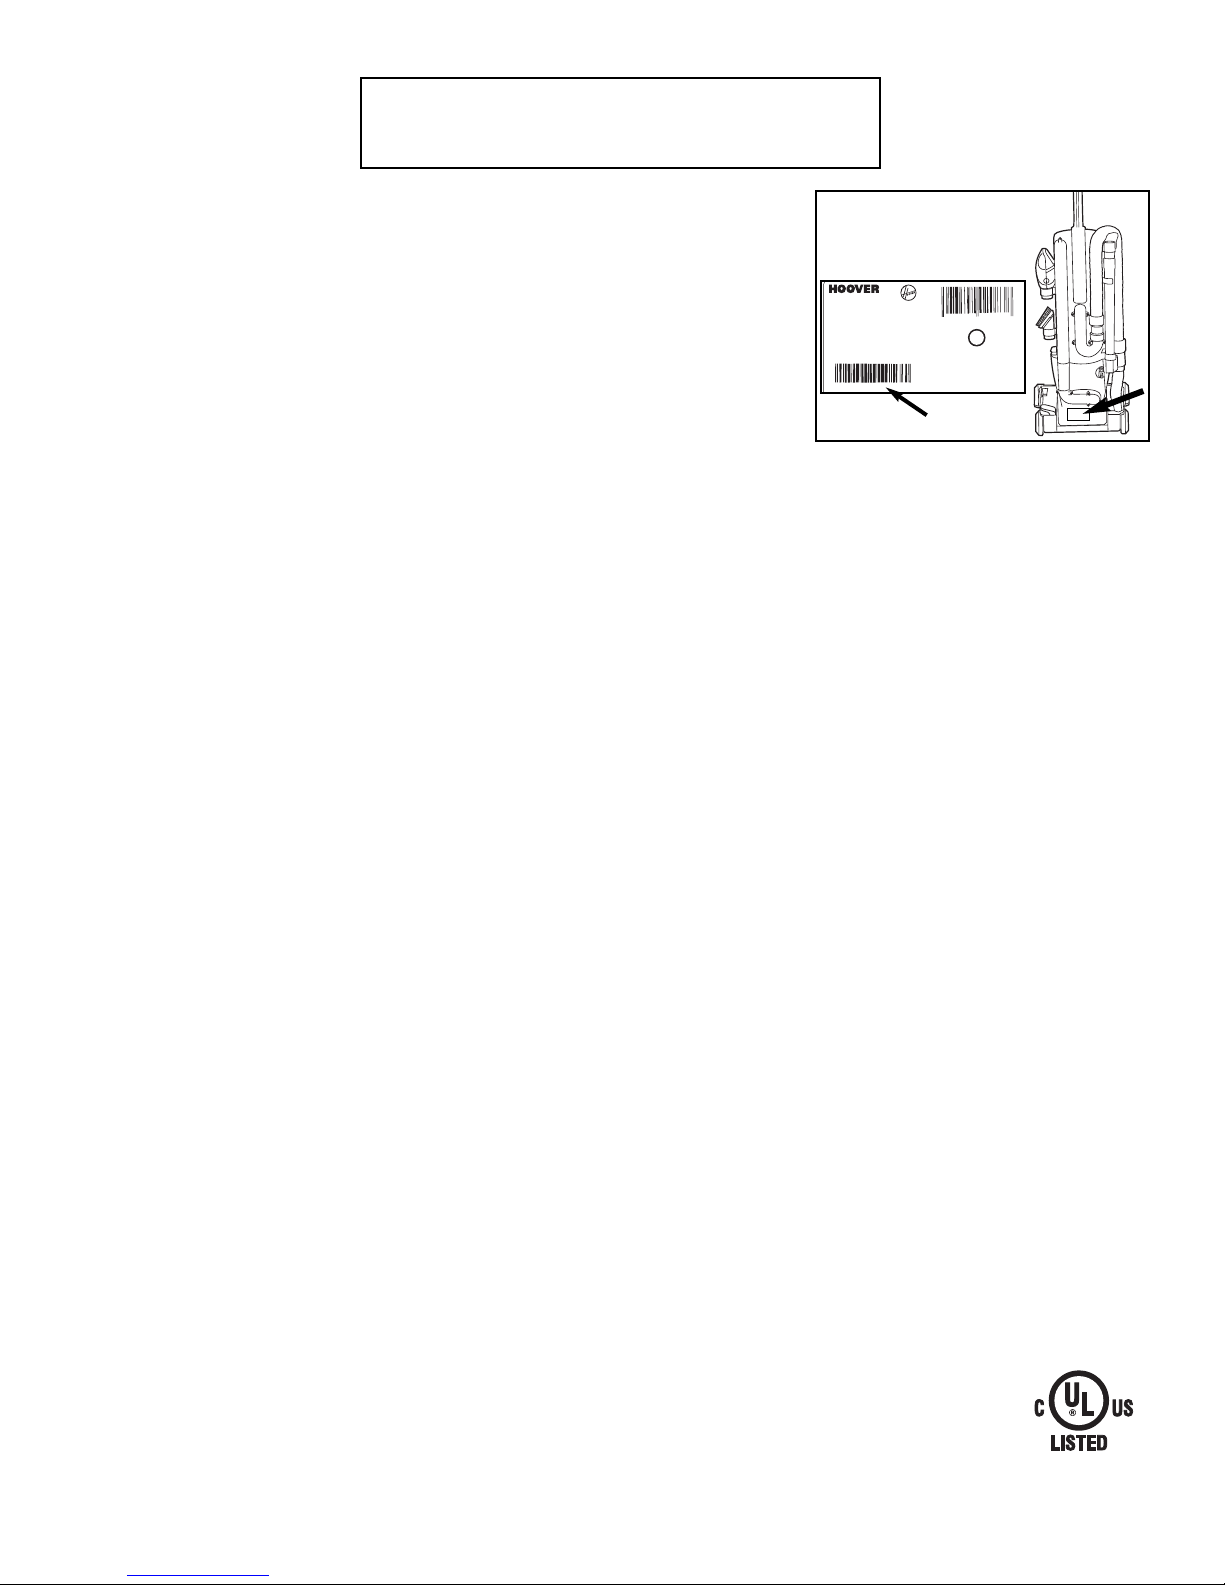
Please enter the COMPLETE model and serial numbers in the spaces provided.
Model___________________________________
Serial number___________________________________
Hint: Attach your sales receipt to this owner’s manual.
Verification of date of purchase may be required for warranty service of your
HOOVER product.
Be sure to fill out and return the product registration card included with your
cleaner (see back cover).
Review this manual before
operating cleaner
© 2006 The Hoover Company
hoover.com
2
e
SERIAL
NUMBER
hooerco
CEANER/AIRA TER/AIRAORA
MOE/MO E/MOE O
ERIE/ RIE/ERIE C20
20 V 0 H 20 A
ET/CORROIE/COR REA
FITER/FITRO/FITRE
HOEHO TE/TE MENAER/TIO OMETICO
ERIA NO/NMERO ER/N MERO E ERIE
SAMPLESAMPLESAMPLESAMPLE
MMYYXXXXXXXX
SAMPLESAMPLESAMPLESAMPLE
UU
UU
XXXX
HOOVER
NEWTON, IOWA 50208
Made in China
Hecho en China/Fabriqué en Chin
3
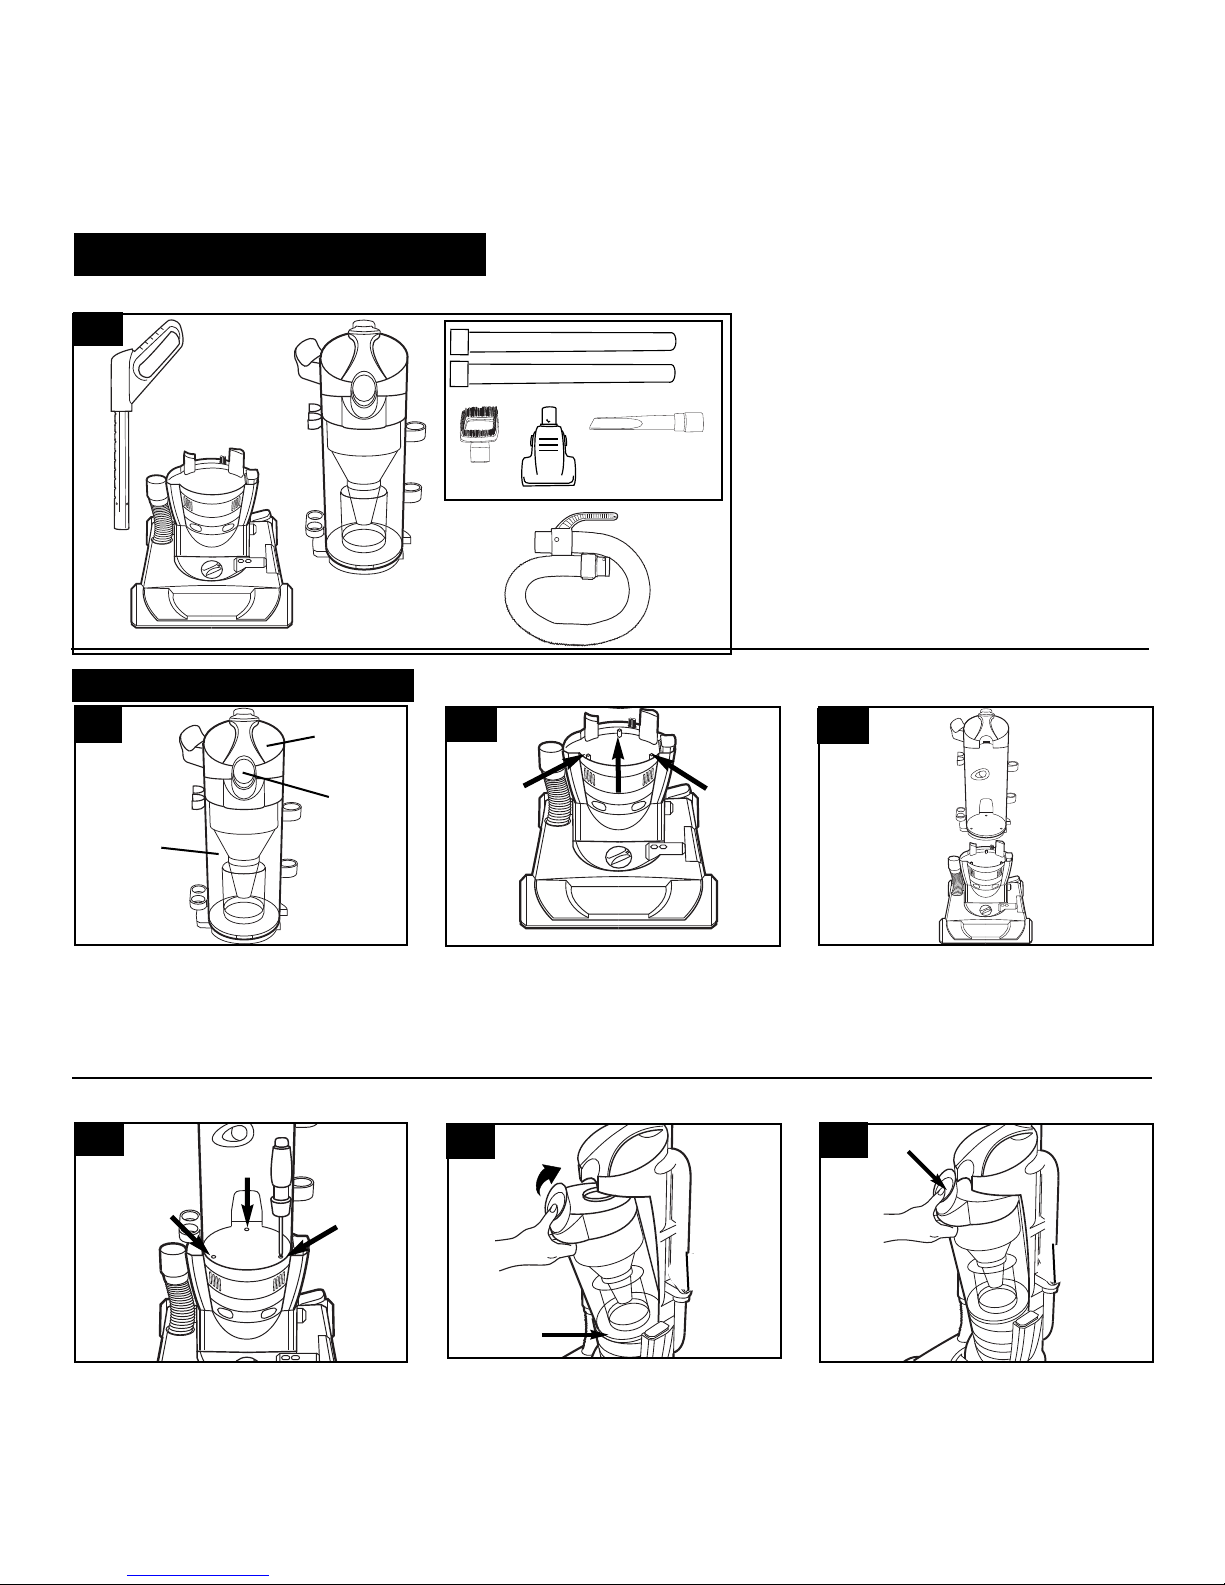
Carton contents
Remove all parts from carton and
identify each item shown.
Make sure all parts are located before
disposing of packing materials.
A
B
D
E
A
B
C
C
If you need any assistance:
Visit our website at hoover.com. Click on the “Service” button to find the service outlet
nearest you OR
Call 1-800-944-9200 for an automated referral of authorized service outlet locations (U.S. only) OR
Call 1-330-499-9499 to speak with a representative in our Consumer Response Center.
Please do not return this product to the store.
Continued
➜
1. Cleaner assembly
1-1
A. Handle section
B. Cleaner base assembly
C. Cleaner upper housing assembly
D. Cleaning tools and wands
E. Hose
Attach upper housing
1-4
1-2
1-6
1-7
1-5
Align upper housing (D) over cleaner
base (E) and slide down until upper
housing sits securely over base.
Remove dirt cup (A) from upper
housing (B) by pressing dirt cup
release button (C) and pivoting cup
out. Set dirt cup aside.
Using a Phillips screwdriver, fasten
(3) screws located at the bottom of
the upper housing.
Place bottom of dirt cup into cleaner
body first. Pivot cup into cleaner
body.
Press on dirt cup release button
while firmly pressing on dirt cup.
Release button in order for it to
return to proper position and lock
the dirt cup into place.
Using a Phillips screwdriver, remove
(3) screws from cleaner base. DO
NOT DISPOSE OF SCREWS.
Remove cardboard and discard.
1-3
1-14
A
D
B
C
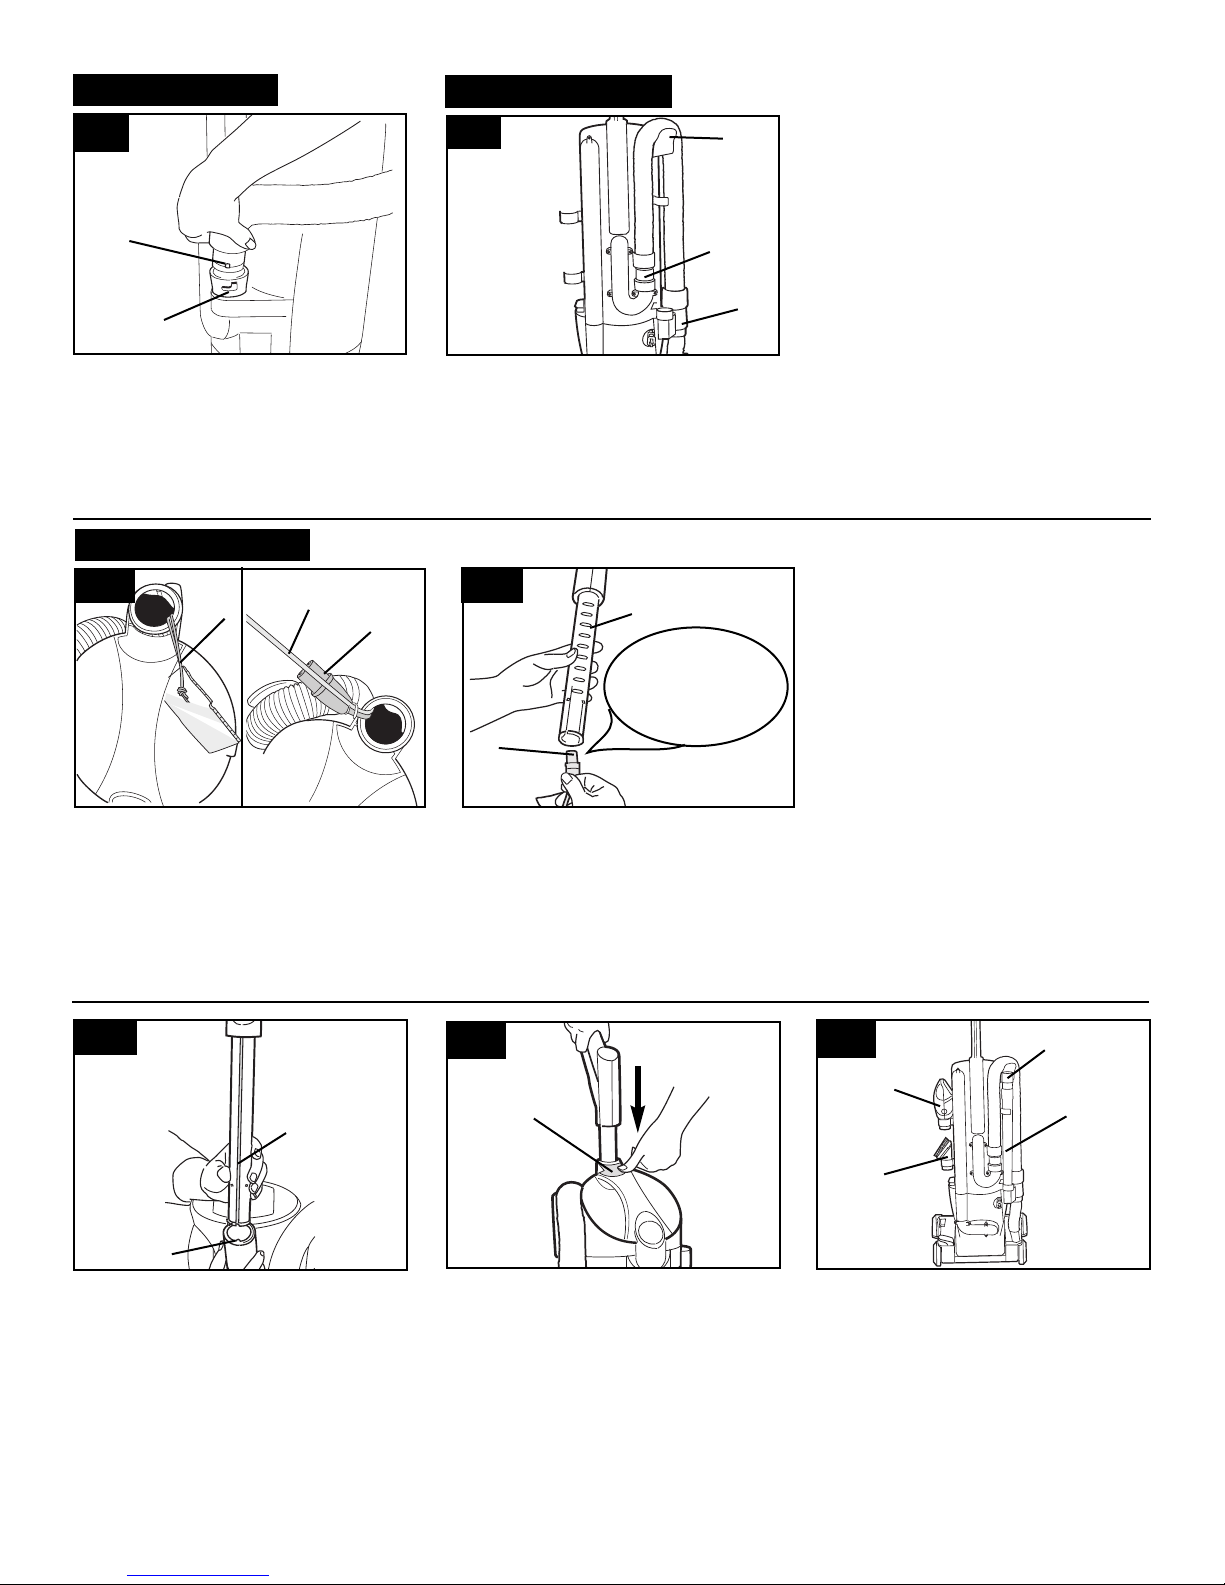
Position tools
Place smaller diameter end of wand
(A) into bottom of rack. Snap wand
into clip at top. Repeat with other
wand.
Crevice tool (B) fits into one of the
extension wands.
Fit combination tool (C) and powered hand tool (D) into storage
areas on side of cleaner as shown.
4
PUSH
FIRMLY UNTIL
YOU HEAR A
SNAP OR
CLICK!
Attach handle
B
E
D
F
C
B
A
A
Hold plug (B) with one hand; upper
handle (C) with other hand.
Push plug into upper handle, aligning with opposite end of plug and
push firmly UNTIL YOU HEAR A
SNAP OR A CLICK.
After ends are connected, pull on
plug to make sure it is securely
attached.
1-10
Align the groove (D) on the back of
the upper handle with the small pro-
jection (E) on the back of the handle
housing.
1-11
1-12
1-13
DO NOT remove orange tie wrap
until step 1-11 is complete.
Grasp orange tie wrap (A) and pull
until the black plug (B) comes out of
the handle cavity.
Note: The plug will only fit together
one way. If plug is not fitting together, check alignment of ends.
After the plug ends are fully connected, the orange tie wrap (A)
must be removed.
Use caution so as NOT TO CUT
the black power cord. Discard the
orange tie wrap.
Press button (F) at handle base and
push handle all the way down.
C
A
B
D
B
Position hose
Attach hose
1-9
1-8
Position hose over rack (C) and into
hose tube (D).
NOTE: Hose must be connected at
the hose tube (D) and at the dirt
duct (B) on the back of the cleaner
for carpet or floor cleaning. For
tool use, refer to Fig. 2-11.
Align end of hose with projections
(A) over slots on dirt duct (B).
Slide hose into slots and twist hose
to lock it into place (To detach hose,
reverse procedure).
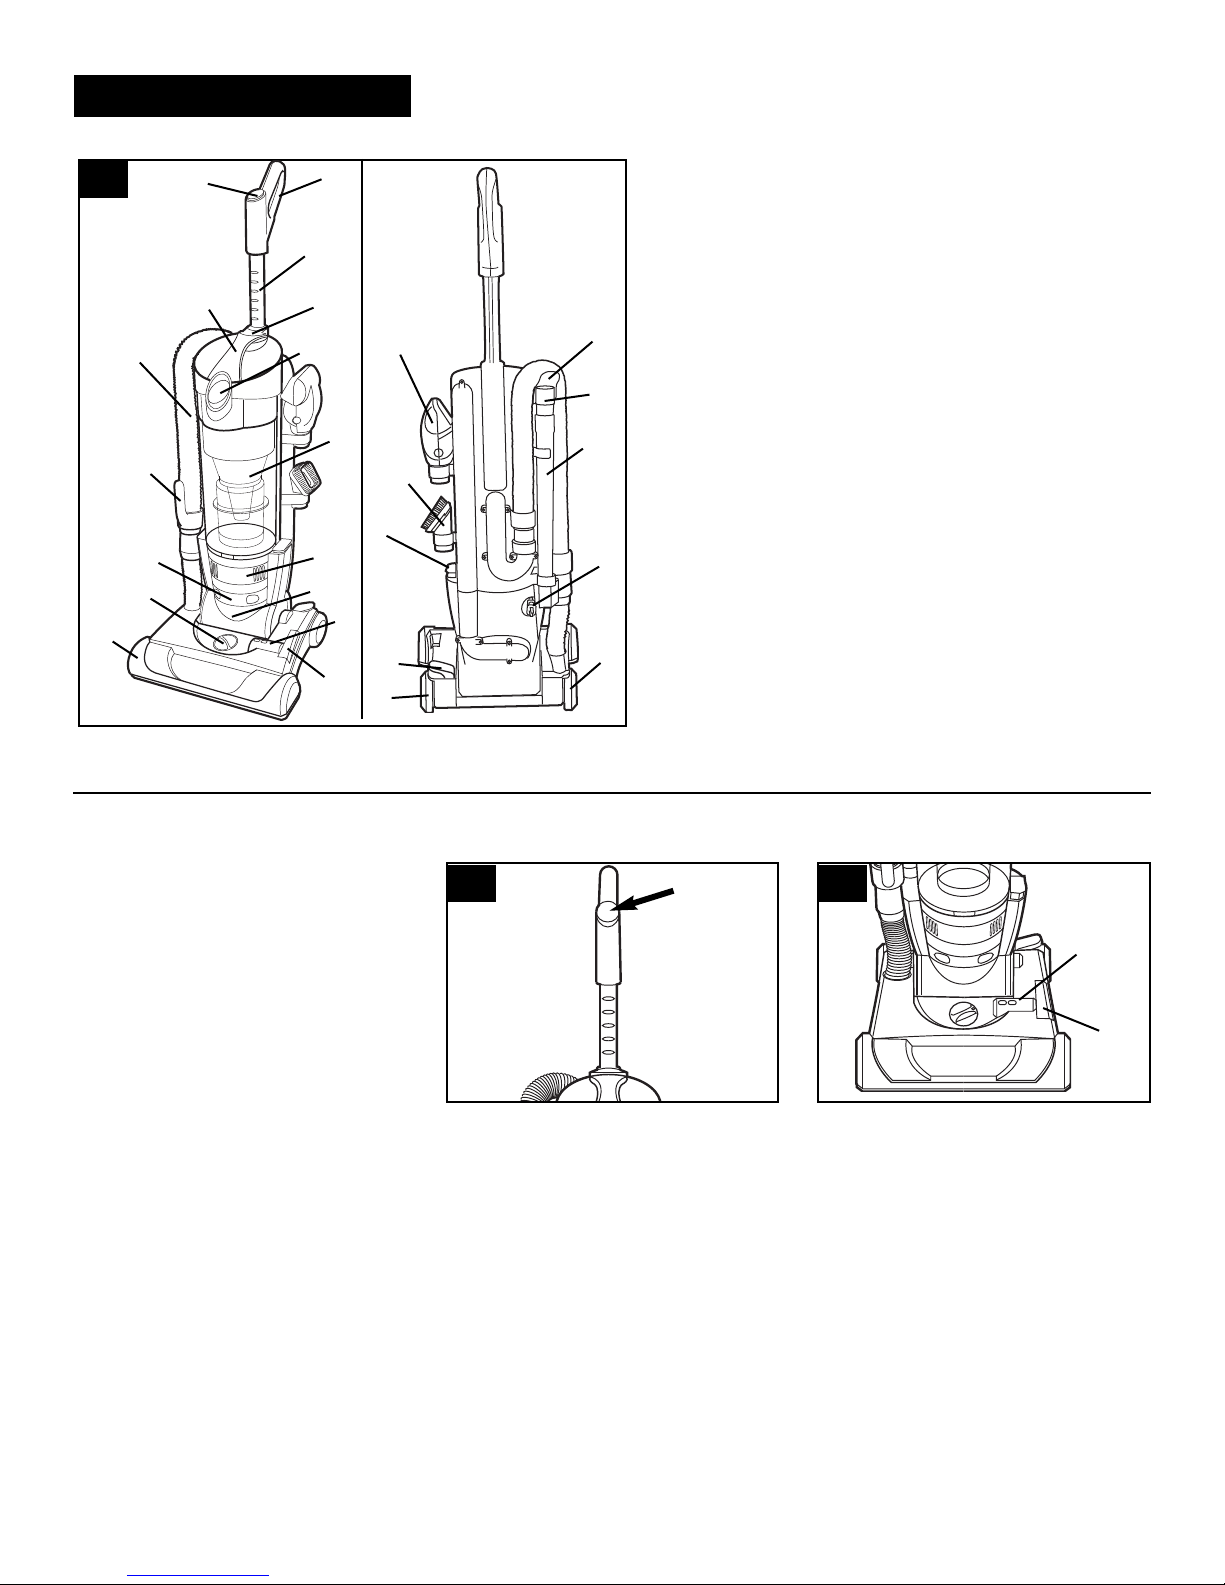
2. How to use
Cleaner description
16. Hose
17. Hose/tool holder
18. Crevice tool
19. Wands
20. Cord reel
21. Soft touch wheels
22. Handle release pedal:
step on lever to lower handle
to operating or low positions.
23. Cord rewind button: press
button to rewind cord for storage. Hold plug until cord is
rewound.
24.Combination tool
25. Powered hand tool
Operate cleaner only at
voltage specified on data
plate on back of cleaner.
This cleaner is intended for
household use.
1. Soft touch handle grip
2. ON/OFF switch
3. Telescoping handle
4. Handle adjustment
button
5. Carrying handle
6. Dirt cup release button
7. Dirt cup assembly
8. Cord reel window
9. Headlight
10. Agitator brush roll
shut-off indicator
11. Agitator brush roll
shut-off pedal
12. Furniture guard: helps
prevent cleaner from marking furniture.
13. Nozzle control knob:
turn knob to correct setting
for height of carpet being
cleaned.
14. Final filter access
15. Hose handle
ON-OFF switch
Plug cord into electrical outlet.
To turn cleaner ON, push ON/OFF
switch once.
To turn cleaner OFF, push switch
again.
1
25
24
13
19
17
23
16
3
2
15
14
6
7
9
8
4
5
11
10
12
21
20
21
22
5
Polarized plug
To reduce the risk of electric shock,
this appliance has a polarized plug
(one blade is wider than the other).
This plug will fit in a polarized outlet
only one way. If the plug does not fit
fully in the outlet, reverse the plug. If
it still does not fit, contact a qualified
electrician to install the proper outlet. Do not change the plug in any
way.
2-1
2-2
18
2-3
Continued
➜
The cleaner is shipped with the agitator brush roll in the OFF position.
To turn the agitator brush roll ON,
step on the pedal (A). The indicator
(B) will show red in the “brush roll
on” window.
B
A

Telescoping handle
The telescoping handle includes
adjustable settings to various
heights for user comfort. The handle
is designed to retract into the body
of the cleaner for convenience in
storing or carrying the cleaner.
Lower the handle by depressing the
button (B) located at the handle
base and pushing the handle down.
Raise the handle by depressing the
button and pulling the handle
upward, locking it into the desired
position.
Settings
For maximum cleaning performance, the following carpet height
settings are recommended:
• Lowest setting: for all types of
carpet.
Note: If the cleaner is difficult to
6
Handle positions
The handle of your cleaner has
three positions; upright for storage
and when using cleaning tools;
operating position for general
operation on carpet and floors; low
for reaching under low furniture.
Step on handle release lever to
lower handle.
Carrying cleaner
The cleaner can also be moved by
using the carrying handle.
2-7
2-8
2-9
Carpet height
adjustment
The cleaning of carpet and rugs
takes place at the nozzle (C).
When it is necessary to raise and
lower the nozzle for various carpet
pile heights, turn the nozzle control
knob (D) to the desired setting.
C
D
Transporting cleaner
To move your cleaner from room to
room, put handle in upright position,
tilt cleaner back on rear wheels and
push forward.
2-6
B
A
2-5
2-4
Cord rewind
Grasp the end of the plug and pull
to release cord from cord reel. After
desired cord length is reached, the
cord will lock into position.
To return cord for storage, hold plug
and press on button (A) at top of
cord reel. To prevent cord from
whipping, hold plug until cord is
rewound.
push, turn knob to the next higher
setting.
• Higher settings: for very deep
pile carpet, where easier pushing
effort is desired, while maintaining
good cleaning performance.
2-10

7
2-12
2-11
F
E
Cleaning lightweight
flexible rugs
Stand on one end of rug and move
cleaner toward other end or edge.
Before reaching edge, push down
on handle. This will lift up the nozzle
(front of cleaner) as shown and will
prevent rug from clinging to cleaner.
Continue to lift up nozzle so that
when you have reached the edge, it
is completely off the rug. Move
cleaner back to start again, lower
nozzle, and use only forward
strokes.
Cleaning tools
Tools allow for cleaning surfaces
above the floor and for reaching
hard to clean areas.
The cleaner is ready for tool use
when handle is in upright
position.
The agitator brush roll will not
rotate when the cleaner is in the
upright position or the if the agitator brush roll shut off indicator
is in the OFF position when the
handle is lowered.
Agitator brush roll
shut-off
The agitator brush roll shuts off automatically for tool use, when the
cleaner is in the upright position.
To manually shut off the agitator
brush roll for cleaning hard floors,
step on the pedal (E). The indicator
(F) will show red in the “brush roll
off” window. To turn the agitator
brush roll on, step on the pedal
again. The indicator will show red in
the “brush roll on” window.
How to clean tools
To clean the hose and powered
hand tool, wipe off dirt with a cloth
dampened in a mild detergent.
Rinse with a damp cloth. DO NOT
submerge powered hand tool in
water.
Cleaning tools may be washed in
warm water with a detergent. Rinse
and air dry before using.
Continued
➜
G
H
2-13
Removing hose
When using cleaning tools, place
cleaner handle in the upright position. The agitator brush roll will
not rotate when the cleaner is in
the upright position. Also, turn
cleaner OFF before disconnecting
and connecting hose to hose tube
(G).
To use hose, lift hose end (H) as
shown.
When you are finished cleaning with
the tools, reposition hose end into
tube.
Select proper tool
I. Combination tool use with brush
for carved furniture, table tops,
books, lamps, lighting fixtures,
venetian blinds, baseboards, shutters, and registers.
Remove brush (Fig. 2-15) to clean
upholstered furniture, draperies,
mattresses, clothing, and carpeted
stairs.
J. Powered hand tool may be used
for upholstered furniture, draperies,
mattresses, clothing, automobile
interiors, and carpeted stairs.
K. Crevice tool may be used in
tight spaces, corners and along
edges in such places as dresser
drawers, upholstered furniture,
stairs and baseboards.
L. Wands are used to give extra
length to your hose. Use them with
any of the above tools.
2-14
K
L
J
I
M
2-15
2-16
Combination tool
Slide brush to remove.
To replace brushes, align bottom of
brush with grooves (M) on tool. Slide
brush into place.

B
3-2
How to empty
Press dirt cup release button (B)
and pivot cup out.
8
A
3-1
2-17
2-18
3. Maintenance
Familiarize yourself with these home
maintenance tasks as proper use
and care of your cleaner will ensure
continued cleaning effectiveness.
When to empty
It is recommended that the dirt cup
be emptied before the dirt reaches
the fill line (A), or after every use if
preferred. Place the cleaner in the
upright position before removing the
dirt cup.
Disconnect cleaner from electrical
outlet. Do not use cleaner without
dirt cup or filters in place.
CAUTION: Very fine materials,
such as face powder or cornstarch, may seal the filter and
cause loss of suction. When using
the cleaner for this type of dust,
empty the cup and clean the filters often.
Dirt cup
2-19
F
G
A
B
C
D
E
Attach wand and tools
Attach tool or wand to the hose (F).
Attach tool to wand (G) by pushing
it firmly onto the wand.
Twist wand or tool slightly to tighten
or loosen the connection.
Stair cleaning
Use the hose and powered hand
tool for stair cleaning. Clean from
bottom to top.
CAUTION: To avoid personal
injury or unnecessary wear to carpet, and to prevent the cleaner
from falling, always place it at bottom of stairs.
Turn cleaner OFF before disconnecting and connecting hose.
Remove hose end from dirt duct (A).
Align end of Extra Reach™ hose
with projections (B) over slots on dirt
duct (C). Slide hose into slots and
twist hose to lock it into place.
Extra Reach™ hose
(available at additional cost)
The Extra Reach™ hose provides
easier cleaning of stairs and hard to
reach places. Follow the steps
below for attaching and detaching
the Extra Reach™ hose.
Align end of hose with projections
(D) over slots (E) on Extra Reach™
hose. Slide hose into slots and twist
hose to lock it into place. (To detach
hose, reverse procedure).
Attach wands or tools to the other
end of hose.
NOTE: Hose must be connected to
dirt duct and hose tube after
removing Extra Reach™ hose for
carpet or floor cleaning.

9
Continued
➜
C
D
Holding dirt cup over trash receptacle, press dirt cup door release button (C) to open dirt cup door (D).
Close door and press dirt cup door
release button to latch dirt cup door
closed.
3-6
3-8
3-7
B
B
A
A
Dirt and debris can be cleaned from
the filter assembly by brushing with
the cleaner’s combination tool.
Place the filter assembly on the dirt
cup, aligning (3) tabs (A) on filter
with (3) slots on dirt cup (B) and
twist it clockwise to secure into
position. Press dirt cup door release
button (C) to latch dirt cup door
closed.
Replace dirt cup as described in
Figs. 3-4 & 3-5.
Cyclonic filter assembly
How to clean
Disconnect cleaner from electrical outlet. Do not use cleaner without dirt cup
or filters in place.
3-3
3-5
3-4
Press on dirt cup release button
while firmly pressing on dirt cup.
Release button in order for it to
return to proper position and lock
the dirt cup into place.
Remove dirt cup as described in Fig. 3-2.
Twist filter assembly (A) counterclock-
wise. Remove assembly from dirt cup.
Secondary filter
How to clean
Disconnect cleaner from electrical
outlet. Do not operate cleaner
without dirt cup or filters in place.
With thumb, slide latch (A) located
at the top of the housing to the right
and pull down to remove gray filter
frame. Remove black foam filter.
Rinse filter frame cartridge and foam
filter under cold water.
Allow both filter frame and filter to air
dry for 24 hours before replacing filter into filter frame. Reposition filter
frame cartridge by inserting tabs (B)
into slots on back of housing. Rotate
filter cartridge frame up toward top
of housing and snap closed.
What to buy
When purchasing a new secondary
filter cartridge, ask for HOOVER
part No. 93002517. To purchase a
new black foam filter, ask for
HOOVER part No. 93002518.
Cleaning filters
Remove dirt cup as described in
Fig. 3-2.
Place bottom of dirt cup into cleaner
body first. Pivot cup into cleaner
body.
B
C
A
T
T
T
T

With fingers in slots, pull filter frame
(A) straight out.
Dirt and debris can be cleaned from
the filter cartridge by brushing with
the cleaner’s combination tool. DO
NOT RINSE OR WASH the HEPA
filter cartridge.
Slide back into position on cleaner.
Replacing lens
Reposition lens and secure with the
screw.
Belt replacement
The belts are located under the bottom plate of the cleaner and should
be checked from time to time to be
sure they are in good condition.
The flat (wide) belt is described
below; the other belt is described
under “Agitator brush roll”.
When to replace
Disconnect cleaner from electrical
outlet. WARNING: Agitator brush
roll can start suddenly. Unplug
cleaner before turning it over.
To check the flat belt, remove bottom plate as shown in “Replacing
flat belt”. Replace belt if it is
stretched, cut or broken.
What to buy
To assure effective operation, use
only genuine HOOVER belts with
your cleaner. When purchasing a
new belt, ask for Flat belt - HOOVER
part No. 40201-271.
10
3-11 3-12
Installing bulb
Pull old bulb straight out of socket.
Push new bulb straight into socket
until locked in place.
Excessive force is not required.
Removing lens
Disconnect cleaner from electrical
outlet.
Press handle release pedal and
place handle in low position.
Using a Phillips screwdriver, remove
the the screw as shown and lift off
lens.
3-9
A
HEPA Final filter
How to clean
Disconnect cleaner from electrical
outlet. Do not operate cleaner
without dirt cup or filters in place.
3-10
What to buy
When purchasing a new HEPA
filter cartridge, ask for HOOVER
part No. 93002360.
Headlight replacement
What to buy
This cleaner uses a 13 volt, T-3 114
wedge base bulb, Hoover part No.
27313-107.

11
Continued
Positioning back of belt
With lettering on outside of belt,
slide new belt over motor shaft (D).
Positioning front of belt
Place other end of belt over large
pulley (C) while rolling the pulley in
direction shown.
Turn agitator brush roll making sure
belt turns freely and is not pinched
between agitator brush roll and agitator shield.
3-15
3-16
3-14
C
Removing belt
Remove used belt (B) from large
pulley (C) and discard.
3-13
A
B
D
A
C
Replacing flat belt
Disconnect cleaner from electrical
outlet.
Removing bottom plate
WARNING: Agitator brush roll can
start suddenly. Unplug cleaner
before turning it over.
Place handle in low position and
turn cleaner over so bottom side is
facing up.
Remove the 6 screws as shown with
a Phillips screwdriver.
Lift off bottom plate (A).
3-19
Replacing bottom plate
Reposition bottom plate and 6
Phillips head screws. Tighten
screws securely.
The agitator brush roll
When to replace
When agitator brush roll brushes are
worn, the agitator brush roll should
be replaced.
Disconnect cleaner from electrical
outlet.
WARNING: Agitator brush roll can
start suddenly. Unplug cleaner
before turning it over.
What to buy
When purchasing a new agitator,
ask for HOOVER part No.
93002361.
To check condition of brushes, move
edge of a card across bottom plate
while turning agitator brush roll. To
maintain cleaning effectiveness,
replace agitator brush roll if brushes
do not touch card.
3-20
Removing agitator brush roll
Disconnect cleaner from electrical
outlet.
Turn carpet height adjustment knob
to lowest setting. Turn cleaner over
and remove bottom plate (Fig. 3-13).
Lift up agitator brush roll and slide
V-belt (A) off agitator brush roll.
3-18
3-17

12
3-21 3-22 3-23
Inspecting V-belt
The V-belt is designed to last for a
long time and is not normally
replaced. However, if the V-belt is
cracked, gouged or broken, it
should be replaced.
Slide flat belt off large pulley as
shown in Fig. 3-14.
To remove V-belt, slide back of belt
over pulley (B). Then firmly pull on
belt and “snap” it out.
Discard used belt. Replace with
HOOVER part No. 40201-200.
To install new belt (with lettering on
outside of belt), slide back of belt
over pulley and pull front of belt
toward groove (C) next to pulley.
Belt will “pop” into place.
Positioning belt on agitator
brush roll
Before positioning belt onto agitator brush roll, check for debris
accumulation as described in Fig.
4-3.
Insert agitator brush roll through belt
and position belt in groove (D) on
agitator brush roll.
Installing agitator brush roll
Grasp agitator brush roll firmly and
fit it into position by first sliding end
opposite the belt into the rectangular slot (E) on side of cleaner.
Pull other side of agitator brush roll
(F) into place. Belt may fit loosely
when properly installed.
Reposition flat belt and bottom plate
(Figs. 3-15 through 3-16).
3-24
A
Powered hand tool
Agitator brush roll
replacement
When agitator brushes are worn, the
brush roll should be replaced. Ask
for HOOVER part No. 48414-088.
How to replace
1. Remove tool from hose and turn
it so bottom faces up. Press the
latches on either side of tool and
remove bottom plate (A).
3-26
3. Remove agitator including end
plates (C) and discard.
4. Inspect belt to ensure that it is in
good condition. If belt is cracked,
gouged or broken, replace it (see
following section).
5. Insert brush roll through belt and
position belt over gear teeth (D) on
brush roll.
C
D
3-25
2. Unscrew the two Phillips screws
and remove belt guard (B).
B
D
F
E
C
B

13
Continued
3-27
E
6. With curved ends down, slide end
plates (C) of brush roll into slots (E)
on tool.
C
3-29
8. To replace bottom plate (A), insert
the four tabs on edge of bottom
plate into slots on front of tool.
Pivot bottom plate down and snap
closed.
A
3-28
7. Replace belt guard (B) making
sure not to pinch brush bristles in
guard. Turn agitator, to make sure it
rotates freely.
Replace and tighten screws.
B
1. Remove tool from hose. The
belt can be seen through the top of
the nozzle or by removing the bottom plate and belt guard (Figs. 3-24
and 3-25).
Powered hand tool
Belt replacement
Inspect the belt
The powered hand tool belt is
designed to last a long time and is
not normally replaced. However, if
the belt is cracked, gouged or broken, it should be replaced.
3-30
Replace belt
When replacing belt, ask for
HOOVER part No. 38528-037.
3-32
3-31
B
A
2. Grasp turbine (A) and pull firmly
to remove.
3. Remove belt from turbine pulley
(B). Replace with new belt.
4. With flat sides of turbine retainers
(C) pointing down, slide retainers
into grooves (D) in tool housing and
snap into place.
5. Replace brush roll, belt guard,
and bottom plate as described in
Figs. 3-26 through 3-29.
C
D

Thermal protector
An internal thermal protector has
been designed into your cleaner to
protect it from overheating.
When the thermal protector activates, the cleaner will stop running. If this happens, proceed as
follows:
1. Turn the cleaner OFF and disconnect it from the electrical outlet.
2. Check secondary and final filters for dirt accumulation.
3. Refer to “Clearing blockages”
section.
4. When cleaner is unplugged
and the motor cools for 30 minutes, the thermal protector automati-
cally resets and cleaning may continue.
If the thermal protector continues to
activate after following the above
steps, your cleaner may need servicing (see “Service” section).
Service
To obtain approved HOOVER service
and genuine HOOVER parts, locate
the nearest Hoover Sales and
Service Center or Authorized
Hoover Warranty Service Dealer
(Depot) by:
• checking the Yellow Pages
under “Vacuum Cleaners Household” OR -
• checking the list of Sales and
Service Centers provided with this
cleaner OR -
• checking the Service section of
Hoover on-line at
hoover.com OR -
• calling 1-800-944-9200 for an
automated referral of authorized
service outlet locations (U.S.
only).
Possible Cause
Possible Solution
• Incorrect carpet height setting
•
Move carpet height control to a
higher setting
Possible Cause
Possible Solution
• Belt broken or stretched
•
Replace agitator brush roll belt
as described in Figs. 3-13
through 3-18 in the Maintenance
section
Problem: Cleaner hard to push
Problem: Smoky/burning smell
detected
4. If you have a
problem
Problem: Smoky
Possible Cause
Possible Solution
• Broken or worn belt
•
Replace belt
• Agitator brush roll worn
•
Replace agitator brush roll
• Dirt cup full
•
Empty dirt cup
• Incorrect carpet height setting
•
Move nozzle control knob to
lower setting
• Blockage in air flow passages
•
Clear blockage
• Agitator brush roll is OFF
•
Step on pedal (Fig. 2-11) to turn
agitator brush roll ON
• Filters dirty
•
Clean filters (Figs. 3-6 through
3-9)
Possible Cause
Possible Solution
• Not firmly plugged in
•
Plug unit in firmly
• No voltage in wall receptacle
•
Check fuse or breaker
• Blown fuse or tripped breaker
•
Replace fuse or reset breaker
• Thermal protector activated
•
Unplug cleaner and allow cleaner
to cool for 30 minutes (this will
reset the thermal protector)
If a minor problem occurs, it usually
can be solved quite easily when the
cause is found by using the checklist below.
Problem: Cleaner won’t run
Problem: Cleaner/tools won’t pick up
Problem: Powered hand tool brush
roll won’t turn
Possible cause
Possible solution
•
Too much pressure being
applied to tool
•
Continue using tool applying light
pressure.
•
Blockage in turbine channel
•
Remove blockage.
• Broken or worn belt
•
Replace belt
• Low cleaner suction
•
Check items under “Cleaner won’t
pick up”.
14
Lubrication
The motor is equipped with bearings that contain sufficient lubrication for the life of the motor. The
addition of lubricant could cause
damage. Therefore, do not add
lubricant to motor bearings.
The agitator brush roll is equipped
with two ball bearings that should
be lubricated periodically by a
Hoover Sales and Service Center or
an Authorized Hoover Warranty
Service Dealer.
Do not send your cleaner to Hoover
in North Canton, Ohio for service,
this will only result in delay.
If further assistance is needed, contact the Hoover Consumer
Response Center,
Phone: 1-330-499-9499.
In Canada, contact Hoover Canada,
Burlington, Ontario L7R 4A8,
Phone: 1-800-263-6376.
Always identify your cleaner by the
complete model number when
requesting information or ordering
parts. (The model number appears
on the back of the cleaner.)

Clearing blockages
Disconnect cleaner from electrical
outlet.
Low suction or pick up may be due
to a blockage in the system. Refer
to the following steps to check for
blockages continuing with each
step until the blockage is found:
1. Check fullness of dirt cup; empty
if needed.
4-1
Checking under bottom plate
9. Turn cleaner OFF and unplug.
10. Remove bottom plate (Fig. 3-13)
and agitator brush roll (Fig. 3-20).
Look into opening (D), in channels (E)
and around liner (F) and remove any
accumulated debris.
11. Replace agitator brush roll and
bottom plate.
Checking airflow path
2. Plug cleaner in and turn ON.
Check for suction at end of hose (A).
If there is suction, continue with step
3.
3. Turn cleaner OFF and unplug.
Check connection at hose tube (B);
remove any blockage.
Check secondary filter
4. Remove and clean secondary filter
(Fig. 3-8). Replace filter.
A
C
D
F
E
4-3
4-2
B
Checking airflow path through
hose inlet tube on back of
cleaner
5. Turn cleaner OFF and unplug.
6. If blockage can be seen in tube
(C), remove 5 screws using a Phillips
screwdriver.
7. Pull tube from cleaner, remove
blockage.
8. Reposition tube on back of cleaner,
replace 5 screws.
15
4-4
A
If a blockage occurs during
powered hand tool use:
12. Disconnect powered hand tool
from hose. Remove bottom plate,
belt guard and turbine as described
in Figs. 3-24, 3-25 and 3-31.
Remove any blockage from turbine
channel (G).
Replace belt turbine, brush roll, belt
guard and bottom plate.
Full One Year
Warranty
(Domestic Use)
Your HOOVER® appliance is warranted
in normal household use, in accordance
with the Owner’s Manual against original
defects in material and workmanship for
a period of This warranty provides, at no
cost to you, all labor and parts to place
this appliance in correct operating condition during the warranted period. This
warranty applies when the appliance is
purchased in the United States including
its territories and possessions, or in
Canada or from a U. S. Military
Exchange. Appliances purchased elsewhere are covered by a limited one year
warranty which covers the cost of parts
only. This warranty does not apply if the
appliance is used in a commercial or
rental application.
This warranty only applies when the
product is in use in the country or territory in which it is purchased.
Warranty service can only be obtained
by presenting the appliance to one of
the following authorized warranty service
outlets. Proof of purchase will be
required before service is rendered.
1. Hoover Sales and Service Centers.
2. Hoover Authorized Warranty
Service Dealers (Depots).
For an automated referral of authorized service outlets in the U.S.A.,
phone 1-800-944-9200 OR
visit Hoover on-line at hoover.com
This warranty does not cover pick up,
delivery, or house calls; however, if you
mail your appliance to a Hoover Sales
and Service Center for warranty service,
transportation will be paid one way.
While this warranty gives you specific
legal rights, you may also have other
rights which vary from state to state.
If further assistance is needed, or if
there are questions concerning this warranty or the availability of warranty service outlets, phone the Hoover
Consumer Response Center,
1-330-499-9499.
In Canada, contact Hoover Canada,
Burlington, Ontario L7R 4A8,
1-800-263-6376.
 Loading...