

Page 1
CRUISE
™
CORDLESS VACUUM
©2017 Techtronic Floor Care Technology Limited. All Rights Reserved. #9 61152025 • RevC
User manual
IMPORTANT: READ CAREFULLY
BEFORE ASSEMBLY AND USE.
This product is intended for household use only.
If used commercially the warranty is void.
Page 2

IT’S GUARANTEED.
Hoover will replace your batteries under our 2 year
limited warranty. See Warranty for complete details.
Register your vacuum by:
Calling 888 679-2121Visiting Hoover.com
or Hoover.ca
Make it official.
Welcome to
Hoover
ownership.
Page 3

YOUR GUIDE
Important Safety Instructions .............................................................................................................................4
Getting started with your Cruise™ Cordless ....................................................................................................6
Assembly ................................................................................................................................................................7
Attach the wall bracket........................................................................................................................................8
How to use .............................................................................................................................................................9
Before you begin cleaning ................................................................................................................................10
Using your machine ............................................................................................................................................12
Using your machine as a Handheld vacuum ..................................................................................................13
Using your machine to clean up high ..............................................................................................................14
Maintenance........................................................................................................................................................16
How to order accessories .................................................................................................................................22
Need Help?...........................................................................................................................................................23
Service and Warranty ........................................................................................................................................24
Page 4

4
IMPORTANT SAFETY INSTRUCTIONS
SAVE THESE INSTRUCTIONS
When using an electrical appliance, basic precautions should always be
followed, including the following:
READ ALL INSTRUCTIONS BEFORE USING
THIS APPLIANCE.THIS PRODUCT IS INTENDED FOR HOUSEHOLD USE ONLY. IF USED
COMMERCIALLY WARRANTY IS VOID.
WARNING: TO REDUCE THE RISK OF FIRE,
ELECTRIC SHOCK, DAMAGE OR INJURY:
• Fully assemble before operating.
• Do not use appliance on wet surfaces. Do not expose appliances to
rain. Store appliances indoors.
• The charger is for indoor use only. Be sure to always keep the battery
and charger indoors in a dry place.
• Do not allow to be used as a toy. Not intended for use by children age
12 and under. Close supervision is necessary when used near children.
To avoid injury or damage, keep children away from product, and do not
allow children to place fingers or other objects into any openings.
• Use only as described in this manual. Use only Hoover
®
recommended
attachments and products.
• Do not use charger with damaged cord or plug. If appliance or charger
is not working as it should, has been dropped, damaged, left outdoors,
or dropped into water, take it to a service center prior to continuing use.
• Do not pull or carry charger by cord, use cord as a handle, close a
door on cord, or pull cord around sharp edges or corners. Do not place
product on cord. Do not run appliance over cord. Keep cord away from
heated surfaces.
• Do not unplug charger by pulling on cord. To unplug charger, grasp the
plug, not the cord.
• Do not handle charger including charger plug and charger terminals, or
appliance with wet hands.
• Do not put any object into openings. Do not use with any opening
blocked; keep free of dust, lint, hair, and anything that may reduce air
flow.
• Keep hair, loose clothing, fingers, and all parts of body away from
openings and moving parts.
• Use extra care when cleaning on stairs. To avoid personal injury or
damage, and to prevent the cleaner from falling, always place cleaner
at bottom of stairs on floor. Do not place cleaner on stairs or furniture,
as it may result in injury or damage.
• Do not use to pick up flammable or combustible liquids, such as
gasoline, or fine wood shavings, or use in areas where they may be
present.
Page 5

5
• Do not pick up anything that is burning or smoking, such as cigarettes,
matches, or hot ashes.
• Do not use without Dirt Cup and/or Filters in place.
• Turn power switch off and remove battery before removing or installing
brush roll.
• Always turn off this appliance before connecting or disconnecting
Motorized Turbo Tool or tools.
• Do not incinerate the charger, battery, or appliance even if it is severely
damaged. The batteries can explode in a fire.
• This product includes rechargeable lithium-ion batteries. Do not expose
batteries to high temperatures, as they may catch fire and/or explode.
• Do not expose battery to crushing, incineration or similar actions.
• Do not dispose of battery in a fire or trash compactor. See battery
disposal section for directions.
• Do not attempt to disassemble battery.
• Unplug the charger from the outlet before any routine cleaning or
maintenance.
• Leaks from battery cells can occur under extreme conditions. If any
liquid gets on the skin wash quickly with soap and water. If any liquid
gets into the eyes, do not rub eyes, immediately flush them with clean
water continuously for a minimum of 15 minutes. Seek medical attention
immediately.
• Use only the charger (Hoover Part #440009553) supplied by Hoover
®
to
recharge.
• Use only the battery (Hoover Part #440009633) supplied by Hoover
®
.
Other batteries may burst causing serious personal injury or damage.
• Do not touch or insert objects into battery pack or charger terminals.
• Do not attempt to short circuit the battery or charger terminals.
WARNING: This product contains chemicals
known to the State of California to cause cancer, birth
defects or reproductive harm. WASH HANDS AFTER
HANDLING.
Page 6
6
Getting started with your Cruise™ Cordless:
CONTENTS VARY DEPENDING ON THE MODEL PURCHASED.
WHAT’S IN THE BOX?
Unit Model
BH52200/PC/CDI
ü ü ü ü ü
BH52210/PC/CA
ü ü ü ü ü ü ü
BH52212
ü ü ü ü ü ü ü
Reach Wand Powered Nozzle
Handheld
Wall Mount
Crevice Tool Upholstery Tool
Articulating
Dusting Brush
Dusting Brush
ALL MODELS COME WITH A CHARGER, BATTERY, SCREWS, SCREW COVERS AND USER MANUAL.
Page 7
7
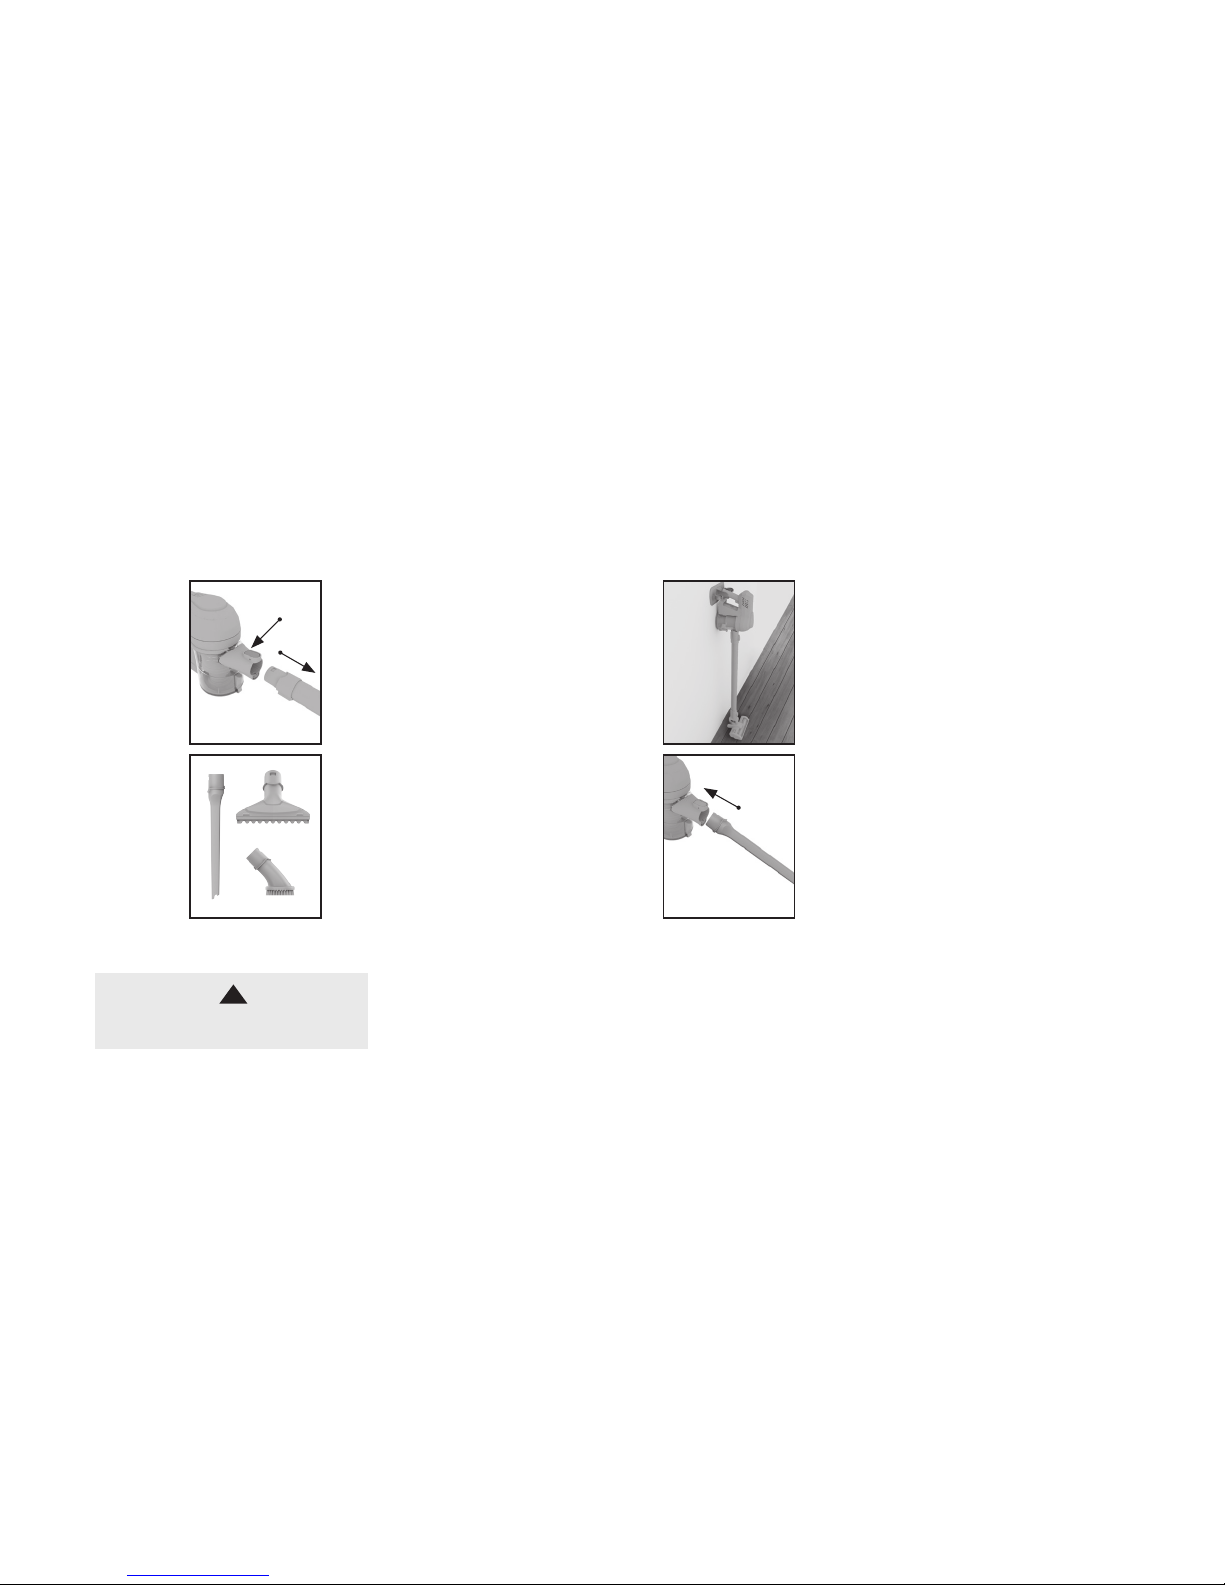
Assembly:
Push the Handheld
down onto the Reach
Wand until it clicks
into place.
Line up the connector on
the Reach Wand with the
Powered Nozzle. Push the
Reach Wand down onto
the Powered Nozzle until it
clicks into place.
The vacuum cleaner is not
free standing and in between
uses must always be placed
in the wall bracket or laid
flat on the floor, in a suitable
location so it does not
become a trip hazard or can
be stepped on.
1 2 3
WARNING
To reduce the risk of personal injury,
remove battery before cleaning or
servicing.
!
IMPORTANT
This vacuum cleaner is not free standing. In between uses or
when carrying out any maintenance always lie flat on the floor in
a suitable location so it does not become a trip hazard or can be
stepped on.
!
Page 8
8
Attach the wall bracket:
First, fully assemble the vacuum but do not attach the battery.
With the wall bracket
attached, stand the
vacuum close to the wall,
in the upright position with
the Powered Nozzle flat on
the floor.
Firmly press the vacuum
handle into the wall
bracket to secure.
Attach the wall
bracket to the handle.
Use both screws and screw
covers to secure the wall
bracket to the wall. Place
covers over the screws.
Holding the wall bracket
firmly in place, carefully
remove the vacuum.
Using a pencil make a small
mark for each screw.
The tools can be stored on
the wall bracket.
1
4
2
5
3
6
Page 9
9
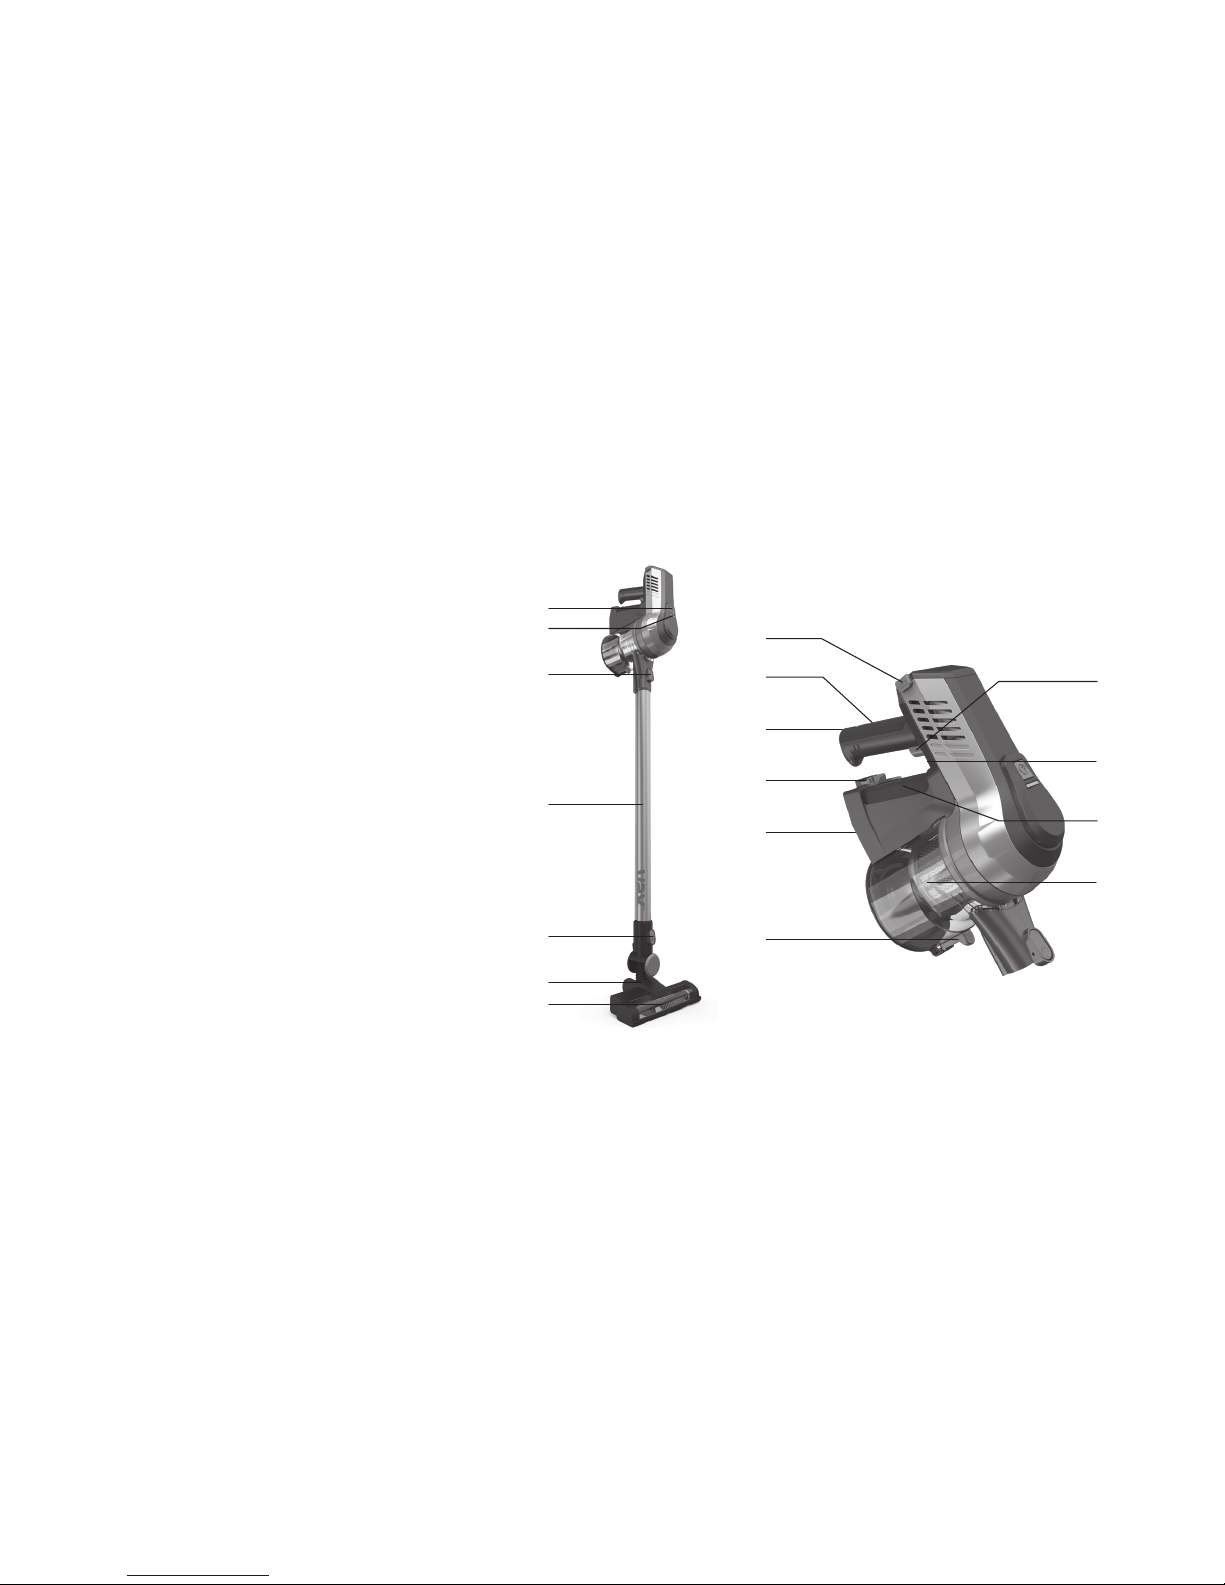
How to use:
1. Brush roll On/Off button
2. On/Off & charging light
3. Handheld release button
4. Reach Wand
5. Power Nozzle/accessory release button
6. Powered Nozzle
7. Brush roll
8. Filter cover release buttons
9. Handle
10. Battery Charging Port
11. Battery release button
12. Dirt container removal button (hidden)
13. Dirt empty button
14. On/Off trigger
15. Continuous power lever (hidden)
16. Battery
17. Dirt container
1
4
5
6
9
10
12
14
2
7
3
8
11
13
15
16
17
Page 10
10
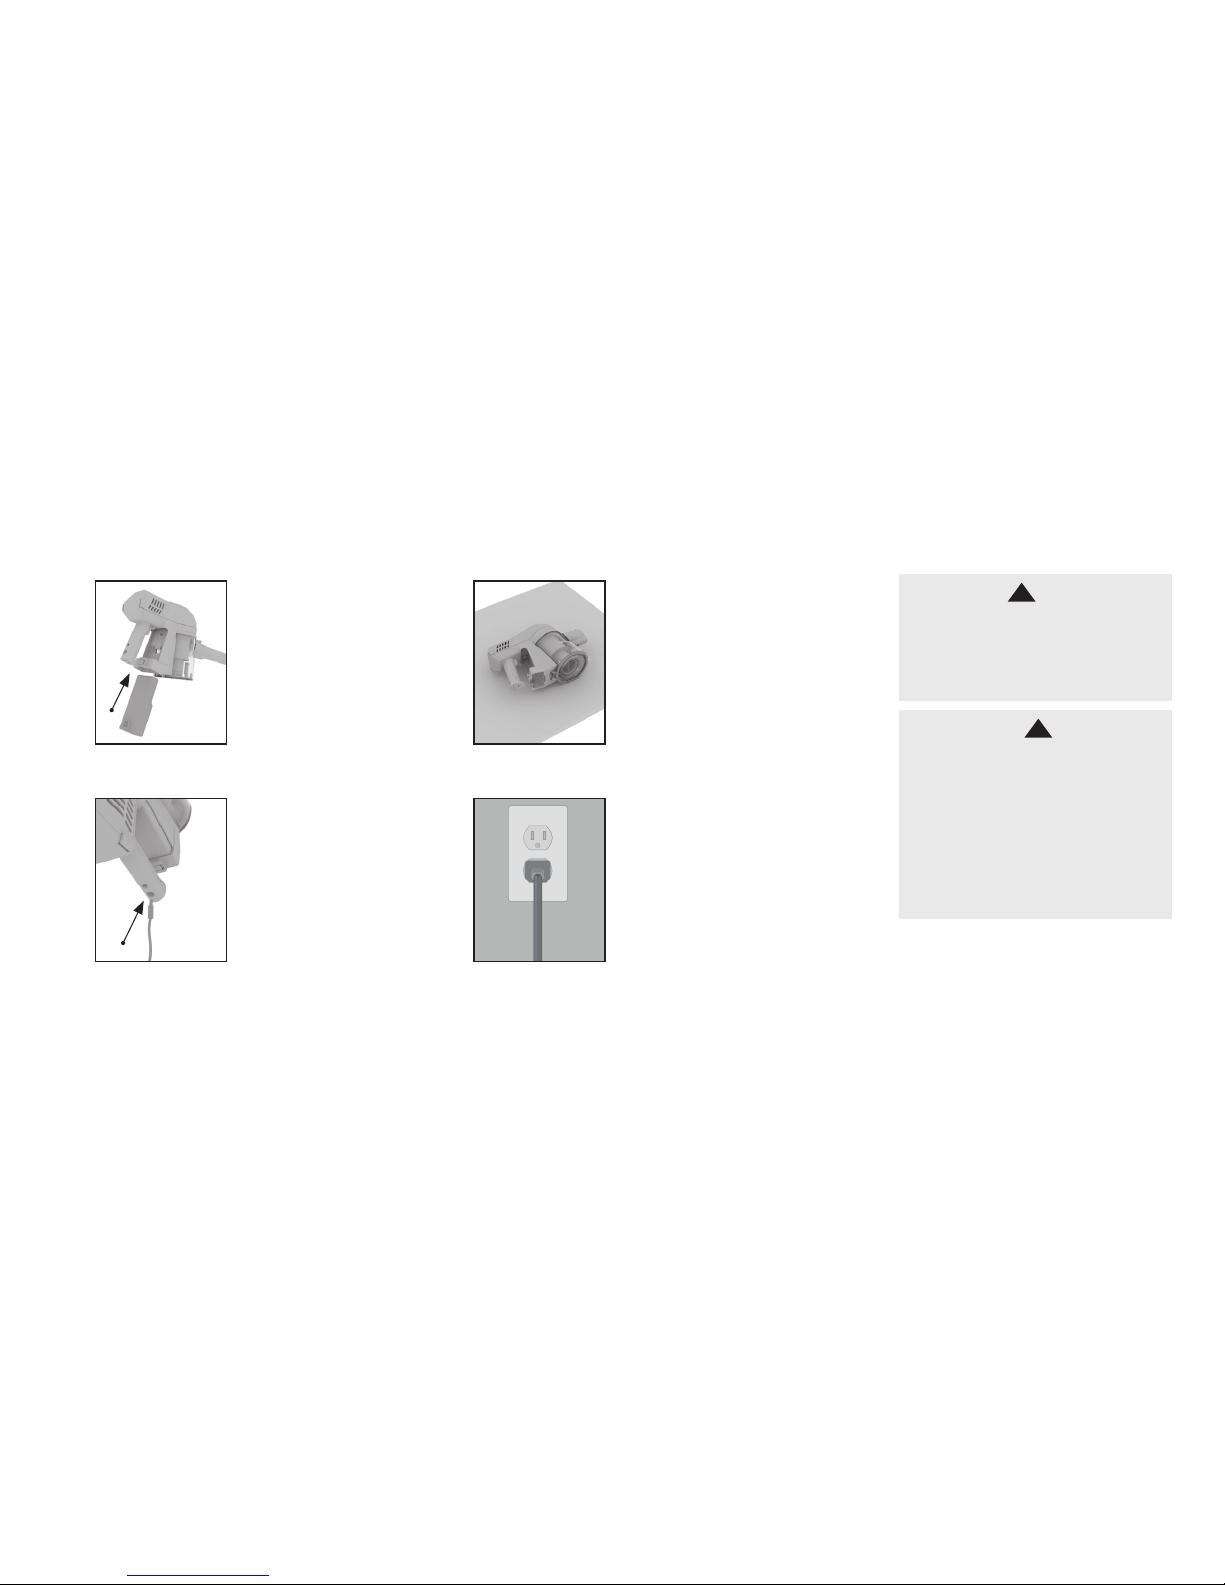
Before you begin cleaning:
Charge the machine, while stored in
the wall mount with the floorhead
and wand attached. You can
also charge the machine when
not in wall mount by removing
the attachments and laying the
Handheld on its side.
Slide the battery into
the back of the Handheld.
The battery will click into
position when correctly
fitted.
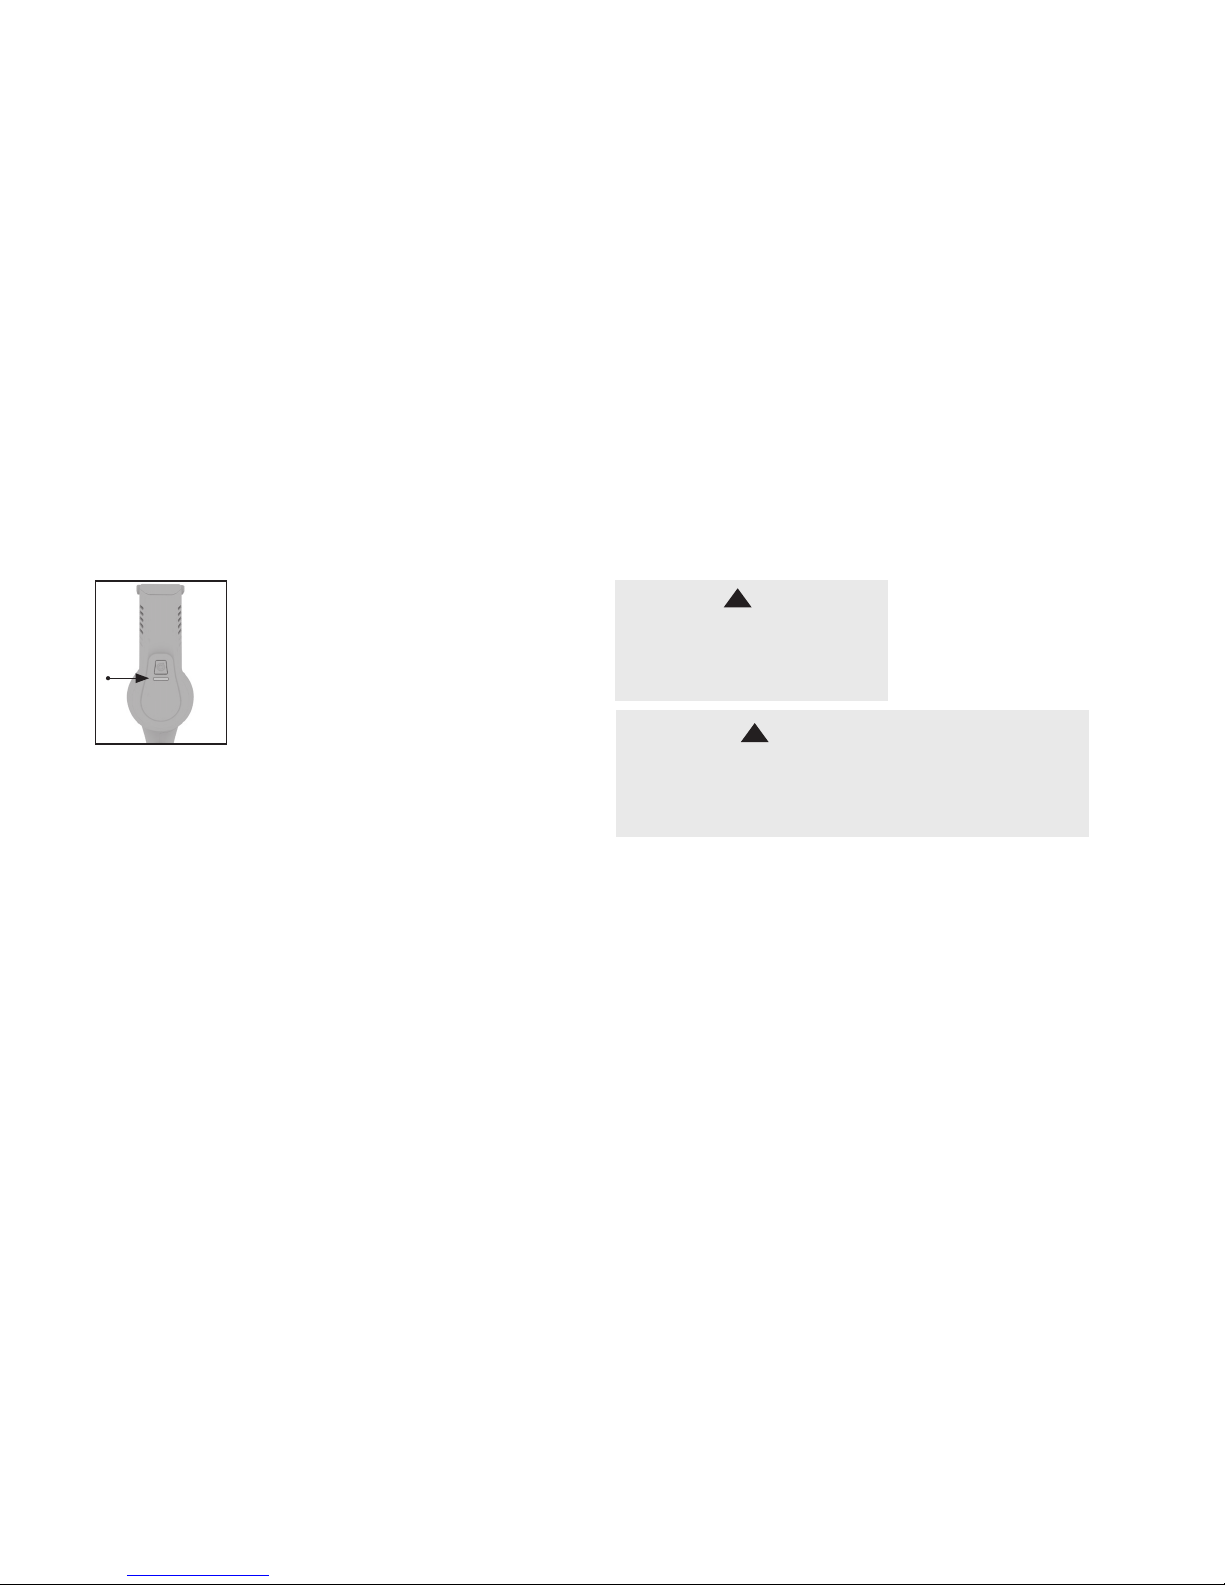
Plug the charger plug into
the outlet.
Insert the charging
cord into the
charging port
located on the back
of the handle.
NOTE: DUE TO FEDERAL REGULATIONS
THE BATTERY DOES NOT COME FULLY
CHARGED.
1
4
2
3
WARNING
To reduce the risk of personal injury,
remove battery before cleaning or
servicing.
!
IMPORTANT
For best cleaning results, filters
require cleaning at least every 3
months and should be replaced
every 12 months depending upon
use. If the vacuum cleaner is
blocked, remove the battery before
removing the blockage.
!
Page 11
11
Before you begin cleaning:
IMPORTANT
For best performance the terminals on the battery and vacuum
cleaner must be clean and free from dust and dirt.The life
expectancy of the battery will vary depending on the usage of the
vacuum cleaner.
!
The On/Off and charging light will illuminate while
the charger is connected.
Red flashing light - the battery is charging.
Green continuous light - the battery is charged.
If charging for the first time the initial charge time
may be up to 6 hours.
5
WARNING
Do not use the vacuum cleaner
when the machine is plugged in and
charging.
!
Page 12
12
Using your machine:
Squeeze the trigger located
underneath the handle, the machine
will switch ‘On’. The On/Off and
charging light will illuminate green
indicating the power is on and the
machine is charged. Release the
trigger to switch the machine ‘Off’.
Press the brush roll’s On/Off button
to go between carpet and hard floor
mode. The brush roll will spin for
carpet mode.
Squeeze the trigger and pull the
‘Continuous Power Lever’ towards
the trigger. This will lock it into the
‘On’ position and will continue to
power the machine without having
to hold in the trigger. Push the lever
away from the trigger to unlock and
release the trigger.
When the vacuum cleaner is in use
the On/Off and charging light will
illuminate and flash red when the
battery is running low. When the red
light flashes the machine will turn
off in 20 seconds. The user should
recharge the battery.
1
3
2
4
WARNING
Risk of personal injury – the brush roll may
suddenly restart. Turn power switch Off
and remove the battery before cleaning of
servicing the brush roll.
!
WARNING
This vacuum cleaner has a constantly rotating brush roll when the
brush roll ‘ON’ is selected. Never leave the vacuum cleaner in one spot
for an extended period of time as this may damage the floor surface.
The brush roll should be ON for carpets and OFF for hard floors.
!
Page 13
13
Using your machine as a Handheld vacuum:
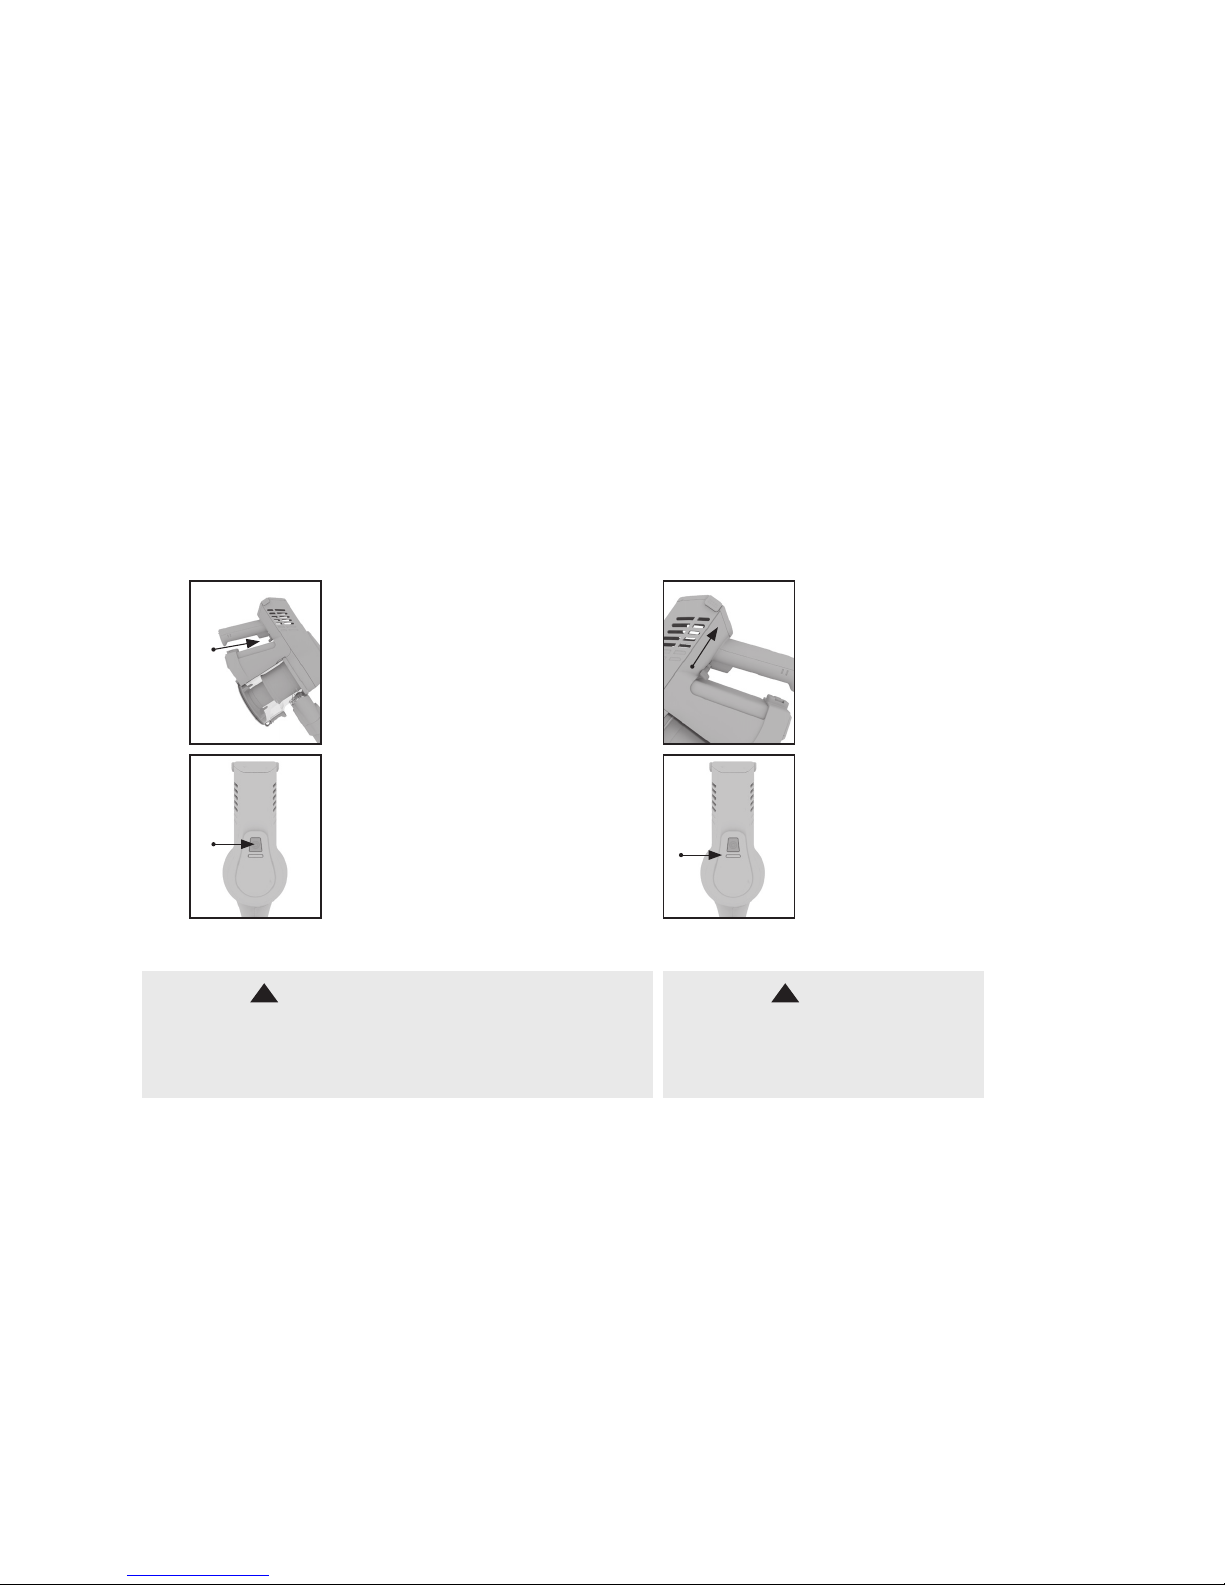
Press the Handheld
release button. Pull to
separate the Handheld
from the Reach Wand .
Choose an accessory
(all accessories not available on all
models).
The Reach Wand when attached to
the Powered Nozzle/accessory is
not free standing, place safely and
securely to one side.
Push the chosen accessory
into the Handheld until it
clicks into place.
(All available accessories can
be attached directly onto the
Handheld).
1
3
2
4
IMPORTANT
Not to be used for grooming a pet.
!
Page 14

14
Using your machine to clean up high:
Choose an accessory
(all accessories not available on all
models).
Press the Power Nozzle/
accessory release button
and pull to remove the
Powered Nozzle from the
Reach Wand.
Push the chosen
accessory into the
Reach Wand until it
clicks into place.
1 2 3
The Reach Wand can be used for hard-to-reach places.
Page 15

15
The Reach Wand can be used for hard-to-reach places.
Using your machine to clean up high:
The Reach Wand can be used for
hard-to-reach places.
The vacuum cleaner is not free standing
and in between uses must always be
placed in the wall bracket or laid flat
on the floor, in a suitable location so it
does not become a trip hazard or can be
stepped on.
1
2
Page 16
16
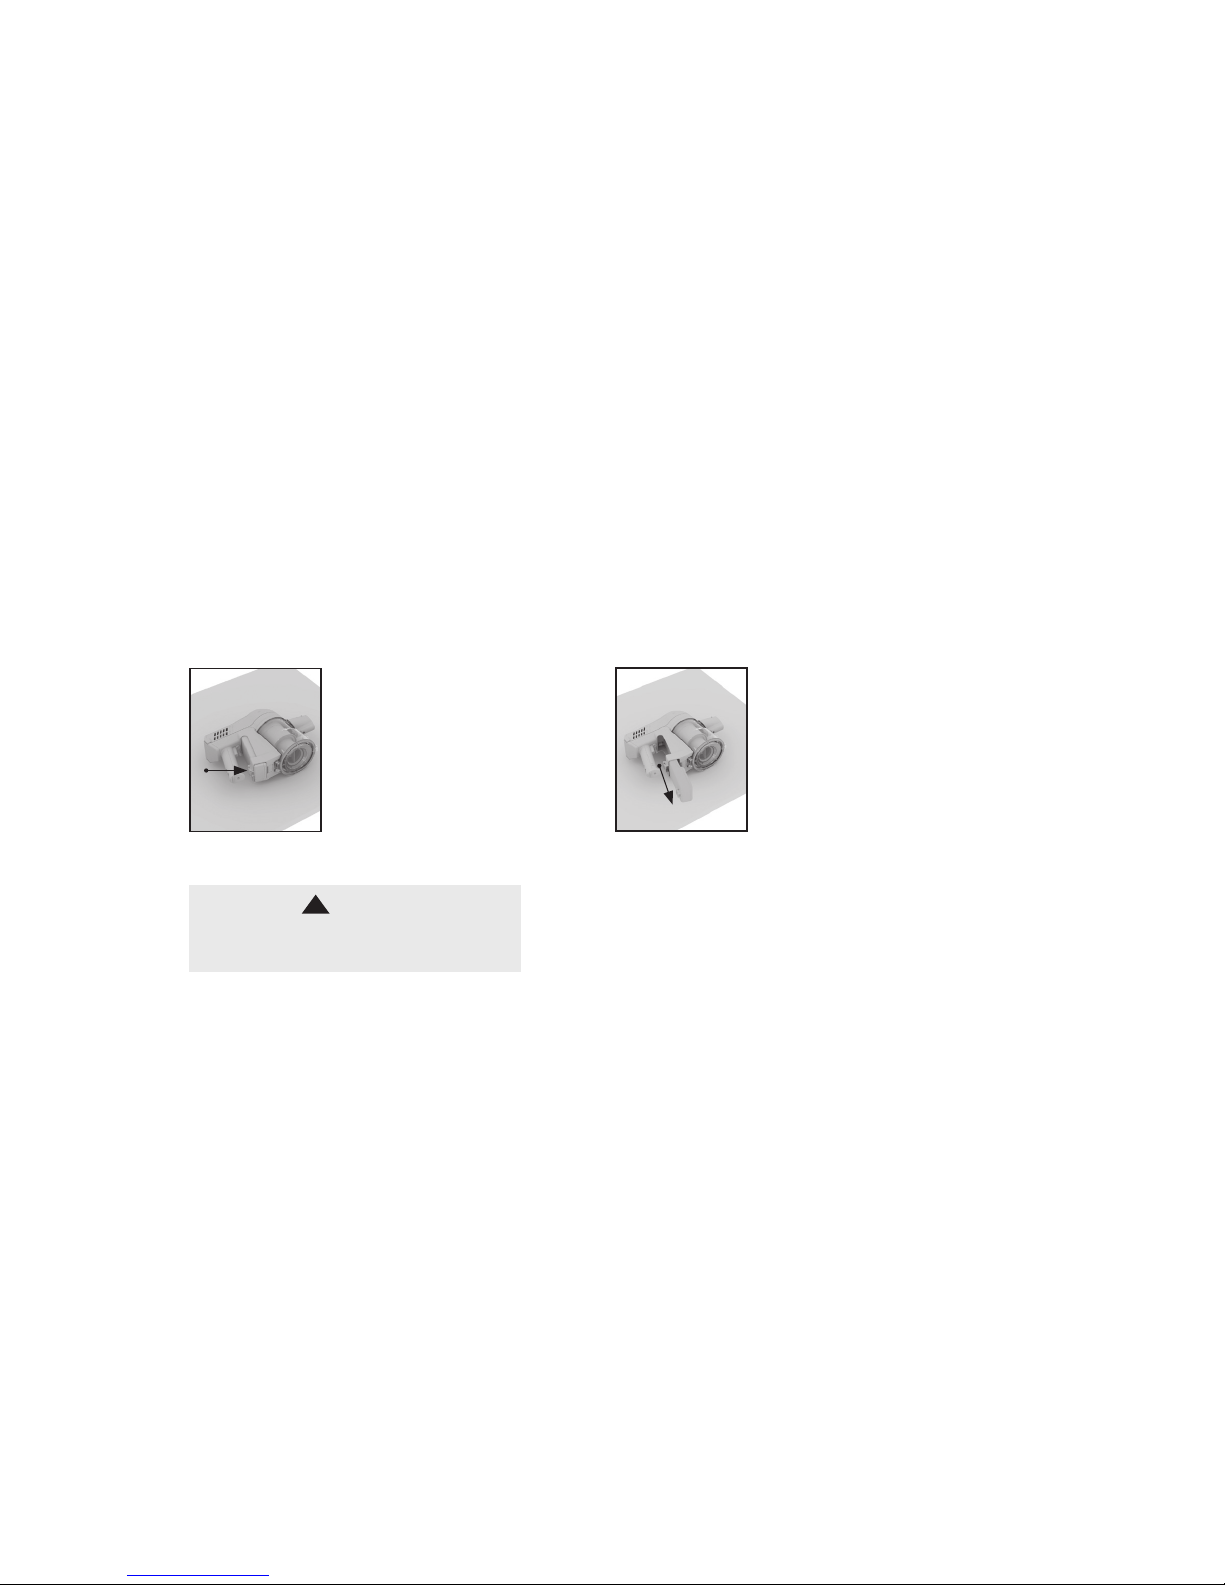
Maintenance:
Lie the Handheld on its side on
a flat stable surface. Press the
battery release button.
Slide the battery out from
the bottom of the Handheld.
1
2
Removing the battery.
WARNING
To reduce the risk of personal injury,
remove battery before cleaning or servicing.
!
Page 17
17
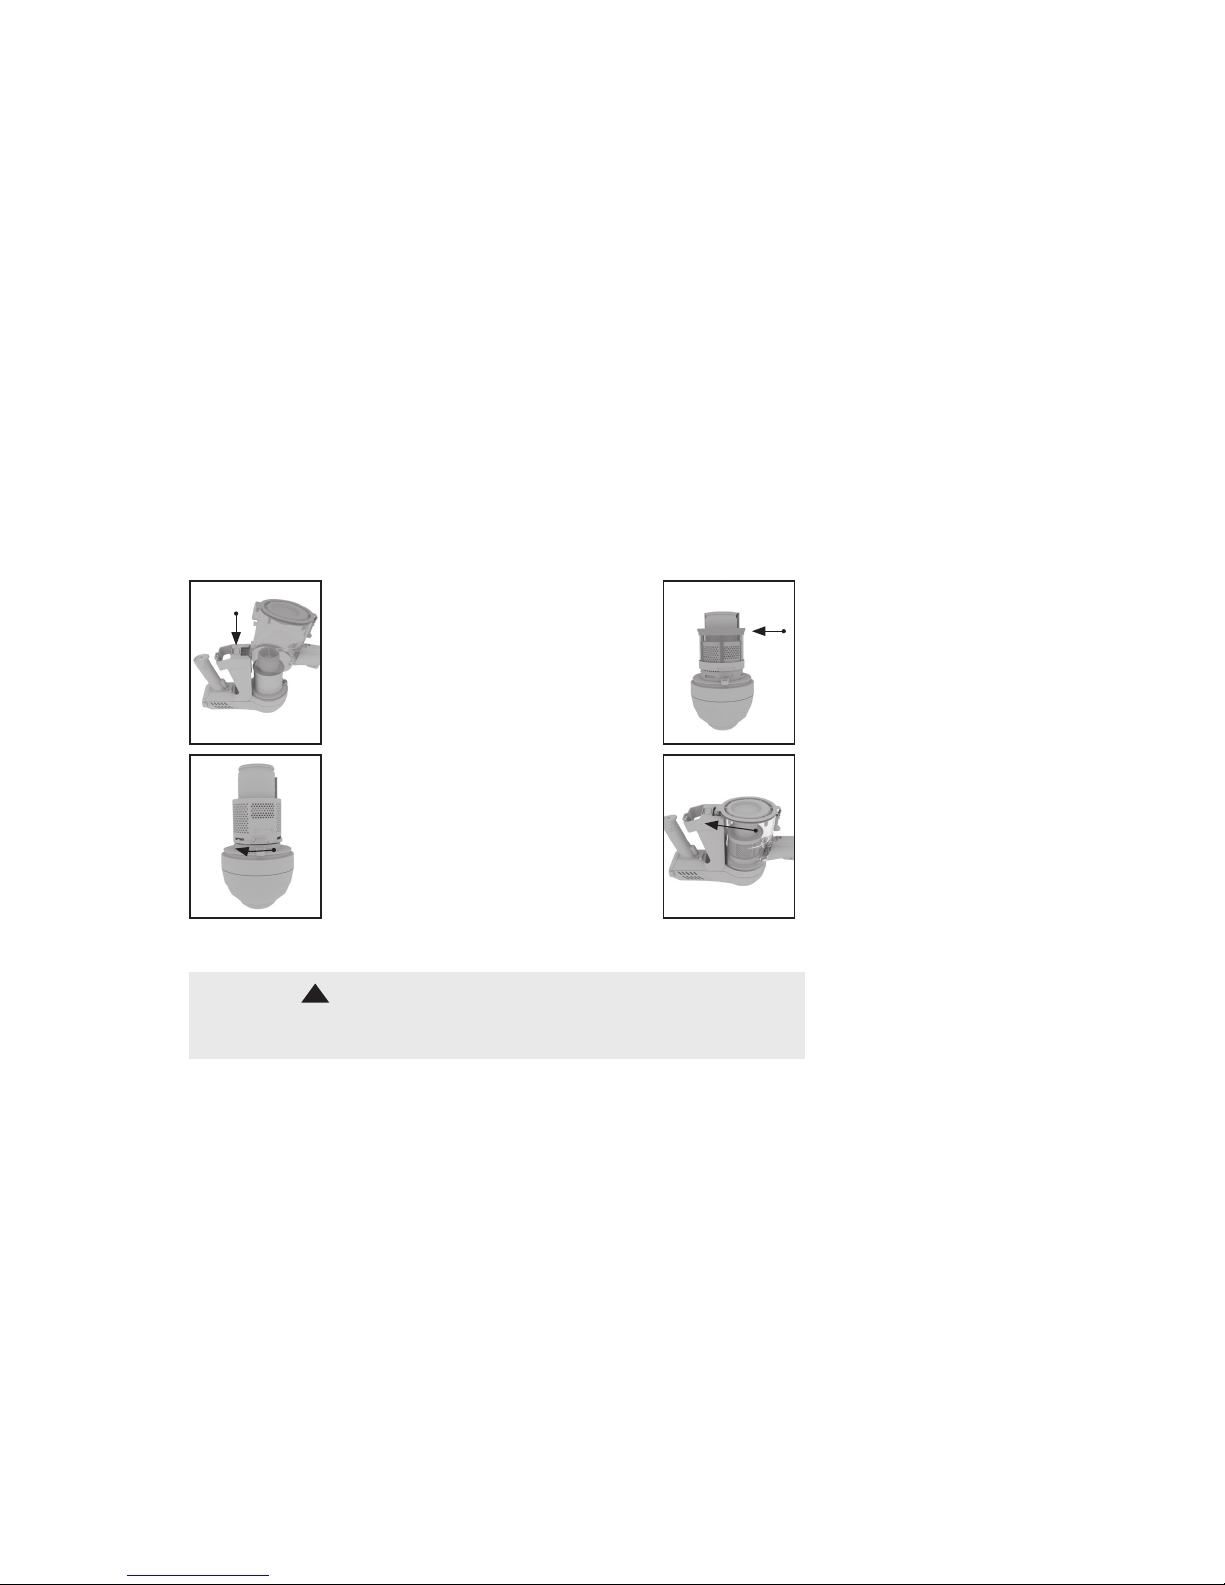
Maintenance:
Cleaning the post–motor filter.
Press the filter cover release
buttons located on both sides
of the filter cover and pull to remove
the filter from the machine.
Hold filter cover and pull filter off of the
filter cover. Tap filter and filter cover over
the trash bin to remove any dirt or debris.
Rinse filter under warm running water
until water is clear.
1
2
NOTE: DO NOT USE SOAP OR ANY OTHER
CHEMICAL TO CLEAN.
DRY FILTER COMPLETELY, FOR UP TO
24 HOURS, BEFORE REINSTALLING INTO
THE PRODUCT.
WARNING
To reduce the risk of personal injury,
remove battery before cleaning or servicing.
!
Page 18

18
Maintenance:
Press the Handheld release button.
Pull to separate the Handheld from
the Reach Wand.
Ensure the battery has been
removed and hold the Handheld
over a trash bin.
The Reach Wand when attached
to the Powered Nozzle/accessory
is not free standing. Place safely
and securely to one side.
Press the dirt empty button.
1
3
2
4
Emptying the dirt container.
WARNING
To reduce the risk of personal injury,
remove battery before cleaning or servicing.
!
Page 19
19
Maintenance:
To remove the dirt container,
turn unit upside down. Push the
‘Remove Dirt Cup’ button and tilt
the dirt container slightly forward
and pull to remove.
To reassemble, line up the arrows around
the side of the separator with the arrows
on the Handheld. Twist the separator
clockwise locking it into place.
Twist the separator counterclockwise and pull to remove.
Clean any dust and dirt from the
separator.
Reassemble the dirt container onto
the unit over the separator - the
hook should go onto the front
first. Then, push the dirt container
backwards to lock into place.
1
3
2
4
Cleaning the separator, filter and dirt container.
WARNING
Risk of personal injury – the brush roll may suddenly restart. Turn power switch Off and
remove the battery before cleaning or servicing the brush roll.
!
Page 20
20
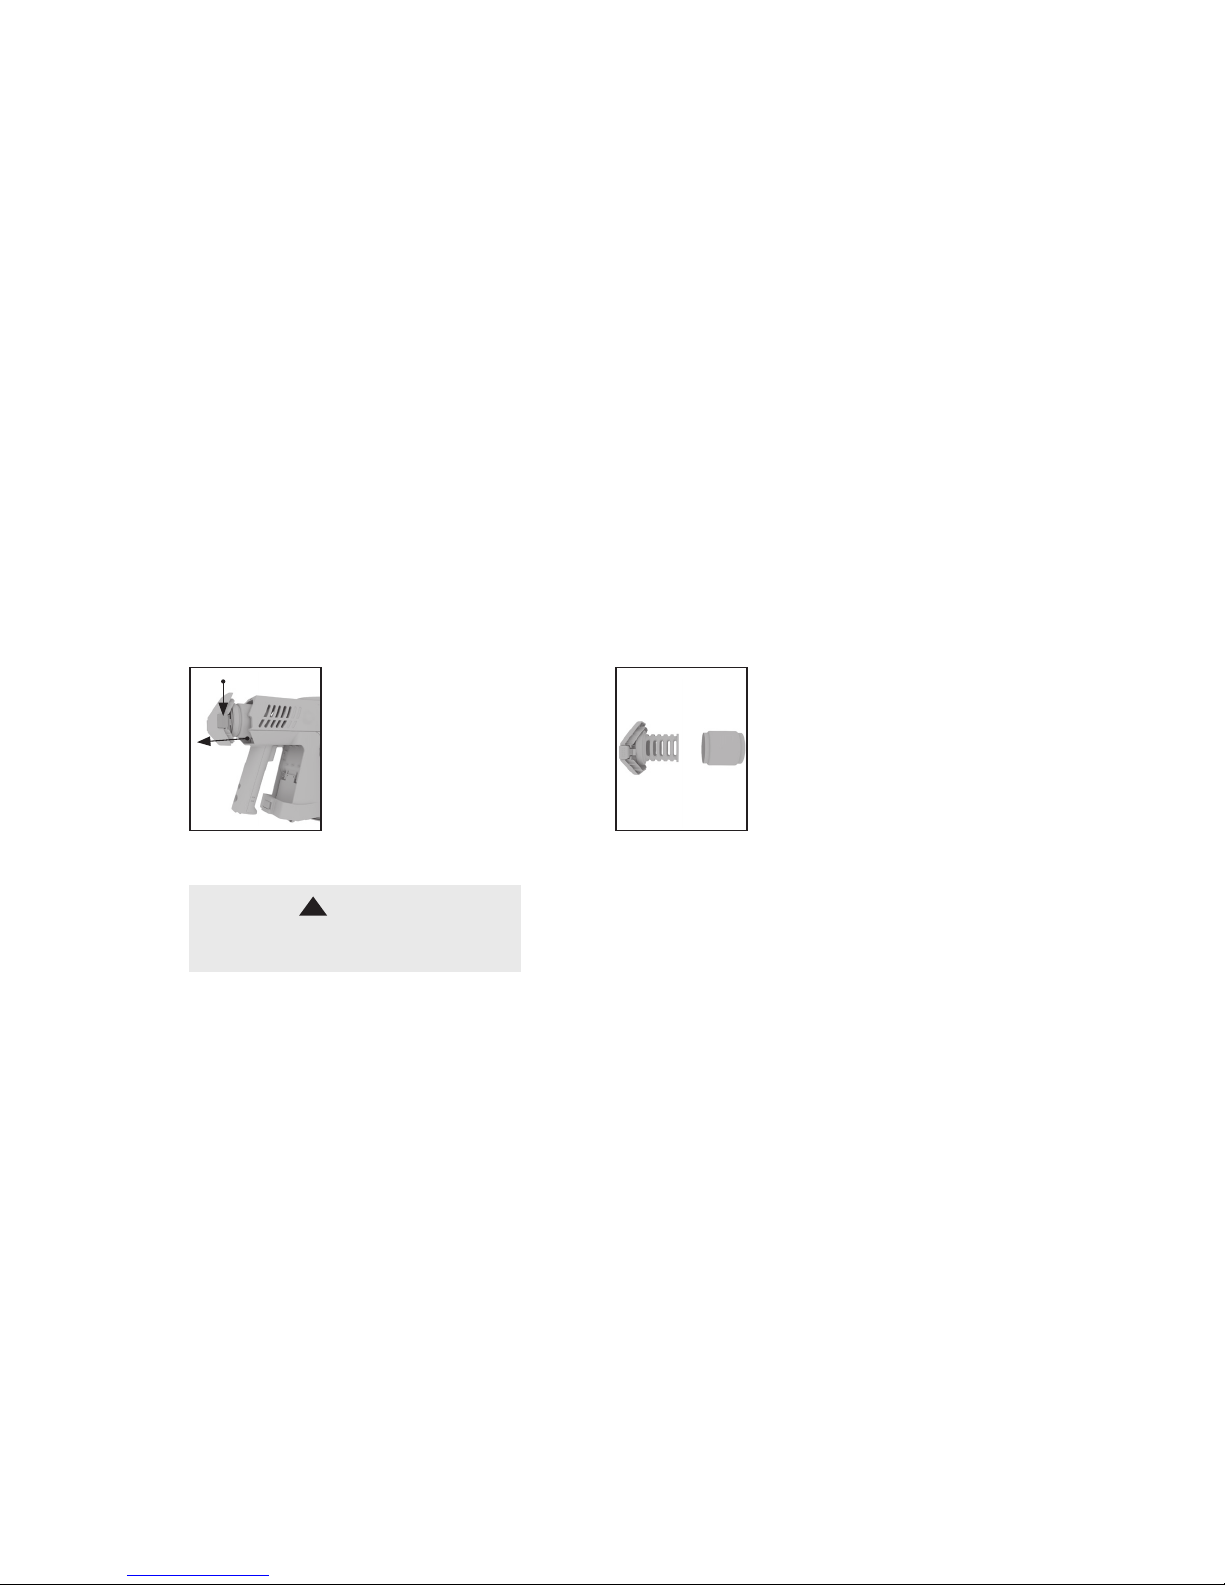
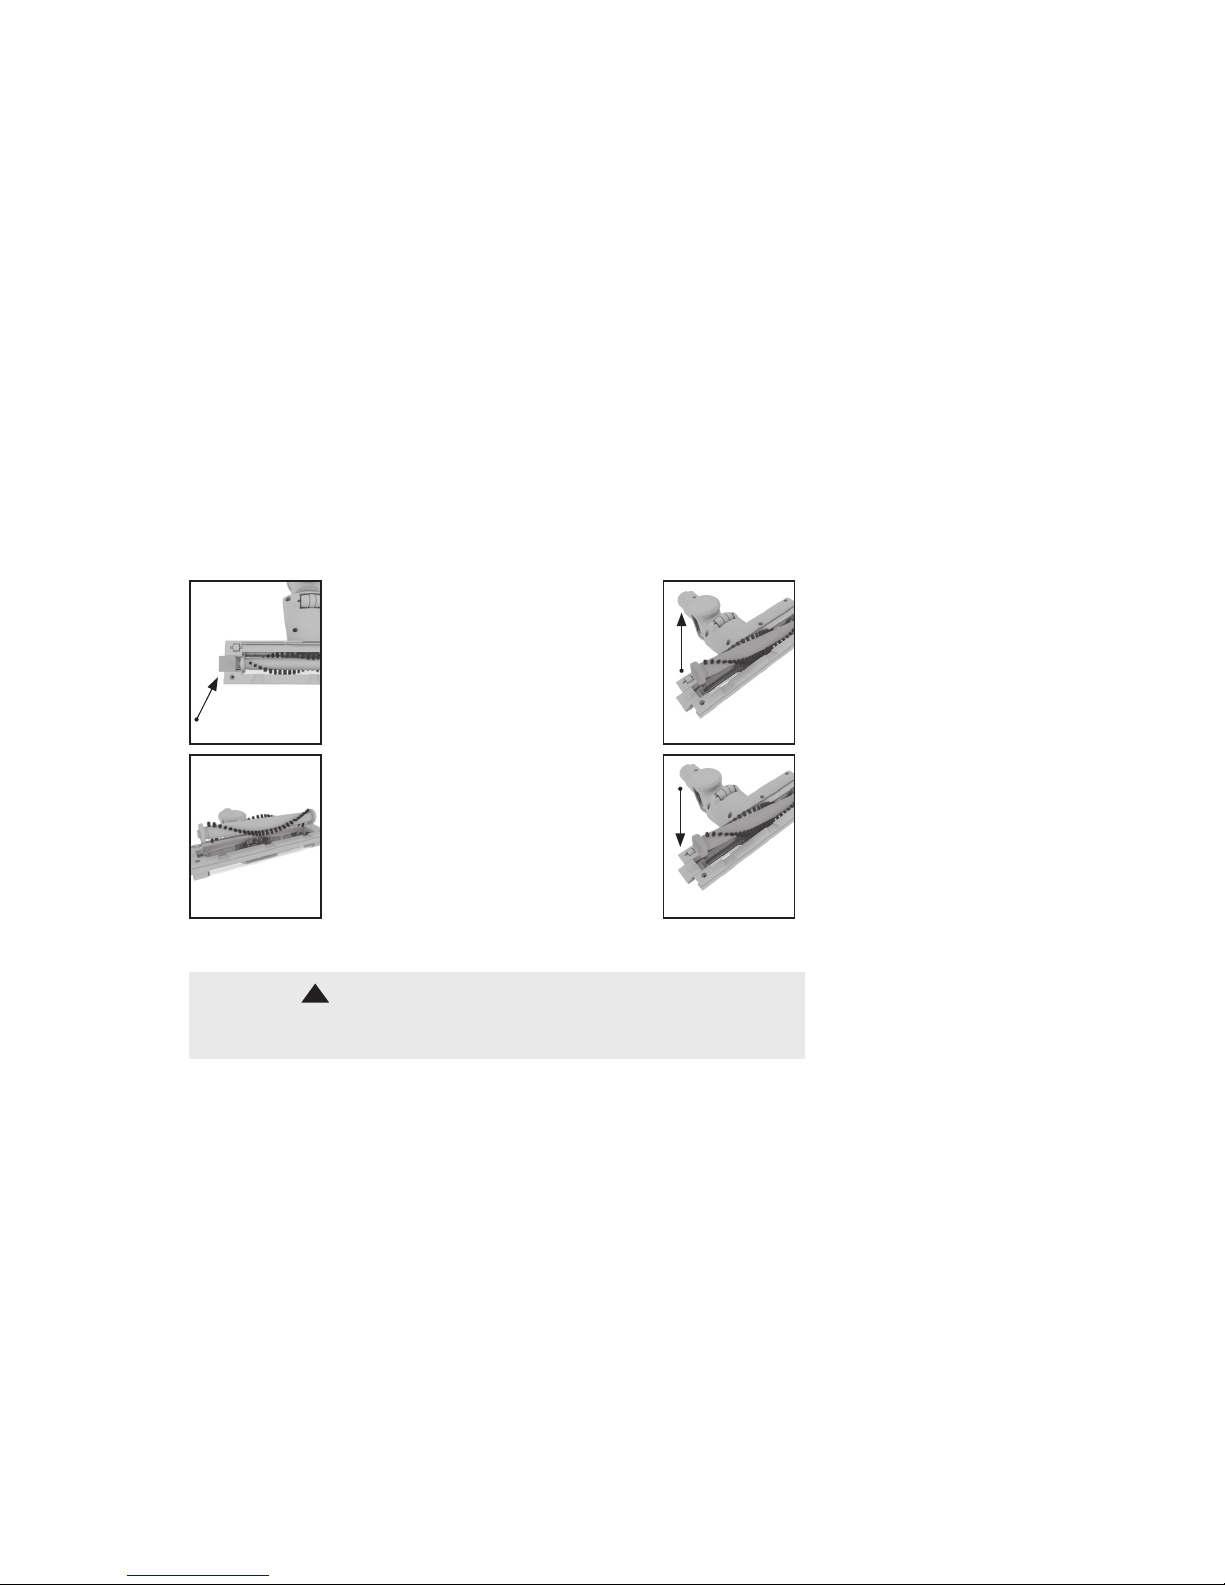
Maintenance:
Slide to release the brush roll. The
button can not be removed.
Clear any threads or hair from both
ends of the brush roll and any dirt/
debris inside the housing of the
Powered Nozzle.
Lift left end of brush roll
first to remove.
When re-fitting the brush roll fit
the right side into the housing first.
Then line up left end of brush roll
and slide into place. Ensure that the
brush roll release button slides back
into place to secure the brush roll.
1
3
2
4
Removing and replacing the brush roll.
WARNING
Risk of personal injury – the brush roll may suddenly restart. Turn power switch Off and
remove the battery before cleaning or servicing the brush roll.
!
Page 21
21
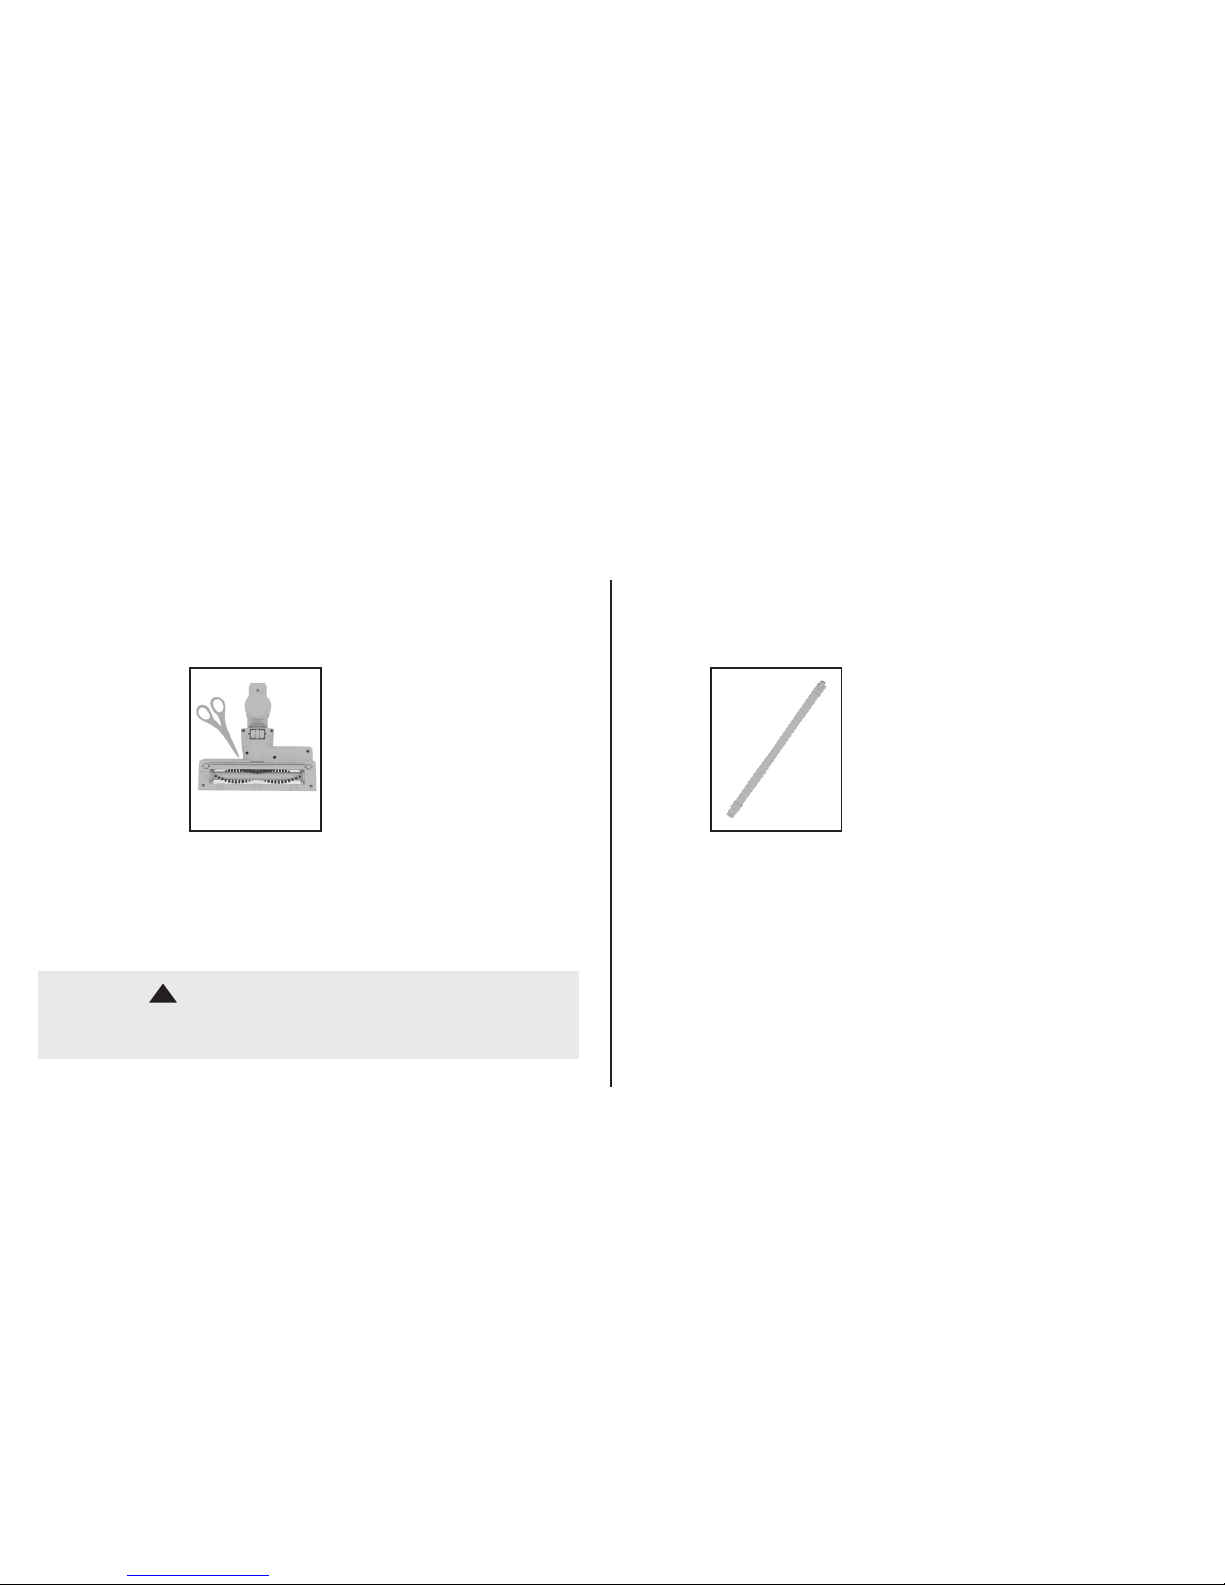
Maintenance:
The brush roll should be removed
from the Powered Nozzle before
attempting to remove any
blockages. Carefully use scissors
to remove any threads or hair from
around the brush roll and clear any
dirt or debris from Powered Nozzle.
To test for a blockage in the Reach Wand,
drop a small ball of paper into the wand.
The paper will drop through if the wand is
clear. Use a broom handle or similar blunt
object to remove any blockage.
1
2
Removing blockages from the Powered Nozzle. Removing blockages from the Reach Wand.
LUBRICATION
The motor and brush roll are equipped with bearings which
contain sufficient lubrication for their lifetime. The addition of
lubricant could cause damage. Do not add lubricant to motor
or brush roll.
Any other servicing should be done by an authorized service
representative. If appliance is not working as it should, has
been dropped, damaged, left outdoors, or dropped into water,
take it to a service center prior to continuing use.
WARNING
Risk of personal injury – the brush roll may suddenly restart. Turn power
switch Off and remove the battery before cleaning or servicing the brush roll.
!
Page 22
22
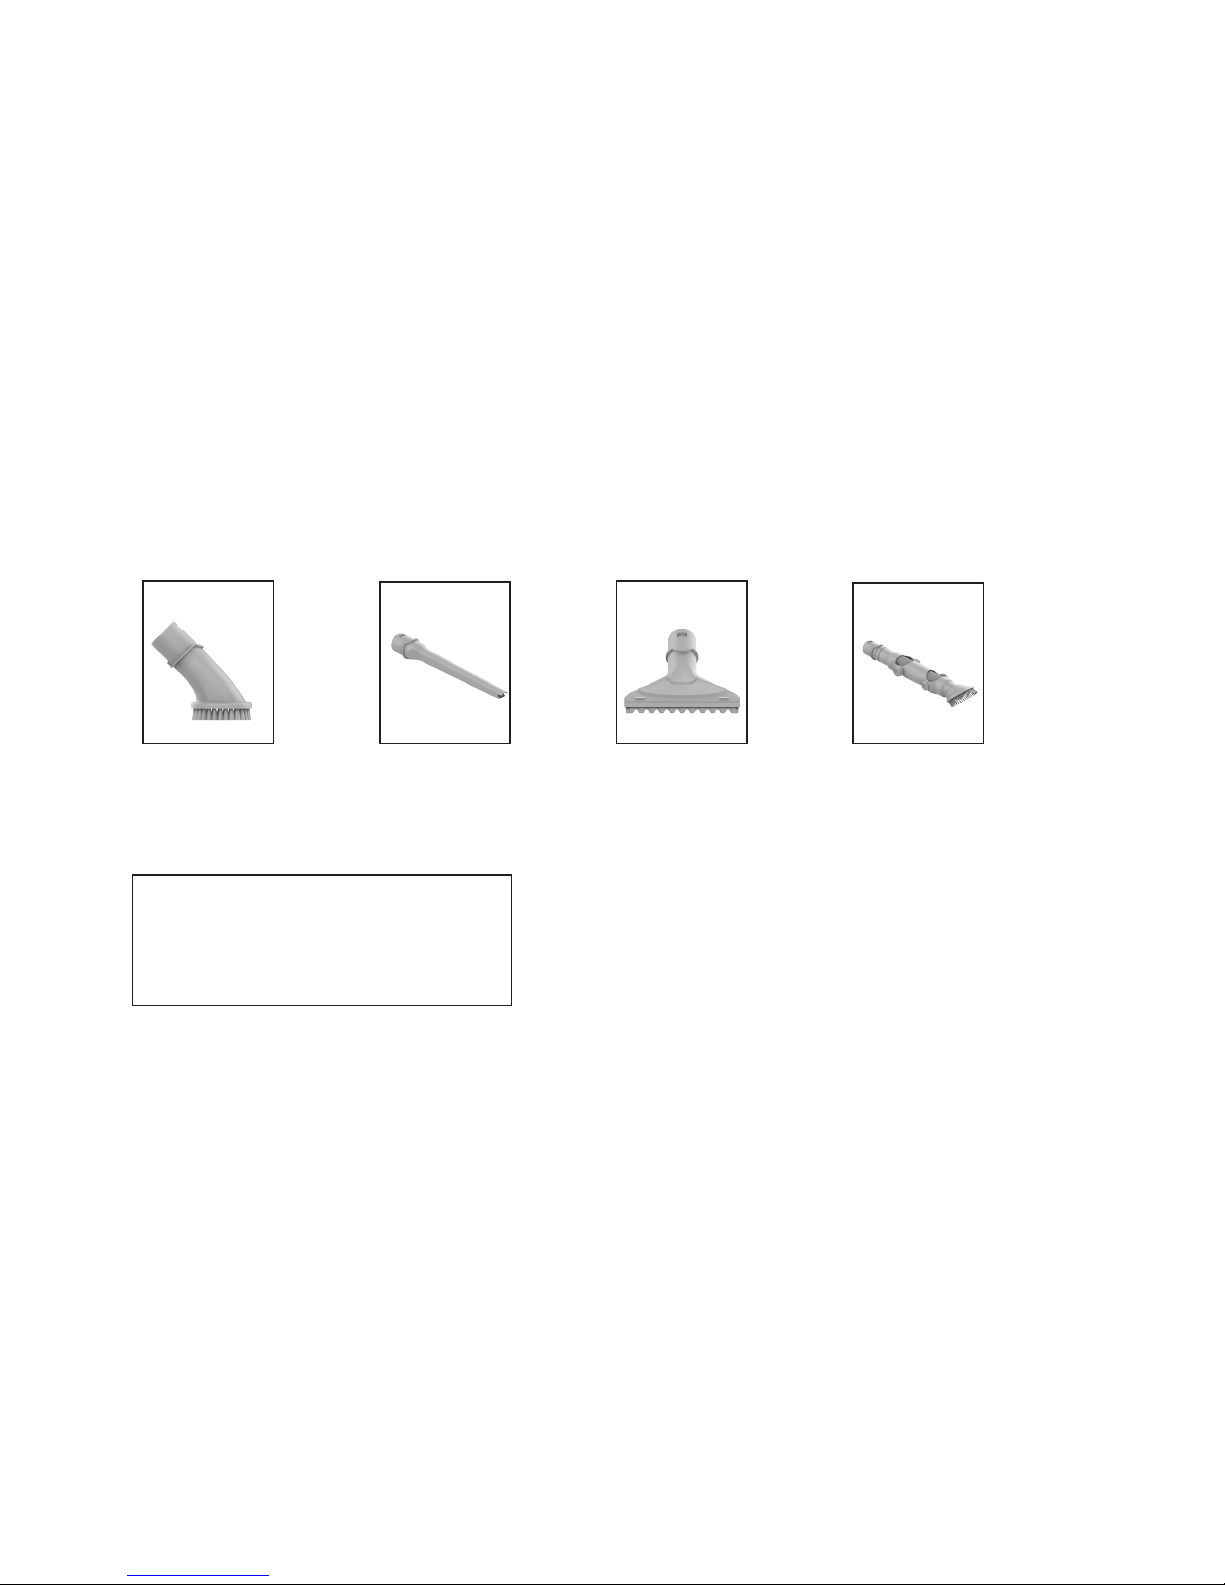
How to order accessories:
Dusting Brush
Part #440010636
Upholstery tool
Part #440010637
Crevice Tool
Part #440010635
Articulating Dusting Brush
Part #440010638
WHAT TO BUY:
Contact a Hoover® customer service representative
at 1-888-679-2121 for replacement details
or visit Hoover.com or Hoover.ca
Page 23

23
QUESTIONS OR CONCERNS?
For a Complete Troubleshooting Guide, see:
Hoover.com/support or Hoover.ca/support
Connect with us:
Twitter: @HooverUSA • Facebook: facebook.com/hoover
Do not return to store. See back of product for model number.
Need Help?
WARNING
To reduce the risk of personal injury,
remove battery before cleaning or servicing.
!
My Cruise Cordless Vacuum won’t turn on.
Your battery may not be charged. Check the Charge Level Indicator and
charge the battery if it’s low. Charge time may take up to 6 hours. Due to
federal regulations the battery does not come fully charged.
My Cruise Cordless Vacuum isn’t picking up well.
You may have a clogged filter. Your filter should be rinsed every 4-6 uses.
Remove the filter. Rinse with clear warm water for two minutes. Let it dry
for 24 hours before reinstalling it.
If your filter was dirty…
You may also have a clog in the system. Check the Reach Wand for any
clogged debris. If found, remove the clog.
My Cruise™ Cordless Vacuum picks up well on hard floors, but not on carpet.
When you’re vacuuming, look to see if the brush roll is spinning. You should hear it.
If you don’t, pull the trigger switch to turn on the brush roll.
Any other servicing should be done by an authorized service representative.
If appliance is not working as it should, has been dropped, damaged, left
outdoors, or dropped into water, take it to a service center prior to continuing use.
Page 24

24
SERVICE & WARRANTY FOR HOOVER® CRUISE CORDLESS
VACUUM PRODUCT & BATTERY SERVICE INFORMATION
ANY SERV ICING SHOULD BE DONE BY AN AUTHORIZED SER VICE REPRESENTATIVE
Call 888 679-2121 USA & Canada
In the event that f urther assis tance is required, visit an au thorized service center. Find
one nearest you by visiting our website at www.hoover.com. Costs of any transportation
to and from any place of repair are to be paid by the ow ner. Alway s identify your product
by the model number and manufacturing code w hen reques ting information or ordering
replacement parts. (The model number and manufacturing code for t he vacuum appears on
the bo ttom and/or back of the product, and on the back of the battery and charger.)
LIMITED TWO YEAR WARRANT Y (DOMES TIC USE)
WHAT T HIS WARRANTY COVERS: When used and maintained in normal household
use and in accordance with the Ow ner’s Guide, your Hoover
®
product and batter y are
warranted against original defects in material and workmanship for a full two years from
(a.) date of purchase (the “Warran ty Period”). During the Warranty Period, Hoover
®
will
provide labor and part s, at no cost to you, to cor rect any such defect in your products
and (b.) will provide a replacement battery at no cost to you, to correct de fects in the
LithiumLife™ battery that came with your product purchased in t he United S tates, U.S.
Military Exchanges and Canada.
HOW TO MAK E A WARRANTY CLAIM: If this product is not as warranted, take or send the
product to a Hoover
®
Aut horized Warranty Service Dealer along wi th proof of purchase.
If the bat teries are not as warranted, eit her take or send the batteries along with proof of
purchase to a Hoover
®
authorized dealer or contact Hoover® Services at 888 6 79-2121. For
an automated referral to au thorized service outlets in the U.S. A., phone 888 679 -2121 or
visit Hoover
®
online at www.hoover.com.
WHAT T HIS WARRANTY DOES NOT COVER: T his warran ty does not cover belt s, filters
and brush rolls, use of the product in a commercial operation (such as maid, janitorial and
equipment rent al services), improper maintenance of t he product , damage due to misuse,
acts of God, nature, vandalism or ot her acts beyond the control of Hoover
®
, owner’s
acts or omissions, use outside the countr y in which the product was init ially purchase
and resales of the produc t by the original ow ner. This war ranty does not cover pick up,
delivery, transpor tation or house calls . However, if you mail your product to a Hoover
®
Sales and Ser vice Center for warrant y service, cost of shipping will be paid one way.
Please call the Hoover
®
Services, 888 6 79-2121, on how to ship this product. This warranty
does not appl y to products purchased outside t he United S tates, including its territories
and possessions, a U.S. Military E xchange and Canada.
OTHER IMPORTANT TERMS: This warrant y is not transferable and may not be assigned.
This warrant y shall be governed and cons trued under the laws of the state of Ohio. The
Warranty Period will not be extended by any replacement of bat teries or parts or repair
performed under this warranty.
THIS WARRA NTY IS THE E XCLUSIV E WARRANTY AND REME DY ALL OTHER
WARRA NTIES, EXPRES SED OR IMPLIED, INCLUDING WARRANT IES OF
MERCHANTABILITY OR FI TNESS FOR PA RTICUL AR PURP OSE, ARE DIS CLAIMED IN
NO EVENT WILL HOOV ER BE LIABL E FOR AN Y SPECIAL , INDIRECT, INCIDENTAL OR
CONSEQUEN TIAL DAM AGES OF ANY KIND OR NATURE T O OWNER OR AN Y PART Y
CL AIMING T HROUGH OWNER, WHE THER BASED IN CONT RACT, NEGLIGENCE , TORT OR
STRIC T PRODUCTS LIABILITY OR ARISING FR OM ANY CAUSE WHATSOEVER.
Some s tates do not allow the exclusion of consequential damages, so the above exclusion
may not apply to you. This warrant y gives you specific rights; you may also have ot hers
that vary from s tate to s tate.
Page 25

NOTES:
Page 26

ASPIRATEUR
SANSFIL CRUISE
MC
© Techtronic F loor Care Technolog y Limited, 2017. Tous droits réservés. N° 961152025 • Rév.C
Guide de l’utilisateur
IMPORTANT : LISEZ ATTENTIVEMENT LE
PRÉSENT GUIDE D’UTILISATION AVANT
D’ASSEMBLER ET D’UTILISER L’APPAREIL.
Ce produit est destiné à un usage domestique seulement.
La garantie est nulle si l’appareil est utilisé à des fins
commerciales.
MD
Page 27

C’EST GARANTI.
Hoover remplacera vos batteries conformément à sa garantie limitée de
deux ans. Consultez la garantie pour obtenir plus de détails.
Pour enregistrer votre aspirateur :
Appelez au 888 679-2121Visitez Hoover.com
ou Hoover.ca
Devenez officiellement propriétaire.
Bienvenue
chez Hoover.
Page 28

VOTRE GUIDE
Consignes de sécurité........................................................................................................................................29
Premiers pas avec votre aspirateur sans fil Cruise
MC
..................................................................................31
Assemblage .........................................................................................................................................................32
Fixation du support mural ..................................................................................................................................33
Utilisation..............................................................................................................................................................34
Avant de commencer .........................................................................................................................................35
Utilisation de votre appareil ..............................................................................................................................37
Utilisation de votre appareil comme aspirateur à main ...............................................................................38
Utilisation de votre appareil pour le nettoyage en hauteur .........................................................................39
Entretien ...............................................................................................................................................................41
Commande d’accessoires .................................................................................................................................47
Dépannage ...........................................................................................................................................................48
Entretien et garantie ...........................................................................................................................................49
Page 29

29
CONSIGNES DE SÉCURITÉ IMPORTANTES
CONSERVEZ CES INSTRUCTIONS
Lorsque vous utilisez des appareils électriques, veuillez toujours respecter
entre autres les consignes de sécurité élémentaires suivantes:
VEUILLEZ
LIRE TOUTES LES INSTRUCTIONS AVANT D’UTILISER CET APPAREIL. CE PRODUIT EST
DESTINÉ UNIQUEMENT À UN USAGE DOMESTIQUE. UNE UTILISATION À DES FINS
COMMERCIALES ANNULERA LA GARANTIE.
AVERTISSEMENT: POUR RÉDUIRE LE RISQUE
D’INCENDIE, DE DÉCHARGE ÉLECTRIQUE, DEDOMMAGE
OU DE BLESSURE:
• Assemblez entièrement l’appareil avant de l’utiliser.
• N’utilisez pas l’appareil sur des surfaces mouillées. N’exposez pas l’appareil à
la pluie. Rangez les appareils à l’intérieur.
• Le chargeur est conçu pour être utilisé à l’intérieur seulement. Assurezvous de toujours conserver la batterie et le chargeur à l’intérieur, dans un
endroit sec.
• Ne permettez pas aux enfants de jouer avec l’appareil. Cet appareil ne doit
pas être utilisé par des enfants de moins de 12ans. Exercez une surveillance
étroite lorsque l’appareil est utilisé à proximité d’enfants. Gardez l’appareil
hors de la portée des enfants et ne laissez pas ces derniers introduire leurs
doigts ou d’autres objets dans aucune ouverture afin d’éviter les blessures ou
les bris.
• Utilisez l’appareil uniquement aux fins décrites dans le présent guide.
N’utilisez que des accessoires et des produits recommandés par Hoover
MD
.
• N’utilisez pas le chargeur si la fiche ou le cordon est endommagé. Si l’appareil
ou le chargeur ne fonctionnent pas adéquatement, s’ils sont tombés sur le sol
ou dans l’eau, s’ils sont endommagés ou ont été laissés à l’extérieur, apportezles à un centre de service pour les faire inspecter avant de continuer à les
utiliser.
• Ne tirez pas ni ne transportez le chargeur par le cordon, n’utilisez pas le
cordon comme une poignée, ne coincez pas le cordon dans l’embrasure
d’une porte et ne l’appuyez pas contre des arêtes tranchantes ou des coins.
Ne placez pas l’appareil sur le cordon. Ne faites pas rouler l’appareil sur le
cordon. Tenez le cordon éloigné des surfaces chaudes.
• Ne débranchez pas le chargeur en tirant sur le cordon. Pour débrancher le
chargeur, tirez sur la fiche.
• Ne manipulez pas le chargeur, y compris la fiche et les bornes, ni l’appareil si
vous avez les mains mouillées.
• N’insérez aucun objet dans les ouvertures. N’utilisez pas l’appareil si les
ouvertures sont obstruées. Assurez-vous qu’elles sont exemptes de poussière,
de mousse, de cheveux ou de tout ce qui pourrait réduire le débit d’air.
• Gardez les cheveux, les vêtements amples, les doigts et toute autre partie du
corps à l’écart des ouvertures et des pièces en mouvement.
Page 30

30
• Redoublez de prudence lorsque vous utilisez l’appareil dans un escalier.
Pour éviter tout dommage ou blessure et empêcher l’appareil de tomber,
placez toujours ce dernier au bas des escaliers, sur le plancher. Ne placez
pas l’appareil sur les marches d’un escalier ou sur un meuble, car cela peut
entraîner des dommages ou des blessures.
• N’utilisez pas l’appareil pour aspirer des liquides inflammables ou
combustibles comme de l’essence, ni de la sciure de bois, ni dans des endroits
où de telles substances peuvent être présentes.
• N’utilisez pas l’appareil pour aspirer quoi que ce soit qui brûle ou dégage de la
fumée comme des cigarettes, des allumettes ou des cendres chaudes.
• N’utilisez pas l’appareil si le vide-poussière ou les filtres ne sont pas installés.
• Éteignez l’appareil et retirez la batterie avant d’enlever ou d’installer le
rouleau-brosse.
• Éteignez toujours l’appareil avant d’installer ou de retirer le tuyau, l'accessoire
turbo motorisé ou les accessoires.
• N’incinérez pas le chargeur, la batterie ou l’appareil mêmes s’ils sont
gravement endommagés. La batterie peut exploser au feu.
• Ce produit contient une batterie au lithium-ion rechargeable. N’exposez pas la
batterie à des températures élevées, car elle pourrait s’enflammer et exploser.
• Évitez d’écraser et d’incinérer la batterie ou de la soumettre à des actions
similaires.
• Ne jetez pas la batterie au feu ou dans un compresseur à déchets. Consultez
la section sur l’élimination de la batterie pour obtenir des instructions.
• Ne tentez pas de démonter la batterie.
• Débranchez le chargeur de la prise avant de procéder à tout nettoyage ou
entretien de routine.
• La batterie peut fuir si elle est soumise à des conditions extrêmes. Si
l’électrolyte entre en contact avec votre peau, lavez aussitôt les parties
touchées avec de l’eau et du savon. En cas de contact avec les yeux, ne
frottez pas. Rincez immédiatement vos yeux à l’eau propre pendant au moins
15minutes et consultez un médecin sans attendre.
• Pour recharger l’appareil, utilisez uniquement le chargeur (pièce n°440009553)
fourni par Hoover
MD
.
• Utilisez uniquement la batterie (pièce n°440009633) fournie par Hoover
MD
.
Un autre type de batterie pourrait exploser et causer des blessures ou des
dommages graves.
• Ne touchez pas aux bornes du chargeur et du bloc-piles et n’y insérez
pasd’objets.
• Ne tentez pas de court-circuiter la batterie ou les bornes du chargeur.
AVERTISSEMENT: Ce produit contient des
produits chimiques reconnus par l’État de la Californie
comme pouvant causer le cancer, des anomalies
congénitales ou des dysfonctions du système reproducteur.
BIEN SE LAVER LES MAINS APRÈS LA MANIPULATION.
Page 31

31
Premiers pas avec votre aspirateur sans fil CruiseMC :
LE CONTENU VARIE EN FONCTION DU MODÈLE.
COMPRIS DANS L'EMBALLAGE
Modèle
BH52200/PC/CDI
ü ü ü ü ü
BH52210/PC/CA
ü ü ü ü ü ü ü
BH52212
ü ü ü ü ü ü ü
Tube-rallonge Buse motorisée
Aspirateur à main
Support mural
Suceur plat
Outil pour revêtements
en tissu
Brosse à épousseter
articulée
Brosse à épousseter
TOUS LES MODÈLES SONT FOURNIS AVEC UN CHARGEUR, UNE BATTERIE, DES VIS, DES CACHE-VIS ET UN GUIDE DE L’UTILISATEUR.
Page 32

32
Assemblage
Poussez l’aspirateur
à main dans le tuberallonge jusqu’à ce
qu’il s’enclenche.
Alignez le connecteur du
tube-rallonge avec la buse
motorisée. Poussez le
tube-rallonge dans la buse
motorisée jusqu’à ce qu’il
s’enclenche.
Cet aspirateur ne se tient pas
seul en position verticale.
Entre les utilisations, il doit
toujours être posé sur le support
mural ou à plat sur le sol à
un emplacement où vous ne
risquerez pas de trébucher ou
de marcher dessus.
1 2 3
AVERTISSEMENT
Afin de réduire le risque de blessures
corporelles, retirez la batterie avant le
nettoyage ou l’entretien.
!
IMPORTANT
Cet aspirateur ne se tient pas seul en position verticale. Entre
les utilisations ou lors de toute tâche d’entretien, posez toujours
l’aspirateur à plat sur le sol à un emplacement où vous ne risquerez
pas de trébucher ou de marcher dessus.
!
Page 33

33
Fixation du support mural
Assemblez d’abord entièrement l’aspirateur sans installer la batterie.
Une fois le support mural
installé sur l’aspirateur, placez
ce dernier près d’un mur en
position verticale avec la buse
motorisée à plat au sol.
Poussez fermement la
poignée de l’aspirateur
dans le support mural pour
l’y installer.
Fixez le support mural
à la poignée.
Utilisez les vis et les cache-vis
pour fixer le support mural
au mur. Placez les cache-vis
sur les vis.
En tenant fermement le
support mural en place, retirez
lentement l’aspirateur. À l’aide
d’un crayon, faites une petite
marque à l’emplacement
de chaque vis.
Les accessoires peuvent
également être rangés sur le
support mural.
1
4
2
5
3
6
Page 34

34
Utilisation
1. Bouton marche/arrêt du rouleau-brosse
2. Voyant de marche/arrêt et de chargement
3. Bouton de dégagement de l’aspirateur à main
4. Tube-rallonge
5. Bouton de dégagement de la buse motorisée et
des accessoires
6. Buse motorisée
7. Rouleau-brosse
8. Boutons de dégagement du couvercle du filtre
9. Poignée
10. Port de chargement de la batterie
11. Bouton de dégagement de la batterie
12. Bouton de retrait du vide-poussière (caché)
13. Bouton du vide-poussière
14. Gâchette marche/arrêt
15. Levier de verrouillage de l’alimentation continue
(caché)
16. Batterie
17. Vide-poussière
1
4
5
6
9
10
12
14
2
7
3
8
11
13
15
16
17
Page 35

35
Avant de commencer
Rechargez l'appareil lorsqu'il est
rangé sur le support mural, avec la
tête et le tube installés. Vous pouvez
également recharger l'appareil
lorsqu'il n'est pas sur le support
mural en retirant les accessoires et en
couchant l'appareil sur le côté.
Glissez la batterie à l’arrière
de l’aspirateur à main. La
batterie s’enclenchera une
fois correctement installée.
Branchez la fiche du chargeur
sur une prise de courant.
Introduisez le cordon
pour le chargement
dans le port de
chargement situé au
dos de la poignée.
REMARQUE : EN RAISON DES RÈGLEMENTS
FÉDÉRAUX, LA BATTERIE N’EST PAS
COMPLÈTEMENT CHARGÉE AU MOMENT
DE L’ACHAT.
1
4
2
3
AVERTISSEMENT
Afin de réduire le risque de blessures
corporelles, retirez la batterie avant le
nettoyage ou l’entretien.
!
IMPORTANT
Pour de meilleurs résultats, nettoyez
le filtre au moins tous les 3 mois et
remplacez-le tous les 12 mois, selon
l’utilisation. Si l’aspirateur est obstrué,
enlevez la batterie avant d’enlever
l’obstruction.
!
Page 36

36
Avant de commencer
IMPORTANT
Pour des résultats optimaux, les bornes de la batterie et l’aspirateur
doivent être propres et exempts de poussière et de saleté. La durée de
vie de la batterie varie selon l’usage de l’aspirateur.
!
Le bouton marche/arrêt et le voyant du chargeur
s'allument lorsque le chargeur est branché.
Voyant rouge clignotant - la batterie est en charge.
Voyant vert continu - la batterie est chargée.
Si vous rechargez l’appareil pour la première fois,
le chargement peut prendre jusqu'à 6 heures.
5
AVERTISSEMENT
N’utilisez pas l’aspirateur lorsqu’il est
branché au chargeur de batterie.
!
Page 37

37
Utilisation de votre appareil
Appuyez sur la gâchette située sous la
poignée pour mettre l’aspirateur sous
tension. Le voyant de marche/arrêt
et de chargement s’allume en vert
pour indiquer que l’appareil est en
marche et qu’il est chargé. Relâchez
la gâchette pour mettre l’appareil hors
tension.
Appuyez sur le bouton marche/arrêt
du rouleau-brosse pour basculer
entre les modes tapis et plancher en
dur. Le rouleau-brosse va passer en
mode tapis.
Appuyez sur la gâchette et tirez le
levier de verrouillage de l’alimentation
continue vers la gâchette. L’appareil est
alors sous tension sans que vous ayez à
maintenir la gâchette enfoncée. Replacez
le levier dans sa position initiale pour
déverrouiller la gâchette. Relâchez
ensuite la gâchette.
Lorsque l’aspirateur est en marche,
le voyant de marche/arrêt et de
chargement s’allume. Il clignote rouge
lorsque la batterie est faible. L’appareil
s’éteint dans les 20 prochaines
secondes lorsque le voyant clignote
rouge. L’utilisateur doit alors recharger
la batterie.
1
3
2
4
AVERTISSEMENT
Risque de blessures– le rouleau-brosse peut
redémarrer de façon soudaine. Mettez l’appareil
hors tension et retirez la batterie avant de nettoyer le
rouleau-brosse ou d’en faire l’entretien.
!
AVERTISSEMENT
Le rouleau-brosse fonctionne en continu lorsqu’il est activé. Ne laissez
jamais l’aspirateur au même endroit pendant une période prolongée, car il
pourrait endommager la surface du plancher. Le rouleau-brosse devrait être
activé pour les tapis et désactivé pour les planchers durs.
!
Page 38

38
Utilisation de votre appareil comme aspirateur à main
Appuyez sur le bouton de dégagement
de l’aspirateur à main. Tirez sur
l’aspirateur à main pour le dégager du
tube-rallonge.
Choisissez un accessoire
(tous les accessoires ne sont pas
disponibles sur tous les modèles).
Le tube-rallonge ne tient pas debout
lorsqu’il est attaché à la buse
motorisée ou aux accessoires. Mettezle sur le côté de façon sécuritaire.
Poussez l’accessoire choisi dans
l’aspirateur à main jusqu’à ce qu’il
s’enclenche.
(Tous les accessoires disponibles
peuvent être installés directement sur
l'appareil.)
1
3
2
4
IMPORTANT
N’utilisez pas l’aspirateur pour toiletter un animal.
!
Page 39

39
Utilisation de votre appareil pour le nettoyage en hauteur
Choisissez un accessoire
(tous les accessoires ne sont pas
disponibles sur tous les modèles).
Appuyez sur le bouton de
dégagement de la buse
motorisée et des accessoires
et tirez pour retirer la buse
motorisée du tube-rallonge.
Poussez l’accessoire
choisi dans le tuberallonge jusqu’à ce
qu’il s’enclenche.
1 2 3
Le tube-rallonge peut être utilisé pour nettoyer des endroits difficiles à atteindre.
Page 40

40
Le tube-rallonge peut être utilisé pour nettoyer des endroits difficiles à atteindre.
Utilisation de votre appareil pour le nettoyage en hauteur
Le tube-rallonge peut être utilisé
pour nettoyer des endroits difficiles à
atteindre.
Cet aspirateur ne se tient pas seul en
position verticale. Entre les utilisations, il
doit toujours être posé sur le support mural
ou à plat sur le sol à un emplacement où
vous ne risquerez pas de trébucher ou de
marcher dessus.
1
2
Page 41

41
Entretien
Posez l’aspirateur à main sur le côté,
sur une surface plane et stable.
Appuyez sur le bouton de dégagement
de la batterie.
Retirez la batterie du dessous
de l’aspirateur à main en la
faisant glisser.
1
2
Retrait de la batterie.
AVERTISSEMENT
Afin de réduire le risque de blessures corporelles,
retirez la batterie avant le nettoyage ou l’entretien.
!
Page 42

42
Entretien
Nettoyage du filtre de sortie du moteur.
Appuyez sur les boutons de
dégagement du couvercle du filtre
situés des deux côtés du couvercle.
Tirez sur le couvercle afin de retirer le
filtre de l’appareil.
Tenez le couvercle du filtre et retirez le filtre
du couvercle. Tapotez le filtre, le couvercle
du filtre au-dessus d’une poubelle pour
enlever la poussière et les débris. Rincez
le filtre à l'eau chaude jusqu'à ce que l'eau
soit claire.
1
2
REMARQUE : N'UTILISEZ PAS DE SAVON NI
D'AUTRES PRODUITS CHIMIQUES POUR LE
NETTOYAGE.
FAITES SÉCHER LE FILTRE COMPLÈTEMENT
JUSQU’À 24 HEURES AVANT DE LE
RÉINSTALLER DANS LE PRODUIT.
AVERTISSEMENT
Afin de réduire le risque de blessures corporelles,
retirez la batterie avant le nettoyage ou l’entretien.
!
Page 43

43
Entretien
Appuyez sur le bouton de dégagement
de l’aspirateur à main. Tirez sur
l’aspirateur à main pour le dégager du
tube-rallonge.
Assurez-vous que la batterie a bien
été retirée et tenez l'aspirateur à main
au-dessus d’une poubelle.
Le tube-rallonge ne tient pas debout
lorsqu’il est attaché à la buse
motorisée ou aux accessoires. Vous
devez le poser sur le côté de façon
sécuritaire.
Appuyez sur le bouton du
vide-poussière.
1
3
2
4
Vidange du vide-poussière.
AVERTISSEMENT
Afin de réduire le risque de blessures corporelles,
retirez la batterie avant le nettoyage ou l’entretien.
!
Page 44

44
Entretien
Pour retirer le vide-poussière, mettez
l'appareil à l'envers. Appuyez sur le
bouton de retrait du vide-poussière,
inclinez le vide-poussière légèrement
vers l'avant et tirez pour l’enlever.
Pour remettre les éléments en place, alignez
les flèches sur le côté du séparateur avec
celles de l’aspirateur à main. Tournez le
séparateur dans le sens des aiguilles d’une
montre pour le fixer en place.
Tournez le séparateur dans le sens
contraire des aiguilles d'une montre et
tirez dessus pour le retirer. Retirez la
poussière et la saleté du séparateur.
Remontez le vide-poussière
dans l'appareil sur le séparateur.
Commencez par installer le crochet
à l'avant. Poussez ensuite le videpoussière vers l'arrière pour le fixer.
1
3
2
4
Nettoyage du séparateur, du filtre et du vide-poussière.
AVERTISSEMENT
Risque de blessures– le rouleau-brosse peut redémarrer de façon soudaine. Mettez l’appareil hors
tension et retirez la batterie avant de nettoyer le rouleau-brosse ou d’en faire l’entretien.
!
Page 45

45
Entretien
Faites glisser le rouleau-brosse pour
le retirer. Le bouton ne s’enlève pas.
Enlevez tout fil ou cheveu des
extrémités du rouleau-brosse
ainsi que tout débris ou saleté du
compartiment de la buse motorisée.
Pour enlever le rouleau-brosse,
soulevez d'abord l'extrémité de gauche.
Glissez d’abord le côté droit dans le
compartiment pour réinstaller le rouleaubrosse. Alignez ensuite l'extrémité gauche
du rouleau-brosse et glissez-la pour la
mettre en place. Assurez-vous que le
bouton de dégagement du rouleau-brosse
se remet en place pour fixer le rouleaubrosse.
1
3
2
4
Retrait et réinstallation du rouleau-brosse.
AVERTISSEMENT
Risque de blessures– le rouleau-brosse peut redémarrer de façon soudaine. Mettez l’appareil hors
tension et retirez la batterie avant de nettoyer le rouleau-brosse ou d’en faire l’entretien.
!
Page 46

46
Entretien
Avant d’essayer de dégager une
obstruction, retirez le rouleau-brosse
de la buse motorisée. À l’aide de
ciseaux, enlevez soigneusement les
fils ou cheveux autour du rouleaubrosse ainsi que les débris ou les
saletés de la buse motorisée.
Si vous souhaitez déterminer si le tuberallonge est obstrué, glissez-y une petite boule
de papier. Elle traverse le tube-rallonge s’il
n’est pas obstrué. Utilisez le manche d’un
balai ou un objet similaire à bout rond pour
retirer toute obstruction.
1
2
Retrait des obstructions de la buse motorisée. Retrait des obstructions du tube-rallonge.
LUBRIFICATION
Le moteur et le rouleau-brosse sont dotés de roulements
contenant une quantité suffisante de lubrifiant pour leur durée de
vie. L’ajout de lubrifiant pourrait causer des dommages. N’ajoutez
pas de lubrifiant au moteur ni au rouleau de brosses.
Toute autre tâche d’entretien doit être confiée à un représentant
de service autorisé. Cessez d’utiliser l’appareil s’il ne fonctionne
pas comme prévu, s’il a été échappé sur le sol ou dans l’eau, s’il
est endommagé ou s’il a été laissé à l’extérieur et apportez-le au
centre de réparations.
AVERTISSEMENT
Risque de blessures– le rouleau-brosse peut redémarrer de façon soudaine.
Mettez l’appareil hors tension et retirez la batterie avant de nettoyer le
rouleau-brosse ou d’en faire l’entretien.
!
Page 47

47
Commande d’accessoires :
Brosse à épousseter
Pièce n° 440010636
Outil pour revêtements
en tissu Pièce
n° 440010637
Suceur plat
Pièce n° 440010635
Brosse à épousseter
articulée
Pièce n° 440010638
QUOI ACHETER
Pour des renseignements sur les pièces de rechange,
communiquez avec un représentant du service à la
clientèle de HooverMD au1888679-2121 ou visitez le site
Hoover.com ou Hoover.ca
Page 48

48
DES QUESTIONS OU DES PRÉOCCUPATIONS?
Pour obtenir le guide complet de dépannage, rendez-vous au:
Hoover.com/support ou Hoover.ca/support
Suivez-nous:
Twitter: @HooverUSA • Facebook: facebook.com/hoover
Ne retournez pas le produit en magasin. Le numéro de modèle du
produit est indiqué à l’arrière de l’appareil.
Dépannage
AVERTISSEMENT
Afin de réduire le risque de blessures corporelles,
retirez la batterie avant le nettoyage ou l’entretien.
!
Mon aspirateur sans fil Cruise ne se met pas sous tension.
La batterie n’est peut-être pas chargée. Vérifiez l’indicateur de charge et
rechargez la batterie si le niveau est bas. La recharge peut prendre jusqu’à 6
heures. En raison des règlements fédéraux, la batterie n’est pas complètement
chargée au moment de l’achat.
Mon aspirateur sans fil Cruise ne ramasse pas bien les débris.
Le filtre de votre aspirateur est peut-être obstrué. Votre filtre doit être nettoyé
après 4 à 6 utilisations. Enlevez le filtre. Rincez-le à l’eau tiède propre pendant
2 minutes et laissez-le sécher pendant 24 heures avant de l’installer de nouveau.
Si votre filtre est encrassé, voir ci-dessous.
Il est également possible que le système soit obstrué. Assurez-vous que le tube n'est
pas obstrué. Retirez le bouchon qui obstrue le système, le cas échéant.
Mon aspirateur sans fil CruiseMC aspire bien sur les planchers durs, mais pas sur
les tapis.
Lorsque vous passez l’aspirateur, vérifiez si le rouleau-brosse fonctionne. Vous devriez
l’entendre. Dans le cas contraire, tirez sur le commutateur à gâchette pour mettre en
marche le rouleau-brosse.
Toute autre tâche d’entretien doit être confiée à un représentant de service autorisé.
Cessez d’utiliser l’appareil s’il ne fonctionne pas comme prévu, s’il a été échappé sur le
sol ou dans l’eau, s’il est endommagé ou s’il a été laissé à l’extérieur et apportez-le au
centre de réparations.
Page 49

49
ENTRETIEN ET GARANTIE DE L’ASPIRATEUR SANS FIL CRUISE DE
HOOVER
MD
ET RENSEIGNEMENTS RELATIFS À L'ENTRETIEN DE LA BATTERIE
TOUTES AUTRES RÉPARATIONS DOIVENT ÊTRE CONFIÉES À UN REPRÉSENTANT DE SERVICE
AUTORISÉ.
Appelez au888679-2121 (É.-U. et Canada)
Si vous avez besoin d’aide supplémentaire, visitez un centre de service autorisé. Trouvez le centre
le plus près de chez vous en visitant notre site Web à www.hoover.com. Les frais de transport à
destination et en provenance de l’emplacement de réparation sont payés par le propriétaire. Indiquez
toujours le numéro de modèle et le code de fabrication de votre produit lorsque vous demandez des
renseignements ou que vous commandez des pièces de rechange. (Le numéro de modèle et le code
de fabrication de l’aspirateur se trouvent au bas ou à l’arrière du produit et à l’arrière de la batterie et
du chargeur.)
GARANTIE LIMITÉE DE DEUX ANS (USAGE DOMESTIQUE)
COUVERTURE DE LA GARANTIE: Lorsqu’ils sont utilisés et entretenus dans des conditions normales
d’utilisation et d’entretien domestiques, comme stipulé dans le guide de l’utilisateur, votre produit
Hoover
MD
et sa batterie sont garantis contre les défauts de fabrication et de main-d’œuvre pendant
une période de deuxans (a.) à partir de la date d’achat (ci-après la «Période de garantie»). Au cours
de la Période de garantie, Hoover
MD
fournira sans frais la main-d’œuvre et les pièces nécessaires à
la réparation de tels défauts de vos produits et (b.) elle fournira sans frais une pile de rechange afin
de remplacer la batterie LithiumLifeMC défectueuse livrée avec le produit que vous avez acheté aux
États-Unis ou dans les boutiques d’échanges militaires américaines et au Canada.
RÉCLAMATION AU TITRE DE LA GARANTIE: Si le produit n’est pas dans l’état prévu par la garantie,
apportez ou envoyez le produit chez un fournisseur autorisé de service sous garantie Hoover
MD
avec une preuve d’achat. Si les batteries ne sont pas dans l’état prévu par la garantie, apportez-les
ou envoyez-les, avec une preuve d’achat, chez un fournisseur de services autorisé Hoover
MD
ou communiquez avec les services Hoover
MD
au888679-2121. Pour accéder à un service d’aide
automatique présentant la liste des centres de service autorisés aux États-Unis, composez le
888679-2121 ou visitez le site Web de Hoover
MD
à www.hoover.com.
ÉLÉMENTS NON COUVERTS PAR LA GARANTIE: La présente garantie ne couvre pas les courroies,
les filtres et les rouleaux-brosses, toute utilisation du produit dans des conditions commerciales
(par exemple dans le cadre de services ménagers, de conciergerie et de location d’équipement),
l’entretien inadéquat du produit, les dommages liés à une mauvaise utilisation, à des cas fortuits ou à
des catastrophes naturelles, au vandalisme, à tout autre acte hors du contrôle de Hoover
MD
, ou à tout
acte ou négligence de la part du propriétaire, toute utilisation dans un pays autre que celui où le produit
a été acheté initialement et tout produit revendu par son propriétaire original. La présente garantie
ne couvre pas le ramassage, la livraison, le transport, ni les réparations à domicile. Toutefois, si vous
envoyez votre produit par courrier à un centre de vente et de service Hoover
MD
pour une réparation
sous garantie, les frais de livraison de retour seront payés. Veuillez appeler les services Hoover
MD
au1888679-2121 pour savoir comment expédier ce produit. Cette garantie ne s’applique pas aux
produits achetés à l'extérieur des États-Unis, y compris ses territoires et possessions, en dehors dans
les boutiques d’échanges militaires aux É.-U. et au Canada.
AUTRES CONDITIONS IMPORTANTES: La présente garantie n’est pas transférable et ne peut pas
être cédée. La présente garantie sera régie et interprétée selon les lois de l’État de l’Ohio. La Période
de garantie ne peut pas être prolongée par une réparation ou un remplacement des batteries ou des
pièces exécutés en vertu de la présente garantie, quels qu’ils soient.
LA PRÉSENTE GARANTIE CONSTITUE L’UNIQUE GARANTIE ET RECOURS. L’ENTREPRISE DÉCLINE
TOUTE RESPONSABILITÉ QUANT À TOUTES LES AUTRES GARANTIES EXPRESSES OU IMPLICITES, Y
COMPRIS LES GARANTIES LIÉES À LA QUALITÉ MARCHANDE OU À LA COMPATIBILITÉ DU PRODUIT
POUR UN USAGE PARTICULIER. HOOVER NE POURRA EN AUCUN CAS ÊTRE TENUE RESPONSABLE DE
DOMMAGES-INTÉRÊTS SPÉCIAUX OU DOMMAGES INDIRECTS, ACCESSOIRES OU CONSÉCUTIFS DE
QUELQUE NATURE QUE CE SOIT, SUBIS PAR LE PROPRIÉTAIRE DU PRODUIT OU PAR TOUTE PARTIE
RÉCLAMANT PAR L’INTERMÉDIAIRE DU PROPRIÉTAIRE, QU’ILS RELÈVENT DU DROIT DES CONTRATS,
DE LA NÉGLIGENCE, DELA RESPONSABILITÉ CIVILE DÉLICTUELLE OU DE LA RESPONSABILITÉ
STRICTE DU FAIT DES PRODUITS, OU QU’ILS DÉCOULENT DE QUELQUE CAUSE QUE CE SOIT.
Certains États ne permettent pas l’exclusion des dommages consécutifs. Par conséquent, l’exclusion
précédente pourrait ne pas être applicable dans votre cas. La présente garantie vous donne des droits
précis. Vous pouvez également avoir d'autres droits, lesquels varient d'une province à l'autre.
Page 50

NOTES:
Page 51

ASPIRADORA
INALÁMBRICA CRUISE
™
©2017 Techtronic Floor Care Technology Limited. Todos los derechos reser vados. #961152025 • RevC
Manual del usuario
IMPORTANTE: LEA CUIDADOSAMENTE
ESTA INFORMACIÓN ANTES DE ENSAMBLAR
Y USAR LA ASPIRADORA.
El único uso previsto para este producto es el uso
doméstico.
Si se utiliza para uso comercial, se invalida la garantía.
Page 52

TIENE GARANTÍA.
Hoover reemplazará las baterías durante nuestra garantía limitada de 2 años.
Consulte la Garantía para conocer los detalles completos.
Registre su aspiradora de la siguiente manera:
Llamando al 888 679-2121Visitando Hoover.com
o Hoover.ca
Hágalo oficial.
Bienvenido a la
propiedad de Hoover
.
Page 53

SU GUÍA
Instrucciones de seguridad importantes ........................................................................................................54
Pasos iniciales para la aspiradora inalámbrica Cruise™ ............................................................................56
Ensamblaje ...........................................................................................................................................................57
Fijación del soporte de pared ...........................................................................................................................58
Funcionamiento ...................................................................................................................................................59
Antes de comenzar la limpieza .........................................................................................................................60
Antes de comenzar la limpieza .........................................................................................................................61
Uso de la máquina ..............................................................................................................................................62
Uso de la máquina como una aspiradora portátil .........................................................................................63
Uso de la máquina para limpiar lugares elevados ........................................................................................64
Uso de la máquina para limpiar lugares elevados ........................................................................................65
Mantenimiento ....................................................................................................................................................66
Cómo pedir accesorios ......................................................................................................................................72
¿Necesita ayuda? ...............................................................................................................................................73
Servicio y garantía ..............................................................................................................................................74
Page 54

54
INSTRUCCIONES DE SEGURIDAD IMPORTANTES
CONSERVE ESTAS INSTRUCCIONES
Cuando se utilizan aparatos eléctricos, se deben seguir siempre
precauciones básicas, incluidas las siguientes:
LEA TODAS LAS INSTRUCCIONES
ANTES DE USAR ESTE APARATO. ESTE PRODUCTO ESTÁ DISEÑADO SOLO PARA USO
DOMÉSTICO. SI SE LO UTILIZA CON FINES COMERCIALES, LA GARANTÍA QUEDARÁ
ANULADA.
ADVERTENCIA: PARA DISMINUIR EL RIESGO DE
INCENDIO, DESCARGA ELÉCTRICA, DAÑOS O LESIONES,
RESPETE LAS SIGUIENTES MEDIDAS:
• Arme la unidad por completo antes de ponerla en funcionamiento.
• No utilice este aparato en superficies mojadas. No exponga los aparatos a
la lluvia. Almacénelo en interiores.
• El cargador es para uso en interiores solamente. Siempre asegúrese
deguardar la batería y el cargador en interiores y en un lugar seco.
• Evite que se lo utilice como un juguete. Los niños de 12 años o menos no deben
utilizar la unidad. Cuando se lo utilice cerca de niños, será necesario hacerlo
bajo una estricta supervisión. Para evitar lesiones o daños, mantenga a los
niños alejados del producto y no permita que introduzcan los dedos ni objetos
en ninguna de las aberturas del producto.
• Utilice la unidad únicamente según el uso descrito en este manual. Utilice
solamente los accesorios y productos recomendados por Hoover
®
.
• No utilice el cargador si el cable o el enchufe se encuentran dañados.
Siel aparato o el cargador no funcionan como deben; si se han caído, han
sido dañados, dejados a la intemperie o sumergidos en agua, llévelos a un
Centro Técnico antes de continuar usándolos.
• No extraiga ni transporte el cargador tomándolo por el cable; no tire del
cable, no cierre una puerta con él ni lo enrosque alrededor de bordes o
esquinas filosas. No apoye el producto sobre el cable. Nopase el aparato
por encima del cable. Mantenga el cable lejos de las superficies calientes.
• No desenchufe el cargador tirando del cable. Para desenchufarlo, agarre el
enchufe, no el cable.
• No manipule el cargador (incluido el enchufe y los terminales) ni el aparato
con las manos mojadas.
• No coloque ningún objeto en las aberturas. No utilice la unidad si alguna de
sus aberturas se encuentra bloqueada. Manténgala libre de polvo, pelusas,
cabello y cualquier otro elemento que pueda disminuir elflujo de aire.
• Evite que el cabello, la ropa suelta, los dedos y cualquier otra parte delcuerpo
entren en contacto con las aberturas y las piezas móviles dela unidad.
• Extreme las precauciones cuando limpie en escaleras. Para evitar lesiones o
daños físicos, y a fin de evitar que la aspiradora se caiga, siempre colóquela
al pie de las escaleras, sobre el suelo. No coloque la aspiradora sobre las
escaleras ni sobre un mueble, ya que pueden generarse lesiones o daños.
Page 55

55
• No utilice la unidad para aspirar líquidos combustibles o inflamables, tales
como gasolina o restos de madera lijada, ni la utilice en áreas en las que
dichas sustancias puedan estar presentes.
• No aspire nada que se encuentre en combustión o emita humo, como
cigarrillos, fósforos o cenizas calientes.
• No utilice la unidad si esta no tiene colocados la copa de recolección
deresiduos o los filtros.
• Apague el interruptor de alimentación y extraiga la batería antes de extraer
o instalar el cepillo giratorio.
• Siempre apague el aparato antes de conectar o desconectar la herramienta
Turbo motorizada o las herramientas.
• No incinere el cargador, la batería ni el aparato, aun si estuvieran
muydañados. Las baterías pueden explotar y provocar un incendio.
• Este producto incluye baterías recargables de iones de litio. No exponga las
baterías a altas temperaturas, ya que pueden prenderse fuego oexplotar.
• No aplaste ni incinere la batería, ni la someta a acciones similares.
• No deseche la batería en un incinerador ni en un compactador de desechos.
Consulte la sección sobre desecho de la batería para obtener instrucciones.
• No intente desarmar la batería.
• Desenchufe el cargador del tomacorriente antes de llevar a cabo una rutina
de limpieza o mantenimiento en la unidad.
• En condiciones extremas, pueden producirse pérdidas en las celdas de la
batería. Si la piel entrara en contacto con el líquido, lávese rápidamente con
jabón y agua. Si el líquido le entrara en los ojos, no se los frote. Enjuáguelos
de inmediato con agua limpia, en forma continua durante 15 minutos como
mínimo. Consulte a un médico de inmediato.
• Para recargar la unidad, utilice únicamente el cargador (N.° de pieza
Hoover440009553) provisto por Hoover
®
.
• Utilice únicamente la batería (N.° de pieza Hoover 440009633) provista por
Hoover
®
. Otras baterías pueden explotar y causar lesiones o daños físicos
graves.
• No toque el paquete de baterías ni los terminales del cargador, ni inserte
objetos en ellos.
• No intente cortocircuitar la batería ni los terminales del cargador.
ADVERTENCIA: Este producto contiene
químicos reconocidos por el estado de California como
causantes de cáncer, defectos de nacimiento u otros
daños reproductivos. LÁVESE LAS MANOS LUEGO DE
MANIPULARLO.
Page 56

56
Pasos iniciales para la aspiradora inalámbrica Cruise™:
EL CONTENIDO PUEDE VARIAR SEGÚN EL MODELO QUE COMPRÓ.
¿QUÉ HAY EN LA CAJA?
Modelo de la
unidad
BH52200/PC/CDI
ü ü ü ü ü
BH52210/PC/CA
ü ü ü ü ü ü ü
BH52212
ü ü ü ü ü ü ü
Vara de alcance Boquilla eléctrica
Dispositivo portátil
Montaje en la pared
Herramienta para
limpieza en rincones
Herramienta para
tapizados
Articulación del
cepillo quitapolvo
Cepillo quitapolvo
TODOS LOS MODELOS VIENEN CON UN CARGADOR, UNA BATERÍA, TORNILLOS, TARUGOS Y EL MANUAL DE USUARIO.
Page 57

57
Ensamblaje:
Empuje el dispositivo
portátil hacia abajo
en la vara de alcance
hasta que encaje en su
sitio (se oirá un clic).
Alinee el conector de la vara
de alcance con la boquilla
eléctrica. Empuje la vara de
alcance hacia abajo en la
boquilla eléctrica hasta que
encaje en su sitio.
La aspiradora no se mantiene
por sí sola y entre un uso y otro
siempre debe colocarse en el
soporte de pared o recostarse
sobre el piso, en una ubicación
adecuada de modo que no
constituya una obstrucción en
el paso ni nadie pueda pisarla.
1 2 3
ADVERTENCIA
A fin de reducir el riesgo de daños
personales, retire la batería antes de
realizar la limpieza o el mantenimiento.
!
IMPORTANTE
Esta aspiradora no se mantiene por sí sola. Entre los usos o cuando
lleve a cabo cualquier tipo de mantenimiento, siempre recuéstela
sobre el piso en una ubicación adecuada de modo que no constituya
una obstrucción en el paso ni nadie pueda pisarla.
!
Page 58

58
Fijación del soporte de pared:
Primero, ensamble completamente la aspiradora,
pero no coloque la batería.
Con el soporte de pared fijado,
coloque la aspiradora de
forma vertical junto a la pared,
la boquilla eléctrica debe
permanecer en el piso.
Presione firmemente el
mango de la aspiradora
hacia el soporte de pared
para asegurar.
Fije el soporte de pared
al mango.
Utilice ambos tornillos y
tarugos para asegurar el
soporte de pared a la pared.
Coloque tapas sobre los
tornillos.
Mientras sostiene el soporte
de pared firmemente en su
lugar, retire la aspiradora con
cuidado. Con un lápiz, haga
una pequeña marca para
cada tornillo.
Las herramientas se pueden
guardar en el soporte
de pared.
1
4
2
5
3
6
Page 59

59
Funcionamiento:
1. Botón de encendido/apagado del cepillo giratorio
2. Luz de carga y de Encendido/Apagado
3. Botón de liberación del dispositivo portátil
4. Vara de alcance
5. Botón de liberación de la boquilla eléctrica/el
accesorio
6. Boquilla eléctrica
7. Cepillo giratorio
8. Botones de liberación de la cubierta del filtro
9. Mango
10. Puerto de carga de batería
11. Botón de liberación de la batería
12. Botón de extracción del contenedor de
residuos (oculto)
13. Botón de vaciado de residuos
14. Gatillo de Encendido/Apagado
15. Palanca de alimentación continua (oculto)
16. Batería
17. Contenedor de residuos
1
4
5
6
9
10
12
14
2
7
3
8
11
13
15
16
17
Page 60

60
Antes de comenzar la limpieza:
Cargue la máquina mientras esté
almacenada en el montaje para pared
con el cabezal y la varilla conectados.
También puede cargar la máquina
cuando no esté en el montaje de
pared quitando los accesorios y
colocando la aspiradora portátil
de lado.
Deslice la batería hacia la
parte posterior del dispositivo
portátil. La batería encajará
en su sitio (se oirá un clic),
cuando se fije correctamente.
Enchufe el enchufe del
cargador en el tomacorriente.
Inserte el cable de
carga en el puerto
de carga ubicado
en la parte posterior
del mango.
NOTA: DEBIDO A REGLAMENTACIONES
FEDERALES LA BATERÍA NO VIENE
COMPLETAMENTE CARGADA.
1
4
2
3
ADVERTENCIA
A fin de reducir el riesgo de daños
personales, retire la batería antes de
realizar la limpieza o el mantenimiento.
!
IMPORTANTE
Para obtener mejores resultados
de limpieza, debe limpiar los filtros
al menos cada 3 meses y deben
reemplazarse cada 12 meses, según
el uso. Si la aspiradora está atascada,
retire la batería antes de extraer la
obstrucción.
!
Page 61

61
Antes de comenzar la limpieza:
IMPORTANTE
Para obtener un mejor rendimiento, debe limpiar los terminales de
labatería y la aspiradora y mantenerlos libres de polvo y residuos.
Laexpectativa de vida útil de la batería puede variar según el uso
delaaspiradora.
!
La luz de encendido/apagado y de carga se iluminará
mientras el cargador esté conectado.
Luz roja parpadeante: la batería se está cargado.
Luz verde fija: la batería está cargada.
Si se carga por primera vez, el tiempo de carga inicial
puede ser de hasta 6 horas.
5
ADVERTENCIA
No utilice la aspiradora cuando la
máquina esté enchufada y se esté
cargando.
!
Page 62

62
Uso de la máquina:
Apriete el gatillo que está ubicado
debajo del mango, la máquina se
“ENCENDERÁ”. La luz de carga y
de Encendido/Apagado se iluminará
en verde, lo que indica que la
alimentación está encendida y la
máquina está cargada. Suelte el
gatillo para “APAGAR” la máquina.
Presione el botón de encendido/
apagado del cepillo giratorio para
cambiar de modo para alfombras y
para pisos duros. El cepillo giratorio
rotará al modo para alfombras.
Apriete el gatillo y tire de la “palanca
de alimentación continua” hacia
el gatillo. Esto lo bloqueará en la
posición “ENCENDIDO” y continuará
alimentando la máquina sin tener
que mantener apretado el gatillo.
Empuje la palanca lejos del gatillo
para desbloquear y liberar el gatillo.
Cuando la aspiradora esté en uso, la
luz de carga y de Encendido/Apagado
se iluminará y parpadeará en rojo
cuando la batería esté baja. Cuando la
luz roja parpadee, la máquina se
apagará en 20 segundos. El usuario
debe recargar la batería.
1
3
2
4
ADVERTENCIA
Riesgo de daños personales: el cepillo
puede reiniciarse repentinamente. Apague el
interruptor de alimentación y quite la batería
antes de limpiar o hacer un mantenimiento
del cepillo giratorio.
!
ADVERTENCIA
Esta aspiradora tiene un cepillo giratorio que rota constantemente cuando
se selecciona cepillo giratorio “ENCENDIDO”. Nunca deje la aspiradora
en un mismo lugar durante un período extenso, ya que esto puede dañar
la superficie del piso. El cepillo giratorio debe estar ENCENDIDO para
alfombras y APAGADO para pisos duros.
!
Page 63

63
Uso de la máquina como una aspiradora portátil:
Presione el botón de
liberación del dispositivo
portátil. Tire para separar
el dispositivo portátil de la
vara de alcance.
Elija un accesorio
(no todos los accesorios están disponibles
en todos los modelos).
Cuando está conectada a la boquilla
eléctrica/al accesorio, la vara de
alcance no se queda en posición
vertical, así que colóquela de un lado
en forma segura.
Empuje el accesorio elegido en el
dispositivo portátil hasta que encastre
en su lugar.
(Todos los accesorios disponibles se
pueden conectar directamente en el
dispositivo portátil).
1
3
2
4
IMPORTANTE
La aspiradora no debe utilizarse para
limpiar mascotas.
!
Page 64

64
Uso de la máquina para limpiar lugares elevados:
Elija un accesorio
(no todos los accesorios están
disponibles en todos los modelos).
Presione el botón de liberación
de la boquilla eléctrica/el
accesorio y tire para extraer
la boquilla eléctrica de la vara
de alcance.
Empuje el accesorio
elegido en la vara de
alcance hasta que
encastre en su lugar.
1 2 3
La vara de alcance puede utilizarse para lugares difíciles de alcanzar.
Page 65

65
La vara de alcance puede utilizarse para lugares difíciles de alcanzar.
Uso de la máquina para limpiar lugares elevados:
La vara de alcance puede utilizarse
para lugares difíciles de alcanzar.
La aspiradora no se mantiene por sí sola y
entre un uso y otro siempre debe colocarse
en el soporte de pared o recostarse sobre el
piso, en una ubicación adecuada de modo
que no constituya una obstrucción en el
paso ni nadie pueda pisarla.
1
2
Page 66

66
Mantenimiento:
Recueste el dispositivo portátil sobre
un lado en una superficie plana
y estable. Presione el botón de
liberación de la batería.
Deslice la batería hacia
fuera de la parte inferior
del dispositivo portátil.
1
2
Extracción de la batería.
ADVERTENCIA
A fin de reducir el riesgo de daños personales,
retire la batería antes de realizar la limpieza o el
mantenimiento.
!
Page 67

67
Mantenimiento:
Limpieza del filtro posterior al motor.
Presione los botones de liberación
de la cubierta del filtro que están
ubicados en ambos lados de la
cubierta del filtro y tire para retirar
el filtro de la máquina.
Sostenga la cubierta del filtro y quite el filtro
de la cubierta del filtro. Golpee el filtro y la
cubierta del filtro sobre un cubo de basura
para remover la suciedad y los residuos.
Enjuague con agua corriente tibia hasta
obtener el agua limpia.
1
2
NOTA: NO USE JABÓN O CUALQUIER OTRO
QUÍMICO PARA LIMPIARLO.
SEQUE EL FILTRO COMPLETAMENTE
DURANTE AL MENOS 24 HORAS ANTES DE
VOLVER A INSTALARLO EN EL PRODUCTO.
ADVERTENCIA
A fin de reducir el riesgo de daños personales,
retire la batería antes de realizar la limpieza o el
mantenimiento.
!
Page 68

68
Mantenimiento:
Presione el botón de liberación del
dispositivo portátil. Tire para separar
el dispositivo portátil de la vara de
alcance.
Asegúrese de haber extraído la batería
y sostenga el dispositivo portátil sobre
un cubo de basura.
Cuando está conectada a la boquilla
eléctrica/al accesorio, la vara de
alcance no se queda en posición
vertical. Colóquela de manera
segura sobre un lado.
Presione el botón para vaciar los
residuos.
1
3
2
4
Vaciado de un contenedor lleno.
ADVERTENCIA
A fin de reducir el riesgo de daños personales,
retire la batería antes de realizar la limpieza o el
mantenimiento.
!
Page 69

69
Mantenimiento:
Para quitar el contenedor de residuos,
voltee la unidad. Presione el botón
‘Extraer copa de recolección de
residuos’ e incline el contenedor de
residuos levemente hacia adelante
para extraerlo.
Para rearmar, alinee las flechas alrededor
de la parte lateral del separador con las del
dispositivo portátil. Gire el separador en el
sentido de las agujas del reloj hasta fijarlo
en su sitio.
Gire el separador en sentido
antihorario y tire para quitarlo.
Limpie el polvo y la suciedad del
separador.
Vuelva a armar el contenedor de
residuos en la unidad sobre el
separador, el gancho debe colocarse
primero en el frente. Luego empuje
el contenedor de residuos hacia atrás
hasta que se bloquee en su lugar.
1
3
2
4
Limpieza del separador, el filtro y el contenedor de residuos.
ADVERTENCIA
Riesgo de daños personales: el cepillo puede reiniciarse repentinamente. Apague el
interruptor de alimentación y quite la batería antes de limpiar o hacer un mantenimiento del
cepillo giratorio.
!
Page 70

70
Mantenimiento:
Deslice para liberar el cepillo giratorio.
El botón no puede extraerse.
Quite todos los hilos o cabellos de
ambos extremos del cepillo giratorio
y cualquier basura/desecho que esté
dentro del alojamiento de la boquilla
eléctrica.
Levante el extremo izquierdo del
cepillo giratorio para quitarlo.
Cuando vuelva a colocar el cepillo
giratorio, ajuste el lado derecho en el
alojamiento primero. Luego alinee el
extremo izquierdo del cepillo giratorio
y deslícelo en su lugar. Verifique que
el botón del cepillo giratorio se vuelva
a deslizar en su lugar para asegurar el
cepillo giratorio.
1
3
2
4
Extracción y reemplazo del cepillo giratorio.
ADVERTENCIA
Riesgo de daños personales: el cepillo puede reiniciarse repentinamente. Apague el
interruptor de alimentación y quite la batería antes de limpiar o hacer un mantenimiento del
cepillo giratorio.
!
Page 71

71
Mantenimiento:
El cepillo giratorio debe extraerse de
la boquilla eléctrica antes de intentar
extraer cualquier bloqueo. Use tijeras
con cuidado para extraer todos los
hilos o cabellos de alrededor del
cepillo giratorio y quite cualquier
basura o desecho de la boquilla
eléctrica.
Para probar si existen bloqueos en la vara de
alcance, arroje una pequeña bola de papel
hacia la vara. El papel caerá a través de ella
si la vara está limpia. Use un palo de escoba
o un objeto contundente similar para remover
cualquier bloqueo.
1
2
Extracción de los bloqueos de la boquilla eléctrica. Extracción de los bloqueos de la vara de alcance.
LUBRICACIÓN
El motor y el cepillo giratorio vienen equipados con cojinetes
de suficiente lubricación para toda su vida útil. La adición de
lubricante podría causar daños. No agregue lubricante al motor
o al cepillo.
Cualquier otro mantenimiento lo debe realizar un representante
de servicio autorizado. Si el aparato no funciona como debe,
si se ha caído, dañado o dejado a la intemperie, o si se ha
sumergido en agua, llévelo a un centro técnico antes de
continuar usándolo.
ADVERTENCIA
Riesgo de daños personales: el cepillo puede reiniciarse repentinamente.
Apague el interruptor de alimentación y quite la batería antes de limpiar o hacer
un mantenimiento del cepillo giratorio.
!
Page 72

72
Cómo pedir accesorios:
Cepillo quitapolvo
N.° de pieza 440010636
Herramienta para tapizados
N.° de pieza 440010637
Herramienta para limpieza
en rincones
N.° de pieza 440010635
Articulación del cepillo
quitapolvo
N.° de pieza 440010638
QUÉ COMPRAR:
Comuníquese con un representante de atención al
cliente de Hoover® llamando al 1-888-679-2121 para
ver los detalles del reemplazo o visite Hoover.com o
Hoover.ca
Page 73

73
¿TIENE PREGUNTAS O INQUIETUDES?
Para obtener una guía completa de resolución de problemas, consulte:
Hoover.com/support o Hoover.ca/support
Comuníquese con nosotros:
Twitter: @HooverUSA • Facebook: facebook.com/hoover
No devuelva la unidad a la tienda. Vea la parte posterior del producto
para consultar el número de modelo.
¿Necesita ayuda?
ADVERTENCIA
A fin de reducir el riesgo de daños personales,
retire la batería antes de realizar la limpieza o el
mantenimiento.
!
La aspiradora inalámbrica Cruise no enciende.
La batería puede estar descargada. Verifique el indicador de nivel de la batería y
cargue la batería si está baja. La carga puede demorar hasta 6 horas. Debido a
reglamentaciones federales la batería no viene completamente cargada.
La Aspiradora inalámbrica de velocidad constante no aspira bien.
Es probable que el filtro esté obstruido. Se debe enjuagar el filtro cada 4 a
6 usos. Extraiga el filtro. Enjuague con agua tibia limpia durante dos minutos.
Déjelo secar durante 24 horas antes de volver a colocarlo.
Si el filtro estaba sucio...
Es posible que haya una obstrucción en el sistema. Controle que la varilla
de alcance no tenga residuos obstruidos. Si encuentra una obstrucción,
remuévala.
La aspiradora inalámbrica Cruise™ aspira bien en pisos duros, pero no en la
alfombra.
Cuando aspire, verifique que el cepillo giratorio gire. Debería escucharlo. Si no es así,
tire del interruptor del gatillo para encender el cepillo giratorio.
Cualquier otro mantenimiento lo debe realizar un representante de servicio autorizado.
Si el aparato no funciona como debe, si se ha caído, dañado o dejado a la intemperie,
o si se ha sumergido en agua, llévelo a un centro técnico antes de continuar usándolo.
Page 74

74
SERVICIO Y GARANTÍA PARA HOOVER® INFORMACIÓN DE SERVICIO
DE PRODUCTO Y BATERÍA DE LA ASPIRADORA INALÁMBRICA CRUISE
TODO S ERVICIO DE MA NTENIMIENTO DEBE SER REA LIZA DO POR UN REPRESENTANT E
DESERVICIO TÉCNICO AUTORIZADO.
Llame al 88 8 679-2121 en EE. UU y Canadá
En caso de que necesite asistencia adicional, visite un centro de s ervicio autorizado.
Encuentr eel más cercano en nues tro sit io web: www. hoover.com. El propietar io deberá pagar
todo s los costos de tr ansporte desde y hasta cualquier lugar de repar ación. Siempre ident ifique
su product o de acuerdo al nú mero del mod elo y el código de fábr ica cuando solicite inf ormación
o realice el ped ido de las piez as de repues to. (El nú mero de modelo y el código de fábrica de
la aspi radora apar ecen en la par te inferior o en la p arte pos terior del producto, y en la parte
posterior de la bater ía y del cargador).
GAR ANTÍ A LIMITADA DE DOS AÑOS (USO DOMÉS TICO)
COBE RTURA DE LA G ARAN TÍA: En casos de uso y man tenimiento domés ticos en con diciones
norm ales y confo rme a la Guía del propietario, el product o y la batería Hoover
®
tienen garantía
cont ra fallas de f ábrica en los material es y fallas por mano de obra por un periodo co mpleto de
dos años desd e (a.) la fecha de compr a (en adelant e, el “Plazo de la garantía”). Duran te el Plazo
de la garantía, Hoover
®
proporcio nará la mano de obra y los repuestos, sin ning ún costo, a los
fines de repar ar cualquier falla del product o y (b.) proporcionará un a batería de repue sto grat is
para reparar las fal las de la batería Lith iumLif e™ que vino incluida con su pr oducto adquirido
enlos E stados U nidos, Tiendas de int ercambios mili tares de los EE.UU., y en Canadá.
¿CÓMO H ACER UN RECLAMO DE L A GARANT ÍA?: Si es te producto no pr esentar a las
característ icas garant izadas, llével o o envíelo a un Distribuidor Técnico O ficial aut orizado de
Hoover
®
junt o con el compr obante de co mpra. Si las baterías no presentaran las caracterí sticas
garan tizadas , llévelas o en víelas jun to con el comprobante de compr a a un Distr ibuidor
autoriz ado de Hoover
®
o comun íquese con los Ser vicios de H oover® llamando al 8 88 679-2 121.
Para qu e lo redirijan en fo rma automática a un Centr o de Servicios au torizado en los EE.U U.,
llame al 88 8 679-2121 o visi te el sitio en línea de Ho over
®
, www.hoover.com.
¿QUÉ ES LO QUE NO CUB RE ESTA GA RANTÍA?: L a presente garantía no cubr e las correas,
losfil tros y los cepillos giratorios, el us o del produc to en operaci ones comerciales (tal es como
servicios de con tratación de equipam iento y lim pieza), el mantenimient o incorrec to del producto ,
los dañ os derivados de su m al uso, casos for tuitos o hechos de la nat uraleza, vandalismo u
otr os actos fuera del cont rol de Hoover
®
. La gar antía tampoco cu bre los actos u omisiones del
propietario, su uso f uera del país de compra ori ginal y las rev entas del produc to por par te del
propietario. Esta garantía no cubre los serv icios de reco lección, en trega, transporte o visit as
a domicilio . No obstante, si envía el producto por correo pos tal al Cent ro técnico y de vent as
de Hoover
®
para ob tener el servicio de la garan tía, el env ío tendrá un cost o de ida solamente.
Póngase en contac to con el Cen tro Técnico de Hoover
®
al 88 8 679 -2121 para i nformar se sobre
las formas de e nvío de este pro ducto. Esta garantía no se aplica a los pr oductos adquir idos fuer a
de los E stados Unidos, incluido s sus terri torios y poses iones, fuera de t iendas de intercambio s
mili tares de lo s EE.UU. , y Canadá.
OTROS TÉRMINOS IMPORTANTES: Esta garantía no es t ransfer ible y no puede asignarse .
Estagarantía se reg irá e inter pretará bajo las leyes del es tado de Ohio. El Plazo de la garan tía
no se prolongará po r el reemplazo de las baterías o pi ezas, ni por cualquier reparación realizada
conf orme a est a garantía.
ESTA GARA NTÍA E S LA GA RANTÍA EXCLU SIVA Y SE RE NUNCIA AL DE RECHO DE CUA LQUIE R
OTRA G ARANTÍA , EXPR ESA O IMP LÍCITA , INCLU SIVE GAR ANTÍ AS DE COM ERCIA BILIDAD O
ADE CUACIÓ N PARA UN F IN PART ICUL AR. EN NINGÚ N CASO HOOVER SE RÁ RESPONSABLE
POR NINGÚ N DAÑO ESPECIA L, INDIR ECTO, I NCIDEN TAL O CONS ECUEN TE DE NINGÚN
TIP O O NATUR ALE ZA AL PROPI ETARIO O CUA LQUIE R PART E QUE REC LAME A T RAVÉ S DEL
PROPIE TARIO, YA S EA CON BASE E N UN CONT RATO, L A NEGLIGENCIA, E L AGRAVIO O LA
RES PONSA BILIDA D ESTRIC TA DE LOS PR ODUCT OS O PROCEDE NTES DE CUA LQUIE R CAUSA .
Algunos estados no permi ten la exclusión de l os daños consecuen tes, por lo que la
exclusión an terior puede no ap licarse a us ted. Es ta garant ía le otorga derechos especí ficos.
Tambiénpuede tener otros derechos, que varían según el es tado.
Page 75

NOTAS:
Page 76

#RethinkCleaning
FIND US ON:
Hoover.com
youtube.com/hoover facebook.com/hoover twitter.com/hooverusa
 Loading...