

Hoover conquest 14 Owner's Manual
Please review this manual before operating your Hoover® Commercial appliance.
www.hoovercommercial.com
Owner’s Manual
Operating and Servicing Instructions
All rights reserved. #964A00044-04. 2018
This cleaner meets Occupational Safety and Health Act (OSHA-29 CFR 1910 Subpart S) requirements.
Please enter the complete model and serial
numbers in the spaces provided.
Model ______________________________
Serial Number ________________________
Hint: Attach your sales receipt to this owner’s
manual. Verification of date of purchase
may be required for warranty service of your
HOOVER® COMMERCIAL product.
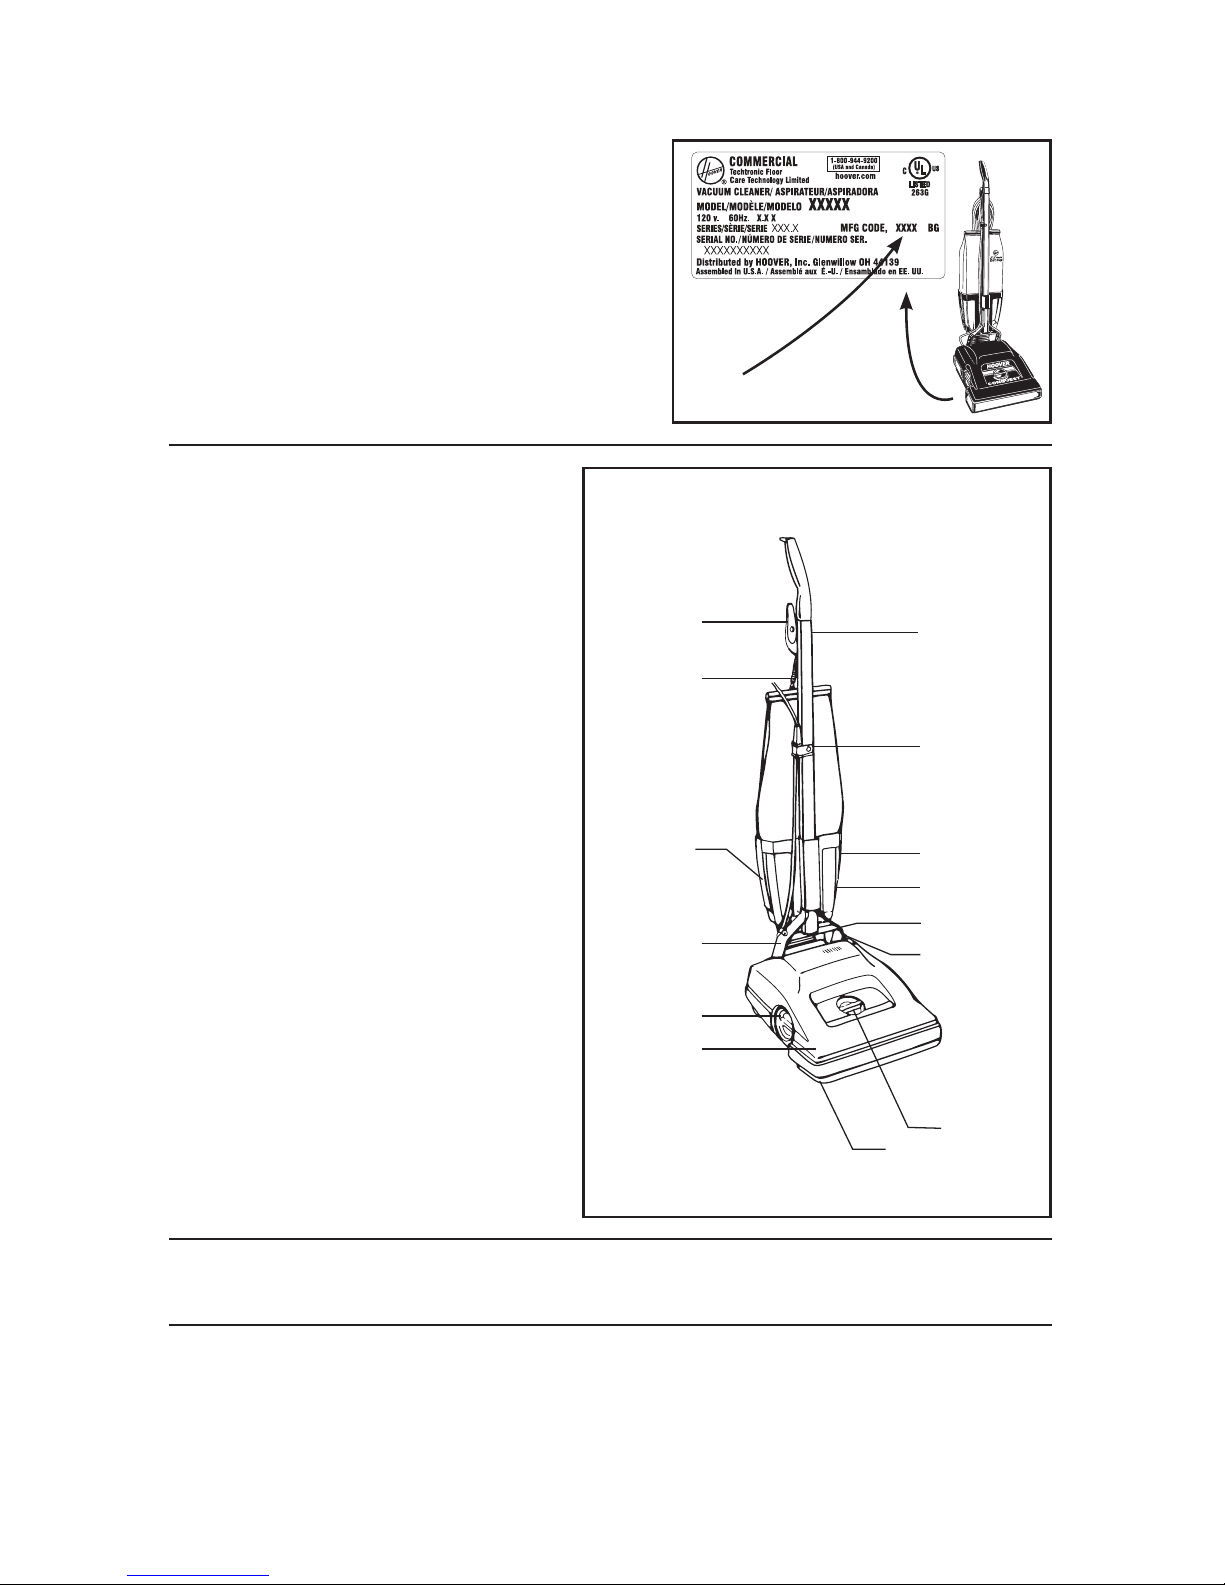
1. Hood
2. Access Cap:
Provides access to dirt channel for removing
heavy particles. Turn cap counterclockwise
to remove; clockwise to install.
3. Handle Bail/Carrying Handle:
4. Spring Hook:
Place spring ring over hook to support the
bag.
5. Cord Storage Hook:
Loop cord around hook for storage.
6. Handle
7. Cord Clamp And Cord Protector
8. Dirt Cup:
Dirt receptacle of the cleaner.
9. Latches:
Located on both sides of the dirt cup; lock
dirt cup into position.
10. Handle Release Lever:
11. On-Off Control:
Depress control with your foot to turn
cleaner ON or OFF.
12. Adjustment Control For Carpet Pile Height:
Adjusts nozzle (agitator location) to carpet
pile height; 1-glue-down to 6-shag.
13. Furniture Guard
2
If you need assistance:
Call 1888-768-2014 to speak to a customer service representative Mon-Fri 8am-5pm EST.
Please do not return this product to the store.
Thank you for choosing a HOOVER® COMMERCIAL product.
Cleaner Description
MFG Code
1
7
4
3
9
9
5
2
8
10
11
12
13
6
This vacuum is intended for commercial use.
Operate cleaner only at voltage specified on data plate on bottom of cleaner.

IMPORTANT SAFETY INSTRUCTIONS
When using an electrical appliance, basic precautions should always be followed, including the following:
READ ALL INSTRUCTIONS BEFORE USING THIS APPLIANCE
WARNING: To reduce the risk of fire, electric shock, or injury:
• Do not leave appliance when plugged in. Unplug from outlet when not in use and
before servicing.
• Do not use outdoors or on wet surfaces.
• Connect to a properly grounded outlet only. See grounding instructions.
• Do not allow to be used as a toy. Close attention is necessary when used by or near children.
• Keep hair, loose clothing, fingers, feet and all parts of body away from openings, rotating
agitator and other moving parts.
• Do not operate cleaner in bare feet or when wearing open toe shoes or sandals.
• Do not pick up anything that is burning or smoking, such as cigarettes, matches, or hot ashes.
• Do not use to pick up flammable or combustible liquids such as gasoline, or fine wood
sandings, or use in areas where they may be present.
• Avoid picking up hard, sharp objects with the cleaner. They may damage the cleaner and
the bag.
• Do not use without dust bag or dirt cup in place. Change bag frequently when picking up
very fine materials such as powder.
• Use extra care when cleaning on stairs.
• Do not put any object into openings. Do not use with any opening blocked; keep free of
dust, lint, hair, or anything that may reduce air flow.
• Do not pull or carry by cord, use cord as a handle, close door on cord or pull cord around
sharp edges or corners. Do not run appliance over cord. Keep cord away from heated surfaces.
• Always disconnect cord from electrical outlet before servicing the cleaner.
• Unplug cleaner when not in use. Turn off all controls before unplugging.
• Do not unplug by pulling on cord. To unplug, grasp the plug, not the cord. Never handle
plug or appliance with wet hands.
• The use of an extension cord is not recommended. If an extension cord is absolutely
necessary, use at least a 16 gauge 3-wire cord which has a 3-prong grounding type plug and
a 3-pole receptacle that accepts the machine plug.
• Do not use with damaged cord or plug. If appliance is not working as it should, has been
dropped, damaged, left outdoors, or dropped into water, take it to a Hoover Commercial
Service Center or Authorized Hoover Commercial Warranty Service Distributor.
• Use only as described in this manual. Use only manufacturer's recommended attachments.
SAVE THESE INSTRUCTIONS!
3
4
DANGER ‑ Improper connection of the equipment-
grounding conductor can result in the risk of electric shock. Check
with a qualified electrician or service person if you are in doubt
as to whether the outlet is properly grounded. Do not modify the
plug provided with the appliance - if it will not fit the outlet, have
a proper outlet installed by a qualified electrician.
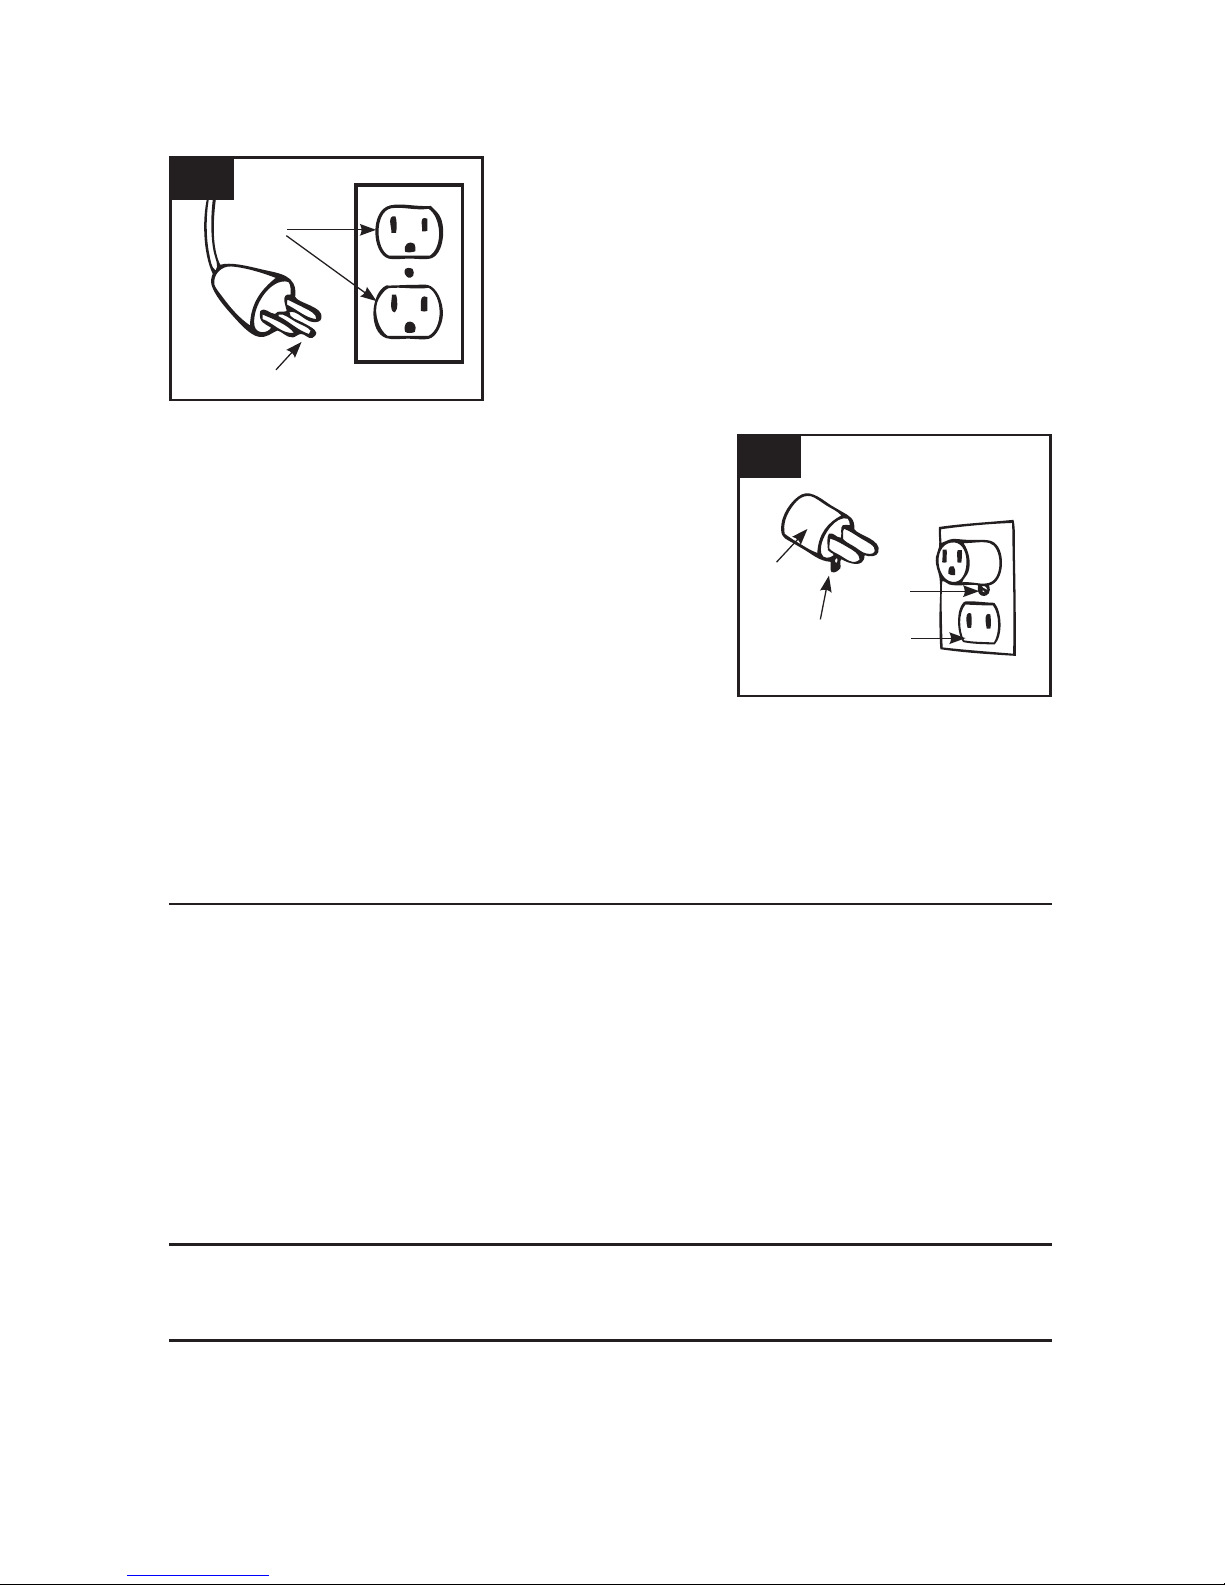
This appliance is for use on a nominal 120 volt circuit and has a
grounding plug that looks like the plug in sketch (1).
A temporary adapter (D) may be used to connect this plug to a
2-pole receptacle (E) if a properly grounded outlet is not available.
The temporary adapter should be used only until a properly grounded outlet (B) can be installed by a
qualified electrician.
The green colored rigid ear, lug, or the like (F) extending from the adapter must be connected to a
permanent ground (G) such as a properly grounded outlet box cover.
Whenever the adapter is used, it must be held in place by a metal screw.
Note: In Canada, the use of a temporary adapter is not permitted by the Canadian Electrical Code.
Grounding Instructions
This appliance must be grounded.
If it should malfunction or breakdown, grounding provides a
path of least resistance for electrical current to reduce the risk of
electric shock.
This appliance is equipped with a cord having an equipmentgrounding conductor (C) and grounding plug (A).
The plug must be plugged into an appropriate outlet (B) that
is properly installed and grounded in accordance with all local
codes and ordinances.
1
2
C
A
F
E
G
D
B
An internal thermal protector has been designed into your cleaner to protect it from overheating.
When the thermal protector activates the cleaner will stop running.
If this happens proceed as follows:
1. Turn cleaner OFF and disconnect it from the electrical outlet.
2. Inspect the nozzle and bag inlet openings for any obstructions. Clear obstructions if present.
3. When cleaner is unplugged and motor cools for 30 minutes, the thermal protector will deactivate
and cleaning may continue.
If the thermal protector continues to activate after following the above steps, your cleaner may
need servicing.
WARNING ‑ This product contains chemicals known to the State of California to cause cancer.
WASH HANDS AFTER HANDLING.
Thermal Protector:

5
Brushed Edge Cleaning
Brushed edge cleaning is provided on both sides of the nozzle to remove embedded dirt in carpet near
baseboards and furniture. Guide either side of the nozzle parallel to edge of carpet or furniture.
Carpet Height Adjustment
1. HOW TO USE
It is necessary to raise and lower the nozzle for various carpet pile heights.
Turn the control to the desired adjustment for carpet pile height according to the chart below.
Note: If the cleaner is difficult to push, move adjustment lever to next higher setting. This will
decrease the belt load and pushing effort.
1
For cleaning glue-down carpet and removing loose dirt from hard surface.
2
For short pile and kitchen type carpet.
3
For multi-level carpet or carpet with normal pile height.
4
For padded level loop or sculptured type carpet.
5
For plush carpet or carpet with normal pile height but thicker density.
6
For very long or shag pile carpet.
Power Cord
Heavy Object Clean-Out
Disconnect cleaner from electrical outlet before attempting to service it in any manner.
Do not operate cleaner without either cloth dirt bag or paper throw away bag.
To reduce twisting of the power cord, start at the cleaner handle end of the cord and coil before storing
on storage hook.
Remove access cap and inspect channel after every use. Remove any debris to maintain performance and
prevent damage to cleaner.
2. MAINTENANCE
6
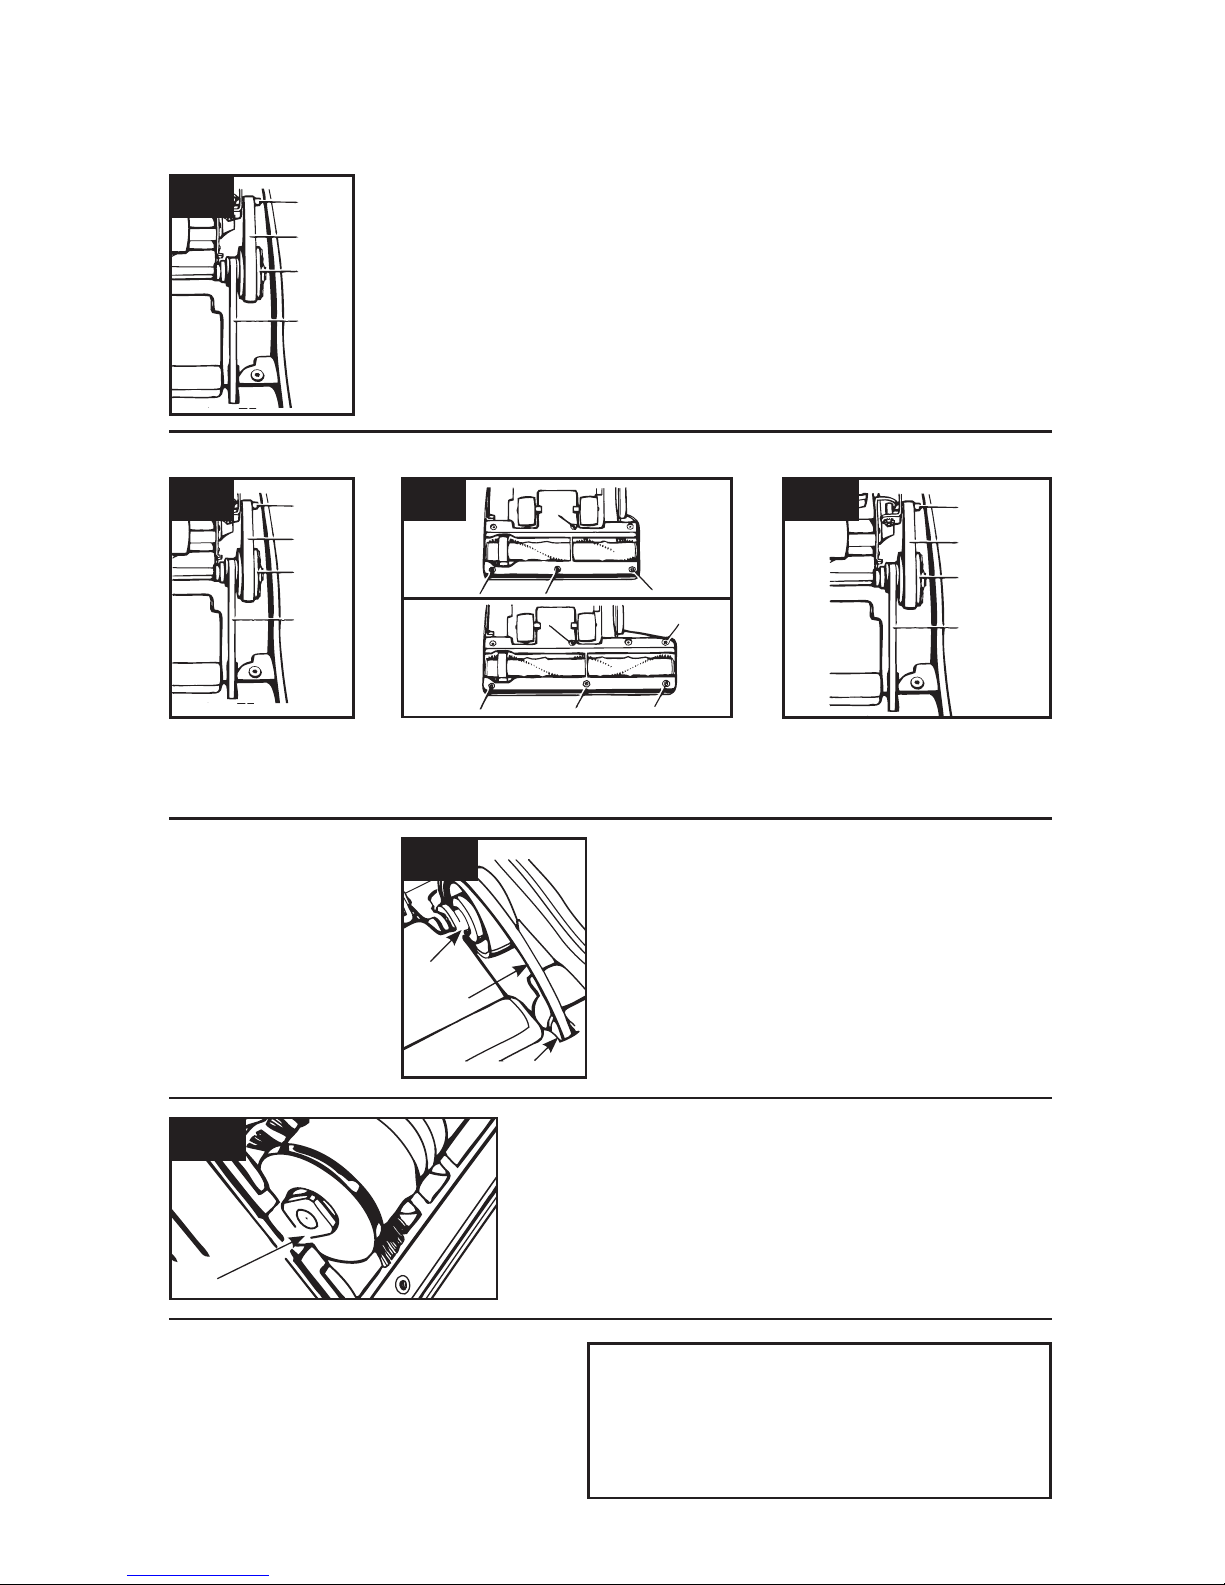
The Belts
To check belts, remove hood (see following section).
If either belt is stretched or cut; or if the agitator fails to rotate, replace the appropriate belt.
Remove hood, by turning cleaner over and removing the 4 Phillips head screws indicated by arrows on
bottom of cleaner.
Return cleaner to original position.
Depress handle release lever to lower handle and then lift off hood.
When to Replace
How to Replace
Disconnect cleaner from electrical outlet before checking or replacing belt.
Disconnect cleaner form electrical outlet before checking or replacing belt.
The dirt picked up by the cleaner is deposited into the dirt cup.
When empty, the cup can be cleaned with a damp cloth or rinsed with water.
Be sure cup is dry before re-using.
Frequently check dirt level in the dirt cup.
It is recommended that you empty the cup when the dirt level reaches the “Full
Line” on back of cup.
If more dirt is allowed to accumulate, your cleaner may not operate effectively
and spillage may occur when cup is removed.
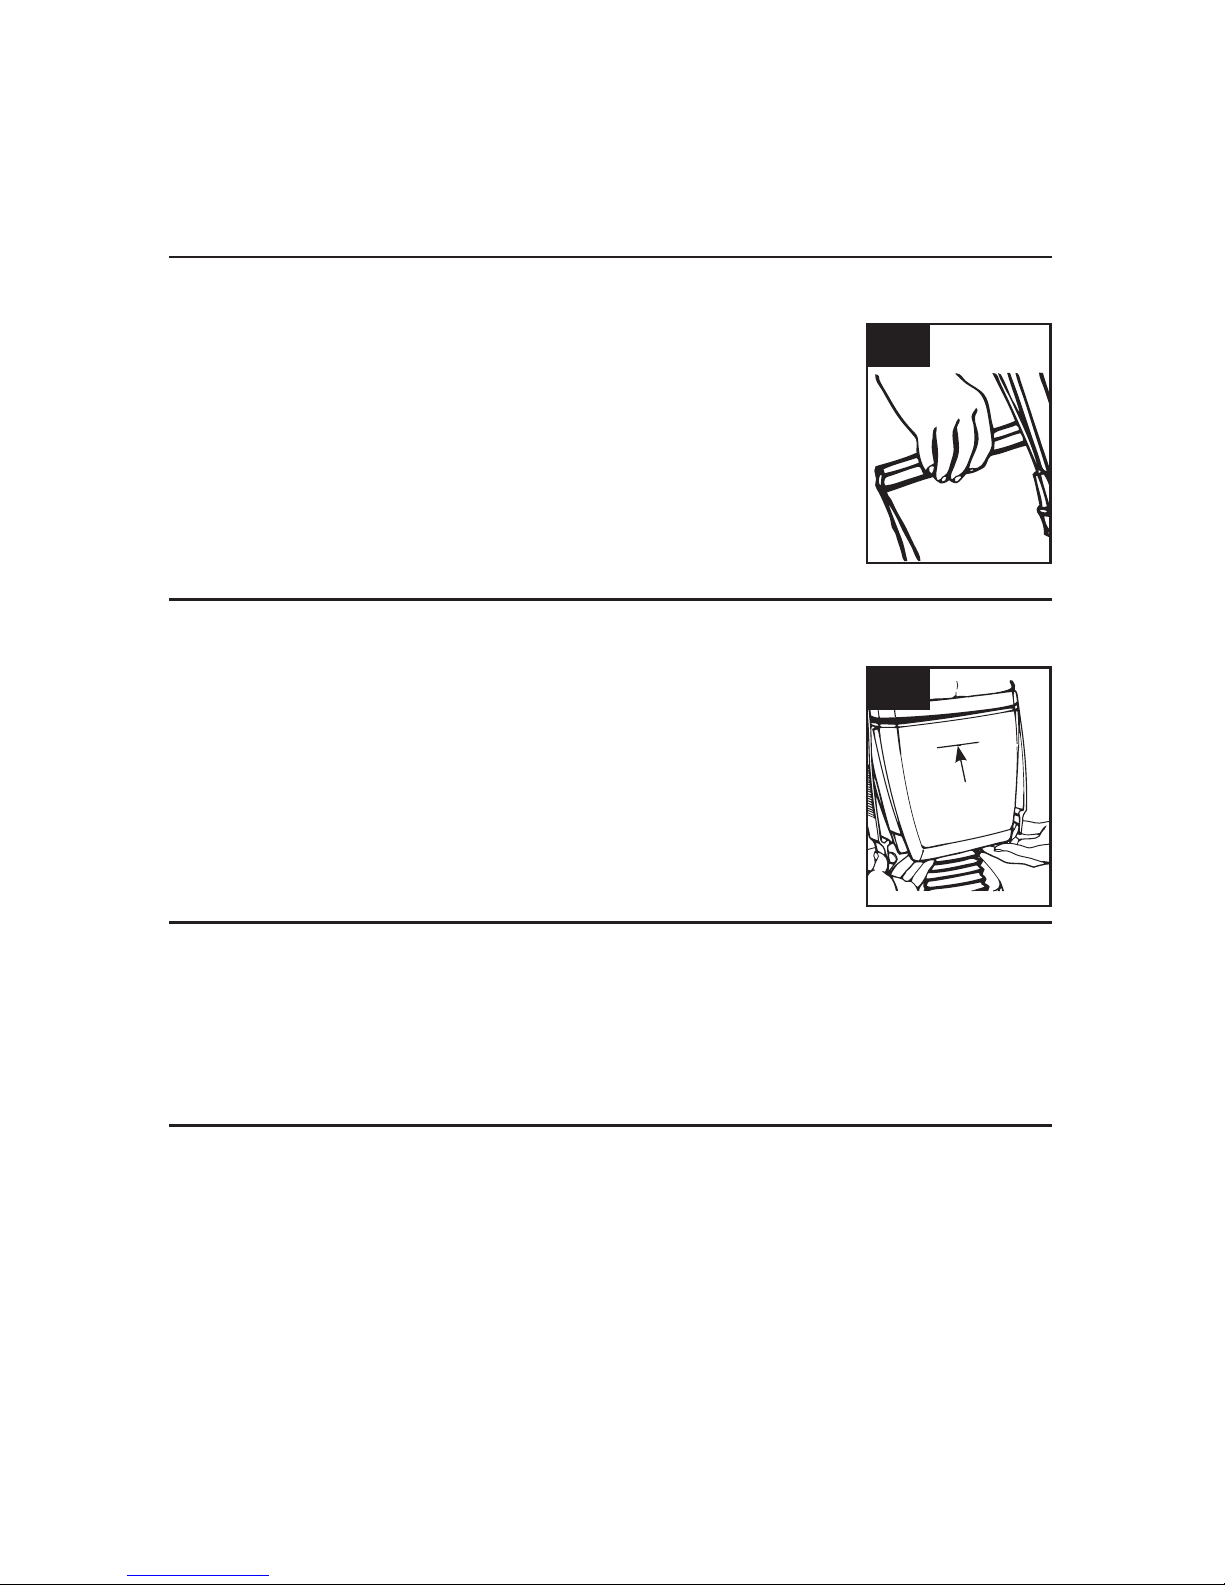
Peak performance of your cleaner can be maintained by turning the cleaner
off, unhooking bag spring, shaking the filter bag, and emptying the dirt cup
frequently before it becomes full. (Fig. 2.2)
Place handle in operating position and unhook spring from handle.
While holding bag closure clip, shake bag vigorously to release dirt accumulated in bag.
Re-hook spring and place handle in upright position. Allow a few seconds for
dirt to settle into cup.
While supporting bottom of cup, release the two latches by pulling them outward
as shown.
Remove cup and empty it
Reposition cup up into support at bottom of bag and snap latches into position.
When to Empty
How to Empty
The Dirt Cup
2.2
2.1
FULL LINE
7
Turn cleaner over.
Place V-belt into groove of agitator.
Reposition agitator by sliding square projection on belt end
of agitator into square slot on side of nozzle.
Then slide round projection on other end of agitator into
round slot.
Turn cleaner over and roll idler pulley to make
sure flat belt and V-belt are positioned properly.
Reposition hood and bottom plate.
Replace hood and bottom plate screws.
Tighten screws with screwdriver.
Belts: What to Buy
Use only genuine Hoover® Commercial belts with your
cleaner. When purchasing a new Flat Belt, ask for Hoover®
Commercial part No. 38528036. When purchasing a new
V-Belt, ask for Hoover® Commercial part No. 38528013.
2.8
A
Replacing V-Belt
2.4 2.6
2.7
2.5
Remove flat belt from
motor and idler pulley.
With lettering on outside of new V-belt, position belt
into groove of idler pulley.
Then push belt through opening on bottom of cleaner.
With lettering on outside of flat belt, position belt
around idler and motor pulley.
Turn cleaner over and
remove old belt from
idler pulley.
Turn cleaner over and remove remaining
bottom plate screws as shown.
Remove bottom plate.
Pull out agitator and slide off
old belt.
A A
A
B B
B
C C
C
D D
Remove old belt from motor and idler pulleys.
With lettering on outside of new belt, slip belt around idler and motor pulley.
Roll idler pulley to make sure belt is positioned properly.
Reposition hood, turn cleaner over and replace screws. Tighten with screwdriver.
Replacing Flat Belt
2.3
A
B
C
D
The Belts (cont.)
8
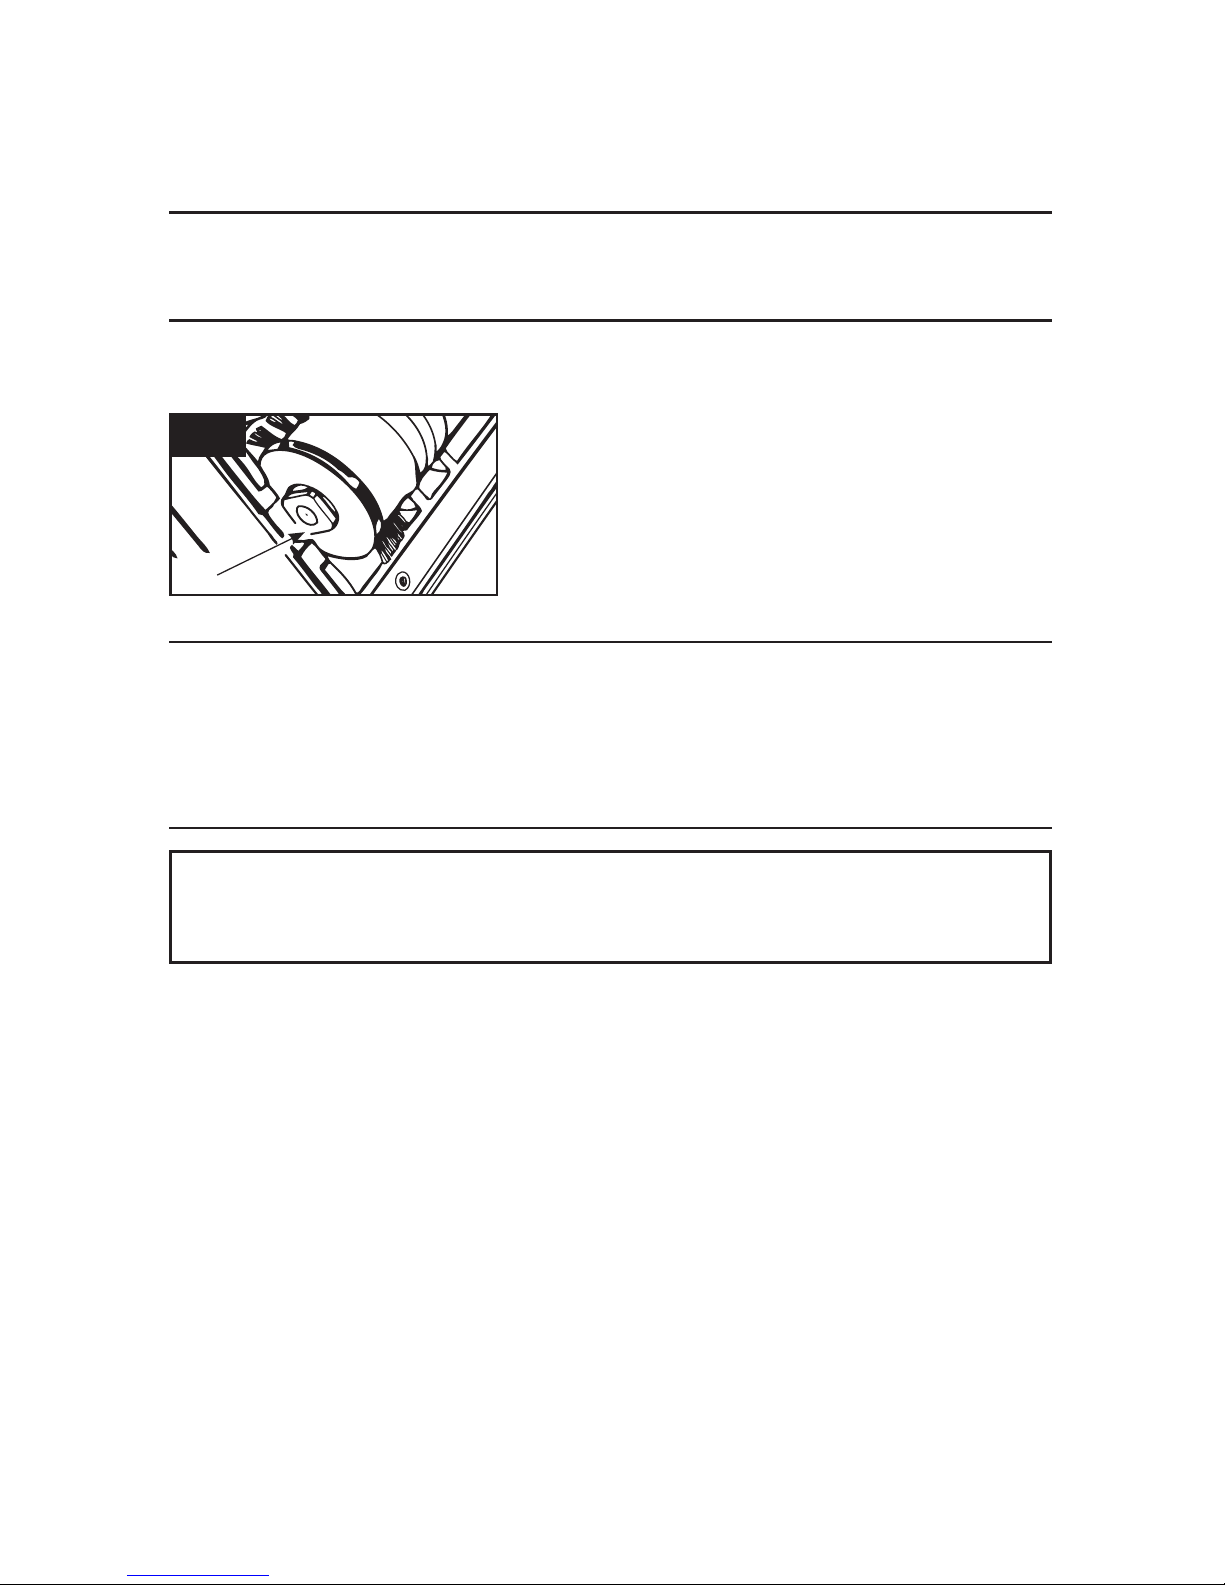
Pull V-belt up through opening in cleaner. Position belt into
groove in new agitator roll sleeve.
Reposition agitator by sliding square and round projections on
agitator ends into square and round slots on sides of nozzle.
Roll agitator toward rear of cleaner.
Reposition bottom plate. Replace bottom plate screws.
Tighten screws with screwdriver.
To make sure agitator rotates, plug cleaner into electrical
outlet and turn cleaner on.
If agitator does not rotate, the V-belt is not positioned properly in the groove of the idler pulley.
Should this occur, proceed as follows:
1. Disconnect cleaner from electrical outlet.
2. Referring to section “How to replace belts”, remove hood and reposition V-belt into groove of idler pulley.
3. Reposition hood, turn cleaner over and replace hood screws. Tighten screws with screwdriver.
Agitator Roll Sleeve: What to Buy
Use only genuine Hoover® Commercial agitator roll sleeves with your cleaner. For the Conquest 14, ask for Hoover®
Commercial part No. 48416035. For the Conquest 18, ask for Hoover® Commercial part No. 48416036.
Remove bottom plate and pull out agitator. Slip V-belt off of agitator. (Figs. 2.4-2.8)
How to Replace
Agitator Roll
Disconnect cleaner from electrical outlet before checking or replacing agitator roll.
To check condition of brushes, move edge of a card across agitator opening. Rotate agitator by hand. If
brushes do not touch edge of card, the brushes are worn and brush roll should be replaced.
When to Replace
Agitator Roll Sleeve
A
2.9

9
3. TROUBLESHOOTING
The motor is equipped with bearings that contain sufficient lubrication for the life of the motor.
The addition of lubricant could cause damage. Therefore, do not add lubricant to motor bearings.
If a minor problem develops, it usually can be remedied quite easily when the cause is identified by
using the check list below.
Lubrication
To obtain approved HOOVER® Commercial service and genuine HOOVER® Commercial parts, locate the
nearest HOOVER® Commercial Sales and Service Center or Authorized Hoover® Commercial Warranty
Service Dealer (Depot) by:
Do not send your cleaner to Hoover in Glenwillow, Ohio for service, this will only result in delay.
If you need more information, contact the Customer Service at 1-888-768-2014.
Always identify your cleaner by the complete model number when requesting information or ordering parts.
(The model number appears on the back of the cleaner.)
Service
PROBLEM POSSIBLE REASON POSSIBLE SOLUTION
Cleaner won’t run
1. Power cord not firmly plugged
into outlet.
1. Plug unit in firmly.
2. No voltage in wall plug. 2. Check fuse or breaker.
3. Blown fuse or tripped breaker. 3. Replace fuse/reset breaker.
Cleaner won’t pick
up or low suction
1. Dirt Cup full. 1. Empty dirt cup.
2. Agitator brushes worn. 2. Replace agitator.
3. Broken or worn belt. 3. Replace belt.
4. Carpet height setting is incorrect. 4. Set carpet height adjustment to appropriate
setting for carpet being cleaned.
5. Agitator not rotating. 5. Check V-belt positioning in groove of agitator
and idler pulley.
6. Heavy object clean-out full of
debris.
6. Empty heavy object clean-out.
Cleaner is hard
to push
1. Carpet height setting is incorrect. 1. Set carpet height adjustment to appropriate
setting for carpet being cleaned.
2. Agitator brushes worn. 2. Replace agitator roll sleeve.
 Loading...