

English GB
Français FR
Italiano IT
Deutsch DE
Português PT
Español ES
Vlaams BE
Nederlands NL
Polski PL
Pycc
KИЙ RU
AR
Ekkgmi GR
Slovenski SI
Âesky CZ
Hrvatski HV
user instructions
captor
HooverCaptor6 1/9/04 9:48 am Page 1
2
A
B
C
D
E
1
2
3
4
5
6
7
8
9
10
11
12
13
HooverCaptor6 1/9/04 9:48 am Page 2

3
F
G
H
J
K
L
M
N
P
2
3
HooverCaptor6 1/9/04 9:48 am Page 3

4
IMPORTANT SAFETY REMINDERS
This cleaner should only be used for domestic cleaning as described in these
instructions. Please ensure that these are fully understood before operating
this appliance. This product is double insulated and must not be earthed.
IMPORTANT: The wires in the power cord are coloured in accordance with the
following code:
Blue - Neutral Brown - Live
13 Amp fused plug on UK versions only.
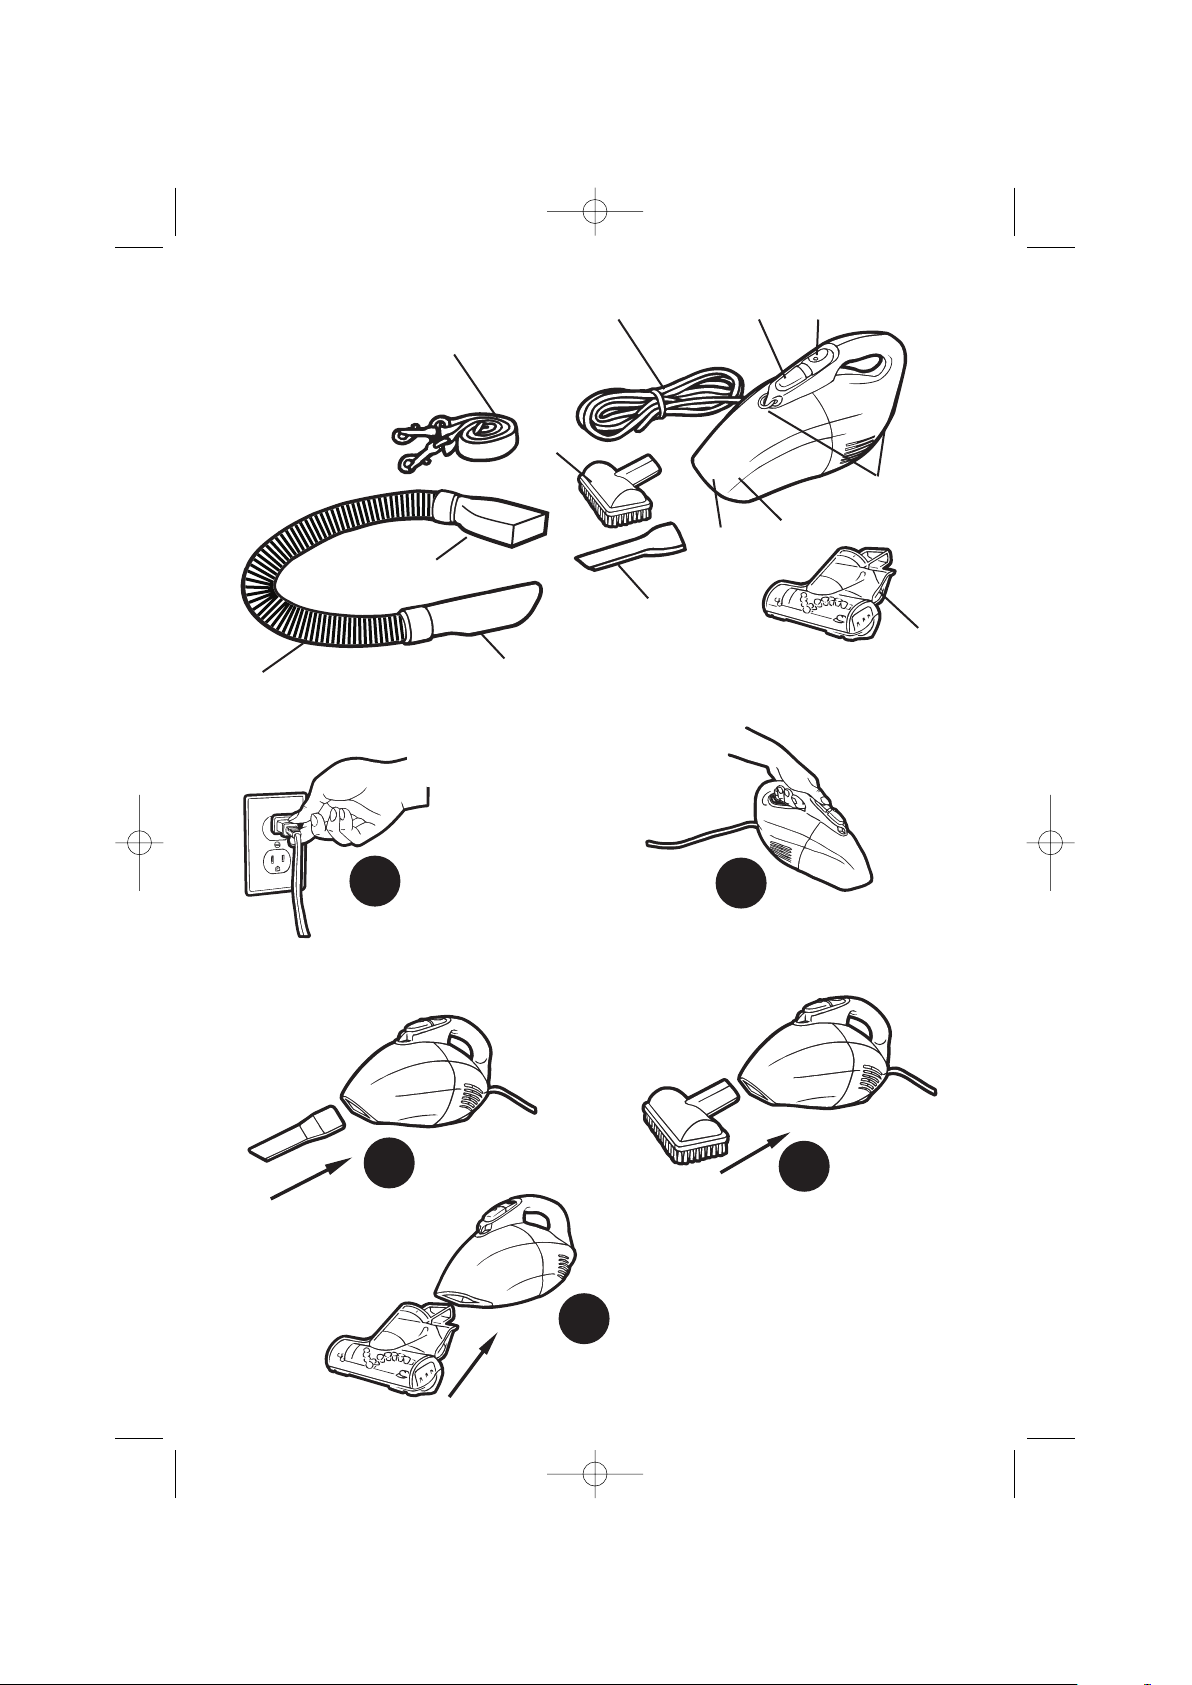
FEATURES -
1 Hose 8 Shoulder Strap Anchors
2 Cleaner End of Hose 9 On/Off Switch
3 Attachment End of Hose 10 Dust Cup Release Button
4 Crevice Tool 11 Power Cord
5 Upholstery Brush 12 Shoulder Strap
6 Cleaner Air Inlet 13 Turbonozzle
7 Dust Cup
GETTING STARTED
Remove the cleaner and accessories from the packaging. Please dispose of the
packaging in a safe and environmentally conscientious way.
Plug cord into electrical outlet
Depress small button on the On/Off Switch, then slide Switch forward
to On position.
To switch Off slide On/Off Switch back to Off position
ATTACHMENTS
Crevice Tool
Uphostery Brush
Turbonozzle
Note: Turbonozzle should not be fitted when picking up fine powder
spillages i.e. Talcum Powder
USING HOSE
Hose
Fit Hose End 2 into Cleaner Air Inlet
Fit Crevice Tool or Furniture Nozzle
A
B
C
D
E
F
G
H
HooverCaptor6 1/9/04 9:48 am Page 4

5
DUST CONTAINER & FILTER: REMOVAL
Always switch off and remove the power plug from the electricity supply after
use and before cleaning the appliance or attempting user maintenance as
described in these instructions. Remember: Electricity can be dangerous
Press Dust Cup Release Button
Tilt Dust Cup down and away from cleaner body
Grip Filter frame and remove from Dust Cup
DUST CONTAINER & FILTER: REPLACEMENT
Empty contents of the Dust Cup into waste container and shake Filter
over waste container to remove loose dust
Return Filter to Dust Cup
Re-assemble Dust Cup to Cleaner body by aligning slot on the Dust Cup
with the projection on the underside of the cleaner body. Tilt Dust Cup
up until it locks into place
Please remember that:
1) Some carpets can cause a small build up of static electricity. Any static
discharge is not hazardous to health or the product.
2) A service charge will be made if the cleaner is examined and found in
working order, has not been assembled in accordance with these
instructions, or has been misused.
Do.
Call your nearest Hoover Service Centre in the event of dissatisfaction.
Ensure that all service and repairs are carried out by an authorised Hoover
Service Engineer.
Only use genuine Hoover parts. Always switch off and remove the power plug
from the electricity supply after use and before cleaning the appliance or
attempting user maintenance as described in these instructions.
Remember: Electricity can be dangerous.
Do Not.
Use your cleaner out of doors, on wet surfaces or for wet pick up. Pick up
matches, hot ashes, cigarette ends or anything that may damage the product.
Spray with or pick up flammable liquids, cleaning fluids, aerosols or their
vapours as this may cause risk of fire/explosion.
Stand on, or wrap the power cord around arms or legs when using
your cleaner.
Continue to use your cleaner if it or the plug/power cord appears to be faulty
or damaged. To avoid safety hazards the cleaner must only be repaired by an
authorised Hoover Service Engineer.
J
K
L
M
N
P
HooverCaptor6 1/9/04 9:48 am Page 5

6
TROUBLESHOOTING GUIDE
WARNING: Always switch off and remove the power plug from the
electrical supply before cleaning or attempting user maintenance as described
in these instructions.
CONSUMABLE PARTS: For consumables please quote the following pack
numbers: Replacement Filter pack No.
GUARANTEE STATEMENT
Your new appliance is fully guaranteed for 12 months against electrical/
mechanical breakdown excluding:
a) Any faults which occur due to incorrect installation or misuse of the
machine or accidental damage.
b) Repair of, or interference with the machine by any person not authorised
by the manufacturer to carry out service.
c) Any parts which are fitted to the machine which are not original
manufacturers parts.
d) Non-domestic use of the machine.
e) Operation at incorrect voltage.
The guarantee applies to Great Britain and Northern Ireland only.
The aforegoing does not affect your statutory rights.
PROBLEM POSSIBLE REASONS POSSIBLE SOLUTIONS
Cleaner will
not run
1. Power cord not plugged
into socket.
2. Service required.
1. Insert plug firmly into socket.
2. Contact GIAS Customer Services.
08705 400600
Cleaner will
not pick-up,
or low suction
1. Dust Container not
fitted correctly.
2. Dust Container full.
3. Filter clogged.
1. Review Dust Container
Removal & Replacement.
2. Empty Dust Container.
3. Remove and clean Filter.
Dust escaping
from cleaner
1. Dust Container full.
2. Dust Container not
fitted correctly.
3. Filter not fitted correctly
4. Filter clogged.
1. Empty Dust Container.
2. Remove Dust Container
Removal & Replacement.
3. Review Filter installation.
4. Clean or replace filter.
Cleaner Tools
will not pick
up
1. Hose clogged.
2. Dust Container full.
3. Filter clogged.
1. Remove Hose & Tools - remove
obstruction.
2. Empty Dust Container.
3. Remove and clean filter.
Turbonozzle
will not run
1. Turbonozzle clogged.
2. Filter clogged.
1. Switch cleaner off. Remove
Turbonozzle and inspect for
blockage.
2. Clean or replace filter.
HooverCaptor6 1/9/04 9:48 am Page 6
 Loading...