


CRUISE CORDLESS VACUUM
User manual.
BH52210, BH52200
BH52212
IMPORTANT: Read carefully before assembly and use.
This product is intended for household use only. If used commercially the warranty is void.
©2016 Techtronic Floor Care Technology Limited. All Rights Reserved. Distributed by Royal Appliance Mfg. Co. Glenwillow, Oh 44139 #961152025 • ID117827 R0

Welcome to Hoover® ownership.
Make it official.
Hoover.com |
(888) 679-2121 |
It’s Guaranteed.
Hoover will replace your batteries under our 2 year limited warranty. See Warranty for complete details.
Your Guide:
Safety Instructions |
1 |
|
|
Getting started with your Cruise Cordless Vacuum |
3 |
|
|
Assembly |
4 |
|
|
Attach the wall bracket |
5 |
|
|
How to use |
6 |
|
|
Accessories |
7 |
|
|
Before you begin cleaning |
8 |
|
|
Using your machine |
10 |
|
|
Using your machine as a handheld |
11 |
|
|
Using your machine to clean up high |
13 |
|
|
Maintenance |
15 |
|
|
How to order accessories |
22 |
|
|
Need Help? |
23 |
|
|
Service & Warranty |
24 |
|
|
IMPORTANT SAFETY INSTRUCTIONS
SAVE THESE INSTRUCTIONS
When using an electrical appliance, basic precautions should always be followed, including the following:
READ ALL INSTRUCTIONS BEFORE USING THIS APPLIANCE. THIS PRODUCT IS INTENDED FOR HOUSEHOLD USE ONLY.
IF USED COMMERCIALLY WARRANTY IS VOID.
WARNING:
or dropped into water, take it to a service center prior to continuing use.
•Do not pull or carry charger by cord, use cord as a handle, close a door
on cord, or pull cord around sharp edges or corners. Do not place product on cord. Do not run appliance over cord. Keep cord away from heated surfaces.
•Do not unplug charger by pulling on cord. To unplug charger, grasp the plug, not the cord.
ELECTRIC SHOCK, DAMAGE OR INJURY:
•Fully assemble before operating.
•Do not use appliance on wet surfaces. Do not expose appliances to rain. Store appliances indoors.
•The charger is for indoor use only. Be sure to always keep the battery and charger indoors in a dry place.
•Do not allow to be used as a toy. Not intended for use by children age 12 and under. Close supervision is necessary when used near children. To avoid injury or damage, keep children away from product, and do not allow children to place fingers or other objects into any openings.
•Use only as described in this manual. Use only Hoover ®recommended attachments and products.
•Do not use charger with damaged cord or plug. If appliance or charger is not working as it should, has been dropped, damaged, left outdoors,
•Do not handle charger including charger plug and charger terminals, or appliance with wet hands.
•Do not put any object into openings. Do not use with any opening blocked; keep free of dust, lint, hair, and anything that may reduce air flow.
•Keep hair, loose clothing, fingers, and all parts of body away from openings and moving parts.
•Use extra care when cleaning on stairs. To avoid personal injury or damage, and to prevent the cleaner from falling, always place cleaner at bottom of stairs on floor. Do not place cleaner on stairs or furniture, as it may result in injury or damage.
•Do not use to pick up flammable or combustible liquids, such as gasoline, or fine wood shavings, or use in areas where they may be present.
•Do not pick up anything that is burning or smoking, such as cigarettes, matches, or hot ashes.
1
•Do not use without Dirt Cup and/or Filters in place.
•Turn power switch off and remove battery before removing or installing brush roll.
•Always turn off this appliance before connecting or disconnecting Motorized Turbo Tool or tools.
•Do not incinerate the charger, battery, or appliance even if it is severely damaged. The batteries can explode in a fire.
•This product includes rechargeable lithium-ion batteries. Do not expose batteries to high temperatures, as they may catch fire and/or explode.
•Do not expose battery to crushing, incineration or similar actions.
•Do not dispose of battery in a fire or trash compactor. See battery disposal section for directions.
•Do not attempt to disassemble battery.
•Unplug the charger from the outlet before any routine cleaning or maintenance.
•Leaks from battery cells can occur under extreme conditions. If any liquid gets on the skin wash quickly with soap and water. If any liquid gets into the eyes, do not rub eyes, immediately flush them with clean water continuously for a minimum of 15 minutes. Seek medical attention immediately.
•Use only the charger (Hoover Part #440009553) supplied by Hoover® to recharge.
•Use only the battery (Hoover Part # 440009633) supplied
by Hoover.® Other batteries may burst causing serious personal injury or damage.
•Do not touch or insert objects into battery pack or charger terminals.
•Do not attempt to short circuit the battery or charger terminals. WARNING: This product contains chemicals known to the State of California to cause cancer, birth defects or reproductive harm.
WASH HANDS AFTER HANDLING.
WARNING: TO REDUCE THE RISK OF ELECTRIC SHOCK, THE CHARGER HAS A POLARIZED PLUG (ONE BLADE IS WIDER THAN THE OTHER). THIS PLUG WILL FIT IN A POLARIZED OUTLET ONLY ONE WAY. IF THE PLUG DOES NOT FIT FULLY IN THE OUTLET, REVERSE THE PLUG. IF IT STILL DOES NOT FIT, CONTACT A QUALIFIED ELECTRICIAN TO INSTALL THE PROPER OUTLET. DO NOT CHANGE THE PLUG IN ANY WAY.
2
Getting started with your Cruise cordless:
|
|
|
|
|
|
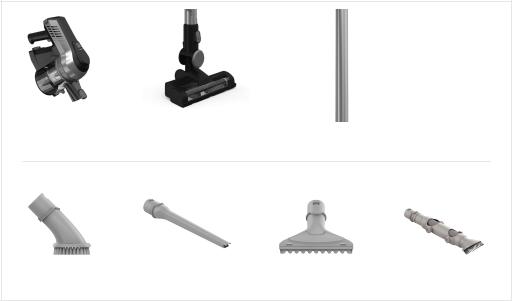
CARTON CONTENTS |
|
|
|
|
|
|
|
|
|
|
|
|
|
A. Handheld |
|
|
|
|
|
|
B. Powered Head |
|
|
|
|
|
|
C. Reach Wand |
|
|
B |
|
C |
|
D. Dusting Brush |
A |
|
|
|
E. Crevice Tool |
||
|
|
|
|
|
||
|
|
|
|
|
|
F. Pet/Stair Tool |
|
|
|
|
|
|
G. Articulating Dusting |
|
|
|
|
|
|
|
|
|
|
|
|
|
Brush |
|
|
|
|
|
|
|
|
All models come with a |
D |
|
E |
|
F |
|
G |
|
charger, battery, wall |
|
|
|
|
mount, 2 screws and |
||||
|
|
|
|
|
|
|
|
|
|
|
|
|
|
|
|
|
user manual. |
|
|
|
|
|
|
|
|
Contents vary dependant |
|
|
|
|
|
|
|
|
on the model purchased. |
3
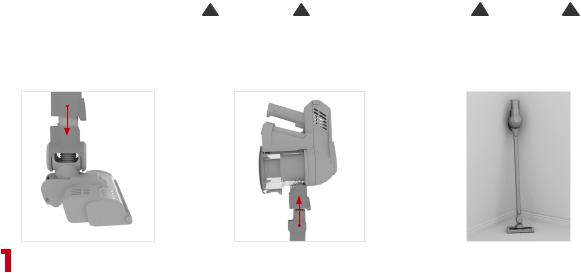
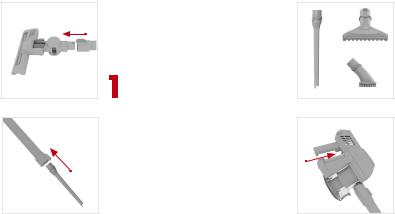
Assembly: |
! WARNING ! |
|
! Important ! |
To reduce the risk of personal injury, remove |
|
This vacuum cleaner is not free standing. In |
|
|
battery before cleaning or servicing. |
|
between uses or when carrying out any |
|
|
|
maintenance always lie flat on the floor in a |
|
|
|
suitable location so it does not become a trip |
|
|
|
hazard or can be stepped on. |
|
|
|
|
Line up the connector on |
Push the Handheld down |
The vacuum cleaner is not free |
the Reach Wand with the |
onto the Reach Wand until |
standing and in between uses |
Powered Head. Push the |
2it clicks into place. |
3must always be placed in the wall |
Reach Wand down onto the |
|
bracket or laid flat on the floor, in |
Powered Head until it clicks |
|
a suitable location so it does not |
into place. |
|
become a trip hazard or can be |
|
|
stepped on. |
4
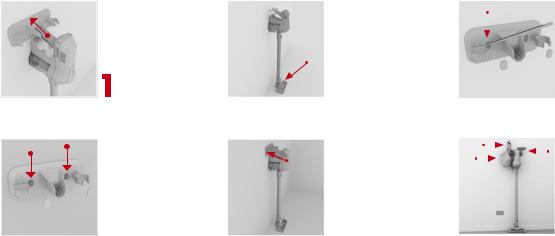
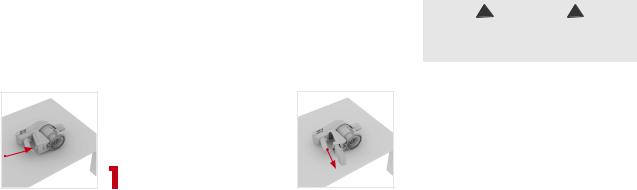
Attach the wall bracket:
First, fully assemble the vacuum but do not attach the battery.
|
|
|
|
|
Holding the wall |
|
|
With the wall bracket |
|
|
bracket firmly in |
|
|
|
|
||
|
|
|
|
place, carefully |
|
|
|
|
|
||
|
|
attached, stand the |
|
|
remove the |
|
|
|
|
||
|
|
vacuum close to the |
|
|
vacuum. Using |
|
|
wall, in the upright |
|
|
a pencil |
Attach the wall |
|
position with the |
|
|
make a small |
bracket to |
|
Powered Head |
|
|
mark for |
the handle. |
|
2 flat on the floor. |
|
|
3each screw. |
Use both screws |
|
|
|
|
|
|
|
|
|
|
|
|
|
|
|
|
|
|
|
|
|
|
|
|
|
|
|
|
|
|
|
|
|
|
|
|
|
|
|
|
|
|
|
and wall plugs to |
|
|
|
|
|
|
|
|
|
|
secure the wall |
|
Firmly press the |
|
|
|
|
|
|
|
The tools can |
bracket to the wall. |
|
vacuum handle |
|
|
|
|
|
|
|
|
Place covers over |
|
into the wall |
|
|
|
|
|
|
|
be stored on the |
4the screws. |
|
5bracket to secure. |
|
|
|
|
|
|
|
6wall bracket. |
5

How to use:
1.Brushbar On/Off button
2.On/Off & charging light
3.Handheld release button
4.Reach Wand
5.Power head/accessory release clip
6.Powered Head
7.Brushbar
8.Filter cover release buttons
9.Handle
10.Battery charger inlet
11.Battery release button
12.Dirt container release button (hidden)
13.Dirt release button
14.On/Off trigger
15.Continuous power latch (hidden)
16.Battery
17.Dirt container
1 |
|
|
|
|
|
|
|
|
|
|
|
|
|
|
|
|
|
|
|
|
|
|
|
|
|
|
|
|
|||
2 |
|
|
8 |
|
|
|
|
|
|
|
|||||
|
|
|
|
|
|
|
|
|
|
||||||
3 |
|
|
|
9 |
|
14 |
|||||||||
|
|
|
|||||||||||||
|
|
|
10 |
|
|
|
|
|
|
15 |
|||||
|
|
|
|
|
|
|
|
||||||||
4 |
|
|
11 |
|
|
|
|
||||||||
|
|
|
|
||||||||||||
|
|
|
16 |
||||||||||||
|
|
|
|
|
|
|
|
|
|||||||
|
12 |
|
|||||||||||||
|
|
|
|
||||||||||||
5 |
|
|
|
|
|
|
|
|
17 |
||||||
|
|
|
|
|
13 |
|
|
|
|||||||
|
|
|
|
|
|
|
|||||||||
|
|
|
|
|
|
|
|
|
|
|
|||||
|
|
|
|
|
|
|
|
|
|
||||||
|
|
|
|
|
|
|
|
|
|
|
|
||||
6 |
|
|
|
|
|
|
|
|
|
|
|
|
|
|
|
|
|
|
|
|
|
|
|
|
|
|
|
|
|
||
7 |
|
|
|
|
|
|
|
|
|
|
|
|
|
|
|
|
|
|
|
|
|
|
|
|
|
|
|
|
|
||
6
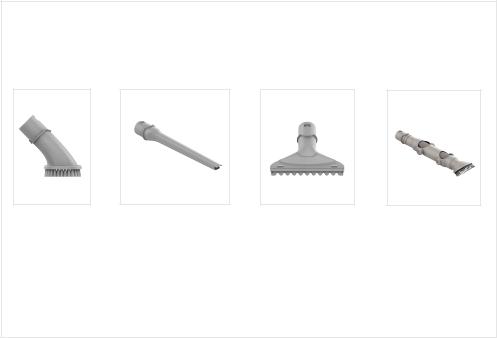
Accessories:
Dusting Brush |
Crevice Tool |
Pet/Stair Tool |
Articulating Dusting |
|
|
|
Brush |
All models come with a charger, battery, wall mount, 2 screws and user manual.
Contents vary dependant on the model purchased.
7
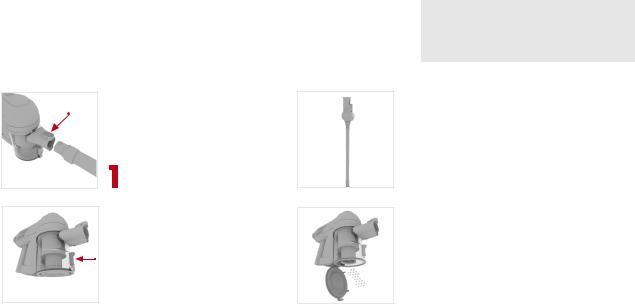
Before you begin cleaning:
! WARNING !
To reduce the risk of personal injury, remove battery before cleaning
or servicing.
• IMPORTANT •
For best cleaning results, filters require cleaning at least every 3 months and should be replaced every 12 months depending upon use. If the vacuum cleaner is blocked, remove the battery before removing the blockage.
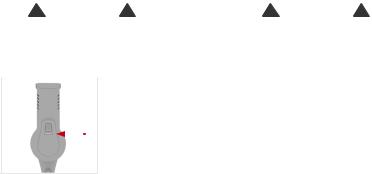
Slide the battery into |
To charge the machine, |
the back of the handheld. |
detach the reach wand |
The battery will click |
2and lie the handheld on |
into position when |
its side on a flat stable |
correctly fitted. |
surface. You can also |
|
charge the machine |
|
while attached to the |
|
wall mount. Make sure |
|
the floorhead and wand |
|
are attached together. |
|
|
|
|
4 |
|
|
|
|
|
|
|
|
|
|
|
|
|
|
|
|
|
|
|
|
|
|
|
|
|
|
|
|
|
|
|
|
|
|
|
|
|
|
|
|
|
|
|
|
Insert the charger lead |
Plug the charger plug |
|||||||||
|
into the charger inlet |
into the outlet. |
|||||||||
3located on the back of |
|
|
|
|
|
|
|
||||
the handle.
see next page
8
Before you begin cleaning:
|
! WARNING ! |
|
! WARNING ! |
|||
Do not use the vacuum cleaner when the |
|
For best performance the terminals |
||||
machine is plugged in and charging. |
|
on the battery and vacuum cleaner must |
||||
|
|
|
|
|
|
be clean and free from dust and dirt. |
|
|
|
|
|
||
|
|
|
|
|
|
The life expectancy of the battery will |
|
|
|
|
|
|
vary depending on the usage of the |
|
|
|
|
|
|
vacuum cleaner. |
|
|
|
|
|
|
|
|
|
|
|
|
|
|
5The On/Off and charging light will illuminate continuously while the charger is connected.
Red light – The battery is charging. Green light – The battery is charged (after 5 hours).
If charging for the first time the initial charge time is 8 hours.
9
Using your machine:
! |
WARNING |
! |
|
! WARNING ! |
This vacuum cleaner has a constantly rotating brushbar when the brushbar |
|
Risk of personal injury – the brush |
||
‘ON’ is selected. Never leave the vacuum cleaner in one spot for an |
|
roll may suddenly restart. Turn power |
||
extended period of time as this may damage the floor surface.The brushbar |
|
switch off and remove the battery before |
||
should be ON for carpets and OFF for hard floors. |
|
cleaning of servicing the brush roll. |
||
|
|
|
|
|
Squeeze the trigger located underneath the handle, the machine will switch ‘On’. The On/Off and charging light will illuminate green indicating the power is on and the machine is charged. Release the trigger to switch the machine ‘Off’.
Press the brushbar’s On/Off button to activate. Repeat this process to de-activate the brushbar.
3The brushbar should be switched ON for carpets and OFF for hard floors.
Squeeze the trigger and push the ‘Continuous power latch’ towards the trigger. This will lock it into the ‘On’ position and will continue
to power the machine without 2 having to hold in the trigger. Push
the latch away from the trigger to unlock and release the trigger.
When the vacuum cleaner is in use the On/Off and charging light will illuminate and flash red when the battery is running low. When the
4 red light flashes the machine will turn off in 20 seconds. The user
should recharge the machine.
see next page
10
Using your machine as a handheld vacuum:
Always take extra care when using the vacuum cleaner on the stairs. |
|
! IMPORTANT ! |
||
|
|
|
|
Not to be used for |
|
|
|
|
grooming a pet. |
|
|
|
The reach wand when |
|
|
|
|
||
|
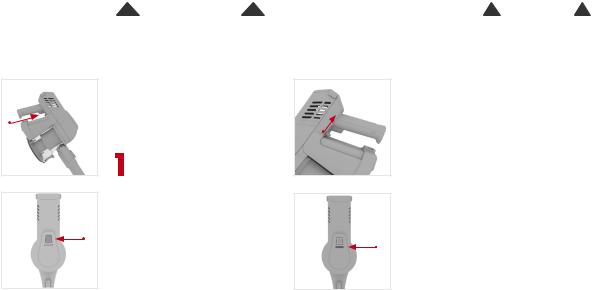
Press the handheld |
|
attached to the Powered |
|
|
release clip. Pull to |
|
Head/accessory is not free |
|
|
separate the handheld |
|
standing, place safely and |
|
|
5from the reach wand. |
|
6 securely to one side. |
|
|
|
|||
7Choose an accessory (pictures illustrated dependent upon model).
8 Push the chosen accessory into the handheld until it clicks into place.
see next page
11
Using your machine as a handheld vacuum:
Always take extra care when using the vacuum cleaner on the stairs.
Squeeze the trigger located underneath the handle, the machine will switch ‘On’. The On/Off and charging light will illuminate green indicating the
9power is on and the machine is charged. Release the trigger to switch the machine ‘Off’.
! IMPORTANT !
Not to be used for grooming a pet.
Squeeze the trigger and push the ‘Continuous power latch’ towards the trigger. This will lock it into the ‘On’ position and will continue
to power the machine without 10 having to hold in the trigger. Push
the latch away from the trigger to unlock and release the trigger.
All of the accessories can be attached directly onto the handheld.
12
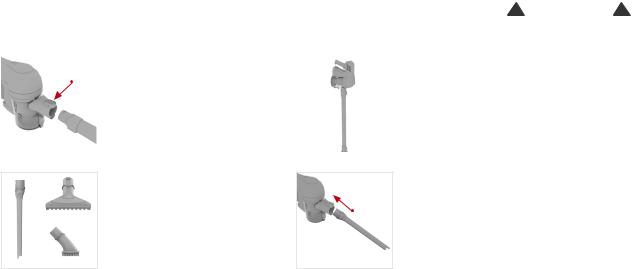
Using your machine to clean up high:
The reach wand can be used for hard to reach places.
Press the Power Head/ accessory release clip and pull to remove the Powered Head from the reach wand.
Push the chosen 3 accessory into the
reach wand until it clicks into place.
2 Choose an accessory (pictures illustrated dependent upon model).
Squeeze the trigger located underneath the handle, the machine will switch ‘On’. The On/Off and charging light will illuminate green indicating the
4 power is on and the machine is charged. Release the trigger to switch the machine ‘Off’.
see next page
13

Using your machine to clean up high:
The reach wand can be used for hard to reach places.
Squeeze the trigger and push the ‘Continuous power latch’ towards the trigger. This will lock it into the ‘On’ position and will continue to power the machine without having to hold in the trigger. Push the
5 latch away from the trigger to unlock and release the trigger.
The Reach Wand can be used for hard to reach places and at different
7 heights for above floor cleaning.
6 The Reach Wand can be used for hard to reach places.
The vacuum cleaner is not free standing and in between uses must always be placed in the wall bracket or laid flat on the floor, in a suitable location so it does not
8 become a trip hazard or can be stepped on.
14
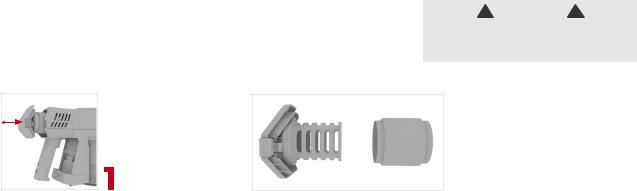
Maintenance:
Removing the battery.
! WARNING !
To reduce the risk of personal injury, remove battery before cleaning
or servicing.
Lie the handheld on its side on a flat stable surface. Press the battery release button.
2 Slide the battery out from the back of the handheld.
15
Maintenance:
Cleaning the filter and separator.
WARNING
To reduce the risk of personal injury, remove battery before cleaning
or servicing.
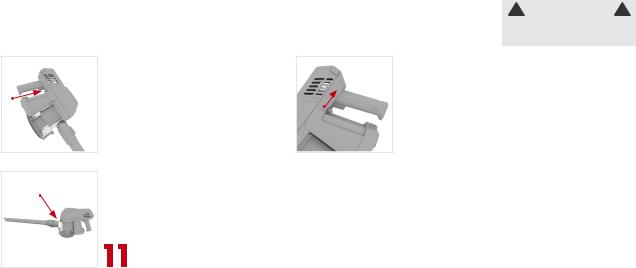
Press the handheld release clip. Pull to separate the handheld from the reach wand.
Ensure the battery has been removed and hold the handheld over a bin,
3 press the dirt release button to allow dirt and debris to fall out.
The reach wand when attached 2 to the Powered Head/accessory is not free standing. Place safely
and securely to one side.
Ensure the battery has been removed and hold the handheld over a bin,
4 press the dirt release button to allow dirt and debris to fall out.
16
Maintenance:
Cleaning the post–motor filter.
Press the filter
cover release buttons located on both sides of the filter cover and pull to remove the filter from the machine.
! WARNING !
To reduce the risk of personal injury, remove battery before cleaning
or servicing.
Pull to separate the filter from the filter cover/holder. Tap the filter and filter cover/holder over a bin
2to remove any dirt/debris. Wash the filter under running water (40 degrees max).
17
Maintenance:
Emptying the dirt container.
Press the handheld release clip. Pull to separate the handheld from the reach wand.
Ensure the battery has been removed and hold the handheld over a bin,
3 press the dirt release button to allow dirt and debris to fall out.
! WARNING !
To reduce the risk of personal injury, remove battery before cleaning
or servicing.
The reach wand when attached 2 to the Powered Head/accessory is not free standing. Place safely
and securely to one side.
Ensure the battery has been removed and hold the handheld over a bin,
4 press the dirt release button to allow dirt and debris to fall out.
18
 Loading...