

Page 1
®
®
PRINTED IN P.R.C.
48003560/01
INSTRUCTION MANUAL
ARYA
1
N*
* Certain models only
ENGLISH GB
FRANÇAIS FR
DEUTSCH DE
ITALIANO IT
ESPAÑOL ES
A
B
C
D
E
F
G
H
I
J
K
L
E
M
Page 2

2
7 10
10 12
6 7
a)
b)
c)
3
4
9
“click”
* Certain models only
7
5
7
6
7
8
11 10
12
13
7
12
Page 3

1
GB
This clean er sh ould only be used for domestic cleaning, as described in this user guide.
Pleas e ensure that this guide is fully under stood bef ore operating the appliance. U se only
attac hments re commended or supplied by Hoove r.
WARNING : Electr icity can be ex tremely danger ous. This appliance i s double ins ulated and
must not be earthed. This p lug i
tted with a 13 amp fuse (UK o nly).
IMP ORTANT: The w ires in the main s power lead are c oloured in ac cordance with the
follow ing code:
Blue – Neutra l Brow n – Live
STATIC ELE CTRICIT Y: So me carpets can cause a s mall b uild up of static electr icity. Any
stati c dischar ge is not h azardous to health .
AFTER USE: S witch the c leaner
and remove the plug from t he electric ity supply.
Always switch and re move th e plug before clean ing the appliance or at tempting a ny
maint enance task.
SAF ETY WITH CHILDRE N, E LDERLY OR T HE INFIRM: Do not l et chi ldren p lay wi th the
appli ance or its controls. Please supervise the u se of the appliance by ol der chi ldren, th e
elder ly or th e i
rm.
HOO VER S ERVICE: To e nsure the continued safe and
cient operation of th is applianc e
we re commend tha t any se rvicing or repairs a re only carried out by a n authorised Hoover
serv ice engineer.
(*Certain Models Only)
IMPORTANT SAFETY REMINDERS
Positi on the cleaner above yo u when clea ning the stairs .•
Use your c leaner o ut of doo rs or on an y wet sur face or for wet pick up.•
Pick up ha rd or sharp objects, m atches, ho t ashes, ci garette e nds or other s imilar •
items.
Spray with o r pick up liqui ds, cleanin g ids, ae rosols or their vapours as this •
may c ause risk
re / exp losion.
Run ove r the supply cor d when usin g your cleaner o r remove the pl ug by pulling on the •
suppl y cord.
Stand on or wr ap the pow er cord a round arm s or legs when using the cleane r.•
Use t he applia nce to cle an people or animals.•
Continue to us e your clean er if it appears t o be faulty. If th e supply cord is damage d •
stop using the clea ner IMMEDIATELY. To avoid a s afety hazard, an authori sed Ho over
serv ice engineer mus t replace the supply cord.
IT IS IMPORTANT THAT YOU DO NOT:
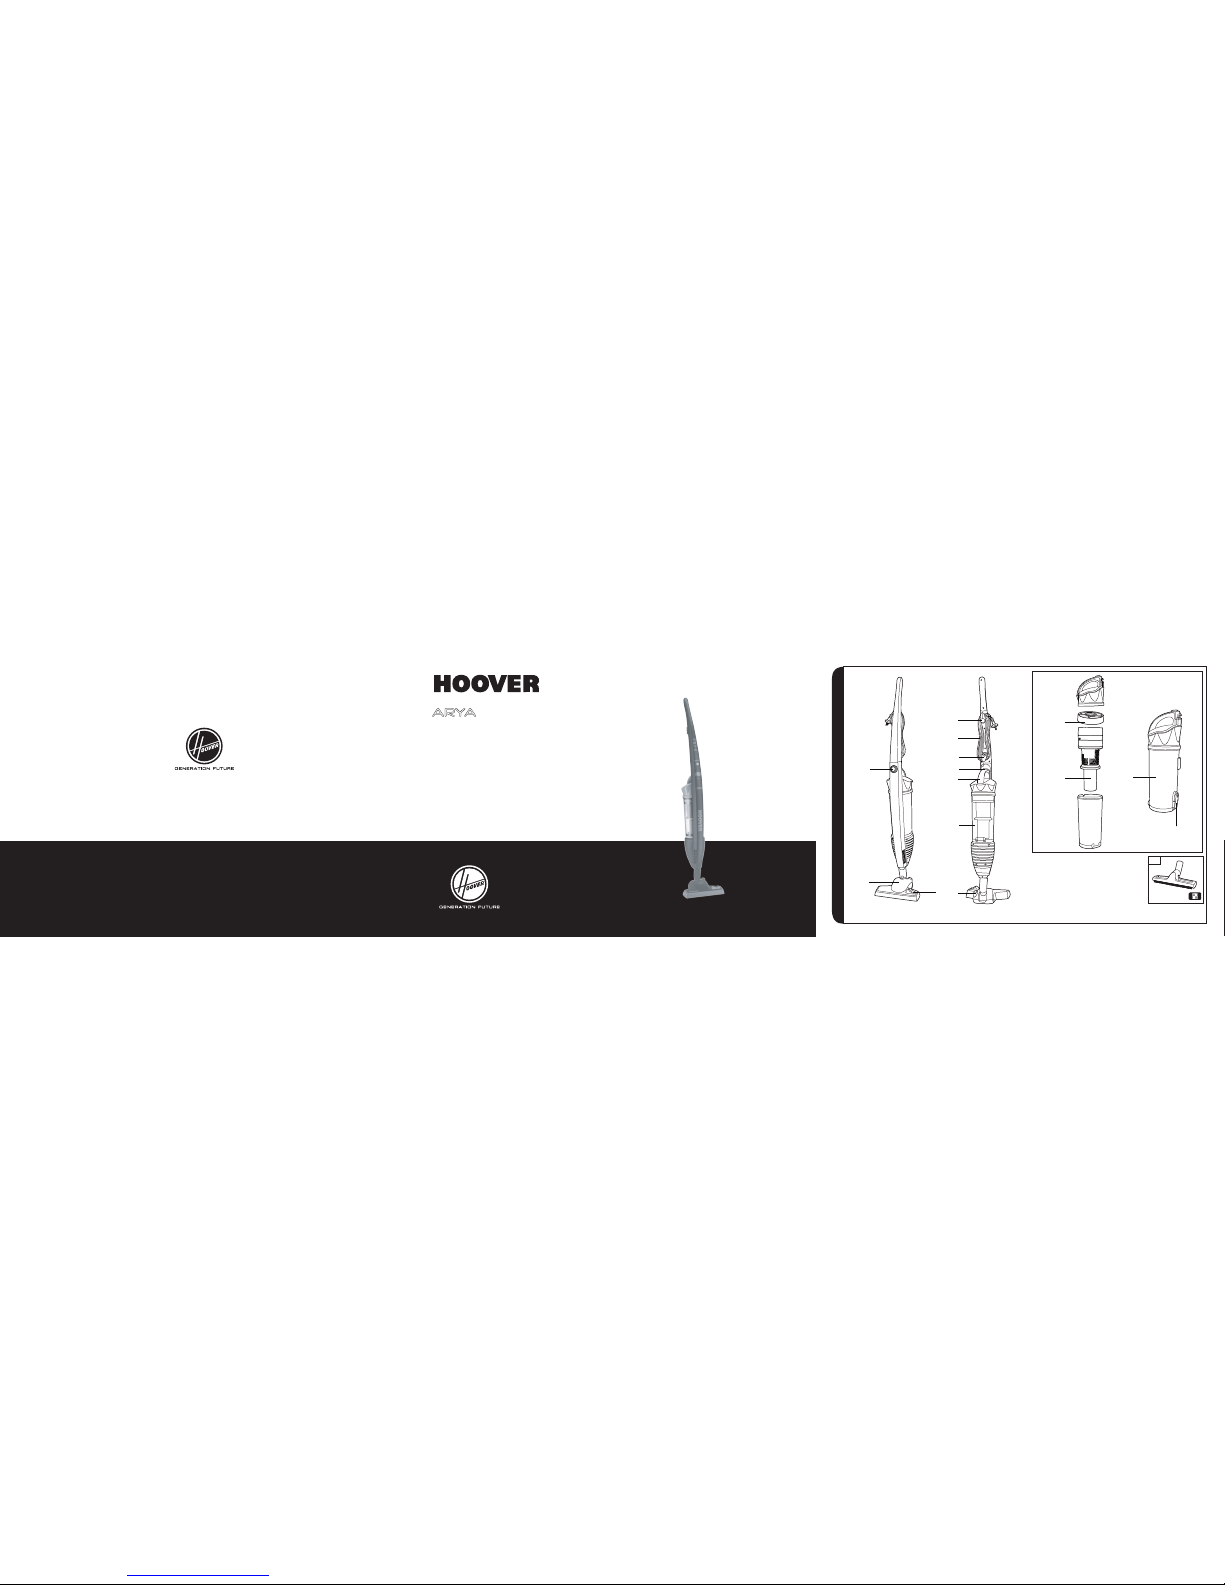
GET TING TO KNOW YOUR CLEANER
A.
B.
Surface selector pedalC.
Cleaner lock releaseD.
Dust containerE.
Dust container handleF.
Dust container release buttonG.
Lower cord hookH.
Power cordI.
Upper cord hookJ.
Separation unitK.
L.
Dust container door release button
Hard oor nozzle*
M.
N.
ASSEMBLING YOUR CLEANER
Remov e all comp onents fr om the pack aging.
Assemble the cle aner handle to the main body 1. [2a] ositi on with the sup plied
screw. [2b]
Secure t he nozzle t o the produc t. 2. [2c]
USING YOUR CLEANER
Power switc h:
To switc h the cleaner on, press the power button in the centr e of the c leaner.1. [3]
To swit
he pro duct, rep ress the s ame button.2.
Surf ace sele ctor:
Selec t the type of surfa ce to be clean ed by pre ssing the peda l in the nozzle. 1. [1C]
Hard Fl oor – Br ushes are lowered to protect t oor.
Carpe t – Brus hes are r aised for the d eepest clean.
Cleaner lock re lease:
To star t cleani ng, unl ock the cleaner by pressi ng with your foot the l ocking pedal on the
nozzl e. [4]
Cord s torage:
To store the cord af ter clean ing:
Wrap the c ord around the two cord hook s.1. [5]
For quick c ord unwind rotate the lower cord hook. 2. [6]
AryaManual__1-3_union2.indd 1 29/03/2011 13.08.33
Page 4

2
GB
(*Certain Models Only)
CLEANER MAINTENANCE
Emptying t he Dust Con tainer
Press th e bin rele ase button downward a nd remove the dust bin from the clean er. 1. [7]
Hold the contai ner usin g the b in handle and pre ss the bi n emptyi ng latch. The 2.
dustcont ainer door w ill autom atically open. [8 ]
Once e mpty, gent ly tap or shake the c ontainer to release any excess dust.3.
IMPORTANT - Do not
ll ab ove the max level ma rk shown on the bin .
Cleaning the w ters
The cl ea wi aintain optimum cle aning
perf ormance, reg gains t t he side of the bin to release
dust.
The pre-mo tor
ld be w ashed every 5 c ontainer empties or when the ter has
excess ive dust level.
IMPORTANT: All bagless cl eaners re quire reg ular
ter cl eaning. Fa ilure to c lean your
rs may resu lt in air block age, overheati ng and product failure. This may invali date
your g uarantee.
IMPORTANT: Regularl y check a nd maintain th lters.
IMPORTANT: Always ensur lter pack is fully dry before use .
To access the Pre -Mot
ter:
1. Press th e bin releas e button d ownward an d remove t he dust b in from the cl eaner.
Rotate the upper s ection of the bin to r emove from the dust container. 2. [9]
Remove t
lter pack.3. [10]
Gentl y tap and wa sh
er, 4. do not u se hot water or detergent s. [1 1] Re move
excess water and l eave to dr y fully befo re re-us ing. [12]
Reass emble the pre-mo tor
lter pack o nce fully dr y and r t t o the cle aner.5.
Cleaning the d ust bin / s eparation unit
1. Place the bin o at sur face and re move th lters.
Remove the sep aration syst em by lif ting fro m the dust co ntainer.2. [13]
Use a cloth to remove exc essive dust f rom the sep aration uni t surfa ce.3.
R
the s eparation unit int o the dust bi n and r lters in posit ion.4.
R the d ust bin to the clea ner.5.
IMPORTANT - For opti mum p erforman ce, we recom mend that Air volution syst em is
inspe cted aft er each e mpty.
Removing a blockag e
Check if the dust co ntainer i s full. I f so refer to ‘Emptyin g the dust container ’.1.
If the dust co ntainer i s empty b ut suction is still low :2.
D lters need clean ing? If so refer to ‘Cleanin g the was habl lters’.A.
Check the bin inlet by re moving th e bin and c hecking inside th e bin in let.B.
Check if pre- mot
lter is t ted and lter door is clo sed.C.
IMPOR TANT - Switc h the clean
and remove th e plug from the electric ity supply
before checkin g cleaner.
USER CHECKLIST
Should you h ave a problem with th e produc t, comp lete th is simpl e user check list befo re
calli ng your l ocal Hoove r servi ce.
Is the re a workin g electrici ty supply to the cleane r? Please c heck with another e lectrica l •
appli ance.
Is the dust con tainer over
lled? P lease refe r to ‘Cleaner Mainten ance’.•
ter b locked? Ple ase refer to ‘Cleaner M aintenance’.•
Has the cleaner over heated? If so, it will take ap proximately 30 minutes to aut omatically •
reset.
IMPORTANT INFORMATION
Hoover s pares and Consuma bles
Always replace parts with genui ne Hoover spares. These are avai lable from your local Hoover
deale r or dire ct from H oover. When ordering p arts alw ays quote your mode l number.
Consum ables:
Filter rotom erP S106 3560 1198•
Polish er PO1 3560094 3•
Spares :
Carpe t and Floo r Nozzle G136 3560120 8•
Hard Floor Nozzle G137PC 35601209•
AryaManual__1-3_union2.indd 2 29/03/2011 13.08.33
C
M
Y
CM
MY
CY
CMY
K
48003560 01 Arya IM ML.pdf 1 7/17/2012 10:24:24 AM
Page 5

3
GB
(*Certain Models Only)
Quality and the Environment
Quality
BSI ISO 9001
Hoover’s factories have been independently assessed for quality. Our products are made
using a quality system which meets the requirements of ISO 9001.
The Environment:
This appliance is marked according to the European Directive 2002/96/EC on Waste
Electrical and Electronic Equipment (WEEE).
By ensuring this product is disposed of correctly you will help prevent potential negative
conse quences for the environme nt and human health , which could other wise b e caus ed
by inappropriate waste handling of this product.
The symbol on the produ ct i ndicates that this product may not b e tre ated as h oushold
waste. Ins tead it s hall be h anded over to the a ppliance coll ection point for recyc ling of
electrical and electronic equipment.
Dispo sal m ust be carr ied ou t in accorda nce wi th the local environme ntal re gulation s for
waste disposal.
For more detailed information about treatment, recovery and recycling of this product,
please contact your local city office, your household waste disposal service or the shop
where you purchased the product.
Your Guarantee
The guarantee conditions for this appliance are as defined by our representative in the
country in which it is sold. Details regarding these conditions can be obtained from
the dealer from whom the appliance was purchased. The bill of sale or receipt must be
produced when making any claim under the terms of this guarantee.
Subject to change without notice.
AryaManual__1-3_union2.indd 3 29/03/2011 13.08.33
Page 6

4
FR
Cet aspirat eur doit unique ment être u tilisé pour le net toyage domesti que, conformémen t
aux instruc tions de ce manuel. Veuillez vous assur er que ces instruc tions sont parfaitemen t
compris es avant d’uti liser l’appar eil. N’utilisez que les accessoires recommandés ou fournis
par Hoover.
MIS E E N GARD E : L’électricité peut êtr e extrêmement dangere use. Ce t appareil est
doublement isolé et ne do it pas être relié à la ter re. Cette che est équipée d’un fusible 13
ampères (uniquem ent au R.U.).
IMPOR TANT : Les ls du co rdon d’alimentat ion sont c
olorés selon le code suivant :
Bleu – N eutre Marron – Phase
ELE CTRICI TE STATIQ UE : Certa ins tapi s/moquettes peuvent ent raîner une petite
accumulat ion d’élect ricité stati que. Les décharges d’élect ricité s tatique ne sont pas
dangereuses pour la santé.
APR ES U TILI SATION : Eteig nez l’aspirateur et débranc hez la prise de l ’alimentat ion
secteur.
Eteig nez et débranchez toujours l’aspirateur avant de le nettoyer ou de procéder à son
entre tien.
SÉC URITÉ DES ENFANTS , D ES PERS ONNES ÂG ÉES ET/OU NO N A PTES À SE SERV IR
DE L’APPA REIL : Ne l ai
ssez pas les enfants j ouer avec l’appare il ou ses command es.
L’utilisation sans sur veillance de cet appareil est déconseillée aux enfants et aux personnes
qui ne s eraient pas aptes à s’en servir.
SER VICE HOO VER : Pour assurer l’ utilisation sûre et ecace d e cet appareil, nous
recommandons de n’en coner l’entreti en et les réparations qu’à un réparateur Hoove r
agréé.
(*Sur certains modèles uniquement)
REMARQUES IMPORTANTES CONCERNANT LA SÉCURITÉ
Placer l’aspirateur plus hau t que vous lorsque vous nettoyez des esc aliers.•
Utiliser votre aspirateur à l ’extér ieur, sur des surfaces humides ou po ur aspirer des •
liquides.
Aspirer des objets durs ou tranchan ts, allumettes, cendres chaudes, mégots de cigarettes •
ou autres objets similaires.
Pulvériser ou aspirer des liquides inammables, des produ its d’entretien liquides , des •
aéros ols ou leurs vapeurs car cela comporte des r isques d’incen die ou d’explosion.
Faire passer l’aspirateur sur le co rdon d’alim entation
ou débrancher la prise en tirant •
sur le co rdon.
Marcher sur le cordon d’alimentation ou l’enrouler autour de vo s bras ou vos jambes •
quand v ous utilisez l ’aspirateur.
Utiliser l’appareil sur des pers onnes ou des animaux .•
Continu er à utiliser vo tre aspirateur s’il semble défe ctueux. Si le cordon d’ali mentation •
est endommag é, arrêter IMMEDIATEMENT l’aspirateur. Pour éviter les risques d’accident,
un réparateur Hoover agréé d oit remplacer le cordon.
IL EST IMPORTANT DE NE PAS :
PREMIÈRE UTILISATION
Bouton de Marche/Arrêt.A.
Brosse pour moquette et solB.
Pédale sélection de surfaceC.
Déverrouillage de l’aspirateurD.
Bac à poussièreE.
Poignée du bac à poussièreF.
Bouton pour détacher le bac à poussièreG.
Crochet inférieur cordonH.
Cordon d’alimentationI.
Crochet supérieur cordonJ.
Unité de séparationK.
Filtre pré-moteurL.
Bouton pour ouvrir la trappe du bac à poussièreM.
Brosse pour sol dur*N.
MONTAGE DE L’ASPIRATEUR
Sort ez tous les compos ants de l’emballag e.
Montez la po ignée 1. [2a] d e l’aspirateur et xez-la à l’aide de la vis fo urnie. [2 b]
Fixez la brosse à l’appar eil. 2 . [2c]
UTILISATION DE L’ASPIRATEUR
Bouton d’alimentation :
Pour allu mer l’appareil, appuyez sur le bout on au centre de l’aspirateur.1. [3]
Pour éteind re l’appareil, a ppuyer à nouveau sur l e même bouton.2.
Sélect eur de surface
Sélectionnez le type de surf ace à nettoyer en appuyant sur la pédale de la brosse. 1.
[1C]
Sol dur – Les brosses sont baissées pour pr otéger le sol.
Moquet te – Les brosses sont rel evées p our un ne ttoyage en grande
profondeur.
Déverrouil lage de l’appa reil:
Pour utiliser l’aspir ateur, déverrouille z-le en appuyant av ec le pied su
r la pédale de blocag e
autonome située sur la brosse. [4]
Rangement du cordon:
Pour ranger le cordon aprè s le nettoyage :
Enroulez le cordon a utour de d eux crochets.1. [5]
Pour déroul er rapidement l e cordon, tour nez le crochet inférieur. 2. [6]
AryaManual__1-3_union2.indd 4 29/03/2011 13.08.33
Page 7

5
FR
(*Sur certains modèles uniquement)
ENTRETIEN DE L’ASPIRATEUR
Vidage du bac à p oussière
Faites g lisser le bouton de déverroui llage du bac à poussière vers le b as et reti rez-le de 1.
l’appa reil. [7]
Tenez le bac à l’aide de la poignée et appu yez sur le bouton de v idage. La trappe du 2.
bac à poussière s’ouv re automat iquement. [8]
Après avoir vidé le bac, tapo tez dessu s ou agi tez-le po ur élimi ner tout résidu de 3.
poussièr e.
IMPOR TANT - Ne rempli ssez pas la cuv e au-dess us du rep
ère d e niveau ma ximum.
Nettoy res l avables
L’aspirateu r e st équ ipé d ’un ltre pré -moteur
.
P
our
une
perfor mance
optimale d’aspirat ion, re tirez r égulièremen t le
ltre et tapo tez-le contre le
côté de la poubell e pour dé coller la poussière.
L
ltre pr é-moteur doit être la vé réguliè rement. Au moins apr ès 5 vidage s.
IMPOR TANT : Tous les aspi rateurs sans sa c nécessitent un nettoyage régu lier du
ltre.
Un dé faut de nettoyage des res peut entraîner un bloc age d’air, une sur e et
un défau t du produit . Ceci peut a nnuler votr e garantie.
IMPORTANT : Contrôlez et entret enez régulière ment les ltr es.
IMPOR TANT : Vei llez touj ours à ce qu e le jeu ltre soit bien sec avant utilisat ion.
Pour a ccéder au
re de protection du moteu r :
1. Fai tes glisse r le bouto n de déver rouillage d u bac à pouss ière vers le bas et retirez-le de
l’appa reil.
Tournez la section supérieure d u bac pour l e retirer du bac à poussière. 2. [9]
Retire z le jeu d
ltres.3. [10]
Tapotez doucement et lave z le
ltre, 4. n’utilis ez pas d’eau chaude ni de déte rgents.
[11] Eliminez l’excédent d’eau et laissez-l e sécher com plètement avant d e le ré utiliser.
[12]
Remonte z le je u de
ltres pré-moteu r une fois com plètement sec et remett ez le b ac à 5.
poussière sur l’aspira teur.
Nettoyage du bac à poussiè re. / de la unit é de sépa ration
1. Placez la cuve su r une surf ace plate et reti rez ltre s.
Retir ez le systè me de séparat ion en le soule vant du b ac à pous sière.2. [13]
Eliminez la poussière de la surface de l’uni té de séparatio n à l’aid e d
on.3.
Remet tez l’unité de séparatio n dans le b ac à poussi ère et re placez
ltres.4.
Remet tez le bac à poussière dans l’asp irateur.5.
IMPOR TANT - Pou r des per formance s optima les, nous vous conseil lons d’i nspecter l e
système A irvoluti on après ch aque vidange.
Elim ination d ’une obstru ction
Vér ez si le bac à p oussière est plein. Si c’est le cas, v oir « Pour vider le bac à pous sière 1.
».
Si le bac à po ussière e st vide mais que l ’aspirateur aspire mal :2.
Les
ltres ont-ils beso in d’être nettoy és ? Si c’est le cas, voir « Pour nettoyer les A.
ltres la vables ».
Vér ez l’ori c e de la cuve en retira nt la cuv e et en contrôlant l’inté rieur de B.
l’or
ce.
Vér ez que le ltre de prote ction du moteur est en place et que la trappe de lt re C.
est fe rmée.
IMPOR TANT - Av ant d’
ectue r l’ins pection d e l’asp irateur, éteignez -le et débranc hez la
prise de l’ali mentation secteur.
LISTE DES VÉRIFICATIONS À EFFEC TUER
En cas de problèmes avec l ’appareil, ect uez les véri c ations de la liste de vér cations
avant d ’appeler le serv ice après- vente Hoov er.
L’aspirateu r est-il ali menté en é lectrici té ? Veuill ez véri e r la prise utilisée avec un autre •
appar eil élec trique.
Le bac à p oussière est-il s aturé ? Veuille z vous re porter à « Entretie n de l’as pirateur ».•
L
re est-il encrassé ? Veuillez vous report er à « Entre tien de l’asp irateur ».•
L’aspirateu r a- t-il surchau é ? S i c’est le cas, il lui faudra envir on 30 minutes pou r se •
réinitial iser auto matiquement.
INFORMATIONS IMPORTANTES
Pièces d étachées et con sommables Hoover
Toujours remplacer l es pièces pa r des pièces détac hées de la marque Hoover. Celles-ci son t
disponi bles a uprès de votr e reve ndeur Ho over. Lors de la commande de p ièces, veuillez
toujours précise r le numé ro de votre modèle.
Consomma bles:
Filtr e pré-moteur S106 35601198•
Poliss eur PO1 3560094 3•
Pièces détachées :
Suceu r pour mo quette et sol G136 35601208•
Brosse pour sol dur G137PC 356012 09•
AryaManual__1-3_union2.indd 5 29/03/2011 13.08.33
C
M
Y
CM
MY
CY
CMY
K
48003560 01 Arya IM ML.pdf 1 7/17/2012 10:25:26 AM
Page 8

6
FR
(*Sur certains modèles uniquement)
Qualité et environnement
Qualité
BSI ISO 9001
La qualit é des usines Hoove r a fait l’objet d’une évalu ation indépen dante. Nos produits
sont fabriqués selon un système de qualité conforme à la norme ISO 9001.
Environnement :
Cet appareil porte des marques conformément à la directive européenne 2002/96/CE
relative aux déchets d’équipements électriques et électroniques (WEEE).
Si vous jetez ce produit convenablement, vous contribuerez à éviter des conséquences
potentiellement nuisibles pour l’environnement et pour la santé.
Le symbole figurant sur le produit indique qu’il ne peut pas être mis à la poubelle avec
les ordure s mén agères. Vous d evez le dé poser dans un centre de r ecyclage des d échets
électriques et électroniques.
La mise au rebut doit être effectuée conformément à la réglementation locale en matière
de déchets.
Pour obtenir des compléments d’information sur le traitement, la récupération et le
recyclage de ce produit, merci de contacter votre municipalité, le service local des ordures
ménagères ou le lieu d’achat du produit.
Votre garantie
Les conditions de garantie de cet appareil sont définies par notre représentant dans le pays
où il est vendu et peuven t être obt enues aup rès de vot re revendeur. La facture d ’achat ou
le reçu doivent être présentés pour toutes réclamations relevant des conditions de cette
garantie.
Ces conditions peuvent être modifiées sans préavis.
AryaManual__1-3_union2.indd 6 29/03/2011 13.08.33
Page 9

7
DE
Diese r Stau bsauger darf nur zur Reinigung im Haushalt gemäß dieser Bedienungsanleitung
verwe ndet werde n. Vor dem Gebrauch des Geräte s muss die vo rliegende
Bedienungsa nleitung gelesen und vollständ ig verstanden worden sein. Verwenden Sie nur
von Hoover empfohlene o der gelieferte Zubeh örteile.
ACH TUNG: Elektrizität kann gefährlich sein! Dieses Ge rät ist doppelt isolier t und darf nicht
geerdet wer den. Der Netzs tecker enthält eine Sic herung von 13 A (nur GB).
WIC HTIG: Die einzelnen Drähte des Netzk abels sind wie folgt farbig gekennz eichnet:
Blau – Null leiter B raun – Stromfüh rend
STATIS CHE AUF LADU NG: Manche Teppic
he können die Bildu ng sta tischer Elektrizit ät
verursachen , die jedoch sehr gering u nd bei Entladung nicht gesundheits schädlich ist .
NAC H JED EM GE BRAUC H: Gerät ausschalten und Stec ker aus der Steckdos e ziehen.
Auch vor der Reinigung oder War tung des Gerä tes den Staubsauger st ets ausschalten und
den Netzste cker aus der Dose ziehen.
SIC HERH EIT IN BEZU G AU F K INDER: Lassen Sie Kinder nicht unbea ufsichtigt mit dem
Gerät oder den Bedi enelementen s pielen. Die Benutzung d es Gerätes durch ältere Kinder
sollte n ur unter Auf sicht eines Er wachsenen er
folgen.
HOOVE R NDE NDIE NST: Um auf Dauer den sicher en und ezien ten B etrieb dieses
Gerät es zu gewährleist en, empfeh len wir, Wartungs- und Reparat urarbeiten aus schließlich
von einem zugelassenen Hoover-Kundendien sttechniker durchführen zu lassen.
(*Geräteausstattung ist modellabhängig)
WICHTIGE SICHERHEITSHINWEISE
Positionieren Sie den Staubsauger bei der Reinigung von Treppen nicht oberhalb Ih res •
Standorts!
Benutzen Sie den Staubsauger nicht im F
•
von Feuchtschmutz.
Ver meiden Sie es , hart e oder scha rfe Gegenständ e, St reichhölze r, heiße Asch e, •
Zigarettenk ippen oder Ähnliches aufzusaugen.
Brennbare Flüs sigkeiten, Flü ssigre iniger, Aer osole od er Aer osoldämpf e weder [ in •
Staub saugernähe] versprühen noch aufsaugen, da diese brennbar sind b zw. z u einer
Explosion führen könnten.
Während des Saugens nicht über das Netzkabel fahren. Nicht am Kabel ziehen, um den •
Gerätestecker aus der Steckdose zu ziehe n.
Stellen Si e sich beim Gebrauch des Staubsaugers nicht auf da s Netzkabel und wic keln es •
sich nich
t um Arme oder B eine.
Benutzen Sie das Gerät nicht zur Reinigung von Me nschen oder Tieren.•
Den Staubsauger bitte nich t mehr benutzen, wenn ein De fekt des Ger ätes vorliegt •
oder vermutet wird. Ist das Netzkabel beschäd igt, dar f der Staubsauger NI CHT LÄNGE R
benutzt werden. Ein beschädigtes Netzkabel muss von einem zugelassenen H ooverKun dendiens ttechni ker au sgetaus cht we rden, da mit die Sicher heit d es G erät es
gewährleistet ist .
WICHTIGE HINWEISE
BEZEICHNUNG DER TEILE
Ein/Aus-TasteA.
Umschaltbare BodendüseB.
Einstellpedal für BodenartC.
Freigabetaste für ParkpositionD.
StaubbehälterE.
F.
StaubbehälterentriegelungsknopfG.
Unterer KabelbefestigungshakenH.
NetzkabelI.
Oberer KabelbefestigungshakenJ.
AirVolution-EinheitK.
L.
Entrelungskopf für StaubbehälterklappeM.
Hartbodendüse*N.
ZUSAMMENBAU IHRES STAUBSAUGERS
Nehmen Sie alle Teile d es Gerätes aus dem K arton.
Den Gr i 1. [2 a] anbringen und mit der mitgelie ferten S chraube xieren. [2b]
Die Düse a m Gerät anbringen. 2. [2c]
GEBRAUCH DES STAUBSAUGERS
Ein- / Ausschalten des Gerät es
Zum Einsch alten des Staubsaugers die Ein/Aus-Taste in der Mitt e des St aubsaugers 1.
drücken. [3]
Zum Ausschalt en des Gerätes d ie Taste erneut drüc ken.2.
Einstellpedal für Bodena rt:
Das Pedal an der D üse drücken, u m die gewünschte Bodenart auszuwä hlen. 1. [1C]
Hart böden – Der Bo rstenkranz wird zum Schutz des Bodens a bgesenkt.
Teppichböden – Beson ders gründliche Reinigung durch Anheben des
Bürstenkranze s.
Entriege lung aus der Park position:
Entriegel n Sie den Stau bsauger vor dem Sa ugen, indem Sie mit dem Fuß auf den
e
ntsprechenden K nopf an der Düse treten . [4]
Kabelaufwick lung:
Verstauen des Netzkabels nach der Reinig ung:
Das Netzkabel um di e beiden Kabelhak en wickeln.1. [5]
Drehen Sie den un teren Kabelh aken, um die S chnur schnell ab zuwickeln. 2. [6]
AryaManual__1-3_union2.indd 7 29/03/2011 13.08.33
Page 10

8
DE
(*Geräteausstattung ist modellabhängig)
WARTUNG DES STAUBSAUGERS
Leeren des Staubbehälters
Die Taste zum Entriegeln des Staubbehälters nach unten schieben und den Staubbehälter 1.
aus dem Gerät nehmen. [7]
2.
[8]
Nach der Entleerung den Behälter vorsichtig schütteln oder abklopfen, um überschüssigen 3.
Staub zu entfernen.
WICHTIG - Der Behälter da rf nicht über die angegebene Markierung ge füllt werden.
Reinigung der waschbaren Filter
zur Aufrechterhaltung der optimalen Leistungsfähigkeit des Gerätes die Filter regelmäßig und
klopfen Sie diese an der Seite eines Abfallbehälters aus.
Reinigen Sie die Filter spätestens nach jeweils fünf Entleerungen des Staubb ehälters oder bei
starker Verschmutzung mit lauwarmem Wasser aus.
WICHTIG: Alle beutellosen Staubsauger müssen regelmäßig gereinigt werden. Werden die
Filter nicht gereinigt, kann dies zu Verstopfung, Überhitzung und Produktausfall führen.
Dadurch erlischt möglicherweise Ihre Garantie.
WICHTIG: Die Filter regelmäßig überprüfen und warten.
WICHTIG: Die Filter erst dann wieder einsetzen, wenn sie komplett trocken sind.
1. Die Taste zum Entriegeln des Staubbehälte rs nach unten schieben und den Staubbehälter
aus dem Gerät nehmen.
Drehen Sie den oberen Teil des Behälters, um ihn vom Sta ubbehälter zu lösen. 2. [9]
3. [10]
Klopfen Sie Filter vorsichtig aus, und waschen diese; 4. verwenden Sie dafü r kein
heißes Wasser und keine Reinigungsmittel. [11] Entfernen Sie das überschüssige Wasser
aus dem Filter und lassen ihn vor erneuter Verwendung gründlic h trocknen. [12]
Filter völlig 5.
getrocknet ist.
Reinigung des Staubbehälters / AirVolution-Einheit
1. Den Staubbehälter auf e iner ebenen Fläche ablegen und die Filter ausbauen.
Heben Sie die AirVolution-Einheit aus dem Staubbehälter.2. [13]
W
3.
Bauen Sie die AirVolution-Einheit wieder in den Staubbehälter ein und setzen die Filter 4.
wieder ein.
Den Staubbehälter wieder am Staubsauger anbauen.5.
WICHTIG - Im Interesse optimaler Leistung e mpfehlen wir die Prüfung der AirVolution-Einheit
nach jeder Entleerung.
Entfernen eine r Verstopfun g
Füllst and des Sta ubbehälters pr üfen. Ist er voll, siehe „Leeren de s Staubbehäl ters’’.1.
Falls der Staubbehält er leer ist und d ie Saugkraf t dennoch schw ach ist, f olgendes 2.
prüf
en:
Müssen d ie Filter gereinigt werden ? Falls ja, siehe „Re inigung de r waschbaren A.
Filter “.
Um d en Staubbehäl tereinsatz z u überpr üfen, ein fach den Behälter a bnehmen un d B.
das Inn ere überprüf en.
Prüfen Sie, ob di e Filter ko rrekt eingeba ut und d ie Deckel richt ig geschlossen sind.C.
WICHT IG - Vor allen Reinigu ngs- und Wa rtungsar beiten das Ge rät a usschalten und den
Stecker aus der Steck dose ziehen .
PRÜFLISTE ZUR FEHLERSUCHE
Bitte p rüfen Sie die einzelnen Pun kte diese r iste, bevor Sie sich bei einem Proble m an
Ihre zuständig e Hoover- Kundendiens tstelle wende n.
Ist die Stromve rsorgung in Or dnung? Bitte über prüfen Sie sie mit einem andere n •
elekt rischen Ge rät.
Ist der Staubbehälter ü bervoll? S iehe „Wartung de s Staubsauge rs“.•
Ist der Fi lter block iert? Si ehe „Wartu ng des Sta ubsaugers“.•
Ist der Staubsa uger überhitzt? Falls ja, dauert es ca. 30 Minuten, bis der Überhitzun gsschutz •
sich au tomatisch a bschaltet.
WICHTIGE INFORMATIONEN
Hoover O riginal-Ersatzteile u nd Verbrauchsar tikel
Verwen den Sie stet s Or iginal-Er satzteile von Hoo ver. Di ese s ind ü ber Ihren Hoov erKunde ndienst e rhältlich. G eben Sie bei d er Best ellung vo n Ersatzte ilen bi tte stets
die kom plette Matr ikelnummer (Plake tte auf der Unt erseite de s Ge rätes) Ihres
Staub saugermodells an.
Verbrauch sartikel:
Filter (Vormoto r) S 106 35601198•
Polier aufsatz f ür Bodendüse PO1 35600943•
Ersatzte ile:
Umsch altbare Bodendüs e G136
35601208•
Hartbo dendüse G13 7PC 356012 09•
AryaManual__1-3_union2.indd 8 29/03/2011 13.08.33
C
M
Y
CM
MY
CY
CMY
K
48003560 01 Arya IM ML.pdf 1 7/17/2012 10:27:13 AM
Page 11

9
DE
(*Geräteausstattung ist modellabhängig)
Qualität und Umwelt
Qualität
BSI ISO 9001
Die Hoover-Werke wurden unabhängig voneinander jeweils einer Qualitätsprüfung
unterzogen. Unsere Produkte werden nach einem Qualitätsstandard hergestellt, der die
Anforderungen von ISO 9001 erfüllt.
Umweltschutz:
Diese s Ger ät ist entsp rechend der europäisc hen R ichtlinie 2002 /96/EG des e uropäisch en
Parlam ents und Rates üb er Elektro- un d El ektronik- Altgeräte (WEEE-Ri chtlinie)
gekennzeichnet.
Durch die sichere und umweltgerechte Entsorgung dieses Produkts tragen Sie dazu bei,
mögli che n egative Auswir kungen auf die Umwelt und die G esundhei t des Mens chen zu
verhindern.
Das a m Produkt a ngebracht e Symbol gi bt an, das s dieses Produk t nicht al s Hausmül l
behandelt werden darf, sondern an einer entsprechenden Sammelstelle für das Recycling
von elektrischen und elektronischen Geräten zu entsorgen ist.
Die Entsorgung ist in Übereinstimmung mit allen geltenden Vorschriften für die
umweltgerechte Abfallentsorgung vorzunehmen.
Ausführlichere Informationen über die korrekte Entsorgung und das Recycling dieses
Produkts erhalten Sie von der zuständigen Umweltbehörde, der Müllentsorgungsstelle
Ihrer Kommune oder dem Händler, bei dem Sie das Produkt erworben haben.
Garantieerklärung
Die Garantiebestimmungen für dieses Gerät entsprechen den Richtlinien des Landes, in
dem Sie das Gerät erworben haben. Weitere Einzelheiten hierzu erhalten Sie vom Händler,
bei dem Sie da s G erät erworb en haben oder aus der rot en Garantieb roschüre, die den
Unter lagen zum Ge rät be iliegt. Bitte bewahre n Sie den Kaufbele g sorg fältig auf, d enn er
wird für eventuell auftretende Garantieansprüchen benötigt.
Änderungen vorbehalten.
AryaManual__1-3_union2.indd 9 29/03/2011 13.08.34
Page 12

10
IT
Quest o apparecch io de ve es sere util izzato es clusivamente in amb ito d omestico per
inter venti di pu lizia, secon do le istru zioni riportate nel pre sente documento. Accer tarsi
di aver co mpreso le is truzioni prima di mettere in funzi one l’ap parecchio. U tilizzare sol o
acces sori cons igliati o fornit i da Hoover.
AVVE RTENZA: l’elettricità può e ssere estremam ente pe ricolosa. Q uesto apparecchio
è dotato di doppio isolament o e non richiede la messa a terra. La sp
ina è munita di un
fusib ile da 13 amp ere (solo R egno Unito).
IMP ORTANT E:
nel cavo di alime ntazione so no colorati secon do il seguente
codic e:
Blu – N eutro Marr one – Fase
ELE TTRICITÀ S TATIC A: alcuni tappeti pos sono produrre un accum ulo di elettricit à statica.
Le car iche di elettr icità stat ica non sono peric olose per la s alute.
DOP O L’UTILIZZO: spegnere l’apparecchio e scollega re la spina da lla presa di corren te.
Prima di proce dere alla pulizia dell’apparecc hiatura o di
tuare qualsiasi operazione di
manut enzione, spegnere sempre l’appar ecchio e scollegare la spina.
SICUREZZ A CON I BAMBI NI, GLI ANZIANI O DISABILI: non lasciare che i bambini giochino
con l’apparecchi o o con i relat ivi comandi. Sup ervisio nare l’utili zzo dell’apparecchio da
part e di ragaz zi o persone anziane o disab ili.
ASSIS TENZA H OOVE R: per gara ntire un funzio namento s empre sicuro ed
nte
dell’ apparecchi atura, si consigl ia di fa re e seguire eventu ali interven ti di assistenza o di
ripar azione dai tec nici del servizi o assistenza au torizzato Hoover.
(*Solo su alcuni modelli)
AVVERTENZE IMPORTANTI PER LA SICUREZZA
Collo care l ’apparecchio in una posi zione p iù alta ri spetto alla prop ria quando si •
pulis cono delle scale.
Utili zzare l’a pparecchio all ’aperto, su s upe
ci bag nate o per aspir are liquidi.•
Aspir are oggetti duri o tagl ienti, ammifer i, ceneri inc andescenti, mozz iconi di sigarett a •
o oggetti simili.
Vapori zzare o aspirare liq uidi mabil i, liquidi detergenti, ae rosol o i loro vapori •
poich é ne può deri vare un r ischio di incendio/ esplosione.
Calpe stare il cavo di a limentazion e du rante l’utilizz o dell’appare cchio o sc ollegare la •
spina dalla presa tirando i l cavo di alim entazione .
Calpe stare il cavo di alim entazione dell’appare cchio o avvol gerlo intorno alle braccia o •
alle g ambe durante l’uso.
Utili zzare l’a pparecchio per l’igi ene della pers ona o degli anima li.•
Continuare a utilizza
re l’apparec chio in caso di presunto guasto. Se il cavo di alimentazion e •
è danneggia to, int errompere IMMEDIATAMENTE l’utilizzo dell’appar ecchio. Per ev itare
peric oli, il cavo di alimentazi one dovrà esser e sostituito da u n tecnico de l serviz io
assis tenza autor izzato Hoov er.
È IMPORTANTE EVITARE DI:
DESCRIZIONE DELL’ASPIRAPOLVERE
A.
Spazzola tappeti e pavimentiB.
Selettore tipo pavimentoC.
Rilascio blocco apparecchioD.
Contenitore raccoglipolvereE.
Impugnatura contenitore raccoglipolvereF.
Pulsante sblocco contenitore raccoglipolvereG.
Gancio inferiore del cavoH.
Cavo di alimentazioneI.
Gancio superiore del cavoJ.
Pulizia dell’unità di separazioneK.
Filtro Pre-MotoreL.
Pulsante sblocco sportello contenitore raccoglipolvereM.
Spazzola per pavimenti duri*N.
MONTAGGIO DELL’APPARECCHIO
Disimball are tutti i component i.
Assembl are l’impugnatura 1. [2a] all’a pparecchio andol a c on la v ite in dotazione.
[2b]
Fissare l a spazzol a all’appare cchio. 2. [2c]
UTILIZZO DELL’APPARECCHIO
Inter ruttore d i alimenta zione:
Per ac cendere l’app arecchio, prem ere il pul sante di alim entazione a l centro.1. [3]
Per spegn ere l’apparecc hio, ripreme re lo stesso pul sante.2.
Selet tore tip o pavimento :
Selez ionare il tipo di supe
cie d a pulire prem endo il pedale sulla sp azzola. 1. [1C]
Pavime nto – Le setole s i abbass ano per pr oteggere il p avimento.
Tappeto /moquette – Le set ole si sollevano per gara ntire una pulizia più in
profon dità.
Pulsa nte di sbloc co della spaz zola:
Per av viare la pulizi a, sbloccare la spazzola premendo c on il pie de l’appo sito puls ante. [4 ]
Avvolgica vo:
Per ri porre il cavo dopo l a pulizia:
Avvolgere i l cavo att orno ai due ganci.1. [5]
Per il ri avvolgime nto rapid o del
cavo ruotare il gancio in feriore del cavo. 2. [6]
AryaManual__1-3_union2.indd 10 29/03/2011 13.08.34
Page 13

11
IT
(*Solo su alcuni modelli)
MANUTENZIONE DELL’APPARECCHIO
Svuotamento d el conteni tore raccog lipolvere
Abbassa re il pulsante di s blocco conten itore e rim uovere il con tenitore racc oglipolvere 1.
dall’a pparecchio. [ 7]
Tenere i l contenit ore dall’imp ugnatura e tirate la levetta svuotamento del contenito re. 2.
Lo spo rtello del contenito re raccoglip olvere si aprirà a utomaticame nte. [8]
Una volt a vuoto, scuot ere o agitare delicatamente il contenito re in modo da far e uscire 3.
un even tuale eccesso di pol
vere.
IMPORTANTE: - Non riemp ire oltre il seg no del massi mo livello ripor tato sul contenit ore.
P avabili
L’apparecchio è dot ato di ltro pre- motore. Per mantenere prestazioni
ottimali, rim picchiettarl o contro il lato del conten itore per elim inare la
polver e.
ltro pre -motore deve essere lavato og ni 5 sv uotamenti del contenit ore o quando l a
polver e nel ltro risulti e ccessiva.
IMPOR TANTE: Tutti gli appare cchi senza sa cchetto richiedon o una regolare puliz ia del
ro. La mancata pulizia dei può causare il blocco d ell’aria, i l surriscaldamen to
e il dann eggiamento dell’apparec chio. Tutto ciò p uò invalidare la g aranzia.
IMPOR TANTE: c ontrollare i ltr i sistematicame nte e sottopor li a regola re manutenzion e.
IMPORTANTE: p rima di utilizzare i ltri, acc ertarsi se mpre che si ano asciutti .
Per acc edere al
ro Pre-motore :
1. Abba ssare il pulsante di sblocco co ntenitore e rimuovere i l contenitore ra ccoglipol vere
dall’a pparecchio.
Ruotare l a parte superio re per estrarla da l contenit ore raccoglipolve re. 2. [9]
Rimuovere l’uni
ltro.3. [10 ]
Batter e delic atamente e la vare
ltro, 4. non ut ilizzare a cqua calda o
deterg enti. [11 ] Elimina re l’acqu a in ecce sso e lasciare asciugare comp letamente
prima d el riutil izzo. [12]
Una vo lta asciugata, r iassemblare l ’un
-motor e e rimontarla 5.
sull’apparec chio.
Pulizia co ntenitore raccog lipolvere / unità di separazione
1. Collocare il co ntenitore su un a supe cie pian a e rimuover ri.
Rimuovere l’unità di separazione so llevandola dal c ontenitore rac coglipolvere.2. [13]
Utilizzar e un panno per rimuovere la polvere in eccesso da lla s upe
cie dell’unità di 3.
separazio ne.
Rimontare l’unità di separazione nel contenitore raccogl ipolvere e rim o
ltri in 4.
posizione.
Rimontare i l contenitore raccoglip olvere sull ’apparecchio.5.
IMPORTANTE: - Per otten ere presta zioni ottim ali, si consigli a di is pezionare il sistema
Airvo lution dopo ogni vuotamento.
Rimozione di un’ostruzione
Contro llare che il contenit ore ra ccoglipolvere non sia pieno. Se è pie no, ved ere 1.
“Svuot amento de l contenitore raccoglipolv ere”.
Se il c ontenitore raccoglipolvere non è pieno ma l’aspira zione è ancora sca rsa:2.
Potrebbe essere necessario
aso, v edere l a sezi one “Pulizia A.
ri lavabil i”.
Contro llare la bocca del cont enitore rimuove ndo il c onteni ndo B.
all’int erno.
Ver
re che i ltro pre-mot ore sia install ato e lo spor tello del tro sia chiuso.C.
IMPORTANTE: - Spegnere l’appa recchio e scoll egare la spina d alla presa di c orrente pr ima
di co ntrollare l’a pparecchio.
CHECKLIST UTENTE
In caso di probl emi, completare q uesta semplice checkl ist utente prim a di chiamare il
centro assistenza Hoover.
La presa elettrica a cui è col legato l’appare cchio è f unzionante? Cont rollare co llegando •
un altro el ettrodomestico.
Il co ntenitore racc oglipolvere è pi eno? Vedere “Manute nzione dell’ap parecchio”.•
Il
ro è os truito? Ved ere “Manutenzione dell’apparec chio”.•
L’aspirapolve re si è s urriscalda to? In quest o caso, il res et aut omatico richiede circa 30 •
minuti.
INFORMAZIONI IMPORTANTI
Parti di ricambio e di c onsumo Hoove r
Utilizz are sempre par ti di rica mbio origi nali Hoover, c he è pos sibile acqu istare dal
distr ibutore loc ale Hoover o dire ttamente dalla Hoover. Quando si ordinano delle parti di
ricam bio, ricord arsi semp re di fornire il numero di modello del l’apparecchio utilizzato.
Materiali di consumo:
Filtro pre-mot ore S106 35601198•
Accessor io “POLISHER” PO1 35600943•
Pezzi di ricambio:
Spazzola per ta ppeti e pavimenti G136 35601208•
Spazzola per pavimenti duri G137
PC 35601209•
AryaManual__1-3_union2.indd 11 29/03/2011 13.08.34
l
C
M
Y
CM
MY
CY
CMY
K
48003560 01 Arya IM ML.pdf 1 1/27/2012 10:46:38 AM
Page 14

12
IT
(*Solo su alcuni modelli)
Qualità e ambiente
Qualità
BSI ISO 9001
La qualità degli stabilimenti Hoover è stata sottoposta a valutazione indipendente. I nostri
prodotti vengono realizzati mediante un sistema di qualità che soddisfa i requisiti ISO
9001.
Ambiente:
L’apparecchio è contrassegnato in conformità alla Direttiva europea WEEE (RAEE) 2002/96/
EC sulla gestione dei rifiuti da apparecchiature elettriche ed elettroniche.
Garan tendo il corr etto smalti mento del pro dotto, il clie nte contrib uisce alla s alvaguardia
della salute delle persone e alla protezione dell’ambiente che potrebbero altrimenti essere
compromessi da uno smaltimento eseguito in maniera non idonea.
Il simbolo apposto su di esso indica che questo prodotto non può essere smaltito come
i normali rifiuti domestici, bensì deve essere portato al punto di raccolta o al centro di
riciclaggio delle apparecchiature elettriche ed elettroniche più vicino.
Lo smalt imento deve es sere eseguito in confo rmità alle no rmative locali vig enti per la
salvaguardia dell’ambiente e lo smaltimento dei rifiuti.
Per ulteriori informazioni sul trattamento, il recupero e il riciclaggio di questo prodotto,
contattare l’unità territoriale competente per il servizio di smaltimento o il negozio in cui
il prodotto è stato acquistato.
Regolamento per la garanzia
Le condizioni di garanzia relative a questo apparecchio sono definite dal rappresentate
Hoove r nel Paes e di vend ita. Per conosce re i n dettagl io l e condizi oni, riv olgersi a l
distributore Hoover presso il quale l’apparecchio è stato acquistato. Per ogni contestazione
ai sensi dei termini della garanzia, è necessario mostrare la fattura o un documento di
acquisto equipollente.
Queste condizioni potrebbero venire modificate senza obbligo di preavviso.
AryaManual__1-3_union2.indd 12 29/03/2011 13.08.34
Page 15

13
ES
Este aspirador debe utiliz arse s ólo p ara la limp ieza domést ica ta l y como se d escribe en
el presente manu al de l usu ario. Asegúrese de haber com prendido todo el c ontenido de
este manual antes d e poner en funcionam iento el apa rato. Utili ce únicamente acc esorios
recomendad os o dis tribuidos por Hoove r.
ADV ERTENCIA: La electr icidad p uede ser extremad amente peli grosa. Este aparat o
dispone de doble aisla miento y no debe conectar se a tierra. Este enchufe disp
one de un
fusib le de 13 amperios (solo para e l Reino Uni do).
IMP ORTANT E: Los cables que compo nen el cable de toma de co rriente sig uen el siguient e
códig o de color:
Azul – Neutra l Mar rón – Con corriente
ELE CTRICID AD ESTÁTICA: Algunas alfombras puede n provoca r una pequeña acumulación
de ele ctricida d estática. Las descar gas estáticas no son pelig rosas para la salud.
DES PUÉS DE UTILIZ ARLO: Apag ue e l ap arato y saque e l enc hufe de la toma de
corri ente.
Apagu e y desenchu fe siem pre el ap
arato a ntes de limpiar lo o de realiz ar cualquier labor
de ma ntenimiento.
SEGUR IDAD CON RELA CIÓN A NIÑO S, AN CIANOS O ENFERM OS: N o perm ita que los
niños jueguen con el aparato ni con s us man dos. Super vise a niños mayores, ancianos o
enfer mos cuando utilicen el aparat o.
SER VICIO DE RE PARACION ES HOO VER: Para g arantizar el funci onamiento seguro,
z
y durade ro del aspi rador, recom endamos q ue las tare as de mante nimiento sea n realizadas
exclus ivamente p or técnic os autori zados del servici o de repa raciones de Hoover.
(*Sólo algunos modelos)
CONSEJOS IMPORTANTES DE SEGURIDAD
Situa r el aspirado r por encima de usted cuando est é limpian do las es caleras.•
Utili zar el a spirador en exteriores, sobre sup e ies húmed as o para recoger líquido s.•
Aspir ar objetos duros o lados , cerillas , ceniza cand ente, colil las de cigarri llo u objetos •
simil ares.
Pulver izar e l apar ato con líquidos ables , product os de limpieza , aero soles o sus •
vapor es, n i ta mpoco recoger ninguno de los anterio res, dado q ue p odría provocarse
una s ituación de riesgo d e incendi o/explosi ón.
Pasar por encima del cabl e de alimentac ión cuando utili za el aspira dor ni desenchufar lo •
tiran do del co rdón.
Pisar el c able ni enrollar lo en los braz os ni las pie rnas al utili zar el aspirador.•
Emple ar el apa rato para limpia r a personas o a nimales.•
Seguir utiliz ando el aparato si p arece te ner alg
ún defecto. Si el cable de alimentación •
está dañado, deje de utili zar el aspirador INMEDIATAMENTE. Para evitar que se produzca n
riesg os para su segurida d, el cable de alime ntación sólo debe ser su stituido por un
técni co de Hoove r autori zado.
ES IMPORTANTE RECORDAR QUE NO DEBE:
INFORMACIÓN SOBRE SU ASPIRADOR
A.
Tobera para alfombras y suelosB.
C.
Desbloqueo del aspiradorD.
Contenedor de polvoE.
Empuñadura contenedor recolector polvoF.
Pulsador desbloqueo contenedor recolector polvoG.
Gancho del cable inferiorH.
Cable de alimentaciónI.
Gancho del cable superiorJ.
Unidad ciclónicaK.
Filtro pre-motorL.
Botón desbloqueo contenedor recolector polvoM.
Tobera para suelo duro*N.
MONTAJE DEL ASPIRADOR
Saque todas las piezas del emba laje.
Monta r la empu ñadura 1. [2a] del asp irado en su posici ón con el tornillo
suminis trado. [2 b]
Asegurar l a tobera en el apar ato. 2. [2c]
UTILIZACIÓN DEL ASPIRADOR
Inter ruptor de alimetación:
Para encender el as pirador, p ulsar el botón de al imentació n ubic ado en el ce ntro d el 1.
apara to. [3]
Para apagar el apar ato, volver a apreta r el mismo b otón.2.
Sele ctor de super
es
Escoj a el ti po de s upe
cie que dese a limpiar apretand o el pe dal que se encu entra en 1.
la tobera . [1C]
Suelo s duros – Los cepill os bajan pa ra proteger el suelo.
Alfom bra – Los cepi llos se eleva n para un a limpie za a fondo.
Liber ación del bloqueo del aspirador :
Para empezar a limpiar, desbloquee el aspirad or pisan do con el pie el pedal de bloqueo
de la tobe ra. [4]
Almacenamie nto del ca ble:
Tras limpia r, al macenar el cable
Enrol lar el cable al rededor d e los dos ga nchos del cable.1. [5]
Para d esenrollar el cordón rápidamente, gire el gancho i nferior. 2. [6]
AryaManual__1-3_union2.indd 13 29/03/2011 13.08.34
Page 16

14
ES
(*Sólo algunos modelos)
MANTENIMIENTO DEL ASPIRADOR
Vaciado del depósito de suciedad
Desliza r hac ia aba jo el bot ón de desb loqueo del co ntenedor y sa car este último del 1.
aspir ador. [7]
Sujetar el depósito con la empu ñadura de l contenedo r y tirar del circu ito de re tención 2.
de va ciado. La pu erta de l depósit o de sucied ad se abrirá a utomáticame nte. [8]
Tras vaci arse, golpet ear suave mente el d epósito o agitarlo para sac ar el po lvo en 3.
exceso.
IMPORTANTE - No llenarlo por encim a de la
ma rca de nivel máximo presente en el
conten edor.
ros l avables
En aspir ador incluye un ltro premotor . Para que su aspir ador mantenga
un rendimie nto óptimo, debe ex traer con re gularidad lo acu dirlos con tra el
latera l del cu bo de basura para desincr ustar la suc iedad.
or d ebe lavarse después de haber sido vacia dos 5 ve ces o c uando el
acumu le una ca ntidad exc esiva de sucie dad.
IMPOR TANTE: Todos los aspir adores sin bolsa requieren una limpieza regular de los
no hace rlo, sus ros puede n produ cir bloqu eos de ai re, reca lentamien to
y fal los en el pro ducto; lo cual ademá s puede ha cer inval idar la g arantía.
IMPORTANTE : Comprueb e l tros con regular idad y manténga los en buen esta do.
IMPOR TANTE: Cerció rese si empre de que el paquet e de tr os esté completamen te seco
antes de utilizarlo d e nuevo.
Para a cceder al
1. D eslizar hacia abajo el botón d e de sbloqueo del contenedor y sacar este último del
aspir ador.
Gire la parte superior de l cubo p ara extra erlo del rec olector d e polvo. 2. [9]
Extra iga el co njunt
ltros.3. [ 10]
Golpee suav emente y lave la
tro, 4. no use agu a caliente ni de tergentes . [11] Elimine
el exceso de a gua y deje que se seque co mpletamente antes de usarlo nuevame nte.
[12]
Montar nuevamente la unida
-moto r una ve z que es té seca e insta larla en el 5.
equip o.
Limpieza del rec olector de polvo / unidad ciclónic a
1. Coloca r el conte nedor so bre una s upe e plana y sacar los tros.
Extraig a el sistema ciclón ele vándolo d el recole ctor de p olvo.2. [13]
Utili ce un pañ o para sa car el polvo excesivo de la supe
ie de la unidad ciclónica.3.
Coloque otra vez la unida d ciclóni ca en el rec olector y ponga los
ltros en su lugar.4.
Montar n uevamente el contenedo r recolec tor de pol vo en el eq uipo.5.
IMPORTANTE - Para me jores prest aciones. se re comienda in specciona r el sistem a
Airvo lution tras cada va ciado.
Eliminación de obstrucciones
Compr uebe s i e l d epósito de suci edad está lleno. En caso onsulte el 1. 1.
apar tado “Vacia do del de pósito de s uciedad”.
Si el depó sito de suc iedad es tá vacío y, au n así, hay poca potenc ia de as pirado:2.
¿Cabe la posi bilidad d e que sea preciso limpi a
osA.
consulte el aparta do “Limpieza d e los ltros lav ables”.
Contro lar la bo ca de e ntrada d el conten edor saca ndo este último e inspe ccionado B.
dentro de dicha boca.
Compruebe si el
motor está inst alado y l a port ezuela d eC.
cerrad a.
IMPOR TANTE - Antes de c ontrolar el asp irador, apa gue el aparato y s aque el enchu fe de
la toma d e corrient e.
LISTA DE COMPROBACIONES QUE DEBE REALIZAR EL USUARIO
Si surgi era algún problema co n e l producto, lleve a cabo la s s encillas comp robacione s
que se enume ran a con tinuación antes de llamar a su Servicio local de repara ciones de
Hoover.
¿Hay s uministro de corriente pa ra el asp irador? Pr uebe con otr o aparato eléctri co.•
¿El conten edor recolect or pol vo es tá lleno ? Re mítase al capítulo “Mantenimiento del •
Aspirado r”.
¿Está ob struid
ltro? Remítase al capítulo “Mante nimiento de l Aspirador ”.•
¿Se ha r ecalentad o el a spirador? En ca so
tivo, tardará aproximadam ente 30 •
minut os en rei niciarse automáticamen te.
INFORMACIÓN IMPORTANTE
Piezas de r epuesto y consumibles de Hoover
Utili ce siem pre pie zas de repuesto originale s de Hoover. Pue de adquir irlas en su Servic io
Asiste ncia Técnica de Hoover o pedir las direct amente a Ho over. Cuando realice p edidos de
piezas, indique siemp re el númer o de modelo que posee.
Consum ibles:
Filtro pre-mo tor S106 35601198•
Encera dora PO1 35600943•
Pieza s de repu esto:
Cepillo para alfombra s y suelo s G136 35601208•
Tobera para suelo duro G137PC 35601209•
AryaManual__1-3_union2.indd 14 29/03/2011 13.08.34
C
M
Y
CM
MY
CY
CMY
K
48003560 01 Arya IM ML.pdf 1 7/17/2012 10:42:24 AM
Page 17

15
ES
(*Sólo algunos modelos)
Calidad y ambiente
Calidad
BSI ISO 9001
Las fábricas de Hoover han sido sometidas a inspecciones de calidad independientes.
Nuest ros produ ctos se f abrican d e conform idad con u n sistema de calid ad que cu mple los
requisitos de la norma ISO 9001.
El Medio Ambiente:
Este aparato está marcado de acuerdo con la Directiva Europea 2002/96/CE sobre residuos
de aparatos eléctricos y electrónicos (RAEE).
Al cerciorarse de que este producto se elimine correctamente, usted ayudará a prevenir
las posibles consecuencias perjudiciales para el medio ambiente y la salud humana que,
de otro modo, podrían producirse en caso de manejo inadecuado de los residuos de este
producto.
El símbolo que puede verse en el producto indica que este producto no puede tratarse
como un residuo doméstico. En vez de esto debe entregarse en un punto de recogida de
electrodomésticos para el reciclaje de equipos eléctricos y electrónicos.
La eli minación debe lleva rse a cabo según los regla mentos med ioambient ales loca les
sobre eliminación de residuos.
Para información más detallada sobre el tratamiento, la recuperación y el reciclaje de este
produ cto, póng ase en contacto con su Ayuntamien to, su se rvicio de recogida de residu os
domésticos o con el establecimiento donde haya comprado el producto.
Su garantía
Las condiciones de garantía para este aparato vienen definidas por nuestro representante
en el país de venta. Puede obtener los detalles acerca de estas condiciones en el
establecimiento donde haya comprado este aparato. Debe mostrarse la factura de compra
o el recibo al hacer alguna reclamación en virtud de las condiciones de garantía.
Sujeto a cambios sin previo aviso.
AryaManual__1-3_union2.indd 15 29/03/2011 13.08.34
 Loading...