

Hoover AIRLIFT LIGHT Instructions Manual
IMPORTANT: Read carefully before assembly and use.
LET’S GET STARTED.
© 2016 Techtronic Floor Care Technology Limited. All Rights Reserved.
Distributed by Royal Applicance Mfg. Co. Glenwillow, OH 44139
961152011 ID#: ID117382-R1
TM

Let’s talk safety
IMPORTANT SAFETY INSTRUCTIONS
SAVE THESE INSTRUCTIONS
When using an electrical appliance, basic precautions should always be followed,
including the following:
READ ALL INSTRUCTIONS BEFORE USING THIS APPLIANCE.
THIS PRODUCT IS INTENDED FOR HOUSEHOLD USE ONLY.
IF USED COMMERCIALLY WARRANTY IS VOID.
WARNING: TO REDUCE THE RISK OF FIRE, ELECTRIC SHOCK,
DAMAGE OR INJURY:
• Fully assemble before operating.
• Operate vacuum only at voltage specified on data label on bottom of vacuum
canister.
• Do not leave appliance when plugged in. Unplug from outlet when not in use and
before cleaning or servicing.
• Do not use outdoors or on wet surfaces.
• Do not allow to be used as a toy. Not intended for use by children age 12 and
under. Close attention is necessary when used by or near children. To avoid injury
or damage, keep children away from product, and do not allow children to place
fingers or other objects into any openings.
• Use only as described in this manual. Use only manufacturer’s recommended
attachments and products.
• Do not use with damaged cord or plug. If appliance is not working as it should,
has been dropped, damaged, left outdoors, or dropped in to water, take it to a
service center prior to continuing use.
• Do not pull or carry by cord, use cord as a handle, close a door on a cord, or pull
cord around sharp edges or corners. Do not place product on cord. Do not run
appliance over cord. Keep cord away from heated surfaces.
• Do not unplug by pulling on cord. To unplug, grasp the plug, not the cord.
• Do not handle plug or appliance with wet hands.
• Do not put any object into openings. Do not use with any opening blocked; keep
free of dust, lint, hair, and anything that may reduce air flow.
• Keep hair, loose clothing, fingers, and all parts of body away from openings and
moving parts.
• Turn o all controls before unplugging.
• Use extra care when cleaning on stairs. To avoid personal injury or damage, and to
prevent the vacuum from falling, always place vacuum at bottom of stairs on floor.
Do not place vacuum on stairs or furniture, as it may result in injury or damage.
• Do not use to pick up flammable or combustible liquids, such as gasoline, or fine
wood sandings, or use in areas where they may be present.
• Do not pick up anything that is burning or smoking, such as cigarettes, matches,
or hot ashes.
• Do not use without Dirt Cup and/or Filters in place.
•
Always turn o this appliance before connecting or disconnecting motorized nozzle.

This vacuum cleaner is intended for household use only and
NOT for commercial or industrial use.
• Only use the vacuum cleaner indoors on dry surfaces and keep the area you’re
cleaning well lit.
• Keep fingers, hair and loose clothing away from moving parts and openings
whilst using the vacuum cleaner.
CAUTION: TO REDUCE THE RISK OF DAMAGE:
• Avoid picking up hard, sharp objects with this product, as they may cause damage.
• Do not use sharp objects to clean out hose as they can cause damage.
• Store appropriately indoors in a dry place. Do not expose machine to freezing
temperatures.
• With brushroll on, do not allow vacuum to sit in one location for an extended
period of time, as damage to floor can result.
WARNING: This product contains chemicals known to the State of
California to cause cancer, birth defects or reproductive hard. WASH HANDS
AFTER HANDLING.
WARNING: TO REDUCE THE RISK OF ELECTRIC SHOCK, THIS
APPLIANCE HAS A POLARIZED PLUG (ONE BLADE IS WIDER THAN THE
OTHER). THIS PLUG WILL FIT IN A POLARIZED OUTLET ONLY ONE WAY. IF THE
PLUG DOES NOT FIT FULLY IN THE OUTLET, REVERSE THE PLUG. IF IT STILL
DOES NOT FIT, CONTACT A QUALIFIED ELECTRICIAN TO INSTALL THE PROPER
OUTLET. DO NOT CHANGE THE PLUG IN ANY WAY.
NOTICE:
A Thermal Protector has been designed into your cleaner to protect it from
overheating. When the thermal protector activates the cleaner will stop
running. If this happens proceed as follows:
1. Turn cleaner OFF and unplug it from the electrical outlet.
2. Empty the dirt cup.
3. Inspect the nozzle inlet, hose connector, hose, dirt cup inlet, pre-motor filter,
and HEPA filter for any obstructions. Clear obstructions if present.
4. When cleaner is unplugged and motor cools o for 30 minutes, the thermal
protector will deactivate and cleaning may continue.
If the thermal protector continues to activate after following the above steps,
your cleaner needs servicing.

Let us know what
you think @HooverUSA
Taking care of you
We’re here if you need us.
Instead of taking me back
to the shop, simply visit:
Hoover.com/support or call:
(800) 944-9200 Monday-Friday 8:00 a.m. to 6:00 p.m., EST
Calls are toll free. Please make a note of the serial number and model number of the
product before calling.
Alternatively, you can write to us at:
TTI Floor Care North America
7005 Cochran Road, Glenwillow, OH 44139
This user guide can be found online at: Hoover.com/support/manuals
Thank you for buying this AirTM Lift Light.
Taking care of your carpets and hard floors
The Air
TM
Lift Light is designed to make vacuuming carpets and hard floors
regularly, as eective and ecient as possible and this user guide will help you
get the most out of your machine.
Maintaining your carpets and hard floor will ensure they keep their appearance
for longer. You’ve chosen the carpets and hard floors for your home for a
reason and Hoover will help you take good care of them.
Taking care of your Air
TM
Lift Light
Also inside this guide are instructions on maintaining your new machine, so that
it’s always ready when you are to tackle your carpets and hard floors.
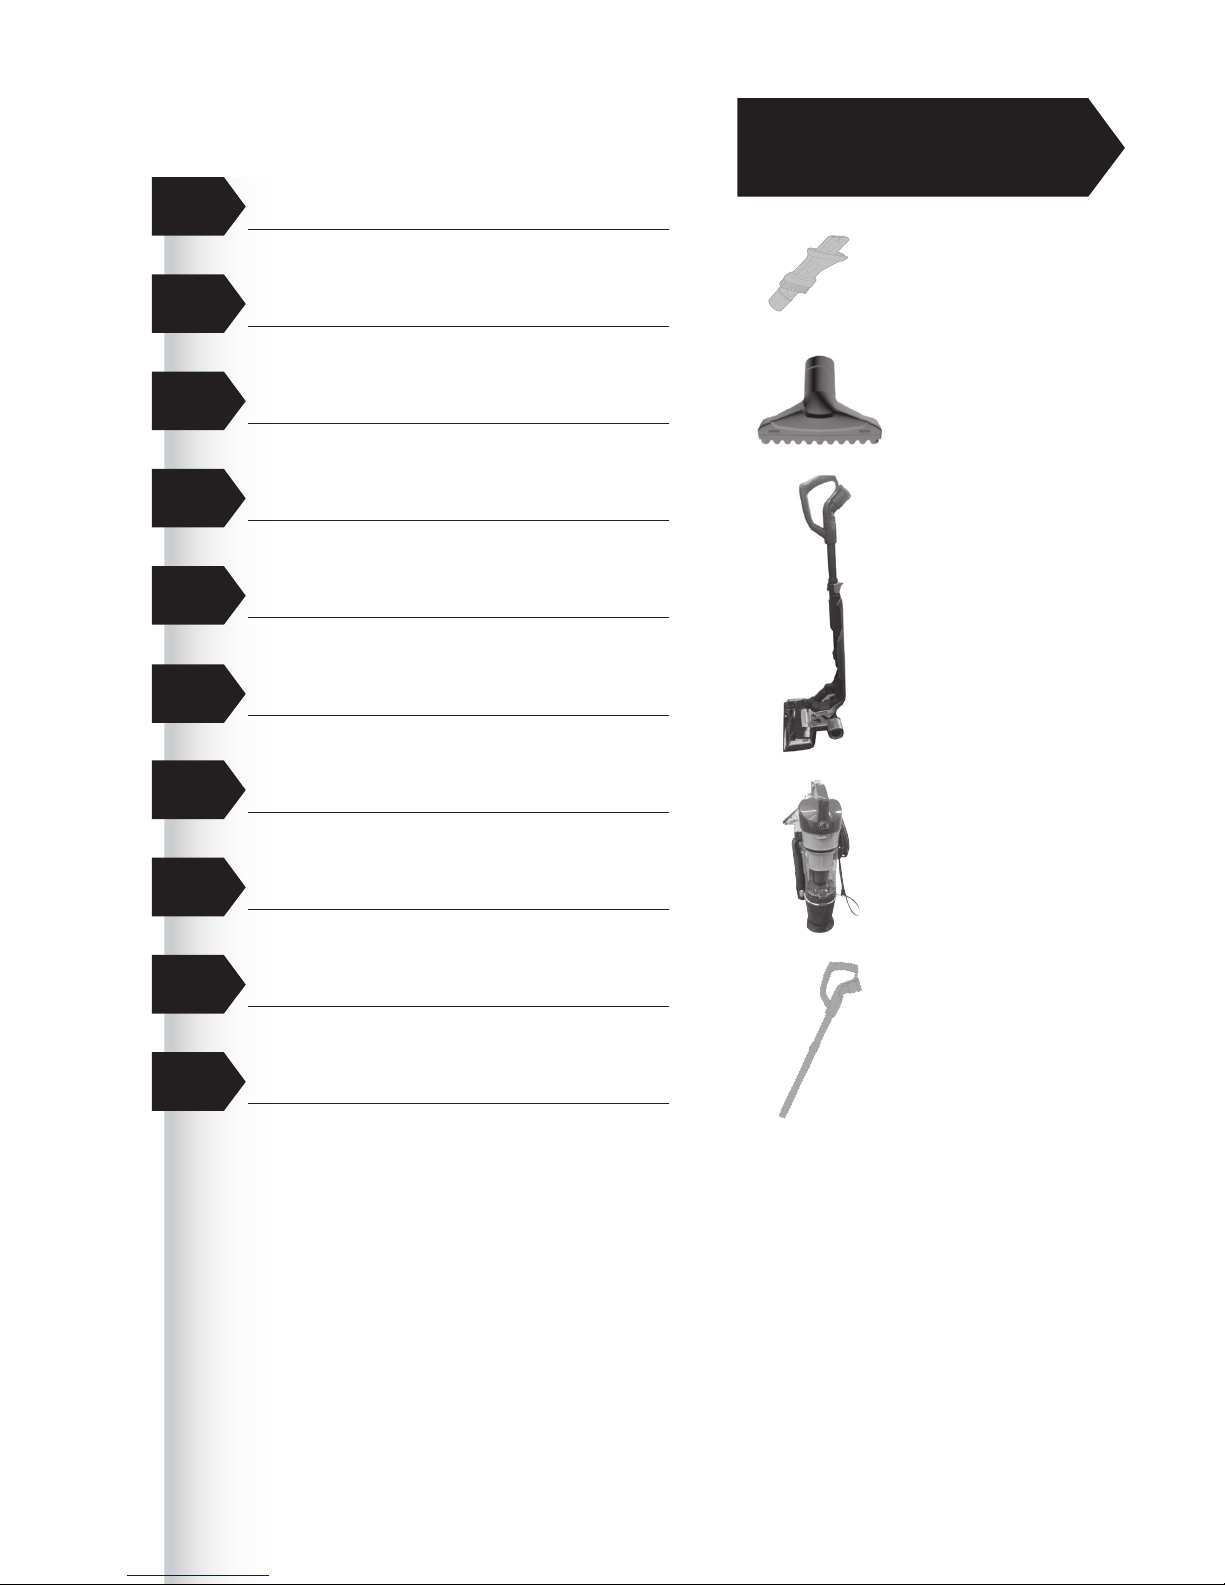
Pet Hair Tool
Contents
Let’s talk safety
Getting to know your machine
Getting started
Using your machine
Taking care of your machine
Let’s talk technical
What to do if it goes wrong
Getting in touch
Accessories
Notes
2-in-1 Tool
(Crevice &
Dusting Tool)
Handle
Detachable
Canister
Spine & Nozzle
AirTM Lift Light
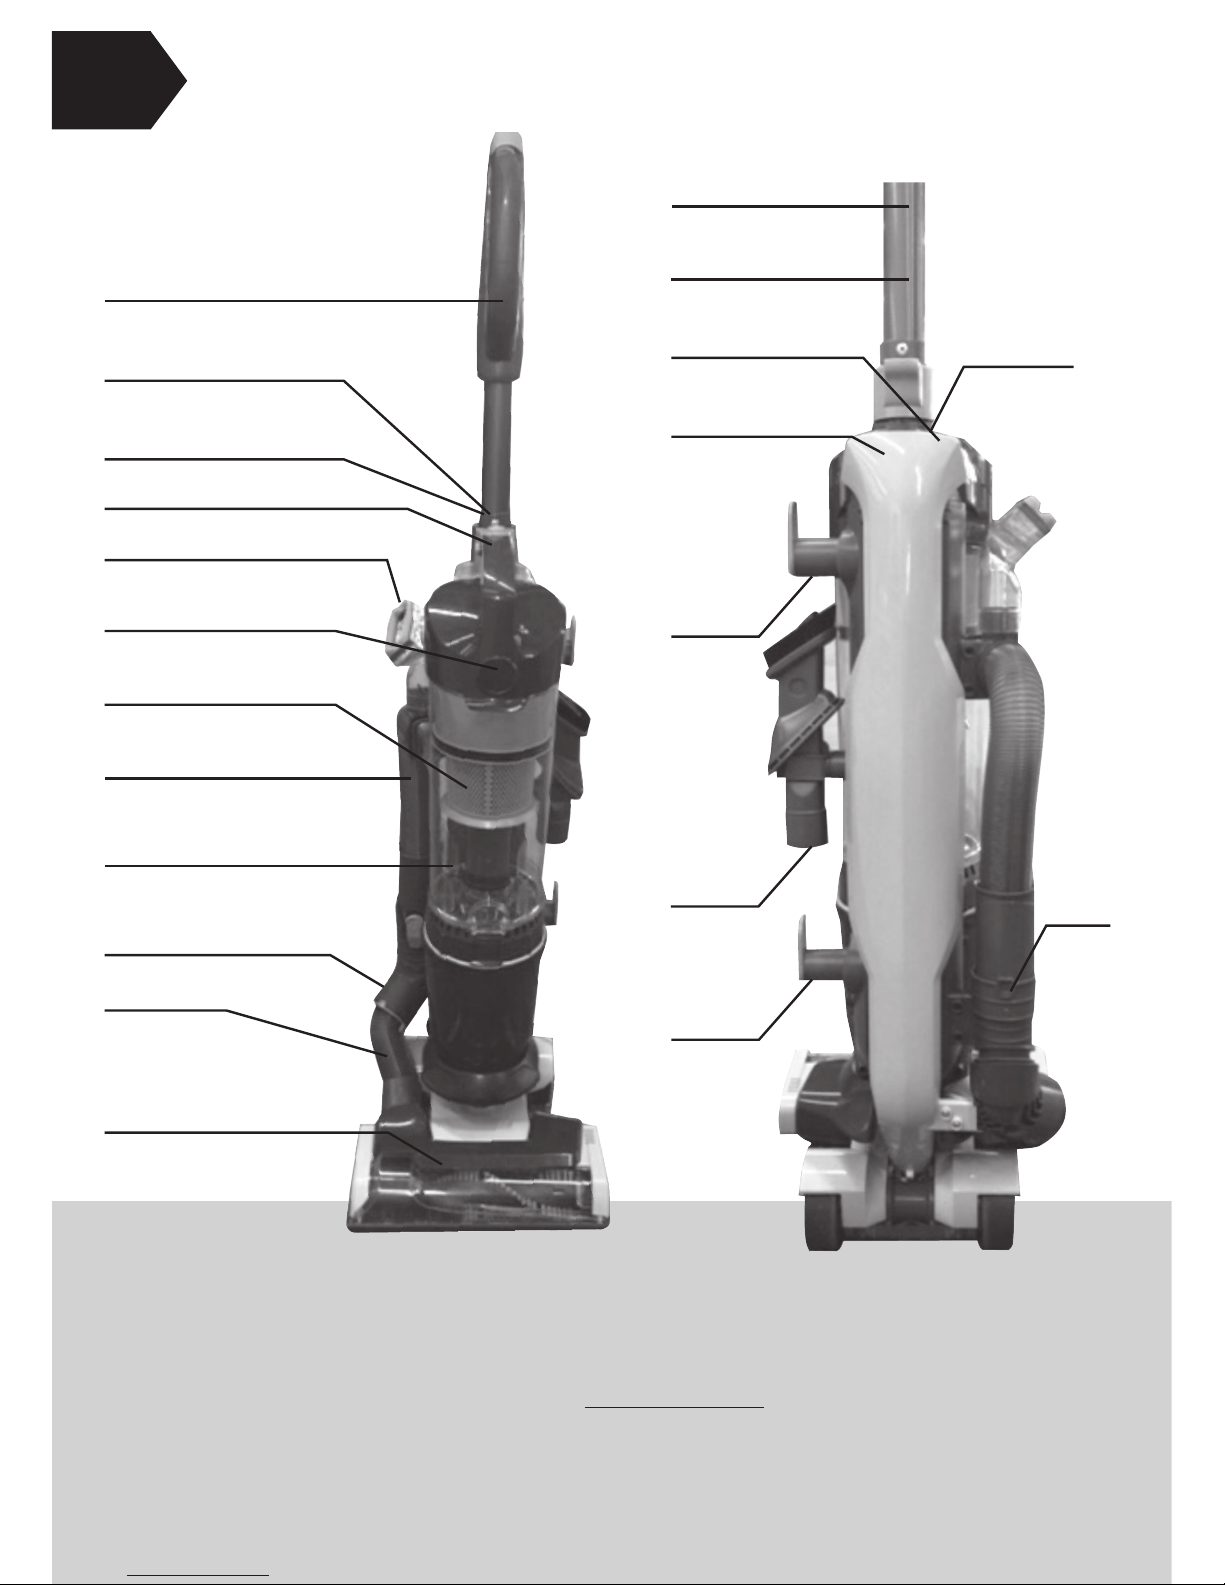
Getting to know your machine
Technical Specification
Name AirTM Lift Light
Voltage 120V
Wattage See rating label on machine
for details
Cord length 30ft.
Weight 15.2 lbs.
Subject to technical change without notice.
Accessories & Consumables
Primary Filter Assembly- Rinsable: 303903001
Filter- Final HEPA: 440003905
Belt- WindTunnel & Reg: Air: 562535001
Tool, 2-in-1 Tool: 440009413
Pet Hair Tool: 440008204
To purchase consumables and accessories, please visit Hoover.com
Handle
Hose end clip
Power On/O
button
Separator
Dirt cup
release button
Extension wand
Brushroll On/O
button
Hose
holder
2-in-1 Tool
storage
clip
Quick
release
cord
hook
Quick
release
cord
hook
Carry handle
Pet hair tool
Dirt cup lid release clip
Hose
Dirt release button
(hidden)
Brushroll
Lower hose
Hose to handle
connection
Handle
release clip
Canister release button
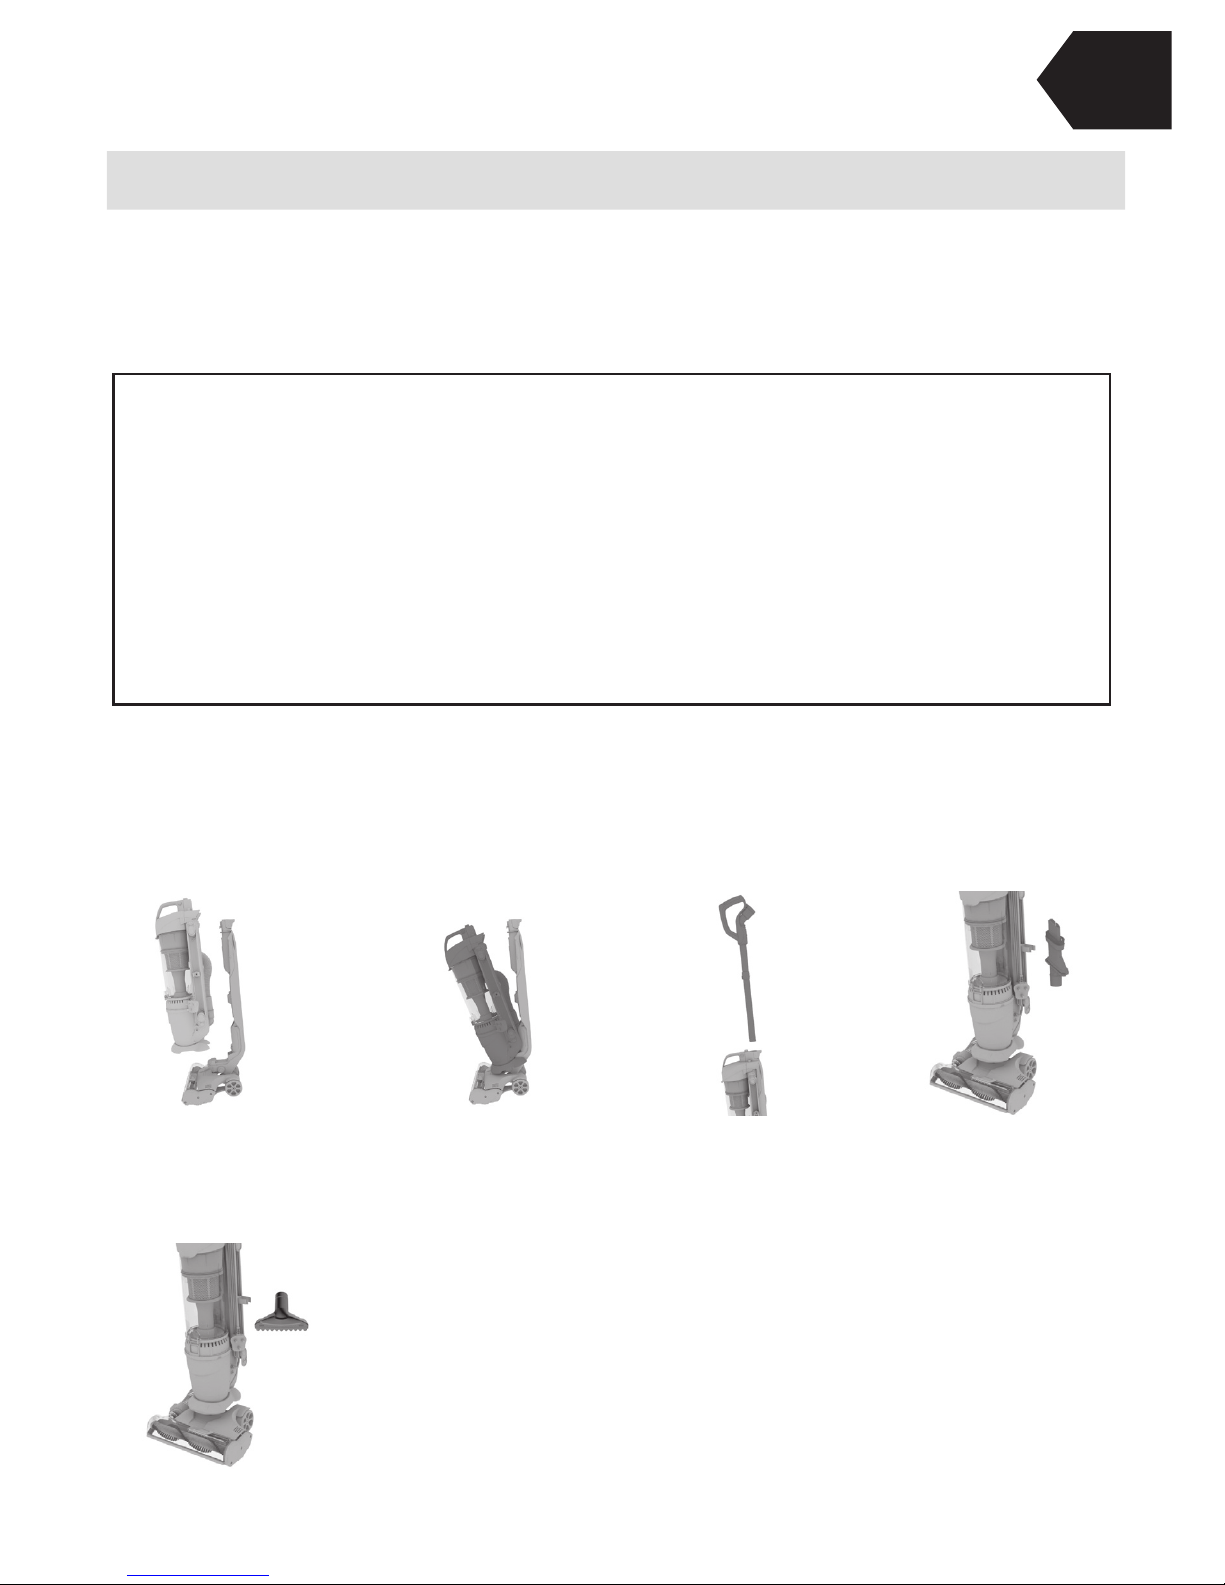
Assembling your upright
Place the lift o canister
onto the spine and nozzle.
Place the 2-in-1 tool
onto the storage clip.
Store Pet Hair tool on the
side of the vacuum.
In a hinge like manner
push the lift o canister
backwards until it clicks
into place.
Push the handle with
extension wand into the
spine of the vacuum
cleaner. The handle will
click into position when
correctly fitted.
PLEASE READ ‘LET’S TALK SAFETY’ AT THE BEGINNING BEFORE USE
Getting started
Before you begin cleaning
WARNING: Always switch o the vacuum cleaner before connecting or disconnecting the lift o
canister/ hose/attachments or removing and emptying the dirt cup.
For best cleaning results, filters should be tapped over a bin every 4-6 uses to remove dirt and debris
and washed every 3 to 6 months (depending on the level of use).
NOTICE:
A Thermal Protector has been designed into your cleaner to protect it from overheating.
When the thermal protector activates the cleaner will stop running. If this happens
proceed as follows:
1. Turn cleaner OFF and unplug it from the electrical outlet.
2. Empty the dirt cup.
3. Inspect the nozzle inlet, hose connector, hose, dirt cup inlet, pre-motor filter, and HEPA
filter for any obstructions. Clear obstructions if present.
4. When cleaner is unplugged and motor cools o for 30 minutes, the thermal protector
will deactivate and cleaning may continue.
If the thermal protector continues to activate after following the above steps, your cleaner
needs servicing.
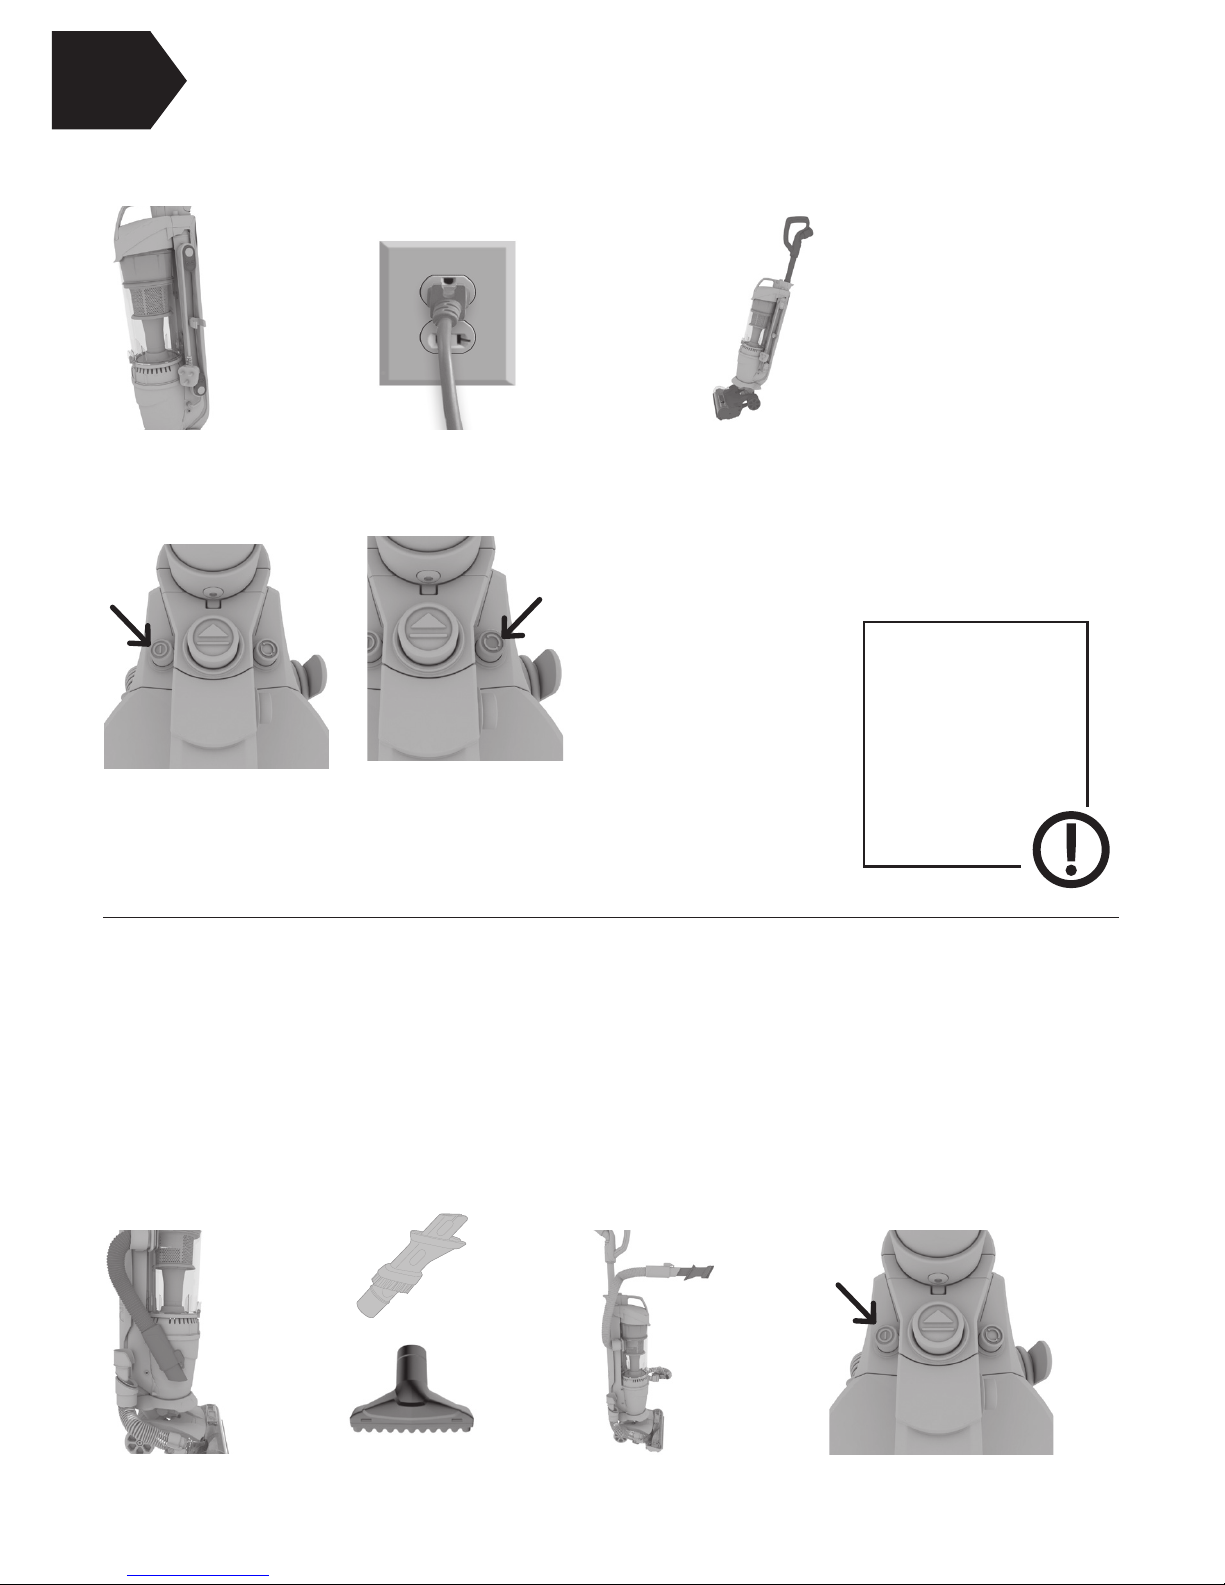
Twist the quick
release cord hooks
and release the power
cord.
Plug the vacuum
cleaner into the mains
and switch on.
Place foot on the
nozzle and pull the
handle backwards to
recline.
Press the On/O
button to switch the
vacuum cleaner on.
Using with the lift o canister attached
Using your machine – The full unit
Press the brushroll
button to activate the
brushroll The brushroll should be ON for
carpets and OFF for
hard floors.
Pull and remove
the hose from
the hose holder.
Choose an accessory
Pet Hair Tool
2-in-1 Crevice Tool
Attach the tool to the
end of the hose.
Press the On/O
button to switch the
vacuum cleaner on.
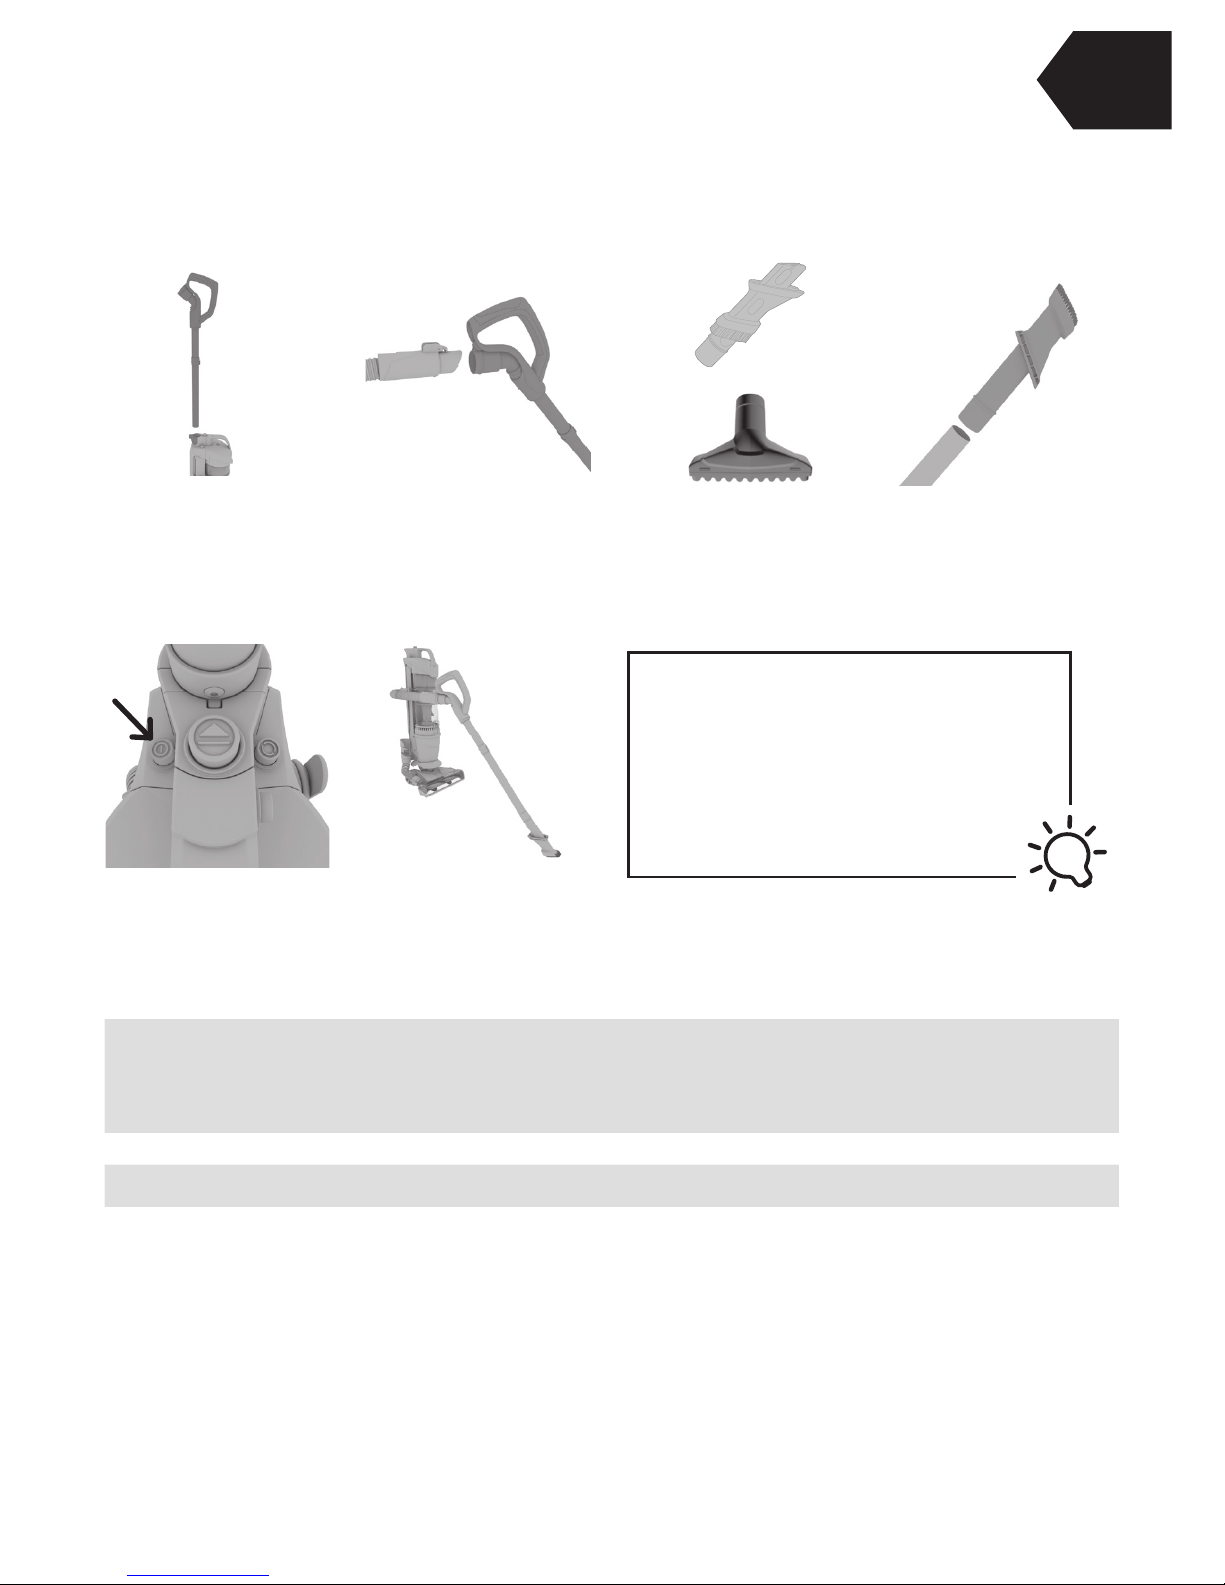
Using the hose/extension wand with the lift o canister attached
Always switch o the vacuum cleaner before connecting or disconnecting the hose/ tools.
For easier cleaning detach the lift o canister for stair and above floor cleaning. Hold the lift o
canister by the carry handle at all times when detached.
The accessories can be attached directly to the hose or extension wand.
Using the hose
When the vacuum
is reclined with the
brushroll switched
on, never leave
the vacuum in one
position for any long
period of time.
CAUTION
Using your machine – The full unit
Press the handle
release clip and lift
to remove the handle
with extension wand
from the spine.
Attach the hose to
the handle, clipping
the hose end clip
over the ridge on the
handle entry point.
Attach the tool
to the end of the
extension wand.
Using the hose with the extension wand
Press the On/O
button to switch the
vacuum cleaner on.
Use the hose with
extension wand for
hard to reach areas.
TIP
The brushroll will not rotate when the
vacuum cleaner is stood in the upright
position.
Whilst using the whole unit, don’t
forget to use the handle cord hook so
that the cord doesn’t get caught or
tangled in the machine.
CAUTION: Use extra care when cleaning on stairs. To avoid personal injury or damage, and to
prevent the cleaner from falling, always place the vacuum at the bottom of the stairs or on floor.
Do not place vacuum on stairs or furniture, as it may result in injury or damage. When using
tools, always ensure handle is in the upright position.
CAUTION: Not to be used for grooming a pet.
Choose an accessory
Pet Hair Tool
2-in-1 Crevice Tool
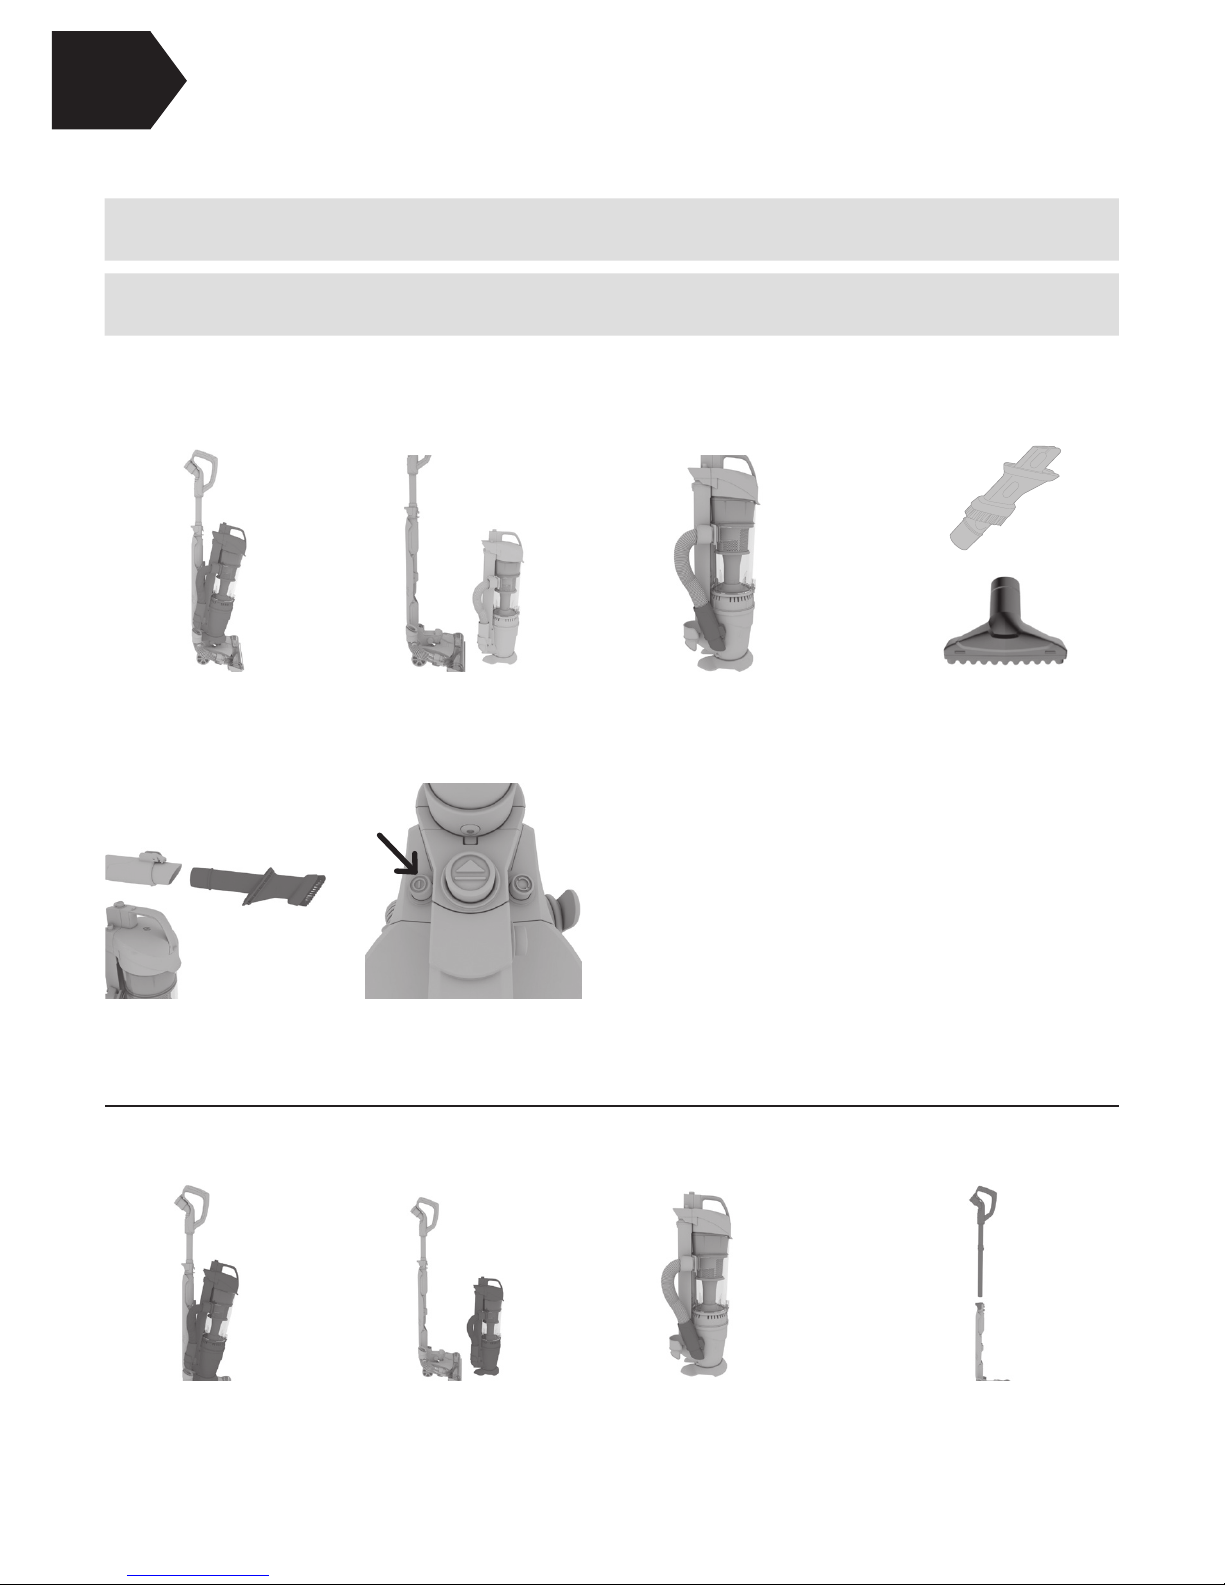
Hold the carry handle
and press the lift o
release button.
Using the hose/extension wand with the lift o canister detached
Using the hose with the extension wand
Lift and remove the lift
o canister body o
the spine and nozzle.
Pull and remove the
hose from the hose
holder.
Hold the carry handle
and press the lift
o canister release
button.
Pull and remove
the hose from the
hose holder.
Lift and remove the
lift o canister o the
spine and nozzle.
Press the handle
release clip and
remove the handle
with extension wand
from the spine.
Using your machine – The lift away
CAUTION: Hold the lift o canister by the carry handle at all times when the lift o canister is
detached for stair and above floor cleaning.
WARNING: Always turn o this appliance before connecting or disconnecting the canister,
hose or tools.
Using the hose
Choose an accessory
Pet Hair Tool
2-in-1 Crevice Tool
Attach the tool to the
end of the hose.
Press the On/O
button to switch the
vacuum cleaner on.
Attach the hose to the
handle, clipping the
hose end clip over the
ridge on the handle
entry point.
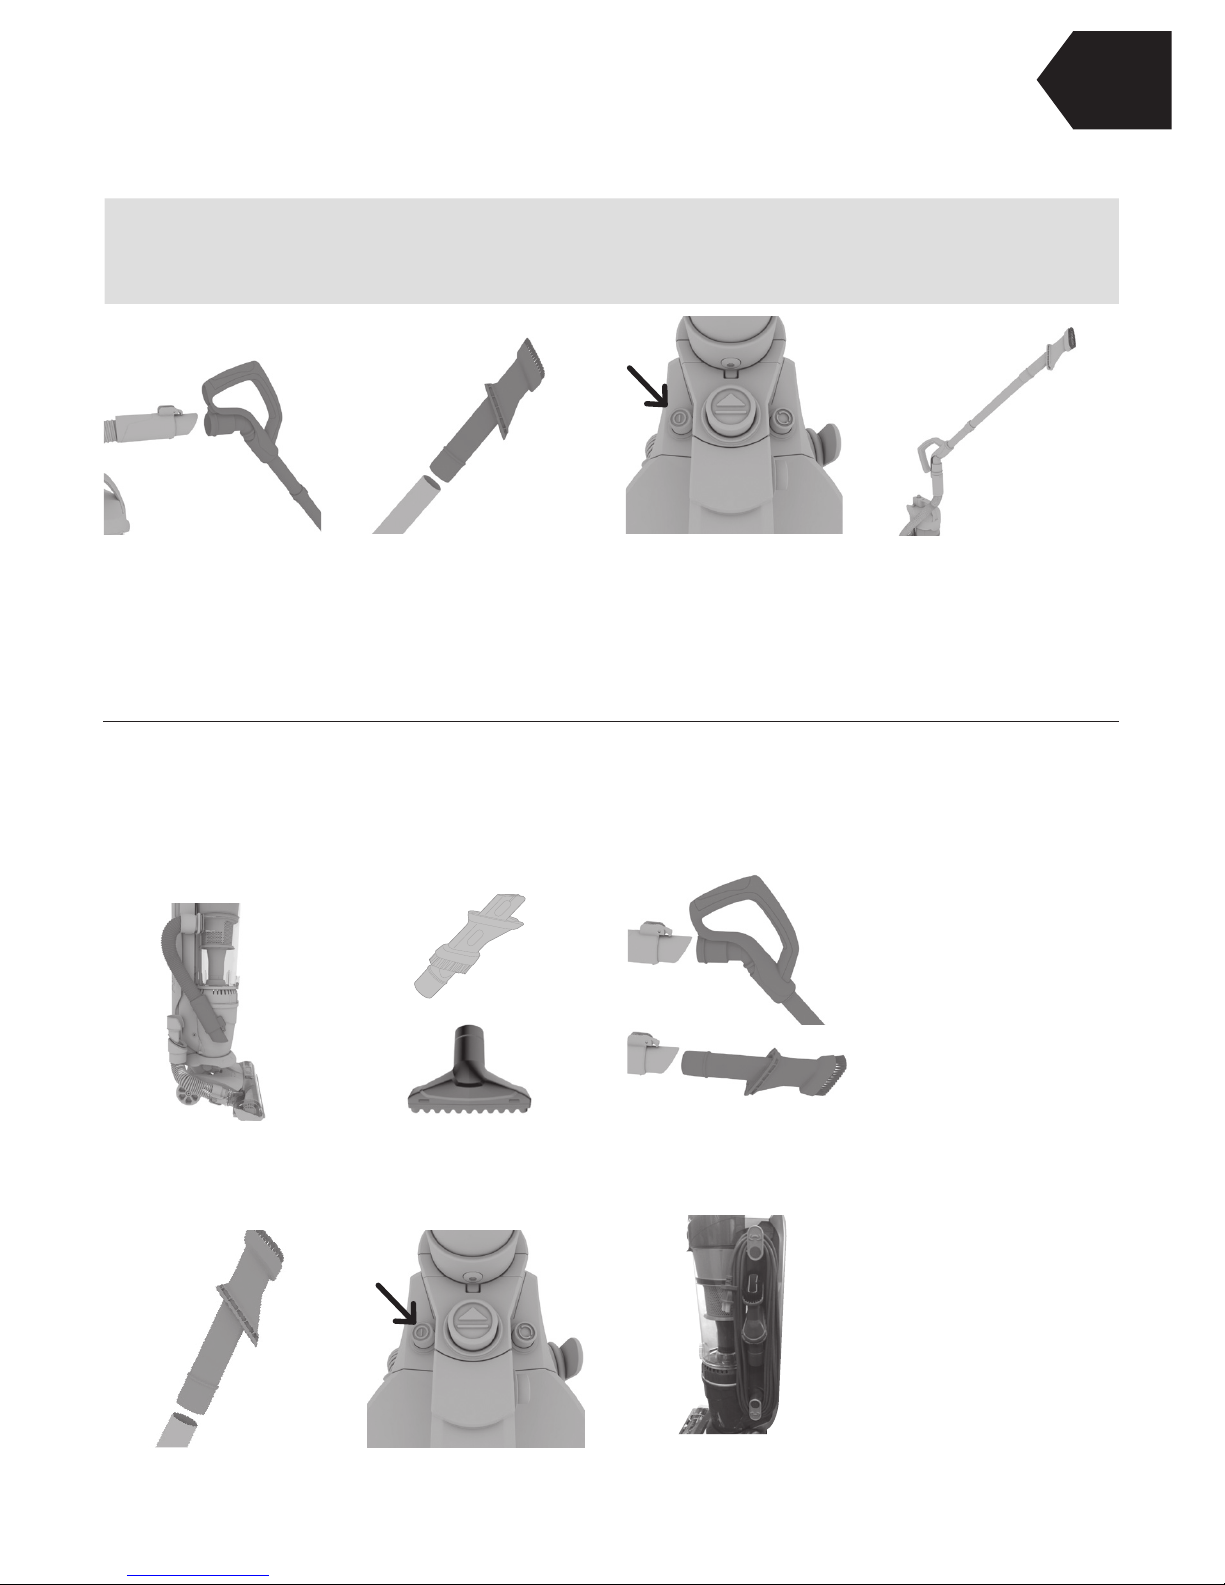
Using the hose with the extension wand (continued)
Choose an accessory
and attach tool to the
end of the extension
wand.
Press the On/O
button to switch the
vacuum cleaner on.
Using your machine – The lift away
CAUTION: Use extra care when cleaning on stairs. To avoid personal injury or damage, and to
prevent the cleaner from falling, always place the vacuum at the bottom of the stairs or on floor.
Do not place vacuum on stairs or furniture, as it may result in injury or damage. When using
tools, always ensure handle is in the upright position.
Use the hose with
extension wand for
hard to reach areas.
Hold the lift o
canister by the carry
handle at all times.
Using the hose with the lift o canister attached
Pull and remove the
hose from the hose
holder.
Choose an accessory
Pet Hair Tool
2-in-1 Crevice Tool
Attach the tool or
extension wand to the
other end of the hose.
Press the On/O
button to switch the
vacuum cleaner on.
CORD STORAGE
Wrap cord around hooks for
convenient storage. Attached
the plug end to the cord.
If required attach tool
to the end of the
extension wand.
Only attach the hose to the vacuum cleaner with the lift o canister attached. The hose can be
attached directly to the hose.
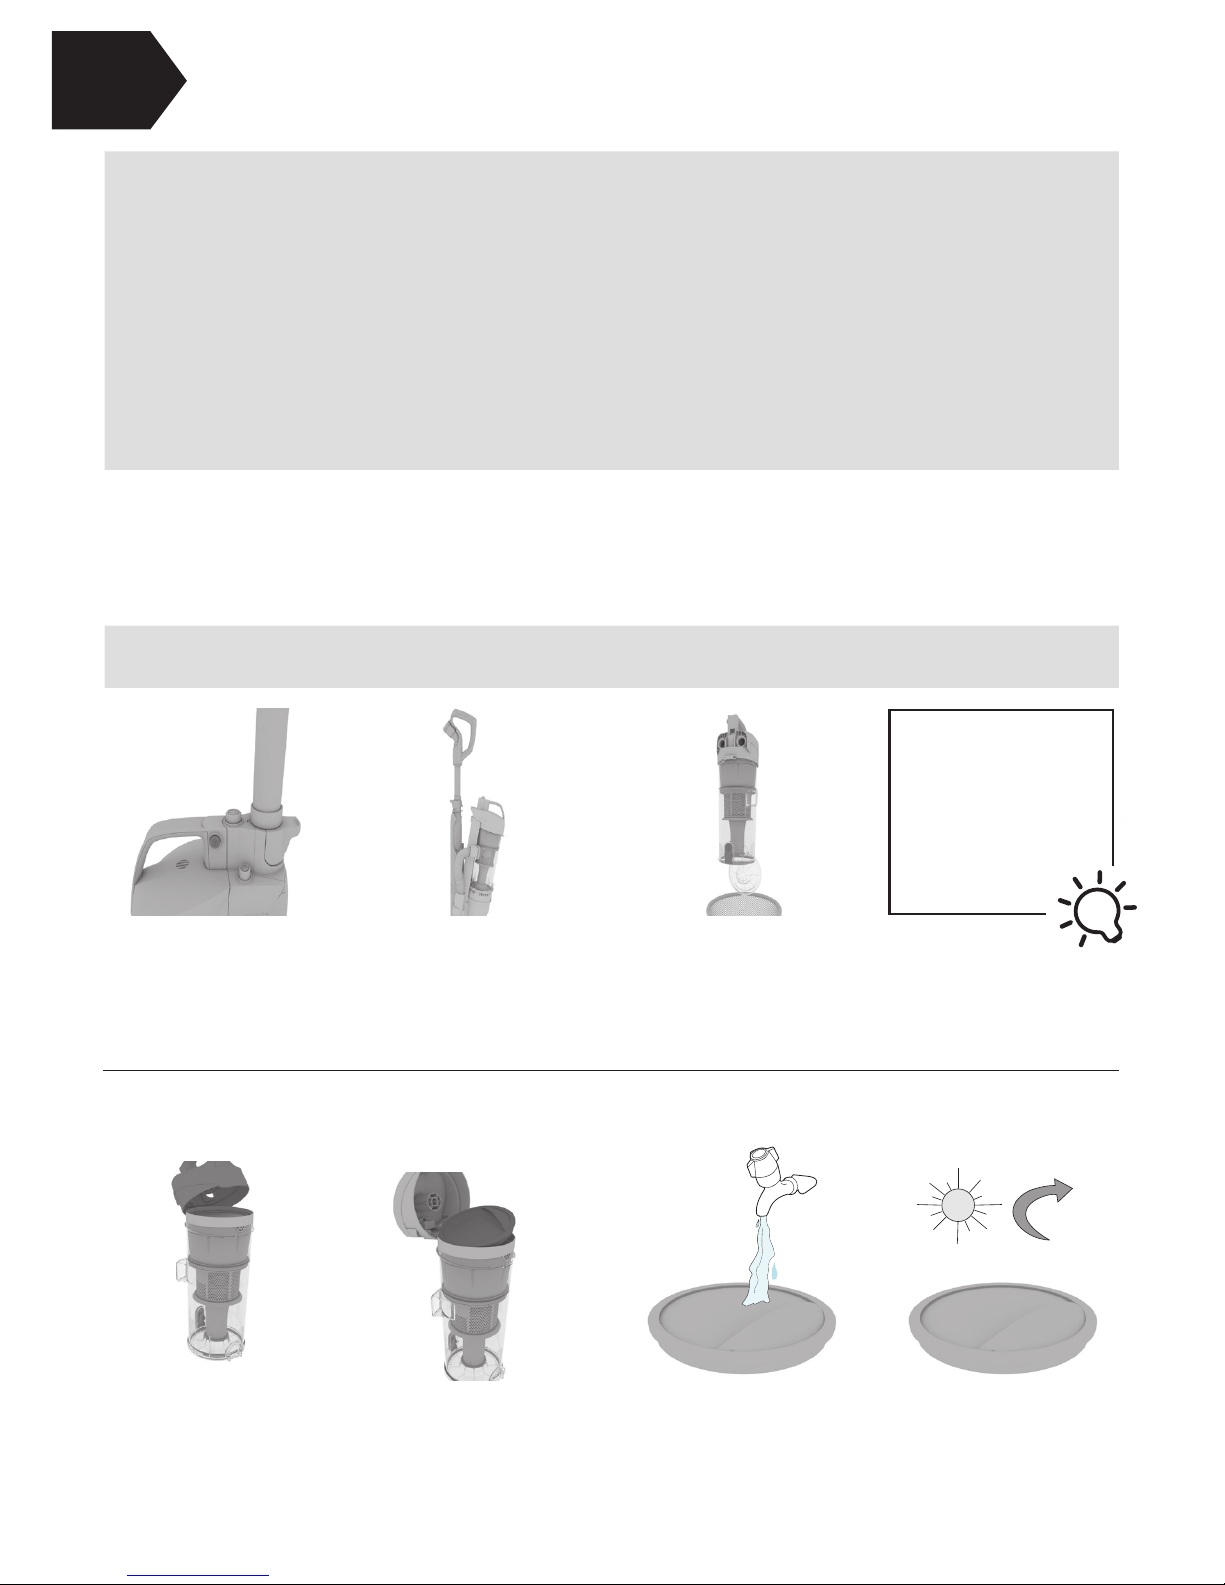
Press the dirt cup
release buttons located
the side of the carry
handle.
Lift the dirt cup lid
release clip. In a hinge
like manor lift the dirt
cup lid.
Tap the filter over a bin
to remove any dirt/
debris. Wash the filter
under running water
(40° C max).
Leave for 24 hrs or
until fully dry before
replacing.
Pull the rinseable and
replaceable filter tab
and remove the filter
from the dirt cup.
Emptying and cleaning the dirt cup
Cleaning the pre-motor filter
Taking care of your machine
For best cleaning results, filters should be tapped over a bin every 4-6 uses to remove dirt and
debris and washed every 3 to 6 months (depending on the level of use). Don’t use your vacuum
cleaner without all of the filters in place.
Pull and remove the
dirt cup o the
vacuum cleaner.
Hold the dirt cup over a
bin, press the dirt release
button to open and allow
the dirt to fall out.
MA
X
40˚C
TIP
To avoid blocking
the air flow through
the vacuum cleaner,
don’t overfill the dirt
cup, and replace
filters every 6-9
months.
24hrs
WARNING: To reduce the risk of personal injury - unplug before cleaning or servicing. Do not
use vacuum without dirt cup or filters in place.
104° F
MAX
NOTICE:
A Thermal Protector has been designed into your cleaner to protect it from overheating.
When the thermal protector activates the cleaner will stop running. If this happens
proceed as follows:
1. Turn cleaner OFF and unplug it from the electrical outlet.
2. Empty the dirt cup.
3. Inspect the nozzle inlet, hose connector, hose, dirt cup inlet, pre-motor filter, and HEPA
filter for any obstructions. Clear obstructions if present.
4. When cleaner is unplugged and motor cools o for 30 minutes, the thermal protector
will deactivate and cleaning may continue.
If the thermal protector continues to activate after following the above steps, your cleaner
needs servicing.
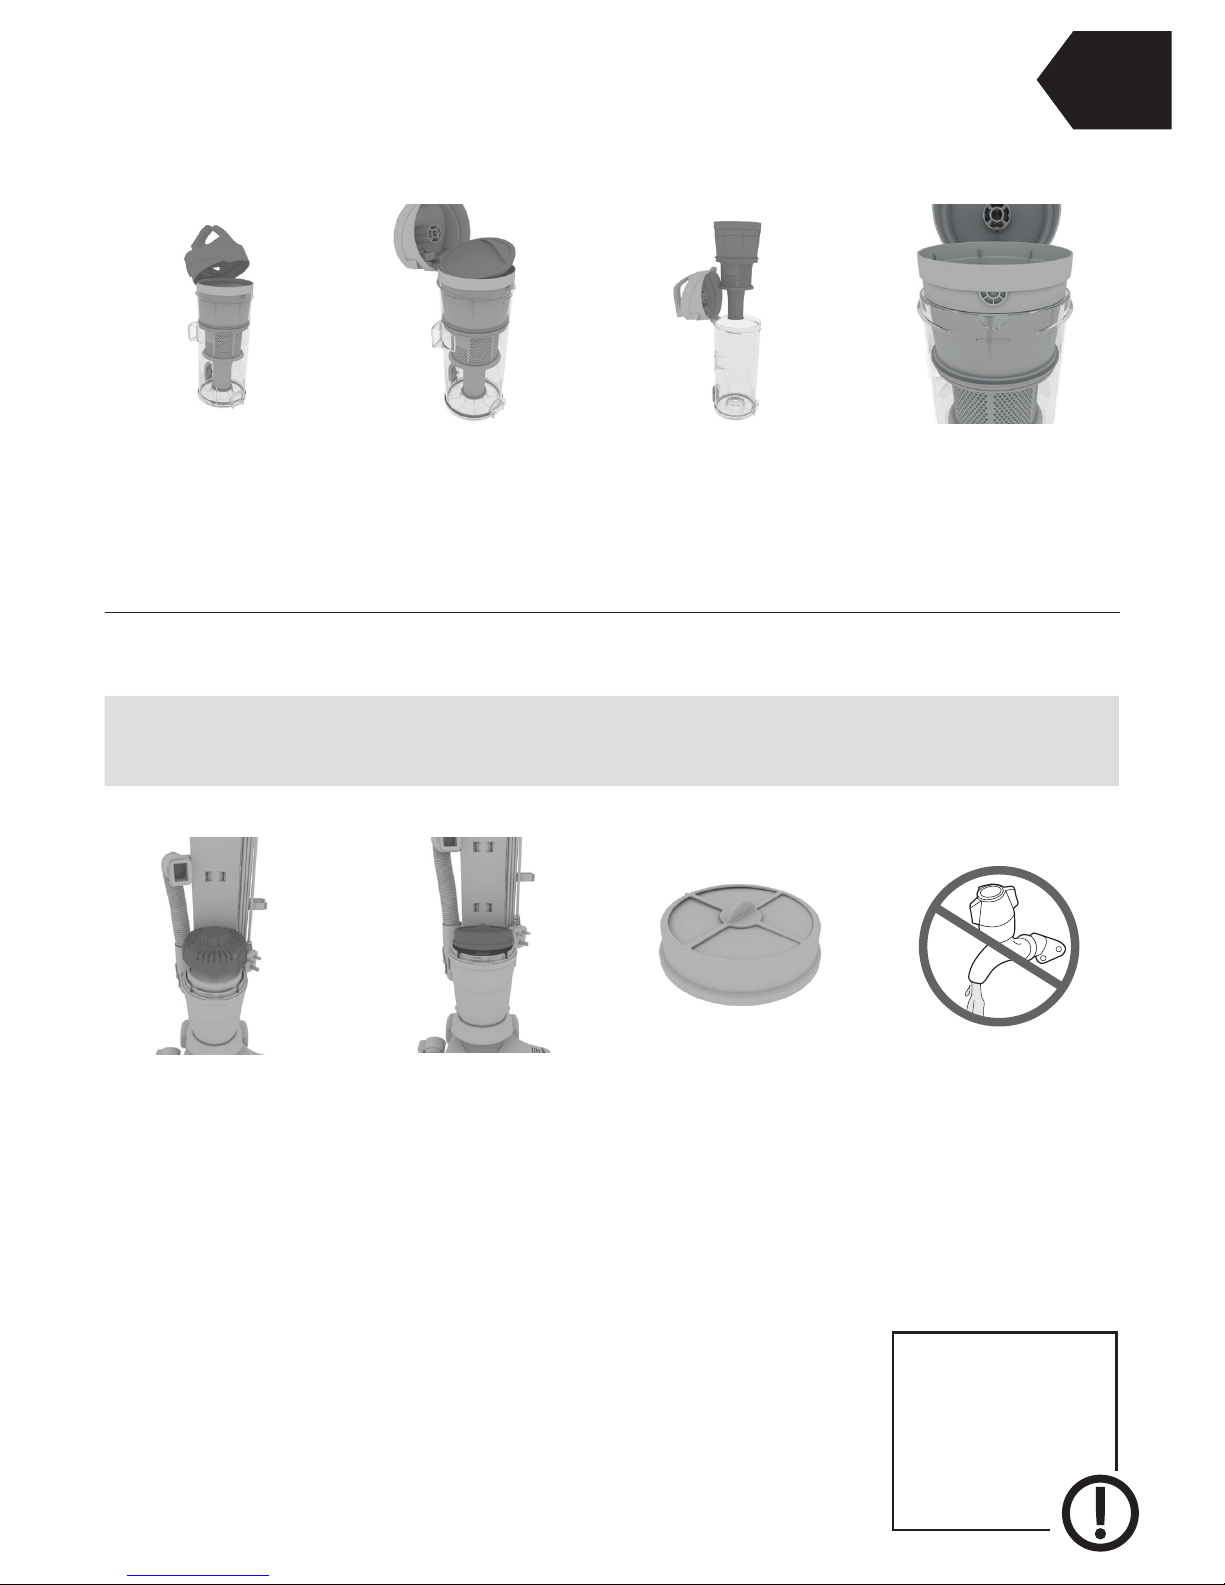
Cleaning the separator
Twist the HEPA Media
filter cover anti clockwise and remove.
Check the HEPA
Media filter for any
discolouration.
Lift and remove the
HEPA Media filter.
Lift the dirt cup lid
release clip. In a hinge
like manor lift the dirt
cup lid.
Pull the rinseable and
replaceable filter tab
and remove the filter
from the dirt cup.
Lift and remove
separator out of dirt
cup. Using a soft brush
remove any dirt/debris
from separator.
Re fit the separator
making sure the semi
circular tab on the
separator fits into the
groove on the
dirt cup.
Taking care of your machine
HEPA Media filter maintenance
IMPORTANT: The post-motor filter is designed to oer long life with no maintenance. The filter
should be checked periodically and when heavily discoloured it should be replaced. Please do not
wash, scrub or brush the filter as this will damage the filter.
Don’t use your
vacuum cleaner
without all of the
filters in place.
CAUTION
Let’s talk technical
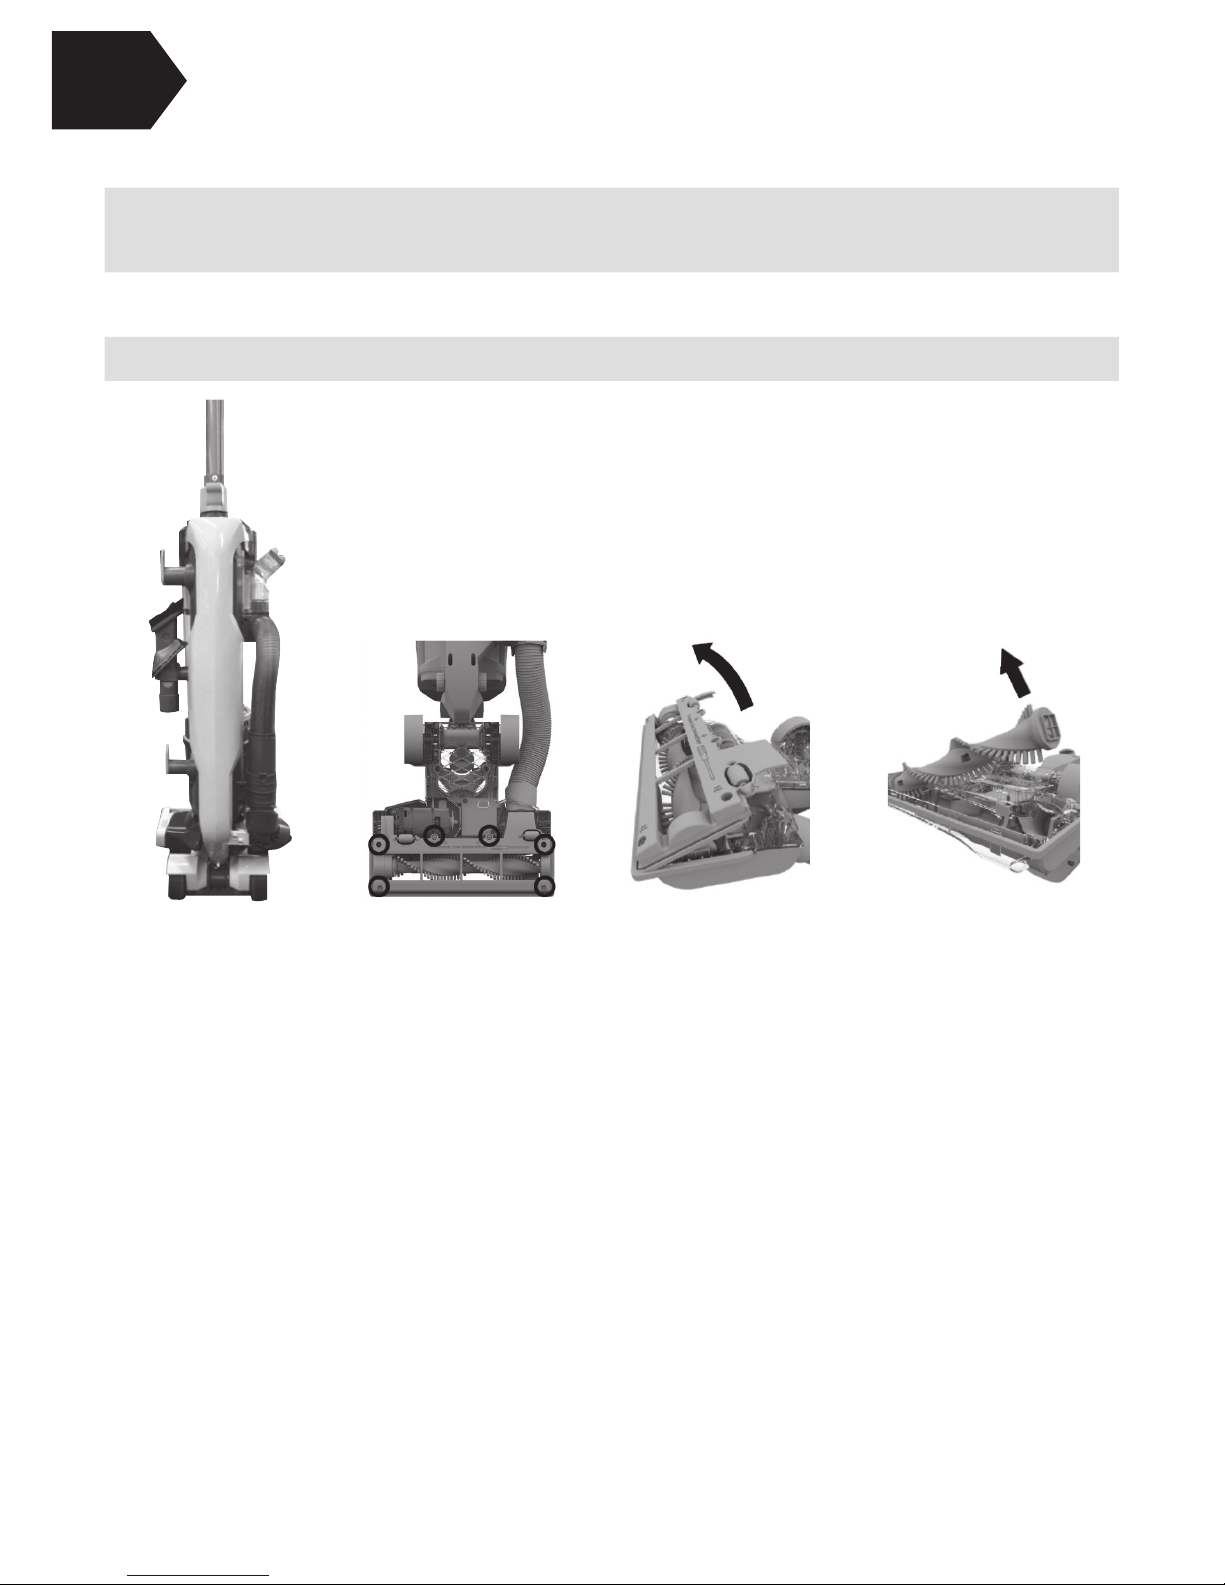
Flip vacuum over.
Cleaning the brushroll
IMPORTANT: Unplug and switch o vacuum cleaner before performing maintenance or
troubleshooting checks. If the brushroll has been obstructed, the Motor Protection Sensor may
have been activated.
Any other servicing should be done by an authorized service representative. If appliance
is not working as it should, has been dropped, damaged, left outdoors, or dropped into
water, take it to a service center prior to continuing use.
Remove the 6
screws with a Phillips
screwdriver.
Pull out the brushroll
and remove debris.
Rotate bottom plate
o.
CAUTION: To reduce the risk of injury from moving parts - unplug before servicing.
See us do it:
Hoover.com/video-instruction-guide
Let’s talk technical
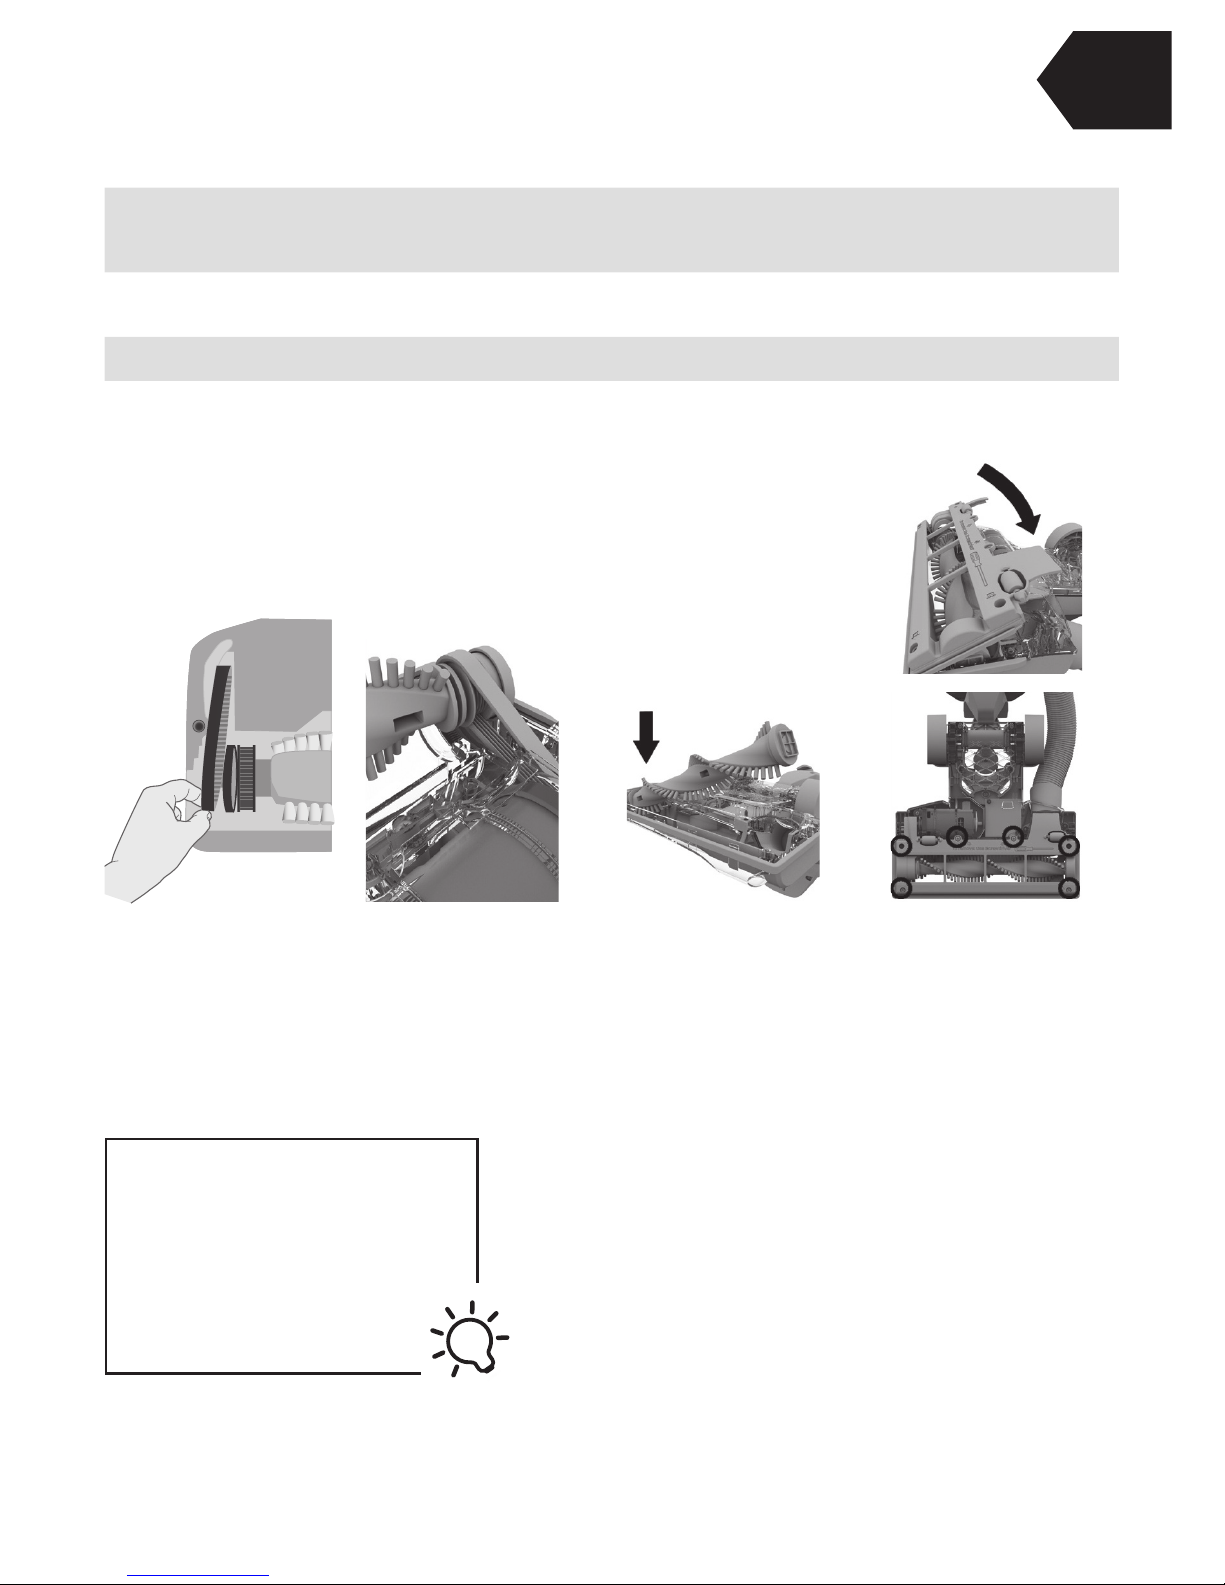
IMPORTANT: Rotate brushroll manually to make sure the belt is properly installed. Vacuum is
equipped with an automatic brushroll shut-o in event of overload or jam. Check for obstructions
in the brushroll area and remove any obstructions.
Slide belt over motor
shaft with the lettering
on the outside of the
belt.
Slide other end of
belt around end of
brushroll.
With belt in place,
slide brushroll into
nozzle making sure
that the brushroll end
caps are in the correct
orientation.
Replace the bottom
plate and reinstall the
6 screws as shown.
LUBRICATION NOT REQUIRED
The motor and brushroll are
equipped with bearings which
contain sucient lubrication for
their lifetime. The addition of
lubricant could cause damage.
Do not add lubricant to motor
or brushroll.
TIP
Cleaning the brushroll
CAUTION: To reduce the risk of injury from moving parts - unplug before servicing.
See us do it:
Hoover.com/video-instruction-guide
For additional maintenance required for
belt or brushroll please contact a HOOVER®
service provider at 1-800-944-9200.

What to do if it goes wrong
• Check the ‘This pack contains’ panel on the box to make sure the
part is included with your vacuum cleaner.
• The plug may not be fully pushed into the electrical socket.
• The motor thermostat may have tripped. If this has happened, unplug
the vacuum cleaner. Remove and empty the dirt cup and check the hose
for blockages. Clean the filters and allow the vacuum cleaner to cool for
approximately 1 hour (if you have washed the filters you will need to wait
24 hours for the filters to fully dry before putting them back into the vacuum
cleaner). If this doesn’t work, there may be no voltage in the wall plug.
Check fuse or tripped breaker, replace fuse or reset breaker in home.
• The brushroll may not be turned on. Go to ‘Getting started’.
• The vacuum cleaner may not be reclined. Go to ‘Getting started’.
• The lift o canister may not be correctly assembled to the spine and nozzle.
Go to ‘Getting started’.
• The brushroll may be obstructed. Go to ‘Let’s talk technical’.
• The brushroll may need resetting. Go to ‘Let’s talk technical’.
• The belt may be broken. Go to ‘Let’s talk technical’.
• The dirt cup may not be fitted correctly, remove the dirt cup and
re-attach making sure it is clicked firmly into place.
• The dirt cup may be blocked, empty the dirt cup and clean the filters.
Go to ‘Taking care of your machine’.
• There may be a blockage in the hose. Check and clear any blockages.
Go to ‘Let’s talk technical’.
• The brushroll may not be turning.
Go to ‘Why isn’t my brushroll rotating?’ below.
• If the accessory/tool will not pick up, check and clear any blockages.
Go to ‘Let’s talk technical’.
SolutionProblem
There is an
accessory
missing
Why does my
vacuum cleaner have
no power?
Why won’t the
vacuum cleaner
pick up?
Why isn’t my
brushroll rotating?
• The filters may not be correctly fitted. Go to ‘Taking care of your machine’.
• The dirt cup may be full or blocked. Go to ‘Taking care of your machine’.
• The filters may need cleaning. Go to ‘Taking care of your machine’.
• There may be a blockage in the hose. Go to ‘Let’s talk technical’.
Why is dust
escaping
from the vacuum?
Any other servicing should be done by an authorized service representative. If appliance
is not working as it should, has been dropped, damaged, left outdoors, or dropped into
water, take it to a service center prior to continuing use.
WARNING: To reduce the risk of personal injury - unplug before cleaning or servicing.

Service & Warranty
for Hoover® Air™Lift Light
†
SERVICE INFORMATION
ANY SERVICING SHOULD BE DONE BY AN AUTHORIZED SERVICE REPRESENTATIVE
Call (800)-944-9200 USA & Canada
In the event that further assistance is required, visit and authorized service center. Find one nearest you by visiting
our website at www.hoover.com. Costs of any transportation to and from any place of repair are to be paid by the
owner. Always identify your product by the model number and manufacturing code when requesting information
or ordering replacement parts. (the model number and manufacturing code for the vacuum appears on the spine
of the vacuum.)
LIMITED FIVE YEAR WARRANTY (DOMESTIC USE)
WHAT THIS WARRANTY COVERS
When used and maintained in normal household use and in accordance with the Owner’s Manual, your HOOVER®
product is warranted against original defects in material and workmanship for a full five year from date of
purchase (the “Warranty Period”). During the Warranty Period, Hoover® will provide labor and parts, at no cost to
you, to correct any such defect in products purchased in the United States, U.S. Military Exchanges and Canada.
HOW TO MAKE A WARRANTY CLAIM
If this product is not as warranted, take or send the product to either a Hoover® Sales and Service Center
or Hoover® Authorized Warranty Service Dealer along with proof of purchase. For an automated referral to
authorized service outlets in the U.S.A., phone: 1-800-944-9200 OR visit Hoover® online at www.hoover.com.
For additional assistance or information concerning this Warranty or the availability of warranty service outlets,
phone the Hoover® Consumer Response Center, Phone 1-800-944-9200, Mon-Fri 8am-7pm EST. In Canada,
contact Hoover® Canada, Carson Building, 100 Carson St., Etobicoke, Ontario M8W 3R9, Phone: 1-800-944- 9200,
Mon-Fri 8am-7pm EST.
WHAT THIS WARRANTY DOES NOT COVER
This Warranty does not cover: use of the product in a commercial operation (such as maid, janitorial and
equipment rental services), filter, brushroll, belt, improper maintenance of the product, damage due to misuse,
acts of God, nature, vandalism or other acts beyond the control of Hoover®, owner’s acts or omissions, use outside
the country in which the product was initially purchased and resales of the product by the original owner. This
warranty does not cover pick up, delivery, transportation or house calls. However, if you mail your product to a
Hoover® Sales and Service Center for warranty service, cost of shipping will be paid one way.
This warranty does not apply to products purchased outside the United States, including its territories and
possessions, outside a U.S. Military Exchange and outside of Canada. This warranty does not cover products
purchased from a party that is not an authorized retailer, dealer, or distributor of Hoover® products.
OTHER IMPORTANT TERMS
This Warranty is not transferable and may not be assigned. This Warranty shall be governed and construed under
the laws of the state of Ohio. The Warranty Period will not be extended by any replacement or repair performed
under this Warranty.
THlS WARRANTY lS THE EXCLUSlVE WARRANTY AND REMEDY PROVlDED BY HOOVER®. ALL OTHER
WARRANTIES, EXPRESSED OR lMPLlED, lNCLUDlNG WARRANTlES OF MERCHANTABlLlTY OR FITNESS FOR
PARTICULAR PURPOSE, ARE DISCLAIMED. IN NO EVENT WILL HOOVER BE LlABLE FOR ANY SPEClAL,
lNDlRECT, INCIDENTAL OR CONSEQUENTIAL DAMAGES OF ANY KlND OR NATURE TO OWNER OR ANY
PARTY CLAlMlNG THROUGH OWNER, WHETHER BASED IN CONTRACT, NEGLIGENCE, TORT OR STRICT
PRODUCTS LlABlLlTY OR ARlSlNG FROM ANY CAUSE WHATSOEVER.
Some states do not allow the exclusion of consequential damages, so the above exclusion may not apply to you.
This warranty gives you specific rights; you may also have others that vary from state to state.
 Loading...