

Hoover Air Cordless Lift Instruction Manual
Instruction Manual IMPORTANT: Read carefully before assembly and use.
©2014 Techtroni c Floor Care Tech nology Lim ited. All Ri ghts Reser ved. Dist ributed by Roy al Applian ce Mfg. Co. Gl enwillow, Oh 44139 # 961151941 ID112561

Welcome to
Hoover
®
ownership.
It’s Guaranteed.
Hoover will replace your bat teries under our 5 year
LithiumLife
TM
limited warranty. See Warrant y for complete details.
Text "AirCordlessLift" to
72105. Text HELP for options.
(Messa ge and data ra tes may appl y.
For full t erms and con ditions, v isit
Hoover.com/AirCordless Lift.)
Hoover.com/AirCordlessLift
(8 88) 67 9-2121
Make it official.

Safety Instructions
Your LithiumLife
™
Battery
Getting started
Using your Air
TM
Cordless Lift as an Upright
Using your Air
TM
Cordless Lift as a Canister
Using your Air
TM
Cordless Lift Hose, Wand & Accessories
Keep Your Air
TM
Cordless Lift Running Properly
Need Help?
Warranty
1
4
5
6
7
8
9
14
15
Your Guide:

IMPORTANT SAFETY INSTRUCTIONS
SAVE THESE INSTRUCTIONS
When using an electrical appliance, basic precautions should always be
followed, including the following:
READ ALL INSTRUCTIONS BEFORE USING THIS APPLIANCE.
THIS PRODUCT IS INTENDED FOR HOUSEHOLD USE ONLY.
IF USED COMMERCIALLY WARRANTY IS VOID.
WARNING: TO REDUCE THE RISK OF FIRE,
ELECTRIC SHOCK, DAMAGE OR INJURY:
•Fully assemble before operating.
• Do not use appliance on wet surfaces. Do not expose appliance to rain.
Store appliance indoors.
• The charger is for indoor use only. Be sure to always keep the battery and
charger indoors in a dry place.
• Do not allow to be used as a toy. Not intended for use by children age 12
and under. Close supervision is necessary when used near children. To
avoid injury or damage, keep children away from product, and do not
allow children to place fingers or other objects into any openings.
• Use only as described in this manual. Use only Hoover
®
recommended
attachments and products.
• Do not use charger with damaged cord or plug. If appliance or charger is not
working as it should, has been dropped, damaged, left outdoors, or dropped
into water, take it to a service center prior to continuing use.
• Do not pull or carry charger by cord, use cord as a handle, close a door on
cord, or pull cord around sharp edges or corners. Do not place product on
cord. Do not run appliance over cord. Keep cord away from heated surfaces.
• Do not unplug charger by pulling on cord. To unplug charger, grasp the plug,
not the cord.
• Do not handle charger including charger plug and charger terminals, or
appliance with wet hands.
• Do not put any object into openings. Do not use with any opening blocked;
keep free of dust, lint, hair, and anything that may reduce air flow.
• Keep hair, loose clothing, fingers, and all parts of body away from openings
and moving parts.
• Use extra care when cleaning on stairs. To avoid personal injury or damage,
and to prevent the cleaner from falling, always place cleaner at bottom of
stairs on floor. Do not place cleaner on stairs or furniture, as it may result in
injury or damage.
• Do not use to pick up flammable or combustible liquids, such as gasoline,
or fine wood sandings, or use in areas where they may be present.
1

• Do not pick up anything that is burning or smoking, such as cigarettes,
matches, or hot ashes.
•Do not use without Dirt Cup and/or Filters in place.
• Turn power switch off and remove batter y before installing Multi- Floor Brush
roll or Hard Floor Brush roll.
• Always turn off this appliance before connecting or disconnecting wand
or tools.
• Do not incinerate the charger, battery, or appliance even if it is severely
damaged. The batteries can explode in a fire.
• This product includes rechargeable lithium-ion batteries. Do not expose
batteries to high temperatures, as they may catch fire and/or explode.
•Do not expose battery to crushing, incineration or similar actions.
• Do not dispose of battery in a fire or trash compactor. See battery disposal
section for directions.
•Do not attempt to disassemble battery.
• Unplug the charger from the outlet before any routine cleaning or
maintenance.
• Leaks from battery cells can occur under extreme conditions. If any liquid
gets on the skin wash quickly with soap and water. If any liquid gets into the
eyes, do not rub eyes, immediately flush them with clean water continuously
for a minimum of 15 minutes. Seek medical attention immediately.
• Use only the charger (Hoover Part #BH03200 or #BH03220) supplied by
Hoover
®
to recharge.
• Use only the battery (Hoover Part #BH03100 or #BH03120) supplied
by Hoover
®
. Other batteries may burst causing serious personal injury
or damage.
• Do not touch or insert objects into battery pack or charger terminals.
•Do not attempt to short circuit the battery or charger terminals.
WARNING: This product contains chemicals known to the
State of California to cause cancer, birth defects or reproductive harm.
WASH HANDS AFTER HANDLING.
WARNING: TO REDUCE THE RISK OF ELECTRIC
SHOCK, THE CHARGER HAS A POLARIZED PLUG (ONE BLADE IS
WIDER THAN THE OTHER). THIS PLUG WILL FIT IN A POLARIZED
OUTLET ONLY ONE WAY. IF THE PLUG DOES NOT FIT FULLY
IN THE OUTLET, REVERSE THE PLUG. IF IT STILL DOES NOT FIT,
CONTACT A QUALIFIED ELECTRICIAN TO INSTALL THE PROPER
OUTLET. DO NOT CHANGE THE PLUG IN ANY WAY.
2

3
CAUTION: TO REDUCE THE RISK OF DAMAGE:
• Avoid picking up hard, sharp objects with this product, as they may
cause damage.
• Store appropriately indoors in a dr y place. Do not expose machine to
freezing temperatures. This product includes rechargeable lithium-ion
batteries. Do not expose batteries to high temperatures,as they may
catch fire and/or explode.
• Do not use sharp objects to clean out hose as they can cause damage.
• With brush roll on, do not allow cleaner to sit in one location for an
extended period of time, as damage to floor can result.
BATTERY DISPOSAL
WARNING:
RISK OF EXPLOSION OR
EXPOSURE TO TOXIC MATERIAL
CAUTION: The battery used in this device may present a
risk of fire or chemical burn if mistreated. Do not disassemble, heat above
manufacturer’s maximum temperature limit (60°C/ 140°F), or incinerate.
Replace battery with Hoover® battery Part #BH03100 or BH03120 only. Use
of another battery may present a risk of fire or explosion. Dispose of used
battery promptly. Keep away from children. Do not disassemble and do not
dispose of in a fire. Do not attempt to disassemble the battery or remove any
component projecting from the battery terminals. The battery and charger
have no user serviceable parts. Fire or injury may result. Prior to disposal,
protect exposed terminals with heavy insulating tape to prevent shorting.
LITHIUM-ION BATTERIES
The battery must be collected, recycled or disposed of in an
environmentally sound manner. The EPA certified RBRC Battery
Recycling Seal on the lithium-ion (Li-ion) battery indicated
Techtronic Industries, a corporate affiliate of Hoover, Inc., is
voluntarily participating in an industry program to collect and
recycle these batteries at the end of their useful life, when taken
out of service in the United States or Canada. The RBRC program
provides a convenient alternative to placing used Li-ion batteries
into the trash or the municipal waste stream, which may be illegal in
your area. Please visit www.rbrc.org/call2recycle/ for information
on Li-ion battery recycling and disposal bans/restrictions in your
area. Hoover, Inc., involvement in this program is part of our
commitment to preserving our environment and conserving our
natural resources.
44
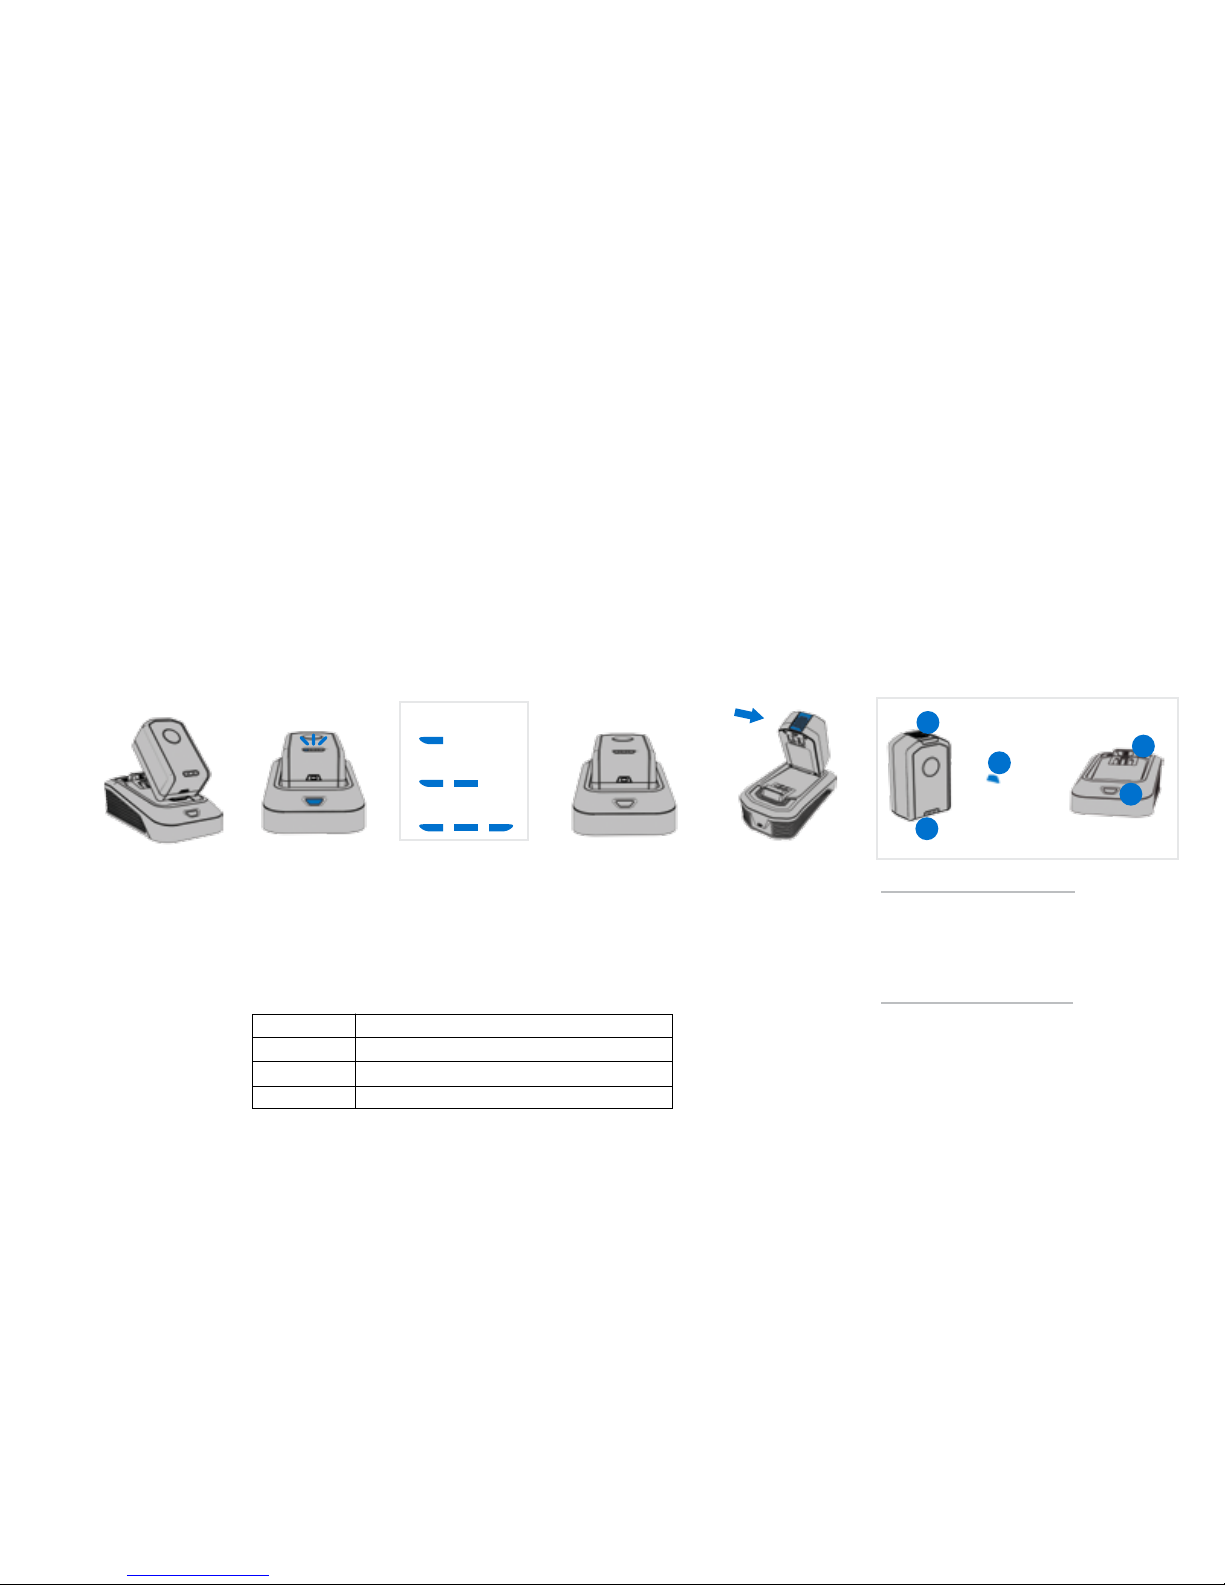
Getting started with your LithiumLife™ or LithiumLife™ Extended Runtime battery
To bring the batter y
to full life, place the
battery onto the
cha rger.
LithiumLife
™
battery
does not come fully
charged.
When charging, the
charger light will turn
solid blue and the blue
LEDs on the battery
will light up to inidcate
charging progress.
The charger light will
turn off when fully
charged.
If the charger LE D
flashes red, an error
has occurred.
Remove and replace.
To remove the battery,
press the blue
release but ton and
lift t he batter y while
holding down on t he
charger base.
Charging the battery Removing the battery
Battery
1. Blue Release Button
2. LED Charge Level Indicator
3. Charge Level Check Button
Charger
4. Batter y Cavity
5. LED Indicator
1
4
2
5
25% Charge d
50% Charged
75% Charged
It’s ready when you are.
You can lea ve your batt ery on the c harger–
even af ter it’s char ged. Refere nce the char t
on page 12 to fi nd the charg e time for your
bat tery and ch arger mode l.
It cleans powerfully at any charge level.
Whet her it’s 25% charg ed or 100% full , get
fade -free po wer until the e nd of the char ge.
It’s versatile.
This ba ttery a nd charger ar e compatib le
with t he rest of our L ithiumLi fe™ family.
Runtime.
Runti me will vary b ased on the p articul ar
combi nation of Li thiumLif e batter y model and
FloorM ate or Air
TM
Cordl ess cleane r products .
If usin g a LithiumL ife
™
bat tery mode l differe nt than
the ba ttery th at came wit h your Air
TM
Cordl ess
produ ct, runtim e differe nces will occ ur.
To check the charge
level of your bat tery,
press the Charge
Level Check Button.
What does it mean when charger light is...
Solid
Blue Bat tery Charg ing Progress : 1-3 LEDs
Fully Ch arged
Leave B attery o n Ch arger. It's to o ho t or co ld to charge.
Call us at 1- 888-679 -2121
Off
Flash ing Blue
Flash ing Red
*Images may differ
from actual product.
NOTE: All LithiumLife
™
batterie s are
compatible with the entire FloorMate
and Air
™
Cordle ss family of pro ducts.
3
5
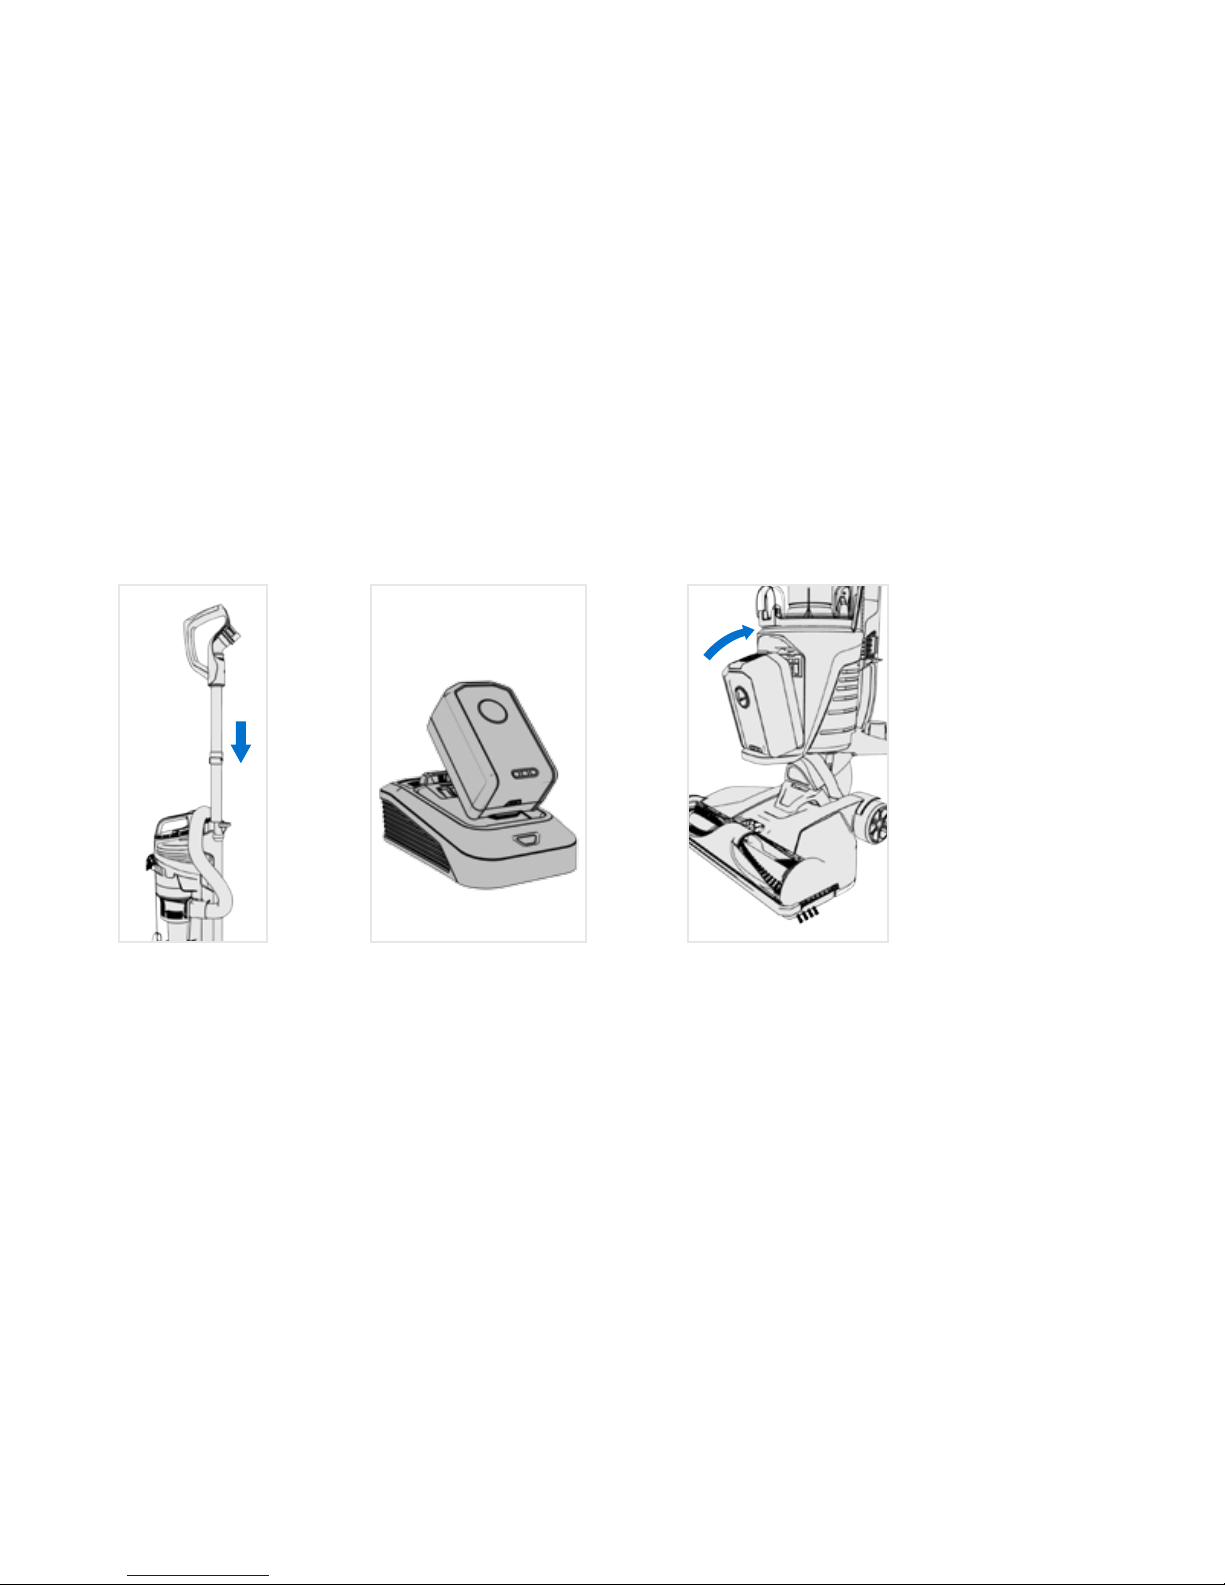
Set batter y as shown and
pivot into place.
Battery does not come fully
charged. Place the battery
on the charger if full runtime
is needed.
Insert wand until it clicks.
1
3
2
Getting started with your Air™ Cordless Lift
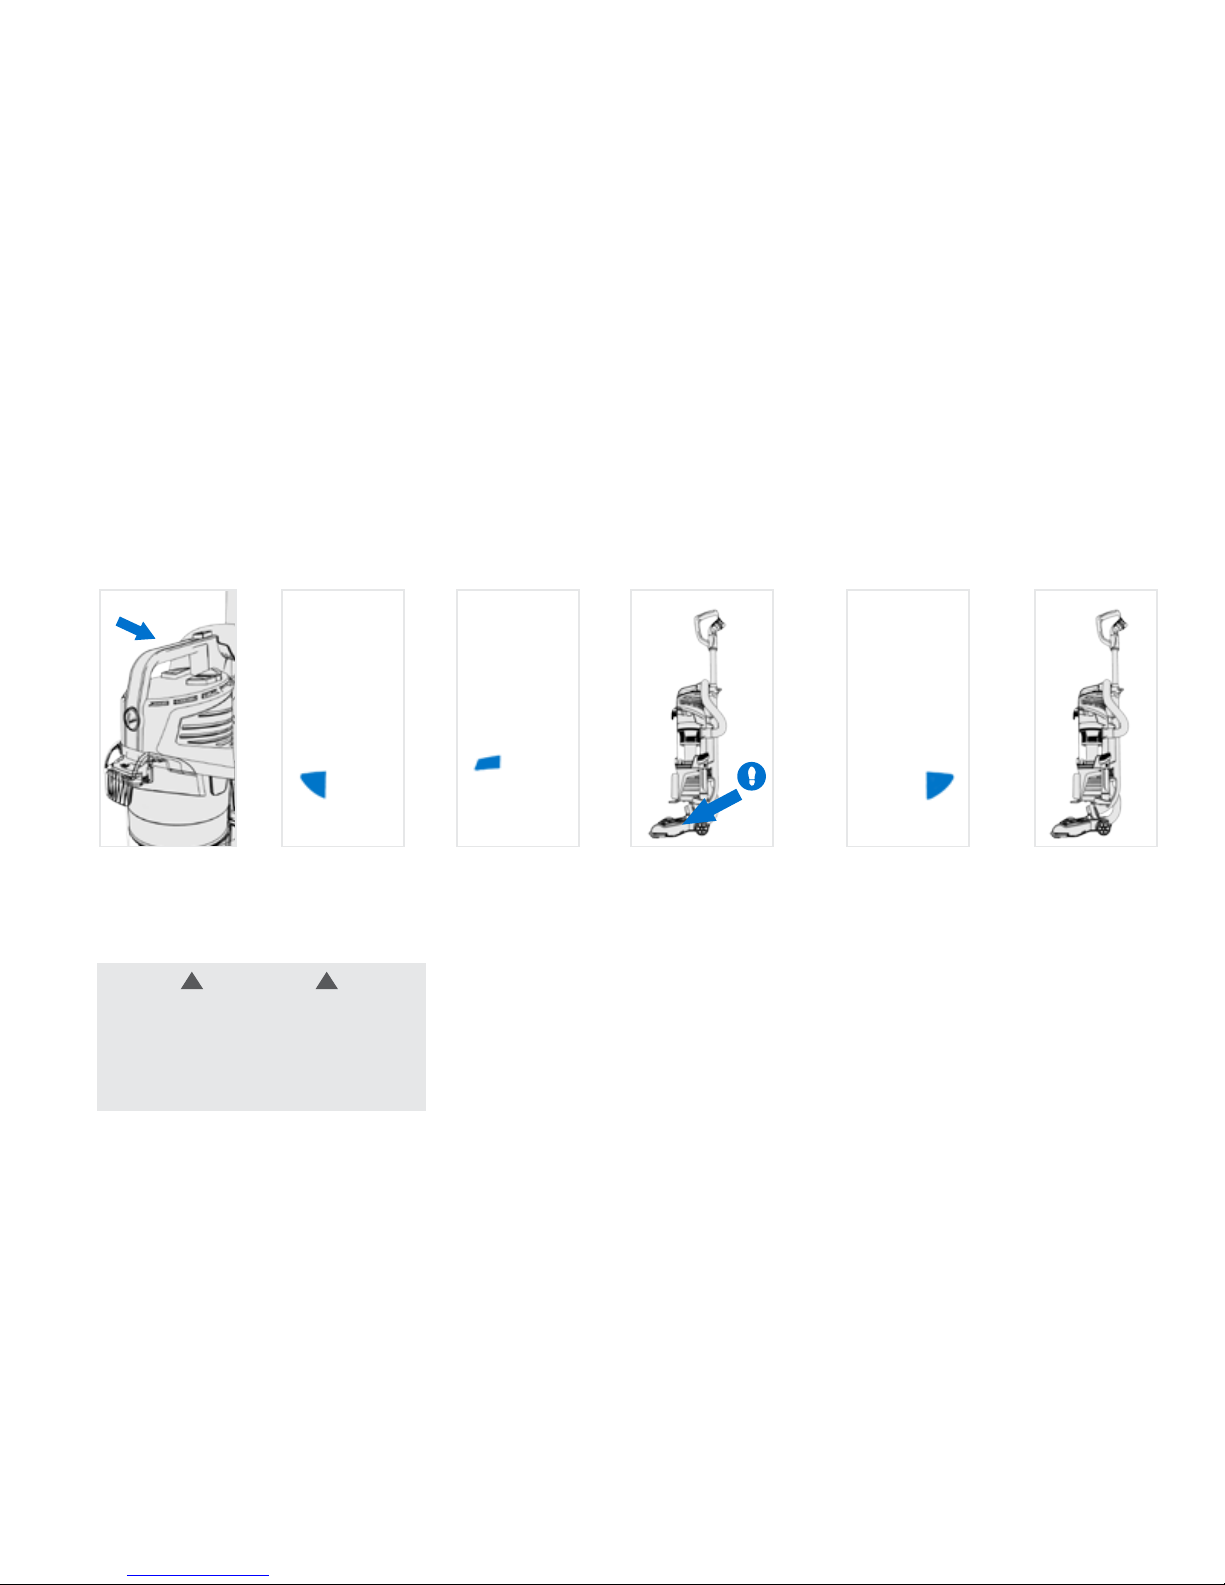
Using your Air™ Cordless Lift as an upright
It’s easiest to
lift and carry
by the handle.
Push here to
activate Boost
Mode for
improved suction.
Using Boost Mode
will shorten
battery runtime.
Step here and pull
the handle back to
activate brush roll
and begin vacuuming.
For optimal
cleaning keep the
brush roll rotating
for all surfaces.
For delicate or
highly polished
floors push here to
switch off brush roll.
Set the handle
upright to use the
hose or to remove
the canister. Brush
roll will not spin in
upright position.
Push here to turn
on and off.
1
2 3
4 5
6
NOTE: Boost M ode automatical ly
switc hes off whe n power is turne d off.
CAUTION
Use extra care when cleaning on stairs. To
avoid personal injury or damage, and to
prevent the cleaner from falling, always place
the vacuum at the bottom of stairs or on floor.
Do not place vacuum on stairs or furniture, as it
may result in injury or damage.
! !

Using your Air™ Cordless Lift as a canister
Pivot canister
forward and lift off.
The canister is
designed to be held
by the carry handle
or stand on its own.
Use Power & Boost
buttons as described
on pg. 6. The brushroll
button does not function
in canister mode.
Holding carry handle,
align bottom of canister
with docking tab on
upright base and pivot
until canister clicks
into place.
Grasp carry handle
and press the button
to release canister.
1
2 3
4 5
WARNING
Always turn off this appliance before connecting
or disconnecting the Canister or tools.
!!
7
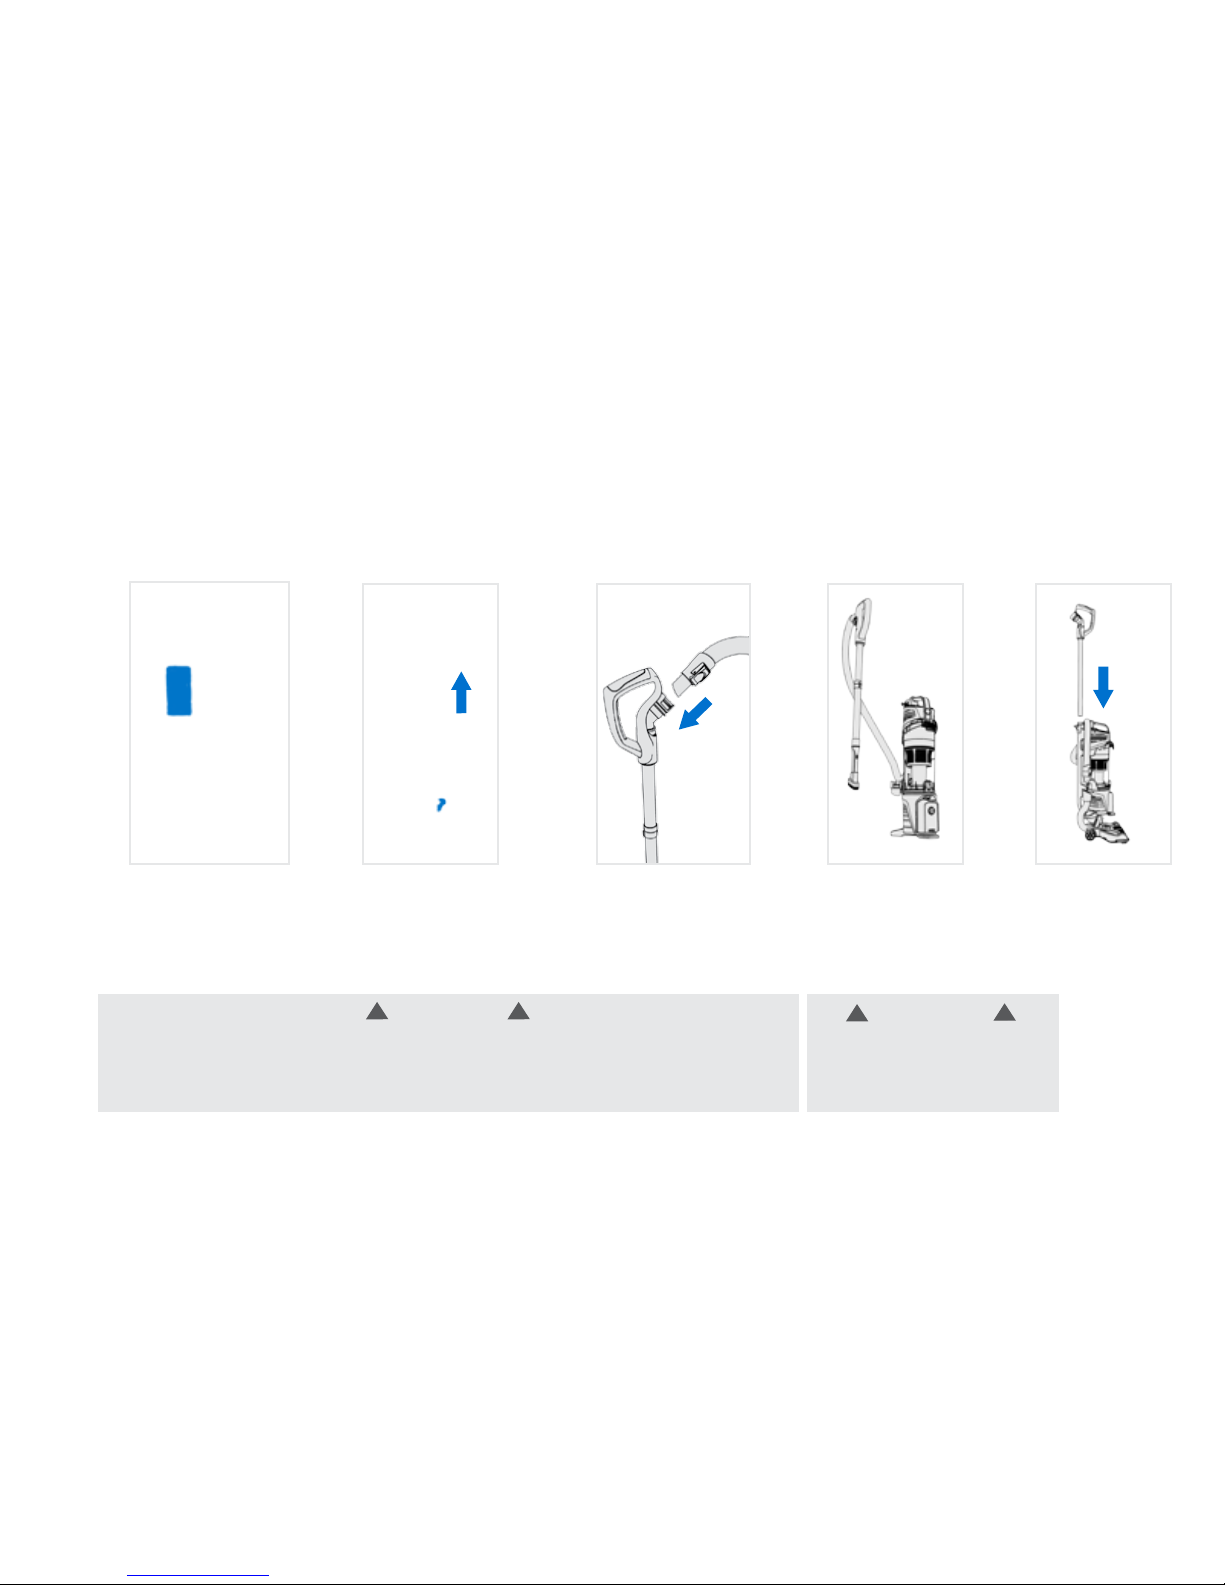
To use the hose in
upright or canister
mode, press hose
release button and
pull out.
Remove the wand by
pressing the wand
release lever down and
pulling the wand out.
Insert the hose end
into the wand
handle until it clicks.
Attach tools to clean
stairs, upholstery
and more.
Reinsert wand
when you're done.
Replace hose to its
original position.
1 2 3
4
5
WARNING
Always turn off this appliance
before connecting or
disconnecting wand or tools.
!
!
8
CAUTION
Use extra care when cleaning on stairs. To avoid personal injury or damage, and to prevent
the cleaner from falling, always place the vacuum at the bottom of stairs or on floor.
Do not place vacuum on stairs or furniture, as it may result in injury or damage.
When using tools, always ensure handle is in upright position.
Using your Air™ Cordless Lift hose, wand and accessories
!!
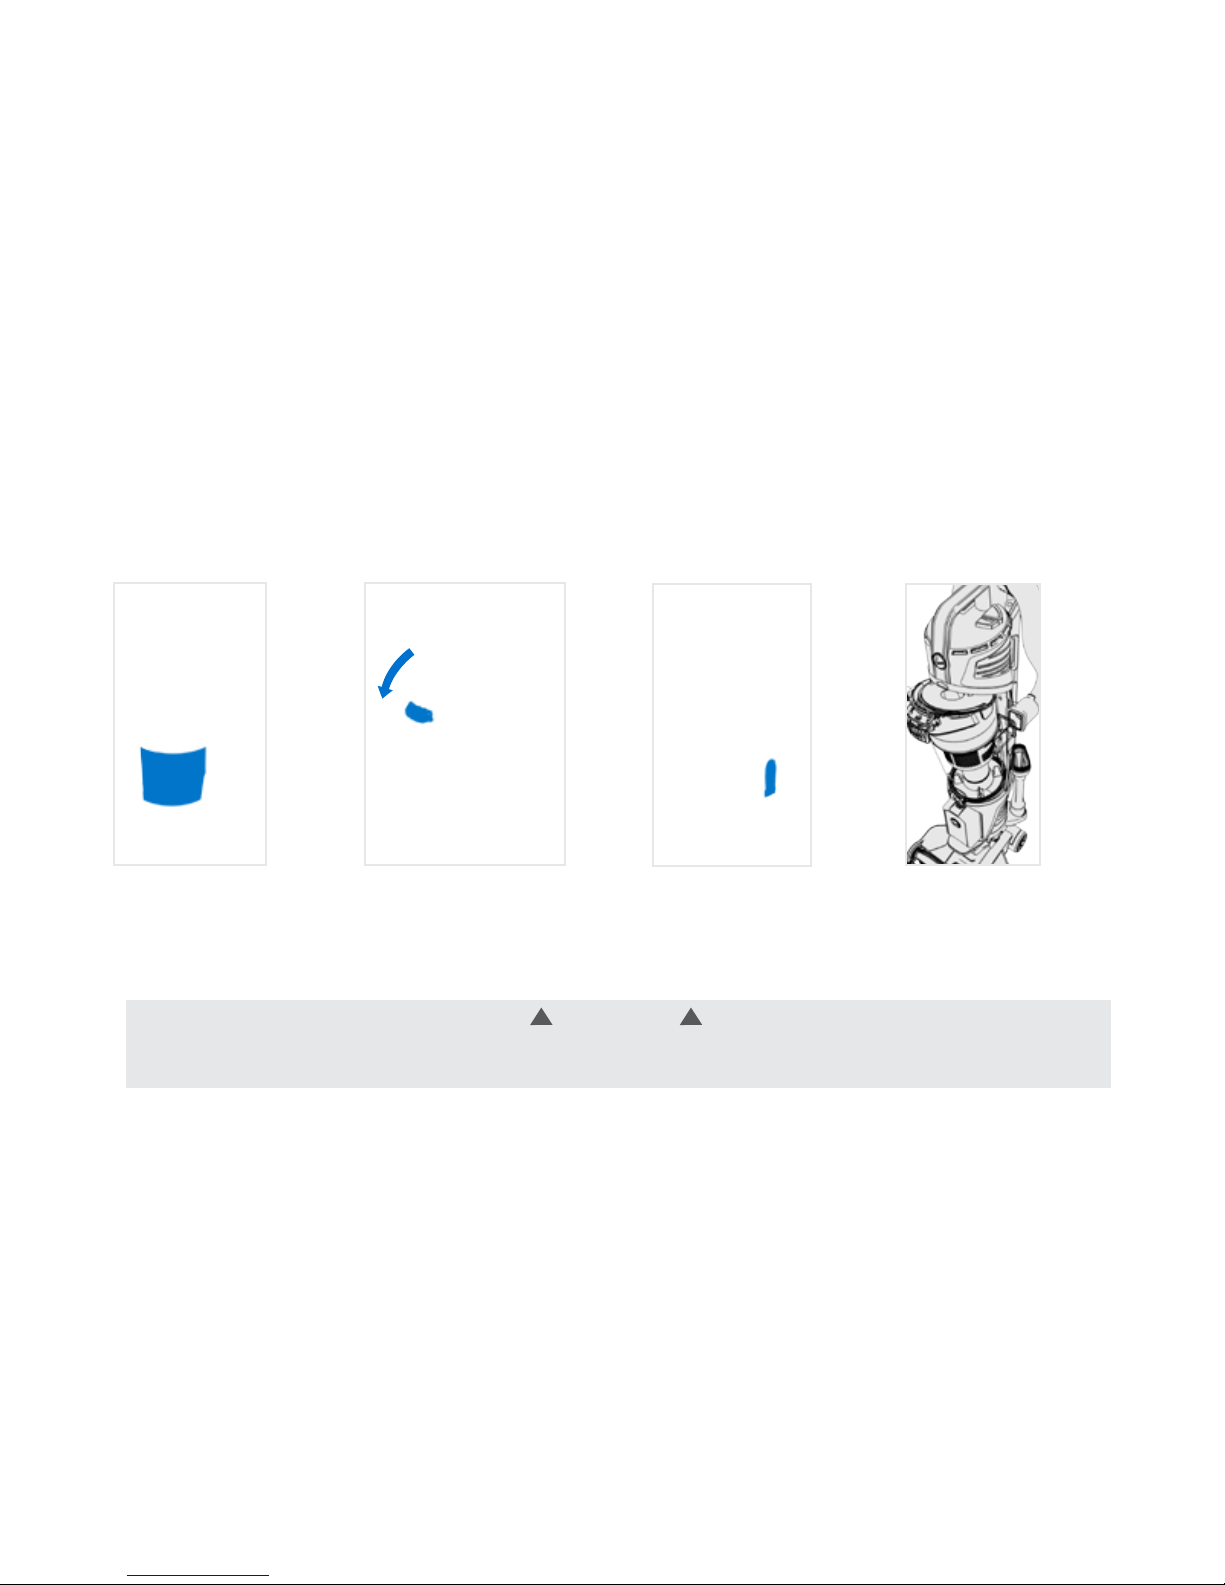
Keep your Air™ Cordless Lift running properly: dirt cup
Empty the dirt
cup when it
reaches the
max fill line.
Press the dirt cup
empty button to
release dirt. Snap
the dirt cup closed.
Place the dirt cup
back in, bottom
first until it clicks
into place.
Press dirt cup release
button then pivot the
dirt cup out.
1 2 3 4
WARNING
To reduce the risk of personal injury, remove battery before cleaning or servicing. Do not use vacuum without dirt cup or filters in place. Very fine
materials, such as face powder or cornstarch may seal the filter and cause a reduction in performance. When using the vacuum for this type of
dust, empty the cup and clean the filters often. Do not lift dirt cup by filter housing handle.
! !
9
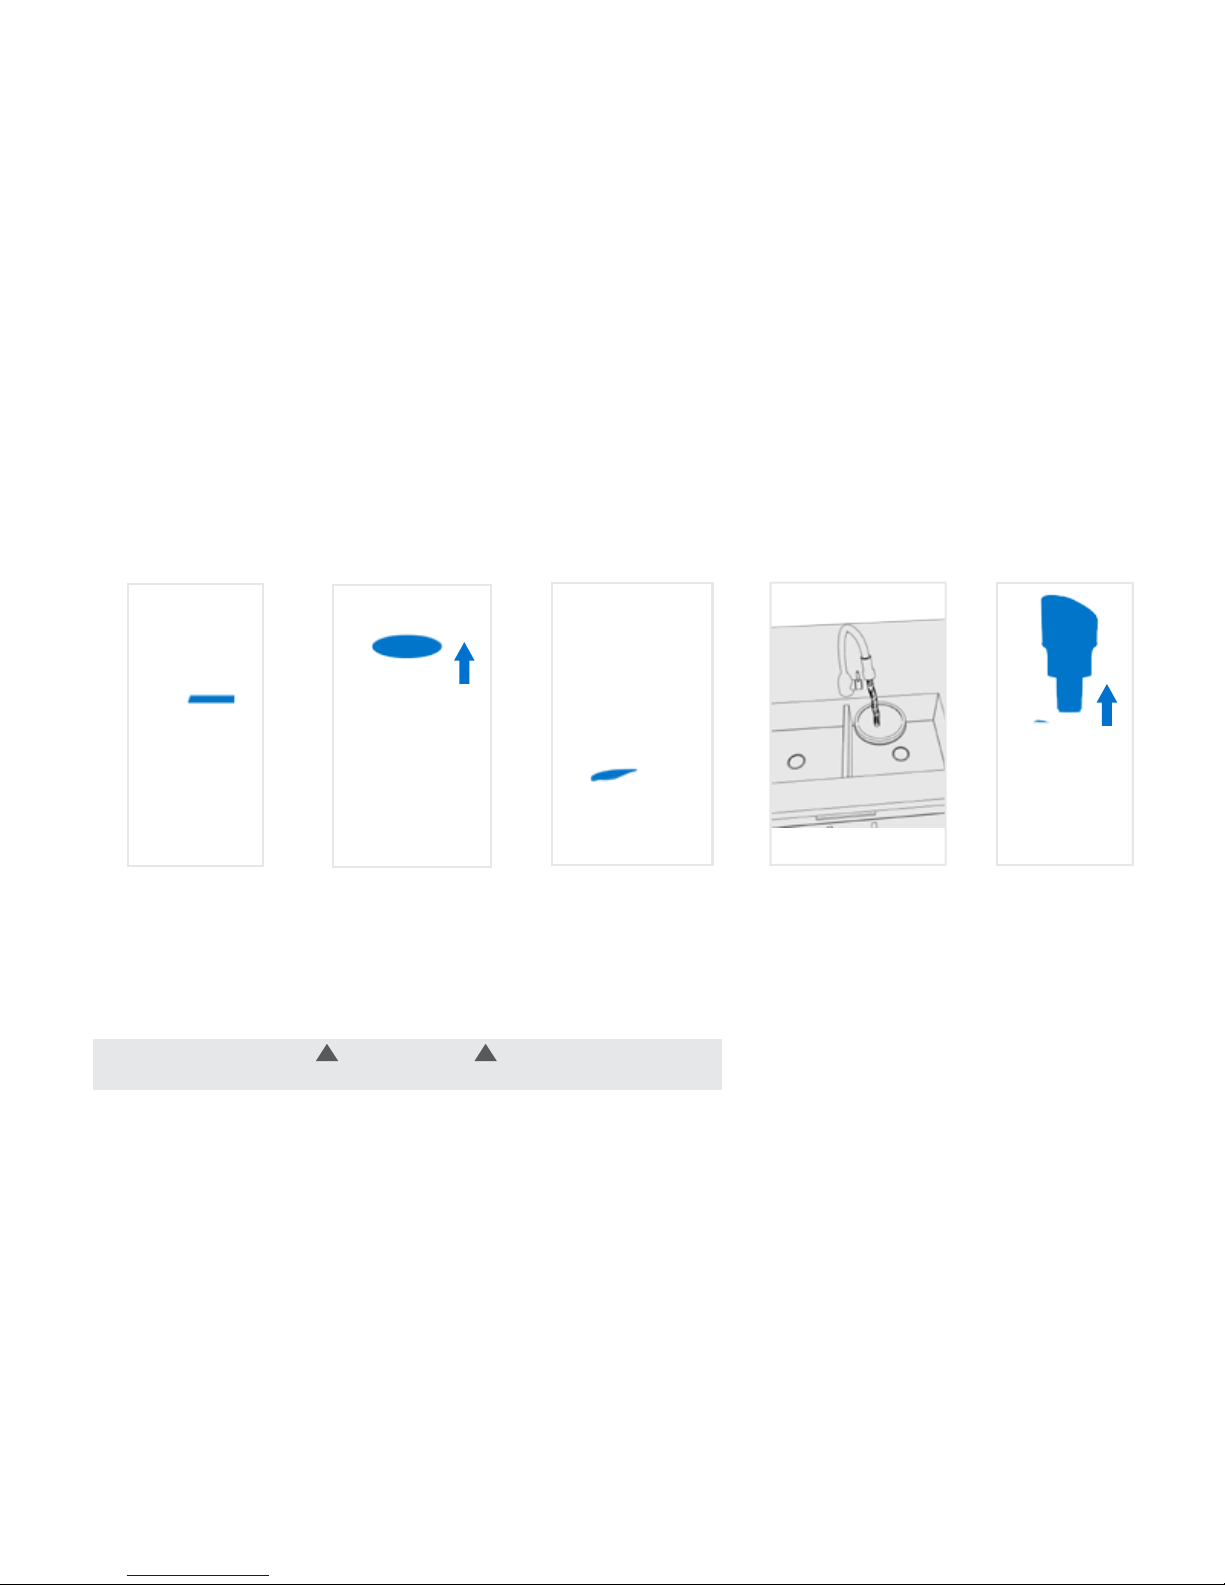
Keep your Air™ Cordless Lift running properly: filters & core
The Air™ Cordless
Lift is equipped
with one filter.
Clean this filter
every 4-6 uses.
Pull the mesh tab
to remove filter.
Rinse for 2
minutes in clear
warm water; dry
for 24 hours.
Slide the core out
of the dirt cup.
Remove the dirt
cup as shown on
page 9. Lift out
filter assembly by
the handle.
21 3 4 5
10
WARNING
To reduce the risk of personal injury, remove battery before cleaning or servicing.
!!
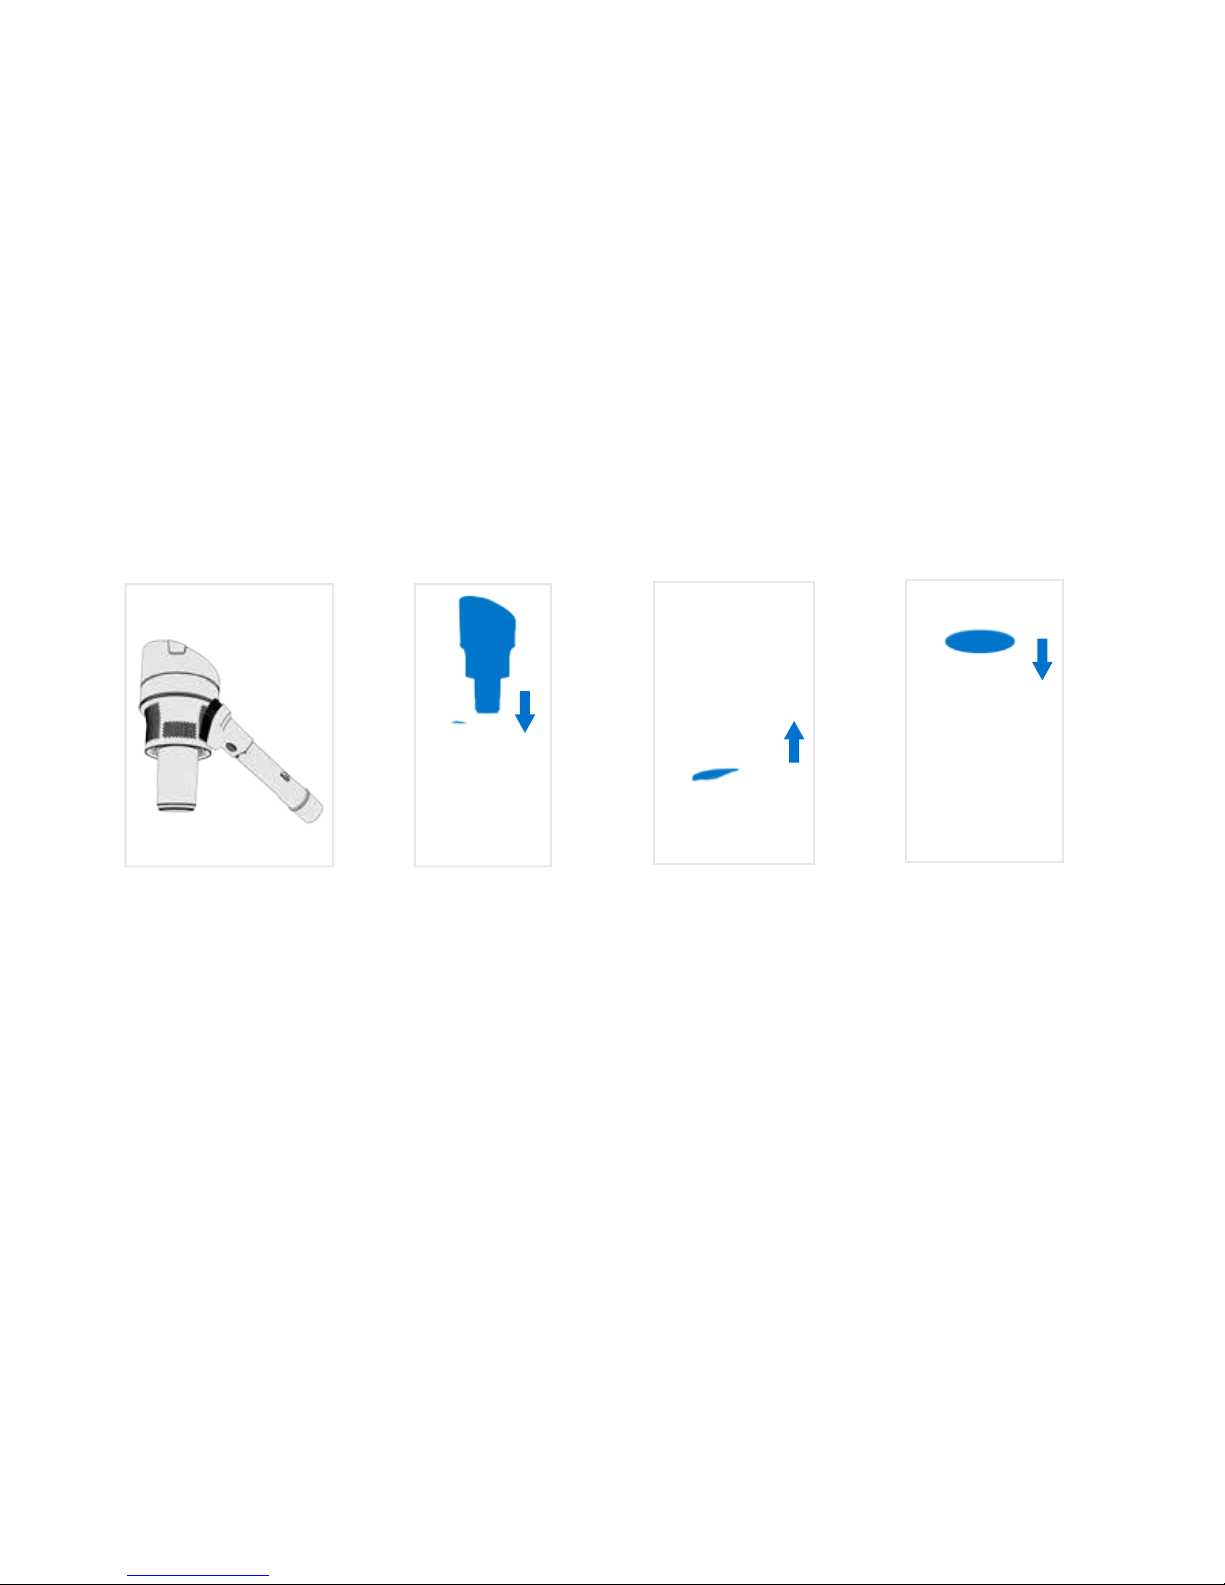
Insert the core into
the dirt cup so the
tabs align.
Use 2-in-1 tool to brush
any dirt or debris from core.
Do not turn vacuum on.
Insert filter assembly back
into the core by aligning
the tabs.
Replace the dry filter
with the mesh tab
facing out.
76 8
9
11
Keep your Air™ Cordless Lift running properly: filters & core
 Loading...