

Page 1

Page 2
Fill
The HOOVER commercial upright cleaner you have just purchased is for
carpet and rug cleaning. The cleaning tool attachments are for floor cleaning
and above the floor cleaning.
in;and:mWn
!
Your cleaner is a model
and has a serial number
For your personal records, please enter the model number and serial number
in the spaces provided above and retain in a safe place.
The model number and serial number appear on the bottom of the cleaner.
. . . . . . . . . . . . . . . . . . . . . . . . . . . . . . . . . . . . . . . . . . . . . . . . . . . . . . . . . . . . . . . . . . . . . . ...*....
. . . . . . . . . . . . . . . . . . . . . . . . . . . .
..*................................................
Save!
Index
Cleaner Description
Energy Saving Tips
How to Unpack and Assemble Cleaner
How to Use on Carpet
How to Use Cleaning Tools
Important Safeguards
Lubrication
Maintenance of Commercial Cleaner
Authorized Hoover Service
How to Replace Belt
How to
Emptying the Bag
User Check List
......................................................
Replace
...........................................
...........................................
....................................
..........................
.......................................
..........................
...............................
Brushes
...................................
................................................
.........................
........... 3-5
3
18
5-7
8-11
2
17
17
13,14
15,16
12,13
17
.
.-a-...-.
1
. .__ -.._
~.
..~-
@ The Hoover Company 1970
Page 3
ImDortantsa#eauards!
l
l
l This cleaner has been equipped with a 3-wire grounding cord in compli-
ance with electrical codes devised for your safety. Use it in a grounded
outlet.
l The use of an extension cord is not recommended. If an extension cord
is absolutely necessary, use only a 3-wire grounding extension cord with
a length as short as possible.
l
children. Do not allow vacuum cleaner to be used as a toy or to run unattended at any time.
l Keep hands, feet, loose clothing, and hair away from rotating agitator.
l Don’t run cleaner over cord. It may damage insulation.
l
I-
-
Read all instructions.
Warning: Electric shock could occur if used outdoors or on wet surfaces.
Close supervision is necessary when any appliance is used by or near
Do not use cleaner to pick up matches, or
-u-
-
ashes and cigarette butts.
l Avoid picking up hard, sharp objects with the cleaner. They may damage
the cleaner and the bag.
l Unplug cleaner when not in use. Turn machine off at switch before un-
plugging.
l
Always disconnect cord from electrical outlet before servicing the cleaner.
l Empty bag frequently when picking up very fine materials such as powder.
l Grasp the plug to disconnect from wall outlet to avoid damage to cord,
plug, prongs, or receptacle.
l If cleaner is in disrepair, do not attempt to operate.
l Have repairs made by the qualified personnel at Hoover Factory Service
Centers or Authorized Hoover Warranty Service Dealers.
l
Use vacuum cleaner only for its intended use as described in the instructions. The use of attachments not recommended by the appliance manufacturer may cause hazards.
Save these instructions!
Q
UL
0
2
Page 4
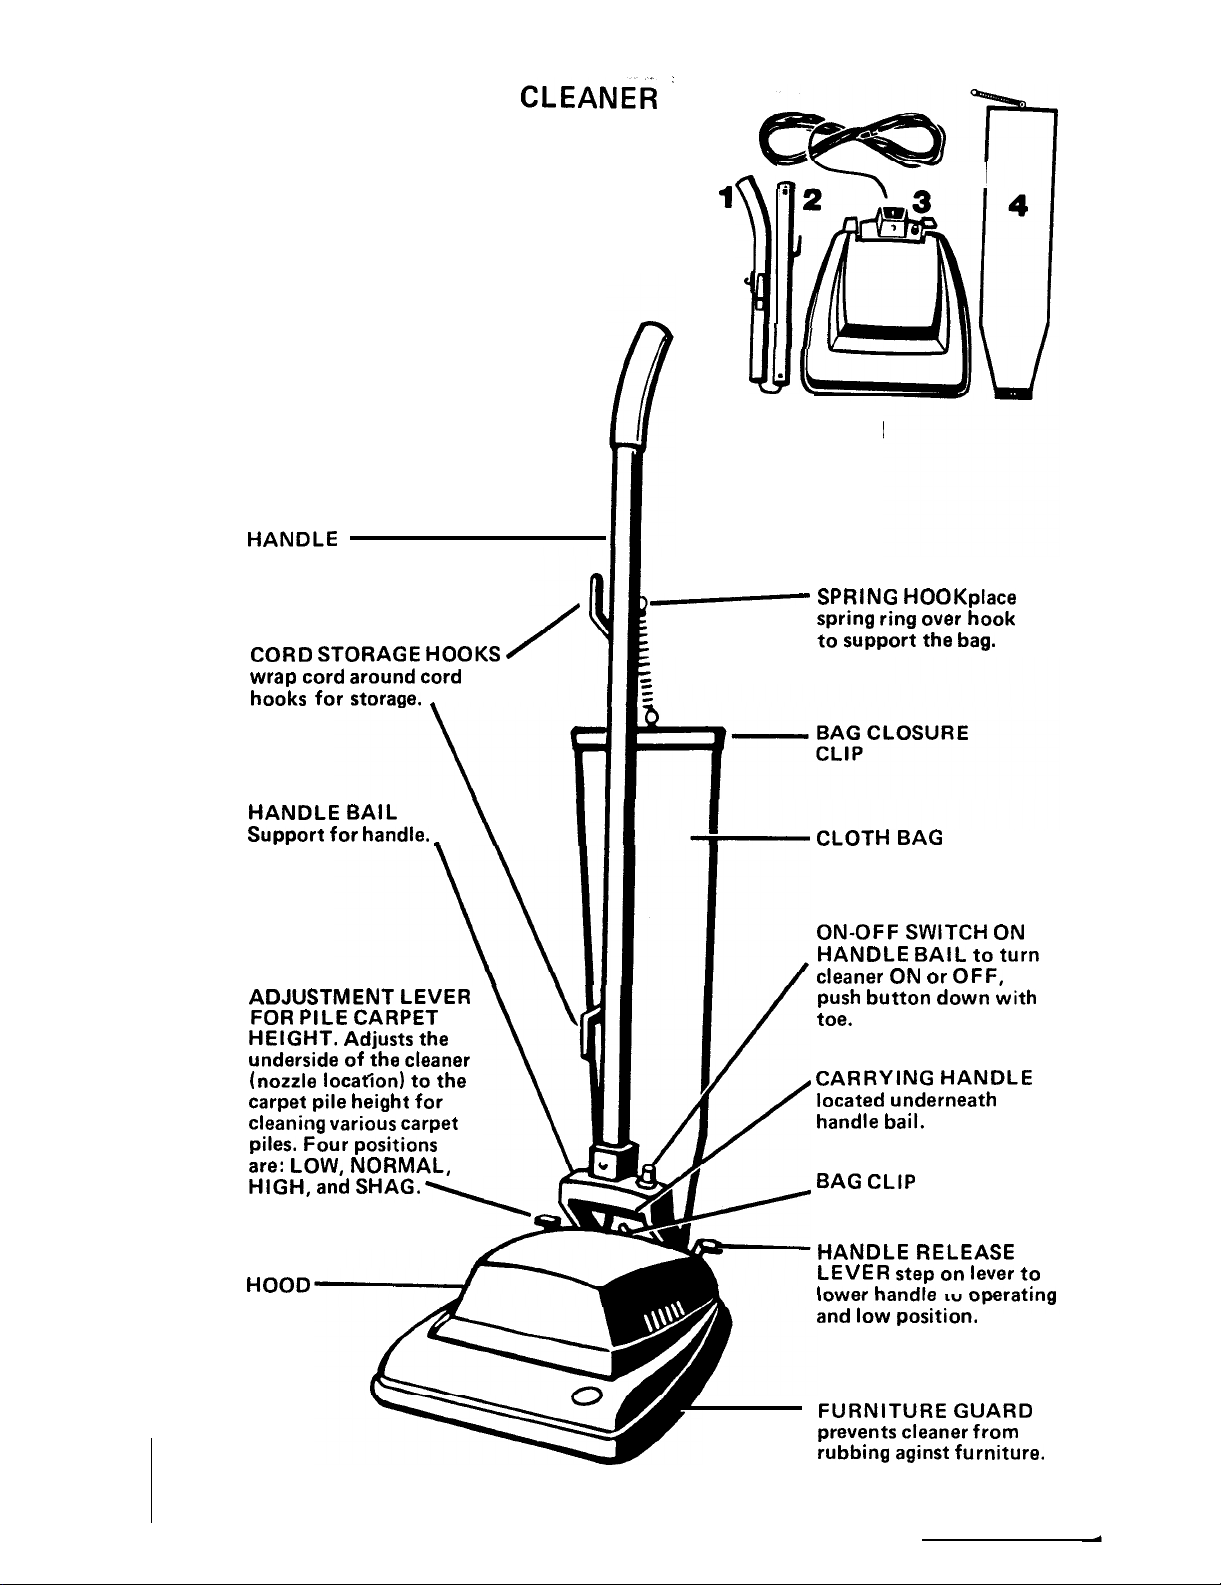
UNPACKING THE CLEANEd
Unpack the cleaner from the carton
and identify the parts shown in Fig. 1.
Remove and dispose of the cardboard
packing.
’
cc
m-b--
1
I
1. Upper handle section
2. Lower handle section
3. Cleaner base
4. Cloth bag assembly
The cleaner assembled will look
like the drawing below.
HANDLE
\
/
CORD STORAGE HOOKS /
wrap
cord around cord
hooks
HANDLE BAIL
Support for
for storage. .
handle.
_
1,
Y
1
FIG. 1
,-
II
SPRING HOOKplace
spring ring over
to support
CLOTH BAG
the
hook
bag.
ADJUSTMENT LEVER
FOR PILE CARPET
HEIGHT.
underside of the cleaner
(nozzle location) to
carpet pile height
cleaning various carpet
piles. Four
are:
HIGH, and SHAG.\
HOOD
Adjusts the
the
for
positions
LOW, NORMAL,
After identifying each part, begin assembling.
3
ON-OFF SWITCH ON
HANDLE BAIL to turn
cleaner ON or
push button down with
toe.
CARRYING HANDLE
located
handle bail.
BAG CLIP
HANDLE RELEASE
LEVER
I,...,.”
and low position.
FURNITURE GUARD
prevents cleaner
rubbing
underneath
step on lever
ke....Al.-.
OFF,
l .
,....s.,,*:..”
from
aginst furniture.
to
Page 5
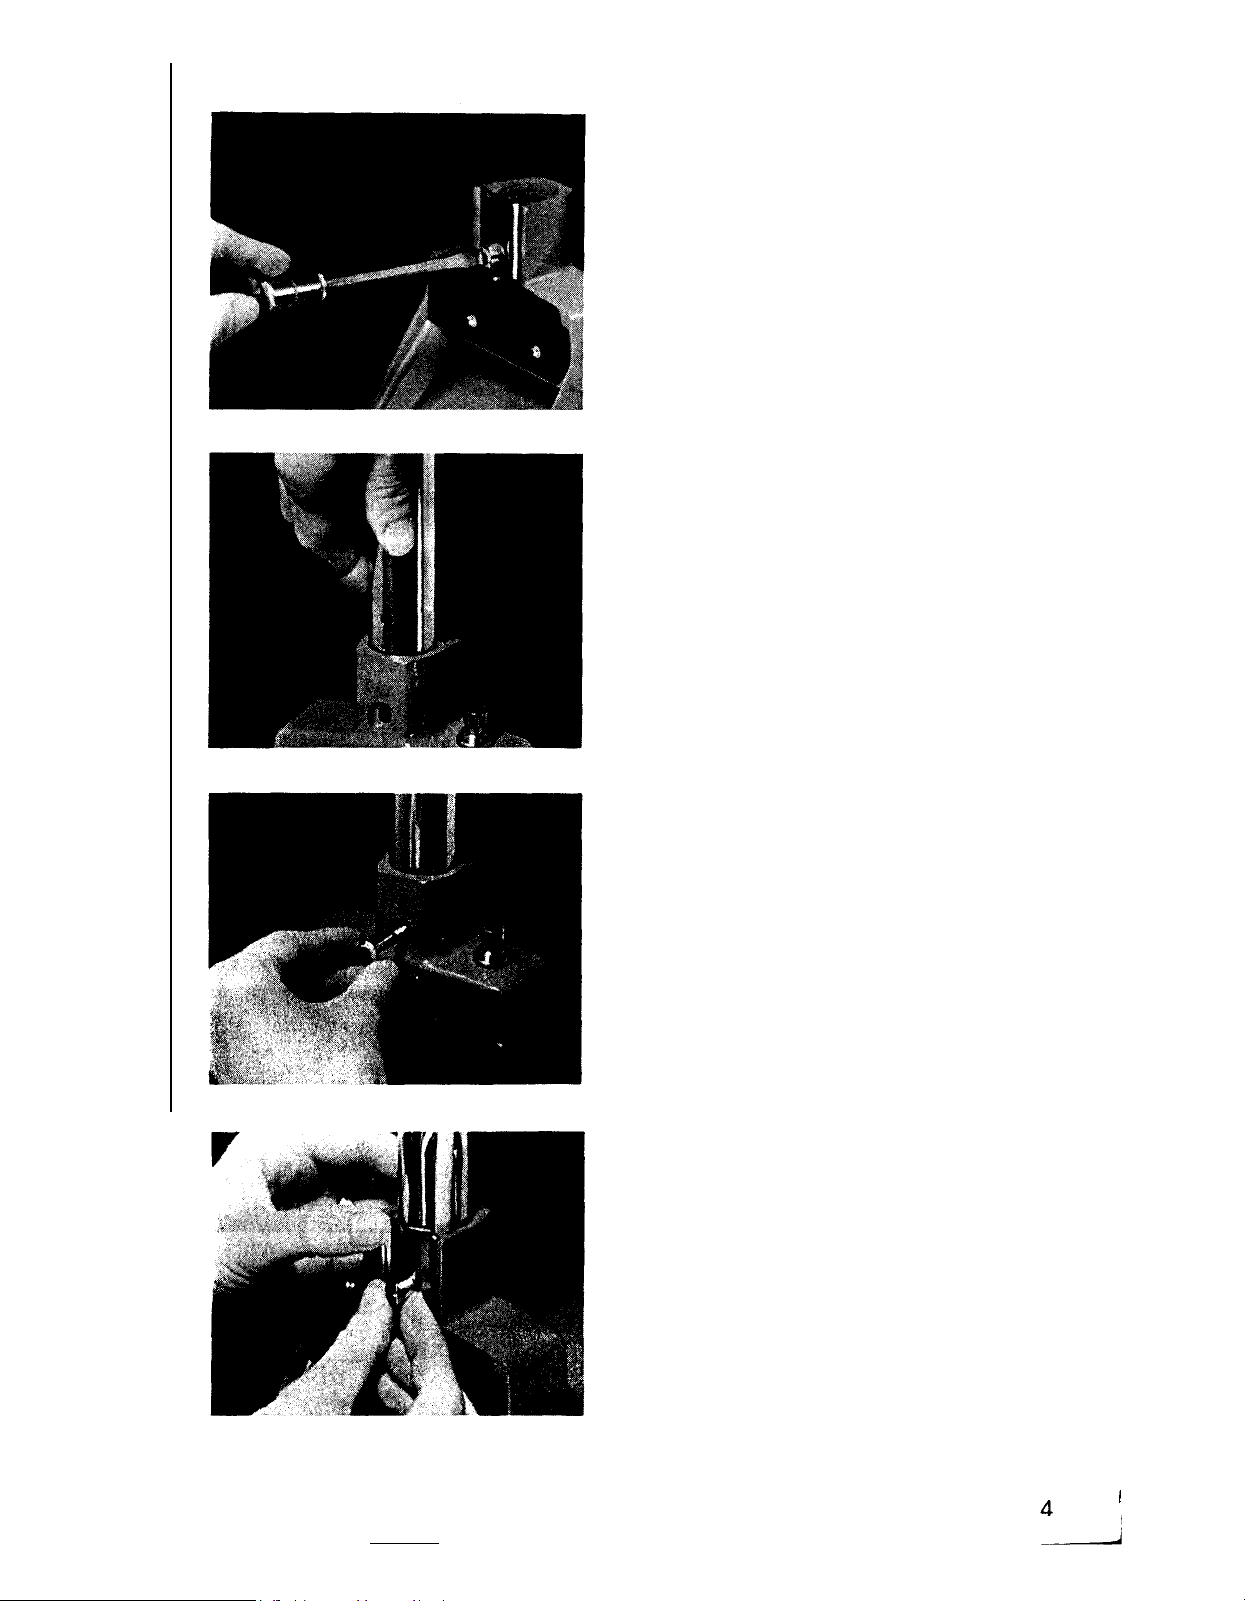
HOW TO ASSEMBLE
A. Attach handle to the cleaner
Unscrew nut and remove bolt and
plate from handle socket.
Place bottom section of handle into
handle socket lining up small holes
toward front of cleaner. Cord will
run up indentation at base of handle,
Insert bolt into hole in front of handle.
Place plate over end of bolt and hole
at back of handle. The tab at the bottom of the plate will fit into the handle and the tabs of the handle bail
will fit the cutout areas of the plate.
Secure with nut. Tighten nut with
screwdriver.
4
--l
I
Page 6
B. Join upper and lower handles
Join upper and lower handles, aligning
holes.
Place cord clip around cord with flat
side toward handle of cleaner and
holes to the front.
Insert bolt through washer, cord clip
and both parts of the handle (small
holes). Secure with nut. Pull up slack
in cord and tighten nut with screw-
driver.
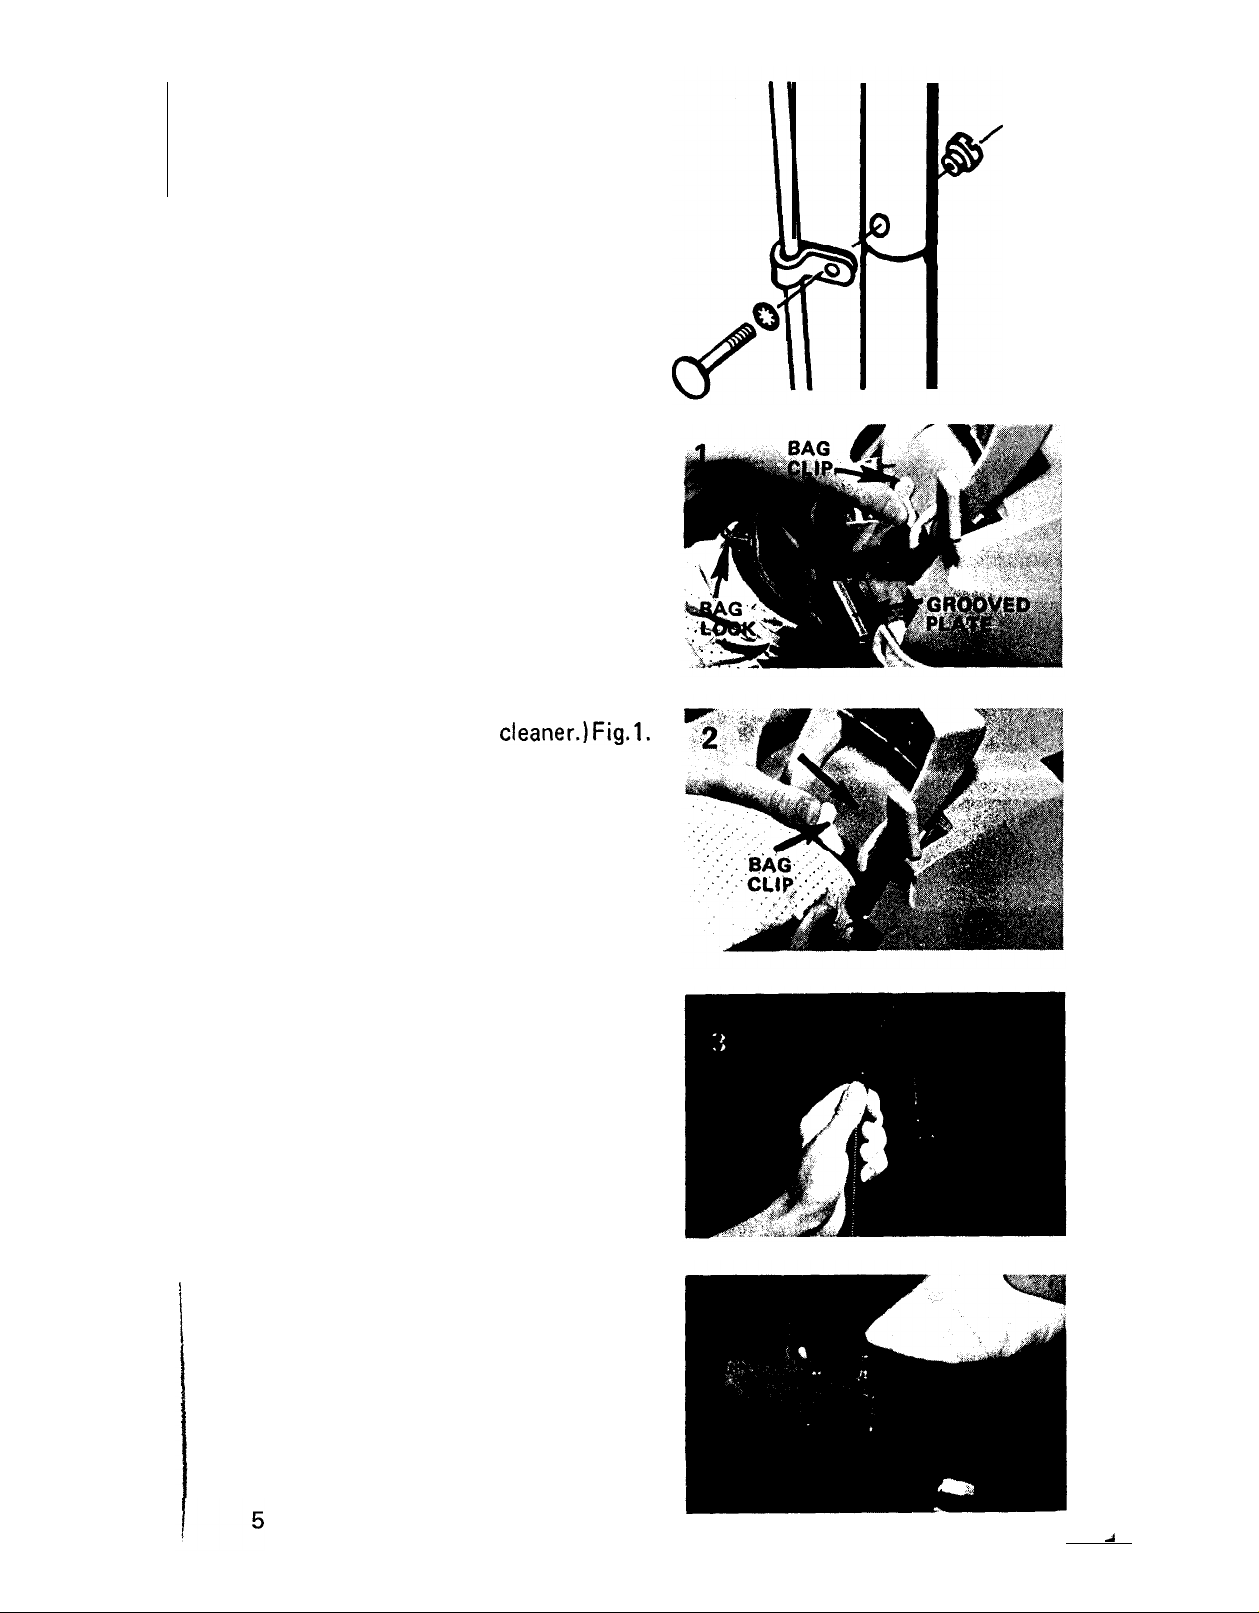
C. Attach cloth bag to cleaner
The cloth bag is connected at the
rear of the cleaner. There are two
projections at the bottom of the
cloth bag assembly.
To attach cloth bag to the cleaner,
place the two projections at the bottom of the cloth bag assembly inside
the metal grooved plate. (You will
find the grooved plate extending out
from the bottom of the cleaner.IFig.1.
Just above the opening at the rear of
the cleaner is the bag clip. Pull the
bag clip to the left and fit bag against
opening. When you release the bag
clip, it should move to the right and
fit completely over the bag lock. Fig.2.
Attach the bag to the bag spring hook,
which is located on the top section
of the handle. Fig. 3.
HOW TO USE YOUR CLEANER
How to operate
Operate cleaner only at voltage speci-
fied on data plate on bottom of cleaner.
Warning: Electric shock could occur if
used outdoors or on wet surfaces.
I
On-off switch
The ON-OFF switch is located on the
handle bail. To turn the cleaner on
and off, push button on cleaner han-
dle bail with toe.
4
Page 7

Upright
Handle adjustments
The handle has three positions: Up-
right for storage and when using
attachments. Operating for general
operation on carpet and floors. Low
for reaching under low furniture.
Adjustment for carpet pile height
The cleaning of carpet and rugs takes
place at the nozzle. This is the opening
at the bottom of the cleaner where the
agitator is located.
It is necessary to raise and lower the
nozzle for various carpet pile heights.
The four positions are Low, Normal,
High and Shag.
Select the proper nozzle adjustment
by tilting the cleaner forward and
adjusting the lever until it “clicks”
into position.
For best results the lever is conven-
iently adjusted by hand.
Select the adjustment for the carpet pile height according to the chart below.
. . . . . . . . . . . . . . . . . . . . . . . . . . . . . . . . . . . . . . . . . . . . . . . . . . . . . . . . . . . . . . . . . . . . . . . . . . . . . . . . . . . . . . . . . . . . . . . . . . . . . . . . . . . . . . . . . . . . . . . . .
Low
. . . . . . . . . . . . . . . . . . . . . . . . . . . . . . . . . . . . . . . . . . . . . . . . . . . . . . . . . . . . . . . . . . . . . . . . . . . . . . . . . . . . . . . . . . . . . . . . . . . . . . . . . . ..*............
Normal
. . . . . . . . . . . . . . . . . . . . . . . . . . . . . . . . . . . . . . . . . . . . . . . . . . . . . . . . . . . . . . . . . . . . . . . . . . . . . ..*.........................................
High
. . . . . . . . . . . . . . . .
Shag
. . . . . . . . . . . . . . . . . . . . . . . . . . . . . . . . . . .
Note: If the “Low” setting is used when cleaning normal or shag pile carpet,
for low pile and kitchen carpet
for rugs with normal pije height and for removing loose dirt from
hard surface floors.
for rugs with normal pile height but thicker density; if the cleaner
is difficult to push at “Normal”, move the lever to the “High”
position
..*..............................................................................*.......................
for very long or shag pile carpet
..*.....*.............................-...............................................
there is an increase in the belt load and pushing effort is greatly increased.
6
-
Page 8

SPECIAL FEATURES
Carrying handle
Your cleaner has a convenient carrying
handle located underneath the handle
bail.
Edge cleaning
This feature improves the cleaning of
carpet edges near baseboards and solid
furniture. Dust and lint tend tocollect
along these edges. The cleaner bottom
plate has been designed with a passage-
way for dirt to enter the nozzle from
the side to increase cleaning ability of
edges. From the right or left side,
slowly guide the cleaner paralled to
the edge of the carpet.
Cleaning lightweight flexible rugs
Lightweight flexible rugs used on hard
surface floors in entrances, bathrooms,
etc. should be cleaned by the following
method.
Stand on one end of the rug and move
the cleaner toward the other end or
edge. Before reaching the other end,
push down on the handle. This will
lift up the nozzle (front of cleaner)
and will prevent the rug from clinging to the cleaner. Continue to lift
up the nozzle so that when you have
reached the edge, it is completely off
the rug. Move the cleaner back to
start again and lower the nozzle,
using only forward strokes.
7
Page 9

CLEANING TOOL ATTACHMENTS
Cleaning tools are available at additional cost from Hoover Dealers. The cleaning tools allow you to do above the floor cleaning and to clean hard to reach
areas.
Deluxe cleaning set Includes vinyl
hose with suction regulator and converter, curved wand, straight wand,
dusting brush, furniture nozzle, wall/
floor brush, crevice tool and a storage bag.
The cleaner is converted for use with the attachments in a matter of seconds.
To use the attachments, follow the simple steps discussed in this section.
A. Attach the converter
B. Select the desired tool
C. Attach the tool
D. Set the suction regulator
E. Have cleaner in upright position when using cleaning tools.
Standard cleaning set Includes vinyl
hose with suction regulator and converter, curved wand, crevice tool and
upholstery brush.
USING CLEANING TOOLS
A. Attach converter
By using the converter attachment,
Fig. 1, you can channel the suction
from the cleaner to the hose and
cleaning tools. The converter must
first be attached to the vinyl hose;
then the converter is attached to the
bottom of the cleaner. Follow the
steps detailed here for attaching the
converter.
To attach the converter to the vinyl
hose, insert converter into hose con-
nector. Fig. 2.
8
Page 10

Push connector and converter together and twist.
The converter is locked into position
when the projections on the converter
fit into the holes on the hose connector. Fig. 3.
To attach the converter to the cleaner,
first unplug cord. Warning: Cleaner
must not be running when positioning or removing front converter.
Have cleaner in upright position.
Grasp handle of cleaner and lean
backwards so that bag is flat on the
floor and the underside is visible.
Fig. 4.
d
J
Grasp the converter; turn red converter lock away from the hose.
Fig. 5.
Bring converter up until it covers the
opening. Fig. 7.
Place plastic latches of converter on-
to metal rim of bottom plate. Fig. 6.
To lock in place, turn red converter
lock toward the vinyl hose. Fig. 8.
Raise cleaner to upright position.
Page 11
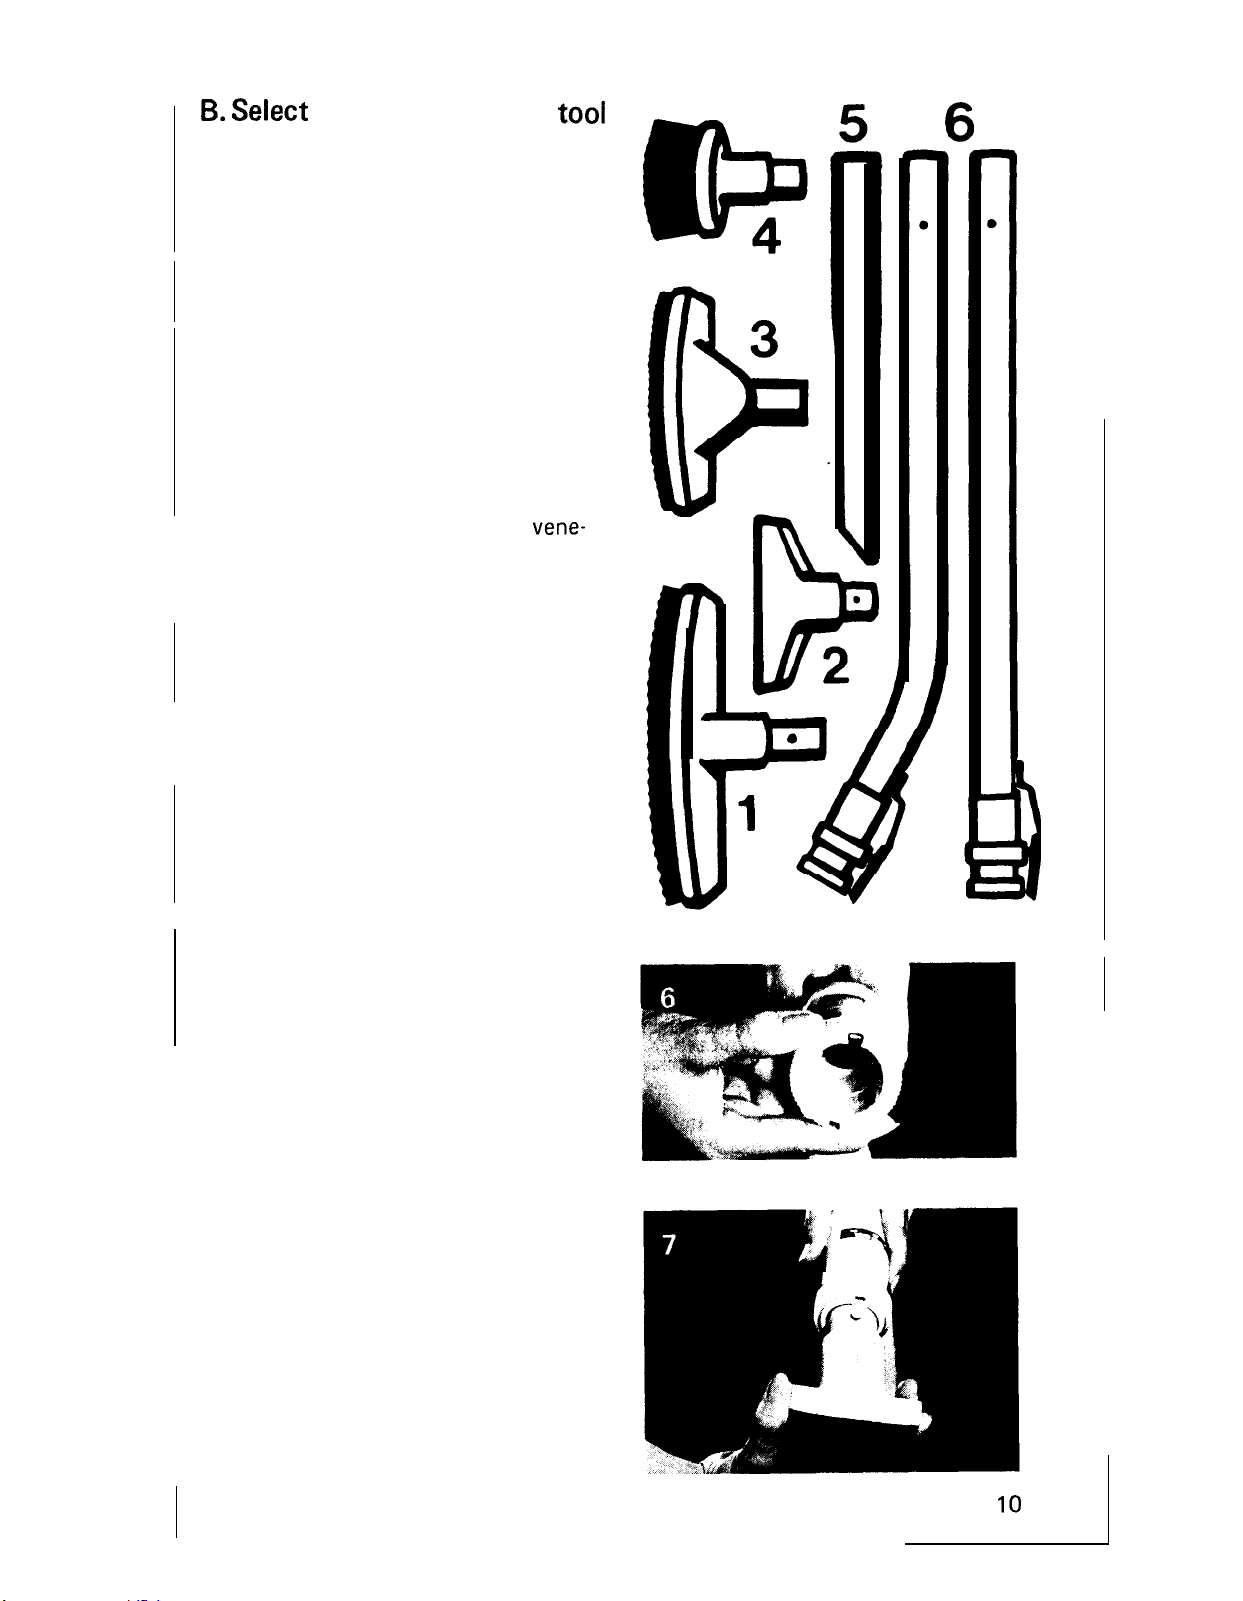
9.
Select
The cleaning tools have many uses.
Select the tool best suited for the
cleaning task from the descriptions
below.
Wall/floor brush* For walls and very
irregular hard surface floors such as
brick and slate. Fig. 1.
Furniture nozzle* For upholstered fur-
niture, draperies, tapestries, mattresses,
clothing, automobile interiors and carpeted stairs. Fig. 2.
Furniture brush For upholstered fur-
niture, draperies, mattresses, clothing,
carved furniture, books, lamps,
tian blinds, baseboards. Fig. 3.
Standard set only.
Dusting brush* For carved furniture,
table tops, books, lamps, lighting fixtures, Venetian blinds, baseboards,
shutters and registers. Fig. 4.
the proper cleaning
vene-
tool
6
Crevice tool For radiators, dresser
drawers, spaces between kitchen appliances. Fig. 5.
Straight* and curved wands Used to
give extra length to your vinyl hose.
They are ideal to reach ceilings, the
top of draperies, high shelves and cupboards. Use the straight and curved
wands with any of the above tools.
Fig. 6.
*Available onl-y in deluxe set.
C. Attaching the tools
After having chosen the proper tool
for your particular task, attach it to
the end of the vinyl hose.
The outer plastic ring on the end of
the hose has a slot which adjusts.
Note the slot in the hose grip. Turn
the outer ring until the slots align.
Fig. 6.
Insert the tool so that the button on
the tool fits into the slot in the end of
the vinyl hose. Fig. 7.
Page 12

.
Turn the plastic ring counterclock-
wise to lock the tool in place. Fig. 8.
For additional length, attach one or
both* wands to the vinyl hose as
de-
scribed above.
To attach the tools to the other end
of the wand, press down firmly on
the white plastic spring latch. Fig. 9.
Fit the attachment into place and
release plastic latch when it fits over
n on tool. It is now locked in
butto
place.
“Avai
lable
with deluxe set only.
D. Regulating the suction
The suction regulator is located on
the end of the vinyl hose attached
to the cleaner. Set the regulator by
turning the dial to minimum, medium, or maximum suction. Fig. 10.
When using the cleaning tools, the adjustment for carpet pile height should
be set according to the surface on which the cleaner is standing. This will
give added stability when using the attachments. Set the adjustment for
pile height to LOW if using the cleaning tools in an area where there are
bare floors anduse SHAG in carpeted areas.
After having followed the steps detailed above you are ready to use your cleaning attachments. Simply turn the cleaner switch to the ON position and you
are ready to clean above the floor and hard to reach areas.
The handle must be in the upright position for proper, effective use of tools.
Page 13

Storing attachments
For Storage, the attachment set will
conveniently fit in the storage bag.*
The bag has two slots located near
the top for use in hanging. Therefore,
it can be attached to the cleaner or
hung conveniently on a hook in the
closet.
To clean attachments To clean the
hose wipe off dirt with a cloth dampened with a liquid detergent. Rinse
with a damp cloth. Cleaning tools
may be washed in warm water with
a detergent. Rinse and let dry before
using.
*Available with deluxe set only.
MAINTENANCE
The following sections are concerned with proper maintenance of the HOOVER
commercial cleaner. Familiarize yourself with these maintenance tasks and keep
this owner’s manual in a convenient place where you can refer to it when needed.
Proper use and care of the commercial cleaner will insure continued cleaning
effectiveness.
The bag
The cleaner has a durable cloth bag. Check the bag from time to time. It should
be emptied often. If the bag is allowed to overfill, the cleaner will not operate
How to empty the bag
Disconnect the cord from electrical
outlet before cleaning or changing
parts.
Unhook bag from handle. Slide bag
clip to the left and remove bag from
rear of cleaner.
*
Slide the bag closure clip from the
top of the bag.
12
Page 14
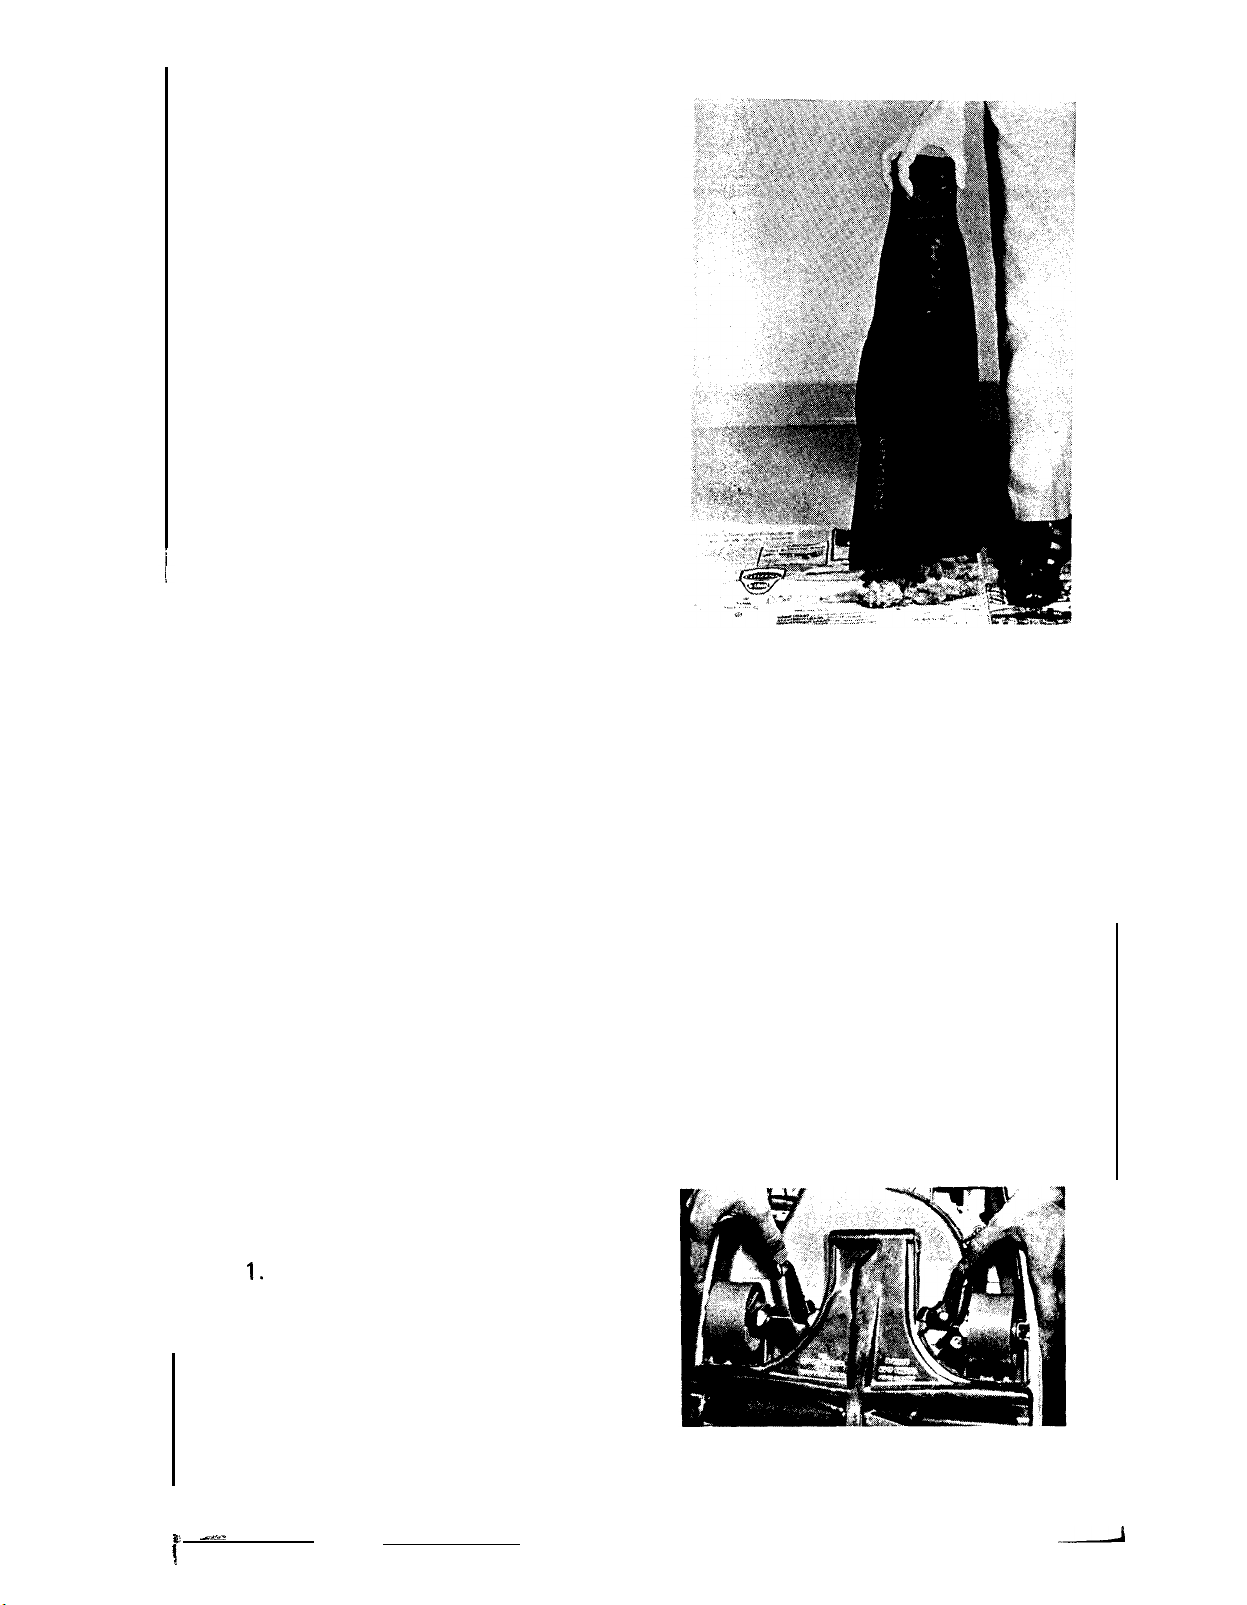
Empty bag by placing large opening
over a paper. The bulk of the dirt will
fall on the paper. Shake bag until
clean.
Replace the bag closure clip and attach bag to cleaner following the
instructions give on page 5.
The belt
The belt of your HOOVER commercial cleaner controls the speed of the agita-
tor and it is important for the effective operation of the cleaner. The belt is
located under the bottom plate of the cleaner and should be checked from
time to time to be sure it is in good condition.
When to replace the belt
To check the belt, remove the bottom plate (see following section). If the belt
is stretched or cut; or if the agitator fails to rotate, replace the belt.
What belt to buy
To assure effective operation, use only genuine HOOVER belts with your
HOOVER commercial cleaner. When purchasing a new belt ask for Hoover
part No. 49258.
How to replace the belt
1.
Turn cleaner over. Remove metal
plate on bottom of cleaner by push-
ing latches toward outside of cleaner.
13
Disconnect cleaner from electrical outlet.
I
L 4-I
!
._I
Page 15

2. Release worn belt from pulley.
3. Lift out rug agitator, remove old
belt and place new belt in groove of
rug agitator.
4. Replace agitator. On one end of
the agitator roll there is a raised metal
plate. Make sure that this end is
placed in groove on side of cleaner.
5. Place belt on pulley. Side of belt
nearer cleaner should be in line with
arrow on bottom of cleaner.
6. Replace metal plate. Place metal
knobs on front end of plate in wire
holders. Check to see that latches are
pushed back and will not be covered
by plate. Place plate in position and
latch securely.
14
Page 16

The brushes
When to replace brushes
When brushes are worn and bristles
do not touch the edge of a card held
across the bottom plate, they should
be replaced. Always replace both
brushes at the same time to maintain
cleaning effectiveness.
What brushes to buy
When purchasing new brushes, ask for
Hoover Part No. 48445001. They are
designed to be used with your cleaner.
How to replace the brushes
Disconnect the cleaner from electrical outlet.
1. To replace worn brushes, remove bottom plate, belt and agitator, following
directions given on preceding pages.
2. Turn end plates of agitator
opposite directions to loosen.
4. Gently tap the end of the shaft
with hammer to loosen opposite
end.
15
in
3. Continue turning until one end
comes off exposing the end section.
Then, pry out end section exposing
the shaft.
5. Pull shaft and end assembly from
agitator.
Page 17

6. Remove brushes by pulling them
from agitator. Slide new brushes
into channels. Push them in as far
as possible.
7. To reassemble, replace shaft and
end assembly lining up the locator
with the slot in the agitator. Press
into place. Place remaining end section over the shaft end, lining up the
locator and slot. Press into place.
Screw end plate on and tighten.
16
. ..-I
Page 18

USER CHECK LIST
This appliance was inspected thoroughly and was in good operating condition
when it was shipped from the factory. If a minor problem develops, it usually
can be remedied quite easily when the cause is identified. Accordingly, this
check list is provided for your convenience.
Problem Possible cause
Cleaner
won’t 2. No voltage in wall plug.
run
Cleaner
won’t
pick up 3. Bag full. 3. Empty bag.
Cleaner
hard lever setting.
to push
1. Not firmly plugged in.
3. Blown fuse/tripped breaker.
1. Broken or worn belt.
2. Agitator brushes worn.
4. Incorrect carpet adjustment 4. Set carpet adjustment lever for
lever setting.
1,
Incorrect carpet adjustment
Possible solution
1. Plug unit in firmly.
2. Check fuse or breaker.
3. Replace fuse/reset breaker.
1. Replace belt.
2. Replace brushes.
type carpet being cleaned.
1. Set carpet adjustment lever for
type carpet being cleaned.
If the problem persists, check the telephone book for a HOOVER COMPANY
listing, or consult the white insert accompanying this manual for the nearest
location where approved service and genuine HOOVER replacement parts may
be obtained. For service under Warranty, follow the instructions in the warranty provided with this product.
Always identify your Cleaner by model number when requesting information
or ordering replacement parts. (The model number appears on the bottom of
the cleaner.)
If further assistance is needed, contact the Hoover Company Customer Rela-
tions Department, North Canton, Ohio
Lubrication The motor is equipped with one ball bearing and one sleeve bear-
44720,216499-9200.
ing. The ball bearing should be lubricated, but the sleeve bearing should never
be lubricated.
The agitator is equipped with two ball bearings that should be lubricated
periodically.
Ball bearings should be checked annually and lubrication of all ball bearings
should be performed by the Hoover Factory Branch Service Center, or the
Authorized Warranty Service Dealer, as listed on the white insert.
17
Page 19

ENERGY SAVING TIPS
1. Empty cleaner bag promptly, before overfilled.
2. To maintain effective cleaning, replace agitator brushes and belt when
necessary.
‘3. Turn off cleaner when not in use, such as when moving furniture.
4. Keep your cleaner operating at peak performance level - have inspection and
service performed by a Hoover Factory Service Center or Authorized Hoover
Service Dealer.
18
Page 20

VACUUM CLEANER MANUFACTURERS ASSOCIATION
VCMA
This information has been compiled by the Vacuum Cleaner Manufacturers Associ-
ation from Governmental and Private Sources concerned with product safety.
These basic guidelines are for your protection and convenience.
TO AVOID ELECTRIC SHOCK
Never vacuum liquids (unless using special equipment).
Never vacuum carpeting that is damp or wet (unless using special
equipment).
Do not store machine outdoors.
Replace worn or frayed power cord immediately.
TO AVOID ACCIDENTS
Never vacuum live ashes or cigarette butts.
Never run machine over power cord or place sharp objects on it.
Never let children use machine as a toy.
Use extra caution when cleaning on stairs.
Keep machine on floor - not on chairs, tables, etc.
When machine is turned on, never allow fingers, hair or garments to
come near intake suction ports or revolving brushes.
Never leave machine running or cord
Turn machine off at switch before unplugging from wall outlet.
When unplugging machine, grasp plug - not cord.
Always unplug power cord from wall outlet before servicing machine or
attachin’g accessories.
Store machine promptly after each use to prevent accidents from trip-
ping over power cord or machine.
Use machine and accessories only in manner intended by manufacturer.
FOR BEST PERFORMANCE
Keep your machine and all accessories clean and in good operating
condition.
Change or clean bags and/or filters as recommended by manufacturer to
maintain optimum cleaning efficiency.
Periodically check revolving brush for build-up of lint, hair or other
foreign material and remove as necessary.
Adjust or replace cleaning brushes when worn.
Buy replacement parts from manufacturer’s authorized service center.
Have machine checked periodically by manufacturer’s authorized service
center.
Store machine carefully - in dry area - never outdoors.
For optimum cleaning performance and safety, study and follow your
Owner’s Manual
(HOOVER -AN ASSOCIATION MEMBER)
Service To The Consumer Since 19 13
.plugged
-
keep it in a handy and safe place for future reference.
in when unattended.
THE HOOVER COMPANY, NORTH CANTON, OHIO 44720
Rl
2-77
u7039/41
U7KOl
Litho USA
565 1 l-054
 Loading...