

Page 1
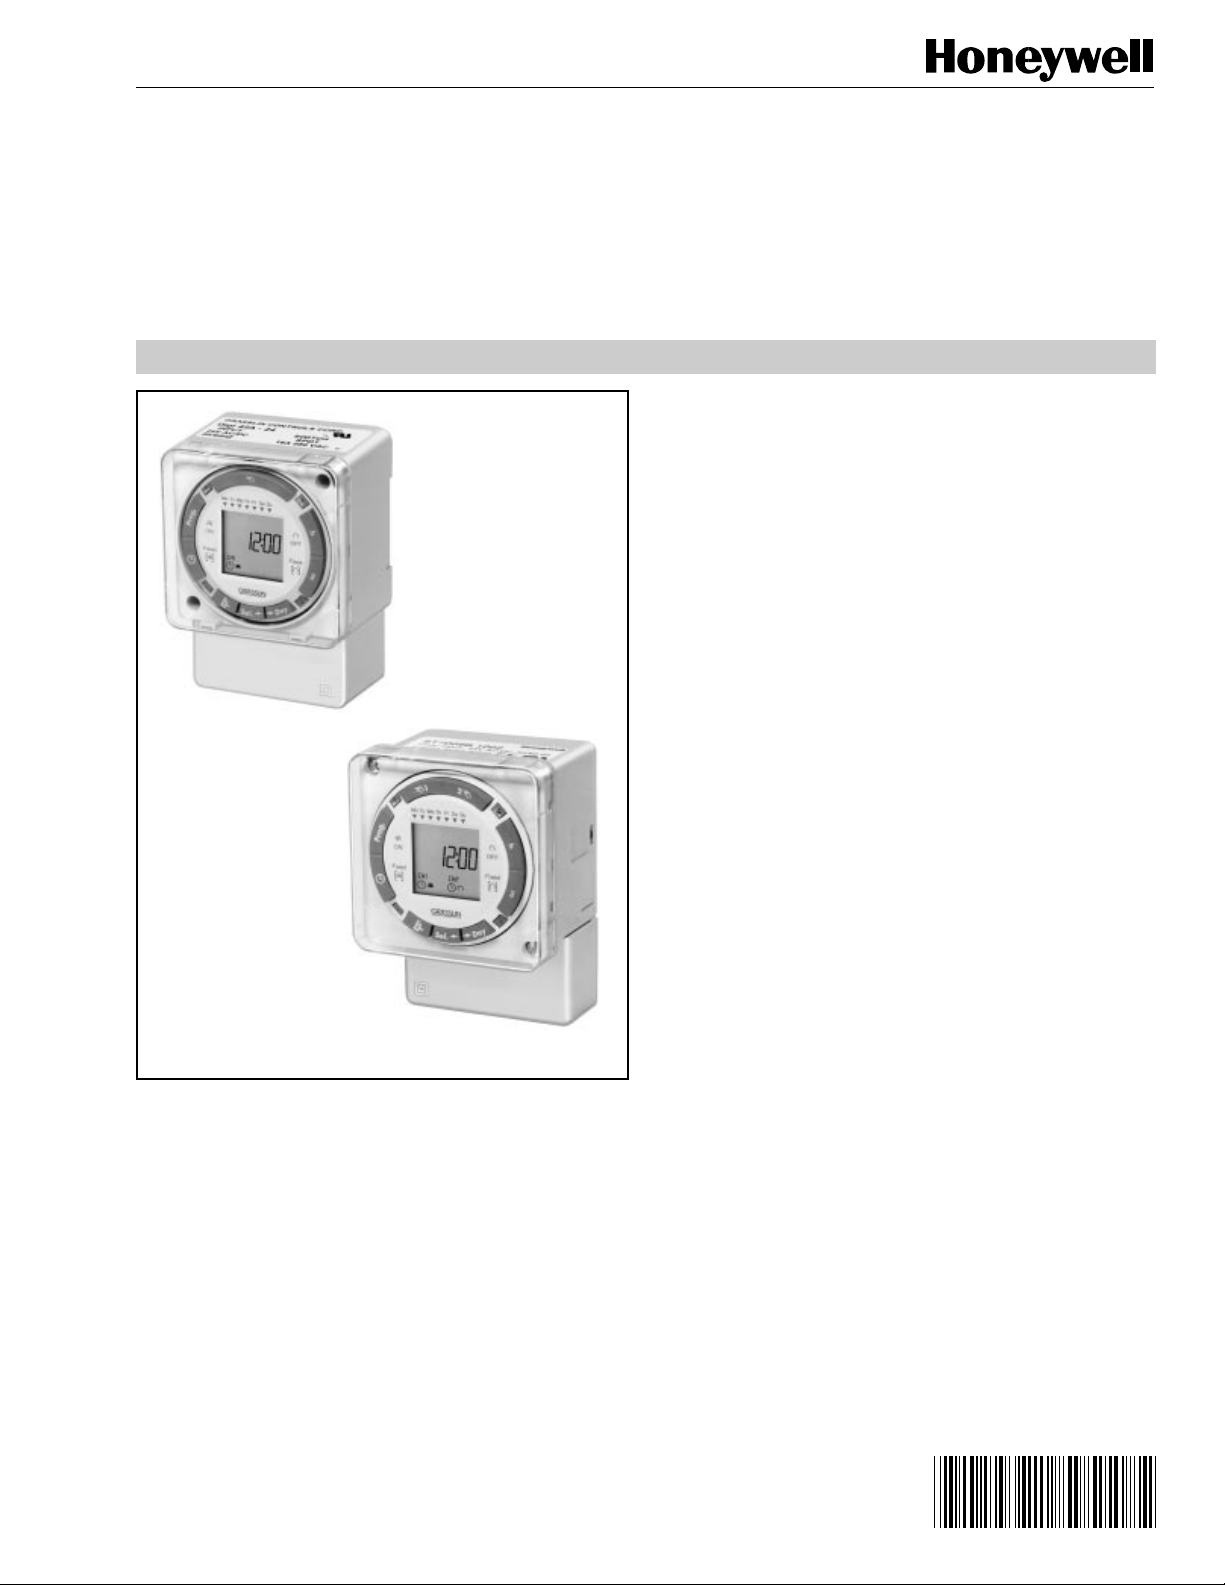
ST7009A,B,C,D
Electronic Programmable Timer
24-HOUR OR 7-DAY TIME SWITCHES
SPECIFICATION DATA
FEATURES
• Universal 24-hour or 7-day programming accurate to the
second.
• UL and CUL recognized components.
• Multiple on-off daily programs with unlimited flexibility.
• Program simplicity with a minimal number of keys and
program steps.
• Holiday programming.
• Built-in program backup.
• Daylight Savings Time changeover in the spring and fall.
ST7009A,C
ST7009B,D
APPLICATION
The ST7009 family of one and two-switch Programmable Timers are
compact time controls providing 24-hour or 7-day microprocessorbased switching. Heavy duty 16A spdt relay contacts can switch lowor line-voltage loads. Up to 21 on and 21 off functions are available
per day .
These timers are applicable for time-of-day control of pumps, fans,
heaters, HVAC control circuits, lighting and many other types of
commercial and industrial equipment.
• Screw wiring terminals.
All models feature large keys and a large LCD display for easy circular
programming of schedules. The ST7009 allows for selection of any
combination of days and additional programming events per day.
Built-in program backup provides retention of memory and time of
day during a power outage. The ST7009 features an automatic
internal recharging battery backup program for up to a two-week
period. The ST7009 also offers a holiday programming schedule of
one or more days that can be programmed up to a week in advance.
® U.S. Registered Trademark
Copyright © 1997 Honeywell Inc. • All Rights Reserved
68-3003
Page 2
ST7009A,B,C,D ELECTRONIC PROGRAMMABLE TIMER
SPECIFICATIONS
IMPORTANT
The specifications given in this publication do not include
normal manufacturing tolerances; therefore, an individual
unit may not exactly match the listed specifications. Also, this
product is tested and calibrated under closely controlled
conditions, and some minor differences in performance can
be expected if those conditions are changed.
Channels:
ST7009A,C: 1.
ST7009B,D: 2.
Programs:
42 per day.
Holiday Program:
Yes.
Reserve Carryover (Minimum):
2 weeks.
Models:
OS Number Type Input Voltage Channels Relay Output Battery Reserve
ST7009A1003 24-hour, 7-day 24V, 50/60 Hz 1 1 spdt 7-day
ST7009B1002 24-hour, 7-day 24V, 50/60 Hz 2 2 spdt 7-day
ST7009C1001 24-hour, 7-day 120V, 50/60 Hz 1 1 spdt 7-day
ST7009D1000 24-hour, 7-day 120V, 50/60 Hz 2 2 spdt 7-day
Daylight Savings Time Key:
Yes.
Power Input:
ST7009A,B: 24V, 50/60 Hz.
ST7009C,D: 120V, 50/60 Hz.
Power Consumption:
4 VA.
Output:
ST7009A,C: 1 spdt relay.
ST7009B,D: 2 spdt relays.
Mounting:
ST7009A,C: Surface or DIN Rail.
ST7009B,D: Panel or Surface.
Switching Capacity:
16A resistive at 277 Vac.
1000W tungsten at 240 Vac.
1/2 hp at 120 Vac; 1 hp at 240 Vac.
Shortest Switching Time:
1 minute.
Accuracy:
+ 4 minutes per yr.
Ambient Temperature:
-20°F (-28°C) to 140°F (60°C).
Ambient Humidity:
0 to 95% RH, non-condensing.
LCD Time Display:
Selectable AM/PM or 24-hour.
Manual 3-way Override:
Temporary or permanent on or off.
LCD status indication display.
Contact Material:
Silver cadmium oxide.
Dimensions:
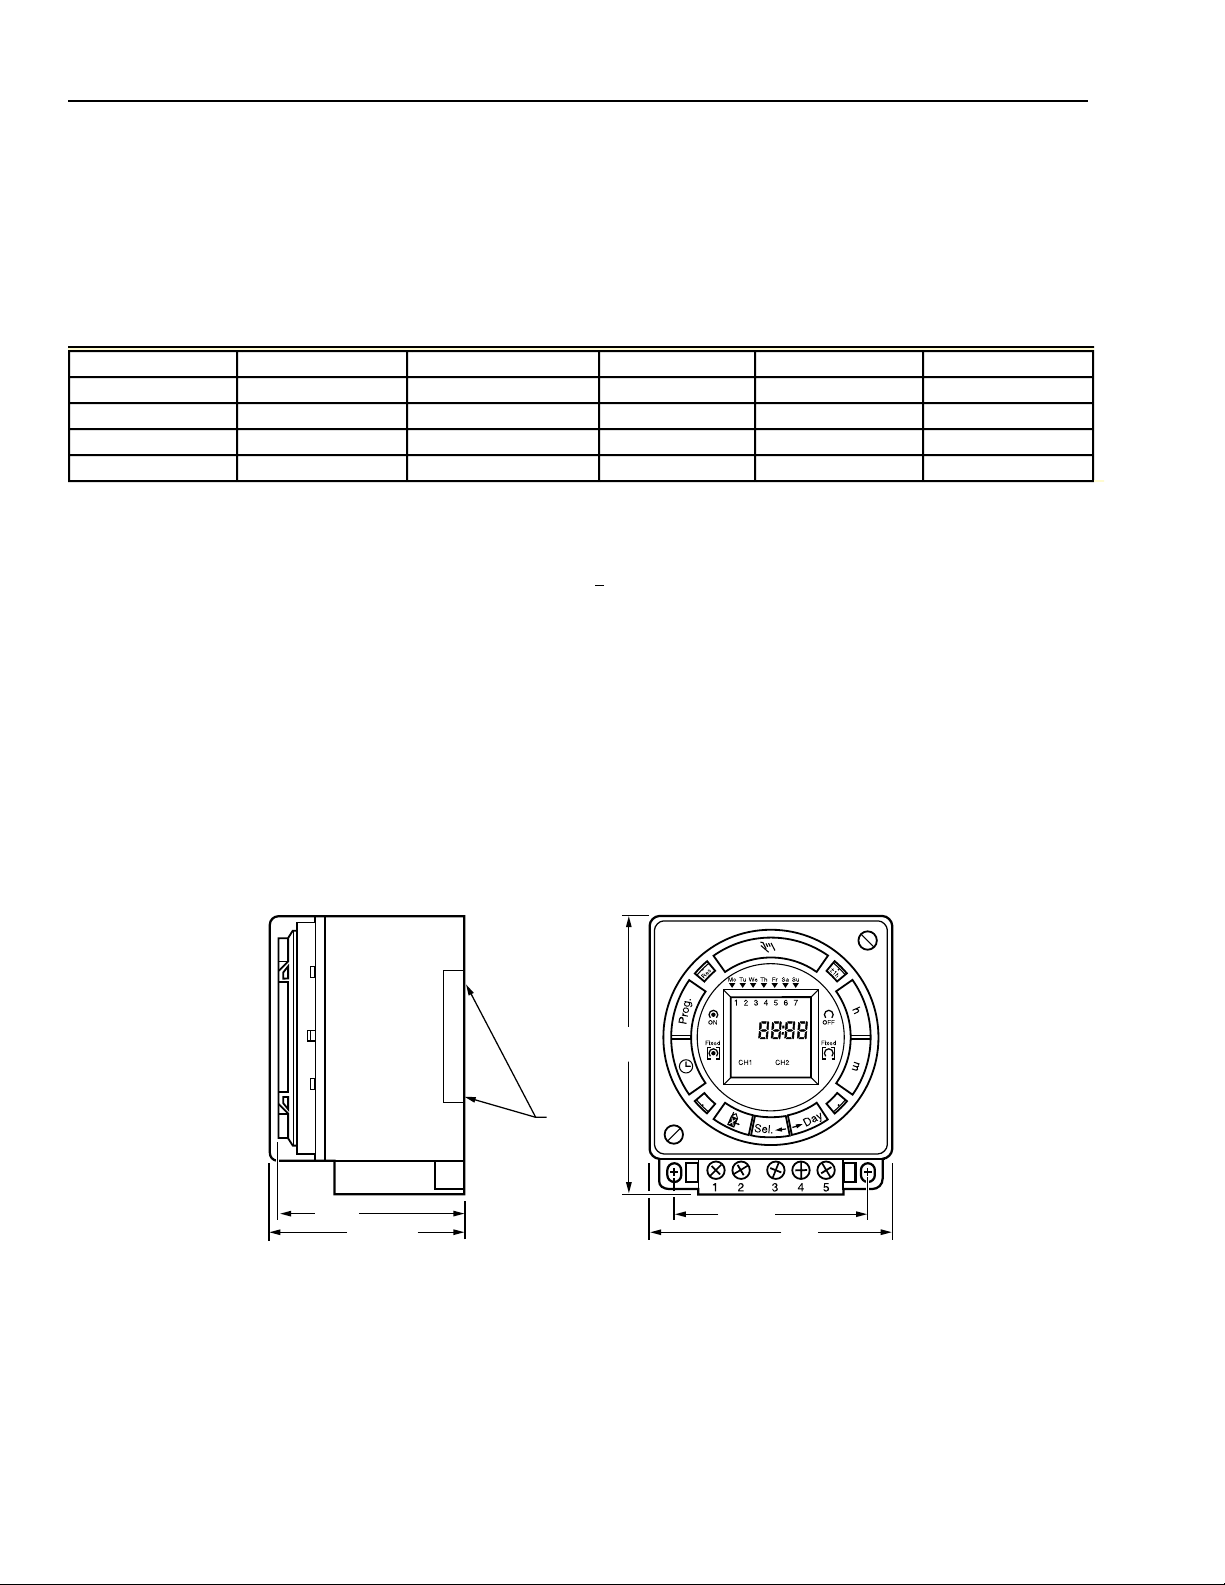
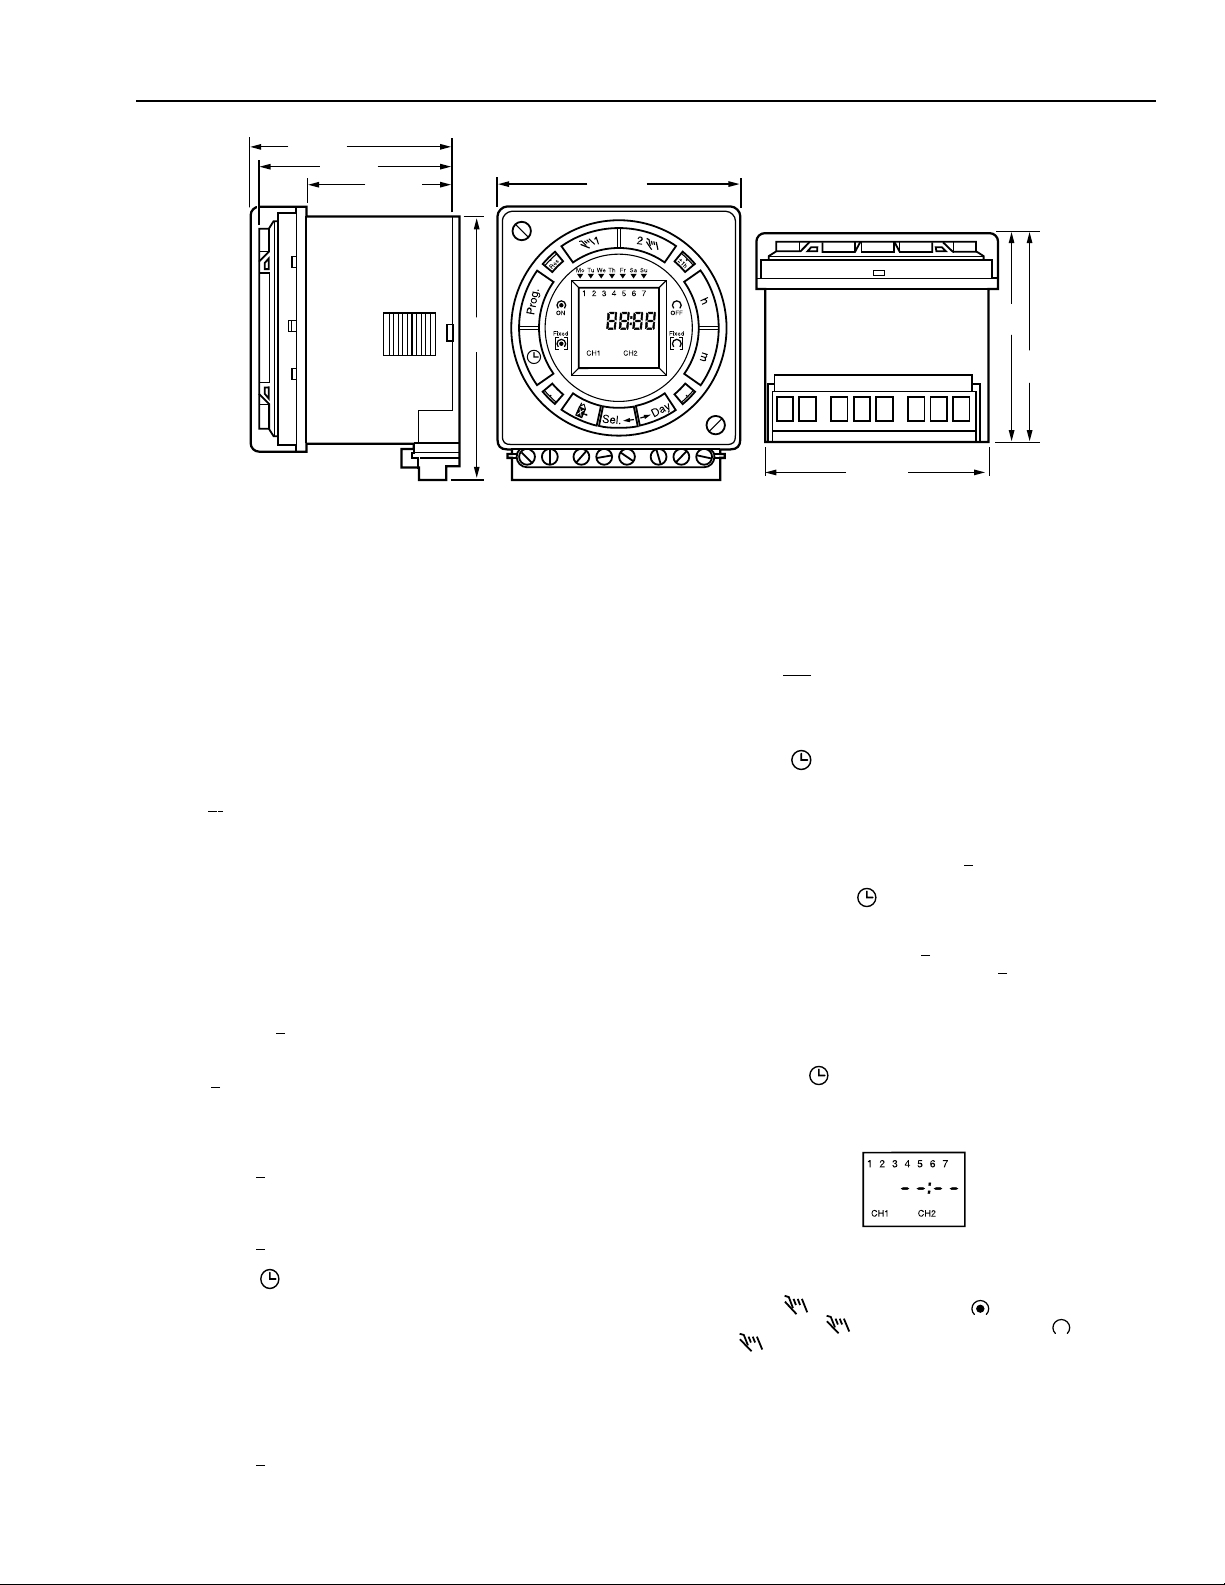
See Fig. 1.
68-3003
3-1/4
(83)
DIN RAIL
MOUNTING
2 (51)
2-1/16 (52)
2-1/8 (54)
ST7009A,C
Fig. 1. ST7009A,C, ST7009B,D dimensions in in. (mm) (1 of 2).
2
3 (76)
M12192
Page 3
2-1/4 (57)
2-1/8 (54)
(76)
ST7009A,B,C,D ELECTRONIC PROGRAMMABLE TIMER
2-7/8 (73)1-5/8 (41)
2-1/4
3
(57)
2-1/2
(64)
12 345 678
ST7009B,D
Fig. 1. ST7009A,C, ST7009B,D dimensions in in. (mm) (2 of 2).
PROGRAMMING
Daylight Savings Time Changeover
For areas where Daylight Savings Time is not observed, please skip
to Set Time and Day Clock section.
The ST7009 offers manual or automatic Daylight Savings Time
changeover in the spring and fall.
For manual changeover:
Press the + 1h key to set the clock time either ahead one hour or
back one hour.
For automatic changeover:
NOTE: The following programming steps need to be performed only
at initial installation, or if the Reset key is pressed at any
time. After programming is complete, the automatic time
switch changes the time at 2:00 AM on the first Sunday of
April and the last Sunday of October until the year 2079.
Entering programming mode:
A Select military (24:00 hr) or AM/PM time by simultaneously
pressing the +1h and h keys. (AM or PM is displayed when in
AM/PM time.)
B Enter the Daylight Savings time by simultaneously pressing
the +1h and Day keys once. A 1 is displayed under Mo. Then
enter today’s date with the m key and the month with the h
key. (For military time, set the date with the h key and the
month with the m key). Example: February 15 is displayed as
02:15 for AM/PM time, or as 15:02 in military time.
C Press the +1h key once. A 2 is displayed under Tu. Then enter
the current year with the m key. If you go past the current year,
hold down the m key until the years scroll up to 2079 and then
back to 1995.
D Press the +1h key once. A 3 is displayed under We and AU
(for preset European dates). If European dates are desired,
press the key to enter the data and exit the Daylight
Savings Time programming mode.
E Press the m key once. cHA is displayed (for entering North
American dates).
NOTE: If the m key is inadvertently pressed two times, HA is
displayed. Press the m key two more times, or until
the display shows cHA. (HA is for specific dates and
is not currently used.)
F Press the +1h key once. A 4 is displayed under Th. Enter the
date for Summer Daylight Savings Time changeover for the
2-1/2 (64)
M12191
current year by entering the date with the m key and the
month with the h key. (If in military time, set the date with the h
key and the month with the m key). Example: April 7 is
displayed as 04:07 if in AM/PM time, or 07:04 in military time.
G Press the +1h key once. A 5 is displayed under Fr. Enter the
date for Winter Daylight Savings Time changeover for the
current year by entering the date with the m key and the
month with the h key. (If in military time, set the date with the h
key and the month with the m key.)
H Press the key to save the data and exit the Daylight
Savings Time programming mode.
Set Time and Day Clock
A Select military (24:00 hr) or AM/PM time mode by pressing and
holding the h key while pressing the +1h key to toggle between
military and AM/PM. (AM is displayed when in AM/PM mode.)
B Press and hold the key while completing steps C
through F.
C If automatic changeover to Daylight Savings Time has not
been programmed, press the +1h key once to set the timer
when Daylight Savings Time is in effect (+1h is displayed).
D Set the hour with the h key. If AM or PM is not displayed, the
unit is in military time. See step A to change to AM/PM time.
E Set the minutes with the m key.
F Press the Day key repeatedly to select the day of the week
(1 is Monday, 7 is Sunday).
G Release the key; a colon flashes. If the days are also
flashing, the day of the week was not entered (see step F).
Set Program Schedule
A Press the Prog. key. is displayed.
Press the Prog. key again to display the number of free programs.
Fr 42 is displayed. Press the Prog. key again to advance to
the first program.
B Press the key. The on symbol [ ] is displayed beneath
CH1. Press the key again to toggle to off [ ] . Press
the key again to toggle to on. Select either on or off.
C Press the h key to select the hour for switching time.
D Press the m key to select the minute for switching time.
E If the program is used every day of the week (24-hour time
control), press the Prog. key to advance to the next program.
F If 7-day time control is desired, press the Day key; a flashing
underline is displayed beneath Day 1. Press the Day key a
second time to advance the underline to Day 2. To delete a
3
68-3003
Page 4
ST7009A,B,C,D ELECTRONIC PROGRAMMABLE TIMER
day from the program, use the Day key to advance to that day
and press the Sel. (select) key. The chosen day flashes.
Continue pressing the Day and Sel. keys to delete additional
days until only the desired days remain and the remaining
days are not flashing on the display.
G Press the Prog. key and repeat steps B through F to enter
additional programs for on and off times.
NOTE: More than one off time program can be entered to
gain automatic control of manual overrides.
H Press the key to enter the Run Mode.
Set Eighth Day Holiday/Vacation Program
Multiple programs (more than one on and off time) can be entered for
holidays or vacation periods. Example: Enter off, and 12:01 AM to
shut off the load(s) on vacations and holidays.
A Press the Prog. key, select on or off, and use h and m to enter
the hour and minutes, but do not select or delete any days.
B Press the key. is displayed indicating the Eighth Day
Holiday/Vacation Program.
C Press the key to enter the Run mode. The time switch is
now permanently preset with the on/off schedule to be
implemented for holidays and extended vacation periods. See
Set Holiday Program section.
Set Holiday Program
The Holiday Program can be implemented at any time up to six days
in advance of the holiday(s) or vacation period. It can also be
activated on the holiday or first day of the vacation period.
A When in the Run Mode, press the key. -:-HO is displayed.
B Press the Day key to select the day of the week that the
Holiday Program should begin.
C Press the Sel. key to select the number of days that the
Holiday Program should run. (Enter up to 99 days. If the Sel.
key is held down, the numbers scroll up rapidly to 99 and then
start over with 01).
D Press the key to store the program. The holiday symbol
is displayed.
E To review or change the Holiday Program, press the key.
To cancel the Holiday Program, press the key a second time.
On the day the Holiday Program begins, the Eighth Day Program is
implemented at 12:00 AM Midnight taking priority over the regular
daily programs. The holiday symbol and the number of days of the
program run are displayed. Each day is counted down until all days of
the holiday/vacation period are shown. When complete, the display
reverts to normal. To cancel the Holiday Program, press the key.
IMPORTANT
The output relays switch on or off only at the programmed
times. After programming is complete, if the switch is
desired in the on position, it must be turned on manually
with the key. Example: Programming was completed at
2:00 PM and CH1 was programmed to be on at 8:00 AM
and off at 5:00 PM. After pressing the key, CH1 turns
off. Press to turn it on. Automatic operation begins at
the 5:00 PM off time.
Review and Change of Programs
A To review a program at any time, press the Prog. key. Each
press of the Prog. key displays a program in the sequence it
was entered.
B To change a program, select the program to be changed with
the Prog. key, and enter the new time of day and/or days of
the week as done in the Set Holiday Program section. The old
program is overwritten with the new selections. Press the
Prog. key to store the new program.
C To delete an individual program, select the program as
explained in step A and press the m key and then the h key
until -:- is displayed. Press either the Prog. or the key
until -:- flashes. The program is deleted after a few seconds.
Manual Override
When in the Run Mode, ( symbol is displayed), press the
key to reverse the load status (switch the load off if on, or on if off).
The hand symbol is displayed to indicate that the override is active.
At the next scheduled switching time, the automatic time control
resumes, eliminating the override.
Press the key a second time. [ ] is displayed indicating
the load is switched permanently on.
Press the key a third time. [ ] is displayed indicating the
load is switched permanently off.
Press the key a fourth time to return to automatic
programming. is displayed.
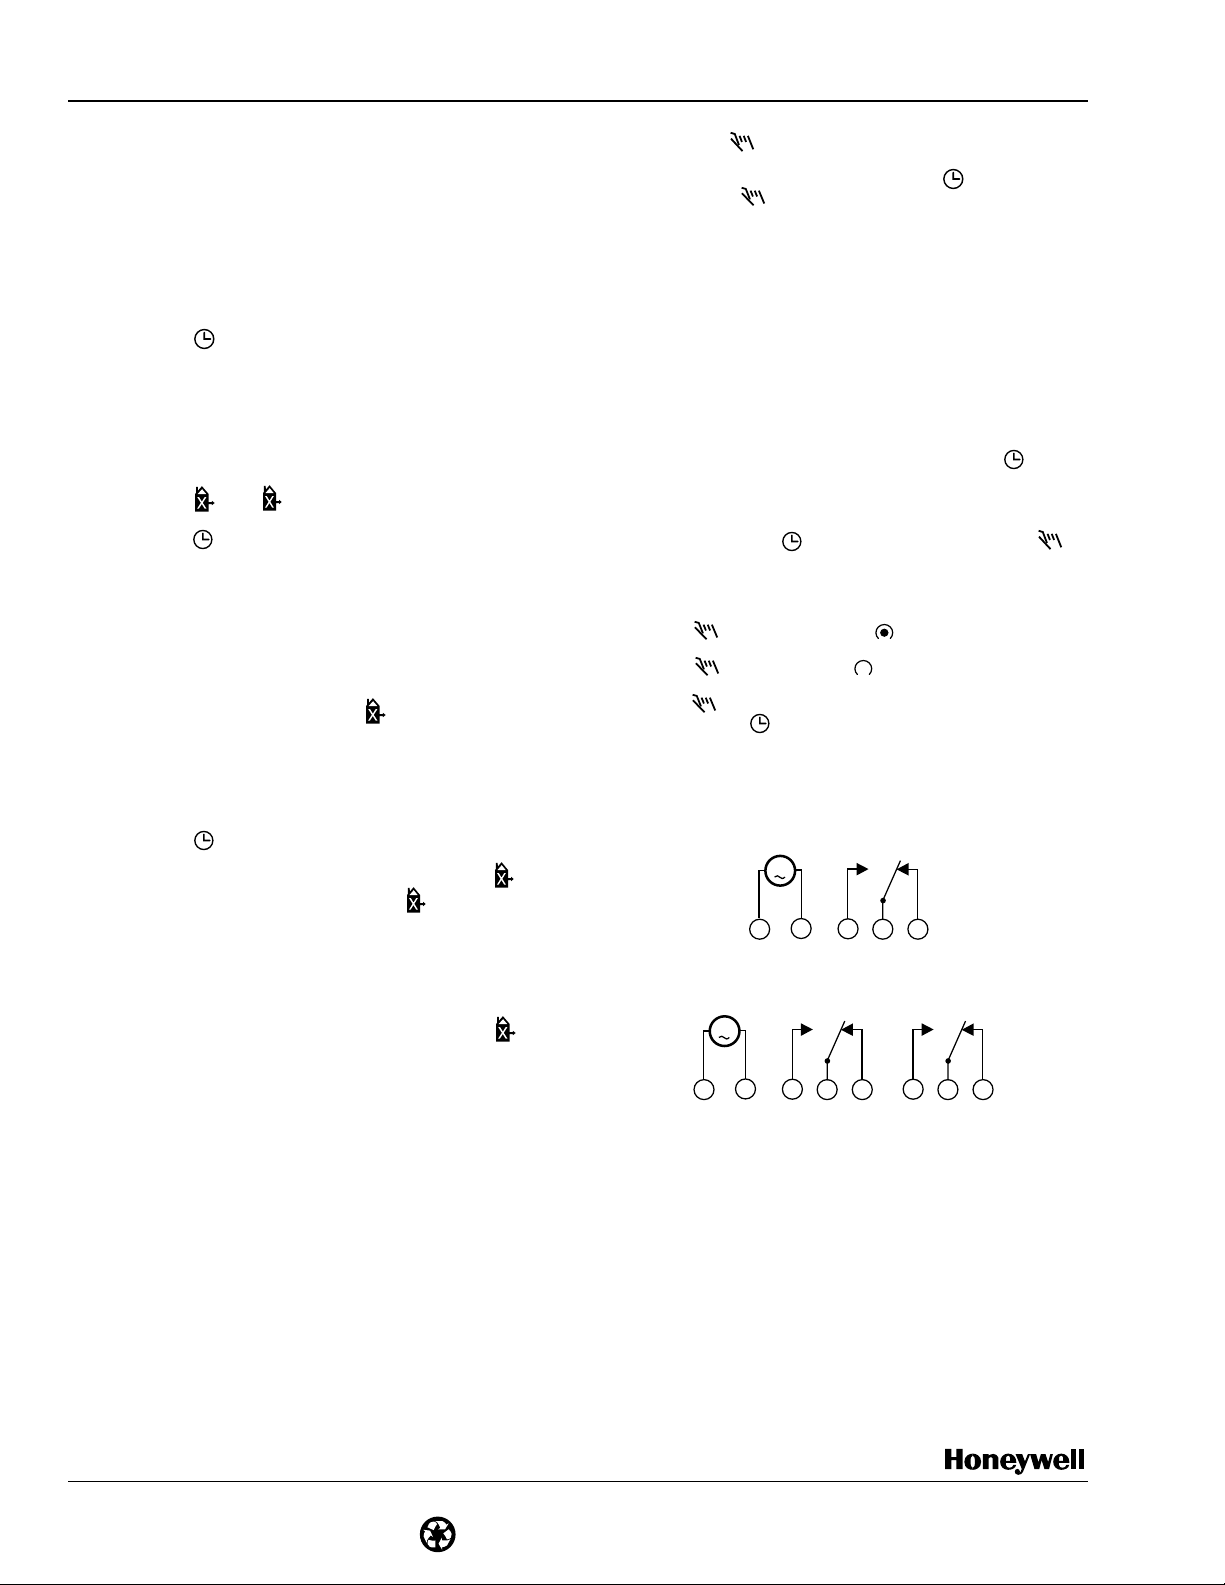
TERMINAL DESIGNATIONS
ST7009A,C
NO
NC
4
3
NC
5
NO
NC
7
6
5
8
M11346
1
INPUT
M
2
1
ISOLATED CONTACTS
INPUT
ST7009B,D
M
NO
2
4
3
CIRCUIT 1 CIRCUIT 2
ISOLATED CONTACTS
Home and Building Control
Honeywell Inc.
Honeywell Plaza
P.O. Box 524
Minneapolis MN 55408-0524
Honeywell Latin American Division
Miami Lakes Headquarters
14505 Commerce Way Suite 500
Miami Lakes FL 33016
68-3003
68-3003 J.S. 2-97
Home and Building Control
Honeywell Limited-Honeywell Limitée
155 Gordon Baker Road
North York, Ontario
M2H 2C9
Honeywell Europe S.A.
3 Avenue du Bourget
B-1140 Brussels Belgium
Printed in U.S.A. on recycled paper
containing at least 10% post-consumer paper fibers
4
Honeywell Asia Pacific Inc.
Room 3213-3225
Sun Hung Kai Centre
No. 30 Harbour Road
Wanchai
Hong Kong
Helping You Control Your World
®
 Loading...