

Page 1

What if something happens to my heating system? How can I check that the
See the troubleshooting guide below. If you need assistance after this call your installer.
honeywell
CM61NG is working?
RF Programmable Thermostat
CM61NG
Symptom
Blank display
Display shows flashing ‘battery’
symbol
Display shows ‘flame’ symbol but
heating does not switch on
Display works but heating does not
switch on (HC60NG LEDs are off or
green one is on)
HC60NG red LED is constantly on or
flashing
Heating switches on or off too slowly
or too quickly
Temperature swings between too hot
and too cold
Trouble-Shooting Guide
Possible Cause
No batteries
Wrong battery orientation
Exhausted batteries
Improper battery compartment insertion
Batteries need replacing
The heating is not required at this
moment
Boiler switched off
Wrong electrical connection
RF communication lost due to the
wrong location of the room unit
RF communication fault
CM61NG not set correctly for your
system
CM61NG not set correctly for your
system
Remedy
Check that the batteries are in the battery compartment and that the
paper tab has been pulled out
Check that the batteries have been installed in the correct orientation
Replace batteries
Remove battery compartment and re-insert
Change batteries as described previously
The heat demand is sent to the relay box as a value between 0-100%.
The relay box will adjust the boiler on time to meet this requirement.
That is why the heating will be off sometimes even if the ‘flame’
symbol is displayed. To check if RF system is communicating properly
press the TEMPerature UP button to increase the set temperature a
few degrees above the current temperature. The heating should come
on after a few seconds
Switch the boiler on
Call electrical installer to check the boiler and relay box power supply
as well as the connection between the boiler and the relay box
Hook the room unit back on the wall bracket or replace the room unit
on the table stand to the position where RF communication was
reliable.
Call installer
NOTE: You can control the boiler manually when the RF communication is lost:
Press the HC60NG push button to switch the boiler on and off. When
the green LED is on – the boiler is on.
Call installer
Call installer
What is an RF Programmable Thermostat?
A Honeywell Radio Frequency (RF) programmable thermostat is a
thermostat that controls your heating system so that you can have
comfortable temperatures when you are at home and energy savings
when you are out. With RF communication there is no need to provide
a wired connection between thermostat and boiler. The CM61NG
can therefore be installed without disrupting your room decor. These
instructions explain how to program and operate your CM61NG to
get the most comfort at the least cost.
What will the CM61NG Programmable Thermostat do for me?
Wireless connection to the boiler allows you to mount the
•
CM61NG in your room without disrupting the decor
Armchair programming lets you set up your CM61NG while
•
resting comfortably in your armchair
Optimum Start means that the CM61NG will switch on your
•
heating system so that your desired comfort temperature is
reached at the programmed time, thus avoiding unnecessary boiler
firing
Display show ‘spanner’ symbol
Warning.
This product and its associated documentation and packaging are protected by various intellectual property rights belonging to Honeywell Inc and its
subsidiaries and existing under the laws of the UK and other countries. These intellectual and property rights may include patent applications,
registered designs, unregistered designs, registered trade marks, unregistered trade marks and copyrights and also include the following UK registration rights:
UK patent application number 98062207.8
UK registered design numbers 2073334, 2073340 and 2073343.
Fault in the CM61NG
Remove the battery compartment and re-insert it. If the ‘spanner’
symbol does not clear itself in a few minutes call the installer
honeywell
Attractive slim styling compatible with any room decor
•
6 daily independent temperature levels let you set any 6
•
temperatures from 5 to 30°C to match your daily lifestyle
Holiday button saves energy by letting you reduce the tempera-
•
ture for 1 to 99 days while you are on holiday, returning to normal
operation on the day you return
Memory holds the user program indefinitely so that it is never lost
•
even if you take the batteries out
What is Optimum Start?
Instead of switching on the heating at the set time every day, the
CM61NG will delay the start time to the latest possible moment, so
that unnecessary heating is avoided. All you have to do is set the time
when you want comfort temperature and the CM61NG will then
decide when to turn the heating on, thereby ensuring your comfort.
Honeywell Control Systems Ltd.
Arlington Business Park
Bracknell, Berkshire RG12 1EB
Tel: 01344 656000
www.honeywell.com/uk/homes.htm
42010475-003 R1
Page 2
How do I install the batteries?
1. Lift up the front flap to reveal the battery compartment. Open the
battery compartment by inserting a coin underneath the bottom
right edge of the flap and lift out.
2. Pull the paper tab out to activate the 2 AA LR6 Alkaline Batteries
included and push the battery compartment firmly back into the
front of the unit. After a pause the unit will now display information.
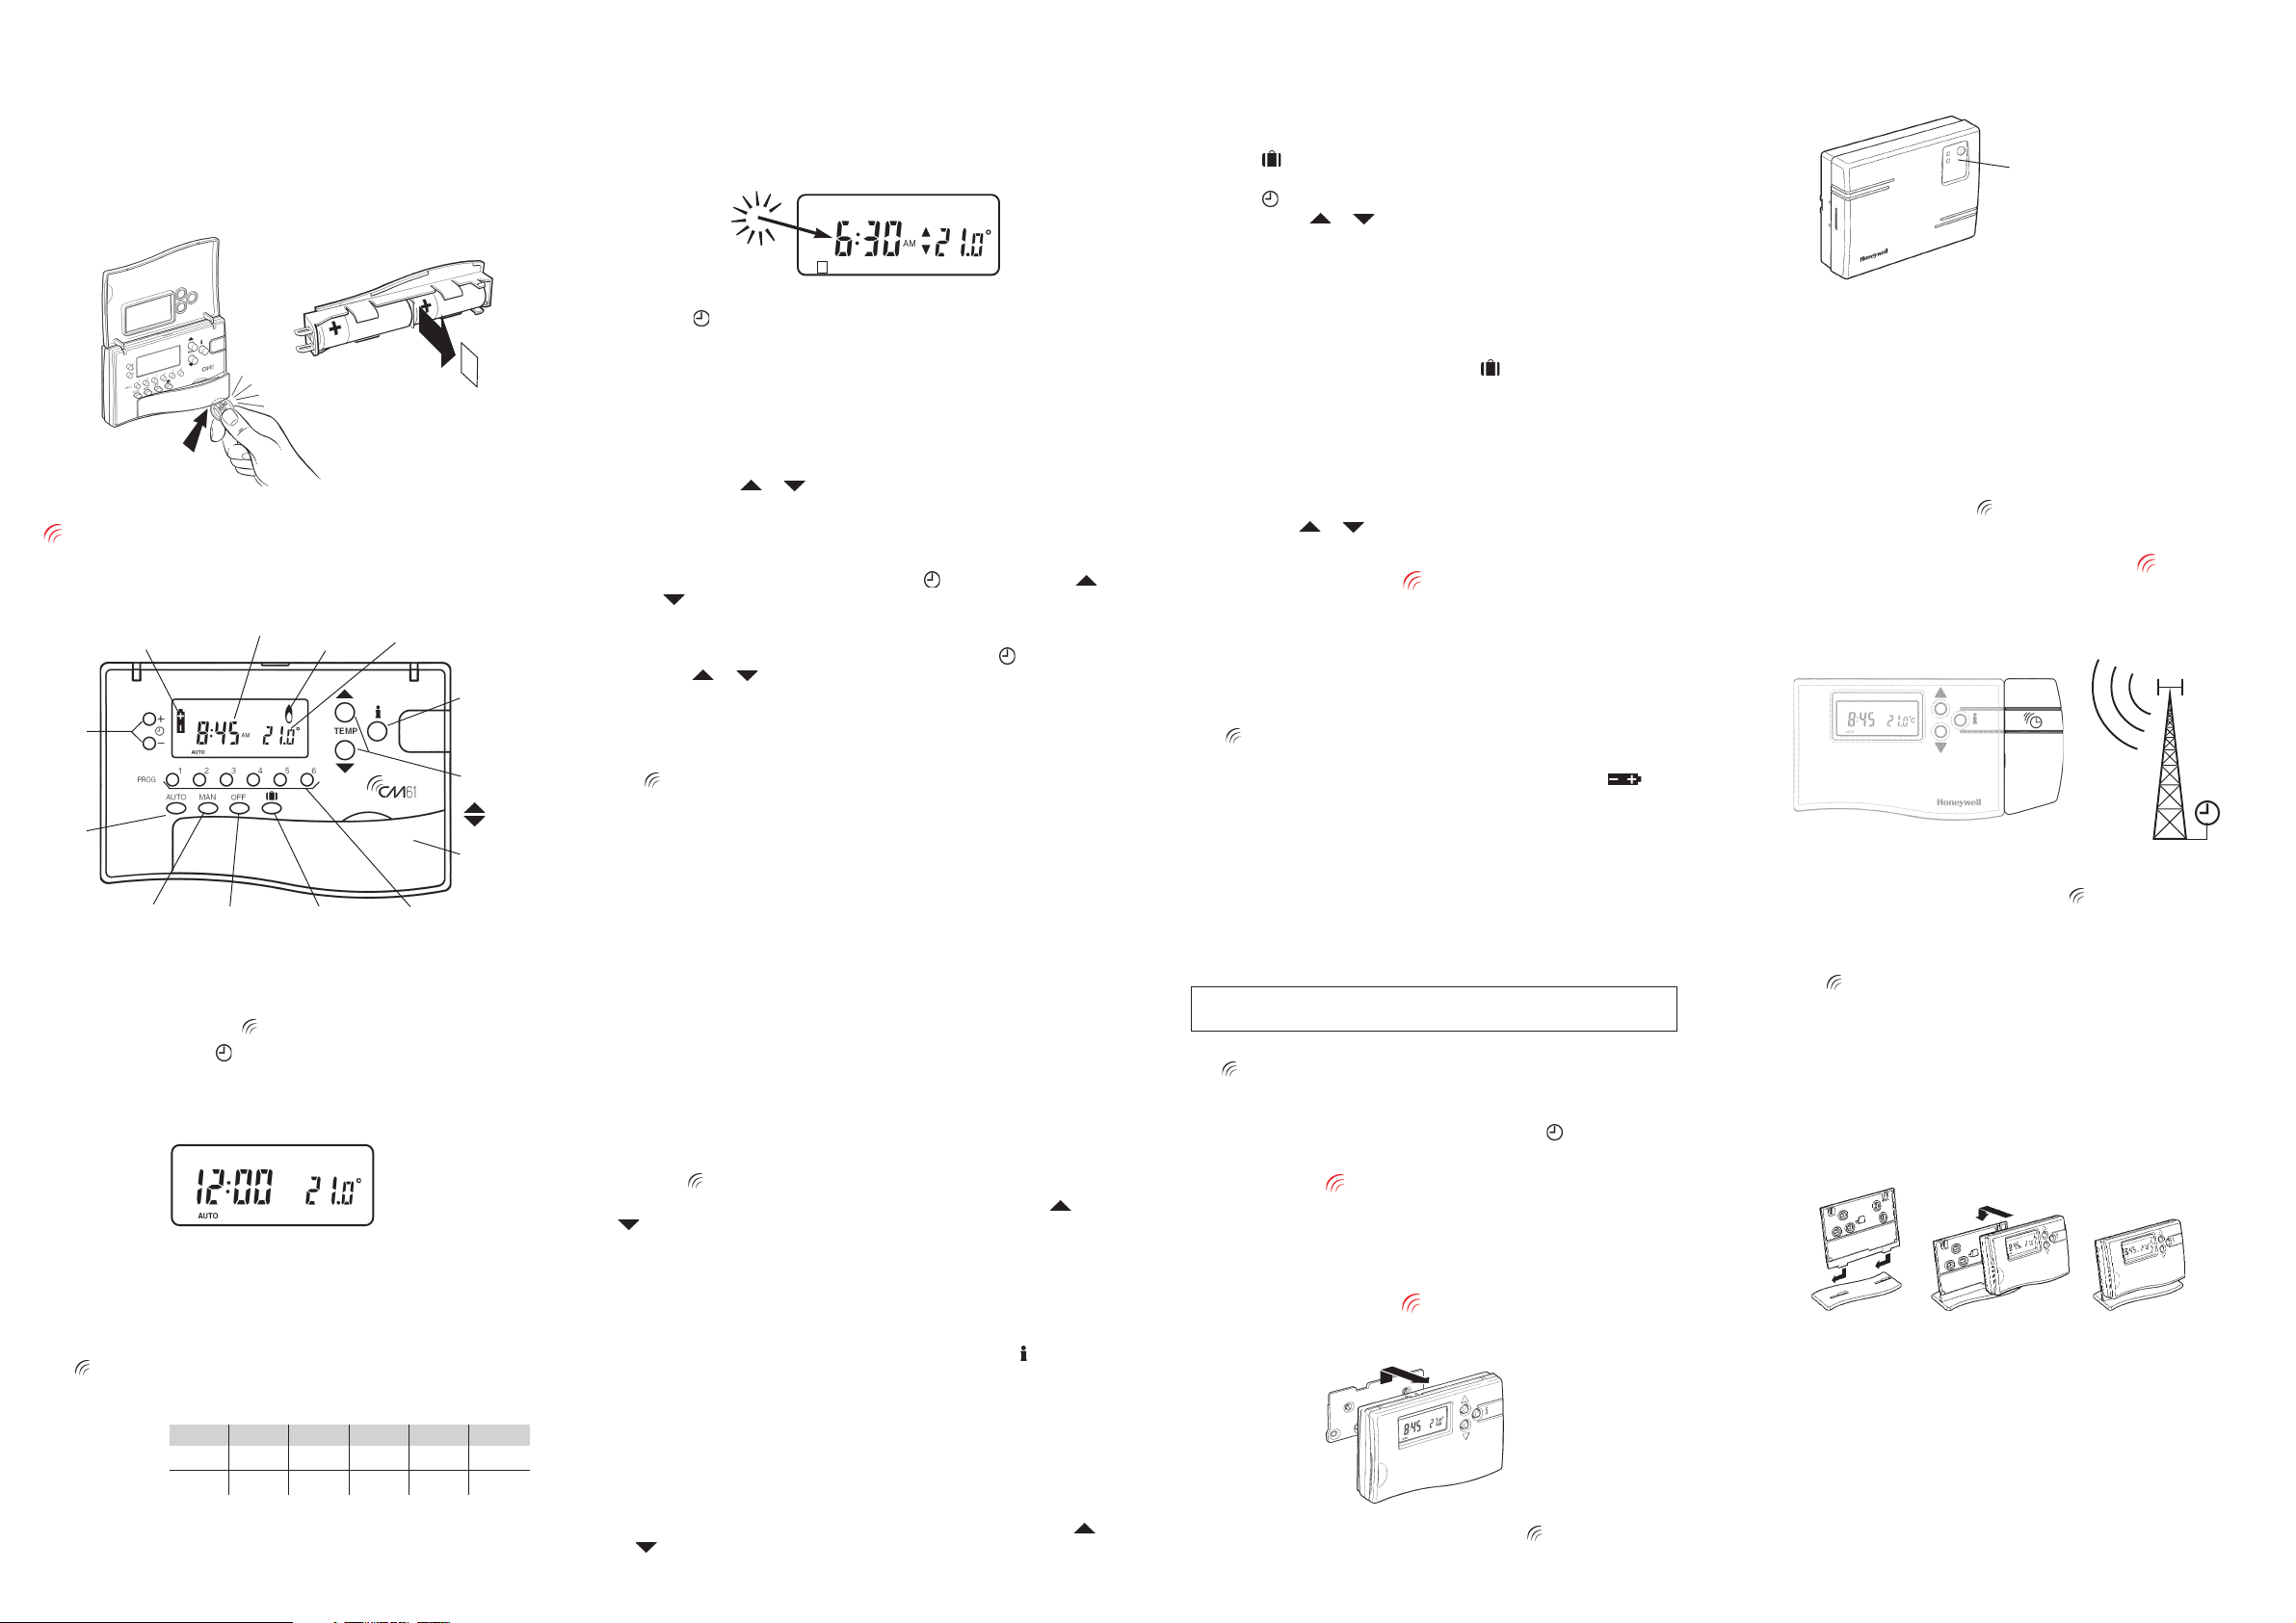
CM61NG Controls/Display Layout
The diagram below details the key button functions and display
information.
Time
Change
Buttons
Automatic
Function
Button
Battery Low
Indicator
Manual Function
Button
Time Display Heat Demand
Indicator
Holiday ButtonOff Button
Temperature
Display
NG
Program
Buttons
Information
Enquiry
Button
Temperature
Change
Buttons
= increase
= decrease
Battery
Compartment
How do I set the time?
The time can be set with the CM61NG in the AUTO, MAN or OFF
operating modes. Press + or - until the correct time is displayed.
Each button press will change the time by one minute. Holding the
button down for a few seconds will change the time slowly at first, then
quickly. Make sure AM or PM is correct.
PM
How do I set my own daily temperature program?
1. Press PROG 1. The first temperature change time and temperature level will flash to indicate they can be changed. (the two small
arrows are displayed only when the programmed temperature level
is shown).
123456
2. Press + or - to adjust the first temperature change time.
Holding the button down will change the time quickly. The change
time can be set in 10 minute steps from 03:00 in the morning. The
change time can be adjusted up to 02:50 on the next morning, so
you can maintain the evening temperature after midnight.
(Note: If you attempt to move a change time past the next change
time, both times will be moved).
3. Press TEMP or to adjust the first temperature level.
Holding the button down will change the temperature quickly. The
temperature can be set in 0.5°C steps from 5°C to 30°C.
4. Press PROG 2 to display the second temperature change time and
temperature level. Set these by pressing + or - and TEMP
or .
5. The remaining temperature changes can be displayed by pressing
PROG buttons 3, 4, 5 and 6 and adjusted by using + or - and
TEMP or . (If you don’t want to use all the temperature
change times 2, 3, 4, 5 or 6 refer to the section “What if I don’t
want to use all 6 temperature change times?”).
6. Press AUTO when you have completed your programming, The
CM61NG will now control the room temperature to match your
program.
What if I don’t want to use all 6 temperature
change times?
The built-in program uses 6 temperature change times as indicated by
the numbers 1, 2, 3, 4, 5 and 6 on the display. Unwanted change times
can be deleted by holding the appropriate PROG buttons (2, 3, 4, 5 or
6) down for a few seconds. The change time will be removed and the
display will show dashes instead of a time / temperature display.
Deleted temperature change times can be brought back by again
pressing the appropriate program button (2, 3, 4, 5 or 6) for a few
seconds.
Can I change the programmed temperature for a
short time?
When the CM61NG is in AUTO position (display will show “AUTO”)
the
temperature can be adjusted temporarily by pressing TEMP or
.
The temperature will return to the program at the next temperature
change time.
I am going on holiday for a few days. How do I
save energy but ensure that the house is warm
when I return?
1. Make sure the CM61NG is in AUTO or MAN mode.
2. Press
temperature.
3. Press + or - to set the holiday time (1 - 99 days).
4. Press TEMP or to set the holiday temperature (5°C 30°C).
The unit will control to the new temperature for the set number of days
holiday. At midnight the holiday counter will be reduced by one until the
selected number of days have passed. The unit will then return to
normal control as set by the MAN or AUTO position.
To cancel the HOLIDAY setting, press the button a second time.
How can I switch the
(HOLIDAY) to display the holiday days counter and
Heating
on and off
manually?
To switch the boiler ON or OFF:
1. Press the MAN button.
2. Press TEMP or until the boiler switches ON or OFF.
How can I switch the CM61NG off?
Press the OFF button. The unit will now control at 5°C.
How do I know when the batteries need to be
changed and how do I do this?
Your CM61NG has built-in electronics that constantly monitor the
battery power level. With no accessory fitted the batteries should last
about 2 years. When the batteries need replacing, a flashing
symbol will be displayed.
To change the batteries:
1. Lift up the front flap to reveal the battery compartment. Open the
battery compartment by inserting a coin underneath the bottom
right edge of the flap and lift out.
2. Replace the used batteries with 2 new AA LR6 Alkaline Batteries
(Duracell are recommended) and push the battery compartment
firmly back into the front of the unit.
RESPECT YOUR ENVIRONMENT!
Take care to dispose of used batteries carefully.
The CM61NG has a permanent memory to keep your program
settings. While you change the batteries, you should never need to
reprogram. However, if you take more than one minute to change
them, you may need to correct the time by pressing + or -.
Can I use my CM61NG to control my air-conditioning system?
Yes. Please refer to your installer for more information.
HC60 Relay Box Controls Layout
The relay box will normally be found mounted close to the boiler.
Push button and relay
status LED’s
What does it mean when the HC60NG relay box
green LED is ON?
The green LED indicates normal operation of the radio frequency
system. When the green LED is ON the boiler is also ON. When the
LED is OFF the boiler is OFF.
When do I need to use the push button?
You should use the push button to control your boiler only when the RF
communication is lost (see the CM61NG Trouble-Shooting Guide).
What other accessories can I buy for the CM61NG?
Automatic Time Setting (ATS) “Add-On” Module *
(Part No. Q6667B1015)
The ATS module picks up a daily time signal from a transmitter in
Central Europe and corrects the time on the CM61NG display. So:
• You never need to set or adjust the time
• There is no need to adjust the unit by -/+ 1 hour in summer / winter
since the unit does this automatically
• Your CM61NG is the most accurate clock in your home so you
can use this information to set-up all your other clocks.
* Not available in all Geographic Regions depending on transmitter
range and home location.
Table stand for the room unit (Part No. F42010248-002)
If you do not want to mount the room unit on the wall you can use
optional table stand, ask you installer for details
How do I get started with the built-in temperature program?
Press the AUTO button.
The CM61NG will now control your heating using the built-in
temperature program:-
Daily
Program 1 2 3 4 5 6
Time 06:30 08:00 12:00 2:00 6:00 10:30
Temperature 21°C18°C21°C18°C21°C16°C
How do I check the programmed temperature?
In normal operation the temperature displayed is the actual room
temperature. To check the programmed temperature press and the
display will show the programmed temperature with the two small
arrows.
How do I set one temperature for the whole
day?
To operate as a simple thermostat with one temperature throughout the
day, press MAN. Adjust the manual temperature by pressing TEMP
or
. The manual temperature can be set anywhere from 5°C to 30°C
in 0.5°C steps.
How do I remove the CM61NG from the wall
bracket?
*Note: The room unit must be located in a location where reliable
communication was proven. Advise your installer where you would like
to position the room unit and they will check if the RF communication
is reliable in the selected location(s)
After programming is finished always replace the CM61NG back on
the wall bracket.
 Loading...