

Page 1
8
For product inquiries or support / Para consultas del producto o soporte /
Pour les questions sur les produits ou pour du soutien:
www.honeywellportableac.com
Customer Support / Atención al cliente / Soutien au client:
1-800-474-2147
Portable Air Conditioner
Acondicionador de aire portátil
Système de climatisation portatif
OWNER’S MANUAL
Read and save these instructions before use
MANUAL DEL PROPIETARIO
Lea y guarde estas instrucciones antes de usar la unidad
MANUEL DU PROPRIÉTAIRE
Lire et conserver ces instructions avant utilisation
Model / Modelo / Modèle:
MN10CES / MN10CESWW / MN10CESBB
Made in China
Hecho en China
Fabriqué en Chine
Voltage rating / Tensión / Tension nominale: 115V~60Hz
Power rating / Potencia / Puissance nominale: 1050W
Page 2

THANK YOU.....................................................................................................
INDEX .............................................................................................................. 1
2
3
4
6
7
13
15
16
USER TIPS........................................................................................................
SAFETY ............................................................................................................
PARTS DESCRIPTION.....................................................................................
INSTALLATION.................................................................................................
10
USE & OPERATION..........................................................................................
CLEANING & MAINTENANCE..........................................................................
TROUBLESHOOTING GUIDE...........................................................................
14
WATER CONDENSATION DRAINAGE............................................................
TECHNICAL SPECIFICATIONS.........................................................................
17
SERVICE AND WARRANTY .............................................................................
2.
1.
3.
4.
5.
6.
7.
8.
10.
9.
11.
12.
SECTION PAGE
1
INDEX
Read all instructions carefully before setting up and operating the unit. Keep this
instruction manual for future reference. This manual is designed to provide important
information needed to setup, operate, maintain and troubleshoot your portable air
conditioner. Failure to follow these instructions may void the warranty.
Page 3

Congratulations on your purchase of this versatile Honeywell Portable Air Conditioner.
Honeywell Portable Air Conditioners are ideal for spot cooling. The compressor, condenser
and evaporator are housed in a compact unit. The air is filtered, dehumidified and cooled while
a flexible air outlet hose sends heat outside. The air conditioner includes a window venting kit.
No permanent installation is needed. The unit is easy to move from room to room and offers a
truly flexible air conditioning solution.
Auto Evaporation System - The unit automatically evaporates the condensate through the air
outlet hose. There is no need to empty the drainage tank except in very high humidity conditions.
Read and follow the instructions carefully.
2
THANK YOU
r.
Page 4
3
USER TIPS
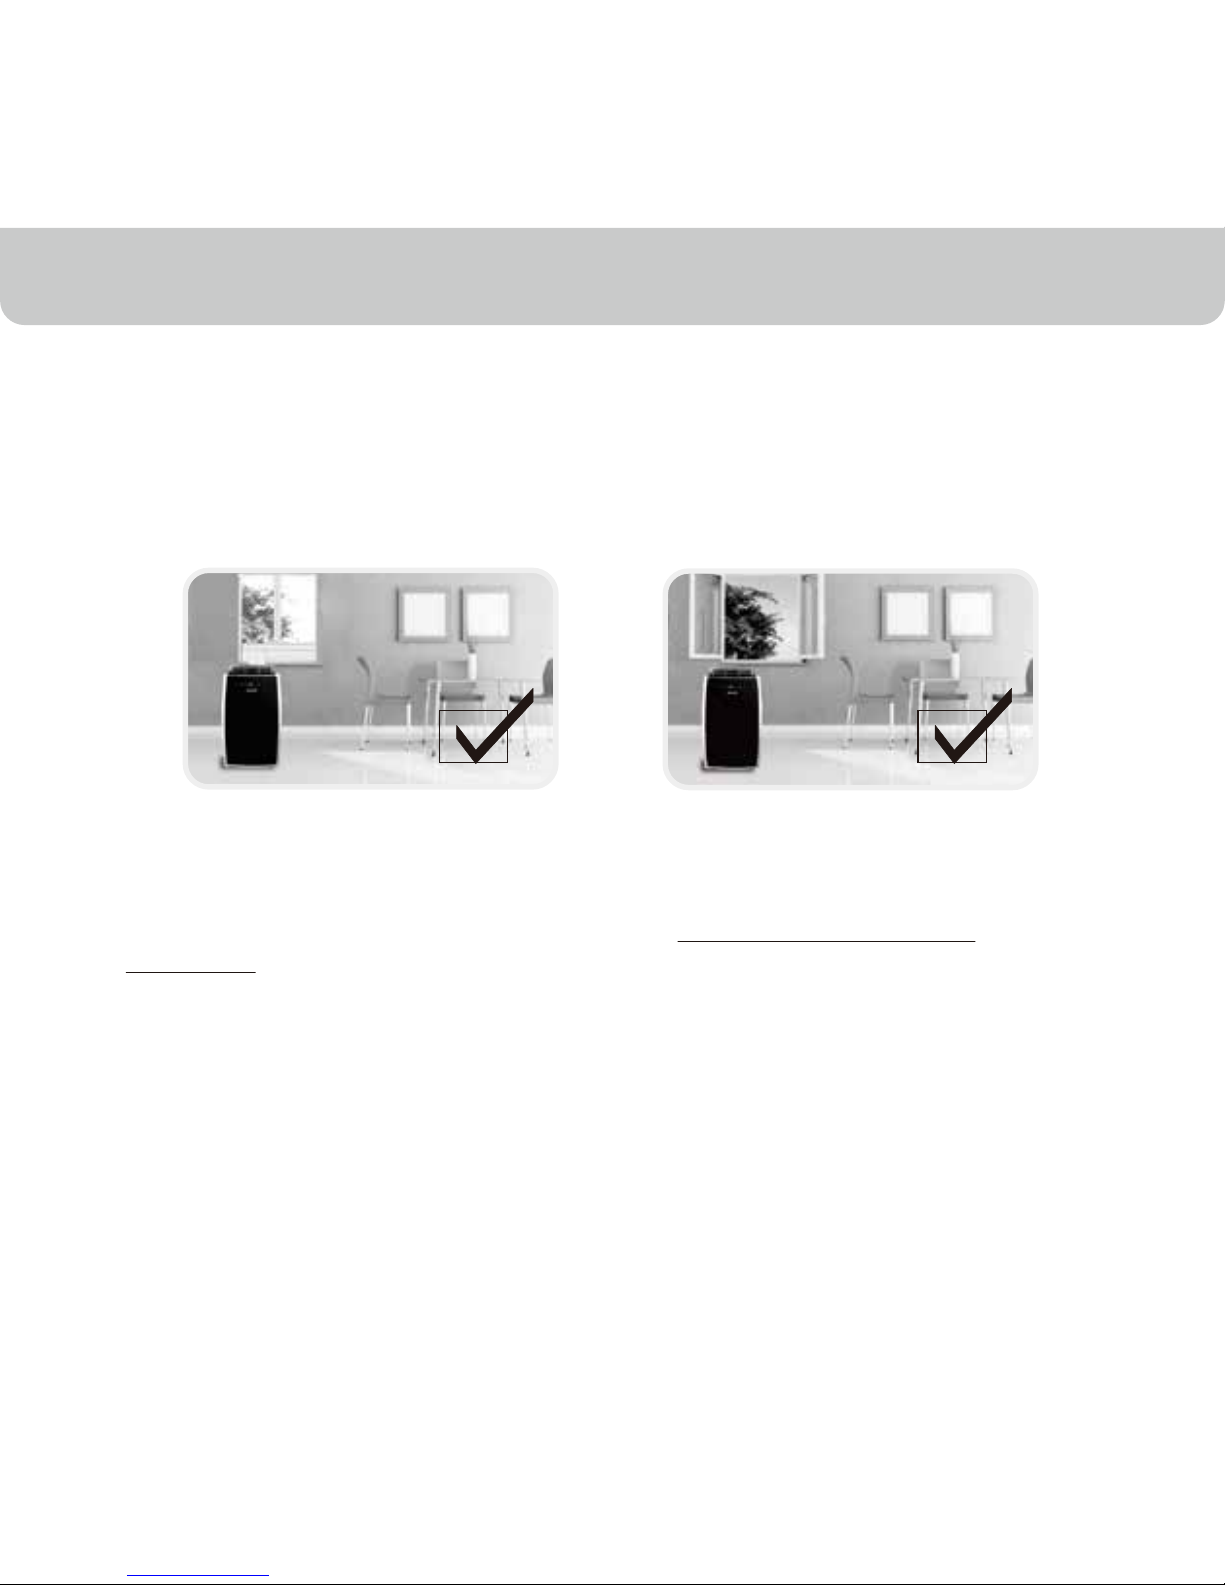
To ensure optimal efficiency of the product, keep doors and windows closed when it
is used as an air conditioner or dehumidifier.
If the product is being used with the fan function only, an open window could improve
air circulation.
Important : Before installing the unit, place it UPRIGHT for 20 minutes
before use to allow the refrigerant to stabilize.
• Follow installation instructions to set up the unit.
• Plug the unit into a properly grounded circuit.
Cooling and Dehumidifying Operation Fan Operation
Page 5

4
SAFETY
WARNING
READ AND SAVE THESE INSTRUCTIONS
Improper handling can cause serious damage to the appliance.
DO NOT operate the unit with a damaged plug or loose wall outlet. If the power
cord is damaged, it must be replaced by the manufacturer or an authorized service agent.
DO NOT cover the air intake and exhaust when in use.
This appliance is not intended for use by children. Children should be supervised
and should not play on or around the appliance.
DO NOT place objects on or sit on the unit.
Always turn off and unplug the unit when cleaning or servicing.
If service is needed contact an authorized service agent.
Unplug the unit when stored or not in use.
1.
2.
3.
4.
5.
6.
7.
Page 6

DO NOT run the power cord under carpeting and rugs.
Use caution to prevent tripping on cord.
DO NOT use in areas where gasoline, paint or other flammable goods are stored.
Basic safety precautions should always be followed when using electrical appliances.
8.
9.
10.
11.
5
SAFETY
Page 7
6
PARTS DESCRIPTION
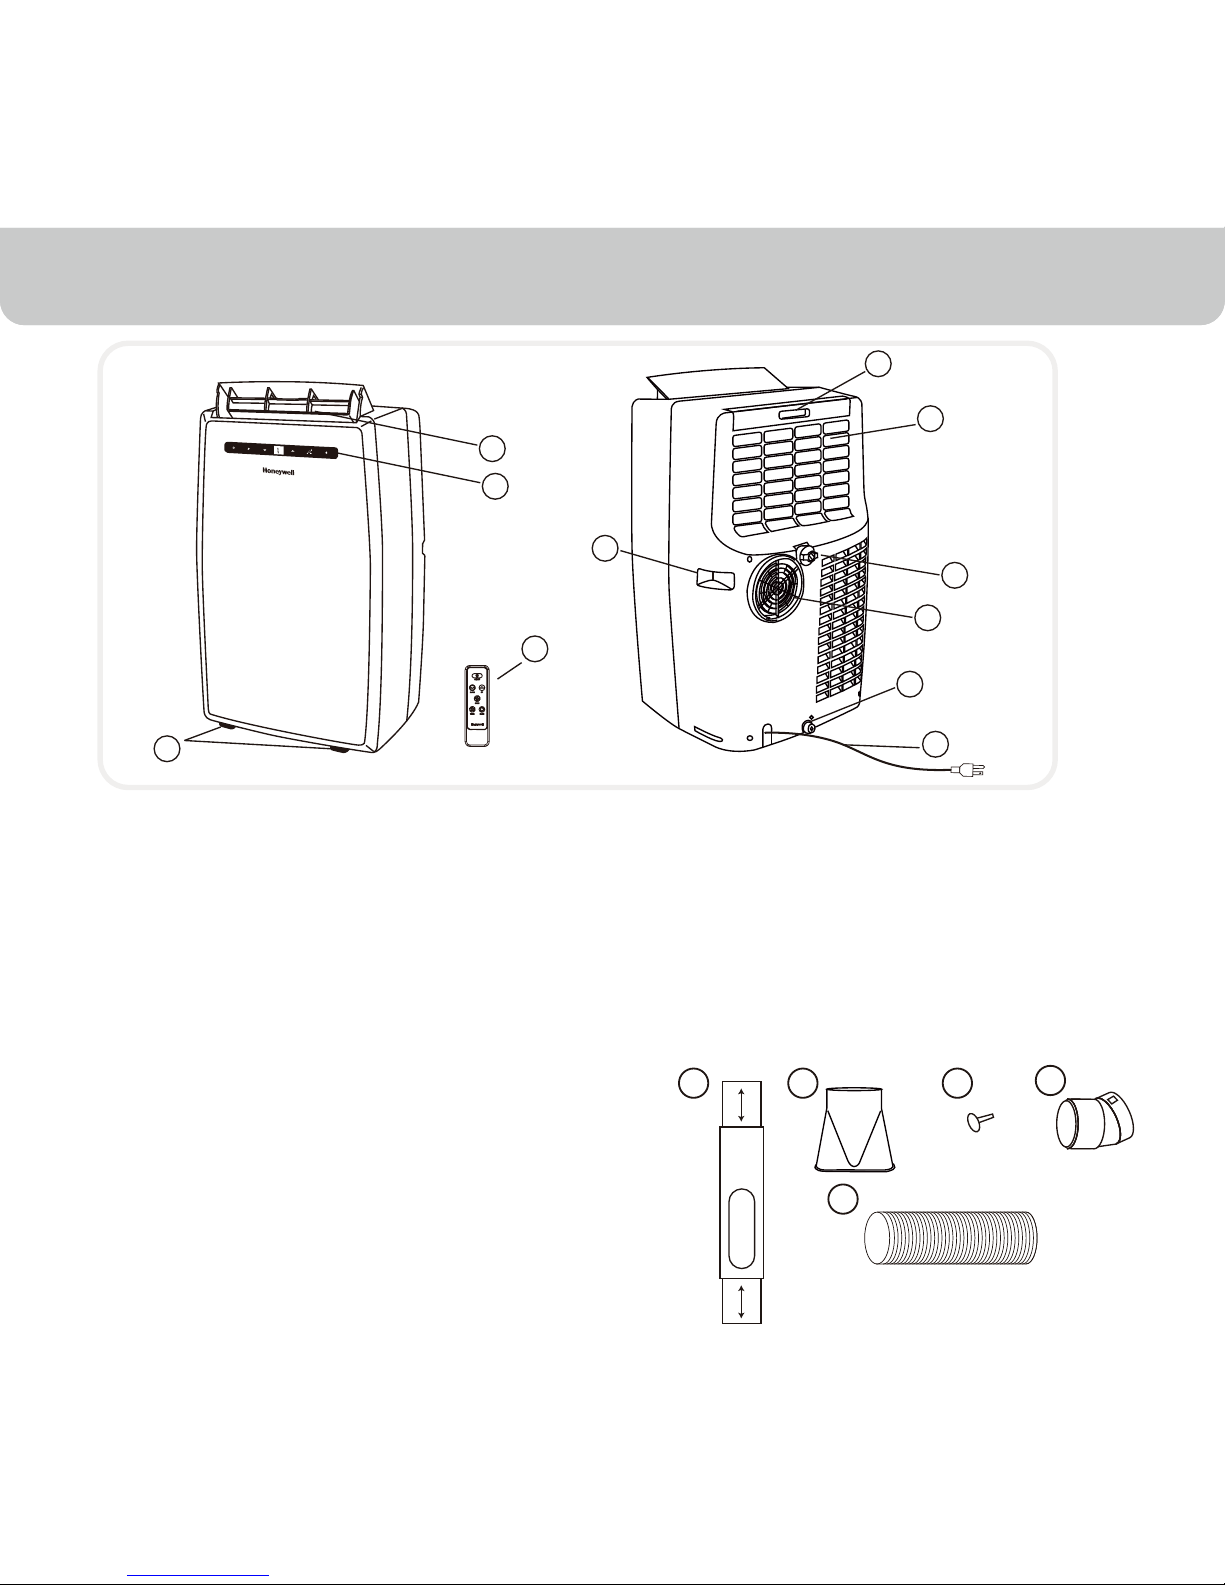
1. Control Panel (Incl. Signal Receptor)
2. Air Outlet
3. Handle
4. Casters
5. Drain Plug (De-humidifier mode)
6. Air Filter
7. Back Grill
8. Drain Plug (Air Conditioning Mode)
9. Power Supply Cord
10. Exhaust Hose Connector
11. Remote Control
1
2
5
3
x 1
x 1
x 2
x 1
Installation Kit :
1. Window Bracket Kit.............................
2. Window Bracket Panel Adapter..........
3. Plastic Pin...........................................
4. Hose Connector..................................
5. Plastic Hose........................................
1 Set
1 Piece
2 Pieces
1 Piece
1 Piece
1
2
8
6
7
5
4
3
10
11
9
8
4
Page 8

7
INSTALLATION
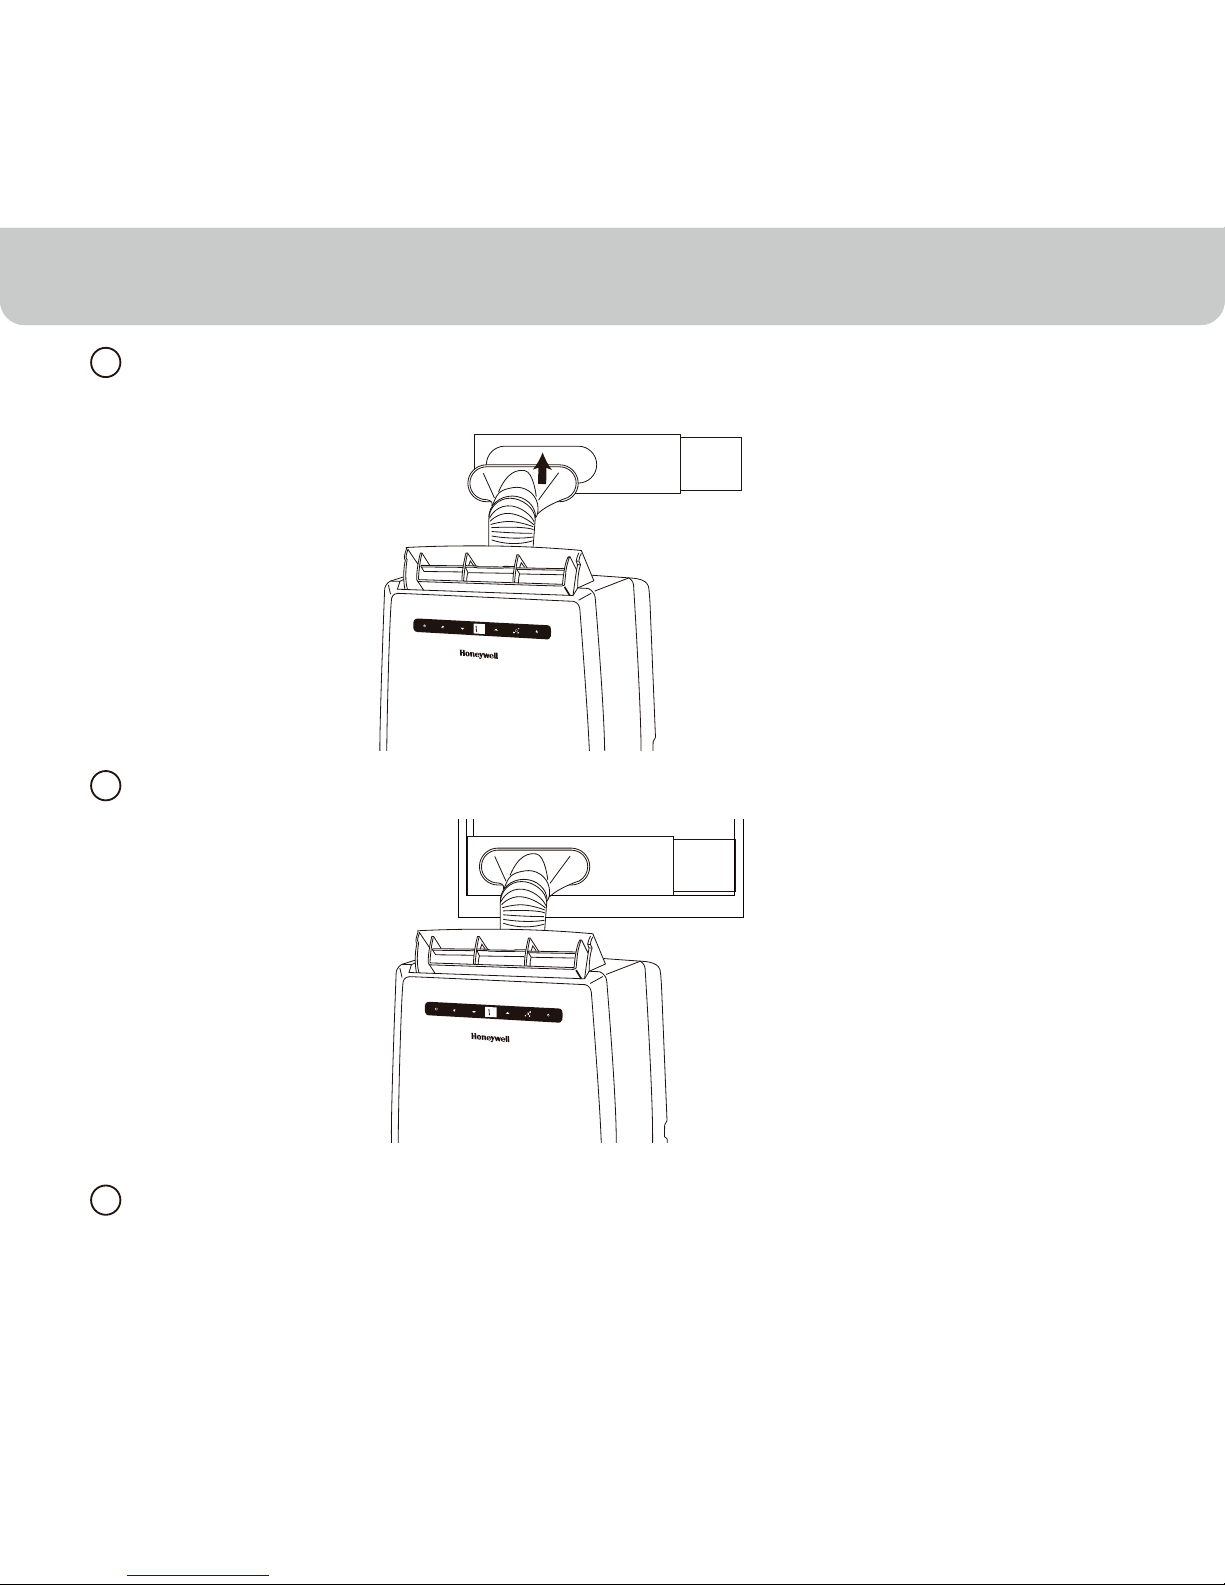
Install the plastic hose with window bracket adapter and hose connector on both sides.
Ensure proper fit on both ends.
Adjust the window bracket as per width or height of your window and insert the plastic
pins to fix at the desired position.
Note : Do not install the window
bracket to your window. This step is
required only to adjust it to the
size of your window. The bracket
should be removed from the window
after the size is adjusted.
1
2
3
=
Connect the plastic hose to the hose connector on the back of the unit. Push-in then rotate
clockwise.
Plastic Pin
Plastic Pin
Page 9
Connect the window bracket to the opposite end of the plastic hose. Ensure that
all connections are tight and installed properly.
8
INSTALLATION
8
8
4
5
Connect the window bracket to the window.
6
The Portable Air Conditioner is now ready to use.
Page 10
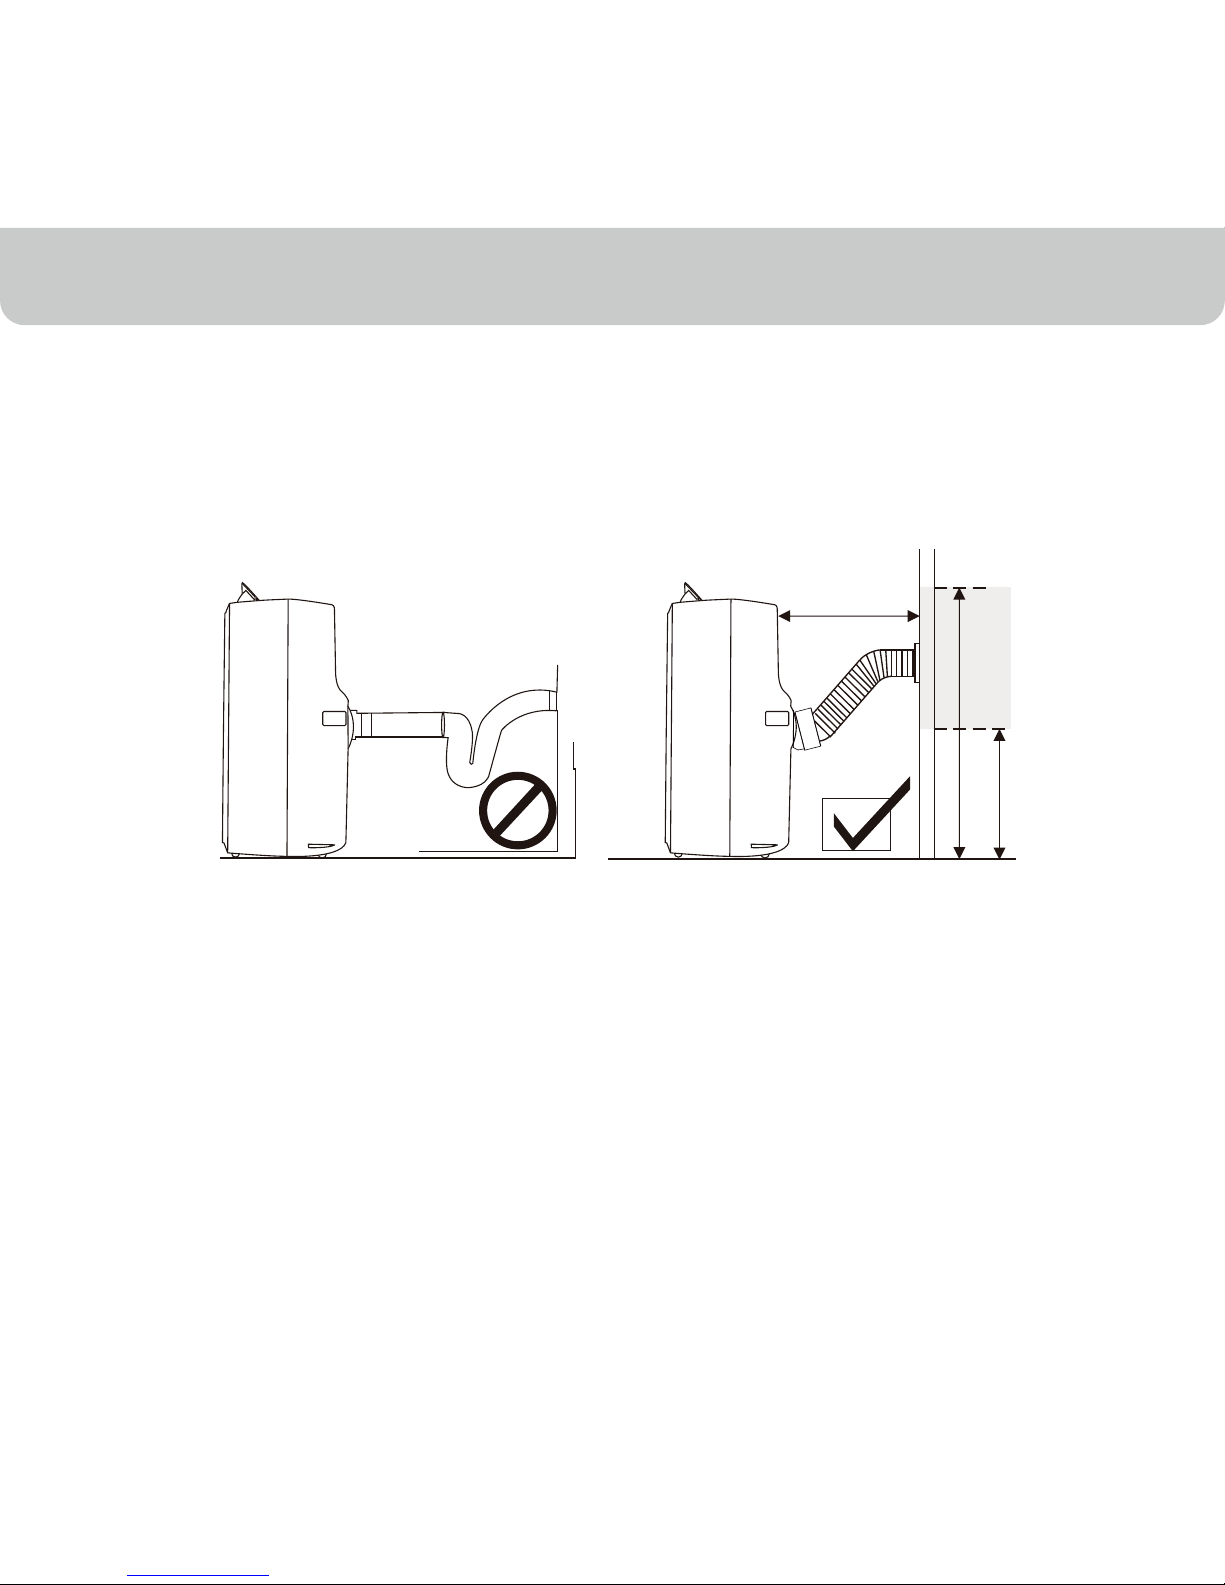
The supplied exhaust hose can be extended from 12 inches (1 foot) to 47 inches
(3.9 feet).
Do not bend (to the extent shown below) the exhaust hose.
A bent hose will block exhaust air and cause the unit to malfunction or shut-off.
The length of the exhaust hose is determined by the product specifications. Do not
replace or lengthen it as this could cause the unit to malfunction.
Make sure the back of the unit is at least 20 inches away from a wall.
Do not place the unit in front of curtains or drapes as this could obstruct the
airflow.
9
INSTALLATION
Note:
1.
2.
RECOMMENDEDNOT RECOMMENDED
Warning:
•
•
MIN. 14”
20”
MAX. 40”
Page 11
10
USE & OPERATION
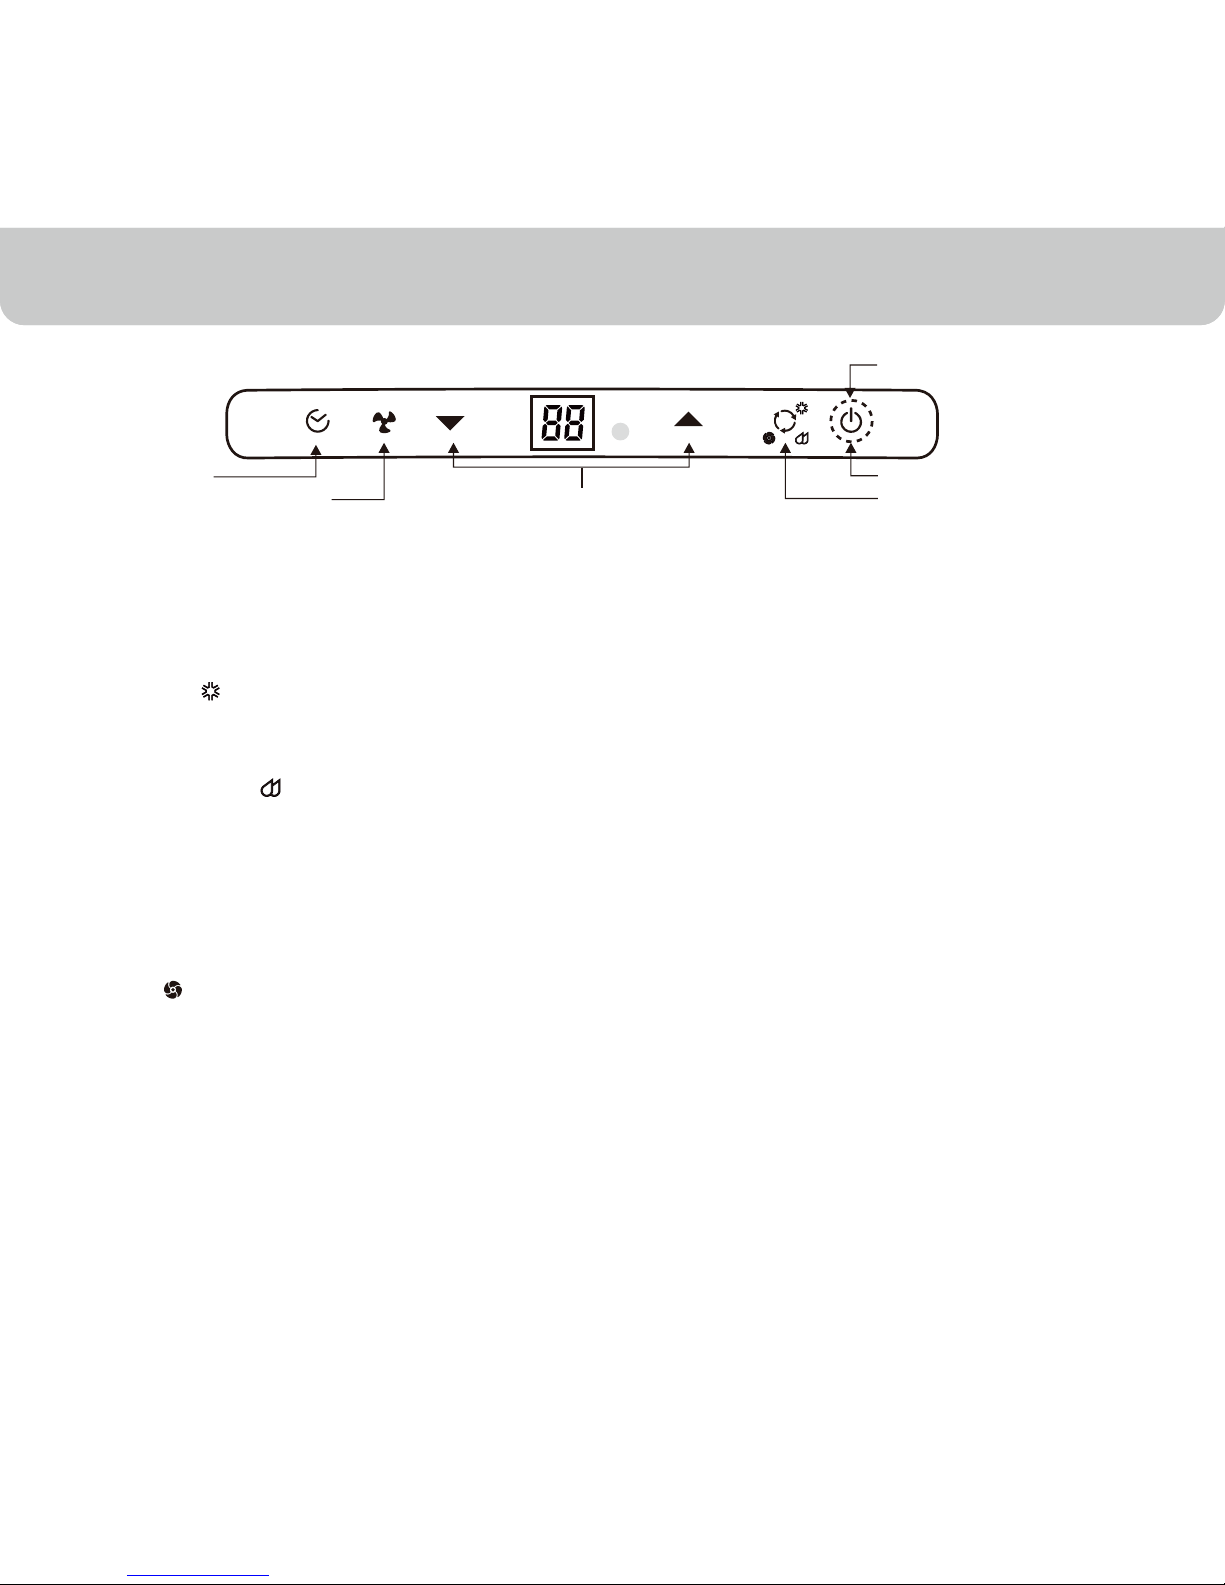
Touch Screen Control Panel
Power Control
Warning Light (when flashing)
Mode Control
Timer Control
Timer / Temperature
Set Controls
Fan Speed Control
After switching the air conditioner off, you must wait 3 minutes before switching it back on again.
Power Control
The Power Control turns the unit on and off.
Mode Control
3 settings: Cool, Dehumidify and Fan
A light will indicate which setting is currently being used.
• Cooling Mode
The unit works as an air conditioner. Adjust fan speed and air
temperature to suit your desired comfort level. Temperature
setting range is 61°F ~ 89°F
• Dehumidifying Mode
Air is dehumidified as it passes through the unit, without being in
full cooling mode. If room temperature is higher than 77°F
fan speed can be adjusted; otherwise fan speed is preset to LOW.
Note : If the unit will be used mainly as a dehumidifier, do not
connect the exhaust hose and let the warm air return in the
room. Continuous drainage is then necessary and more
efficient (refer to page 14, Continuous Water Drain
[Dehumidifier Mode]).
• Fan Mode
For air circulation without air conditioner cooling.
Fan Speed Control
3 settings: High, Medium and Low.
Timer Control
Auto turn off:
While unit is running, press the Timer Control button to select the
number of hours you want the unit to run in air conditioning mode.
Auto turn on:
When unit is in a standby mode, press the Timer Control button to
select the number of hours until you want the unit to automatically
start running.
Temperature / Timer Set Controls
• Used for adjusting the timer and thermostat.
• The default display is room temperature.
• In cooling mode, when “ ▼ “ or “▲“ button is pressed, the set
temperature is displayed and may be adjusted.
After 10 seconds the display will revert back to room temperature.
Temperature is only adjustable in cool mode.
The time is adjustable between 1~24 hours.
Note : By pressing both “ ▼ “ / “▲“ set buttons at the same
time, the display will toggle between Celsius and Fahrenheit.
Warning Light
Condensed water may accumulate in the unit. If the internal tank
becomes full, the Power Light will flash and the unit will not
operate until the unit has been drained (refer page 14, Water
Condensation Drainage).
Page 12

Note :
Do not place the remote control in direct sunlight.
Timer Control
Temperature / Timer Set
Mode Control
Cool
Dehumidify
Fan
In running mode:
Auto switch off
In stand-by mode:
Auto switch on
Press “ ▼ “ or “▲“ button
to adjust the time
setting for 1 hour intervals.
Control
• Used for adjusting the timer
and temperature.
• The default display is room
temperature.
• When “ ▼ “ or “▲“ key is
pressed in cool mode, the set
temperature is displayed and
may be adjusted. After 10
seconds the display will revert
back to room temperature.
• Timer setting is available from
1-24 hours by pressing the
key “ ▼ “ or “▲“
Press this button to change the
operation mode in the order of:
Remote Control
The functions work the same as the portable air conditioner's Touch Screen Control Panel.
All key functions can be accessed from the remote control.
11
USE & OPERATION
Power Control
ON / OFF
Fan Speed Control
• HIGH • MEDIUM • LOW
Page 13
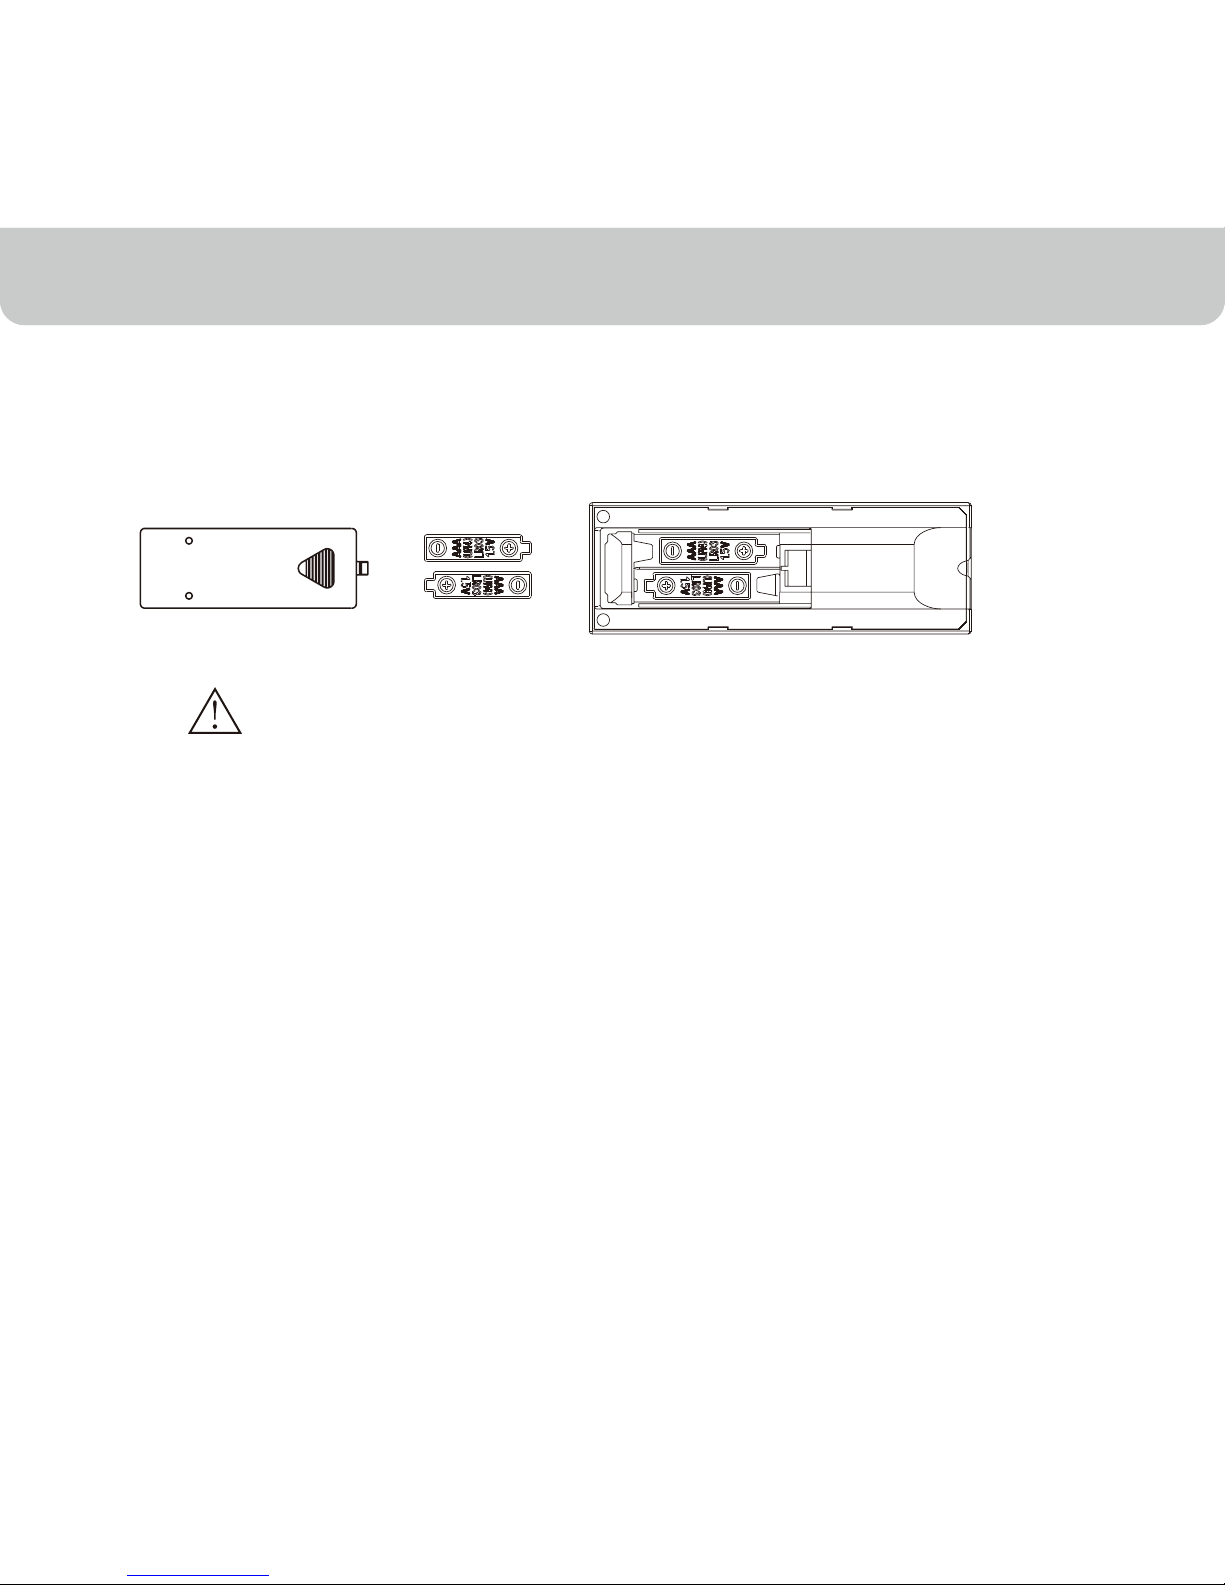
Battery Installation: Remove the cover on the back of the remote control and insert two AAA
batteries with ‘‘+’’ and ‘‘-’’ pointing in the proper direction according to the polarity markings.
• Use only two AAA or IEC R03 1.5V batteries.
• Remove the batteries if the remote control is not in use for a month or longer.
• All batteries should be replaced at the same time, do not mix with old batteries.
• Properly dispose of used batteries.
12
USE & OPERATION
Caution
Page 14

13
CLEANING & MAINTENANCE
Appliance Maintenance:
1. Turn off the appliance before disconnecting the power supply.
2. Always clean the appliance with a soft dry cloth.
Air Filter Maintenance:
The air filter should be cleaned every two weeks.
Clean it as follows:
1.
2.
Turn off the appliance and remove the air filter (refer to page 6, #6).
Rinse it in lukewarm water. After cleaning, dry in a shaded and cool place, then
reinstall.
If the appliance will not be used for a long time, be sure to drain the left-over
water condensation.
Remove the water drain cap (refer to page 14) and use a shallow pan to collect the
water.
To dry excess moisture, run the unit in fan mode for 30 minutes before storing.
Clean and reinstall air filter.
Remove air hose and window bracket and store with the portable air conditioner.
Maintenance After Use:
1.
2.
3.
4.
5.
Page 15
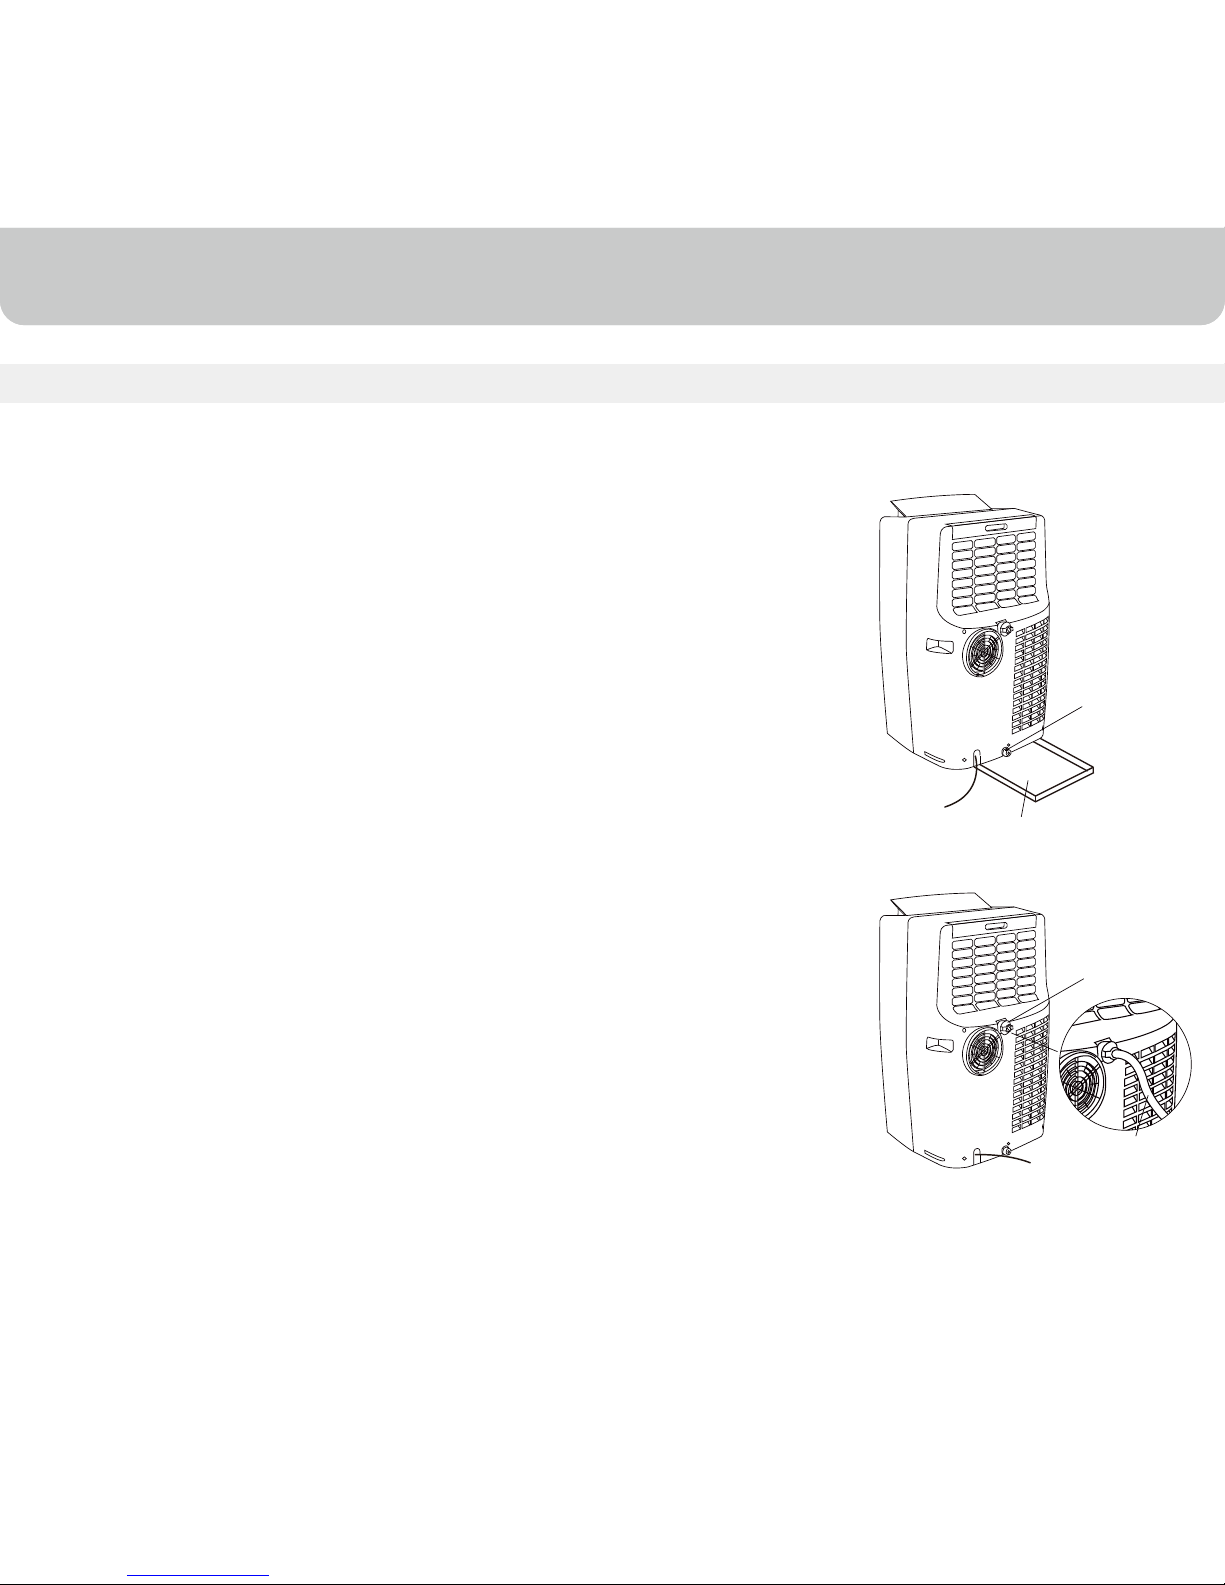
When there is excess water condensation inside the unit, the air conditioner stops running and
shows a warning light (refer to page 10). This warning light indicates that the water condensation
needs to be drained using the following procedures:
WATER CONDENSATION DRAINAGE
14
Dehumidifier Mode
Drain Plug
(De-Humidifier
Mode)
Unplug the unit from power source.
Place a shallow pan under the drain plug. See diagram.
Remove the drain plug.
Water will drain out and collect in the shallow pan.
After the water is drained, replace the cap firmly.
You can now turn on the unit.
Air Conditioning Mode
Water Condensation Drainage
1.
2.
3.
4.
5.
6.
Unplug the unit from power source.
Remove the drain plug.
Connect the drain connector to a ¾” hose(not included). See diagram.
Drain the water condensation into a bucket or a floor drain.
After the water is drained, replace the cap firmly.
You can now turn on the unit.
1.
2.
3.
4.
5.
6.
Drain Plug
(AC Mode)
Water Drain Pipe
Water may need to be drained in high humidity areas
Shallow Pan
(Not included)
Page 16
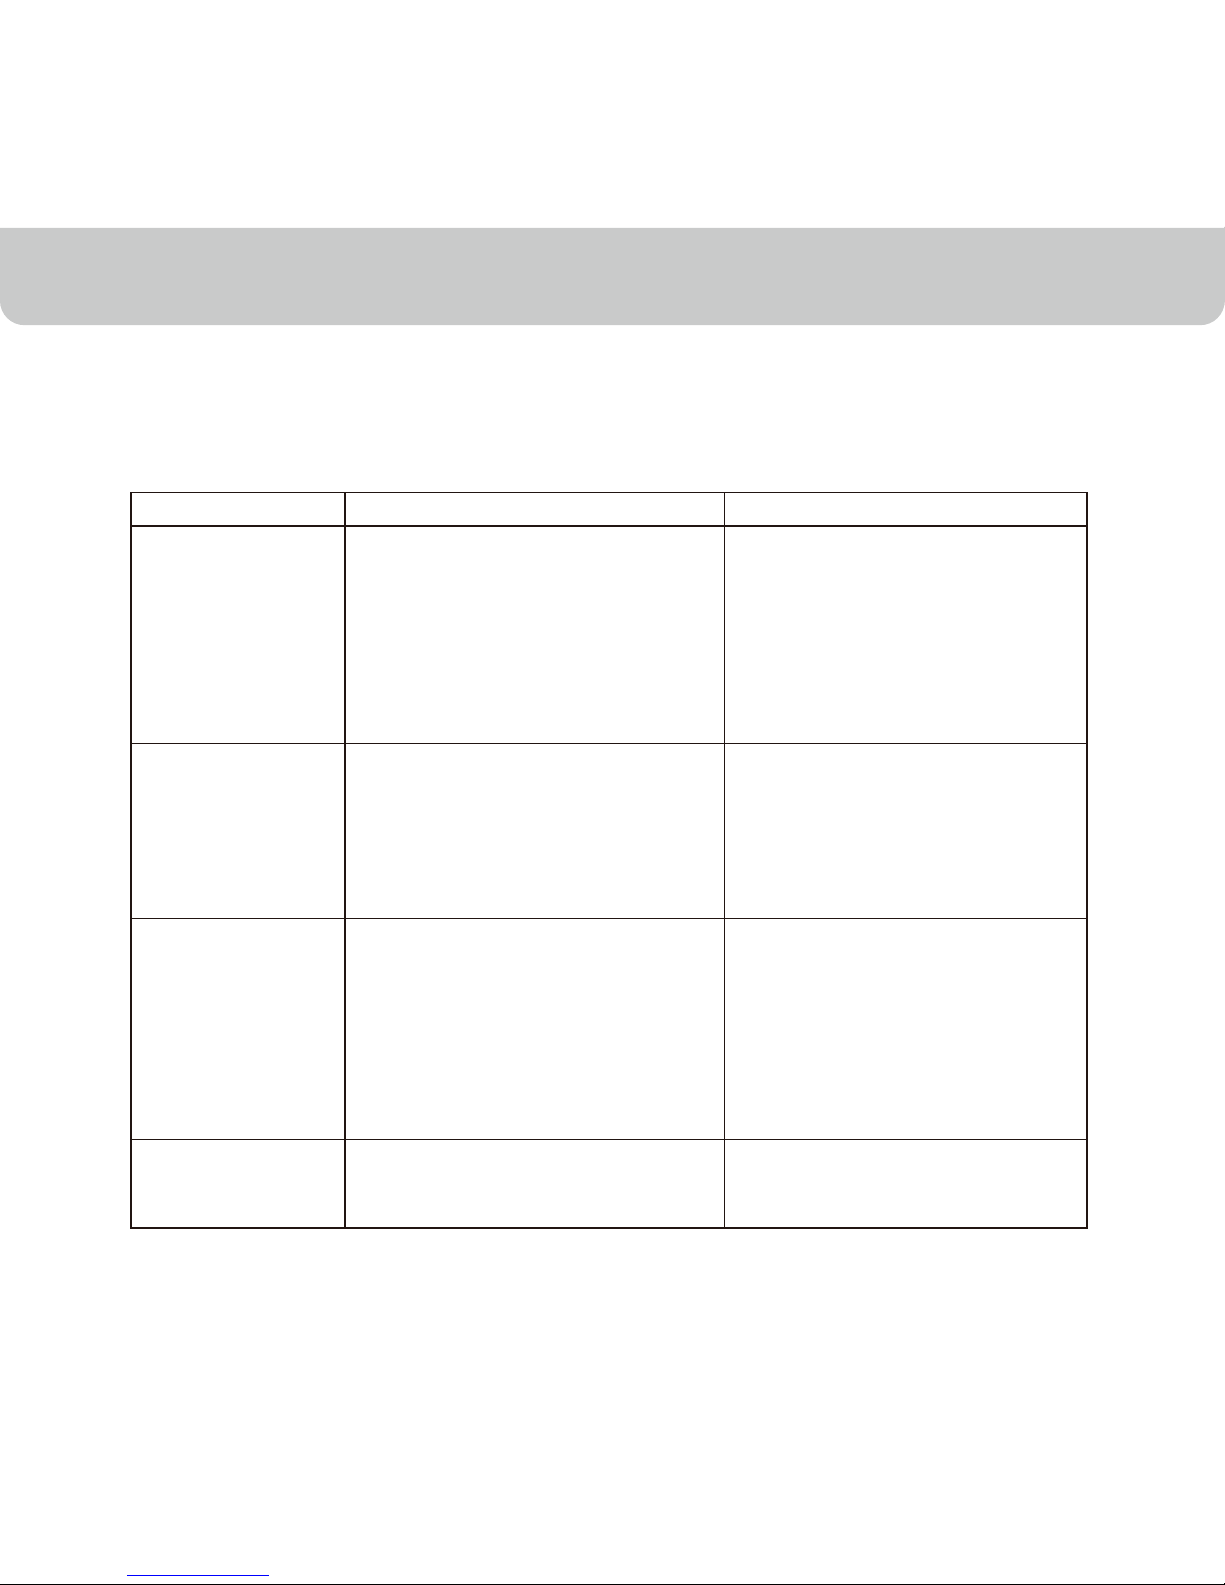
The following troubleshooting guide addresses the most common problems. If problems
persist, call customer service. Unplug and disconnect the appliance from the power
source before attempting to troubleshoot.
15
TROUBLESHOOTING GUIDE
Will not run and
water full indicator
light is ON
•
No electricity.
•
Batteries in the remote control need
to be replaced.
• The power cord is not properly
plugged in.
•
The safety GFI plug has tripped.
• The thermostat temperature setting
is too close to room temperature.
• Air outlet is blocked.
• There are tight bends in the air
exhaust hose.
• A door or window is open.
•
Clean the air filter
Reinstall exhaust hose properly
(refer to page 9, Installation)
Reduce temperature setting on
control panel.
Drain the water through the drain
plug (refer to page 14, Water
Condensation Drainage).
Make sure the window or door
is closed.
• The exhaust hose is detached.
•
The air filter is dirty.
• Temperature setting is too high.
• Air outlet or intake is blocked.
• Excess water condensation inside
the tank.
• Check for power.
• Change remote control batteries.
• Remove and reconnect the power
cord.
Reset the safety GFI plug, if
problem persists contact our
customer support.
•
•
The air conditioning
unit does not start
Problem Possible Cause
Solution
Runs a short while
only
Runs but no cooling
• Lower the set temperature.
Connect exhaust hose as per
instructions on page 9.
• Make sure the exhaust hose is
properly connected.
•
•
•
•
• Remove blockage.
Page 17
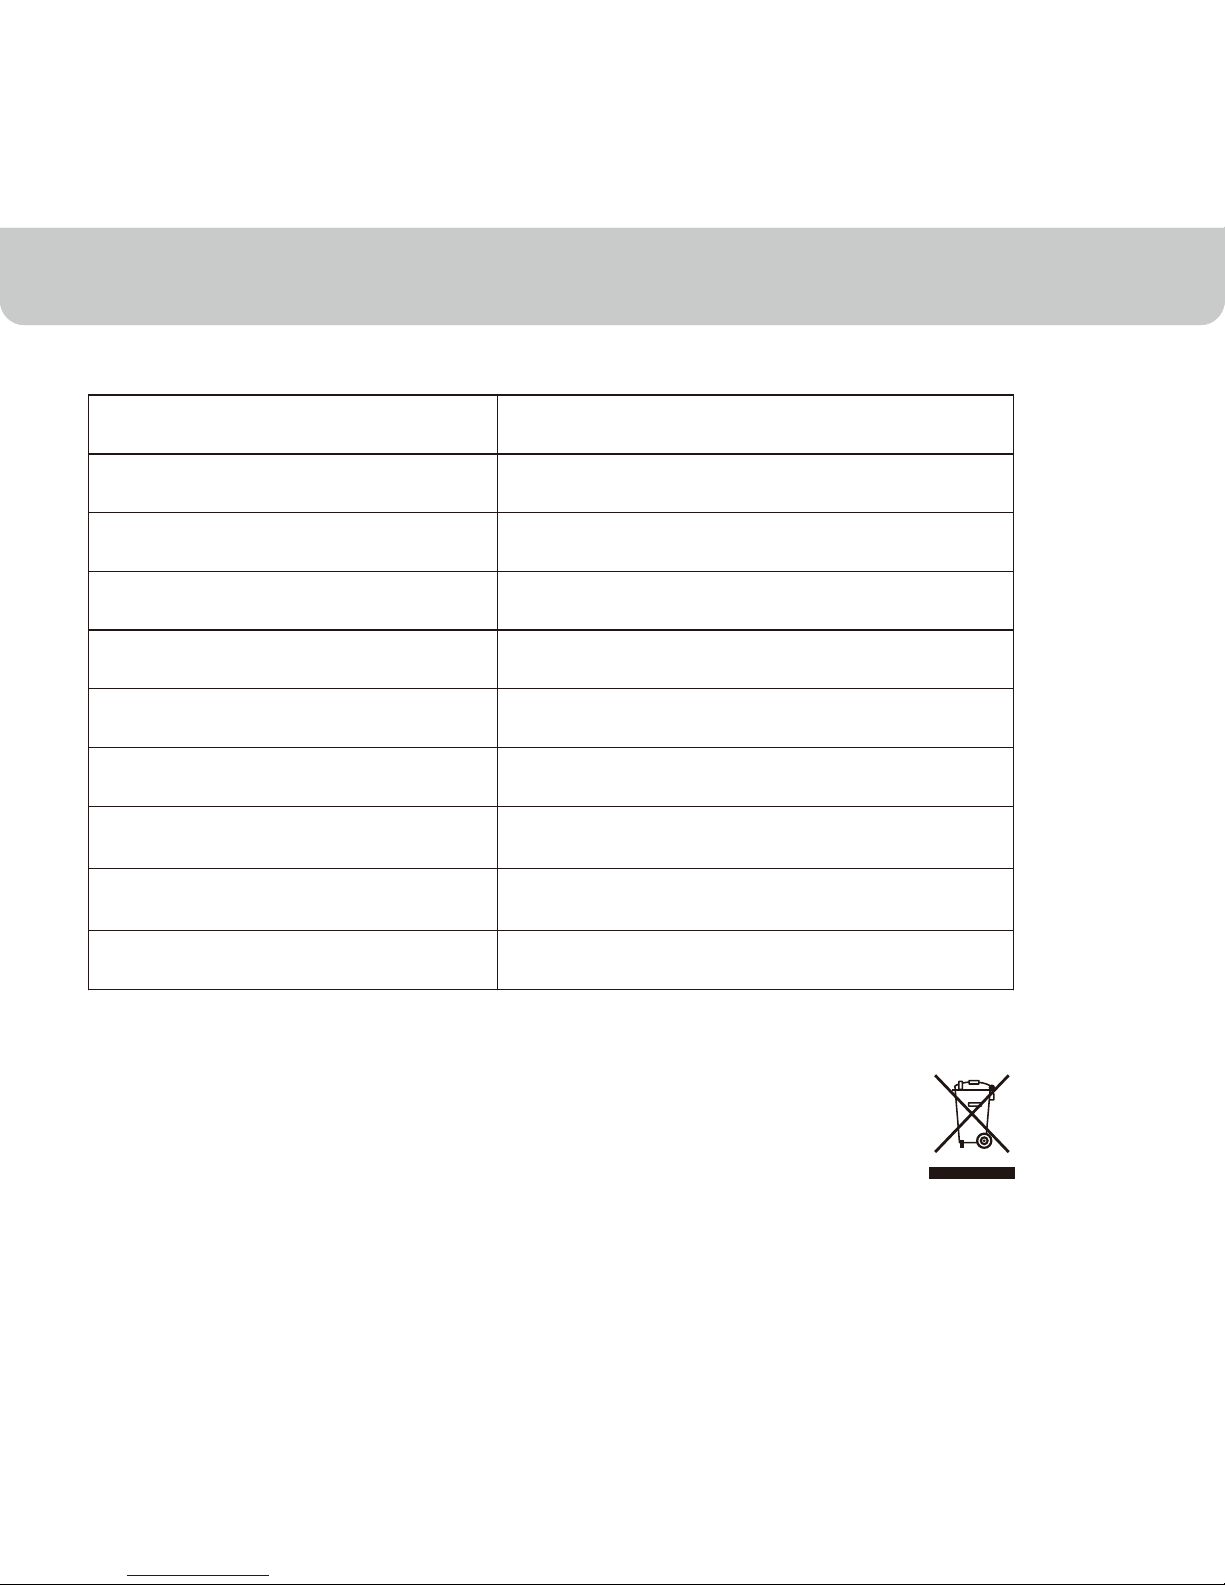
Portable Air Conditioner
MN10CES / MN10CESWW / MN10CESBB
115 V~ 60 Hz
TECHNICAL SPECIFICATIONS
16
Electrical products should be properly disposed.
Please recycle where facilities exist. Check with your local authority
or retailer for recycling.
Description of Product
Model
Voltage/Frequency
Power Consumption
Cooling capacity
Dehumidifying capacity
R-410ARefrigerant Type
24 hour (ON / OFF)Timer
Dimensions (W) x (H) x (D) (inches)
Weight (lbs)
1050W
10000 BTU
70 pints/24 hours
15.2 X 18.1 X 29.3 inches
63.9 lbs
Page 18

17
SERVICE AND WARRANTY
5-YEAR LIMITED WARRANTY
1st year parts and labor.
5 years on all parts of the sealed system, consisting of the compressor,
evaporator, condenser and factory connected refrigerant tubing.
This warranty does not apply to any damage resulting from abusive, unreasonable use or
damage. Defects that are the result of normal wear and tear will not be considered
manufacturing defects under this warranty.
JMA NORTH AMERICA LLC IS NOT LIABLE FOR INCIDENTAL OR CONSEQUENTIAL
DAMAGES OF ANY NATURE. ANY IMPLIED WARRANTY OF MERCHANTABILITY OR
FITNESS FOR A PARTICULAR PURPOSE ON THIS PRODUCT IS LIMITED IN DURATION
TO THE DURATION OF THIS WARRANTY.
Some jurisdictions do not allow the exclusion or limitation of incidental or consequential
damages or limitations on how long an applied warranty lasts, so the above limitations or
exclusions may not apply to you. This warranty gives you specific legal rights, and you
also may have other rights which vary from jurisdiction to jurisdiction. This warranty
applies only to the original purchaser of this product from the original date of purchase.
At its option, JMA NORTH AMERICA LLC will repair or replace this product if it is found to be
defective in material or workmanship.
This warranty does not cover damage resulting from any unauthorized attempts to repair or
from any use not in accordance with the instruction manual.
A.
B.
C.
Page 19

SERVICE AND WARRANTY
18
Please read the Instruction Manual carefully before setting up or using this product. If you
believe this product to be suffering from a manufacturing fault, or if you have inquiries about
this product, please contact our Customer Support:
CUSTOMER SUPPORT
JMA North America LLC
Mahwah, New Jersey 07495 USA
Phone : 1-800-474-2147
Email: info@jmana.us
Web: www.honeywellportableac.com
When contacting our Customer Support, please have the information below along with the
proof of purchase. All warranty requests must be accompanied by a proof of purchase, which
is a copy of the original receipt.
Model : .......................................................................................................................
Date of purchase : .......................................................................................................................
Purchased from : .......................................................................................................................
D.
Page 20

37
2. MERCI .............................................................................................................
1. INDEX .............................................................................................................. 37
38
39
40
42
43
49
50
51
53
3. CONSEILS D'UTILISATION ............................................................................
4. SÉCURITÉ .......................................................................................................
5. DESCRIPTION DES PIÈCES ..........................................................................
6. INSTALLATION ...............................................................................................
46
7. UTILISATION ET FONCTIONNEMENT .........................................................
8. NETTOYAGE ET ENTRETIEN .......................................................................
9. DRAINAGE DE L'EAU DE CONDENSATION ................................................
10. GUIDE DE DÉPANNAGE ...............................................................................
12. SERVICE ET GARANTIE ................................................................................
52
11. CARACTÉRISTIQUES TECHNIQUES ...........................................................
SECTION PAGE
Lisez attentivement toutes les instructions avant d'installer et d'utiliser l'appareil.
Conserver ce manuel d'instructions pour référence future. Ce manuel est destiné à
fournir des informations importantes et nécessaires pour configurer, exploiter,
entretenir et dépanner votre climatiseur portatif. Le fait de ne pas respecter ces
instructions peut entraîner l'annulation de la garantie.
INDEX
Page 21

19
ÍNDICE
Lea t odas las instrucciones de manera cuidadosa antes de encender y operar la
unidad. Conserve este manual para referencias futuras. Este manual está diseñado
para ofrecerle información importante necesaria para configurar, operar, mantener y
reparar su acondicionador de aire portátil. No seguir estas instrucciones puede
ocasionar daños o dañar el funcionamiento y por tanto, anular la garantía.
AGRADECIMIENTO ..........................................................................................
ÍNDICE .............................................................................................................. 19
20
21
22
24
25
31
32
33
34
USO RECOMENDADO .....................................................................................
SEGURIDAD ......................................................................................................
DESCRIPCIÓN DE PARTES .............................................................................
INSTALACIÓN ...................................................................................................
29
USO Y OPERACIÓN .........................................................................................
LIMPIEZA Y MANTENIMIENTO.........................................................................
DRENADO DE AGUA ........................................................................................
GUÍA DE SOLUCIONES ....................................................................................
ESPECIFICACIONES TÉCNICAS .....................................................................
35
SERVICIO Y GARANTIA ...................................................................................
2.
1.
3.
4.
5.
6.
7.
8.
9.
10.
11.
12.
SECCIÓN PÁGINA
Page 22

Felicidades por la compra de este versátil Acondicionador de aire portátil Honeywell.
Los acondicionadores de aire portátiles Honeywell son ideales para el enfriamiento de lugares.
El compresor, condensador y evaporador están alojados dentro de una unidad compacta. La
unidad flitra, deshumidifica y enfría el aire. Una manguera flexible de salida de aire envía el
calor al exterior. Esta unidad incluye un equipo de ventilación por ventanas. Los
acondicionadores de aire portátiles le ofrecen una solución flexible para el acondicionamiento
de aire.
Sistema de auto evaporación - La unidad automáticamente evapora la condensación a través de
la manguera de salida. No hay necesidad de vaciar el tanque de drenaje.
Lea cuidadosamente estas instrucciones.
20
AGRADECIMIENTO
Page 23

21
USO RECOMENDADO
Para asegurar una eficiencia óptima del producto, recomendamos mantener las
puertas y ventanas cerradas cuando esté en operación como acondicionador de
aire o deshumidificador.
Si el producto se usa tan sólo con la función de ventilador, coloque la unidad cerca
de una ventana abierta, de manera que la unidad pueda atraer el aire exterior, y el
aire que circula en la habitación salga por la puerta.
IImportante: Después de transportarlo coloque la unidad en posición vertical para
permitir que el refrigerante se estabilice y espere tres horas antes de usarlo.
• Siga las instrucciones de instalación para configurar su unidad.
• Conecte la unidad a un circuito conectado adecuadamente a tierra.
Función Enfriamiento
y deshumidificador
Función ventilador
Page 24

22
SEGURIDAD
PRECAUC IÓN
LEA Y GUARDE ESTAS INSTRUCCIONES
El manejo indebido puede ocasionar serios daños al aparato.
Si el cordón de alimentación es dañado, éste debe sustituirse por el Fabricante,
por su agente de servicio autorizado o por personal calificado con el fin de evitar
un peligro.
No cubra la entrada de aire y de escape cuando está en uso.
Este aparato no está diseñado para ser usado por niños. Los niños deben ser
supervisados para asegurarse de que no jueguen con el aparato.
No coloque objetos sobre o se siente sobre la unidad.
Siempre apague y desconecta la unidad cuando la limpie o repare.
Si es necesario el contacto con un agente de servicio autorizado.
Descontectar la unidad cuando no esté en uso o en reparación.
1.
2.
3.
4.
5.
6.
7.
Page 25

23
SEGURIDAD
No haga funcionar el cable de alimentación debajo de alfombras y tapetes.
Tenga cuidado para evitar tropezar con el cable.
No lo use en áreas donde los bienes gasolina, pintura u otros inflamables
almacenados.
Las precauciones básicas de seguridad siempre se deben seguir cuando se utilizan
aparatos eléctricos.
8.
9.
10.
11.
Page 26

24
DESCRIPCIÓN DE PARTES
1
2
5
3
x 1
x 1
x 2
x 1
1
2
8
6
7
5
4
3
10
11
9
8
4
1. Panel de control (Incluye receptor de señal)
2. Salida de aire
3. Mango
4. Ruedas
5. Tapa de desagüe (modo deshumidificador)
6. Filtro de aire
7. Grilla trasera
8. Tapa de desagüe (modo aire acondicionado)
9. Cable de corriente eléctrica
10. Conector de la Manguera
11. Control Remoto
Kit de instalación :
1. Equipo deslizante para ventana/ puerta ..
2. Adaptador para panel de ventana .......….
3. Perno de plástica ......................................
4. Conector de manguera ........................….
5. Manguera plástica .................................…
1 juego
1 pieza
2 piezas
1 pieza
1 pieza
Page 27

25
INSTALACIÓN
=
Instale la manguera plástica a su adaptador del anaquel de ventana y el conector de
mangera en ambos lados. Asegurar un ajuste apropiado en ambos extremos.
Ajuste el anaquel de ventana según la anchura o la altura de su ventana, y luego inserte
un tornillo plástico para fijar en la posición deseada.
Nota: No instale por el momento el
anaquel de ventana a su ventana,
este paso es solo requerido para
ajustar el anaquel según el tamaño
de su Ventana. El anaquel tiene que
ser quitado de la ventana después
de que el tamaño es ajustado.
1
2
3
Conectar la manguera plástica al conector de manguera sobre la parte posterior de su
unidad empuje en rotación dextrorso.
Perno de plástica
Perno de plástica
Page 28

26
INSTALACIÓN
8
8
6
Conectar el soporte de ventana en el extremo opuesto de la manguera de plástico.
Asegúrese de que las conexiones estén apretadas y correctamente instaladas.
4
5
Finalmente conectar el anaquel de ventana a su ventana.
Su Aire acondiconado portátil está listo para usarse.
Page 29

27
INSTALACIÓN
MIN. 35 cm
50 cm
MAX. 100 cm
La manguera de salida proporcionada puede extenderse de 300 mm a
1200 mm Para mejores resultados, use la menor longitud posible.
Impida cualquier doblez o lazo (como los que se muestran abajo) en la manguera
de salida. Una manguera doblada bloqueará el aire de salida y ocasionará que la
unidad se apague inmediatamente.
La longitud de la manguera de salida está especialmente diseñada de acuerdo
con las especificaciones del producto. No la reemplace o la alargue con ninguna
otra manguera, pues esto podría dañar su aparato.
Asegúrese que la parte trasera de la unidad esté a al menos 50 cm de distancia
de la pared.
Nota:
1.
2.
Advertencia:
•
•
RECOMENDADONO RECOMENDADO
Page 30

28
USO Y OPERACIÓN
PANEL DE CONTROL
Control De Energía
Luz de advertencia
(cuando parpadea)
Modo De Control
Timer Control
Timer / Set Temperatura
Control de velocidad
del ventilador
Después de encender el acondicionador de aire, debe esperar 3 minutos antes de encenderlo de nuevo.
CONTROL DE ENCENDIDO
El control de encendido enciende y apaga la unidad.
Control Modo
3 configuraciones:
• Frío • Ventilador • Dehumidificación
La configuración es seleccionada con el botón Modo Control. La
luz LEDindicará que configuración fue seleccionada.
• Modo de enfriamiento
La unidad funciona como un acondicionador de aire. Ajuste la
velocidad del ventilador y la temperatura del aire para adaptarse
a su nivel de confort deseado. Rango de temperatura ambiente
es de 61°F ~ 89°F
• Modo de deshumidificación
El aire se deshumidifica a medida que pasa a través de la unidad,
sin estar en modo de enfriamiento total. Si la temperatura
ambiente es superior a 77°F velocidad del ventilador se puede
ajustar, de lo contrario la velocidad del ventilador está preajustado "LOW".
Nota: Si la unidad se utiliza principalmente como un
deshumidificador, no conecte el tubo de escape y dejar que
el retorno de aire caliente en la habitación. Drenaje continuo
es entonces necesario y más eficaz (véase la página 14, el
agua de drenaje continua [Modo deshumidificador]).
• Modo De Ventilación
Para la circulación de aire sin enfriar.
Control de velocidad del ventilador
3 configuraciones:
Alta, Media, Baja
Timer
Apagado automático:
Con la máquina en el modo de ejecución, pulse el botón del
temporizador para seleccionar el número de horas que desea que
la unidad funcione en modo de aire acondicionado.
Encendido automático:
Con la máquina en modo de espera, presione el botón del
temporizador para seleccionar el número de horas hasta que la
unidad se inicie automáticamente en funcionamiento.
Controles Para Cambiar Temperatura / Timer
• Se usan para ajustar el termostato.
• El valor predeterminado es la temperatura ambiente.
• En modo de enfriamiento, cuando el botón “ ▼ “ o “▲“ se
presiona, la temperatura configurada se despliega y puede
ajustarse. Después de 10 segundos, la pantalla regresará a la
temperatura ambiente. La temperatura sólo es ajustable en el
modo frío. El tiempo es ajustable entre 1 y 24 horas.
Nota: Al presionar ambos botones “ ▼ “ y “▲“ al mismo
tiempo por más de 3 segundos, la pantalla alternará entre
Celsius y Fahrenheit.
Luz de advertencia
El agua condensada se puede acumular en la unidad. Si el
tanque interno se llena, la luz de encendido parpadea y la unidad
no funcionará hasta que la unidad haya sido drenado.
Page 31

Nota :
No coloque el control remoto en un lugar expuesto a sumlight directa.
Se utiliza para ajustar el
contador de tiempo y
temperatura.
La pantalla por defecto en
el panel de control de la
temperatura ambiente.
Cuando " " o la tecla " "
se pulsa en el modo de
enfriamiento, la temperatura
se visualiza y se puede ajustar.
Después de 10 segundos,
la pantalla volverá a la
temperatura ambiente.
Ajuste del temporizador está
disponible de 1-24 horas
pulsando la tecla " " o " ".
Control De Energía
Modo De Control
Frío Deshumidificador
Ventilador
Pulsar este botón para cambiar el
modo de operación en el orden de:
Timer / Set Temperatura
Control
Control de velocidad
del ventilador
En el modo de ejecución:
Apagado automático
En el modo de espera:
Detector magnético en
Presione " " o el botón " "
para ajustar la hora para el
intervalo de 1 hora.
ALTA MEDIA BAJA
Control Remoto
Las funciones trabajan igual que los controles táctiles de los acondicionadores de aire
portátil. Todas las funciones de las teclas se puede acceder desde el control remoto.
29
USO Y OPERACIÓN
Page 32

30
USO Y OPERACIÓN
Instalación de baterías: quite la cubierta en la parte trasera del control remoto
e inserte las baterías con los polos “+” y “-“ apuntando a la dirección correcta.
• Use sólo baterías AAA ó IEC R03 1,5V.
• Retire las baterías si el control remoto no se va a utilizar por más de un mes.
• Todas las baterías deben reemplazarse al mismo tiempo, no mezclar con baterías viejas.
• Deshágase de las baterías usadas.
Precaución
Page 33

31
Mantenimiento Del Aparato:
1. Apague el aparato antes de desconectarlo de la corriente eléctrica.
2. Limpie con un lienzo suave y seco.
Mantenimiento Del Filtro De Aire:
Es necesario limpiar el filtro de aire después de 2 semanas de uso.
Hágalo de la siguiente manera:
1.
2.
Apague el aparato antes de quitar el filtro de aire.
Se lave con ura solución de detergente en agua tilia. Después de limpiarlo,
séquelo en un lugar sombreado y frasco, después reinstale.
Si el aparato no se usará por un periodo prolongado de tiempo, asegúrese de
drenar el agua al quitar el tapón de hule del orificio de drenado.
Antes de almacenarlo, encienda la unidad en el modo de ventilación por unas horas
para secar cualquier humedad en la turbina e impedir la formación de moho.
Apague el aparato y desconecte el enchufe de la corriente eléctrica Saque las
baterías del control remoto.
Limpie el filtro de aire y reinstálelo.
Quite las mangueras de aire y guárdelos en un lugar seguro. Coloque cubiertas
sobre los orificios de aire de la unidad.
LIMPIEZA Y MANTENIMIENTO
Mantenimiento Después Del Uso:
1.
2.
3.
4.
5.
Page 34

Cualquiera que sea la acumulación de agua adentro de la unidad debe ser drenada, ya que la
unidad dejará de funcionar y mostrará un mensaje de error. Este error indicará que el agua
necesita ser drenada de acuerdo a algunos de los métodos:
DRENADO DE AGUA
32
Modo Deshumidificador
Tapón de
drenado (Modo
deshumidificador)
Desenchufe la unidad de la fuente de alimentación.
Coloque una bandeja de poca altura debajo del tapón de drenaje.
Vea el diagrama.
Retire el tapón de drenaje.
El agua se drene y se acumulan en la bandeja.
Después de que el agua es drenada, cierre la tapa firmemente.
Ahora puede encender la unidad.
Modo Aire Acondicionado
Drenado de agua
1.
2.
3.
4.
5.
6.
Desenchufe la unidad de la fuente de alimentación.
Retire el tapón de drenaje.
Instalar el conector (5/8" universal femenino) con 3/4" de manguera
(comprar localmente).
Drena la condensación de ague en un balde o un drenaje de piso.
Después de que el agua es drenada, cierre la tapa firmemente.
Ahora puede encender la unidad.
1.
2.
3.
4.
5.
6.
Tapón de
drenado
(Modo AC)
Tubo de desagüe
de agua
Sin embargo si el área está en una zona muy húmeda, posiblemente
se necesitará el drenado del agua.
Bandeja
(No incluídas)
Page 35

33
La siguiente guía solución de problemas aborda los problemas más comunes. Si los
problemas persisten, llame a servicio al cliente. Desconecte el aparato de la corriente
eléctrica antes de intentar reparar cualquiers.
GUÍA DE SOLUCIONES
No funciona en absoluto
y la luz indicadora del
exceso de agua está
en ENCENDIDO
•
•
•
•
•
•
•
•
•
•
•
•
•
•
No electricidad.
Pilas de control remotoestán bajas.
El cable eléctrico no está enchufado
apropiadamente.
El dispositivo de seguridad en la
clavija se ha roto.
La temperatura es demasiado
parecida a la temperatura ambiente.
La salida de aire etá bloqueada por
algún objeto.
Existe polvo o pelusas en la
manguera de la salida de aire.
•
•
•
•
•
•
•
•
•
Una puerta o ventana están abiertas.
El filtro de aire está sucio.
La manguera de escape se separa.
La temperatura configurada es
demasiado alta.
La salida o entrada de aire están
bloqueadas.
Limpiar o remplazar el filtro.
• Hacer que la puerta o ventana
está cerrada.
Conectar la manguera de aire.
Reducir la temperatura en el panel
de control.
Revisar que entre y salga
suficiente aire en el equipo.
•
El tanque adentro de la unidad está
lleno.
Revisar la corriente de luz.
Cambiar las baterias del control
remoto.
Remover y reconectar el cable
eléctrico.
Resetear el dispositivo protector,
si el problema persiste contactar
al servicio.
• Drene el agua a través del orificio
de drenado.
El equipo de aire
acondicionado no
opera
Problema Posible Causa
Solución
La unidad funciona
solo por un corto
tiempo
Funciona pero no
enfría
Disminuir la temperatura
establecida.
Revisar no haya obstáculos en la
salida de aire.
Eliminar pelusas o residuos.
Page 36

Aire Acondicionado Portátil
MN10CES / MN10CESWW / MN10CESBB
115 V~ 60 Hz
ESPECIFICACIONES TÉCNICAS
34
Los productos eléctricos de desecho, no deben desecharse con el
desperdicio doméstico. Recíclelos donde existan instalaciones para
ello. Pida asesoría a su autoridad o minorista local.
Descripción del producto
Modelo
Voltaje / Frecuencia
Potencia
Capacidad de enfriamiento
Capacidad deshumidificadora
R-410ARefrigerante
24 hour (ON / OFF)Timer
Dimensiones (W) x (H) x (D) (mm)
Peso (Kg)
1050W
10000 BTU
33 litros / 24 hours
385 X 460 X 745 mm
29 Kg
Page 37

35
SERVICIO Y GARANTIA
GARANTÍA LIMITADA DE 5 AÑOS
1 año en piezas y mano de obra.
5 años en todas las piezas del sistema de sellado, que consiste en el compresor, evaporador,
condensador y la tubería refrigerante conectoda de fábrica.
La garantía no cubre ningún daño resultante de un uso comercial, abusivo o irracional, ni
daños causados intencionadamente. Los defectos resultantes del uso normal y la rotura no
se considerarán defectos de fabricación a efectos de esta garantía.
JMA NORTH AMERICA LLC NO ES RESPONSABLE DE LOS DAÑOS SECUNDARIOS O
DERIVADOS DE NINGUNA NATURALEZA. CUALQUIER GARANTÍA TÁCITA DE
COMERCIABILIDAD O DE PREPARACIÓN PARA UN USO CONCRETO DE ESTE
PRODUCTO QUEDA LIMITADA A LA DURACIÓN DE ESTA GARANTÍA.
Algunas jurisdicciones no permiten la inclusión o limitación de los daños accidentales o
derivados del uso o sobre el periodo de duración de la garantía, de forma que las limitaciones
indicadas pueden no afectarle. Esta garantía le otorga derechos legales específicos, pero
usted también puede tener otros derechos que varíen de una jurisdicción a otra. Esta garantía
solamente se aplicará al comprador original del producto y comenzará en la fecha original de
la compra.
Dado el caso, JMA NORTH AMERICA LLC reparará o sustituirá este producto si se detecta
algún defecto de material o de manipulación.
La garantía no cubre el daño causado por cualquier intento no autorizado de reparar el
producto, ni el derivado de no utilizarlo de acuerdo con el manual de instrucciones.
A.
B.
C.
Page 38

SERVICIO Y GARANTIA
36
Por favor, lea el manual de instrucciones detenidamente antes de configurar o de utilizar este
producto. Si considera que este producto sufre un defecto de fabricación, o si tiene dudas
sobre el mismo, por favor contacte con nuestro Servicio de Atención al Cliente:
CUSTOMER SUPPORT
JMA North America LLC
Mahwah, New Jersey 07495 USA
Phone : 1-800-474-2147
Email: info@jmana.us
Web: www.honeywellportableac.com
Cuando contacte con nuestro Servicio de Atención al Cliente, por favor tenga la siguiente
información preparada como prueba de compra. Todas las solicitudes de cobertura de la
garantía tendrán que ir acompañadas de una prueba de compra, que será una copia de la
factura original.
Model : .......................................................................................................................
Fecha de compra : .......................................................................................................................
Punto de venta : .......................................................................................................................
D.
Page 39

MERCI
38
Félicitations pour votre achat de ce polyvalent Système de climatisation portatif Honeywell.r.
Les climatiseurs portatifs Honeywell sont idéals pour le refroidissement localisé. Le compresseur,
le condenseur et l'évaporateur sont logés dans une unité compacte. L'air est filtré, déshumidifié
et refroidi tandis qu'un tuyau souple d'évacuation d'air transporte la chaleur à l'extérieur. Le
climatiseur comprend une trousse de ventilation pour la fenêtre. Aucune installation permanente
est nécessaire. L'appareil est facile à déplacer d'une pièce à l'autre et offre une solution de
climatisation tout à fait flexible.
Système d'évaporation automatique - L'unité évapore automatiquement l'eau de condensation
à travers le tuyau de sortie d'air. Il n'est pas nécessaire de vider le réservoir de drainage, sauf
dans des conditions de très forte humidité.
Lisez et suivez les instructions attentivement.
Page 40

39
CONSEILS D'UTILISATION
Pour assurer l'efficacité optimale du produit, garder les portes et les fenêtres fermées
quand il est utilisé comme climatiseur ou déshumidificateur.
Si le produit est utilisé avec la fonction du ventilateur seulement, une fenêtre ouverte
pourrait améliorer la circulation de l'air.
Important : Avant d'installer l'appareil, placez-le en POSITION VERTICALE
pendant 20 minutes avant utilisation pour permettre au réfrigérant de se stabiliser.
• Suivez les instructions d'installation pour configurer l'appareil.
• Branchez l'appareil dans un circuit mis à la terre.
Opération de refroidissement et
de déshumidification
Fonctionnement du ventilateur
Page 41

40
SÉCURITÉ
LIRE ET CONSERVER CES INSTRUCTIONS
Une mauvaise manipulation peut causer de graves dommages à l'appareil.
AVERTISSEMENT
NE PAS utiliser l'appareil avec une prise endommagée ou une prise de courant
murale lâche. Si le cordon d'alimentation est endommagé, il doit être remplacé
par le fabricant ou par un agent de service autorisé.
NE PAS couvrir l'entrée d'air et d'évacuation lors de son utilisation.
Cet appareil n'est pas destiné à être utilisé par les enfants. Les enfants doivent
être surveillés et ne devraient pas jouer sur ou autour de l'appareil.
NE PAS vous asseoir ou placer des objets sur l'appareil.
Éteindre et débrancher l'appareil pendant le nettoyage ou l'entretien.
Si un entretien est nécessaire, contactez un agent de service autorisé.
Débranchez l'appareil lorsqu'il est entreposé ou non utilisé.
1.
2.
3.
4.
5.
6.
7.
Page 42

SÉCURITÉ
41
9.
10.
Faites preuve de prudence pour éviter de trébucher sur le cordon.
8.
Ne courez pas le cordon d'alimentation sous la moquette et les tapis.
11.
NE PAS utiliser dans les zones où de l'essence, de la peinture ou d'autres
produits inflammables sont entreposés.
Des précautions de sécurité doivent toujours être suivies lors de l'utilisation
d'appareils électriques.
Page 43

42
DESCRIPTION DES PIÈCES
1. Panneau de commandes
(incl. récepteur de signal)
2. Sortie d'air
3. Poignée
4. Roulettes
5. Bouchon de vidange (mode déshumidificateur)
6. Filtre à air
7. Grillage arrière
8. Bouchon de vidange (mode climatisation)
9. Cordon d'alimentation
10. Connecteur de tuyau d'évacuation
11. Télécommande
1
2
5
3
x 1
x 1
x 2
x 1
4
1
2
8
6
7
5
4
3
10
11
9
8
Trousse d'installation :
1. Trousse de support de fenêtre............
2. Adaptateur pour panneau de
support de fenêtre..............................
3. Cheville en plastique..........................
4. Connecteur de tuyau..........................
5. Tuyau souple en plastique ................
1 Jeu
1 Pièce
2 Pièces
1 Pièce
1 Pièce
Page 44

43
INSTALLATION
Installer le tuyau souple en plastique à l'aide d'un adaptateur de support de fenêtre et
d'un connecteur de tuyau sur les deux côtés. Assurer un bon ajustement sur les deux
extrémités.
Ajuster le support de fenêtre selon la largeur ou la hauteur de votre fenêtre, et insérer les
chevilles en plastique pour fixer à la position désirée.
Remarque : Ne pas installer le
support de fenêtre à votre fenêtre.
Cette étape est nécessaire
seulement pour l'adapter à la
taille de votre fenêtre. Le support
doit être retiré de la fenêtre après
l'ajustement de la taille.
1
2
3
=
Connecter le tuyau de plastique au connecteur de tuyau à l'arrière de l'appareil.
Pousser puis tourner dans le sens horaire.
Cheville en
plastique
Cheville en plastique
Page 45

44
INSTALLATION
8
8
6
Connecter le support de fenêtre à l'extrémité opposée du tuyau en plastique. Assurez-vous
que toutes les connexions sont serrées et correctement installées.
4
5
Connecter le support de fenêtre à la fenêtre.
Le climatiseur portatif est maintenant prêt à être utilisé.
Page 46

Le tuyau d'évacuation fourni peut être prolongé de 30 cm à 1,2 mètre.
Ne pliez pas le tuyau d'évacuation (de la façon illustrée ci-dessous).
Un tuyau courbé va bloquer l'évacuation de l'air et provoquer le dysfonctionnement ou
l'arrêt de l'appareil.
La longueur du tuyau d'évacuation est déterminée par les caractéristiques du
produit. Ne pas remplacer ou allonger, car cela pourrait provoquer le
dysfonctionnement de l'appareil.
Assurez-vous que l'arrière de l'appareil est à au moins 50 centimètres d'un mur.
Ne pas placer l'appareil en face de rideaux ou tentures, car cela pourrait gêner la
circulation de l'air.
45
INSTALLATION
Remarque :
1.
2.
RECOMMANDÉDÉCONSEILLÉ
Avertissement :
•
•
MIN. 14”
20”
MAX. 40”
Page 47

46
UTILISATION ET FONCTIONNEMENT
Panneau de commandes à écran tactile
Commande d'alimentation
Témoin d'avertissement
(clignotant)
Commande du mode
Commande
de minuterie
Commande de minuterie/
réglage de la température
Commande de
vitesse du ventilateur
Après avoir mis le climatiseur hors tension, vous devez attendre 3 minutes avant de le rallumer.
Commande de l'alimentation
La commande d'alimentation met l'appareil sous et hors tension.
Commande de mode
3 réglages : Refroidir, déshumidifier et ventilateur
Un témoin lumineux indique quel réglage est actuellement utilisé.
• Mode de refroidissement
L'appareil fonctionne comme un conditionneur d'air. Réglez la
vitesse du ventilateur et la température de l'air en fonction du
niveau de confort souhaité. La plage de réglage de la température
est de 16 °C ~ 32 °C
• Mode déshumidification
L'air est déshumidifié lorsqu'il passe dans l'appareil, sans être en
mode de refroidissement complet. Si la température ambiante est
supérieure à 25 °C, la vitesse du ventilateur peut être réglée,
sans quoi la vitesse du ventilateur est réglée à "LOW".
Remarque : Si l'appareil est utilisé principalement comme
déshumidificateur, ne pas brancher le tuyau d'évacuation et
laisser l'air chaud circuler dans la pièce. Un drainage continu
est alors nécessaire et plus efficace (voir page 14, Drainage
d'eau continue [mode déshumidificateur]).
• Mode ventilateur
Pour la circulation de l'air sans refroidissement.
Commande de vitesse du ventilateur
3 réglages : High, Medium et Low (Haut, Moyen et Bas).
Mise hors tension automatique sur la commande de
minuterie :
Avec l'appareil en mode de fonctionnement, appuyez sur le
bouton de la minuterie pour sélectionner le nombre d'heures de
fonctionnement désiré en mode climatisation.
Mise sur tension automatique :
Avec la machine en mode veille, appuyez sur le bouton de la
minuterie pour sélectionner le nombre d'heures qui précèdent le
moment de la mise en tension automatique désirée.
Réglage de la température/Commande de minuterie
• Utilisé pour régler la minuterie et le thermostat.
• L'affichage de la valeur par défaut est la température ambiante.
• Lorsque la touche "▼" ou "▲" est pressée en mode refroidissement, la température réglée est affichée et peut être ajustée.
Après 10 secondes, l'affichage revient à la température ambiante.
La température est réglable uniquement en mode refroidissement. L'heure est réglable entre 1 ~ 24 heures.
Remarque : En appuyant sur les boutons de réglage "▼" /
"▲" en même temps, l'affichage basculera entre Celsius et
Fahrenheit.
Témoin d'avertissement
De l'eau de condensation peut s'accumuler dans l'appareil. Si le
réservoir interne est plein, le voyant d'alimentation clignotera et
l'appareil ne fonctionnera pas tant que l'appareil n'a été vidangé
(voir page 14, Drainage de l'eau de condensation).
Page 48

Remarque :
Ne placez pas la télécommande en plein soleil.
Télécommande
Les fonctions sont les mêmes que celles sur les commandes tactiles de l'appareil. Toutes
les fonctions principales sont accessibles depuis la télécommande.
47
UTILISATION ET FONCTIONNEMENT
Commande de l'alimentation
ON/OFF (MARCHE/ARRÊT)
Commande de vitesse du ventilateur
• HIGH • MEDIUM • LOW (HAUT • MOYEN • BAS)
Température / Commande de minuterie
Commande de mode
Commande de la minuterie
ON/OFF sur 24 heures
En mode de marche:
Arrêt (OFF) automatique
En mode veille:
Marche (ON) automatique
Appuyez sur touche "▼" ou "▲"
pour ajuster le réglage de l’heure
par intervalles d’une heure.
• Utilisé pour régler la minuterie et la
température.
• L'affichage de la valeur par défaut
est la température ambiante.
• Lorsque la touche
"▼" ou "▲" est
enfoncée en mode refroidissement,
la température réglée est affichée et
peut être ajustée. Après 10 secondes,
l'affichage revient à la température
ambiante.
• Le réglage de la minuterie est
disponible de 1 à 24 heures en
appuyant sur la touche
"▼" ou "▲".
Appuyer sur ce bouton pour
changer le mode de
fonctionnement de l'ordre de :
Refroidir
Déshumidifier
Ventilateur
Page 49

Installation de la pile : Retirer le couvercle au dos de la télécommande et insérez deux piles
AAA avec "+" et "- " correctement alignés.
• Utiliser seulement deux piles AAA ou IEC R03 1,5 V.
• Retirer les piles si la télécommande n'est pas utilisée pendant un mois ou plus.
• Toutes les piles doivent être remplacées en même temps; ne pas mélanger avec des
piles usagées.
• Disposer des piles usagées selon les consignes du fabricant.
48
UTILISATION ET FONCTIONNEMENT
Attention
Page 50

49
NETTOYAGE ET ENTRETIEN
Entretien de l'appareil :
1. Éteindre l'appareil avant de débrancher l'alimentation électrique.
2. Nettoyer toujours l'appareil à l'aide d'un chiffon sec et doux.
Entretien du filtre à air :
Le filtre à air doit être nettoyé toutes les deux semaines.
Nettoyer comme suit :
1.
2.
Éteindre l'appareil et retirer le filtre à air. (Se référer à la page 42, n° 6)
Rincer à l'eau tiède. Après le nettoyage, sécher dans un endroit ombragé et frais,
puis réinstaller le filtre.
Si l'appareil reste inutilisé pendant une longue période, vider l'eau de condensation
restante.
Retirer le bouchon de vidange d'eau (voir page 50) et utiliser un récipient peu
profond pour recueillir l'eau.
Pour sécher l'excès d'humidité, faire fonctionner l'unité en mode ventilateur pendant
30 minutes avant de le ranger.
Nettoyer et réinstaller le filtre à air.
Retirer le tuyau d'air et le support de fenêtre puis les ranger avec le climatiseur
portatif.
Entretien après utilisation :
1.
2.
3.
4.
5.
Page 51

Lorsqu'il y a un excès d’eau de condensation à l'intérieur de l'appareil, le climatiseur s'arrête et
affiche un témoin lumineux (voir page 46). Ce témoin indique que l'eau de condensation doit être
vidangée en utilisant les procédures suivantes :
DRAINAGE DE L'EAU DE CONDENSATION
50
Mode déshumidificateur
Bouchon de
vidange (mode
déshumidification)
Débrancher l'appareil de sa source d'alimentation.
Placer un récipient peu profond sous le bouchon de vidange.
Voir le schéma.
Retirer le bouchon de vidange.
L'eau va s'écouler et s'accumuler dans le récipient.
Une fois l'eau drainée, replacer fermement le bouchon.
Vous pouvez maintenant allumer l'appareil.
Mode de climatisation
Drainage de l'eau de condensation
1.
2.
3.
4.
5.
6.
Débrancher l'appareil de sa source d'alimentation.
Retirer le bouchon de vidange.
Brancher le connecteur de drain à un tuyau de 2 cm (non compris).
Voir le schéma.
Égoutter l'eau de condensation dans un seau ou un drain de sol.
Une fois l'eau drainée, replacer fermement le bouchon.
Vous pouvez maintenant allumer l'appareil.
1.
2.
3.
4.
5.
6.
Bouchon de
vidange (mode
climatisation)
Tuyau d'évacuation
de l'eau
L'eau peut avoir besoin d'être vidée dans les zones de forte humidité
Récipient peu profond
(non compris)
Page 52

Le guide de dépannage suivant aborde les problèmes les plus courants. Si le problème
persiste, appeler le service à la clientèle. Débrancher et déconnecter l'appareil de la
source d'alimentation avant de tenter de résoudre les problèmes.
51
GUIDE DE DÉPANNAGE
Ne fonctionne pas et
le témoin d'eau plein
est à ON
•
Il n'y a pas d'électricité.
•
Les piles de la télécommande
doivent être remplacées.
• Le cordon d'alimentation n'est pas
correctement branché.
•
L'interrupteur de sécurité GFCI
s'est déclenché.
• Le réglage de la température du
thermostat est trop près de la
température ambiante.
• La sortie d'air est bloquée.
• Il y a des courbures prononcées
dans le tuyau souple d'évacuation.
• Une porte ou une fenêtre est
ouverte.
•
Nettoyer le filtre à air
Réinstaller le tuyau d'évacuation
correctement
Réduire le réglage de la température
sur le panneau de commande.
Videz l'eau à travers le bouchon de
vidange (reportez-vous à la page 14,
Drainage de l'eau de condensation)
S'assurer que la fenêtre ou la porte
est fermée.
• Le tuyau d'évacuation est détaché.
•
Le filtre à air est sale.
• Le réglage de température est trop
élevé.
• L'entrée ou la sortie d'air est bloquée.
• Eau de condensation en excès à
l'intérieur du réservoir.
• Vérifier l'alimentation.
• Changer les piles de la
télécommande.
• Débrancher puis rebrancher le
cordon d'alimentation.
Réinitialiser l'interrupteur de sécurité
GFCI; si le problème persiste,
contacter notre service à la clientèle.
•
•
L'unité de
conditionnement
d'air ne démarre pas
Problème Cause possible
Solution
Fonctionne sur une
courte période
seulement
Fonctionne, mais
sans refroidissement
• Baisser la température réglée.
Connecter le tuyau d'évacuation
selon les instructions de la page 45.
• S'assurer que le tuyau d'évacuation
est correctement branché.
•
•
•
•
• Enlever le blocage.
Page 53

Système de climatisation portatif
MN10CES / MN10CESWW / MN10CESBB
115 V~ 60 Hz
CARACTÉRISTIQUES TECHNIQUES
52
Les produits électriques doivent être éliminés correctement.
Bien vouloir recycler aux installations appropriées. Vérifier auprès de
vos autorités locales ou détaillants pour le recyclage.
Description du produit
Modèle
Tension/Fréquence
Consommation d'énergie
Puissance frigorifique
Capacité de déshumidification
R-410AType de réfrigérant
24 hour (ON / OFF)Minuterie
Dimensions (D) x (L) x (H) (mm)
Poids (Kg)
1050W
10000 BTU
33 litros / 24 hours
385 X 460 X 745 mm
29 Kg
Page 54

53
SERVICE ET GARANTIE
GARANTIE LIMITÉE DE 5 ANS
1 an pièces et main d’œuvre.
5 ans sur toutes les pièces du système scellé, comprenant le compresseur, l'évaporateur, le
condenseur et les tuyaux réfrigérants connectés en usine.
Cette garantie ne s'applique pas aux dommages résultant d'un usage abusif ou déraisonnable
ou de dommages. Les défauts qui sont le résultat d'une usure normale ne seront pas
considérés comme des défauts de fabrication en vertu de cette garantie.
JMA NORTH AMERICA LLC N'EST PAS RESPONSABLE DES DOMMAGES DIRECTS OU
INDIRECTS DE QUELQUE NATURE QUE CE SOIT. TOUTE GARANTIE IMPLICITE DE
QUALITÉ MARCHANDE OU D'ADÉQUATION A UN USAGE PARTICULIER DE CE PRODUIT
EST LIMITÉE DANS LE TEMPS À LA DURÉE DE CETTE GARANTIE.
Certaines juridictions n'autorisent pas l'exclusion ou la limitation des dommages fortuits ou
consécutifs ou de limitation sur la durée d'une garantie appliquée, de sorte que les limitations
ou exclusions susmentionnées peuvent ne pas s'appliquer à vous. Cette garantie vous donne
des droits légaux spécifiques; vous pouvez également avoir d'autres droits qui varient d'une
juridiction à l'autre. Cette garantie s'applique uniquement à l'acheteur original de ce produit à
partir de la date d'achat originale.
À sa discrétion, JMA NORTH AMERICA LLC réparera ou remplacera ce produit s'il est jugé
défectueux au niveau de matériau ou de fabrication.
Cette garantie ne couvre pas les dommages résultants de tentatives non autorisées de
réparation ou de toute utilisation non conforme aux instructions du manuel d'utilisation.
A.
B.
C.
Page 55

SERVICE ET GARANTIE
54
Veuillez lire le manuel d'instructions attentivement avant de configurer ou d'utiliser ce produit.
Si vous croyez ce produit porteur d'un défaut de fabrication, ou si vous avez des questions sur
ce produit, veuillez communiquer avec notre Service à la clientèle :
ASSISTANCE AU CLIENT
JMA North America LLC
Mahwah, New Jersey 07495 USA
Phone : 1-800-474-2147
Email: info@jmana.us
Web: www.honeywellportableac.com
Lorsque vous communiquez avec notre Service à la clientèle, veuillez avoir les informations
ci-dessous avec la preuve d'achat. Toutes les demandes de garantie doivent être accompagnées d'une preuve d'achat, soit une copie de la facture originale.
Modèle : .......................................................................................................................
Date d'achat : .......................................................................................................................
Acheté auprès de: .......................................................................................................................
D.
Page 56

November 2013
© 2013 AirTek Int’l Corp. Ltd. All rights reserved.
The Honeywell Trademark is used under license from
Honeywell International Inc.
Honeywell International Inc. makes no representations
or warranties with respect to this product.
This product is manufactured by Airtek Int’l Corp. Ltd.
JMA North America LLC
Mahwah, New Jersey 07495 USA
Phone : 1-800-474-2147
Email: info@jmana.us
Web: www.honeywellportableac.com
 Loading...