

Page 1

MB4-BAT-SCN02
4-Bay Battery Charging Station
Quick Start Guide
MB4BATSCN02-EN-QS Rev A
5/18
Page 2

Overview
The MB4-BAT-SCN02 is a compact 4-slot battery charging station for use with BAT-SCN02 and BAT-SCN03 batteries.
• The BAT-SCN02 high capacity lithium ion battery (3.8V,
2160mAh) powers the 8680i for 8000 scans and 10 hours.
• The BAT-SCN03 standard capacity lithium ion battery (3.7V,
1150mAh) powers the 8680i for 3000 scans and 7 hours.
Batteries are not fully charged when shipped. The battery
should be charged for a minimum of 4 hours at room temperature before initial use to ensure optimal performance.
Unpack your charging station
After you open the shipping carton containing the product, take
the following steps:
• Check for damage during shipment. Report damage
immediately to the carrier who delivered the carton.
• Make sure the items in the carton match your order.
• Save the shipping container for later storage or shipping.
1
Page 3
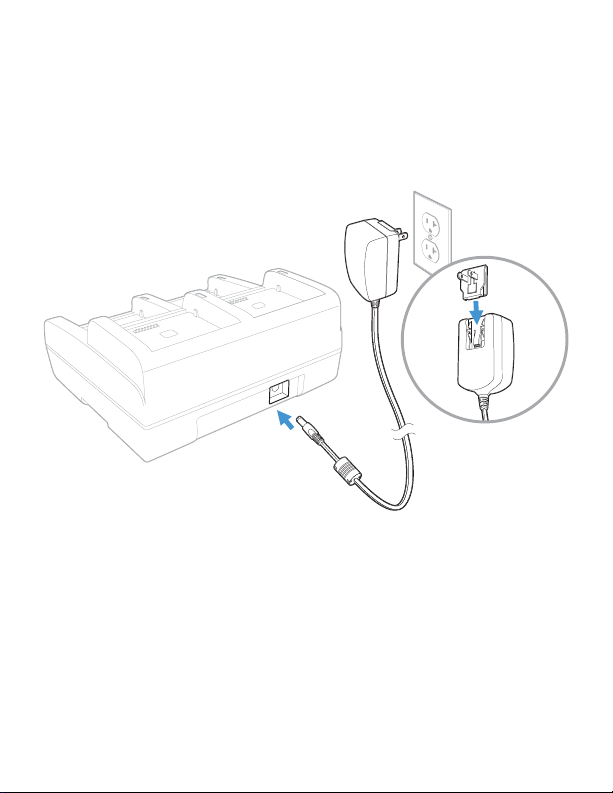
Power
Use only a UL Listed power supply, qualified by Honeywell, with
an output rated at 12VDC and 3A with the device. The power
supply input rating is 100-240V, 50/60Hz. Operating temperature 5°C to 40°C (41°F to 104°F).
2
Page 4
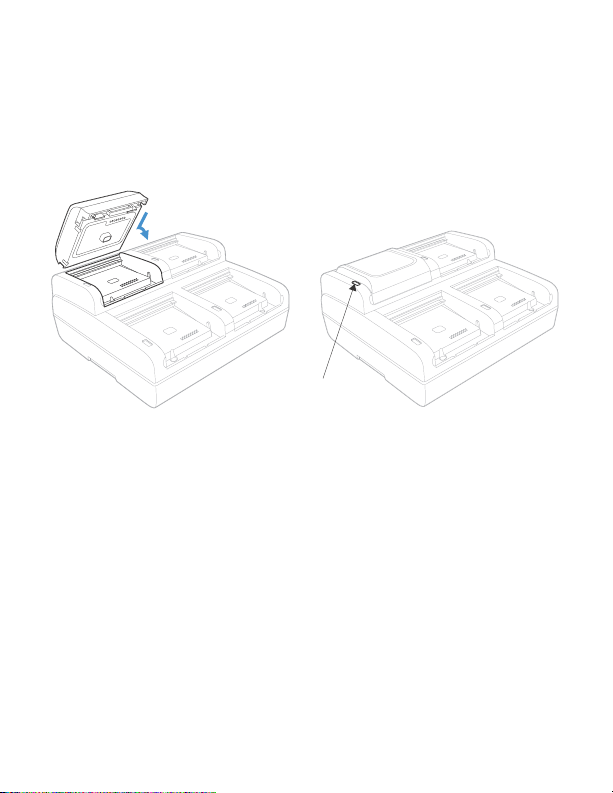
Charging a Battery
Status LED
Line the battery’s contacts up with the contacts on the charging
pocket. Firmly press the battery into the battery charging
pocket. The LED to the left of the pocket lights up in an amber
color when the battery is properly inserted.
It is important that batteries are inserted into the charging
pocket correctly. Inserting the battery incorrectly could result in
damage to the battery or the charger.
When a battery is placed in a charging pocket, the charger
begins charging the battery. There is a slight delay while the
charger evaluates the condition of the battery before charging
begins. While charging, the amber LED on the battery charger
indicates the battery is charging. A green LED indicates the battery has been fully charged and can be removed.
3
Page 5

Status LED
Ensure all components are dry prior to mating
batteries with peripheral devices. Mating wet
components may cause damage not covered by the
warranty.
Each charging slot has a dedicated status LED located to the
left of the slot.
LED Status Indicates
Amber solid The battery is properly seated in the slot and
is charging.
Green solid The battery is fully charged.
Red blinking Battery fault.
Red solid Temperature error.
Off No battery is installed or the battery is
improperly installed.
The charger should be on a dry, stable surface and can be
mounted on a flat, horizontal surface such as a desktop or workbench. When choosing a location, always keep in mind:
• The mounting location must allow users easy access to the
power connector.
• The charger should be oriented so that users can easily insert
and remove battery packs and see the LEDs.
4
Page 6

Mount the Charger
3.16 in
(80.28mm)
2.6 in
(66.04mm)
4.96 in
(126mm)
The charger can be mounted to a flat surface, or to a DIN rail for
a multi-bay charge rack installation.
Option 1
Use the four SL-B M3.5 x 8 screws to mount the charger to a flat,
horizontal surface.
5
Page 7

Option 2
The DIN rail slot on the bottom panel enables secure mounting
to a charge rack.
Hardware Required
•DIN rail
• 3/16 in. dia. x 5/8 in. long pan head screw
• 1/2 in. OD x 7/32 in. ID x 3/64 in. thick flat washer
•3/16 in. dia. nut
6
Page 8

Installation
1. Slide the DIN rail into the DIN rail slot on the bottom of the
charging station.
7
Page 9

2. Using the appropriate hardware listed above, secure the
DIN rail to the charge rack.
Cautions and Warnings
There is a danger of explosion if the batteries are
incorrectly replaced. Use only Honeywell lithium ion
battery packs, model numbers BAT-SCN02 or BATSCN03 in this device. Use of any non-Honeywell
battery may result in damage not covered by the
warranty. Dispose of used batteries according to the
recycle program for batteries as directed by the
governing agency for the country where the batteries
are to be discarded.
Use the provided AC power supply only. Using any
other type of AC power supply is prohibited.
8
Page 10

Do not disassemble or perform modifications to the charging
station. There are no user serviceable components in the
charging station.
Battery Recommendations
• The battery is a lithium ion cell and can be used without a full
charge, and can also be charged without fully discharging,
without impacting the battery life. There is no need to perform
any charge/discharge conditioning on this type of battery.
• Replace a defective battery immediately since it could
damage the scanner.
• Do not leave the battery in a non-operating charger. The
battery may discharge through the charger rather than hold
its charge.
• Although your battery can be recharged many times, it will
eventually be depleted. Replace it after the battery is unable to
hold an adequate charge.
• If you are not sure if the battery or charger is working properly,
send it to Honeywell International Inc. or an authorized service
center for inspection.
Safety Precautions for Lithium Batteries
• Do not place batteries in fire or heat the batteries.
• Do not store batteries near fire or other high temperature
locations.
• Do not store or carry batteries together with metal objects.
9
Page 11

• Do not expose batteries to water or allow the batteries to get
wet.
• Do not connect (short) the positive and negative terminals, of
the batteries, to each other with any metal object.
• Do not pierce, strike or step on batteries or subject batteries to
strong impacts or shocks.
• Do not disassemble or modify batteries.
Support
To search our knowledge base for a solution or to log into the
Technical Support portal and report a problem, go to
www.hsmcontactsupport.com.
User Documentation
For the user guide and other documentation, go to
www.honeywellaidc.com.
Limited Warranty
For warranty information, go to www.honeywellaidc.com and
click Get Resources > Product Warranty.
Patents
For patent information, see www.hsmpats.com.
10
Page 12

Disclaimer
Honeywell International Inc. (“HII”) reserves the right to make
changes in specifications and other information contained in
this document without prior notice, and the reader should in all
cases consult HII to determine whether any such changes have
been made. The information in this publication does not represent a commitment on the part of HII.
HII shall not be liable for technical or editorial errors or omissions contained herein; nor for incidental or consequential
damages resulting from the furnishing, performance, or use of
this material. HII disclaims all responsibility for the selection
and use of software and/or hardware to achieve intended
results.
This document contains proprietary information that is protected by copyright. All rights are reserved. No part of this document may be photocopied, reproduced, or translated into
another language without the prior written consent of HII.
Copyright2018 Honeywell International Inc. All rights
reserved.
11
 Loading...