

Honeywell MAXON VALUPAK-II, MAXON VALUPAK-II 60, MAXON VALUPAK-II 150, MAXON VALUPAK-II 300, MAXON VALUPAK-II 600 Technical Catalogue
Page 1
32-00188-01
VALUPAK®-II
Low Temperature Burners
TECHNICAL CATALOG
• High turndown
•Available in 4 sizes
• Capacities 2 kW - 558 kW (HHV)
• Stable and clean combustion
• Suitable for UV scanner and flame rod
• Low gas pressure requirements
• Ease of installation and operation with low
maintenance requirements
• All metal construction
• Multi voltage and frequency blower motors
• Better control on CO over the entire turndown of the
burner
• Pilot connection availability
• Easily Switch between Natural Gas and Propane
PRODUCT DESCRIPTION
The VALUPAK®-II is designed for process air heating
applications.
A motorized gas control valve controls the heat output of
the burner over the full operating range. The gas flows
through the nozzle and then along the inside of the burner
cone where combustion air is progressively and
tangentially mixed with the gas. This results in a short, very
stable flame and clean combustion.
Like many other Honeywell products, the standard
VALUPAK-II burner can be customized into a package
which could include a gear motor, burner controls,
automatic shut-off valves, flame sensors and/or pressure
switches.
Page 2
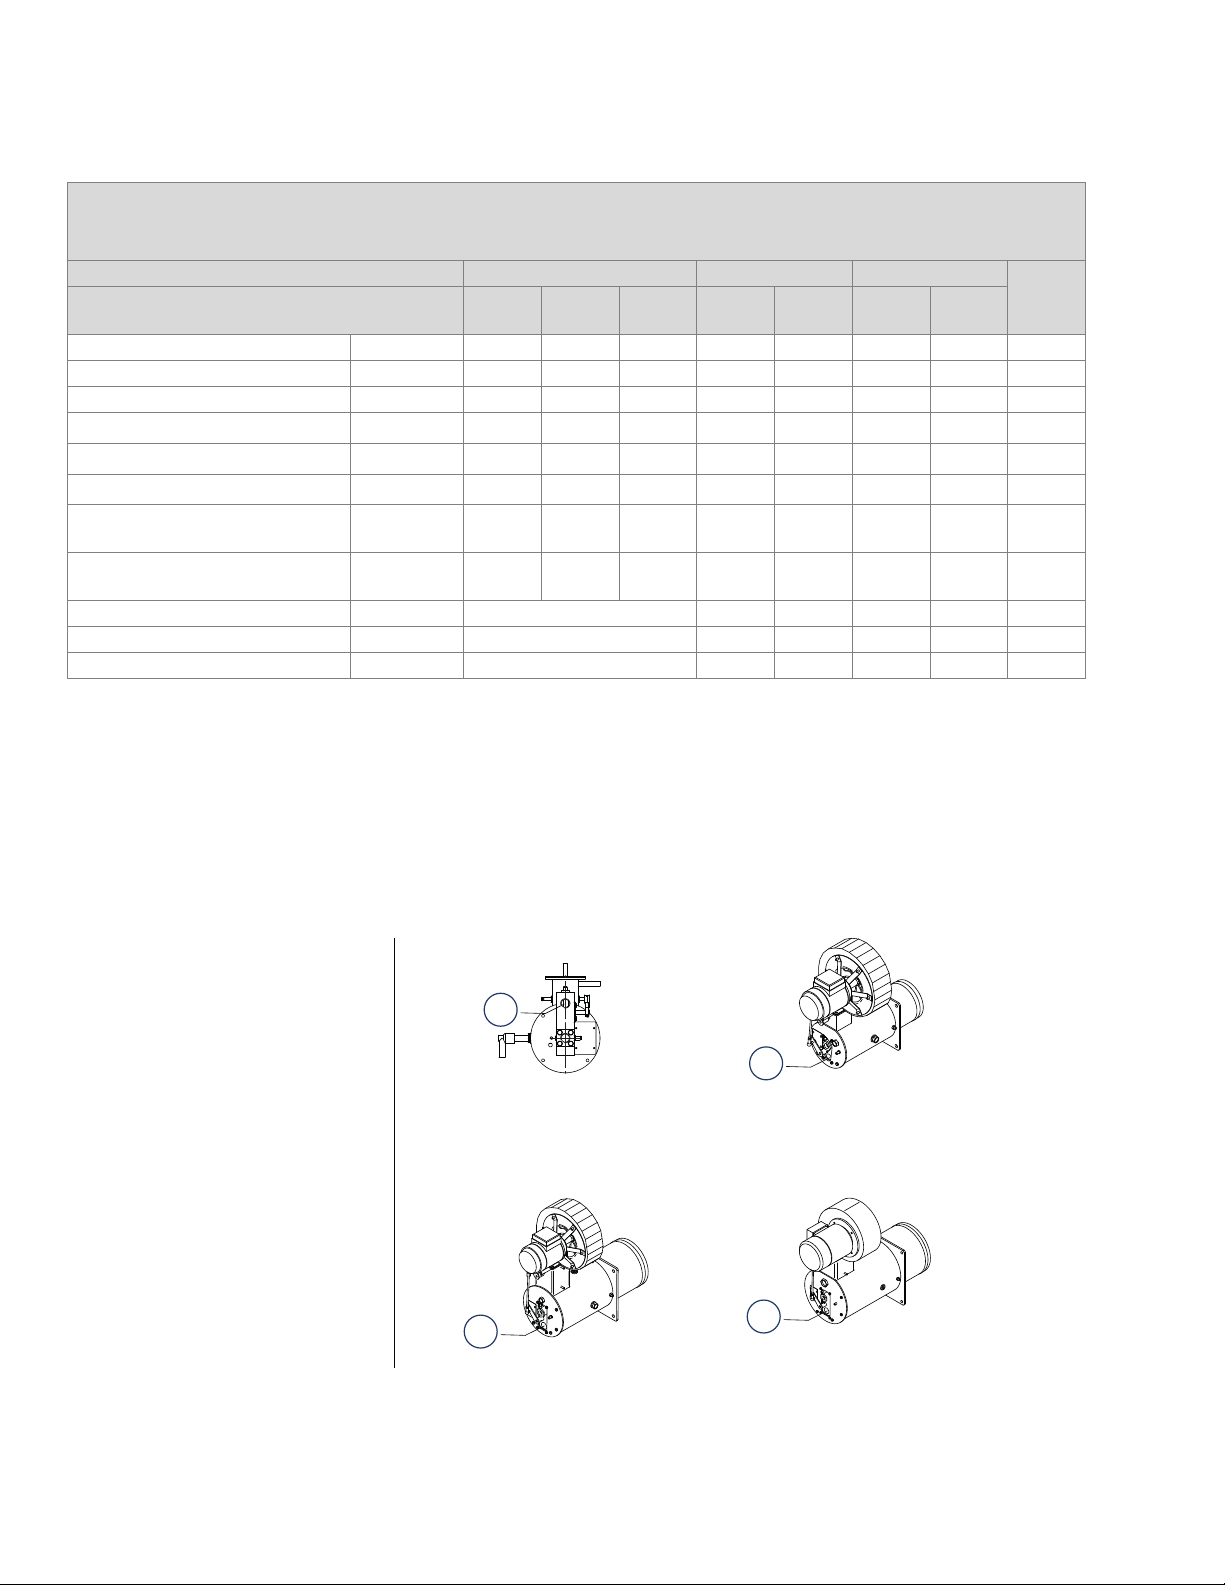
VALUPAK®-II
VALUPAK®-II 60
VALUPAK
®
-II 600
VALUPAK®-II 150
VALUPAK®-II 300
1) 1/2" NPT gas inlet
2) 3/4" NPT gas inlet
3) 1" NPT gas inlet
4) 1" NPt gas inlet
1
2
3
4
AVAILABLE VALUPAK®-II SIZES
Capacity and selection data in kW, 50 Hz operation
Gross heating value = 10.9 kWh/m
All figures are for balanced - 0 mbar - duct pressure
VALUPAK®-II size 60 [2] 150[2] 300[2]
Standard blower type
Maximum heat release
UHC
102
[3] kW (HHV) 40 60 80 225 185 290 360 558
UHC
122
Minimum heat release kW (HHV) 2 2 3 6 6 6 10 15
Turndown 20:1 30:1 27:1 38:1 31:1 48:1 36:1 37
Gas Q max.
Gas Q min.
Max. combustion air volume
Gas pressure at test connection
at maximum heat release
Gas pressure at inlet burner
at maximum heat release
m3 (st)/h
3
m
(st)/h
3
(st)/h
m
mbar 5.4 9 18 14.6 9.8 5 7.7 10.2
mbar 6.7 11.5 24 20.8 14.2 10.8 15.2 16.2
3.7 5.5 7.3 21.8 17.9 28.1 34.8 54
0.18 0.18 0.28 0.6 0.6 0.6 1 1.5
48 64 98 251 206 323 401 622
Blower motor 3x220-420x50 Hz kW 0.09 0.25 0.09 0.25 0.55 1.1
Weight kg n/a 24.2 20 29.7 31.5 47.6
Flame length
[4] m up to 0.4 (after sleeve) 1 1 1.3 1.5 1.6
3(st), d = 0.6
UMI
300
UMI
300
[1]
U/HC
122
UMI
300[5]
UMI
390
600
[1] Air pressure switches should be selected to have a setpoint ranging from (2-10) mbar-, with exception of the
VALUPAK®-II 60 burner with a capacity of 40 kW or 60 kW: setpoint ranging from (0.4 - 3) mbar
[2] Single phase blower motor available.
[3] Use of the standard round air inlet filter will cause a ± 15% capacity reduction. UMI blowers are not suited for filters.
Use of the standard VALUPAK®-II burner at 60 Hz will result in a higher max. capacity to which the gas pressures
need to be adapted.
[4] When firing in open air. Firing in a cross flow shortens flame.
[5] As an alternative blower U/HC 142 (0.18 kW)can be used , performance are same as with UMI300 blower
Protection: IP 54
32-00188-01 2 E - m - 6/18
Page 3
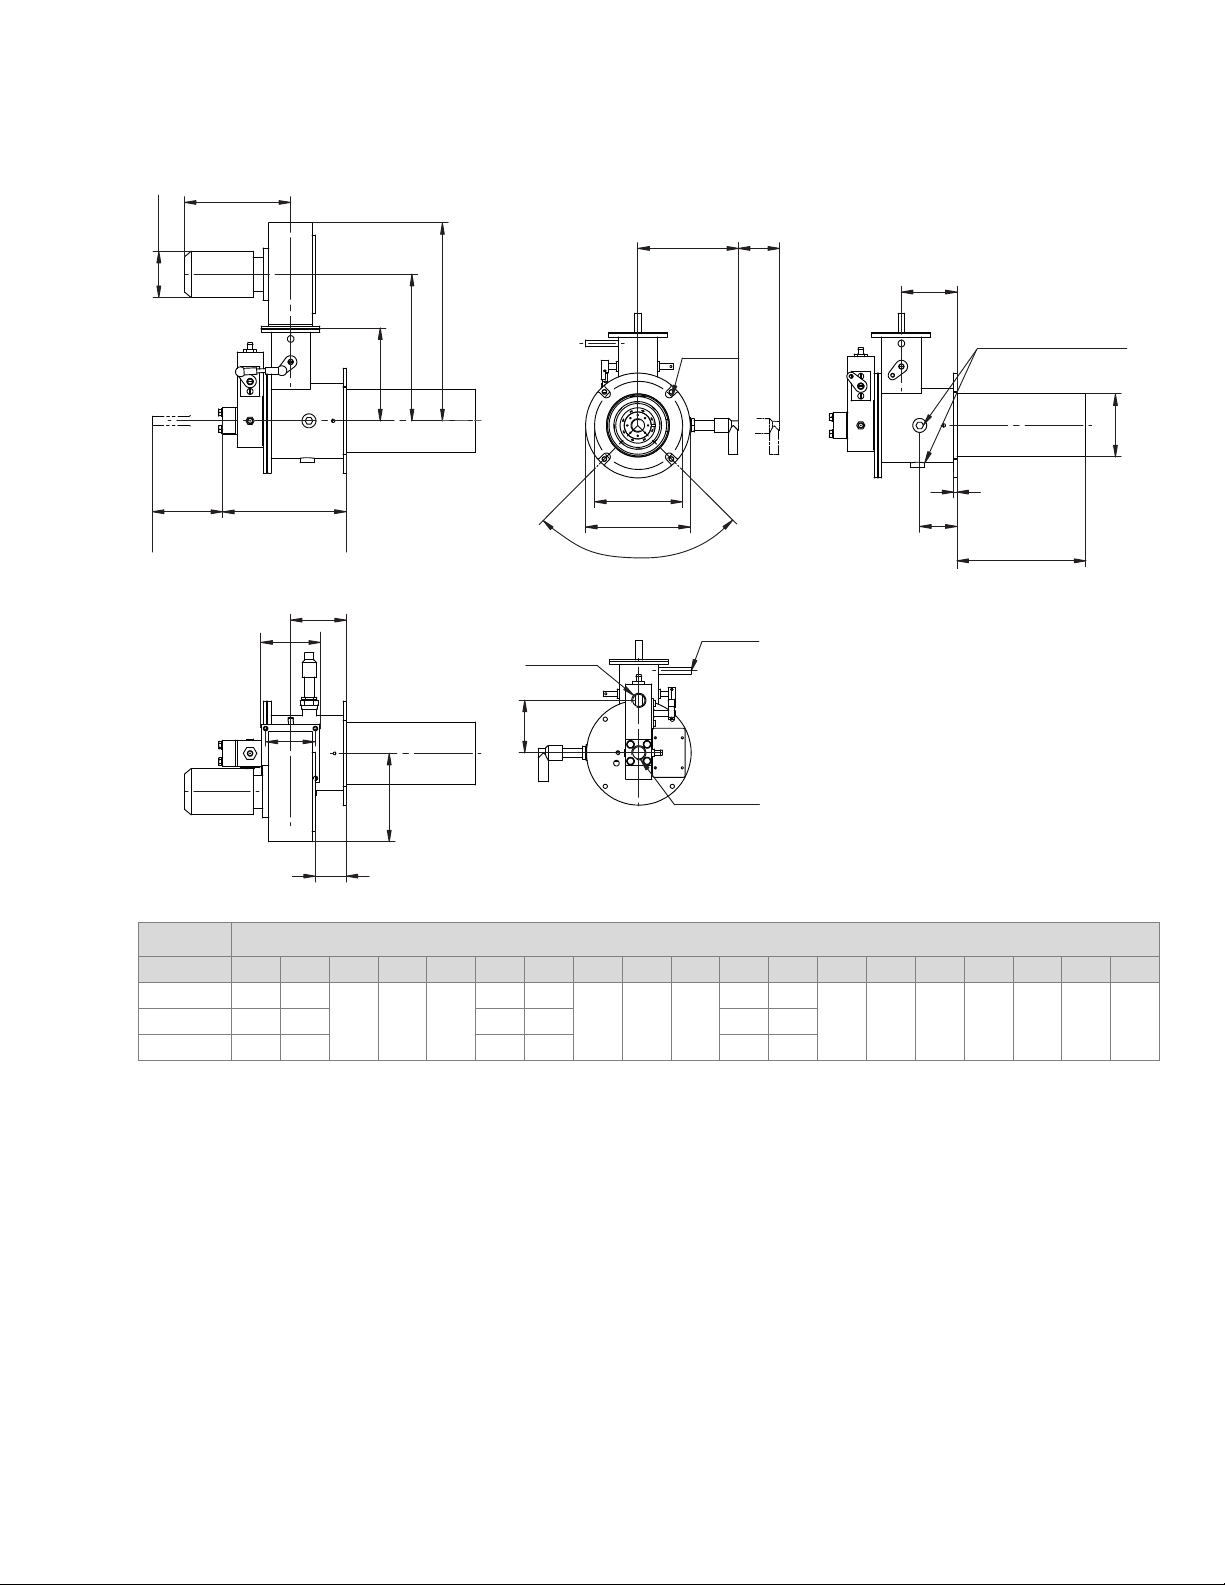
DIMENSIONS - VALUPAK®-II 60
G
ØF
A
B
C
M
4 x Ø12
VALUPAK®-II
N[2]
T
Plug
(Alternative SI position)
DIMENSIONS AND WEIGHTS
DE[1]
H
I
J
L
K
Rp 1/2"
Gas Inlet
T
ØO
ØP
4 x 90°
5
Q
R
Rc1/4"
1/2" NPT
Flame Rod
ØS
VP-II 60 Dimensions in mm unless stated otherwise
Blower A B C D E[1] ØF G H I J K L M N[2] ØO ØP Q ØS T
UHC 102 302 224
142 189 270
70,5 162
85 90 76
47 135
154 150 135 160 57 96 85UHC 122 442 331 112 208 42 179
UMI 300 539 389 120 247 41 248
[1] min. free space required for flame rod removal.
[2] min. free space required for SI removal.
E - m - 6/18 3 32-00188-01
Page 4
VALUPAK®-II
B
A
D
C
E
H
Gasinlet 1" NPT
Sight
glas
Q[1]
□F
□G
4 x Ø 13
Ø N
I
J
P
O
K
M L
R[2]
see note
(Plug for
alternatif
spark ignitor
position (4x90°))
NOTE : 4 possible
Spark Ignitor position
arrangements
L : Left side (standard)
R : Right side
U : Up (Fan side)
D : Down side.
AIR-GAS
linkage
1/4" NPT Air
switch connection
1/8" Gas pressure
test connection
1/8" Combustion air
pressure test connection
1/2" NPT flame
supervision
connection
Spark ignitor
1/2" NPT
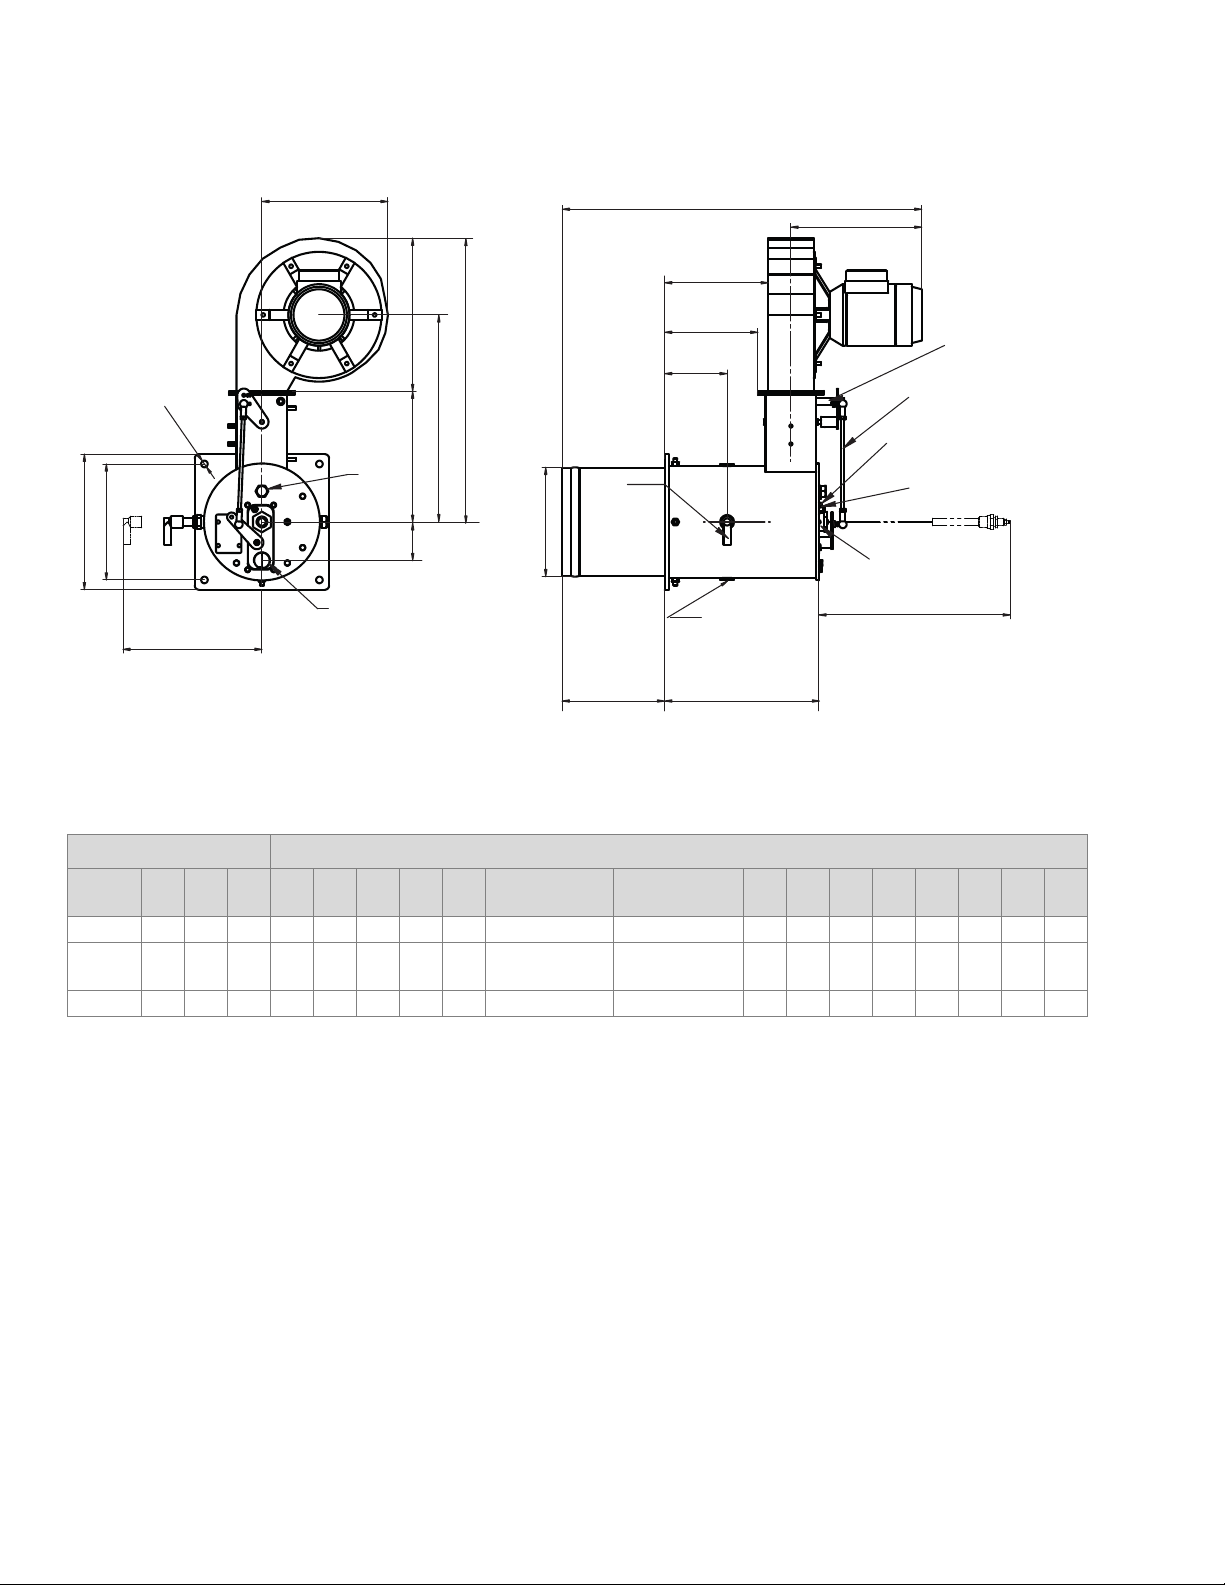
DIMENSIONS - VALUPAK®-II 150, 300 & 600
VALUPA K®-II Dimensions in mm unless stated otherwise
Burner
size
A B C D E F G H I J K L M ØN O P Q[1] R[2]
150 481 248 300 332 182 184 214 55 637 257 123 275 150 160 165 186 240 500
300 553 248 300 404 254 226 264 75
600 549 248 287 403 262 286 318 85 805 293 131 379 200 262 227 250 325 560
[1] Minimum free space required for Spark Ignitor removal.
[2] Minimum free space required for Flamerod removal.
706 (UMI300)
733 (UMI390)
Dimensions with alternatives for UMI blowers available on request.
32-00188-01 4 E - m - 6/18
257 (UMI300)
284 (UMI390)
123 303 200 213 183 204 277 500
Page 5

VALUPAK®-II
1
3
4
5
6
7
8
9
10
11
12
2
1) Cock
2) Housing
3) Male insert
4) Flame safeguard +
Ignition transfo
5) Mounting bracket
6) Gasburner
7) Ignition terminal cap
8) Aptaptor set for
control motor
9) Blower
10) Control motor
11) Flame rod
12) Double shut-off valve
APPLICATIONS
Specifically designed for applications where burners are
used under balanced pressure conditions such as in textile
machines, printing machines and many other types of
dryers.
When firing with heat exchangers, the VALUPAK®-II design
reduces the tendency for resonance.
Application examples VALUPAK®-II
Options
• round air filter
• single phase motor for sizes 60, 150 and 300
• long discharge sleeve 300 mm
• control motor
• flame rod or UV scanner
• Pilot connection
E - m - 6/18 5 32-00188-01
Page 6

VALUPAK®-II
SPECIFICATIONS OF VALUPAK®-II BURNERS FOR 50 HZ OPERATION
Capacity data in kW
3
Gross heating value = 10.9 kWh/m
VALUPAK®-II size 60[1] 150[2] 300[1]
Standard blower type
Maximum heat release
[2] kW(Hs) 40 60 80 225 185 290 360 558
Minimum heat release kW(Hs)2236661015
Turndown 20:1 30:1 27:1 38:1 31:1 48:1 36:1 37:1
Gas Q max.
Gas Q min.
Max. combustion air volume
m3(st)/h
m
m
Excess air at maximum heat
release
Gas pressure at test connection at
maximum heat release
Air diff. pressure at test connection
at maximum heat release mbar 2 3.3 6.3 4.4 2.6 3.7 6.5 6.9
at minimum heat release mbar 0.3 0.2 0.3 0.25 0.15 0.2 0.2 0.45
Blower motor 3x220-420x50 Hz kW 0.09 0.25 0.09 0.25 0.55 1.1
Weight kg n/a 24.2 20 29.7 31.5 47.6
(st), d = 0.6. All figures are for balanced - 0 mbar - duct pressure
UHC
102
UHC
122
UMI
300
UMI
300
U/HC
122
UMI
300
[3]
UMI
390
3.7 5.5 7.3 21.8 17.9 28.1 34.8 54
3
(st)/h
3
(st)/h
0.18 0.18 0.28 0.6 0.6 0.6 1 1.5
48 64 98 251 206 323 401 622
(n) 1.17 1.17 1.17 1.2 1.2 1.2 1.2 1.2
mbar 5.4 9 18 14.6 9.8 5 7.7 10.2
600
[1] Single phase blower motor available.
[2] Use of the standard round air inlet filter will cause a ± 15 % capacity reduction.UMI blowers are not suited for filters.
Use of the standard VALUPAK®-II burner at 60 Hz will result in a higher max. capacity to which the gas pressures
need to be adapted.
[3] As an alternative blower U/HC 142 (0.18 kW) can be used, performance are same as with UMI300 blower.
32-00188-01 6 E - m - 6/18
Page 7

VALUPAK®-II
CAUTION
CAUTION
CAUTION
INSTALLATION AND OPERATING INSTRUCTIONS
Installation instructions
Instructions provided by the company or individual
responsible for the manufacture and/or overall installation
of a complete system incorporating MAXON burners take
precedence over the installation and operating
instructions provided by MAXON. If any of the instructions
provided by MAXON are in conflict with local codes or
regulations, please contact MAXON before initial start-up
of equipment.
Read the combustion system manual carefully
before initiating the start-up and adjustment
procedure.
Verify that all of the equipment associated with and
necessary to the safe operation of the burner system has
been installed correctly, that all pre-commissioning
checks have been carried out successfully and that all
safety related aspects of the installation are properly
addressed.
Do not discard packing material until loose items are
accounted for. To prevent damage in transit spark ignitor
and linkage (if any) are shipped “loose”.
They must be rechecked after start-up and loosened if
necessary to prevent deformation of cone. See start-up
instruction for details.
Tightening can lead to cone distortion and greatly reduced
cone and discharge sleeve life.
Discharge sleeve must be flush with, or extended beyond
interior wall.
A viewing port should be provided for flame observation in
such a position that burner flame can be fully seen.
Installer must comply with all applicable codes
and standards. Observe required space for parts
removal.
Burner mounting
See sketch page 8. Burner may be mounted in any position
suitable for automatic control motor and UV scanner.
Burner will typically be installed through an oven wall or
insulated air duct. Cut opening at least 25 mm larger in
diameter than discharge sleeve to allow for sleeve
expansion.
Additional burner support may be required in conjunction
with a stiffener plate to support burner package weight
(20-25 kg) . Four 13 mm diame ter h oles into pane ls fla nge
accept 10 m m stu d bolts w elde d to panels or s tiffener.
seal welding of burner flange to stiffener plate at
(A) may cause warpage of burner flange and
require additional seal material to prevent
leakage.
For push-through systems, area (A, see drawing page 8)
should be sealed with additional gasketing or high
temperature packing, to prevent back flow of high
temperature air. Fill area (B, see drawing page 8) with no
more than 50 mm of high temperature packing (too little
will overheat mounting, too much will overheat sleeve).
For pull-through systems, spacers may be installed on
stud bolts and area (B, see drawing page 8) left empty to
permit cooling air past the sleeve.
Four lock screws permit centering mixing cone within
burner body and sleeve. They should be drawn up handtight, then backed out 180° to allow for cone expansion.
E - m - 6/18 7 32-00188-01
Page 8

VALUPAK®-II
1
2
3
4
6
5
7
8
9
9
10
10
12
13
1) Stiffener plate
2) Lock screw
3) Discharge sleeve
4) Viewing port
5) Additional burner
support
6) Stud bolt
7) Air pressure switch
(option)
8) Air filter (option)
9) Air supply
10) Fuel supply
11) Space required for
spark ignitor removal
12) Oven wall
13) Control motor (option)
14) Space required for
flame rod/scanner
removal
A
B
11
14
Installation of flame scanner
Instead of a flame rod, a flame scanner can be applied to a
VALUPAK®-II burner (with exception of VALUPAK®-II 60)
without any modification.
32-00188-01 8 E - m - 6/18
Page 9

Flame rod or UV scanner arrangement with spark ignitor
B
Spark ignitor
Detail B
Z
Spark ignitor 1/2" NPT
Flame rod arrangement
Y
X
Sizes VP-II 60 - VP-II 600
VALUPAK®-II
Model VALUPAK®-II
VP-II 60/UHC 102
VP-II 60/UHC 122 70 152
VP-II 60/UMI 300 70 152
VP-II 150 15 60 200
VP-II 300 33 25 200
VP-II 600 27 15 324
Spark ignitor arrangement for VALUPAK®-II
The spark ignitor can be mounted in 4 different positions on the burner housing : left (standard), right, top and bottom (if
the air inlet is on top). Spark ignitor replacement : insert the spark ignitor through the collar into the burner. Insert the
spark ignitor in the cone bushing until its ceramic touches the cone.
Flame rod arrangement for VALUPAK®-II
The flame rod is located at the back of the burner, through the scanner tube. It’s important that the flame rod is mounted
gastight! The recommended adjusting dimension shall be respected.
Dimensions in mm, unless stated otherwise
Spark ignitor Flame rod
Z X Y
35 65
44
E - m - 6/18 9 32-00188-01
Page 10

VALUPAK®-II
CAUTION
C
Detail C
Operating instructions
The operating instructions below are provided only as a
guideline and are not intended to replace those provided
by the manufacturer of a complete system of which the
VALUPAK®-II burner is only a part. Where applicable,
instructions provided by the system's manufacturer shall
take precedence.
Start
1.
Make sure trip release shut-off valve and main gas
cock are all closed.
2.
Make sure the burner firing rate control handle is at
predetermined low fire “LO” position.
3.
Start all circulating and exhaust fans.
4.
Energize system control panel (if applicable).
5.
Start burner blower motor.
6.
Open main gas cock.
7.
Press start button.
8.
Main gas valve will open (only if all safety circuits are
complete).
Stop
1.
Push STOP button and
2.
Main gas valve should automatically close.
3.
De-energize system control panel and burner blower
motor.
4.
Close main gas cock.
START-UP AND ADJUSTMENT INSTRUCTIONS FOR VALUPAK®-II BURNERS
Instructions provided by the company or individual
responsible for the manufacture and/or overall installation
of a complete system incorporating MAXON burners take
precedence over the installation and operating
instructions provided by MAXON. If any of the instructions
provided by MAXON are in conflict with local codes or
regulations, please contact MAXON before initial start-up
of equipment.
Before initiating the following start-up and
adjustment procedure, it is important that a
check be made to verify that all of the equipment
associated with and necessary to the safe
operating of the VALUPAK®-II burner system has
been installed and piped in accordance with the
“General installation instructions”. If the burner
system is part of an oven or other heating unit
which has been purchased as a complete prepiped and pre-wired package, it may be assumed
that these instructions have already been carried
out by the individual or company responsible for
the overall installation.
Initial adjustment and light-off should be undertaken only
by trained and experienced personnel familiar with
combustion systems, with control/safety circuitry and with
knowledge of the overall installation.
To start-up a VALUPAK®-II burner for the first time
1.
Close main gas cock.
Connect U-tube manometer to burner test connection
on the burner gas nozzle inlet. Note burner type and
required gas pressure (page 6).
2.
Establish correct blower direction of rotation of all
. See arrow on blower housings.
fans
3.
Disconnect automatic control motor wiring to avoid
unexpected motor travel.
valve is at low fire position (as supplied). For size 150,
300 and 600 control motor rotation is counter clockwise when looking towards controls linkage going
from low to high fire. For the size 60 when looking to
the linkage the air butterfly crank rotation is counterclockwise. Since the control motor is located at the
opposite side of the linkage its rotation is clockwise
from low to high fire.
4.
When operating the burner with LPG instead of natural gas
needs to be changed. In order to do this, unscrew the
nut (M6) at the back of the crank and relocate the linkage from the hole marked “C1 – NG” to the hole “C3 –
LPG” by slightly rotating the crank and linkage. Screw
the nut back in place. No further modification on the
burner needs to be done. (See Detail C, to the left)
5.
Bleed air from the fuel supply line.
from the gas pressure regulator and establish that
regulator is at low end of control range.
, the linkage connection on the air valve crank
Check tightness of gas piping.
Check that gas control
Remove the cover
32-00188-01 10 E - m - 6/18
Page 11

6.
Check the adjustments of the flame rod, spark
ignitor and/or pilot
7.
Start all machine air blowers
(See page 9 and the wiring).
. Start burner with its
start-stop switch. Motor of combustion air fan will be
started shortly after, by means of the burner flame
safeguard programming relay.
8.
Purge the combustion chamber,
purging any explosive vapors that may have accumulated prior to the
start. The length of purge time required will usually be
specified by insurance or approval agency having
jurisdiction and depends on the total amount of fresh
air and the volume of combustion space. A 5-fold
refresh rate should be minimum. At the end of the
purge time of the burner flame safeguard programming relay ignition is energized and the main gas
valve will be energized shortly after.
9.
Because main gas cock
is closed the programmer will
lock out requiring manual reset. Operation of programmer is correct.
10.
Check setting
of low and high gas pressure switches
and combustion air pressure switch.
11.
Check burner control valve
12.
Slowly open main gas cock
at LO position.
. Reset burner relay and
start burner.
13.
After the burner flame safeguard programmer relay
prepurge time ignition is energized and main gas
valve opened. Flame should be established within
safety time of programmer. If again flame failure, air
could still be in gas supply line just before burner.
Reset programmer and restart until low fire flame is
established. Check gas supply pressure with information on page 2 and correct with adjusting screw of
gas pressure regulator.
In the case of LPG firing,
multiply the referenced natural gas pressures by
0.4 to arrive at optimal LPG pressures.
Observe
flame through observation port at rear of burner.
14.
Slowly bring burner to high fire position
and avoid
maximum temperature of dryer. Check and correct
gas pressure on burner test connection and adjust to
value given on page 2. Close cover on pressure regulator and adjust all pressure switches.
High gas pressure switch at low fire.
Low gas pressure switch at high fire.
Air pressure switch at high fire by closing of air inlet
until flame color start to change. Burner should trip
by air pressure switch.
Reconnect control motor wiring
15.
, start burner and
change several times between low and high fire position by changing temperature controller settings.
16.
Check all other safety devices
such as pressure
switches, high temperature limits etc. and adjust
these devices to their correct values.
VALUPAK®-II
E - m - 6/18 11 32-00188-01
Page 12

VALUPAK®-II
For More Information
For More Information
The Honeywell Thermal Solutions family of products includes
The Honeywell Thermal Solutions family of products includes
Honeywell Combustion Safety, Eclipse, Exothermics, Hauck,
Honeywell Combustion Safety, Eclipse, Exothermics, Hauck,
Kromschröder and Maxon. To learn more about our products,
Kromschröder and Maxon. To learn more about our products,
visit ThermalSolutions.honeywell.com or contact your
visit ThermalSolutions.honeywell.com or contact your
Honeywell Sales Engineer.
Honeywell Sales Engineer.
Honeywell MAXON branded products
Honeywell MAXON branded products
201 E 18th Street
201 E 18th Street
Muncie, IN 47302
Muncie, IN 47302
USA
USA
www.maxoncorp.com
www.maxoncorp.com
Honeywell Process Solutions
Honeywell Process Solutions
Honeywell Thermal Solutions (HTS)
Honeywell Thermal Solutions (HTS)
1250 West Sam Houston Parkway
1250 West Sam Houston Parkway
South Houston, TX 77042
South Houston, TX 77042
ThermalSolutions.honeywell
ThermalSolutions.honeywell
® U.S. Registered Trademark
© 2018 Honeywell International Inc.
32-00188-01 M.S. Rev. 06-18
Printed in United States
 Loading...