

Page 1

Marathon
Hand-Held Computer
Microsoft® Windows® Embedded Standard Operating System
Microsoft® Windows® 7 Professional Operating System
Microsoft® Windows® XP® Professional Operating System
Battery Charger User's Guide
Page 2

Disclaimer
Honeywell International Inc. (“HII”) reserves the right to make changes in specifications and other information contained in this
document without prior notice, and the reader should in all cases consult HII to determine whether any such changes have
been made. The information in this publication does not represent a commitment on the part of HII.
HII shall not be liable for technical or editorial errors or omissions contained herein; nor for incidental or consequential damages
resulting from the furnishing, performance, or use of this material.
This document contains proprietary information that is protected by copyright. All rights are reserved. No part of this document
may be photocopied, reproduced, or translated into another language without the prior written consent of HII.
© 2011-2012 Honeywell International Inc. All rights reserved.
Web Address: www.honeywellaidc.com
Microsoft®Windows, ActiveSync®, MSN, Outlook®, Windows Mobile®, the Windows logo, and Windows Media are
registered trademarks or trademarks of Microsoft Corporation.
Intel®and Atom™ are trademarks or registered trademarks of Intel Corporation or its subsidiaries in the United States and
other countries.
Summit Data Communications, the Laird Technologies Logo, the Summit logo, and "Connected. No Matter What" are
trademarks of Laird Technologies, Inc.
The Bluetooth®word mark and logos are owned by the Bluetooth SIG, Inc.
Symbol®is a registered trademark of Symbol Technologies. MOTOROLA, MOTO, MOTOROLA SOLUTIONS and the
Stylized M Logo are trademarks or registered trademarks of Motorola Trademark Holdings, LLC and are used under license.
RAM®and RAM Mount™ are both trademarks of National Products Inc., 1205 S. Orr Street, Seattle, WA 98108.
Freefloat, Freefloat Link*One and Freefloat Access*One are trademarks of Freefloat, Mölndalsvägen 30B, SE-412
63Gothenburg, Sweden.
Qualcomm®is a registered trademark of Qualcomm Incorporated. Gobi is a trademark of Qualcomm Incorporated.
OneClick Internet is WebToGo’s patented connection manager customized for Honeywell mobile devices. OneClick Internet
documentation is copyright 2010 by WebToGo and modified by Honeywell with WebToGo’s express permission.
Verizon®is a registered trademark of Verizon Trademark Services LLC.
T-MOBILE®is a registered trademark of Deutsche Telekom AG.
AT&T®is a registered trademark of AT&T Intellectual Property.
AuthenTec, TouchChip, Eikon and TrueSuite are registered trademarks and QuickSec, SafeXcel, DRM Fusion, SafeZone,
Eikon, TrueNav, SteelCoat, TouchStone, DataDefender, MatrixSSL, MatrixDLS, TouchStone, SteelCoat, KeepVault,
KeepSync and KeepSafe are trademarks of AuthenTec, Inc.
PenMount, and the Pen Mount logo are registered trademarks of Salt International Corporation, Taipei, Taiwan, R.O.C.
Acrobat®Reader © 2012with express permission from Adobe Systems Incorporated.
Other product names or marks mentioned in this document may be trademarks or registered trademarks of other companies
and are the property of their respective owners.
Patents
For patent information, please refer to www.honeywellaidc.com/patents.
Limited Warranty
Refer to www.honeywellaidc.com/warranty_information for your product’s warranty information.
Page 3

Table of Contents
Chapter 1: Introduction 1-1
About this Guide 1-1
Setup Overview 1-1
Cautions and Warnings 1-2
Battery Charger 1-2
Lithium-Ion Battery Pack 1-2
Components 1-3
Battery Charger 1-3
Extended Battery 1-4
Installation 1-5
Assemble the Power Supply 1-5
Setup 1-6
Charging Batteries 1-7
Inserting a Battery into the Charging Pocket 1-8
Remove the Battery from the Charging Pocket 1-8
Interpreting the Charging Pocket LEDs 1-9
YELLOW - on any charge pocket 1-9
YELLOW FLASHING - on any charge pocket 1-9
RED Continuous - on any charge pocket 1-9
RED FLASHING - on any charge pocket 1-9
RED FLASHING - on all charge pockets 1-9
NO LIGHT - on a charge pocket 1-9
Charge Timer 1-9
Power LED 1-9
Battery Charger Help 1-10
Charger Cleaning, Storage and Service 1-12
Cleaning 1-12
Storage 1-12
Service 1-12
Battery Cleaning, Storage and Service 1-13
Cleaning 1-13
Storage 1-13
Service 1-13
Technical Specifications 1-14
Electrical 1-14
Temperature 1-14
Dimensions 1-14
i
Page 4

Chapter 2: Set up a Battery Maintenance Routine 2-1
Introduction 2-1
Extending Battery Life 2-1
Self-Discharge 2-1
Peripheral Devices 2-2
Maintenance Routine 2-3
Label the Batteries 2-3
A Simple Battery Usage Routine 2-4
Sample Log for Battery Maintenance 2-4
Chapter 3: Technical Assistance 3-1
ii
Page 5

Chapter 1: Introduction
The Marathon Battery Charger is designed to simultaneously charge four rechargeable Lithium Ion (Li-Ion) extended batteries
within 4 hours. The time required for charging is dependent upon the battery pack temperature and conditions. Both sizes of
extended batteries can be charged in every charging bay.
The Marathon is powered by a main battery (Li-Ion rechargeable 2200 mAh)concealed inside the Marathon case, that provides
2.5 hours of operation without a recharge. The main battery can only be recharged using external power sources, such as an
indoor AC/DC adapter connected directly to the Marathon or an extended battery attached directly to the Marathon. The main
battery will also recharge when the Marathon is docked in a powered desktop or vehicle dock.
The battery charger should be located in an area where it:
l Is well ventilated.
l Is not in high traffic areas.
l Locates or orients the AC cord so that it will not be stepped on, tripped over or subjected to damage or stress.
l Has enough clearance to allow easy access to the power port on the back of the device.
l Is protected from rain, dust, direct sunlight or inclement weather.
This device is intended for indoor use only and requires an indoor AC power source. The charger is not approved for use in
Hazardous Locations.
This device cannot charge/recharge coin cell batteries sealed inside the mobile device, if any.
About this Guide
This Marathon Battery Charger User's Guide is intended to familiarize the user with the safety and operating instructions
necessary to use theMarathon Battery Charger (Model FX1385CHARGER, FX1386CHARGER) to charger rechargeable
lithium-ion batteries (42Whr FX1381BATTERY and 62Whr FX1382BATTERY) .
This guide should be readily available to all users and maintenance personnel using this battery charger.
Setup Overview
The following instructions are abbreviated and intended to give an overview of the process to be followed.
1. Assemble the power supply.
2. Connect the power supply to the charger.
3. Insert a battery into a charging bay.
4. When the battery is charging, the setup process is complete.
Note: Store the charger and batteries when not in use in a cool, dry, protected place.
Please refer to the Marathon User's Guide for instruction when connecting and removing extended batteries.
1-1
Page 6

Cautions and Warnings
Battery Charger
l There is a risk of explosion if the Marathon Li-Ion battery in the charging pocket is replaced by an incorrect type. Other
batteries or battery packs may burst causing injury or property damage.
l Do not insert any other type of Li-Ion battery in the Marathon battery charging pocket.
l Do not allow cleaning agents of any kind to contact the battery charging contacts; they may be damaged. If necessary,
clean them with a soft-bristle, dry brush or compressed air.
l Disconnect the charger from AC power by pulling the plug; not the cord.
l Use care when inserting battery. Do not "slam" or slide the battery into the pocket, this could damage the charger.
l Keep dirt and foreign objects out of the battery pocket. Do not short circuit any of the contacts in the battery pocket, this
could result in injury or property damage.
l Do not disassemble or perform modifications to the charger. There are no user serviceable components in the charger.
Lithium-Ion Battery Pack
l Dispose of used Li-Ion batteries according to the instructions for the type of battery.
l When not in use, lay the battery pack contact-side up in a protected environment.
l Do not store the Li-Ion battery pack in direct sunlight or anywhere the battery pack cannot cool down.
l If the Li-Ion battery pack is hot after removal from the Marathon, allow it to cool at room temperature or in a cool air
stream before placing it in the charger.
l Do not dispose of Li-Ion batteries into a fire. Burning will generate hazardous vapors and may cause the battery to
explode. Failure to observe this warning may result in injury from inhalation of vapors or burns from flying debris.
l Do not immerse Li-Ion batteries in water or any other liquid. If batteries are immersed, contact Honeywell.
l Do not disassemble or perform modifications to the battery. There are no user serviceable components in the battery.
l Do not place the Li-Ion battery into a pocket or toolbox with conductive objects (coins, keys, tools, etc.). A Li-Ion battery
placed on damp ground or grass could be electrically shorted.
l Do not store Li-Ion batteries above 140°F (60°C) for extended periods.
l Failure to observe these warnings could result in injury or damage to the battery from rapid discharge of energy or
battery overheating.
l Electrolyte Burns.Be careful when handling batteries. If a battery is broken or shows signs of leakage do not attempt to
charge it. Dispose of it! Lead and Nickel-based cells contain a chemical solution that burns skin, eyes, etc. Leakage
from cells is the only possible way for such exposure to occur. In this event, rinse the affected area thoroughly with
water. If the solution contacts the eyes, get immediate medical attention.
l Electrical Burns. Batteries are capable of delivering high currents when accidentally shorted. Accidental shorting can
occur when contact is made with jewelry, metal surfaces, conductive tools, etc., making the objects very hot. Never
place a charged battery in a pocket or case with keys, coins, or other metal objects.
1-2
Page 7
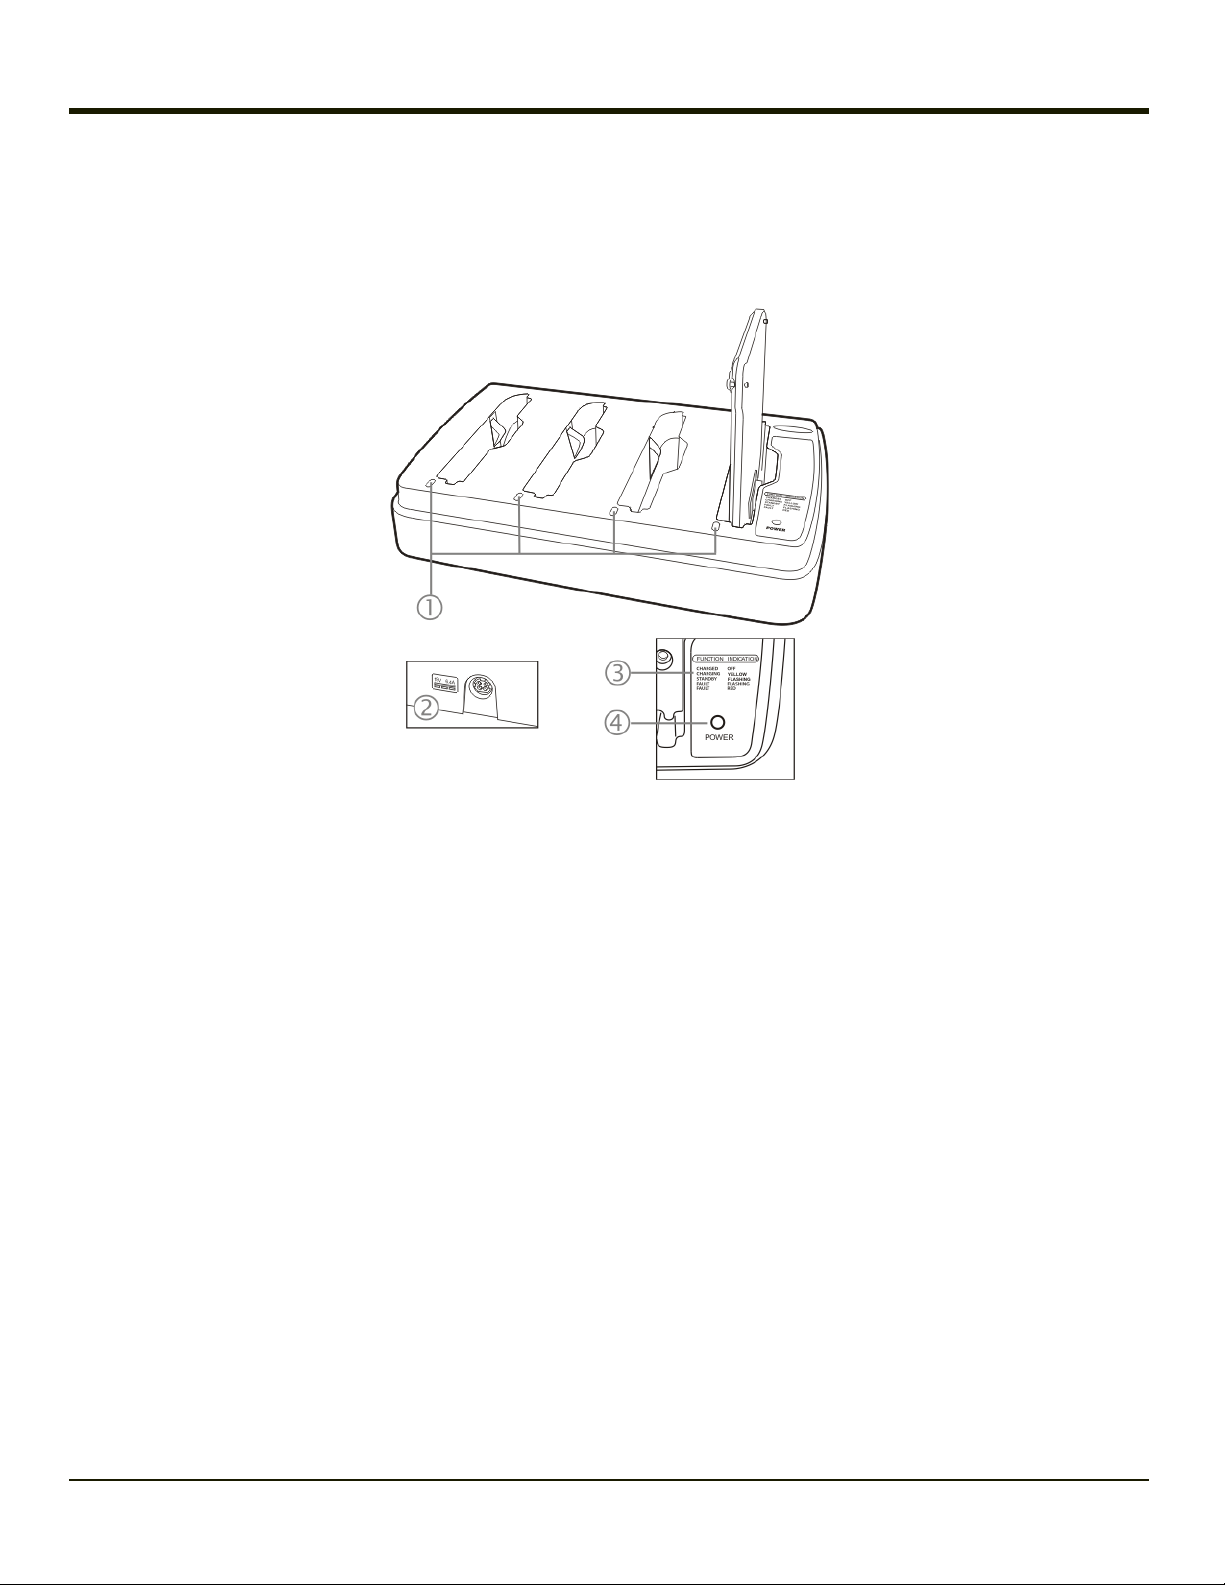
Components
Battery Charger
1. Charging Bay LED
2. Power Connector (Back of Charger)
3. LED Legend
4. Power Indicator
Mounting holes for table mounting are located in the bottom of the first and the fourth charging pocket. The mounting holes
require #10 / 4mm screws/washers or bolts/nuts (not supplied by Honeywell).
1-3
Page 8
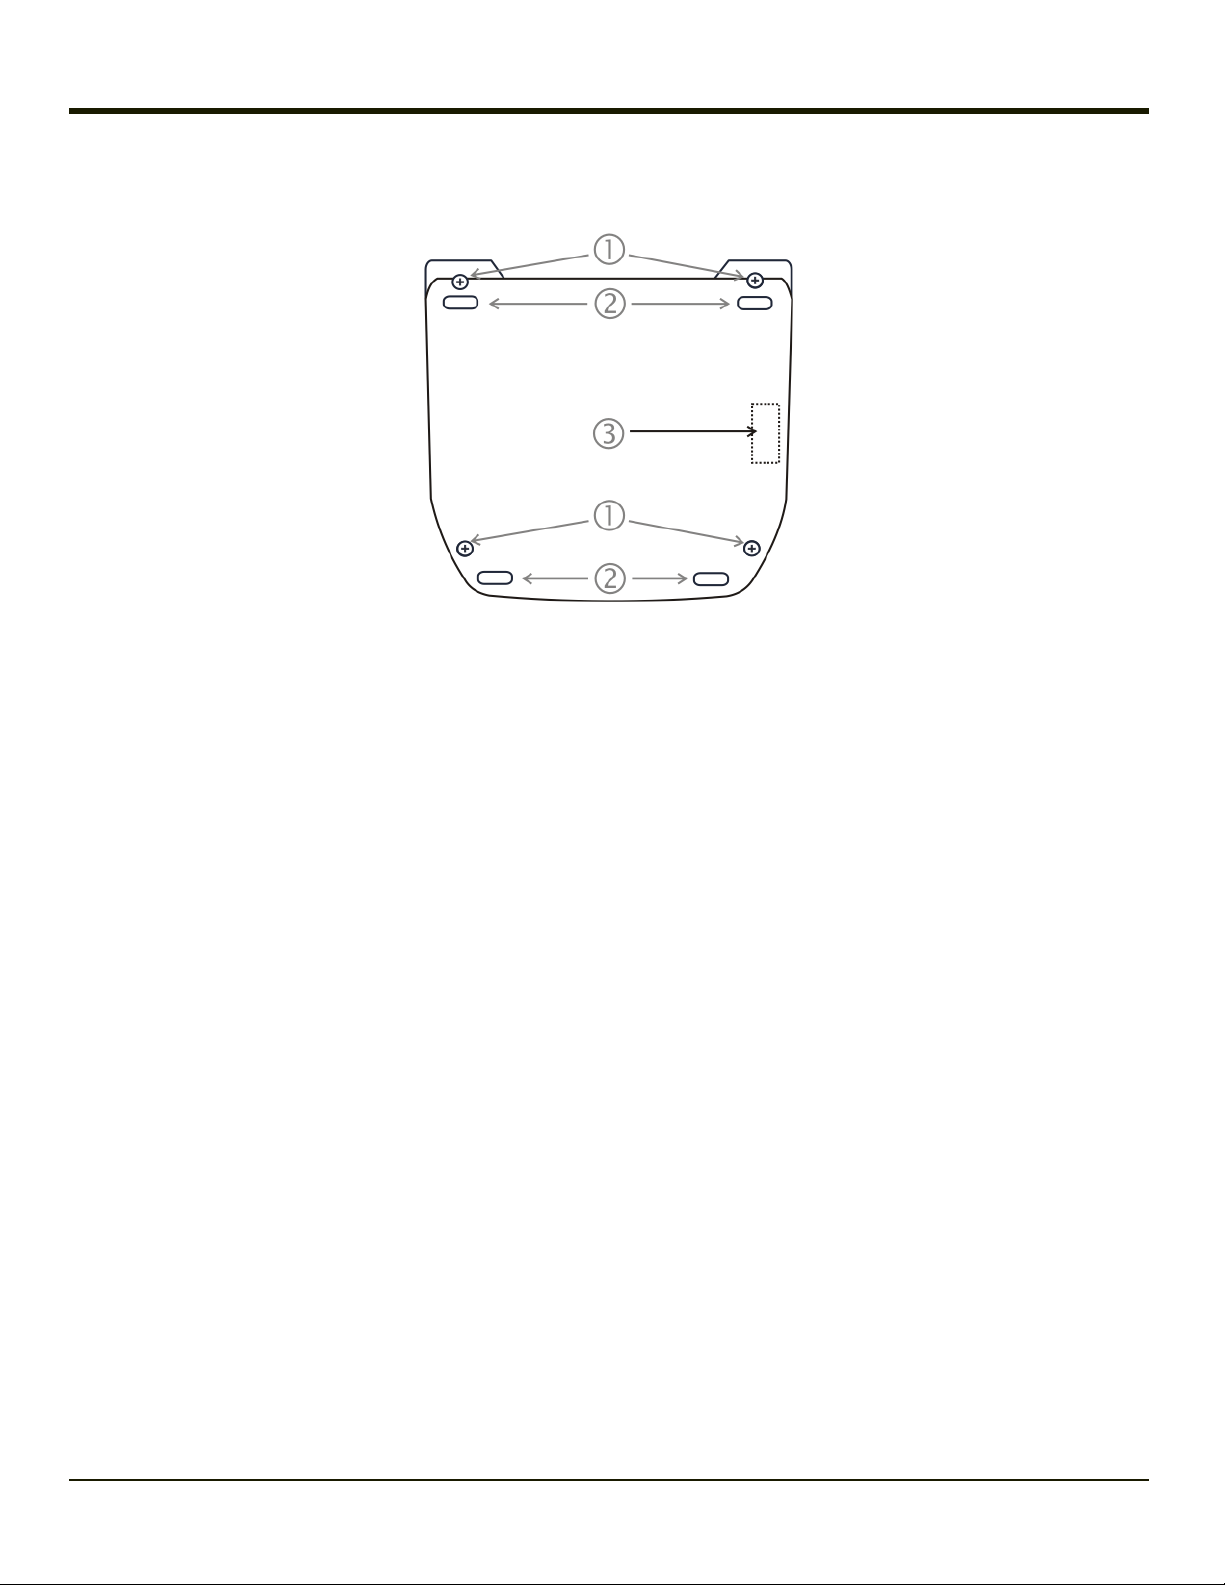
Extended Battery
1. Captive Screw
2. Rubber Foot
3. Battery Charging Terminals
The Marathon 42Whr Extended or 62Whr Extended batteries are physically identical except the 62Whr battery is thicker than
the 42Whr battery.
Please refer to the Marathon User's Guide for instruction when connecting and removing extended batteries.
1-4
Page 9

Installation
Assemble the Power Supply
Assemble the AC adapter for the Marathon Battery Charger before connecting it to the charger.
The AC power supply for the battery charger is shipped with the battery charger. Contact Technical Assistance if there is no
AC cable.
The battery charger power supply can be used with the Marathon battery charger and with the Marathon desktop dock.
1. AC Input Connector (US only)
2. Charger Power port end
l Plug the 3-prong end of the cable into an AC wall outlet.
l Firmly press the female end of the power cable into the male connector on the AC power adapter. An LED on the power
adapter illuminates when AC power is available.
l AC power is now being applied to the power adapter.
1-5
Page 10

Setup
Prerequisite: The AC Adapter is assembled and receiving AC power.
Place the battery charger on a flat, horizontal, hard surface or fasten securely to the surface using the openings on the bottom
of the first and fourth charging pocket. Allow space above and behind the battery charger to allow room to insert or remove
batteries and room to attach the AC adapter cable to the Power port.
Do not insert battery packs until the battery charger has finished powering up:
l Insert the power connector into the power outlet at the back of the battery charger.
l AC power is now being applied to the battery charger and it begins to power up.
l Charge pocket LEDs flash while the battery charger enters and exits the startup check.
l When the charge pocket LEDs are not illuminated, the battery charger is ready for use.
1-6
Page 11

Charging Batteries
New batteries should be charged fully before first use. The life and capacity of a Lithium Ion battery pack can vary
significantly depending on the discharge current and the environment in which it is used.
When a battery is placed in a charging pocket, the battery charger begins charging the battery. There is a slight delay while the
charger evaluates the condition of the battery (ambient temperature, remaining charge, etc.) before charging begins.
As with all batteries, expect to see a reduction in the total number of operations a fully charged battery pack can deliver as it
ages. When the battery reaches end of life (end-of-life occurs after 500 charge/discharge cycles) it must be replaced.
Battery packs do not need to be fully discharged between charge cycles.
While charging, the charger and battery pack will generate enough heat to feel warm. This is normal and does not indicate a
problem.
1-7
Page 12

Inserting a Battery into the Charging Pocket
Caution! It is important that battery packs are inserted into the charging pocket correctly. Inserting the battery incorrectly could
result in damage to the battery pack or the charger.
Caution! Do not “slam” the battery pack into the charging pocket. Damage may result.
When preparing the battery pack for insertion into the battery charging pocket, hold the battery with the battery charging
contacts in line with the charging contacts in the charging pocket.
Insert the battery into the charging pocket. As the battery charging contacts properly mate with the charging contacts in the
pocket, the retaining clip moves in and then out, restraining the battery in the charging pocket.
Remove the Battery from the Charging Pocket
If necessary, stabilize the charger with one hand before removing a battery from a charging pocket. Grasp the battery firmly
and pull it straight up and out of the charging pocket.
1-8
Page 13

Interpreting the Charging Pocket LEDs
The status of the charge operation is indicated by the color of the LED for each charging pocket.
YELLOW - on any charge pocket
l Continuous yellow means the battery pack is charging.
YELLOW FLASHING - on any charge pocket
l Standby, battery pack temperature is not within charging range.
RED Continuous - on any charge pocket
l Fault
l Momentary when battery is inserted.
RED FLASHING - on any charge pocket
l Battery pack fault or failure.
l Battery charger timeout period expiration
RED FLASHING - on all charge pockets
l Battery charger fault or failure.
NO LIGHT - on a charge pocket
l No battery in the charging pocket.
l Battery is charged and the battery charger is connected to an external power source.
l Battery charger is not connected to an external power source.
Charge Timer
Charge must complete within the safety timeout of 5.5 hours.
Power LED
Solid blue when battery charger is connected to an external power source.
1-9
Page 14

Battery Charger Help
The following is intended as an aid in determining whether the battery pack or the charger may be malfunctioning:
Problem Cause Solution
Check if the Marathon battery pack has Honeywell part
Battery pack does not
fit in charging pocket.
Different manufacturer's battery pack,
or there is an object in the charging
pocket.
number FX1381BATTERY/163877-0001 (42Whr) or
FX1382BATTERY/163878-0001 (62Whr) on the label. If
not, do not use.
Remove the object from the charging pocket.
No battery pack in
charger, but any of the
LEDs are on.
Charger is plugged into
a live outlet, battery
pack is inserted, but
RED LED is OFF and
no other LEDs are on,
or all LEDs are off.
Charger is plugged into
a live outlet, battery
pack is inserted, but
RED LED is OFF and
no other LEDs are on,
or all LEDs are off.
Charger is plugged into
a live outlet, battery
pack is inserted, but
RED LED is OFF and
no other LEDs are on,
or all LEDs are off.
Unplug charger from AC supply. Remove any dirt or foreign
Dirt or foreign objects are in the
charging pocket.
Battery pack is not making contact
with battery charge terminals in the
charging pocket.
Faulty battery pack. Replace battery pack.
New battery pack, same result. Contact Technical Assistance for replacement options.
objects from the charging pocket. If the LEDs continue to
remain ON, the charger may be defective. Return charger
to an authorized Honeywell service center.
Push battery pack in firmly. Do not "slam" the battery pack
into the charging pocket.
When you first put a
fully charged battery
pack in the charging
pocket, the RED LED
comes on, indicating
the battery pack is
charging.
LED is flashing RED at
any pocket.
LED is flashing RED at
any pocket.
1-10
During the first few minutes, the
battery charger checks the battery
pack for correct voltage and charge
state. During this time the LED is
RED and is continuously ON. After
charging is complete, the LED is
GREEN.
Current could not be sourced through
the battery pack due to age,
exhaustion or damage to the cell(s).
The battery pack does not
communicate with the charger.
The charger’s timeout period has
expired.
There is nothing wrong with the battery pack or charger.
Do not “top off” a fully charged battery pack by repeatedly
placing it in the charging pocket. The battery pack may
overheat and be damaged.
Contact Technical Assistance for battery pack replacement
options.
Make sure that the battery pack temperature is within
specification and retry charging. Contact Technical
Assistance if problem repeats, for battery pack
Page 15

Problem Cause Solution
replacement options.
LED is flashing RED at
any pocket.
Solid YELLOW /
AMBER LED when
battery pack is inserted
in the charging pocket.
The battery pack is too hot or too cold
to charge.
Contact Technical Assistance for battery pack replacement
options.
Remove battery pack from the charging pocket and allow it
to adjust to room temperature.
Note:
If the battery pack is left in the charging pocket, it will cool
down or warm to a temperature upon which the charger will
begin the charge cycle. However, depending on the
temperature of the battery, it may take 2-3 hours to adjust.
The cool-down / warm-up of a battery pack is much quicker
if the battery is not in the charging pocket.
1-11
Page 16

Charger Cleaning, Storage and Service
Cleaning
Unplug the charger from the power source before cleaning or removing debris from charging pockets.
Use only mild detergent with a slightly damp cloth to clean the outside of the charger. Do not use solvents or flammable
cleaners. Allow the case to dry fully before using again.
Do not allow cleaning agents of any kind to contact the charging contacts; they may be damaged. If necessary, clean them
with a soft-bristle, dry brush or compressed air.
Storage
Remove all batteries from the charging bays and disconnect AC power before placing the charger in storage. It should be
stored in a cool, dry place, protected from weather and airborne debris.
Battery packs should be kept in a cool, dry place whenever possible. Do not store battery packs in direct sunlight, on a metal
surface, or anywhere the battery pack cannot cool down. Do not leave the battery pack in a non-operating charger. The battery
pack may discharge through the charger rather than hold its charge.
Service
There are no user serviceable parts in the Rechargeable Lithium Ion Battery or the Charger. Contact Technical Assistance
should your charger require service.
1-12
Page 17

Battery Cleaning, Storage and Service
Cleaning
The battery pack should not require cleaning unless it has become heavily soiled. Old or damaged batteries should be disposed
of promptly and properly. The best way to dispose of used batteries is to recycle them. Battery recycling facilities recover the
Nickel, Lithium or Lead from old batteries to manufacture new batteries.
Use only mild detergent with a slightly damp cloth to clean the outside of the battery. Do not use solvents or flammable
cleaners. Allow the case to dry fully before using again.
Do not allow cleaning agents of any kind to contact the charging contacts; they may be damaged. If necessary, clean them
with a soft-bristle, dry brush or compressed air.
Storage
Battery packs should be stored, charging contact side up, in a cool dry place, protected from weather and airborne debris,
whenever possible.
Do not store battery packs in direct sunlight, on a metal surface, or anywhere the battery pack cannot cool down.
Do not leave the battery pack in a non-operating charger. The battery pack may discharge through the charger rather than hold
its charge.
Note: Battery packs may leak up to 1 mA current through the battery contacts when left in an unpowered charger pocket.
Service
There are no user serviceable parts in the Lithium Ion Battery Pack. Contact Technical Assistance for battery disposal and
replacement options.
1-13
Page 18

Technical Specifications
Electrical
Note: Battery packs may leak up to 1mA current through the battery contacts when left in an unpowered battery charger
charging pocket.
Parameter Minimum Maximum Note
Power Supply Input Voltage (V AC-IN) 100 VAC 240VAC Auto-switching
Power Supply Input Frequency (freq) 50Hz 60Hz
Power Supply Output Voltage 19VDC 6.32A
Temperature
Function Minimum Maximum Note
Operating
Battery Pack
Charging
Storage
0°C
(32°F)
10°C
(50°F)
-20°C (4°F)
Dimensions
Weight
Length 36 cm (14.2 in)
Width 21.2 cm (8.35 in)
Height 6.55 cm (2.58 in)
Plug Type IEC320/C14
Battery Charger: < 3.5 lbs (1.6 kg)(no batteries, no power connection)
Power Supply: < 1.875 lbs (.85 kg) with cables attached
+50°C
(120°F)
+45°C
(113°F)
+70°C
(160°F)
Battery packs will not begin charging when their internal temperature is outside this range.
Unit is off.
1-14
Page 19

Battery
Manufacturer LXE, Inc. (E344213)
FX1381BATTERY Type: Battery Pack Rechargeable 9 - Cell Lithium Ion Smart Battery Pack (3300 mAh @
163877-0001
163878-0001
42Whr Extended: Li-Ion battery with a 500 charge/discharge life cycle
62Whr Extended: Li-Ion battery with a 500 charge/discharge life cycle
11.1V, 42WHr)
Complies with UL2054
FX1382BATTERY Type: Battery Pack Rechargeable 9 - Cell Lithium Ion Smart Battery Pack (5640mAh @
11.1V, 62WHr)
Complies with UL2054
1-15
Page 20

1-16
Page 21

Chapter 2: Set up a Battery Maintenance Routine
Introduction
The Marathon uses a 42Whr Extended or 62Whr Extended battery. Minimum battery life is 500 charge/discharge cycles before
replacement.
Hand held devices and body worn devices use Lithium Ion (Li-Ion) main battery packs that are lightweight and relatively small.
Vehicle mounted mobile devices and vehicle mounted cradles/docks are powered by the vehicle battery.
Extending Battery Life
The life and capacity of a Lithium Ion battery pack can vary significantly depending on the discharge current and the
environment in which it is used. Li-Ion battery packs do not need to be fully discharged between charge cycles.
Regardless of the type of battery being used, following are suggestions for extending battery life:
l Immediately replace batteries in mobile devices with the appropriate, fully charged battery when equipment battery
warnings are issued, heard or displayed.
l Fully charge a new battery before using.
l Remove batteries from unused units or units that will be unused longer than a day.
l Place discharged batteries in a battery charger as soon as possible.
l Store batteries in locations that maintain an ambient temperature of approximately 25°C (77°F).
l Recycle defective, shorted or end-of-life batteries.
l Any Lithium-Ion battery that is over a year old is considered an old battery.
l Replace all batteries more than a year old with new batteries.
To determine the age of the battery, check the battery label that shows the manufacturer ship date. The ship date has the year
and the month that the battery was shipped. The first field (labeled 1-0) is the year the battery was shipped. The second field
(labeled J, F, M, A, etc.) is the month. So if the 8 and the F are punched out, the battery was shipped in February of 2008.
To determine the actual shipping date, use the serial number on the battery label to determine the ship date. Contact Technical
Assistance for help if needed.
Self-Discharge
Batteries should be stored at temperatures close to 25°C (77°F) because higher temperatures cause batteries to self discharge
faster than lower temperatures.
All batteries begin self-discharging after receiving a charge. The rate at which the battery self discharges depends on the
battery construction, temperature, initial capacity of the battery, and the amount of time that has passed since the battery was
charged.
Note: Temperatures significantly above 25ºC (77ºF) increase the self-discharge rate of all batteries.
2-1
Page 22

Peripheral Devices
Hand-held and vehicle mount devices have ports for the attachment of peripheral devices. A peripheral device might be a bar
code decoder, a bar code printer, a keyboard, a mouse or a monitor.
If the peripheral device does not have its own power source, and is designed to draw power from your Marathon battery, be
aware that the way you use the peripheral device affects the drain on your battery. Peripheral devices affect your battery life in
the following ways:
l The number of peripheral devices you use affects the drain on your batteries.
l The length of time you use peripheral devices affects the drain on your batteries. Using a peripheral device for 6 hours
per shift drains your batteries more than using a peripheral device for 4 hours per shift.
l Scanning bad bar code labels with your bar code decoder can increase the drain on your batteries significantly. You
should ensure that your bar code labels are in good condition to prevent unnecessary drain.
l Using a heater, if installed, greatly reduces battery life.
Wireless Bluetooth peripherals have their own power source.
2-2
Page 23

Maintenance Routine
Managing your batteries with a battery maintenance routine is intended to ensure:
l You get as much battery life as you can.
l You need fewer batteries per shift.
l Every shift has fully charged batteries.
l There is a battery slot on the charger for each battery at the end of every shift.
l All unused batteries are placed in a charger at the end of every shift.
As with all batteries, expect to see a reduction in the total number of operations a fully charged battery pack can deliver as it
ages. When the battery reaches end-of-life, it must be replaced.
Note: It is not necessary to place unused spare batteries in chargers; lay the battery pack contact-side up in a protected
environment.
Label the Batteries
Label batteries with an identification number, symbol, or color. Base the identification scheme on the type of equipment that
uses the battery, the type of battery (NiCd, Li-Ion) and, if necessary, the specific charger that accepts the battery type.
The outside of the battery charger may look the same, but the internal programming and algorithms, as well as the charger cup
configuration, are the factors that determine the type of battery that can be maintained in each particular battery
charger/analyzer.
Place a blank label, such as a mailing label, on the battery for recording the date and capacity reading (spare batteries too). Do
not cover the battery’s charging terminals with the label.
Note: You may use a log sheet instead of a label for tracking capacity readings. However, the labels ensure that the
necessary information concerning each battery is always with that battery.
2-3
Page 24

A Simple Battery Usage Routine
A color coding routine used for a large or small operation that uses the same kind of battery in all mobile devices:
1. Color code all batteries by shift:
1. Shift 1 Blue
2. Shift 2 Red
3. Shift 3 Green
2. Charge all batteries according to color. For example, all blue coded batteries should be charged during shifts 2 and 3.
3. Users place all used batteries into battery chargers at the end of every shift.
4. Track battery capacity readings by recording the date of last charge for each battery on the label (or log sheet).
Sample Log for Battery Maintenance
Marathon Extended Battery
Charger (MarathonBattery Charger)
Charger Identification (Serial Number)
Placed in Service (Date)
Battery Type Lithium Ion
Power Source AC power adapter
Battery Serial Number / Mfr Date on Battery Shift Date Charged
2-4
Page 25

Chapter 3: Technical Assistance
If you need assistance installing or troubleshooting your device, please contact us by using one of the methods below:
Knowledge Base: www.hsmknowledgebase.com
Our Knowledge Base provides thousands of immediate solutions. If the Knowledge Base cannot help, our Technical Support
Portal (see below) provides an easy way to report your problem or ask your question.
Technical Support Portal: www.hsmsupportportal.com
The Technical Support Portal not only allows you to report your problem, but it also provides immediate solutions to your
technical issues by searching our Knowledge Base. With the Portal, you can submit and track your questions online and send
and receive attachments.
Web form: www.hsmcontactsupport.com
You can contact our technical support team directly by filling out our online support form. Enter your contact details and the
description of the question/problem.
Telephone: www.honeywellaidc.com/locations
For our latest contact information, please check our website at the link above.
Product Service and Repair
Honeywell International Inc. provides service for all of its products through service centers throughout the world. To obtain
warranty or non-warranty service, please visit www.honeywellaidc.comand select Support > Contact Service and Repair
to see your region’s instructions on how to obtain a Return Material Authorization number (RMA #). You should do this prior to
returning the product.
Limited Warranty
Honeywell International Inc. ("HII") warrants its products to be free from defects in materials and workmanship and to conform
to HII’s published specifications applicable to the products purchased at the time of shipment. This warranty does not cover
any HII product which is (i) improperly installed or used; (ii) damaged by accident or negligence, including failure to follow the
proper maintenance, service, and cleaning schedule; or (iii) damaged as a result of (A) modification or alteration by the
purchaser or other party, (B) excessive voltage or current supplied to or drawn from the interface connections, (C) static
electricity or electro-static discharge, (D) operation under conditions beyond the specified operating parameters, or (E) repair or
service of the product by anyone other than HII or its authorized representatives.
This warranty shall extend from the time of shipment for the duration published by HII for the product at the time of purchase
("Warranty Period"). Any defective product must be returned (at purchaser’s expense) during the Warranty Period to HII factory
or authorized service center for inspection. No product will be accepted by HII without a Return Materials Authorization, which
may be obtained by contacting HII. In the event that the product is returned to HII or its authorized service center within the
Warranty Period and HII determines to its satisfaction that the product is defective due to defects in materials or workmanship,
HII, at its sole option, will either repair or replace the product without charge, except for return shipping to HII.
EXCEPT AS MAY BE OTHERWISE PROVIDED BY APPLICABLE LAW, THE FOREGOING WARRANTY IS IN LIEU OF
ALL OTHER COVENANTS OR WARRANTIES, EITHER EXPRESSED OR IMPLIED, ORAL OR WRITTEN, INCLUDING,
WITHOUT LIMITATION, ANY IMPLIED WARRANTIES OF MERCHANTABILITY OR FITNESS FOR A PARTICULAR
PURPOSE, OR NON-INFRINGEMENT.
HII’S RESPONSIBILITY AND PURCHASER’S EXCLUSIVE REMEDY UNDER THIS WARRANTY IS LIMITED TO THE
REPAIR OR REPLACEMENT OF THE DEFECTIVE PRODUCT WITH NEW OR REFURBISHED PARTS. IN NO EVENT
3-1
Page 26

SHALL HII BE LIABLE FOR INDIRECT, INCIDENTAL, OR CONSEQUENTIAL DAMAGES, AND, IN NO EVENT, SHALL
ANY LIABILITY OF HII ARISING IN CONNECTION WITH ANY PRODUCT SOLD HEREUNDER (WHETHER SUCH
LIABILITY ARISES FROM A CLAIM BASED ON CONTRACT, WARRANTY, TORT, OR OTHERWISE) EXCEED THE
ACTUAL AMOUNT PAID TO HII FOR THE PRODUCT. THESE LIMITATIONS ON LIABILITY SHALL REMAIN IN FULL
FORCE AND EFFECT EVEN WHEN HII MAY HAVE BEEN ADVISED OF THE POSSIBILITY OF SUCH INJURIES,
LOSSES, OR DAMAGES. SOME STATES, PROVINCES, OR COUNTRIES DO NOT ALLOW THE EXCLUSION OR
LIMITATIONS OF INCIDENTAL OR CONSEQUENTIAL DAMAGES, SO THE ABOVE LIMITATION OR EXCLUSION MAY
NOT APPLY TO YOU.
All provisions of this Limited Warranty are separate and severable, which means that if any provision is held invalid and
unenforceable, such determination shall not affect the validity of enforceability of the other provisions hereof. Use of any
peripherals not provided by the manufacturer may result in damage not covered by this warranty. This includes but is not
limited to: cables, power supplies, cradles, and docking stations. HII extends these warranties only to the first end-users of the
products. These warranties are non-transferable.
The duration of the limited warranty for the Marathon is 2 years.
The duration of the limited warranty for the Marathon Desktop Dock is 1 year.
The duration of the limited warranty for the Marathon Vehicle Dock is 1 year.
The duration of the limited warranty for the Marathon2D Imager Add-on is 1 year.
The duration of the limited warranty for the MarathonMagnetic Stripe Reader Add-on is 1 year.
The duration of the limited warranty for the MarathonBattery Charger is 1 year.
The duration of the limited warranty for the Marathon 3300mAh Li-Ion and 5640mAh Li-Ion Extended Battery is 6 months.
The duration of the limited warranty for the Marathon Main Battery is 6 months.
The duration of the limited warranty for the MarathonAC power supply and cables is 1 year.
The duration of the limited warranty for the MarathonDC-DC Converter and cable is 1 year.
The duration of the limited warranty for the Marathoncables (USB, Serial, Communication, Power) is 1 year.
3-2
Page 27

3-3
Page 28

Honeywell Scanning & Mobility
9680 Old Bailes Road
Fort Mill, SC 29707
www.honeywellaidc.com
E-EQ-MARATHONCHGROG
Rev E
10/12
 Loading...