

HPW2P1 WDR 1080P Pin-hole Camera
Quick Installation Guide
Thank you for purchasing a Honey well Perfor mance Series IP camera.
Follow the instructions in this guide to install and log in to your camera.
For instructions on configuring the camera, refer to the Performa nce
Series IP Cameras User Guide on the installation CD that came with your
camera.
If you require additional assistance, contact Tech Support (contact info
is listed on the back page).
Cautions and Warnings
WARNING
To ensure compliance with electrical safety standards, this product is intended
for use with a Listed Power Adapter marked “Limited Power Sou rce” or “LPS” on
the unit, output rated to 12 VDC, minimum 0.33 A, TMA=60 deg C, or from Power
over Ethernet (PoE) provided by Listed Information Technology Equipment
meeting IEEE 802.3af PoE standar d.
WARNING
The Ethern et connection is not inten ded to be connected to exposed (outside
plant) networks. Do not connect two power sources to the camera at the same
time.
CAUTION
Invisible LED radiation (850 nm). Avoid exposure to beam.
Important Safeguards
• Read and keep these instructions.
• Do not aim the camera toward a bright light source for extended periods to prevent damage to
the imager. Avoid operating the unit under or close to unstable light sources (may cause
flickering), or close to fluorescent lamps or objects reflecting light.
• Do not touch the camera lens.
• Do not drop the camera or subject it to physical shock.
• Do not use a strong or abrasive detergent when cleaning the camera.
• Avoid opera ting or storing the uni t in extremely humid, d usty, hot/cold envi ronments, where
the operating temperature is outside the recommended range of -22°F to 140°F (–30°C to
60°C).
Note
Do not apply power to t he camera before completing installation.
Confirm the installation surface can support at least three times the weight of the
camera.
Before You Begin
Before you begin, check that you have received all of the parts listed below. If any parts are missing
or damaged, contact your dealer immediately.
• Camera
• Installation CD
• Quick installation guide
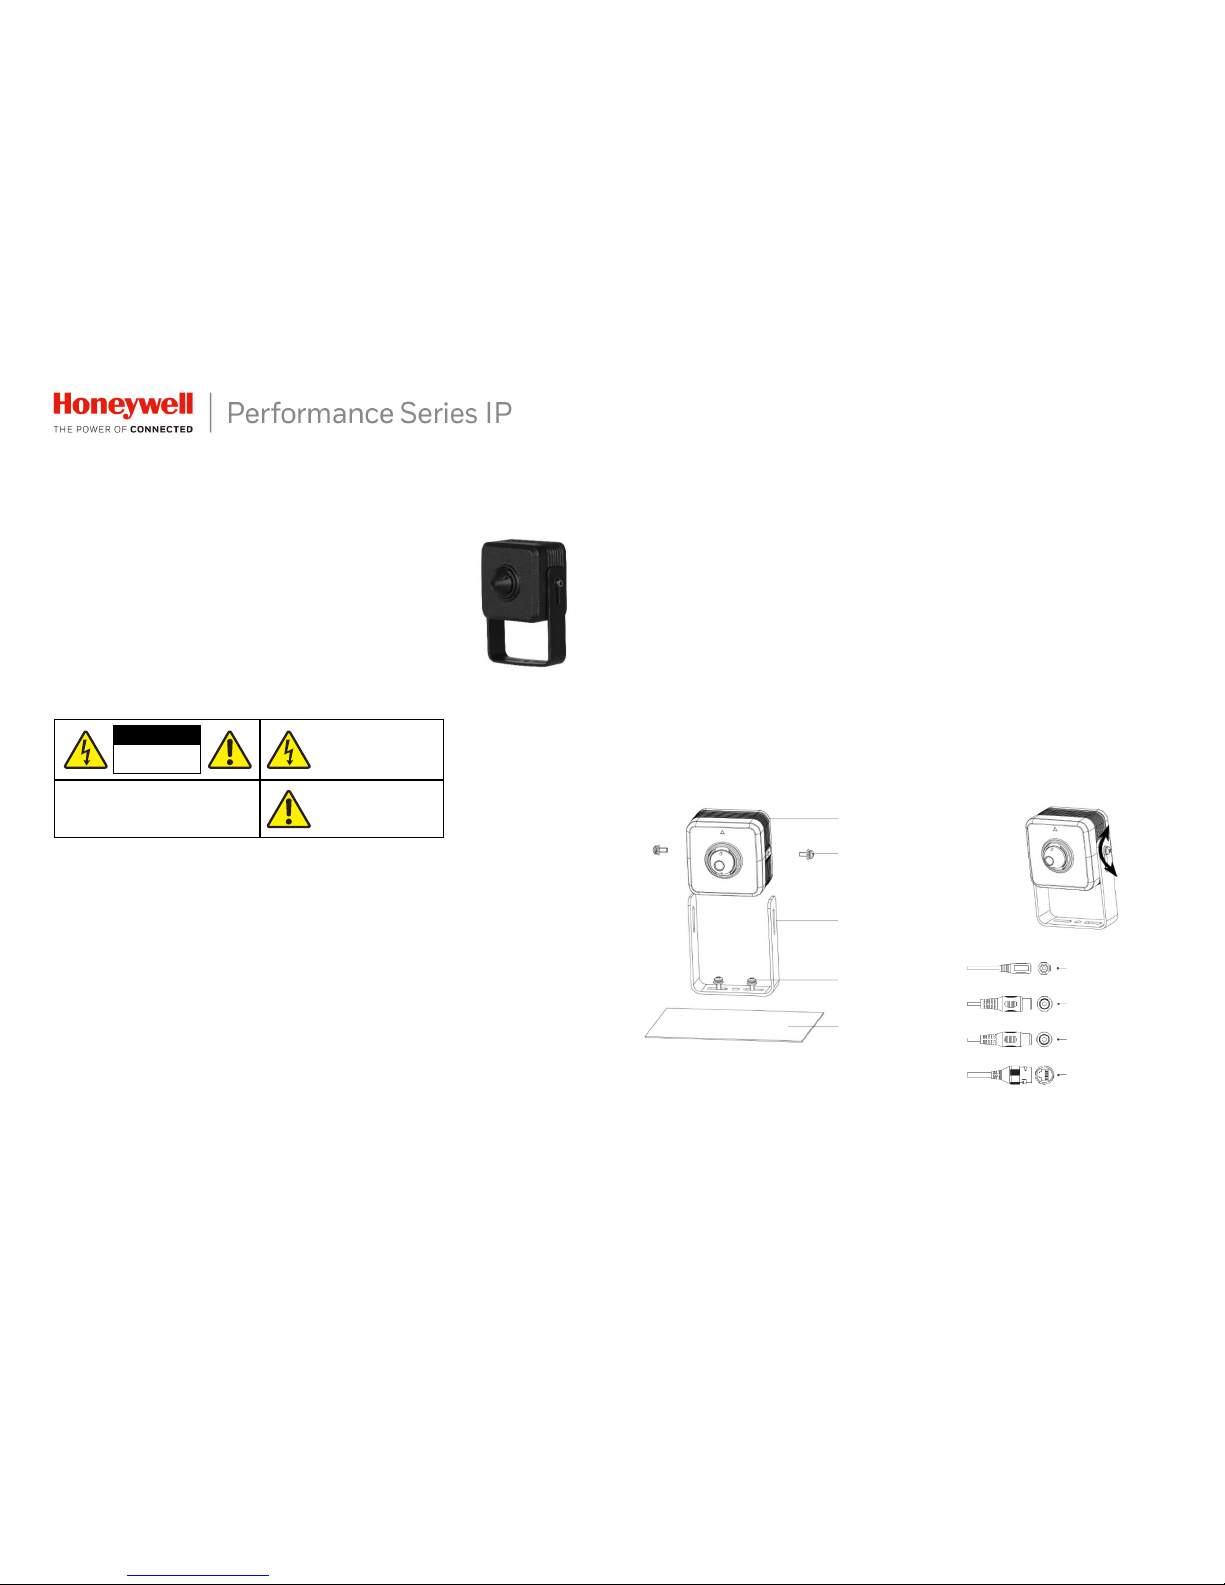
Preparing the Mounting Surface and Mounting the Camera
Inspect the site where you want to install the camera. The mounting surface must be flat and
capable of supporting at least three times the weight of the camera.
1. Install the camera together with the bracket on the mounting surface and secure the
installation screws firmly.
2. Connect the came ra’s connectors to power, network and a udio in/out.
3. Adjust the camera ang le and tighten the adj usting screws.
Logging On to the Camera
If the came ra is connected to t he PoE port of a Honeywell Embedded NVR, you can log on to t he
camera directly from the NVR.
CAUTION
THIS SYMBOL INDICATES THAT
DANGEROUS VOLTAGE
CONSTITUTING A RISK OF
ELECTRIC SHOCK IS PRESENT
WITHIN THE UNIT.
CAUTION: TO REDUCE THE RISK OF ELECTRIC
SHOCK, DO NOT REMOVE THE COVER.
NO USER-SERVICEABLE PARTS INSIDE.
REFER SERVICING TO QUALIFIED SERVICE
PERSONNEL.
THIS SYMBOL INDICATES THAT
IMPORTANT OPERATING AND
MAINTENANCE INSTRUCTIONS
ACCOMPANY THIS UNIT.
RISK OF ELECTRIC
SHOCK
DO NOT OPEN
Camera body
Adjusting s
crews
Bracket
Mounting s
crews
(
not included)
Mounting s urface
Power 12 VDC
Audio In
(Yellow) A u
dio Out
Network
© 2018 Honeywell International Inc. All rights reserved. No part of this publication may be reproduced by any means without written permission from Honeywell. The information in this publication is believed to be accurate in all respects. However, Honeywell
cannot assume responsibility for any consequences resulting from the use thereof. The information contained herein is subject to change without notice. Revisions or new additions to this publication may be issued to incorporate such changes.
To log on to the camer a from a PC, install the Honeywell Config Tool from the installation CD. Use
the Config Tool to discover the ca mera and open the camera’s webpage. Log on to the camera as
the admin user. The default user name is admin (c ase-sensitive) and the default password is 1234.
Note
•
Be sure to remember the password of the camera. If the password is lost, the
camera may need to be sent back to the factory for recovery.
• Only Internet Explorer 11 (or later) is supported.
• IP address of the device is assigned automatically by DHCP server. If the DHCP
server is not available, the device will acquire 192.168.1.108 as the default IP
address.
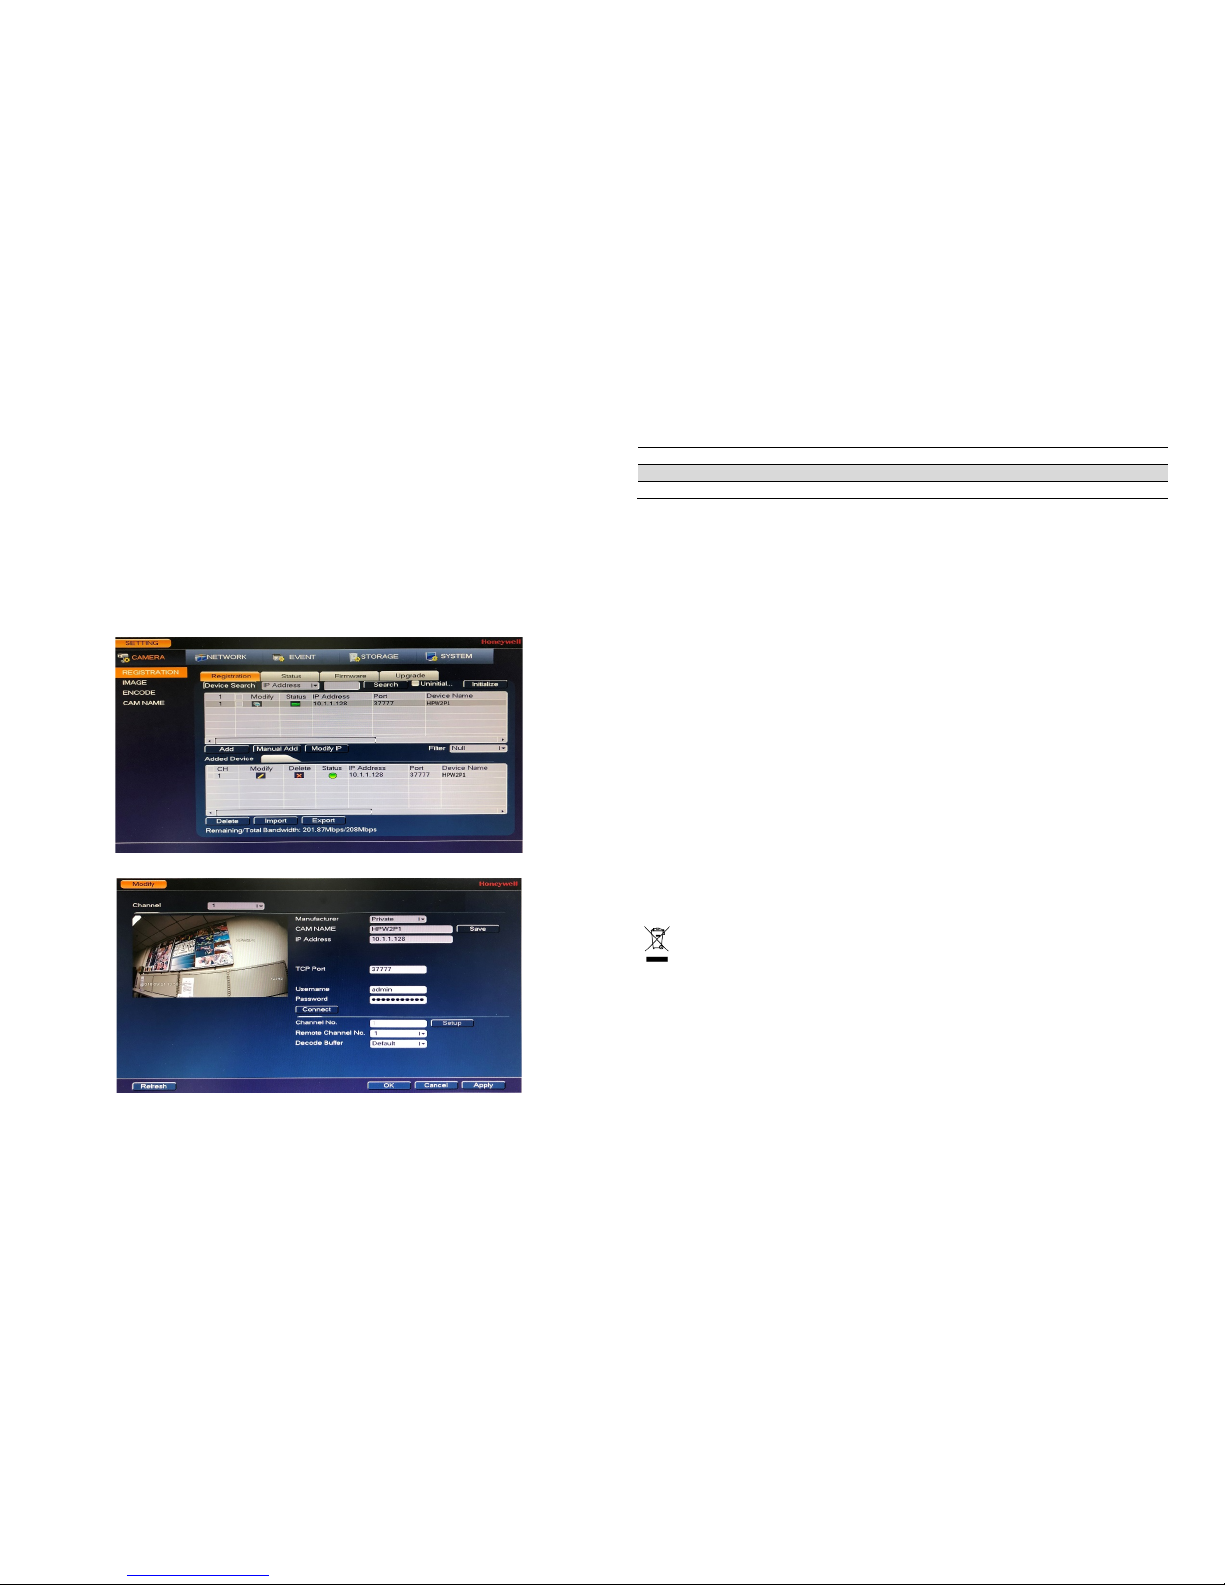
1. Power up the camera. To add the camera to NVR, right-click the live window on t he main
screen of NVR
Registr ation.
2. Click Device Search. Check t he camera o n Device Sea rch panel and clic k Add.
3. Click Modify icon on Added Device panel.
4. Select manufacturer as “Private” and enter the password.
Recommended Recorders
HEN*4
8/16/32/64- channel Focus 4K NVRs (H.264 and H.265)
HEN*3 4/8/16/32- channel Performance Series NVR s (H.264 and H.265)
HEN*2 4/8/16-channel P erformance Series NVRs (H.26 4)
Regulatory Statements
FCC Compliance
This equipment has been tested and found to comply with the limits for a Class B dig ital device, pursuant
to part 15 of the FCC Rules. T hese limits are designed to provide reasonable protection ag ainst harmful
interference in a residential installation. This equipme nt generates, uses, and can radiate radio frequency
energy and, if not installed and use d in accordance with the instructions, may cause har mful interference
to radio communications. However, the re is no guarantee that interference will not oc cur in a particular
installation.
If this equipment does cause har mful interference to radio or television reception, which can be
determined by turning the equipmen t off and on, the user is encouraged to try to corre ct the interference
by one or more of the following me asures:
• Reorient or relocate the rec eiving antenna.
• Increase the separation between the equipment and receiver.
• Connect the equipment int o an outlet on a circuit different from that to whic h the receiver is
connected.
• Consult the dealer or an experienced radio/TV technician for help.
Note
Changes or modifications not e xpressly approved by the party responsible for compli ance
could void the user’s authority to op erate the equipment.
This Cl ass B digital ap paratus complies with Can adian ICES-003.
Manufacturer’ s Declaration of Confor mance
North America T he equipment supplied with this guide conforms to U L 60950-1 and CSA C2 2.2 No.
60950-1.
Europe The m anufacturer declares that the equipment supplied is c ompliant with the European
Parliament and Council Directive on the restriction of the use of certain hazardous substa nces in
electrical and electronic equipment ( 2011/65/EU), General Product Safety Di rective (2001/ 95/EC), and
the essential requirements of the EMC directive (2014/30/EU), conforming to the require ments of
standards EN 55032 for emissions , EN 50130-4 for immunity, and EN 62368-1 for elec trical equipment
safety.
WEEE (Waste El ectrical and Electronic Equipment)
Correct disposal of this product ( applicable in the European Union and other European
countries with separate collection sy stems). This product should be disposed of, at the end of
its useful life, as per applicable local laws, regulations, and procedures .
Honeywell
2700 Blankenbaker Pkwy, Suite 150
Louisville, KY, 40299, USA
www.honeywell.c om/security
+1 800 323 4576
(North A merica o nly)
Aston Fie lds Road, Whitehouse Industrial
Estate R uncorn, Cheshi re, WA7 3DL, UK
www.honeywell.com/security/uk
+1 44 (0) 1928 754 028
(Europe o nly)
Building #1, 555 H uanke Road , Zhang J iang Hi-T ech
Park, Pudong New Area, Shanghai, 2012 03, China
www.asia.security.honeywell.com
+400 840 2233
(Asia Pacific only)
Document 800-24590 – Rev B – 08/2018
 Loading...