

Page 1
19-inch LCD Monitor
HMLCD19
User Manual
Video Systems
www.honeywellvideo.com
1-800-796-CCTV
© 2004 Honeywell International Inc.
All rights reserved. No part of this publication may be reproduced by any means
without written permission from Honeywell Video Systems. The information in
this publication is believed to be accurate in all respects. However, Honeywell
Video Systems cannot assume responsibility for any consequences resulting
from the use thereof. The information contained herein is subject to change
without notice. Revisions or new editions to this publication may be issued to
incorporate such changes.
HMMU000882 – 04/04 – Rev. A
Page 2
ISSUE DATE REVISIONS
SECTION 5:
SPECIFICATIONS
A April 2004 Initial Release (PCN 1632)
Type TFT Color LCD
Screen Size
Signal RGB Analog PC Input
Type 15-Pin D-Sub
Sync
Display Color 16,777,216 (24 bit)
Resolution 1280 x 1024 @ 75Hz
Video Band Width 162MHz Max
OSD Controls PICTURE (Auto Adjustment, Horizontal
Power Management As per VESA standard
Power Consumption 48W (max)
Plug & Play VESA DDC1/2B
Speaker
Tilt U/D 15° / 3°
Dimensions (W x H x D) 17.4 x 17.8 x 7.8 inches
Specifications are subject to change without prior notice for product
improvements. Actual specifications may vary depending on features
and components.
H-Freq
V-Freq
Operating 32°F to 104°F (0°C to 40°C) Temperature
Storage 14°F to 122°F (-10°C to 50°C)
Operating 30% ~ 80% (Non-condensing) Humidity
Storage 5% ~ 90% (Non-condensing)
19” (diagonal)
~80KHz
31.5
56~75Hz
Position, Vertical Position, Horizontal Size,
Phase, DOS/Graphic), COLOR (Auto
Adjustment, Brightness, Contrast,
Temperature); OSD (Horizontal Position,
Vertical Position, Timeout, Transparency,
Language), Factory Preset, Information,
Volume, Balance, Treble, Bass, Mute,
INPUT SELECT (Analog, Digital, S-Video,
Video), VIDEO (Sharpness, Brightness,
Contrast, Color, Hue)
2W × 2Ea.
(443 x 451 x 198 mm)
Rev. A ii HMMU000882
04/09/04
Rev. A 21 HMMU000882
04/09/04
Page 3

4.4 LIMITED WARRANTY
Honeywell International Inc. ("Seller"), 1305 Waters Ridge Drive, Lewisville, TX 75057,
warrants this monitor to be in conformance with its own plans and specifications and to
be free from defects in materials and workmanship under normal use and service for a
period of up to one (1) year from the date of manufacture. Seller's obligation shall be
limited to repairing or replacing, at its option, free of charge for materials or labor, any
product which is proved not in compliance with Seller's specifications or proves
defective in materials or workmanship under normal use and service. Seller shall have
no obligation under this Limited Warranty or otherwise if the product is altered or
improperly repaired or serviced by anyone other than Honeywell factory service. For
warranty service, return product transportation prepaid, to Honeywell Video Systems
Factory Service, 1305 Waters Ridge Drive, Lewisville, TX 75057.
THERE ARE NO WARRANTIES, EXPRESS OR IMPLIED, OF MERCHANTABILITY, OR
FITNESS FOR A PARTICULAR PURPOSE OR OTHERWISE, WHICH EXTEND BEYOND
THE DESCRIPTION ON THE FACE HEREOF. IN NO CASE SHALL SELLER BE LIABLE
TO ANYONE FOR ANY CONSEQUENTIAL OR INCIDENTAL DAMAGES FOR BREACH
OF THIS OR ANY OTHER WARRANTY, EXPRESS OR IMPLIED, OR UPON ANY OTHER
BASIS OF LIABILITY WHATSOEVER, EVEN IF THE LOSS OR DAMAGE IS CAUSED BY
THE SELLER'S OWN NEGLIGENCE OR FAULT.
Seller does not represent that the products it sells may not be compromised or
circumvented; that the products will prevent any personal injury or property loss by
burglary, robbery, fire or otherwise; or that the products will in all cases provide
adequate warning or protection. Customer understands that a properly installed and
maintained alarm may only reduce the risk of a burglary, robbery, fire or other events
occurring without providing an alarm, but it is not insurance or a guarantee that such will
not occur or that there will be no personal injury or property loss as a result.
CONSEQUENTLY, SELLER SHALL HAVE NO LIABILITY FOR ANY PERSONAL INJURY,
PROPERTY DAMAGE OR OTHER LOSS BASED ON A CLAIM THE PRODUCT FAILED
TO GIVE WARNING. HOWEVER, IF SELLER IS HELD LIABLE, WHETHER DIRECTLY OR
INDIRECTLY, FOR ANY LOSS OR DAMAGE ARISING UNDER THIS LIMITED
WARRANTY OR OTHERWISE, REGARDLESS OF CAUSE OR ORIGIN, SELLER'S
MAXIMUM LIABILITY SHALL NOT IN ANY CASE EXCEED THE PURCHASE PRICE OF
THE PRODUCT, WHICH SHALL BE THE COMPLETE AND EXCLUSIVE REMEDY
AGAINST SELLER. This warranty replaces any previous warranties and is the only
warranty made by Seller on this product. No increase or alteration, written or verbal, of
the obligations of this Limited Warranty is authorized.
FCC COMPLIANCE STATEMENT
INFORMATION TO THE USER: This equipment has been
tested and found to comply with the limits for a Class A digital
device, pursuant to Part 15 of the FCC rules. These limits are
designed to provide reasonable protection against harmful
interference when the equipment is operated in a commercial
environment. This equipment generates, uses, and can radiate
radio frequency energy and, if not installed and used in
accordance with the instruction manual, may cause harmful
interference to radio communications. Operation of this
equipment in a residential area is likely to cause harmful
interference in which case the user will be required to correct
the interference at his own expense.
CAUTION: Changes or modifications not expressly approved
by the party responsible for compliance could void the user’s
authority to operate the equipment.
This Class A digital apparatus complies with Canadian ICES-003.
Cet appareil numérique de la Classe A est conforme à la norme
NMB-003 du Canada.
Rev. A 20 HMMU000882
04/09/04
Rev. A iii HMMU000882
04/09/04
Page 4
SECTION 4:
TROUBLESHOOTING AND MAINTENANCE
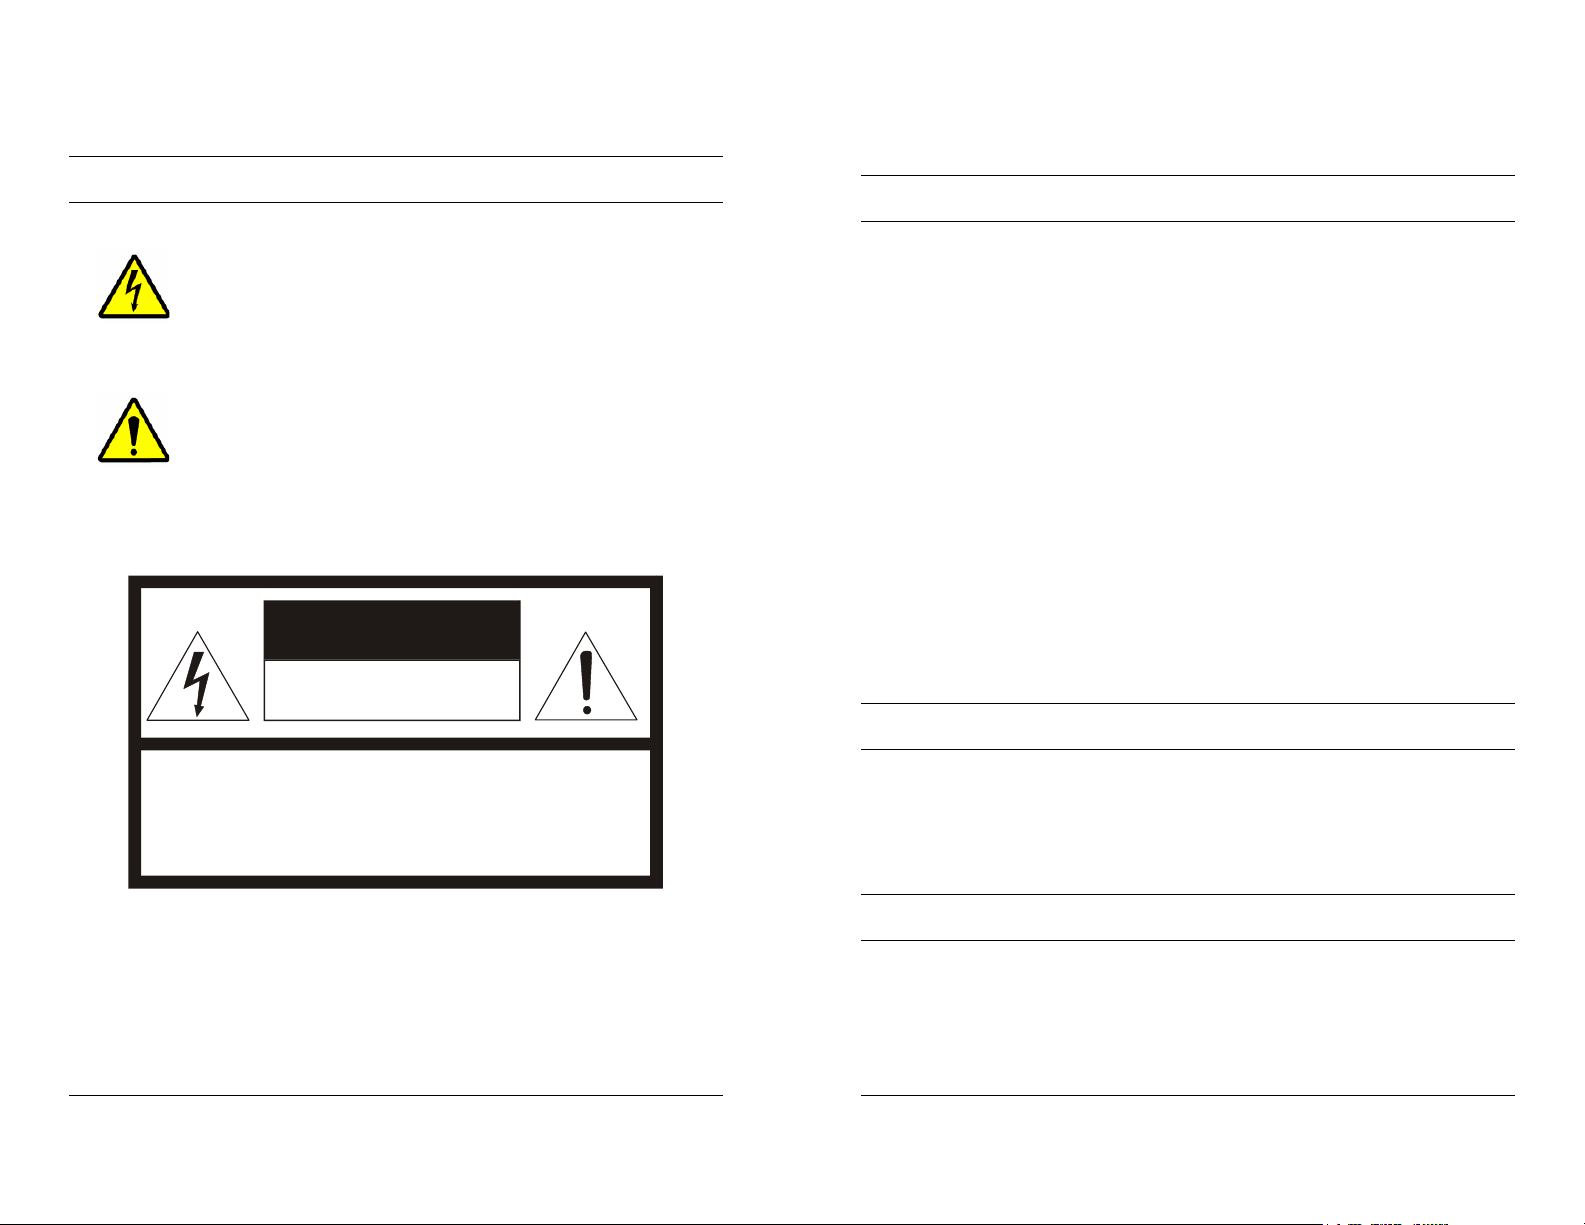
EXPLANATION OF GRAPHICAL SYMBOLS
The lightning flash with arrowhead symbol within an
equilateral triangle is intended to alert the user to the
presence of uninsulated "dangerous voltage" within the
product's enclosure that may be of sufficient magnitude
to constitute a risk of electric shock to persons.
The exclamation point within an equilateral triangle is
intended to alert the user to the presence of important
operating and maintenance (servicing) instruction in the
literature accompanying the product.
CAUTION
RISK OF ELECTRIC SHOCK
DO NOT OPEN
4.1 TROUBLESHOOTING
No Power
• Make sure the Power cable is plugged to the wall and the
back of the monitor.
• Make sure that the Power button on the front of the monitor
is turned ON. Press the Power button firmly to turn the
power OFF, then again to turn it ON.
Poor Picture Quality
If the quality of the picture is poor and cannot be improved by
making adjustments on the front control panel, inspect all
system connections and cable runs.
4.2 MAINTENANCE
CAUTION: TO REDUCE THE RISK OF ELECTRIC SHOCK,
DO NOT REMOVE COVER (OR BACK).
To reduce the risk of electrical shock, do not remove the cover
or back of monitor. No user-serviceable parts are inside.
NO USER-SERVICEABLE PARTS INSIDE.
REFER SERVICING TO QUALIFIED SERVICE PERSONNEL.
Rev. A iv HMMU000882
04/09/04
4.3 SERVICE AND SUPPORT
Rev. A 19 HMMU000882
04/09/04
Refer servicing to qualified personnel or contact the Technical
Support at 1-800-796-CCTV for assistance.
Page 5
H
3.4 GETTING OPTIMAL PICTURE
Step 1: Window’s background or “H” character should be displayed
on your screen.
Step 2: Adjust the screen to the center of the Display (LCD) by using
the top and bottom display controls and the V-Position Adjust
menu.
WARNINGS
• Installation and servicing should be performed only by
qualified and experienced personnel.
TO PREVENT FIRE OR SHOCK HAZARD, DO NOT
EXPOSE THIS PRODUCT TO RAIN OR MOISTURE.
Step 3: Adjust the screen to the center of the Display (LCD) by using
the right and left display controls and the Horizontal size and
H=Position Adjust menu.
Step 4: Adjust the phase until the “H” character displays clearly.
Step 5: Using the Contrast, Brightness, and Color options,
set the color.
Step 6: When finished adjusting, save the settings by pressing
the Exit key.
SAFEGUARDS
This product is made with consideration of the maximum safety of
users. However, in order to prevent all possible accidents and financial
lost, the monitor must be installed in the appropriate environment.
Read instructions and follow all safeguards.
POWER WARNINGS
1. Insert the power plug completely into the socket and verify that it is
inserted well. An unstable connection can cause fire.
2. Do not use a damaged power cable or plug or a loose socket.
Doing so may cause electric shock or fire.
3. Do not touch the plug with wet hands. Doing so may cause
electric shock or fire.
4. Do not overload the socket by using it for several devices at the
same time. Doing so may cause a fire.
ENVIRONMENT/INSTALLATION WARNINGS
1. Do not install the unit in an extremely hot or humid location, or in a
place subject to dust or mechanical vibration. Do not install in
locations with oil or smoke or inside vehicles. The unit is not
designed to be waterproof. Exposure to rain or water may damage
the unit. Do not use this unit near water or in an unprotected
outdoor installation, or any area which is classified as a wet
location.
Rev. A 18 HMMU000882
04/09/04
Rev. A v HMMU000882
04/09/04
Page 6

SAFEGUARDS, CONTINUED
3.3 ON-SCREEN DISPLAY (OSD) CONTROL
PROCEDURE, CONTINUED
ENVIRONMENT/INSTALLATION WARNINGS
2. Do not place candlelight, mosquito coils, or cigarettes on top of the
monitor or install it close to heating appliances. Doing so may
damage the product or create a fire danger. The product should
be situated away from heat sources such as radiators, heat
registers, stoves, or other products (including amplifiers) that
produce heat.
3. Do not place this product on an unstable cart, stand, tripod,
bracket, or table. Do not install in an unstable location or place the
monitor on top of a smaller stand. The product may fall, causing
serious injury to a child or adult and serious damage to the monitor.
4. Do not leave the power cable close to any heating appliance or
product that may generate heat. Heat-producing items can melt
the skin of the power cable and cause electric shock or fire.
5. Power supply cords should be routed so that they are not likely to
be walked on or pinched by items placed upon or against them,
paying particular attention to cords and plugs, convenience
receptacles, and the point where they exit from the unit. Do not
bend the power cable by force or place a heavy object on it as this
may cause electric shock or fire.
6. When removing the power plug, hold the plug head properly.
Pulling on the power cord itself may damage the core of the cable
and cause heating or danger of fire.
7. Remove power from the monitor when cleaning the monitor or
around the plug. Do not use flammable spray or material when
cleaning the monitor or place any such materials near the monitor.
8. Slots and openings in the cabinet and the back or bottom are
provided for ventilation and to ensure reliable operation of the
equipment and to protect it from overheating. These openings
must not be blocked or covered. Equipment should never be
placed near or over a radiator or heat register. This product should
not be placed in a built-in installation, such as a bookcase or rack
unless proper ventilation is provided or the manufacturer’s
instructions have been adhered to.
Using HOTKEY
Frequent adjustments such as auto-geometry, Brightness,
Contrast, Audio-volume, Audio-Mute, and Source (selected in
RGB/VIDEO) can be quickly done without calling the MENU.
The following table describes the HOTKEY.
OSD KEY DESCRIPTION
1 BRT BRIGHTNESS
2 CONT CONTRAST
3 VOL AUDIO-VOLUME
4 MUTE AUDIO- MUTE
5 SOURCE SELECTED IN RGB/S-VHS
6 CH REFERENCE TO TV BOX MANUAL
7 AUTO AUTO GEOMETRY
1 2 3
4
COMPOSITE
5 6 7
Rev. A vi HMMU000882
04/09/04
Rev. A 17 HMMU000882
04/09/04
Page 7

3.3 ON-SCREEN DISPLAY (OSD) CONTROL
PROCEDURE, CONTINUED
OSD Menu Description
OSD
Audio
Input
Select
Video Sharpness Control the outline.
Brightness Adjust the brightness of the screen.
Contrast Adjust the contrast of the screen.
Color Adjust the saturation of Red, Green, and
Hue Adjust the tone of color.
Horizontal position Select OSD MENU horizontal position.
Vertical position Select OSD MENU vertical position.
Timeout Time after which OSD MENU leaves
screen.
Transparency Adjust the transparency of the OSD
Menu.
Language
Factory Preset Initialize the current mode. Advanced
Information Normal state of the monitor.
Volume Adjust the volume level.
Balance Adjust the audio balance.
Treble Adjust the volume of the high sounds.
Bass Adjust the volume of the low sounds.
Mute Turn the sound ON or OFF.
Analog Selects analog signal.
S-VHS Selects S-VHS mode.
Video Selects Video mode.
English
French
German
Italian
Spanish
Select one of the five languages.
Blue in the display area.
SAFEGUARDS, CONTINUED
CLEANING AND GENERAL USAGE
1. For added protection of this unit during a lightning storm, or when
it is left unattended and unused for long periods of time, unplug it
from the wall outlet and disconnect the cable system. This will
prevent damage to the unit due to lightning and power-line surges
2. Never push objects of any kind into this unit through openings as
they may touch dangerous voltage points or short-out parts that
could result in a fire or electric shock. Never spill liquid of any kind
on the unit.
3. Do not attempt to service this unit yourself as opening or removing
covers may expose you to dangerous voltage or other hazards.
Refer all servicing to qualified service personnel.
4. When moving the monitor, turn the monitor OFF, unplug the power
cord, and make sure that all other connecting cables are
disconnected. This will prevent electric shock or fire caused by
cable damage.
5. If the monitor makes an unusual noise or produces a burning odor
or smoke, disconnect it from power immediately and contact the
service center.
6. If the monitor is not used for a long period of time, disconnect it
from the power outlet.
7. Consult with the service center once each year to clean the inside
of the monitor. Accumulation of dust inside the monitor may cause
fire or malfunction.
8. Unplug the unit from the outlet before cleaning. Do not use liquid
or aerosol cleaners. Use a clean soft cloth for cleaning. Do no use
wax, benzene, alcohol, thinner, mosquito spray, aromatic or
lubricating oil, or any other detergent or chemical.
9. Do not place the monitor face down on the floor or press on it,
otherwise the LCD screen may be damaged.
10. Careless use and improper repair may cause electric shock and/or
damage to the product. Do not open the monitor.
Rev. A 16 HMMU000882
04/09/04
Rev. A vii HMMU000882
04/09/04
Page 8
PURCHASE INFORMATION
3.3 ON-SCREEN DISPLAY (OSD) CONTROL
PROCEDURE, CONTINUED
Date Purchased:
Serial Number:
Location Installed:
OSD Menu Description
The following table describes the OSD menu and a description
of each option.
OSD Menu Description
Picture
Color
Auto adjustment Automatically adjusts the Horizontal
position, Vertical position, horizontal
size and Phase. Windows
background or characters should be
displayed on the full screen prior to
processing this function.
Horizontal position Adjust the horizontal position of the
screen’s image.
Vertical position Adjust the vertical position of the
screen’s image.
Horizontal size Adjust the horizontal size of the
screen’s image.
Phase Adjust the focus of the screen’s
image.
DOS/Graphics Select priority of DOS mode/
Graphic mode.
Auto adjustment Adjust the color balance of the
screen.
Brightness Adjust the brightness of the screen.
Contrast Adjust the contrast of the screen.
Temperature
6500k
9300k
User
Red
Green
Blue
Control the temperature of the color
Control the intensity of the color of
the screen’s image.
Rev. A viii HMMU000882
04/09/04
Rev. A 15 HMMU000882
04/09/04
Page 9
3.3 ON-SCREEN DISPLAY (OSD) CONTROL
PROCEDURE
TABLE OF CONTENTS
Image and sound can easily be adjusted through an OSD menu.
4 AUTO / EXIT Used to exit OSD.
3 MENU / SEL Used to start the OSD and select
options.
2 CH Z Menu move/adjust buttons.
Used to move the menu bar or adjust
values.
1 SOURCE Y Used to exit OSD.
On-Screen Display (OSD) Control Adjustment
Æ
o
Start
OSD
Exit the
pq
Move
Menu
Item
Æ
o
Select
Menu
Item
Æ
pq
Select
SubMenu
Item
n
OSD
Æ
Å
o
Select
Menu
Item
n
Return
to
Menu
Æ
pq
Adjust
the
Value
È
Å
n
Return
to
Menu
SECTION 1: INTRODUCTION .................................................. 1
1.1 INTRODUCTION .............................................................1
1.2 FEATURES ......................................................................1
1.3 CONTENTS OF PACKAGE .............................................3
SECTION 2: CONTROLS AND CONNECTIONS ..................... 5
2.1 CONTROLS – FRONT PANEL......................................... 5
2.2 CONTROLS – REAR PANEL ...........................................6
2.3 INSTALLING THE MONITOR DRIVER.............................7
2.4 VGA CABLE..................................................................... 7
2.5 MICROCONTROLLER FEATURES .................................8
2.6 DISPLAY MODES MEMORY ...........................................9
User Setting Area ..........................................................9
Factory Presetting Area................................................. 9
Automatic Save .............................................................9
SECTION 3: OPERATION...................................................... 11
3.1 POWER MANAGEMENT............................................... 11
3.2 PRESET MODE CHART ................................................12
Timing Charts ..............................................................12
Input Timing Limits ......................................................12
Input Level Limits......................................................... 12
Timing Charts ..............................................................13
3.3 ON-SCREEN DISPLAY (OSD) CONTROL
PROCEDURE ................................................................14
On-Screen Display (OSD) Control Adjustment........... 14
OSD Menu Description................................................15
Using HOTKEY ............................................................17
3.4 GETTING OPTIMAL PICTURE ......................................18
Rev. A 14 HMMU000882
04/09/04
Rev. A ix HMMU000882
04/09/04
Page 10
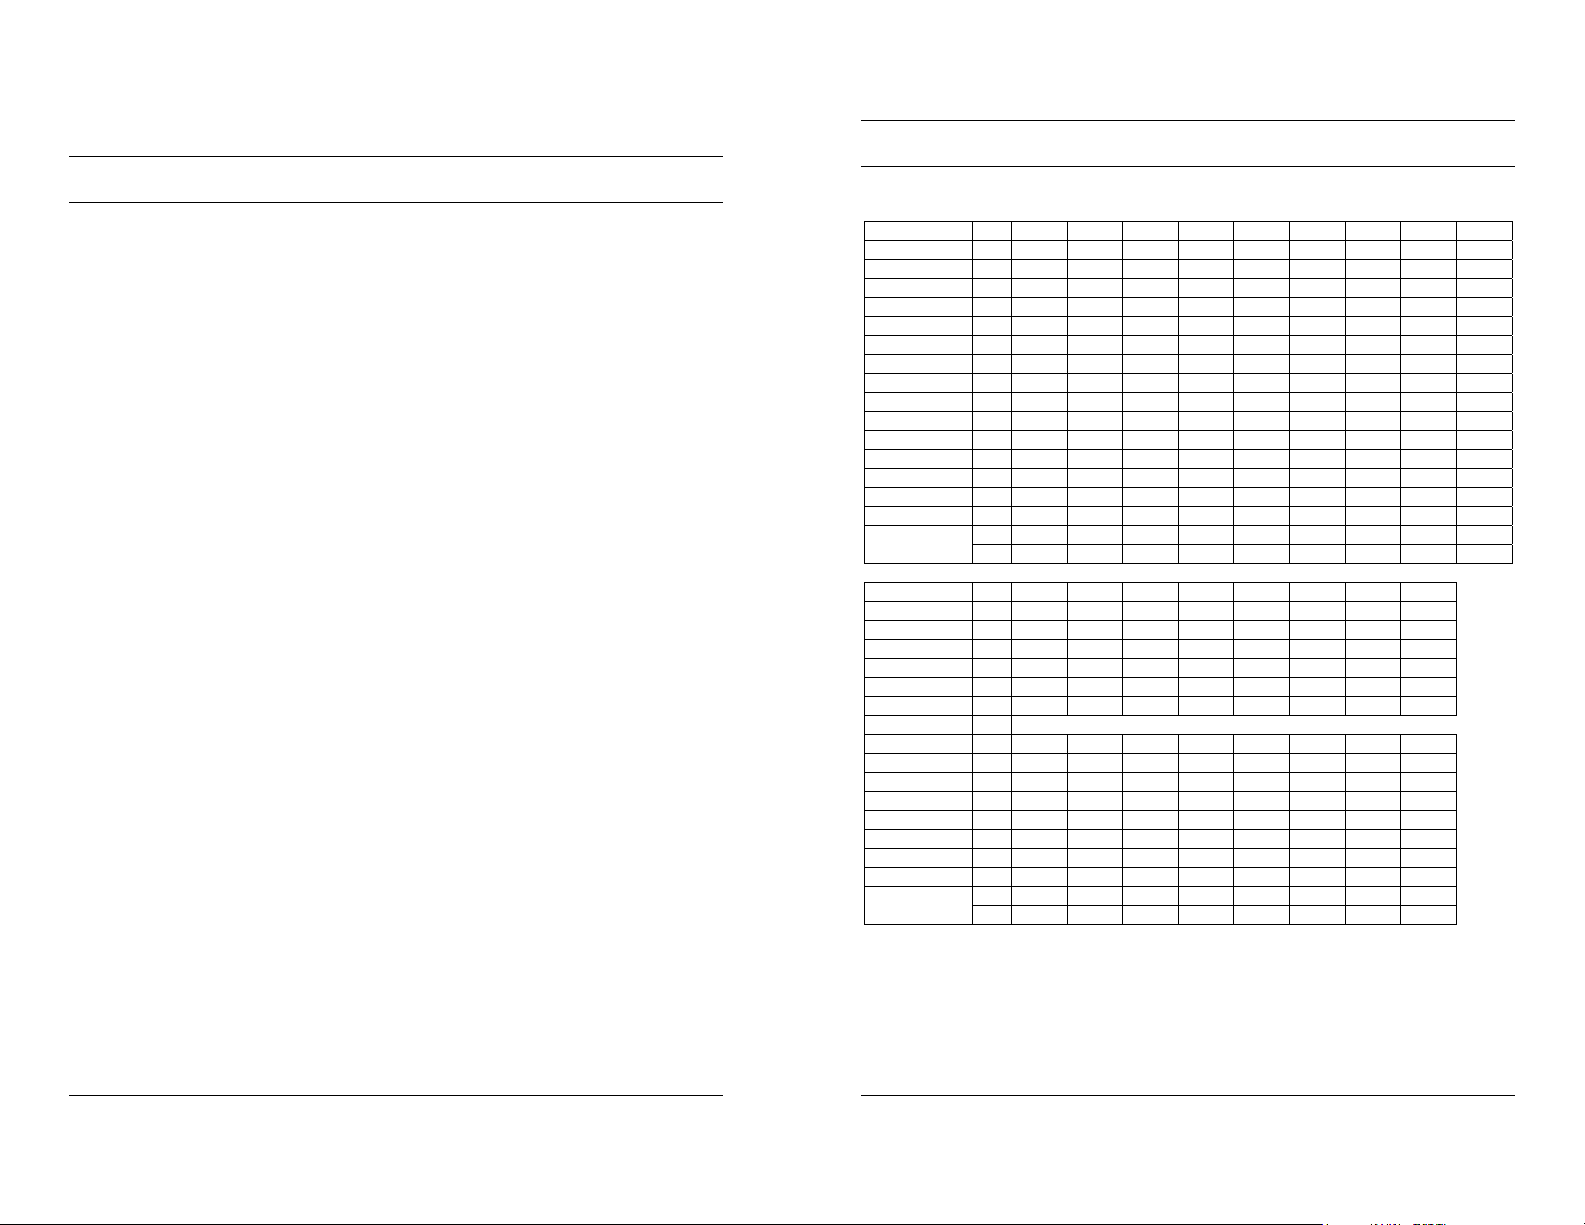
TABLE OF CONTENTS, CONTINUED
SECTION 4: TROUBLESHOOTING AND MAINTENANCE.... 19
4.1 TROUBLESHOOTING ................................................... 19
No Power..................................................................... 19
Poor Picture Quality.....................................................19
4.2 MAINTENANCE.............................................................19
4.3 SERVICE AND SUPPORT .............................................19
4.4 LIMITED WARRANTY ....................................................20
SECTION 5: SPECIFICATIONS.............................................. 21
3.2 PRESET MODE CHART, CONTINUED
Timing Charts
Horizontal Pixel 640 640 640 640 720 800 800 800 800
Frequency KHz 31.469 31.469 37.862 37.500 31.469 35.156 37.879 48.077 46.875
Period (T1) ms 31.778 31.778 26.413 26.667 31.778 28.444 26.400 20.800 21.333
Sync Width (T2) ms 2.542 3.813 1.270 2.032 3.813 2.000 3.200 2.400 1.616
Back Poach (T3) ms 3.178 1.907 4.064 3.810 1.907 3.556 2.200 1.280 3.232
Active (T4) ms 25.422 25.422 20.317 20.317 25.422 22.222 20.000 16.000 16.162
Front Poach (T5) ms 0.635 0.636 0.762 0.508 0.636 0.667 1.000 1.120 0.323
Vertical Line 350 480 480 480 400 600 600 600 600
Frequency Hz 70.087 59.940 72.539 75.000 70.087 56.250 60.317 72.188 75.000
Period (T1) ms 14.268 16.683 13.735 13.333 14.268 17.778 16.579 13.853 13.333
Sync Width (T2) ms 0.095 0.064 0.079 0.080 0.064 0.057 0.106 0.125 0.064
Back Porch (T3) ms 1.905 1.048 0.739 0.427 1.080 0.626 0.607 0.478 0.448
Active (T4) ms 11.136 15.253 12.678 12.800 12.711 17.067 15.840 12.480 12.800
Front Porch (T5) ms 1.145 0.318 0.237 0.027 0.413 0.028 0.026 0.770 0.021
Interlaced Y/N N N N N N N N N N
Sync Polarity
Horizontal Pixel 832 1024 1024 1024 1152 1280 1280 1280
Frequency KHz 49.726 48.363 54.476 60.023 67.500 60.000 63.981 79.976
Period (T1) ms 20.110 20.677 17.707 16.660 14.815 16.667 15.633 12.500
Sync Width (T2) ms 3.910 2.092 1.813 1.219 1.185 1.037 1.037 1.067
Back Poach (T3) ms 1.117 2.462 1.920 2.235 2.370 2.889 2.296 1.837
Active (T4) ms 14.524 15.754 13.653 13.653 10.667 11.852 11.852 9.481
Front Poach (T5) ms 0.559 0.369 0.320 0.203 0.593 0.889 0.222 0.119
Vertical Line 624 768 768 768 864 960 1024 1024
Frequency Hz 74.552 60.004 70.069 75.029 75.000 60.000 60.020 75.025
Period (T1) ms 13.414 16.666 14.272 13.328 13.333 16.667 16.661 13.329
Sync Width (T2) ms 0.060 0.124 0.106 0.050 0.044 0.050 0.047 0.038
Back Porch (T3) ms 0.784 0.600 0.513 0.466 0.474 0.600 0.594 0.475
Active (T4) ms 12.549 15.880 13.599 12.795 12.800 16.000 16.005 12.804
Front Porch (T5) ms 0.020 0.062 0.053 0.017 0.015 0.017 0.016 0.013
Interlaced Y/N N N N N N N N N
Sync Polarity
H P N N N N P P P P
V N N N N P P P P P
H - N N P P P P P
V - N N P P P P P
The monitor is compatible with additional modes within one of
the following specified frequency ranges, provided they are
different at least for one of the following:
Horizontal Frequency: ±1 KHz
Vertical Frequency: ±1 Hz
Rev. A x HMMU000882
04/09/04
Rev. A 13 HMMU000882
04/09/04
Page 11

3.2 PRESET MODE CHART
SECTION 1:
INTRODUCTION
Timing Charts
The monitor shall be capable of supporting the following video
timings:
VIDEO
SYNC
Synch Width (T2)
Input Timing Limits
H-Sync Pulse Width 1.0 µs ≤ Sync Pulse Width ≤ 8.0 µs.
V-Sync Pulse Width 0.04 ms ≤ Sync Pulse Width ≤0.5 ms.
NOTE: The width of Sync Pulse is out of input timing range,
the monitor may operate abnormally. Check Sync
Pulse Width of Input Timing.
(T4) Active
(T3) Back Poach
(T1) Period
(T5) Front Poach
1.1 INTRODUCTION
Honeywell's HMLCD19 SXGA Color LCD Display features a 19"
viewable active matrix LCD screen, with outstanding 1280 x
1024 pixel resolution. When used in PC based applications the
HMLCD19 provides connection points for VGA, PC Sound, and
Headphones. CCTV applications are supported by input
connections for audio, Y/C (S-Video) and composite video
sources while providing a flicker free viewing experience not
normally experienced with traditional CRT-type monitors. Easy
to access front panel OSD display controls including direct
contrast, brightness, volume and mute control buttons along
with single button source selection for quick and easy
adjustments.
1.2 FEATURES
• SXGA (1280 x 1024) resolution LCD module
• 16,777,216 Color Display
• DPMS (Display Power Management Signaling)
Input Level Limits
Low level: 0.4V (Max)
High level: 2.4V (Min)
NOTE: For better quality display image, use the timing and
polarity shown in the preset mode table. Refer to your
video card user guide to ensure compatibility.
Rev. A 12 HMMU000882
04/09/04
Rev. A 1 HMMU000882
04/09/04
• OSD (On-Screen Display) controls
• Multi-language OSD Menu
• Utilizes DDC1/2B controls. The system will perform Plug &
Play feature if both monitor and host system support
DDC1/2B protocol.
• Internal speakers
Page 12

SECTION 3:
OPERATION
Some computer systems are not compatible
with the DDC standard. If your monitor is
3.1 POWER MANAGEMENT
displaying the wrong resolution, check your
computer system for a DDC compatible video
card and contact the Service Center.
This monitor is equipped with DPMS (Display Power
Management Signaling) function which automatically switches
to power saving mode (less than 5 watts consumed) when the
computer is left unattended. Although the monitor can be left in
power saving mode for longer periods, it is recommended that
you turn it off after your daily work.
Do not open the monitor. There are no userserviceable components inside. There is
dangerous high voltage inside even when the
power is off. If the display monitor does not
operate properly, remove the power cord from
the wall outlet and contact your dealer. Careless
use and unprofessional maintenance can cause
serious electrical shock and other hazards.
The DPMS function requires support from the computer system
of any software DPMS function currently being used. If the
keyboard (or mouse) is left unattended for a certain period, the
program or system will set the sync signals to SPMS modes.
The DPMS function has three states. Recommended signals,
power consumption, and recovery time are shown in the table
below:
No
Pulse
No
Pulse
Signal
Pulse Blank
No
No
Blank
Blank
Pulse
Pulse
Status
HSync VSync Video
On Pulse Pulse Active 48Watt -- Green
Standby
Suspend Pulse
Off
Power
Consumption
Less than
5Watt
Less than
5Watt
Less than
5Watt
Recovery
Time
Within
2sec
Within
2sec
Within
2sec
LED
Indicators
Alternating
Green/Orange
(1sec)
Alternating
Green/Orange
(0.5sec)
Orange
Rev. A 2 HMMU000882
04/09/04
Rev. A 11 HMMU000882
04/09/04
Page 13

NOTES:
1.3 CONTENTS OF PACKAGE
LCD Monitor User Manual VGA Cable
U
S
E
R
M
A
N
U
A
L
Sound Cable AC/DC Adapter Installation Disk
Power Cord Video Sound Cable
Composite Cable BNC to RCA Adapters (2)
OPTIONAL ACCESSORIES: S-video cable, Wall Mount
adapter (VESA standard)
Rev. A 10 HMMU000882
04/09/04
Rev. A 3 HMMU000882
04/09/04
Page 14

NOTES:
2.6 DISPLAY MODES MEMORY
The microcontroller has memory capacity to store 27 different
display modes including timing formats and display settings.
This memory capacity is divided into two parts: user setting
area and factory presetting area.
User Setting Area
The user can add non-standard modes. If display image is
adjusted, the image is saved automatically, then when the
microcontroller is turned on it detects and displays the last
mode stored in the user setting area. The user setting area
maintains the last 10 display modes set by the user in its
memory. When the user setting area is full (6 modes are
registered), if new non-standard timing is registered, the oldest
timing settings will be deleted.
Factory Presetting Area
There are 17 display modes stored in the Factory Presetting
Area. The display modes are preset at the factory and include
most of the display modes currently available (see Timing Chart).
Factory Preset Mode can also be retrieved by selecting the
RECALL menu.
Automatic Save
The monitor automatically saves the setting value 20 seconds
after adjusting the OSD menu.
Rev. A 4 HMMU000882
04/09/04
Rev. A 9 HMMU000882
04/09/04
Page 15

2.5 MICROCONTROLLER FEATURES
SECTION 2:
CONTROLS AND CONNECTIONS
The microcontroller automatically detects the video board
installed in your system. When the monitor is turned on, the
microcontroller first checks the display mode memory stored in
the user setting area and the factory presetting area.
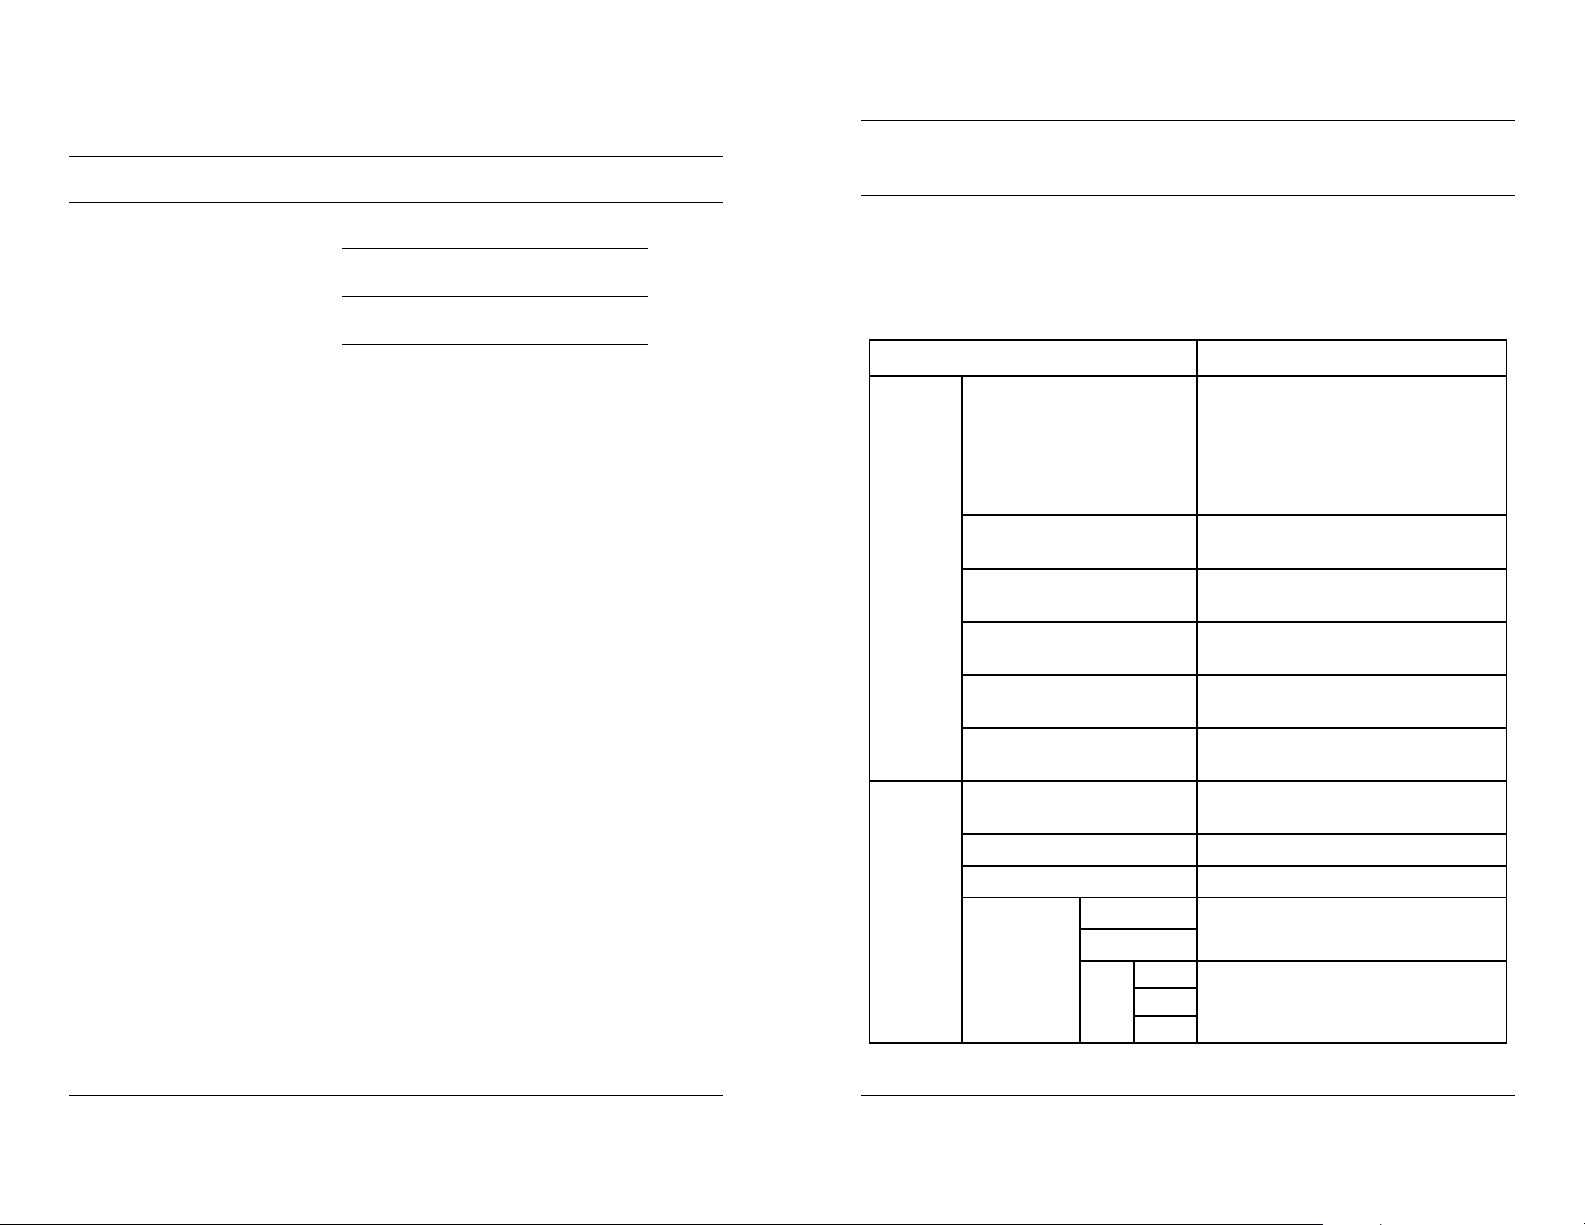
2.1 CONTROLS – FRONT PANEL
J
HG
I
K
A
B
C
D
E
F
A AV1 F AUTO/EXIT
B PC
C SOURCE Y H CONT Z
D CH Z I VOL Y
E MENU/SEL J MUTE Z
K POWER BUTTON
Rev. A 8 HMMU000882
04/09/04
Rev. A 5 HMMU000882
04/09/04
LAMP
G BRT Y
Page 16

2.2 CONTROLS – REAR PANEL
CD
B
A
PC
A DC12V
B Ear
C PC Sound
D VGA
E Video Sound
F S-VHS
G Composite
E
F
G
DVR or VCR
AV1
2.3 INSTALLING THE MONITOR DRIVER
You can achieve an optimal resolution and scanning rate by
installing the monitor driver as follows:
1. Insert the monitor driver diskette into the floppy diskette
drive and run INSTALL.EXE.
2. Select the monitor model then press OK.
The installation will begin immediately.
2.4 VGA CABLE
A 15-pin D-Sub connector is used as the input signal connector.
Pin and input signal are shown in the table below.
Pin Name Pin Name Pin Name
1 Red 2 Green 3 Blue
4 N.C 5 GND 6 RED-GND
7 GREEN-GND 8 BLUE-GND 9 +5V
10 Logic-GND 11 N.C 12 SDA (DDC)
13 H-sync 14 V-sync 15 SCL (DDC)
Rev. A 6 HMMU000882
04/09/04
Rev. A 7 HMMU000882
04/09/04
 Loading...