

Page 1
Local Air Conditioner
EN
User Manual
Read and save these instructions before use
Lokale Klimaanlage
DE
Benutzerhandbuch
Lesen sie die anleitung vor dem gebrauch
und heben sie sie auf
Climatiseur Local
FR
Mode d'emploi
Lire ces instructions avant l'utilisation et
les conserver
Aire Acondicionado Local
ES
Manual de Instrucciones
Lea y guarde estas instrucciones antes
de usar la unidad
Lokale Airconditioner
NL
Gebruiksaanwijzing
Lees de gebruiksaanwijzing zorgvuldig en
bewaar deze goed
Condizionatore d'aria Locale
IT
Manuale Utente
Leggere attentamente le istruzioni prima
dell'utilizzo dell'apparecchio
Ar Condicionado Local
PT
Manual do Utilizador
Leia e guarde estas instruções antes da
utilização
Model / Modèle / Modelo / Modello /
Model / Modelo / Modelo:
HF Series
www.honeywellportableac
info@honeywellportableac.com
Page 2

SAFETY
READ AND SAVE THESE INSTRUCTIONS
IMPORTANT SAFETY INSTRUCTIONS. READ CAREFULLY AND
KEEP FOR FUTURE REFERENCE. IN CASE THERE IS ANY
INCONSISTENCY OR CONFLICT BETWEEN THE ENGLISH
VERSION AND ANY OTHER LANGUAGE VERSION OF THE
CONTENT OF THIS MATERIAL, THE ENGLISH VERSION
SHALL PREVAIL.
WARNING:
•
DO NOT operate the unit with a damaged plug or loose wall
outlet. If the supply cord is damaged, it must be replaced
by the manufacturer, its service agent or similarly qualified
persons in order to avoid a hazard.
•
DO NOT cover the air intake and exhaust when in use.
•
DO NOT place objects on or sit on the unit.
•
Always turn off and unplug the unit when cleaning or
servicing.
•
DO NOT use the appliance if it is damaged.
•
If service is needed contact an authorized service agent.
•
Unplug the unit when stored or not in use.
•
DO NOT pull or carry the appliance by the power cord.
•
DO NOT pinch the power cord in the door and DO NOT pull
it along edges or sharp corners.
•
DO NOT run the power cord under carpeting and rugs.
•
Use caution to prevent tripping on cord.
•
DO NOT use the device in the following cases:
- Near a fire source
- In areas where gasoline, paint or other flammable
goods are stored
- In an area where the water can be projected
•
DO NOT touch the plug or the device with wet hands.
•
Basic safety precautions should always be followed when
using electrical appliances.
EN
Page 3

SAFETY (CONTINUED)
This appliance has been manufactured for use in domestic
•
environments and should not be used for other purposes.
Only use the installation kit provided to install this unit.
•
DO NOT attempt to extend the hose or install this unit
using other methods other than that shown in this
manual. Improper installation will void any existing
warranties.
DO NOT use an extension cord with this unit.
•
This appliance can be used by children aged from 8 years
•
and above, and persons with reduced physical, sensory or
mental capabilities or lack of experience and knowledge if
they have been given supervision or instruction concerning
use of the appliance in a safe way and understand the
hazards involved. Children shall not play with the appliance.
Cleaning and user maintenance shall not be made by
children without supervision.
Never insert your fingers or rods into the air outlet. Take
•
special care to warn children of these dangers.
The manufacturer is not liable for injury caused to
•
persons or property damage due to non-compliance
with maintenance instructions and improper use of the
appliance.
The appliance shall be installed in accordance with national
•
wiring regulations.
The appliance is not to be used by persons (including
•
children) with reduced physical, sensory or mental
capabilities, or lack of experience and knowledge, unless
they have been given supervision or instruction.
Children should be supervised to ensure that they do not
•
play with the appliance.
EN
Page 4
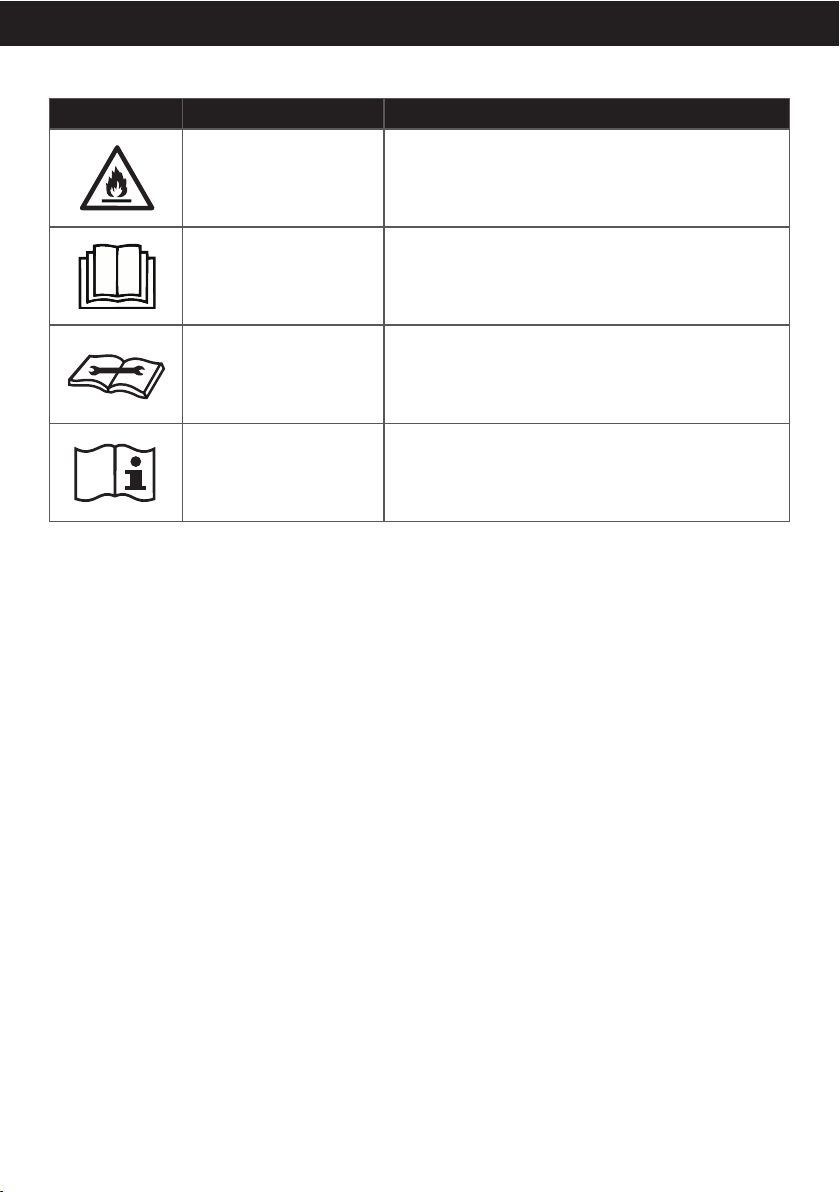
R290 SAFETY
SYMBOL NOTE EXPLANATION
This symbol shows that this appliance uses a
WARNING
flammable refrigerant. If the refrigerant is leaked and
exposed to an external ignition source, there is a risk
of fire.
CAUTION
CAUTION
CAUTION
Additional warnings for appliances with R290 refrigerant gas.
Read the instruction carefully before using the appliance.
•
R290 refrigerant gas complies with European environmental directives.
•
This appliance contains a certain number of grams (see rating label at the back of the unit) of
•
R290 refrigerant gas. The maximum refrigerant charge amount is 0.3 kg.
When defrosting or cleaning, do not use any method other than those recommended by the
•
manufacturer.
Do not place the appliance in a room with continuous sources of ignition (e.g. open flame,
•
operating gas appliance or working electrical heater).
Do not pierce and do not burn.
•
Do not perforate any part of the refrigerant circuit.
•
Refrigerant gas may be odorless.
•
The appliance must be installed, used and stored in an area that is greater than 12 m2.
•
Accumulation of possible refrigerant leaks in an unventilated room could lead to fire or explosion
•
should the refrigerant come in contact with electric heaters, stoves or other sources of ignition.
The appliance must be stored in a way to prevent mechanical damage.
•
Only individuals authorized by an accredited organization certifying their competence to handle
•
refrigerants in compliance with industry legislation should work on the refrigerant circuit.
Repair must be performed based on the recommendations from the manufacturer.
•
Maintenance and repair that requires the assistance of other qualified personnel must be
•
performed under the supervision of specialists in the use of flammable refrigerants.
This symbol shows that the operation manual should
be read carefully.
This symbol shows that a service personnel should
be handling this equipment with reference to the
installation manual.
This symbol shows that information is available such
as the operating manual or installation manual.
EN
Page 5

THANK YOU
Congratulations on your purchase of this Honeywell Local Air Conditioner.
Regarding the information pertaining to the installation, handling, servicing, cleaning and disposal
of the appliance, please refer to the below paragraph of the manual.
USER TIPS
Local Air Conditioners are ideal for spot cooling. The compressor, condenser and evaporator are
housed in a compact unit. The air is dehumidified and cooled while a flexible hose sends heat
outside. The Local Air Conditioner includes a window venting kit.
No permanent installation is needed. The unit is easy to move from room to room and offers a truly
flexible air conditioning solution.
Auto Evaporation System - The unit automatically evaporates the condensate through the hose.
There is no need to empty the drainage tank except in humid conditions. Read and follow the
instructions carefully.
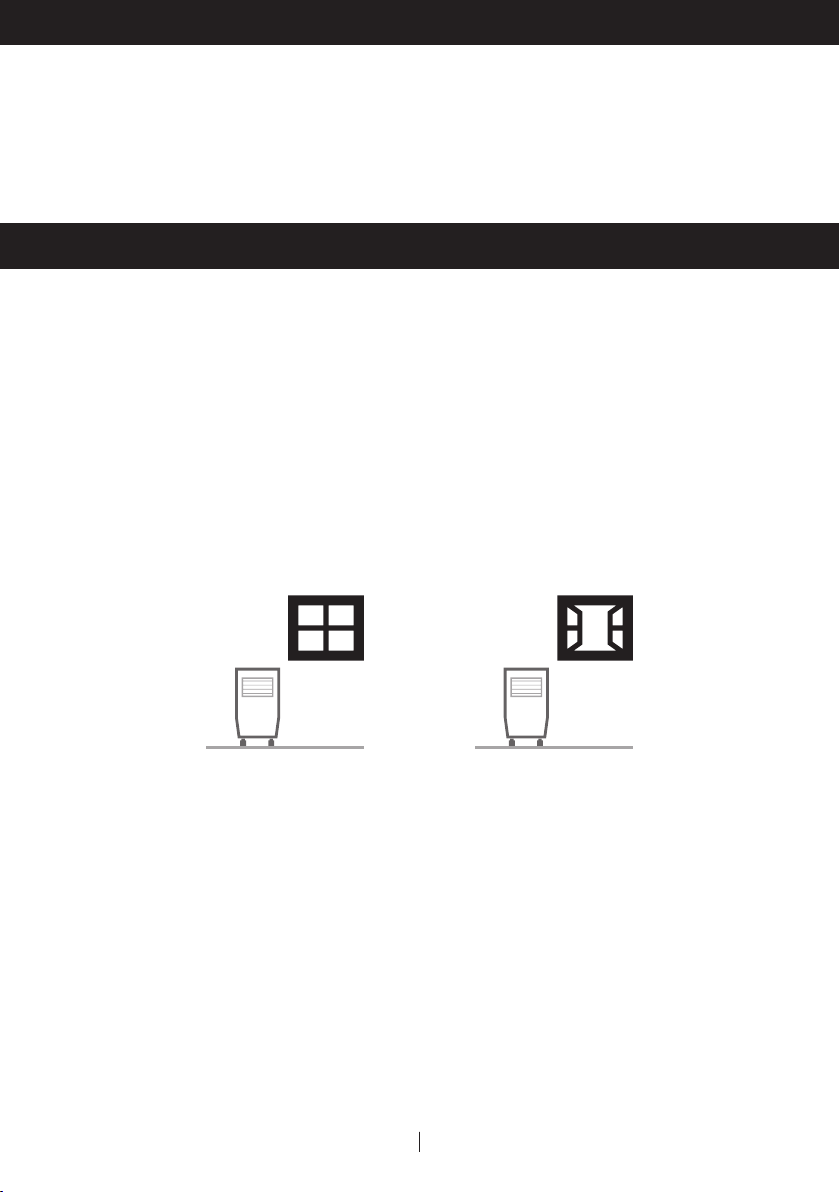
To ensure optimal efficiency of the product, keep doors and windows closed when it is used as an air
conditioner or dehumidifier. If the product is being used with the fan function only, an open window
could improve air circulation.
Cooling and Dehumidifying
Operation
Important:
Before installing the unit, place it UPRIGHT for 1 hour before use to allow the refrigerant to stabilize.
Air outlet automatically opens when the unit is turned on, and automatically closes when the unit is
turned off. Manually adjust the air vent located at the top of the unit to adjust the direction of air flow.
Follow installation instructions to set up the unit.
•
Plug the unit into a properly grounded circuit. DO NOT plug into an extension cord.
•
EN
1
Fan Operation
Page 6
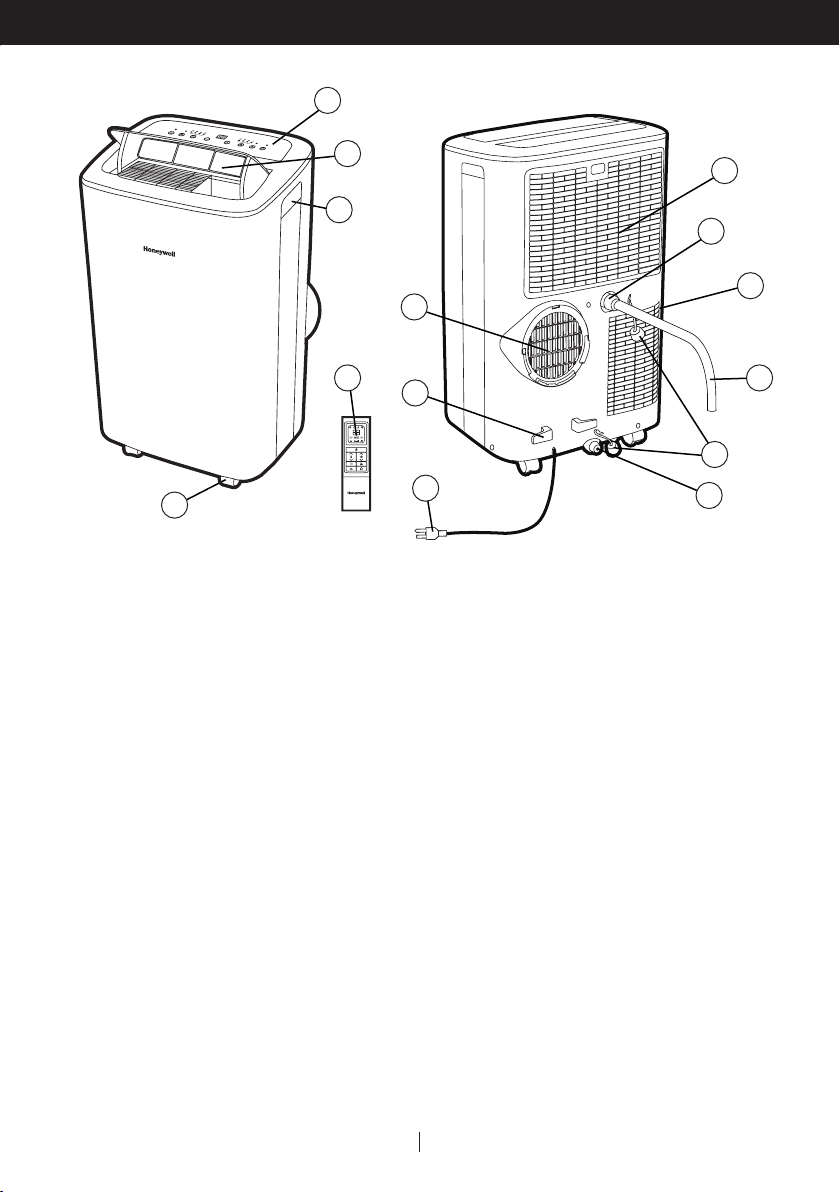
PARTS DESCRIPTION
1
2
3
6
5
7
°F
°C
14
4
1) Control Panel 8) Upper Dust Filter
2) Air Outlet 9) Upper Rubber Drain Plug
3) Handle 10) Lower Dust Filter
(Dehumidifying Mode)
8
9
10
11
12
13
4) Casters 11) Drain Tube
5) Remote Control 12) Drain Plug Cap
6) Hose Connector 13) Lower Rubber Drain Plug
7) Cord Winder 14) Power Supply Cord
EN
(For Continuous Drain)
(Air Conditioning Mode)
2
Page 7

INSTALLATION
It is important that the installation instructions below are followed for successful installation of this
Local Air Conditioner. Please call Customer Support if you have any difficulties or queries
regarding these installation procedures.
1
x1
5
x1
Installation Kit:
1. Window Bracket Kit (1 Set) 5. Hose (1 Piece)
2. Window Bracket Panel Adapter (1 Piece) 6. Foam Seal (adhesive) (2 Pieces)
3. Hose Connector (1 Piece) 7. Foam Seal (non-adhesive) (1 Piece)
4. Plastic Pin (2 Pieces)
Installation Steps:
Window bracket panel adapter, hose and hose connector are pre-assembled inside the package.1.
2 3
x1
6
x1
7
x2 x1
4
x2
2. Adjust the window bracket as per width or height of your window and insert the plastic pin to
fix at the desired position. There is a hole where the hose will be inserted later. Make sure this
hole is not blocked.
Plastic Pin
Hole for Window Bracket
26.6", 36.2" to 52"
(67.5 cm, 92 cm to 132 cm)
Panel Adapter and Hose
3EN
Page 8

INSTALLATION (CONTINUED)
Note: After setting the window bracket to the size of your window, please remove it from the window
and follow the instructions below.
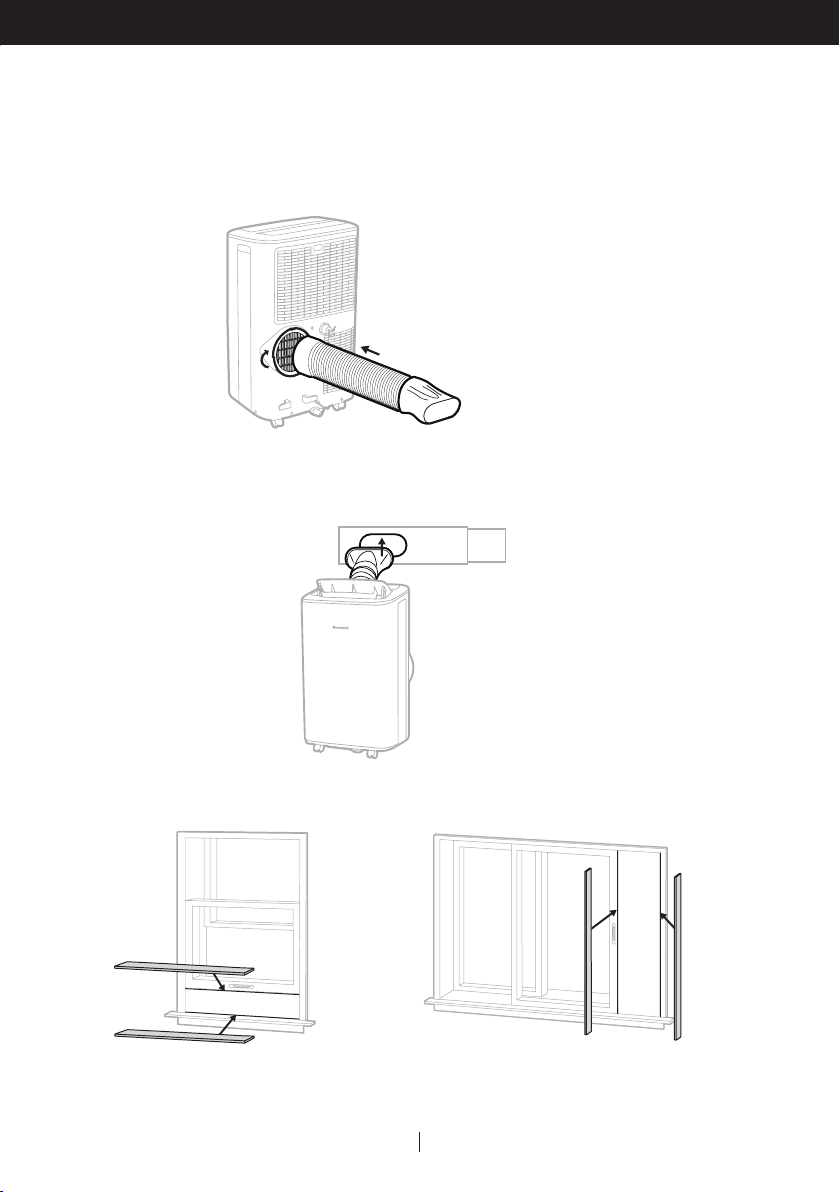
3. Connect the hose to the rear exhaust outlet on the back of the unit. Slide-in the hose connector
then rotate clockwise until it is locked in place.
Hose:
Dia. 5.9" (15 cm)
Length: 10.6" to 59" (27 cm to 150 cm)
4. Connect the window bracket to the window bracket panel adapter. Ensure that all connections are
tight and installed properly.
Cut the Foam Seal (adhesive) to the proper length and attach them to the window sash
5.
and frame.
Horizontal Sliding Window Vertical Sliding Window
4EN
Page 9

INSTALLATION (CONTINUED)
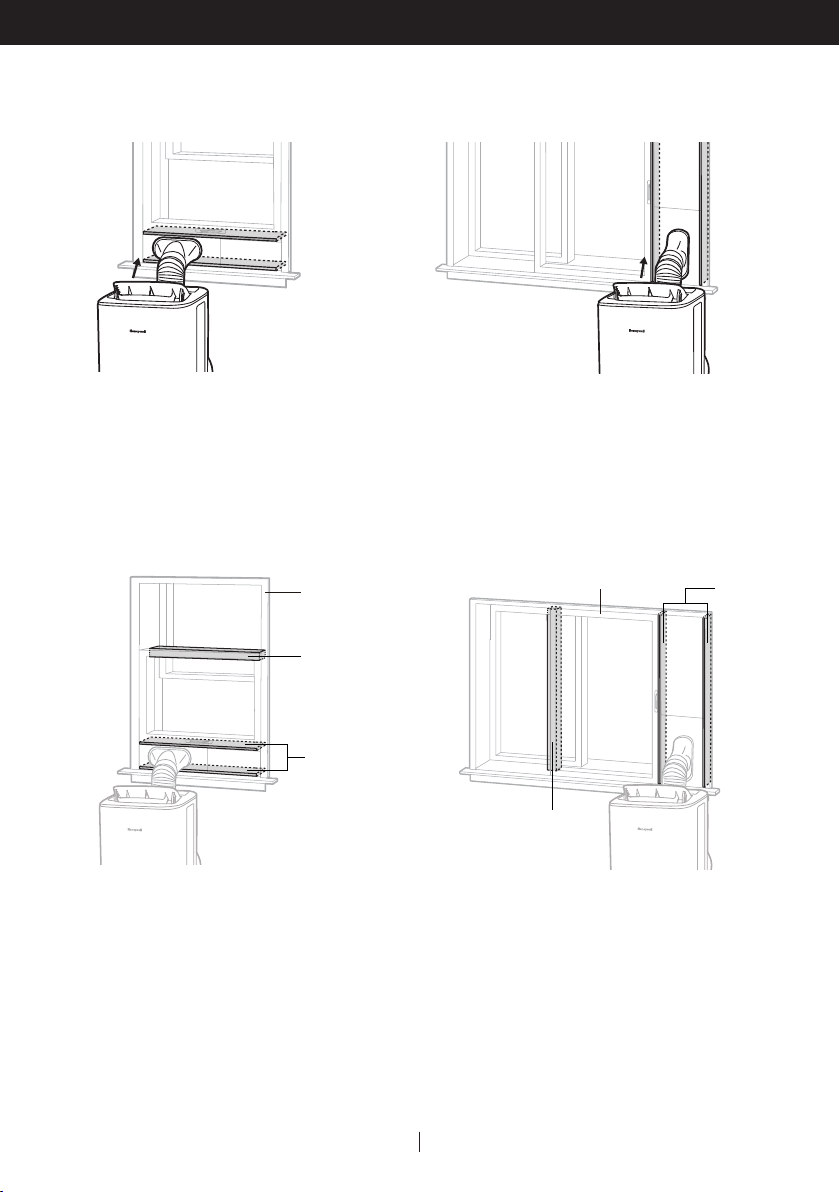
6. Connect the window bracket to the window.
Horizontal Sliding Window
Vertical Sliding Window
7. Cut the Foam Seal (non-adhesive) to the window length. Stuff the Foam Seal (non-adhesive)
between the inner window sash and the outer window glass to prevent air and insects from
getting into room.
Horizontal Sliding Window
Window
Sash
Foam Seal
(non-adhesive)
Foam Seal
(adhesive)
Window
Sash
Foam Seal
(non-adhesive)
Vertical Sliding Window
Foam Seal
(adhesive)
8. The Local Air Conditioner is now ready to use.
5EN
Page 10

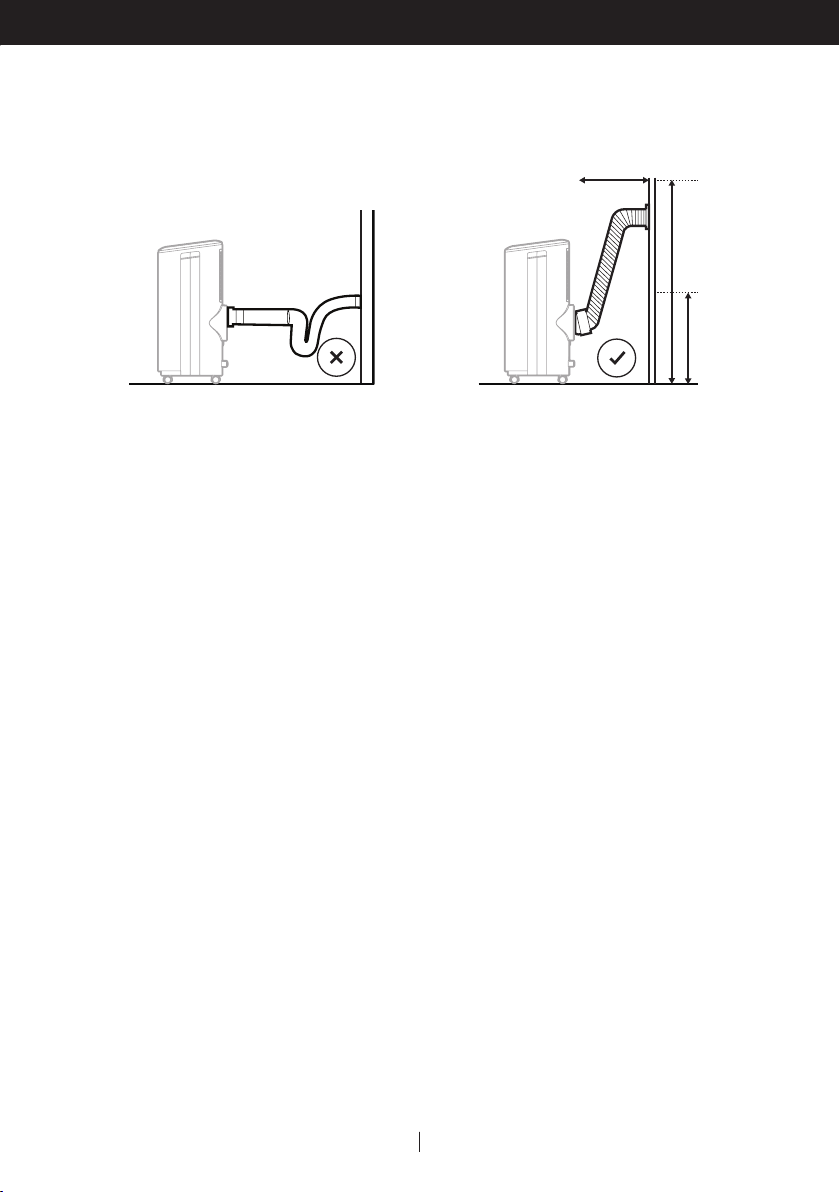
INSTALLATION (CONTINUED)
IMPORTANT:
Do not replace or lengthen the hose as this could cause the unit to malfunction.
20" (50 cm)
MIN 31 cm
MAX. 12" (31 cm)
MAX. 43" (110 cm)
Not Recommended Recommended
WARNING: Any warranties included with this product will be voided if an extra extension hose is
added to the originally provided installation kit or if the installation is performed differently than the
manufacturer's instructions, without proper consultation. Please contact Customer Support for help
with installation procedures if needed.
The supplied hose has a diameter of 5.9" (15 cm) and can be extended from
•
10.6" to 59" (27 cm to 150 cm).
Do not bend (to the extent shown below) the hose. A bent hose will block exhaust air
•
and cause the unit to malfunction or shut-off.
Make sure the back of the unit is at least 20" (50 cm) away from the wall. Do not place the unit in
•
front of curtains or drapes as this could obstruct the airflow.
Note: Due to the power input of the unit on start up, voltage drops may occur and this can influence
other equipment (e.g. dimming lights). Please make sure that the unit is connected to a supply with
a maximum permissible system impedance Zmax = 0.306 Ohm. If you require further clarification,
you may contact your local power supply authority.
EN
6
Page 11
USE AND OPERATION
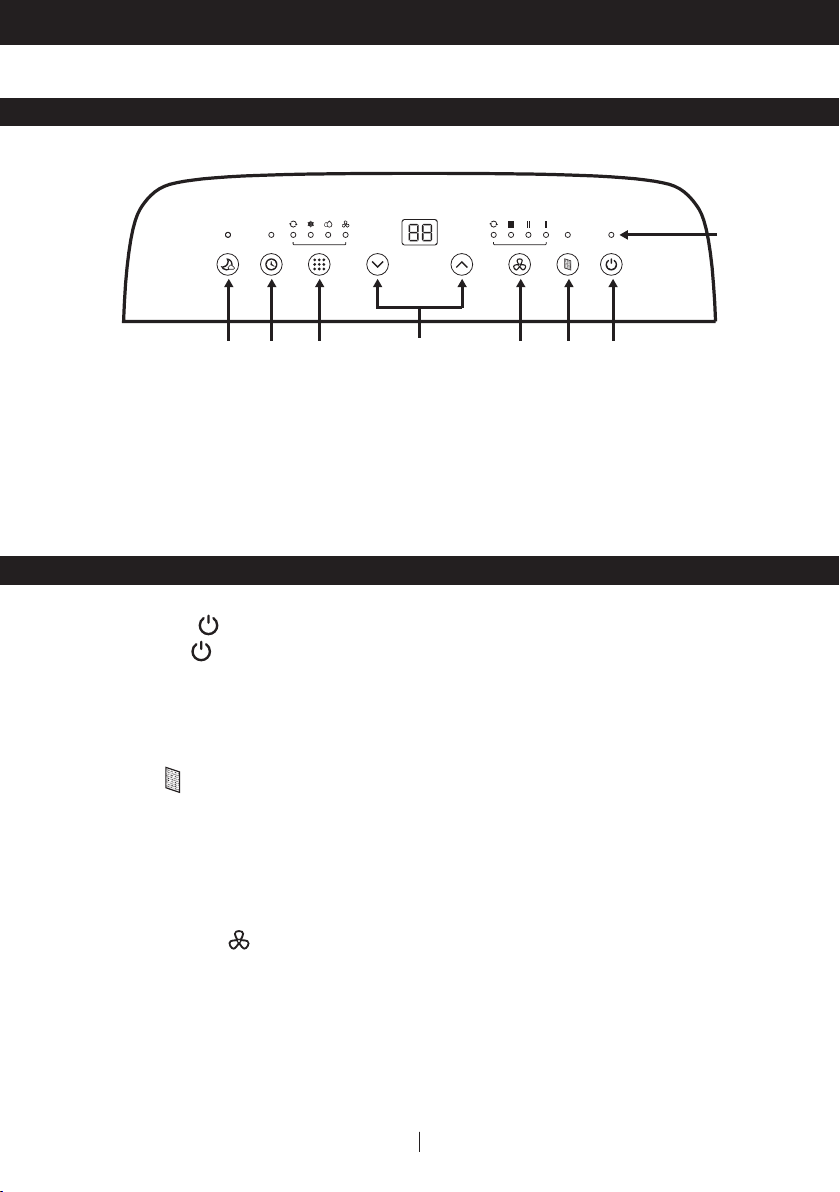
CONTROL PANEL
(7)(8) (5)
1) Indicator Lights 5) Timer / Temperature Set Controls
2) Power Control 6) Mode Control
3) Filter Reset 7) Timer Control
4) Fan Speed Control 8) Sleep Control
FUNCTION BUTTONS
(1)
(6) (4) (3) (2)
POWER CONTROL
The Power Control turns the unit on and off. When the unit is plugged into an appropriate
electrical outlet, the POWER indicator light will illuminate red indicating the unit is in a Standby
Mode, ready to be switched on at anytime. The air vent will automatically open when the unit is
turned ON and automatically close when unit is turned OFF.
FILTER RESET
When the operation has reached 250 hours, the Filter Reset light will illuminate.
Switch the Local Air Conditioner OFF and carefully remove filters from the unit and clean. Replace
filters and press the Filter Reset button, the Filter Reset light will turn off and the operation time will
be cleared.
FAN SPEED CONTROL
4 settings: High, Medium, Low and Auto.
Note: Auto fan speed can be selected in cooling mode only.
EN
7
Page 12
USE AND OPERATION (CONTINUED)
FUNCTION BUTTONS (CONTINUED)
TEMPERATURE CONTROL
The default display is setting temperature.
•
In cooling mode, when or button is pressed, the set temperature is displayed and may be
•
adjusted.
Note: By pressing both or buttons at the same time, the display will toggle between Celsius
(°C) and Fahrenheit (°F).
MODE CONTROL
Settings: Air Conditioning, Dehumidifying, Fan, Auto.
The corresponding indicator light will illuminate to indicate the current mode setting.
Air Conditioning Mode (COOL)
•
Adjust fan speed and air temperature to suit your desired comfort level.
Temperature setting range is 16°C - 32°C (60°F - 90°F).
Ambient temperature range is 16'C - 35'C (60'F - 95'F).
Dehumidifying Mode (DRY)
•
Fan speed is preset to Low.
Note: If the unit will be used mainly as a dehumidifier, do not connect the hose. Continuous
drainage is then necessary (refer to Continuous Draining for Dehumidifier Mode).
IMPORTANT: The Dehumidifier mode is used to support moisture reduction but should not
be expected to dehumidify to the same degree as a standard dehumidifier-only appliance. The
built-in dehumidifier automatically adjusts dehumidification based on ambient room temperatures.
It is not possible to adjust to a desired humidity percentage. The front display only shows the
current and desired temperatures. It does not show humidity levels.
Fan Mode
•
For air circulation without air conditioner cooling.
Note: Auto fan speed cannot be selected in fan mode.
Auto Mode
•
Press the or button to select the temperature you want.
In this mode, the unit will automatically select cooling or fan only depends on the set temperature
and the room temperature. The Local Air Conditioner will control room temperature automatically
around the set temperature.
Note: Fan speed can't be adjusted in auto mode.
EN
8
Page 13
USE AND OPERATION (CONTINUED)
FUNCTION BUTTONS (CONTINUED)
TIMER CONTROL
The Timer is adjustable between 1 - 24 hours.
AUTO TURN OFF:
While unit is running, press the Timer button and the display will flash. While the display is
flashing, press the or button to select the number of hours you want the unit to turn OFF
automatically.
AUTO TURN ON:
When unit is in a standby mode (plugged in with power light on), press the Timer button
and the display will flash. While the display is flashing, press the or button to select the number
of hours until you want the unit to turn ON automatically.
SLEEP MODE
When the Sleep Mode is activated in Air Conditioning mode, the set temperature will increase by 1°C
or 1°F after the first hour of cooling and will increase a further 1°C or 1°F after the second hour of
cooling. The unit will maintain this temperature for 5 hours. The set temperature will then reduce by
1°C or 1°F on the seventh hour and reduce a further 1°C or 1°F on the tenth hour. Sleep mode will
then deactivate automatically.
Note: The Sleep Mode can be deactivated during cooling mode by pressing any button at any time.
WATER FULL ALARM
Condensation may accumulate in the unit.
If the internal tank is full, error code "P1" will be displayed and an alarm will beep for 30 seconds.
The unit will not operate until the water has been drained from the lower drain plug (refer to Water
Condensation Drainage).
After switching the Local Air Conditioner off, the compressor will not start immediately. You must
wait about 4 minutes before it switches back on again.
EN
9
Page 14
USE AND OPERATION (CONTINUED)
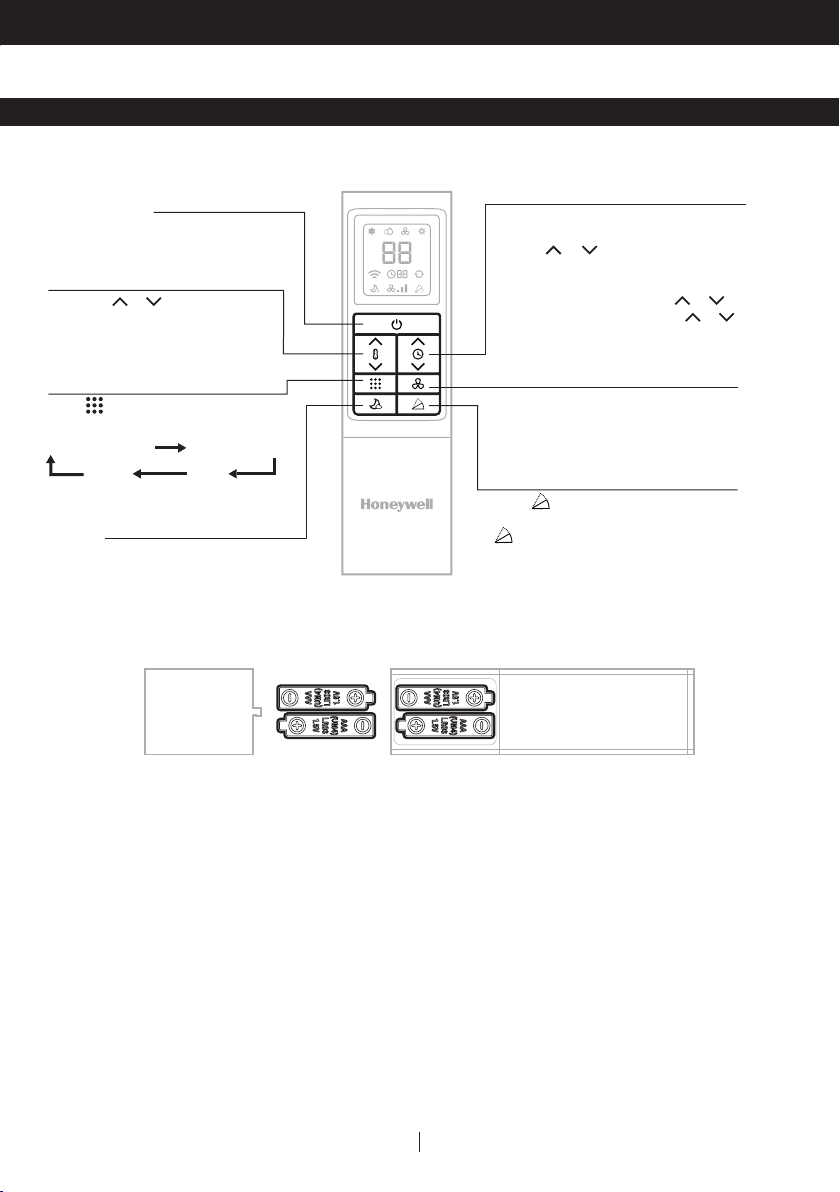
REMOTE CONTROL
All key functions can be accessed from the remote control.
Power Control
ON / OFF
Temperature Control
When the or
the set temperature is displayed
and may be adjusted
key is pressed,
°F
°C
Timer Control
•
In running mode: Auto switch off
In stand-by mode: Auto switch on
Press or
time setting for 1 hour intervals.
•
Timer setting is available from 1 - 24
hours by pressing the key or
•
When timer is set, press the or
key will cancel the timer setting.
button to adjust the
.
Press button to change the
operation mode in the order of:
Air Conditioning Dehumidifying
Mode Control
Auto
Fan
Sleep Control
ON / OFF
Fan Speed Control
• HIGH • MID • LOW • AUTO
Swing Control
Press button to enable air outlet
louver swinging up and down. Press
button again to disable the swing
function. Swing can only be set from
the remote control.
Note:
Battery Installation: Remove the cover on the back of the remote control and insert two AAA
•
batteries with + and - pointing in the proper direction according to the polarity markings.
Caution:
Use only two AAA or IEC R03 1.5V batteries.
•
Remove the batteries if the remote control is not in use for a month or longer.
•
All batteries should be replaced at the same time, do not mix with old batteries.
•
Do not mix alkaline, standard (carbon-zinc) or rechargeable (nickel-cadmium) batteries.
•
Properly dispose of used batteries.
•
10EN
Page 15
CLEANING AND MAINTENANCE
Appliance Maintenance:
Turn off the appliance before disconnecting the power supply.
1.
Only clean the appliance with a soft dry cloth.
2.
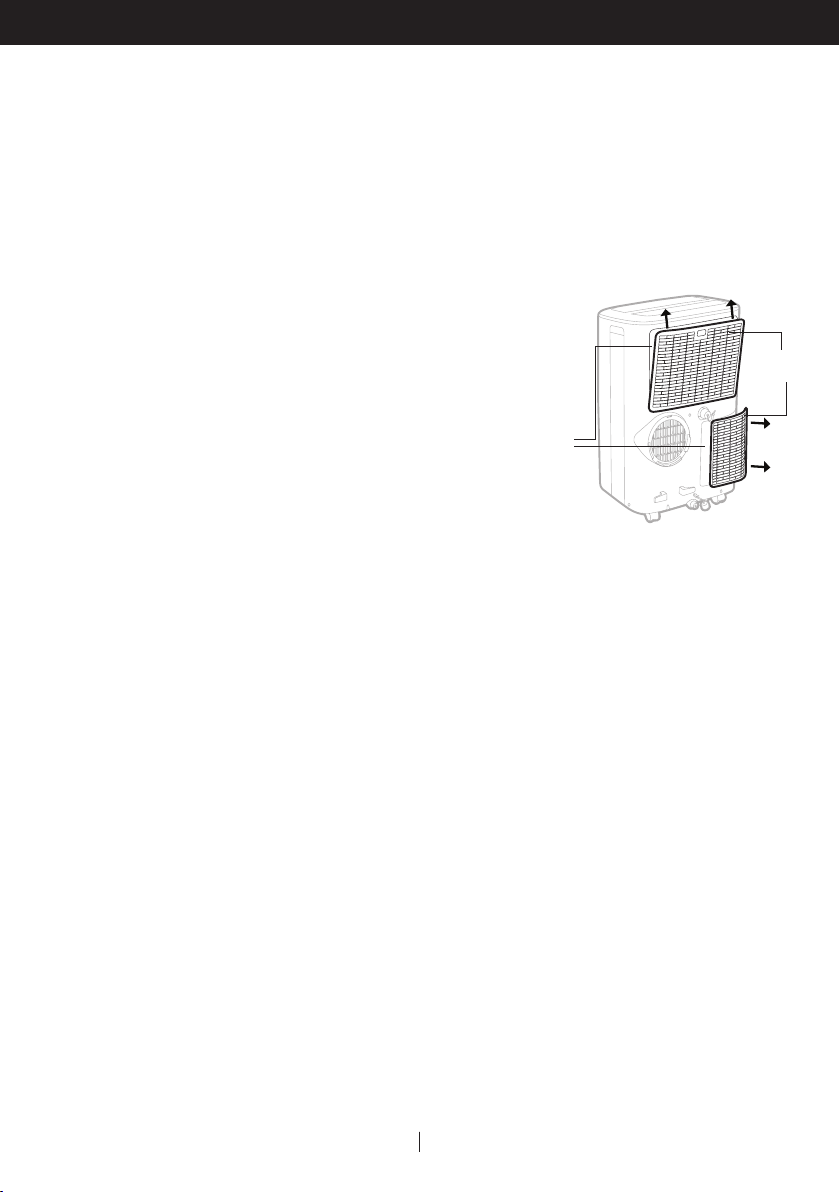
Dust Filter Maintenance:
The dust filter is to be cleaned every two weeks to maintain air cooling efficiency. Please follow the
below instructions for cleaning the dust filters:
Switch off and unplug the Local Air Conditioner from the
1.
electrical outlet.
Remove the Upper Filter/ Grill, unscrew the Lower Filter/ Grill
2.
and carefully remove.
Gently wash using water and/ or diluted liquid dishwashing
3.
detergent. Rinse thoroughly and gently shake excess water
from the filters. Make sure the filters are dry before reinstalling.
Note: You may use a vacuum cleaner to remove dust.
Replace the Upper Grill onto the unit, and reinstall the Lower
4.
Rear
Grill
Grill with the screw.
WARNING: DO NOT power or operate the Local Air Conditioner when cleaning or when the Dust Filter
is removed from the unit, or if there is a loose-fitting Dust Filter. DO NOT attempt to handle or touch
any of the parts or wiring inside the Rear Grill after the Dust Filter has been removed from the unit.
Doing so can cause serious injury or electrical shock.
Upper
Dust Filter
EN
11
Page 16

CLEANING AND MAINTENANCE (CONTINUED)
End of Season Storage and Maintenance:
If the appliance will not be used for a long time, follow these steps:
Be sure to drain the left-over water condensation. Remove the lower drain plug and use a shallow
1.
pan to collect the water (make sure to replace the deain plug cap when finished).
To dry excess moisture, run the unit in Fan only mode for 30 minutes before storing.
2.
Turn off and unplug the Local Air Conditioner from the power supply.
3.
Remove the dust filter and clean with water. Dry the dust filter and then reinstall.
4.
Disconnecting the Window Installation Kit:
5.
Remove the Hose from the unit by rotating anti-clockwise then pulling away.
•
Remove the Foam Seal, Window Bracket, Window Bracket Panel Adapter and Hose Connector.
•
It is recommended to store the Window Kit parts in a bag together with the Remote Control,
•
Drain Tube and placing them together with the Local Air Conditioner unit.
If needed, you can clean the Window Kit with a damp cloth and water before storing.
•
Make sure all parts of the Window Kit are dry before storage.
Cover the Local Air Conditioner with a cloth/ plastic bag before storage, to protect from dust and
6.
scratches collecting on the surface of the unit.
It is recommended to coil the power cord before storing to ensure the cord is protected from
7.
bents and creases.
Store the Local Air Conditioner in a cool, dry place, away from direct sunlight.
8.
EN
12
Page 17
WATER CONDENSATION DRAINAGE
When there is excess water condensation inside the unit, the Local Air Conditioner stops running
and shows an error code "P1" with an alarm. This indicates that the water condensation needs to be
drained using the following procedures:
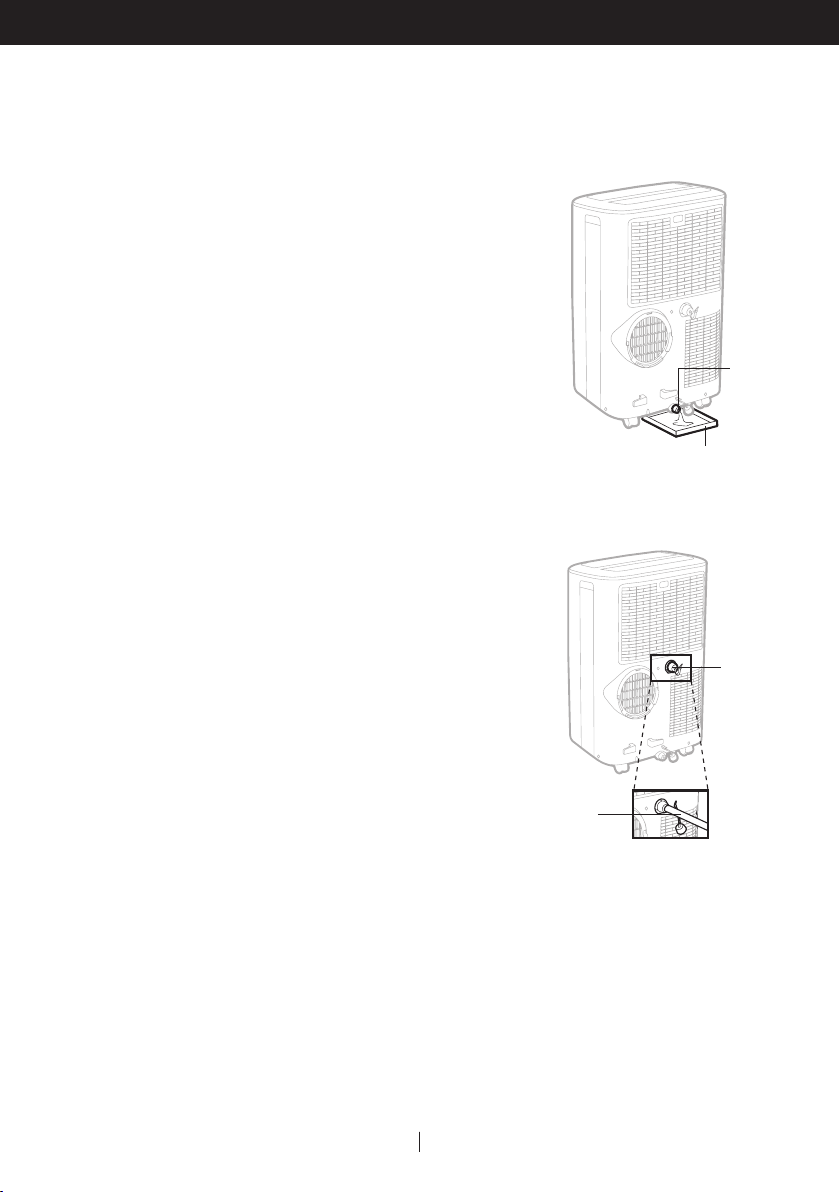
Manual Draining in Cooling, Dehumidifying and Auto Modes
Water may need to be drained in high humidity areas.
Unplug the unit from power source.
1.
Place a shallow pan under the lower rubber drain plug.
2.
See diagram.
Remove the drain plug cap.
3.
Water will drain out and collect in the shallow pan.
4.
After the water is drained, replace the drain plug cap.
5.
You can now turn on the unit.
6.
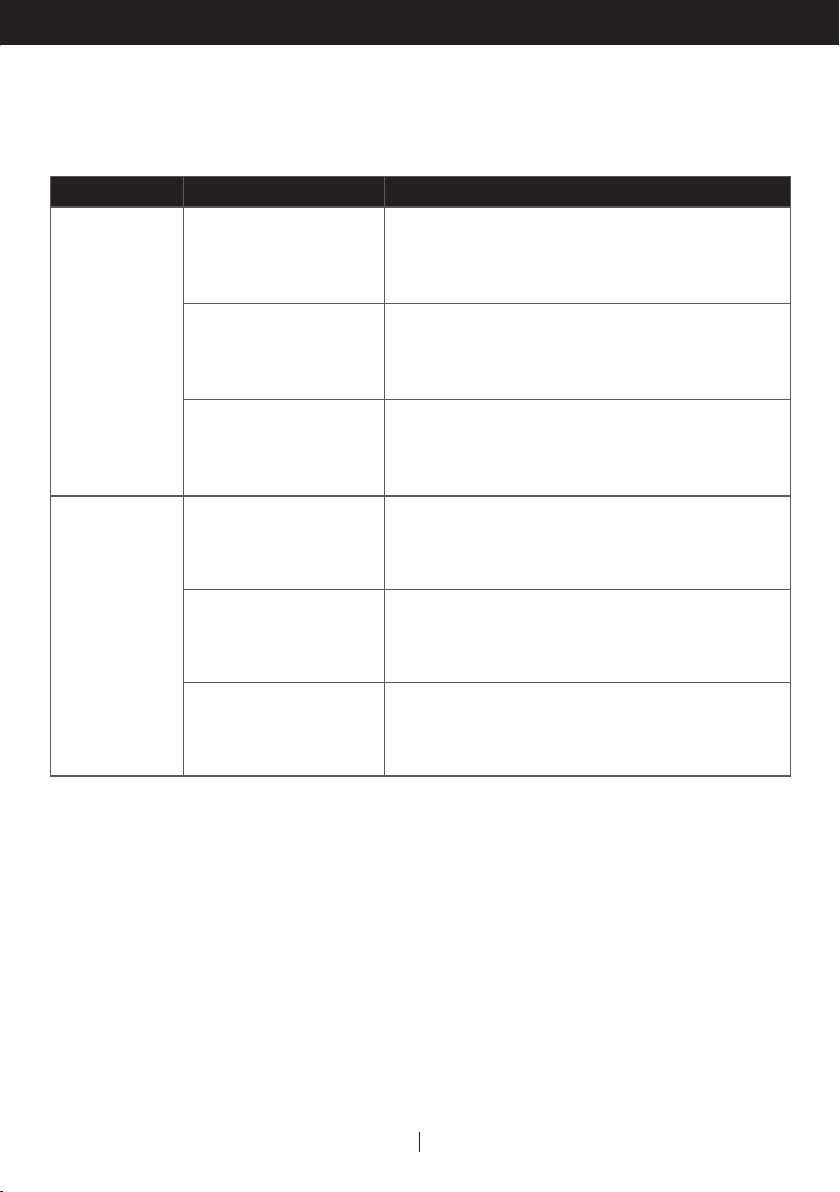
Continuous Draining for Dehumidifier Mode
While using the unit in dehumidifier mode, continuous drainage is recommended.
Unplug the unit from power source.
1.
Remove the upper drain plug cap.
2.
Some residual water may spill so please have a pan to
collect the water.
Connect the drain tube (included) to the upper drain
3.
plug. See diagram.
The water can be continuously drained through the
4.
drain tube into a floor drain or bucket.
Replace the drain plug cap.
5.
You can now turn on the unit.
6.
Lower
Rubber
Drain Plug
Shallow Pan
(not included)
Upper Rubber
Drain Plug
Drain Tube (included):
Dia. 0.6" (1.6 cm)
Length: 23.6" (60 cm)
13EN
Page 18
TROUBLESHOOTING GUIDE
The following troubleshooting guide addresses the most common problems. If problems persist, call
customer support. Unplug and disconnect the appliance from the power source before attempting
to troubleshoot.
PROBLEM POSSIBLE CAUSE SOLUTION
No electricity. Check for power.
The air
conditioning
unit does not
start
Runs a short
while only
Batteries in the remote
control need to be
replaced.
The power cord is not
properly plugged in.
The thermostat
temperature setting
is too close to room
temperature.
Air outlet is blocked. Make sure the hose is properly connected.
There are tight bends in
the air hose.
Change remote control batteries.
Remove and reconnect the power cord.
Lower the set temperature.
Connect hose as per instructions on page 4.
EN
14
Page 19
TROUBLESHOOTING GUIDE (CONTINUED)
PROBLEM POSSIBLE CAUSE SOLUTION
A door or window is open. Make sure the window or door is closed.
The dust filter is dirty. Clean the dust filter.
Runs but not
cooling
The hose is detached.
Temperature setting is
too high.
Air outlet or intake is
blocked.
Room exceeds
recommended size.
Large size or number of
windows are decreasing
cooling effectiveness.
Reinstall hose properly
(refer to Installation section).
Reduce temperature setting.
Remove blockage.
Move unit to smaller room.
Cover windows with curtains or blinds.
Will not run and
error code "P1"
is displayed
Excess water
condensation inside
the tank.
Drain the water (refer to Water Condensation
Drainage).
15
EN
Page 20
ERROR CODE GUIDE
ERROR CODE ERROR POSSIBLE CAUSE
"E1" Indoor temperature sensor failure (open circuit or short circuit).
"E3" Evaporator temperature sensor failure (open circuit or short circuit).
"P1" Water full alarm.
EN
16
Page 21

SÉCURITÉ
LIRE ET CONSERVER CES CONSIGNES
UNE MAUVAISE MANIPULATION PEUT CAUSER DE SERIEUX
DOMMAGE AUX PERSONNES ET A L`APPAREIL. EN CAS
D'INCOHERENCE OU DE CONFLIT ENTRE LA VERSION
ANGLAISE ET TOUT AUTRE VERSION LINGUISTIQUE DU
CONTENU DE CE MATERIEL, LA VERSION ANGLAISE
PRÉVAUDRA.
AVERTISSEMENT:
•
NE PAS utiliser l’appareil avec une prise endommagée ou
une prise murale mal fixée. Si le cordon d’alimentation est
endommagé, il doit être remplacé par le fabricant, son
service après-vente ou une personne de qualification
similaire, afin d'éviter tout danger.
•
NE PAS couvrir la prise, ni l’évacuation d’air pendant
l’utilisation.
•
NE PAS placer d’objets sur l’appareil, ni s’asseoir dessus.
•
Toujours éteindre et débrancher l’appareil au moment du
nettoyage ou de l’entretien.
•
N’utilisez pas l’appareil si ce dernier est endommagé.
•
Pour toute réparation, communiquer avec un agent de
service autorisé.
•
Débrancher l’appareil lorsqu’il est entreposé ou inutilisé.
•
Ne tirez et ne portez pas l’appareil par le cordon
d’alimentation.
•
Ne coincez pas le cordon d'alimentation dans la porte et ne
le tirez pas le long de bords ou angles acérés.
•
NE PAS faire passer le cordon électrique sous la moquette
ou le recouvrir avec un tapis.
•
Faire preuve de prudence pour éviter de trébucher sur le
cordon.
FR
Page 22

SÉCURITÉ (SUITE)
Ne pas utiliser l’appareil dans les cas suivants:
•
- Près d’une source de feu
- Dans les zones où de l'essence, de la peinture ou d'autres
produits inflammables sont stockées
- Dans une zone où de l’eau peut être projetée
•
Ne manipulez ni l’appareil, ni la prise avec les mains
mouillées.
•
Des précautions de sécurité doivent toujours être suivies
lors de l'utilisation d'appareils électriques.
Cet appareil a été fabriqué pour être utilisé en milieu
•
domestique et ne doit pas être utilisé à d’autres fins.
N’utiliser que le kit d’installation fourni pour cet appareil.
•
NE PAS tenter de prolonger le tuyau d’évacuation ou
d’installer cet appareil en recourant à d’autres méthodes
que celles indiquées dans ce manuel. Une installation
inadéquate peut annuler toutes les garanties existantes.
NE PAS utiliser une rallonge électrique avec cet appareil.
•
Cet appareil peut être utilisé par des enfants âgés de 8
•
ans et plus, ainsi que des personnes ayants des capacités
réduites au niveau physique, sensoriel ou mental, ou un
manque d’expérience et de connaissances si ils ont été
supervisés ou instruits à propos de l’utilisation de l’appareil
de manière sûre et s’ils ont compris les risques encourus.
Les enfants de devront pas jouer avec l’appareil. Le
nettoyage ou la maintenance ne devra pas être effectuée
par des enfants, sauf si ces derniers sont âgés de plus de 8
ans et s’ils sont supervisés.
FR
Page 23

SÉCURITÉ (SUITE)
Ne mettez jamais vos doigts ou des objets dans la
•
prise d'air. Faites attention à prévenir les enfants de ces
dangers.
Le fabricant décline toute responsabilité en cas de
•
blessure causée à des personnes ou de dégât matériel
dus à la nonobservation des instructions d’entretien et à
l’usage inadéquat de l’appareil.
L'appareil sera installé en conformité avec les
•
réglementations nationales sur le câblage.
L'appareil ne doit pas être utilisé par des personnes
•
(y compris des enfants) dont les capacités physiques,
sensorielles ou mentales sont réduites, ou qui n'ont pas
l'expérience ou les connaissances nécessaires, sauf
si elles bénéficient d'une surveillance ou ont reçu des
instructions.
Surveiller les enfants pour s’assurer qu’ils ne jouent pas
•
avec l’appareil.
FR
Page 24

R290 SÉCURITÉ
SYMBOLE REMARQUE EXPLICATION
Ce symbole indique que cet appareil utilise un
AVERTISSEMENT
réfrigérant inflammable. Si le réfrigérant fuit et est
exposé à une source d'inflammation externe, il existe
un risque d'incendie.
ATTENTION
ATTENTION
ATTENTION
Avertissements supplémentaires pour les appareils avec gaz réfrigérant R290
Lisez attentivement les instructions avant d'utiliser l'appareil.
•
Le gaz réfrigérant R290 est conforme aux directives environnementales européennes.
•
Cet appareil contient un certain nombre de grammes (voir l'étiquette signalétique à l'arrière de
•
l'appareil) de gaz réfrigérant R290. La quantité maximale de charge de réfrigérant est de 0.3 kg.
Lors du dégivrage ou du nettoyage, n'utilisez aucune méthode autre que celles recommandées
•
par le fabricant.
Ne placez pas l’appareil dans une pièce présentant des sources d’ignition continues (p. ex.
•
flamme nue, appareil à gaz en marche ou appareil de chauffage électrique en marche).
Ne pas percer et ne pas brûler.
•
Ne perforez aucune partie du circuit de réfrigérant.
•
Le gaz réfrigérant peut être inodore.
•
L'appareil doit être installé, utilisé et stocké dans une zone supérieure à 12 m2.
•
L'accumulation de fuites éventuelles de réfrigérant dans une pièce non ventilée pourrait
•
provoquer un incendie ou une explosion si le réfrigérant entrait en contact avec des radiateurs
électriques, des cuisinières ou d'autres sources d'inflammation.
L'appareil doit être rangé de manière à éviter les dommages mécaniques.
•
Seules les personnes autorisées par un organisme accrédité certifiant leur compétence à
•
manipuler des frigorigènes conformément à la législation du secteur doivent travailler sur le
circuit frigorifique.
Les réparations doivent être effectuées conformément aux recommandations du fabricant.
•
L'entretien et les réparations nécessitant l’assistance d’un autre personnel qualifié doivent être
•
effectuées sous la supervision de spécialistes de l’utilisation de réfrigérants inflammables.
Ce symbole indique que le mode d'emploi doit être lu
attentivement.
Ce symbole indique qu'un personnel de service
devrait manipuler cet équipement en se référant au
Manuel d'installation.
Ce symbole indique que des informations sont
disponibles, telles que le manuel d'utilisation ou le
manuel d'installation.
FR
Page 25
MERCI
Nous vous félicitons d’avoir acheté ce climatiseur local de Honeywell.
En ce qui concerne les informations pour l'installation, la manipulation, l'entretien, le nettoyage et la
mise au rebut de l’appareil, référez-vous aux paragraphes ci-après de la notice.
CONSEILS D'UTILISATION
Les climatiseur local de Honeywell sont idéaux pour le refroidissement localisé. Le compresseur, le
condenseur et l’évaporateur sont logés dans une enceinte compacte. L’air est filtré, déshumidifié
et refroidi tandis qu’un tuyau de sortie d’air souple évacue la chaleur à l’extérieur. Le climatiseur
comprend une trousse d’évacuation pour fenêtre. Aucune installation permanente n’est requise.
L’appareil est facile à déplacer de pièce en pièce et offre une solution de climatisation véritablement
flexible.
Système d’évaporation automatique - Le dispositif évacue automatiquement la chaleur par le tuyau
de sortie d’air. Sauf en présence d’une humidité très élevée, la vidange du réservoir n’est pas requise.
Lire attentivement les consignes et les suivre minutieusement.
Pour assurer l’efficacité optimale du produit, garder les portes et les fenêtres fermées quand il est
utilisé comme climatiseur local ou déshumidificateur. Si seule la fonction de ventilation du dispositif
est en marche, ouvrir une fenêtre pourrait améliorer la circulation de l’air.
Refroidissement et fonction
de déshumidification
Important:
Avant d'installer l'appareil, placez le en position verticale 1 heure avant de l'utiliser pour permettre au
réfrigérant de se stabiliser. La sortie d'air s'ouvre automatiquement lorsque l'appareil est allumé et se
ferme automatiquement lorsque l'appareil est éteint. Ajustez manuellement le ventilateur localisé sur
le haut de l'appareil afin d'ajuster la direction du flux d'air.
Suivre les consignes d’installation de l’appareil.
•
Brancher l’appareil à un circuit mis à la terre. NE PAS brancher au moyen d'une rallonge
•
électrique.
FR
Fonctionnement du
ventilateur
1
Page 26

DESCRIPTION DES PIÈCES
1
2
3
6
5
7
°F
°C
14
4
1) Panneau de commande 8) Filtre à saupoudrer
2) Sortie d’air 9) Bouchon de vidange superieur
3) Poignée 10) Filtre à saupoudrer inferieur
en caoutchouc (mode dehumidifier)
8
9
10
11
12
13
4) Roulettes 11) Tube de drainage
5) Télécommande 12) Cache du bouchon
6) Raccord du tuyau d’évacuation 13) Bouchon de vidange inferieur
7) Enrouleur de cablage 14) Cordon d’alimentation
FR
(pour un drainage continu)
de vidange
en caoutchouc (en mode
climatisation)
2
Page 27

INSTALLATION
Il est important que les consignes d’installation ci-dessous soient respectées pour réussir
l’installation de ce climatiseur local. Si vous éprouvez des difficultés ou avez des questions concernant
ces procédures d’installation, veuillez communiquer avec notre service à la clientèle.
1
x1
5
x1
Kit d’installation:
1. Trousse de supports
pour fenêtre
2. Adaptateur de support de
fenêtre pour panneau
3. Raccord de tuyau (1 pièce) 7. Joint en mousse (non adhésif) (1 pièce)
4. Cheville de plastique (2 pièces)
Étapes de l’installation:
L'adaptateur de support de fenêtre, le tuyau et le raccord de tuyau sont pré-assemblés dans
1.
l'emballage.
2 3
x1
6
x2 x1
(1 jeu) 5. Tuyau (1 pièce)
(1 pièce) 6. Joint en mousse (adhésif) (2 pièces)
x1
7
4
x2
2. Ajustez le support de fenêtre selon la largeur ou la hauteur de votre fenêtre et insérez l'attache en
plastique pour fixer à la position désirée. Un trou a été créé pour permettre l'insertion du tuyau à
une étape ultérieure. Assurez-vous de ne pas bloquer le trou.
Cheville de
plastique
Support paneau adaptateur de
26.6", 36.2" to 52"
(67.5 cm, 92 cm à 132 cm)
la fenetre et Tuyau d'échappement
3FR
Page 28
INSTALLATION (SUITE)
Remarque: Après avoir réglé le support de fenêtre à la taille de votre fenêtre, il convient de l'en retirer
et de suivre les instructions ci-dessous.
3. Raccordez le tuyau à la sortie d'échappement arrière située à l'arrière de l'appareil. Insérez le
raccord de tuyau, puis tournez dans le sens des aiguilles d'une montre jusqu'à ce qu'il soit fixé en
place.
Tuyau:
Dia. 5.9" (15 cm)
Length: 10.6" à 59" (27 cm à 150 cm)
4. Raccordez le support de fenêtre à l'adaptateur de support de fenêtre. Vérifiez que tous les
raccordements sont bien serrés et correctement installés.
Coupez le joint en mousse (adhésif) à la longueur appropriée et attachez les joints au châssis et
5.
au cadre de la fenêtre.
Fenêtre coulissante horizontale Fenêtre coulissante verticale
4FR
Page 29
INSTALLATION (SUITE)
6. Installer le support de fenêtre dans la fenêtre.
Fenêtre coulissante horizontale Fenêtre coulissante verticale
7. Coupez le joint en mousse (non adhésif) à la longueur de la fenêtre. Bourrez le joint en mousse
(non adhésif) entre le châssis de la fenêtre interne et la vitre de la fenêtre externe de manière à
empêcher l'air et les insectes de pénétrer dans la pièce.
Châssis
de fenêtre
Châssis
de fenêtre
Joint en
mousse
(adhésif)
Joint en mousse
(non adhésif)
Joint en mousse
(adhésif)
Fenêtre coulissante horizontale Fenêtre coulissante verticale
8. Le climatiseur local est maintenant prêt à être utilisé.
5FR
Joint en mousse
(non adhésif)
Page 30
INSTALLATION (SUITE)
Important:
Ne pas le remplacer ni le rallonger, car cela pourrait provoquer le fonctionnement défectueux de
l’appareil.
20" (50 cm)
MIN 31 cm
MAX. 12" (31 cm)
MAX. 43" (110 cm)
DÉCONSEILLÉ RECOMMANDÉ
AVERTISSEMENT: Toute garantie visant ce produit sera annulée si un tuyau de rallonge
supplémentaire est ajouté au kit d’installation fournie initialement ou si l’installation est effectuée
sans suivre les consignes du fabricant et sans consultation appropriée. S’il y a lieu, veuillez
communiquer avec le service à la clientèle pour obtenir de l’aide à l’égard des procédures
d’installation.
Le diamètre du tuyau d’évacuation fourni est de 5.9" (15 cm) et celui-ci peut être déployé de
•
10.6" à 59" (27 cm à 150 cm).
Ne pas plier le tuyau d’évacuation (de la façon illustrée ci-dessous). Un tuyau plié empêchera
•
l’évacuation de l’air et provoquera le fonctionnement défectueux ou l’arrêt de l’appareil.
Assurez-vous d’une distance minimale de 20" (50 cm) entre l’arrière de l’appareil et un mur. Ne
•
pas placer l'appareil en face de rideaux ou tentures, car cela pourrait gêner la circulation de l'air.
Remarque: En raison de la puissance absorbée par l’appareil au démarrage, des chutes de tension
peuvent se produire et affecter d'autres équipements (par exemple diminuer l'intensité des lumières).
Assurez-vous que l'unité est raccordée à une source d'impédance système maximale admissible
Zmax = 0.306 Ohm. Si vous avez besoin de plus amples précisions, vous pouvez contacter l’autorité
locale chargée de l’alimentation.
FR
6
Page 31

UTILISATION ET FONCTIONNEMENT
PANNEAU DE COMMANDE TACTILE
(6) (4) (3) (2)
(7)(8) (5)
(1)
1) Voyants lumineux 5) Commande de la minuterie /
2) Interrupteur 6) Commande du mode
3) Réinitialisation de filtre 7) Commande de la minuterie
4) Commande de la
vitesse du ventilateur
TOUCHES DE FONCTION
INTERRUPTEUR
L’interrupteur permet de mettre l’appareil en marche et de l’éteindre. Lorsque l'appareil est
branché, mais éteint, la touche de mise en marche reste allumée pour indiquer qu'il est en mode
Veille, prêt à être mis en marche. Le ventilateur ouvrira automatiquement lorsque l'appareil est
allumé et se fermera automatiquement lorsque l'appareil est éteint.
RÉINITIALISATION DE FILTRE
Lorsque l'appareil a atteint 250 heures d'utilisation, le voyant lumineux de la Réinitilisation de filtre
s'allumera. Éteignez (OFF) le climatiseur local et retirez soigneusement les filtres de l'appareil et
procédez au nettoyage. Remplacez les filtres et appuyez sur le bouton de réinitialisation de filtre; le
voyant lumineux de réinitialisation de filtre s'éteindra et le temps d'utilisation sera réinitialisé.
COMMANDE DE LA VITESSE DU VENTILATEUR
4 églages: Élevée, Moyenne, Faible et Auto.
réglage de la température
8) Commande de la sommeil
Remarque: La vitesse de ventilation Auto peut être sélectionnée en mode de refroidissement
uniquement.
FR
7
Page 32

UTILISATION ET FONCTIONNEMENT (SUITE)
TOUCHES DE FONCTION (SUITE)
RÉGLAGE DE LA TEMPÉRATURE
L’affichage par défaut indique la température ambiante.
•
En mode refroidissement, quand la touche ou est enfoncée, la température sélectionnée est
•
affichée et peut être réglée.
Remarque: En appuyant sur les touches de réglage ou en même temps, l’affichage
basculera entre Celsius(°C) et Fahrenheit(°F).
COMMANDE DU MODE
Réglages: Refroidissement, Déshumidification et Ventilation, Auto.
Un voyant indique le réglage de la fonction utilisée.
Mode refroidissement
•
Régler la vitesse du ventilateur et la température de l’air de manière à vous sentir à l’aise.
La plage de réglage de la température est de 16°C à 32°C (de 60°F à 90°F).
La plage de température ambiante est de 16°C à 35°C (60°F à 95°F).
Mode déshumidification
•
La vitesse du ventilateur est réglée à Faible.
Remarque: Si l’appareil est utilisé principalement en tant que déshumidificateur, ne pas brancher
le tuyau d’évacuation. La vidange continue est alors requise (se référer à la section Vidange
continue en mode déshumidification).
AVERTISSEMENT: Le mode Déshumidification est utilisé afin d'aider à réduire le taux d'humidité,
mais la déshumidification n'atteint pas le même niveau qu'avec un appareil humidificateur
classique, uniquement conçu à cet effet. Le déshumidificateur intégré règle automatiquement la
déshumidification d'après la température des pièces ambiantes. Il n'est pas possible de régler à un
pourcentage d'humidité désiré. L'afficheur avant indique uniquement les températures actuelles et
souhaitées. Il ne montre pas les taux d'humidité.
Mode ventilation
•
Pour une circulation de l'air sans refroidissement par climatiseur local.
Remarque: La vitesse automatique du ventilateur ne peut pas être sélectionnée en mode
ventilateur.
Mode Auto
•
Appuyez sur le bouton ou pour sélectionner la température désirée.
Dans ce mode, l'appareil sélectionnera automatiquement le refroidissement ou la ventilation en
fonction de la température réglée et de la température de la pièce. Le climatiseur local contrôlera
automatiquement la température de la pièce autour de la température réglée.
Remarque: La vitesse de ventilation ne peut pas être ajustée en mode auto.
FR
8
Page 33

UTILISATION ET FONCTIONNEMENT
TOUCHES DE FONCTION (SUITE)
COMMANDE DE LA MINUTERIE
La minuterie est réglable entre 1 - 24 heures.
ARRÊT AUTOMATIQUE:
Pendant que l'unité est en marche, appuyez sur le bouton de la minuterie et l'écran va clignoter.
Quand l’écran clignotera, appuiyer sur le boutton ou pour selectioner le nombre d’heures
desireés pour que l unité s’ éteigne automatiquement.
MISE EN MARCHE AUTOMATIQUE:
Pendant que l’appareil est en mode attente (branché, avec le voyant allumé), appuyez sur le bouton
de la minuterie et l'écran va clignoter. Quand l’écrant clignotera, appuiyez sur le boutton ou
pour séléctionez le nombre d heures désireés pour que l unite s’ éteigne automatiquement.
MODE EN VEIILLE
Lorsque le mode en veille est choisi en mode climatiseur , la temperature reglée augmentera de 1°F
ou de 1°C après la premiere heure de refroidissement, et augmentera encore de 1°F ou 1°C aprés la
deusieme heure de refroidissement. Cette unite vas maintenir cette temperature pendant 5 heures.
La temperature reglee réduira alor de 1°F ou 1°C a la septieme heure et seras encore reduite de 1°F
ou 1°C a la disieme heure. Le mode en veille sera alor reactive automatiquement.
Remarque: Le mode en veille pourrait être désactivé en mode refroidissement en pressent sur n
importe quel boutton à n'importe quel moment.
ALARME DU NIVEAU D'EAU MAXIMAL
L'eau de condensation peut s'accumuler dans l'appareil.
Une condensation peut s'accumuler dans l'appareil. Lorsque le réservoir interne est plein, un code
d'erreur "P1" s'affichera et une alarme émettra un signal sonore pendant 30 secondes. L'appareil
ne fonctionnera pas avant que l'eau ait été drainée à partir du bouchon de vidange (voir la section
Drainage de l'eau de condensation).
Après avoir eteint le climatiseur local, le compresseur ne démarrera pas immédiatement aprés.
Vous devezattendre 4 minutes avant de le re mettre en marche.
FR
9
Page 34

UTILISATION ET FONCTIONNEMENT
TÉLÉCOMMANDE
La télécommande permet de régler toutes les principales fonctions.
Interrupteur
MARCHE / ARRÊT
Réglage de la température
Après avoir appuyé sur le bouton
ou , la température réglée
s'affiche et doit être ajustée
Commande du mode
Appuyer sur cette touche pour
changer le mode de fonctionnement
Refroidissement Déshumidification
Auto
Ventilation
Mode en veiille
MARCHE / ARRÊT
°F
°C
Remarque:
Retirer le couvercle au dos de la télécommande et insérer deux piles AAA en les plaçant
•
conformément à l’indicateur de polarité.
Commande de la minuterie
•
En mode de fonctionnement : Arrêt
automatique En mode veille : Mise en
marche automatique Appuyez sur les
boutons ou pour ajuster le temps à
des intervalles de 1 heure.
•
Le réglage de la minuterie s'effectue entre
1 et 24 heures en appuyant sur le bouton
ou .
•
Lorsque la minuterie est réglée, le fait
d'appuyer sur le bouton ou annulera
le réglage de la minuterie.
Commande de la vitesse du ventilateur
• Élevée • Moyenne • Faible • Auto
Commande d'oscillation
Ce bouton permet l'oscillation vers
le haut et le bas des grilles d'aération de
la sortie d'air. Après un second appui, le
bouton désactive la fonction d'oscillation.
L'oscillation peut seulement être réglée à
partir de la télécommande.
Attention:
Utiliser seulement deux piles AAA ou IEC R03 1,5 V.
•
Retirer les piles si la télécommande n'est pas utilisée pendant un mois ou plus.
•
Toutes les piles doivent être remplacées en même temps; ne pas mélanger avec des piles déjà
•
utilisées.
Ne pas mélanger les piles alcalines, standard (zinc-carbone) ou rechargeables (nickel-cadmium).
•
Disposer des piles usagées selon les consignes du fabricant.
•
10FR
Page 35

NETTOYAGE ET ENTRETIEN
Entretien de l’appareil:
Éteindre l'appareil avant de débrancher l'alimentation électrique.
1.
Toujours nettoyer l’appareil à l’aide d’un chiffon sec et doux.
2.
Entretien du filtre à poussière:
Le filtre à poussière doit être nettoyé toutes les deux semaines.
Nettoyer comme suit:
Éteindre et débrancher le climatiseur local.
1.
Éteindre l'appareil et retirer le filtre à la grille/ le filtre inférieurs.
2.
Retirez le filtre/ grille supérieure et dévisser le filtre/ grille
3.
inférieure et retirez soigneusement. Voorzichtig wassen met
water en/ of verdund vloeibaar afwasmiddel. Spoel grondig
en schud het overtollige water uit de filters. Zorg ervoor dat
de filters droog zijn voordat deze opnieuw installeren.
Remarque: U kunt een stofzuiger te gebruiken om stof
Grille
arrière
te verwijderen.
Placer la grille supérieur sur l'unite et réinstallez la grille
4.
inférieur en la vissent.
AVERTISSEMENT: NE PAS alimenter ou utiliser le climatiseur local lors du nettoyage ou lorsque
le filtre à poussière est retirés de l’appareil ou s’il existe un filtre anti-poussière mal ajusté. NE PAS
essayer de manipuler ou de toucher des pièces ou des câbles à l’intérieur du gril arrière après le
retrait du filtre antipoussière de l’appareil. Cela pourrait provoquer des blessures graves ou un choc
électrique.
Filtre à
poussière
supérieur
11FR
Page 36

NETTOYAGE ET ENTRETIEN (SUITE)
Entretien et entreposage de fin de saison:
Si l’appareil n’est pas utilisé pendant une longue période, Suivez ces étapes:
S’assurer de drainer l’eau condensée restante. Retirer le bouchon de vidange inférieur et utiliser
1.
un plat peu profond pour recueillir l’eau (s’assurer de remettre le bouchon en place par la suite).
Pour éliminer l’excès d’humidité, faire fonctionner l’appareil en mode ventilation pendant 30
2.
minutes avant de le ranger.
Éteindre et débrancher le climatiseur local.
3.
Retirer le filtre et le rincer à l’eau. Après le rinçage, laisser sécher le filtre dans un endroit ombragé
4.
et frais, puis le réinstaller.
Retirer la trousse d’installation pour la fenêtre:5.
Retirez le tuyau d'échappement de l'unité en appuyant sur le bouton de déverrouillage situé
•
sur le côté droit du tuyau, puis en faisant glisser le tuyau vers la droite.
Retirer le support de fenêtre, l’adaptateur du support et le raccord du tuyau.
•
Il est recommandé de ranger les pièces de la trousse de fenêtre dans un sac avec la
•
télécommande et de les placer avec le climatiseur local.
Si nécessaire, nettoyer la trousse de fenêtre avec un chiffon humide et de l’eau avant
•
de la ranger.
Couvrir le climatiseur local avec un sac de tissu ou de plastique avant l’entreposage, à l’abri de
6.
l’accumulation de poussière et des éraflures sur la surface de l’appareil.
Il est recommandé d’enrouler le cordon d’alimentation, et de ne pas le laisser au sol afin d’éviter
7.
qu’il soit plié ou autrement endommagé.
Entreposer le climatiseur local dans un endroit frais et sec, à l'abri de la lumière directe.
8.
12FR
Page 37

IDANGE DE L’EAU DE CONDENSATION
Lorsque l'eau de condensation se trouve en quantité excessive à l'intérieur de l'appareil, le climatiseur
local s'arrête de fonctionner; un code d'erreur "P1" s'affiche et une alarme se met en route. Cela
indique que l'eau de condensation doit être évacuée conformément aux procédures suivantes:
Évacuation manuelle pendant les modes de refroidissement,
déshumidification
Dans les régions où l’humidité est très élevée, la vidange
de l’eau peut se révéler nécessaire.
Débranchez l'appareil à partir de la source d'alimentation.
1.
Placez le bac de vidange sous le bouchon de vidange en
2.
caoutchouc inférieur. Voir le diagramme.
Retirez le cache du bouchon de vidange.
3.
L'eau s'évacue et sera récupérée dans le récipient peu profond.
4.
Une fois que l'eau a été drainée, replacez le cache du bouchon
5.
de vidange.
L’appareil peut maintenant être remis en marche.
6.
Vidange continue en mode déshumidification
Lorsque l’appareil est utilisé en mode déshumidification,
la vidange continue est recommandée.
Bouchon de
vidange inferieur
en caoutchouc
Récipient peu
profond
(non compris)
Débrancher l’appareil.
1.
Retirez le bouchon du bouchon de vidange supérieur.
2.
Il est donc conseillé d’avoir un récipient à portée de
main pour recueillir l’eau.
Raccordez le tube de vidange (inclus) au bouchon de
3.
vidange supérieur. Voir le diagramme.
L'eau peut être évacuée en continu à travers le tube
4.
de vidange dans une terre a drainer ou un seau.
Remettre le bouchon en place.
5.
L’appareil peut maintenant être remis en marche.
6.
Tube de drainage (included):
Dia. 0.6" (1.6 cm)
Length: 23.6" (60 cm)
13FR
Bouchon
de vidange
supérieur
Page 38

GUIDE DE DÉPANNAGE
Le guide de dépannage suivant aborde les problèmes les plus courants. Si le problème persiste,
appeler le service à la clientèle. Débrancher l’appareil de la prise murale et en retirer le tuyau de
plastique fixé à l’arrière avant de tenter de résoudre les problèmes.
PROBLÈME CAUSSE POSSIBLE SOLUTION
Il n'y a pas d'électricité. Vérifier l'alimentation.
Il est impossible
de mettre
l’appareil en
marche
Ne fonctionne
que pendant
une courte
période
Les piles de la
télécommande
doivent être remplacées.
Le cordon d'alimentation
n'est pas correctement
branché.
Le réglage de la
température du
thermostat est trop
près de latempérature
ambiante.
La sortie d’air est obstruée.
Le tuyau d’évacuation
est fortement replié
sur lui-même.
Changer les piles de la télécommande.
Débrancher, puis rebrancher le cordon
d’alimentation.
Abaisser la température réglée.
S'assurer que le tuyau d'évacuation est
correctement branché.
Brancher le tuyau d’évacuation selon
les consignes à la page 3.
FR
14
Page 39

GUIDE DE DÉPANNAGE (SUITE)
PROBLÈME CAUSSE POSSIBLE SOLUTION
Fonctionne,
mais sans
refroidir
Une porte ou une fenêtre
est ouverte.
Le filtre à poussière
doit être nettoyé.
Le tuyau d'évacuation est
détaché.
Le réglage de la
température est trop élevé.
L’entrée ou la sortie d’air
est obstruée.
La taille de la salle
dépasse la taille de salle
recommandé.
S’assurer que la fenêtre ou la porte est fermée.
Nettoyer le filtre à poussière.
Réinstaller le tuyau d’évacuation correctement
(se référer à la section installation).
Abaisser la température au moyen du panneau de
commande.
Éliminer l’obstruction.
Deplacer l unite a une plus petite salle.
L'appareil ne
fonctionnera
pas et un code
d'erreur "P1"
s'affichera.
Une grande taille ou le
nombre de fenêtre peut
diminuer l’efficacité de
refroidissement.
Excès d’eau de
condensation à
l’intérieur du réservoir.
Couvrir les fenêtres avec des rideaux ou des stores.
Vidanger l’eau (se référer à la section
vidange de l’eau de condensation).
15
FR
Page 40

GUIDE SUR LES CODES D'ERREUR
CODE D'ERREUR POSSIBLE CAUSE D'ERREUR
"E1"
"E3"
"P1" Alarme de niveau d'eau maximum.
Panne du capteur de température intérieure
(circuit ouvert ou court circuit).
Panne du capteur de température de l'évaporateur
(circuit ouvert ou court circuit).
FR
16
Page 41

SEGURIDAD
LEA Y GUARDE ESTAS INSTRUCCIONES
LÉALAS DETENIDAMENTE Y GUÁRDELAS PARA FUTURA
REFERENCIA. EN CASO DE EXISTIR ALGUNA DISCREPANCIA
O CONFLICTO, EN EL CONTENIDO DE ESTE MATERIAL,
ENTRE LA VERSIÓN EN INGLÉS Y LA VERSIÓN EN
CUALQUIER OTRO IDIOMA PREVALECERÁ LA VERSIÓN EN
INGLÉS.
PRECAUCIÓN:
•
Si el cordón de alimentación es dañado, éste debe sustituirse
por el fabricante, por su agente de servicio autorizado o por
personal calificado con el fin de evitar un peligro.
•
NO cubra la entrada de aire y de escape cuando está en uso.
•
NO coloque objetos sobre la unidad ni se siente en la unidad.
•
Siempre apague y desconecte la unidad cuando la limpie o
repare.
•
NO ponga la unidad en funcionamiento si se encuentra
dañada o si funciona mal.
•
Si es necesario contacte a un agente de servicio autorizado.
•
Desconectar la unidad cuando no esté en uso o en
reparación.
•
NO tire o lleve el aparato por el cable de alimentación.
•
NO atorar el Cable de alimentación eléctrica y no tire de ella
a lo largo de los bordes o esquinas afiladas.
•
NO atorar el cable de alimentación en la puerta y no tire de
ella a lo largo de los bordes o esquinas afiladas.
•
Tenga cuidado para evitar tropezar con el cable.
•
NO utilizar el aparato en los siguientes casos:
- Cerca del fuego
- En áreas donde haya gasolina, pintura u otros productos
flameables almacenados
- En un área donde se pueda proyectar el agua
ES
Page 42

SEGURIDAD (CONTINUACIÓN)
NO operar el aire acondicionado cuando esté mojado.
•
Las precauciones básicas de seguridad siempre se deben
•
seguir cuando se utilizan aparatos eléctricos.
Este producto ha sido fabricado para uso habitacional y no
•
debe ser utilizado para otros propósitos.
Utilice solo el kit de instalación proporcionado para
•
instalar esta unidad. Utilice solo el kit de instalación
proporcionado para instalar esta unidad. NO intente
extender la manguera de escape o instalar esta unidad
mediante otros métodos que no sean los indicados en
este manual. La inapropiada instalación puede anual su
garantía.
NO UTILICE un cable de extensión con esta unidad.
•
Este aparato puede ser utilizado por niños de 8 años y
•
mayores y las personas con capacidades físicas, sensoriales o
mentales reducidas o falta de experiencia y conocimiento, si
se les ha dado la supervisión o instrucciones relativas al uso
del aparato de una manera segura y comprenda los peligros
involucrado. Los niños no deben jugar con el aparato.
La limpieza y mantenimiento del equipo no debe ser hecho
por los niños sin supervisión.
Nunca insertar los dedos o barras en la salida de aire.
•
Tenga especial cuidado para advertir a los niños de estos
peligros.
ES
Page 43

SEGURIDAD (CONTINUACIÓN)
El fabricante no se hace responsable de los daños
•
causados a las personas o daños a la propiedad debido a
incumplimiento de las instrucciones de mantenimiento y el
uso indebido del aparato.
El aparato se instalará de acuerdo con las normas nacionales
•
de cableado.
Este equipo no se destina para utilizarse por personas
•
(incluyendo niños) cuyas capacidades físicas, sensoriales o
mentales sean diferentes o estén reducidas o carezcan de
experiencia o conocimiento a menos que dichas personas
reciban una supervisión o capacitación para el
funcionamiento del aparato.
Los niños deben ser supervisados para no jugar con el
•
equipo.
ES
Page 44

R290 SEGURIDAD
SÍMBOLO NOTA EXPLICACIÓN
Este símbolo muestra que la unidad utiliza un
ADVERTENCIA
refrigerante inflamable. Si el refrigerante se fuga y
se expone a una fuente de ignición externa, existe
riesgo de incendio.
PRECAUCIÓN
PRECAUCIÓN
PRECAUCIÓN
Advertencias adicionales para unidades con refrigerante de gas R290
Leer cuidadosamente las instrucciones antes de usar la unidad.
•
El gas refrigerante R290 cumple con las directivas ambientales europeas.
•
Este aparato contiene una cierta cantidad de gramos (consultar la etiqueta en la parte
•
posterior de la unidad) de gas refrigerante R290. La cantidad máxima de carga de
refrigerante es de 0,3 kg.
Al descongelar o limpiar, no utilizar ningún método que no sea el recomendado por el fabricante.
•
No colocar la unidad en una habitación con fuentes continuas de ignición (por ejemplo, flama
•
abierta, aparato de gas en funcionamiento o calefactor eléctrico en funcionamiento).
No perforar y no quemar.
•
No perforar ninguna parte del circuito de refrigeración.
•
El gas refrigerante puede ser innodoro.
•
La unidad debe instalarse, utilizarse y almacenarse en un área superior a los 12 m2.
•
La acumulación de posibles fugas de refrigerante en una habitación sin ventilación podría
•
provocar un incendio o una explosión si el refrigerante entra en contacto con calentadores
eléctricos, estufas u otras fuentes de ignición.
La unidad debe almacenarse de forma que se eviten daños mecánicos.
•
Solo personas autorizadas por una organización acreditada que certifique su competencia para
•
manejar refrigerantes de conformidad con la legislación de la industria deben trabajar en el
circuito de refrigerante.
La reparación de la unidad debe realizarse según las recomendaciones del fabricante.
•
El mantenimiento y la reparación que requieran la asistencia de otro personal calificado deben
•
realizarse bajo la supervisión de especialistas en el uso de refrigerantes flamables.
Este símbolo muestra que el manual de operación
debe leerse cuidadosamente.
Este símbolo muestra que el personal de servicio
debe estar manejando esta unidad con referencia al
manual de instalación.
Este símbolo muestra que la información está
disponible tanto en el manual de operación como
en el manual de instalación
ES
Page 45

AGRADECIMIENTO
Felicidades por la compra de este versátil Aire Acondicionado Local Honeywell.
En cuanto a información relativa a la instalación, manipulación, servicio, limpieza y eliminación del
aparato, agradeceremos consultar el siguiente párrafo del manual.
USO RECOMENDADO
Aire Acondicionado Local son ideales para el enfriamiento de lugares. El compresor, condensador
y evaporador están alojados dentro de una unidad compacta. El aire es deshumidificado y enfriado
mientras una manguera flexible de drenado de aire envía el calor al exterior. Una manguera
flexible de salida de aire envía el calor al exterior. Esta unidad incluye un juego de accesorios para
ventanas. Los acondicionadores local de aire portátiles le ofrecen una solución flexible para el
acondicionamiento de aire.
Sistema de auto evaporación - La unidad evapora automáticamente la humedad condensada
a través de la manguera de drenado de aire. No hay necesidad de vaciar el tanque de drenaje.
Lea cuidadosamente estas instrucciones.
Para asegurar una eficiencia óptima del producto, recomendamos mantener las puertas y ventanas
cerradas cuando esté en operación como acondicionador local de aire o deshumidificador. Si el
producto se usa tan sólo con la función de ventilador, coloque la unidad cerca de una ventana
abierta, de manera que la unidad pueda atraer el aire exterior, y el aire que circula en la habitación
salga por la puerta.
Enfriador, Operación
Deshumidificante
Importante:
Después de transportarlo, coloque la unidad en posición vertical para permitir que el refrigerante se
estabilice y espere 1 hora antes de usarlo. Ajuste manualmente la ventila de aire localizada en la
parte superior de la unidad, para ajustar la dirección del flujo de aire.
Siga las instrucciones de instalación para configurar su unidad.
•
Conecte la unidad a un circuito conectado adecuadamente a tierra.
•
No conectar a un cable con extensión.
Función Ventilador
1ES
Page 46

DESCRIPCIÓN DE PARTES
1
2
3
9
6
5
4
1) Panel de Control 8) Filtro de Polvo Superior
2) Salida de Aire 9) Tapón de Goma de Drenaje Superior
3) Manija 10) Filtro de Polvo Inferior
7
°F
°C
12
14
(Modo Deshumidificador)
13
8
10
11
4) Ruedas 11) Manguera de Drenaje
5) Control Remoto 12) Cubierta del Tapón del Drenaje
6) Conector de la Manguera 13) Tapón de Goma de Drenaje Inferior
7) Carrete para Cable 14) Cable de Corriente Eléctrica
(para continuo drenaje)
(Modo Aire Acondicionado)
2ES
Page 47

INSTALACIÓN
Es importante que las instrucciones de instalación se siguen para la correcta instalación de este
Aire Acondicionado Local. Por favor llamar al Centro de Atención a Clientes si usted tiene cualquier
dificultad o duda con respecto a estos procedimientos de instalación.
1
x1
5
x1
Kit de Instalación:
1. Equipo Deslizante para
Ventana / Puerta
2. Adaptador para Panel
de Ventana
3. Conector de Manguera (1 Pieza) 7. Sello de Espuma (no adherible) (1 Pieza)
4. Pasador de Drenado (2 Piezas)
Pasos de la Instalación:
El adaptor del panel del soporte de ventana, manguera y contacto de la manguera están
1.
preensamblados dentro del paquete.
2 3
x1
6
x2 x1
(1 Juego) 5. Manguera (1 Pieza)
(1 Pieza) 6. Sello de Espuma (adherible) (2 Piezas)
x1
7
4
x2
2. Ajuste el soporte de la ventana a la altura y el ancho de su ventana e inserte el pasador de
plástico para fijar la posición deseada. Hay un agujero donde la manguera se insertará después.
Asegúrese de que este agujero no esté bloqueado.
Pasador de Drenado
Agujero para el Soporte de
26,6", 36.2" a 52"
(67,5 cm, 92 cm a 132 cm)
Ventana. Adaptador del
Panel y Manguera
3ES
Page 48

INSTALACIÓN (CONTINUACIÓN)
Nota: Después de ajustar el Adaptador de Soporte De Ventana al tamaño de su ventana removerlo
de la misma y seguir las siguientes instrucciones.
3. Conecte la manguera al escape de salida posterior en la parte de atrás de la unidad. Deslice hacia
adentro el conector de la manguera, luego gírelo en dirección a las manecillas del reloj, hasta que
este cerrado en su lugar.
Manguera
Diámetro: 5,9" (15 cm)
Longitud: 10,6" a 59" (27 cm a 150 cm)
4. Conecte el soporte de ventana al adaptador del panel del soporte de ventana. Asegúrese de que
todas las conexiones estén apretadas e instaladas correctamente.
Corte los Sellos de Espuma (adherible) en la longitud adecuada y péguelos al marco de la
5.
ventana.
Ventana Corrediza Horizontal Ventana Corrediza Vertical
4ES
Page 49

INSTALACIÓN (CONTINUACIÓN)
6. Conecte el soporte de ventana a la ventana.
Ventana Corrediza Horizontal Ventana Corrediza Vertical
7. Corte los Sellos de Espuma (no adherible) a la longitud de la ventana. Rellene con el Sello de
Espuma (no adherible) entre el marco de la ventana y el vidrio exterior de la ventana para evitar
que el aire y los insectos entren en la habitación.
Marco de
la Ventana
Marco de
la Ventana
Sello de Espuma
(adherible)
Sello de Espuma
(no adherible)
Sello de Espuma
(adherible)
Ventana Corrediza Horizontal Ventana Corrediza Vertical
8. Su Aire acondiconado local portátil está listo para usarse.
5ES
Sello de Espuma
(no adherible)
Page 50

INSTALACIÓN (CONTINUACIÓN)
IMPORTANTE:
No remplazar o alargar la manguera de drenado de aire ya que esto podría provocar un malfuncionamiento
de la unidad.
20" (50 cm)
MIN 31 cm
MAX. 12" (31 cm)
MAX. 43" (110 cm)
NO RECOMENDADO RECOMENDADO
ADVERTENCIA: Cualquier garantía que se incluya con este producto será anulada si una manguera
de extensión se añade al kit de instalación suministrado originalmente o si la instalación se realiza
de manera diferente a las instrucciones del fabricante, sin la debida consulta. Póngase en contacto
con el Centro de Atención al Cliente en caso necesario, para obtener ayuda con los procedimientos
de instalación correctos.
La manguera de salida proporcionada tiene un diámetro de 5,9" (15 cm) y puede ser extendida de
•
10,6" a 59" (27 cm a 150 cm).
•
No doblar (como se muestra abajo) la manguera de drenado de aire. Una manguera doblada
bloqueará el aire de salida y ocasionará que la unidad se apague inmediatamente.
•
Asegúrese que la parte trasera de la unidad esté a al menos 20" (50 cm) in de distancia
de la pared.
Nota: Debido a la entrada de energía de la unidad al encenderla, pueden ocurrir bajas en el voltage
y éstas pueden influir en otros equipos (ejemplo: Disminución de las luces). Por favor, asegúrese
de que la unidad esté conectada a un suministro con una impendancia de sistema del máximo
permitido Zmax = 0,306 Ohms. Si ustede requiere una explicación más clara, puede contactar a la
autoridad local que le suministra la energía.
ES
6
Page 51

USO Y OPERACIÓN
PANEL DE CONTROL
(7)(8) (5)
(1)
(6) (4) (3) (2)
1) Luces Indicadoras 5) Temporizador / Controles
2) Control de Energía 6) Control del Modo
3) Reestablecimiento
del Filtro
4) Control de Velocidad
del Ventilador
BOTONES DE FUNCIONES
BOTONES DE FUNCIÓN
El Control de Energía enciende y apaga la unidad. La ventila del aire se abrirá automáticamente
cuando la unidad se enciende y se cierra automáticamente cuando la unidad se apaga.
REESTABLECIMIENTO DEL FILTRO
Cuando la operación ha alcanzado las 250 horas, la luz de Reestablecimiento del Filtro se iluminará.
Desconecte el Aire Acondicionado Local y con cuidado quite el filtro de la unidad y límpielo.
Reemplace los filtros y presione el botón de Reestablecimiento del Filtro, la luz de Reestablecimiento
del Filtro se encenderá y el tiempo de operación se reiniciará.
CONTROL DE VELOCIDAD DEL VENTILADOR
4 ajustes: Alto, Medio, Bajo y Auto
Nota: La velocidad automática del ventilador puede ser elegida únicamente en modo enfriamiento.
de Ajuste de Temperatura
7) Control del Temporizador
8) Control del Sueño
ES
7
Page 52

USO Y OPERACIÓN (CONTINUACIÓN)
BOTONES DE FUNCIONES (CONTINUACIÓN)
CONTROL DE TEMPERATURA
La pantalla está ajustando la temperatura
•
En el modo enfriamiento, cuando el botón o se presiona, el ajuste de temperatura se muestra y
•
puede ser ajustado.
Nota: Nota: Al presionar ambos botones o al mismo tiempo, la pantalla oscilará entre
Celsius (°C) y Farenheit (°F).
CONTROL DEL MODO
Ajustes: Fresco, Seco, Ventilador y Auto
La luz del indicador correspondiente se iluminará para indicar el ajuste de modo actual.
Modo Aire Acondicionado (FRESCO)
•
Ajuste la velocidad del ventilador y la temperatura del aire para satisfacer su nivel de confort
deseado.
El rango de ajuste de temperatura es de 16°C - 32°C (60°F - 90°F).
El rango de temperatura ambiente es 16°C - 35°C (60°F - 95°F).
Modo Deshumidificador (SECO)
•
La velocidad del ventidador está preestablecida en Baja.
Nota: Nota: SI la unidad será usada principalmente como deshumidificador, no conecte la
manguera. El drenado continuo será necesario en este caso (remítase a Modo de Drenado
Continuo para el Modo Deshumidificador).
IMPORTANTE: El modo deshumidificador se usa para apoyar a la reducción de la humedad, pero no
debe esperarse que deshumidifique al mismo grado que un aparato estándar solo deshumificador.
El deshumidificador intercontruido ajusta automáticamente la deshumidificación basado en las
temperaturas del ambiente de la habitación. No es posible ajustarlo a un porcentaje deseado de
humedad. La pantalla frontal muestra sólamente las temperaturas actuales y deseadas. No muestra
los niveles de humedad.
Modo Ventilador
•
Para circulación del aire sin el enfriamiento del aire acondicionado.
Nota: La velocidad automática del ventilador puede ser elegida únicamente en modo
enfriamiento.
Modo Auto
•
Presione o para elegir la temperatura que quiere.
En este modo, la unidad elegirá automáticamente solo enfriamiento o ventilador dependiendo
de la temperatura establecida y la temperatura de la habitación, El Aire Acondicionado Local
controlará la temperatura de la habitación automátiamente alrededor de la temperatura
establecida.
Nota: La velocidad del ventilador no puede ser ajustada en el modo auto.
ES
8
Page 53

USO Y OPERACIÓN (CONTINUACIÓN)
BOTONES DE FUNCIONES (CONTINUACIÓN)
CONTROL DEL TEMPORIZADOR
El Temporizador se puede ajustar entre 1 - 24 horas.
AUTO APAGADO:
Mientras la unidad está operando, presione el botón y la pantalla destellará. Mientras la pantalla
está destellando, presione el botón o para elegir el número de horas hasta cuando usted quiera
que la unidad se apague automáticamente.
AUTO ENCENDIDO:
Cuando la unidad está en modo espera (conectada con la luz de energía encendida), presione el
botón y la pantalla destellará. Mientras la pantalla está destellando, presione el botón o para
elegir el número de horas hasta cuando usted quiera que la unidad se encienda automáticamente.
CONTROL DEL SUEÑO
Cuando el Modo Sueño se activa en el modo Aire Acondicionado Local, la temperatura establecida
aumentará en 1°C o 1°F después de la primera hora de enfriamiento y aumentará 1°C o 1°F después
de la segunda hora de enfriamiento. La unidad mantendrá esta temperatura durane 5 horas. La
temperatura establecida se reducirá entonces en 1°C o 1°F en la séptima hora y se reducirá 1°C o 1°F
más en la décima hora. El modo sueño se desactivará entonces, automáticamente.
Nota: El Modo Sueño puede desactivarse durante el modo enfriamiento al presionar cualquier botón
en cualquier momento.
ALARMA DE LLENO TOTAL DE AGUA
La condensación puede acumularse en la unidad.
Si el tanque interno está lleno, el código de error "P1" se mostrará y la alarma sonará por 30
segundos. La unidad no operará hasta que el agua haya sido drenada del tapón de drenaje bajo
(remítase a Drenado de la Condensación del Agua).
Después de desconectar el Aire Acondicionado Local, el compresor no encenderá inmediatamente.
Debe usted esperar cerca de 4 minutos antes de que se encienda nuevamente.
ES
9
Page 54

USO Y OPERACIÓN (CONTINUACIÓN)
CONTROL REMOTO
Todas las funciones de las teclas se puede acceder desde el control remoto.
Control de Encendido
Encendido / Apagado
Ajuste de Temperatura
Cuando se presiona la tecla
o , la temperatura establecida
se muestra y puede ser ajustada.
Pulsar este botón para cambiar
el modo de operación:
Aire Acondicionado Deshumidificador
Control de Modo
Auto
Ventilador
Control del Sueño
Encendido / Apagado
°F
°C
Nota:
Instalación de Baterías: quite la cubierta en la parte trasera del control remoto e inserte dos
•
baterías AAA con los polos “+” y “-“ apuntando a la dirección correcta.
Control del Temporizador
•
En el modo operación: Encendido
automático. Presione el botón o para
ajustar el establecimiento del tiempo para
intervalos de 1 hora.
•
El ajuste del Temporizador está disponible
de 1 - 24 horas al presionar la tecla o .
•
Cuando el temporizador esté ajustado,
presionar la tecla o cancelará el
ajuste del Temporizador.
Control de Velocidad del Ventilador
• Alta • Media • Baja• Auto
Control de Oscilación
Presione este boton para permitir que
la rejilla de salida de aire oscile de arriba
abajo. Presione este botón otra vez
para cancelar la función de oscilación. La
oscilación puede establecerse sólamente
desde el control remoto.
Precaución:
Use sólo dos baterías AAA ó IEC R03 1,5V.
•
Retire las baterías si el control remoto no se va a utilizar por más de un mes.
•
Todas las baterías deben reemplazarse al mismo tiempo, no mezclar con baterías viejas.
•
No mezcle pilas alcalinas, estándar (zinc-carbón) o recargables (níquel-cadmio).
•
Deshágase de las baterías usadas.
•
10ES
Page 55

LIMPIEZA Y MANTENIMIENTO
Mantenimiento de la Unidad:
Apague la unidad andes de desconectarla de la toma de corriente eléctrica.
1.
Limpie con un lienzo suave y seco.
2.
Mantenimiento para el Filtro de Polvo:
El filtro de polvo debe limpiarse cada dos semanas para mantener la
eficiencia de la refrigeración del aire. Por favor, siga las siguientes
instrucciones para limpiar los filtro de polvo:
Apague y desconecte el Aire Acondicionado Local del contacto
1.
eléctrico.
Quite la Parrilla / Filtro Superior, desatornille la Parrilla / Filtro
2.
Inferior y quítelo con cuidado.
Lávelo suavemente usando agua y/o detergente líquido para
3.
trastes diluido. Enjuáguelo perfectamente y suavemente
sacuda el exceso de agua de los filtros. Asegúrese de que los
filtros estén secos antes de reinstalarlos.
Parrilla
Trasera
Nota: Usted puede usar una aspiradora para quitar el polvo.
Vuelva a colocar la Parrilla del Filtro Superior sobre la unidad
4.
y reinstale la Parrilla Inferior con el tornillo.
ADVERTENCIA: NO encienda ni haga funcionar el acondicionador de aire al limpiar o cuando el
filtro de polvo esté retirado de la unidad, o si hay un filtro de polvo suelto. NO intente manejar o tocar
cualquiera de las piezas o el cableado dentro de la parrilla trasera después de haber retirado el filtro
de polvo de la unidad. Hacerlo puede causar lesiones graves o descargas eléctricas.
Filtro de
Polvo
Superior
ES
11
Page 56

LIMPIEZA Y MANTENIMIENTO (CONTINUACIÓN)
Almacenamiento y Mantenimiento al Terminar la Temporada:
Si la unidad no se usará por un periodo prolongado de tiempo:
Asegúrese de drenar la condensación del agua sobrante. Retire el tapón de drenaje inferior
1.
y utilizar una bandeja de poca altura para recoger el agua (asegúrese de colocar el tapón de
drenaje cuando termine).
Para secar el exceso de humedad, haga funcionar la unidad en modo de sólo ventilador durante
2.
30 minutos antes de guardarla.
Apague y desconecte el acondicionador de aire de la toma de corriente eléctrica.
3.
Quite el filtro de aire y limpie con agua. Seque el filtro de aire y vuelva a instalarlo en la unidad.
4.
Desconexión del kit de instalacion para Ventana:5.
Retirar la manguera de escape de la unidad presionando el botón de liberación ubicado en el
•
lado derecho de la manguera y luego deslizar la manguera hacia el lado derecho.
•
Retire el soporte de ventana, el adaptador del soporte de ventana y la manguera de conexión.
•
Se recomienda almacenar las piezas del kit de ventana en una bolsa junto con el control remoto
y colocarlos junto con la unidad de Aire Acondicionado Local.
Si es necesario, puede limpiar el Kit de ventana con un paño húmedo y agua antes de guardarla.
•
Asegúrese de que todas las partes del kit de ventana estén secos antes de guardarlas.
Cubra la unidad de Aire Acondicionado Local con una bolsa de tela / plástico antes de su
6.
almacenamiento, para proteger del polvo y rayones en la superficie de la unidad.
Se recomienda enrollar el cable de alimentación y almacenarlo lejos del piso para asegurarse de
7.
que el cable esté protegido de inclinaciones y pliegues.
Colocar su Aire Acondicionado Local en un lugar seco y fresco, lejos de la luz directa.
8.
12ES
Page 57

DRENADO DE AGUA
Cuando exista exceso de condensación de agua dentro de la unidad, el Aire Acondicionado Local
deja de operar y muestra un código de error "P1" con una alarma. Esto indica que la condensación de
agua necesita ser drenada usando los procedimientos siguientes:
Drenado Manual en los Modos Enfriamiento,
Deshumidificación y Automático.
Es necesario drenar el agua en ares de muy alta humedad.
Desconecte la unidad de la corriente eléctrica.
1.
Coloque una bandeja de poca altura debajo del
2.
tapón de drenaje. Vea el diagrama.
Quite la cubierta del tapón de drenado.
3.
El agua drenada se acumula en la bandeja.
4.
Después de que el agua sea drenada, vuelva a colocar la
5.
cubierta del tapón de drenaje.
Ahora puede encender la unidad.
6.
Drenaje Continuo para Modo Deshumidificador
Mientras utiliza la unidad en el modo deshumidificador, el drenaje continuo es recomendado.
Desconecte la unidad de la toma de corriente.
1.
Quite la cubierta superior del tapón de drenado.
2.
Algo de agua residual puede salpicar, así que por
favor tenga una bandeja para juntar el agua.
Conecte el tubo de drenaje (incluido) al tapón de
3.
drenaje superior. Vea el diagrama.
El agua debe ser drenada continuamente a través
4.
del tubo de drenaje hacia un drenaje en el piso o
una cubeta.
Vuelva a colocar la cubierta del tapón de drenado.
5.
Ahora puede encender la unidad.
6.
Tubo de Drenaje (Incluído):
Diámetro: 0.6" (1.6 cm)
Longitud: 23.6" (60 cm)
Tapón de
Goma de
Drenaje
Inferior
Bandeja
(No incluida)
Tapón de
Goma de
Drenaje
Superior
13ES
Page 58

GUÍA DE SOLUCIONES
La siguiente guía solución de problemas aborda los problemas más comunes. Si los problemas
persisten, llame a servicio al cliente. Desconecte el aparato de la corriente eléctrica antes de intentar
reparar cualquier problema.
PROBLEMA POSIBLE CAUSA SOLUCIÓN
No hay electricidad. Revisar la corriente eléctrica.
El equipo de aire
acondicionado
no opera
La unidad
funciona solo
por un corto
tiempo
Las baterías en el control
remoto están agotadas.
El cable eléctrico
no está conectado
correctamente.
La temperatura
seleccionada está
demasiado cerca de la
temperatura ambiente.
La salida de aire está
bloqueada por un
obstáculo.
Hay codos que
estrangulan la manguera
de salida de aire.
Cambie las baterías del control remoto.
Desconecte y reconecte el cable de alimentación.
Baje la temperatura seleccionada.
Revise que la salida de aire no esté obstruida por
ningún obstáculo.
Conecte la manguera de escape de acuerdo con
instrucciones en página 3.
ES
14
Page 59

GUÍA DE SOLUCIONES (CONTINUACIÓN)
PROBLEMA
Funciona pero
no enfría
POSIBLE CAUSA SOLUCIÓN
Una puerta o ventana
está abierta.
El filtro de polvo
está sucio.
La manguera de
drenado de aire está
desconectada.
La temperatura
configurada es
demasiado alta.
La salida o entrada de
aire están bloqueadas.
Cerrar cualquier puerta o ventana que se encuentre
abierta.
Conectar la manguera de polvo.
Reinstalar la manguera de drenado de aire
adecuadamente (consulte la Instalación sección).
Reducir la temperatura.
Revisar que entre y salga suficiente aire en el equipo.
No opera y
muestra el
código de
error "P1".
Habitación excede el
tamaño recomendado.
El tamaño o número
de ventanas grandes
disminuirán la eficacia
del enfriamiento.
El tanque adentro de la
unidad está lleno.
Mover la unidad a un cuarto más pequeño.
Cubrir las ventanas con cortinas o persinas.
Drene el agua (consulte la Drenado de Agua).
15
ES
Page 60

GUÍA PARA CODIGO DE ERROR
CODIGO DE ERROR CAUSA DE POSIBLE ERROR
"E1" Falla del sensor de temperatura interior (circuito abierto o cortocircuito).
"E3"
"P1" Alarma tanque lleno.
Falla del sensor de temperatura del evaporador (circuito abierto o
cortocircuito).
ES
16
Page 61

VEILIGHEID
BELANGRIJKE VEILIGHEIDSINSTRUCTIES
LEES ZORGVULDIG DE BELANGRIJKEVEILIGHEIDSINSTRUCTIES
EN BEWAAR HET VOOR IN DE TOEKOMST. IN GEVAL VAN
INCONSISTENTIE OF CONFLICT TUSSEN DE ENGELSE VERSIE
EN IEDERE ANDERE TAALVERSIE OMTRENT DE INHOUD VAN
DEZE INFORMATIE, HEEFT DE ENGELSE VERSIE VOORRANG.
WAARSCHUWING:
•
NOOIT de unit gebruiken met een beschadigde stekker, snoer
of loszittend stopcontact. Als de voedingskabel beschadigd
is, moet deze vervangen worden door de fabrikant of door
diens technische dienst om ieder risico te voorkomen.
•
Bedek NOOIT de luchtinlaat en uitlaat tijdens het gebruik.
•
Plaats NOOIT voorwerpen op de unit of en ga nooit zitten op
het apparaat.
•
Schakel altijd uit en haal de stekker van de het toestel uit
het stopcontact bij het schoonmaken of onderhoud.
•
Gebruik het apparaat NIET als het beschadigd is.
•
Als service contact nodig is contacteer een geautoriseerde
service agent.
•
Haal altijd de stekker uit het stopcontact wanneer de unit is
opgeslagen of niet in gebruik.
•
NIET aan de stekker van het apparaat trekken.
•
NIET in de stroomdraad in de deur knijpen en trek het NIET
langs randen of scherpe hoeken.
•
NOOIT het snoer onder vloerbedekking, tapijten of iets
dergelijks verbergen.
•
Voorkom dat mensen kunnen struikelen over het snoer.
•
Gebruik het apparaat NIET in de volgende gevallen:
- Vlakbij een vuurbron
- In ruimtes waar benzine, verf of andere brandbare
goederen worden opgeslagen
- In een ruimte waar het water kan worden 'komen
•
Raak de stop of het apparaat NIET met natte handen aan.
NL
Page 62

VEILIGHEID (VERVOLG)
Basis veiligheidsinstructies altijd opvolgen bij het gebruik
•
van elektrische apparaten.
Dit apparaat is vervaardigd voor gebruik in
•
woonomgevingen en mag niet worden gebruikt voor andere
doeleinden.
Gebruik alleen de installatie kit die aan dit apparaat toe
•
behoort. Probeer NIET de afvoerslang aan dit toestel met
andere dan die welke in deze handleiding zit uit te breiden
of te installeren. Onjuiste installatie kan alle bestaande
garanties ongeldig maken.
MAAK NOOIT gebruik van een verlengsnoer met dit toestel.
•
Dit apparaat kan worden gebruikt door kinderen van 8
•
jaar en ouder en personen met verminderde lichamelijke,
zintuiglijke of verstandelijke vermogens of gebrek aan
ervaring en kennis als ze onder toezicht staan of instructie
over het gebruik van het apparaat op een veilige manier en
het begrijpen van de eventuele gevaren. Kinderen mogen
niet met het apparaat spelen. Reiniging en onderhoud
mogen niet door kinderen worden gedaan zonder toezicht.
Steek nooit uw vingers in de luchtuitlaat. Zorg er met name
•
voor om kinderen voor deze gevaren te waarschuwen.
De fabrikant is niet aansprakelijk voor verwonding aan
•
personen of materiële schade veroorzaakt door het zich niet
houden aan de onderhoudsinstructies of onjuist gebruik
van het toestel.
Het apparaat moet geïnstalleerd worden met inachtneming
•
van de nationale normen die elektrische installaties regelen.
Het toestel mag niet door personen (inclusief kinderen)
•
met verminderde fysieke, sensorische of geestelijke
mogelijkheden, of gebrek aan ervaring en kennis worden
gebruikt, tenzij zij supervisie of instructie hebben gekregen.
Let op dat kinderen niet met het apparaat spelen.
•
NL
Page 63

R290 VEILIGHEID
SYMBOOL NOTITIE UITLEG
Dit symbool geeft aan dat dit apparaat een
WAARSCHUWING
ontvlambaar koelmiddel gebruikt. Als het koelmiddel
lekt en wordt blootgesteld aan een externe
ontstekingsbron, is er kans op brand.
LET OP
LET OP
LET OP
Aanvullende waarschuwingen voor apparaten met R290-koelgas
Lees de instructies zorgvuldig door voordat u het apparaat gebruikt.
•
R290-koelgas voldoet aan de Europese milieurichtlijnen.
•
Dit apparaat bevat een bepaald gewicht in gram (zie het label op de achterkant van de apparaat)
•
van R290-koelgas. De maximale hoeveelheid koelmiddel is 0.3 kg.
Gebruik voor het ontdooien of schoonmaken geen andere methoden dan die worden aanbevolen
•
door de fabrikant.
Plaats het apparaat niet in een ruimte met ontstekingsbronnen (bijvoorbeeld open vuur,
•
werkende gastoestellen of werkende elektrische verwarming).
Niet doorboren en niet verbranden.
•
Geen enkel deel van het koelcircuit perforeren.
•
Koelmiddel kan geurloos zijn.
•
Het apparaat moet geïnstalleerd, gebruikt en opgeslagen worden in een ruimte die
•
groter is dan 12 m2.
Ophoping van mogelijke koelmiddellekken in een ongeventileerde ruimte kan leiden tot brand
•
of ontploffing als het koelmiddel in contact komt met elektrische verwarming, kachels of andere
ontstekingsbronnen.
Het apparaat moet zodanig worden opgeslagen om mechanische schade te voorkomen.
•
Alleen personen die zijn gecertificeerd door een geaccrediteerde organisatie om koelmiddelen
•
te verwerken in overeenstemming met de wetgeving van de industrie, mogen werken aan het
koelmiddelcircuit.
Reparatie moet worden uitgevoerd op basis van de aanbevelingen van de fabrikant.
•
Onderhoud en reparaties waarvoor de assistentie van ander gekwalificeerd personeel vereist
•
is, moeten worden uitgevoerd onder toezicht van specialisten in het gebruik van ontvlambare
koelmiddelen.
Dit symbool geeft aan dat de handleiding zorgvuldig
moet worden gelezen.
Dit symbool geeft aan dat een servicepersoneel deze
apparatuur moet hanteren met verwijzing naar de
installatiehandleiding.
Dit symbool geeft aan dat er informatie
beschikbaar is, zoals de bedieningshandleiding of
installatiehandleiding.
NL
Page 64

DANK U WEL
Gefeliciteerd met uw aankoop van deze veelzijdige Honeywell Mobiele Airconditioner.
Betreffende de informatie omtrent de installatie, gebruiksaanwijzing, onderhoud, schoonmaak en
verwijdering van het toestel, zie gelieve onderstaande paragraaf van het handboek.
GEBRUIKERS TIPS
Mobiele Airconditioner zijn ideaal voor directe koeling. The compressor, condensor en verdamper zijn
ondergebracht in een compacte eenheid. De lucht wordt gefilterd, ontvochtigd en gekoeld, terwijl
een flexibele uitlaatslang de warme lucht naar buiten stuurt. De Mobiele Airconditioner is voorzien
van een set om via het een raam de warme lucht af te voeren. Geen permanente installatie nodig.
Het apparaat is gemakkelijk te verplaatsen van kamer naar kamer en biedt een werkelijk flexibele
airconditioning-oplossing.
Auto Verdamping System - De eenheid verdampt automatisch het condensaat door de uitlaatslang.
Er is geen noodzaak om de drainage tank te legen behalve in zeer hoge luchtvochtigheid. Lees en
volg de instructies nauwkeurig.
Om een optimale efficiëntie van het product te garanderen, blijven de deuren en ramen gesloten
wanneer het wordt gebruikt als een Mobiele Airconditioner of ontvochtiger. Als het product wordt
gebruikt in de ventilator functie zal alleen een open raam de luchtcirculatie verbeteren.
Koelen en
ontvochten gebruik
Belangrijk:
Voor het installeren / aanzetten van het toestel, plaats hem rechtop gedurende 1 uur voor gebruik
om het koelmiddel te laten stabiliseren. De luchtuitlaat opent automatisch wanneer het apparaat
wordt ingeschakeld en wordt automatisch gesloten als het apparaat wordt uitgeschakeld. De
luchtuitlaat aan de bovenkant van de unit kan handmatig in de juiste richting worden gezet.
Volg de installatie-instructies voor het installeren/aanzetten van de unit.
•
Steek de stekker van het apparaat in een geaard stopcontact.
•
1NL
Ventilator stand
Page 65

ONDERDELEN BESCHRIJVING
1
2
3
6
5
7
°F
°C
14
4
1) Controlepaneel 8) Stuifmeelfilter
2) Lucht Uitlaat 9) Hoge Drain Plug
3) Handvat 10) Beneden Stuifmeelfilter
(Luchtontvochtiger Mode)
8
9
10
11
12
13
4) Wielen 11) Afvoer Pijp
5) Afstandsbediening 12) Draai de Dop Af
6) Uitlaat Slang Verbinding 13) Lagere Water Aftap
7) Koord de Omslag Van 14) Bovenrooster
NL
(Continu Afvoer)
Plug met Plastic Dop
(Airconditioning Mode)
2
Page 66

INSTALLATIE
Het is belangrijk dat de installatie-instructies worden gevolgd voor een succesvolle installatie van
deze Mobiele Airconditioner. U kunt bellen met de klantenservice als u problemen of vragen hebt met
betrekking tot deze installatieprocedures.
1
x1
5
x1
Installatie set:
1. Raam Beugel Kit (1 Stel) 5. Uitlaat Slang (1 Stuk)
2. Raam Bevestiging Adapter (1 Stuk) 6. Schuimrubber (zelfklevend) (2 Stuks)
3. Slang Bevestiging (1 Stuk) 7. Schuimrubber (niet-zelfklevend) (1 Stuk)
4. Plastic Dop (2 Stuks)
Installatie Stappen:
Adapterpaneel voor raam, slang en slangaansluiting zijn voorgemonteerd in de verpakking.1.
2 3
x1
6
x1
7
x2 x1
4
x2
2. Stel de raambeugel in op basis van de breedte of hoogte van uw raam en plaats de kunststof pen
op de gewenste positie. Er is een gat waar later de slang wordt ingebracht. Zorg dat dit gat niet is
geblokkeerd.
Plastic Dop
Gat voor adapterpaneel
26.6", 36.2" tot 52"
(67.5 cm, 92 cm tot 132 cm)
3NL
en slang
Page 67

INSTALLATIE (VERVOLG)
OPMERKING: Na het instellen van het raam beugel ter grootte van uw raam, kunt u het verwijderen
uit het venster en volg de onderstaande instructies.
3. Sluit de slang aan op de uitlaat aan de achterkant van het apparaat. Schuif de slangconnector in
en draai vervolgens met de klok mee totdat deze op zijn plaats is vergrendeld.
Uitlaat Slang
Dia. 5.9" (15 cm)
Lengte:: 10.6" to 59" (27 cm tot 150 cm)
4. Sluit de raambeugel aan op de raamadapterpaneel. Zorg ervoor dat alle verbindingen goed
vastzitten en zijn geïnstalleerd.
Snij de schuimrubber (zelfklevend) op de juiste lengte en verbindt het met raamkozijn en raam.5.
Horizontaal schuif raam Verticaal schuif raam
4NL
Page 68

INSTALLATIE (VERVOLG)
6. Verbind de raambeugel met het raam.
Horizontaal schuif raam Verticaal schuif raam
7. Snij het schuimrubber (niet-zelfklevend) op de lengte van het raam. Vul de afdichting met
schuimrubber (niet-zelfklevend) tussen de binnenruit en de buitenruit om te voorkomen dat lucht
en insecten de ruimte in komen.
Raam
Schuimrubber
(niet-zelfklevend)
Schuimrubber
(zelfklevend)
Horizontaal schuif raam Verticaal schuif raam
8. De Mobiele Airconditioner is nu klaar voor gebruik.
5NL
Schuimrubber
(niet-zelfklevend)
Raam
Schuimrubber
(zelfklevend)
Page 69

INSTALLATIE (VERVOLG)
Belangrijk:
Niet vervangen of verlengen van de afvoerslang, omdat dit kan leiden tot het defect raken van het
apparaat.
20" (50 cm)
MIN 31 cm
MAX. 12" (31 cm)
MAX. 43" (110 cm)
NIET AANBEVOLEN NIET AANBEVOLEN
WAARSCHUWING: Elke garantie die bij dit product wordt gegeven, vervalt als een extra verlengslang
wordt toegevoegd aan de oorspronkelijk installatie kit of als de installaties anders dan de instructies
van de
fabrikant is uitgevoerd, zonder goed overleg. Neem dan contact op met de klantenservice voor hulp
bij de installatie procedures indien nodig.
De geleverde uitla atslang heeft een diameter van 5.9" (15 cm) en kan van 10.6" tot
•
59" (27 cm tot 150 cm) worden verlengd.
Buig NOOIT (voor zover hieronder) de afvoerslang. Een gebogen slang zal afvoerlucht blokkeren
•
en ervoor zorgen dat het apparaat defect kan raken of uitschakelt.
Zorg ervoor dat de achterkant van het apparaat tenminste 20" (50 cm) van de muur staat. Plaats
•
het apparaat niet aan de voorkant van gordijnen, etc. omdat dit de luchtstroom kan belemmeren.
Notitie: Wanneer het apparaat bij het opstarten aan de stroom wordt aangesloten, kunnen
spanningsdalingen optreden en dit kan andere apparatuur beïnvloeden (bijvoorbeeld dimlichten).
Zorg ervoor dat het apparaat is aangesloten op een voeding met een maximaal toelaatbare
systeemimpedantie Zmax = 0,306 Ohm. Als u meer uitleg nodig heeft, kunt u contact opnemen met
uw plaatselijke elektriciteitsleverancier.
NL
6
Page 70

GEBRUIK & WERKING
CONTROLEPANEEL
(7)(8) (5)
1) Indicatie lichten 5) Tijds- / temperatuur bediening
2) Aan/uit control 6) Modus knop
3) Filter resetten 7) Tijdsbediening knop
4) Ventilator snelheid 8) Slaap knop
FUNCTIETOETSEN
(1)
(6) (4) (3) (2)
AAN/UIT CONTROL
De Aan/uit Controlzet het apparaat aan en uit. De luchtuitlaat wordt automatisch geopend
wanneer het apparaat wordt ingeschakeld en wordt automatisch gesloten wanneer het apparaat
wordt uitgeschakeld.
FILTER RESETTEN
Wanneer het apparaat 250 uur heeft gewerkt, gaat het Filter Resetten-lampje branden. Zet de
Mobiele Airconditioner UIT en verwijder zorgvuldig de filters van het apparaat en maak het schoon.
Vervang de filters en druk op de Filter Reset-knop, het Filter Reset-lampje gaat uit en de werkingstijd
wordt gewist.
VENTILATOR SNELHEID
4 instellingen: Hoog, Gemiddeld, Laag en Auto.
Opmerking: De automatische ventilatorsnelheid kan alleen in de koelmodus worden geselecteerd.
NL
7
Page 71

GEBRUIK & WERKING (VERVOLG)
FUNCTIETOETSEN (VERVOLG)
TEMPERATUUR REGELAAR
Het standaard display is voor het instellen van de temperatuur.
•
In de koelmodus, wanneer de of knop wordt ingedrukt, wordt de ingestelde temperatuur
•
weergegeven en kan deze worden aangepast.
Opmerking: Door tegelijkertijd op de knoppen of te drukken, wisselt de display tussen
Celsius(°C) en Fahrenheit(°F).
MODUS KNOP
Instellingen: Koelen, Ontvochtigen, Ventilatie of Auto
Het bijbehorende indicatie lampje zal oplichten op de huidige instelling te weergeven.
Air Conditioner Modus (KOELEN)
•
Stel de ventilator snelheid en luchttemperatuur af op het gewenste comfortniveau.
De temperatuur kan ingesteld worden tussen 16°C - 32°C (60°F - 90°F).
Omgevingstemperatuurbereik is 16°C - 32°C (60°F - 90°F).
Ontvochtigings Modus (DRY)
•
Ventilator snelheid is standaard op laag ingesteld.
Opmerking: Als het apparaat hoofdzakelijk als een ontvochtiger wordt gebruikt, sluit dan de slang
niet aan. Continue afvoer is dan noodzakelijk (zie Continue afvoer voor ontvochtigingsmodus).
BELANGRIJK: De modus Ontvochtiger wordt gebruikt om vochtvermindering te ondersteunen, maar
er mag niet verwachtt worden dat deze in dezelfde mate ontvochtigt als een apparaat met alleen
ontvochtiger. De ingebouwde ontvochtiger past automatisch de ontvochtiging aan op basis van de
kamertemperatuur. Het is niet mogelijk om het gewenste vochtigheidspercentage aan te passen.
Het display op de voorzijde toont alleen de huidige en gewenste temperaturen. Het toont geen
luchtvochtigheid.
Ventilator Modus
•
Voor lucht circulatie zonder air conditioning verkoeling.
Opmerking: De automatische ventilatorsnelheid kan niet worden geselecteerd in de
ventilatormodus.
Auto Modus
•
Druk of in voor het selecteren van de gewenste temperatuur.
In deze modus selecteert het apparaat automatisch de koeling of de ventilator afhankelijk
van de ingestelde temperatuur en de kamertemperatuur. De Mobiele Airconditioner regelt de
kamertemperatuur automatisch rond de ingestelde temperatuur.
Opmerking: De ventilatorsnelheid kan niet worden aangepast in de automatische modus.
NL
8
Page 72

GEBRUIK & WERKING (VERVOLG)
FUNCTIETOETSEN (VERVOLG)
TIJDSBEDIENING KNOP
De tijdschakelaar is instelbaar tussen 1 - 24 uur.
AUTO SCHAKEL UIT
Terwijl het apparaat werkt, drukt u op de knop Timer en het display knippert. Terwijl het display
knippert, drukt u op de knop of om het aantal uren te selecteren waarna u wilt dat het apparaat
automatisch wordt uitgeschakeld.
AUTO SCHAKEL IN
Wanneer het apparaat in de standby-modus staat (aangesloten met aan / uit-lampje aan), drukt
u op de knop Timer en het display knippert. Terwijl het display knippert, drukt u op de knop
of om het aantal uren te selecteren waarna u wilt dat het apparaat automatisch
wordt ingeschakeld.
SLAAP STAND
Wanneer de slaapstand wordt geactiveerd in de airconditioningsmodus, neemt de ingestelde
temperatuur na het eerste uur af met 1°C of 1°F toe en neemt deze na het tweede uur van koeling
nog eens 1°C of 1°F toe. Het apparaat houdt deze temperatuur gedurende 5 uur aan. De ingestelde
temperatuur zal dan verminderen met 1°C of 1°F in het zevende uur en nog eens 1°C of 1°F op het
tiende uur. De slaapmodus wordt vervolgens automatisch gedeactiveerd.
Opmerking: De slaapstand kan tijdens het koelen worden gedeactiveerd door op een willekeurige
knop te drukken.
WATER TANK VOL ALARM
Condens kan zich ophopen in het apparaat.
Als de interne tank vol is, wordt de foutcode "P1" weergegeven en klinkt er gedurende 30 seconden
een alarmsignaal. Het apparaat zal niet werken voordat het water uit de onderste aftapplug is
afgevoerd (raadpleeg Watercondensatieafvoer).
Nadat de Mobiele Airconditioner is uitgeschakeld, start de compressor niet onmiddellijk. U moet
ongeveer 4 minuten wachten voordat het weer wordt ingeschakeld.
NL
9
Page 73

GEBRUIK & WERKING (VERVOLG)
AFSTANDSBEDIENING
Alle belangrijke functies kunnen bediend worden via de afstandsbediening.
Aan/uit control
AAN/UIT
Temperatuur knop
Wanneer op de of toets
wordt gedrukt, wordt de ingestelde
temperatuur weergegeven en kan
deze worden aangepast.
Auto
Modus knop
Ventilatie
Slaap knop
AAN/UIT
Druk op deze knop om de
bedieningsmodus te wijzigen in de
volgorde van:
Koelen Ontvochtigen
°F
°C
Opmerking:
Batterij installatie: Verwijder het deksel aan de achterkant van de afstandsbediening en plaats
•
twee AAA-batterijen met + en - in de juiste richting volgens polariteitmarkeringen.
Tijdsbediening knop
•
In de bedrijfsmodus: Automatisch
uitschakelen. In de standby-modus:
automatisch inschakelen. Druk op de
of knop om de tijdsinstelling voor
intervallen van 1 uur aan te passen.
Tijdinstelling is beschikbaar van 1 - 24 uren
•
door op de toets of te drukken.
•
Wanneer de tijd is ingesteld, druk of
om de instelling af te breken.
Ventilator snelheid
• HOOG • MIDDEN • LAAG • AUTO
Swing knop
Druk op deze knop om de ventilatieklep
op en neer te laten gaan. Druk opnieuw
op deze knop om de swing-functie
uit te schakelen. Swing kan alleen worden
ingesteld vanaf de afstandsbediening.
Voorzichtigheid:
Gebruik slechts twee AAA of IEC R03 1,5V batterijen.
•
Verwijder de batterijen als de afstandsbediening niet in gebruik is voor een maand of langer.
•
Alle batterijen moeten worden vervangen op hetzelfde moment, niet mengen met oude batterijen.
•
Geen alkaline, gewone (koolstof-zink) of oplaadbare (nikkel-cadmium batterijen combineren).
•
Breng gebruikte batterijen naar een opvangplaats voor batterijen.
•
10NL
Page 74

REINIGING & ONDERHOUD
Apparaat Onderhoud:
Schakel het apparaat uit voordat u de stekker uit het stopcontact haalt.
1.
Reinig altijd het apparaat met een zachte, droge doek.
2.
Onderhoud van het luchtfilter:
Het luchtfilter moet worden gereinigd om de twee weken.
Reinig het als volgt:
Schakel de unit en haal de stekker uit het stoppcontcat.
1.
Verwijder de bovenste en Lagere filter/ Grill filter/ Grill.
2.
Voorzichtig wassen met water en/ of verdund vloeibaar
3.
afwasmiddel. Spoel grondig en schud het overtollige
water uit de filters. Zorg ervoor dat de filters droog zijn
voordat deze opnieuw installeren.
Opmerking: U kunt een stofzuiger te gebruiken om
Rooster
Achterkant
stof te verwijderen.
Herplaats de Upper Grill op het apparaat.
4.
WAARSCHUWING: NOOIT de untit aanluiten op het stopcontcat of aan zetten als bij het
schoonmaken of wanneer een van de Grills achter of beide worden/zijn verwijderd uit het apparaat,
of als deze niet goed vast zit of los zit. NOOIT proberen aan te raken een van de draden, onderdelen,
etc. aan de achterkant/ binnenin de unit als de Grlls aan de achterkant zijn verwijderd. Dit kan als
gevolg hebben dat u ernstig letsel oploopt of er ontstaat een gevaarlijke elektrische shock.
Stuifmeelfilter
NL
11
Page 75

REINIGING & ONDERHOUD (VERVOLG)
Seizoen Einde Opslag & Onderhoud:
Indien het apparaat niet wordt gebruikt gedurende lange tijd:
Zorg ervoor dat de condensatie van water wordt afgevoerd. Verwijder de onderste aftapplug en
1.
gebruik een ondiepe pan om het water op te vangen (zorg ervoor dat de aftapplug wordt terug
geplaatst).
Om eventuele overgebleven vochtigheid te verwijderen, gebruik de ventilator modus voor
2.
30 minuten voordat het apparaat wordt opgeslagen.
Schakel de Mobiele Airconditioner uit en haal de stekker uit het stopcontact. Verwijder het
3.
stoffilter en reinig met water. Droog het stoffilter en installeer het opnieuw.
4.
Loskoppelen van de Raam installatie set:5.
Verwijder de Uitlaat Slang uit het apparaat.
•
Verwijder de Window Bracket, Window Bracket Panel Adapter en slang Connector.
•
Het wordt aanbevolen om de Raam set onderdelen op te slaan in een tas samen met de
•
afstandsbediening en te bewaren bij de airconditioner.
Indien nodig, kunt u de Raam set met een vochtige doek en water reinigen. Zorg ervoor dat alle
•
onderdelen van de Raam set droog zijn voordat opbergt.
Bedek de airconditioner met een doek/ plastic zak tijdens de opslag, om te beschermen tegen
6.
stof en krassen op het oppervlak van de unit.
Het wordt aanbevolen om het snoer met de stekker op te rollen en deze bewaren uit de buurt van
7.
de vloer om ervoor te zorgen het snoer niet beschadigd wordt.
Bewaar de airconditioner op een koele, droge plaats, weg van direct zonlicht.
8.
12NL
Page 76

WATER CONDENSATIE AFTAPPEN
Wanneer er overtollige watercondensatie in het apparaat is, stopt de mobiele airconditioner met
draaien en toont de foutcode "P1" met een alarm. Dit geeft aan dat de watercondensatie moet
worden afgevoerd met behulp van de volgende procedures:
Handmatig leeg laten lopen in koelen, ontvochtigen en automodus
Water moet mogelijk worden afgetapt in ruimtes met hoge
luchtvochtigheid.
Koppel het apparaat los van de stroombron.
1.
Plaats de ondiepe pan onder de onderste rubberen
2.
aftapplug. Zie diagram.
Verwijder de aftapplug.
3.
Water loopt weg en verzamelt zich in de ondiepe pan.
4.
Nadat het water is afgetapt, zet de aftapplug er weer in.
5.
U kunt nu het apparaat weer inschakelen.
6.
Continue Aftappen in luchtontvochtiging stand
Tijdens het gebruik van het apparaat in de ontvochtiging
stand wordt het continue watre aftappen aanbevolen.
Koppel het apparaat los van de stroombron.
1.
Verwijder de aftapplug.
2.
Terwijl dit te doen kan wat resterene water morsen
dus neem dan een pan om het water te halen.
Sluit de afvoerslang (meegeleverd) aan de
3.
bovenste afvoer.
Het water kan continu worden afgevoerd via de
4.
afvoerslang in een afvoerputje of emmer.
De aftapplug wortd terug geplaatst.
5.
U kunt nu de unit weer aanzetten.
6.
Water afvoer slang
(meegeleverd):
Dia. 0.6" (1.6 cm)
Lengte:: 23.6" (60 cm)
Ondiepe pan
(Niet inbegrepen)
Lagere water
aftap Plug
met plastic
dop
Bovenste
aftap
plug
13NL
Page 77

GIDS VOOR PROBLEEMOPLOSSING
De volgende handleiding voor probleemoplossing behandelt de meest voorkomende problemen.
Als de problemen aanhouden, neem contact op met uw klantenservice. Trek de stekker uit het
stopcontact voordat u het probleem wil gaan oplossen.
PROBLEEM MOGELIJKE OORZAAK OPLOSSING
De
airconditioning
unit start niet
Laat een korte
tijd werken
Geen elektriciteit.
Batterijen van de
afstandsbediening
moeten worden
vervangen.
Het netsnoer is niet
goed aangesloten.
De instelling van de
thermostaat
temperatuur is te dicht
bij kamertemperatuur.
Luchtuitlaat is
geblokkeerd.
Er zijn scherpe bochten
in de lucht Uitlaat Slang.
Controleer of er stroom op het
stopcontact staat.
Vervang de batterijen van de
afstandsbediening.
Trek de stekker uit het stopcontact en sluit
opnieuw aan.
Verlaag de ingestelde temperatuur.
Zorg ervoor dat de afvoerslang goed is
aangesloten.
Sluit Uitlaat Slang volgens de instructies op
pagina 3.
14NL
Page 78

GIDS VOOR PROBLEEMOPLOSSING (VERVOLG)
PROBLEEM MOGELIJKE OORZAAK OPLOSSING
Werkt maar
geen
koeling
Een deur of raam
open staat.
Het luchtfilter is vuil. Reinig het luchtfilter.
De Uitlaat Slang is los. Installeer uitlaatslang goed (zie hoofdstuk Installatie).
Ingestelde temperatuur is
te hoog.
Luchtuitlaat of inname
wordt geblokkeerd.
Zorg ervoor dat het raam of de deur gesloten is.
Verlaag de temperatuurinstelling.
Verwijder verstopping.
Wordt niet
uitgevoerd
en foutcode
"P1" wordt
weergegeven
Kamer overschrijdt
aanbevolen grootte.
Grote of veel ramen
reduceren de koeling
effectiviteit.
Overtollig water
condensatie in de tank.
Verplaats apparaat naar een kleinere kamer.
Bedek ramen met gordijnen of jaloezieën.
Leeg de watertank (zie Water Condensatie
verwijderen).
15
NL
Page 79

HANDLEIDING FOUTCODES
FOUTCODE MOGELIJKE OORZAAK VAN DE FOUT
"E1" Binnenshuis temperatuursensor storing (open circuit of kortsluiting).
"E3" Storing temperatuursensor verdamper (open circuit of kortsluiting).
"P1" Water vol alarm.
NL
16
Page 80

SICHERHEIT
LESEN SIE DIE BEDIENUNGSANLEITUNG
WICHTIGE SICHERHEITSHINWEISE - AUFMERKSAM
LESEN UND ZUM NACHLESEN AUFBEWAHREN. SOLLTEN
DIE ENGLISCHE UND DIE UNGARISCHE FASSUNG DER
UNTERLAGEN VONEINANDER ABWEICHEN, SO HAT DIE
ENGLISCHE FASSUNG VORRANG.
WARNUNG:
•
Das Gerät DARF NICHT mit einer beschädigten
oder lockeren Netzsteckdose betrieben werden. Bei
Beschädigung des Netzkabels ist dieses ausschließlich
vom Hersteller oder von seinem technischen Kundendienst
zu ersetzen, um jedes Risiko auszuschließen.
•
Wenn das Netzkabel beschädigt ist, muss es vom Hersteller
oder von einem autorisierten Kundendienst ersetzt werden.
•
KEINE Gegenstände auf dem Gerät ablegen oder auf dem
Gerät sitzen.
•
Always turn off and unplug the unit when cleaning or
servicing.
•
Bei der Reinigung oder Wartung schalten Sie das Gerät aus
und trennen Sie es von der Spannungsversorgung.
•
Gerät NICHT benutzen, wenn es beschädigt ist.
•
Wenn Service erforderlich ist, wenden Sie sich an eine
autorisierte Servicewerkstatt.
•
Ternnen Sie das Gerät von der Spannungsversorgung bei
Lagerung oder Nichtgebrauch.
•
Gerät NICHT am Netzkabel ziehen oder tragen.
•
Kabel NICHT in der Tür einklemmen und NICHT über
scharfe
Kanten oder um scharfkantige Ecken ziehen.
•
Verlegen Sie das Anschlusskabel nicht unter Teppichen
oder Teppichböden.
DE
Page 81

SICHERHEIT (FORTSETZUNG)
Verhindern Sie Stolperfallen durch das Anschlusskabel.
•
Das Gerät NICHT in den folgenden Situationen benutzen:
•
- In der Nähe einer Feuerquelle
- In Bereichen, in denen Benzin, Farbe oder andere
brennbare
Substanzen gelagert werden
- In an area where the water can be projected
Den Stecker oder das Gerät NICHT mit nassen Händen
•
anfassen.
Grundlegende Sicherheitshinweise sollten beim Einsatz
•
von elektrischen Geräten eingehalten werden.
Dieses Gerät wurde für den Einsatz im Wohnbereich
•
konzipiert und sollte nicht für andere Zwecke verwendet
werden.
Gebrauchen Sie das mitgelieferte Montageset, um
•
das Gerät aufzubauen. Versuchen Sie nicht den
Abluftschlauch zu verlängern oder das Gerät anders zu
installieren als in dieser Anleitung beschrieben. Wenn
Sie das Gerät unsachgemäß installieren können Sie Ihre
Garantieansprüche verlieren.
Nutzen Sie KEIN Verlängerungskabel mit diesem Gerät.
•
Dieses Gerät darf von Kindern über 8 Jahre, sowie von
•
Personen mit reduzierten körperlichen, sinnlichen oder
geistigen Fähigkeiten oder ohne Erfahrung und Wissen
benutzt werden, sofern sie unter Aufsicht sind, oder mit
den entsprechenden Anleitungen zum sicheren Gebrauch
des Geräts und der Gefahrenerkennung vertraut gemacht
worden sind. Kinder dürfen mit dem Gerät nicht spielen. Die
Reinigungs- und Wartungsarbeiten sollten nicht von
Kindern ausgeführt werden, außer sie sind älter als 8
Jahre und werden dabei beaufsichtigt.Children should
be supervised to ensure that they do not play with the
appliance.
DE
Page 82

SICHERHEIT (FORTSETZUNG)
Dieses Gerät darf von Kindern über 8 Jahre, sowie von
•
Personen mit reduzierten körperlichen, sinnlichen oder
geistigen Fähigkeiten oder ohne Erfahrung und Wissen
benutzt werden, sofern sie unter Aufsicht sind, oder mit
den entsprechenden Anleitungen zum sicheren Gebrauch
des Geräts und der Gefahrenerkennung vertraut gemacht
worden sind. Kinder dürfen mit dem Gerät nicht spielen. Die
Reinigungs- und Wartungsarbeiten sollten nicht von
Kindern ausgeführt werden, außer sie sind älter als 8 Jahre
und werden dabei beaufsichtigt.
Stecken Sie niemals Ihre Finger oder Stangen in den
•
Luftauslass. Seien Sie besonders vorsichtig, um Kinder vor
diesen Gefahren zu warnen.
Der Hersteller haftet nicht für Personen- oder Sachschäden,
•
die auf Nichteinhaltung der Wartungsanweisungen und
unsachgemäßen Gebrauch des Geräts zurückzuführen
sind.
Das Gerät muss gemäß den nationalen
•
Verdrahtungsvorschriften installiert werden.
Das Gerät darf nicht von Personen (einschließlich Kindern)
•
mit eingeschränkter körperlicher, sensorischer oder
geistiger Leistungsfähigkeit oder mangelnder Erfahrung
und Wissen verwendet werden, es sei denn, sie wurden
beaufsichtigt oder unterwiesen.
Kinder sollten beaufsichtigt werden, um sicherzustellen,
•
dass sie nicht mit dem Gerät spielen.
DE
Page 83

R290 SICHERHEIT
SYMBOL HINWEIS ERKLÄRUNG
Dieses Symbol weist darauf hin, dass das Gerät ein
WARNUNG
brennbares Kältemittel verwendet. Wenn Kältemittel
ausläuft und mit einer externen Zündquelle in
Kontakt kommt, besteht die Gefahr eines Feuers.
VORSICHT
VORSICHT
VORSICHT
Zusätzliche Warnhinweise für Geräte mit R290 Kältemittelgas
Vor dem Gebrauch des Gerätes die Anleitung sorgfältig durchlesen.
•
R290 Kältemittelgas entspricht den europäischen Umweltrichtlinien.
•
Dieses Gerät enthält eine gewisse Menge (siehe Typenschild auf der Rückseite des Gerätes) des
•
R290 Kältemittelgases. Die maximale Kältemittelfüllmenge beträgt 0.3 kg.
Zum Abtauen oder Reinigen keine andere als die vom Hersteller empfohlene Methode verwenden.
•
Das Gerät darf nicht in einem Raum mit dauerhaft betriebenen Zündquellen (wie beispielsweise
•
offene Flammen, ein aktives Gasgerät oder eine aktive elektrische Heizung) gelagert werden.
Nicht durchstechen oder verbrennen.
•
Es darf kein Teil des Kältemittelkreislaufs perforiert werden.
•
Kältemittelgas kann geruchlos sein.
•
Das Gerät muss in einem Bereich installiert, benutzt und gelagert werden, der größer
•
als 12 m2 ist.
Das gehäufte Auftreten von Kältemittellecks in einem unbelüfteten Zimmer kann zu einem
•
Brand oder einer Explosion führen, wenn das Kältemittel mit elektrischen Heizgeräten, Öfen oder
anderen Zündquellen in Berührung kommt.
Das Gerät muss so gelagert werden, dass es vor mechanischen Schäden geschützt ist.
•
Es dürfen nur Personen mit einer Zulassung von einer akkreditierten Organisation, die deren
•
Kompetenz im Umgang mit Kältemittel unter Einhaltung der Branchengesetze bestätigt, an dem
Kältemittelkreislauf arbeiten.
Reparaturen müssen gemäß den Empfehlungen des Herstellers durchgeführt werden.
•
Wartungsarbeiten und Reparaturen, die die Hilfe anderer Fachkräfte erfordern, müssen unter
•
Aufsicht von Fachleuten im Umgang mit brennbaren Kältemitteln durchgeführt werden.
Dieses Symbol weist darauf hin, dass die
Bedienungsanleitung sorgfältig gelesen
werden sollte.
Dieses Symbol weist darauf hin, dass qualifiziertes
Fachpersonal dieses Gerät unter Einbeziehung der
Installationsanleitung handhaben sollte.
Dieses Symbol weist darauf hin, dass Informationen
vorhanden sind, wie z. B. Bedienungsanleitung oder
Installationsanleitung.
DE
Page 84

DANKE SCHÖN
Herzlichen Glückwunsch zu Ihrem Kauf dieser vielseitigen lokale klimaanlage von Honeywell.
Lesen Sie bitte den nachfolgenden Abschnitt der Bedienungsanleitung, um mehr über die Montage,
Bedienung, Instandhaltung, Reinigung und Entsorgung des Gerätes zu erfahren.
ANWENDUNGSTIPPS
Die lokale klimaanlage von Honeywell sind ideal für eine gezielte Kühlung. Der Kompressor,
Kondensator und Verdampfer sind in einer kompakten Einheit untergebracht. Die Luft wird
entfeuchtet und gekühlt, während ein flexible Abluftschlauch die Hitze nach außen abführt. Die
Klimaanlage enthält ein Fenster Entlüftungs-kit. Es ist keine dauerhafte Installation erforderlich. Das
Gerät ist leicht von Raum zu Raum zu bewegen und bietet eine wirklich flexible Klimalösung.
Automatisches Verdunstungssystem - Das Gerät lässt automatisch das Kondenswasser durch den
Abluftschlauch verdunsten. Es besteht keine Notwendigkeit, den Entleerungsbehälter außer in
sehr hohen Feuchtigkeitsbedingungen zu entleeren. Lesen Sie und befolgen Sie die Anweisungen
sorgfältig.
Um eine optimale Leistungsfähigkeit des Produktes zu gewährleisten, halten Sie Türen und Fenster
geschlossen, wenn es wie eine lokale klimaanlage oder Entfeuchter verwendet wird. Wird das Gerät
nur mit der Lüfterfunktion verwendet, könnte ein offenes Fenster die Luftzirkulation verbessern.
Kühlung und Luftentfeuchtung Lüfterbetrieb
Wichtig:
Bevor Sie das Gerät installieren, stellen Sie es aufrecht 1 Stunden vor Gebrauch, damit das
Kältemittel stabilisiert wird. Der Luftauslass öffnet sich automatisch, wenn das Gerät eingeschaltet
wird, und schließt sich automatisch, wenn es ausgeschaltet wird.
Einbauanleitung zum Einrichten des Gerätes.
•
Schließen Sie das Gerät an einen geerdeten Stromkreis an. Schließen Sie KEIN
•
Verlängerungskabel an.
1DE
Page 85

BESCHREIBUNG DER TEILE
1
2
3
6
5
7
°F
°C
14
4
1) Systemsteuerung 8) Bestäuben Filter
2) Luftauslass 9) Obere Ablassschraube
3) Griff 10) Niedriger Bestäuben Filter
(LuftentfeuchterModus)
8
9
10
11
12
13
4) Rollen 11) Ablaufschlauch
5) Fernbedienung 12) Auffangwanne
6) Schlauchverbinder 13) Unteren GummiAblassschraube
7) Schnurwickler 14) Abflussrohr
DE
(Für ununterbrochenen Abfluss)
(KühlbetriebModus)
2
Page 86

INSTALLATION
Damit die Installation dieser lokale klimaanlage gelingt, ist es wichtig, dass die nachfolgenden
Installationsanleitungen befolgt werden. Bitte rufen den Kundendienst an, wenn Sie Schwierigkeiten
oder Fragen zu der Installation habenu der Installation haben.
1
x1
5
x1
InstallationsBausatz:
1. Set mit Haltern zur Anbringung
am Fenster
2. Adapter für die Fensterhalterung(1 Stück) 6. Schaumdichtung (selbstklebend)
3. Schlauchverbinder (1 Stück) 7. Schaumdichtung
4. Plastikstift (2 Stücke)
Installationsschritte:
Scheibenadapter der Fensterhalterung, Schlauch und Schlauchverbinder sind bereits vormontiert
1.
im Karton.
2 3
x1
6
x2 x1
(1 Set) 5. Schlauch
(nicht selbstklebend)
x1
7
4
x2
(1 Stück)
(2 Stücke)
(1 Stück)
2. Passen Sie die Fensterhalterung in Breite und Höhe an Ihr Fenster an und verwenden Sie den
Plastikstift, um es in der gewünschten Position zu fixieren. Dort, wo der Abluftschlauch später
durchgeführt wird, befindet sich eine Öffnung. Stellen Sie sicher, dass dieses Loch nicht blockiert ist.
Plastikstift
Öffnung für den Adapter für die
26.6", 36.2" bis 52"
(67.5 cm, 92 cm bis 132 cm)
Fensterhalterung & Abluftschlauch
3DE
Page 87

INSTALLATION (FORTSETZUNG)
Hinweis: Nach Sie die Halterung an die Größe des Fensters angepasst haben, nehmen Sie sie bitte
aus dem Fenster und folgen Sie den unten genannten Anweisungen.
3. Schließen Sie den Schlauch an den hinteren Abluftauslass an der Rückseite des Gerätes an.
Schieben Sie den Schlauchverbinder hinein und drehen Sie ihn dann im Uhrzeigersinn, bis er
einrastet.
Schlauch:
Durchmesser: 5.9" (15 cm)
Länge: 10.6" bis 59" (27 cm bis 150 cm)
4. Verbinden Sie die Fensterhalterung mit dem FensterhalterAdapter. Drücken Sie ihn bis er
einrastet in die Öffnung.
Schneiden Sie die Schaumdichtungen (selbstklebend) auf die passende Länge und befestigen
5.
Sie diese am Fensterflügel und-rahmen.
Waagerechtes Schiebefenster Senkrechtes Schiebefenster
4DE
Page 88

INSTALLATION (FORTSETZUNG)
6. Montieren Sie die Fensterhalterung am Fenster.
Waagerechtes Schiebefenster
Senkrechtes Schiebefenster
7. Schneiden Sie die Schaumdichtung (nicht selbstklebend) auf die Fensterlänge zu. Stecken Sie
die Schaumdichtung (nicht selbstklebend) zwischen den inneren Fensterflügel und das äußere
Fensterglas, um zu verhindern, dass Luft und Insekten in das Zimmer eindringen können.
Waagerechtes Schiebefenster
Fensterflügel
Schaumdichtung
(nicht selbstklebend)
Schaumdichtung
(selbstklebend)
Fensterflügel
Schaumdichtung
(nicht selbstklebend)
Senkrechtes Schiebefenster
Schaumdichtung
(selbstklebend)
8. Die lokale klimaanlage ist jetzt betriebsbereit.
5DE
Page 89

INSTALLATION (FORTSETZUNG)
Wichtig:
Ersetzen oder verlängern Sie den Schlauch nicht, weil die Funktion des Gerätes dadurch
beeinträchtigt werden kann.
20" (50 cm)
MIN 31 cm
MAX. 12" (31 cm)
MAX. 43" (110 cm)
NICHT ZU EMPFEHLEN EMPFEHLUNG
WARNUNG: Alle mit diesem Produkt enthaltenen Garantien werden ungültig, wenn ein zusätzlicher
Verlängerungsschlauch hinzugefügt wird oder wenn die Installation anders als nach den
Anweisungen des Herstellers durchgeführt wurde, ohne sich vorher angemessen beraten zu lassen.
Bitte kontaktieren Sie - wenn nötig - den Kundendienst, um Hilfe bei der Installation zu bekommen.
Der mitgelieferte Abluftschlauch hat einen Durchmesser von 5.9" (15 cm) und kann von 10.6" bis
•
59" (27 cm bis 150 cm).
Biegen Sie den Abluftschlauch nicht (so weit wie oben abgebildet). Ein gebogener Schlauch kann
•
die Abluft blockieren und zu einer Fehlfunktion oder zur Abschaltung des Geräts führen.
Stellen Sie sicher, dass die Rückseite des Geräts mindestens 20" (50 cm) von der Wand entfernt
•
ist. Stellen Sie das Gerät nicht vor Gardinen oder Vorhängen auf, weil diese den Luftstrom
behindern können.
Hinweis: Aufgrund der Leistungsaufnahme des Gerätes beim Einschalten kann es zu zum
Spannungsabfall kommen. Dies kann sich auf andere Geräte auswirken (z. B. schwächeres Licht).
Achten Sie bitte darauf, dass das Gerät an eine Stromversorgung mit einer maximal zulässigen
Netzimpedanz von Zmax = 0,306 Ohm angeschlossen ist. Falls Sie weitere Informationen benötigen,
können Sie sich an Ihr örtliches Stromversorgungsunternehmen wenden.
DE
6
Page 90

VERWENDUNG UND BETRIEB
SYSTEMSTEUERUNG
(6) (4) (3) (2)
(7)(8) (5)
(1)
1) Kontrollleuchten
2) Stromzufuhr 6) Modus Kontrolle
3) FilterReset 7) Timer Steuerung
4) Lüfter Geschwindigkeits
Kontrolle
FUNKTIONSTASTEN
STROMZUFUHR
Der Hauptschalter schaltet das Gerät ein und aus. Wenn das Gerät eingesteckt und ausgeschaltet
ist, leuchtet das Kontrolllämpchen. Das Gerät befindet sich im StandBy Modus und ist
betriebsbereit. Die Entlüftungsöffnung öffnet sich automatisch, wenn das Gerät eingeschaltet ist
und sich automatisch schließt, wenn das Gerät ausgeschaltet ist.
FILTERRESET
Wenn das Gerät für 250 Stunden betrieben wurde, leuchtet die FilterResetAnzeige auf.
Schalten Sie die lokale klimaanlage AUS und entfernen Sie die Filter vorsichtig aus dem Gerät, um sie
zu reinigen. Setzen Sie die Filter wieder ein und drücken Sie die FilterResetTaste. Die FilterResetAnzeige erlischt und die Betriebszeit wird zurückgesetzt.
LÜFTERSTEUERUNG
4 Stufen: Hoch, Mittel, Niedrig und Aautomatisch
5) Timer / TemperaturSollwert Steuerelemeante
8) SchlaffunktionTaste
Hinweis: Die automatische Lüftergeschwindigkeit kann nur im Kühlmodus ausgewählt werden.
DE
7
Page 91

VERWENDUNG UND BETRIEB (FORTSETZUNG)
FUNKTIONSTASTEN (FORTSETZUNG)
EINSTELLUNG VON TEMPERATUR UND TIMER
Standardmäßig wird die Raumtemperatur angezeigt.
•
Wenn Sie den Kühlbetrieb eingestellt haben und die Tasten oder gedrückt halten, wird die
•
eingestellte Temperatur angezeigt und kann verändert werden.
Hinweis: Durch gleichzeitiges Drücken der oder Tasten wechselt die Anzeige zwischen
Celsius (°C) und Fahrenheit (°F).
MODUS KONTROLLE
Einstellungsmöglichkeiten: Kühlen, Entfeuchten, Lüften und Auto.
Die entsprechende Anzeige leuchtet auf, um die aktuelle ModusEinstellung anzuzeigen.
KühlbetriebModus (Kühlbetrieb)
•
Sie können die Lüftergeschwindigkeit und Lufttemperatur einstellen, um die gewünschte
Raumtemperatur zu erreichen. Temperatureinstellbereich 16°C - 32°C (60°F - 90°F).
Umgebungstemperatur bereich ist 16'C - 35'C (60'F - 95'F).
LuftentfeuchterModus (Trockenhaltemodus)
•
Die StandardVentilatorgeschwindigkeit ist „Low“.
Hinweis: Wenn das Gerät überwiegend als Luftentfeuchter benutzt wird, schließen Sie den
Abluftschlauch nicht an. In diesem Fall ist ein kontinuierliches Entleeren erforderlich (siehe
Kontinuierliches Entleeren im LuftentfeuchterModus).
WICHTIG: Der Luftentfeuchtermodus wird zum Senken der Luftfeuchtigkeit eingesetzt, allerdings
kann das Gerät die Luftfeuchtigkeit nicht in gleichem Maße wie ein StandardLuftentfeuchter
reduzieren. Der eingebaute Luftentfeuchter passt die Luftentfeuchtung automatisch an die
Umgebungstemperatur an. Es ist nicht möglich, einen gewünschten Luftfeuchtigkeitsgehalt
einzustellen. Das Display an der Vorderseite zeigt nur die aktuelle und die gewünschte Temperatur an.
Es zeigt nicht den Luftfeuchtigkeitsgrad an.
LüfterModus
•
Für die Luftkühlung ohne die Kühlung durch die lokale klimaanlage.
Hinweis: Die Ventilatorgeschwindigkeit kann im automatischen Modus nicht eingestellt werden.
Automatischer Modus
•
Drücken Sie die oder Taste, um die gewünschte Temperatur auszuwählen.
In diesem Modus wählt das Gerät je nach eingestellter Temperatur und der Zimmertemperatur
automatisch den Kühl- oder Ventilatormodus. Die lokale klimaanlage regelt die
Zimmertemperatur automatisch entsprechend der eingestellten Temperatur.
Hinweis: Die Ventilatorgeschwindigkeit kann im automatischen Modus nicht eingestellt werden.
DE
8
Page 92

VERWENDUNG UND BETRIEB (FORTSETZUNG)
FUNKTIONSTASTEN (FORTSETZUNG)
TIMERSTEUERUNG
Sie können eine Zeit zwischen 1 und 24 Stunden einstellen.
AUTOMATISCHE AUSSCHALTUNG:
Während das Gerät läuft, drücken Sie die TIMER Taste und das Display blinkt. Während die
Anzeige blinkt, Drücken Sie die Taste oder , um die Anzahl der Stunden auszuwählen, die das
Gerät automatisch ausschalten soll.
AUTOMATISCH INSCHAKELEN:
Wenn das Gerät auf StandBy steht (eingesteckt, das Stromkontrolllicht leuchtet), drücken Sie die
Taste, und das Display blinkt. Während die Anzeige blinkt, drücken Sie die Taste oder , um die
Anzahl der Stunden auszuwählen.
SCHLAFMODUS
Wenn der Energiesparmodus im Klimatisierungsmodus aktiviert ist, erhöht sich die eingestellte
Temperatur nach der ersten Stunde der Kühlung um 1°F oder 1°C und erhöht nach der zweiten
Stunde der Kühlung weitere 1°F oder 1°C. Das Gerät hält diese Temperatur für 5 Stunden. Die
eingestellte Temperatur verringert sich dann um 1°F oder 1°C in der siebten Stunde und verringert
weitere 1°F oder 1°C auf der zehnten Stunde. Der Ruhemodus wird dann automatisch deaktiviert.
Hinweis: Der SleepModus kann während des Kühlens oder Heizens deaktiviert werden, indem Sie
jederzeit eine beliebige Taste drücken.
WASSERTANKVOLLALARM
Es kann sich Kondenswasser im Gerät ansammeln.
Wenn der interne Wassertank voll ist, wird der Fehlercode „P1“ angezeigt und für 30 Sekunden ist
ein Alarmsignal zu hören. Das Gerät wird erst wieder laufen, wenn das Wasser durch den unteren
Ablaufstutzen (siehe Ablassen des Kondenswassers) abgelassen wurde.
Wenn Sie die Klimanlage ausschalten, müssen Sie nach erneutem Einschalten 4 Minuten
warten, bis sie wieder in Betrieb geht.
DE
9
Page 93

VERWENDUNG UND BETRIEB (FORTSETZUNG)
FERNBEDIENUNG
Alle wichtigen Funktionen lassen sich mit der Fernbedienung aufrufen.
Spannungsversorgungl
EIN / AUS
Temperatur Kontrolle
Wenn Sie den Kühlbetrieb eingestellt
haben und die Tasten oder gedrückt
halten, wird die eingestellte Temperatur
angezeigt und kann verändert werden.
Drücken Sie diese Taste, um den
Betriebsmodus in der gewünschten
Reihenfolge zu ändern:
Kühlen Entfeuchtung
Modus Kontrolle
Auto
Steuert die Schlafmodus
Lüfter
EIN / AUS
°F
°C
Im Betriebsmodus: Automatische Abschaltung Im
•
StandbyModus: Auto switch on Auto einschalten
Drücken oder Taste um die Zeit einzustellen.
Einstellung für 1StundenIntervall.
Timer kann von 1 bis 24 Stunden durch
•
Drücken der Taste oder eingestellt werden.
Wenn die TimerZeit eingestellt ist, kann sie durch
•
Drücken der Taste oder gelöscht werden.
Drücken Sie diese Taste, um die Schwenkbewegung der
Lamelle nach oben und unten zu aktivieren. Drücken
Sie diese Taste erneut, um die Schwenkfunktion zu
deaktivieren. Die Schwenkfunktion kann nur über die
Fernbedienung eingestellt werden.
Hinweis:
Einbau des Akkus: Entfernen Sie die Abdeckung auf der Rückseite der Fernbedienung und legen
•
Sie zwei AAABatterien so ein, dass die Pole richtig herum liegen.
TimerTaste
Lüfterdrehzahlregler
• Hoch • Medium • Niedrig
• Automatisch
Schwenkfunktion
Vorsicht:
Verwenden Sie nur zwei AAA oder IEC R03 1,5V.
•
Entfernen Sie die Batterien, wenn die Fernbedienung für einen Monat oder länger nicht benötigt
•
wird.
Alle Batterien sollten gleichzeitig ersetzt werden, nicht mit alten Batterien mischen.
•
Mischen Sie keine alkalischen, Standard- (KohleZink) oder aufladbare (NickelCadmium)
•
Batterien.
Entsorgen Sie verbrauchte Batterien.
•
10
DE
Page 94

REINIGUNG UND PFLEGE
Geräte Watung:
Schalten Sie das Gerät aus, bevor Sie das Netzkabel abziehen.
1.
Gerät nur mit einem trockenen, weichen Tuch reinigen.
2.
Luftfilterwartung:
Der Luftfilter muss alle zwei Wochen gereinigt werden, um eine saubere Umgebung und die
Kühlleistung aufrechtzuerhalten. Folgen Sie bitte den nachfolgenden Anleitungen zur Reinigung des
Luftfilters:
Klimaanlage ausschalten und den Stecker aus der
1.
Netzsteckdose ziehen.
Oberen und unteren Filter/ Gitter entfernen.
2.
Filter vorsichtig mit Wasser und/oder verdünntem
3.
Geschirrspülm ttel waschen. Filter gründlich spülen
und behutsam das restliche Wasser von den Filtern
abschütteln. Die Filter müssen trocken sein, bevor sie
wieder eingesetzt werden.
Hinweis: Sie können mithilfe eines Staubsaugers den Staub
entfernen.
Das obere Gitter und das untere Gitter wieder am Gerät
4.
anbringen.
Hinterer
Grill
Bestäuben
Filter
WARNUNG: Die Klimaanlage NICHT einschalten oder laufen lassen, wenn sie gereinigt wird oder
wenn einer oder beide der hinteren Gitter vom Gerät entfernt wurden oder nicht richtig befestigt sind.
NICHT versuchen, eine der Komponenten oder die Kabel in der Klimaanlage zu manipulieren oder
zu berühren, nachdem das (die) hintere(n) Gitter vom Gerät entfernt wurden. Dies kann zu schweren
Verletzungen oder einem Stromschlag führen.
11
DE
Page 95

REINIGUNG UND PFLEGE (FORTSETZUNG)
SaisonEnde Lagerung und Betriebsanleitung:
Wenn das Gerät nicht für längere Zeit nicht verwendet wird:
Achten Sie darauf, dass das übrig gebliebene Kondenswasser ablaufen kann. Entfernen Sie die
1.
untere Ablassschraube und sammeln Sie mit einer flachen Pfanne das Wasser. (achten Sie
darauf, dass Sie die Ablassschraube wieder einsetzen, wenn Sie fertig sind).
Um überschüssige Feuchtigkeit zu trocknen, schalten Sie das Gerät in LüfterModus für
2.
30 Minuten, vor der Lagerung.
TurSchalten Sie Aus und ziehen Sie das lokale klimaanlage von der Stromversorgung ab.
3.
Entfernen Sie den Luftfilter und reinige Sie ihn mit Wasser. Trocknen Sie den Luftfilter und
4.
installieren.
Sie ihn dann im Gerät erneut.:
5.
Entfernen Sie den Schlauch vom Gerät durch Drehen gegen den Uhrzeigersinn, dann
•
wegziehen.
Entfernen Sie die Schaumdichtung, Fensterhalterung, den Fensterhalter PanelAdapter und
•
den Schlauchanschluss.
Es wird empfohlen, die FensterBausatz Teile in einer Tasche zusammen mit der
•
Fernbedienung zu lagern, zusammen mit dem lokale klimaanlage.
Falls erforderlich, können Sie den FensterBausatz mit einem feuchten Tuch und Wasser
•
vor der Lagerung reinigen. Stellen Sie sicher, dass alle Teile des Fenster Bausatzes vor der
Lagerung trocken sind.
Decken Sie die lokale klimaanlage mit einem Tuch/ Plastiktasche vor der Lagerung ab, um sie vor
6.
Staub und Kratzern auf der Oberfläche des Gerätes zu schützen.
Es wird empfohlen, das Stromkabel aufzurollen und vom Boden zu entfernen, um sicherzustellen,
7.
dass das Kabel von Biegungen und Knicken geschützt ist.
Lagern Sie die lokale klimaanlage an einem kühlen, trockenen Ort, an dem sie vor direkter
8.
Sonneneinstrahlung geschützt ist.
DE
12
Page 96

KONDENSWASSER-ABLAUF
Wenn sich übermäßig viel Kondenswasser im Gerät angesammelt hat, stoppt die lokale klimaanlage
und zeigt den Fehlercode „P1“ an, während ein Alarmsignal ertönt. Dies weist darauf hin, dass das
Kondenswasser gemäß den nachfolgenden Schritten abgelassen werden muss:
Manuelles Ablassen im Kühl-, Luftentfeuchter- und
automatischen Modus
In Bereichen mit hoher Luftfeuchtigkeit muss eventuell Wasser
abgelassen werden.
Ziehen Sie den Stecker des Gerätes aus der Steckdose.
1.
Stellen Sie die Auffangwanne unter den unteren Gummi-
2.
Ablaufstutzen. Siehe Schaubild
Entfernen Sie den Verschluss.
3.
Das Wasser läuft daraufhin ab und wird in der
4.
Auffangwanne gesammelt.
Nachdem das Wasser abgelassen ist, verschließen Sie den
5.
Ablaufstutzen wieder.
Jetzt können Sie das Gerät einschalten.
6.
Kontinuierliche Entwässerung für den Luftentfeuchtungsmodus
Während des Betriebs im EntfeuchterModus wird eine kontinuierliche Entwässerung empfohlen.
Unteren GummiAblassschraube
Flache Schale
(Nicht inbegriffen)
Trennen Sie das Gerät von der Stromquelle.
1.
Entfernen Sie den oberen / unteren Gummi-
2.
Ablassschraube. Während Sie dieses Vorgangs kann
etwas Restwasser verschüttet werden, benützen Sie
hierzu eine Pfanne, um das Wasser zu sammeln.
Verbinden Sie das Abflussrohr (inbegriffen) mit dem
3.
oberen oder unteren Abfluss (je nachdem, was für Ihren
Platz bequemer ist).
Das Wasser kann kontinuierlich durch den Schlauch in
4.
einen Bodenablauf oder in einen Eimer abgelassen
werden.
Entfernen Sie die untere Ablassschraube.
5.
Jetzt können Sie das Gerät einschalten.
6.
Wasserablaufrohr
(inbegriffen):
Durchmesser: 0.6" (1.6 cm)
Länge: 23.6" (60 cm)
13DE
Untere
Ablassschraube
Page 97

ANLEITUNG ZUR FEHLERSUCHE
Die folgenden Fehlerbehebungsanleitung behandelt die häufigsten Probleme. Wenn das Problem
weiterhin besteht, rufen Sie den Kundendienst. Trennen Sie und das Gerät vom Netz, bevor Sie
versuchen den Fehler zu beheben.
PROBLEM MÖGLICHE URSACHE LÖSUNG
Kein Strom. Überprüfen Sie die.
Das Klimagerät
läuft nicht an
Läuft nur eine
kurze Zeit
Die Batterien in der
Fernbedienung
müssen ersetzt werden.
Das Netzkabel ist nicht
richtig eingesteckt.
The thermostat
temperature setting
is too close to room
temperature.
Der Luftaustritt ist
blockiert.
Es gibt zu enge Kurven
im Abluftschlauch.
Spannungsversorgung. Wechseln Sie die Batterien
der Fernbedienung.
Entfernen Sie das Netzkabel und schließen Sie es
wieder an.
Reduzieren Sie die eingestellte Temperatur.
Abluftschlauch richtig angeschlossen ist.
Schließen Sie den Abluftschlauch gemäß den
Anweisungen an. wie auf Seite 3.
14DE
Page 98

ANLEITUNG ZUR FEHLERSUCHE (FORTSETZUNG)
PROBLEM MÖGLICHE URSACHE LÖSUNG
Läuft, aber kühlt
nicht
Eine Tür oder ein Fenster
ist geöffnet.
Der Luftfilter ist
verschmutzt.
Der Abluftschlauch hat
sich abgelöst.
Die
Temperatureinstellung
ist zu hoch.
Der Luftaustritt oder die
Zufuhr ist blockiert.
Stellen Sie sicher, dass Fenster oder Türen
geschlossen sind.
Reinigen Sie den Luftfilter.
Installieren Sie Abluftschlauch richtig (siehe
Installation).
ReduzierenSie die Temperatureinstellung.
Entfernen Sie Verstopfungen.
Läuft nicht und
Fehlercode „P1“
wird angezeigt.
Das Zimmer ist größer als
die empfohlene Größe.
Eine großes Zimmer oder
viele Fenster verringern
die Kühlleistung.
Überschüssiges
Kondenswasser im
Inneren des Tanks.
Gerät in ein kleineres Zimmer stellen.
Fenster mit Vorhängen oder Fensterläden verdecken
Lassen Sie das Wasser ab (siehe
Wasserkondensablauf).
15DE
Page 99

FEHLERCODE-ERKLÄRUNG
FEHLERCODE FEHLER MÖGLICHE URSACHE
"E1"
"E3"
"P1" Wasser vollMelder.
Ausfall des Innentemperatursensors (offener Stromkreis oder
Kurzschluss).
Ausfall des Verdampfertemperatursensors (offener Stromkreis oder
Kurzschluss).
DE
16
Page 100

SICUREZZA
LEGGERE E CONSERVARE LE PRESENTI ISTRUZIONI
ISTRUZIONI DI SICUREZ ZA IMPORTANTI, LEGGERE
ATTENTAMENTE E CONSERVARLE PER RIFERIMENTO
FUTURO. IN CASO DI DISCREPANZA O CONFLITTO TRA LA
VERSIONE INGLESE E QUELLA IN LINGUA STRANIERA DEL
CONTENUTO DEL PRESENTE MATERIALE, PREVARRÀ LA
VERSIONE INGLESE.
ATTENZIONE:
•
NON avviare il dispositivo con spina danneggiata o presa
della corrente allentata. Se il cavo di alimentazione è
danneggiato, dovrà essere sostituito dal produttore, da
un suo agente autorizzato o da una persona similmente
qualificata al fine di evitare qualsiasi rischio.
•
NON coprire la presa d'aria e lo scarico durante l'utilizzo.
•
NON posizionare oggetti oppure non sedersi sul dispositivo.
•
Spegnere sempre e scollegare il dispositivo durante la
pulizia o la manutenzione.
•
NON usare il dispositivo se danneggiato.
•
Se è necessaria manutenzione, contattare un agente autorizzato.
•
Scollegare il dispositivo quando lo si ripone o non è in uso.
•
NON tirare o trasportare il dispositivo usando il cavo di
alimentazione.
•
NON staccare il cavo nello sportello e NON tirarlo lungo
estremità o angoli stretti.
•
NON far passare il cavo di alimentazione sotto moquette e
tappeti.
•
Fare attenzione a non inciampare nel cavo.
•
NON usare il dispositivo nei seguenti casi:
- Near a fire source
- In aree in cui sono conservati benzina, vernici o altri
prodotti infiammabili.
- In un'area in cui vi possono essere fuoriuscite di acqua.
IT
 Loading...