

Page 1
Page 2
ForanyquestionsregardingyourGenesisTouch:
CustomerService
1-888-353-5440
VisitusontheWeb
http://www.hommed.com/customer-service/
BrowsetheUserManual
http://www.hommed.com/customer‐service/genesis‐touch‐manuals/
WatchTrainingPresentations and Video
Scan to Visit
the Website:
http://www.hommed.com/lifestream‐services/clinical‐support/
UsingQRCodes
Quick reference codes are used in this document for your added convenience. To learn how to use these
codes with your cellular phone, please visit the following site: http: //www.qrcode.com/en/
You must have a phone capable of transferring data and browsing the Web in order to scan them. I f you do,
then access the app store on your phone and download a QR reader. Please check with your cellular service
provider to see if data transfer charges will be incurred. Download a QR reader from the following app
stores and follow the on screen instructions on your software to scan QR codes in this document:
For Apple (iOS) products: http: //www.qrcode.com/en/howto/app.html
For Android products: http: //play.google.com/store
© 2014 Honeywell HomMed. All rights reserved. 6/9/14 P4810EN.05
Page 3

IndicationsforUse
The Honeywell HomMed Genesis Touch System is designed to retrospectively monitor vital signs. Vital signs include noninvasive
blood pressure, pulse oximetry, pulse rate, weight and manually entered temperature. The Genesis Touch system collects, displays
and transmits vital signs measurements captured from commercially available wireless medical devices designed for home use.
Collected measurement data from the Genesis Touch System may be transmitted via a commun ication module to a central viewing
station where the data can be viewed and analyzed by a healthcare professional.
The Genesis Touch System is intended for home use by adult and pediatric patients over twelve years of age or in a healthcare
related environment by healthcare providers.
Contra‐Indications
The Genesis Touch monitor is not an emergency medical response device. The monitor does not have auditory or visual alarms for
out-of-limit parameters. The Genesis Touch monitor does not provide real-time, critical-care monitoring of patient vital signs. All
data is transmitted to your monitoring platform (LifeStream™) and examined retrospectively by qualified health professionals.
SafetyInformation
Read and observe all the safety information in this document before you install or use the Genesis Touch to prevent
injury to yourself or damage to any equipment. Consult the Genesis Touch User Manual (P4820EN) for more detailed
cautionary information and see the manufacturer’s user manual for information on approved Honeywell peripherals.
The Genesis Touch is a pre-configured medical device. DO NOT MAKE UNAUTHORIZED CHANGES TO THE DEVICE
SETTINGS as it may result in damage to the functionality of the medical device.
Warnin g
RiskofELECTRICALSHOCK
DO NOT spray cleaners on or into the unit.
DO NOT immerse in water or other liquid.
DO NOT use with wet hands.
DO NOT turn on if wet, if on, turn off and dry the device with a towel.
DO NOT disassemble
DO NOT expose to dust, dirt, or sand.
DO NOT use around or store with flammable liquids, gases, or explosive materials
DO NOT put in an oven, microwave or dryer
DO NOT drop, knock, or shake the unit
• EXPLOSION HAZARD
• Unit is powered with electricity and could ignite highly flammable gases.
• TheGenesisTou c h monitorcontainsabatteryandshouldnotbeplacedinornearaheatsource.Excessiveheatingcan
damagethemonitororthebatteryandcouldcausethemonitororthebatterytoexplode.
• NOT A BABY UNIT
• The Genesis Touch is not a toy. Caregiver supervision should practiced when the device is being used by children.
• IMPLANT ABLE MEDICAL DEVICES
• When the unit is turned on, a minimum separation of six (6) inches should be maintained between the monitor and an
implantable medical device, such as a pacemaker or implantable cardioverter-defibrillator, to avoid potential
interference with the unit. TURN OFF the unit if there is any reason to suspect interference.
• PHYSICAL HAZARD
• Exercise care in the routing of external cables, wires and hoses to avoid creating a tripping hazard.
• USE ONLY HOMMED AUTHORIZED MEDICAL EQUIPMENT
• Attaching unauthorized equipment to the Genesis Touch may cause damage or equipment failure.
• DO NOT use any AC adaptor other than the one that came with the Genesis Touch monitor.
• TOUCH SCREEN DAMAGE
• DO NOT use sharp, pointed or metallic instruments, as they may permanently damage the monitor’s screen.
• DO NOT operate on your lap. Use with a firm grip and use a monitor stand for added stability.
• DO NOT use if monitor screen is broken or cracked.
© 2014 Honeywell HomMed. All rights reserved. 6/9/14 P4810EN.05
Page 4

TableofContents
Purpose of this Document ............................................................................................................................... 1
Unpacking Your Products ................................................ ............................................................................... 1
Overview .........................................................................................................................................................1
Operating the Monitor ..................................................................................................................................... 1
Turning the Monitor On and Off .............................................................................................................2
Using Monitor Keys .................................................. ............................................................................... 3
Screens .....................................................................................................................................................4
Setting General Features .................................................................................................................................5
Setting Up Peripheral Devices ........................................................................................................................ 6
Before You Begin ....................................................................................................................................6
Clinical Details for Pairing Bluetooth Peripherals ..................................................................................7
Setting Up a Scale ....................................................................................................................................7
General Guidelines ........................................................................................................................... 7
Configuring the Scale Type ..................................................................................................................... 8
Pairing a HomMed or NCI Technology Scale .......................................................................................10
Pairing an A&D Scale............................................................................................................................. 13
Pairing a Blood Pressure Unit............................................................. ................................................... 17
Pairing an Oximeter ............................................................................................................................... 20
Configuring for Manually-Entered Temperature ...................................................................................23
Configuring for Manually-Entered Pulse Rate ......................................................................................25
Un-Pairing a Peripheral Device 2........................................................................................................... 26
Syncing with LifeStream .......................... ................................................................. ...................................28
Scheduling .....................................................................................................................................................29
Setting the Overall Schedule ..........................................................................................................29
Setting Schedules for Peripherals ...................................................................................................32
Setting Advanced Features ....................................................................................................................33
Getting to the Advanced Settings Screen ..............................................................................................34
Setting Up Video ........................................................................................................................................... 35
HIPAA Privacy Notice ..........................................................................................................................35
Entering a Custom Caption .................................................................................................................... 37
Entering a Meeting Identifier .................................................................................................................38
Verifying One-Touch Video Setting ......................................................................................................38
Enabling All Education.................................................................................................................................. 39
Getting Started Checklist
P4810EN.05 © 2014 Honeywell HomMed. All rights reserved. 6/9/14
Page 5

Purpose of this Document
PurposeofthisDocument
This document is intended for the person installing and setting up the monitor and peripheral medical
devices for the Genesis Touch System. It does not contain instructions for scheduling or taking vital signs.
UnpackingYourProducts
When you receive your Genesis Touch kit, carefully remove each piece of equipment from the box and
save any packaging materials in the event you need to return items. Your package may include different
products depending on the model and/or patient need. Assemble peripheral medical devices as necessary.
Refer to the manufacturer’s instructions and safety documentation for more information.
Attach the included USB extender cable between the monitor and the adapter unit to power the Genesis
Touch from an outlet, as shown above. Alternatively, connect the USB cable to a USB slot on a computer.
Overview
Setting up generally consists of the following, depending on the patient’s individual requirements:
• Understanding the monitor
• Setting up peripheral devices
• Pairing and positioning the scale
• Pairing a blood pressure unit
• Pairing an oximeter
• Configuring for manually-entered temperature readings
• Un-pairing a peripheral device
Note: Many features and functions of the tablet have been disabled to allow for use as a
Genesis Touch Monitor. Refer to the tablet manufacturer’s instructions for additional
information.
OperatingtheMonitor
Place the monitor on the stand or on a flat, stable, and uncluttered surface where seating is available. A
location near a window on an outside wall usually works best for transmission purposes. The monitor can
be run on batteries, just as a cellular phone does, however , the preferred method is to keep it plugged in. To
charge the batteries, plug the monitor into an electrical outlet via the supplied AC power adapter.
IMPORTANT: We recommend that you have the monitor plugged in while using.
6/9/14 © 2014 Honeywell HomMed. All rights reserved. P4810EN.05 1
Page 6
Getting Started
TurningtheMonitorOnandOff
TurningtheMonitorOn
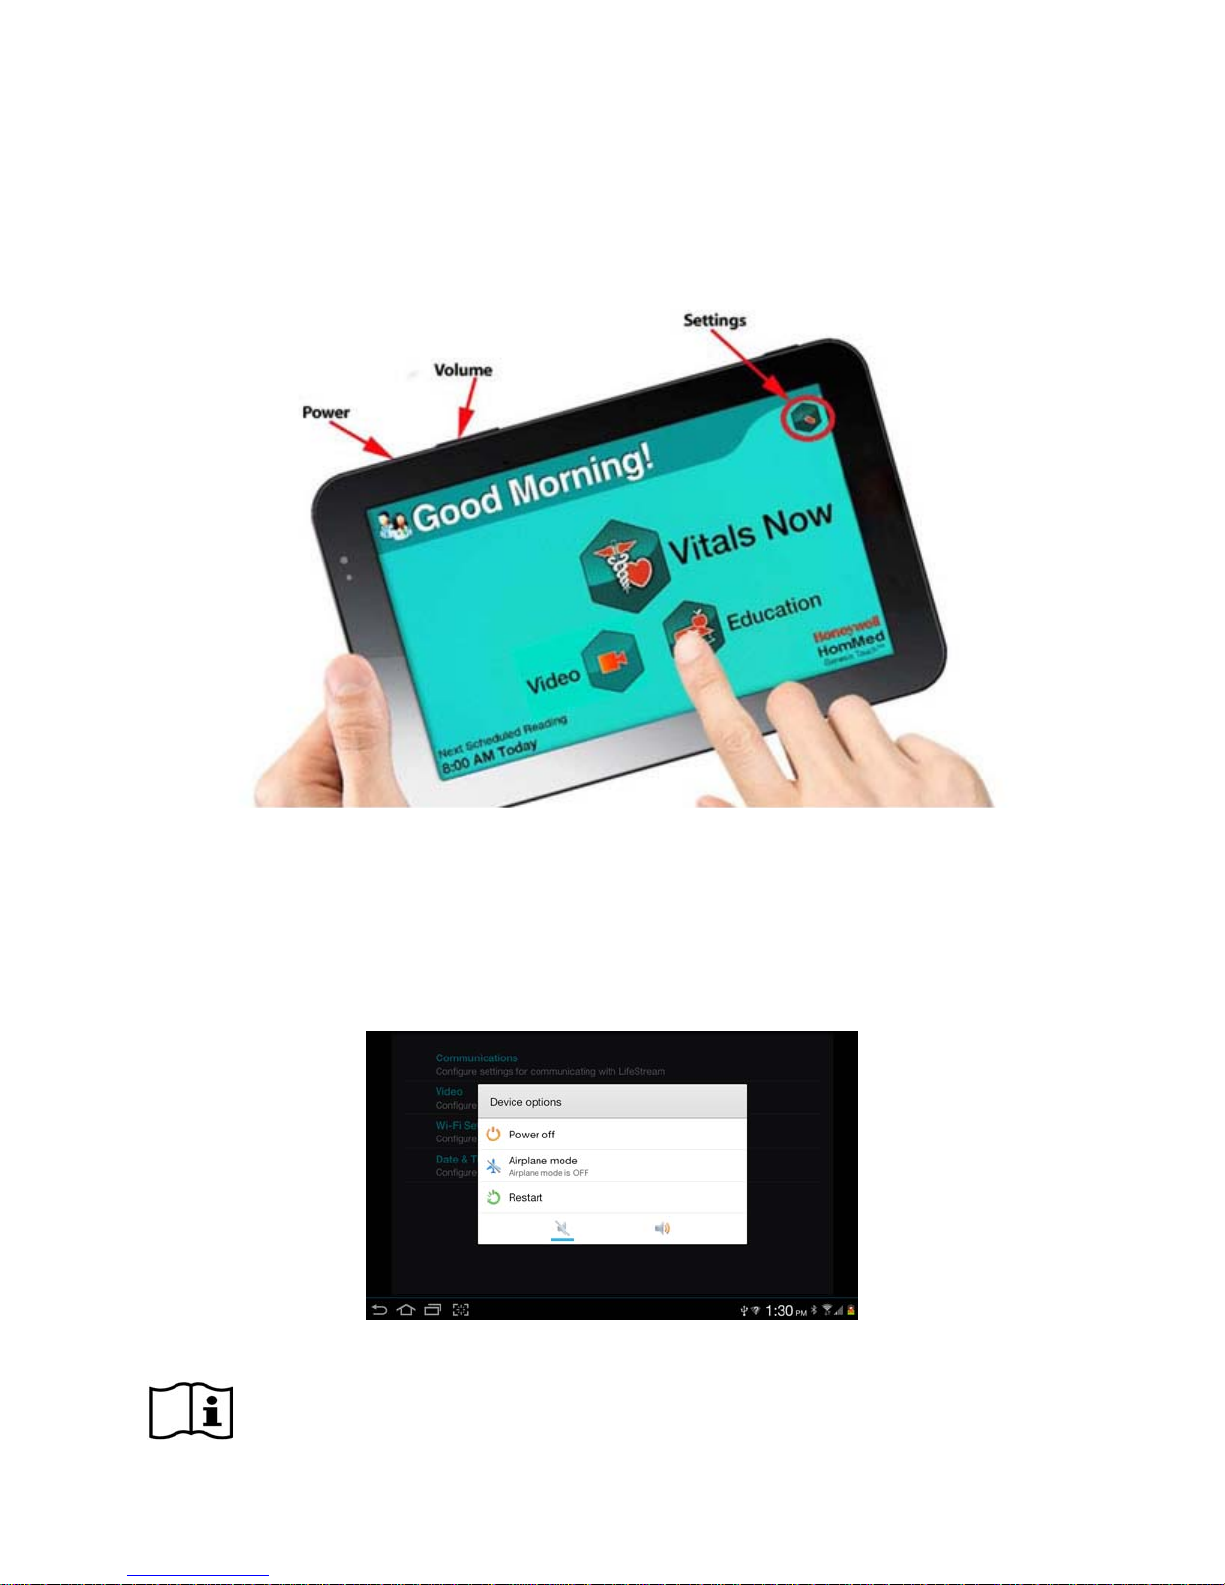
T o turn the Genesis Touch monitor on, press and hold the power button on the top side of the monitor until
you see the logo. The monitor cycles through initialization images and sounds. When it is ready, a Vitals
Now/Home screen similar to the following appears:
TurningtheMonitorOff
To eliminate the possibility of a patient accidentally turning off the monitor, you must be within a
password protected area to turn it off.
Once a password has been entered, to turn the monitor off:
1. Press and hold the power button on the top side of the monitor. A window similar to the following
appears:
2. Select Power off. The monitor turns off.
Note: Refer to the manufacturer’s instructions for information on the other options on this
menu. Consult the user manual for more information about password protection.
2 P4810EN.05 © 2014 Honeywell HomMed. All rights reserved. 6/9/14
Page 7
Operating the Monitor
UsingMonitorKeys
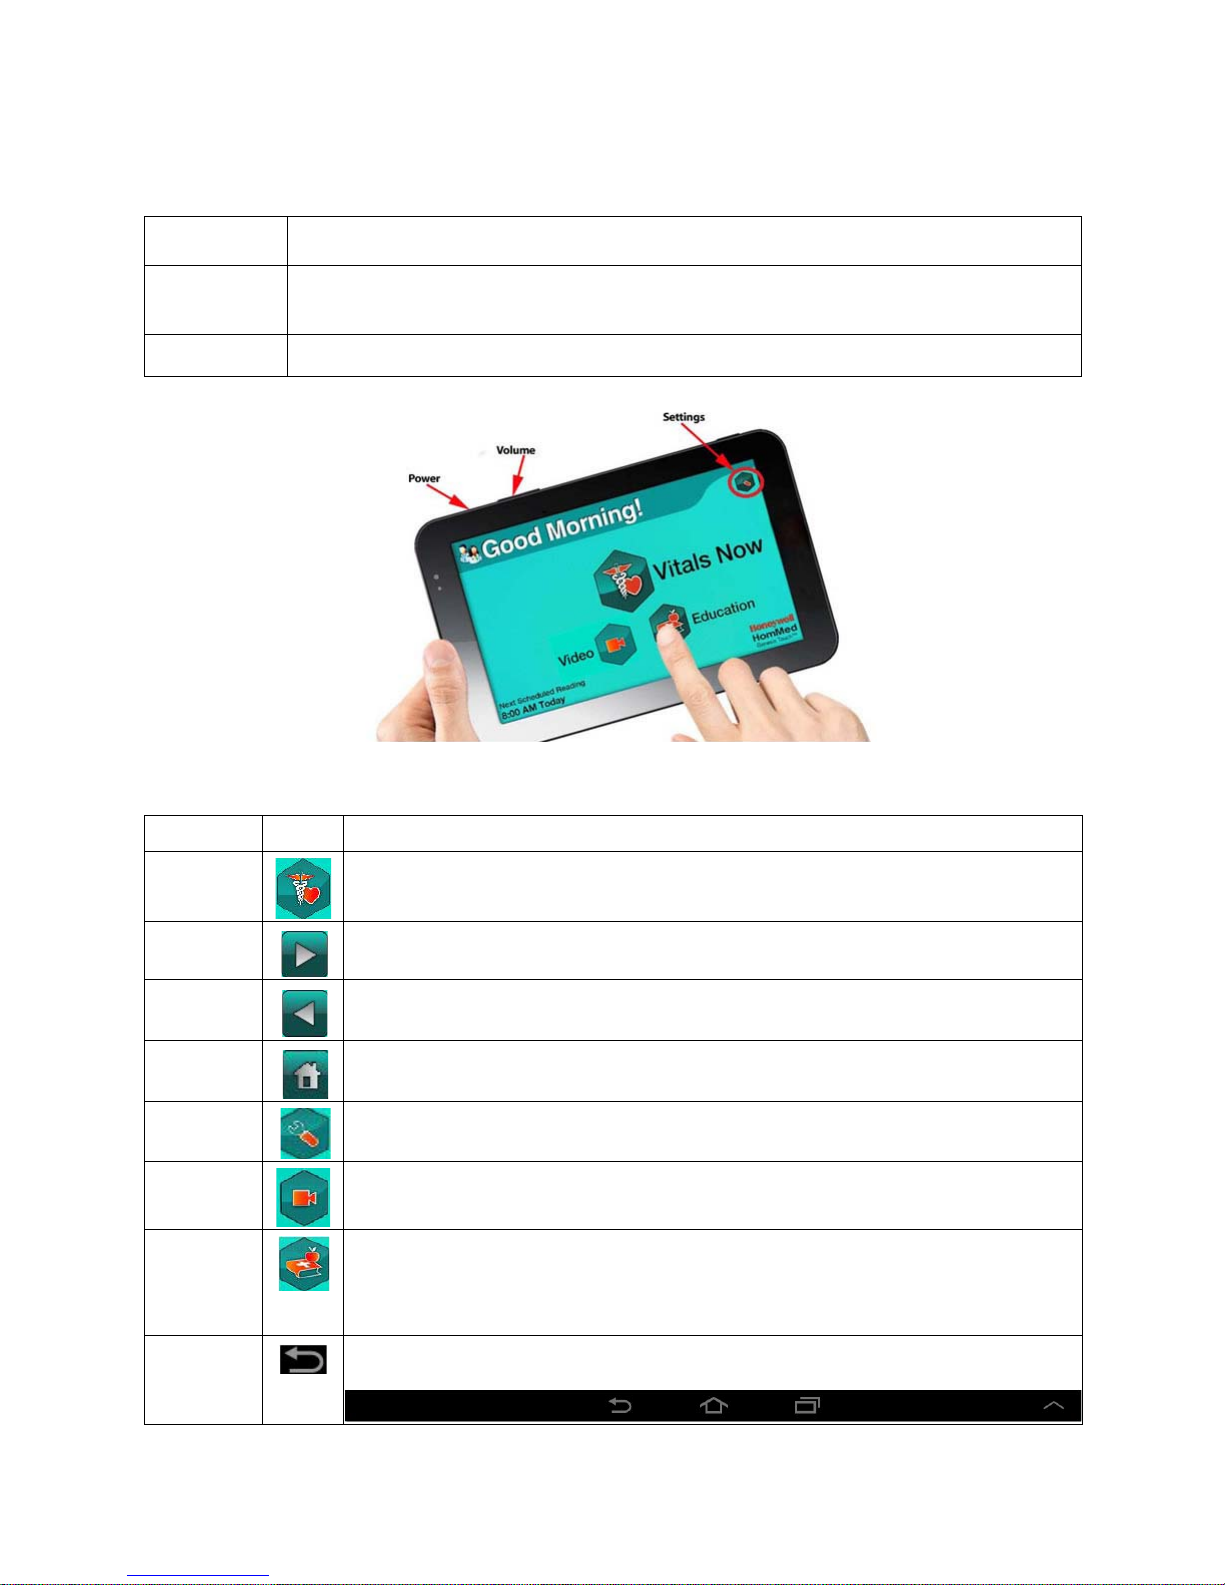
Two keys that are standard on the tablet are active for use within the Genesis application:
Button Function
Power Allows you to turn the monitor’s power on or off or wake up the monitor. If you have
entered a password protected area, this button also allows you to turn off the monitor.
Volume Allows you to adjust the volume while using the monitor.
There are several keys on the screen that are used in many locations. To slect icons on Gen esis Touch
screens, simply touch the icon with your finger tip.
Key Icon Function
Vitals
Begins manual vitals acquisition process.
Now
Forward Allows you to move forward to the next screen in the workflow.
Back Allows you to back out of screens.
Home Brings you back to the Vitals Now/Home screen.
Settings Allows you to change the brightness of the screen and volume of the monitor as
well as access the About, General Settings and Advanced settings screens.
Video Allows this monitor to have the ability to join a video conference. If this doesn’t
appear on your home screen, your clinician has not set your monitor up for video.
Education Allows this monitor to provide education to patients as scheduled, or as a list of
self-guided general health questions to review on demand. If this doesn’t appear
on the home screen, a clinician has not set the monitor up for education and has
disabled all questions from being viewed via the Advanced Settings menu.
Return Allows you to return to the previous screen. Appears periodically (e.g., if you
touch the black bar at the bottom of the screen or if you are on a setup screen).
6/9/14 © 2014 Honeywell HomMed. All rights reserved. P4810EN.05 3
Page 8
Getting Started
Screens
Because of the nature of the tablet, if you inadvertently touch certain parts of the screen, you may have
some items appear randomly on your screen. These items are described below and information is provided
to allow you to remove them so that you can continue to use the Genesis Touch for its intended purpose.
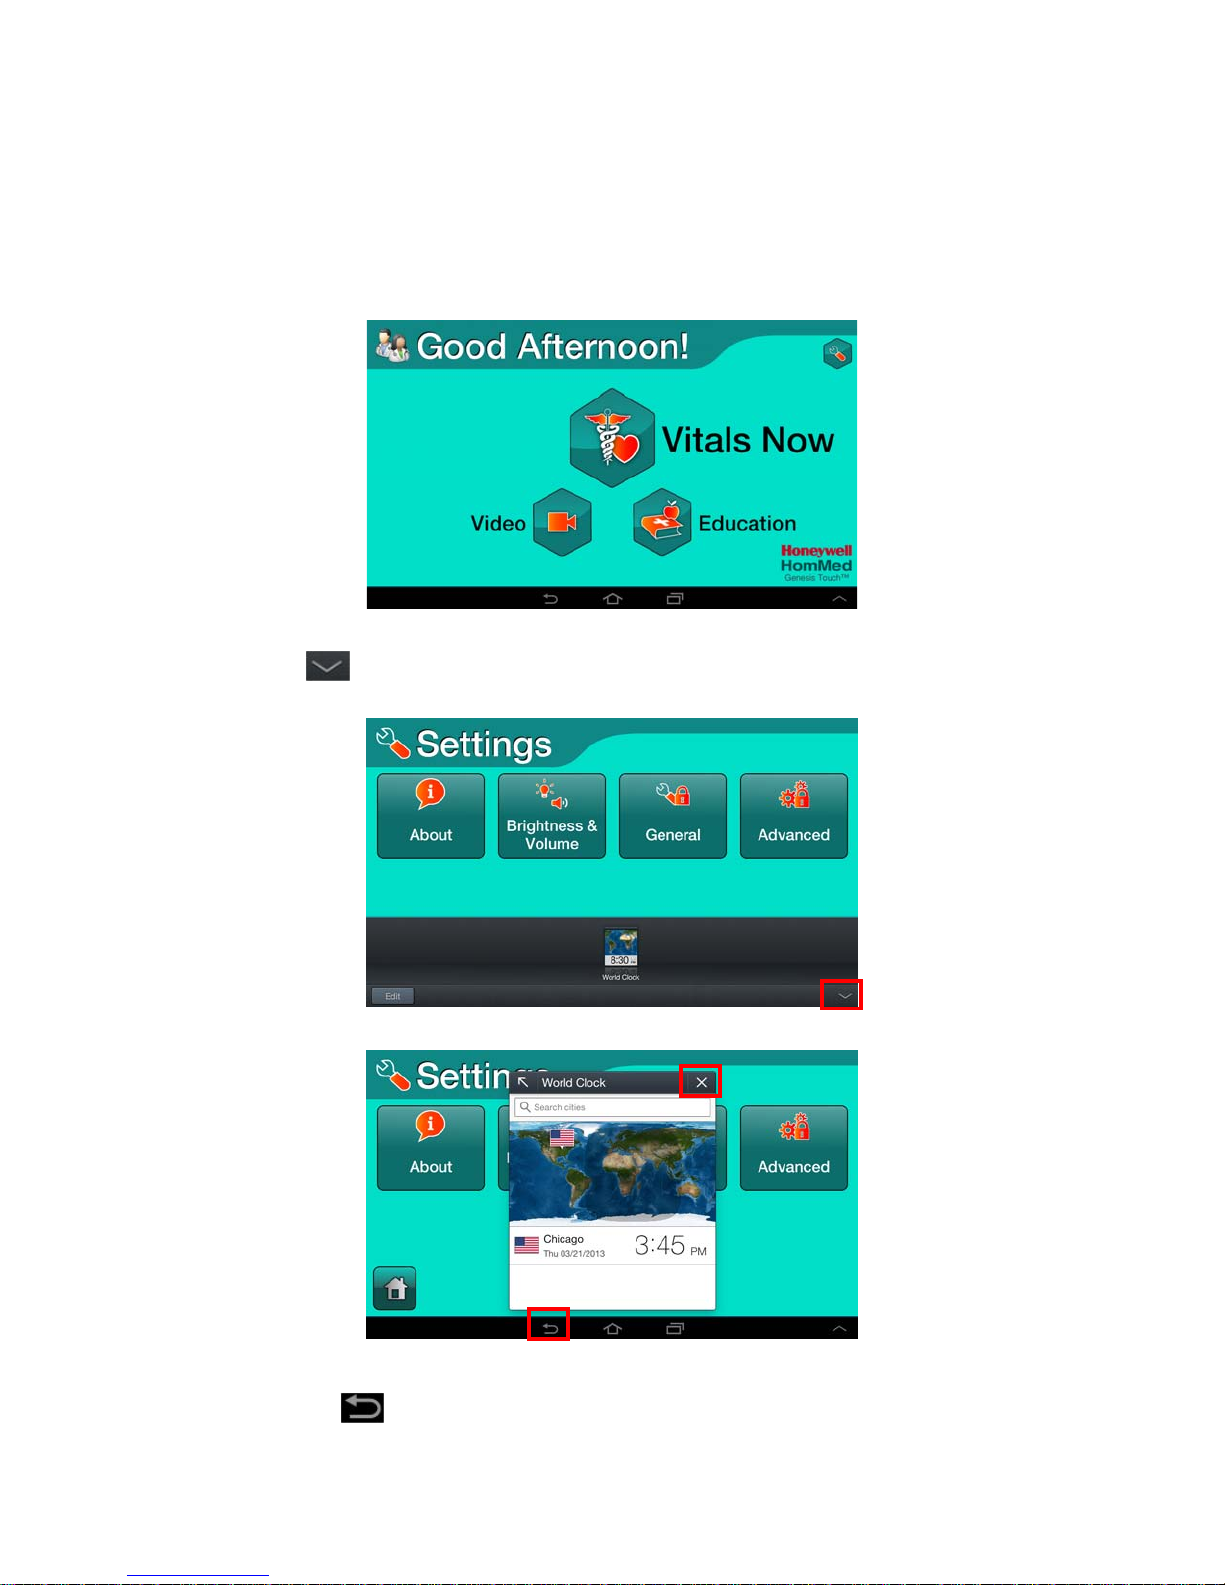
If a menu bar similar to the following appears on the bottom of the screen, simply touch the colored part of
the screen to remove it.
If a menu bar showing applications similar to the following appears on the bottom of the screen, touch the
down arrow icon (
)in the bottom right corner of the screen to remove it and go back to the Genesis
Touch screen:.
If you touch an item on this menu bar, a window similar to the following opens for that application:
Touch the X in the upper right corner of the application window to close the application.
Touch the return key ( )to go back to the Genesis Touch scree n.
4 P4810EN.05 © 2014 Honeywell HomMed. All rights reserved. 6/9/14
Page 9
Setting General Features
SettingGeneralFeatures
Topics accessible from the General option include:
• Setting up peripherals
• Setting up questions and reminders
• Setting schedules
• Setting language and units
• Communicating with LifeStream
All of these settings are accessed through the General Settings screen.
Refer to the Genesis Touch User Manual for information about other features on this menu.
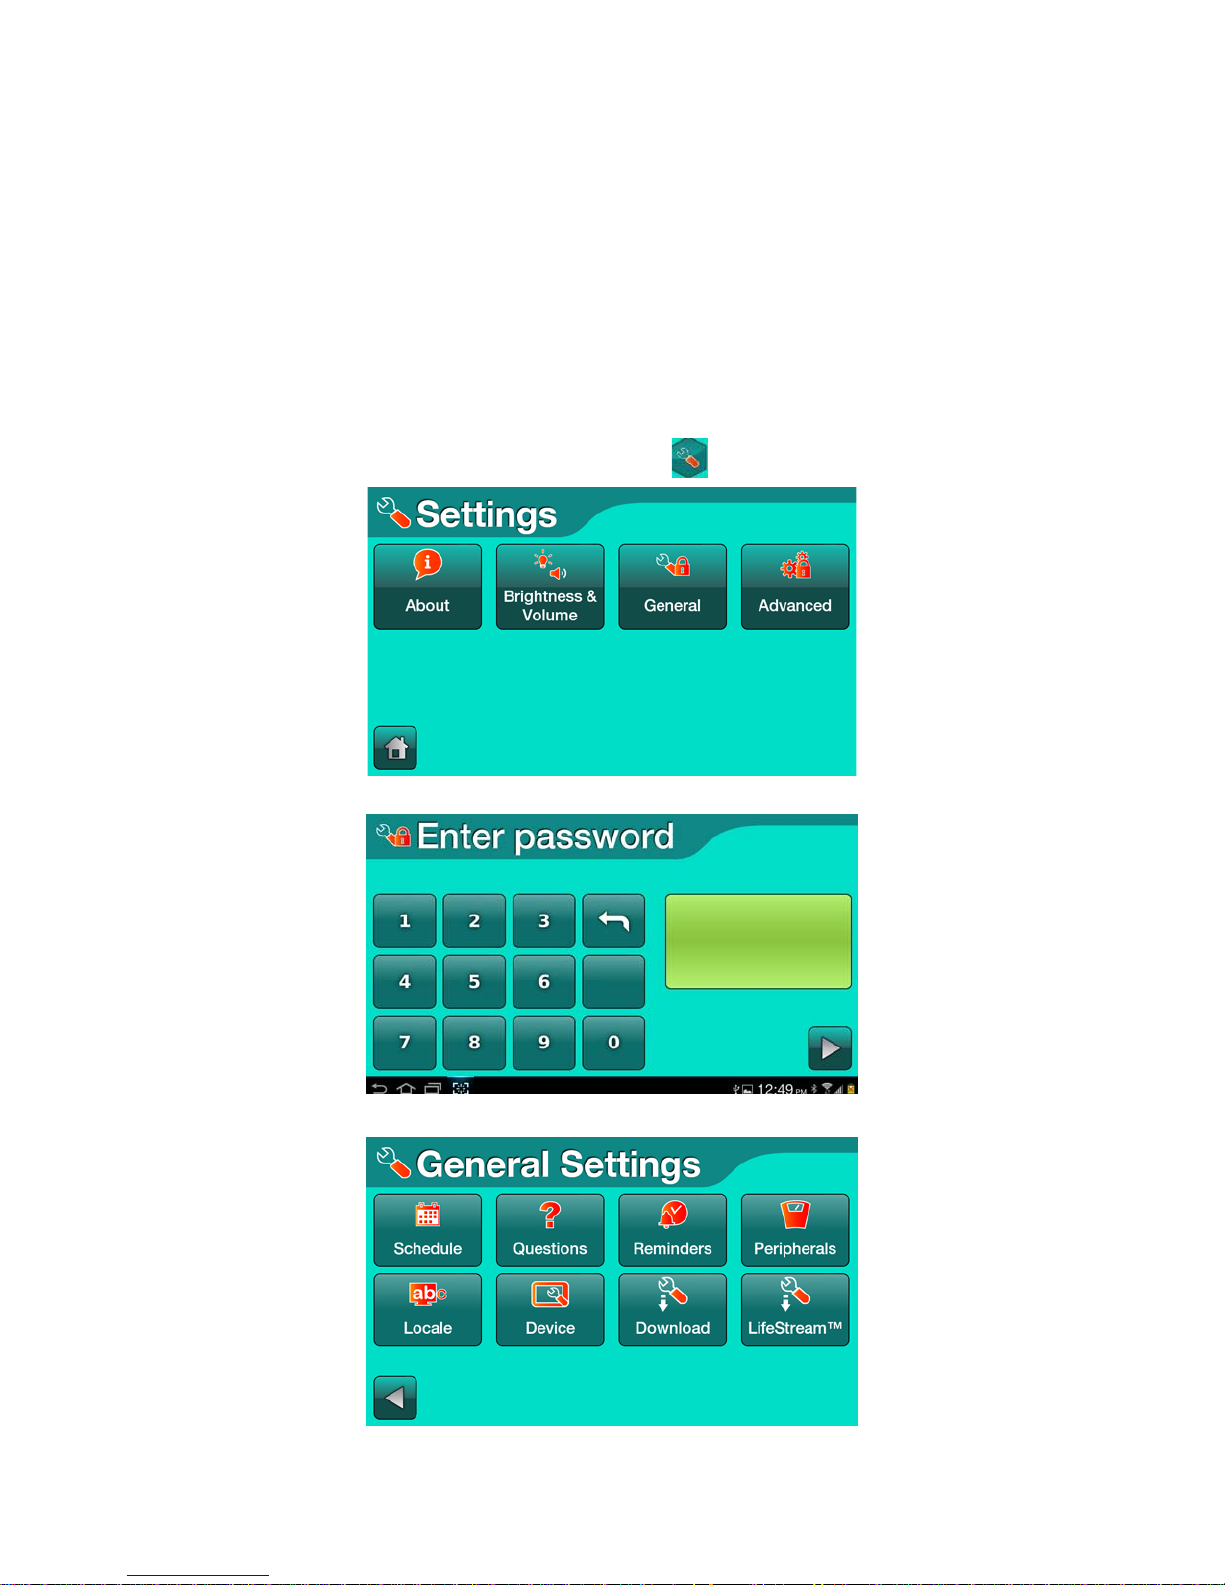
From the Vitals Now/Home screen, select the settings icon ( ).The Settings screen appears:
Select General. The Enter Password screen appears:
Type 4237 and select the forward icon. The General Settings screen appears:
6/9/14 © 2014 Honeywell HomMed. All rights reserved. P4810EN.05 5
Page 10
Getting Started
SettingUpPeripheralDevices
There are several different peripheral devices that can be used with the Genesis Touch System:
• Scale
• Blood pressure unit
•Oximeter
•Thermometer
IMPORTANT: Whenever you see a black configuration screen, you have the ability to inadvertently
negatively affect the Genesis Touch application by touching keys on the bottom of the
screen. The only button that should be used from that area is the back key, which allows
you to back out of the area.
BeforeYouBegin
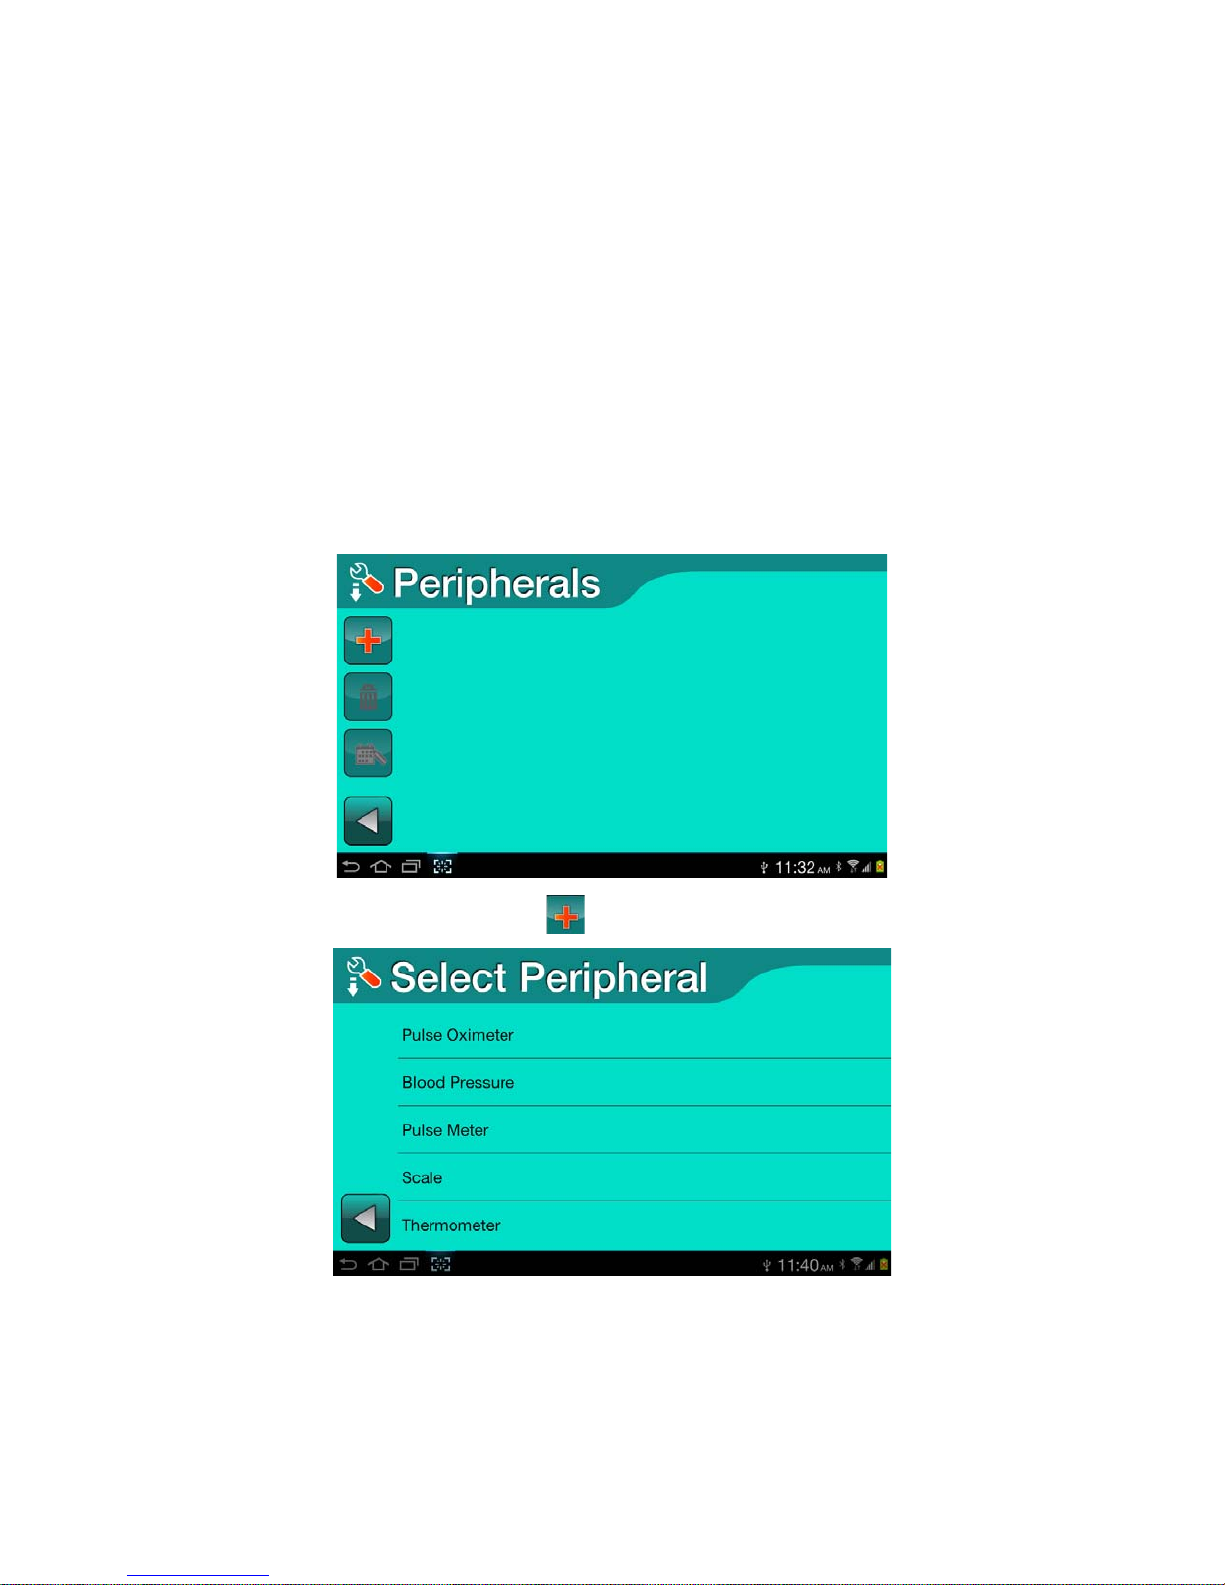
When the Genesis Touch is originally shipped, no peripherals are paired and a screen similar to the
following appears when you select Peripherals, from the General Settings screen:
1. To add a peripheral, select the Add icon ( ). A screen similar to the following appears:
2. Select the type of peripheral you want to set up. A screen for that peripheral appears ready for you to
edit.
3. Refer to the pairing instructions for the peripheral you are setting up for more information.
6 P4810EN.05 © 2014 Honeywell HomMed. All rights reserved. 6/9/14
Page 11
Setting Up Peripheral Devices
ClinicalDetailsforPairingBluetoothPeripherals
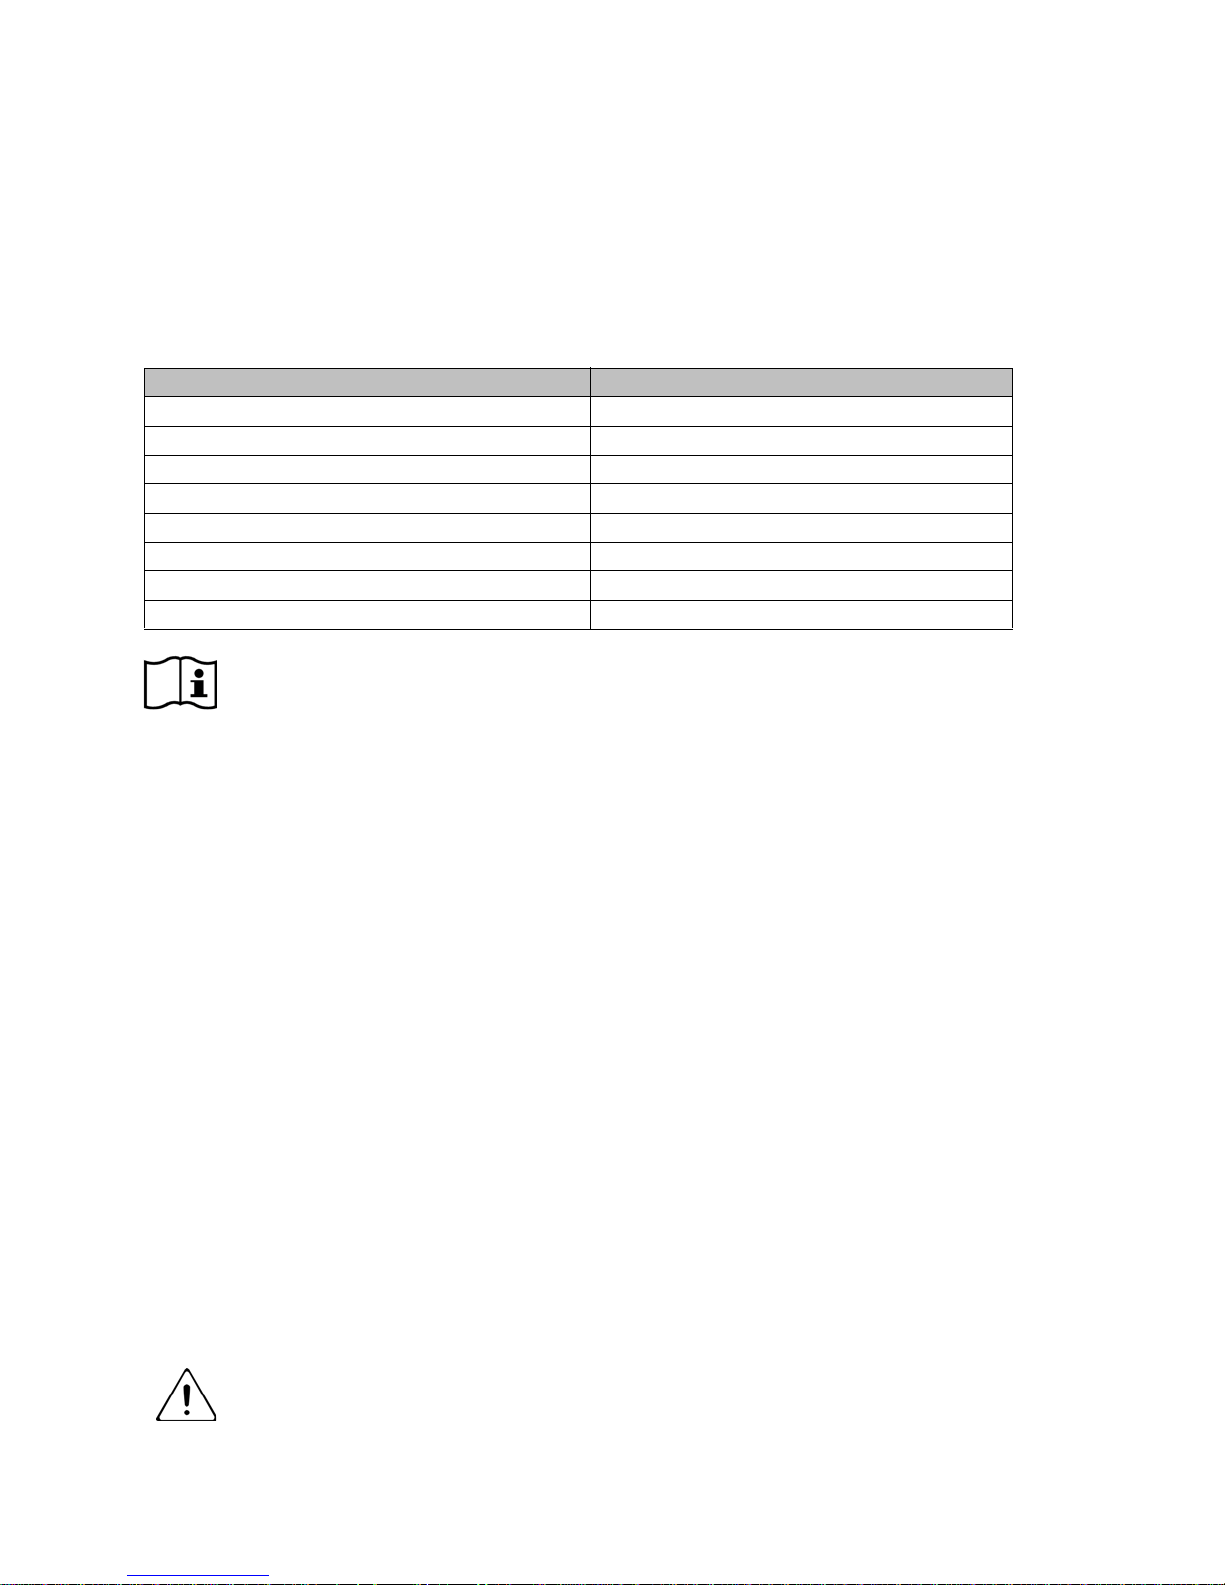
The following table is intended to help pair peripherals in a clinical environment. As a best practice, it is
recommended to select user peripherals and pair them away from other Bluetooth peripherals in storage.
You are able to match a unique ID number on your peripheral with what is displayed by the Genesis Touch
as a Bluetooth device ID. You may then assign this identification to the LifeStream equipment tracker for
each patient for better health plan management. See the HomMed.com clinical support page for more info.
Examples of device-specific numbers are bold in this chart, indicating when a unique ID is used:
Peripheral BluetoothIdentifierExample
Honeywell HomMed Scale HomMed HWS5104610025
A&D Scale A&D AND SC5100752482
Accuro HRS305 Handrail Scale NCI Technology ACCURO-NCITHRS-B077CB
A&D Digital Blood Pressure Monitor PBT A&D AND BP5100850864
A&D Digital Blood Pressure Monitor UA-767 PBT-Ci A&D UA-767PBT-Ci 806E37
Nonin Onyx® II 9560 Pulse Oximeter Nonin-NONIN 673038
Contec CMS 50E Pulse Oximeter Contec CONTEC-CE0490*
ChoiceMed MD300C318T Pulse Oximeter Choicemmed BCOXM-115203371
*The identifying number of a Contec Pulse Oximeter is located opposite of where the finger is
placed into the device.
For installation instructions and other important information, please consult the manufacturer’s
user guide that has shipped with your scale.
SettingUpaScale
If your kit includes a scale, you will need to:
• Find a location for the scale
• Properly assemble your scale if necessary and follow all directions in the manual.
• Configure the monitor to use the type of scale you have and then pair (establish a Bluetooth wireless
connection) the scale with the monitor.
GeneralGuidelines
Before you place the scale, look for the scale’s serial number and write it down so that you have it for
pairing to the monitor.
Depending on the scale you have, it is either powered by four AA batteries or plugged into an electrical
outlet through an AC adapter. Refer to the scale manufacturer’s instructions for more information.
Scales should be located on hard, un-carpeted surfaces with pressure evenly placed on all four corners. Be
sure to take the patient’s mobility into account when placing the scale.
The scale should be close enough to the monitor that it is able to connect via the Bluetooth range (less than
30 feet (10 meters)). It is best if the scale can be placed in a permanent location and has enough room for
the patient to be able to stand on it comfortably without support for the time it takes the monitor to collect
their weight (approximately ten seconds without movement).
Make sure that the scale is in the proper location and doesn’t have any weight on it before you attempt to
pair it with the monitor. If there is weight on the scale when you power up, it will not zero
correctly.
DO NOT place your scale in a wet location or near a sink or tub.
6/9/14 © 2014 Honeywell HomMed. All rights reserved. P4810EN.05 7
Page 12

Getting Started
ConfiguringtheScaleTyp e
Honeywell HomMed provides two Bluetooth scale options: a HomMed scale (default) and an Accuro
scale. Bluetooth scales require that you pair the scale with a Bluetooth connection and depending on which
scale you have, they will be paired differently.
To configure the type of scale you have:
1. From the General Setting screen, select Device. The following appears, select scale type:
2. The Scale Type window appears:
8 P4810EN.05 © 2014 Honeywell HomMed. All rights reserved. 6/9/14
Page 13
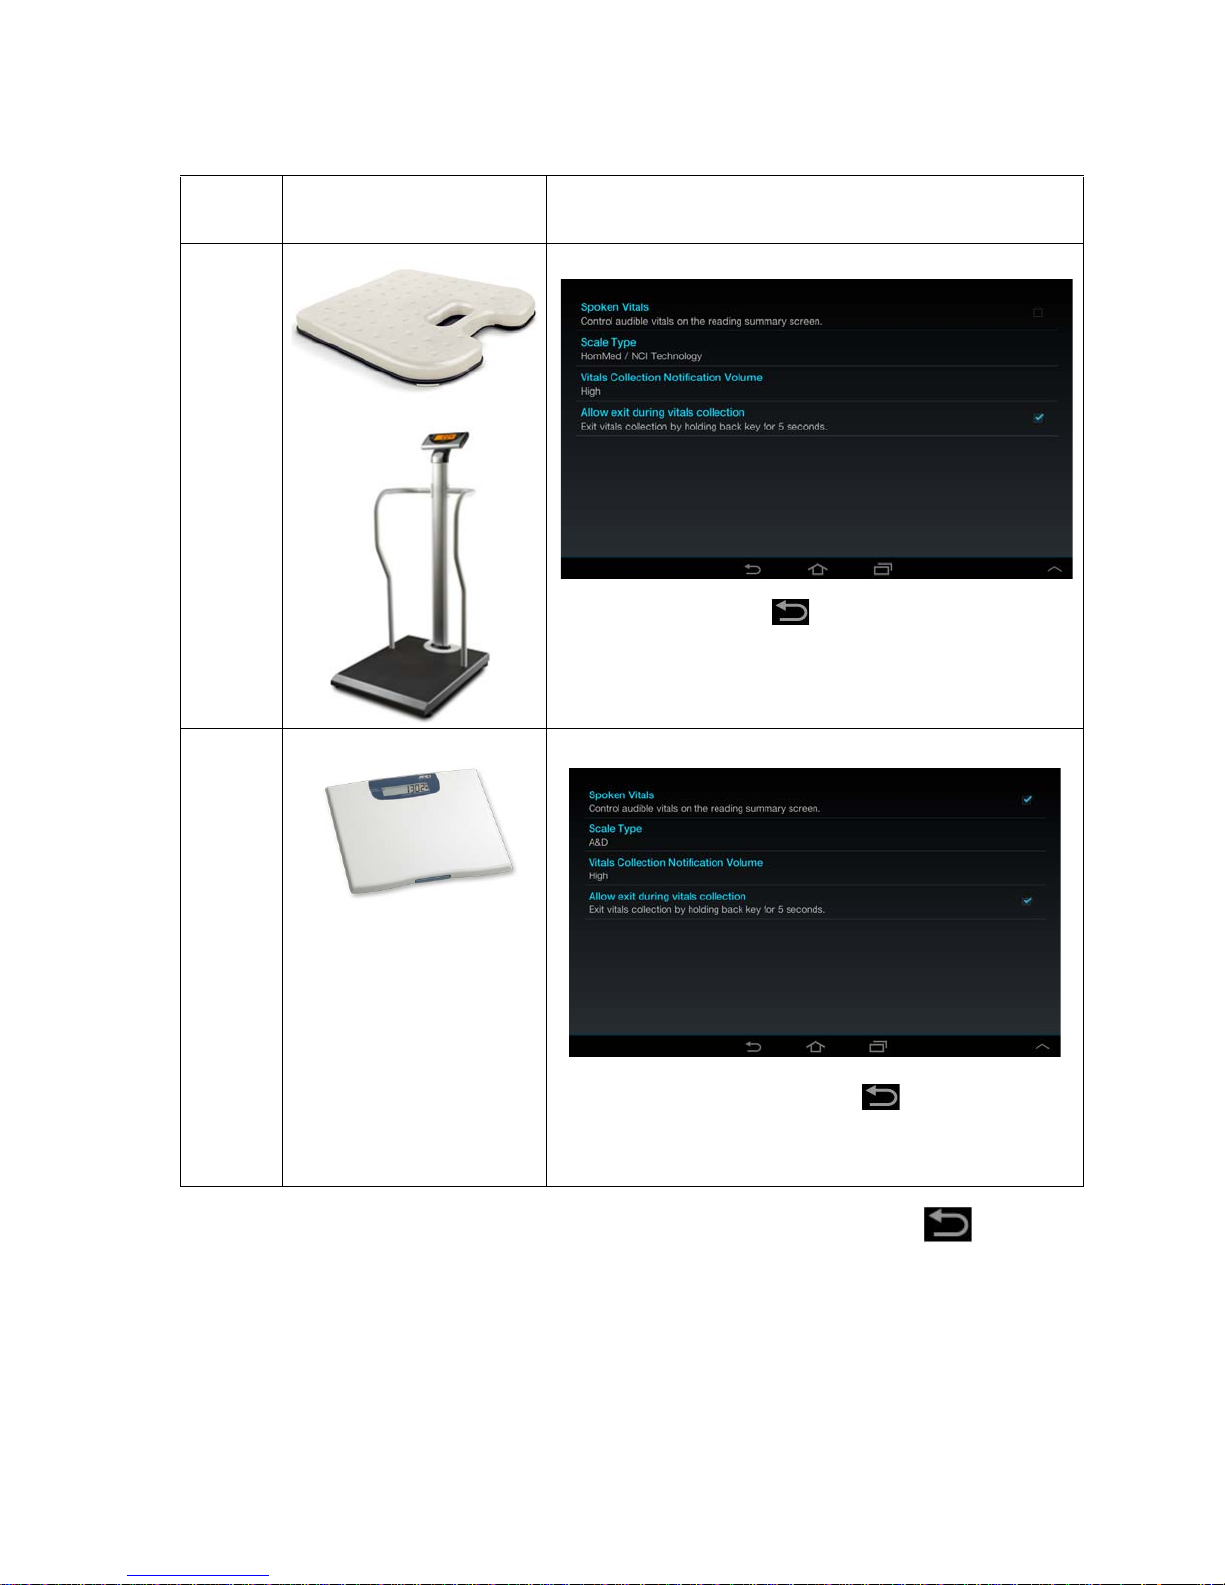
3. Now reference the following chart:
Setting Up Peripheral Devices
If the
scale is a:
HomMed
scale
or an
NCI
HRS 305
Accuro
Scale
A&D
scale
It looks like this: Then:
1. Select HomMed / NCI Technology:
2. Press the return key . The General Settings screen
appears.
3. Go to Pairing a HomMed or NCI Technology Scale.
1. Select A&D :
IMPORTANT: The only button that should be used from this black menu area is the
return key, which allows you to back out of the area:
6/9/14 © 2014 Honeywell HomMed. All rights reserved. P4810EN.05 9
2. Press the monitor’s return key . The General
Settings screen appears.
3. Go to Pairing an A&D Scale.
Page 14
Getting Started
PairingaHomMedorNCITechnologyScale
Before you can use these bluetooth scales, you need to pair one with the Genesis Touch monitor. Refer to
Configuring the Scale Type for more information.
1. Power up the HomMed scale by either inserting batteries or plugging the AC adapter into an electrical
outlet and into the scale connector under the scale handle.
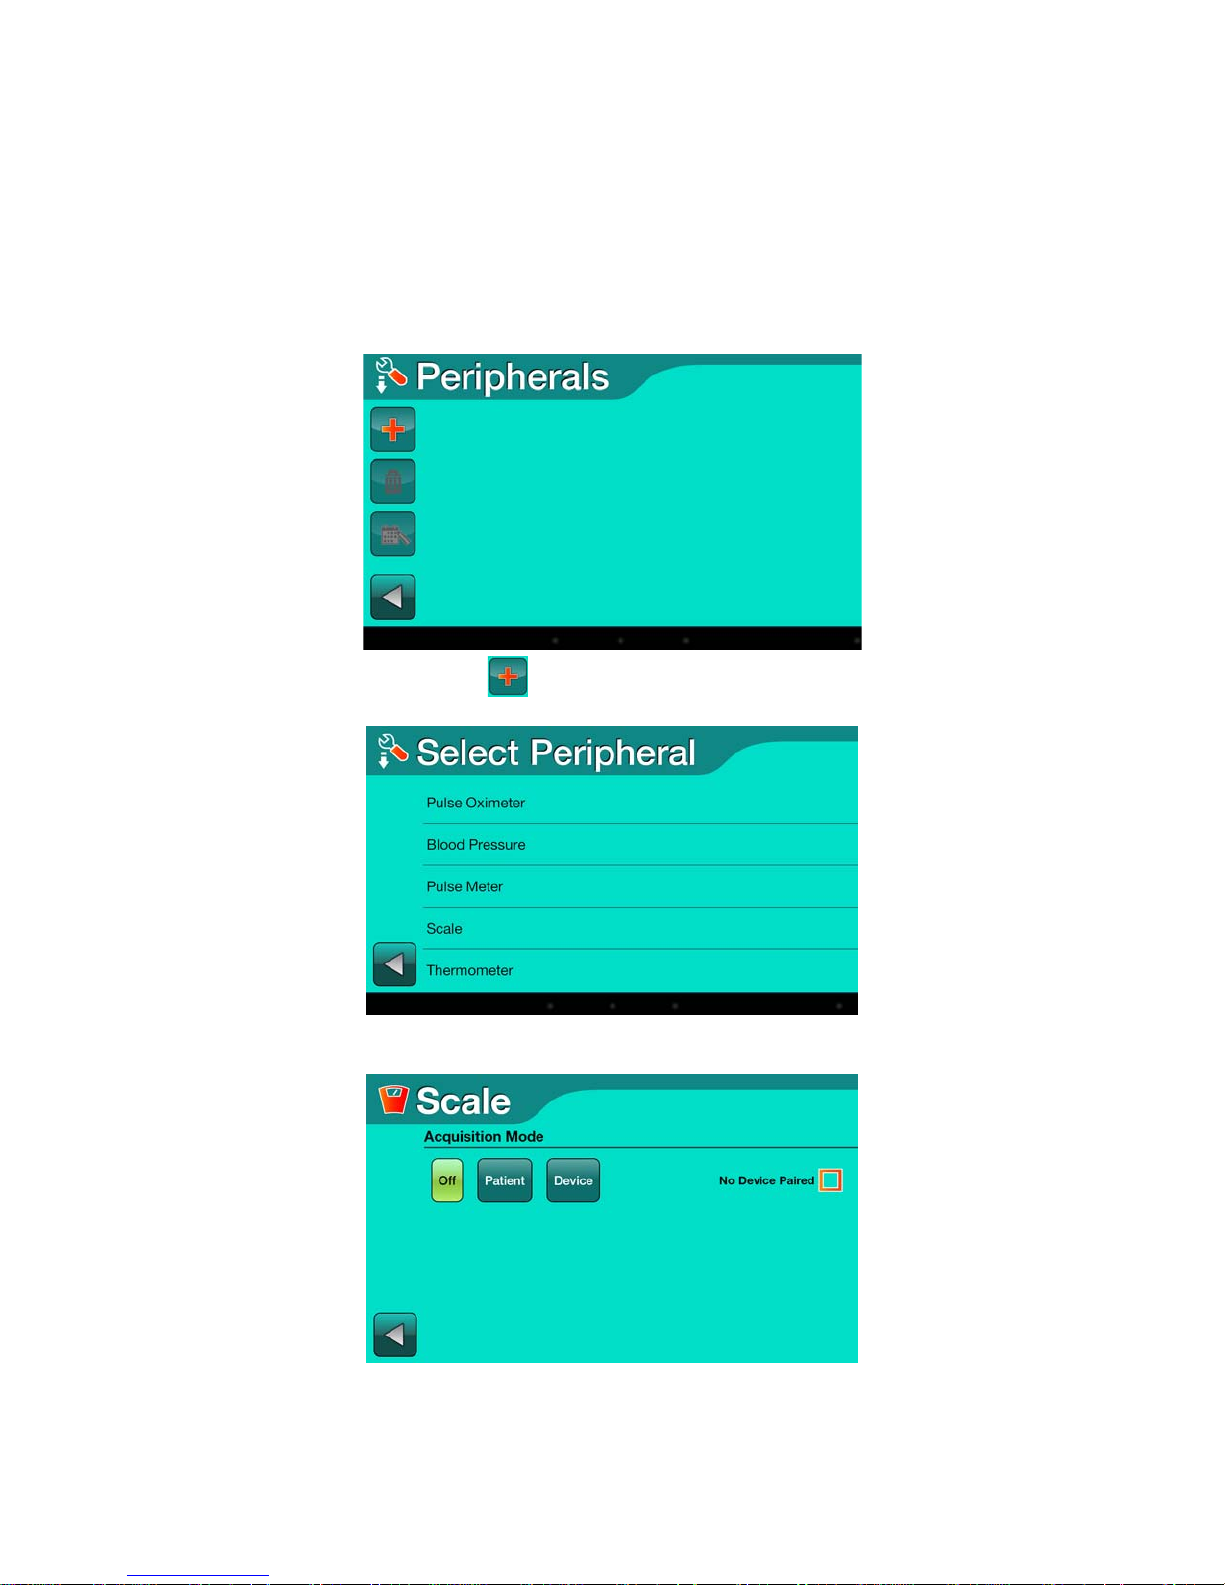
2. From the General Settings screen, select Peripherals. A Peripherals screen similar to the following
appears:
Note: To add peripherals select ( ). Refer to Before You Begin for more information.
3. Select Scale:
4. A Scale screen similar to the following appears:
10 P4810EN.05 © 2014 Honeywell HomMed. All rights reserved. 6/9/14
Page 15

Setting Up Peripheral Devices
5. Select Device. The device button is highlighted:
6. Select the No Device Paired check box. A screen similar to the following appears as a scale is being
located:
7. Compare the scale’s serial number (located on the bottom of the scale) to those on the list and select
check box next to the scale that matches. One or more scale serial numbers may appear in a busy
clinical environment. For more guidance, see Clinical Details for Pairing Bluetooth Peripherals:
6/9/14 © 2014 Honeywell HomMed. All rights reserved. P4810EN.05 11
Page 16

Getting Started
8. Select the check box next to the scale with which you want to pair. A series of windows will quickly
appear as the devices pair with each other, until the Genesis Touch returns to this screen:
Note: We recommend that you pair all devices first, then set up the acquisition schedule for all
devices for a patient. However, if you want to set up the acquisition schedule for the scale at
this time, you can. Refer to Scheduling for more information.
9. Press the back icon. The Peripherals screen appears with the serial number of the scale that has been
paired listed:
Note: Different peripherals will appear depending on what has been assigned.
12 P4810EN.05 © 2014 Honeywell HomMed. All rights reserved. 6/9/14
Page 17
Pairing an A&D Scale
PairinganA&DScale
Before you can use an A&D Bluetooth scale:
• Insert four AA batteries.
• Set the switch on the bottom of the scale to WEIGHT B (second from left for kg). Refer to the
manufacturer’s document that came with your scale for more information.
• Configure the Genesis Touch monitor to use the A&D scale. Refer to Configuring the Scale Type for
more information.
To pair an A&D scale:
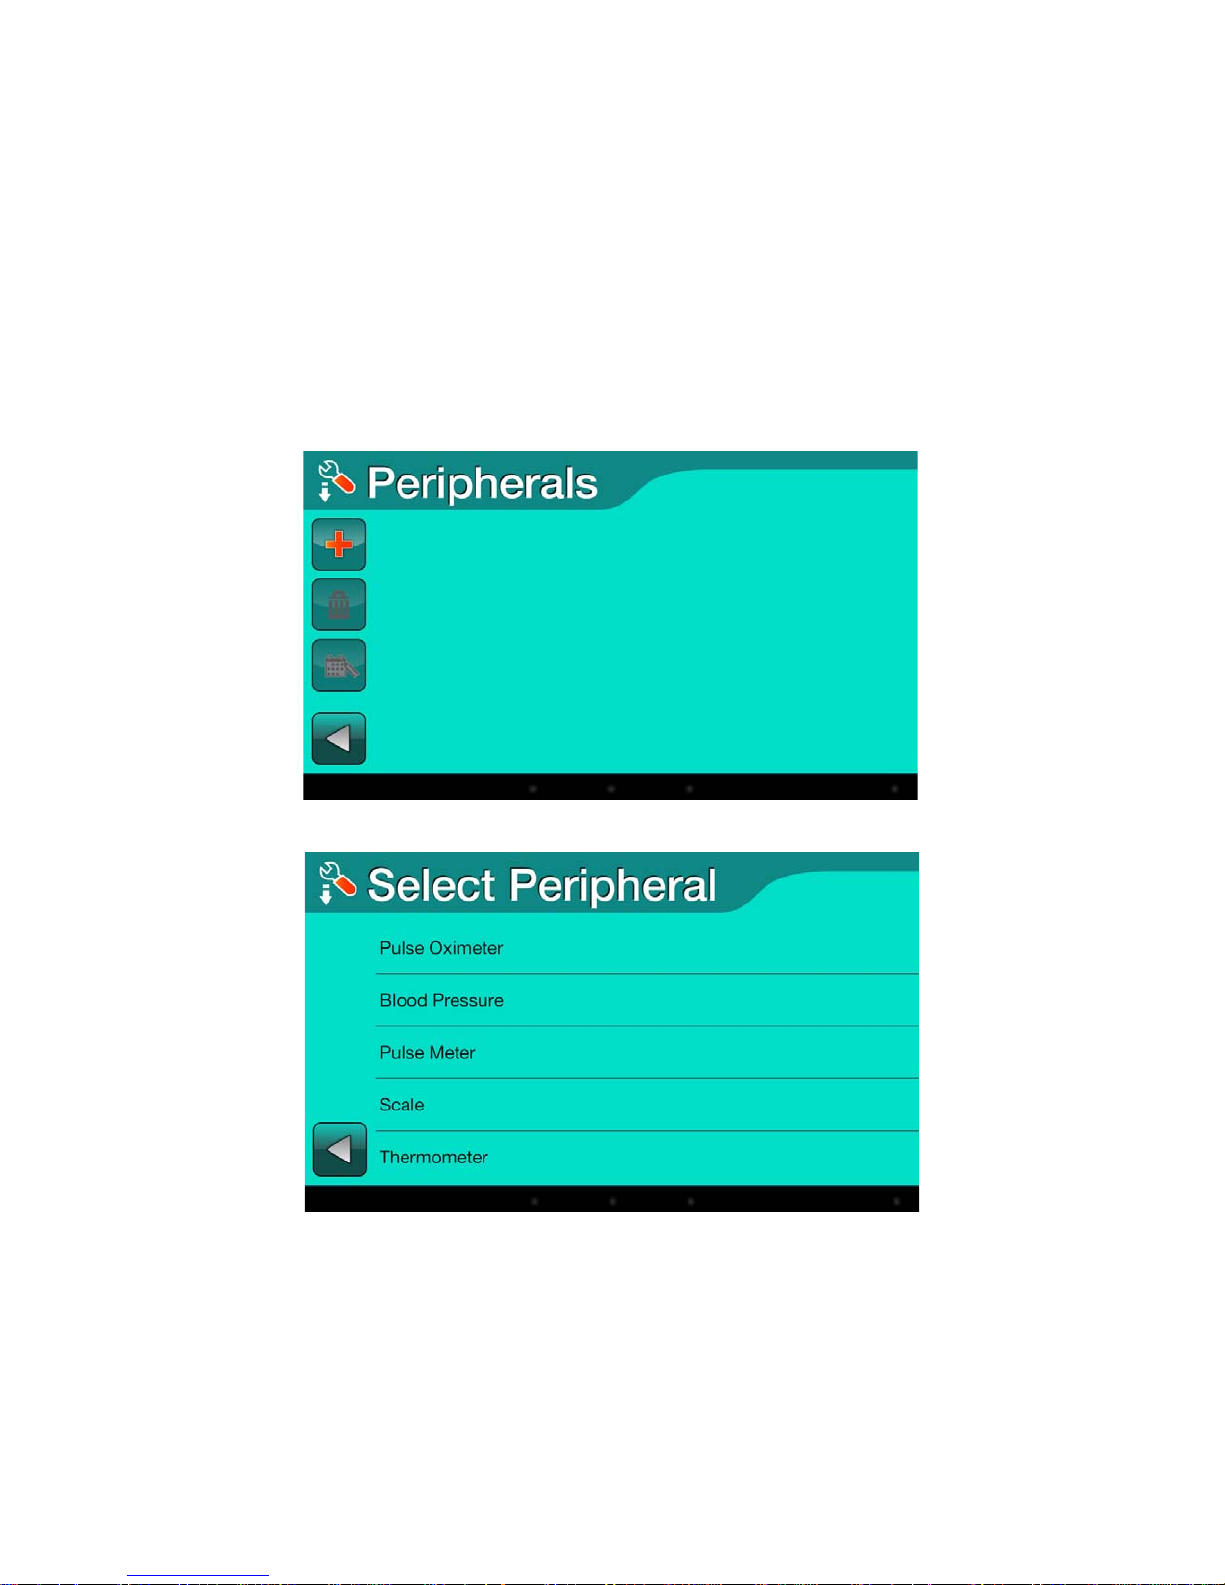
1. From the General Settings screen, select Peripherals. A Peripherals screen similar to the following
appears:
2. Select Scale. The Scale row is highlighted:
6/9/14 © 2014 Honeywell HomMed. All rights reserved. P4810EN.05 13
Page 18

Getting Started
3. A Scale screen similar to the following appears:
4. Select Device. The device button is highlighted and a screen similar to the following appears:
5. Select the No Device Paired check box. The Scale screen appears:
14 P4810EN.05 © 2014 Honeywell HomMed. All rights reserved. 6/9/14
Page 19
Pairing an A&D Scale
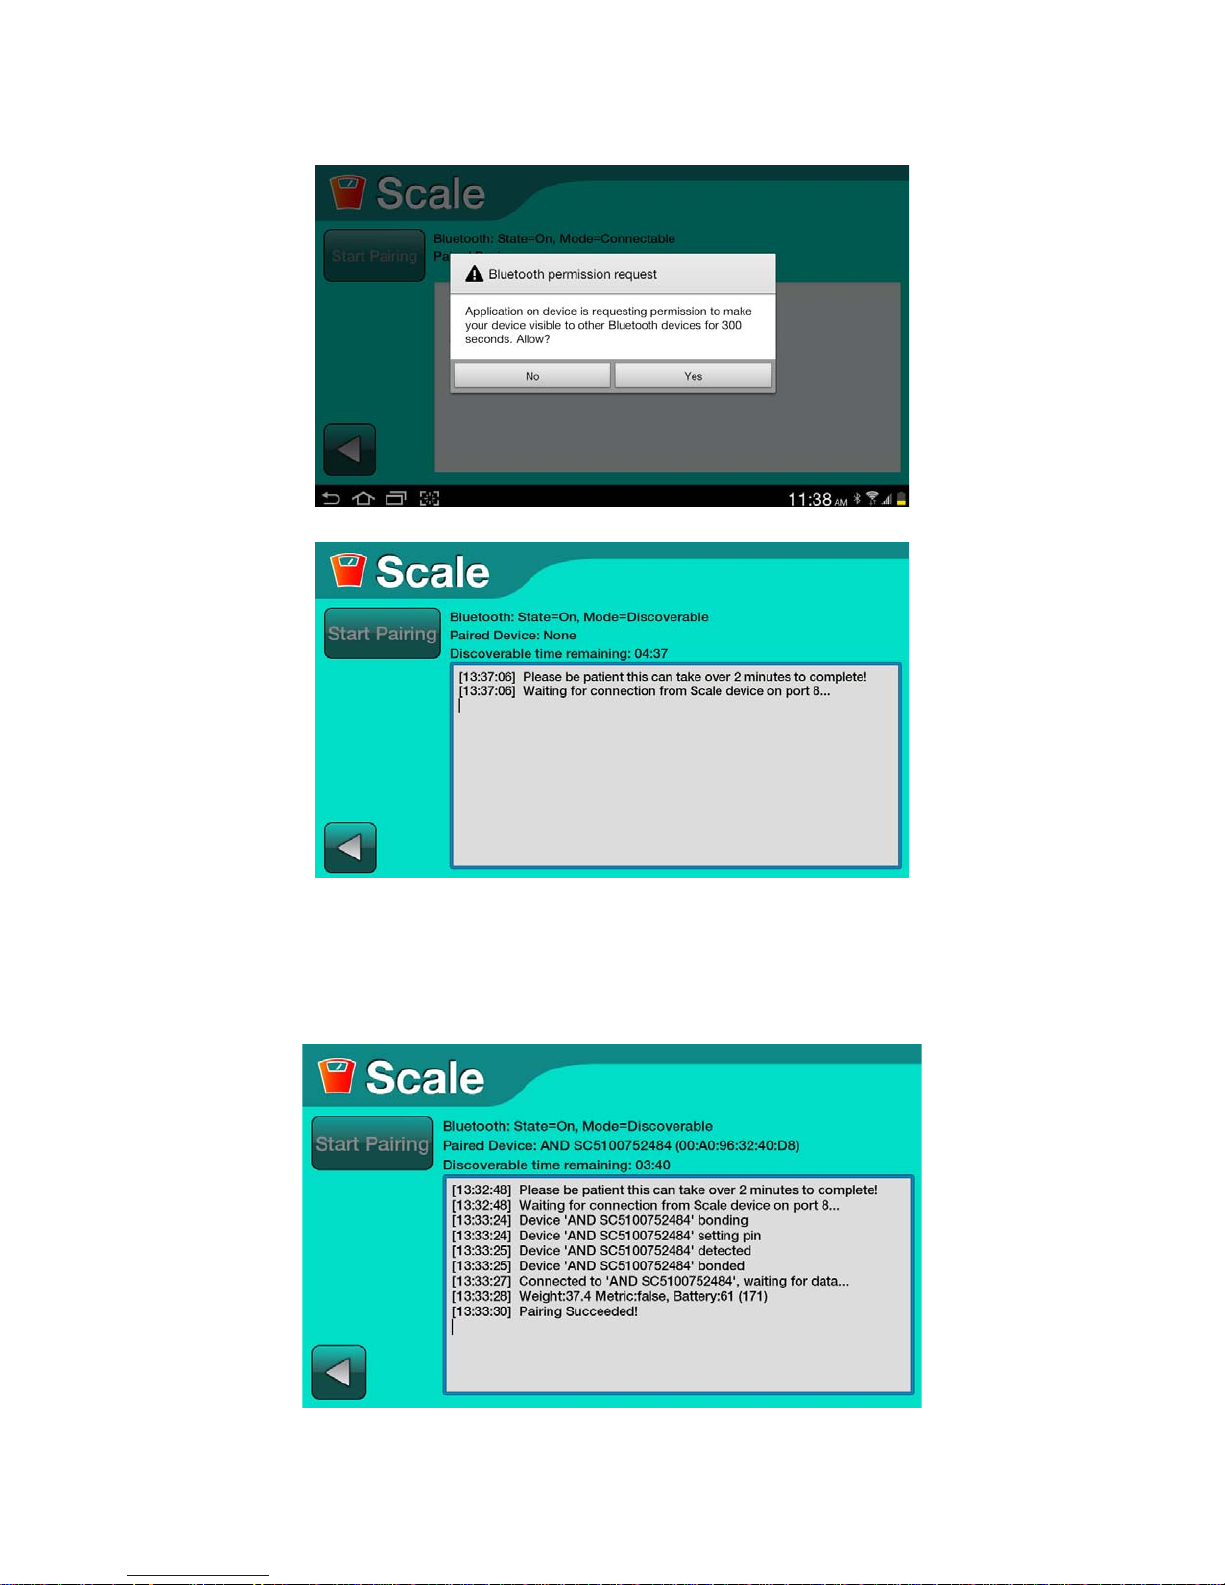
6. On the monitor, press Start Pairing. A Bluetooth Permission Request window appears:
7. Select Yes. Messages similar to the following appear:
8. T o power the A&D scale, press the Measurement Switch button (blue/gray power button on the front
side of the A&D scale). The display window on the scale should zero.
9. Step on the scale.
10. Watch the messages on the screen. When the scale is paired, messages similar to the following appea r
on the screen ending with “Pairing Succeeded!”
6/9/14 © 2014 Honeywell HomMed. All rights reserved. P4810EN.05 15
Page 20

Getting Started
11.
If pairing is: Then:
Successful
1. Press the back icon. The Scale screen appears showing the serial number of the
scale that has been paired:
Note: We recommend that you pair all devices first, then set up the acquisition
schedule for all devices for a patient. Refer to Scheduling for more
information.
2. Press the back icon. The Peripherals screen appears showing the serial number
of the scale that has been paired:
3. Go to the next peripheral device you want to configure.
Not Successful Go to Pairing an A&D Scale and try again.
16 P4810EN.05 © 2014 Honeywell HomMed. All rights reserved. 6/9/14
Page 21

Pairing a Blood Pressure Unit
PairingaBloodPressureUnit
If your kit includes a blood pressure unit, complete the following steps:
• Insert four AA batteries and wait approximately two minutes or until you do not see “Pr” displayed on
the blood pressure unit screen if you are using the A&D Blood Pressure Unit, UA-767 PBT-Ci,.
• Attach the blood pressure cuff to the blood pressure unit. Refer to the manufacturer’s documentation
for instructions on how to operate it.
• Follow these instructions to begin Bluetooth pairing with the monitor:
1. From the General Settings screen, select Peripherals. A Peripherals screen similar to the following
appears:
2. Select Blood Pressure:
3. The Blood Pressure screen appears:
6/9/14 © 2014 Honeywell HomMed. All rights reserved. P4810EN.05 17
Page 22

Getting Started
4. Select Device. A screen similar to the following appears:
5. Select the No Device Paired check box. A screen similar to the following appears:
6. Put the blood pressure cuff on your arm.
7. On the Genesis Touch Blood Pressure screen, select Start Pairing. A message appears:
8. Press Yes. You will see messages similar to the following:
9. Now briefly press the START button on the blood pressure unit. Do not hold the button down. The
cuff inflates and messages appear on the Genesis Touch as your blood pressure reading is recorded.
Note: A valid blood pressure reading will need to be established on the unit and the cuff may feel
tight on your arm. Follow the manufacturer instructions for taking a proper measurement.
18 P4810EN.05 © 2014 Honeywell HomMed. All rights reserved. 6/9/14
Page 23

Pairing a Blood Pressure Unit
10. Watch the messages on the screen. When the devices are paired, messages similar to the following
appear on the screen ending with “Pairing Succeeded”:
If pairing
is:
Successful
Not
Successful
Then:
1. Press the back icon. The Blood Pressu r e screen appears with the serial number of the
paired blood pressure monitor listed:
2. Remove the blood pressure cuff.
1. Press the back icon. The Blood Pressure screen appe ars.
2. Go to step 4 of Pairing a Blood Pressure Unit and try again.
3. If you are using the A&D Blood Pressure Unit, UA-767 PBT-Ci, and pairing is still
not successful after a second attempt, then hold the start button down on your A&D
unit until you see “uPr” displayed on the screen.
4. Briefly press the start button again while “uPr” is still displayed.
5. When the monitor displays “End” you have reset your Bluetooth pairing settings.
6. Please go to step 4 of Pairing a Blood Pressure Unit and try again.
6/9/14 © 2014 Honeywell HomMed. All rights reserved. P4810EN.05 19
Page 24

Getting Started
PairinganOximeter
If your kit includes an oximeter, before you can use it with the monitor:
• Charge the unit. Refer to the oximeter manufacturer’s documentation for more information.
• Pair it with the monitor.
To pair an oximeter:
1. From the General Settings screen, select Peripherals. The Peripherals screen appears:
2. Select Pulse Oximeter:
3. A Pulse Oximeter screen similar to the following appears:
20 P4810EN.05 © 2014 Honeywell HomMed. All rights reserved. 6/9/14
Page 25

Pairing an Oximeter
4. Select Device. The Device button is highlighted:
5. Select the Power button on the pulse oximeter to turn it on and/or place the oximeter on the middle
finger of your left hand like you would to take a reading with the Genesis Touch (shown below).
6. Select the No Device Paired check box. A Pulse Oximeter screen similar to the following appears and
begins searching for all pulse oximeters in the area. One or more oximeters may appear depending on
your location. For best results, always pair away from other Bluetooth devices:
7. Compare the number on the bottom of the oximeter (or where the finger is placed for a Contec
oximeter) to the numbers displayed on the screen. See below for an example of what you may see on
your screen, depending on the type of oximeter you are pairing with:
Nonin Onyx® II 9560 Pulse Oximeter Nonin-NONIN 673038
Contec CMS 50E Pulse Oximeter Contec CONTEC-CE0490
ChoiceMed MD300C318T Pulse Oximeter Choicemmed BCOXM-115203371
6/9/14 © 2014 Honeywell HomMed. All rights reserved. P4810EN.05 21
Page 26

Getting Started
8. Select the oximeter that you want to pair with. A series of Bluetooth Pairing Request windows
appears, and finally a check mark appears next to the oximeter that the monitor is paired with:
Note: We recommend that you pair all devices first, then set up the acquisition schedule for all
devices for a patient. Refer to Scheduling for more information.
If pairing
is:
Then:
Successful
Not
Successful
1. Press the back icon. The Peripherals screen appears with the serial number of the
oximeter that has been paired listed:
2. Go to the next peripheral device you want to configure.
1. Press the back icon. The Pulse Oximeter screen appears.
2. Go to step 4 of Pairing an Oximeter and try again.
22 P4810EN.05 © 2014 Honeywell HomMed. All rights reserved. 6/9/14
Page 27

Configuring for Manually-Entered Temperature
ConfiguringforManually‐EnteredTemperature
If your patient will be manually reporting a temperature, you must configure it for use. The thermometer
reading is done through manual entry only, so no pairing is involved.
To configure the thermometer for use:
1. From the General Settings screen, select Peripherals. A Peripherals screen similar to the following
appears:
2. Select the add icon ( ). A screen similar to the following appears:
3. Select Thermometer. A screen similar to the following appears:
6/9/14 © 2014 Honeywell HomMed. All rights reserved. P4810EN.05 23
Page 28
Getting Started
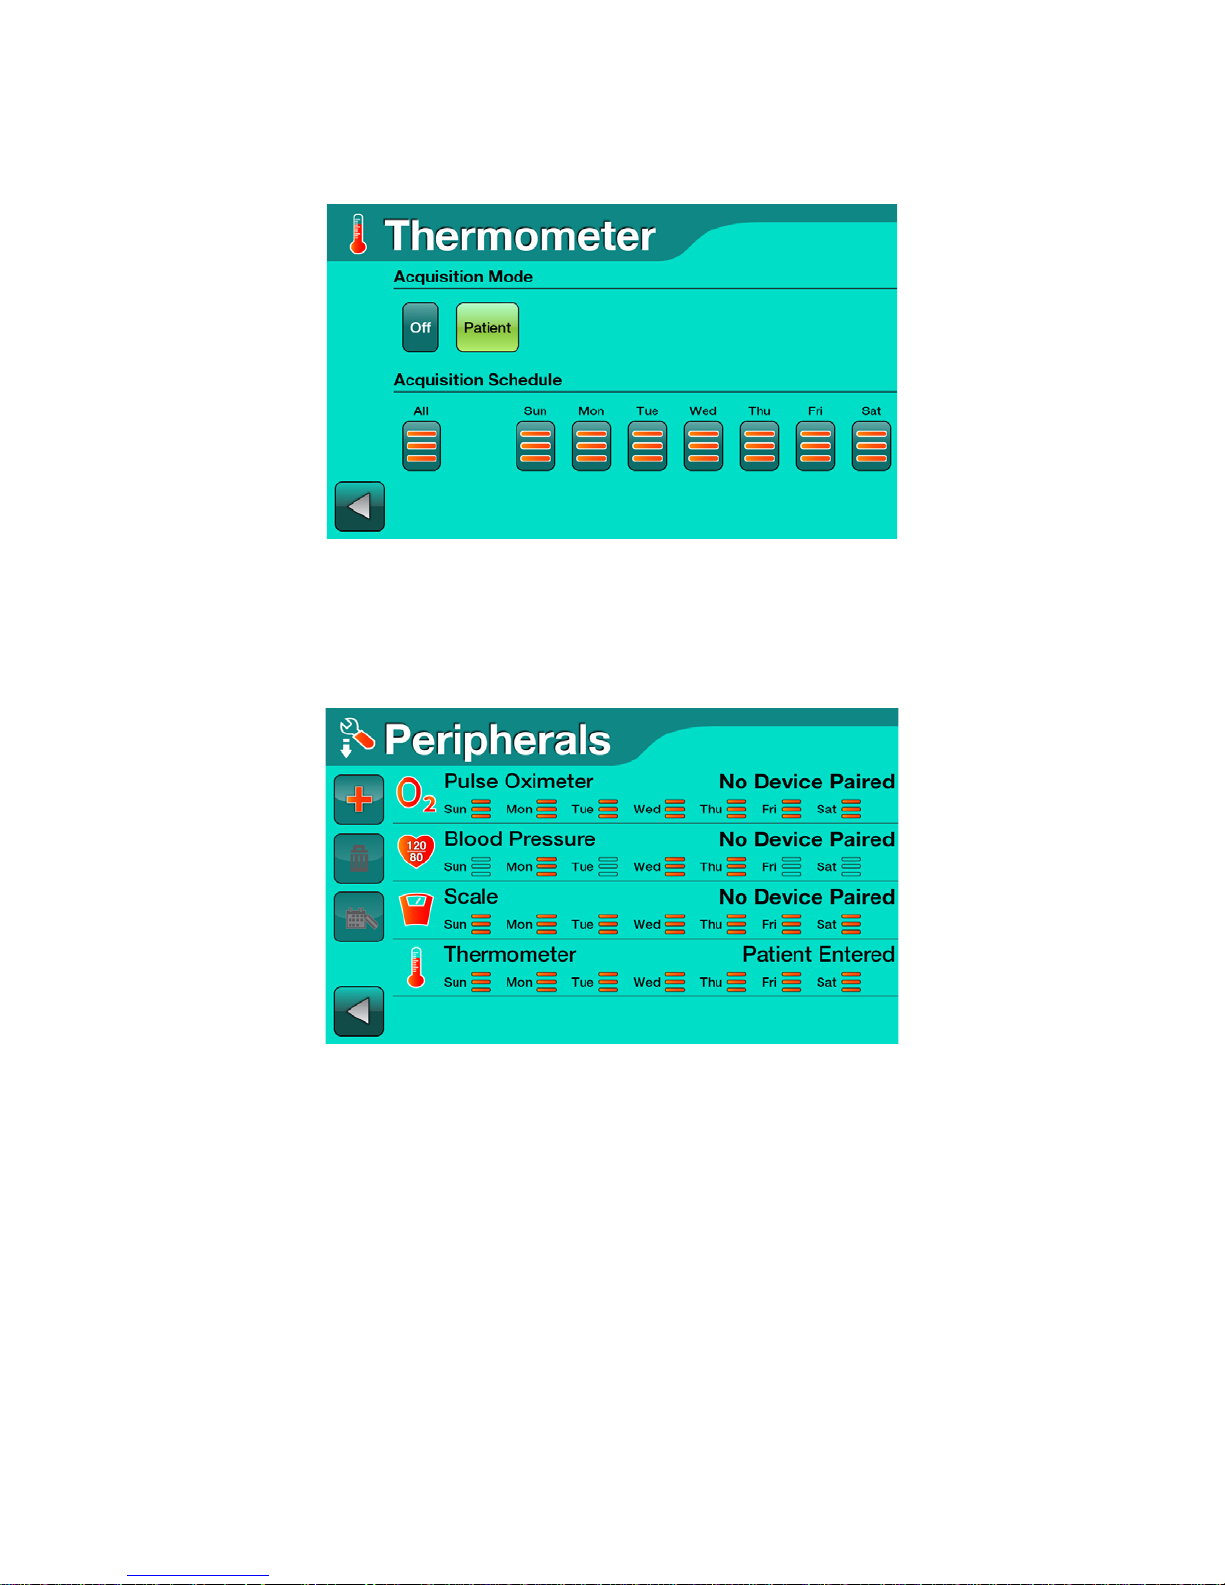
4. Select Patient to enable the patient to enter their temperature manually. A screen similar to the
following appears:
Note: We recommend that you pair all devices first, then set up the acquisition schedule for all
devices for a patient. However, if you want to set up the acquisition schedule for the scale at
this time, you can. Refer to Scheduling for more information
5. Press the back icon. The Peripherals screen appears showing that Patient Entered is set for the
thermometer
24 P4810EN.05 © 2014 Honeywell HomMed. All rights reserved. 6/9/14
Page 29

Configuring for Manually-Entered Pulse Rate
ConfiguringforManually‐EnteredPulseRate
If your patient will be manually reporting a pulse, you must configure the monitor. Since this reading is
done through manual entry, no pairing is involved.
To configure manually-entered pulse rate:
1. From the General Settings screen, select Peripherals. A Peripherals screen similar to the following
appears:
2. Select the add icon ( ). A screen similar to the following appears. Select Pulse Meter:
3. Select Patient to enable the patient to enter their pulse manually:
6/9/14 © 2014 Honeywell HomMed. All rights reserved. P4810EN.05 25
Page 30

Getting Started
4. Press the back icon. The Peripherals screen appears showing that Patient Entered is set for the Pulse
Meter:
Un‐PairingaPeripheralDevice
If a device is already paired to the monitor and you want to pair a different one, you will need to un-pair the
first one. For example, in the screen below, a blood pressure unit is already paired to the monitor:
To un-pair this unit:
1. Select Blood Pressure. The Blood Pressure row is highlighted.
2. Select the Edit icon ( ). A Blood Pressure screen similar to the following appears:
26 P4810EN.05 © 2014 Honeywell HomMed. All rights reserved. 6/9/14
Page 31

Un-Pairing a Peripheral Device
3. Select the Paired to check box. A confirm action window appears:
4. Select Yes.The check mark in the check box disappears and the device is unpaired:
5. Select the back key. The serial number no longer appears on the screen:
6/9/14 © 2014 Honeywell HomMed. All rights reserved. P4810EN.05 27
Page 32

Getting Started
SyncingwithLifeStream
The Genesis Touch can be configured for patient use from LifeStream (recommended) as well as from the
monitor. When you attempt to exit the General Settings screen, you will be prompted to sync the with
LifeStream. If you answer Yes to this question, the configuration changes you made at the monitor will be
uploaded to LifeStream and will overwrite any pending configurations in LifeStream. If you do not want
the configuration from the monitor to overwrite the pending LifeStream configuration, you must answer
No to this question.
1. A window similar to the following appears:
To: Select:
Sync with LifeStream
(overrides the current
or pending
configuration in
LifeStream for this
monitor.)
Yes. A screen similar to the following appears as the information is provided
to LifeStream:
When the information is received, a screen similar to the following appears:
Not sync with
LifeStream
28 P4810EN.05 © 2014 Honeywell HomMed. All rights reserved. 6/9/14
No. The Setting screen appears. You will now use the configuration
provided by LifeStream rather than what you set up on the monitor.
Page 33
Scheduling
Scheduling
We recommend that care providers schedule vitals acquisition from LifeStream, however, schedules can
also be set from the monitor.
There are two steps to scheduling:
• Setting the overall schedule.
• Setting the peripheral schedule.
You should first set up the patient’s overall schedule of days and times for vital signs acquisition. Then, if
necessary, you can modify the schedule to set up specific days and/or times for each peripheral device or
manually entered reading, as needed. The process is the same for both, however, if you are setting up for
individual peripherals, you must be in the unique location for that peripheral.
SettingtheOverallSchedule
You can set up to four individual scheduled reading times for a patient each day. The following example
shows how scheduling would be set up for the patient’s overall schedule:
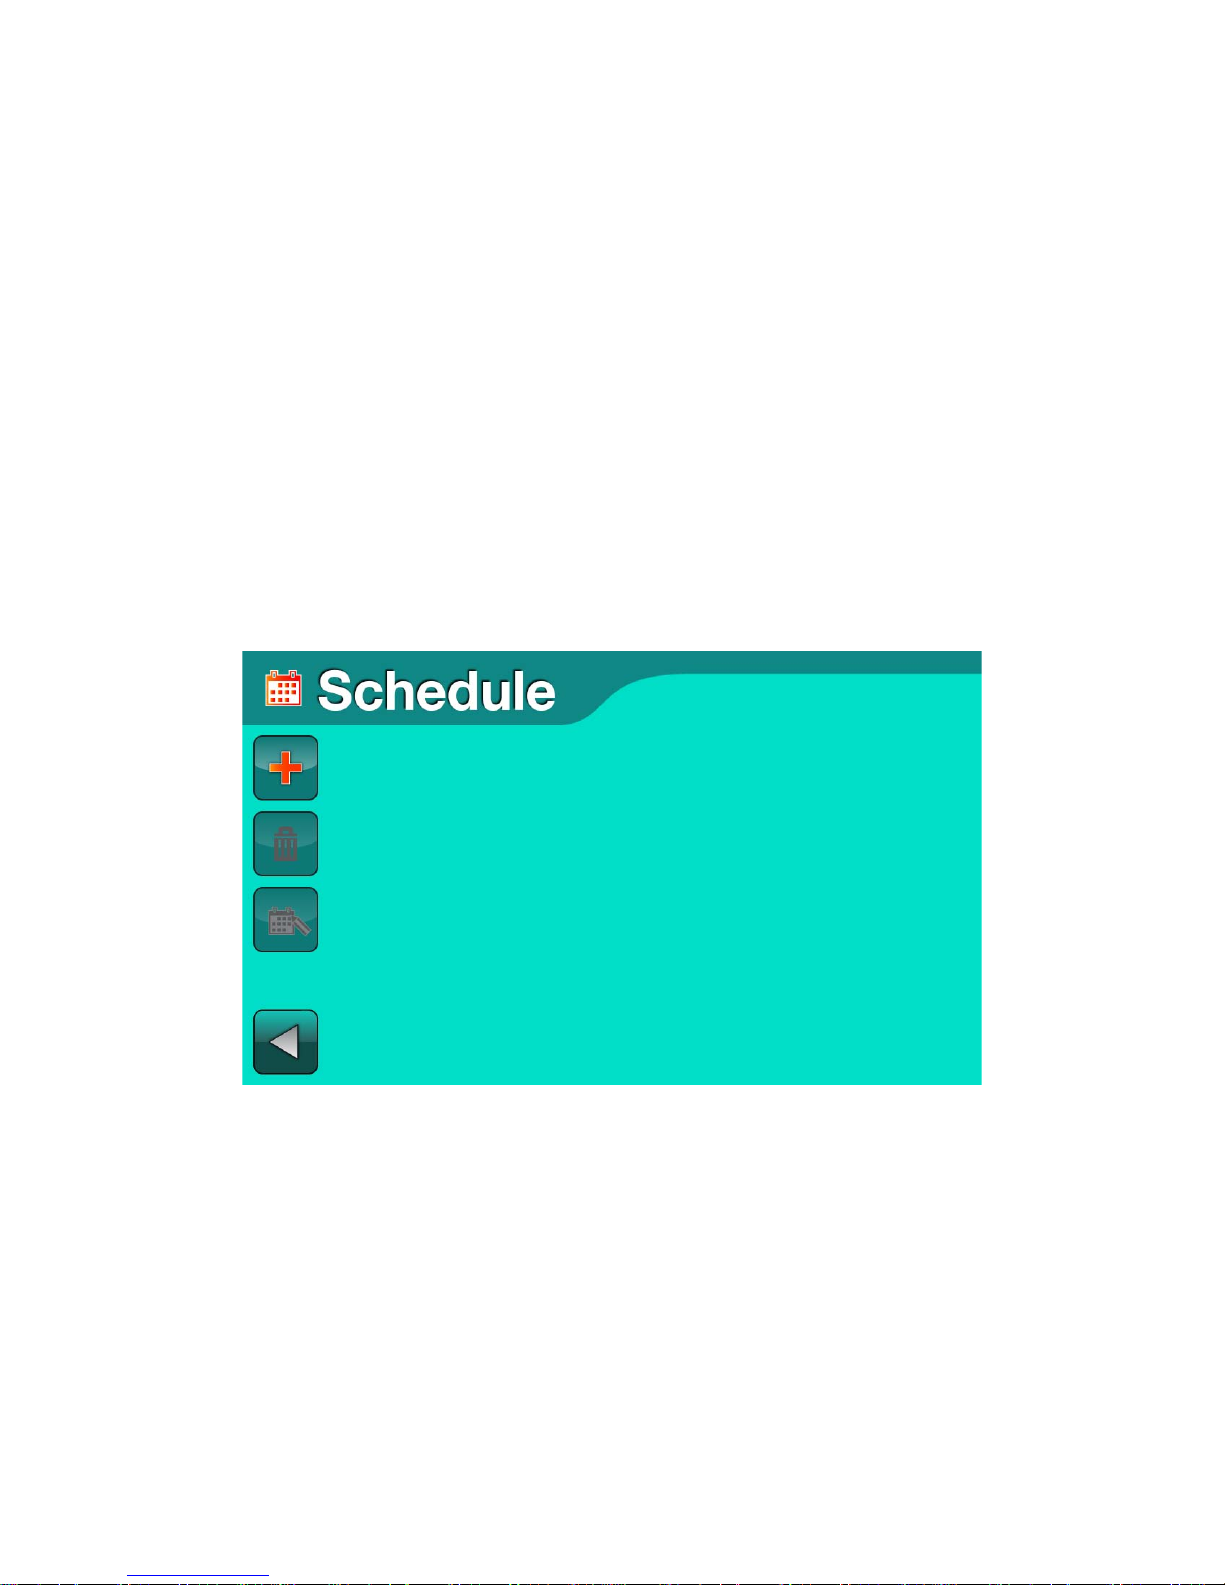
1. From the General Settings screen, select Schedule. The Schedule screen appears:
Note: If readings are already scheduled, they will appear on this screen. To edit an existing reading,
select the reading. The reading is highlighted. Select the Schedule icon. The Edit Schedule
screen appears.
6/9/14 © 2014 Honeywell HomMed. All rights reserved. P4810EN.05 29
Page 34
Getting Started
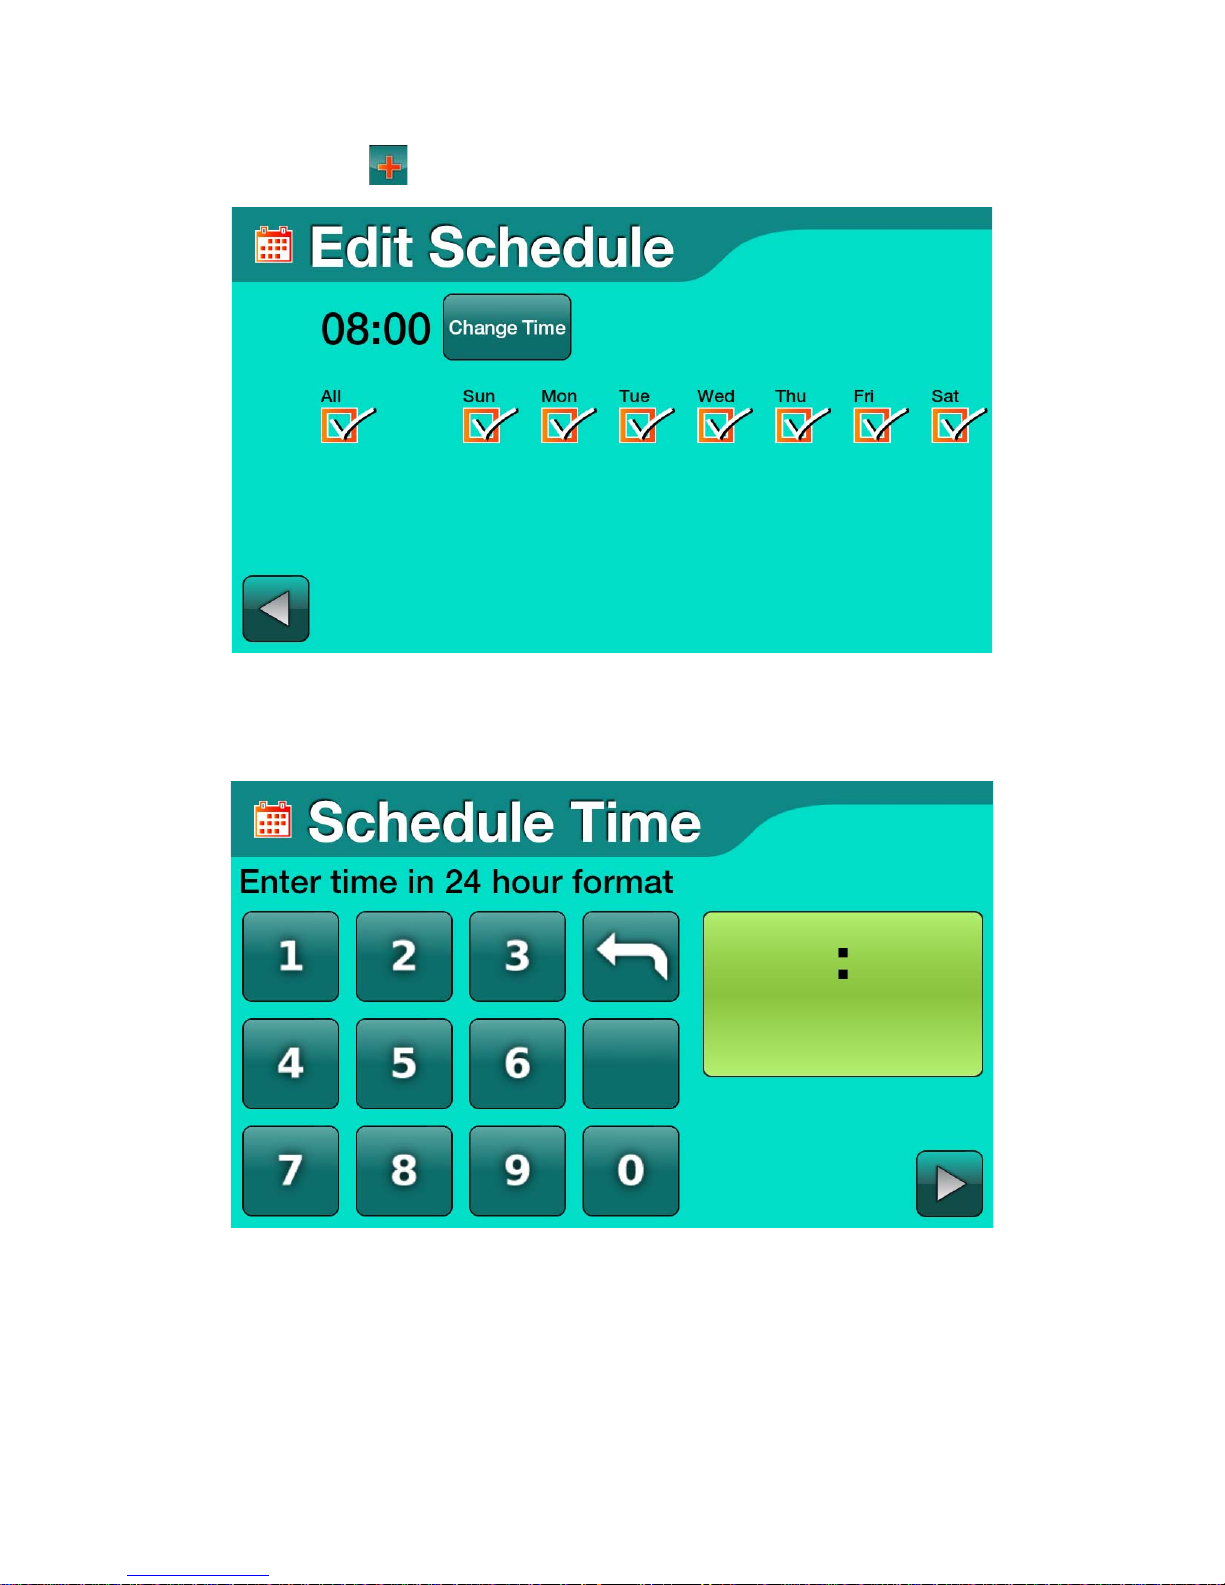
2. Select the Add icon ( ). The Edit Schedule screen appears:
3. Select the individual box for each day that vital signs acquisition will occur. A check mark will appear
in the boxes for scheduled days.
4. Select the Change Time button. The Schedule Time screen appears:
30 P4810EN.05 © 2014 Honeywell HomMed. All rights reserved. 6/9/14
Page 35

Scheduling
5. Type in the first time of the day at which you will schedule a vital signs acquisition and press the
forward icon (
). The Edit Schedule screen appears with the days selected and the time displayed.
6. To schedule additional times for the days, go to step 2.
To: Do this:
Schedule
Go to step 2.
additional
times for the
days
Exit the
schedule
Select back ( ).The Schedule screen appears containing the schedule that you set.
Select back ( ).The General Settings screen appears.
7. Select the back icon ( ). The General Settings screen appears.
6/9/14 © 2014 Honeywell HomMed. All rights reserved. P4810EN.05 31
Page 36
Getting Started
SettingSchedulesforPeripherals
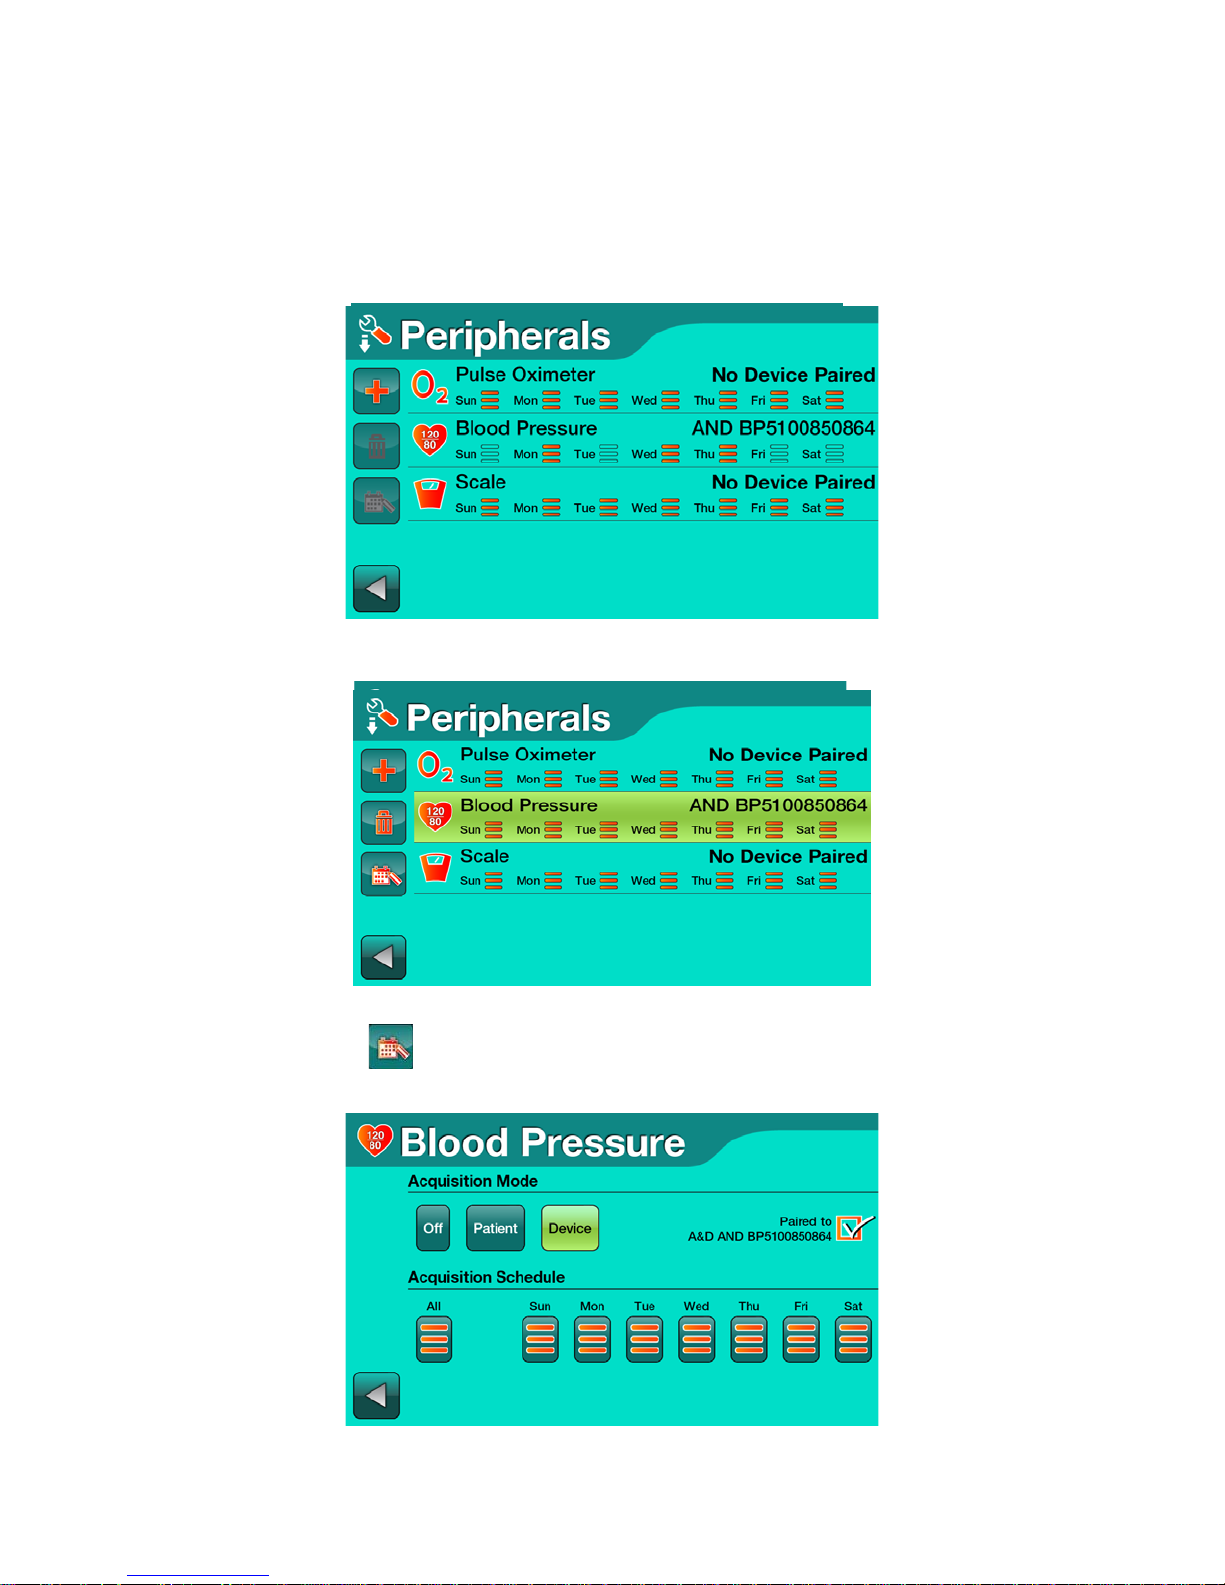
The following example shows how scheduling would be set up for blood pressure and assumes the blood
pressure unit is already paired with the Genesis Touch.
1. From the General Settings screen, select Peripherals. A Peripherals screen similar to the following
appears:
2. Select Blood Pressure. The Blood Pressure row is highlighted:
3. Select the Edit icon ( ). The Blood Pressure screen appears with the current acquisition schedule
on the lower half of the screen:
32 P4810EN.05 © 2014 Honeywell HomMed. All rights reserved. 6/9/14
Page 37
Scheduling
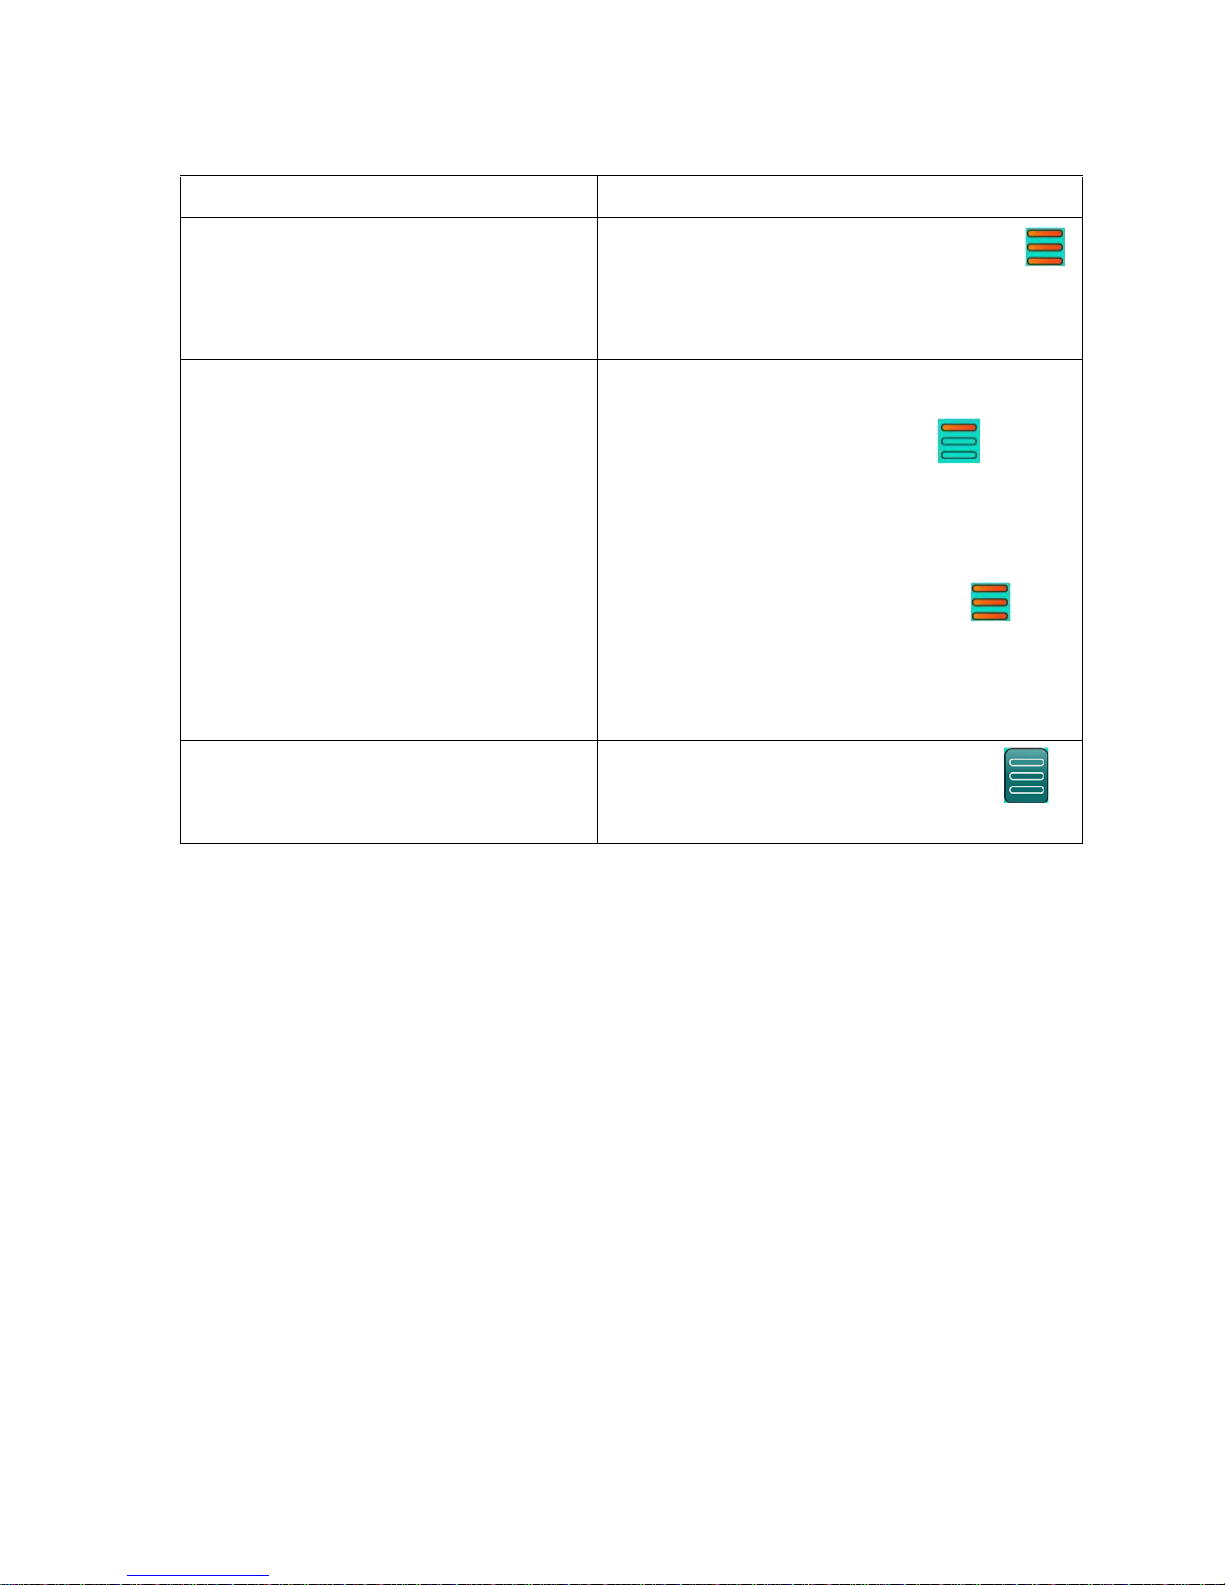
4.
To schedule: Select:
All readings for each of the days of the week
The All icon until the icon shows three red bars .
This means that the monitor is scheduled to initiate
readings (in this example, for blood pressure) for all
of the scheduled readings for each day of the week.
Customized readings for each day The icon below the day until the appropriate readings
appear for that day
One red bar = first reading of the day . This
means that the monitor is scheduled to initiate
readings (in this example, for blood pressure) for only
the first scheduled reading for the day of the week
under which it appears.
Three red bars = all readings for that day . This
means that the monitor is scheduled to initiate
readings (in this example, for blood pressure) for all
of the scheduled reading for the day of the week
under which it appears.
No readings for each of the days of the week
The All icon until the icon shows no red bars .
This means that no readings will be initiated.
5. Select the back icon. The Peripheral screen appears with the schedule you set for this reading under
the reading name.
SettingAdvancedFeatures:VideoVisits
Additional topics accessible from the Advanced option include:
• Setting up communications
• Setting Wi-Fi settings
• Setting date and time
• Setting educational features
All of these settings are accessed through the Advanced Settings screen. Refer to the Genesis Touch User
Manual for information about other features in this menu.
http://www.hommed.com/customer‐service/genesis‐touch‐manuals/
Additional information related to configuring video visits is found in the Clinical Support section of our
website under Training Presentations & Webinars and Training Videos:
http://www.hommed.com/lifestream‐services/clinical‐support/
6/9/14 © 2014 Honeywell HomMed. All rights reserved. P4810EN.05 33
Page 38
Getting Started
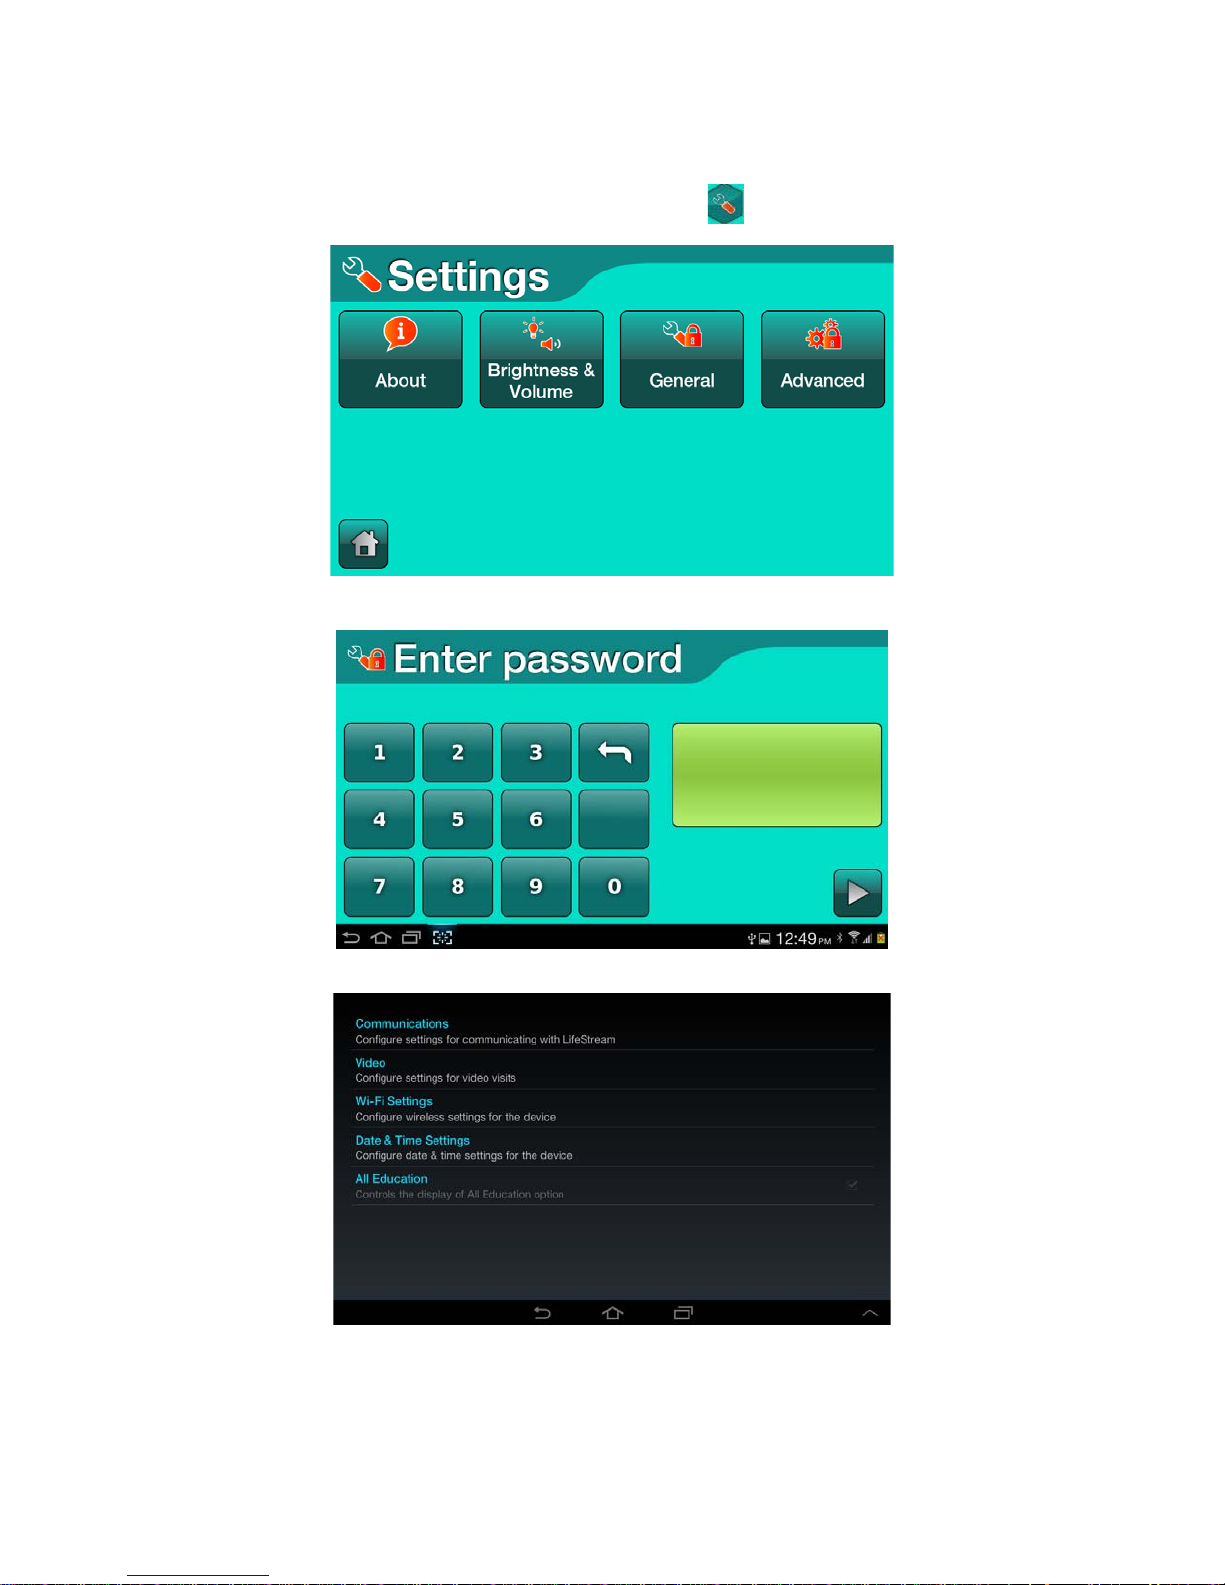
To access the Advanced menu:
1. From the Vitals Now/Home screen, select the settings icon ( ).The Settings screen appears:
2. Select Advanced. The Enter Password screen appears:
3. Type 4237 and select the forward icon. The Advanced Settings screen appears:
4. Go to Setting Up Video Visits below.
34 P4810EN.05 © 2014 Honeywell HomMed. All rights reserved. 6/9/14
Page 39

Setting Up Video Visits
SettingUpVideoVisits
The basic Fuze Meeting application, which provides video conferencing capability, is available on the
Genesis Touch monitor. You must have a Fuzebox license to host a video conference, however the basic
application, which is installed on the Genesis Touch, allows you to attend video conferences hosted by
others. Refer to Video Conferencing in the Getting Started chapter of the Genesis Touch User Manual for
licensing information. Refer to the Fuzebox instructions for specifics on video conferencing.
This section assumes that you are at the Advanced Settings screen. Refer to Getting to the Advanced
Settings Screen for more information.
To enable the monitor to use video confer encing:
• Enable video on the monitor.
• Start the camera automatically when video is selected.
• Start the video on the full screen.
• Automatically start audio when video is selected.
• Set a caption to appear on the monitor.
• Enable a custom caption to be entered.
• Set up the one touch feature for video.
IMPORTANT: Whenever you see a black configuration screen, you have the ability to inadvertently
negatively affect the Genesis Touch application by touching keys on the bottom of the
screen. The only button that should be used from that area is the back key, which allows
you to back out of the area.
HIPAAPrivacyNotice
In the same way HomMed devices on their own are not HIPAA compliant, the Fuze Meeting application is
not inherently HIPAA compliant. HIPAA compliance is achieved based on the system and method in
which devices and applications are being used.
In order to ensure that our devices and applications are being used in a way that achieves HIPAA
compliance, we have implemented the following:
• Anonymity of patient data on the tablet – the link between patient data and LifeStream has been
designed to be “discreet” at a patient level and visible to a care provider only via a password protected
environment.
• Video collaboration as implemented provides anon ymity of patient. Additionally, meeting host/care
provider must approve all video participants before they are allowed to join a video collaboration
session.
• All data centers (both Fuze and LifeStream) are documented as being compliant – so data and
education being displayed is secure.
Another way to take additional steps toward privacy compliance is to disable a custom
identifier and also disable recording functionality. For more information on this, please refer
to the Genesis Touch User Manual.
Additional references:
Fuze Meeting security information: https://www.fuze.com/security
Amazon Web Services (utilized by Fuze Meeting): http://aws.amazon.com/security/
6/9/14 © 2014 Honeywell HomMed. All rights reserved. P4810EN.05 35
Page 40
Getting Started
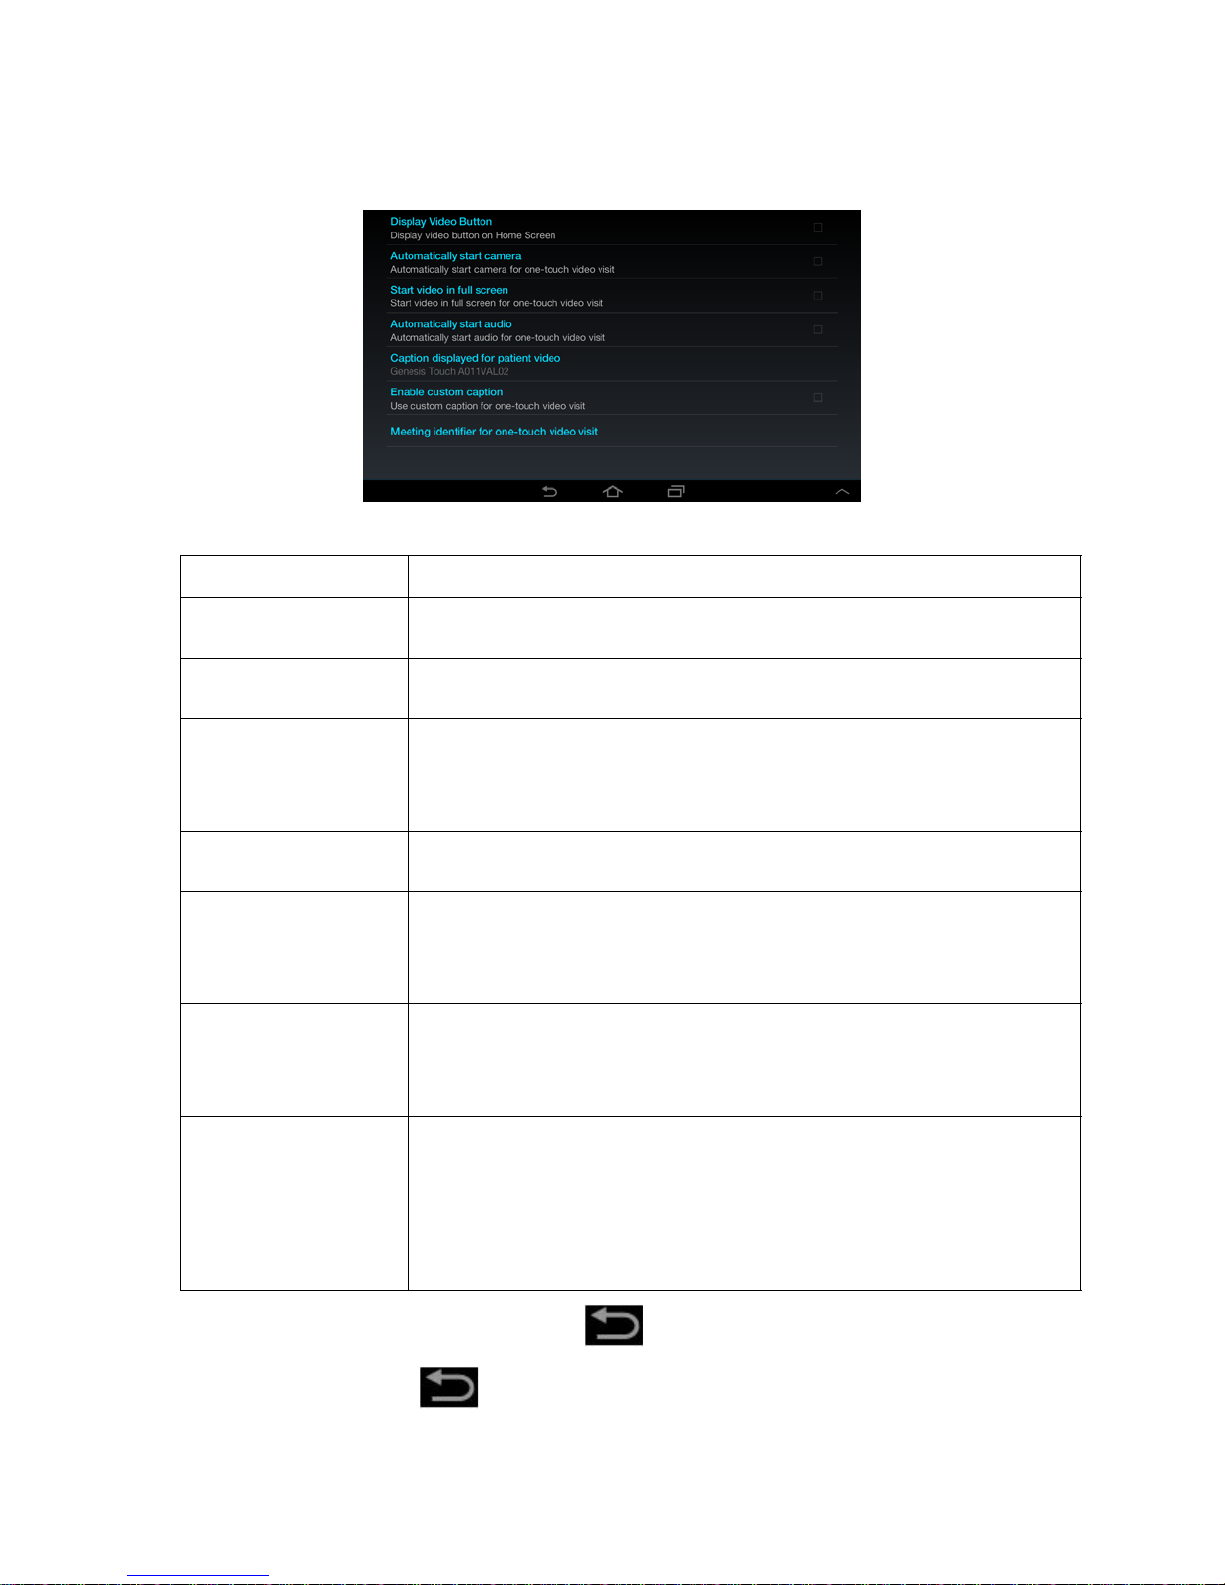
To set up the video options:
1. From the Advanced Setting screen, select Video. A screen similar to the following appears:
2.
Field Description
Display Video Button Select this to enable video on the monitor. When this is checked, the video
button appears on the Vitals Now/Home screen on this monitor.
Automatically start
camera
Select this to automatically start the camera on the monitor when the video
button is selected.
Start video in full screen Select this to show the video of the initiator and the video of the patient (if
Automatically Start Camera is selected) side-by-side in the entire screen.
By default video is displayed in a smaller window, however this full screen
option may be easier for patients to see and interact with.
Automatically start
audio
Caption displayed for
patient video
Select this to use Voice Over IP (VoIP) for audio. When this is checked the
audio will come through the monitor rather than through a telephone line.
This shows the caption that will appear under the patients image.
If Enable custom caption is checked, you can type a custom caption for the
patient. Refer to Entering a Custom Caption for instructions on changing a
caption.
Enable custom caption When this is checked, you have the ability to customize the video for the
patient on this monitor. Refer to Entering a Custom Caption for
instructions on changing a caption. The default caption is the tablet serial
number.
Meeting identifier for
one-touch video visit
This shows the meeting number required for this monitor as defined
through your Fuze Meeting schedule. Refer to the Genesis Touch User
Manual for more information. Refer to Entering a Meeting Identifier for
instructions on changing a meeting number.
IMPORTANT: If you do not have a meeting identifier assigned, one-
touch video cannot occur.
3. To exit the Video screen, select the return key . The Advanced screen appears.
4. Select the return key again . The Settings screen appears.
36 P4810EN.05 © 2014 Honeywell HomMed. All rights reserved. 6/9/14
Page 41

Setting Up Video Visits
EnteringaCustomCaption
To set up the video options:
1. From the Video screen, select Enable custom caption. A screen similar to the following appears:
2. Select Caption displayed for patient video. A screen similar to the following appears:
3. T y pe the caption that you want to di sp lay under the patient ’s image and select OK. A screen similar to
the following appears showing the caption you entered:
4. To exit the Video screen, select the return key . The Advanced screen appears.
5. Select the return key again . The Setting screen appears.
6/9/14 © 2014 Honeywell HomMed. All rights reserved. P4810EN.05 37
Page 42

Getting Started
EnteringaMeetingIdentifier
To set up the meeting identifier:
1. From the Video screen, select Meeting identifier for one-touch video visit. A screen similar to the
following appears:
If you are seeking optimum HIPAA compliance, it is recommended that a space is entered as the custom
meeting identifier so that a patient will be even more anonymous in a video visit.
2. Type the meeting identifier from your Fuze Meeting schedule and select OK. A screen similar to the
following appears showing the meeting identifier you entered:
VerifyingOne‐To uc hVideoSetting
To verify that you configured the monitor for one-touch video, from the Setting screen, select About. If
one-touch video is configured, a screen similar to the following appears with the meeting identifier for this
monitor of over 5 digits/numbers. Consult the Genesis Touch User Manual if you do not see this listed:
38 P4810EN.05 © 2014 Honeywell HomMed. All rights reserved. 6/9/14
Page 43

Enabling All Education
EnablingAllEducation
The Genesis Touch may be configured to replay programmed educational questions on demand, in
addition to selected education sets during a scheduled monitoring time. When All Education is enabled, a
patient may access self-guided questions from the Vitals Now / Home Screen. These questions cover topics
like pain management, diet, diabetes, cardiac care and more.
To enable this feature, go back to the Advanced Settings menu:
Then choose All Education by touching the check box (to disable this feature simply uncheck the box):
Now go back to the Vitals Now / Home Screen by continually selecting the return key:
Select the Education button ( ) and you will see a screen similar to the following:
6/9/14 © 2014 Honeywell HomMed. All rights reserved. P4810EN.05 39
Page 44

Getting Started
Notes
40 P4810EN.05 © 2014 Honeywell HomMed. All rights reserved. 6/9/14
Page 45

GettingStartedChecklist
Unpack Products
Review Safety Information
Passwords
Getting Started Checklist
General Entry
Scale
Oximeter
Configure Scale
Position
Configure Scale Type
Pair
Set Up Blood Pressure Unit
Pair Blood Pressure Unit
Set Up Oximeter
Pair Oximeter
Configure Thermometer
Set Up Video
Sync with LifeStream
4237
1111
0000
ContactingCustomerService
Honeywell HomMed Customer service:
U.S. and Canada
U.K.
Toll Free: 888-353-5404
Phone: 0854 602 9954
Page 46

Honeywell HomMed
3400 Intertech Drive, Suite 200
Brookfield, WI 53045
Phone: (262) 783-5440
www.hommed.com
 Loading...