

Page 1
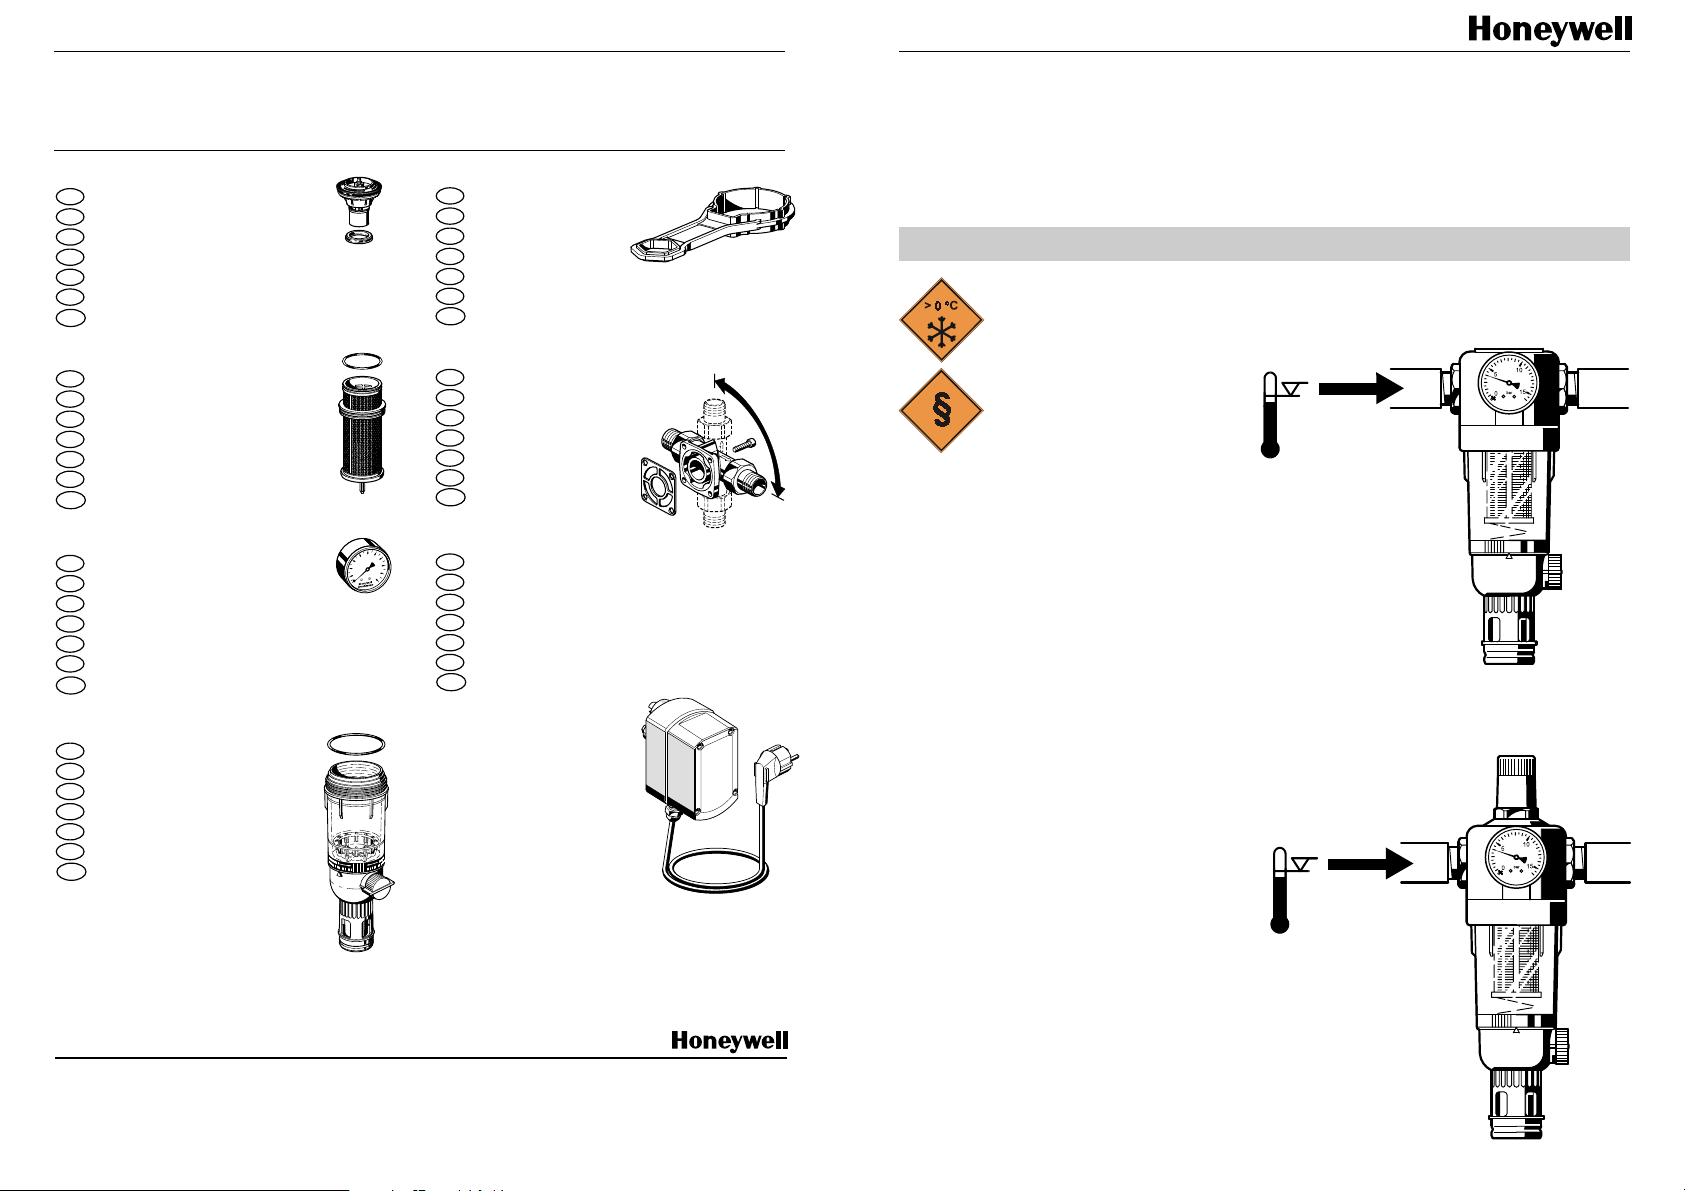
9. Austauschteile und Zubehör • Exchange parts and accessories • Pièces de
rechange et accessoires • Reserveonderdelen en toebehoren • Pezzi di ricambio e
accessori • Piezas de recambio y accesorios • Запасные части и
дополнительные ринадлежности
D06FA-1B
D
Ventileinsatz
GB
Valve insert
F
Garniture
NL
Binnenwerk
I
Cartuccia
E
Partes internas
Вставка клапана
RUS
ZR10-3/4
D
Doppel-Ringschlüssel
GB
Double ring wrench
F
Clé polygonale double
NL
Dubbele ringsleutel
I
Doppia chiave poligonale
E
Llave poligonal doble
RUS
Двойной ключ
ZR 74
F74C / FN74C / FK74C / FKN74C
Einbau-Anleitung • Installation instructions • Instructions de montage
Installatievoorschrift • Istruzioni per il montaggio • Instrucciones de instalación
Инструкции по монтажу
F74C / FN74C
AF74
D
Austausch-Filtereinsatz
GB
Exchange filter insert
F
Filtre de rechange
NL
Reservefilter
I
Filtro di ricambio
E
Filtro de recambio
Сменный картридж фильтра
RUS
M07K
D
Manometer
GB
Pressure gauge
F
Manomètre
NL
Manometer
I
Manometro
E
Manómetro
Манометр
RUS
KF74
D
Klarsicht-Filtertasse
GB
Transparent filter bowl
F
Pot de décantation transparent
NL
Doorzichtige zeefhouder
I
Tazza di filtro trasparente
E
Vaso de filtro transparente
Прозрачный корпус фильтра
RUS
DA74C
D
Drehbares Anschlußstück
GB
Flange
F
Raccord à bride
NL
Verdraaibaar aansluitstuk
I
Dispositivo a flangia
E
Unión de brida
RUS
Фланец
In der Einbau-Anleitung wird für die grafische Darstel-
6
4
8
2
r
a
b
0
10
Z74A / Z11S
D
Rückspülautomatik
Automatic reverse rinse actuator
GB
Moteur de rinçage à contre-courant
F
Terugspoelautomaat
NL
Motore di lavaggio in controcorrente
I
Programador de lavado a contracorriente
E
Привод автоматической обратной
RUS
промывки
lung immer der Typ FK74C verwendet. Die Angaben sind
aber für alle Typen gültig.
Although illustrations of type FK74C are shown
throughout these installation instructions, the details
given apply for all patterns.
Dans les instructions de montage on utilise toujours le
type FK74C pour les illustrations. Les indications sont
néanmoins valables pour tous les types.
In het installatievoorschrift wordt voor de afbeeldingen
steeds het type FK74C gebruikt. De aanduidingen
gelden niettemin voor alle typen.
max. 30 °C
Pmin = 1,5 bar
P
max = 16 bar
FK74C / FKN74C
max. 30 °C
Nelle istruzioni per il montaggio ci si serve per i disegni
sempre del tipo FK74C. I dettagli sono tuttavia validi
per tutti i tipi.
En las instrucciones de montaje se utiliza siempre el tipo
FK74C para las ilustraciones. Sin embargo, las
indicaciones sirven para todos los tipos.
Pmin = 1,5 bar
P
max = 16 bar
Automation & Control Products
Honeywell AG Phone: (49) 6261 810
Hardhofweg Fax: (49) 6261 81309 www.honeywell.de/haustechnik
D-74821 Mosbach braukmann@honeywell.com http://europe.hbc.honeywell.com
Хотя иллюстрации к инструкции даны для фильтра
FK74C, инструкция относится к обоим типам
фильтров FK74C и F74C, кроме специфических.
MU1H-1106GE23R0103
EB-F74C/FK74C=D
Page 2
1. Einbau • Installation • Installation • Installatie • Installazione • Instalación • Монтаж
Beim Anbau an einen bereits installierten Flanschanschluß eines
D
anderen Herstellers (z.B. Cillit) ist zu beachten, daß die
n
o
p
5
1
0
0
b
a
r
1
5
1
6
Anströmung auch bei diesem über den äußeren Ring erfolgt.
Sollte dies nicht der Fall sein, so ist das Anschlußstück
umgekehrt einzubauen, auch wenn der Durchflußpfeil dann nicht
in die tatsächliche Durchflußrichtung zeigt. Sind Gewinde am
Flanschanschluß vorhanden, müssen diese aufgebohrt werden
(ø 6,3 mm).
When connecting to an existing flange of another make (e.g.
GB
Cillit) ensure that the inlet flow is through the outer ring of holes.
If this is not so, the whole connection piece must be installed
the other way round, even if the arrow does not then indicate the
actual flow direction. If the flange is threaded, the threaded holes
must be drilled out to a diameter of 6.3 mm.
En cas de fixation à un raccord à bride monté auparavant et
F
provenant d'un autre constructeur (Cillit p.e.), il faut faire très
attention à ce que l'eau arrive également dans ce cas-ci, via le
circuit extérieur. S'il n'en était pas ainsi, le raccord devrait alors
être monté en sens inverse, même si la flèche montrant le sens
de la circulation n'indique pas la direction réelle. Lorsque le
raccord à bride possède des filetages, il faudra les supprimer à
la foreuse (ø 6,3 mm).
Bij bevestiging aan een reeds gemonteerde aansluitstuk van
NL
een andere fabrikant (Cillit bijv.) erop letten, dat de watertoevoer
ook hier via de buitenste kring plaats vindt. Mocht dat niet het
geval zijn, dan moet de aansluitstuk omgekeerd ingebouwd
worden, zelfs indien de pijl dan niet de werkelijke
doorstroomrichting aangeeft. Bezit de aansluitstuk schroefdraadaansluitingen, dan moeten deze uitgeboord worden (ø 6,3 mm).
In caso di collegamento a un dispositivo a flangia già montato
I
e proveniente da un altro fabbricante (p.e. Cillit) bisogna
badare che l’acqua arrivi anche in questo caso dal circuito
esterno. Se non fosse così, il dispositivo dovrebbe allora
essere montato in senso inverso, anche se la freccia indicante
il senso del flusso non mostri il senso reale. Quando il
dispositivo a flangia è dotato di imperfezioni, è necessario
toglierle col trapano (ø 6,3 mm).
En caso de conexión con una unión de brida de otro fabricante
E
(p.ej. Cillit) montada antes, hay que comprobar que el agua liega
también por el circuito exterior. Si no es así la unión deberá
montarse al revés, aun cuando la flecha que indica la dirección
del fluido no indique el sentido real del mismo. Si la unión tiene
roscas, habrá que suprimirlas con la taladradora (ø 6,3 mm).
После установки фланца необходимо убедиться, что
RUS
входящий поток проходит через наружное кольцо отверстий.
Если это не так, тогда все соединение должно быть собрано
в обратном направлении, даже если стрелка не указывает
истинное направление потока. В случае если во фланце
нарезана резьба, резьбовые отверстия рассверливаются до
диаметра 6,3 мм.
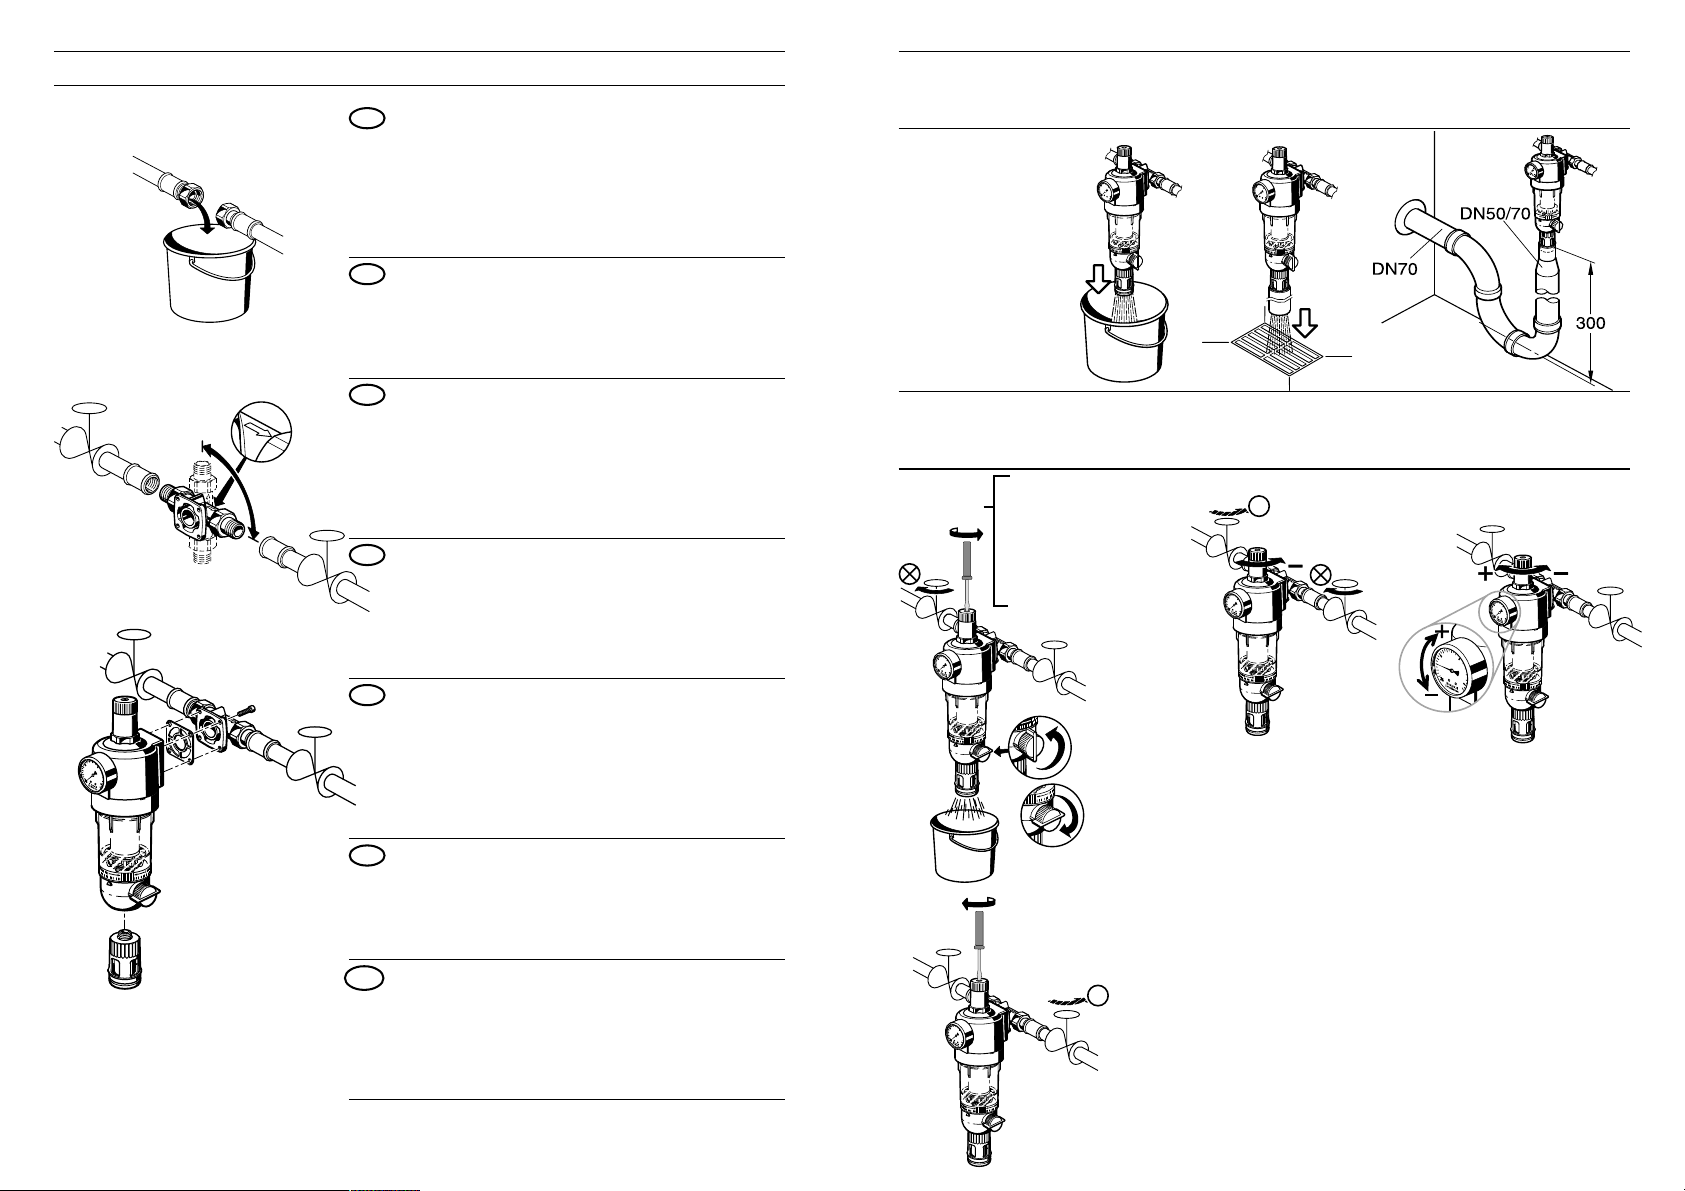
2. Wasserabführung • Water Drainage • Evacuation de l’eau de rinçage • Afvoer van
het water • Scarico dell’acqua di lavaggio • Evacuación del agua de lavado • Слив
воды для промывки
• 3 Möglichkeiten
• 3 variations
• 3 possibilités
•3 mogelijkheden
5
1
0
0
b
a
r
15
1
6
5
1
0
0
b
a
r
1
5
1
6
• 3 possibilità
• 3 posibilidades
•3 возможности
25 l
3. Hinterdruck einstellen • Setting outlet pressure • Régler la pression aval •
Instellen van de uitlaatdruk • Tarare la pressione a valle • Ajuste de la presión de
salida • Установка выходного давления
n
5
0
Nicht herausdrehen
Do not remove completely
q
Ne pas l'enlever
Niet geheel verwijderen
Non svitare completamente
No quitarlo
Но не снимать полностью
1
0
b
ar
15
16
v
5
1
0
0
b
ar
1
5
16
w
o
p
Wenn der Hinterdruck auf einen niedrigeren Wert eingestellt wird, muß die
Ausgangsseite druckentlastet werden, damit sich der gewünschte Hinterdruck
einstellt.
If the pressure is to be set to a lower value, the outlet pressure must first be
relieved to achieve the required setting.
Si la pression aval est réglée sur une valeur inférieure, il faut dépressuriser le
coté sortie pour que la pression aval souhaitée puisse apparaître.
Wordt de uitlaatdruk op een lagere waarde ingesteld, dan dient de druk aan de
uitlaatzijde te worden afgelaten om de gewenste uitlaatdruk te kunnen
instellen.
Se la pressione a valle viene tarata a un valore inferiore, si deve
depressurizzare il lato uscita in modo che la pressione a valle desiderata
possa stabilizzarsi.
Al calibrar la presión de salida a un valor inferior, hay que despresurizar el
lado de la salida a fin de obtener la presión deseada.
Поворот по часовой стрелке увеличивает давление, против - снижает
(проверьте давление по манометру).
❼
5
0
r
u
s
10
b
a
r
15
16
5
10
0
b
a
r
15
1
6
5
1
0
0
ba
r
15
1
6
Page 3

4. Rückspülen • Reverse rinsing • Rinçage à contre-courant • Terugspoelen
r
1
5
5
0
1
0
Lavaggio in controcorrente • Lavado a contracorriente • Обратная промывка
Automatisches Rückspülen
mit Z74A / Z11S
Automatic reverse rinsing with
the Z74A / Z11S
Rinçage à contre-courant avec
le moteur Z74A / Z11S
Automatisch terugspoelen met
de Z74A / Z11S
Lavaggio in controcorrente
con il motore Z74A / Z11S
Lavado a contracorriente con el
programador Z74A / Z11S
Автоматическая обратная
промывка с Z74A / Z11S
5
1
0
0
b
ar
1
5
16
q
5
1
0
0
b
ar
15
1
6
o
DIN1988
n
p
> 25 s
5. Kontrolle • Check • Contrôle • Controle • Controllo • Control • Контроль
• Leichtgängigkeit des Ablasskugelhahns c
regelmäßig prüfen. Eventuell austauschen.
• Check regularly drain ball valve for smooth
running and replace, if necessary.
c
5
0
o
1
0
b
ar
15
16
n
• Vérifier régulièrement que la vanne à boule
fonctionne correctement.
La remplacer si nécessaire.
• Controleer regelmatig de aftapkogelkraanop
goede werking en vervang deze indien nodig.
• Controllare regolarmente la funzionalità del
rubinetto di scarico a sfera.
Eventualmente sostituirlo.
• Verificar periódicamente la suavidad de marcha
de la llave esférica de descarga.
p
Eventualmente reemplazarla.
• Легкость вращения шарика спускного крана
следует регулярно проверять.
При необходимости заменить.
6. Inspektion Druckminderer • Inspection of the pressure reducing valve
Inspection du détendeur • Inspectie van de reduceerklep • Ispezione del riduttore
di pressione • Inspección de la válvula reductora de presión • Проверка
редукционного клапана давления
nur FK74C und FKN74C • FK74C and FKN74C only • uniquement pour le FK74C et FKN74C • uitsluitend voor FK74C
en FKN74C • soltanto FK74C e FKN74C • sólo FK74C y FKN74C • только для FK74C и FKN74C
P1
.
V = 0 m3/h
o
n
5
5
1
0
0
b
ar
1
5
1
6
5
10
0
ba
r
15
1
6
P2
1
0
0
b
ar
15
1
6
P2 = stabil Funktion in Ordnung
P2 = stable Function all right
P2 = stable Fonctionne bien
o
P2 = stabiel Werking in orde
P2 = stabile Funzionamento corretto
P2 = estable Función correcta
P2 = стойкий Функция не в порядке
.
V = 0 m3/h
P1
n
5
1
0
0
b
ar
1
5
1
6
b
a
r
1
6
P2
P1 = P2 Funktion nicht in Ordnung
Function not all right
Ne fonctionne pas bien
Werking niet in orde
7.
Funzionamento non corretto
Función incorrecta
функция из яние) от порядок
Page 4

7. Wartung Druckminderer • Pressure reducing valve maintenance • Maintenance du
détendeur • Onderhoud van de reduceerklep • Manutenzione del riduttore di
pressione • Mantenimiento de la válvula reductora de presión • Профилактика
редукционного клапана давления
nur FK74C und FKN74C • FK74C and FKN74C only • uniquement pour le FK74C et FKN74C • uitsluitend voor FK74C
en FKN74C • soltanto FK74C e FKN74C • sólo FK74C y FKN74C • только для FK74C и FKN74C
Nicht herausdrehen
Do not remove completely
Ne pas l'enlever
r
Niet geheel verwijderen
n
Non svitare completamente
No quitarlo
Но не снимать полностью
5
0
s
5
1
0
0
b
ar
15
16
o
v
p
q
D06FA-1A
5
10
0
b
a
r
1
5
1
6
Montage in umgekehrter Reihenfolge
12
• Membrane mit Finger eindrücken dann Gleitring einlegen (auf richtige Lage achten)
Assemble in reverse order
• Press in diaphragm with finger and theninsert slip ring (check for correct positioning)
Remontage en sens inverse
• Appuyer avec le doigt sur la membrane avant de remettre la rondelle de friction (faire attention à sa position
correcte).
Montage in omgekeerde volgorde
• Membraan met de vinger indrukken en dan de slipring aanbrengen (erop letten, dat het juist ligt).
Montaggio in senso inverso
• Premere la membrana col dito e poi posare l’anello di scorrimento (badare alla posizione giusta).
Volver a montar en sentido opuesto
• Pulsar la membrana con el dedo y después poner la arandela de fricción (comprobar su posición justa).
Собрать в обратном порядке и
• Вжать мембрану пальцем перед установкой скользящего кольца (проверить, что кольцо
установилось правильно)
13
3.
t
4
7
R
Z
1
0
b
ar
15
1
6
w
Falls erforderlich auswechseln
If necessary replace.
Si nécessaire remplacer
Zonodig vervangen
u
5
1
0
0
b
a
r
15
1
6
Se necessario sostituire
11
Si fuera necesario reemplazar
В случае необходимости
полностью заменить вставку
клапана
8. Wichtige Hinweise • Important notes • Indications importantes • Veiligheidsop-
merkingen • Indicazioni importanti • Indicaciones importantes • Важные указания
D
Kunststoffteile nicht mit lösungsmittelhaltigen Pflegemitteln reinigen.
Filter dürfen nicht in Bereichen mit
UV-Bestrahlung (Sonnenlicht) oder
Lösungsmittel dämpfen eingebaut
werden.
Benutzen Sie das Gerät
• in einwandfreiem Zustand
• bestimmungsgemäß
• sicherheits- und gefahrenbewusst.
Einbau-Anleitung beachten.
Störungen sofort beseitigen lassen.
Die Armaturen sind ausschließlich für
die genannten Einsatzgebiete
bestimmt. Jede andere Benutzung
gilt als nicht bestimmungsgemäß.
NL
Voor het reinigen van kunststofonderdelen geen schoonmaakproducten gebruiken, die
oplosmiddelen bevatten.
Filters mogen niet geinstalleerd
worden op plaatsen, die aan UVstralen (zonnelicht) of aan dampen
van oplosmiddelen blootgesteld zijn.
De apparatuur gebruiken
• in onberispelijke conditie
• overeenkomstig zijnbestemming
• met inachtneming van veiligheid
en eventuele gevaren.
Het installatievoorschrift in acht nemen.
Storingen onmiddellijk laten verhelpen.
De apparatuur is uitsluitend bestemd
voor de vermelde toepassings
gebieden. Elk ander, dit voorschrift te
buiten gaand gebruik, wordt geacht in
strijd te zijn met de doelstelling daarvan.
RUS
Пластиковую деталь не очищать
средствами, содержащими
растворитель.
Нельзя устанавливать фильтр в
местах, где есть ультрафиолетовое
излучение или выделяются пары
растворителя.
GB
Do not use any cleaning materials
containing solvents for cleaning
plastic parts.
Filters must not be installed in
locations where ultra violet rays
(sunlight) or solvent fumes are
present.
Use the appliance
• In good condition
• According to regulations
• With due regard to safety.
Follow installation instructions.
Immediately rectify any malfunctions.
The valves are exclusively for use for
applications detailed in these
installation instructions. Any variation
from this or other use will not comply
I
L’elemento in materia sintetica non
deve essere pulito con detergenti
contenenti solventi.
I filtri non possono essere installati in
luoghi esposti ai raggi UV (luce del
sole) o a vapori di dissolventi.
Impiegare l’apparecchio
• a regola d’arte,
• in accordo alle normative vigenti,
• secondo le norme sulla
sicurezza.
Attenersi alle istruzioni sull’installazione.
Intervenire prontamente in caso di
malfuzionamento.
Le valvole sono destinati esclusivamente per i campi d’impiego indicati.
Ogni altro impiego viene ritenuto
inadeguato.
Используйте прибор
• в исправном состоянии
• в соответствии с назначением
• с соблюдением мер
безопасности.
Соблюдать инструкцию по монтажу.
Ne pas nettoyer la pièce en matière
synthétique avec des produits
d’entretien contenant des solvants.
Les filtres ne peuvent être installés
dans des endroits exposés aux
rayons UV (lumière du soleil) ou à
des vapeurs de dissolvants.
N’utiliser l’appareil que
• dans un état impeccable
• selon les prescriptions
• en tenant compte de la sécurité.
Observer l’instruction de montage.
Remédier immédiatement à tout
défaut.
La robinetterie est destinée uniquement aux applications indiquées.
Toute autre utilisation est considérée
comme contraire aux prescriptions.
No limpiar la parte de plástico con
productos de limpieza que contengan
disolventes.
Los filtros no pueden montarse en
lugares expuestos a los rayos UV (luz
del sol) o a vapores de disolventes.
Utilizar el aparato
• en perfecto estado de
funcionamiento
• de acuerdo con los fines
previstos
• cumpliendo con las normas de
seguridad y de funcionamiento.
Observar las instrucciones de montaje.
Arreglar las averías de forma inmediata.
Los accesorios deberán utilizarse
solamente para las aplicaciones mencionadas. Cualquier otro uso se
considerará distinto a los fines previstos.
Немедленно устранять неполадки.
Арматура предназначена
исключительно для предписанных
областей применения. Всякое
другое использование считается
несоответствующим назначению.
F
E
 Loading...