

Honeywell FIre LIte ALarms D350PL Installation And Maintenance Instructions Manual
D350PL INTELLIGENT PHOTOELECTRONIC DUCT SMOKE DETECTOR
SAMPLING
TUBE
FILTERS
CONDUIT
HOLES
FOAM
GASKETS
DETECTOR
HOUSING
TERMINAL
STRIP
POWER
BOARD
COVER MOUNTING SCREWS
DETECTOR
COVER
DETECTOR
BOARD
PLASTIC
SAMPLING TUBE
SELF-TAPPING
SCREW
PLASTIC
SAMPLING
TUBE
WITH EXTENDED AIR SPEED RANGE
INSTALLATION AND MAINTENANCE INSTRUCTIONS
Before installing detectors, please thoroughly read the NEMA Guide for Proper Use of Smoke Detectors in Duct Applications, which provides detailed
information on detector spacing, placement, zoning, wiring, and special applications. Copies of this manual are available from NEMA (National Electrical
Manufacturers Association, 2101 L Street NW, Washington, DC 20037). NFPA Standards 72 and 90A should also be referenced for detailed information.
NOTICE: This manual shall be left with the owner/user of this equipment.
IMPORTANT: This detector must be tested and maintained regularly following NFPA 72 requirements. The detector should be cleaned at least once
a year.
GENERAL DESCRIPTION
An HVAC system supplies conditioned air to virtually every area of a building. Smoke introduced into this air duct system is distributed to the entire
building. Smoke detectors designed for use in air duct systems are used to sense the presence of smoke in the duct.
The D350PL air duct smoke detector is a photoelectric detector. This smoke detection method combines with an efficient housing design that samples
air passing through a duct and allows detection of a developing hazardous condition. When sufficient smoke is sensed, an alarm signal is initiated at
the fire control panel monitoring the detector, and appropriate action can be taken to shut off fans, blowers and change over air handling systems, etc.
This can prevent the distribution or it can isolate toxic smoke and fire gases throughout the areas served by the duct system.
I56-1975-004R
Two LEDs on each detector may illuminate, if programmed by the system control panel, to provide a local alarm indication. There is also a remote
alarm output for use with auxiliary devices. The D350PL has remote test capability with the RTS451/RTS451KEY Remote Test Station.
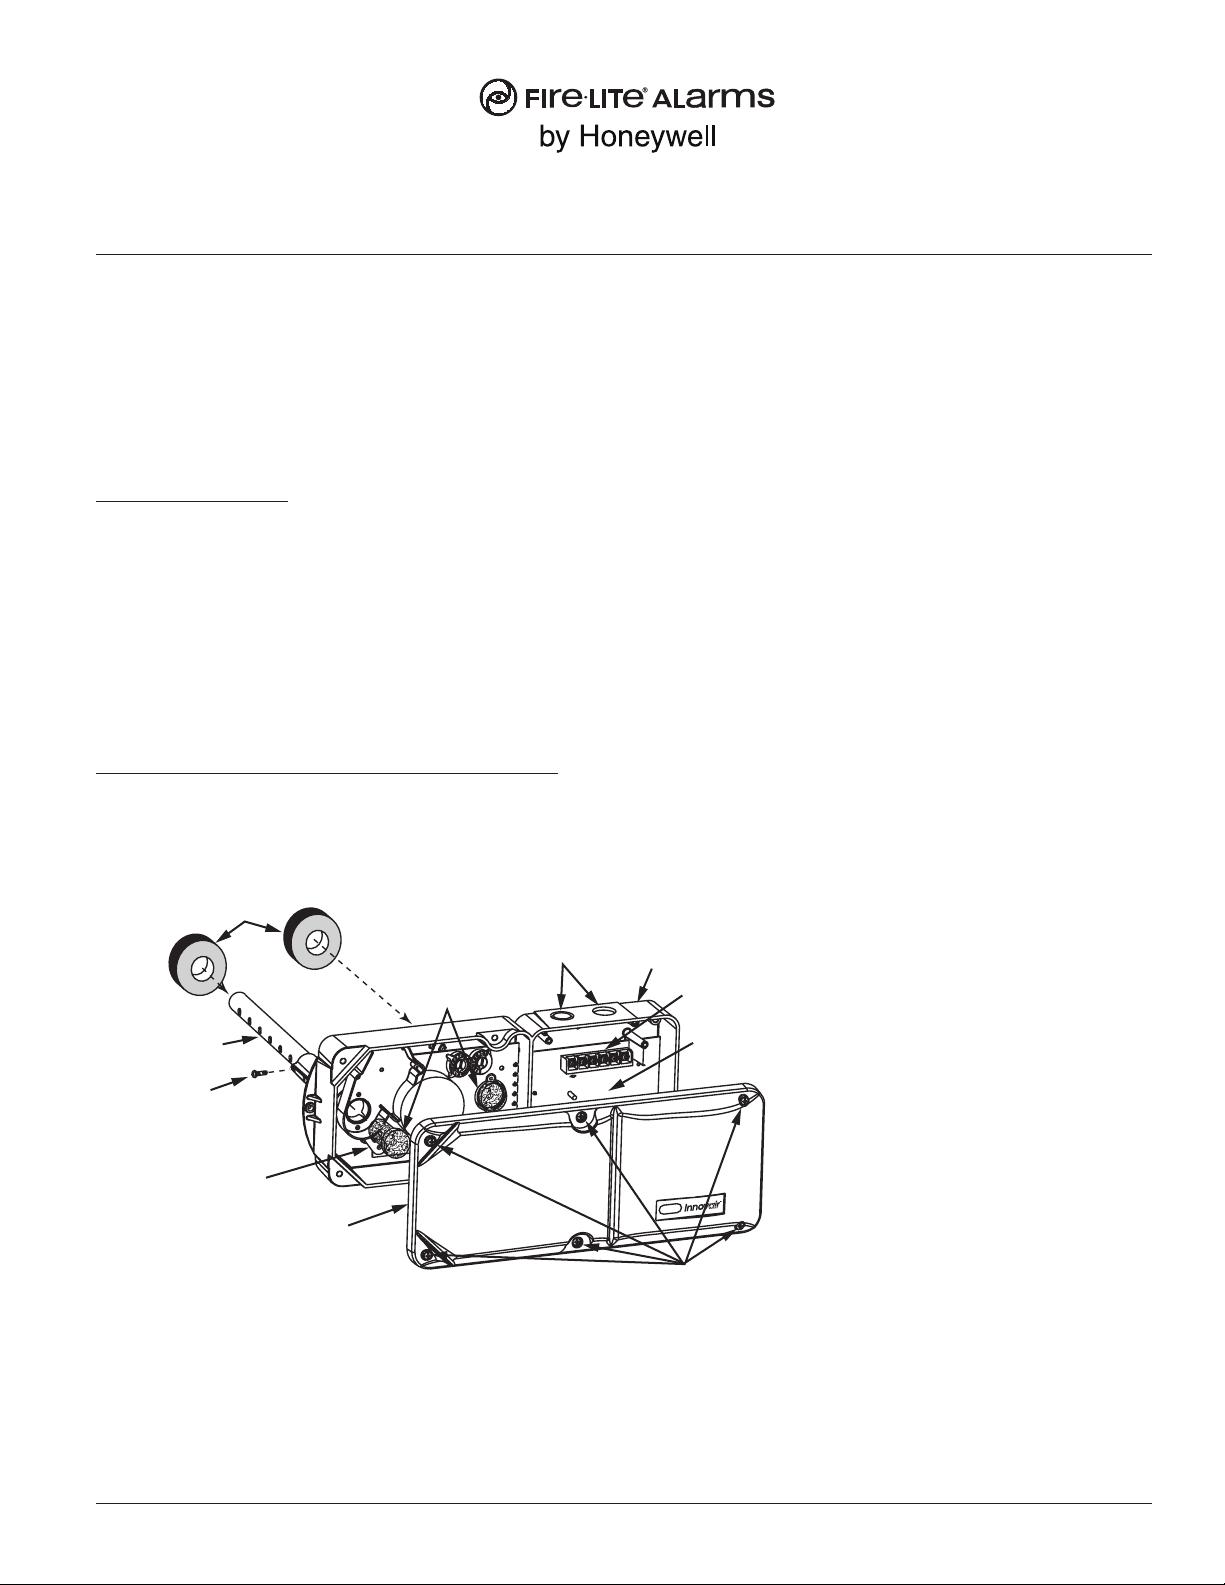
CONTENTS OF THE DUCT SMOKE DETECTOR HOUSING KIT
The D350PL Duct Smoke Detector consists of the following items: (See Figure 1.)
Figure 1: Exploded View Of Duct Smoke Detector Components
H0100-00
Contents Of The Duct
Smoke Detector
1. Complete duct smoke detector assembly with
sensor
2. Two #10 x 1
3. Two sampling tube filters
4. One test magnet
5. Drilling template
6. Two foam gaskets
7. Four #6-self tapping mounting screws for the
sampling tube and optional exhaust tube
extension
8. One sampling tube end cap
9. One plastic sampling tube
10. One #8 self-tapping screw for plastic sampling
tube
NOTE: A detector sensor board DOES
NOT need to be ordered separately.
1
⁄4″ sheet metal mounting screws
NOTE: For ducts over 11⁄2 (0.46m) feet, longer sampling tubes must be ordered to complete the installation. They must be the correct length for the
F300-27-00 1 I56-1975-004R
width of the duct where they will be installed. See Table 1 on page 3 to determine the sampling tube required for different duct widths.
Fire•Lite Alarms, Inc., One Fire-Lite Place, Northford, CT 06472, 203-484-7161
WARNING
WARNING
WARNING
WARNING
WARNING
LIMITATIONS OF DUCT DETECTORS
The National Fire Protection Association has established that DUCT DETECTORS MUST NOT BE USED AS A SUBSTITUTE FOR OPEN AREA
DETECTOR PROTECTION as a means of providing life safety. Nor are they a substitute for early warning in a building’s regular fire detection system.
It is strongly recommended that the user read NFPA Standards 90A, 72, and 101.
This device will not operate without electrical power. Fire situations may cause an interruption of power. The system safeguards should be discussed
with your local fire protection specialist.
This device will not sense smoke unless the ventilation system is operating.
In order to function properly, this detector must be installed according to the instructions. Do not exceed the electrical or ambient specifications or the
detector will not function properly. This detector must be protected from the elements.
INSTALLATION SEQUENCE
Step 1. Verify duct air flow direction and velocity .....................................................................................................................................................2
Step 2. Drill the mounting holes ...............................................................................................................................................................................2
Step 2.1 Install the sampling tube for ducts less than 11⁄2 feet (0.46m) wide .............................................................................................................2
Step 3. Secure the detector housing to the duct ......................................................................................................................................................3
Step 4. Install the sampling tube for ducts greater than 11⁄2 feet (0.46m) wide .......................................................................................................3
Step 4.1 Installation for ducts greater than 11⁄2 feet (0.46m) but less than 8 feet (2.4m) wide ................................................................................3
Step 4.2 Installation for ducts more than 8 feet (2.4m) wide ....................................................................................................................................4
Step 5. Install the filters ............................................................................................................................................................................................4
Step 6. Field wiring ...................................................................................................................................................................................................4
Step 7. Perform detector check ................................................................................................................................................................................5
Step 8. Install the cover ............................................................................................................................................................................................5
Step 9. Detector Maintenance and Test Procedures ................................................................................................................................................5
[1] Verify Duct Air Flow Direction And Velocity
The D350PL duct smoke detector is designed to be used in air handling systems having air velocities of 100 to 4000 feet per minute (0.5 to 20.32m/s).
Be sure to check engineering specifications to ensure that the air velocity in the duct falls within these parameters. If necessary, use a velocity meter
to check the air velocity in the duct.
[2] Drill The Mounting Holes
Remove the paper backing from the mounting template supplied. Affix the template to the duct at the desired mounting location. Make sure the template lies flat and smooth on the duct. Center punch holes A and B. Drill the holes as indicated on the template.
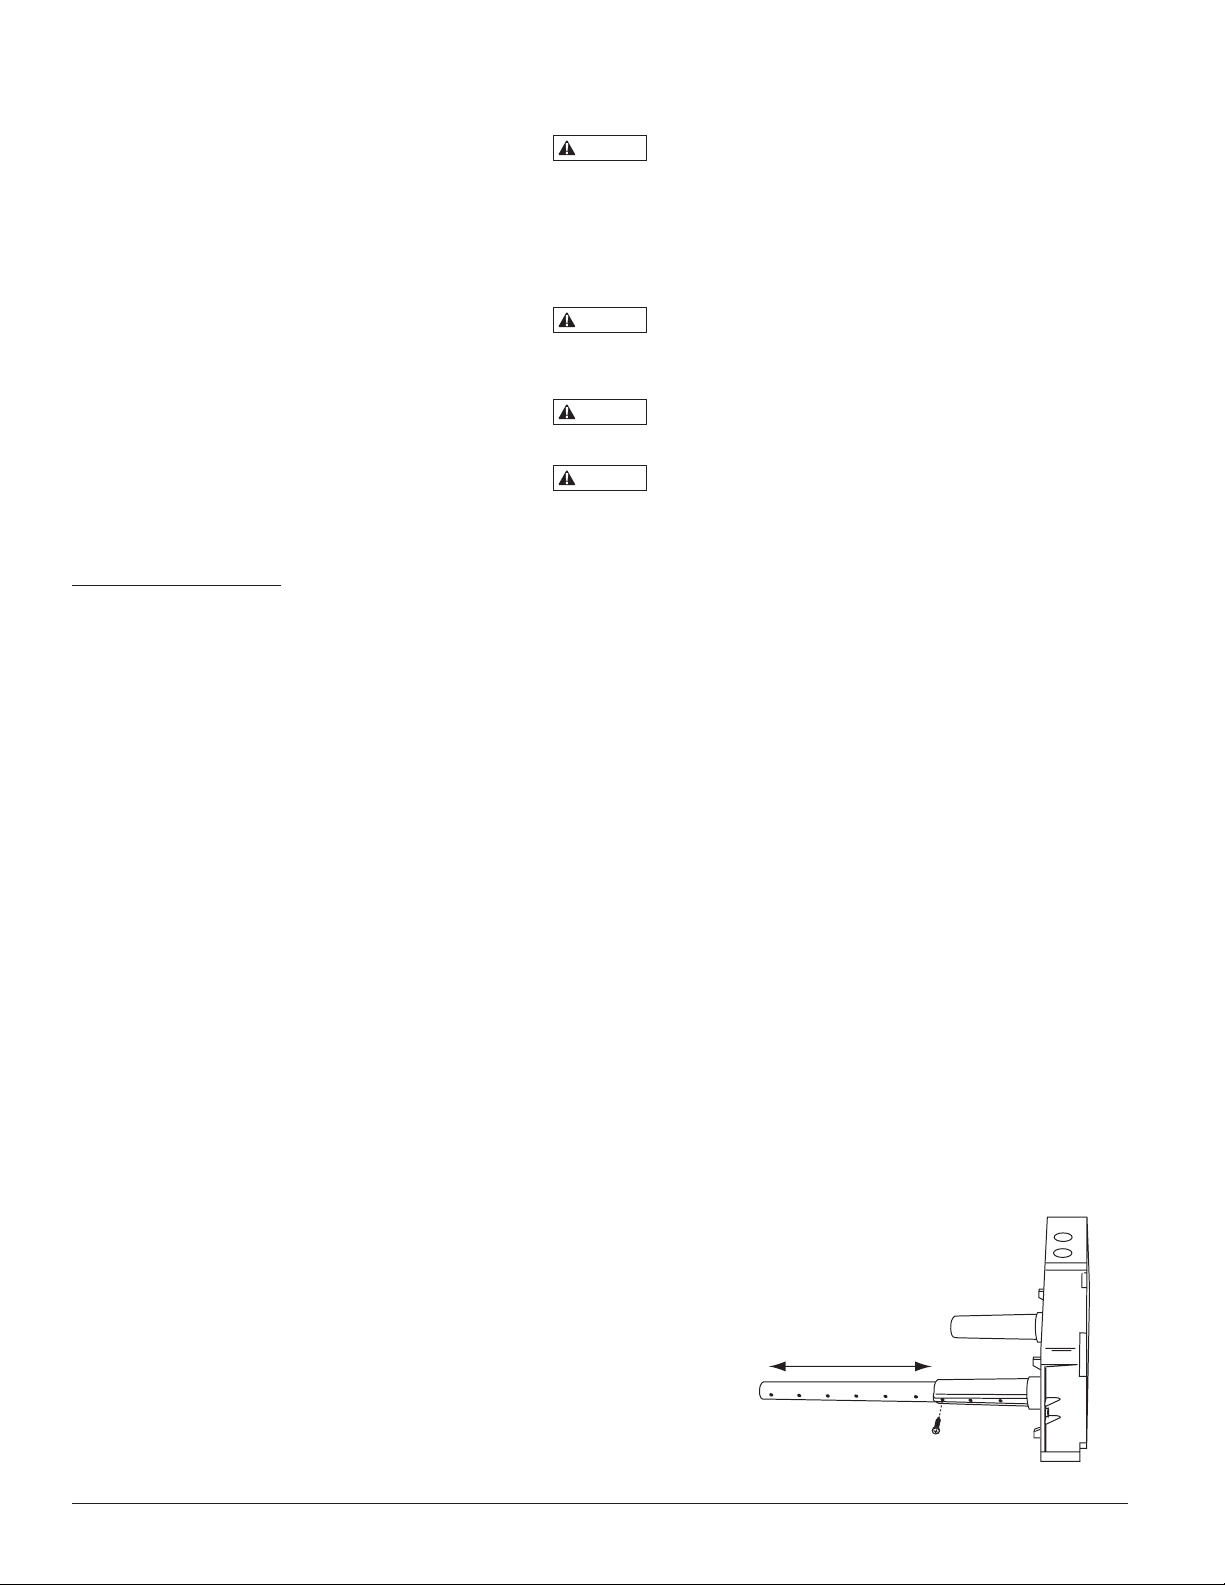
[2.1] Sampling Tube Installation for Ducts Less Than 11⁄2 Feet (0.46m) Wide (see Figure 2)
1. Remove the front cover.
2. Slide the plastic sampling tube into the housing bushing and extend it the full width of
the duct.
3. Align the holes in the bushing with the holes in the sampling tube. Secure with the #8
self-tapping screw into the bottom of the permanent tube.
1
NOTE: For ducts greater than 1
[4.2].
[3] Secure The Detector Housing To The Duct
Slide the foam gaskets over the tube bushings as shown in Figure 3. Use the two 11⁄4″ long
sheet metal screws to screw the detector housing to the duct.
CAUTION: Do not overtighten the screws.
F300-27-00 2 I56-1975-004R
⁄2 feet (0.46m) in width, refer to sections [4], [4.1] and
Figure 2. Plastic sampling tube
connected to duct smoke detector
H0110-00

[4] Sampling Tube Installation for Ducts Greater Than 11⁄2 Feet
SCREW HOLES FOR
AT TACHING HOUSING
TO DUCT WORK.
SAMPLING
TUBE
END CAP
AIR HOLES
ARROW
MUST FACE
INTO AIR FLOW
AIR FLOW DIRECTION
FLANGE
AIR FLOW
DIRECTION
DETECTOR
HOUSING
DOTS INDICATE POSITION OF SAMPLING TUBE HOLES
AIR FLOW
DIRECTION
DETECTOR
HOUSING
SAMPLING
TUBE
EXHAUST
TUBE
AIR FLOW
DIRECTION
EXHAUST
TUBE
SAMPLING
TUBE
SAMPLING
TUBE
EXHAUST
TUBE
DETECTOR
HOUSING
AIR FLOW
DIRECTION
DETECTOR
HOUSING
A.
B.
C.
D.
HORIZONTAL MOUNTING OF HOUSING
VERTICAL MOUNTING OF HOUSING
NOTE: ONLY METAL SAMPLING TUBES CAN BE INSTALLED IN ORIENTATIONS C AND D.
(0.46m) Wide
The sampling tube is identified by a series of air inlet holes on the tube.
A plastic tube is included for ducts up to 11⁄2 feet (0.46m) wide. All other
lengths must be purchased separately. Order the correct length, as
specified in Table 1, for width of the duct where it will be installed. It is
recommended that the sampling tube length extend at least 2⁄3 across the
duct width for optimal performance. The exhaust tube is molded onto the
base of the duct housing, and the A2440-00 Exhaust Tube Extension is
available as an accessory in those cases where the molded exhaust port
does not extend at least 2 inches into the duct.
The sampling tube is always installed with the air inlet holes facing into
the air flow. To assist proper installation, the tube’s mounting flange is
marked with an arrow. Make sure the sampling tube is mounted so that
the arrow points into the air flow (see Figure 4). Figure 5 shows the
various combinations of tube mounting configurations with respect to air
flow. Mounting the detector housing in a vertical orientation is acceptable,
provided that a metal sampling tube is used and the air flows directly into
the sampling tube holes as indicated in Figure 4.
Figure 3. Installation of foam gaskets over sampling
tube bushings:
H0107-00
Table 1. Sampling tubes recommended for different
duct widths:
Outside Duct Width Sampling Tube Recommended*
1 to 2 ft. (0.3 to 0.6 m) ST-1.5
2 to 4 ft. (0.6 to 1.2 m) ST-3
4 to 8 ft. (1.2 to 2.4 m) ST-5
8 to 12 ft. (2.4 to 3.7 m) ST-10
*Must extend a minimum of 2⁄3 the duct width.
[4.1] Installation For Ducts Greater Than 11⁄2 Feet (0.46m) But
Less Than 8 Feet (2.4m) Wide
1. If the tube is longer than the width of the air duct, drill a 3⁄4
in the duct opposite the hole already cut for the sampling tube. Make
sure the hole is 1″ to 2″ (25 to 50 mm) below the sampling hole on
the opposite side of the duct to allow moisture drainage away from the
detector. If the tube is shorter than the width of the air duct, install the
end cap into the sampling tube as shown in Figure 4. Sampling tubes
over 3 ft. (0.91m) long must be supported at the end opposite the duct
smoke detector.
2. Slide the tube into the housing bushing that meets the air flow first.
Position the tube so that the arrow points into the air flow, as shown
in Figure 4.
3. Secure the tube flange to the housing bushing with two #6 self-tapping
screws.
4. For tubes longer than the width of the air duct, the tube should extend
out of the opposite side of the duct. If there are more than 2 holes in the
section of the tube extending out of the duct, select a different length
using Table 1. Otherwise, trim the end of the tube protruding through
the duct so that 1″ to 2″ (25 to 50mm) of the tube extend outside the
duct. Plug this end with the end cap and tape closed any holes in the
protruding section of the tube. Be sure to seal the duct where the tube
protrudes.
NOTE: The sampling tube end cap is critical to the proper operation of
the duct smoke detectors. The end cap is needed to create the
proper air flow to the sensor of the duct smoke detector.
F300-27-00 3 I56-1975-004R
Figure 4. Air duct detector sampling tube:
″ (19mm) hole
H0108-02
Figure 5. Tube mounting configurations with varying
air flow direction:
NOTE: Only metal sampling tubes can be installed in
orientations C and D.
H0109-01
 Loading...