

Page 1
FF40/FF20
Einbauanleitung • Installation instruction • Notice de montage
Installatiehandleiding • Instrucciones de montaje
Anleitung zum späteren Gebrauch aufbewahren!
Keep instructions for later use!
Conserver la notice pour usage ultérieur!
Handleiding bewaren voor later gebruik!
Guardar estas Instrucciones para su uso futuro!
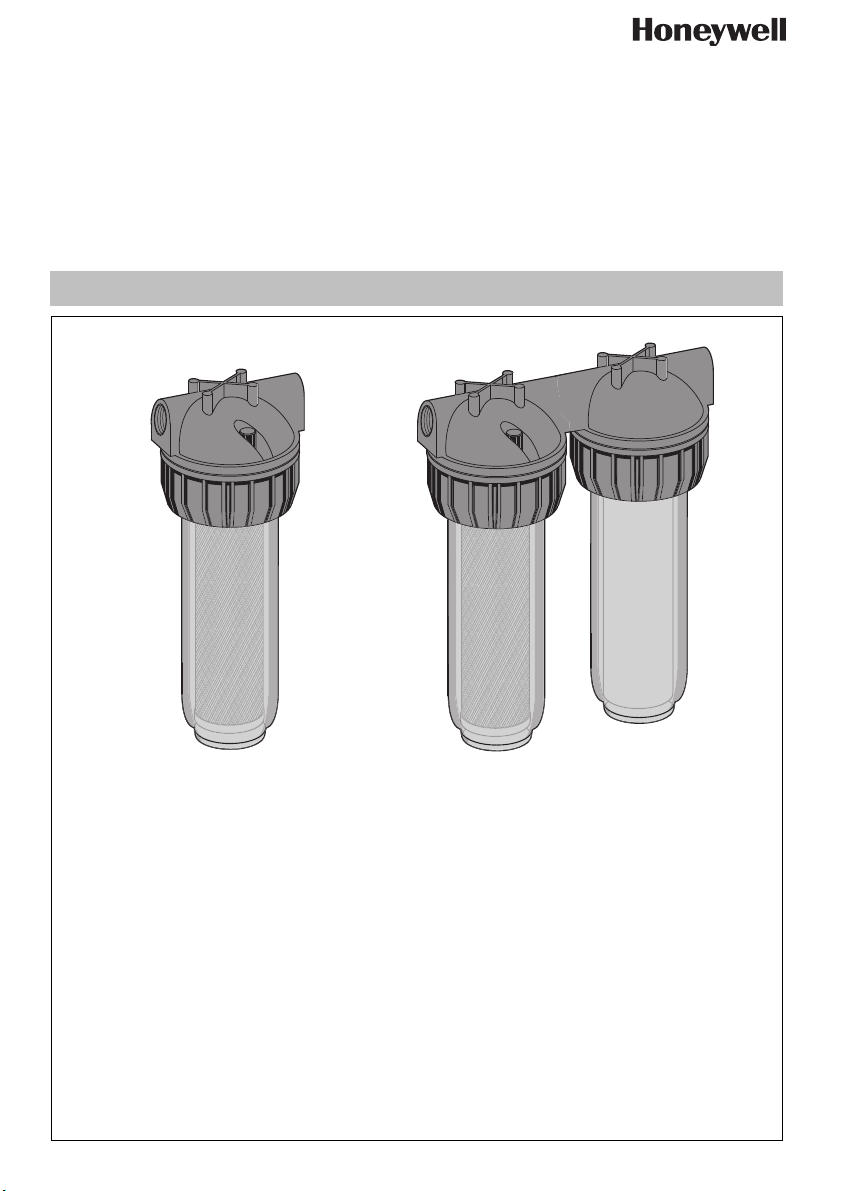
DUPLEX water filter with activated carbon cartridge,
DUPLEX filtro de agua con cartucho de carbón activado
EB-FF40/FF20 Rev. D
SIMPLEX filtro de agua, o filtro de carbón activado
DUPLEX Feinfilter mit Aktivkohlekartusche,
SIMPLEX Feinfilter oder Aktivkohlekartusche
SIMPLEX water filter or activated carbon filter
DUPLEX filtre fin avec cartouche à charbon actif,
SIMPLEX filtre fin ou cartouche à charbon actif
DUPLEX fijnfilter met actieve koolpatroon,
SIMPLEX fijnfilter of actieve koolpatroon
Page 2

D
1. Sicherheitshinweise ........................... 3
2. Funktionsbeschreibung ..................... 3
3. Verwendung ....................................... 3
4. Technische Daten .............................. 3
5. Lieferumfang ...................................... 3
6. Varianten ............................................ 3
7. Montage ............................................. 3
8. Instandhaltung ................................... 3
9. Entsorgung ........................................ 4
10. Störungen / Fehlersuche ................... 4
11. Ersatzteile .......................................... 4
12. Zubehör .............................................. 4
GB
1. Safety Guidelines ............................... 5
2. Functional description ....................... 5
3. Application ......................................... 5
4. Technical data ................................... 5
5. Scope of delivery ............................... 5
6. Options ............................................... 5
7. Assembly ............................................ 5
8. Maintenance ...................................... 6
9. Disposal ............................................. 6
10. Troubleshooting ................................. 6
11. Spare Parts ........................................ 6
12. Accessories ....................................... 6
F
1. Consignes de sécurité ....................... 7
2. Description fonctionnelle ..................7
3. Mise en oeuvre .................................. 7
4. Caractéristiques ................................ 7
5. Contenu de la livraison ...................... 7
6. Variantes ............................................ 7
7. Montage ............................................. 7
8. Maintenance ...................................... 7
9. Matériel en fin de vie .........................8
10. Défaut / recherche de panne ............8
11. Pièces de rechange ........................... 8
12. Accessoires ....................................... 8
NL
1. Veiligheidsvoorschriften .................... 9
2. Functiebeschrijving ........................... 9
3. Gebruik ............................................... 9
4. Technische gegevens ....................... 9
5. Leveringsomvang .............................. 9
6. Modellen ............................................ 9
7. Montage ............................................. 9
8. Onderhoud ....................................... 10
9. Afvoer ............................................... 10
10. Storing / Opzoeken en verhelpen
van fouten ........................................ 10
11. Reserveonderdelen ......................... 10
12. Accesoires ....................................... 10
ES
1. Indicaciones de seguridad .............. 11
2. Descripión de funcionamiento ........ 11
3. Rango de aplicación ........................ 11
4. Datos técnicos ................................. 11
5. Suministro ........................................ 11
6. Suministro ........................................ 11
7. Montaje ............................................ 11
8. Mantenimiento ................................. 11
9. Residuos .......................................... 12
10. Fallo / localización de anomalías .... 12
11. Recambios ....................................... 12
12. Accesorios ....................................... 12
MU1H-1142GE23 R0608 2 Honeywell GmbH
Page 3

D
1. Sicherheitshinweise
1. Beachten Sie die Einbauanleitung.
2. Benutzen Sie das Gerät
• bestimmungsgemäß
• in einwandfreiem Zustand
• sicherheits- und gefahrenbewusst.
3. Beachten Sie, dass das Gerät ausschließlich für
den in dieser Einbauanleitung genannten Verwendungsbereich bestimmt ist. Eine andere oder
darüber hinausgehende Benutzung gilt als nicht
bestimmungsgemäß.
4. Beachten Sie, dass alle Montage-, Inbetriebnahme,
Wartungs- und Justagearbeiten nur durch autorisierte Fachkräfte ausgeführt werden dürfen.
5. Lassen Sie Störungen, welche die Sicherheit beeinträchtigen können, sofort beseitigen.
6. Stellen Sie sicher, dass der Filter weder zu niedrigen noch zu hohen Temperaturen ausgesetzt
wird.
7. Beim Einbau sind die örtlichen Vorschriften, sowie
allgemeine Richtlinien und die Einbau-Anleitung zu
beachten.
2. Funktionsbeschreibung
Wasser fließt von außen nach innen durch das Filtergewebe und Schmutzpartikel werden hierbei an der
Außenfläche des Filters zurückgehalten. Aus Gründen
der Hygiene muss der Filtereinsatz spätestens nach
sechs Monaten gewechselt werden.
Die Aktivkohlekartusche filtert feine Partikel, verhindert
durch Chlor oder andere organische Stoffe verursachten störenden Geruch und Geschmack, entfernt
Pestizide, Insektizide und chlorinierte Lösungsmittel.
Durchschnittliche Lebensdauer von Aktivkohlekartuschen: ca. 6 Monate.
3. Verwendung
Medium Wasser
4. Technische Daten
Einbaulage Waagerecht, mit Filtertasse
nach unten
Betriebsdruck Maximal 6,0 bar
Betriebstemperatur Maximal 45 °C
Anschlussgröße
3
/4" Innengewinde,
1" mit 3/4"-1" Adapter
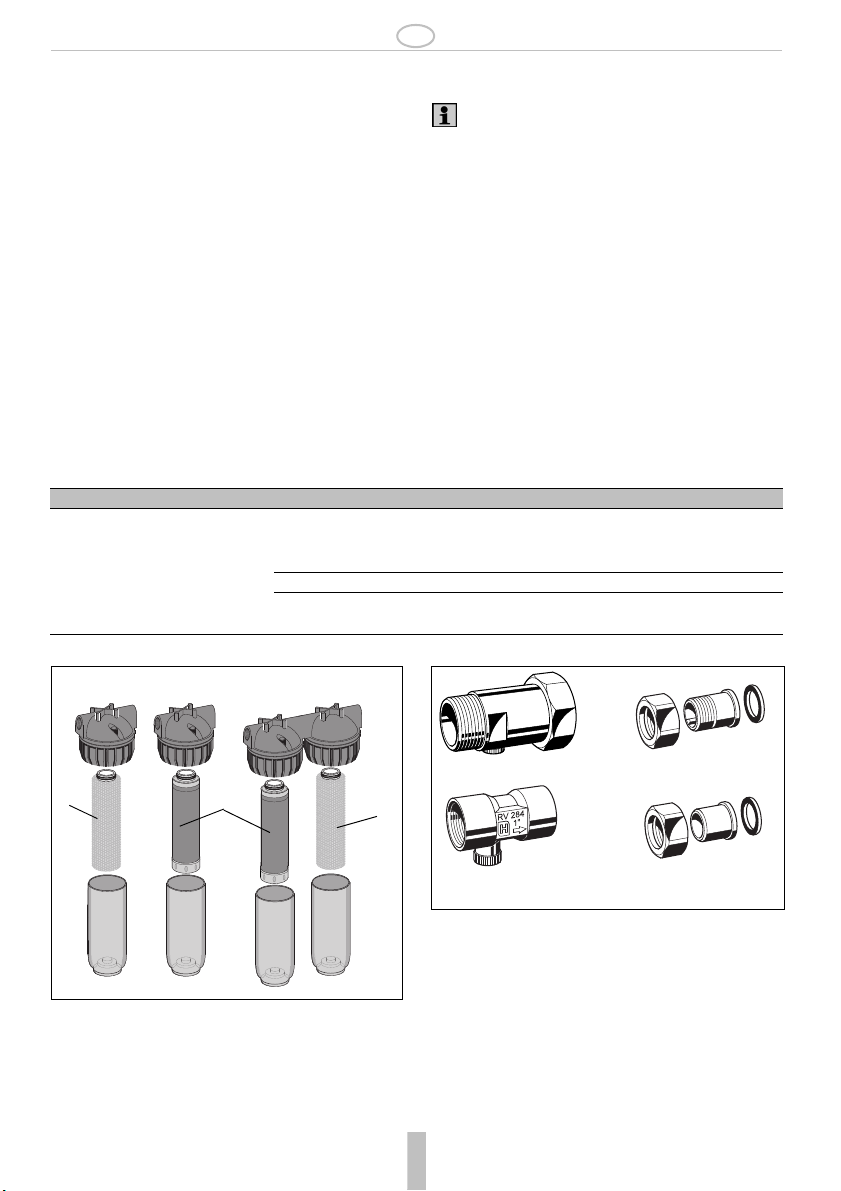
5. Lieferumfang
Die Filter bestehen aus:
• Doppel- oder Einfachgehäuse (Duplex oder
Simplex), Wandhalterung, Schrauben für Wandhalterung
• Durchsichtiger Filtertasse
• Feinfilter 25 µm
• Aktivkohleeinsatz
• ¾" Innengewinde
• ¾"-1" Adapter
• Ringschlüssel für Filtertasse
6. Varianten
FF40 Duplex-Wasserfilter Filterfeinheit 25µm in
Kombination mit Aktivkohlefilter
FF20-MF Simplex-Wasserfilter: Filterfeinheit 25µm
FF20-AC Simplex Aktivkohlefilter
7. Montage
7.1 Einbauhinweise
• Einbau in waagrechte Rohrleitung mit Filtertasse
nach unten
o In dieser Einbaulage ist eine optimale Funktion
gewährleistet
• Vor und nach dem Filter Absperrventile vorsehen
• Auf gute Zugänglichkeit achten
o Verschmutzungsgrad bei Klarsicht-Filtertasse gut
beobachtbar
o Vereinfacht Wartung und Inspektion
• Der Einbauort muss frostsicher sein
• Nicht an Orten mit starkem Lichteinfall einbauen
7.2 Montageanleitung
1. Rohrleitung gut durchspülen
2. Filter einbauen
• Durchflussrichtung beachten (Pfeilrichtung)
o spannungs- und biegemomentfrei einbauen
3. Gerät ist betriebsbereit
8. Instandhaltung
8.1 Inspektion
Überprüfen Sie regelmäßig alle 4 Monate den
Filtereinsatz.
o Bei starker Verschmutzung auswechseln!
Durchführung durch ein Installationsunternehmen.
MU1H-1142GE23 R0608 3 Honeywell GmbH
Page 4
D
8.2 Wartung
8.2.1 Filtertasse
1. Absperrarmatur ein- und ausgangsseitig schließen
2. Ausgangsseite druckentlasten
3. Filtertasse abschrauben
4. Filtereinsatz entnehmen
5. Filtereinsatz in neuen Filtertasse einsetzen
6. Filtertasse aufschrauben
7. Absperrarmatur eingangsseitig öffnen
8. Absperrarmatur ausgangsseitig langsam öffnen
8.2.2 Filtereinsatz
Wechseln Sie den Filtereinsatz spätensens alle
6 Monate aus.
1. Absperrarmatur ein- und ausgangsseitig schließen
2. Ausgangsseite druckentlasten
3. Filtertasse abschrauben
4. Filtereinsatz entnehmen
5. Neuen Filtereinsatz in Filtertasse einsetzen
6. Filtertasse aufschrauben
7. Absperrarmatur eingangsseitig öffnen
8. Absperrarmatur ausgangsseitig langsam öffnen
9. Entsorgung
• Kopf und Ringmutter: verstärktes Polypropylen
• Polypropylen-Feinfilter
• Filtertasse aus durchsichtigem Kunststoffmaterial
•ETP O-Ring
10. Störungen / Fehlersuche
Störung Ursache Behebung
Kein oder zu wenig Wasserdruck Absperrarmaturen vor oder hinter dem
Filter nicht ganz geöffnet
Filtereinsatz verschmutzt Filtereinsatz wechseln
Filter nicht in Durchflussrichtung
montiert
Absperrarmaturen ganz öffnen
Filter in Durchflussrichtung montieren
11. Ersatzteile 12. Zubehör
FF20
1
1 Wechselfiltereinsatz
25µm
2 Aktivkohlefilter-Wech-
seleinsatz
MU1H-1142GE23 R0608 4 Honeywell GmbH
2
FF40
Höhe Filtereinsatz 10"
Höhe Filtereinsatz 10"
1
FF20-DMF
FF20-GAC
RV277
RV284
RV277 Vorschalt-Rückflussverhinderer
Erhältlich in den Anschlussgrößen R
RV284 Rückflussverhinderer
Erhältlich in den Anschlussgrößen R
VST06 Anschluss-Set
Mit Gewindetülle oder Löttülle
A = Gewindetülle; B = Löttülle
VST06A
VST06B
3
/4" - 1"
3
/4" - 1"
Page 5

GB
1. Safety Guidelines
1. Follow the installation instructions.
2. Use the appliance
• according to its intended use
• in good condition
• with due regard to safety and risk of danger.
3. Note that the appliance is exclusively for use in the
applications detailed in these installation instructions. Any other use will not be considered to comply
with requirements and would invalidate the
warranty.
4. Please take note that any assembly, commissioning, servicing and adjustment work may only be
carried out by authorized persons.
5. Immediately rectify any malfunctions which may
influence safety.
• Make sure that the spring is released!
6. Make sure that the filter is neither exposed to to low
nor to high temperatures.
7. It is necessary during installation to observe codes
of good practice, to comply with local requirements
and to follow the installation instructions.
2. Functional description
Water flows through the filter mesh from outside to
inside and this traps dirt particles on the outer face of
the filter. For reasons of hygiene, the filter insert must
be replaced at no longer than six monthly intervals.
Activated Carbon cartridge filters out fine particles,
eliminates of unpleasant odours and flavours caused
by chlorine or other organic substances, removes of
pesticides, insecticides, chlorinate solvents.
Average life-span of activated carbon cartridges: about
6 months.
3. Application
Medium Water
4. Technical data
Installation position Horizontal with filter bowl down-
wards
Operating pressure Maximum 6.0 bar
Operating temperatureMaximum 45 °C
3
Connection size
/4" female,
3
1" with
/4"-1" adapter
5. Scope of delivery
The filters comprise:
• Duplex or Simplex housing, wall bracket, wall
bracket screws
• Clear filter bowl
• Fine filter 25 µm,
• Activated Carbon insert
• ¾" female thread
• ¾"-1" Adapter
• Ring wrench for filter bowl
6. Options
FF40 Duplex water filter: mesh size 25µm
combined with activated carbon
FF20-MF Simplex water filter: mesh size 25µm
FF20-AC Simplex activated carbon
7. Assembly
7.1 Installations Guidelines
• Install in horizontal pipework with filter bowl down-
wards
o This position ensures optimum filter efficiency
• Fit shutoff valves before and after the filter
• Ensure good access
o Degree of contamination can be seen with clear
filter bowl
o Simplifies maintenance and inspection
• The installation location should be protected against
frost
• Do not install in places where there is strong
sunlight
7.2 Assembly instructions
1. Thoroughly flush pipework
2. Install filter
• Note flow direction (indicated by arrow)
o Install without tension or bending stresses
3. The appliance is ready for use
MU1H-1142GE23 R0608 5 Honeywell GmbH
Page 6

GB
8. Maintenance
8.1 Inspection
Regular inspection of filter insert - approx. every
4 month.
o Replace if contamonation is high!
8.2 Maintenance
8.2.1 Filter bowl
1. Close shutoff valve on inlet and outlet.
2. Release pressure on outlet side
3. Unscrew filter bowl
4. Remove filter cartridge
5. Insert filter cartridge in new filter bowl
6. Screw filter bowl in place
7. Open shut-off valve on inlet
8. Slowly open shutoff valve on outlet
8.2.2 Filter insert
Replace filter insert at least every 6 month.
1. Close shutoff valve on inlet and outlet.
2. Release pressure on outlet side
3. Unscrew filter bowl
4. Remove filter cartridge
5. Insert new filter cartridge in filter bowl
6. Screw filter bowl in place
7. Open shut-off valve on inlet
8. Slowly open shutoff valve on outlet
9. Disposal
• Head and ring nut: reinforced polypropylene
• Polypropylene fine filter
• Clear synthetic material filter bowl
•ETP O-Ring
10. Troubleshooting
Problem Cause Remedy
Too little or no water pressure Shut-off valves up- or downstream are
not fully open
Filter cartridge is contaminated Replace filter cartridge
Filter is not fitted in flow direction Fit filter in flow direction
Open the shutoff valves fully
11. Spare Parts 12. Accessories
FF20
FF40
3
/4" - 1"
VST06A
VST06B
RV277
1
1 Replacement filter cart-
ridge 25µm
2 Replacement active
carbon cartridge
MU1H-1142GE23 R0608 6 Honeywell GmbH
2
Cartridge
Height 10"
Cartridge
Height 10"
1
FF20-DMF
FF20-GAC
RV284
RV277 Inlet check valve
Applicable sizes R
RV284 Check valve
Applicable sizes R3/4" - 1"
VST06 Connection set
Connection set
A = Threaded male connection;
B = Solder union connection
Page 7

F
1. Consignes de sécurité
1. Suivre les indications de la notice de montage.
2. En ce qui concerne l'utilisation de l'appareil
• Utiliser cet appareil conformément aux données du
constructeur
• Maintenir l'appareil en parfait état
• Respectez les consignes de sécurité
3. Il faut noter que cet équipement ne peut être mis en
oeuvre que pour les conditions d'utilisation mentionnées dans cette notice. Toute autre utilisation, ou
le non respect des conditions normales d'utilisation,
serait considérée comme non conforme.
4. Observer que tous les travaux de montage, de mise
en service, d'entretien et de réglage ne pourront
être effectués que par des spécialistes autorisés.
5. Prendre des mesures immédiates en cas d'anomalies mettant en cause la sécurité.
6. Assurez-vous que le filtre ne soit pas exposé à de
trop hautes ou de trop basses températures.
7. Lors du montage il faudra observer la réglementation locale ainsi que les directives générales et les
instructions de montage.
2. Description fonctionnelle
L’eau coule entre la maille filtrante de l’extérieur vers
l’intérieur. Les particules de saleté sont collectées sur
la face extérieure du filtre. Pour des raisons d’hygiène
, remplacez la cartouche filtrante à des intervalles
n’excédant pas six mois.
La cartouche de charbon actif filtre les particules fines,
élimine les odeurs désagréables émanant du chlore ou
d'autres substances organiques, retire les pesticides,
les insecticides et les solvants chlorés.
Durée de vie des cartouches de charbon actif : environ
6 mois.
3. Mise en oeuvre
Fluide Eau
4. Caractéristiques
Position de montage Horizontale, avec le bocal du
filtre vers le bas
Pression de service Maximum 6,0 bar
Température de
fonctionnement
Dimensions de
raccordement
Maximum 45 °C
3
/4" femelle, 1" avec adaptateur
3
/4"-1"
5. Contenu de la livraison
Les filtres sont composés de :
• boîtier Duplex ou Simplex, support mural, vis de
support mural
• bocal du filtre transparent
• filtre fin 25 µm,
• insert de charbon actif
• filetage femelle ¾"
• adaptateur ¾"-1"
• clé à cliquet pour le démontage de la cuve de filtre
6. Variantes
FF40 Filtre à eau Duplex : de taille de maille
25µm, combiné avec un filtre à charbon
actif
FF20-MF Filtre à eau Simplex : taille de maille 25µm
FF20-AC Filtre à carbone actif
7. Montage
7.1 Dispositions à prendre
• Installer dans la tuyauterie horizontale avec le bocal
du filtre vers le bas
o Cette position assure une efficacité de filtrage
optimale
• Installer des vannes d'isolement avant et après le
filtre
• Veiller à un accès facile
o Le degré de contamination est visible sur la cuve
de filtre transparente.
o Simplifie la maintenance et l'inspection
• Le lieu de montage doit être à l'abri du gel.
• Ne pas monter aux endroits fortement exposés à la
lumière.
7.2 Instructions de montage
1. Bien rincer la conduite
2. Installer le filtre
• Veillez à la direction de l'écoulement (direction de la
flèche)
o Vérifier l'absence de contraintes anormales en
traction et en flexion
3. L'appareil est opérationnel.
MU1H-1142GE23 R0608 7 Honeywell GmbH
Page 8

F
8. Maintenance
8.1 Inspection
Contrôlez régulièrement tous les 4 mois la
cartouche filtrante.
o Remplacez la si elle est trop encrassée!
8.2 Maintenance
8.2.1 Bac du filtre
1. Fermer la vanne d'isolement côté entrée et sortie.
2. Laissez échapper la pression du côté de la sortie
3. Dévissez le récipient du filtre
4. Retirez l'insertion du filtre
5. Placez l'insertion du filtre dans le nouveau récipient
6. Dévissez le récipient du filtre
7. Ouvrez la robinetterie de fermeture du côté de
l'entrée
8. Ouvrir lentement la vanne d'isolement côté sortie
8.2.2 Insertion du filtre
Changer la cartouche filtrante au bas mot 6
mois.
1. Fermer la vanne d'isolement côté entrée et sortie.
2. Laissez échapper la pression du côté de la sortie
3. Dévissez le récipient du filtre
4. Retirez l'insertion du filtre
5. Placez la nouvelle insertion du filtre dans le récipient
6. Dévissez le récipient du filtre
7. Ouvrez la robinetterie de fermeture du côté de
l'entrée
8. Ouvrir lentement la vanne d'isolement côté sortie
9. Matériel en fin de vie
• Ecrou à tête et écrou à anneau : polypropylène
renforcé
• Filtre fin en polypropylène
• Cuve de filtre transparent en matière sythétique
• Joint torique ETP
10. Défaut / recherche de panne
Panne Cause Remède
Pression d'eau insuffisante
ou nulle
Les robinets d’isolation en amont ou en aval
du filtre ne sont pas entièrement ouverts
Cartouche filtrante sale Changer la cartouche filtrante
Le filtre n’est pas monté dans le sens d’écou-
lement
Ouvrir complètement les vannes
d'isolement
Monter le filtre dans le sens d’écoulement
11. Pièces de rechange 12. Accessoires
FF20
1
1 Remplacement de la
cartouche de filtre 25µm
2 Remplacement de la
cartouche de carbone actif
MU1H-1142GE23 R0608 8 Honeywell GmbH
2
FF40
Poids de
cartouche 10"
Poids de
cartouche 10"
1
FF20-DMF
FF20-GAC
RV277
RV284
RV277 Clapet antiretour amont
Tailles applicables R
RV284 Soupape de retenue
Tailles applicables R
VST06 Jeu de raccordement
Jeu de raccordement A = Raccord fileté
male ; B = Raccord de soudure
3
/4" - 1"
3
/4" - 1"
VST06A
VST06B
Page 9

NL
1. Veiligheidsvoorschriften
1. Lees de installatiehandleiding goed door.
2. Gebruik het apparaat
• waarvoor het is bestemd
• in goede toestand
• met aandacht voor de veiligheid en mogelijke
gevaren
3. Let op dat het apparaat uitsluitend bestemd is voor
het toepassingsgebied dat in de installatiehandleiding wordt aangegeven. Elk ander gebruik geldt als
niet in overeenstemming met het doel waarvoor het
is bestemd, waardoor de garantie vervalt.
4. Houd er rekening mee dat alle montage-, ingebruikname-, onderhouds- en aanpassingswerkzaamheden alleen mogen worden uitgevoerd door
gekwalificeerde vakmensen.
5. Laat storingen die de veiligheid kunnen aantasten
direct verhelpen.
6. Voorkom dat de filter wordt blootgesteld aan te lage
of te hoge temperaturen.
7. Tijdens de montage dient men de plaatselijke voorschriften alsmede de algemene richtlijnen en het
installatievoorschrift in acht te nemen.
2. Functiebeschrijving
Water vloeit van buiten naar binnen door de filterzeef.
Vuildeeltjes blijven in het buitenste gedeelte van de
filterzeef steken. Om hygiënische redenen dient het
filterelement om de 6 maanden te worden vervangen.
Aktief koolstofpatronen filteren kleinen onderdeeltjes,
elimineren onprettige geuren en smaken, veroorzaakt
door chloor of andere organische stoffen, en verwijderen pesticiden, insecticiden en gechloreerde oplosmiddelen.
Gemiddelde levensduur van koolfilterpatronen: ca. 6
maanden.
3. Gebruik
Medium Water
5. Leveringsomvang
De filters bestaan uit:
• Duplex of Simplex behuizing, muurbevestiging,
schroeven
• Transparante zeefhouder
• Fijnfilter 25 µm
• Aktief koolfilterelement
• ¾" binnendraad
• ¾"-1" Adapter
• Ringsleutel voor zeefhouder
6. Modellen
FF40 Duplex waterfilter: maaswijdte 25µm in
combinatie met aktief koolfilterelement
FF20-MF Simplex waterfilter: maaswijdte 25µm
FF20-AC Simplex aktief koolfilter
7. Montage
7.1 Montage-instructies
• Te installeren in horizontale leiding met de zeef-
houder naar beneden gericht
o In deze positie is de werking van de filter optimaal
• Monteer afsluitkranen voor en na de filter
• Zorg voor een goede toegankelijkheid
o Dankzij de transparante zeefhouder kan de mate
van verontreiniging worden vastgesteld
o Vergemakkelijkt onderhoud en inspectie
• De montageplek moet vorstvrij zijn
• Niet inbouwen op plaatsen met sterke lichtinval
7.2 Montagehandleiding
1. Buisleiding goed doorspoelen.
2. Filter installeren
• Let op de stroomrichting (deze wordt aangegeven
door de pijl)
o Spannings- en buigmomentvrij installeren
3. Het toestel is klaar voor gebruik
4. Technische gegevens
Inbouwpositie Horizontaal met zeefhouder
naar beneden
Bedrijfsdruk Maximum 6.0 bar
Bedrijfstemperatuur Maximum 45 °C
3
Aansluitmaat
MU1H-1142GE23 R0608 9 Honeywell GmbH
/4" binnendraad,
1" met 3/4"-1" adapter
Page 10

NL
8. Onderhoud
8.1 Inspectie
Controleer het filterelement elke 4 maanden.
o Vervang het filterelement als het sterk
verontreinigd is!
8.2 Onderhoud
8.2.1 Zeefhouder
1. Afsluiter aan de in- en uitgang sluiten
2. Ontlast de druk aan de uitgang
3. Zeefhouder losdraaien
4. Filterelement verwijderen
5. Filterelement in nieuwe zeefhouder plaatsen
6. Zeefhouder vastdraaien
7. Afsluiter aan de ingang openen
8. Afsluiter aan de uitgang traag openen
8.2.2 Filterelement
Vervang het filterelement om de 6 maanden.
1. Afsluiter aan de in- en uitgang sluiten
2. Ontlast de druk aan de uitgang
3. Zeefhouder losdraaien
4. Filterelement verwijderen
5. Nieuw filterelement in zeefhouder plaatsen
6. Zeefhouder vastdraaien
7. Afsluiter ingangskant openen
8. Afsluiter aan de uitgang traag openen
9. Afvoer
• Aansluitingen: versterkt polypropyleen
• Polypropyleen fijnfilter
• Zeefhouder van transparant kunststof
• ETP O-ring
10. Storing / Opzoeken en verhelpen van fouten
Storing Oorzaak Oplossing
Geen of te weinig waterdruk Afsluiters voor of na de filter zijn niet
helemaal open
Filterelement is te vuil Filterelement vervangen
Filter staat niet in de juiste stroomrich-
ting
Afsluitkleppen volledig openen
Filter in stroomrichting plaatsen
11. Reserveonderdelen 12. Accesoires
FF20
1
1 Nieuw filterpatroon
25µm
2 Nieuw aktief koolfilter-
patroon
MU1H-1142GE23 R0608 10 Honeywell GmbH
2
FF40
Hoogte
patroon 10"
Hoogte
patroon 10"
1
FF20-DMF
FF20-GAC
RV277
RV284
RV277 Ingangskeerklep
3
Maten R
RV284 Terugslagklep
Maten R
VST06 Aansluitset
Aansluitset
A = buitendraadaansluiting;
B = soldeeraansluiting
/4" - 1"
3
/4" - 1"
VST06A
VST06B
Page 11

ES
1. Indicaciones de seguridad
1. Siga las instrucciones de montaje.
2. Utilice el aparato
• conforme a lo previsto
• en estado correcto
• teniendo en cuenta los riesgos y la seguridad.
3. Tenga en cuenta que la válvula ha sido diseñada
exclusivamente para las aplicaciones indicadas en
estas instrucciones de montaje. Una utilización
distinta no se considerará conforme a lo previsto.
4. Tenga en cuenta que los trabajos de montaje, de
puesta en funcionamiento, de mantenimiento y de
ajuste sólo deben efectuarlos técnicos especialistas
autorizados.
5. Solucione de inmediato los fallos que puedan
afectar a la seguridad.
6. Asegure que el filtro no quede expuesto a tempera-
turas demasiado bajas o demasiado altas.
7. Durante el montaje respetar las normas locales, las
directivas generales y las instrucciones de instalación.
2. Descripión de funcionamiento
El agua pasa el tejido del filtro de fuera para dentro,
quedando las partículas de suciedad retenidas en la
superficie exterior del filtro. Por razones de higiene el
filtro debe ser sustituido, al más tardar, después de 6
meses.
El cartucho de carbón activo filtra partículas finas,
impide malos olores y sabores provocados por cloro u
otras sustancias orgánicas, elimina pesticidas, insecticidas y solventes clorinados.
Tiempo de vida medio de los cartuchos de carbón
activo: Aprox. 6 meses.
3. Rango de aplicación
Medio Agua
4. Datos técnicos
Posición de montaje Horizontal, con vaso de filtro
hacia abajo
Presión de servicio Máximo 6,0 bar
Temperatura de
trabajo
Tamaño de la cone-
xión
Máximo 45 °C
3
/4" rosca interior, 1" con
3
adaptador
/4"-1"
5. Suministro
Los filtros son compuestos por:0608
• Carcasa doble os simple, soporte de pared, tornillos
para el soporte de pared
• Vaso de filtro transparente
• Filtro fino 25 µm
• Cartucho de carbón activo
• ¾" rosca interior
• Adaptador ¾"-1"
• Llave de estrella para vaso de filtro
6. Suministro
FF40 Filtro de agua Dúplex, precisión de filtrado
25µm en conjunto con filtro de carbón
activo
FF20-MF Filtro de agua Símplex: Precisión de
filtrado 25µm
FF20-AC Filtro de carbón activo Símplex
7. Montaje
7.1 Notas para el montaje
• Montaje en tubería horizontal con vaso de filtro
hacia abajo
o En esta posición de montaje se garantiza un
funcionamiento óptimo
• Prever antes y después del filtro válvulas de corte
• Observe que la accesibilidad sea buena
o El grado de suciedad se deja observar bien en el
vaso de filtro transparente
o Simplificación de mantenimiento e inspección
• El local de montaje debe estar protegido contra
heladas
• No montar en locales con fuerte exposición a la luz
7.2 Instrucciones de montaje
1. Limpiar de impurezas la tubería.
2. Montar el filtro
• Observar el sentido de flujo (ver flecha)
o Instalar libre de tensiones y flexiones
3. El aparato está listo para ser usado
8. Mantenimiento
8.1 Inspección
Inspecciones regularmente, cada 4 meses, el
filtro.
o ¡Sustituir el filtro cuando está muy sucio!
Lo deberá realizar una empresa instaladora.
MU1H-1142GE23 R0608 11 Honeywell GmbH
Page 12
ES
8.2 Mantenimiento
8.2.1 Vaso de filtro
1. Cerrar la válvula de corte lado entrada.
2. Despresurizar el lado de la salida
3. Desmontar el vaso de filtro
4. Retirar el filtro
5. Insertar el filtro nuevo en el vaso de filtro
6. Montar el vaso de filtro
7. Abrir la válvula de corte lado de entrada
8. Abrir lentamente la válvula de corte lado salida.
8.2.2 Filtro
Sustituya el filtro insertable como máximo cada
6 meses.
1. Cerrar la válvula de corte lado entrada.
2. Despresurizar el lado de la salida
3. Desmontar el vaso de filtro
4. Retirar el filtro
5. Insertar el filtro nuevo en el vaso de filtro
6. Montar el vaso de filtro
7. Abrir la válvula de corte lado de entrada
8. Abrir lentamente la válvula de corte lado salida.
9. Residuos
• Cabeza y tuerca de ojo: Polipropileno reforzado
• Filtro fino de polipropileno
• Vaso de filtro de material plástico transparente
• Junta tórica ETP
10. Fallo / localización de anomalías
Fallo Causa Solución
No hay presión en el agua o la
presión es muy poca
Las válvulas de corte antes o después
del filtro fino no están totalmente
abiertas
Filtro sucio Sustituir el filtro
Filtro no está montado en sentido de
flujo
Abrir las válvulas de corte por completo
Montar el filtro en sentido de flujo
11. Recambios 12. Accesorios
FF20
FF40
RV277
1
1 Filtro insertable 25µm Altura del filtro
2 Filtro insertable de
carbón activo
MU1H-1142GE23 R0608 12 Honeywell GmbH
2
insertable 10"
Altura del filtro
insertable 10"
1
FF20-DMF
FF20-GAC
RV284
RV277 Adaptador antirretorno de entrada
Disponible en los tamaños R
RV284 Adaptador antirretorno
Disponible en los tamaños R
VST06 Conjunto de conexión
Con acoplamiento hembra de rosca o para
soldar A = acoplamiento de rosca; B = acoplamiento para soldar
VST06A
VST06B
3
/4" - 1"
3
/4" - 1"
Page 13

ES
Honeywell GmbH 13 MU1H-1142GE23 R0608
Page 14

ES
MU1H-1142GE23 R0608 14 Honeywell GmbH
Page 15

ES
Honeywell GmbH 15 MU1H-1142GE23 R0608
Page 16

Automation and Control Solutions
Honeywell GmbH
Hardhofweg
D-74821 Mosbach
Phone: (49) 6261 810
Fax: (49) 6261 81309
http://europe.hbc.honeywell.com
www.honeywell.com
Manufactured for and on behalf of the
Environmental and Combustion Controls Division of
Honeywell Technologies Sàrl, Ecublens, Route du
Bois 37, Switzerland by its Authorised Representative
Honeywell GmbH
MU1H-1142GE23 R0608
Subject to change
© 2008 Honeywell GmbH
 Loading...