

Page 1
Fendall 2000
1. Inspect label and review Expiration Date to determine if cartidge is current and ready for use. (See Fendall 2000
Installation and Operation Manual Section C for detailed instructions.)
2. Install Sterile Cartridge by holding the side handles, making sure the nozzle and tube are facing downward and the
front label is facing out.
CAUTION: CARTRIDGE WEIGHS APPROX. 60 LBS (27 KG). Two people lifting cartridge is strongly recommended for
installation.
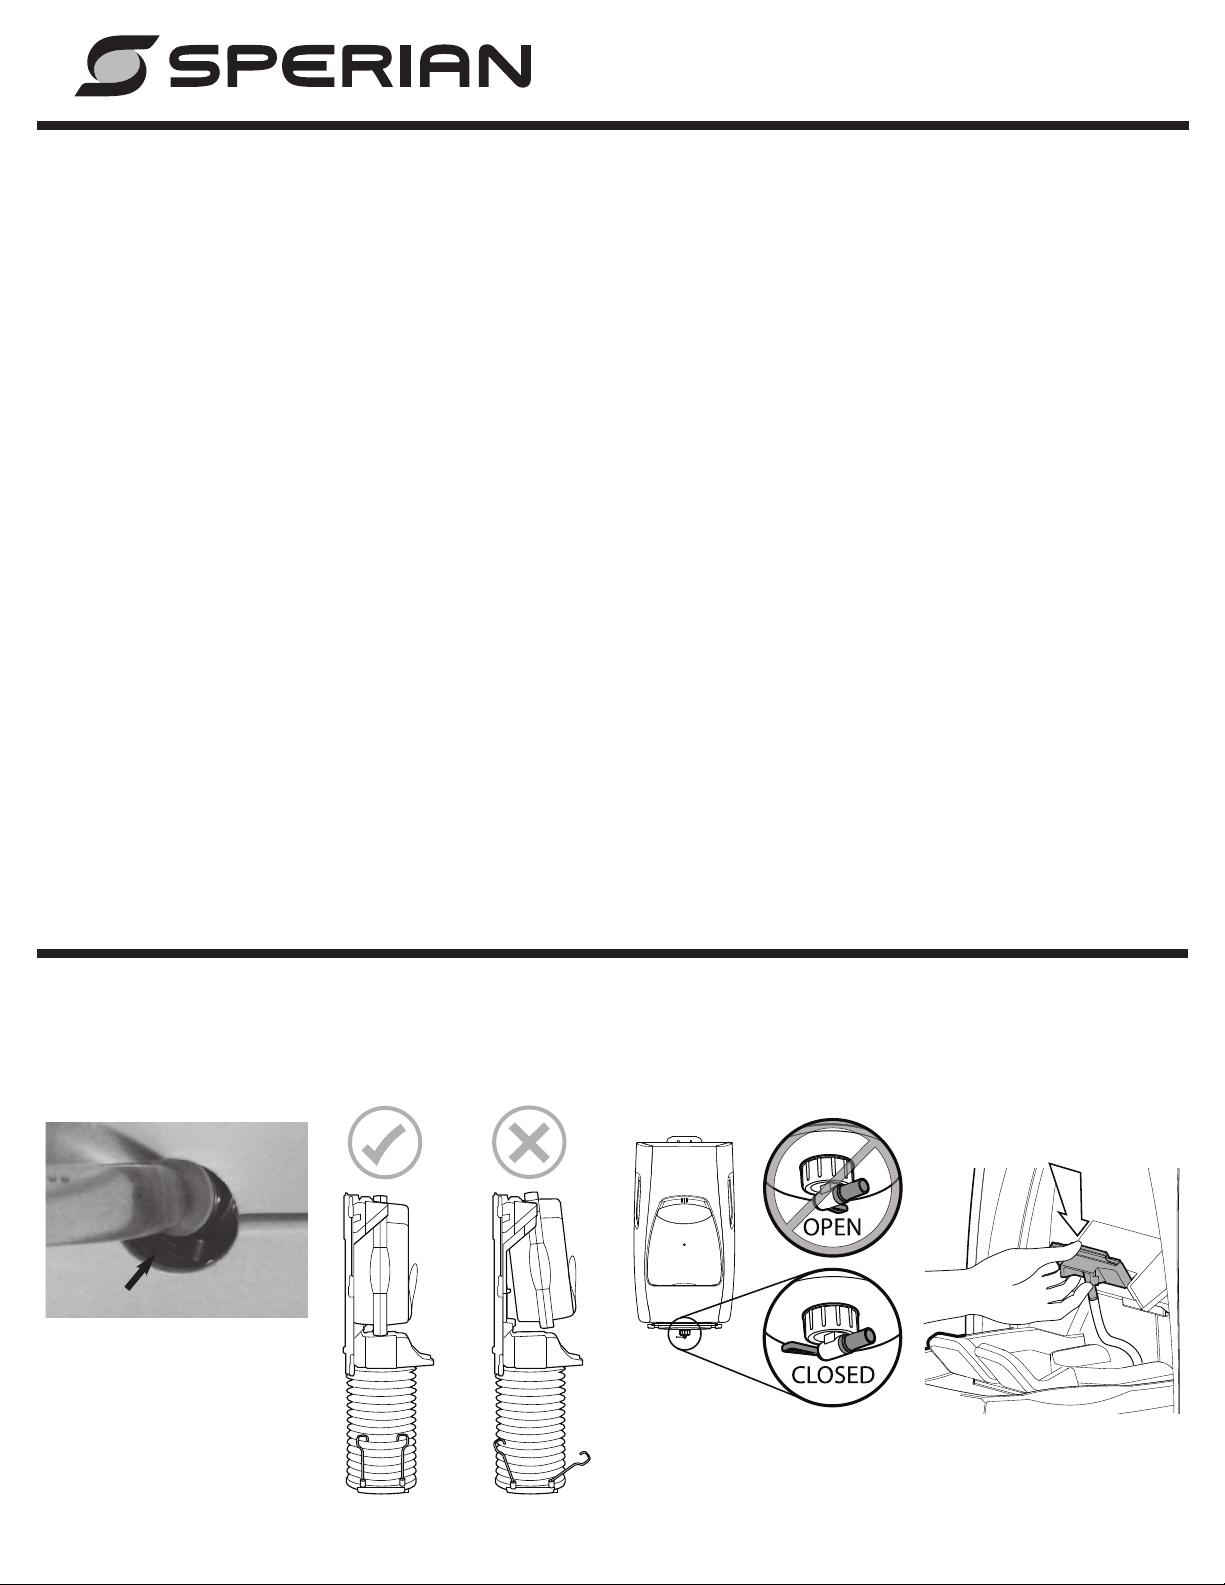
3. Release the four straps by cutting the zip-ties. Ensure that the nozzle and tubing is fully extended from the cartridge.
Fig. 1
4. Hang cartridge on brackets and push cartridge all the way back. Fig. 2
5. Remove the blue poly-bag protecting the nozzle (let the nozzle hang in the basin below).
6. Compress the waste reservoir by pushing it upward. Slide all four straps (two front & two rear) into the hooks,
making sure the straps are not twisted. Visually inspect all four corners of the Bottom Plate, making sure they are
equal in height.
WARNING: If waste reservoir is not properly compressed or if the straps are not installed into the hooks, the unit will
not function properly on activation. Make sure the area underneath the Eyewash Station is kept clear.
7. Make sure the drain spout is closed. Fig. 3
8. Place the front panel back on the unit and close side panels.
9. In event of alarm activating before station is armed, see ALARM SHUT-OFF PROCEDURE (Below).
10. Open the door and pull the head rest towards you.
11. Pull out the nozzle from the basin. Slide the nozzle into the nozzle compartment, making sure the tube is not twisted
and that the small locking hub of the wire tie is facing towards the inside of the unit. Fig. 4
12. Push the headrest back to its original position until an audible ‘click’ is heard. Close the door by pressing the center
of the door and a ‘click’ will be heard confirming the nozzle is engaged.
13. Unit is now armed and ready for use.
14. In 3 days come back to the unit to check for leaks or salt residue by the nozzle and at the base of the unit to ensure
proper installment.
Cartridge Quick Installation
™
Alarm Shut-off Procedure
1. Locate small blue button inside door of station.
2. Press and hold button for approximately 3-5 seconds or until alarm shuts-off.
3. If still setting up station, complete Section C.
4. To rearm alarm, close station door. ALARM IS NOW ARMED.
Black Zip-tie
Fig. 1
Fig. 3
Fig. 2
Sperian Eye & Face Protection, Inc. • 825 East Highway 151 • Platteville, WI 53818 USA • 1-800-336-3255
Part # 32-005631 Rev. C
Fig. 4
Page 2
Cartucho Fendall 2000™ - Instalación Rápida
1. Inspeccione la etiqueta y observe la fecha de vencimiento para determinar si el cartucho aún está utilizable y listo
para usarse. (Las instrucciones detalladas aparecen en la sección C del Manual de Instalación y Utilización – Fendall
2000.)
2. Instale el cartucho estéril; para ello, sujete las asas laterales asegurándose de que la boquilla y el tubo estén hacia
abajo y de que la etiqueta frontal quede hacia afuera.
PRECAUCIÓN: EL CARTUCHO PESA APROX. 27 KG (60 LB). Para la instalación se recomienda que dos personas
levanten el cartucho.
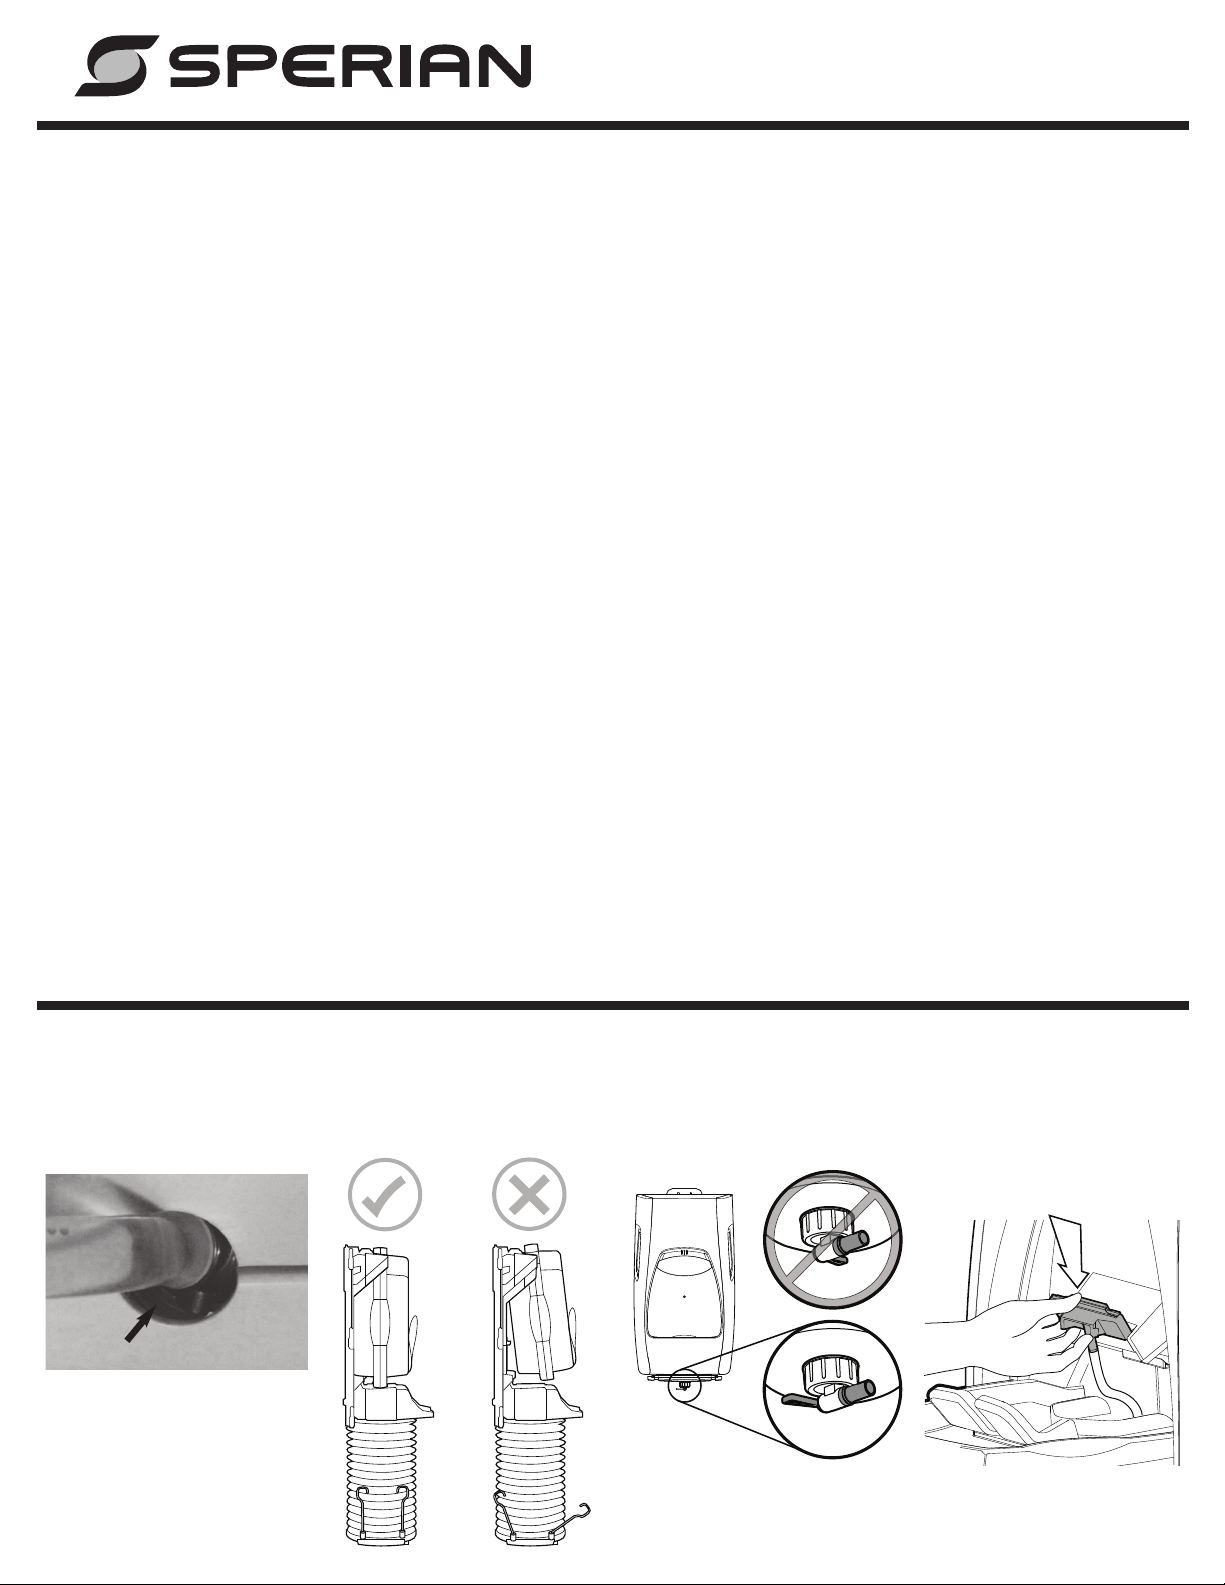
3. Suelte las cuatro tiras; para ello, corte las sujetadores de plástico. Asegúrese de que tanto la tobera como la tubería
estén plenamente extendidas del cartucho. Fig. 1
4. Cuelgue el cartucho sobre las ménsulas y empuje el cartucho hacia atrás por completo. Fig. 2
5. Retire la bolsa azul de polivinilo que protege la boquilla (deje que la boquilla cuelgue en la palangana situada abajo).
6. Comprima el tanque de desechos; para ello, empújelo hacia arriba. Introduzca las cuatro tiras (dos al frente y dos
atrás) en los ganchos, asegurándose de que no queden torcidas. Inspeccione visualmente las cuatro esquinas de la
placa inferior, asegurándose de que estén a la misma altura.
ADVERTENCIA: Si no se comprime debidamente el tanque, o si las tiras no están instaladas en los ganchos, la unidad
no funciona correctamente al tratar de activarla. Asegúrese de que esté despejada el área situada abajo de la unidad
para el lavado de los ojos.
7. Asegúrese de que esté cerrada la válvula de drenaje. Fig. 3
8. De nuevo coloque el panel delantero en la unidad y cierre los paneles laterales.
9. Si se activa la alarma antes de que esté armada completamente la estación, vea PROCEDIMIENTO PARA APAGAR LA
ALARMA (abajo).
10. Abra la puerta y tire del descansacabeza hacia usted.
11. Extraiga la boquilla de la palangana. Introduzca la boquilla en el compartimiento correspondiente, asegurándose de
que el tubo no esté torcido y de que la pequeña pieza aseguradora del sujetador de alambre quede hacia la parte
interior de la unidad. Fig. 4
12. Empuje el descansacabeza a su posición original hasta que escuche un chasquido. Cierre la puerta; para ello,
presione la parte central de la puerta. Cuando la boquilla queda bien enganchada se oye un chasquido.
13. La unidad ha quedado armada y está lista para usarse.
14. A los tres días revise la unidad para ver si tiene fugas o residuo de sal alrededor de la boquilla y en la base de la
unidad, con el fin de asegurarse de que la instalación haya sido realizada de manera correcta.
Procedimiento para apagar la alarma
1. Localice el botón azul pequeño situado en el interior de la puerta de la unidad.
2. Presione y no suelte el botón de 3 a 5 segundos aproximadamente o hasta que se apague la alarma.
3. Si aún está preparando la unidad, lleve a cabo las instrucciones indicadas en la Sección C.
4. Para volver a habilitar la alarma, cierre la puerta de la estación. LA ALARMA ESTÁ AHORA HABILITADA.
ABIERTO
Negras sujetadore
de plástico
Fig. 1
Fig. 2
CERRADO
Fig. 3
Fig. 4
Page 3

Installation rapida des Cartouches Fendall 2000
™
1. Lisez la date d’expiration de l’étiquette pour vérifier que la cartouche peut être utilisée. (voir la section C du Manuel
d’installation et d’utilisation Fendall 2000 pour plus de détails)
2. Installez la cartouche stérile en tenant les poignées latérales et en vous assurant que le gicleur et le tube sont tournés
vers le bas et l’étiquette vers l’extérieur.
ATTENTION : LA CARTOUCHE PÈSE ENVIRON 27 KG. Il est recommandé de la soulever à deux personnes.
3. Libérez les quatre courroies en coupant les attaches. Assurez-vous que le jet et le tuyau soient complètement étirés à
partir de la cartouche. Fig. 1
4. Suspendez la cartouche sur les supports et repoussez la cartouche complètement au fond. Fig. 2
5. Retirez le sac en polyéthylène bleu de protection du gicleur (laissez le gicleur pendre dans le bassin).
6. Comprimez le réservoir d’écoulement en le poussant vers le haut. Glissez les quatre courroies (deux devant, deux
derrière) sur les crochets, en vous assurant qu’elles ne sont pas tordues. Inspectez les quatre coins de la plaque
inférieure pour vérifier qu’ils se trouvent à la même hauteur.
AVERTISSEMENT : si le réservoir d’écoulement n’est pas correctement comprimé ou que les courroies sont mal
installées sur les crochets, l’appareil ne fonctionnera pas normalement lorsqu’il sera activé. Assurez-vous que la zone
sous le poste de lavage oculaire n’est pas encombrée.
7. Vérifiez que le robinet du drain est fermé. Fig. 3
8. Remettez le panneau avant sur l’unité et fermez les panneaux latéraux.
9. En cas de déclenchement de l’alarme avant que le poste ne soit armé, voir la PROCÉDURE D’ARRÊT DE L’ALARME
(ci-dessous).
10. Ouvrez la porte et tirez le repose-tête vers vous.
11. Sortez le gicleur du bassin. Glissez-le dans le logement à gicleur, sans tordre le tube. Le petit embout de verrouillage
de l’attache doit être tourné vers l’intérieur de l’unité. Fig. 4
12. Enfoncez-le repose-tête dans sa position d’origine jusqu’à ce que vous entendiez un clic. Fermez la porte en appuyant
un milieu. Vous devez entendre de nouveau un clic lorsque le gicleur est engagé.
13. L’unité est maintenant armée et prête à l’emploi.
14. Après trois jours, vérifiez que l’installation a été bien effectuée en confirmant l’absence de fuite ou de résidu salin
près du gicleur, ainsi qu’à la base de l’unité.
Procédure d’arrêt de l’alarme
1. Repérez le petit bouton bleu sur la porte intérieure.
2. Appuyez sur le bouton pendant environ 3 à 5 secondes, ou jusqu’à ce que l’alarme s’arrête.
3. Si vous êtes en train d’installer le poste, suivez la procédure de la section C.
4. Pour armer de nouveau l’alarme, fermez la porte du poste. L’ALARME EST MAINTENANT ARMÉE.
OUVERT
Attache noire
Fig. 1
FERMÉ
Fig. 3
Fig. 2
Fig. 4
 Loading...