

Page 1
2016
Lekkerland information
systems GmbH
16.12.2016
SOVIA
MDE User Manual
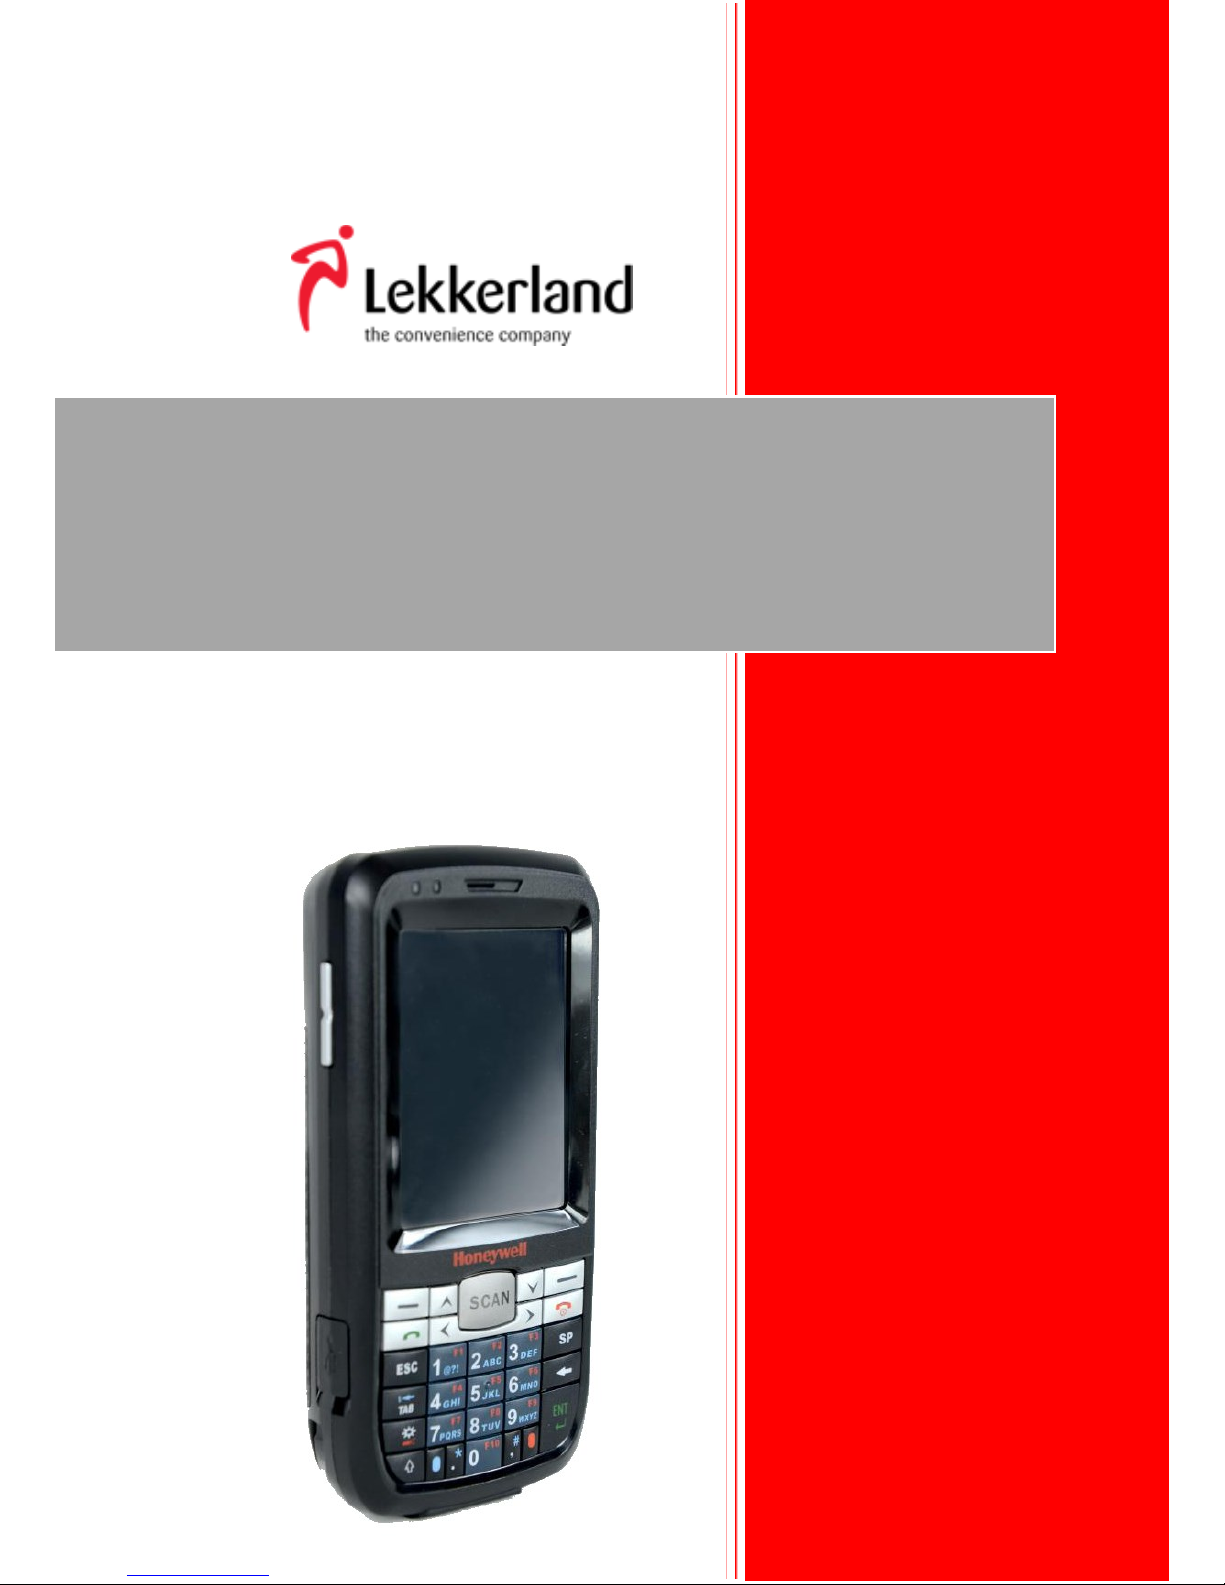
Honeywell Dolphin 60s
Page 2

1
MDE User Manual
Content
1 Information On User Help Desk ..................................................................... 3
1.1 Operating Times ...................................................................................... 3
1.2 Telephone Numbers ................................................................................ 3
2 General Information 2.1 Scope Of Supply ..................................................... 4
2.2 Keys ............................................................................................................. 5
2.3 Hardware..................................................................................................... 6
2.4 - Use ............................................................................................................ 8
3 Operation ..................................................................................................... 10
3.1 Overview Over The Symbols ................................................................. 10
3.2 - Navigation ........................................................................................... 11
3.3 - Keyboard ............................................................................................. 11
3.4 – Overview Over Special Characters ..................................................... 12
3.6 Operating The Scanner ......................................................................... 13
4. First Operation ............................................................................................ 14
4.1 Main Menu ............................................................................................ 14
4.2.1 Sovia Client Status Bar ....................................................................... 15
4.2.2 MDM Client Status Bar ....................................................................... 15
5. Connection Settings ................................................................................ 16
6. Login & Change Of Tenant .......................................................................... 18
7. Entering Orders ........................................................................................... 19
7.1 Freie Erfassung (Free Entry) .................................................................. 20
7.2 Erfassung nach Liste (Entry By List) ....................................................... 22
7.2.1 Sortiment (Assortment) ................................................................. 22
Page 3

2
MDE User Manual
7.2.2 Warengruppe (Product Group) ...................................................... 23
7.3 Zusatzfunktionen (Additional Functions) .............................................. 25
7.3.1 Finishing Orders ............................................................................. 25
7.3.2 Rechnungstexte (Invoice Texts) ..................................................... 26
7.3.3 Lieferdatum (Delivery Date) ........................................................... 26
7.3.4 Artikelsuche (Searching for Articles) .............................................. 27
7.3.5 Bestellung löschen (Delete Order) ................................................. 27
8 Ordering Labels ............................................................................................ 28
8.1 Entry ...................................................................................................... 28
9 Inventur (Stocktaking) .................................................................................. 29
9.1 Entry ...................................................................................................... 29
9.2 Zusatzfunktionen (Additional Functions) .............................................. 30
9.2.1 Finishing Stocktaking .......................................................................... 30
9.2.2 Delete Stocktaking ......................................................................... 30
10 Assortment Maintenance .......................Fehler! Textmarke nicht definiert.
10.1 Assigning Storage Space ...................Fehler! Textmarke nicht definiert.
11 Article Information ................................................................................. 31
11.1 Show Article Information .................................................................... 31
12 Data Transfer .............................................................................................. 32
13 Consultant Functions ................................................................................. 33
13.1 Order Articles ...................................................................................... 33
13.1.1 Adapting Prices (Special Prices) ................................................... 34
Page 4

3
MDE User Manual
1 Information On User Help Desk
Dear Customer
If there are any questions on handling the MDE device or any problems
arising in this context, the IBM User Help Desk is available to you as a
competent partner.
1.1 Operating Times
You can reach the IBM Help Desk during the following operating times:
Monday – Friday from 8.00 am to 5.00 pm, local bank holidays
excepted
1.2 Telephone Numbers
Germany: +49 (0) 800 511 63 40
Austria: +49 (0) 800 511 63 41
Switzerland: 0848 00 00 24 or
+49 (0) 800 511 63 49
Customers from Switzerland can choose a preferred language. German,
Italian and French are eligible.
Page 5
4
MDE User Manual
2 General Information
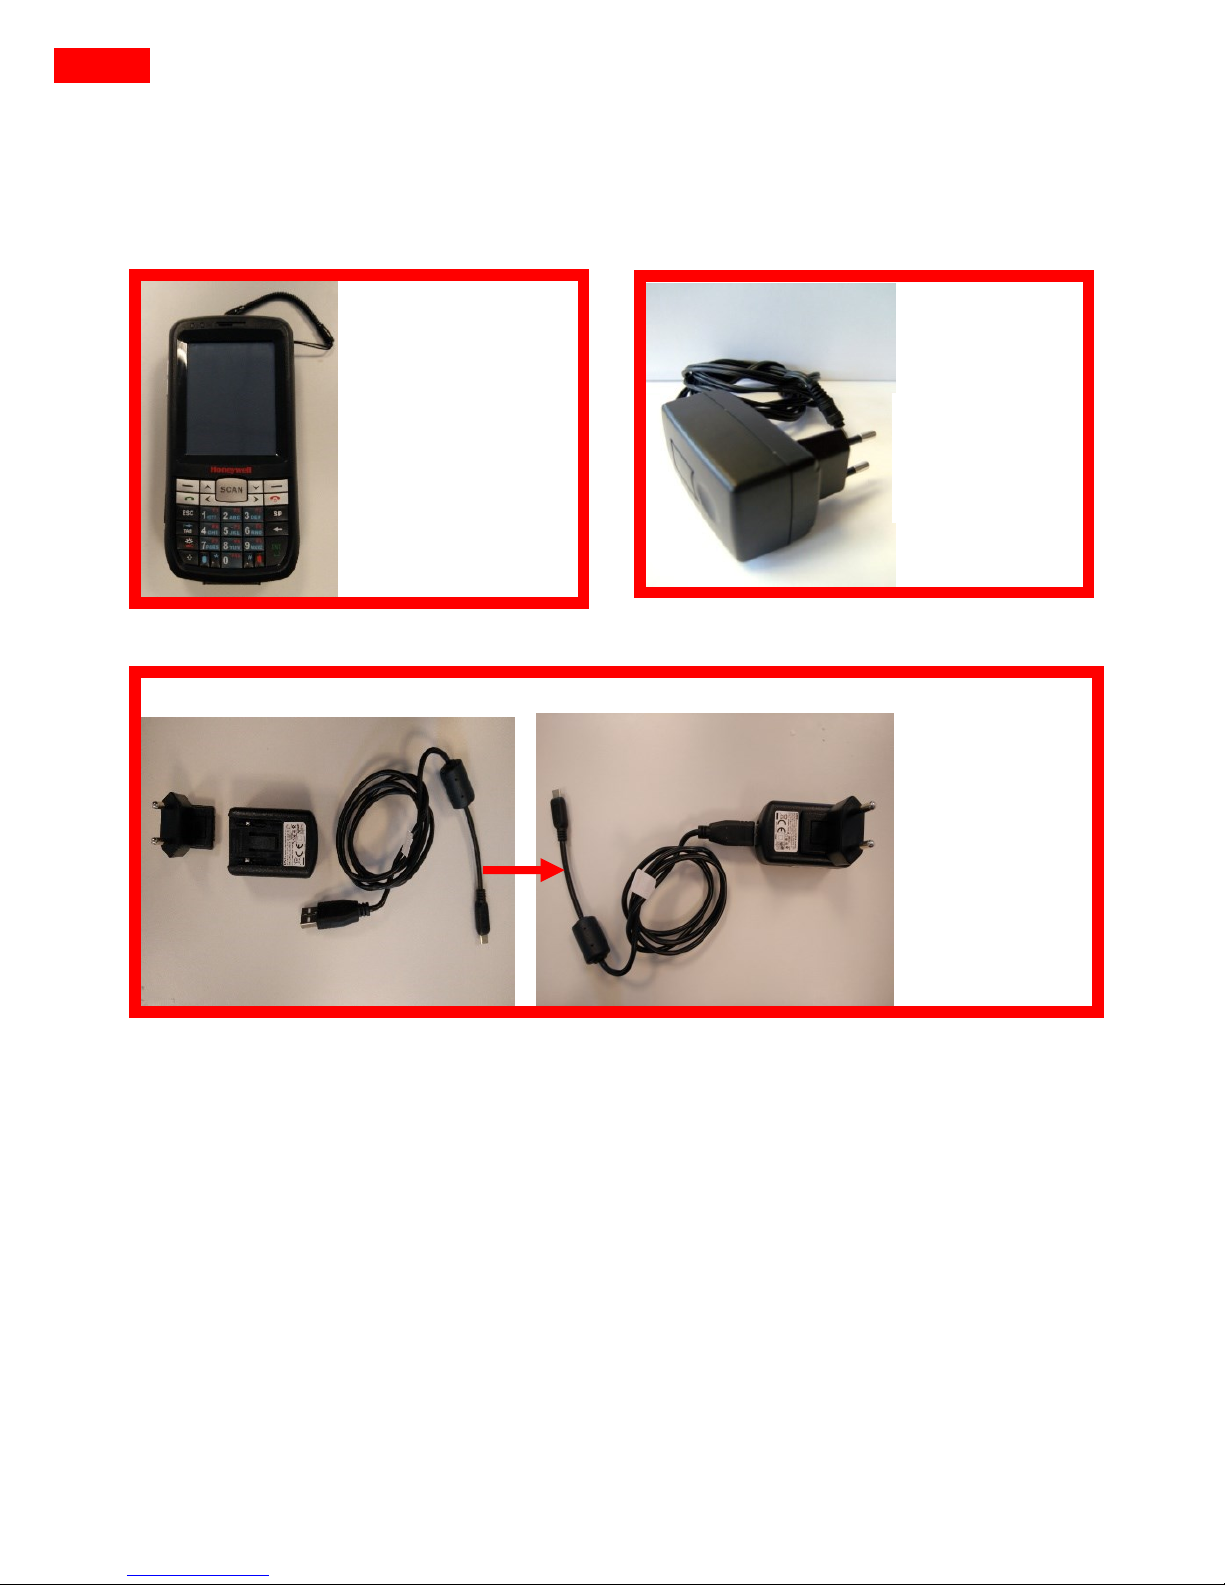
2.1 Scope Of Supply
MDE device
Honeywell
Dolphin 60s
Power
supply unit
Put together
the power
supply unit
before the
first
operation
Page 6
5
MDE User Manual
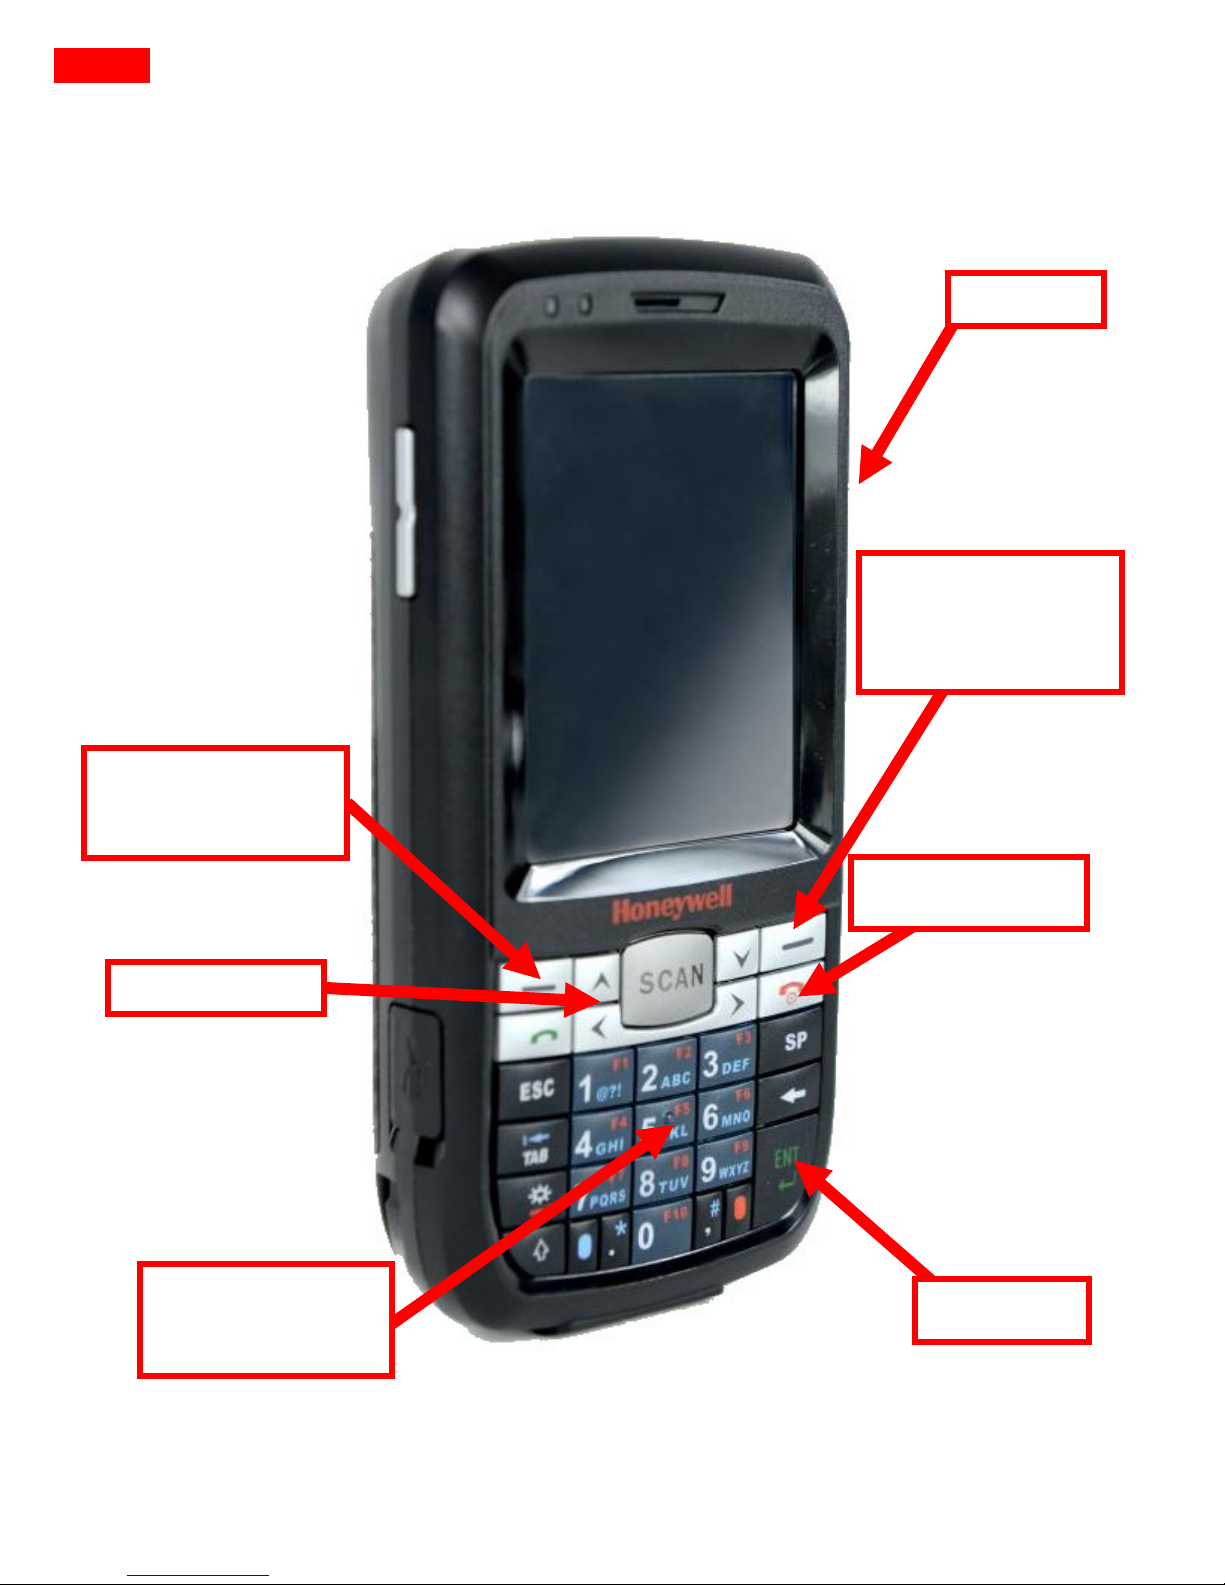
2.2 Keys
Stand-by
Enter
Numeric
keyboard
Show and hide
on-screen
keyboard
Open Context
Menu
Page 7
6
MDE User Manual
2.3 Hardware
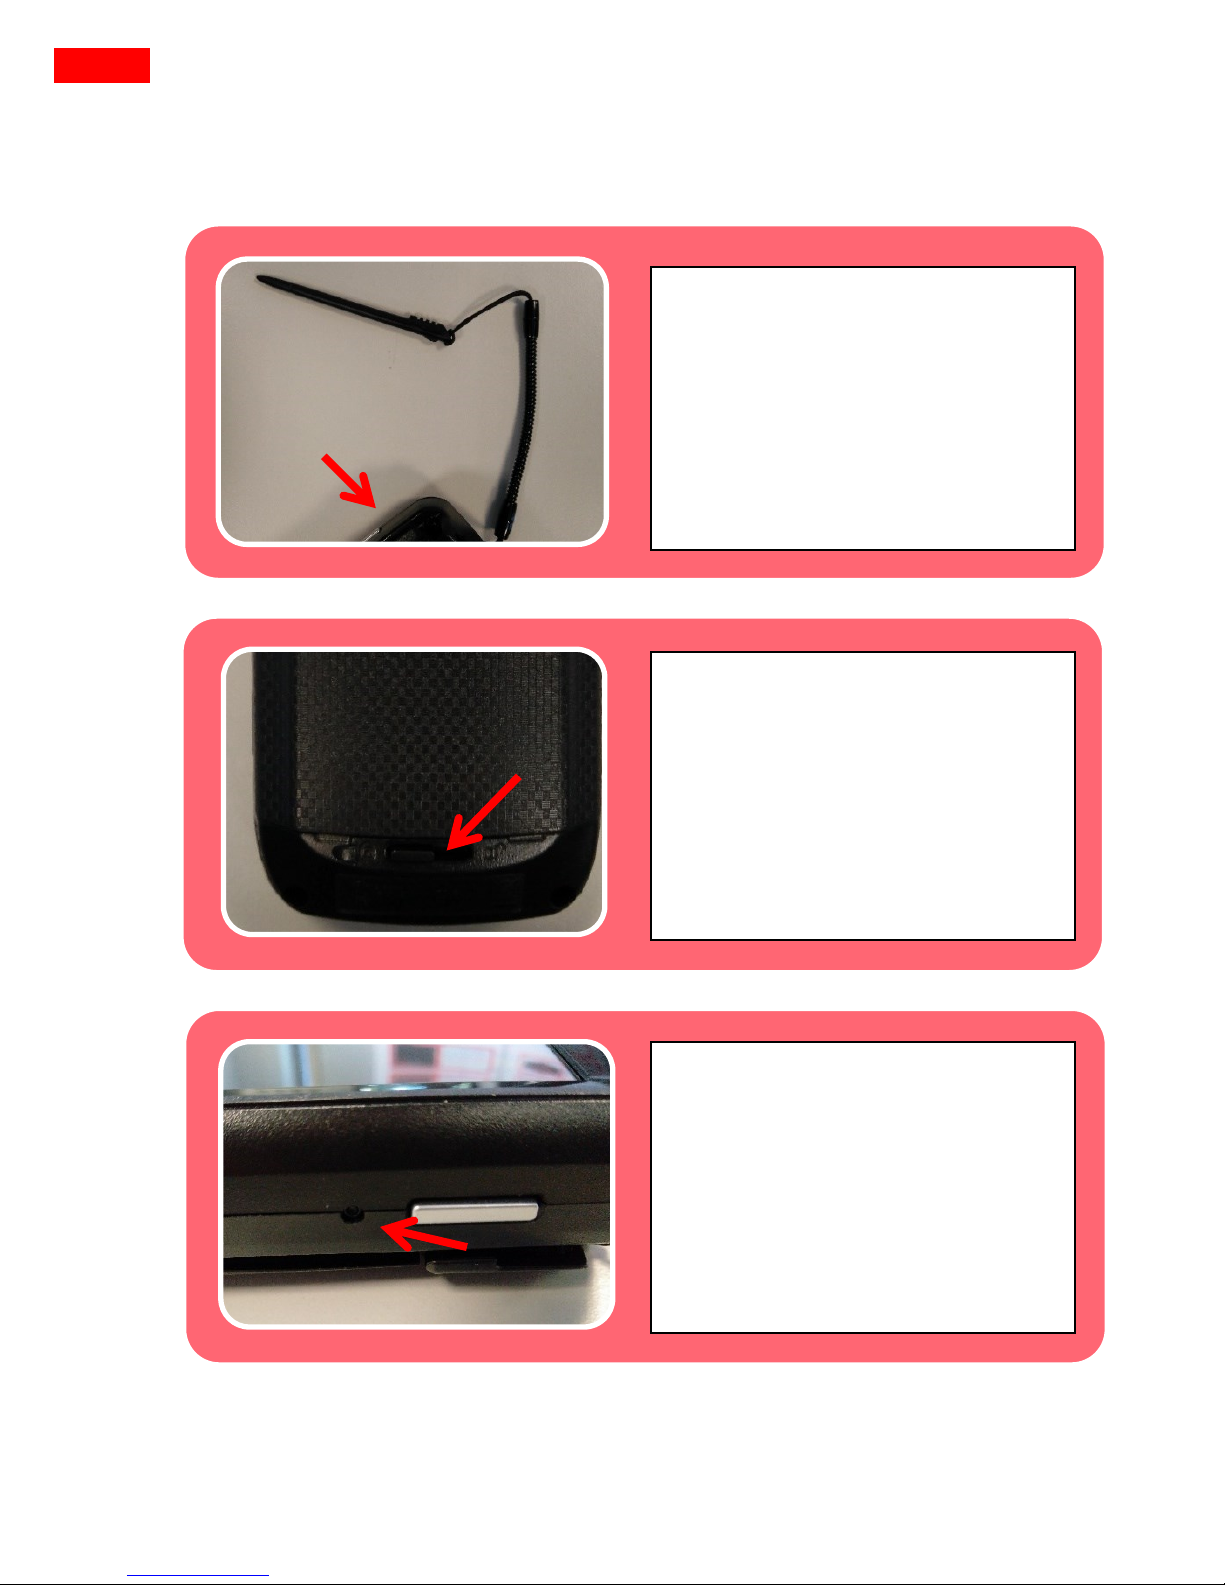
Taking Out The Pen
On the reverse side of the
device, there is the so-called
“Stylus”. It can be removed by
pulling and is used to operate
the touchscreen precisely.
Battery
If you wish to take out the
battery, move the locker on the
reverse side to the right. The
back opens.
Reset
Should your device not react to
entries anymore, push the
button on the right side of the
device with the “Stylus”. The
device will restart.
Page 8
7
MDE User Manual
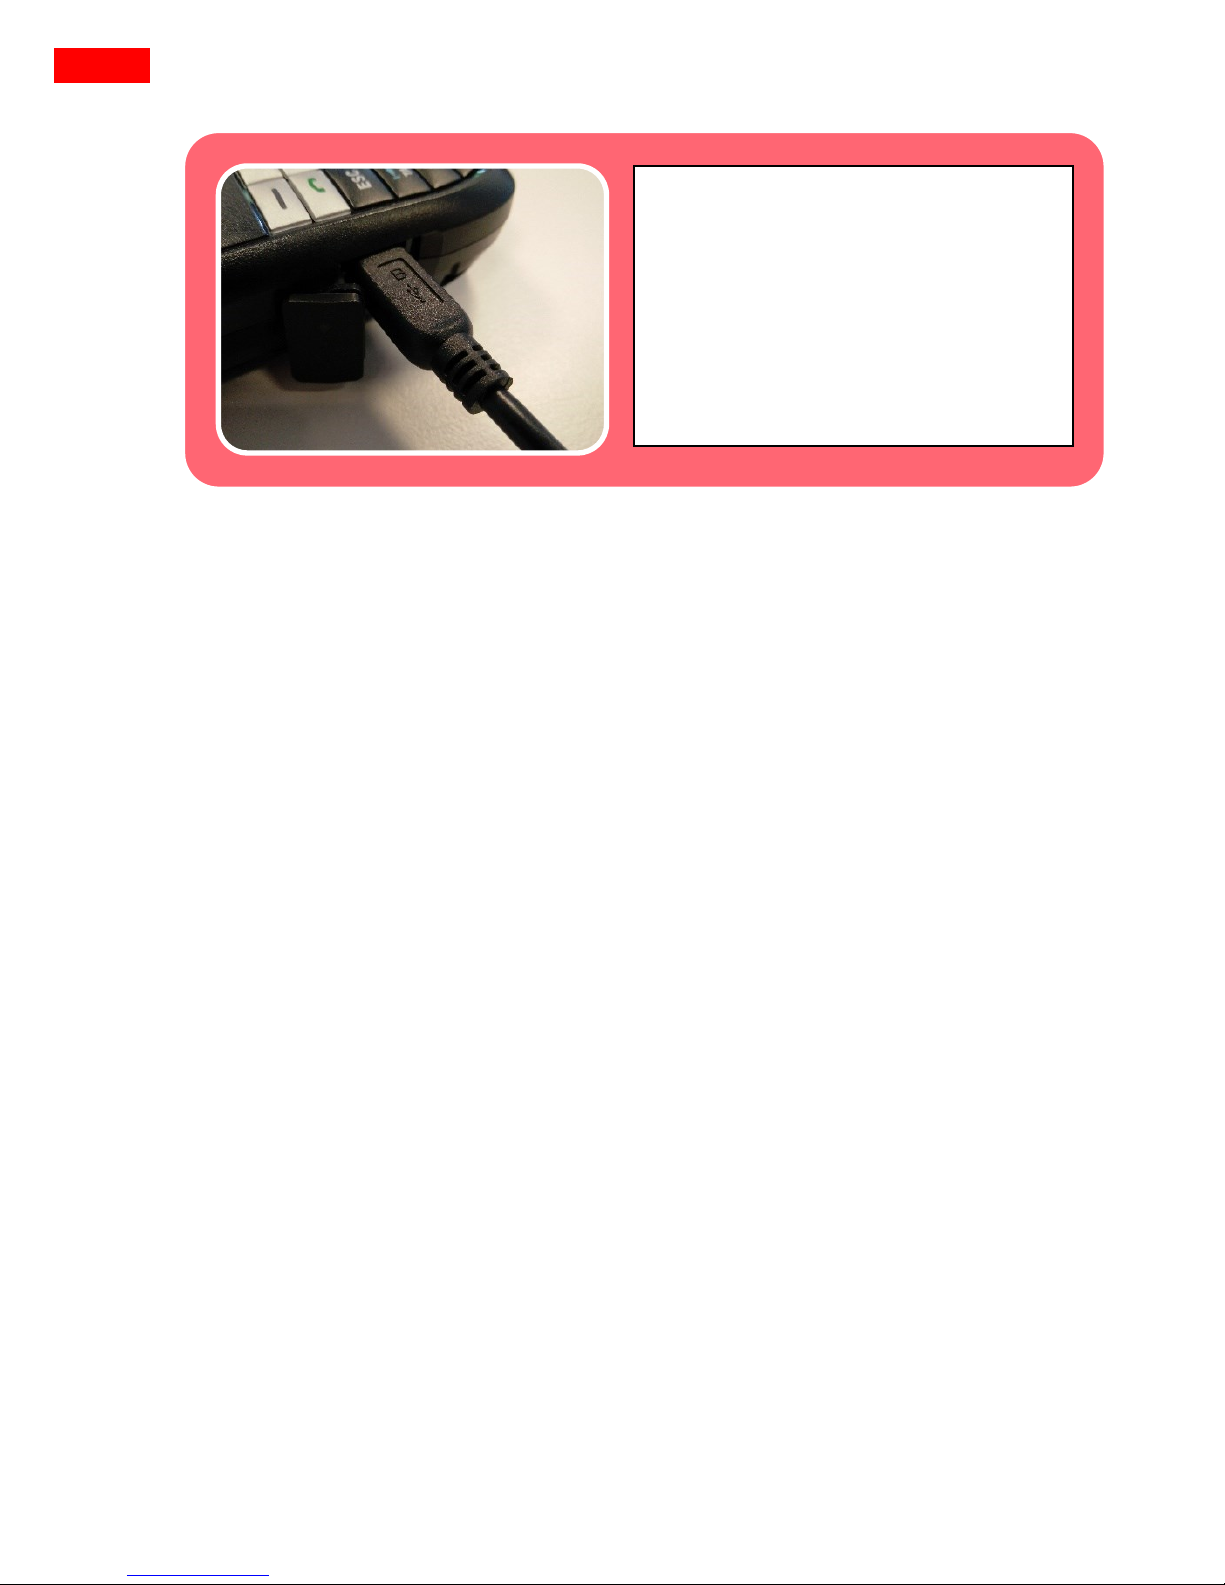
Load Device
To load the battery of the device,
take off the dust protection on
the left side of the device and
connect the plug with the
provided power supply unit.
Page 9
8
MDE User Manual
2.4 - Use
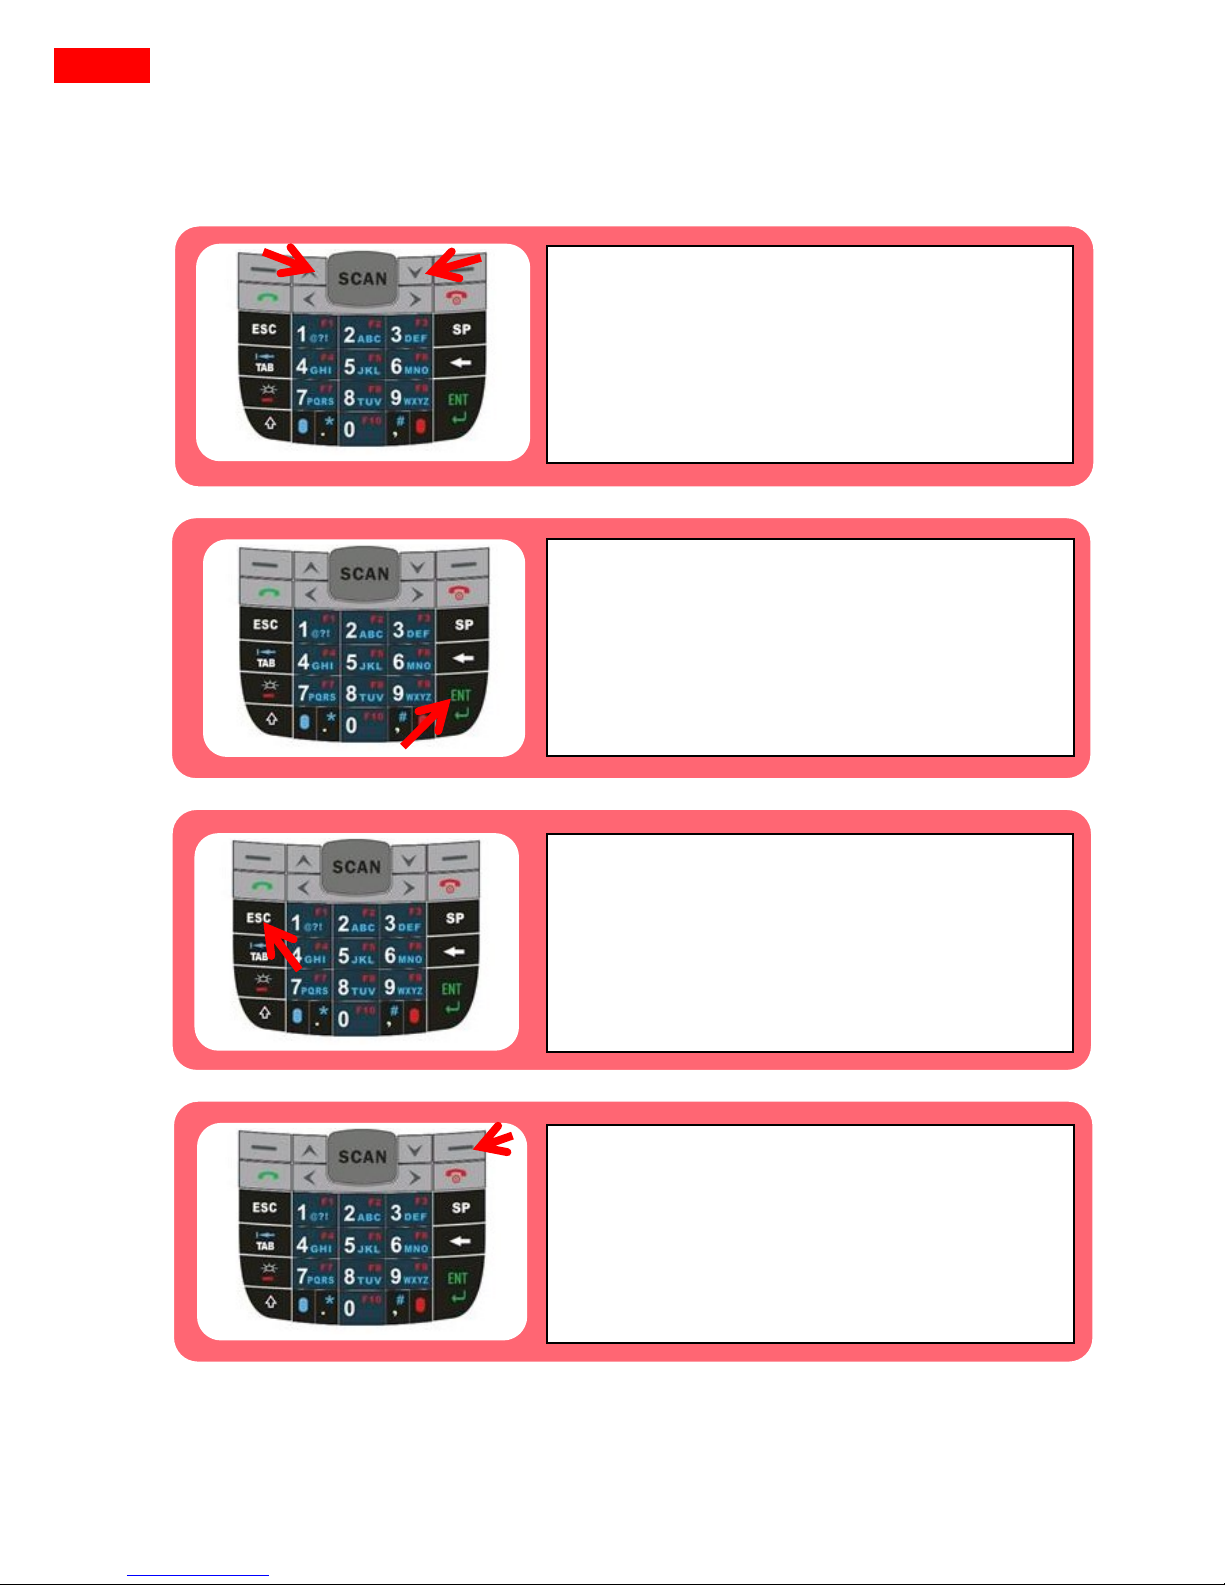
Arrows up/down
Change the quantity in the working
mode.
Navigate through menus.
Confirm
Confirm the entry.
Equals an “OK” key.
Escape
Stop the last action. Back to the last
window. On the start screen: Press long
for stand-by.
Right Dialog Key
Show on-screen keyboard.
Page 10

9
MDE User Manual
Centre Key
Turn device on.
Activate scanner.
Left Dialog Key
Open context menu.
Page 11
10
MDE User Manual
3 Operation
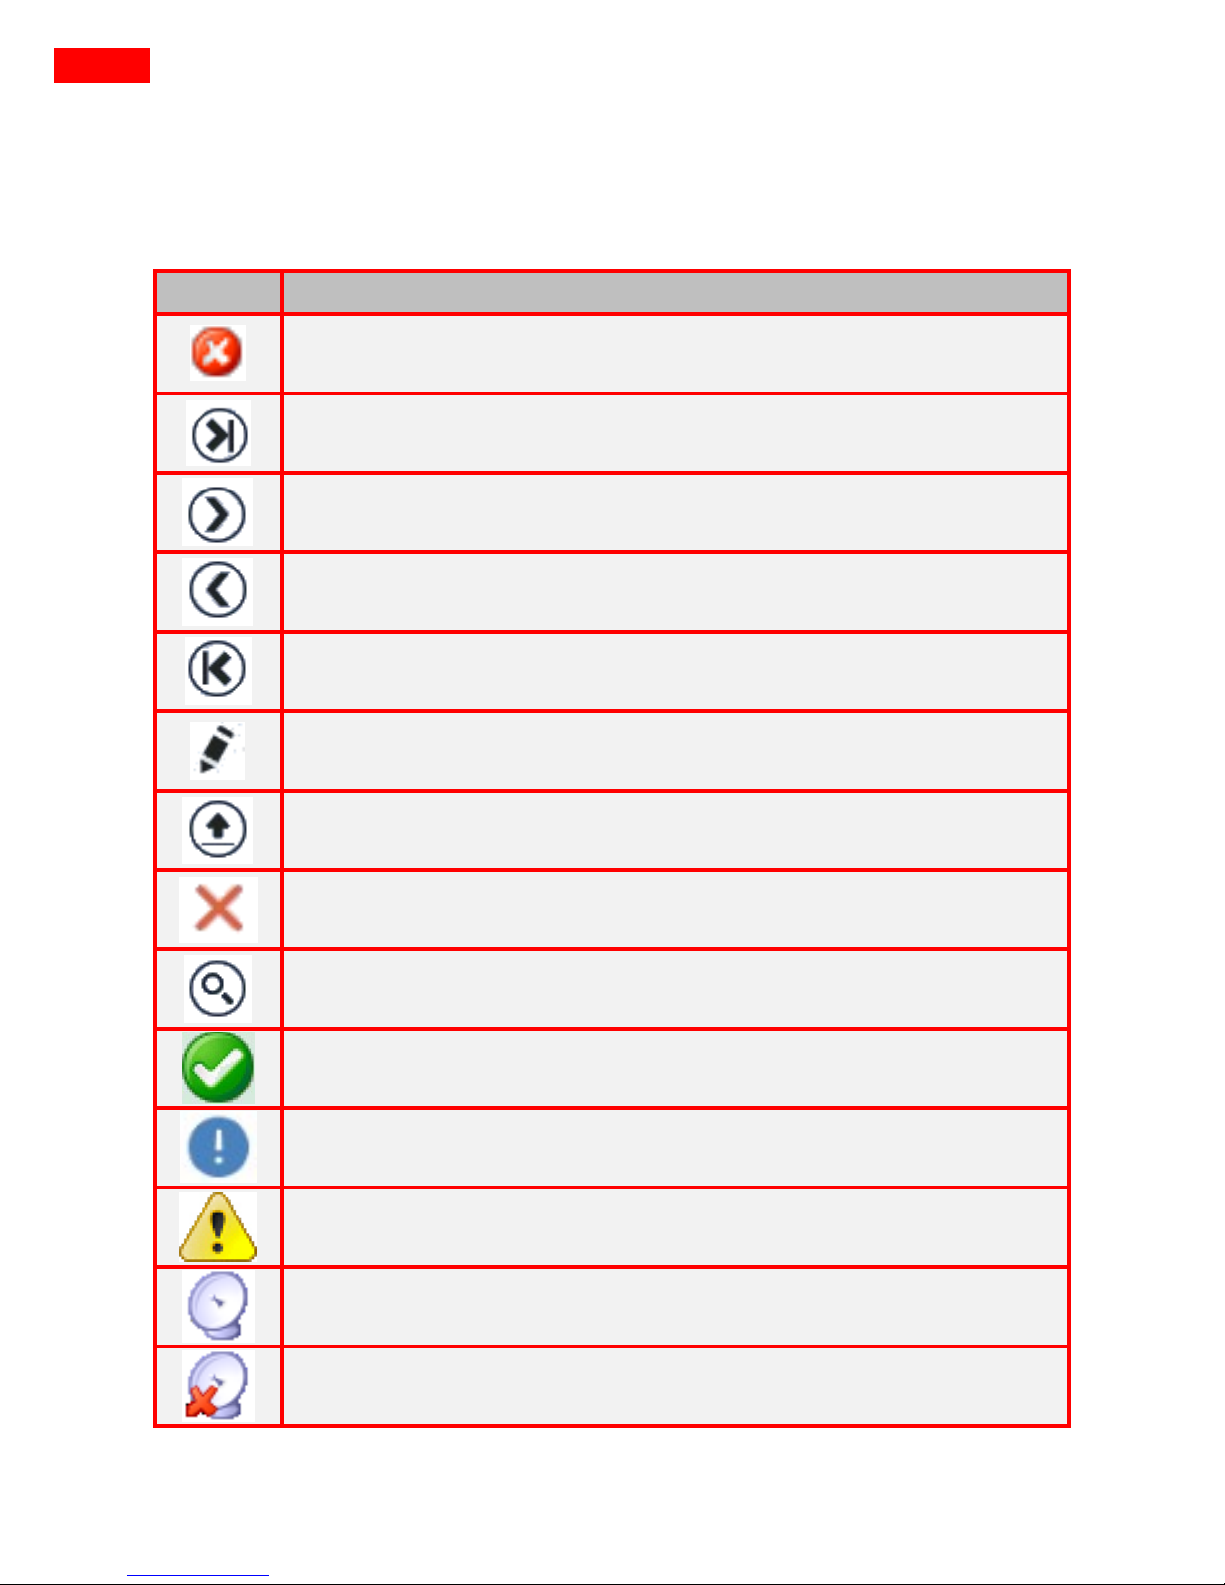
3.1 Overview Over The Symbols
Symbol
Description
Close dialog
Back to the last window
Flickering: To last page
Flickering: To next page
Flickering: To previous page
Flickering: To first page
Edit
Finish current entry: Order
Delete
Search
Assortment entry – edited articles
Assortment entry – not edited articles
Product group entry – edited articles
Wi-Fi (WLAN) activated and connection successful (Sovia Client)
Wi-Fi (WLAN) activated and connection not successful (Sovia
Client)
Page 12
11
MDE User Manual
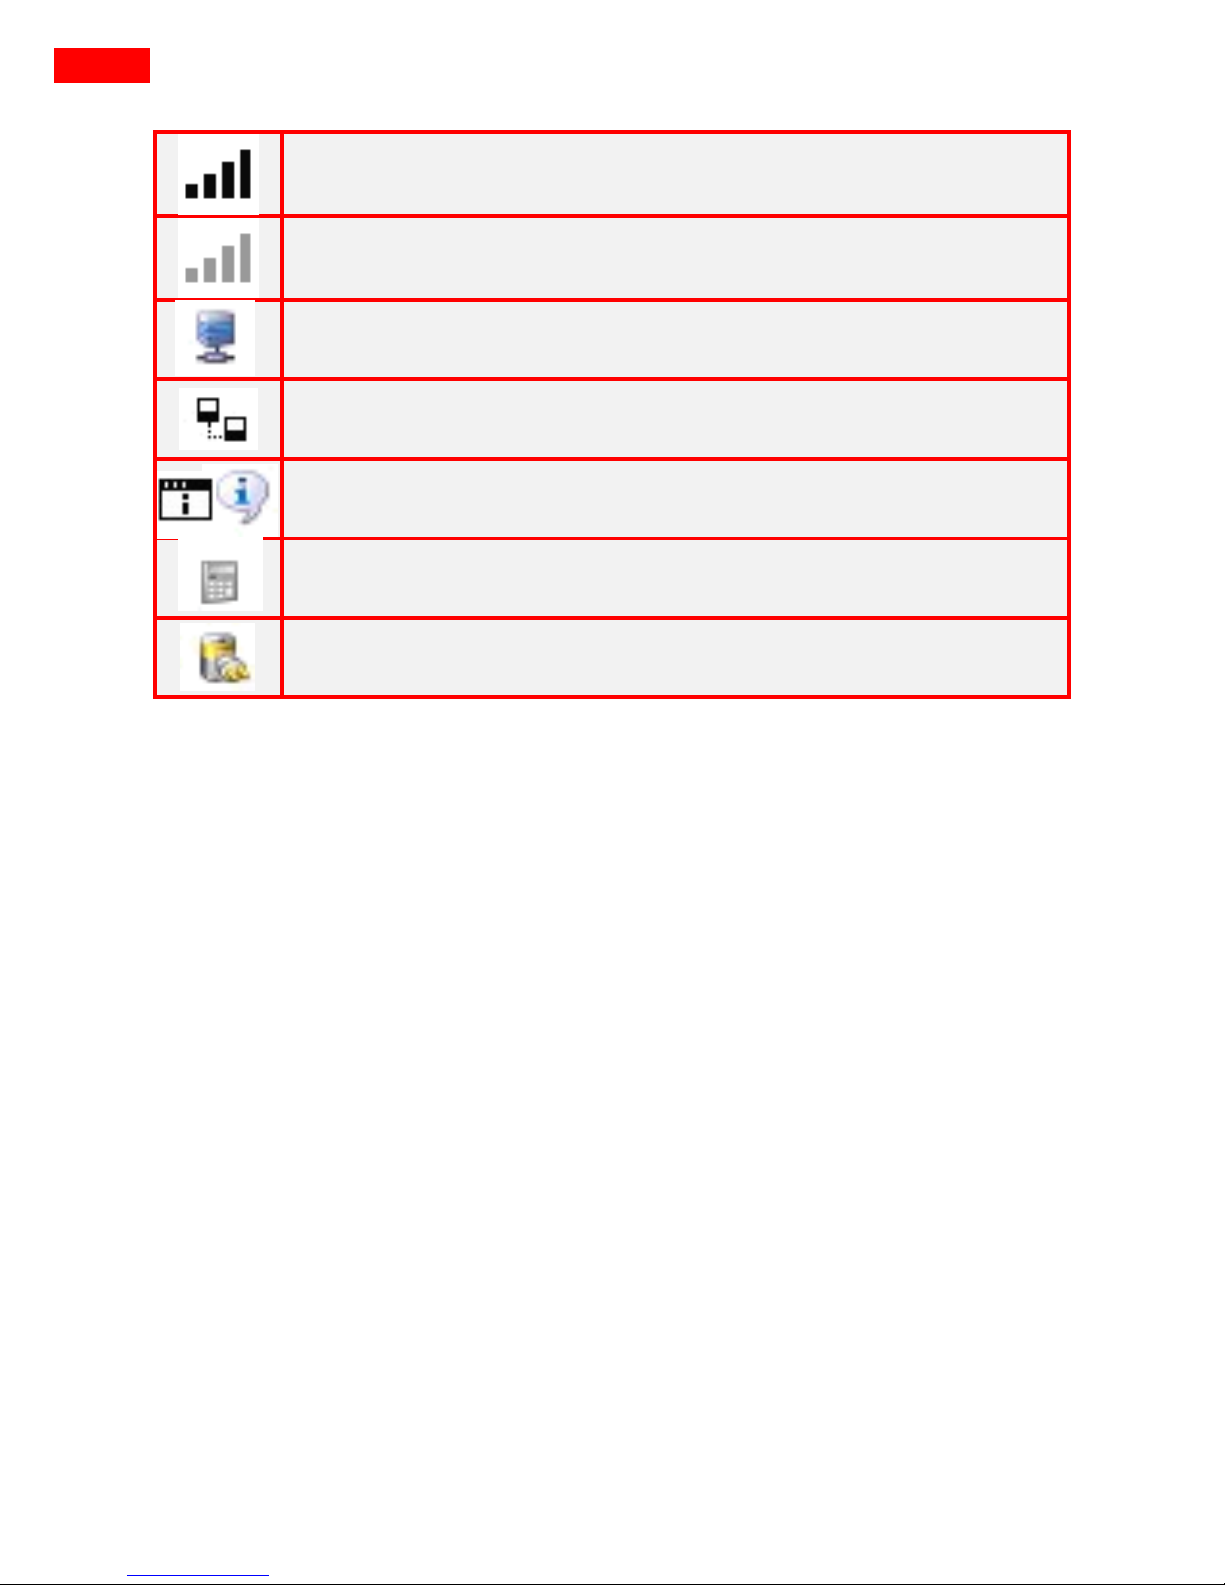
Wifi (WLAN) activated and connection successful (MDM Client)
Wifi (WLAN) activated and connection not successful (MDM
Client)
Mobile data connection successful (Sovia Client)
Mobile data connection successful (MDM Client)
Open information menu (left MDM, right Sovia)
Unhide on-screen keyboard (virtual keyboard)
Battery status
3.2 - Navigation
Navigation normally takes place directly via an entering pen (“Stylus”) or the
touch of a finger on the touchscreen. Please do not use pointed or sharpedged object for entries via touchscreen. Manual entries on the keyboard
always have to be confirmed. Confirmation is made by a click on the
confirmation button (“OK” button) or the enter key. The scanner is triggered
by pressing one or both scanning keys at the sides or by pressing the round,
centre scanning key on the front side of the device.
3.3 - Keyboard
Numbers and alphanumeric entries can be effected directly via the on-screen
keyboard of the device. To show or hide the virtual keyboard, press the right
dialog key. The keyboard for numbers always appears first. You also have the
possibility to enter alphanumeric symbols via the keyboard of the device. To
do so, you need to change to alpha-mode.
Page 13
12
MDE User Manual
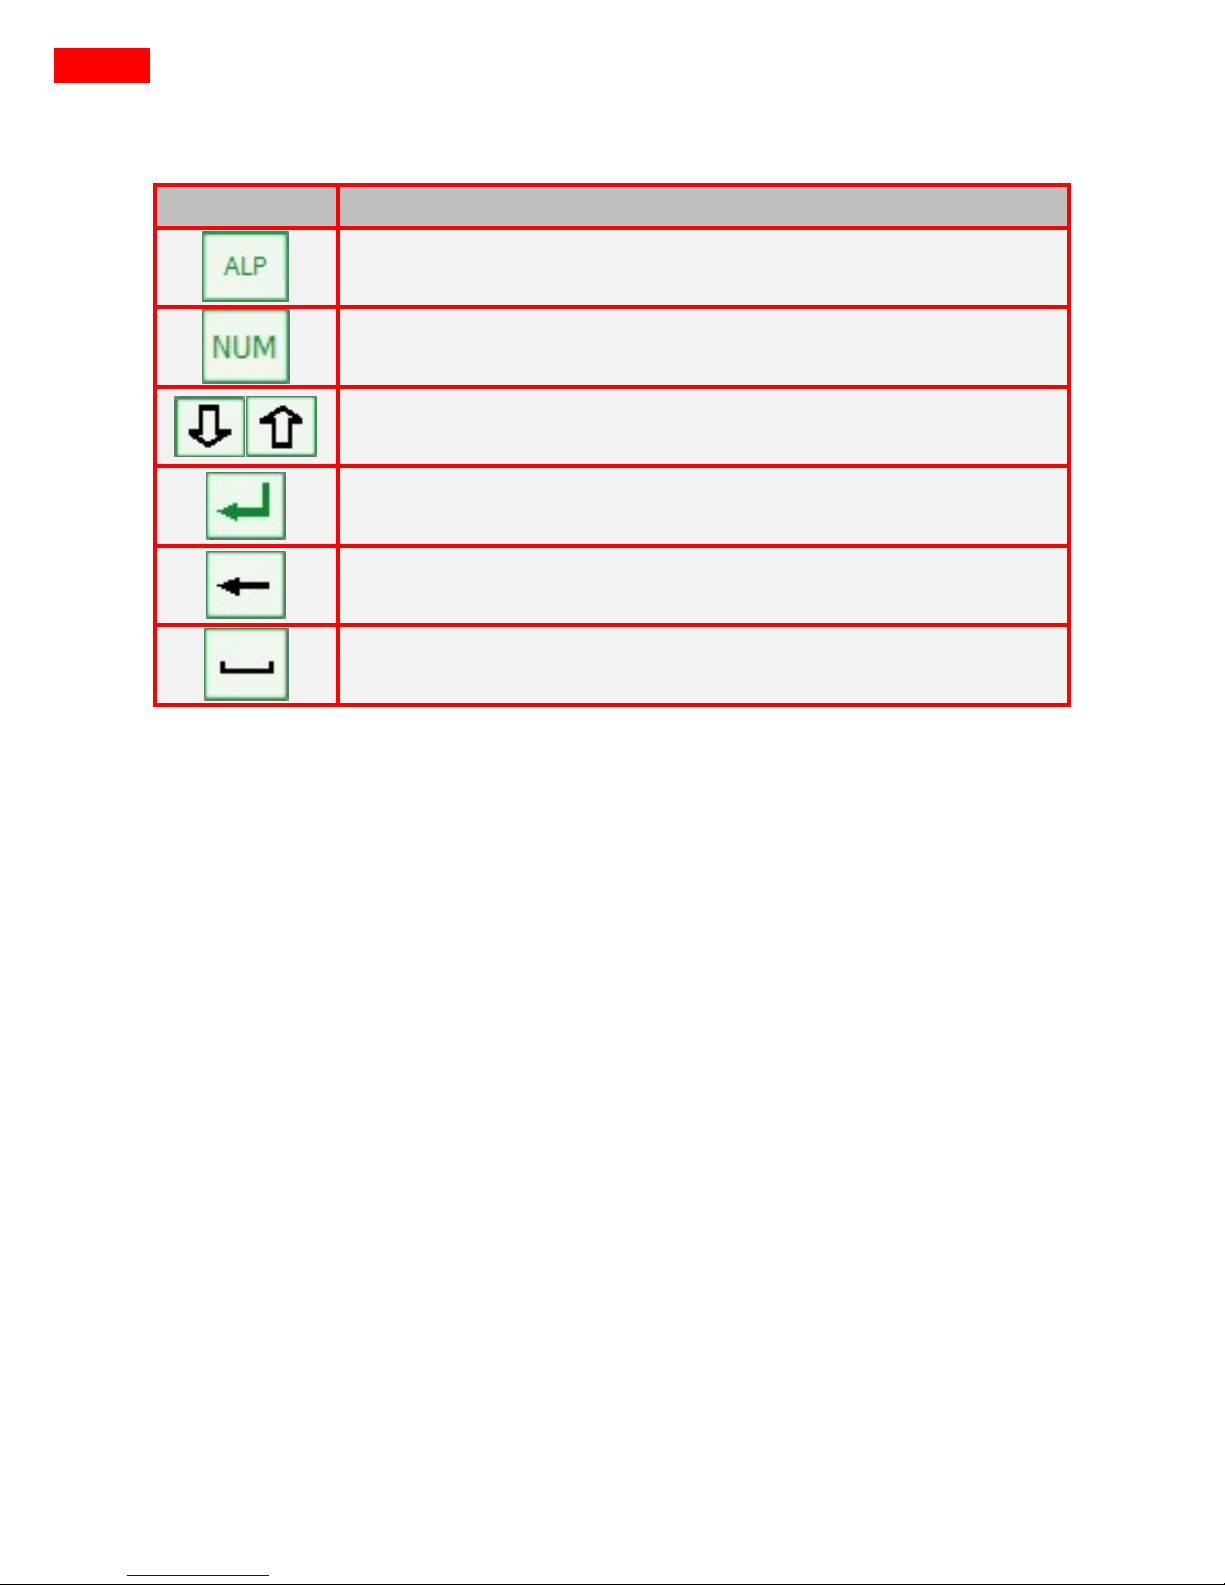
3.4 – Overview Over Special Characters
Symbol
Beschreibung
Change to alphanumeric keyboard – Letters
Change to numeric keyboard – Numbers
Change between upper-case and lower-case letters
Enter – Confirm entries
Backspace – Delete the last entry
Space
Page 14
13
MDE User Manual
3.6 Operating The Scanner
When operated, the scanning camera stays active until the barcode has
successfully been decoded or the scanning key is released. To newly activate
it, please press one of the scanning keys again.
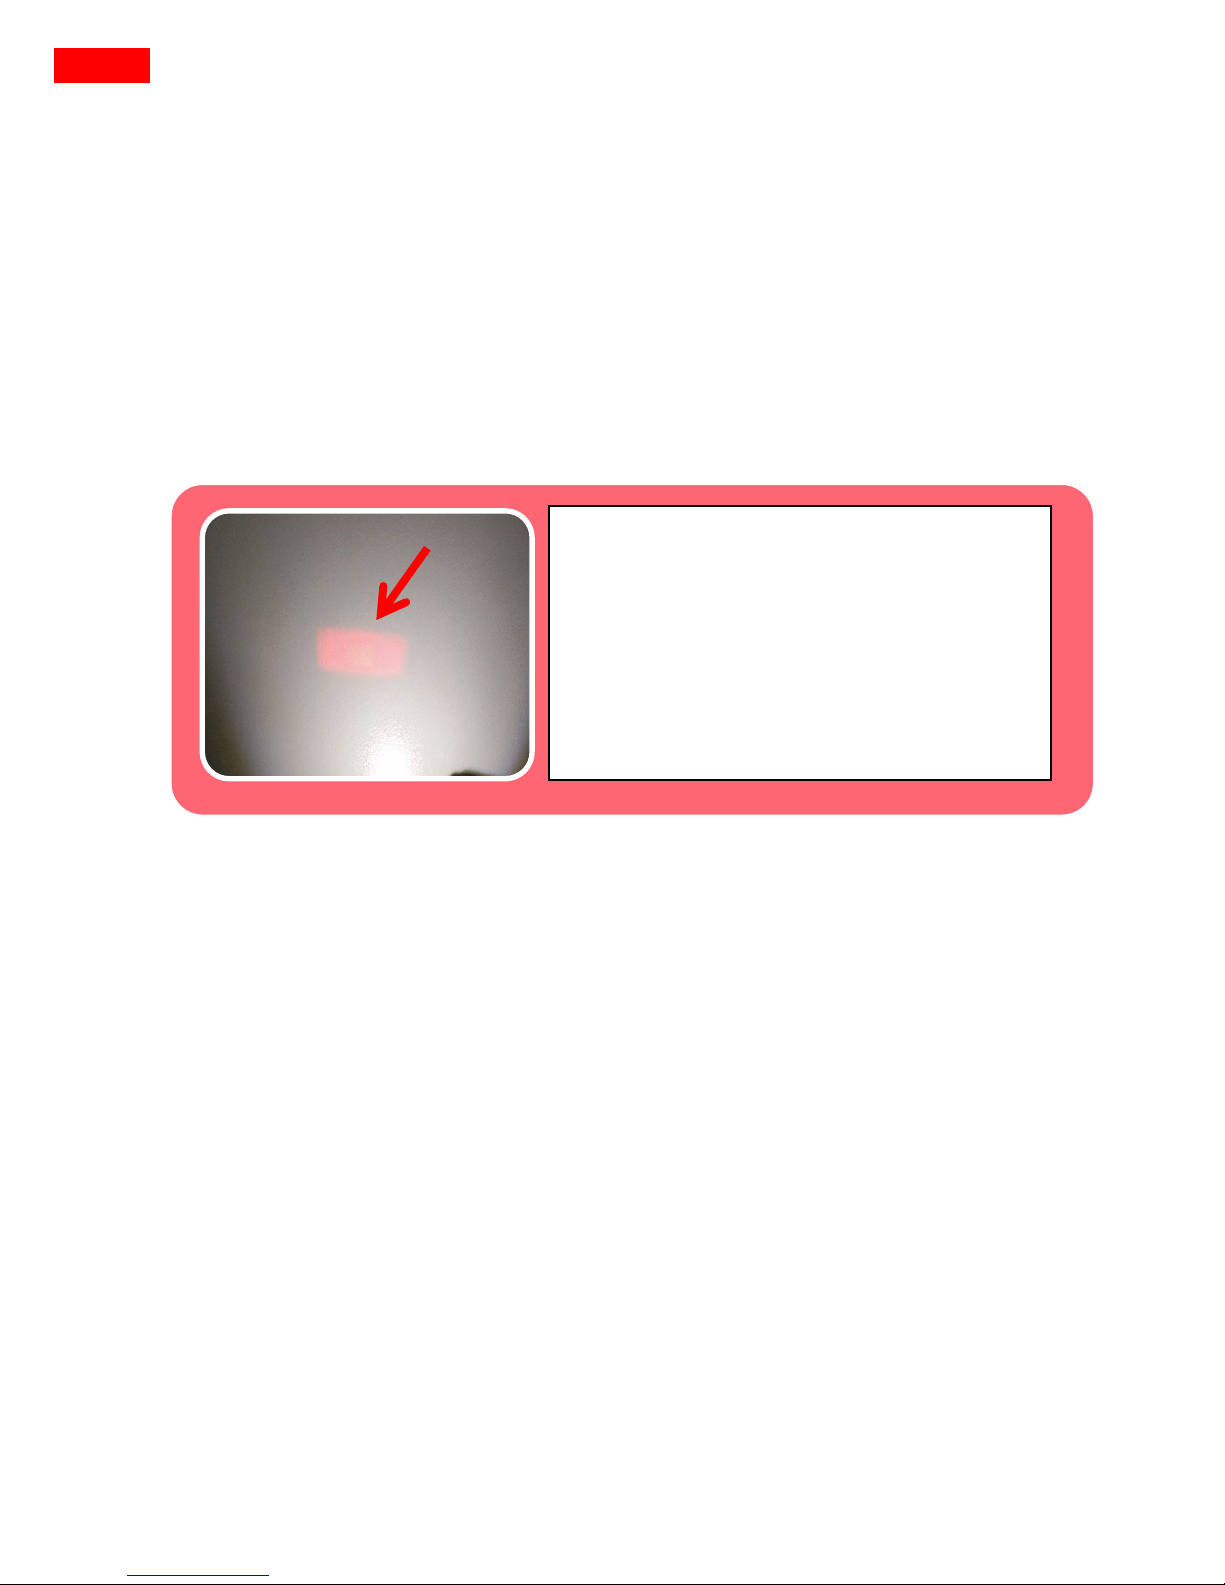
It has been tried and tested to place the MDE device for scanning in an angle
of 35-90° and with a gap of 15 - 30 cm over the barcode. The red bar shows
the scanning area. Place it on the barcode to be scanned.
Scanning In Order Book/From
Shelf
Hold the device with the attached
order book rail with a gap of 10 - 20
centimetres over the object to be
scanned.
Page 15
14
MDE User Manual
4. First Operation
Before operating your MDE device for the first time, you need to have your
Lekkerland customer number at hand.
As a password, use the post code of your shop.
Important: Do not select the box next to “Consultant”!
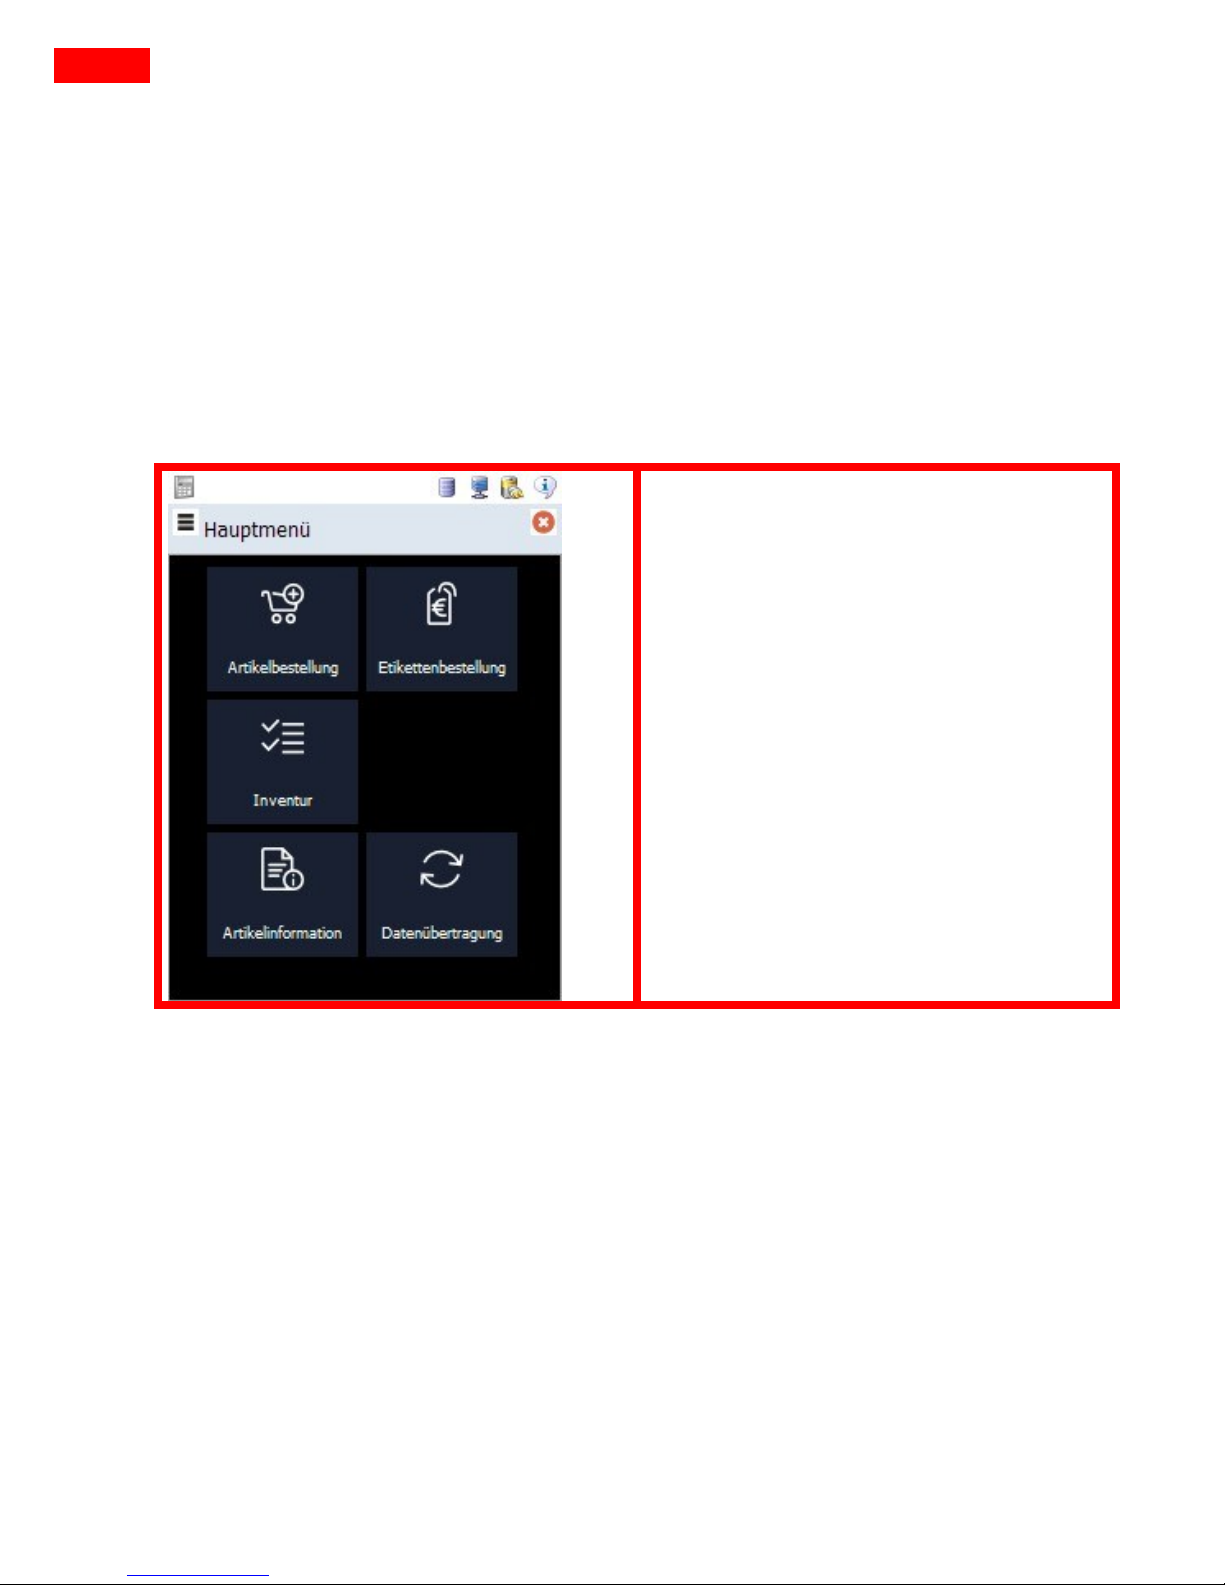
4.1 Main Menu
Next to the individual menu points,
you can put the device into stand-by
in the main menu. To do so, hold the
red “hang up” button pressed.
Apart from this, you can access
information on the device, the
software or your user via the context
menu.
Page 16
15
MDE User Manual
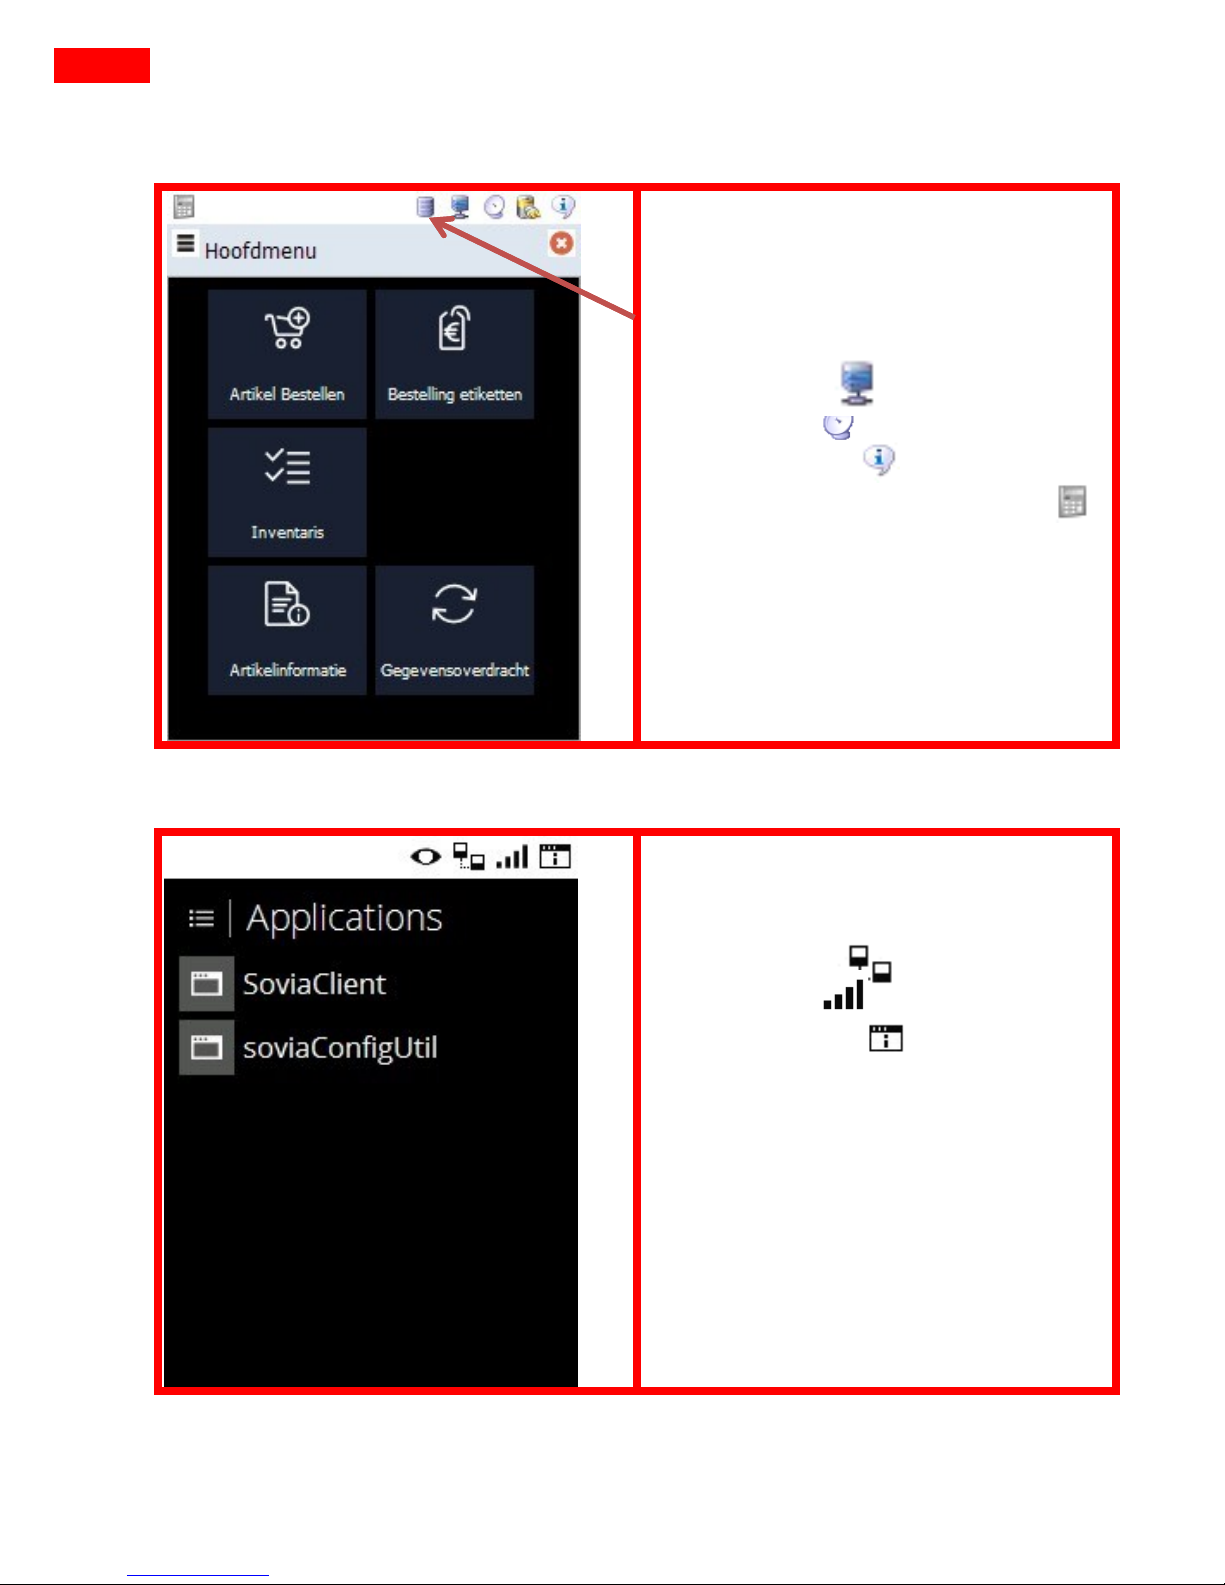
4.2.1 Sovia Client Status Bar
In the Sovia Client Status Bar you see
information on the battery status, the
connection with the database, the
connection with the mobile data
network (GPRS) the connection
with the Wi-Fi , a link to the
information menu and the button
to unhide the on-screen keyboard .
4.2.2 MDM Client Status Bar
In the MDM Client Status Bar you see
the connection with the mobile data
network (GPRS) , the connection
with the Wi-Fi , a link to the
information menu and a button to
access the remote control setup.
Page 17
16
MDE User Manual
5. Connection Settings
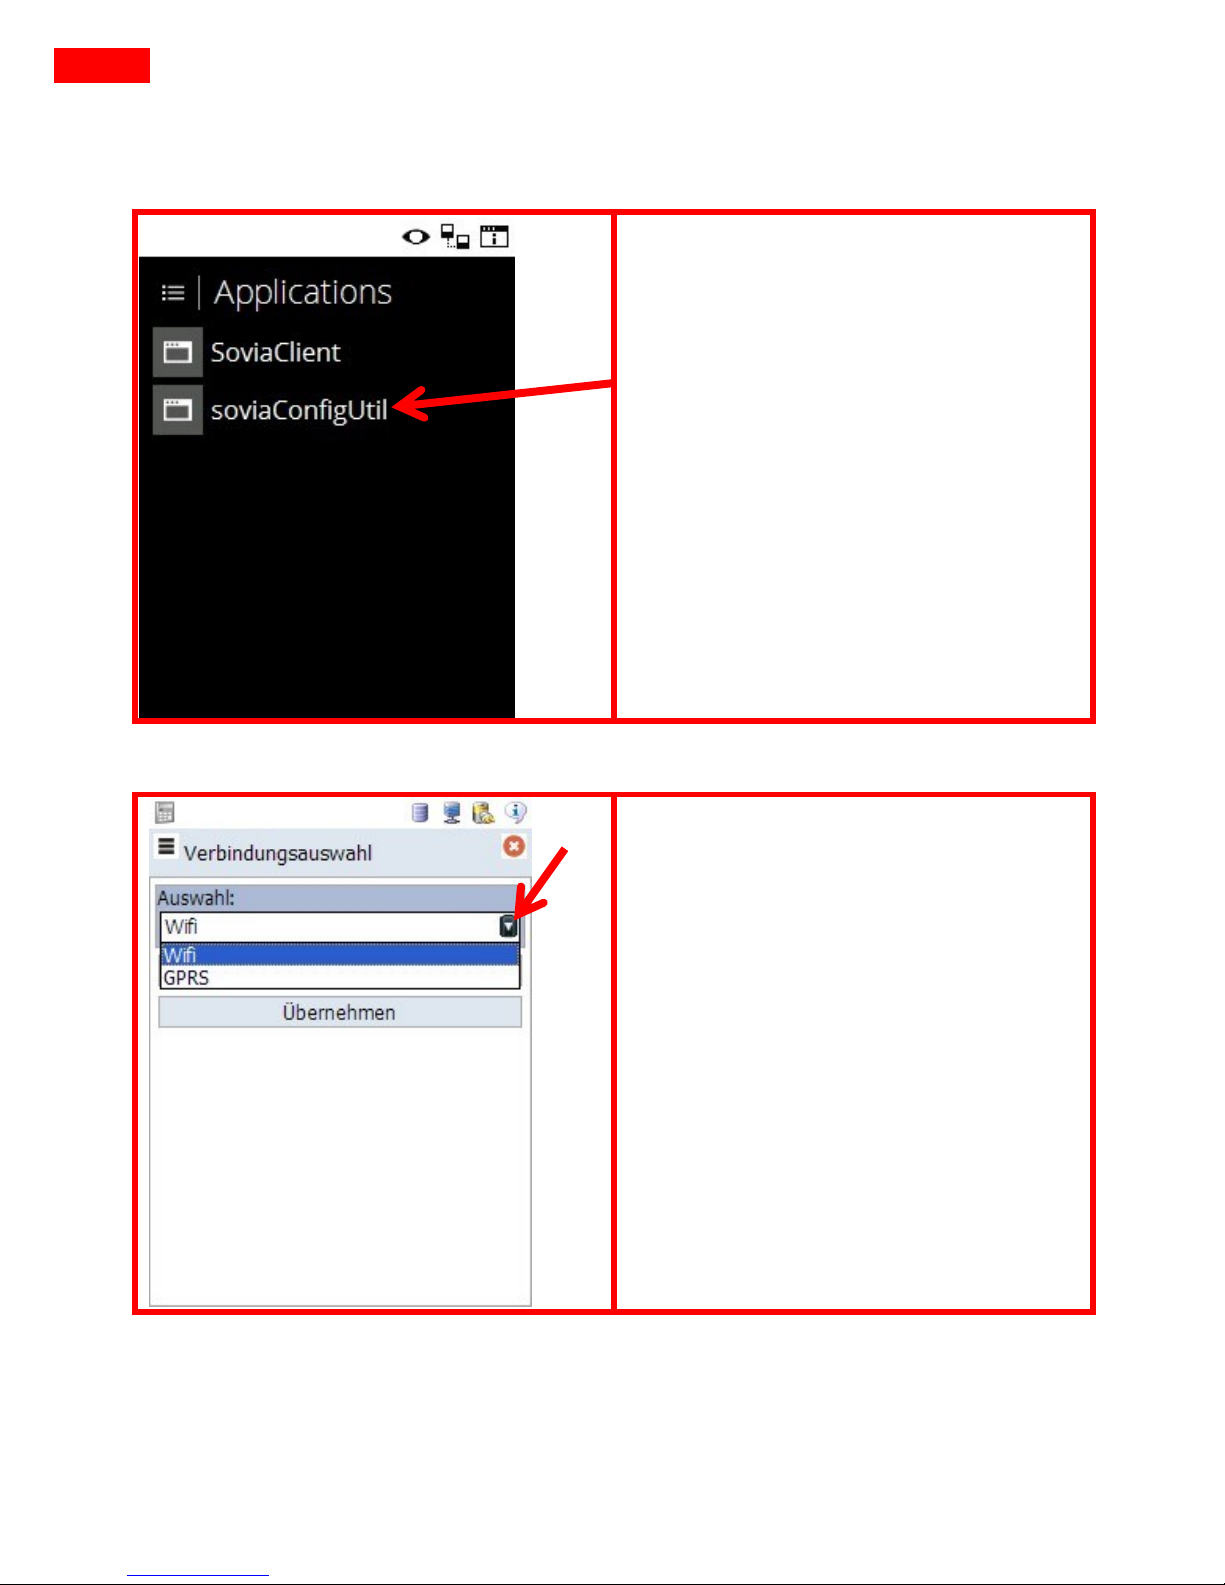
Exit the Sovia Client. Through clicking
the ESC key or the red x and then
„Beenden“ (Finish) you get into this
menu after confirming (see picture).
Select “soviaConfigUtil” here.
In the following menu, select „Edit
connections“.
To configure a Wi-Fi connection,
select “Wifi” in the dropdown menu
afterwards (see arrow), or select
“GPRS” for a GPRS connection. Then,
select the button “Bearbeiten” (Edit).
Page 18
17
MDE User Manual
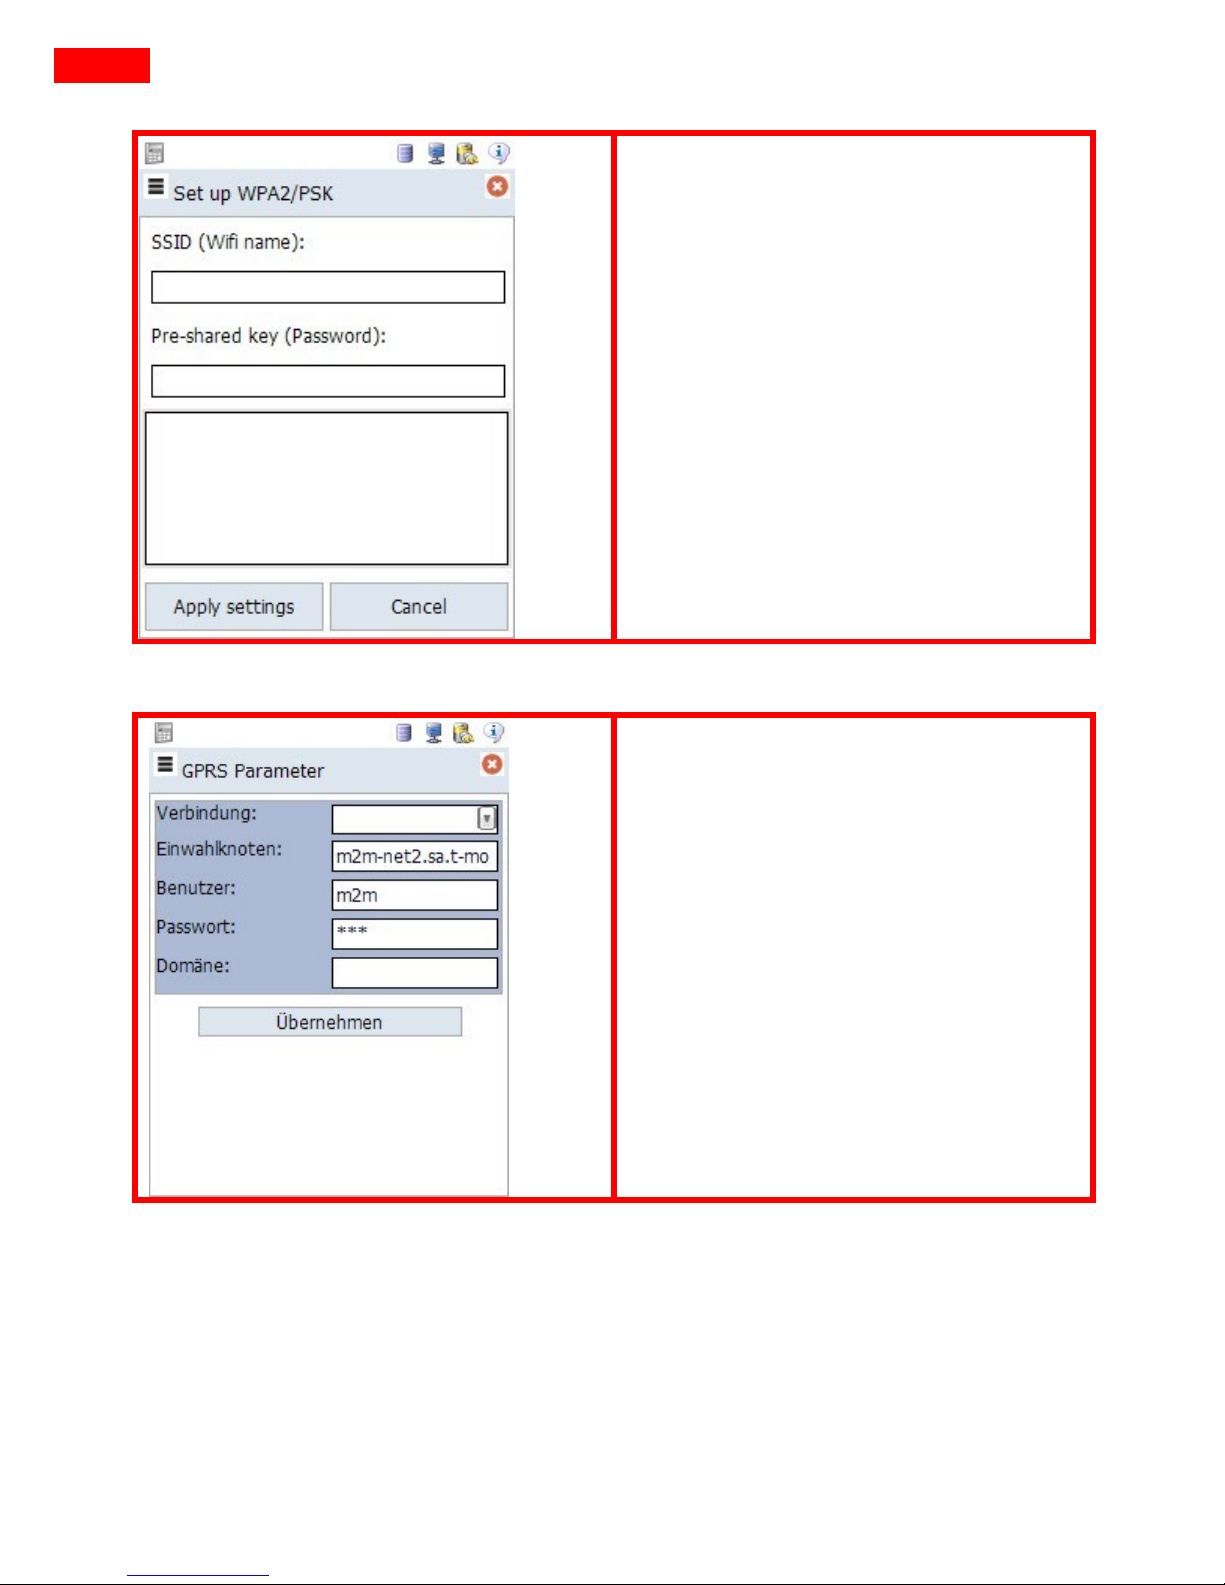
Wi-Fi
In the now following menu (see
picture) enter the name of you Wi-Fi
(SSID) and then the password.
Afterwards, click on „Apply Settings“
and confirm your entry with „OK“.
Now press „Übernehmen“ (Take) to
finish.
GPRS
In the now following menu (see
picture) you can enter the respective
data you have received from you
mobile grid provider.
Afterwards, press „Übernehmen“
(Take) and confirm you entry with
„OK“. Now press “Übernehmen”
(Take) again to finish.
Page 19
18
MDE User Manual
6. Login & Change Of Tenant
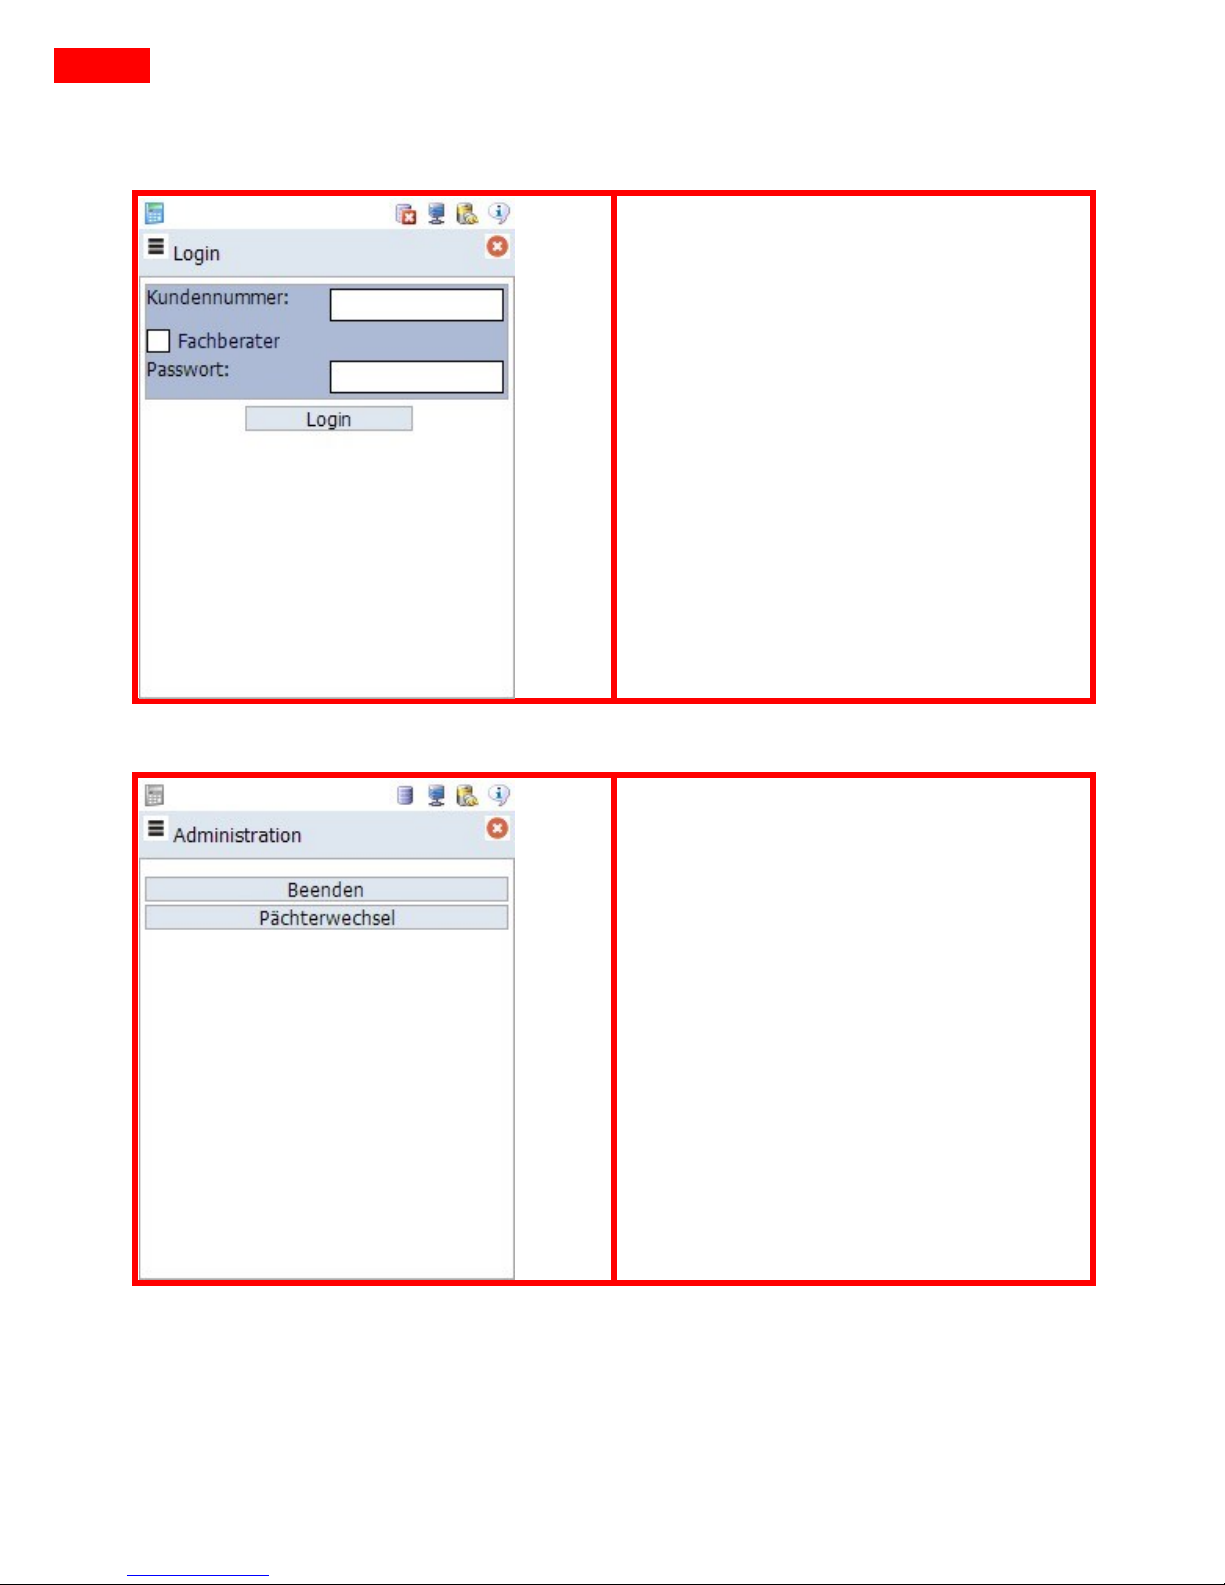
After the installation, or rather to
change the tenant, the login is
effected via this window. The
customer number has to be filled up
with noughts at the front to a total of
ten digits. The box next to
“Fachberater” (Consultant) must not
be selected.
To change the tenant, exit the main
menu via the red cross at the top
right and select „Pächterwechsel“
(Change of tenant). After entering
the password, you get to the login
window shown before.
Page 20
19
MDE User Manual
7. Entering Orders
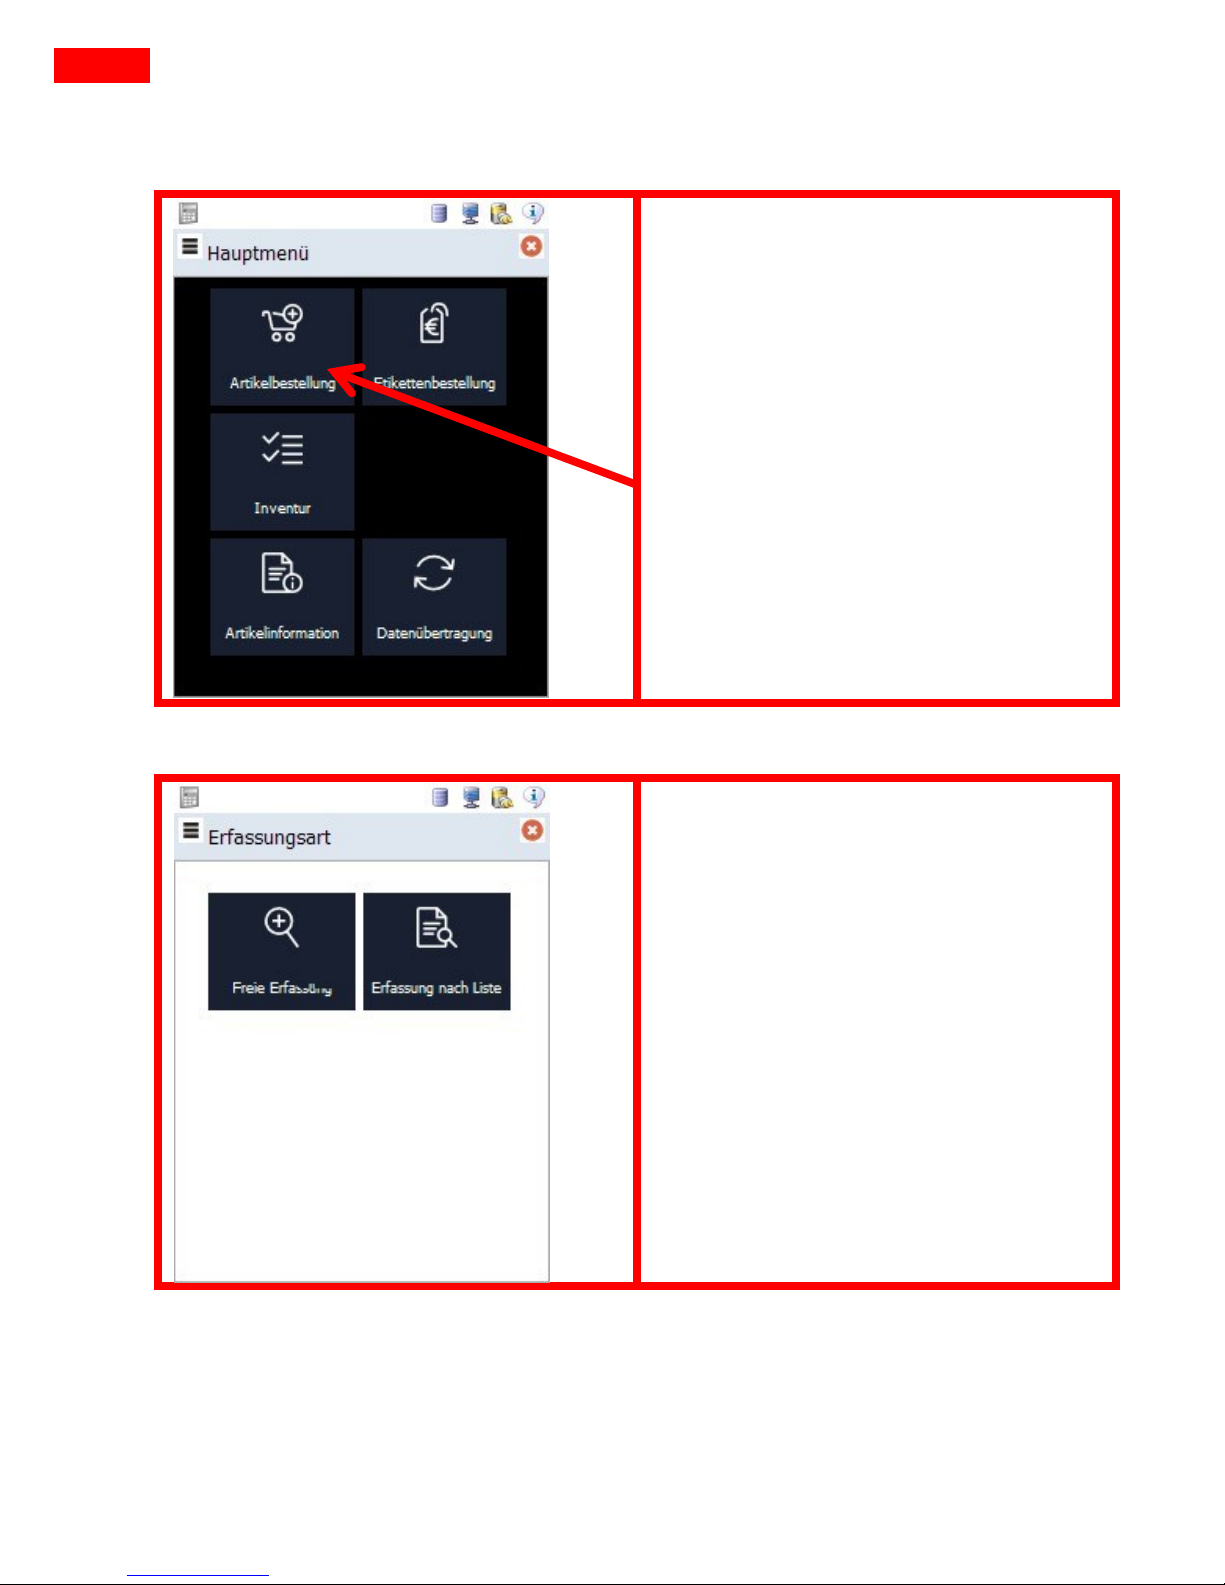
Articles can be entered using the
EAN
Article number or
Stable articel number.
Click on the menu point
“Artikelbestellung” (Order Articles) in
the main menu.
You can choose between “Freie
Erfassung” (Free Entry) and “Erfassung
nach Liste” (Entry By List).
Page 21
20
MDE User Manual
7.1 Freie Erfassung (Free Entry)
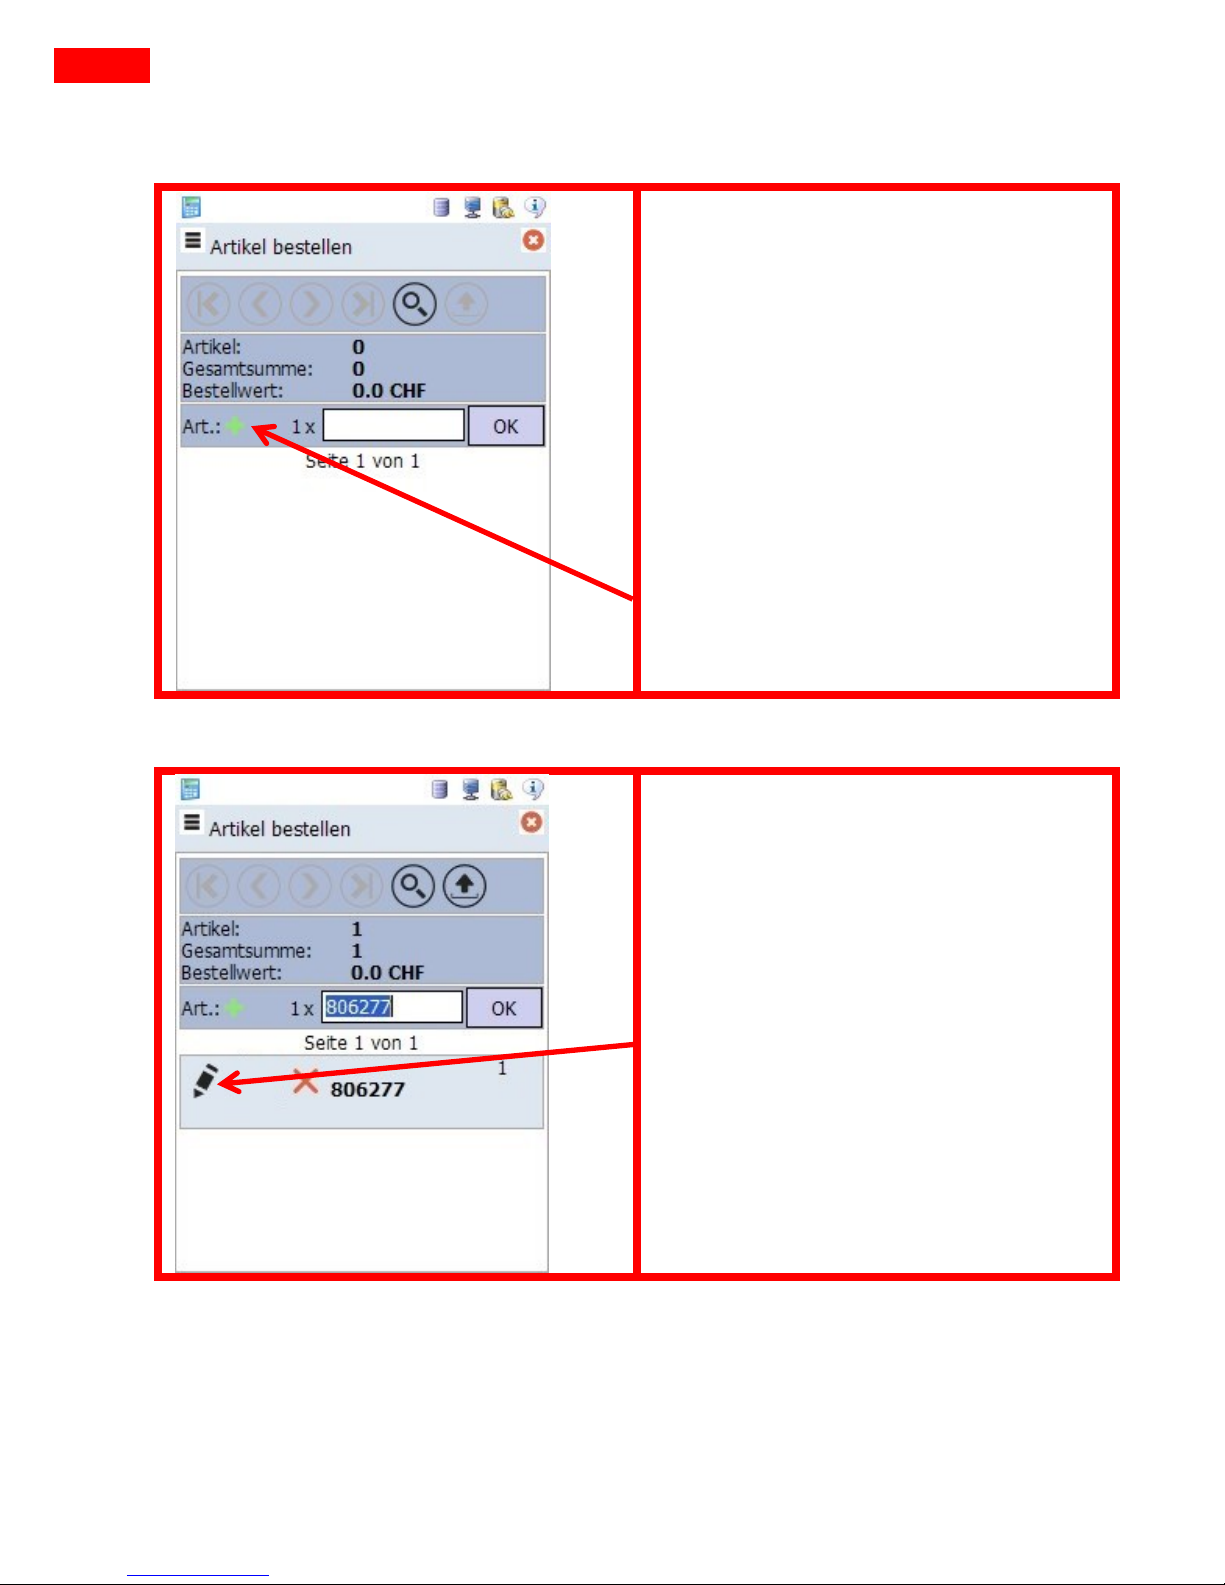
In Free Entry you can order products
with the article number.
Furthermore, you can scan the article
number/EAN of the article via the
barcode in the order book or directly
at the shelf.
Via the “+” symbol you can change the
quantity of the products to be
ordered.
When you have scanned an article,
you can change the details.
For example, you can freely choose
the order quantity.
Page 22
21
MDE User Manual
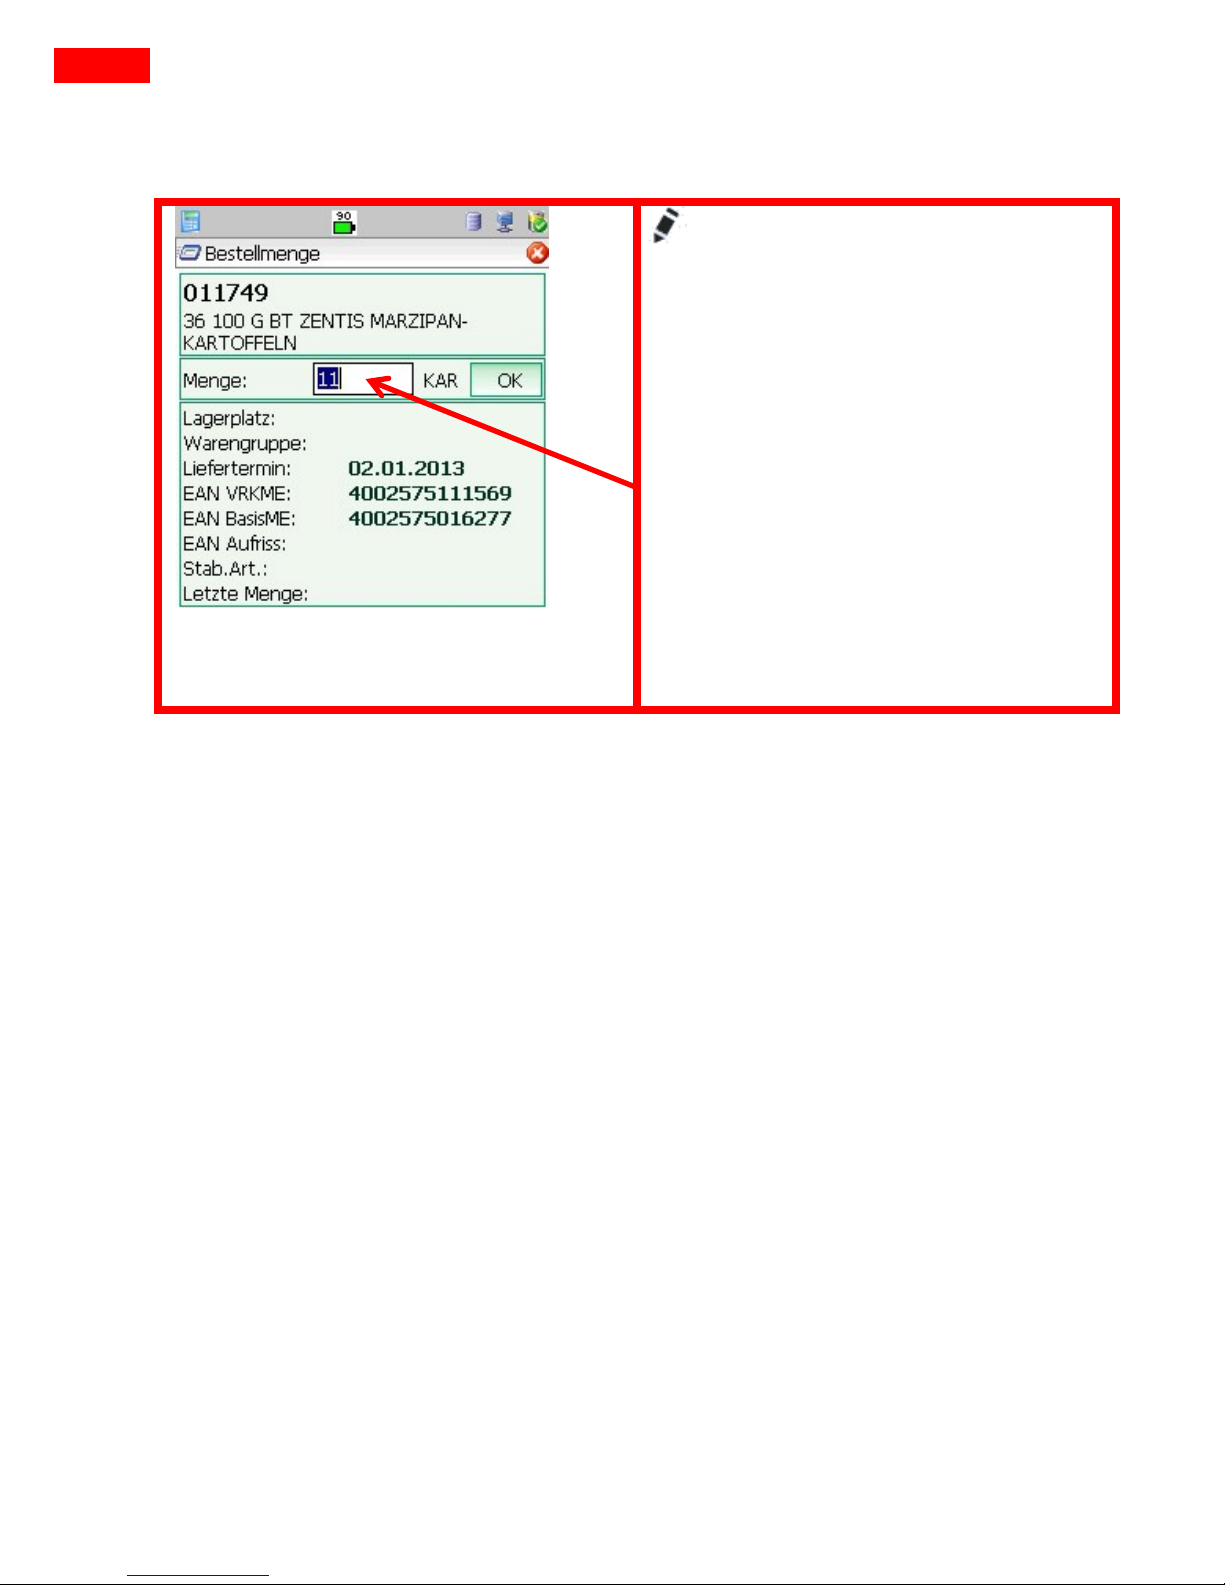
With this you get into the editing
window.
Here you have an overview over the
selected article and you can see the
details.
Furthermore, you can freely chose the
order quantity.
Page 23
22
MDE User Manual
7.2 Erfassung nach Liste (Entry By List)
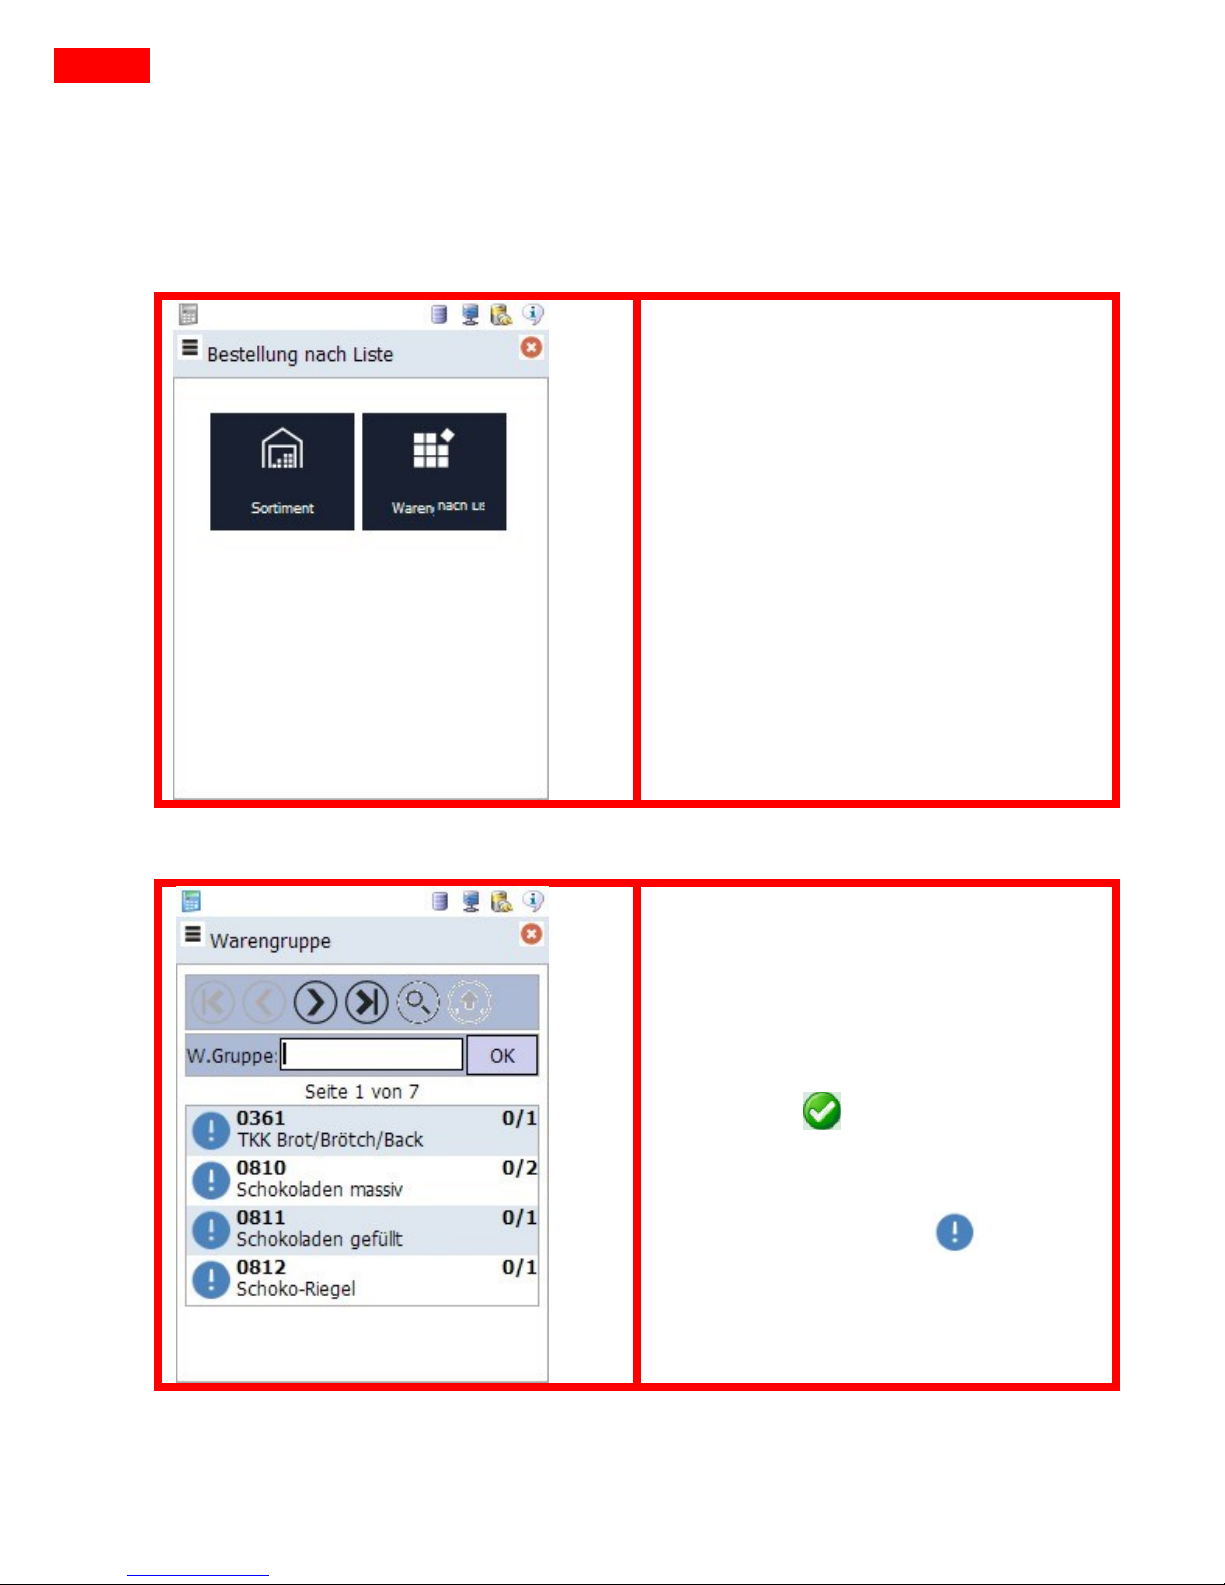
In “Erfassung nach Liste” (Entry by List) the assortment provided on the MDE
device is shown. The order entry is effected from this range.
Confirm your selection with the
button “Sortiment” (Assortment) or
“Warengruppe” (Product Group).
7.2.1 Sortiment (Assortment)
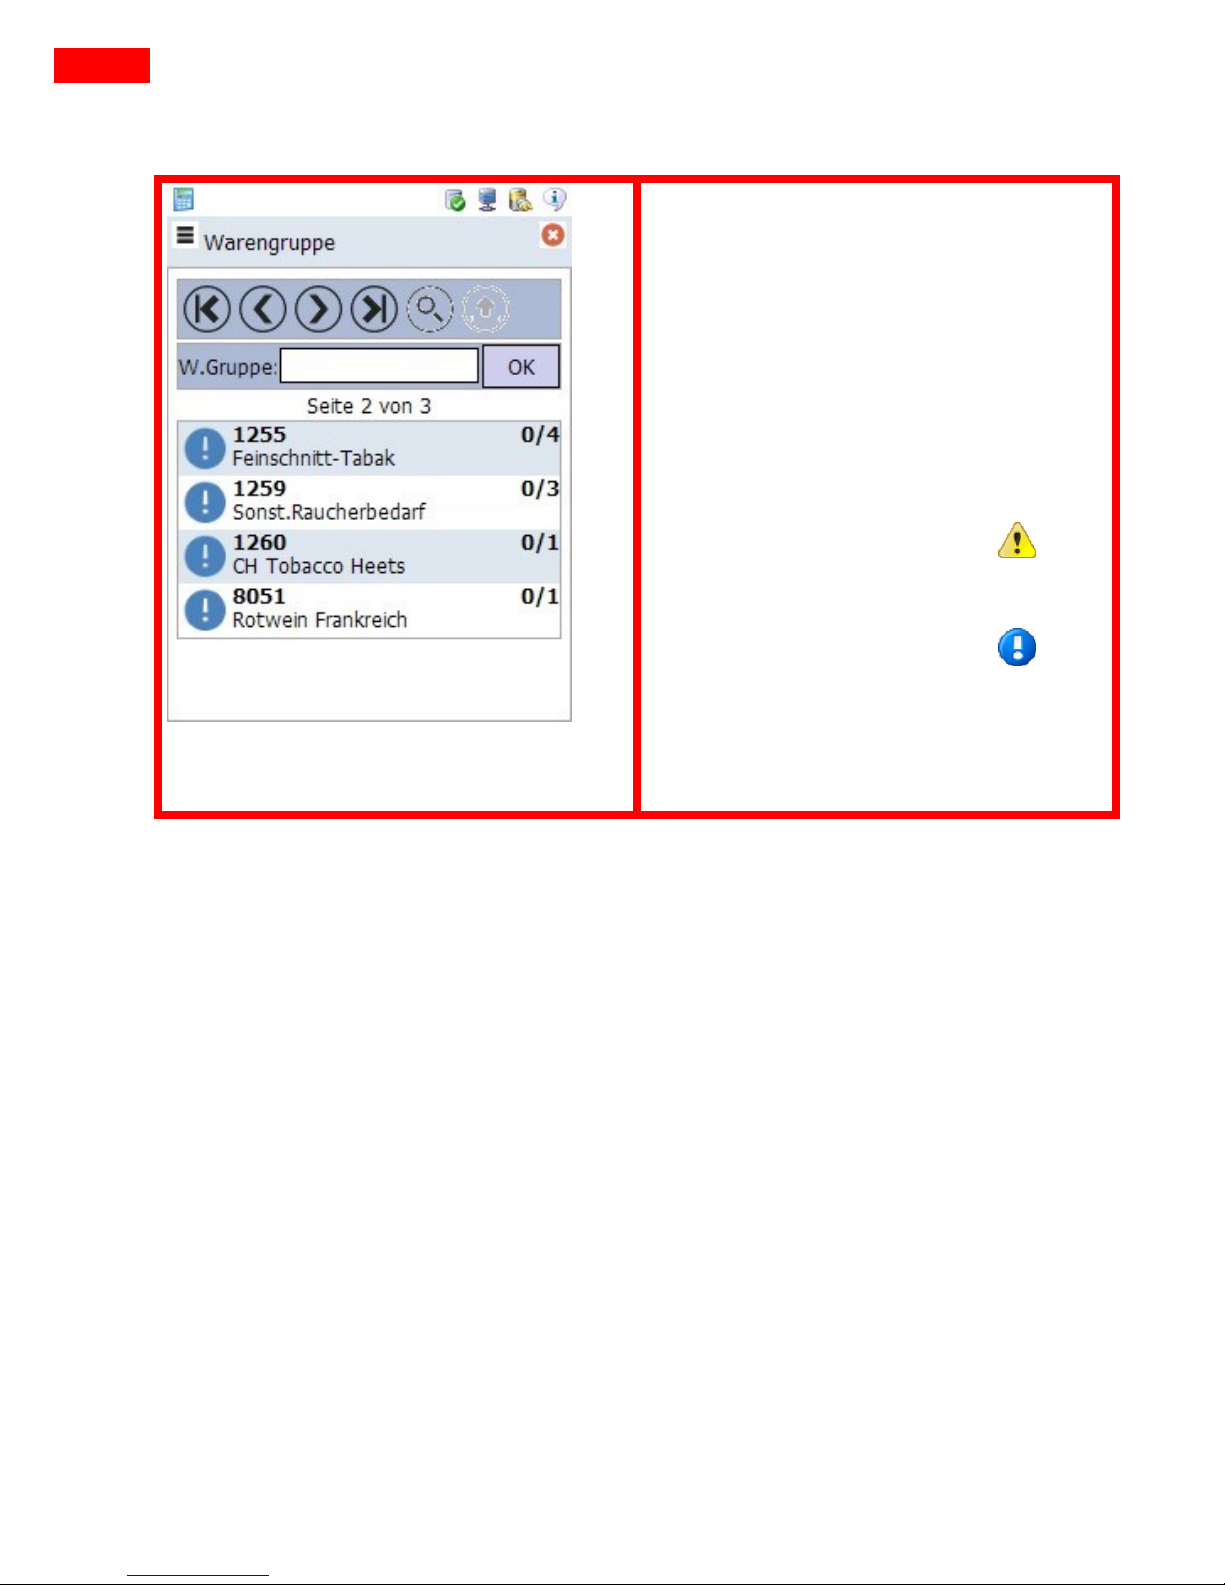
Enter the article number via the
keyboard and confirm with the „OK“
button, scan the barcode or select an
article from the list.
Articles which have been edited are
marked with .
Articles which have not yet been
edited are marked with .
Page 24
23
MDE User Manual
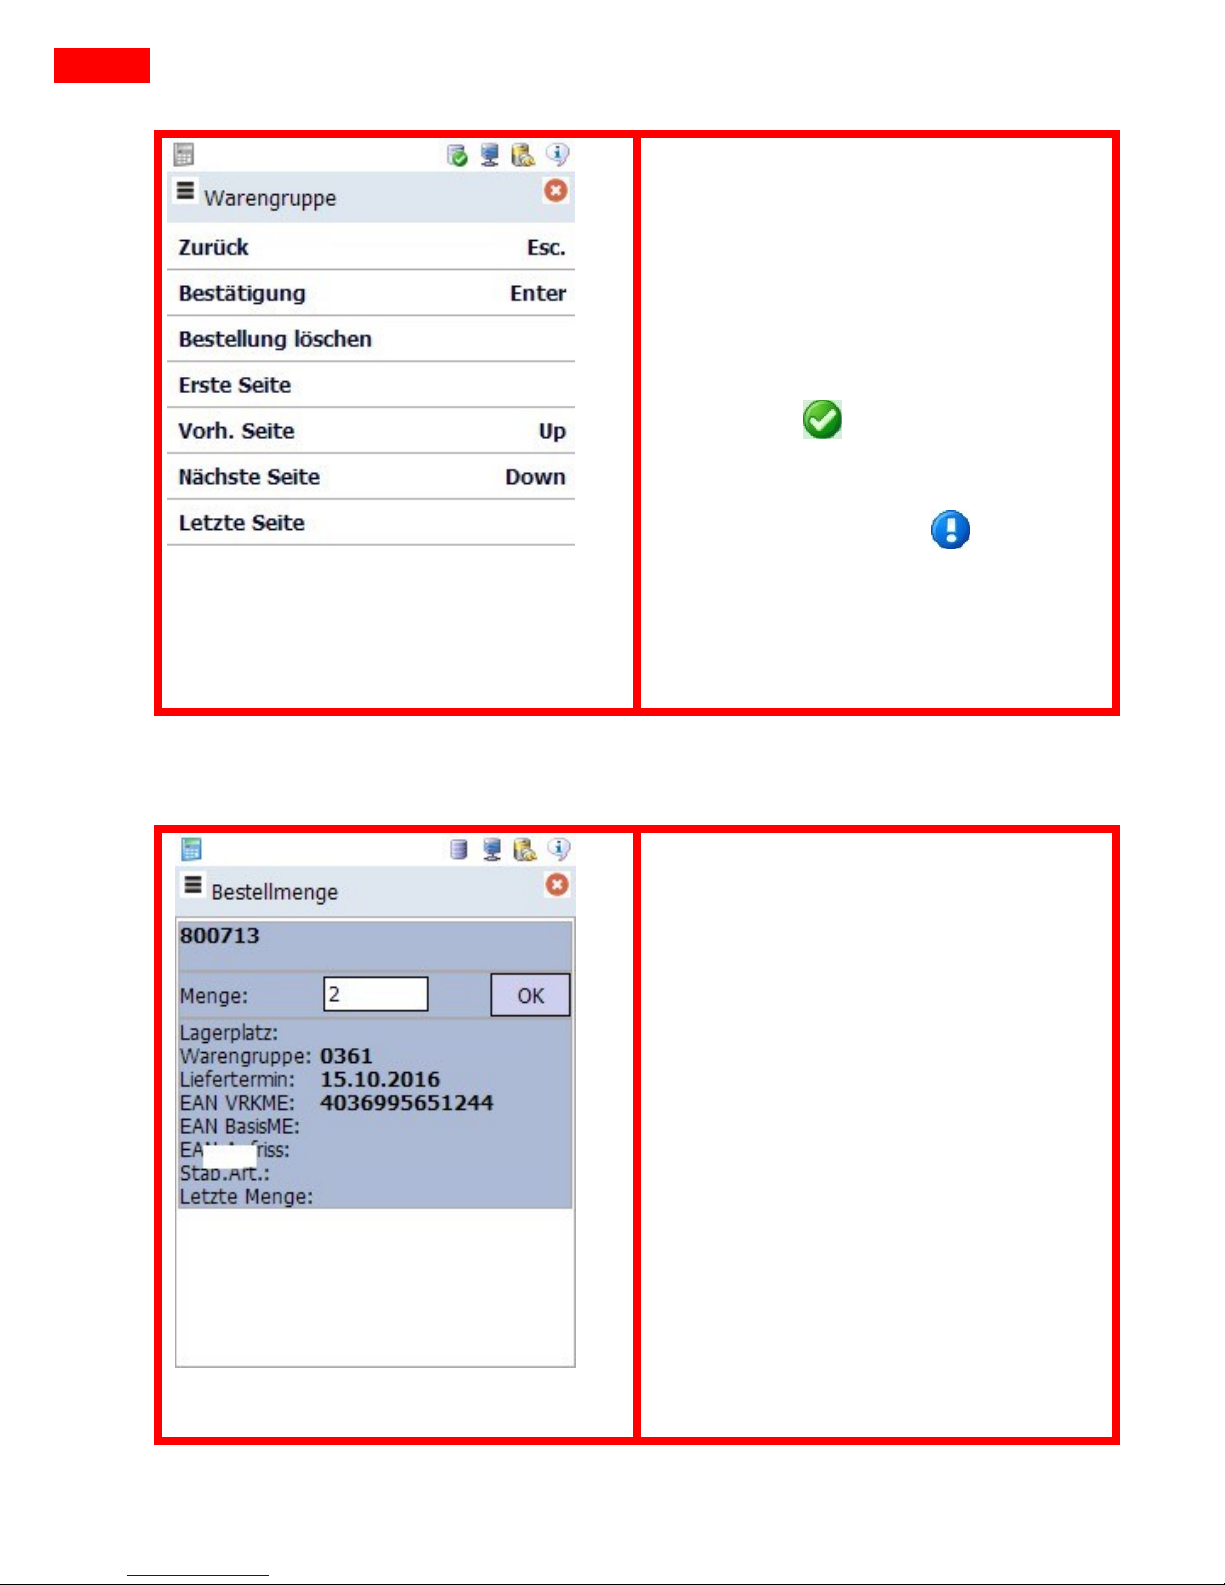
7.2.2 Warengruppe (Product Group)
Select a product group, either by
entering a product group via the
keyboard or by selecting a product
group from the list and confirm with
the “OK” button.
Product groups (or rather articles
from the product group) which have
been edited are marked with .
Product groups which have not yet
been edited are marked with .
Page 25
24
MDE User Manual
Enter the article number via the
keyboard and confirm with the “OK”
button, scan the barcode or select an
article from the list.
Articles which have been edited are
marked with .
Articles which have not yet been
edited are marked with .
Here detailed information on the
selected article is shown. As an order
quantity, “1” is selected by standard.
Correct the quantity and confirm it
with the “OK” button. Or use the
upper red arrow key (+1), or to correct
use the lower red arrow key (-1). Then
the next article from the list is shown
to you.
Page 26
25
MDE User Manual
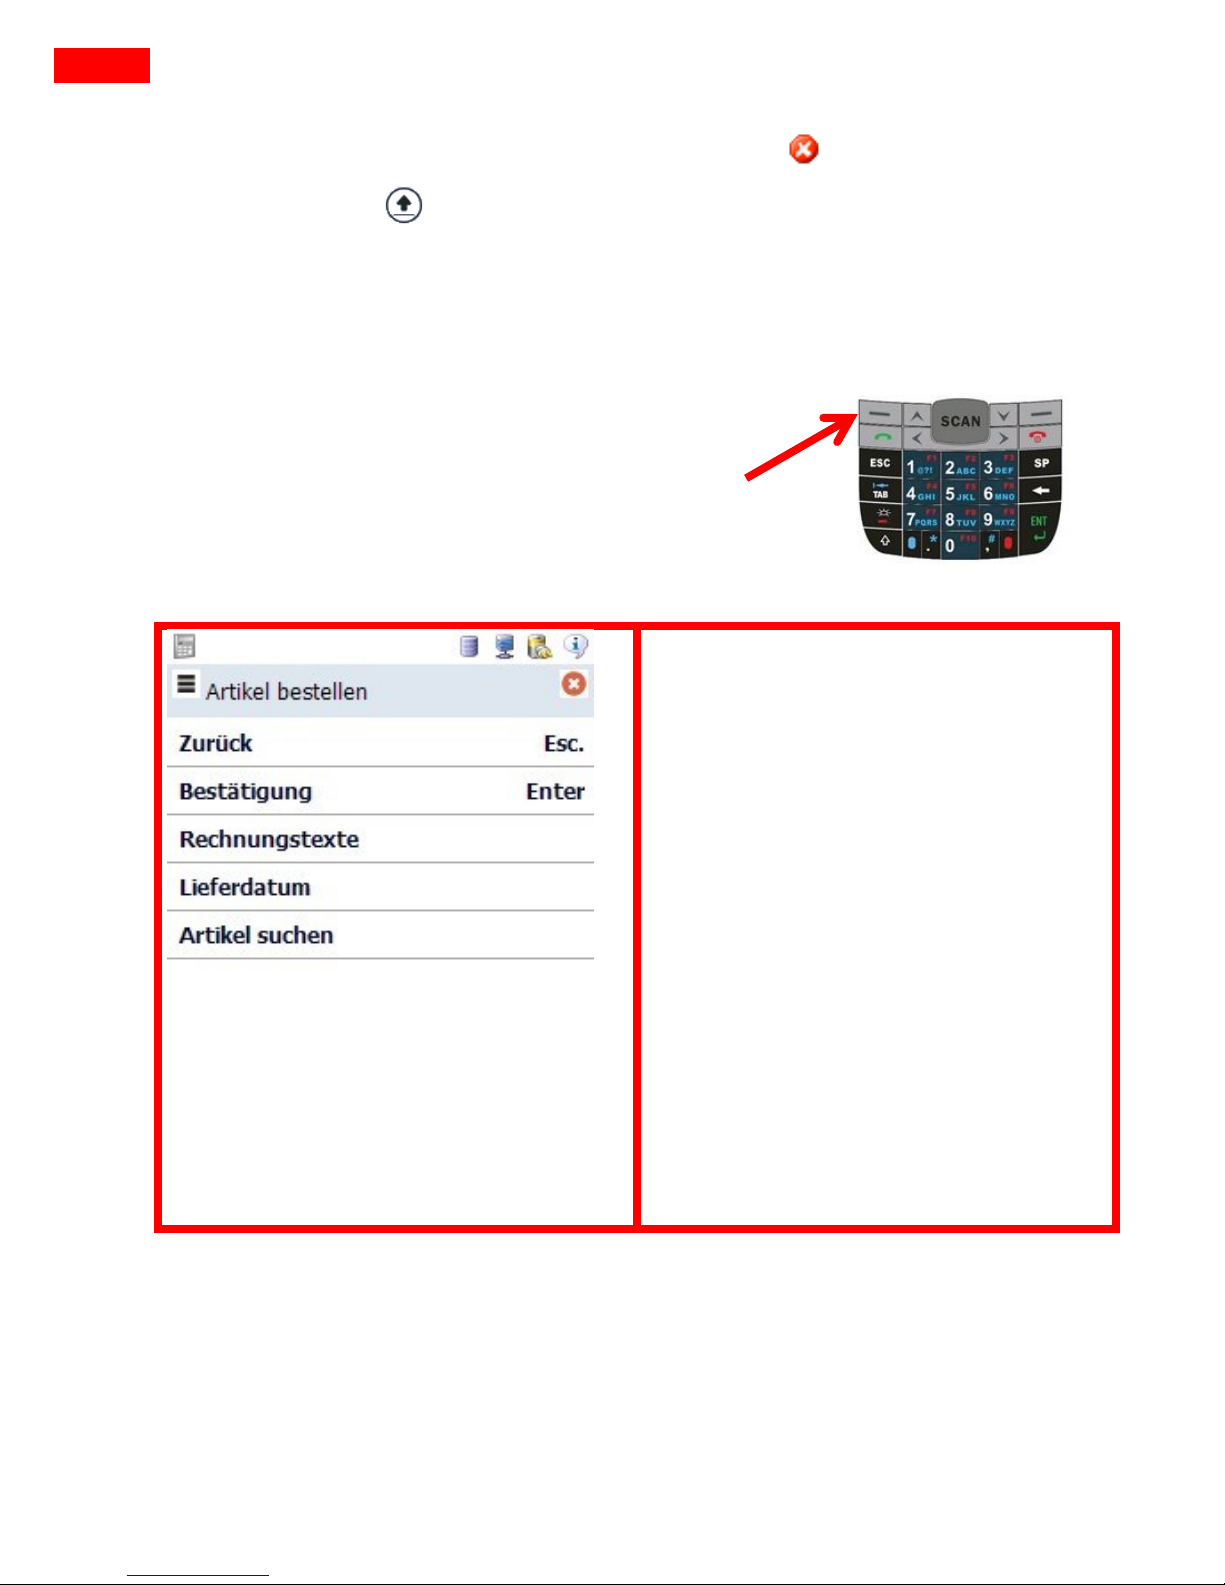
The order can be cancelled by clicking the button or
finished via the button.
7.3 Zusatzfunktionen (Additional Functions)
7.3.1 Finishing Orders
With the left dialog key you get into
the context menu “Zusatzfunktionen”
(Additional Functions).
In the appearing dialog you choose
the item “Abschluss” (Finishing) and
confirm with “Ja” (Yes) to send your
order to Lekkerland.
Page 27
26
MDE User Manual
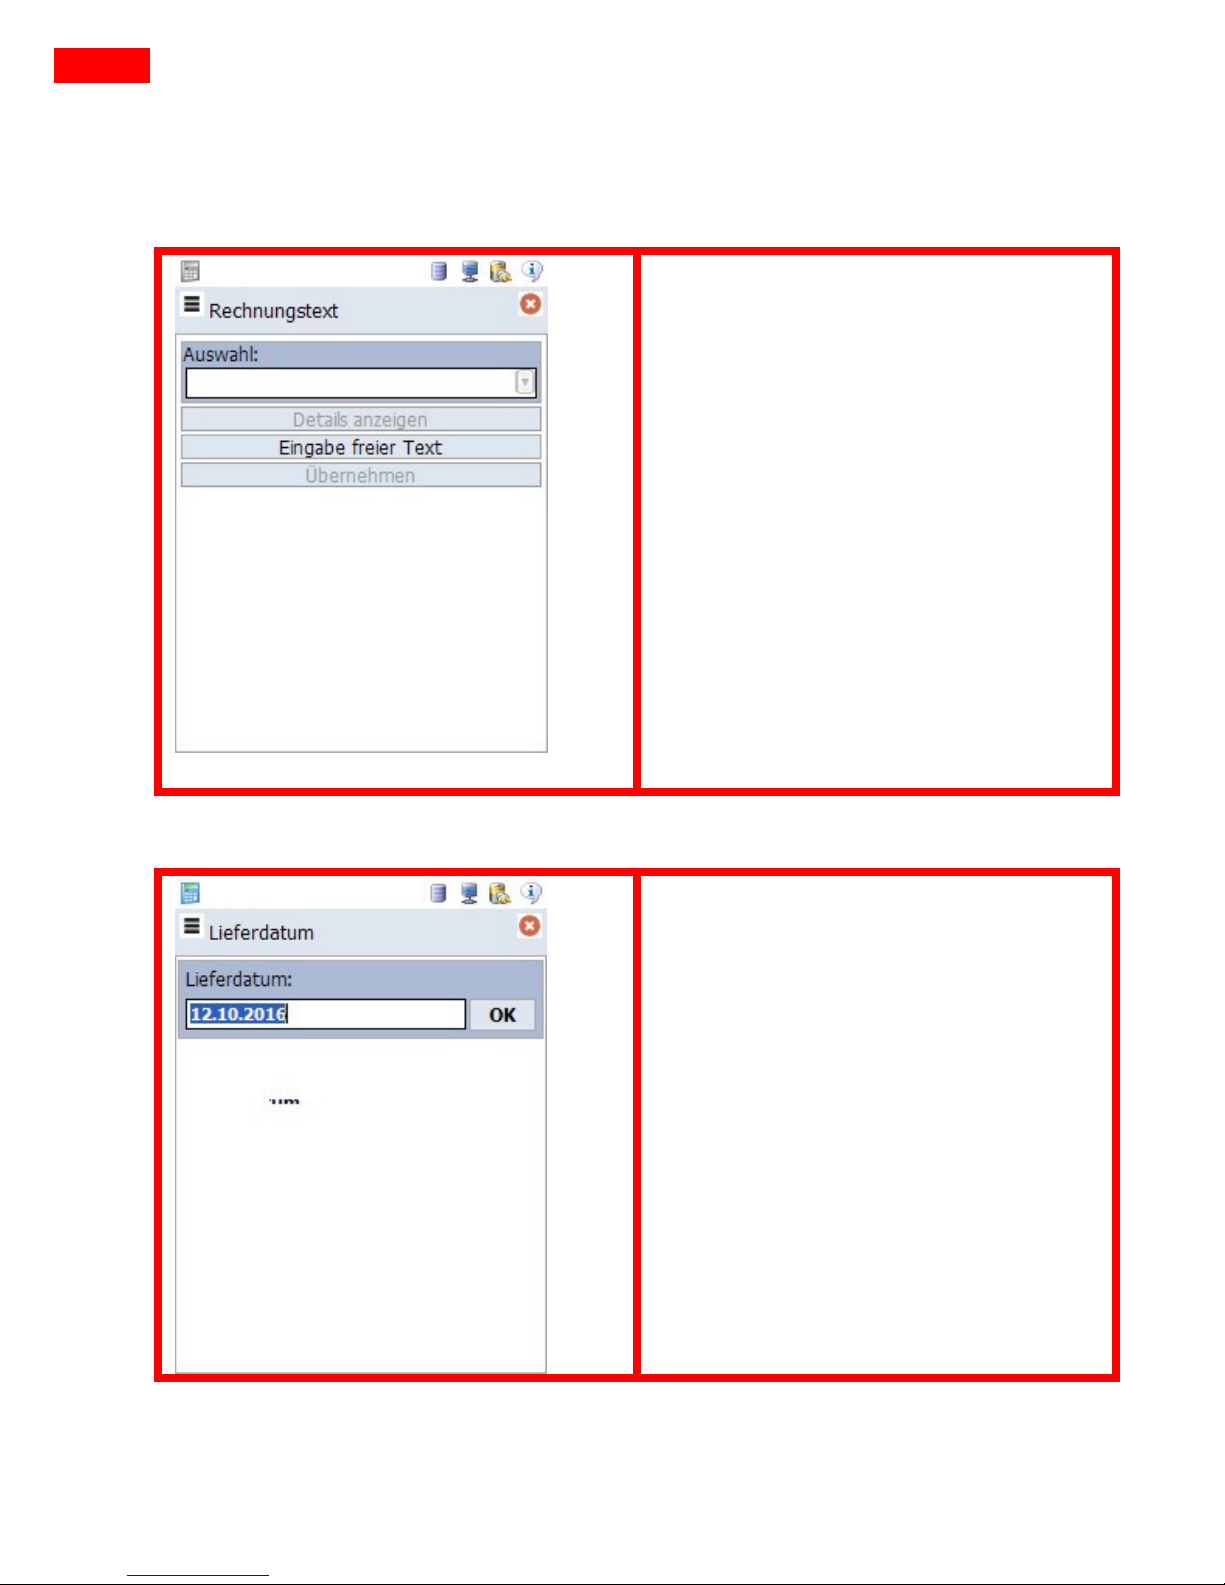
7.3.2 Rechnungstexte (Invoice Texts)
In the dialog menu you also have the
possibility to use Zusatzfunktionen
(Additional Functions).
With “Rechnungstexte” (Invoice Texts)
you can have additional texts written
on your invoice, which will be printed
on the invoice.
You can either choose one of the text
blocks from the menu or write your
own text with “Eingabe freier Text”
(Enter text freely).
With “übernehmen” (take) you
confirm your entry.
7.3.3 Lieferdatum (Delivery Date)
Here you can enter a delivery date
(DD.MM.YYYY) on which the
consignment is to be delivered to you.
With “OK” you confirm the entry.
Page 28
27
MDE User Manual
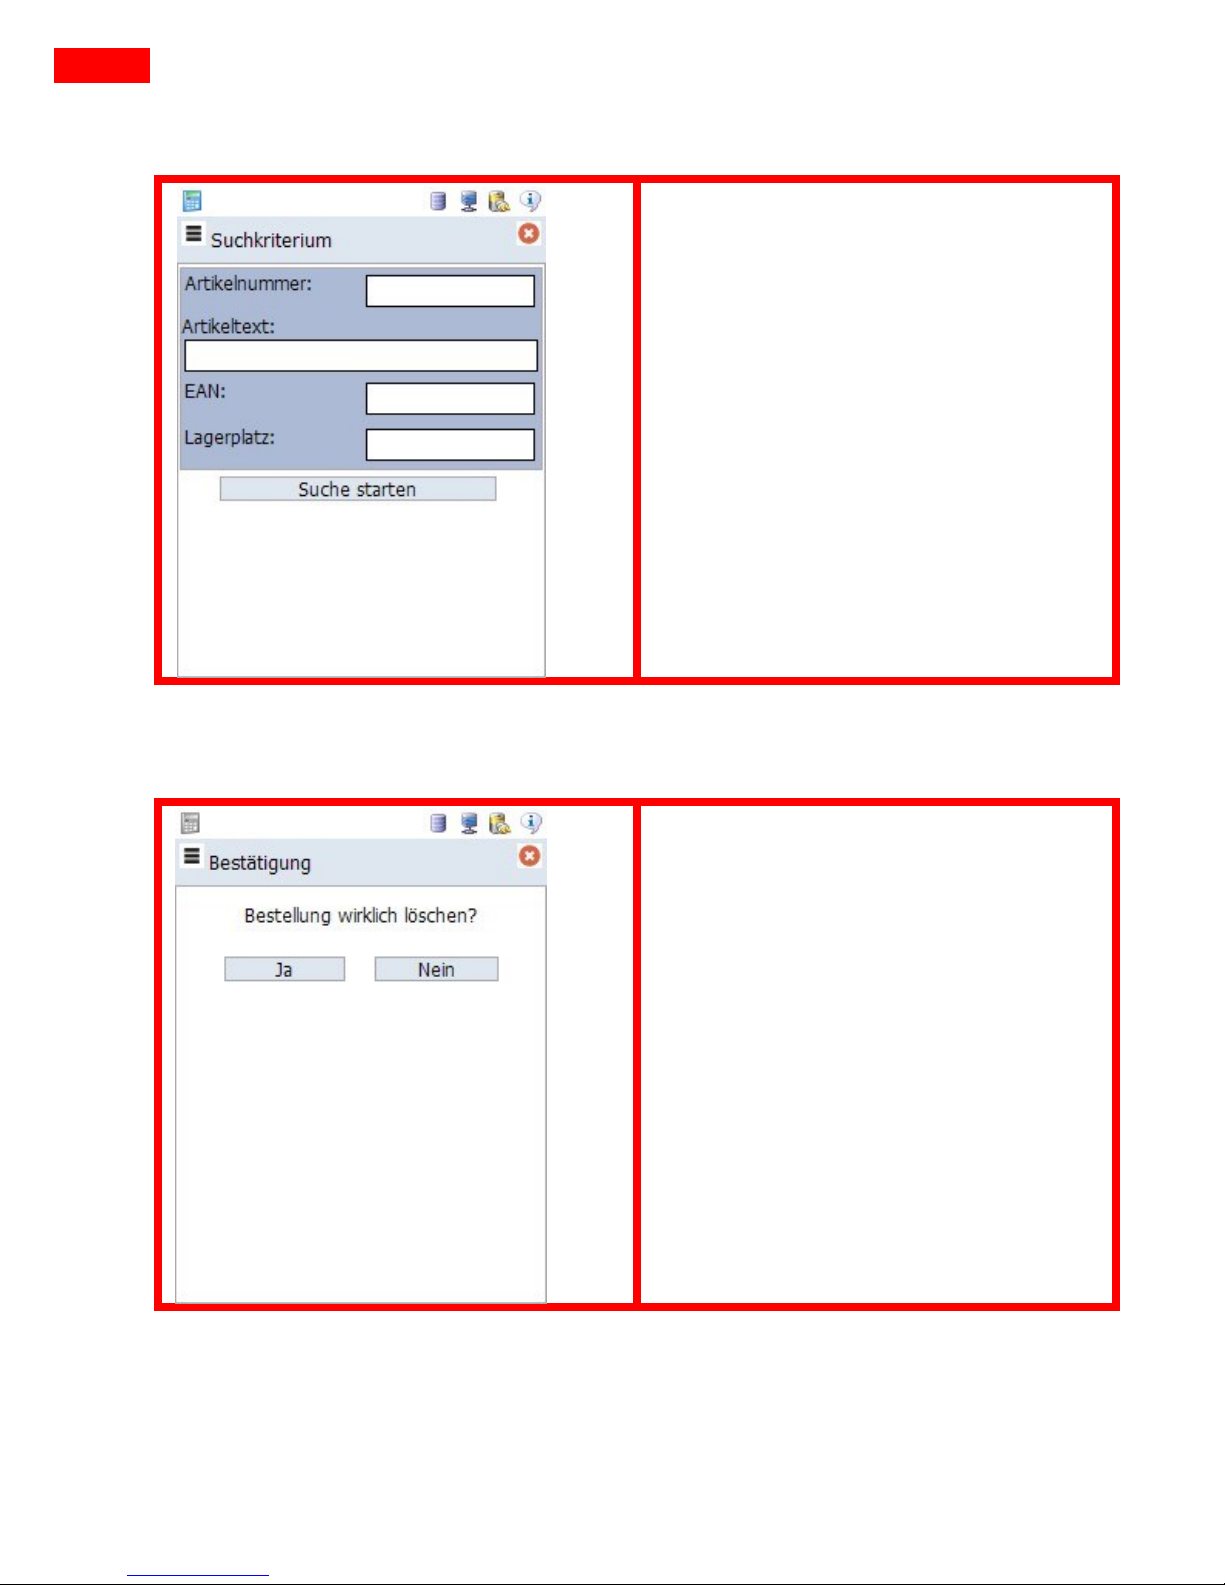
7.3.4 Artikelsuche (Searching for Articles)
If you wish to search for an article
from the product range or the order,
you can enter various criteria for the
search here and start the search in
your product range with “Suche
starten” (Start search).
7.3.5 Bestellung löschen (Delete Order)
To delete the order, confirm with
“Ja”(Yes).
With “Nein”(No) you cancel and get
back to the previous menu.
Page 29
28
MDE User Manual
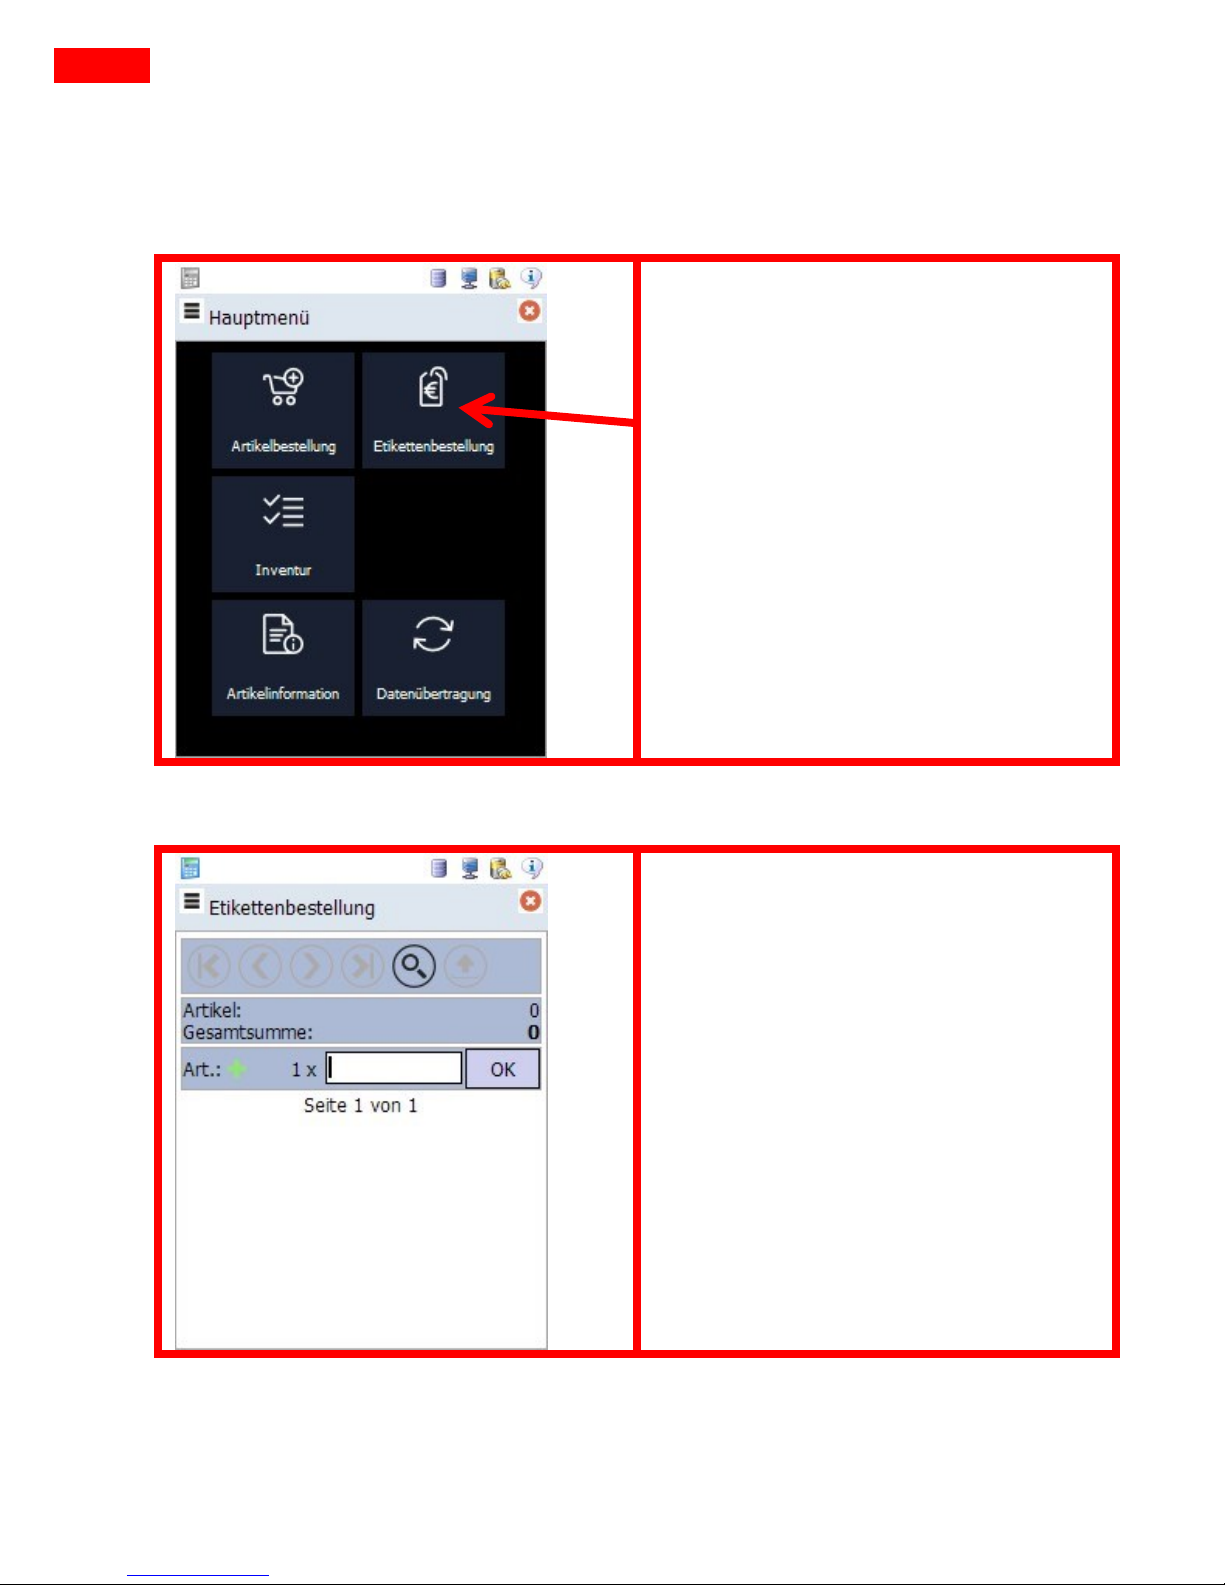
8 Ordering Labels
If you want to order labels for your
articles, you can do so via
“Etikettenbestellung” (Order Labels).
Choose the item “Etikettenbestellung”
(Order Labels) on the start screen.
8.1 Entry
Here you can either scan the article
for the label or enter the article
number manually.
Page 30
29
MDE User Manual
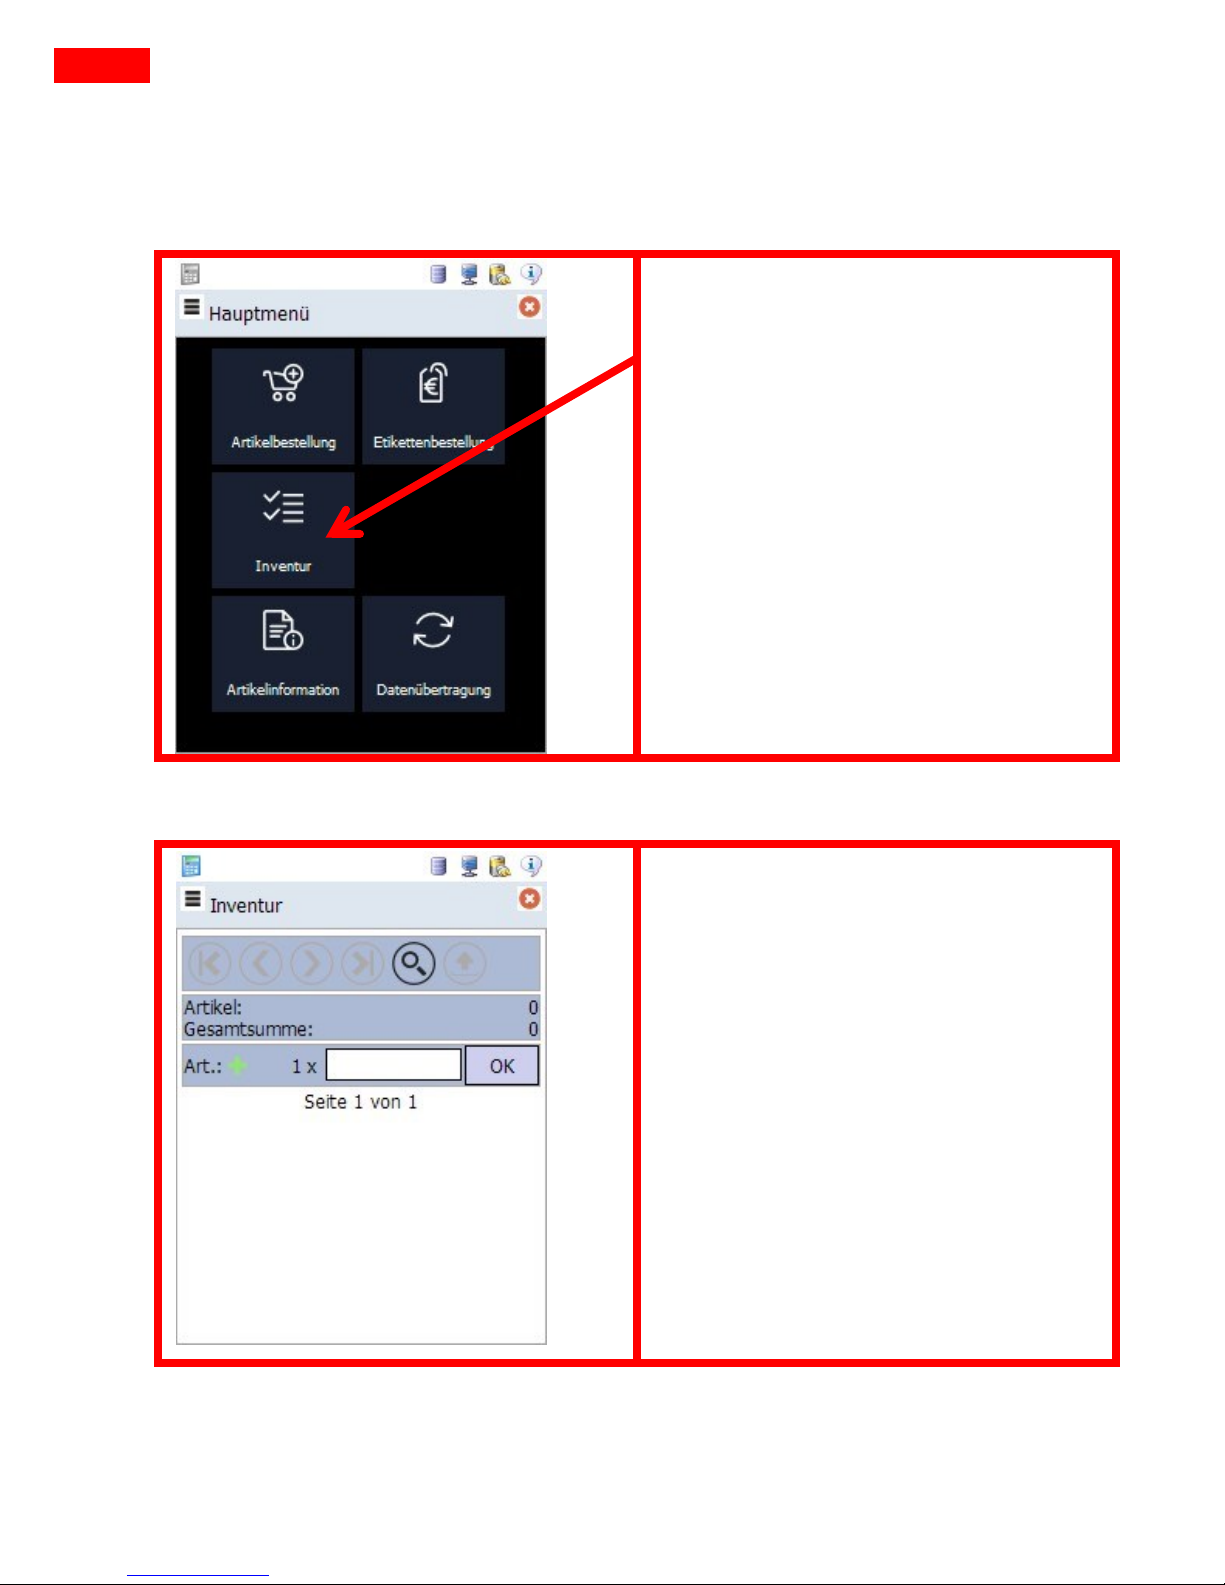
9 Inventur (Stocktaking)
Select „Inventur“ (Stocktaking) on the
start screen.
9.1 Entry
Entries can be made by EAN, article
number or stable article number.
Enter the article number via the
keyboard and confirm with “OK” or
scan the barcode.
If you scan or press “OK” various
times, the order quantity increases by
one.
Repeat until all articles are recorded.
Page 31
30
MDE User Manual
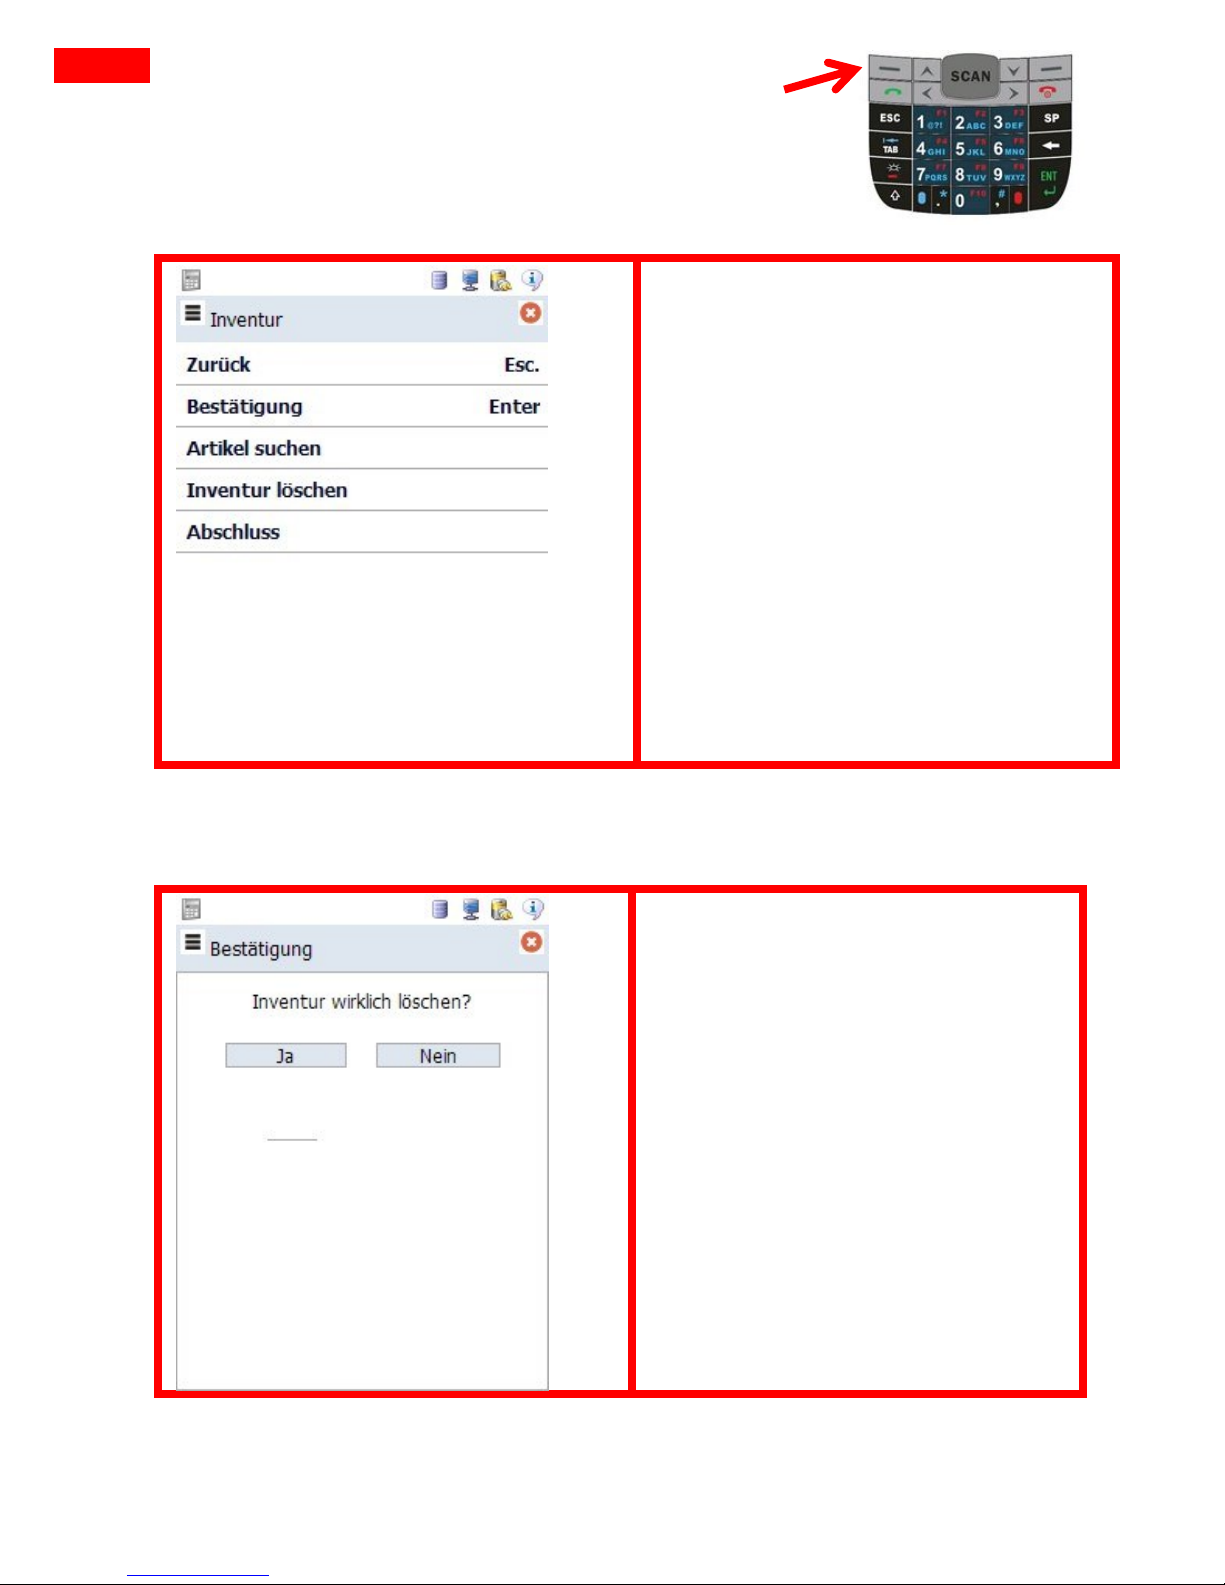
9.2 Zusatzfunktionen (Additional Functions)
9.2.1 Finishing Stocktaking
When all articles have been recorded,
you can access the additional menu
with the left dialog key.
Select the menu item “Abschluss”
(Finish).
9.2.2 Delete Stocktaking
If you want to cancel the
stocktaking, select “Inventur
löschen” (Delete Stocktaking).
Page 32
31
MDE User Manual
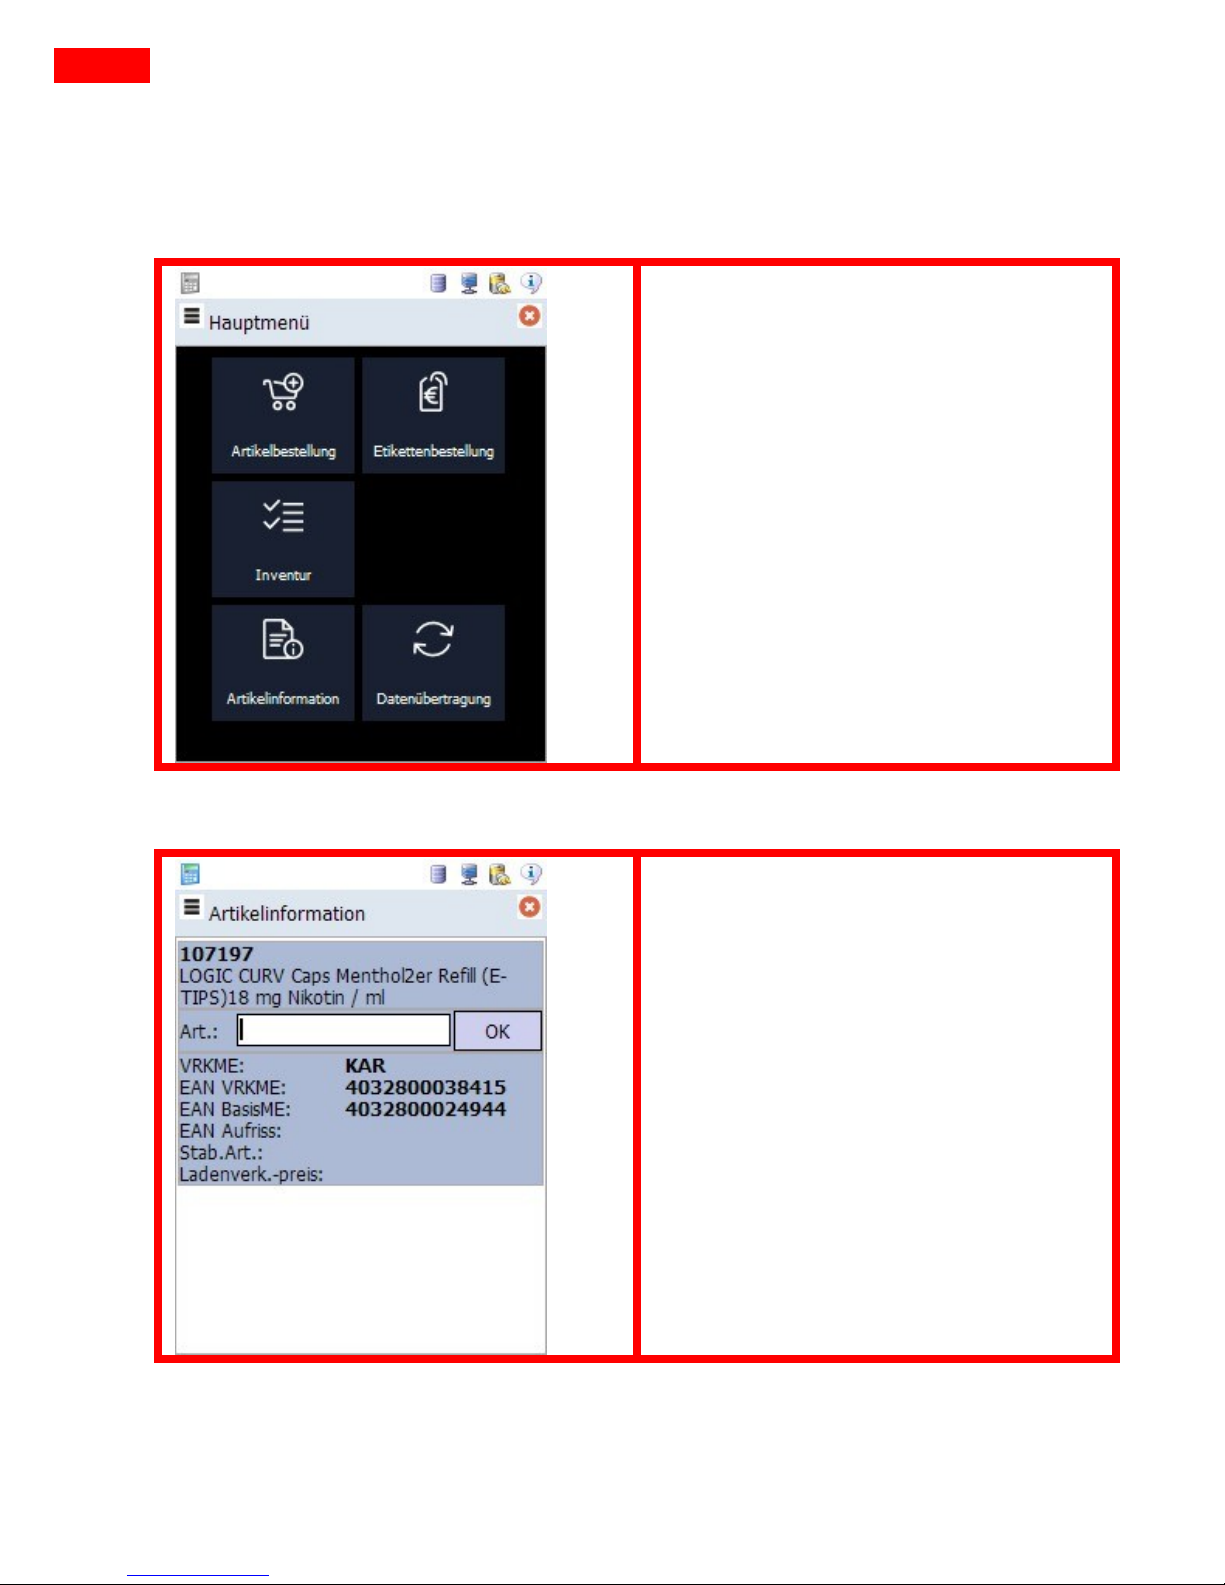
11 Article Information
On the start screen, select the menu
item “Artikelinformationen” (article
information).
11.1 Show Article Information
You can also take the article directly
into your order.
Press the left dialog key to show the
context menu and select the item
„Artikelbestellung“ (order article).
Page 33
32
MDE User Manual
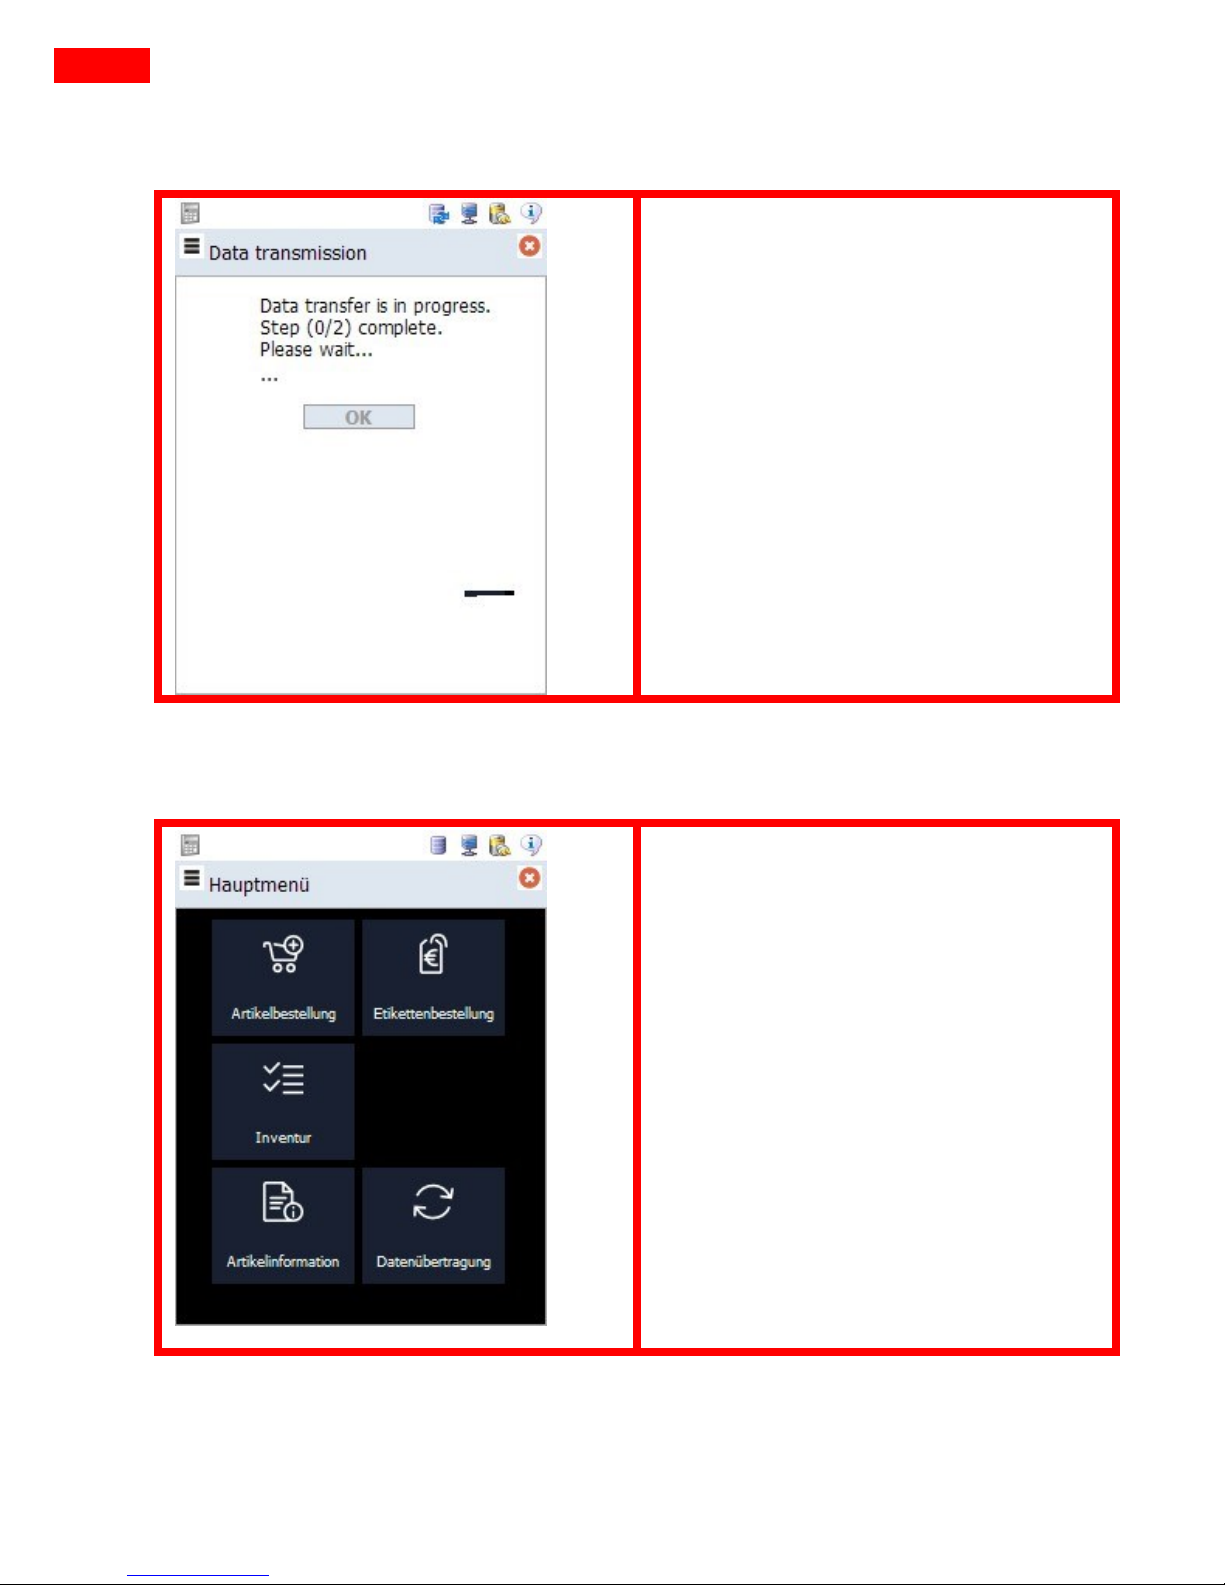
12 Data Transfer
On the start screen, select the menu
item “Datenübertragung” (Data
Transfer).
The created data (orders/shelf
labels/stocktaking) is sent to
Lekkerland and article master data or
software actualisations are received
from Lekkerland.
If necessary, background data is sent
to the MDE device and shown on the
device after the transfer.
The transfer being successful, you get
back to the main menu.
The created data (orders/shelf
labels/stocktaking) is sent to
Lekkerland and article master data or
software actualisations are received
from Lekkerland.
If necessary, receivable messages are
transferred to the MDE device and
shown on the device after the
transfer.
The transfer being successful, you get
back to the main menu.
Page 34
33
MDE User Manual
13 Consultant Functions
If you log in with an account that identifies you as a Lekkerland consultant
you attain additional functions and authorisations on the device.
13.1 Order Articles
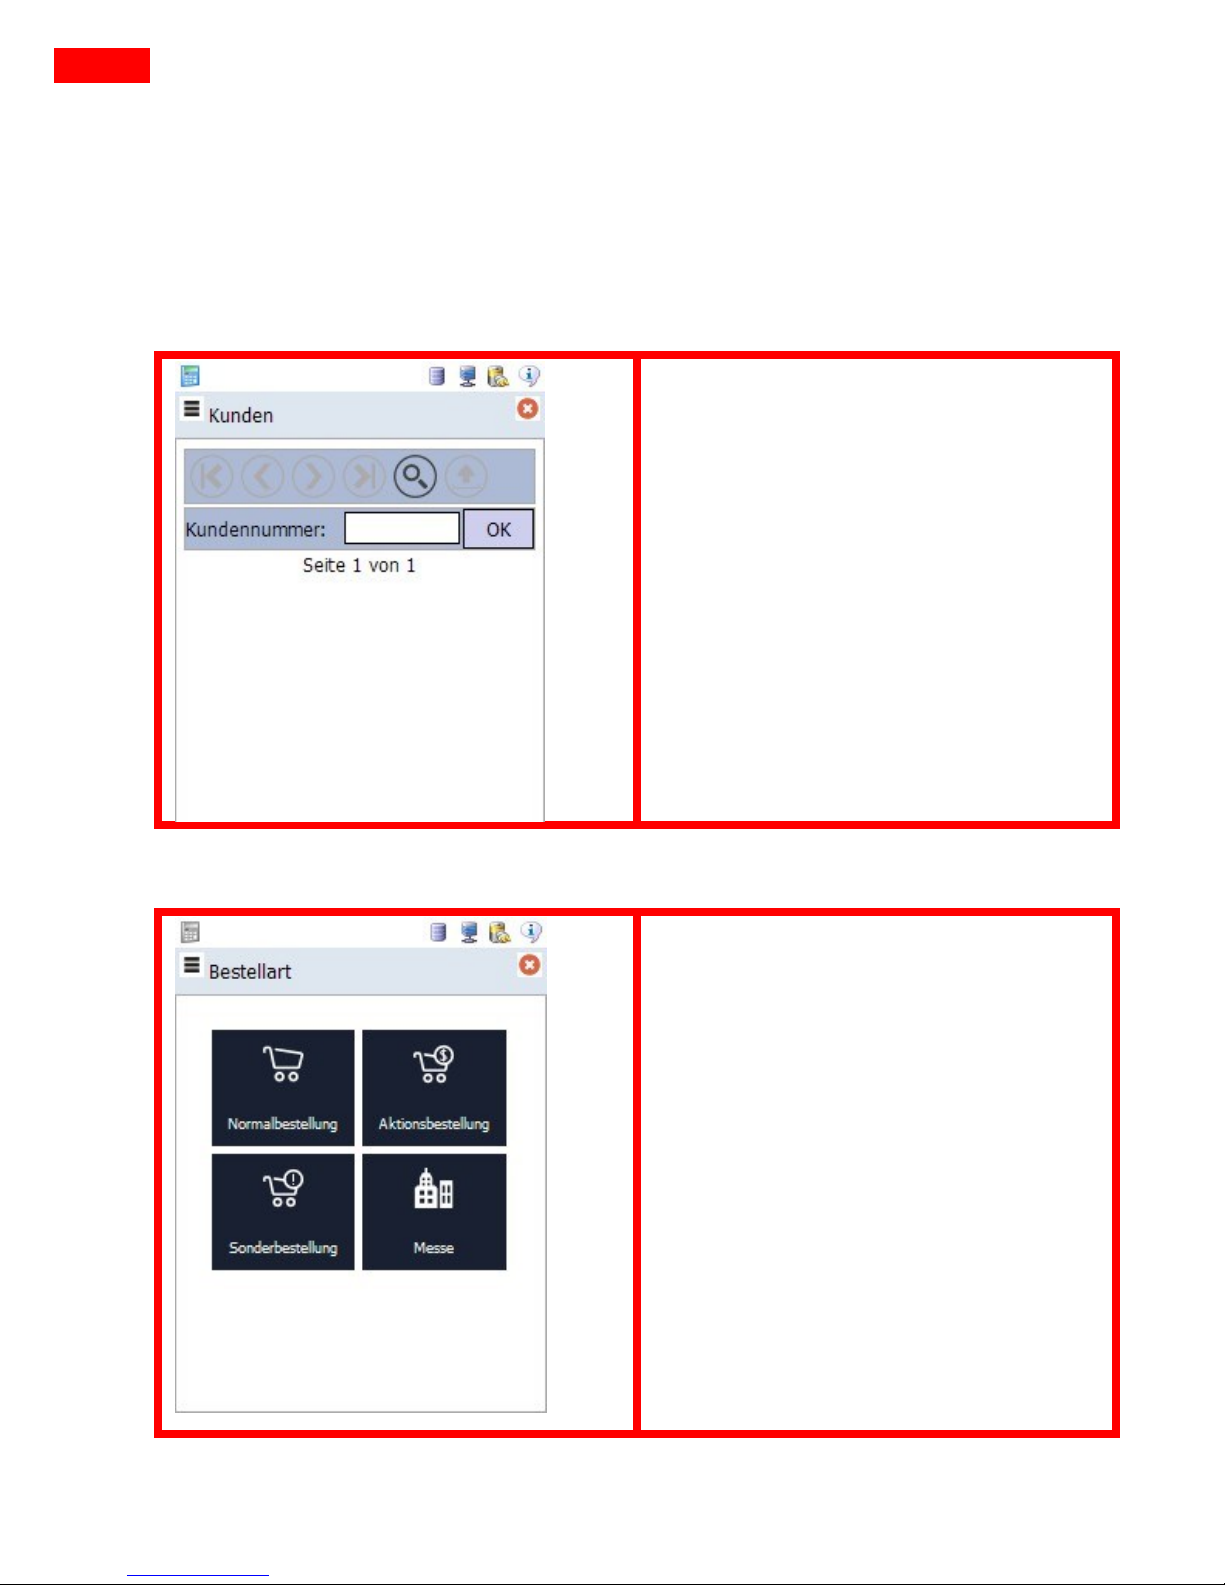
As a consultant, you order articles for
your customer.
If you order articles, you always need
to enter the customer’s customer
number in the beginning.
Now you can choose between
“Normalbestellung” (normal order)
(see point 5), “Aktionsbestellung”
(promotion order),
“Sonderbestellung” (special order)
and “Messe” (trade fair).
These order types differ in the
assortment provided or the delivery
date, which can also be different to
the customer’s normal delivery
schedule.
Page 35
34
MDE User Manual
13.1.1 Adapting Prices (Special Prices)
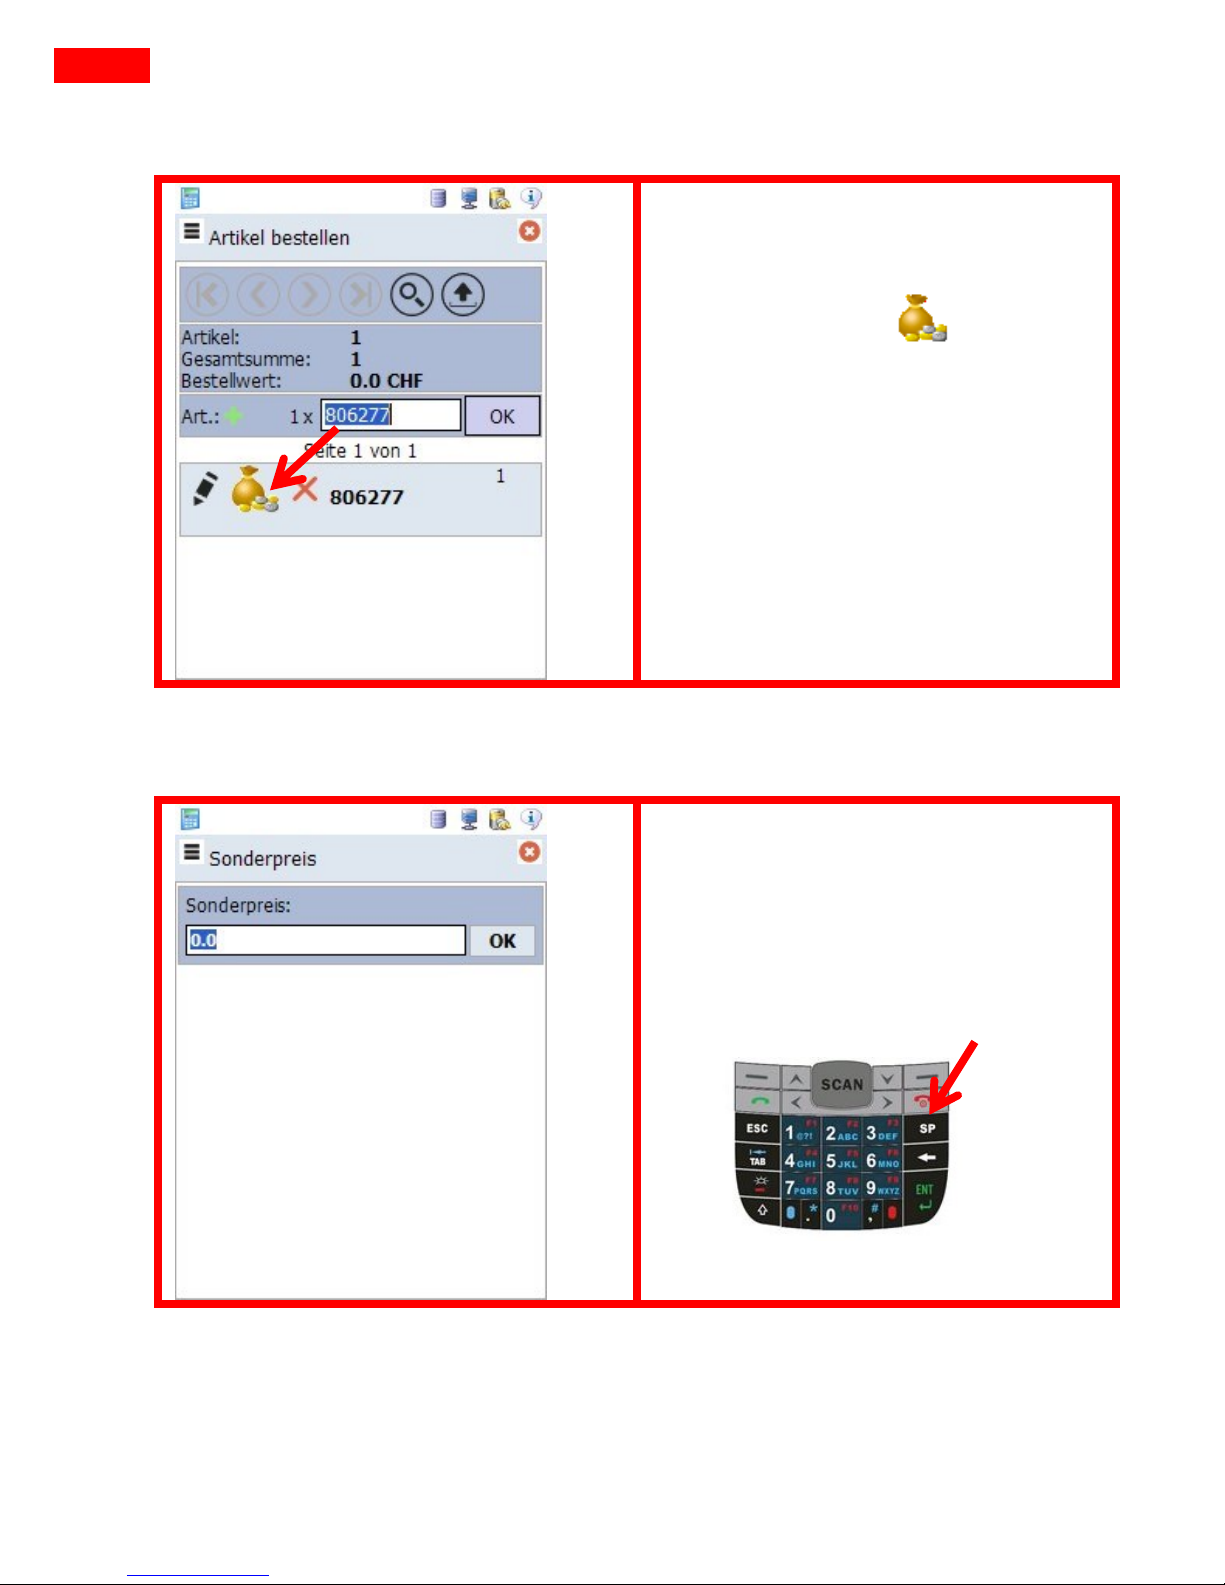
As soon as you are in the order
process, the special price can be called
up by clicking on the symbol (see
arrow).
The menu for entering special prices is
shown. To enter the price, please use
the hardware keyboard or unhide the
on-screen keyboard.
Page 36
35
MDE User Manual
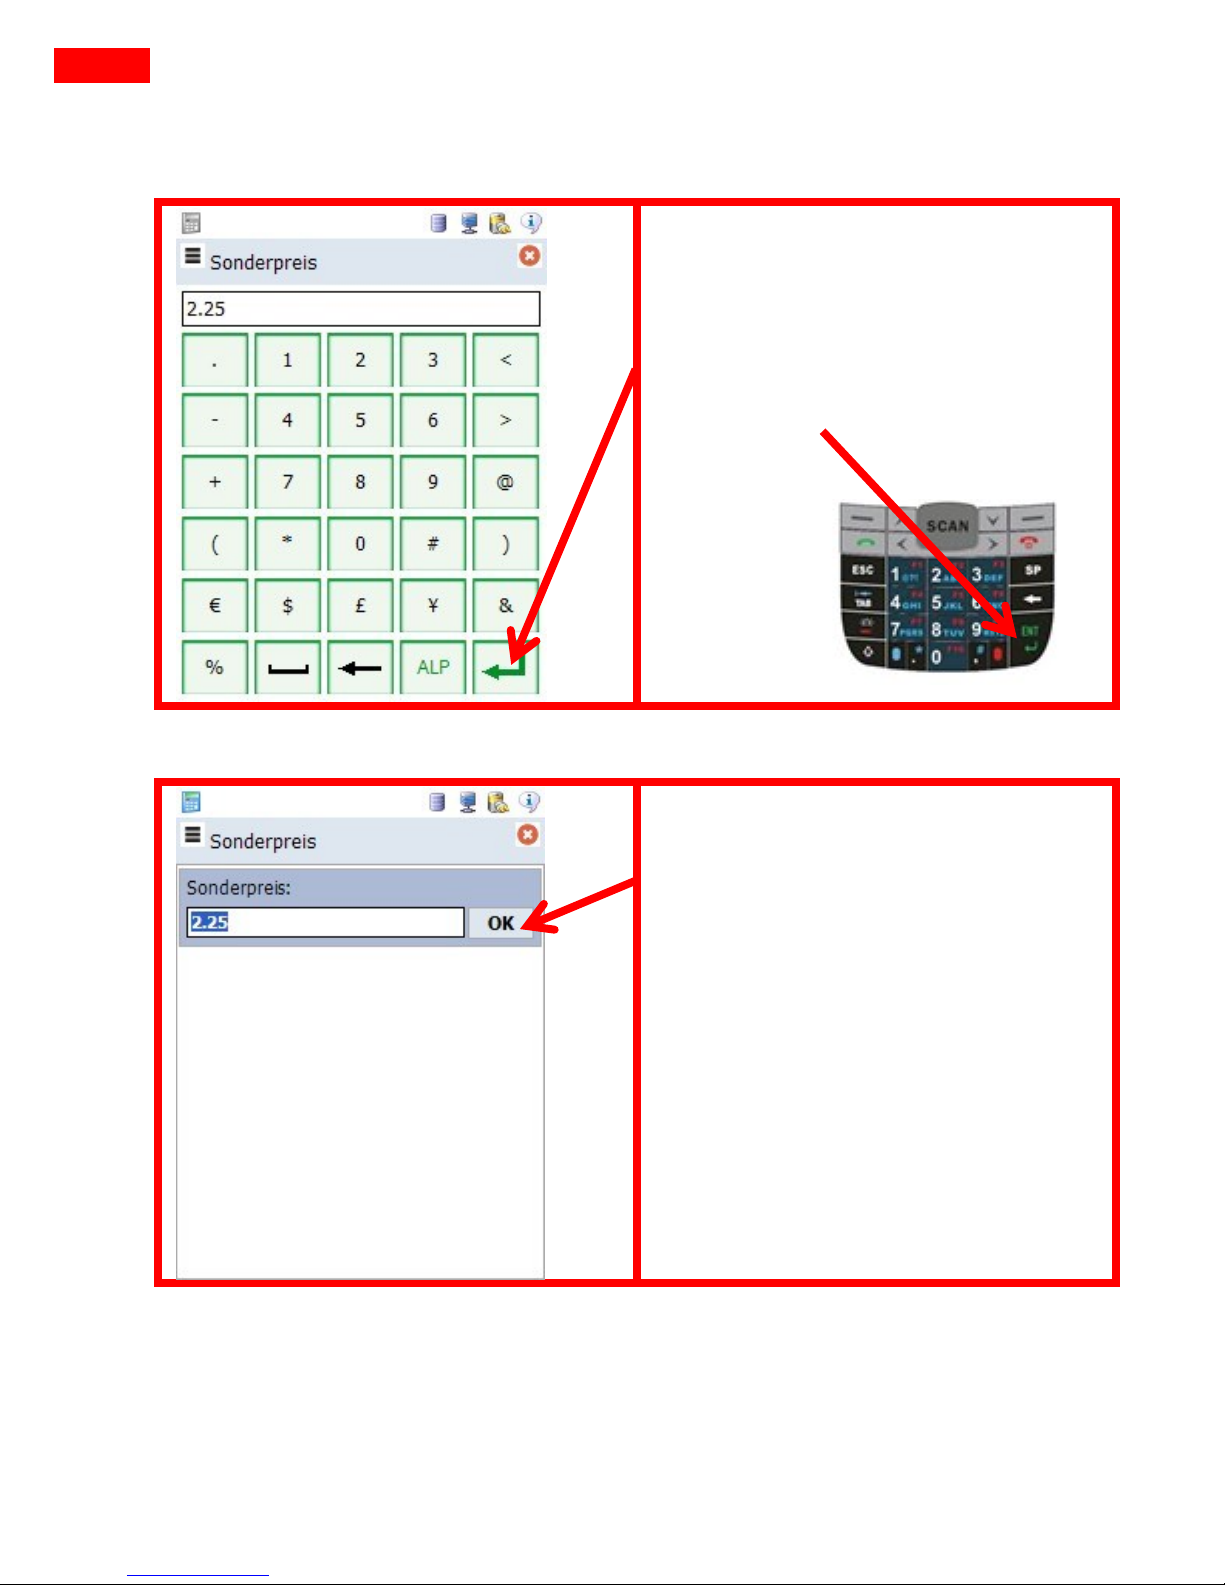
Enter the wished special price and
confirm your entry with the enter key
of the on-screen keyboard (see arrow)
or the hardware keyboard.
To take the price, please press “Enter”
or “OK”.
Page 37
36
MDE User Manual
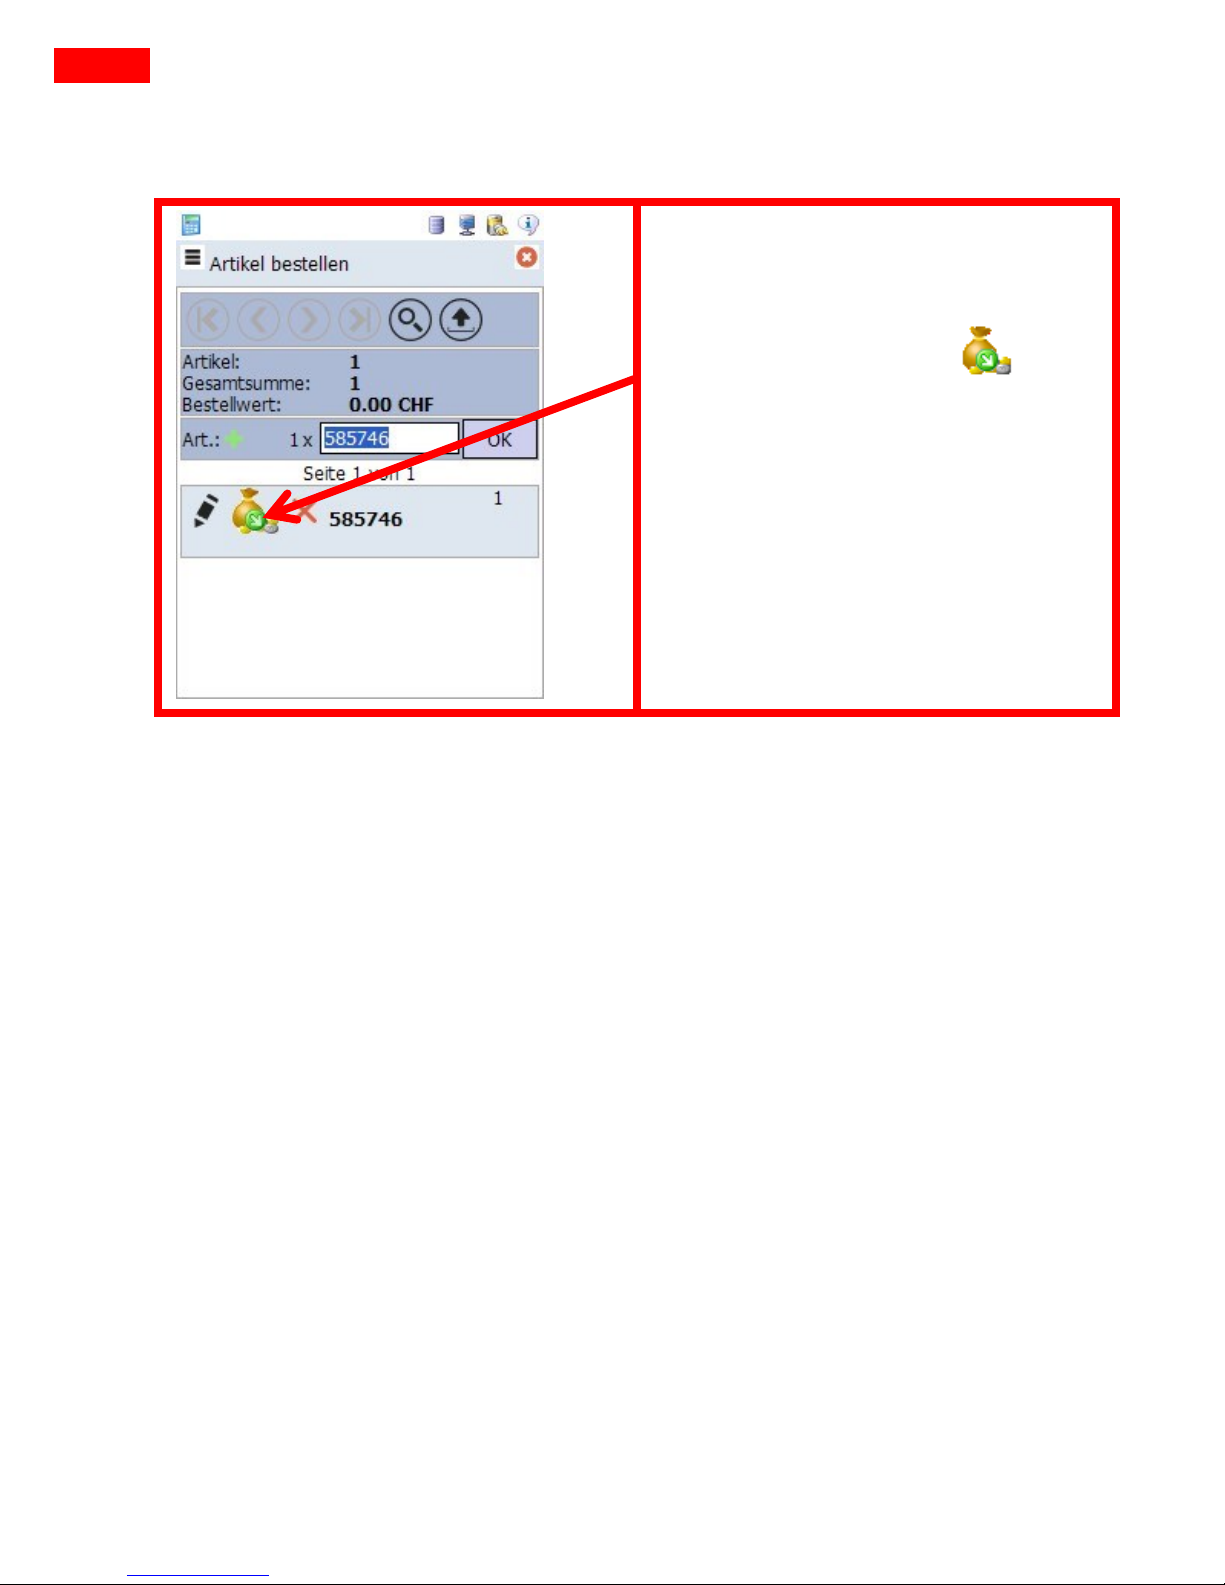
When a special price has been taken
over for an item, this is indicated with
a green arrow (see arrow).
(You can still select the function
“Sonderpeis” (special price) as usual)
 Loading...