

Page 1

(Made by Honeywell)
42008847-021 R1
1234567
USER GUIDE
The Chronotherm Modulation is designed to provide automatic time and
temperature control of heating systems. These instructions explain how to
program and operate your Chronotherm Modulation.
Chronotherm Modulation can be used with all OpenTherm® compatible boilers.
The OpenTherm® compatible boilers are marked with OT logo shown below.
Chronotherm Modulation is a programmable thermostat that controls your heating
system so that you can have comfortable temperatures when you are at home and
energy savings when you are out. To ensure that your heating system is operating
in most efficient way Chronotherm Modulation not only switches the boiler on and
off but also modulates the flame to finely match the heating output of the heating
appliance to the current heat demand.
To maximise energy efficiency Chronotherm Modulation has build -in Adaptive
Intelligent Recovery function Instead of switching the heating on at the set time
every day, the controller will delay the start time to the latest possible moment, so
that unnecessary heating is avoided. All you have to do is set the time by which
you want to be warm and Chronotherm Modulation will then decide when to turn
the heating on.
1 Day button allows you to set correct day of the week.
2 The display continuously shows information about time, day of the week and
temperature. The Energy meter allows you to see the current firing rate of the
boiler. A radiator or tap symbol is shown when boiler is servicing central
heating or domestic hot water.
3 These buttons are used to adjust the temperature level. You can operate
these buttons also when the flap is closed.
4 “
” Enquiry button is used to display the set room temperature level and the
outside temperature (only if the outside temperature sensor is connected to
your boiler).
5 The holiday function allows setting of a setback temperature for a period of
maximum 99 days. The same function can also be used as timed program
override providing energy savings or extended comfort period.
6 These buttons are used to program up to six temperature changes per day.
7 Slider position defines the operating mode. When slider is set to AUTO the
Chronotherm will operate according to the program.
8 Time adjustment buttons are used for clock and temperature change
settings.
9 The copy button allows you to copy the time/temperature program to the next
day.
SPECIAL FUNCTIONS
Modulating control
The Chronotherm Modulation continuously adapts the firing rate of the boiler to
the required heat demand. This results in a very accurate control of the room
temperature. The modulating control is only possible if the heating appliance is
supporting OpenTherm® communications.
OpenTherm
®
communication
The Chronotherm Modulation exchanges information with the heating appliance
using OpenTherm® two-way communication protocol.
NOTE: The amount and type of information that can be displayed as well as
appliance specific information codes may vary.
Refer to the user manual of the appliance for this specific information.
Optimizing through the intelligent adaptive recovery (AIR) feature.
To achieve the required temperature in the house we typically set the on time for
the heating system earlier than required. In this way we can be sure that we will
have the comfortable temperature when we wake up. As we never can guess
precisely when the heating should come on we tend to stay on the save side
setting the on time earlier then required. Consequently we have to pay for keeping
the house at comfort temperature longer then necessary. The Chronotherm
Modulation solves this problem completely. It checks every day how much time is
required to heat up your home. Using this data the Chronotherm Modulation
calculates the precise moment when to start the heating up the next day to
achieve comfort temperature exactly when you want it. Consequently you do not
have to take the warm up time into account when programming. The Chronotherm
Modulation activates adaptive intelligent recovery function before every
programmed temperature level increase.
NOTE: After installation Chronotherm will require a couple of days to learn how to
calculate ON times for a particular house.
Program up to six time/temperature periods per day.
You have the possibility to set 6 different periods for each day of the week. The
time/temperature periods are marked with numbers 1 to 6.
The start time and temperature level for each period is programmable within the
temperature setting range of 5 to 30°C.
Backup during power supply failure
Your Chronotherm Modulation operates without batteries. The power is supplied
through the communication connection. In case of the mains power loss a
rechargeable backup power supply is sufficient to keep the program and the clock
settings for at least 8 hours. If the backup supply is exhausted the display will be
blank and the individual program will be deleted. After the mains supply has been
reestablished the factory program will be activated and the display will flash at
12.00. It will take between 10 and 60 minutes (dependant on the operating
conditions) to charge the backup supply.
The energy meter
If the burner of the boiler is energized, a bar of flames will be shown on the left
side of the display. This allows you to check at all times at what firing rate your
boiler is operating. (The percentages in the above graph are indicative only.
Dependant on the modulation band of your boiler the in between values may vary)
The radiator or tap symbol indicates if energy is being used for central heating or
the domestic hot water (if applicable).
Unique holiday/timer function
The holiday button allows you to override your normal temperature profile and set
the fixed temperature level for a defined time. You can set the required
temperature for as long as 99 days or as short as 1 hour.
Intelligent DHW control
If you own a boiler that also provides hot water (combi boiler) then the
Chronotherm Modulation can provide additional savings.
In the FROST PROTECTION or HOLIDAY/TIMER function, the Chronotherm
Modulation will switch off the DHW function or (dependant of the appliance) will
switch to a savings mode. In this way the DHW storage will not be kept on a high
comfort temperature if this is not necessary.
If desired it is possible to switch off the DHW during the night setback period. Your
installer can set this for you.
NOTE: This function is only available if your boiler is suitable for this
communication. Consult the user manual of the boiler or ask your installer.
CONTROLS LAYOUT
PROGRAMMING YOUR THERMOSTAT
Before you start programming
You can program your Chronotherm Modulation only if the mains supply of the
boiler is switched on, the electrical connection to the boiler is made and the
thermostat has been mounted on the wall plate. When the power for the
thermostat is present the display will be activated and the clock will start.
NOTE: Operate the keypad with your fingertips only. Sharp objects like pens or
pencils can damage the keypad.
How do I set the time and the day?
1. Move the slider to DAY/
position. The time and the
day marker will flash indicating that they can be
changed.
2. Press the + or – button until the correct time is
displayed. Each button press will change the time by
one minute and stop the display from flashing.
Holding the button down for a few seconds will
change the time slowly at first, then quickly.
3. Press DAY 1..7 button until the day marker is
positioned under the correct day (DAY1 is Monday).
Each button press moves the day marker by one
day.
How do I get started with the built-in temperature program?
Move the slider to the AUTOmatic position
The Chronotherm Modulation will now control your heating system using the builtin temperature program.
You now have a choice of two methods to set the program for the next day
6.a Press the COPY DAY button to copy Monday’s program into Tuesday. To set
several days of the week to the same program, press the copy day button
repeatedly.
6.b Press the DAY 1..7 button to step the day marker to Tuesday (Day 2). The
program for Tuesday can be then set as described in steps 2 to 5.
Programs for Wednesday (Day 3) to Sunday (Day 7) can be set in the same
day, using the DAY 1..7 button.
7. Move the slider to AUTOmatic position when you have completed steps 6a or
6b. The Chronotherm Modulation will now control the room temperature to
match your program.
What do I do if I do not want to use all 6 temperature changes times?
The built-in program uses only 4 temperature change times as indicated in section
“How do I get started with the built-in temperature program?”
The unwanted change times can be deleted by moving the slider to PROGRAM
position and holding the appropriate button (1, 2, 3, 4, 5, 6) for a few seconds. The
change time will be removed and the display will show dashes instead of time/
temperature display.
Deleted temperature change times can be brought back by pressing the
appropriate (1, 2, 3, 4, 5, 6) button and then TEMPerature
or button (with
slider set to PROGRAM position).
OPERATING YOUR THERMOSTAT
With the operating mode slider in AUTOmatic position Chronotherm Modulation
will control the room temperature to match your heating program
Manual Override
When the slider is in AUTOmatic position the temperature can be adjusted
temporarily by pressing the TEMPerature
or button. The temperature will
return to program at the next temperature change time.
How do I set the temperature for the whole day?
To operate as a simple thermostat with one temperature throughout the day, move
the slider to the MANUAL position. Adjust the manual temperature by pressing
the TEMPerature
or button. The manual temperature can be set anywhere
from 5°C up to 30°C.
How can I switch the Chronotherm Modulation off?
Move the slider to the position. Thermostat has built-in frost protection feature,
so that if temperature will drop below 7°C it will automatically switch back on to
prevent pipes from freezing.
NOTE: The frost protection activation level can be adjusted from 7°C to 10°C
using TEMPerature
or button.
How do I check the programmed temperature?
In normal operation the temperature displayed is the actual room temperature. To
check the programmed temperature, press the i button once.
NOTE: During upward temperature level change the temperature on the display
may not correspond with the programmed level of the current period. The reason
is that during warm up the thermostat gradually increases the temperature level
setting to the next temperature change level. During the warm up period the
number of the next period is flashing
How can I check the outside temperature?
Press the
button twice. The outside temperature code T3 will be displayed
together with current outside temperature value.
NOTE: This option is available only if the heating appliance provides the outside
temperature information to the thermostat.
I am going on holiday for a couple of weeks. How do I save energy when I
am away?
1. Move the slider to the operating position you require on returning from your
holiday (AUTOmatic or MANUAL)
2. Press the
(HOLIDAY) button to display the holiday days counter and the
temperature
3. Press the
+ or – button to set the holiday time (1-99 days). An extra flashing
day marker shows the day of the week representing the holiday return day.
Today is counted as the first day of holiday. The holiday temperature is set
using the TEMPerature
or button. At midnight of the last day of your
holiday the thermostat will return to the normal control as set by the slider
position.
These two buttons can
also be used when the
flap is closed
Off Low fire 40 60 80 100%
OpenTherm® communication
Monday to Friday
Program 1 1 2 3 4 5 6
Time 07:00 09:00 - - 19:00 23:00
Temperature 19°C 15°C - - 21°C 15°C
Saturdy and Sunday
Période 1 2 3 4 5 6
Time 08:00 - - - - 23:00
Temperature 19°C - - - - 15°C
How do I set my own temperature program for each day of the week?
1. Move the slider to PROGRAM position. You will see
the first temperature change time and temperature
level for Monday’s program (the two small arrows
are displayed only when the programmed
temperature level is shown). The flashing display
indicates that you can make changes.
2. Press the
+ or – button to adjust the first
temperature change time. Holding the button down
will change the time quickly. The change time can
be set in 10 minutes steps from 03:00 in the
morning. The change time can be adjusted to any
time up to 02:50 on the next morning, so you can
maintain evening temperature after midnight.
NOTE: If you attempt to move a change time past
the next change time, both times will be moved.
3. Press the TEMPerature or button to adjust the
first temperature level. Holding the button down will
change the temperature quickly. The temperature
can be set in 0.5°C steps from 5°C to 30°C
4. Press the program 2 button to display the second temperature change time and
temperature level for Monday. Set these by pressing the
+ or – button and
the TEMPerature
or button.
5. The remaining temperature changes for Monday can be displayed by pressing
program buttons 3, 4, 5 and 6 and adjusted by using
+ or – button and the
TEMPerature
or button. (if you don’t want to use all temperature change
times 2, 3, 4, 5 and 6 refer to the next question “What if I don’t want to use all
6 time temperature change times”)
Page 2
Symptom
Blank display
The energy meter and
radiator symbol are on,
but radiators are still cold
At the programmed time
the temperature is too
high or too low
comparing with
programmed values
Change of temperature
level at the wrong time
Temperature too high or
too low
Display shows day, time
and
symbol
Display shows only
symbol and spanner
every 5 sec.
Currently displayed
segments and spanner
symbol are flashing
Possible Cause
No power from the boiler
Mains power loss lasting
more then 8 hours
Wired connection
between the boiler and
the thermostat broken
Boiler not operating
Inertia of the heating
system
Adaptive Intelligent
Recovery action
Adaptive Intelligent
Recovery action
Temperature level set
incorrectly
Thermostat is powered
but receives no
information from the boiler
There is a short or open
circuit between the boiler
and thermostat.
Boiler is in lockout
condition (NOTE:
Pressing the I you can
read the fault code
transmitted by the boiler.
The fault code depends
on the boiler type – refer
to the boiler User Manual
for more information)
OPERATING YOUR THERMOSTAT (CONTINUED)
I’m planning to go out for the weekend. I would like to save energy when I
am away but I would like to be sure that my house would be at comfortable
temperature on Sunday at 17:00.
1. Follow the same procedure as described above to select number of days you
will be away.
2. Press the
(HOLIDAY) button a second time to display the holiday return
time. (The time displayed is current time + 1 hour rounded off to 30 minutes)
The return time can be adjusted using the
+ or – button in 30 minutes steps.
3. At the programmed return time the ther mostat will return to the normal control
as set by the slider position.
I’m having some friends round for party. How can I extend my heating
program for a few hours?
1. Press the
(HOLIDAY) button twice to display the time when you would like to
switch the heating off. (The time displayed is current time + 1 hour rounded off
to 30 minutes) The return time can be adjusted using the
+ or – button in 30
minutes steps.
2. Adjust your room temperature using TEMPerature
or button
3. The thermostat will maintain the set temperature level until specified time. At
the programmed time it will return to the normal control as set by the slider
position.
How can I restore the factory program setting?
The factory program is restored when the RESET key located at the back of the
thermostat is pressed.
NOTE: Before removing the thermostat from the wall review the section
“MAINTAINING YOUR THERMOSTAT”
MAINTAINING YOUR THERMOSTAT
Chronotherm Modulation is made from high quality plastics and does not require
special maintenance if used under normal operational conditions.
In case you have to remove your thermostat temporarily for purpose of wall
decoration or alterations follow the guidelines below.
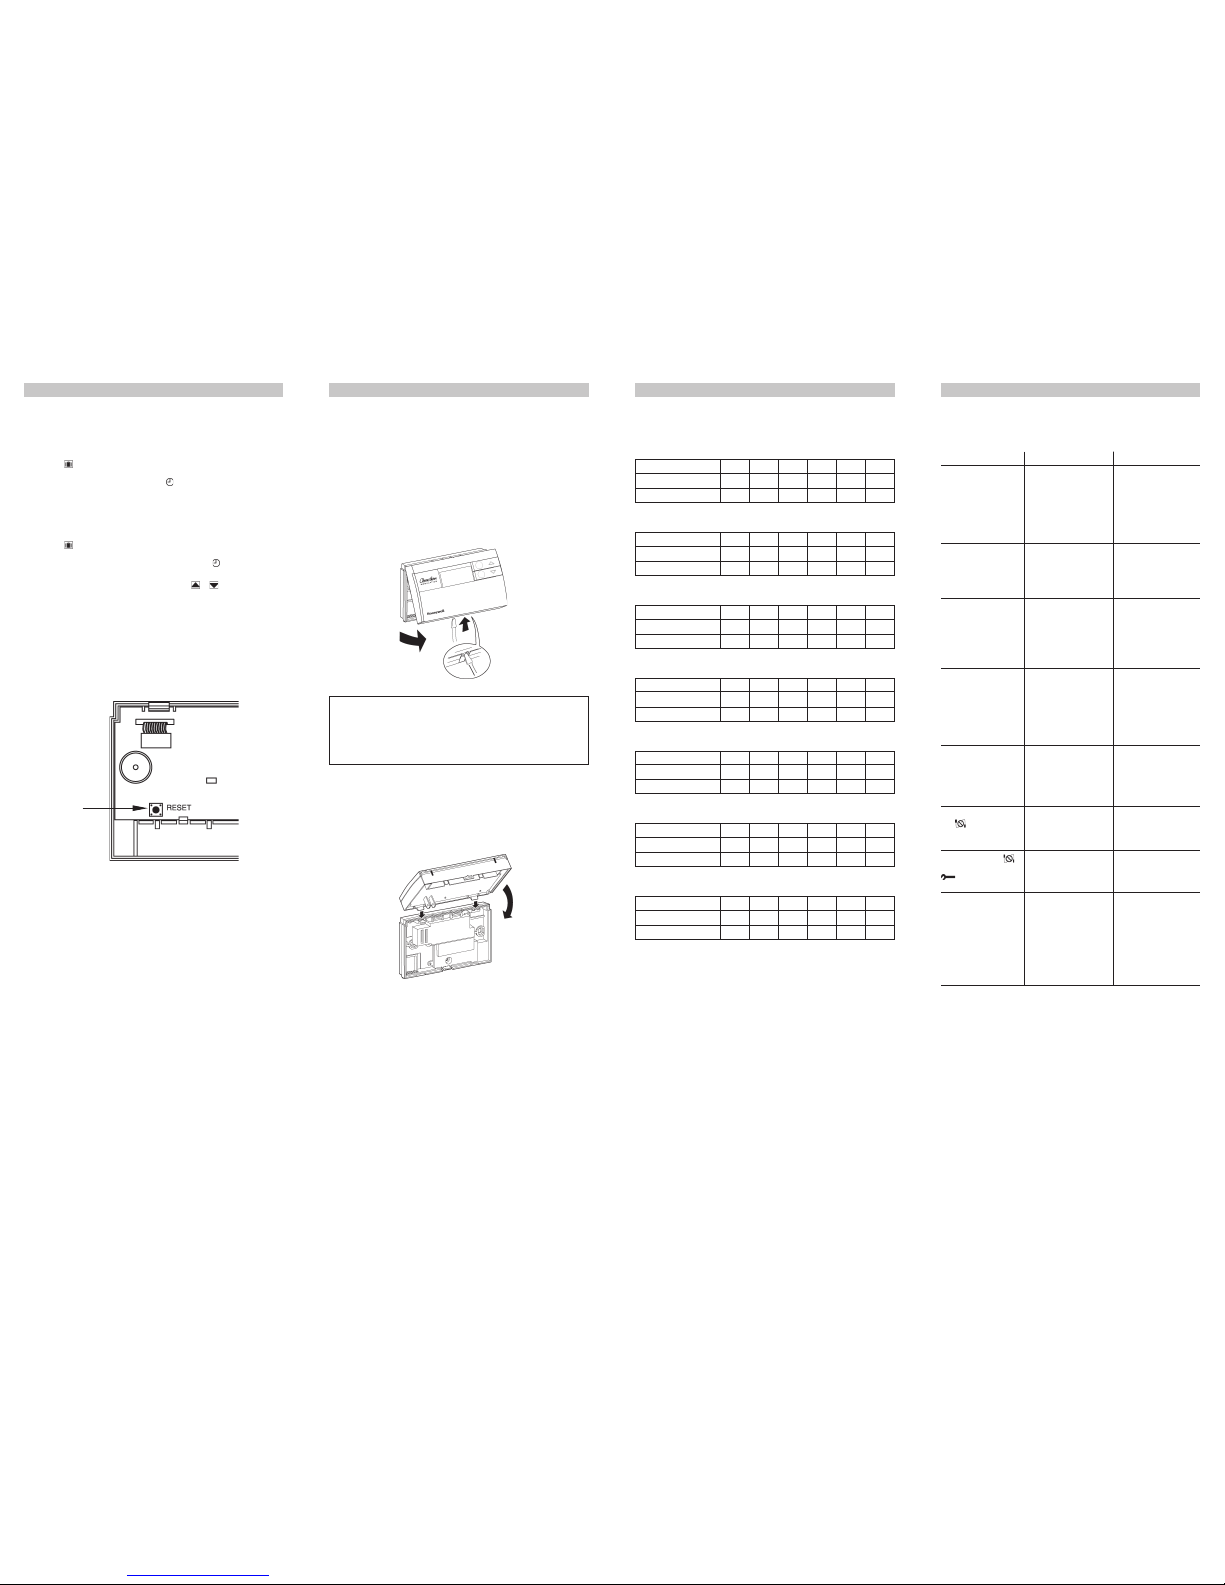
Remove the thermostat from the wall plate
1. Switch off the electrical supply of the thermostat by isolating the heating
system.
2. Remove the thermostat by pressing the plastic lid with a screwdriver and gently
pushing it up. This will loosen the thermostat from its wall plate
3. Always protect the contacts in the wall plate from paint or other substances
TROUBLE - SHOOTING GUIDE
Chronotherm Modulation is able to provide you with fault diagnostic information.
Please note that the type of data sent from the boiler determines the way the
boiler faults are displayed. Review the boiler user manual for more information.
YOUR INDIVIDUAL TEMPERATURE PROGRAM
You can use the tables below to record your weekly temperature profile. Please
note that period 1 must always be programmed.
MONDAY
Program 1 2 3 4 5 6
Time _ _:_ _ _ _:_ _ _ _:_ _ _ _:_ _ _ _:_ _ _ _:_ _
Temperature _ _°C _ _°C _ _°C _ _°C _ _°C _ _°C
TUESDAY
Program 1 2 3 4 5 6
Time _ _:_ _ _ _:_ _ _ _:_ _ _ _:_ _ _ _:_ _ _ _:_ _
Temperature _ _°C _ _°C _ _°C _ _°C _ _°C _ _°C
WEDNESDAY
Program 1 2 3 4 5 6
Time _ _:_ _ _ _:_ _ _ _:_ _ _ _:_ _ _ _:_ _ _ _:_ _
Temperature _ _°C _ _°C _ _°C _ _°C _ _°C _ _°C
THURSDAY
Program 1 2 3 4 5 6
Time _ _:_ _ _ _:_ _ _ _:_ _ _ _:_ _ _ _:_ _ _ _:_ _
Temperature _ _°C _ _°C _ _°C _ _°C _ _°C _ _°C
FRIDAY
Program 1 2 3 4 5 6
Time _ _:_ _ _ _:_ _ _ _:_ _ _ _:_ _ _ _:_ _ _ _:_ _
Temperature _ _°C _ _°C _ _°C _ _°C _ _°C _ _°C
SATURDAY
Program 1 2 3 4 5 6
Time _ _:_ _ _ _:_ _ _ _:_ _ _ _:_ _ _ _:_ _ _ _:_ _
Temperature _ _°C _ _°C _ _°C _ _°C _ _°C _ _°C
SUNDAY
Program 1 2 3 4 5 6
Time _ _:_ _ _ _:_ _ _ _:_ _ _ _:_ _ _ _:_ _ _ _:_ _
Temperature _ _°C _ _°C _ _°C _ _°C _ _°C _ _°C
Reset key
IMPORTANT!
- The wall plate terminals must not be connected to any other voltage
sources. Applying voltage to wall plate terminals can seriously damage your
heating boiler.
- Protect the electronic components from contact with any paint chemicals,
dust etc, that could cause damage to the thermostat
Mounting the thermostat on the wall plate
1. Check the wall plate and make sure that the contacts are clean and dry.
2. Hang the thermostat in the holes on top of the plate
3. Move the thermostat downwards and push it gently towards the wall until
thermostat locks into the wall plate
Remedy
Switch the boiler on
Restore power supply
Call installer to check the
wiring
Refer to the boiler User
Manual
Allow more time for the
system to heat up
This is normal behavior
of your thermostat after
installation. It takes a few
days before AIR function
will adjust itself to your
house
When the temperature
level changes upward the
thermostat will
automatically adjust the
temperature level to
reach the new required
level on time
Press the I button to
check the programmed
temperature level.
Re-program the unit if
necessary.
Call installer
Call installer to check the
wiring
Press the reset button to
restart the boiler. If the
symptom appears again
call installer immediately.
 Loading...