

Page 1
C8600A
CO Alarm
OWNER’S GUIDE
RESIDENTIAL USE ONLY
69-1513EF-01
Page 2

Features
• Patented carbon monoxide (CO) alarm
technology detects CO similar to human
body’s response.
• Detects and warns against conditions
that can lead to acute and chronic effects
of CO poisoning.
• Detects toxic CO gas resulting from
incomplete combustion such as emitted
from appliances, furnaces, fireplaces and
auto exhaust.
• Detects CO gas from any source of
combustion.
• Use in combination with other
combustible gas, fire or smoke alarms.
• Detects levels of carbon monoxide at 70
ppm and above.
• For residential use only.
69-1513EF—01 2
What You Should Know About Carbon Monoxide (CO)
— Colorless, odorless, and tasteless gas.
— Cumulative poison.
— Even low levels can cause brain and other
vital organ damage in unborn infants with no
effect on the mother.
— Symptons of carbon monoxide poisoning
should be discussed with all members of the
household:
a. Mild Exposure—Slight headache,
nausea, vomiting, fatigue (often
described as flu-like symptoms).
b. Medium Exposure—Severe throbbing
headache, drowsiness, confusion,
fast heart rate.
c. Extreme Exposure—Unconscious-
ness, convulsions, cardio-respiratory
failure, death.
Page 3
d. Disoriented—Victims are often aware
they are not well, but are so disoriented, they are unable to save themselves by either exiting the home or
calling for assistance. (Young children
and household pets may be the first
affected.)
What CO Alarm Can/Cannot Do
• This alarm indicates the presence of carbon
monoxide gas at the sensor. Carbon
monoxide gas may be present in other
areas.
• This alarm is not a substitute for other
combustible gas, fire or smoke alarms.
• This CO alarm may not sense CO on a
different level or floor of a residence or
building; for example, a second floor alarm
may not sense a CO leak on the first floor or
in the basement:
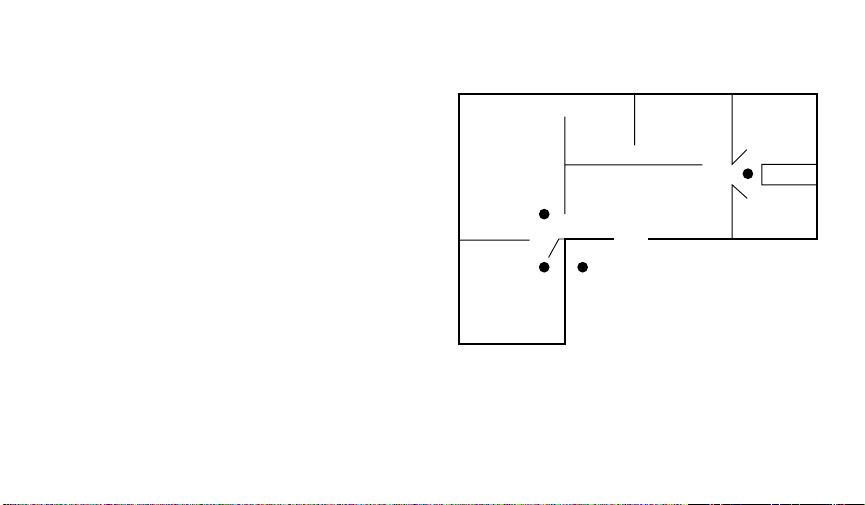
— Place alarms on every level of a resi-
dence as shown in Fig. 1.
• This CO alarm may not be heard behind
closed or partly closed doors such as in
bedrooms:
• Place alarms in each bedroom and in the
hallway if bedroom doors are closed or partly
open at night; an alarm outside a door may
not awaken occupants.
WARNING
CO Alarm does not measure in
compliance with Occupational Safety
and Health Association (OSHA)
commercial or industrial standards.
CO Alarm is for use only in indoor
family living units.
This alarm has not been investigated for
CO detection below 70 ppm.
3 69-1513EF—01
Page 4

WARNING
Individuals with Medical Problems
Alert.
Inability of this device to detect low
carbon monoxide levels below 70
ppm.
Use alternate detection and warning
device that provides audible and visual
signals for CO levels below 30 ppm.
• CO alarms are not a substitute for
insurance. Installing CO alarms may qualify
you for lower insurance rates.
— This CO alarm is not designed for use in
marine or recreational vehicles.
69-1513EF—01 4
Page 5

Developing Your CO Safety Plan
WARNING
Actuation of your CO Alarm indicates
the presence of carbon monoxide
that can KILL YOU.
If alarm sounds:
1) Operate reset/silence button.
2) Call your emergency services
telephone number (-----------), fire
department or 911.
3) Immediately move to fresh air
outdoors or near an open door/window.
Take a head count to check that all
persons are accounted for. Do not reenter your home or move away from the
open door/window until the emergency
services responders have arrived, the
home is aired out, and your alarm
remains in normal condition.
4) After following steps 1-3, if your
alarm reactivates within a 24-hour
period, repeat steps 1-3 and call a
qualified appliance technician (-----------)
to investigate sources of CO from fuelburning equipment and appliances, and
inspect this equipment for correct
operation. If problems are identified
during this inspection, have the
equipment serviced immediately. Note
any combustion equipment that the
technician did not inspect, and consult
the manufacturer’s instructions, or
contact the manufacturers directly for
more information about CO safety and
this equipment. Make sure motor
vehicles are not, and have not been
operating in an attached garage or
garage adjacent to the home.
5 69-1513EF—01
Page 6

• This CO alarm can quickly alert you to the
presence of CO levels equal to or greater
than 70 ppm.
• This alarm cannot prevent toxic CO
emissions. (Regular maintenance of
combustion appliances and their vent
systems is advised.)
• This alarm cannot protect you from hazards
such as gas leaks or explosions. The
ultimate protection against toxic CO gas is
your responsibility.
• This alarm is designed to detect carbon
monoxide entering its sensing chamber. It
does not sense combustible gas such as
natural gas, propane or butane, heat,
smoke, or flames.
69-1513EF—01 6
To protect yourself and your family from toxic
CO poisoning, create an effective, comprehensive safety program:
1. Install CO detectors correctly, using the
instructions in this Owner’s Guide
2. Replace batteries every year (or sooner if
intermittent chirp sound is heard, indicating a low battery condition).
3. Develop a family escape plan and prac-
tice it with your entire family, especially
small children.
a. Draw a floor plan of your home and
find two ways to exit each room; and
an additional way to exit a bedroom
without opening the door.
b. Teach your children what the CO
alarm signal means and how to exit
your home by themselves, if necessary.
Page 7

c. Decide on a meeting place that is a
safe distance from your house and
make sure all children understand
where they should go to wait if there
is a dangerous CO condition.
d. Conduct CO safety drills at least
every six months to be sure everyone, especially small children, know
what to do to escape safely.
e. Know where to go to call the Fire
Department from outside the home.
Installing Residential CO Alarm
Selecting a Location
The CO alarm is designed for use only within a
single-residential living unit. It can be used in a
multi-family building, but should not be placed
outside of residential units, such as on outside
porches, in corridors, lobbies, basements, or in
other apartments.
Early warning of developing poisonous CO
conditions is critical. It is very important to
carefully select the location for the alarms. The
National Fire Protection Association (NFPA)
statistics show that most fatal occurrences
happen at night while people are sleeping.
NOTICE
The manufacturer strongly recomments replacement of alarm six years
after date of purchase. Under no circumstances should the alarm be used
seven years after date of purchase.
Recommended Mounting Locations
• Place a CO alarm inside each bedroom if
the occupant closes the door while sleeping.
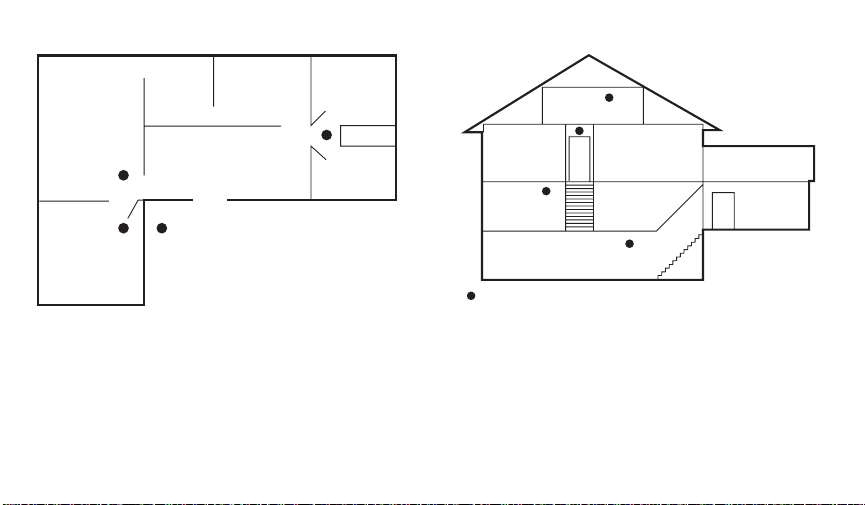
• See Fig. 1 for single-floor residence CO
alarm locations.
7 69-1513EF—01
Page 8
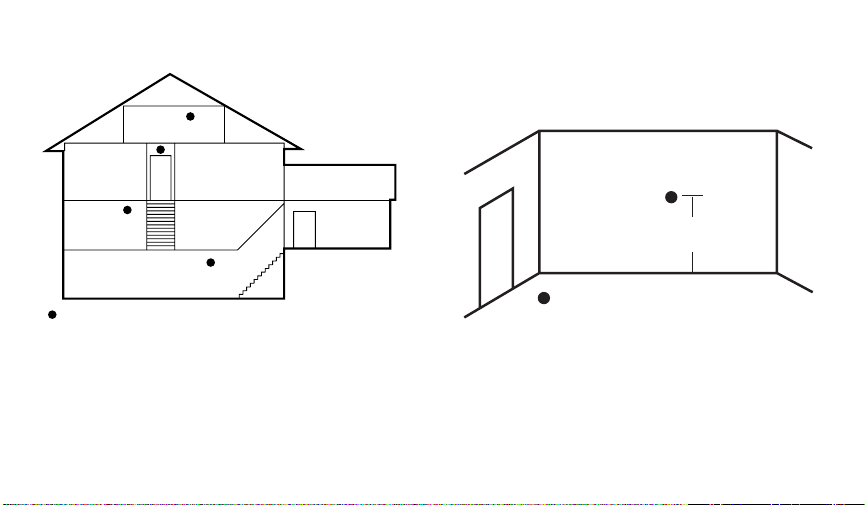
• See Fig. 2 for multi-level residence CO
alarm locations.
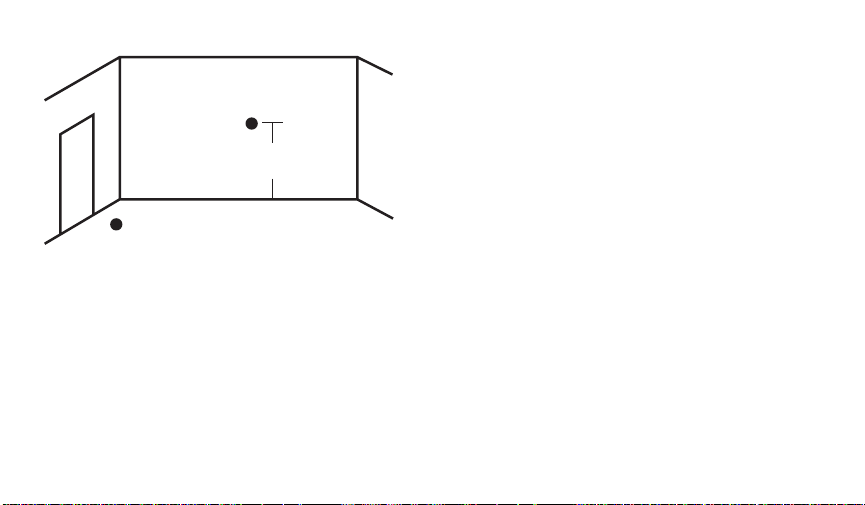
• Mount the CO alarm on the wall or ceiling.
• Locate the top of the alarm at least 3 ft
(.9 meter) from the floor. See Fig. 3.
• Mount the alarm as close as possible to the
center of a hallway or room.
• Mount the edge of the alarm at least four
inches from any adjoining wall.
69-1513EF—01 8
FAMILY ROOM
BEDROOM
KITCHEN
DINING ROOM
LIVING ROOM
= CARBON MONOXIDE ALARM LOCATION
BEDROOM
BEDROOM
M19050
Fig. 1. Single-floor residence CO alarm
locations.
Page 9
BEDROOM
E
BEDROOM BEDROOM
INSIDE WALL LOCATION
LIVING ROOM
BASEMENT
= CARBON MONOXIDE ALARM LOCATION FOR MULTI-LEVEL RESIDENC
(USE A CO ALARM IN EACH BEDROOM IF THE DOORS ARE CLOSED
WHILE SLEEPING.)
KITCHEN
GARAGE
M19051
Fig. 2. Multi-level residence CO alarm
locations.
HEIGHT 5 - 6 FT FROM FLOOR
(MINIMUM 3 FT)
= CARBON MONOXIDE
ALARM MOUNTING LOCATION
M19052A
Fig. 3. CO alarm wall mounting location.
9 69-1513EF—01
Page 10

LOCATIONS TO AVOID
• Near an open window or door with fresh air
entering the opening and delaying the CO
from reaching the alarm.
• In damp or very humid areas or next to
bathrooms with showers; install detectors at
least 10 ft (3 meters) away from bathrooms.
• In very cold or very hot environments or in
unheated buildings or outdoor rooms where
the temperature can drop below or rise
above the operating range of the alarm;
temperature limits for correct operation are
40° to 100°F (5° to 38°C).
• In areas where nuisance alarms can result
because CO alarms are placed where they
cannot operate correctly such as:
— Within 5 ft (1.5M) of any cooking appli-
ance or furnace.
69-1513EF—01 10
— In areas of limited ventilation where
household cleaning supplies or similar
contaminants are used.
CONDITIONS THAT CAN RESULT IN TEMPORARY CO
SITUATION
• Excessive spillage or reverse-venting of
fuel-burning appliances from outdoor
ambient conditions such as:
— Wind direction and/or velocity, including
high gusts of wind; heavy air in vent
pipes (cold /humid air with extended
periods between cycles).
— Negative pressure differential resulting
from using exhaust fans.
— Simultaneous operation of several fuel-
burning appliances that compete for limited internal air.
Page 11

— Vent pipe connections vibrating loose
from clothes dryers, furnaces, or water
heaters.
— Vent pipe obstructions or unconven-
tional vent pipe designs .
• Extended operation of unvented fuel-burning
devices (range, oven, or fireplace).
• Temperature inversions that can trap
exhaust gases near the ground.
• Car idling in an open or closed area of the
garage or near the home.
Mounting Your CO Alarm
NOTICE
Device is sealed; cover is not removable.
1. Select mounting location (see Recom-
mended Mounting Locations section).
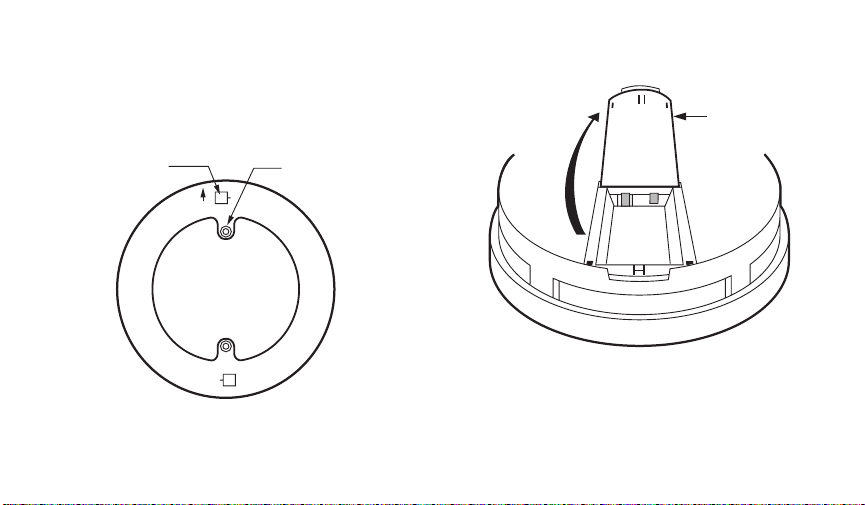
2. Remove the mounting plate from the
back of the alarm by holding the back of
the mounting plate and twisting the alarm
in the direction of the Off arrow on the
alarm front cover.
NOTE: Be sure the UP wall mounting text and
arrow are pointing up.
3. Align the mounting plate on the wall, with
the UP arrow pointing up.
4. Attach the mounting plate to the surface,
using the screws and anchors provided to
secure the mounting plate. See Fig. 4.
NOTE: The battery is installed reversed for
shipping. It requires removal and reinstalling in the correct orientation.
11 69-1513EF—01
Page 12
5. Remove and reinstall the battery in the
correct (+/-) orientation as shown on the
inside of the battery door. (After installing
the battery, close the battery door
securely.) See Fig. 5.
OPEN
BATTERY
DOOR
MOUNTING
HOOKS (2)
MOUNTING
HOLES (2)
UP
M19053
Fig. 4. Installing mounting plate.
69-1513EF—01 12
M19054
Fig. 5. Installing battery.
Page 13

NOTICE
If no battery is installed, the battery
door will not close and the unit cannot
be attached to the mounting bracket.
9. To use the tamper-resistant locking pin,
insert it into the hole in the side of the
alarm after the device is installed on the
mounting plate; see Fig. 7.
6. Listen for the alarm to beep once to indi-
cate correct battery installation.
7. Holding the alarm with the front facing
you; place the mounting holes of the
alarm over the mounting hooks of the
mounting plate.
8. Turn the alarm in the direction of the On
arrow on the alarm cover until it locks in
place. See Fig. 6.
NOTE: A tamper-resistant locking pin is pro-
vided in the bag with the screws and
anchors. Use this pin to deter children
and others from removing the alarm
from the mounting plate.
NOTE: To change the battery, remove the
tamper-resistant pin using a longnosed pliers.
10. Use a long-nosed pliers to pull out the
tamper-resistant locking pin to allow
removing the device from the mounting
plate to replace the battery.
11. Locate the two self-adhesive labels in the
packing box. Write the telephone number
of the emergency service provider and a
qualified technician in the spaces
provided on the labels.
13 69-1513EF—01
Page 14

TAMPER RESISTANT LOCKING PIN
M19056
ON (INSTALL)OFF (REMOVE)
M19055A
Fig. 6. Installing alarm on mounting plate.
69-1513EF—01 14
Fig. 7. Inserting tamper-resistant
locking pin.
Page 15

12. Place one label next to the alarm and the
other label near a source of fresh air
where you plan to gather after the alarm
indicates the presence of carbon
monoxide.
Weekly Alarm Testing
Test the alarm each week to ensure the alarm is
operating correctly:
1. Push the test button until a short beep is
heard (within three seconds).
2. Release the test button.
3. Wait and observe during alarm test:
a. Red LED light flashes four to six
times.
b. Alarm sounds two patterns after test.
c. Alarm resumes normal operation.
Troubleshooting
See Table 1 for meaning of alarm LED and
beeping signals.
15 69-1513EF—01
Page 16

Red LED/Beeping Action Meaning
Flashes once every 30 seconds. Normal operation; alarm is powered.
Turns on for 2 seconds and off for 3 seconds with 4
Alarm condition; alarm is sounding.
short beeps for 1 second and 5 seconds of silence.
Double flashes and beeps once every 30 seconds. Trouble condition.
Beeps (chirping sound) once every 30 seconds for
Low battery; battery needs replacing.
7days minimum.
Reset (silence) after alarm sounding when push and
hold test button for 3 seconds to silence alarm for 4
minutes.
69-1513EF—01 16
Silence after alarm condition; detector
sounds again after 4 minutes until unsafe
CO concentration is reduced.
Page 17

Maintenance
Cleaning Your Alarm
CAUTION
Cleaning Chemical Hazard.
Can damage CO alarm.
Avoid using household cleaning agents,
paints, varnishes, or other chemicals.
Use only a vacuum cleaner or soft cloth.
NOTE: Keep your CO Alarm clean but do not
wash it with water or other household
cleaning agents.
To clean your device:
1. Remove it from the mounting bracket.
2. Use your vacuum cleaner hose to clean
the inside of your alarm; vacuum through
the openings around the alarm perimeter.
3. Wipe the outside with a cloth.
After cleaning your device:
1. Reinstall your alarm and test it using the
test button. (Testing your alarm each
week is recommended.)
2. Test your alarm each week and repair or
replace it, as needed.
17 69-1513EF—01
Page 18
Replacing Your Battery
NOTE: When using the tamper-resistant lock-
ing pin, be sure to remove it before
replacing your battery.
1. Use a long-nosed pliers to pull out the
tamper-resistant locking pin to allow
removing the device from the mounting
plate to replace the battery.
2. Remove the alarm from the mounting
plate by turning the alarm in the direction
of the Off arrow on the cover.
• Use the battery recommended. (A
fresh battery should last for one year
under normal operating conditions.)
3. Verify that you have a 9-volt alkaline bat-
tery and install it; see Fig. 5 (Duracell®
MN1604 is recommended).
69-1513EF—01 18
WARNING
Replacement Battery Hazard.
Use only battery specified.
Using different battery than 9-volt
Duracell® MN1604 can have
detrimental effect on CO alarm
operation and performance.
NOTE: Constant exposures to high or low
temperatures or to high humidity can
reduce battery life.
Page 19

Limited Five-Year Warranty
Honeywell warrants this product, excluding battery, to be free from defects in the workmanship or materials, under normal use and
service, for a period of five (5) years from the date of purchase by the consumer. If, at any time during the warranty period, the
product is defective or malfunctions, Honeywell shall repair or replace it (at Honeywell’s option) within a reasonable period of time.
If the product is defective,
(i) return it, with a bill of sale or other dated proof of purchase, to the retailer from which you purchased it, or
(ii) package it carefully, along with proof of purchase (including date of purchase) and a short description of the malfunction, and
mail it, postage prepaid, to the following address:
Honeywell Return Goods
Dock 4 MN10-3860
1885 Douglas Dr N
Golden Valley, MN 55422
This warranty does not cover removal or reinstallation costs. This warranty shall not apply if it is shown by Honeywell that the
defect or malfunction was caused by damage that occurred while the product was in the possession of a consumer.
Honeywell’s sole responsibility shall be to repair or replace the product within the terms stated above. HONEYWELL SHALL NOT
BE LIABLE FOR ANY LOSS OR DAMAGE OF ANY KIND, INCLUDING ANY INCIDENTAL OR CONSEQUENTIAL DAMAGES
RESULTING, DIRECTLY OR INDIRECTLY, FROM ANY BREACH OF ANY WARRANTY, EXPRESS OR IMPLIED, OR ANY
OTHER FAILURE OF THIS PRODUCT. Some states do not allow the exclusion or limitation of incidental or consequential
damages, so this limitation may not apply to you.
19 69-1513EF—01
Page 20

THIS WARRANTY IS THE ONLY EXPRESS WARRANTY HONEYWELL MAKES ON THIS PRODUCT. THE DURATION OF
ANY IMPLIED WARRANTIES, INCLUDING THE WARRANTIES OF MERCHANTABILITY AND FITNESS FOR A PARTICULAR
PURPOSE, IS HEREBY LIMITED TO THE FIVE YEAR DURATION OF THIS WARRANTY. Some states do not allow limitations
on how long an implied warranty lasts, so the above limitation may not apply to you.
This warranty gives you specific legal rights, and you may have other rights which vary from state to state.If you have any
questions concerning this warranty, please write Honeywell Customer Care, 1985 Douglas Dr N, MN101461, Golden Valley, MN
55422 or call 1-800-468-1502.
Automation and Control Solutions
Honeywell International Inc. Honeywell Limited-Honeywell Limitée
1985 Douglas Drive North 35 Dynamic Drive
Golden Valley, MN 55422 Toronto, Ontario M1V 4Z9
customer.honeywell.com
® U.S. Registered Trademark
© 2007 Honeywell International Inc.
69-1513EF—01 M.S. 07-07
Page 21

C8600A
Détecteur de
monoxyde de
carbone
MODE D'EMPLOI
POUR USAGE RÉSIDENTIEL SEULEMENT
69-1513EF-01
Page 22

Caractéristiques
• Technologie brevetée de détection du
monoxyde de carbone (CO) qui détecte le
CO comme le ferait le corps humain.
• Détecte le CO et déclenche l'alarme en
présence de conditions qui pourraient
entraîner les effets aigus et chroniques
de l'empoisonnement au monoxyde de
carbone.
• Détecte le monoxyde de carbone qui
résulte de la combustion incomplète
comme celle que produisent les
électroménagers, les appareils de
chauffage, les foyers et les gaz
d'échappement des voitures.
• Détecte le monoxyde de carbone
provenant de tout type de source de
combustion.
69-1513EF—01 22
• S'utilise conjointement avec d'autres
détecteurs de combustibles, d'incendie
ou de fumée.
• Détecte des niveaux de monoxyde de
carbone de 70 ppm et plus.
• Pour usage résidentiel seulement.
Que devriez-vous savoir sur le monoxyde de carbone (CO)?
— Gaz incolore, inodore et insipide.
— Poison à effet cumulatif.
— Même un faible niveau de CO peut causer
des lésions au cerveau et à d'autres organes
vitaux chez le foetus, sans que la mère ne
subisse d'effet.
— Les symptômes de l'empoisonnement au
monoxyde de carbone devraient faire l'objet
d'une conversation avec tous les membres
de la famille :
Page 23

a. Faible exposition - Léger mal de tête,
nausée, vomissement, fatigue (souvent perçus comme des symptômes
de la grippe).
b. Exposition modérée - Maux de tête
graves et lancinants, étourdissements, confusion, rythme cardiaque
rapide.
c. Exposition intense - Perte de con-
science, convulsions, arrêt cardiorespiratoire, mort.
d. Désorientation - Il arrive souvent que
les victimes aient conscience que
quelque chose ne va pas mais
qu'elles soient si désorientées qu'il
leur est impossible de réagir en sortant de la maison ou en appelant de
l'aide. (Les jeunes enfants et les animaux domestiques sont souvent les
premiers à ressentir les symptômes).
À quoi peut servir un détecteur de CO et quelles sont ses limites?
• Le présent détecteur indique la présence de
monoxyde de carbone à proximité du
détecteur. Il pourrait y avoir du monoxyde de
carbone ailleurs dans la maison.
• Ce détecteur n'est pas un substitut aux
autres détecteurs de gaz combustibles,
d'incendie ou de fumée.
• Ce détecteur de CO pourrait ne pas détecter
la présence de monoxyde de carbone sur un
autre étage que celui où il est installé; par
exemple, un détecteur installé à l'étage
pourrait ne pas détecter la présence de CO
au rez-de-chaussée ou au sous-sol :
— Installer les détecteurs à tous les étages
de la maison, comme l'illustre la Fig. 1.
• Il se pourrait que le signal d'alarme ne soit
pas audible derrière des portes fermées ou
partiellement fermées, comme dans les
chambres à coucher :
23 69-1513EF—01
Page 24

• Placer des détecteurs de CO dans chaque
chambre à coucher et dans le corridor si les
portes des chambres à coucher sont fermées
ou partiellement fermées la nuit; un détecteur
placé de l'autre côté d'une porte fermée
pourrait ne pas réveiller les occupants.
AVERTISSEMENT
Le détecteur de CO n'est pas une
mesure conforme aux lois sur la
santé et la sécurité au travail ou dans
les industries. Le détecteur de CO
n'est destiné qu'à un usage
résidentiel dans les pièces habitées,
à l'intérieur.
Le présent détecteur n'a pas été mis à
l'essai pour la détection de niveaux de
CO inférieurs à 70 ppm.
69-1513EF—01 24
AVERTISSEMENT
Alerte aux personnes éprouvant des
problèmes de santé.
Cet appareil ne peut détecter de
faibles niveaux de monoxyde de
carbone inférieurs à 70 ppm.
Utiliser un autre appareil de détection et
d'avertissement qui procure un signal
visuel et sonore en présence de
niveaux de monoxyde de carbone
inférieurs à 30 ppm.
— Les détecteurs de CO ne sont pas un
substitut aux assurances. Par contre,
l'installation de détecteurs de CO pourrait donner droit à une réduction des
primes d'assurance.
— Le présent détecteur de CO ne convient
pas aux véhicules récréatifs ou aux
navires de plaisance.
Page 25

Mise au point d'un plan de protection contre le monoxyde de carbone
AVERTISSEMENT
Le déclenchement de l'alarme du
détecteur de CO indique la présence
de monoxyde de carbone qui
pourrait être FATALE.
Si l'alarme est déclenchée :
1. Faire fonctionner le bouton de
réarmement/interruption du signal.
2. Composer le numéro de téléphone
des services d'urgence (-----------), du
service des incendies ou faire le 911.
3. Sortir immédiatement à l'extérieur ou
respirer de l'air frais près d'une porte
ou d'une fenêtre. Faire le compte
pour s'assurer que tous les
occupants de la maison sont
présents. Ne pas retourner à
l'intérieur ou ne pas s'éloigner d'une
porte ou d'une fenêtre ouverte sur
l'extérieur tant que les intervenants
d'urgence ne sont pas arrivés, que la
maison n'a pas été aérée et que le
détecteur reste à l'état normal.
4. Après avoir suivi les étapes 1 à 3, si
le détecteur déclenche à nouveau
l'alarme en moins de 24 heures,
répéter les étapes 1 à 3 et faire appel
à un réparateur qualifié (-----------)
pour qu'il recherche les sources de
monoxyde de carbone autour des
appareils et électroménagers qui
utilisent du combustible et pour qu'il
vérifie le bon fonctionnement de ces
25 69-1513EF—01
Page 26

appareils. Si ce réparateur découvre
des problèmes au cours de
l'inspection, faire immédiatement
réparer l'appareil défectueux.
Prendre note de tout appareil qui
n'aurait pas été inspecté par le
technicien et consulter les directives
du fabricant, ou encore communiquer
directement avec le fabricant, pour
obtenir des renseignements plus
détaillés sur la sécurité et le
monoxyde de carbone produit par cet
appareil. S'assurer que le moteur des
véhicules rangés dans un garage
adjacent ou faisant partie de la
maison ne tourne pas ou n'a pas
tourné à l'intérieur du garage.
• Le présent détecteur de CO peut rapidement
avertir de la présence de monoxyde de
carbone à des taux égaux ou supérieurs à
70 ppm.
69-1513EF—01 26
• Ce détecteur ne peut toutefois empêcher
l'émission de monoxyde de carbone.
(L'entretien régulier des appareils à
combustion et de leur système d'aération est
recommandé.)
• Ce détecteur ne peut protéger les occupants
contre les fuites de gaz ou les explosions ou
les dangers de ce genre. Au bout du
compte, c'est à vous qu'incombe la
responsabilité ultime de vous protéger
contre le monoxyde de carbone.
• Ce détecteur est conçu pour détecter le
monoxyde de carbone qui pénètre dans sa
chambre de détection. Il ne peut détecter les
gaz combustibles tels que le gaz naturel, le
gaz propane, le butane, la chaleur, la fumée
ou les flammes.
Pour protéger, vous et votre famille, contre
l'empoisonnement au monoxyde de carbone, il
est recommandé de mettre en place un plan de
protection efficace et complet :
Page 27

1. Installer les détecteurs de CO correcte-
ment, selon les directives comprises
dans le présent mode d'emploi.
2. Remplacer les piles tous les ans (ou plus
souvent si le détecteur fait entendre un
signal sonore intermittent indiquant que
ses piles sont faibles).
3. Établir un plan d'évacuation à l'intention
de toute la famille et le mettre à l'essai
avec tous les membres de la famille, plus
particulièrement avec les jeunes enfants.
a. Dessiner un plan d'étage de votre
maison et trouver une façon de sortir
de chacune des pièces; trouver une
façon de plus de sortir des chambres
à coucher sans ouvrir la porte.
b. Enseigner à vos enfants ce que signi-
fie le signal d'alarme du détecteur de
CO et leur montrer comment sortir
seuls de la maison en cas de besoin.
c. Choisir un point de rassemblement
qui est à une distance sûre de la maison et s'assurer que tous les enfants
comprennent bien où ils doivent aller
et attendre si le détecteur signale la
présence de monoxyde de carbone.
d. Faire des exercices d'évacuation au
moins une fois par semestre pour
s'assurer que tous les membres de
famille, et particulièrement les jeunes
enfants, savent comment sortir de la
maison en toute sécurité.
e. Savoir où aller pour contacter le ser-
vice des incendies de l'extérieur de la
maison.
Installation d'un détecteur de CO pour la maison
AVIS
Le fabricant recommande fortement
que les détecteurs de monoxyde de
27 69-1513EF—01
Page 28

carbone soient remplacés six ans
après leur achat. Le détecteur de
monoxyde de carbone ne doit en
aucun cas être utilisé sept ans après
sa date d'achat.
Choix d'un emplacement
Le détecteur de CO est conçu pour les maisons
unifamiliales. Il peut être utilisé dans une maison
multifamiliale mais ne doit pas être installé hors
des unités d'habitation, par exemple sous un
porche, dans les corridors, le hall d'entrée, le
sous-sol, ou d'autres appartements.
La possibilité de déclencher rapidement l'alerte
en cas de risque d'empoisonnement au CO est
essentielle. Il est donc très important de choisir
avec soin l'emplacement des détecteurs. Les
statistiques de la National Fire Protection
Association (NFPA) montrent que les accidents
les plus mortels se produisent la nuit, lorsque les
habitants de la maison dorment.
69-1513EF—01 28
Emplacements recommandés
• Placer un détecteur de CO dans chaque
chambre à coucher si l'occupant ferme la
porte la nuit pendant son sommeil.
• Voir la Fig. 1 pour l'emplacement des
détecteurs de CO dans une maison à un
étage.
• Voir la Fig. 2 pour l'emplacement des
détecteurs de CO dans une maison à
plusieurs étages.
• Installer le détecteur de CO au mur ou au
plafond.
• Placer le détecteur à au moins 0,9 mètre
(3 pieds) du plancher. Voir la Fig. 3.
• Installer le détecteur aussi près que possible
du centre du corridor ou de la pièce.
• Placer le rebord du détecteur à au moins
10 cm (4 pouces) de tout mur adjacent.
Page 29
CHAMBRE
À COUCHER
CHAMBRE
À COUCHER
MF19050A
SALLE
FAMILIALE
CHAMBRE
À COUCHER
SALON
SALLE À
MANGER
CUISINE
= EMPLACEMENT DU DÉTECTEUR DE
MONOXYDE DE CARBONE
Fig. 1. Emplacements des détecteurs de CO
dans une maison à un seul étage.
CHAMBRE
À COUCHER
CHAMBRE
À COUCHER
SALON
SOUS-SOL
= EMPLACEMENT DES DÉTECTEURS DE CO DANS UNE MAISON À
PLUSIEURS ÉTAGES (INSTALLER UN DÉTECTEUR DE CO DANS
CHAQUE CHAMBRE À COUCHER SI LA PORTE RESTE FERMÉE
PENDANT LE SOMMEIL DES OCCUPANTS).
CHAMBRE
À COUCHER
CUISINE
GARAGE
MF19051B
Fig. 2. Emplacements des détecteurs de CO
dans une maison à plusieurs étages.
29 69-1513EF—01
Page 30
EMPLACEMENT SUR UN MUR
INTÉRIEUR
HAUTEUR : 1,5 À 2 MÈTRES (5-6 PIEDS) DU
PLANCHER (AU MOINS 0,9 MÈTRE OU 3 PIEDS)
= EMPLACEMENT DU DÉTECTEUR DE CO
MF19052B
Fig. 3. Emplacement pour l'installation du
détecteur de CO au mur.
EMPLACEMENTS À ÉVITER
• Près d'une fenêtre ouverte où l'air frais
pénétrant par l'ouverture pourrait retarder
l'arrivée de CO dans le détecteur.
69-1513EF—01 30
• Dans un endroit humide ou près de salles de
bain avec douche; installer les détecteurs à
au moins 3 mètres (10 pieds) des salles de
bain.
• Dans les endroits où il fait très chaud ou très
froid ou dans des bâtiments ou des pièces
extérieurs non chauffés où la température
peut monter au-dessus ou baisser audessous de la température de service du
détecteur; la gamme de service de l'appareil
est de 5 à 38 °C (40 à 100 °F).
• Dans les endroits où des fausses alarmes
risquent de se produire parce que le
détecteur est placé à un endroit où il ne peut
fonctionner correctement, par exemple :
— À moins de 1,5 mètre (5 pieds) d'un
appareil de cuisson ou d'un appareil de
chauffage.
— Dans les endroits peu ventilés où des
produits nettoyants pour la maison ou
d'autres contaminants similaires sont
utilisés.
Page 31

CONDITIONS QUI PEUVENT PROVOQUER LA
PRÉSENCE TEMPORAIRE DE CO
• Déversement accidentel ou ventilation
inverse d'appareils à combustible résultant
des conditions extérieures telles que :
— Direction ou vitesse du vent, y compris
rafales de vent; air lourd dans les canalisations d'aération (air froid/humide et
longues périodes entre les cycles).
— Pression différentielle négative résultant
de l'utilisation de ventilateurs d'extraction.
— Fonctionnement simultané de plusieurs
appareils à combustible qui se font concurrence pour l'air ambiant en quantité
limitée.
— Raccords de canalisations desserrés
sous l'effet des vibrations d’une
sécheuse, d'un appareil de chauffage
ou d'un chauffe-eau.
— Canalisations d'aération obstruées en
raison d'une conception inhabituelle des
canalisations d'aération.
• Utilisation prolongée d'appareils à
combustible non ventilés (cuisinière, four ou
foyer).
• Inversions de température qui pourraient
piéger les gaz d'échappement près du sol.
• Moteur de véhicule qui tourne au ralenti
dans un espace clos ou ouvert à proximité
du garage ou de la maison.
Installation du détecteur de CO
AVIS
L'appareil est scellé; le couvercle ne
s'enlève pas.
1. Choisir un emplacement (voir la section
Emplacements recommandés).
31 69-1513EF—01
Page 32

2. Retirer la plaque de montage à l'arrière
du détecteur en tenant la plaque de montage d'une main et en faisant tourner le
détecteur dans le sens de la flèche «Off»
figurant sur le couvercle du détecteur.
REMARQUE : S'assurer que le mot «UP» se lit
dans le bon sens et que la
flèche pointe bien vers le haut.
3. Aligner la plaque de montage sur le mur
en vérifiant que la flèche UP pointe bien
vers le haut.
4. Fixer la plaque de montage à la surface à
l'aide des vis et des chevilles fournies de
façon à ce que la plaque tienne bien en
place. Voir la Fig. 4.
REMARQUE : La pile est placée dans le mau-
vais sens pour l'expédition. Il
faut donc la retirer et la remettre
dans la bonne position.
69-1513EF—01 32
5. Retirer la pile et la réinsérer dans la
bonne position (+/-) comme l'illustrent les
symboles dans le compartiment à pile.
(Une fois la pile bien insérée, bien
refermer la porte du compartiment à pile.)
Voir la Fig. 5.
CROCHETS DE
RETENUE (2)
UP
OUVERTURES
DE FIXATION (2)
MF19053A
Fig. 4. Installation de la plaque de montage.
Page 33

SENS D’OUVERTURE
PORTE DU
COMPARTIMENT
À PILE
6. Le détecteur doit faire entendre un bip
sonore qui indique que la pile est
correctement insérée.
7. En tenant le devant de l'appareil vers soi,
placer les ouvertures de fixation du
détecteur par-dessus les crochets de
retenue de la plaque de montage.
8. Faire tourner le détecteur dans le sens de
la flèche ON figurant sur le couvercle
jusqu'à ce que le détecteur soit bloqué en
position. Voir la Fig. 6.
AVIS
MF19054A
Fig. 5. Insertion de la pile.
S'il n'y a pas de pile, la porte du compartiment à pile ne fermera pas et
l'appareil ne pourra être placé sur sa
plaque de montage.
REMARQUE : Une butée anti-sabotage est
fournie avec les vis et les
chevilles. Cette butée peut servir
à empêcher les enfants ou
d'autres personnes de retirer le
détecteur de sa plaque de
montage.
33 69-1513EF—01
Page 34

9. Pour utiliser la butée anti-sabotage,
l'insérer dans l'ouverture sur le côté du
détecteur une fois celui-ci installé sur la
plaque de montage; Voir la Fig. 7.
REMARQUE : Pour remplacer la pile, retirer
d'abord la butée anti-sabotage à
l'aide d'une pince à bec long.
10. Utiliser une pince à bec long pour retirer
la butée anti-sabotage afin de pouvoir
retirer l'appareil de la plaque de montage
et remplacer la pile.
11. Il devrait y avoir deux étiquettes auto-
adhésives dans la boîte. Inscrire le
numéro de téléphone des services
d'urgence et d'un technicien qualifié dans
les espaces prévus à cet effet sur les étiquettes.
69-1513EF—01 34
ON (INSTALLER)OFF (RETIRER)
MF19055B
Fig. 6. Installation du détecteur sur la plaque
de montage.
Page 35

BUTÉE ANTI-SABOTAGE
MF19056A
Fig. 7. Insertion de la butée anti-sabotage.
12. Apposer une étiquette près du détecteur
et l'autre près d'une source d'air frais où
les occupants de la maison prévoient se
rassembler lorsque le détecteur signale
la présence de monoxyde de carbone.
Vérification hebdomadaire du détecteur
Vérifier le détecteur toutes les semaines pour
s'assurer qu'il fonctionne bien :
1. Appuyer sur le bouton d'essai jusqu'à ce
qu'un bip sonore se fasse entendre (il
suffit de quelques secondes).
2. Relâcher le bouton d'essai.
3. Attendre et observer ce qui suit pendant
l'essai :
a. Le voyant rouge clignote quatre à six
fois.
b. L'alarme fait entendre deux séries de
sons différents après l'essai.
c. Le détecteur reprend son fonctionne-
ment normal.
Vérification-dépannage
Consulter le tableau 1 pour connaître la
signification des voyants d'alarme et des
signaux sonores.
35 69-1513EF—01
Page 36

Voyant rouge/bip sonore Signification
Clignote une fois toutes les 30 secondes. Fonctionnement normal; le détecteur est
sous tension.
S'allume deux secondes, s'éteint trois secondes et fait
État d'alarme; l'alarme est déclenchée.
entendre quatre courts bips sonores pendant une
seconde et reste silencieux pendant cinq secondes.
Clignote deux fois et émet un bip toutes les 30
En dérangement.
secondes.
Émet un bip (stridulation) une fois toutes les 30
Pile faible; il faut remplacer la pile.
secondes pendant au moins sept jours.
Réarmement du détecteur après le déclenchement du
signal d'alarme en appuyant sur le bouton d'essai et en
le maintenant enfoncé pendant trois secondes afin
d'interrompre le signal pendant quatre minutes.
Interrompt le signal après le
déclenchement de l'alarme; le détecteur
fait à nouveau entendre un signal sonore
après quatre minutes jusqu'à ce que la
concentration dangereuse de CO soit
réduite.
69-1513EF—01 36
Page 37

Maintenance
Entretien du détecteur
MISE EN GARDE
Les produits chimiques nettoyants
posent un risque. Peuvent
endommager le détecteur de CO.
Ne pas employer d'agents d'entretien
domestiques, de peintures, de vernis ou
d'autres produits chimiques.
Nettoyer au moyen de l'aspirateur ou
d'un chiffon doux seulement.
REMARQUE : Le détecteur de CO doit rester
propre, mais il ne faut pas le
laver à l'eau ou à l'aide de produits d'entretien chimiques.
Pour nettoyer le détecteur :
1. Retirer le détecteur de la plaque de mon-
tage.
2. Nettoyer l'intérieur du détecteur à l'aide
de l'aspirateur. Passer l'aspirateur sur les
ouvertures autour du périmètre du
détecteur.
3. Essuyer l'extérieur à l'aide d'un chiffon
doux.
Une fois le détecteur nettoyé :
1. Réinstaller le détecteur et vérifier son
fonctionnement à l'aide du bouton
d'essai. (Il est recommandé de vérifier le
fonctionnement du détecteur une fois par
semaine.)
2. Vérifier le détecteur une fois par semaine
et le faire réparer ou le remplacer au
besoin.
37 69-1513EF—01
Page 38

Remplacement de la pile
REMARQUE : Si la butée anti-sabotage est util-
isée, il faut la retirer avant de
remplacer la pile.
3. Vérifier que la pile est bien une pile alca-
line de 9 volts et l'insérer en place; voir la
Fig. 5 (nous recommandons les piles
Duracell® MN1604).
1. Utiliser une pince à long bec pour retirer
la butée anti-sabotage afin de pouvoir
retirer le détecteur de sa plaque de montage et remplacer la pile.
2. Retirer le détecteur de la plaque de mon-
tage en le faisant tourner dans le sens de
la flèche Off située sur le couvercle.
• Utiliser la pile recommandée. (Une
pile neuve devrait durer au moins un
an s'il est fait un usage normal du
détecteur.)
69-1513EF—01 38
AVERTISSEMENT
Danger au moment de remplacer la
pile. Utiliser seulement le type de pile
indiqué.
L'utilisation d'une autre pile qu'une pile
Duracell® MN1604 de 9 volts pourrait
nuire au fonctionnement et au
rendement du détecteur.
REMARQUE : L'exposition constante à des
températures trop basses ou
trop élevées ou à un taux
d'humidité élevé peut réduire la
durée de vie de la pile.
Page 39

Garantie limitée de cinq ans
Honeywell garantit ce produit, à l'exception de la pile, contre tout vice de fabrication ou de matière dans la mesure où il en est fait
une utilisation et un entretien convenables, et ce, pour cinq (5) ans à partir de la date d'achat par le consommateur. En cas de
défectuosité ou de mauvais fonctionnement pendant la période de garantie, Honeywell remplacera ou réparera le produit (au gré
de Honeywell) dans un délai raisonnable.
Si le produit est défectueux,
(i) le retourner, accompagné d'une preuve d'achat indiquant la date d'achat, au détaillant auprès de qui il a été acheté, ou
(ii) l'emballer avec soin, accompagné d'une preuve d'achat indiquant la date d'achat et d'une brève description du mauvais
fonctionnement, et l'envoyer par la poste, port payé, à l'adresse suivante :
Honeywell Return Goods
Dock 4 MN10-3860
1885 Douglas Dr N
Golden Valley, MN 55422
La présente garantie ne couvre pas les frais de retrait ou de réinstallation. La présente garantie ne s'appliquera pas s'il est
démontré que la défectuosité ou le mauvais fonctionnement est dû à un endommagement du produit alors que le consommateur
l'avait en sa possession. La responsabilité de Honeywell se limite à réparer ou à remplacer le produit conformément aux
modalités susmentionnées. HONEYWELL N'EST EN AUCUN CAS RESPONSABLE DES PERTES OU DOMMAGES, Y
COMPRIS LES DOMMAGES INDIRECTS OU ACCESSOIRES DÉCOULANT DIRECTEMENT OU INDIRECTEMENT D'UNE
VIOLATION QUELCONQUE D'UNE GARANTIE, EXPRESSE OU TACITE, APPLICABLE AU PRÉSENT PRODUIT NI DE
TOUTE AUTRE DÉFECTUOSITÉ DU PRÉSENT PRODUIT. Certaines provinces ne permettent pas l'exclusion ou la restriction
des dommages indirects et, par conséquent, la présente restriction peut ne pas s'appliquer.
39 69-1513EF—01
Page 40

LA PRÉSENTE GARANTIE TIENT LIEU DE TOUTES LES AUTRES GARANTIES EXPRESSES ACCORDÉES PAR
HONEYWELL POUR CE PRODUIT ET LES GARANTIES DE VALEUR MARCHANDE ET DE CONFORMITÉ À UNE FIN
PARTICULIÈRE SONT PAR LES PRÉSENTES EXCLUES APRÈS LA PÉRIODE DE CINQ ANS DE LA PRÉSENTE GARANTIE
Certaines provinces ne permettent pas de limiter la durée des garanties tacites et, par conséquent, la présente limitation peut ne
pas s'appliquer.
La présente garantie donne au consommateur des droits légaux spécifiques et peut-être certains autres droits qui peuvent varier
d'une province à l'autre. Pour toute question concernant la présente garantie, prière d'écrire aux Services à la clientèle de
Honeywell à l'adresse suivante : Honeywell Customer Relations, 1985 Douglas Drive North, Golden Valley, MN 10, ou encore
composer le 1-800-468-1502.
Solutions de régulation et d'automatisation
Honeywell International Inc. Honeywell Limited-Honeywell Limitée
1985 Douglas Drive North 35, Dynamic Drive
Golden Valley, MN 55422 Toronto, (Ontario) M1V 4Z9
customer.honeywell.com
® Marque de commerce déposée aux É.-U.
© 2007 Honeywell International Inc. Tous droits réservés
69-1513EF—01 M.S. 07-07
 Loading...