

Page 1
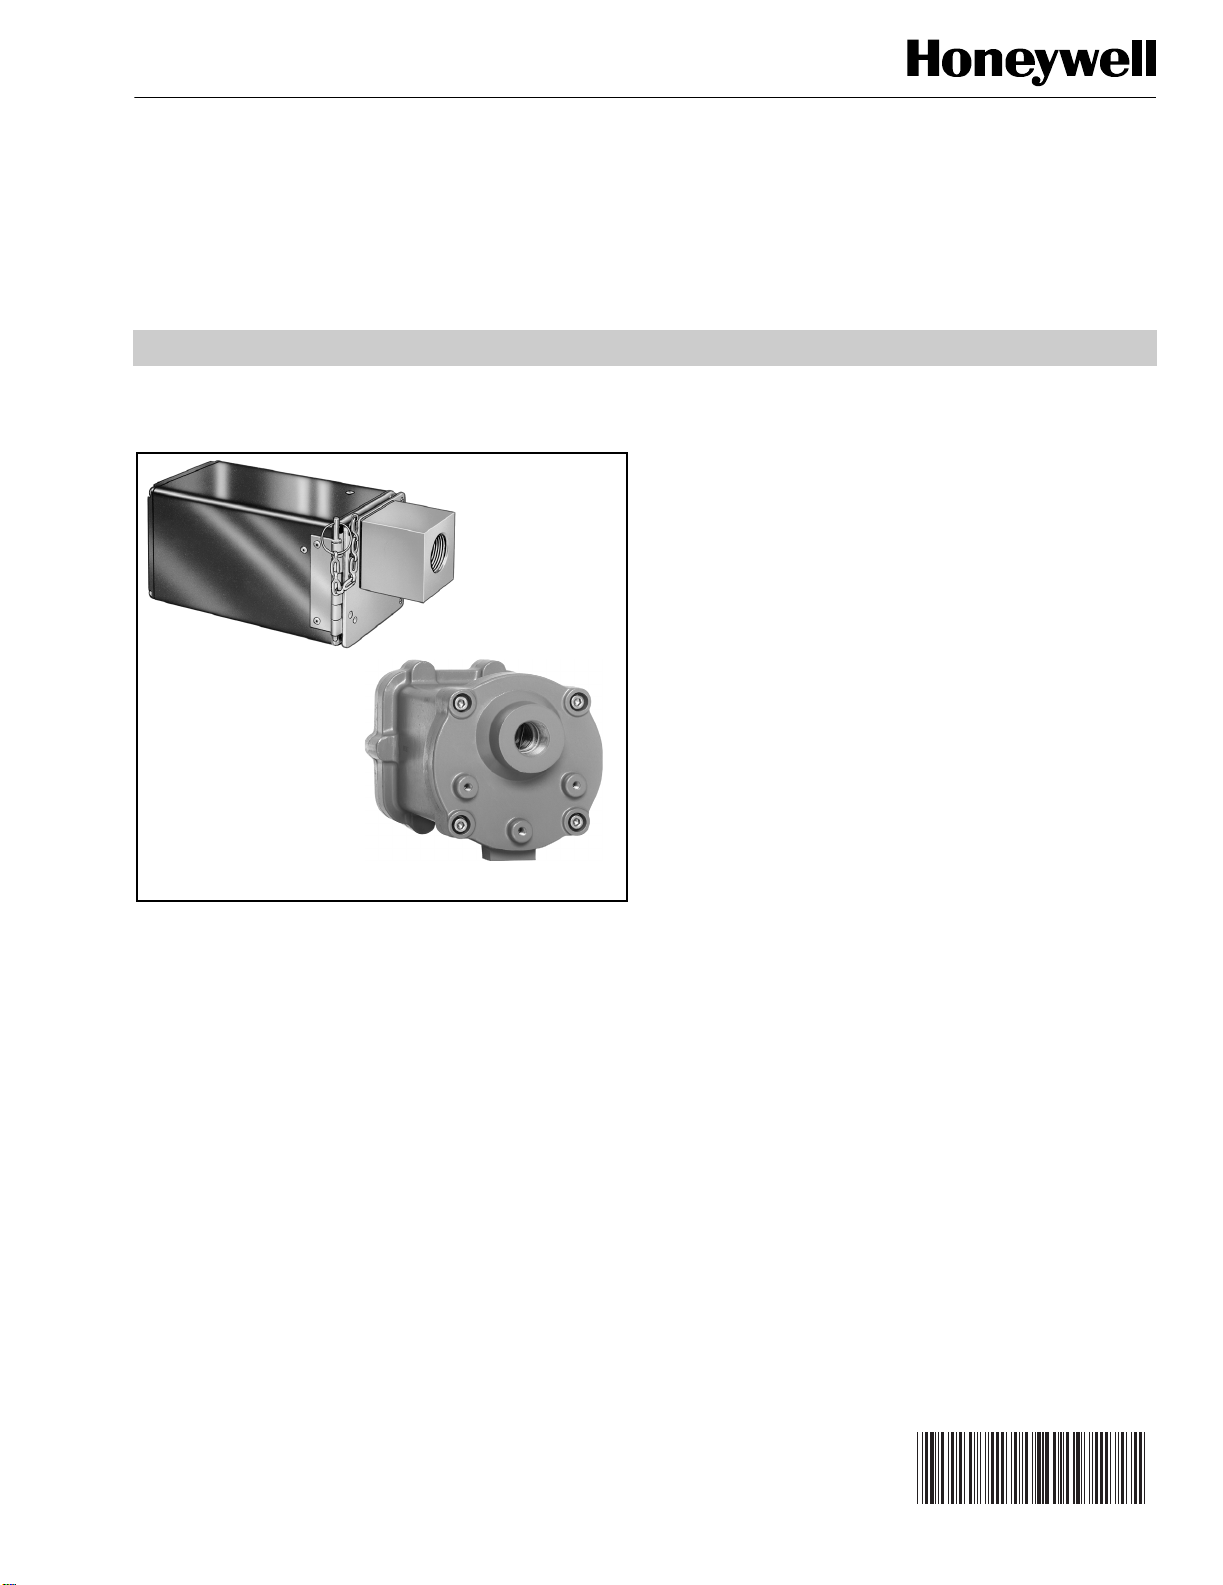
C7076A,D
Adjustable Sensitivity
Ultraviolet Flame Detectors
PRODUCT DATA
The C7076A and C7076D are identical except for their
housings. The C7076A is designed for standard installations
The explosion-proof housing used with the C7076D meets the
requirements for Division I, Class I, Groups C and D; and
Class II, Groups E, F, and G of the National Electrical Code
(NFPA70).
The C7076 features two sensitivity adjustments, each with a
400:1 dynamic range, and an integral flame signal meter jack
to facilitate precise sighting.
C7076A
C7076D
APPLICATION
The C7076 Adjustable Sensitivity Ultraviolet Flame Detector is
a solid-state, adjustable sensitivity, device for sensing the
ultraviolet radiation emanating from gas, oil and pulverized
coal flames. It is designed for burner management and flame
safety systems which require optimum sensitivity and/or flame
discrimination.
The flame detector is designed for use with Dynamic
Self-Check Ultraviolet Amplifiers R7476A and R7886 to
provide a closed-loop, self-checking circuit which insures the
integrity of both amplifier and flame detector. Improper
response to simulated flame loss results in a safety shutdown
and/or alarm.
FEATURES
• High level output permits long distance transmission
without special wiring.
• Solid state circuitry assures long life and stable
sensitivity over wide ranges of temperature and
voltage.
• Available in two versions:
— C7076A for use in standard installations.
— C7076D for use in installations requiring
explosion-proof packaging.
® U.S. Registered Trademark
Copyright © 2002 Honeywell • All Rights Reserved
Contents
Application ........................................................................ 1
Features ........................................................................... 1
Specifications ................................................................... 2
Ordering Information ........................................................ 2
Installation ........................................................................ 7
Wiring ............................................................................... 8
Troubleshooting ................................................................ 16
Service ............................................................................. 18
95-8269-1
Page 2
C7076A,D ADJUSTABLE SENSITIVITY ULTRAVIOLET FLAME DETECTORS
SPECIFICATIONS
Models:
C7076A—Adjustable sensitivity flame detector packaged in
standard housing. Used with R7476A and R7886 Dynamic
Self-Check Ultraviolet Amplifiers.
Table 1. Electrical Ratings.
Line Voltage
(+10%, -15%) Frequency (Hz) Shutter Voltage
100 50/60 100 7 14
120 60 120 7 14
200 50/60 120 7 14
220/240 50/60 120 7 14
c
117
a
Supplied by the appropriate flame safeguard control operating at the designated line voltage.
b
Does not include shutter power, which is supplied by the flame safeguard control.
c
For applications in South Africa.
Temperature Ratings:
Maximum Aspirator Temperature (C7076A only): 225°F
(107°C).
Ambient Operating Temperatures:
C7076A: -40°F to +160°F (-40°C to +71°C).
NOTE: Derate ambient temperature 1°F for every 13°F of
aspirator temperature over 160°F.
C7076D: -40°F to +160°F (-40°C to +71°C).
Storage Temperature Range:
-60°F to +185°F (-51°C to +85°C).
Sensitivity Selection:
Remote Sensitivity Selection: External switch can be wired to
select the setting sensitivity control, either A or B.
External Selector Switch: Must rated for switching 20 mA at
48 Vdc.
Sensitivity Adjustment:
Range: 400 to 1.
Sensitivity Controls: Two, labeled A and B, on plug-in
electronics chassis. Each can be set independently and
locked to prevent drift due to vibration.
50 117 7 14
C7076D—Adjustable sensitivity flame detector packaged in
explosion-proof housing. Used with R7476A and R7886
Dynamic Self-Check Ultraviolet Amplifiers.
Electrical Ratings: See Table 1.
Maximum Power Consumption
a
Flame Signal Amplifiers:
R7476A or R7886 Dynamic Self-Check Ultraviolet Amplifier;
order separately.
Flame Signal:
Measured at flame current meter jack on C7076: 1.4 to 5.5
mA nominal.
Measured at flame current meter jack on R7476A amplifier:
2.5 to 5.5 mA nominal.
Measured at flame voltage meter jack on R7886 amplifier: 0.0
to 5.0 Vdc.
Shutter Frequency:
R7476A: 1.25 Hz nominal. Interrupts the line-of-sight of the
detector about 75 times per minute to provide
self-checking.
R7886: One test every 5 seconds to provide self-checking.
Pressure:
C7076A quartz viewing lens: 20 psig (138 kPa) maximum.
C7076D quartz viewing lens: 142 psig (981 kPa) maximum.
Watts VA
b
ORDERING INFORMATION
When purchasing replacement and modernization products from your TRADELINE® wholesaler or distributor, refer to the
TRADELINE® Catalog or price sheets for complete ordering number.
If you have additional questions, need further information, or would like to comment on our products or services, please write or
phone:
1. Your local Home and Building Control Sales Office (check white pages of your phone directory).
2. Home and Building Control Customer Relations
Honeywell, 1885 Douglas Drive North
Minneapolis, Minnesota 55422-4386
In Canada—Honeywell Limited/Honeywell Limitée, 35 Dynamic Drive, Scarborough, Ontario M1V 4Z9.
International Sales and Service Offices in all principal cities of the world. Manufacturing in Australia, Canada, Finland, France,
Germany, Japan, Mexico, Netherlands, Spain, Taiwan, United Kingdom, U.S.A.
95-8269—1 2
Page 3

C7076A,D ADJUSTABLE SENSITIVITY ULTRAVIOLET FLAME DETECTORS
Interchangeability:
Models C7076A and C7076D are not interchangeable with
other flame detector models; they must be used with either
the R7476A or R7886 Dynamic Self-Check Ultraviolet
Amplifier.
Wiring Connections:
C7076A: Terminal block in front compartment of housing;
wire-clamp type, removable screws (terminal lugs can be
used).
Conduit fitting: 7/8 in. opening in housing to accommodate
1/2 inch flexible conduit; fitting must be water-tight to
meet NEMA 4 standards.
C7076D: Terminal block in front compartment of housing;
wire-clamp type, removable screws (terminal lugs can be
used).
Conduit fitting: 1/2 in. NPT tapped opening in bottom of
housing to accommodate conduit.
Plug-in Electronics Chassis:
Field-replaceable; plugs into octal socket in housing. Contains
ultraviolet sensing tube, shutter assembly, power supply,
solid state circuitry, sensitivity adjustment controls and
flame current meter jack. Keyed to housing to ensure
proper orientation.
Air Flow Requirements (C7076A only):
Purge Air: 0.7 SCFM (3.3 ml/sec) is required to maintain 4 in.
(102 mm) of differential pressure from the aspirator inlet to
the combustion chamber. An air flow of 3 SCFM
(14 ml/sec) is recommended.
Seal-off Air: 5 psig (34.5 kPa) maximum combustion chamber
pressure.
Housing:
C7076A: Meets NEMA 4 standards (water-tight and dust-tight,
indoor and and outdoor).
Construction: Aluminum and cadmium-plated steel.
Color: Light blue.
Front compartment contains terminal block; rear
compartment contains electronic chassis.
C7076D: Meets NEMA 7 requirements (explosion-proof).
Construction: Cast aluminum alloy.
Color: Light blue.
Front compartment contains terminal block; rear
compartment contains electronic chassis.
Mounting:
C7076A: Aspirator has 1-in. NPT tapping for mounting onto
sight pipe, and 3/8 in. NPT tapping for connecting to the air
supply.
Detector mounts on aspirator by means of a removable
piano-type hinge.
C7076D: Detector has 1-in. NPT tapping for mounting onto
sight pipe and two 5/16-18 UNC tapped holes for attaching
a bracket for additional security.
For allowable mounting positions, see Fig. 1.
Weight:
C7076A: 6.6 lb (3 kg).
C7076D: 17.6 lb (8 kg).
Dimensions: See Fig. 2.
Accessories:
118367A Swivel Mount.
W136A Test Meter (includes 117053 meter connector plug).
117053 Meter Connector Plug (for older W136A models).
Replacement Parts:
C7076A:
191002B Plug-in Electronics Chassis (without UV sensing
tube).
190971E Coil and Shutter Assembly (for all models except
100V model).
190971F Coil and Shutter Assembly (for 100V model).
190998A Aspirator Assembly.
191205 Pin and Chain.
191055A Cover Assembly for 120 Vac models.
191055B Cover Assembly for 220/240 models.
191203-767 Hinge.
191053 Ultraviolet Sensing Tube.
191050 Viewing Lens.
190999 grommet, silicone rubber for viewing lens.
191054 Gasket, silicone-rubber seal for front and rear
cover plates.
C7076D:
191002R Plug-in Electronics Chassis (without UV sensing
tube).
190971E Coil and Shutter Assembly (for all models except
100V model).
190971F Coil and Shutter Assembly (for 100V model).
191053 Ultraviolet Sensing Tube.
191050 Viewing Lens.
24400152-001 Lens Kit (consists of quartz window gasket
and gasket seal).
Approvals:
C7076A:
Underwriters Laboratories Inc. Listed (120V models only):
File No. MP268, Guide No. MCCZ.
Canadian Standards Association (CSA) Certified (120V
models only): File No. LR1620.
Factory Mutual Approved: Report No. FM26980.
C7076D:
Underwriters Laboratories Inc. Listed: File No. E34649,
Guide No. ZTSZ.
Industrial Risk Insurers Approvable.
3 95-8269—1
Page 4
C7076A,D ADJUSTABLE SENSITIVITY ULTRAVIOLET FLAME DETECTORS
SIGHT PIPE
ASPIRATOR
DETECTOR CANNOT BE
ROTATED IN THIS PLANE.
THE ASPIRATOR MUST BE ON TOP.
SIGHT PIPE
90
90
DETECTOR MAY
BE ROTATED 90 IN
EITHER DIRECTION
FROM HORIZONTAL
C7076A
90
90
ASPIRATOR
DETECTOR CANNOT BE
ROTATED IN THIS PLANE.
DETECTOR MAY
BE ROTATED 90 IN
EITHER DIRECTION
FROM HORIZONTAL
C7076D
Fig. 1. C7076 allowable mounting positions.
INSTALLATION
Planning the Installation
Proper flame detector application is the basis of a safe and
reliable flame safeguard installation. Refer to the burner
manufacturer instructions as well as to those included here.
Follow all instructions carefully.
Determine the Location
Before beginning the actual installation, estimate the best
location for mounting the detector based upon the following
factors:
Temperature
Install the flame detector where the surrounding temperature
will remain within the specified ambient operating temperature
ratings.
M20748
For the C7076A, to keep the detector temperature within
specifications, the aspirator temperature must not exceed
225°F (107°C). If the aspirator temperature will exceed
temperature ratings, the introduction of cooling-purging air will
be required.
Vibration
Do not install the detector where it could be subjected to
excessive vibration; it shortens the life of the electronic
components. Vibrations with a magnitude greater than 1g will
require an antivibration mount to cushion the detector.
Clearance
Make sure there will be enough room to swing out the detector
for servicing. Refer to Fig. 2 as applicable.
Radiation Sources Other Than Flame
Examples of radiation sources, other than flame, which could
actuate the detector system include:
95-8269—1 4
Page 5
C7076A,D ADJUSTABLE SENSITIVITY ULTRAVIOLET FLAME DETECTORS
6
1 INCH NPT
2-1/4
(57)
1
POWER SUPPLY. PROVIDE DISCONNECT
MEANS AND OVERLOAD PROTECTION
AS REQUIRED.
5/16-18 UNC (3 PLCS)
X 0.47 (12) DEEP
2-1/4
(57)
4 (102)
4-25/32 (122)
1
1-1/16
(27)
(102)
3/8 INCH NPT
4
2-9/32
1-5/8
(19)
(58)
2-21/32
(68)
3/4 (19)
7-13/32 (188)
10-1/4 (261)
29/32 (22) OPENING FOR
1/2-INCH CONDUIT
1 (25)
7-19/32
(194)
1
C7076A
-23/32
(171)
1-31/32 (50)
3-15/16 (100)
15/16
(24)
25/32 (20)
1-9/16 (40)
C7076D
7-13/16 (198)
11-13/16 (300)
1-27/32
(47)
5-25/32
(147)
5-25/32 (147)
M20749A
Fig. 2. C7076 dimensions in in. (mm).
1. Ultraviolet sources:
a. Radiant surfaces above 2200°F (1200°C).
b. Sparks from ignition transformers and welding arcs.
c. Gas lasers.
d. Sun lamps.
e. High voltage condensers.
f. Radioisotopes.
Except under very unusual circumstances, none of these
sources, except a radiant surface or ignition spark, would be
present in or near the combustion chamber.
e. Germicidal lamps.
f. Incandescent lamps held close to the sensing tube
2. Gamma ray and X-Ray sources:
(filament above 2200°F [1200°C]).
The detector may respond to a radiant surface at a
temperature above 2200°F (1200°C) if both of these
conditions are present:
a. Diffraction analyzers.
b. Electron microscopes.
c. Radiographic x-ray machines.
• The detector sensitivity control is set at (or near) maximum,
and
d. High voltage vacuum switches.
5 95-8269—1
Page 6

C7076A,D ADJUSTABLE SENSITIVITY ULTRAVIOLET FLAME DETECTORS
• the surface represents a significant percentage of the
detector field of view.
If the temperature or a radiant surface causes the flame relay
(in the flame safeguard control) to pull in, re-aim the sight pipe
so the detector views a cooler area, or decreases the
sensitivity of the detector.
Ignition spark is a rich source of ultraviolet radiation. When
installing the detector, make sure it does not respond to
ignition spark.
Single Burner Requirements
The detector must have an unobstructed view of the flame it is
supervising under all firing conditions. This implies a proper
sighting angle and the minimization of screening effects.
Sighting Angle
The first 30 percent of a flame (the root) radiates the most
intense ultraviolet energy. Low angle sighting permits the
detector to view a greater depth of the flame root, thus
reducing the effects of irregularities in the flame pattern. The
best sighting angle is nearly parallel to the axis of the flame,
as shown in Fig. 3.
DETECTOR IN GOOD
SIGHTING POSITION
(LOW ANGLE SIGHTING)
BURNER
NOZZLE
DETECTOR IN POOR
SIGHTING POSITION
Fig. 3. Detector sighting angle.
NOTE: When possible, it is desirable to tilt the detector and
sight pipe downward to prevent the buildup of soot in
the pipe or on the viewing lens.
FLAME DEPTH–
ANGLE VIEW
UNBURNED FUEL
FLAME DEPTH–
PERPENDICULAR VIEW
M1956
reaching the detector and may cause flame signal
deterioration resulting in a shutdown. The adverse affects of
screening may be minimized by proper burner adjustment,
increasing the detector viewing area (shorten sight pipe
and/or increase its diameter), and optimizing detector
sensitivity.
Multiburner-Multifuel Requirements
In addition to meeting the requirements for a single burner, a
multiburner installation also requires flame discrimination.
Flame discrimination may be defined as the location of all
flame detectors such that each detector responds only to the
flame(s) produced by the burner it is supervising.
MULTIBURNER REQUIREMENTS
In multiple burner systems, not every detector can be
positioned so that its line of sight does not intercept flames
from other burners. This situation occurs in front-fired boiler
furnaces having more than one row of burners, or in multilevel
opposed-fired furnaces where the burners face each other.
When planning such an installation, locate each flame
detector so that it has the best possible view of the first 30
percent closest to the burner nozzle (the flame root) it is
supervising, and the worst possible view of all other flames.
Fig. 4 illustrates a critical detector application problem that
requires flame discrimination. Flame discrimination is
accomplished for Detector A by repositioning it until the flame
relay (in the flame safeguard control) does not respond to
Flame B. Note that Detector A is aimed at the first 30 percent
of Flame A where the ultraviolet radiation is most intense. It
sights the tip of Flame B, but it is not aimed at the first 30
percent of Flame B where ultraviolet radiation is intense.
Detector A is repositioned to assure maximum response to
Flame A while rejecting Flame B. Similarly, Detector B is
positioned to assure maximum response to Flame B while
rejecting Flame A.
If the sensitivity control on a detector is set at its minimum
position and flame discrimination cannot be achieved, insert
an orifice plate in the sight pipe. An orifice of the proper
diameter will reduce the ultraviolet radiation reaching the
detector so that the sensitivity can be adjusted to effect flame
discrimination.
In most installations, the detector will need to respond to the
pilot flame alone, then to the pilot flame and main burner
flame together, and finally to the main burner flame alone. The
detector must meet all sighting requirements which apply.
1. Pilot flame alone—the smallest pilot flame that can be
detected must be capable of reliably lighting the main
burner.
2. Pilot and main burner flame together—the detector
must sight the junction of both flames.
3. Main burner flame alone—the detector must sight the
most stable part of the flame for all firing rates.
Screening Effects
Smoke, fuel mist, dirt and dust are masking agents that
absorb ultraviolet radiation from the flame. They create a
screen that reduces the amount of ultraviolet radiation
95-8269—1 6
DETECTOR A
FLAME A
FLAME B
DETECTOR B
M1957
Fig. 4. Example of flame discrimination problem
(opposed-fired burners).
Page 7

C7076A,D ADJUSTABLE SENSITIVITY ULTRAVIOLET FLAME DETECTORS
MULTIFUEL REQUIREMENTS
Detectors supervising burners that alternately fire more than
one fuel may require a different sensitivity level for each fuel.
For example, a higher sensitivity is required to reliably sense
pulverized coal or No. 6 fuel oil in contrast to natural gas or to
No. 2 fuel oil. Reliable flame sensing and flame discrimination
may not be maintained simultaneously (without changing the
sensitivity setting) when alternating between two fuels.
The C7076 has two integral sensitivity adjustments that can
be remotely and automatically selected. The two sensitivity
adjustments can be chosen by means of the fuel selector
switch (refer to Remote Sensitivity Selection in the Installation
section). The sensitivity adjustments should be made for both
fuels as described in the section on multiburner requirements,
using one adjustment pot for each fuel.
Parallel Flame Detectors
Two C7076 detectors can be connected in parallel to the
same flame signal amplifier and still provide independent
sensitivity adjustment. This capability is particularly useful for
multiburner, multifuel applications.
Shifting flame patterns, commonly encountered on burners
with wide turndown ratios, may require parallel detectors to
prove the flame at the highest and lowest firing rates. In this
case, one detector supervises the pilot (interrupted) and both
detectors supervise supervise the main burner flame. During
the main burner run period, either detector is capable of
maintaining system operation.
In addition to assuring more reliable flame detection, parallel
detectors facilitate maintenance during burner operation.
Each detector can be removed in turn without shutting down
the supervised burner. However, a flame simulating failure
occurring in the flame signal amplifier or in either detector will
cause a shutdown.
Redundant Flame Detection System
Two C7076 detectors connected to two flame signal amplifiers
wired in parallel comprise a redundant flame detection
system. In addition to the features of parallel flame detectors,
a redundant system increases reliability and is therefore
recommended for critical burner applications. A flame failure,
flame signal loss, or flame simulating failure occurring in either
detector subsystem will cause an alarm (not a shutdown)
allowing corrective action to avert a shutdown.
When Installing this Product…
1. Read these instructions carefully. Failure to follow them
could damage the product or cause a hazardous
condition.
2. Check the ratings given in the instructions and on the
product to make sure the product is suitable for your
application.
3. Installer must be a trained, experienced flame
safeguard service technician.
4. All wiring must comply with applicable local electrical
codes, ordinances and regulations.
5. All wiring must be NEC Class 1 (line voltage).
6. Voltage and frequency of the power supply connected to
this detector must agree with the values marked on the
detector.
7. If an air supply is connected to the aspirator on the
C7076A, its pressure must equal or exceed that
required to seal off the detector from the combustion
chamber.
8. On multiburner installations, each detector must
respond only to the flame(s) produced by the burner it is
supervising.
9. Do not connect more than two detectors in parallel to a
single R7476A or R7886 Dynamic Self-Check
Ultraviolet Amplifier.
10. Perform all required adjustments and checkout tests
after installation is complete.
Selecting and Installing Sight Pipe
After you have determined the approximate location and
sighting angle, select the sight pipe. A black iron pipe is
recommended to provide reliable flame sensing. Stainless
steel and galvanized pipes have bright surfaces that initially
transmit ultraviolet radiation very well. However, their ability to
transmit ultraviolet radiation will decay when the bright
surfaces become dull with age or contamination, and flame
detection will become less reliable with time.
The aspirator on the faceplate of the C7076A, and the
faceplate on the C7076D, are tapped for a 1-inch NPT
threaded pipe. A larger pipe may be necessary to obtain
proper performance; an diameter other than 1 inch will require
a reducer coupling. The geometry of the sight pipe affects the
performance of the detector. If the flame signal is too small,
reduce the length or increase the diameter of the pipe to
increase the field of view of the detector. If a sight pipe longer
than 1 foot is required, use a 2-inch diameter pipe with the
reducer as close to the detector as possible.
INSTALLATION
WARNING
Electrical Shock Hazard.
Can cause serious injury, death or equipment
damage.
Disconnect power supply before beginning installation.
More than one disconnect may be necessary.
NOTE: Sight pipe couplings cannot be used with C7076D
due to the need to safeguard the integrity of the
explosion-proof quality of this model. The size of the
sight pipe for the C7076D, therefore, is restricted to
1-inch diameter.
Cut a hole of the proper diameter for the sight pipe in the
burner front or windbox at the selected location. The hole
should be at least 2 inches in diameter to allow adjustment of
the sighting angle. If register vanes interfere with the desired
line of sight, trim the interfering vane(s) to assure an
unobstructed view of the flame.
Cut the pipe to the desired length. Thread one end of the pipe
to fit the desired mating component; i.e., reducer coupling,
aspirator on the faceplate of the C7076A aspirator; or
7 95-8269—1
Page 8
C7076A,D ADJUSTABLE SENSITIVITY ULTRAVIOLET FLAME DETECTORS
faceplate on the C7076D Detector. Insert the other end of the
pipe into the mounting hole, align it to the desired sighting
angle, and tack weld it in position.
NOTE: When initially mounting the pipe, tack weld it in place
to allow further sighting adjustments. Make sure the
tack weld will support the weight of the detector
when it is installed.
NOTE: When installing a C7076A Detector, a Honeywell
118367A Swivel Mount is recommended to facilitate
sighting the flame properly. For installation
instructions for the Swivel Mount, see form 60-0361.
Installing the C7076A Detector
Mounting the Aspirator
The aspirator on the faceplate of the C7076A Detector screws
directly onto the 1-inch NPT threaded pipe. Remove the
aspirator from the C7076A Detector by removing the hinge
pin. Use an adjustable wrench to tighten the aspirator onto the
pipe. For alternate mounting methods and further information
refer to Fig. 5.
Mounting the Detector
Mount the detector on the faceplate by placing the detector on
its hinge and re-inserting the hinge pin. Install 1/2 inch flexible
conduit to the detector as follows:
Loosen the four captive screws in the front coverplate (with
the viewing lens) and remove the plate.
Seal off of the sight pipe prevents hot gases from escaping
from a positive pressure combustion chamber when the
detector is swung open on its hinge for maintenance. Refer to
Fig. 9 for the minimum inlet pressure or air flow required to
seal off a sight pipe against a positive combustion chamber
pressure.
Fig. 10 shows a method of supplying a constant airflow to
purge the sight pipe, while also providing enough pressure to
seal off the sight pipe when needed.
Mounting the Faceplate
The faceplate of the C7076D Detector screws directly onto the
1-inch NPT threaded pipe (see Fig. 5). Screw the faceplate
onto the pipe; hand-tighten in place, making certain that the
four mounting holes in the faceplate are properly aligned to
allow the detector to be in the desired position when secured
to the faceplate.
Mounting the Detector
Mount the detector on the faceplate and fasten in place using
the four mounting screws supplied for this purpose. Do not
tighten the screws at this time, because the detector must still
be wired.
Obtain a piece of conduit that is not longer than 18 inches in
length and has 1/2-inch NPT threads at both ends. Screw this
piece of conduit into the threaded opening in the bottom of the
detector housing (see fig. 11). Install an approved seal box on
the other end of the piece of conduit and then complete the
conduit installation as required.
Install a flexible conduit fitting in the opening in the bottom of
the detector (Fig. 7). To meet NEMA 4 standards, use
watertight conduit and a watertight fitting (such as an Appleton
ST50 Liquid-Tight® Connector with an STG-50 Neoprene
O-ring and Steel Gasket Assembly). See Table 2 for other
applicable connectors.
Table 2. Applicable Watertight Connectors.
Manufacturer Coupling No. O-Ring No.
T&B 5232 5262
Efcor 11-50 LTG-1
Raco 3402 2452
Steel City LT-101 LR-531
Crouse Hines LT-50 SG-1
Connecting Air Supply (Optional)
Use a flexible air supply line which will allow repositioning of
the sight pipe until the permanent detector position has been
verified.
The aspirator air inlet can be plugged, left open, or connected
to a clean (oil/moisture-free) air supply. Use a 3/8 in. NPT
connector if aspirator air is used (see Fig. 5). The aspirator
allows air to flow through the sight pipe into the combustion
chamber to cool, clean and seal off the sight pipe. The airflow
eliminates the need for frequent lens cleaning. See Fig. 8 for
purge air requirements.
WIRING
WARNING
Electrical Shock Hazard.
Can cause serious injury, death or property
damage.
Disconnect all power before beginning wiring. More
than one disconnect may be involved.
1. All wiring must comply with applicable local electrical
codes, ordinances and regulations. Use NEC Class 1
wiring.
NOTE: The detector has color-coded and labeled,
plastic-insulated no. 18 leadwires, 8 ft (2.4 m) long,
rated for 221°F (105°C).
2. Keep the flame signal leadwires as short as possible
from the flame detector to the terminal strip or wiring
subbase. Capacitance increases with wire length,
reducing the signal strength. the maximum permissible
leadwire length depends on the type of leadwire and the
conduit type and diameter. The ultimate limiting factor in
flame signal leadwire length is the signal current or
voltage at the flame safeguard device. See Table 1.
95-8269—1 8
Page 9
C7076A,D ADJUSTABLE SENSITIVITY ULTRAVIOLET FLAME DETECTORS
0
F
1
E
S
ASPIRATOR
FACEPLATE
AIR SUPPLY
1 INCH (25)
SIGHT PIPE
DIRECT MOUNTING
1 INCH (25)
NPT
THREADS
3/8 INCH (9)
NPT THREADS
URNACE
WALL
2-3/8
(60)
SIGHT PIPE
LARGER
THAN
1 INCH (25)
DIAMETER
USING A REDUCER OR LARGER PIPES
USING A SWIVEL MOUNT (PART NO. 118367A)
REDUCER
2 INCH (50)
NIPPLE
MOUNTING
FLANGE
1 INCH (25)
CLOSE
NIPPLE
3/8 INCH (9)
NPT THREADS
SWIVEL
BALL
ASPIRATOR
NUT
FACEPLATE
AIR SUPPLY
1 INCH (25)
CLOSE
NIPPLE
3/8 INCH (9)
NPT THREADS
ASPIRATOR
FACEPLATE
AIR
SUPPLY
M2075
Fig. 5. Installing the sight pipe for the C7076A Detector.
1 INCH (25)
NPT
THREADS
1 INCH (25)
IGHT PIPE
FACEPLAT
M2075
Fig. 6. Installing the sight pipe for the C7076D Detector.
9 95-8269—1
Page 10

C7076A,D ADJUSTABLE SENSITIVITY ULTRAVIOLET FLAME DETECTORS
2
3
AIR FLOW (SCFM)
8
E
4
MINIMUM ASPIRATOR INLET PRESSURE REQUIRED FOR SEAL OFF – PSIG
R
60
TERMINAL
BLOCK
FLAME
DETECTOR
WIRES
LUCK NUT
FLEXIBLE
WATER TIGHT
CONDUIT
FITTING
CONDUIT
M2075
Fig. 7. Connecting the watertight flexible conduit.
6
4
Pchamber
2
10" OF ASPIRATOR PIP
(1" PIPE)
50
40
30
OR
20
10
MINIMUM ASPIRATOR AIR FLOW REQUIRED FOR SEAL OFF – SCFM
0
AIR FLOW (SCFM)
123 4 5
POSITIVE CONBUSTION CHAMBER PRESSURE – PSIG
INLET PRESSURE (PSIG)
Fig. 9. Minimum inlet pressure or airflow.
2
MANUAL SHUTOFF
VALVE (BALL VALVE)
M2075
Pinlet
012
DIFFERENTIAL PRESSURE ( P = Pinlet – Pchamber)(PSI)
M2075
AIR SUPPLY
PRESSURE
Fig. 8. C7076A purge air requirements.
1
2
3
Fig. 10. Supplying a constant airflow for purge.
1
TO ASPIRATO
NEEDLE
3
VALVE
EQUALS OR EXCEEDS THE PRESSURE REQUIRED TO
SEAL OFF THE SIGHT PIPE FROM A POSITIVE
PRESSURE COMBUSTION CHAMBER.
OPEN ONLY WHEN SERVICING THE DETECTOR.
ADJUST TO PROVIDE ENOUGH AIR TO COOL THE
ASPIRATOR AND MAINTAIN A CLEAR SIGHT PIPE.
REMOVE HANDLE AFTER ADJUSTING.
M20755
95-8269—1 10
Page 11

C7076A,D ADJUSTABLE SENSITIVITY ULTRAVIOLET FLAME DETECTORS
6
R
1
C
T
E
FSP5075
C7076
A
E
FLAME SAFEGUARD
C
C7076
A
g. Floating grounds—ground at some voltage above
earth ground.
h. No G wire—burner used as ground.
i. Detector output less than maximum attainable for
the installation (inadequate sighting).
Wiring Diagrams
Follow approved system wiring diagrams. Refer to Fig. 12, 13,
TERMINAL
BLOCK
14, or 15 for approved system wiring diagrams.
1
/2 INCH NPT
ONDUIT SECTION
O SEAL BOX
1
NOT MORE THAN 18 INCHES IN LENGTH.
FLAME
DETECTO
WIRES
M2075
Fig. 11. Mounting the C7076D Detector.
3. Detector leadwires can be spliced for longer leadwire
runs observing the following considerations:
a. Make required splices in a junction box.
b. Use moisture-resistant no. 14 wire suitable for at
least 167°F (75°C).
c. For High Temperature Installations, use Honeywell
specification no. 32004766-003 or equivalent for the
F leadwire. This wire is rated up to 480°F (250°C)
for continuous duty. It is tested for operation up to
20,000 volts and for breakdown up to 35,000 volts.
For the other leadwires, use moisture-resistant no.
14 wire selected for a temperature rating above the
maximum operating temperature.
d. F and G wires (blue and yellow) must be run in their
own conduit, independent of other power-carrying
leadwires. More than one scanner F and G wires
can be run in the same conduit.
e. A shielded twisted-pair wire may be substituted for
using conduit for routing the F leadwire (blue). Be
advised of the capacitance per foot of shielded wire
effectively reduces the flame signal at the flame
safeguard device. Be sure to ground the shield to
the G terminal at the flame safeguard wiring
subbase.
f. The detector power and shutter wires need to be run
in their own conduit, as well, avoiding other
electrical noise-carrying wiring.
g. The scanner wires should remain separated 2 in.
(51 mm) minimum from other line voltage wires in
the main control panel to the flame safeguard
device.
4. Installation considerations to be avoided that can
influence detector operation and maximum leadwire
length:
a. Moisture.
b. Ignition interference.
c. High resistance connections and poor grounds.
d. Leadwire capacitance.
e. Voltage fluctuations.
f. Induced line transients.
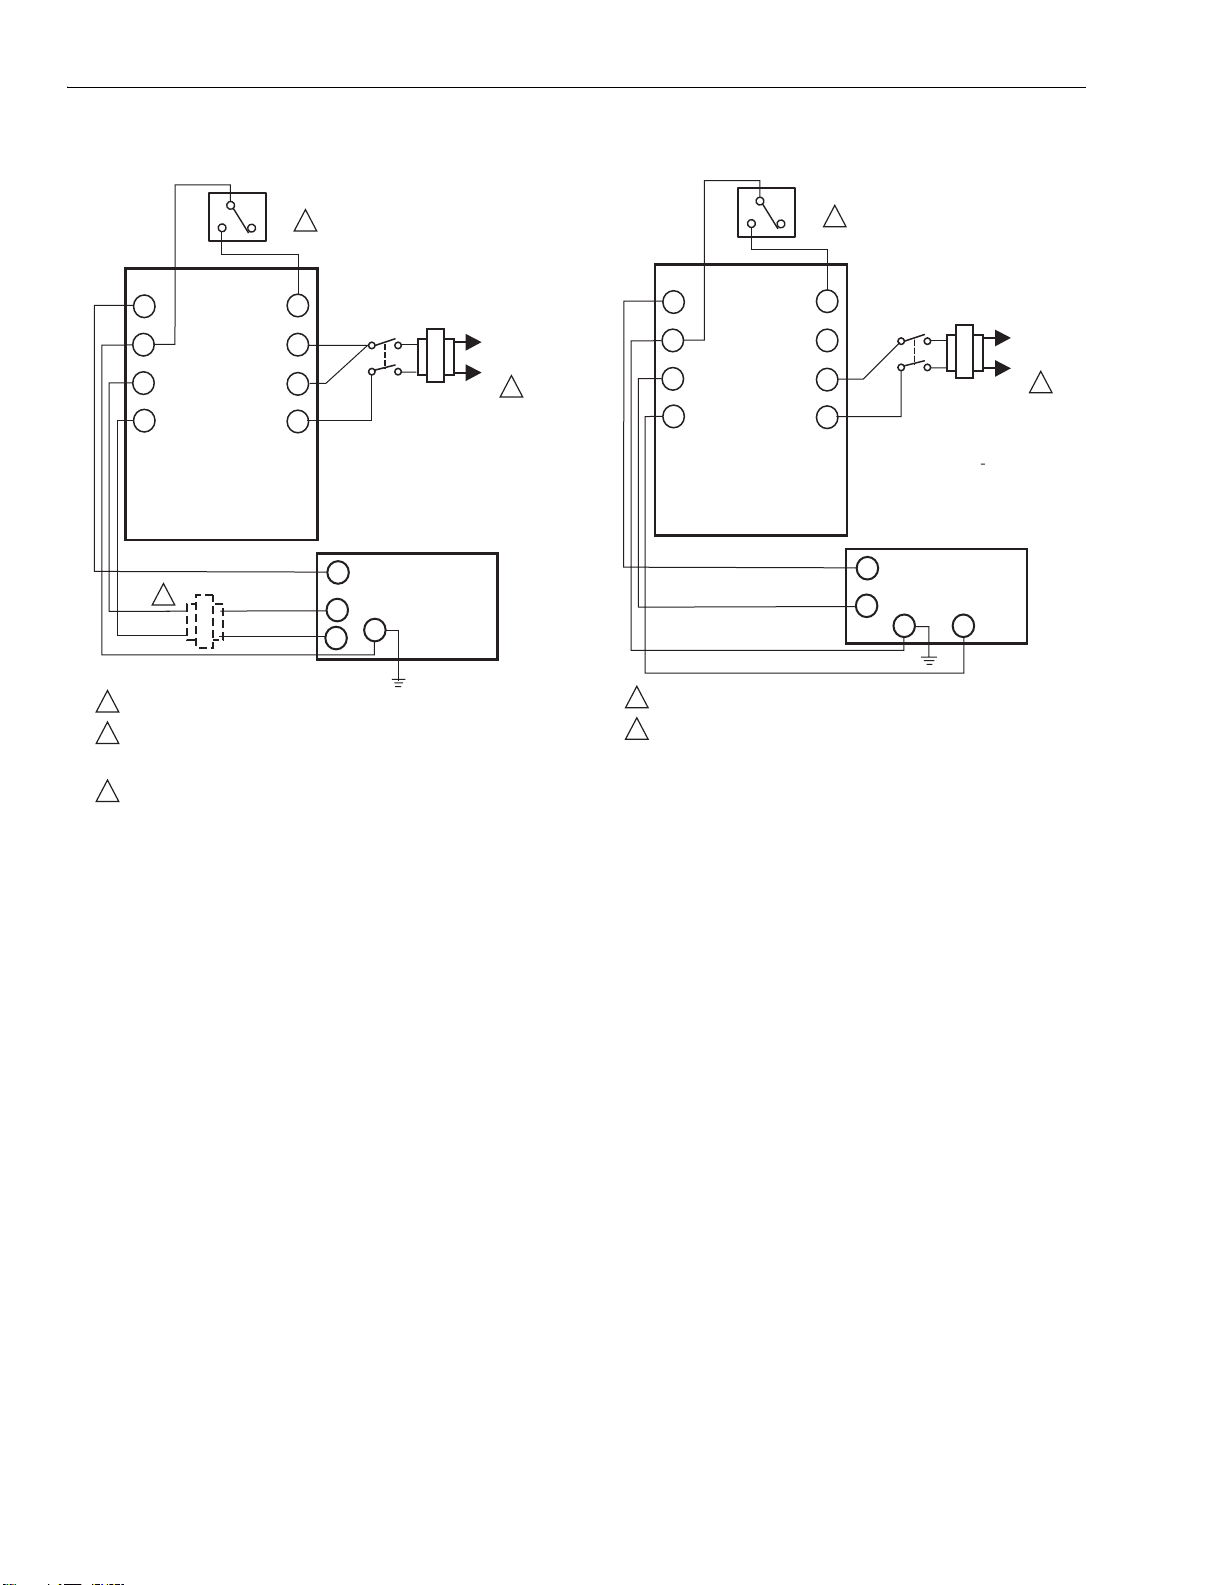
TERMINALS
L1
L2
2
13
G
F
1 POWER SUPPLY. PROVIDE DISCONNECT MEANS AND OVERLOAD
PROTECTION AS REQUIRED. POWER SUPPLY MUST MATCH VOLTAG
AND FREQUENCY RATING OF FLAME DETECTOR.
2
OPTIONAL SPST SWITCH FOR REMOTE SENSITIVITY SELECTION.
TERMINALS
1
L2
SHUTTER
3
SHUTTER
4
5
7
6
SENSITIVITY
SELECTOR
SWITCH
A
L1
(HOT)
L2
1
2
B
M20757
Fig. 12. Wiring C7076A,D to FSP5075.
ONTROL TERMINALS
X
X
G
F
1 POWER SUPPLY. PROVIDE DISCONNECT MEANS AND OVERLOAD
PROTECTION AS REQUIRED. POWER SUPPLY MUST MATCH VOLTAG
AND FREQUENCY RATING OF FLAME DETECTOR.
2
OPTIONAL SPST SWITCH FOR REMOTE SENSITIVITY SELECTION.
TERMINALS
1
L2
SHUTTER
3
SHUTTER
4
5
7
6
SENSITIVITY
SELECTOR
SWITCH
A
L1
(HOT)
L2
1
2
B
M20758
Fig. 13. Wiring C7076A,D to flame safeguard control.
11 95-8269—1
Page 12
C7076A,D ADJUSTABLE SENSITIVITY ULTRAVIOLET FLAME DETECTORS
)
EXTERNAL
A
.
T)
EXTERNAL
0
SELECTOR
SWITCH
3
B
F
6
G
5
4
SHUTTER
SHUTTER
C7076A1031 OR
C7076D1043,
220/240 VAC, 50/60 HZ
2
POWER SUPPLY. PROVIDE DISCONNECT MEANS AND OVERLOAD
1
PROTECTION AS REQUIRED.
CA UTION: PREVENT POSSIBLE DAMAGE TO SHUTTER MECHANISM
2
ON EC7800 SERIES RELAY MODULE APPLICATIONS ONLY.
INSTALL A 200/220/240 VAC TO 120 VAC, 10VA MINIMUM STEP-DOWN
TRANSFORMER (NOT PROVIDED) TO DRIVE THE SHUTTER.
3
OPTIONAL SPST SWITCH FOR REMOTE SENSITIVITY SELECTION.
A
7
8
L1
1
2
L2
MASTER
SWITCH
F
WIRING SUBBASE
22
G
L2
Q7800
L1
(HOT
L2
M20759
SELECTOR
SWITCH
2
B
F
6
G
5
4
1
SHUTTER
SHUTTER
POWER SUPPLY. PROVIDE DISCONNECT MEANS AND OVERLOAD
1
PROTECTION AS REQUIRED.
2
OPTIONAL SPST SWITCH FOR REMOTE SENSITIVITY SELECTION.
A
7
8
L1
1
2
L2
MASTER
SWITCH
F
WIRING SUBBASE
22
G
Q7800
L1
(HO
L2
1
L2
M2076
Fig. 15. Wiring 120 Vac C7076A,D to RM78XX wiring
subbase.
Fig. 14. Wiring C7076A,D to EC78XX Wiring
Subbase at 220/240 Vac, 50/60 Hz.
Remote System Sensitivity
For systems firing more than one fuel, each with a different
level of UV emission, or whose flame patterns change with
firing rate, two sensitivity adjustments are provided. An
external selector switch (spst) is required to choose between
the two sensitivity settings. (Refer to Sensitivity Adjustments
in the Adjustments and Checkout section.) With the external
selector switch open, the A sensitivity control setting will
determine the sensitivity of the detector; with the switch
closed, the B setting will determine the sensitivity. For
automatic sensitivity selection, the switch may be
incorporated into the fuel selector switch or the firing rate
switch.
Connecting Detectors in Parallel
Two C7076A or two C7076D Flame Detectors with the same
voltage rating can be connected in parallel to the same
terminals. To avoid exceeding the rating of the shutter control
circuit, do not connect more than two detectors in parallel.
Making the Connection
1. Provide access to the terminal block in the detector as
follows:
a. For the C7076A, swing open the detector from the
faceplate. Loosen the four captive screws that
secure the cover plate (with the viewing lens) to the
detector, and remove the plate to provide access to
the terminal block.
b. For the C7076D, remove the four screws that
secure the faceplate (attached to the sight pipe) to
the detector. Force the faceplate from the housing
far enough to allow the detector to be sufficiently
reoriented on the conduit to provide access to the
terminal block.
2. Run the wires from the flame safeguard control through
the conduit to the C7076A or C7076D detector.
3. Connect each wire to the proper terminal on the
terminal block in the detector.
4. Reassemble the detector by performing step 1a or 1b
above, as applicable, in the reverse order.
95-8269—1 12
Page 13
C7076A,D ADJUSTABLE SENSITIVITY ULTRAVIOLET FLAME DETECTORS
Adjustments and Checkout
WARNING
Fire or Explosion Hazard.
Can cause serious injury, death or equipment
damage.
Consult the burner/boiler manufacturer instructions
and sequence of operation for the burner
management system before initial burner lightoff.
Flame Signal Readings
The final sighting position of the C7076A or C7076D Detector
may be most readily determined by using a Honeywell W136
Test Meter connected to the Flame Current meter jack on the
plug-in electronics chassis. This output is the unprocessed
flame signal from the detector and is intended as a diagnostic
aid. Readings taken at the detector will facilitate installing the
detector in the best sighting position by pinpointing the region
of greatest UV intensity for a given flame.
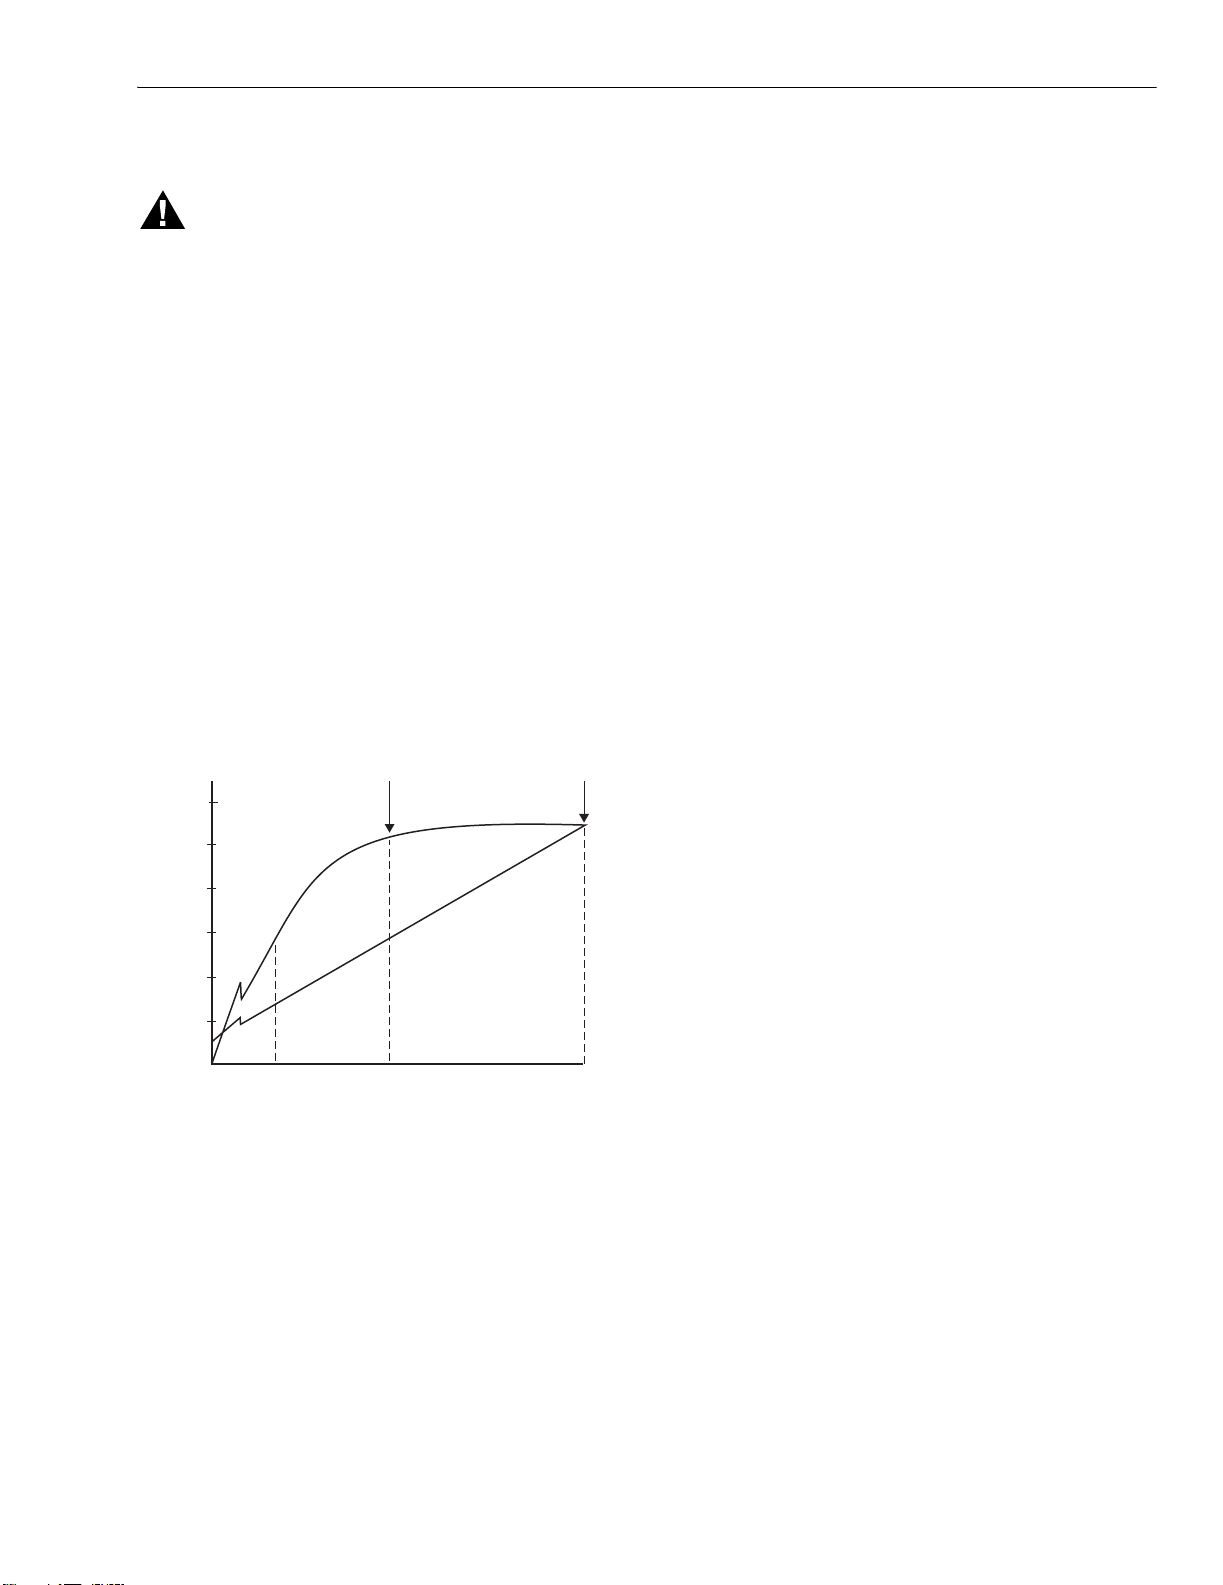
Fig. 16 illustrates the relationship between the detector and
amplifier readings. Detector saturation (the point at which an
increase in UV intensity does not product a noticeable
increase in flame signal strength) occurs at point A. Point B
represents the point at which the amplifier is saturated while
the minimum UV sensitivity required for system operation is at
point C.
AMPLIFIER
6
5
4
3
2
1
NORMAL FLAME SIGNAL - MICROAMPS
6
C7076A
OR
R7476A AMPLIFIER
C7076D DETECTOR (UNPROCESSED)
CB
ULTRAVIOLET INTENSITY
SATURATION
Fig. 16. Comparison of UV intensity, amplifier saturation
and detector saturation.
The linearity of the detector output curve shows that a unit
increase in UV intensity is accompanied by a corresponding
increase in flame signal strength. This condition facilitates
pinpointing the location of the most intense UV radiating from
a flame. Thus, by locating the optimum flame signal with the
detector, the peak UV signal, and therefore the most reliable
reading, is obtained.
The minimum acceptable stable flame signal readings are:
a. C7076A and C7076D Flame Detectors: 1.4
microamperes.
b. R7476A Flame Signal Amplifier: 2.5 microamperes.
c. R7886 Flame Signal Amplifier: 1.2 Vdc.
DETECTOR
SATURATION
M20761
A
Sensitivity Adjustments
General Considerations
1. If a single detector is required to supervise both the pilot
and main burner flame, verify the flame signal for each
flame individually.
2. Make sure the minimum acceptable stable flame signal
(1.4 microamperes at the detector, or 2.5 microamperes
at the R7476 Amplifier, or 1.2 Vdc at the R7886 Amplifier) is obtained throughout the entire turndown range of
the burner.
3. Parallel detectors may be required if a single sighting
angle will not provide a proper flame signal for both the
pilot and main burner flames throughout the entire
turndown range of the burner.
Single Burner System Using the C7076A Detector
1. Loosen the four captive screws in the rear cover plate of
the C7076A and remove the plate.
2. Adjust Sensitivity Control A for maximum sensitivity.
a. If the remote sensitivity selection feature is used,
make sure the external selector switch is open for
Control A adjustment.
b. Loosen the setpoint locking nut on Sensitivity
Control A.
c. Turn the control clockwise to MAX position.
d. Tighten the setpoint locking nut 1/4 turn past hand
tight. Do not over-tighten.
3. Read the flame signal in microamperes at the Flame
Current jack.
a. Use a Honeywell W136A test meter with the
selector switch at the SPL position. (If a W136 is not
available, a microammeter with a 0 to 25
microampere dc range, shunted with a 50
microFarad capacitor, may be used.)
b. A 117053 Meter Connector Plug is needed (supplied
with the W136A, or it may be ordered separately).
Connect the red spade tip to the red (+) meter lead
and the black spade tip to the black (-) meter lead.
See Fig. 17.
c. Insert the plug into the Flame Current meter jack
and allow a few seconds for the meter reading to
stabilize.
d. Read the average stable current, disregarding the
peaks due to shutter operation.
4. Optimize the flame signal.
a. Observe the flame signal while varying the line of
sight of the detector.
(1) Swivel the detector if it is mounted on a
Honeywell 118367A Swivel Mount, or
(2) Adjust the angle and/or position the sight pipe
(which was only tack welded as previously
instructed).
b. Try several sighting angles until you obtain the
highest and most stable meter reading possible. (If it
is less than 1.4 microamperes, refer to the
Troubleshooting section.)
c. Repeat step b for both the pilot and the main burner
flame. Do not sacrifice the main flame signal to
obtain an unnecessarily high pilot flame signal.
5. Repeat steps 2 and 3 for Sensitivity Control B, if used.
Make sure the external selector switch is closed while
adjusting Control B.
13 95-8269—1
Page 14

C7076A,D ADJUSTABLE SENSITIVITY ULTRAVIOLET FLAME DETECTORS
SELECTOR
SPADE TIP
6. Secure the swivel mount (if used), or tack weld the sight
pipe. Do not weld the sight pipe permanently into place
until you have accomplished the spark hold-in and pilot
turndown tests.
7. Remove the plug from the Flame Current meter jack.
8. Replace the rear cover plate and tighten the four screws
securely.
Multiburner System Using C7076A Detector (Flame
Discrimination)
1. Complete steps 1 through 8 under Single Burner
System above for each burner.
2. With all A sensitivity controls set to MAX position and all
burners firing at full load, select one burner and proceed
as follows:
a. Shut down the chosen burner, then note the flame
signal reading.
b. Loosen the locking nut on Sensitivity Control A.
c. Gradually reduce the sensitivity by turning Control A
counterclockwise until the flame relay (in the flame
safeguard control) drops out.
W136A TEST METER
SWITCH
(SET AT SPL)
d. Relight the burner and note the flame signal
reading. The difference between the new reading
and the initial reading in step a represents the
degree of flame discrimination.
e. Repeat the run-shutdown-dropout procedures
(steps 2a-d) until the optimum setting has been
achieved.
f. Hand tighten the locking nut on Sensitivity Control
A, then tighten another 1/4 turn, but do not
overtighten.
NOTE: If the sensitivity control on a detector is reduced to
MIN position and flame discrimination cannot be
achieved, insert an orifice plate in the sight pipe. An
orifice of the proper diameter will reduce the
ultraviolet radiation reaching the detector so that the
sensitivity can be adjusted to effect flame
discrimination.
3. Repeat step 2 for Sensitivity Control A on each burner.
4. Repeat step 2 for Sensitivity Control B (if used) on each
burner. Verify that Sensitivity Controls A and B on each
detector are properly indexed by the system fuel
selector, firing rate switch, etc.
RED (+)
METER LEAD
BLACK (–)
METER LEAD
Fig. 17. Set up for Sensitivity Controls A and B adjustments, C7076A Detector.
Multifuel System
For multifuel systems, use one sensitivity control for each fuel.
Follow steps 2 and 3 above for each fuel.
BLACK
SENSITIVITY
ADJUSTMENT
LOCKING NUT
PLUG
117053
METER
CONNECTOR
PLUG
RED
SPADE TIP
SENSITIVITY
CONTROL
C7076A
FLAME
DETECTOR
PLUG-IN
ELECTRONICS
CHASSIS
(REAR VIEW)
M20762
95-8269—1 14
Page 15

C7076A,D ADJUSTABLE SENSITIVITY ULTRAVIOLET FLAME DETECTORS
Single Burner System Using the C7076D Detector
WARNING
Fire or Explosion Hazard.
Can cause serious injury, death or property
damage.
Make sure that the environment surrounding the
C7076D is free of all explosive or hazardous
conditions before exposing the interior of the detector
to the atmosphere during the performance of the
following adjustment procedures.
1. Loosen the six screws in the rear cover plate of the
C7076D Detector and remove the plate.
2. Adjust Sensitivity Control A for maximum sensitivity.
a. If the remote sensitivity selection feature is used,
make sure the external selector switch is open for
Control A adjustment.
b. Turn Sensitivity Control A to MAX position.
3. Read the flame signal in microamperes at the Flame
Current jack.
a. Use a Honeywell W136A Test Meter with the
selector switch set at the SPL position. (If a W136A
is not available, a microammeter with a 0 to 25
microampere dc range, shunted with a 50
microFarad capacitor, may be used.
b. A 117053 Meter Connector Plug is needed (supplied
with the W136A or it may be ordered separately).
Connect the red spade tip to the red (+) meter lead
and the black spade tip to the black (-) meter lead.
See Fig. 17.
c. Insert the plug into the Flame Current meter jack
and allow a few seconds for the meter reading to
stabilize.
d. Read the average stable current, disregarding the
peaks due to shutter operation.
4. Optimize the flame signal.
a. Observe the flame signal while varying the line of
sight of the detector.
b. Adjust the angle and/or position of the sight pipe
(which was only tack welded as previously
instructed).
c. Try several sighting angles until you can obtain the
highest and most stable meter reading possible. (If it
is less than 1.4 microamperes, refer to the
Troubleshooting section).
d. Repeat step c for both the pilot and main burner
flame. Do not sacrifice the main flame signal to
obtain an unnecessarily high pilot flame signal.
5. Repeat steps 2 and 3 for Sensitivity Control B, if used.
Make sure the external selector switch is closed while
adjusting Control B.
6. Secure the swivel mount (if used) or tack weld the sight
pipe. Do not weld the sight pipe permanently into place
until you have completed the spark hold-in and pilot
turndown tests.
7. Remove the plug from the Flame Current meter jack.
8. Replace the rear cover plate on the detector. Ensure
that the tips of the sensitivity control extensions on the
rear cover are positioned properly to engage the slots of
the respective sensitivity controls on the rear of the
electronic chassis without altering their adjustments.
Reinstall the six screws in the cover plate and tighten
them securely.
Multiburner System Using the C7076D Detector
(Flame Discrimination)
1. Complete steps 1 through 8 under Single Burner
System above for each burner.
2. With all A sensitivity controls set to MAX position and all
burners firing at full load, select one burner and proceed
as follows:
a. Shut down the chosen burner, then note the flame
signal reading.
b. Gradually reduce the sensitivity by turning Control A
counterclockwise until the flame relay (in the flame
safeguard control) drops out.
c. Relight the burner and note the flame signal
reading. The difference between the new reading
and the initial reading in step a represents the
degree of flame discrimination.
d. Repeat the run-shutdown-dropout procedures
(steps 2a-c) until the optimum setting has been
achieved.
NOTE: If the sensitivity control on a detector is reduced to
MIN position and flame discrimination cannot be
achieved, insert an orifice plate in the sight pipe. An
orifice of the proper diameter will reduce the
ultraviolet radiation reaching the detector so that the
sensitivity can be adjusted to effect flame
discrimination.
3. Repeat step 2 for Sensitivity Control A on each burner.
4. Repeat step 2 for Sensitivity Control B (if used) on each
burner. Verify that Sensitivity Controls A and B on each
detector are properly indexed by the system fuel selector, firing rate switch, etc.
Multifuel System
For multifuel systems use one sensitivity control for each fuel.
Follow steps 2 and 3 above for each fuel.
Ignition Spark Response Test
An ignition spark response test must be done for all detectors
to ensure that ignition spark will not actuate the flame relay in
the flame safeguard control The test is done by manually
closing all fuel valves, starting the system, and observing the
flame relay when the ignition comes on. If the flame relay pulls
in, the detector must be repositioned to eliminate the
response to ignition spark.
Pilot (Ignitor) Turndown Test
A pilot (ignitor) turndown test must be done for all applications
in which the detector must prove the pilot before the main fuel
valve can open. This test proves that the smallest pilot flame
which can hold in the flame relay (in the flame safeguard
control) is also capable of safely igniting the main burner. The
test consists of closing the main fuel valve, reducing the pilot
flame until it is just able to hold in the flame relay, and then
opening the main fuel valve to verify a safe main burner
lightoff.
Secure the Sight Pipe or Swivel Mount
1. When the flame signal is acceptable and all adjustments
have been made, remove the detector.
2. Secure the sight pipe (or swivel mount):
15 95-8269—1
Page 16

C7076A,D ADJUSTABLE SENSITIVITY ULTRAVIOLET FLAME DETECTORS
a. Weld the sight pipe in its final position, or
b. Tack weld the swivel ball in place in its socket if
using a Honeywell 118367A Swivel Mount.
3. Reinstall the detector.
Aspirator Adjustment (C7076A Detector Only)
Make the final connections and adjustments of the optional air
supply (if used). Refer to the paragraph entitled Connecting
Air Supply.
Final Checkout
Before putting the burner(s) into service, check out the
installation using procedures in the Checkout section of the
instruction sheet for the appropriate flame safeguard control.
After completing the checkout, run the burner(s) through at
least five complete cycles to verify proper operation.
TROUBLESHOOTING
WARNING
Electrical Shock Hazard.
Can cause serious injury or death.
Open the master switch before removing or installing
the plug-in electronics chassis or the detector. Line
voltage is present on some of the terminals when
power is on.
Preliminary Procedures for C7076A Flame Detector
IMPORTANT
If the combustion chamber has a positive pressure,
make sure the aspirator inlet pressure equals or
exceeds that required for sight pipe seal off, as given
on Fig. 9, before unlatching the detector.
1. If you are using remote sensitivity selection, make sure
that the external selector switch is open if adjusting
Sensitivity Control A or closed if adjusting Sensitivity
Control B.
2. Unlatch the detector and swing it away from the
faceplate.
3. Loosen the four captive screws in the front cover plate
(with the viewing lens) and remove the plate to expose
the terminal block. The wiring diagram is on the inside
of the front cover plate.
4. After each step in the following procedures, relatch the
detector to the faceplate and check for a meter reading
at the Flame Current jack on the detector (Fig. 17).
a. If you get a reading above 1.4 microamperes and
the flame relay (in the flame safeguard control) pulls
in, return to Sensitivity Adjustments.
b. If you do not get a reading, unlatch the detector and
proceed with Troubleshooting Procedure A,
following.
c. If you get a reading but the flame relay (in the flame
safeguard control) does not pull in, unlatch the
detector and proceed with Troubleshooting
Procedure B, following.
General
If you cannot obtain a satisfactory flame signal while adjusting
the sensitivity, refer to the preliminary and troubleshooting
procedures that follow. If you encounter other problems in the
system, refer to the Troubleshooting section in the instruction
sheet for the appropriate flame safeguard control.
Upon completion of the troubleshooting, be sure to perform
the adjustment and checkout procedures previously specified
for the detector.
NOTE: Instructions for replacing the viewing lens, sensing
tube, coil and shutter assembly and plug-in
electronic chassis are given in the Service section.
Before making a replacement, make sure you have the
correct part (check its part number and voltage rating).
Equipment Required
1. Voltmeter (Honeywell W136A or equivalent) with 0 to
300 volt ac scale.
2. Microammeter (Honeywell W136A or equivalent) with 0
to 25 microampere range, SPL damping.
3. Meter connector plug (Honeywell part no. 117053 or
equivalent)—required for some meters.
4. Replacement parts—see Specifications section.
Preliminary Procedures for C7076D Flame Detector
WARNING
Fire or Explosion Hazard.
Can cause serious injury or death.
Make sure that the environment surrounding the
C7076D Flame Detector is free of all explosive or
hazardous conditions before exposing the interior of
the detector to the atmosphere during the
performance of the following troubleshooting
procedures.
1. If you are using remote sensitivity selection, make sure
that the external selector switch is open if adjusting
Sensitivity Control A, or closed if adjusting Sensitivity
Control B.
2. Remove the six screws that secure the cover plate to
the rear of the detector to provide access to the Flame
Current jack on the electronics chassis.
3. Remove the four screws that secure the faceplate
(attached to the sight pipe) to the detector housing.
Force the faceplate from the housing far enough to
allow the detector to be sufficiently reoriented on the
conduit to provide access to wiring at the terminal block
in detector.
95-8269—1 16
Page 17

C7076A,D ADJUSTABLE SENSITIVITY ULTRAVIOLET FLAME DETECTORS
4. After each step in the following procedures, realign the
detector with the faceplate and check for a meter
reading at the Flame Current jack on the detector (Fig.
18).
a. If you get a reading above 1.4 microamperes and
the flame relay (in the flame safeguard control) pulls
in, return to Sensitivity Adjustments.
b. If you do not get a reading, orient the detector away
from the faceplate sufficiently far enough to provide
access to the wiring at the terminal block and
proceed with troubleshooting Procedure A.
c. If you get a reading but the flame relay (in the flame
safeguard control) does not pull in, orient the
detector away from the faceplate sufficiently far
enough to provide access to the wiring at the
terminal block and proceed with troubleshooting
Procedure B.
Troubleshooting Procedures for C7076A and C7076D Flame Detectors.
NOTE: If the detector develops a signal at the Flame Current
Procedure A: Zero Flame Signal Reading at
Detector; Flame Relay Does not Pull In.
NOTE: The nominal voltage rating is printed on the trans-
Nominal Voltage
100 85 110
117 99.5 128.7
120 102 132
200 170 220
220 187 242
240 204 264
jack, skip troubleshooting Procedure A.
1. Complete the Preliminary Procedures listed above.
2. Refer to the wiring diagram on the inside of the front
cover plate or to Fig 14 or 15 for terminal locations.
3. Check for proper line voltage. Connect an ac voltmeter
across terminals 2 and 1 (or 8, if detector is nonEuropean 240 volt, 50/60 Hz model) on the terminal
block. Make sure the ac voltage measured is within the
voltage range listed in Table 3, below, for the particular
detector model used.
former cover next to the sensitivity controls on the
rear of the plug-in electronics chassis.
a. If there is no voltage, make sure line voltage power
is connected to the master switch, the master switch
is closed and overload protection (circuit breaker,
fuse, or similar device) has not opened the power
circuit.
b. If the measured voltage is not within the proper
voltage range, make sure the main power supply is
of the correct voltage and frequency. Then trace the
wiring between the detector and the main power
supply to determine the problem.
Table 3. Line Voltage Ratings for the Detector.
Acceptable Line Voltage
Rating
Minimum Maximum
4. Determine if the self-checking shutter is open by looking
into the front of the detector through the pipe in the
wiring compartment.
a. If the shutter is not open, connect an ac voltmeter
across terminals 3 and 4 on the terminal block.
Make sure the ac voltage measured is within the
voltage range listed in Table 4.
NOTE: The nominal voltage rating is printed on the
transformer cover next to the sensitivity controls on
the rear of the plug-in electronics chassis.
Table 4. Shutter Voltage Range.
Nominal Detector
Voltage Range
100 85 110
117, 120, 200, 220,
240 or 220/240
(1) If the proper voltage is present, replace the coil
and shutter assembly or the entire plug-in
electronics chassis (see Service section).
(2) If the measured voltage is not within the proper
voltage range, connect a dc voltmeter (capable
of measuring 50 volts) across terminals 6 (F)
and 5 (G) on the terminal block (F is+, G is -)
(a)If the voltage is 2 volts or more, replace the
plug-in electronics chassis )(See Service
section).
(b)If the voltage is less than 2 volts, trace the
shutter wiring between the detector and the
flame safeguard control (refer to Fig 14 or 15).
If the wiring is correct but the proper voltage is
still not present, replace the plug-in R7476A or
R7886 Dynamic Self-Check Ultraviolet
Amplifier.
b. If the shutter is open, make sure the sensitivity
control on the plug-in electronics chassis is not set
too low for the flame conditions encountered. (Refer
to Adjustments and Checkout section.)
5. Make sure the viewing path is clear.
a. Clean the sight pipe. Make sure there are no
obstructions in it.
b. Make sure the proper viewing lens is used.
NOTE: Window glass does not transmit ultraviolet radiation.
You can check for an improper lens by testing the
detector with the lens removed.
c. Clean the viewing lens with a soft, clean cloth.
6. If the previous actions have not corrected the problem,
replace the 191053 Ultraviolet Sensing Tube (See
Service section).
7. If you still do not get a meter reading, replace the plug-in
electronics chassis.
Acceptable Shutter Voltage
Minimum Maximum
99.5 132
Procedure B: Flame Signal Reading Present at
Detector; Flame Relay Does Not Pull In)
1. Complete the Preliminary Procedures listed above.
2. Determine if the self-checking shutter is closed by look-
ing into the front of the detector through the pipe in the
wiring compartment.
17 95-8269—1
Page 18

C7076A,D ADJUSTABLE SENSITIVITY ULTRAVIOLET FLAME DETECTORS
3. If the shutter is closed and the signal at the Flame
Current jack on the detector is 1 microampere or more,
remove the ultraviolet sensing tube (see Service
section) and operate the detector.
a. If the shutter opens, replace the 191053 Ultraviolet
Sensing Tube.
b. If the shutter stays closed, replace the plug-in
electronics chassis (see Service section).
4. If the flame signal measured at the Flame Current jack
on the detector is weak (less than 1.4 microamperes),
proceed as follows:
a. Clean the sight pipe. Make sure there are no
obstructions in it.
b. Clean the viewing lens with a soft, clean cloth.
c. Make sure the sensitivity control on the plug-in
electronics chassis is not set too low for the flame
conditions encountered. (Refer to Adjustments and
Checkout section.)
d. Resight the detector. See Planning the Installation
and Installation sections.
5. If the flame signal measured at the Flame Current jack
on the detector is strong (greater than 1.4
microamperes), but the flame relay does not pull in,
connect a dc voltmeter (capable of measuring 50 volts)
across terminals 6 (F) and 5 (G) on the terminal block (F
is +; G is -).
a. If the voltage is less than 5 volts and the shutter is
not oscillating, disconnect the F leadwire from
terminal 6 for a moment.
(1) If the voltage (5 to 6) rises, trace the wiring
between the detector and the flame safeguard
control (refer to Fig. 14 or 15). If the wiring is
correct (no short circuits), replace the plug-in
R7476A or R7886 Dynamic Self-Check
Ultraviolet Amplifier.
(2) If the voltage (F to G) does not rise, replace the
plug-in electronics chassis (see Service section).
b. If the voltage is 5 volts or more, check the F and G
leadwires between the detector and the flame
safeguard control. If they are wired properly (no
open circuits), replace the plug-in R7476A or R7886
Dynamic Self-Check Ultraviolet Amplifier.
6. If the previous actions have not corrected the problem,
replace the plug-in electronics chassis.
SERVICE
WARNING
Electrical Shock Hazard.
Can cause serious injury or death.
Open the master switch before removing or installing
the plug-in electronics chassis or the detector.
IMPORTANT
If the combustion chamber (C7076A Flame Detector)
has a positive pressure, make sure the aspirator inlet
pressure equals or exceeds that required for sight
pipe seal off, as given on Fig. 9, before unlatching
the detector.
IMPORTANT
Only qualified flame safeguard technicians should
attempt to service or repair flame safeguard controls
and burner management systems.
Periodic Maintenance
1. Scheduled replacement of the detector components is
not necessary.
2. Keep the flame detection system adjusted for safe and
reliable operation
3. Clean the viewing lens regularly. Use a soft, clean cloth.
If the lens is damaged, or if it is coated with a substance
which cannot be cleaned off, replace it (see
Maintenance Procedures, following).
4. C7076A Detector only: Replace the silicone-rubber
gaskets which seal the front and rear cover plates if they
are damaged or deteriorated (see Maintenance
Procedures, following).
Maintenance Procedures
CAUTION
Equipment Damage Hazard.
Improper part replacement can damage the
equipment.
Before making a replacement, make sure you have
the correct part (check its part number and voltage
rating).
Replacing the Plug-In Electronics Chassis
REPLACING THE PLUG-IN ELECTRONICS CHASSIS IN THE C7076A
FLAME DETECTOR
1. Open the master switch to interrupt all power to the
detector.
2. Loosen the four captive screws in the rear cover plate
and remove the plate.
3. Remove the four standoffs that hold the plug-in electronics chassis and pull the chassis out of the housing.
4. Align the slot in the top of the new chassis with the key
in the housing.
IMPORTANT
Make sure the part number and the voltage rating of
the new chassis are correct.
WARNING
Fire or Explosion Hazard.
Can cause serious injury or death.
Make sure that the environment surrounding the
C7076D Flame Detector is free of all explosive or
hazardous conditions before exposing the interior of
the detector to the atmosphere during the
performance of the following troubleshooting
procedures.
95-8269—1 18
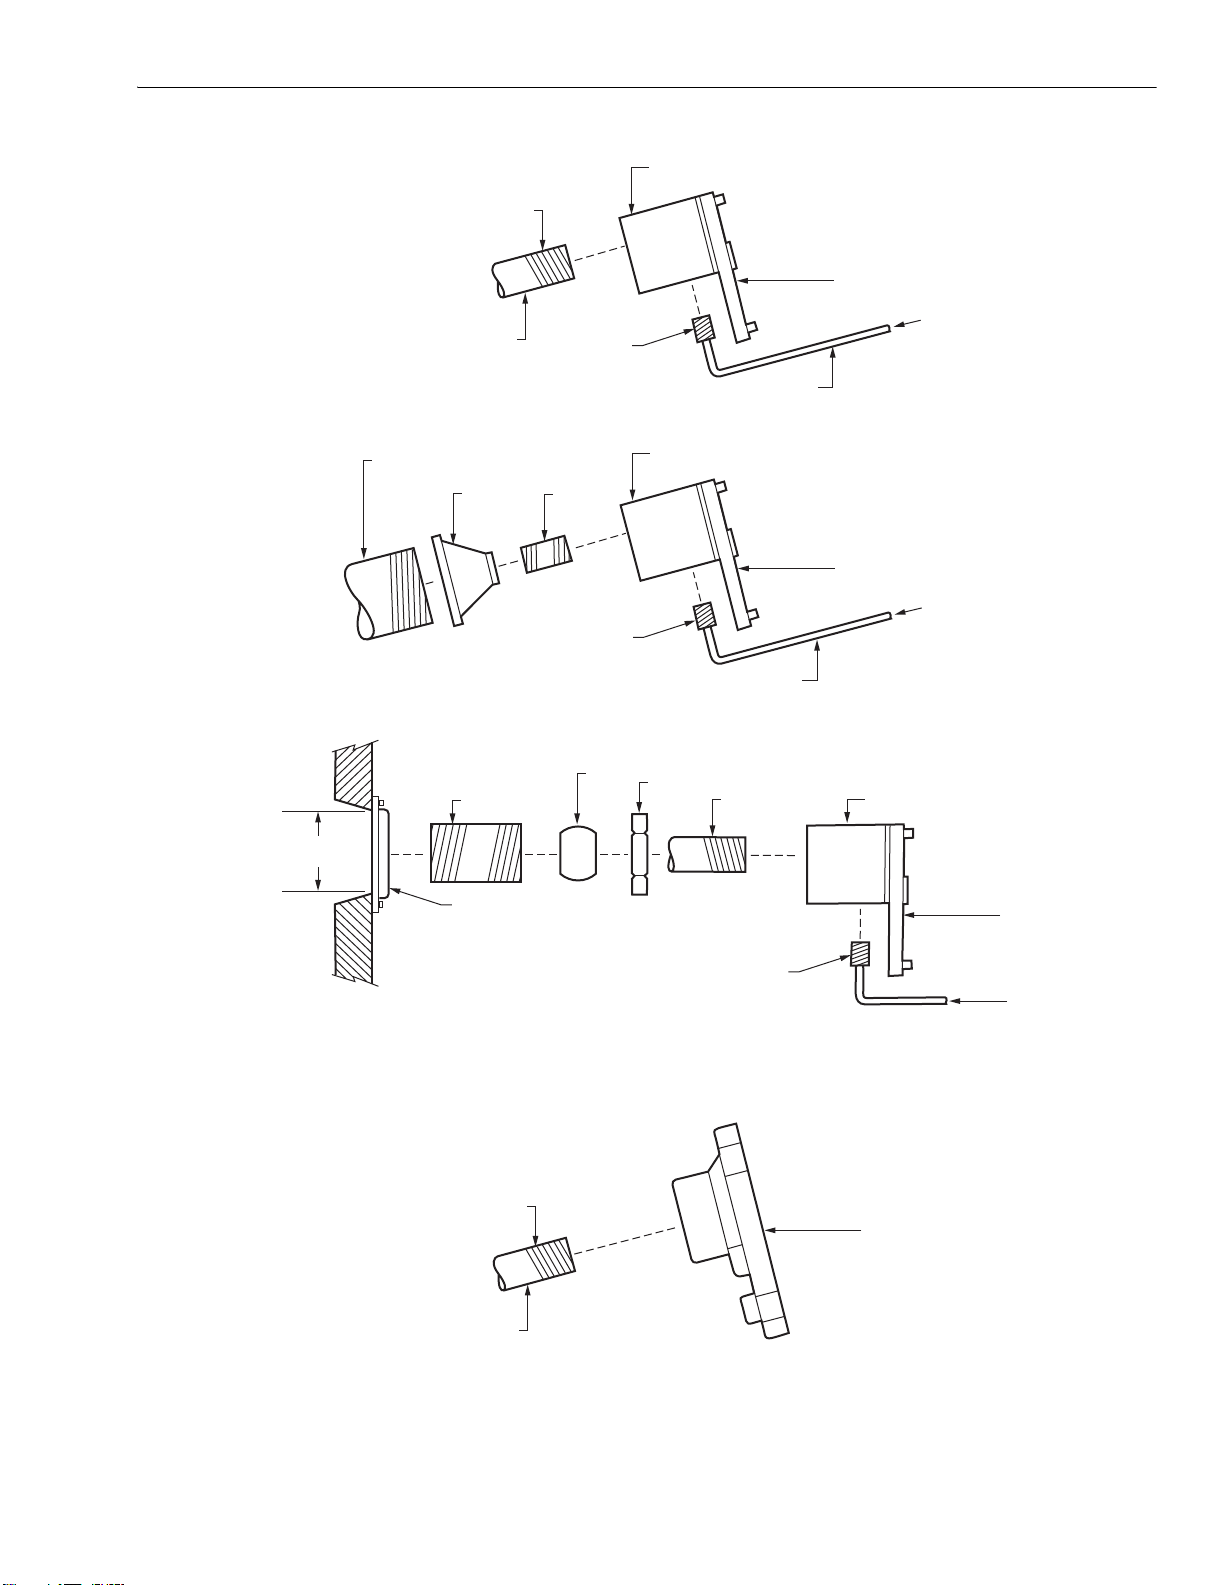
5. Insert the new chassis in the housing and firmly push it
all the way in (see Fig. 18). Make sure the octal plug on
the chassis is securely seated in the socket in the
housing.
6. Insert the four standoffs that hold the chassis and
tighten them securely.
7. Close the master switch and perform the Adjustments
and Checkout.
8. Put the rear cover plate back on and tighten the four
screws securely.
Page 19

C7076A,D ADJUSTABLE SENSITIVITY ULTRAVIOLET FLAME DETECTORS
ASPIRATOR HOUSING
KEY
SLOT
1
STANDOFF (4)
REAR COVER
1
C7076D HAS SCREWS, NOT STANDOFFS.
PLUG-IN ELECTRONICS CHASSIS
(CHECK VOLTAGE RATING)
Fig. 18. Replacing the plug-in electronics chassis in the C7076 Flame Detector.
M20763A
REPLACING THE PLUG-IN ELECTRONICS CHASSIS IN THE C7076D
FLAME DETECTOR.
NOTE: Removing and replacing the plug-in electronics
chassis in the C7076D is identical to the procedure
for the C7076A, above, with the exception of steps 2,
8 and 9, below.
1. Open the master switch to interrupt all power to the
detector.
2. Remove the six screws securing the cover plate to the
rear of the housing and remove the cover plate.
3. Remove the four screws securing the plug-in electronics
chassis and pull the chassis out from the housing.
4. Align the slot in the top of the new chassis with the key
in the housing.
IMPORTANT
Make sure the part number and the voltage rating of
the new chassis are correct.
5. Insert the new chassis in the housing and firmly push it
all the way in Make sure the octal plug on the chassis is
securely seated in the socket in the housing.
6. Reinstall the four screws that hold the chassis in the
housing and tighten them securely.
7. Close the master switch and perform the Adjustment
and Checkout procedures previously specified.
8. Replace the rear cover plate on the detector. Make sure
that the tips of the sensitivity control extensions on the
rear cover are positioned properly to engage the slots of
the respective sensitivity controls on the rear of the
electronics chassis without altering their adjustments.
9. Reinstall the six screws in the cover plate and tighten
them securely.
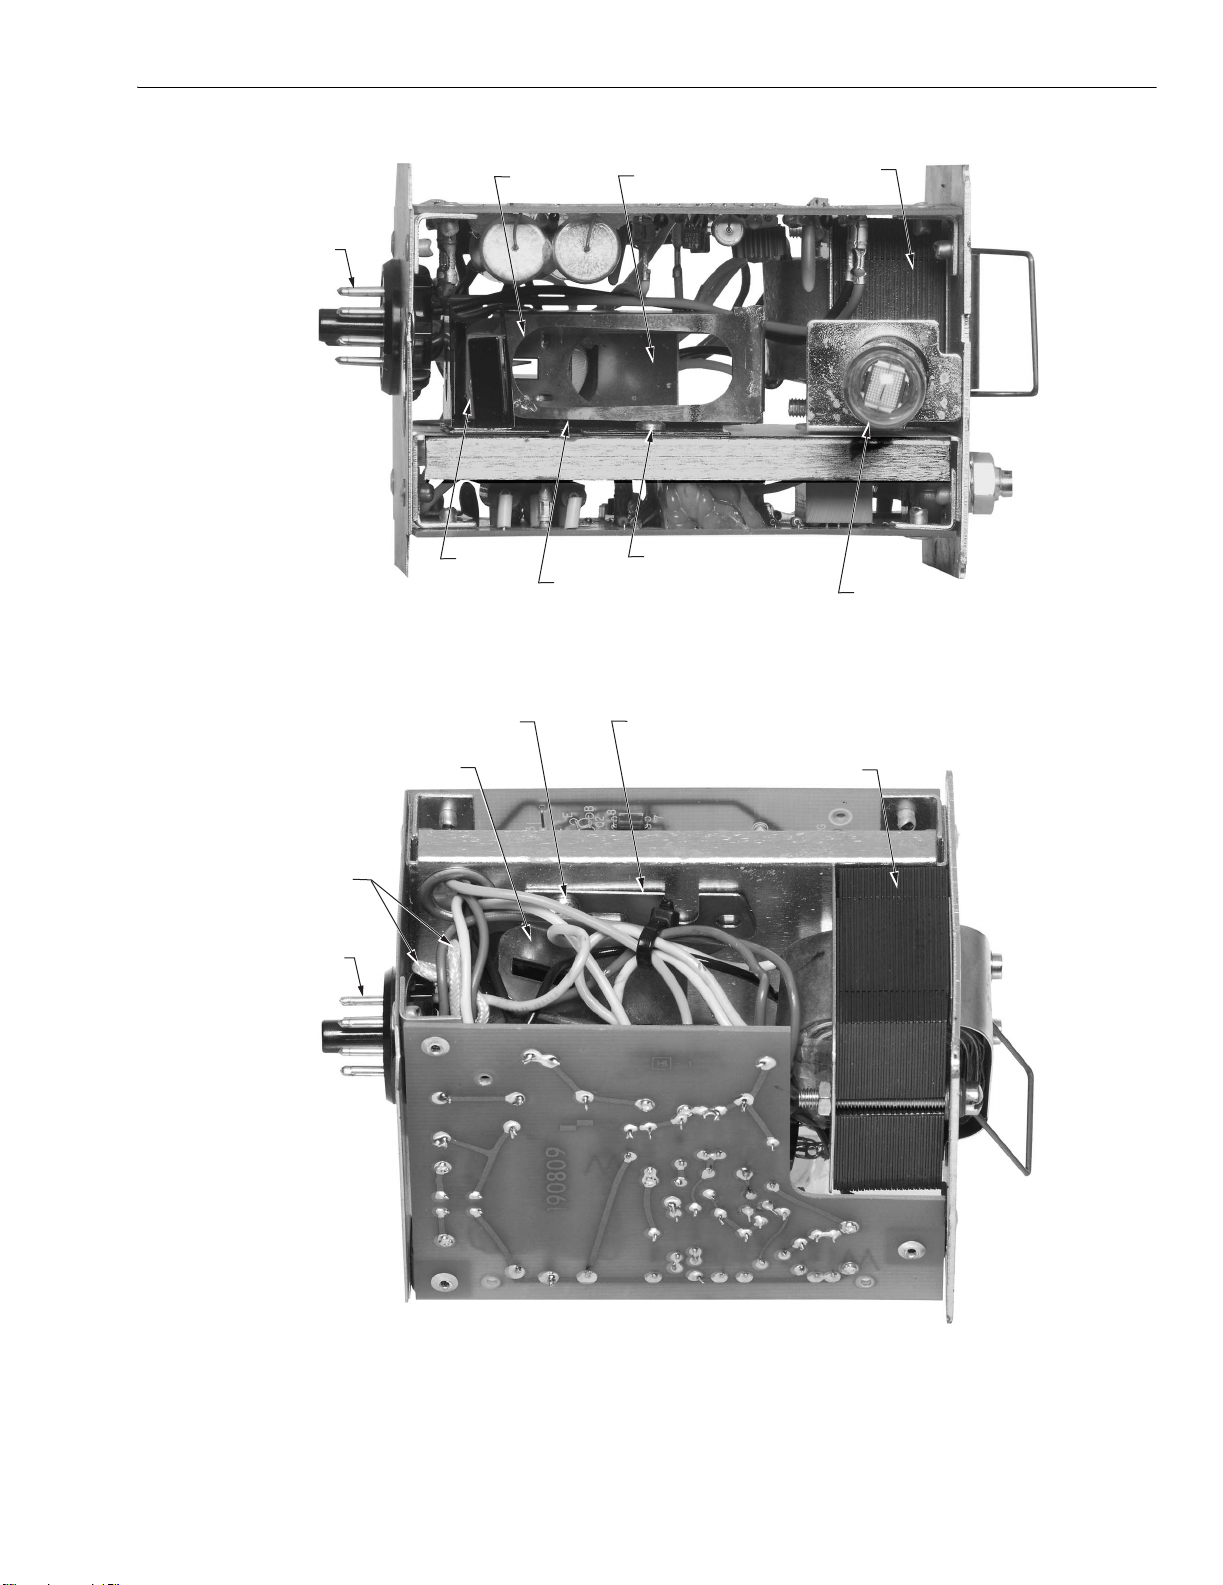
REPLACING THE ULTRAVIOLET SENSING TUBE
1. Open the master switch and remove the plug-in
electronics chassis as specified in Replacing the Plug-in
Electronics Chassis, above.
2. Locate the sensing tube near the top of the chassis.
(See Fig. 19.)
3. Gently push the alignment guide away from the tube
until the tip of the tube is free.
4. While holding the alignment guide away from the tube
tip, grasp the tab on the tube bracket and swing the tube
out from the chassis.
5. Pull the tube out of its socket.
6. Align the three pins on the new tube with the holes in
the socket.
7. Push the new tube firmly into the socket. Make sure it is
seated securely.
8. Swing the tube back into place in the chassis. The
alignment guide will snap into place around the tip of the
tube.
9. Reinstall the plug-in electronics chassis as specified in
Replacing the Plug-in Electronics Chassis, above.
10. Close the master switch and perform the adjustments
and checkout.
IMPORTANT
Be very careful not to kink or otherwise damage the
shutter (Fig. 19).
19 95-8269—1
Page 20

C7076A,D ADJUSTABLE SENSITIVITY ULTRAVIOLET FLAME DETECTORS
PLUG-IN ELECTRONICS
OCTAL PLUG
ALIGNMENT GUIDE
191053
ULTRAVIOLET
SENSING TUBE
TAB ON
TUBE BRACKET
TUBE SOCKET
CHASSIS
M20764
Fig. 19. Replacing the ultraviolet sensing tube.
REPLACING THE COIL AND SHUTTER ASSEMBLY
1. Open the master switch and remove the plug-in
electronics chassis as specified in Replacing the Plug-in
Electronics Chassis, above.
2. Locate the coil near the bottom of the chassis (Fig. 22).
3. Cut the two white coil wires as close to the coil as
possible.
4. Remove the mounting screw from the base of the coil
and shutter assembly.
5. Turn the chassis over and locate the sensing tube.
6. Gently push the alignment guide away from the tube
(just enough to free the tip of the sensing tube) and
swing the tube out from the chassis as far as it will go
(Fig. 21).
7. Remove the other mounting screw from the base of the
coil and shutter assembly (Fig. 22).
8. Carefully slide the coil and shutter assembly out of the
chassis.
NOTE: It may be necessary to move some of the
transformer leadwires out of the way in order to slide
the coil and shutter assembly past them.
9. Slide the new coil and shutter assembly into place.
Make sure its part number and voltage rating are
correct.
10. Remove about 1/4 in. (6 mm) of insulation from each of
the two short, white leadwires still connected to the octal
plug.
11. Using wire nuts, connect one of the coil wires to one of
the short, white leadwires on the plug and connect the
other coil wire to the other short, white leadwire.
12. Insert the two mounting screws in the base of the coil
and shutter assembly and tighten them securely.
13. Swing the sensing tube back into place in the chassis.
The alignment guide will snap into place around the tip
of the tube.
14. Reinstall the plug-in electronics chassis as specified in
Replacing the Plug-in Electronics Chassis, above.
15. Close the master switch.
IMPORTANT
Be very careful not to kink or otherwise damage the
shutter.
95-8269—1 20
Page 21
C7076A,D ADJUSTABLE SENSITIVITY ULTRAVIOLET FLAME DETECTORS
TRANSFORMER
O
C
BASE OF 120625B, C, OR D
CTAL PLUG
COIL
MOUNTING SCREW
SHUTTER
ALIGNMENT
GUIDE
BASE OF 120625B, C, OR D COIL AND
SHUTTER ASSMBLY (CHECK VOLTAGE
RATING–100 OR 120)
Fig. 20. Location of the coil and shutter assembly.
MOUNTING
COIL
SCREWS
COIL AND SHUTTER ASSEMBLY
(CHECK VOLTAGE RATING)
TRANSFORMER
SENSING TUBE
M20765
CUT WHITE
OIL WIRES (2)
OCTAL PLUG
M20766
Fig. 21. Replacing the coil and shutter assembly.
REPLACING THE VIEWING LENS
detector.
2. If the combustion chamber has a positive pressure,
Replacing the Lens in the C7076A Flame Detector
1. Open the master switch to interrupt all power to the
make sure the airflow through the aspirator equals or
exceeds the value required for seal-off (Fig. 10).
21 95-8269—1
Page 22

C7076A,D ADJUSTABLE SENSITIVITY ULTRAVIOLET FLAME DETECTORS
7
CAPTIVE
3. Unlatch the detector and swing it away from the
faceplate-aspirator.
4. Loosen the four captive screws in the front cover plate
and remove the plate.
5. Press on the back of the silicone-rubber grommet until it
pops out of the cover plate.
6. Push on the back of the lens until it pops out of the
grommet.
7. Insert the new lens, flat side toward the grommet small
flange and curved side toward the flame, into the recess
in the grommet. Make sure the recess completely
encloses the lens.
8. Push the small flange of the grommet through the hole
in the cover plate until it pops into place. Make sure the
flange is completely through the the hole and the
grommet is properly seated.
9. Clean both sides of the viewing lens with a soft, clean
cloth.
10. Put the front cover plate back on and tighten the four
screws securely.
11. Latch the detector against the faceplate-aspirator and
close the master switch.
Replacing the Lens in the C7076D Flame Detector
1. Open the master switch to interrupt all power to the
detector.
2. Remove the four screws securing the faceplate
(attached to the sight pipe) to the detector housing.
Force the faceplate and housing sufficiently far apart to
provide access to the lens mounted on the sight tube on
the bracket assembly inside the housing.
3. Remove the rubber grommet containing the lens from
the sight tube.
4. Press on the back of the lens until it pops out of the
grommet.
5. Insert the new lens, flat side toward the small flange and
curved side toward the flame, into the recess of the
grommet. Make sure the recess completely encloses
the lens.
6. Clean both sides of the lens with a soft, clean cloth.
Reinstall the grommet on the sight tube on the bracket.
7. Realign the faceplate and detector housing. Install the
four screws in the faceplate and tighten securely.
8. Close the master switch.
REPLACING THE GASKET SEALS (C7076A DETECTOR ONLY)
1. Open the master switch to interrupt all power to the
detector.
2. If the combustion chamber has a positive pressure,
make sure the airflow through the aspirator equals or
exceeds the value required for seal-off (see Fig. 10).
3. Unlatch the detector and swing it away from the
faceplate-aspirator.
4. Loosen the four captive screws in the front cover plate
and remove the plate.
5. Using a putty knife, carefully separate the siliconerubber gasket from the inside of the plate (see Fig. 22).
6. Pull the gasket over the ends of the four screws and
discard the gasket.
7. Scrape any residual adhesive from the plate, leaving a
smooth surface to which the new gasket can adhere.
8. Insert the four screws through the holes in the corner of
the new gasket.
9. Glue the new gasket to the plate, using a good silicone
rubber adhesive, such as RTV32. Follow the
instructions supplied with the adhesive.
10. Put the cover plate back on and tighten the four screws
securely.
11. Repeat steps 4 through 10 for the rear cover plate.
12. Latch the detector against the faceplate-aspirator and
close the master switch.
SILICONE-RUBBER GASKET
PUTTY KNIFE COVER PLATE
SCREW (4)
M2076
Fig. 22. Replacing the C7076A Detector gasket seals.
95-8269—1 22
Page 23

23 95-8269—1
Page 24

Automation and Control Solutions
Honeywell Honeywell Limited-Honeywell Limitée
1985 Douglas Drive North 35 Dynamic Drive
Golden Valley, MN 55422 Scarborough, Ontario
95-8269—1 G.R. Rev. 09-02 www.honeywell.com
M1V 4Z9
Printed in U.S.A. on recycled
paper containing at least 10%
post-consumer paper fibers.
 Loading...