

Page 1
Portable Evaporative Air Cooler
OWNER’S MANUAL
Read and save these instructions before use
Model: CO301PC
Power rating: 270 Watts
Made in P.R.C.
Voltage rating:
220-240 Volt, 50Hz
Page 2

SECTION
PAGE
1. THANK YOU .........................................................................................................
2. USER TIPS ...........................................................................................................
3. SAFETY RULES ...................................................................................................
4. PARTS DESCRIPTION ........................................................................................
5. USE & OPERATION .............................................................................................
Fill Water ......................................................... .................... ...............
Remote Control .................................................................................................
6. CLEANING & MAINTENANCE .............................................................................
7. TROUBLESHOOTING GUIDE .............................................................................
9. TECHNICAL SPECIFICATIONS ...........................................................................
9. ELECTRICAL WIRING DIAGRAM ........................................................................
.... ............
2
3
5
7
8
10
Control Panel Functions .......................................................................................
8
12
Operating the Unit ..............................................................................................
13
14
16
18
18
INDEX
1
Read all instructions carefully before setting up and operating the unit, and please keep
this instruction manual for future reference. This manual is designed to provide you with
important information needed to setup, operate, maintain, and troubleshoot your cooler.
Failure to follow these instructions may damage and/or impair its operation and void the
warranty.
Page 3

THANK YOU!
THANK YOU
2
Congratulations on your purchase of this versatile Honeywell Evaporative Air Cooler. For optimum
cooling performance from your unit, fill the water tank with water & ice (if available) to increase its
cooling power.
Please read these instructions carefully.
Page 4
USER TIPS
COOL ~ EFFICIENT ~ NATURAL
3
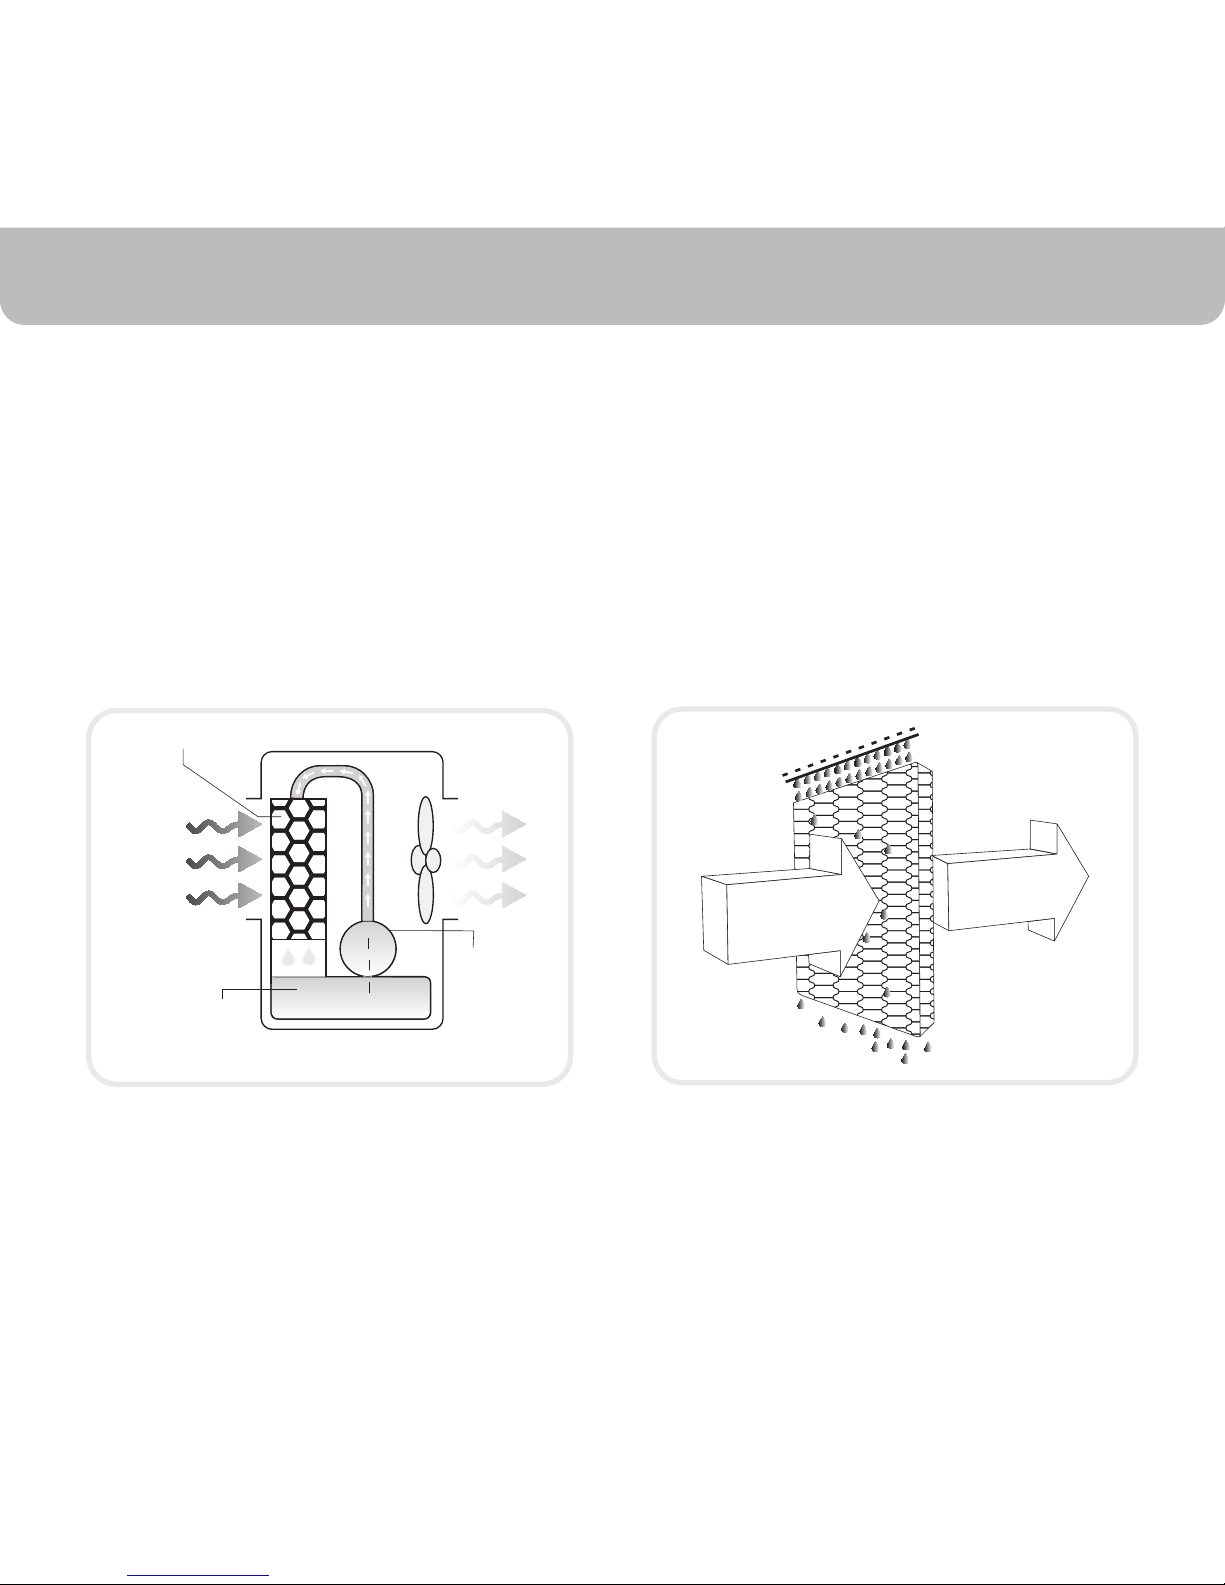
Pump
Water
Honeycomb Cooling Media
Evaporative Air Cooling Mechanism
Warm and
dry air
Cold and
humid air
Evaporative air cooling is the natural way of cooling, similar to a breeze blowing across a lake. This
breeze drops the temperature and has a relaxing cooling effect.
The evaporative air cooler cools the air by means of the evaporation of water. When water
evaporates into the air, the result is a mixture of air and water molecules. This chemical change
requires heat which is taken from the water molecules, resulting in cooler air propelled from the
unit.
Page 5

NOTE
4
USER TIPS
The recommended maximum relative humidity level is 60% or
less, which allows a noticeable temperature decrease. The
temperature decrease will be greater in drier climates because
higher evaporation occurs when the humidity is low.
The evaporative air cooler must be kept at floor level and
there must be water in the water tank. The room should have
doors and windows opened to allow free air flow. The evaporative air cooler works best when placed near an open window,
so that outside air is drawn into the evaporative air cooler, the
air circulates in the room, then exits via the door. The maximum cooling effect is felt when a person is in the flow of air
coming out of the evaporative air cooler.
The evaporative air cooler can also be used to humidify dry air
during cool weather. To be used for humidification the
windows and doors should be closed to allow the humidified
air to accumulate. The evaporative air cooler is not an air
conditioner as it does not use a compressor or refrigerant gas.
It should not be expected to cool as efficiently as a refrigerated
air conditioner.
When the product is used for the first time the Honeycomb
cooling media will have an odour which will dissipate in a week
or so of initial use.
Room with open windows & door
Room with closed windows & door
Page 6
READ AND SAVE THESE INSTRUCTIONS:
SAFETY RULES
220-240 Volt, 50 Hz
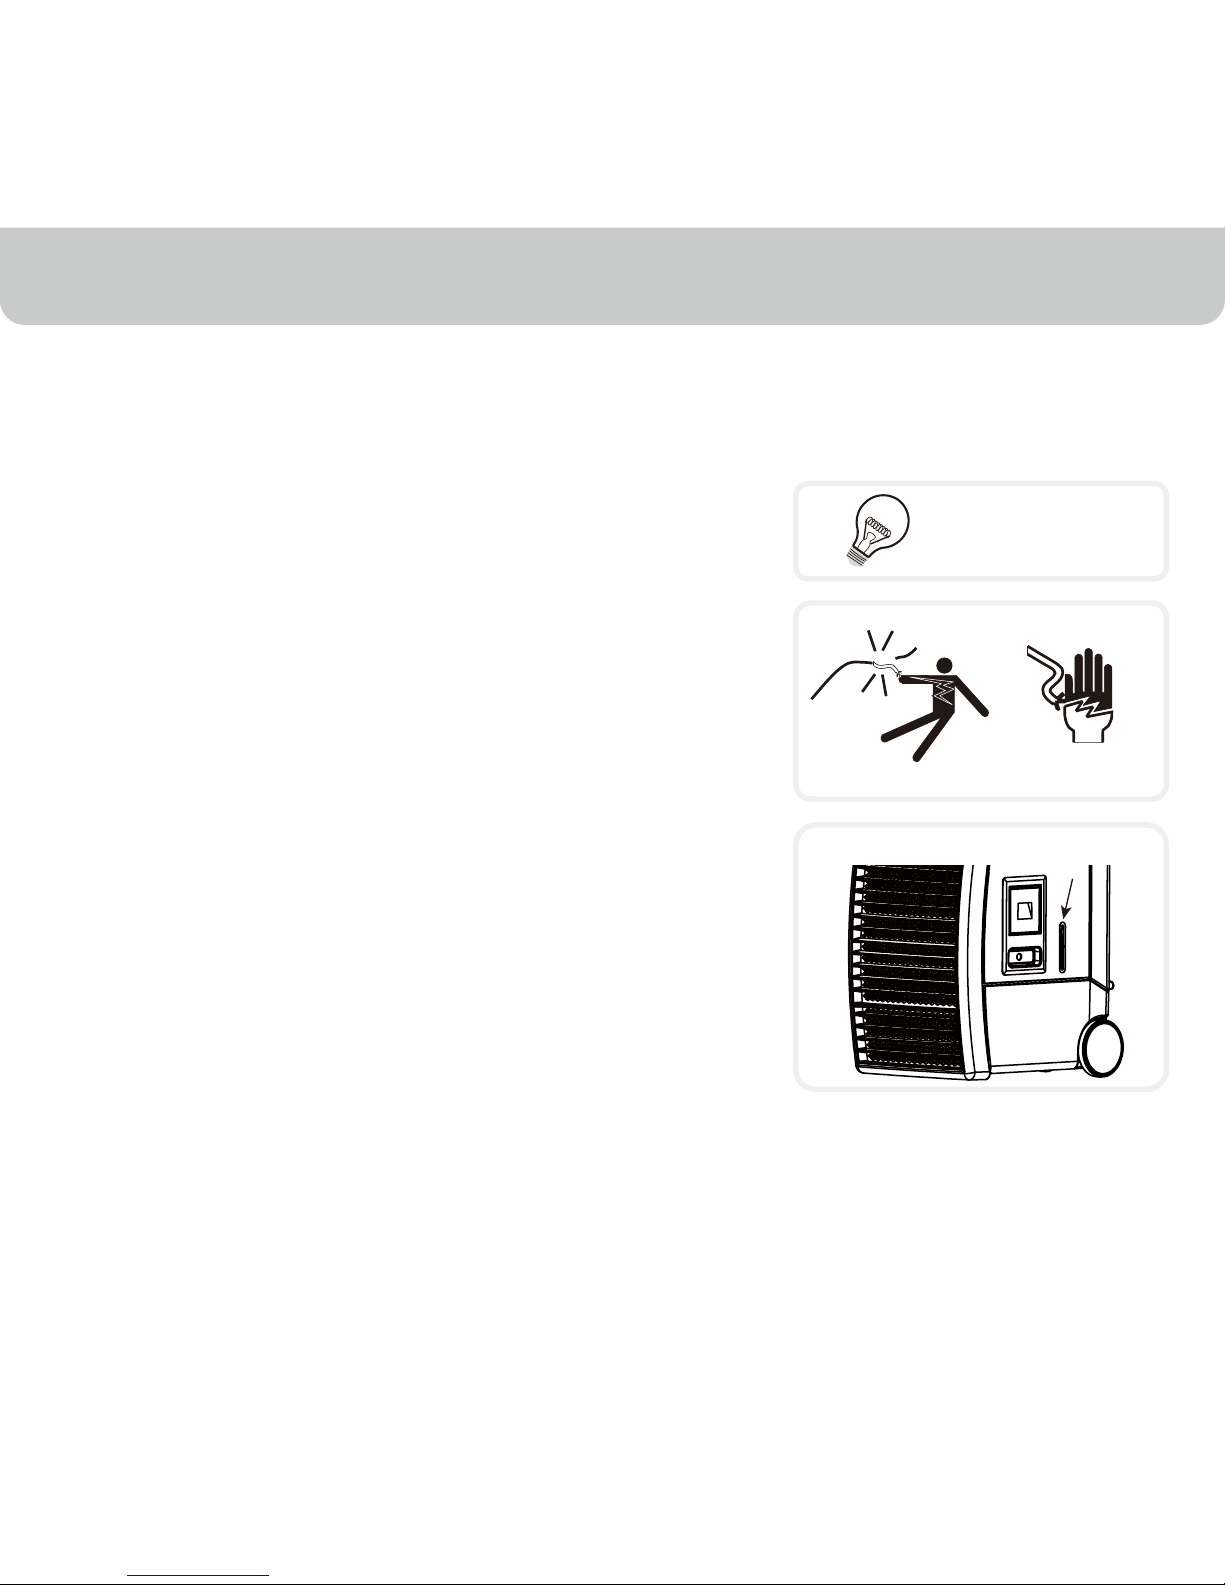
SHOCK HAZARD
WATER LEVEL INDICATOR
5
When using electrical appliances, basic safety precautions should always be followed:
Always unplug the product before refilling the water tank.
•
Always unplug the appliance from the power source before
cleaning, servicing or relocating the unit.
•
Remove the power cord from the electrical receptacle by
grasping and pulling on the power cord plug-end only, never
pull the cord.
•
DO NOT use the product in areas where gasoline, paint or
other flammable goods and objects are stored.
•
When using the ''COOL'' setting, please check the water tank
to ensure it is full. Operation of this unit on the ''COOL'' setting
with an empty tank may result in damage to the water pump.
•
DO NOT run power cord under carpeting, or cover it with
rugs or runners. Keep the cord away from areas where it
may be tripped over.
•
•
Your cooler runs on 220-240 Volt AC, 50 Hz current. Check
the household voltage to ensure it matches the appliance's
rate specification.
•
Before operating the product remove it from its packaging
and check it is in good condition.
•
DO NOT operate any product with a damaged cord or plug.
We recommend not using an extension cord with this
appliance.
Page 7

SAFETY RULES
FLOOR LEVEL
6
may cause motor damage.
This appliance is not intended for use by persons (including
children or elderly) with reduced physical, sensory or mental
capabilities, or lack of experience and knowledge, unless they
have been given supervision or instruction concerning use of
the appliance by a person responsible for their safety.
•
When the unit is not in use always store in a dry area.
•
This product is not intended for use in wet or damp locations.
•
DO NOT let children play with this appliance, packaging or
plastic bags.
•
DO NOT leave the appliance operating unattended for any
extended period of time.
•
DO NOT operate with the Honeycomb media removed as this
will overload and damage the motor.
•
DO NOT insert or allow objects to enter any ventilation or
exhaust opening as this may damage the product and could
cause an electrical shock or fire.
•
DO NOT attempt to repair or adjust any electrical or mechanical
functions of the cooler, as this may void the warranty.
•
DO NOT cover the air inlet or outlet on the appliance as this
•
If the unit is damaged or it malfunctions, do not continue to
operate it. Refer to the troubleshooting section and /or seek
professional advice.
•
Place the unit on a level floor.
•
Never locate the product where it may fall into a bathtub or
other water container. DO NOT use in bathrooms or outdoors.
•
Always grip the side handles to move the unit.
If the power cable is damaged, keep away and avoid danger.
Replacement of the cable must be performed by the
manufacturer or its service/maintenance company or by a
trained and authorized service provider.
•
•
Page 8

PARTS DESCRIPTION
7
1. Control Panel
2. Outlet Louvers
3. Front Pad Cover
4. Casters
5. Wheels
6. Water Fill Door
7. Hose Adapter
8. Water Level Indicator
9. Can Holders
10. Top Storage Compartment
11. Rear Pad Cover
12. Cord Wrap
13. Overflow Hole
14. Drainage cap
15. Power Cord & Plug
1
2
3
4
5
6
9
10
11
12
13
14
7
8
15
Page 9

CONTROL PANEL FUNCTIONS
USE & OPERATION
8
TIMER :
Press the ''TIMER'' button until the indicator light comes on to your desired timer. Once the set time
has passed, the unit will automatically shut off. The Timer function allows you to program the unit
for 0.5 to 8 hours OFF timer.
SWING :
Touch SWING button on the touchscreen panel to turn on the automatic swing function to direct
the air stream. The louvers will begin to move automatically from side to side.
UP - DOWN AIRFLOW:
To adjust the vertical direction of air flow, adjust the horizontal louvers manually.
POWER :
Power On:
1. Connect the cord to a power outlet. the unit will start on Stand-by mode, indicated by a “beeping’’
sound and amber power display.
2. Touch POWER to turn the unit on. The blue outer power circle will light up and the TIMER will
display0.0. The FAN will then turn on at HIGH speed for a few seconds then automatically turn
down to LOW speed.
Power Off:
Touch POWER for 2 seconds to turn the unit off.
TIMER SWING
POWER SPEED COOL
Page 10

USE & OPERATION
SPEED:
Touch SPEED to change fan speed between HIGH and LOW as displayed in incremental bars
HIGH and LOW.
COOL:
To use the unit as an evaporative cooler, touch COOL on the touchsreen panel. The pump will
turn on and distribute water to wet out the cooling pad.
LOW WATER LEVEL WARNING FEATURE :
The CO301PC features low water level warning function. Whenever water is below minimum
level, the COOL display will continuously flash and a warning sound will beep for 10 seconds. At
that moment, the pump will be shut off to protect the life of the pump. Refill the reservoir with
fresh water and turn on the COOL function to enjoy the cool air again.
SAFETY LOCK:
CO301PC features safety lock function to prevent unintentional changes in function when the
touchscreen panel is touched accidentally.
1. To lock the unit at the selected setting, touch POWER and the COOL at the same time and
hold until power icon on the display turns off.
2.To unlock the unit from the safety lock setting, touch POWER and COOL at the same time and
hold until power icon appears on the display.
+
9
Page 11

10
USE & OPERATION
CAUTION
Unplug from power when refilling.
Water Fill Door
Water Level Indicator
• Open the water fill door located to the right side of the unit.
Pour water through the water fill door, and fill the tank, till it
reaches the Max. Level.
• Check Max. Level of water on the Water Level Indicator.
Always check water level in the tank before running the
"COOL" function.
• Always make sure water in the tank is above the Min. Water
level mark.
• Running the unit with inadequate water may cause pump
failure.
• Connect a garden hose to the hose adapter securely.
Make sure hose adapter seal washer is evenly set inside the
adapter.
• Connect water supply to the garden hose, and turn on water
supply.
• Water inside the tank will automatically refill once, it reaches
the Min. Level.
• Similarly, the water supply to the tank will stop, once the tank
•
is full, and reaches Max. Level.
The maximum water pressure in Pascal (Bar) units when
connecting the unit to the main water hose is 300 kPa.
Hose Connector
FILL WATER ( Continuous Water Supply Connection)
FILL WATER ( Manually )
Page 12

11
USE & OPERATION
LOW WATER ALARM FUNCTION
The unit is equipped with a low water sensor. When water in the tank is below the
minimum level, you will hear 10 beeps and the COOL LED indicator will flash
continuously. At the same time the power to the pump inside the unit will be cut off
to protect the life of the pump.
To disengage the alarm function, turn off and unplug the unit from the power
outlet, and fill the tank with water above the minimum level.
To turn off the alarm function and continue to use it in FAN mode, turn off the unit
and turn the unit on. If COOL button is pressed again without filling the tank with
water, low water alarm will activate again.
COOLER LOCAT
I ON
Place the cooler in front of an open door or window. Ensure that
there is adequate cross - ventillation in the room by leaving a
door or window open opposite from the cooler.
Following these rules will ensure your cooler will work as
effectively as possible.
Page 13

USE & OPERATION
Remote Control
POWER - Turn power on/off
SPEED - LOW/HIGH
COOL - Turn the pump/COOL function on
SWING - Automatic swing of louvers
TIMER - Timer function of 0.5 to 8 hours
NOTE: Under direct sunlight, effective remote control range will be reduced.
REMOTE CONTROL
12
NOTE
Batteries not included in the package. Please insert two new AAA dry cell batteries
for fully functional remote control.
Page 14

USE & OPERATION
• Fill the tank manually or after hose connection is made, turn on the water supply to the cooler.
• The hose connection to the float valve provides an automatic method of refilling the water supply
as water is evaporated.Whenever possible operate the blower fan at low speed for maximum
cooling.
• When cooling is not required you can operate the unit as a fan only by turning on the fan and
leaving the pump turned off.
• Power ON the unit, and press the SPEED button (LOW or HIGH) on touchscreen panel, to vary
the speed of air flow depending upon your requirement.LOW and HIGH speed will be indicated
with incremental bars on the panel.
• Press the COOL button to turn on the cooling function, which will be indicated by lit up LED of the
COOL button.
• To turn off the unit, press the COOL button to stop the cooling function, then press SPEED button
to reduce the speed to LOW and then the POWER button to turn off the unit.If you do not intend
to use the product for some time, empty the water tank.
• To empty the water tank, turn the unit off using the FAN switch. Unplug the unit from the power
outlet. Remove the drain cap from the bottom and allow the water to drain out.
OPERATING THE UNIT
13
Page 15

WARNING
Before cleaning the unit, switch it to the ''OFF'' position and
remove the plug from the power socket.
To clean the outside, use a damp cloth to remove dirt and
dust.
Never use detergents, corrosive elements or any chemicals
to clean this product.
When the product is not in use, store the unit in a dry place
out of direct sunlight. to clean this product.
CLEANING & DRAINING THE WATER TANK:
•
•
•
• Turn the power "off" and disconnect the unit from power supply.
• Move the unit to a location where it can be drained and remove
the drainage tube/cap (see parts description on page 7).
• Once the tank is empty, refill with clean water and drain it again.
This should be repeated weekly to maintain the integrity of the
unit and to remove particles filtered from the air.
• Once the tank is clean, refill the water tank. The unit is now
ready to be used again.
•
If you do not intend to use the product for some time, empty
the water tank.
•
CLEANING & MAINTENANCE
14
Page 16

CLEANING THE FILTER
CLEANING & MAINTENANCE
Rear Honeycomb Assembly
screw
Front Honeycomb Assembly
screw
The unit includes honeycomb pads, located in the front and
rear of the unit. The frequency of cleaning the model depends
on local air and water conditions. In areas where the mineral
content of the water is high, deposits may build up and restrict
air flow. In this case, it is recommended that the honeycomb
be cleaned every two months. To clean the honeycomb,
simply wash and rinse with water. Soft brush may be used to
loosen mineral deposits.
Deep Cleaning: Caution - honeycomb assembly should be
removed and serviced one at a time.
Rear Honeycomb Assembly: Remove the screw holding the
rear honeycomb cover in place. Gently unsnap and remove
the rear honeycomb cover. Grab and pull out the rear
honeycomb frame. Remove screws from the honeycomb
retainer cover. Remove the honeycomb for inspection,
cleaning or replacement.
Front Cooling Honeycomb Assembly: Remove the screw
holding the front honeycomb cover in place. Gently unsnap
and remove the front honeycomb cover. Grab and pull the
front honeycomb frame out. Remove the screws from
the honeycomb retainer cover. Remove the honeycomb for
inspection, cleaning or replacement.
15
Page 17

TROUBLESHOOTING GUIDE
No discharge of air Cord is not plugged in.
Make sure power cord is plugged
in and the supply switch in ON.
Power is not on.
Try to turn the unit ON by
pressing buttons on control
panel or remote control.
Not Cooling / Unit is
making noise
Pump is not turned ON.
Turn on COOL function from
remote or control panel.
Low or no water in tank,
when COOL is selected.
Refill water tank.
Odour omission New Unit.
When the unit is used for the
first time, the Honeycomb
cooling media will have an
odour, which will dissipate
within a week of initial use.
Old Unit. There may be an algae issue,
Replace the honeycomb cooling
media. Contact service centre.
Damaged Pump or Calcium
deposits on blower.
Contact service centre.
PROBLEM POSSIBLE CAUSE SOLUTION
16
Page 18

TROUBLESHOOTING GUIDE
The unit does not respond Remote control batteries. Check batteries, Replace if
needed. Try to operate using
the control panel.
Damaged PCB Try with remote control. If the
unit responds, PCB board
fasteners may be loose.
Contact service centre.
If neither remote control nor
control panel works, PCB
board may be damaged.
Contact service centre.
PROBLEM POSSIBLE CAUSE SOLUTION
17
Page 19

MODEL NO. CO301PC
Voltage
Frequency
Wattage
Water Tank Capacity
Cooling Media
Product Dimension
Net Weight
Current
ELECTRICAL WIRING DIAGRAM
TECHNICAL SPECIFICATIONS
220-240V
50Hz
270 Watts
30 Litre
Honeycomb
546 (L) x 437 (W) x 1082 (H) mm
30 Kg
1.2/2.2 A
18
Page 20

© 2012 AirTek International Corporation Limited
The Honeywell Trademark is used under license from
Honeywell International Inc.
Honeywell International Inc. makes no representation or
warranties with respect to this product.
Manufactured by AirTek International Corporation Limited.
:
 Loading...