

Page 1
AT120A, AT140A, AT150A, AT175A
Universal Transformers
INSTALLATION INSTRUCTIONS
APPLICATION
These transformers are for use in 24 Vac nominal control
circuits. They are typically used in heating/cooling control
systems but can be used in any application that does not
exceed the load ratings. They meet National Electrical
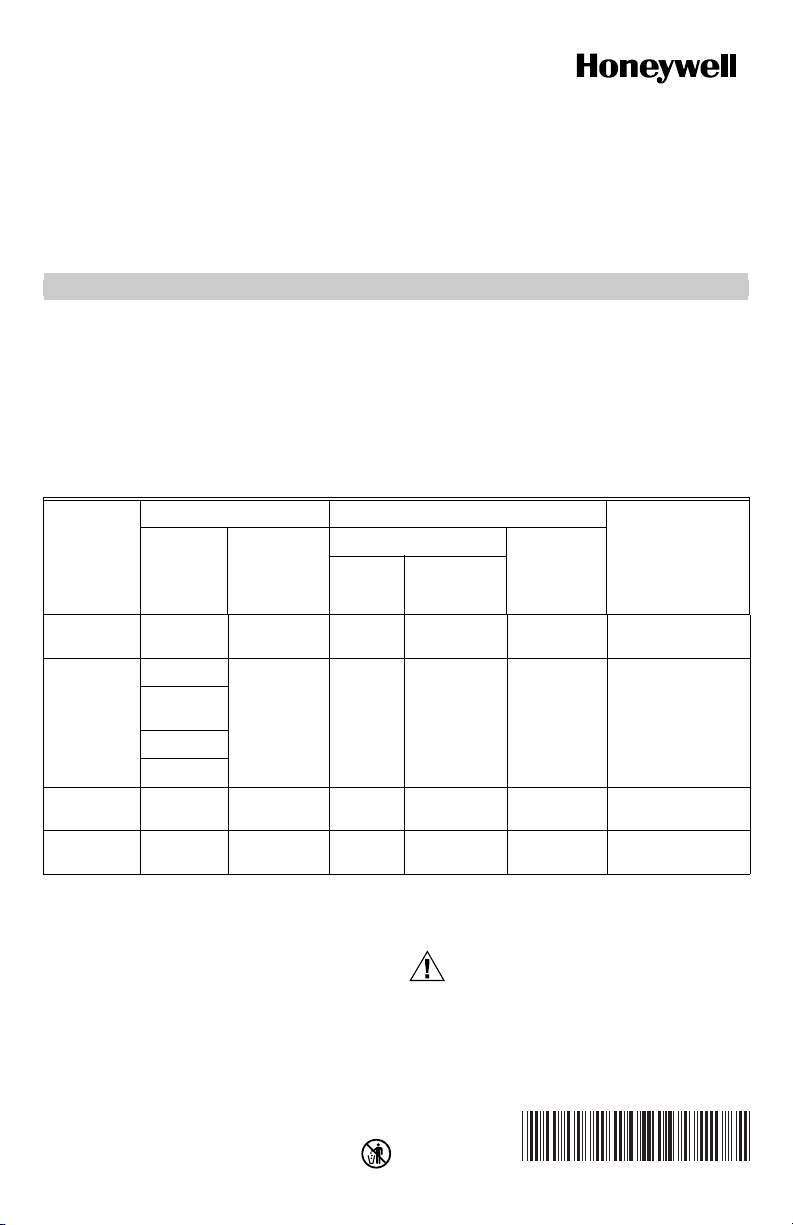
Table 1. Model Specifications.
Primary Secondary
Model
Number
AT120A 120/208/
AT140A 120 9 in. leads 27.0 24.0 Screw
AT150A 120/208/
AT175A 120/208/
Input
Vol tag e
(60 Hz)
240
120/208/
240
120/240
208/240
240
240
Wiring
Connections
9 in. leads 27.0 24.0 Screw
9 in. leads 27.5 24.0 Screw
9 in. leads 27.5 24.0 Screw
Open
Circuit
Code Class 2 “not wet” and Class 3 “wet” requirements
and are Underwriters Laboratories (UL) Inc. listed under
UL 1585. They can be mounted through a 7/8 in. knockout on the accessory mounting plate (included), or with
the integral mounting feet. See Table 1 for additional
specifications.
Vol tag e
At Rated
Power
Output
Wiring
connections
terminals
terminals
terminals
terminals
Output Rating at
100 Percent Power
20 VA
40 VA
50 VA
75 VA
Factor
INSTALLATION
When Installing this Product …
1. Read these instructions carefully. Failure to follow
them could damage the product or cause a hazardous condition.
2. Check the ratings given in the instructions and on
the product to make sure the product is suitable for
your application.
3. Installer must be a trained, experienced service
technician.
4. After installation is complete, check out product
operation as provided in these instructions.
CAUTION
Electrical Hazard.
Can cause electrical shock or equipment
damage.
Disconnect power supply before beginning
installation.
69-0251-3
Page 2
AT120A, AT140A, AT150A, AT175A UNIVERSAL TRANSFORMERS
Mounting
The transformer can be mounted in one of three ways:
— foot mounting.
— plate mounting.
— mounting through outlet box knockout hole.
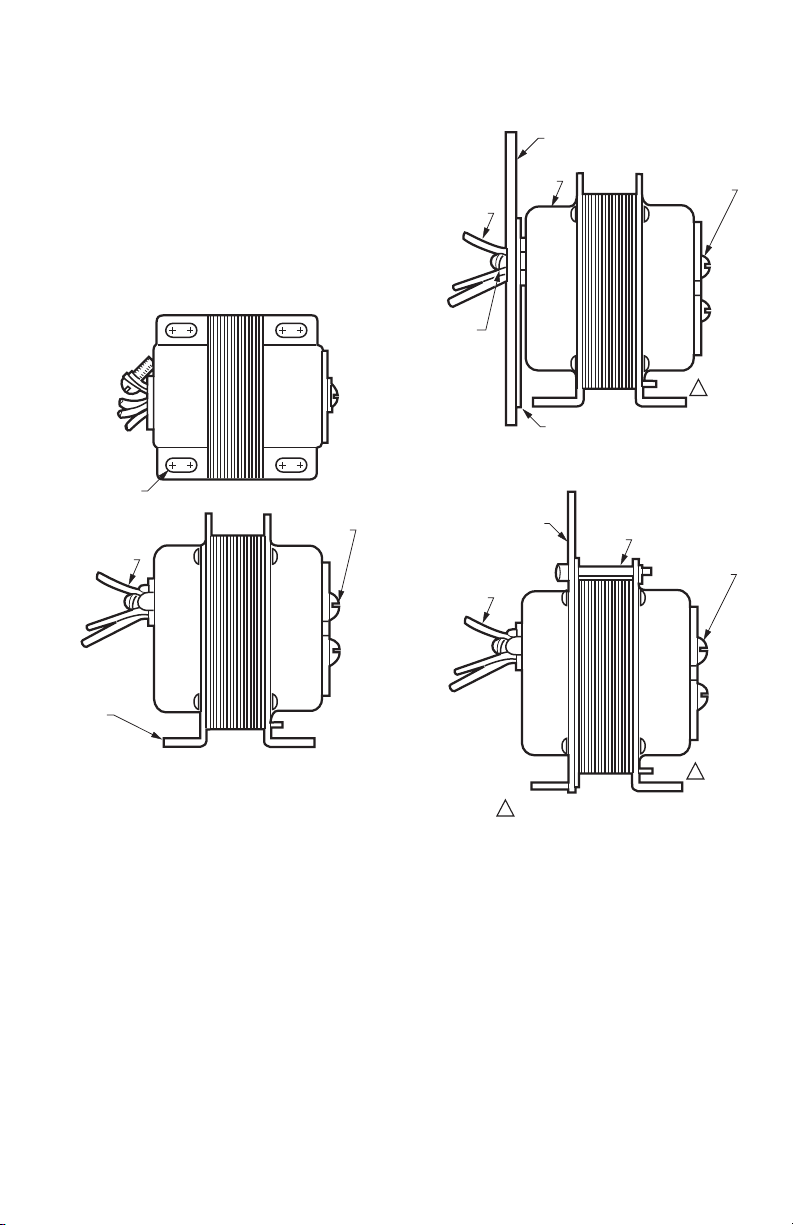
Foot Mounting
1. Mount the transformer using screws (not supplied)
through the four 3/16 in. x 3/8 in. holes in the
mounting feet.
2. Make line voltage primary connections within an
approved enclosure. See Fig. 1.
3. Discard the mounting plate.
USE SCREWS OR
BOLTS THROUGH
SLOTS (4) IN
MOUNTING FEET
LEADWIRES
FOR PRIMARY
CONNECTIONS
SCREW TERMINALS
FOR SECONDARY
CONNECTIONS
LEADWIRES
FOR PRIMARY
CONNECTIONS
CLAMP SCREW
AND CLAMP
LEADWIRES
FOR PRIMARY
CONNECTIONS
PLATE MOUNTED AT CLAMP ON PRIMARY END BELL
MOUNTING PLATE
SCREW
END
BELL
RAISED PORTION OF
LARGE CENTER KNOCKOUT
TERMINALS FOR
SECONDARY
CONNECTIONS
PLATE MOUNTED AT THE LAMINATIONS
MOUNTING
PLATE
MOUNTING
SCREW
SCREW
TERMINALS FOR
SECONDARY
CONNECTIONS
1
MOUNTING
FOOT (2)
M9161
Fig. 1. Foot mounting.
Plate Mounting
MOUNTING PLATE TO TRANSFORMER
Mount the plate to the transformer in either of two
positions (see Fig. 2):
• at clamp on primary end bell.
• at laminations.
69-0251-3 2
1
1
MOUNTING FEET ON "A" MODELS ONLY.
Fig. 2. Mounting plate to transformer in either
of two positions.
MOUNTING PLATE AT CLAMP ON PRIMARY END BELL
1. Turn the screw on the clamp almost all the way out.
2. Hold the mounting plate with the keyhole slots up
and the raised portion of the large center knockout
away from you.
3. From the back, thread the primary leadwires
through the round center hole in the plate.
4. Fit the clamp and screw through the round hole.
5. While holding the plate in place, tighten the
setscrew securely against the rim of the hole.
See Fig. 3. Avoid damaging the leadwires with the
screwdriver.
M9162
Page 3

AT120A, AT140A, AT150A, AT175A UNIVERSAL TRANSFORMERS
WITH RAISED PORTION OF KNOCKOUTS FACING YOU:
PRY UP TOP SECTION OF LARGE KNOCKOUT
1.
BY INSERTING SCREWDRIVER FIRST AT ONE
SIDE OF SLOT AND THEN AT THE OTHER SIDE.
M12126
Fig. 3. When screw is tightened, clamp holds
plate on transformer.
MOUNTING PLATE AT LAMINATIONS
1. Remove the large rectangular knockout in the
mounting plate as shown in Fig. 4.
2. Hold the transformer so the clamp on the end bell
faces you.
3. With the keyhole slots up, fit the mounting plate
over the primary leadwires and end bell. Insert
small tab at the bottom of the plate into the slot in
the transformer mounting foot.
4. Insert the mounting screw (supplied) through the
holes as shown in Fig. 5. Secure the plate to the
transformer, but do not overtighten the screw.
MOUNTING TRANSFORMER AND PLATE ON OUTLET BOX
The mounting plate can be mounted on 4 in. square
boxes, 2 x 4 in. rectangular boxes, and on 4 in. octagonal
boxes. See Fig. 4.
1. Align the plate with the box to determine the correct
mounting holes. The mounting feet and secondary
terminals are outside the box.
2. Remove the mounting hole knockouts, if necessary.
Mount the plate on the outlet box using two screws
(obtained locally).
Mounting Through Outlet Box Knockout Hole
The transformer can be mounted on an outlet box using
the clamp on the primary end bell. The mounting plate is
not used. To mount the transformer on an outlet box:
1. Turn the clamp screw almost all the way out.
2. From outside box, thread the primary leadwires
through suitable 7/8 in. knockout. Fit the clamp and
screw through the knockout. Do not mount the
transformer through a plastic knockout.
3. Tighten the clamp screw securely against the rim of
the knockout. Avoid damaging the leadwires with
the screwdriver.
THEN PRY UP BOTTOM SECTION OF KNOCKOUT.
2.
REMOVE BOTH SECTIONS OF KNOCKOUT WITH PLIERS.3.
SHADED AREAS REPRESENT KNOCKOUTS
AND SCREW SLOTS USED WITH 2 X 4 INCH
OR OCTAGONAL OUTLET BOXES.
Fig. 4. Use screwdriver to pry out both
sections of knockout.
TRANSFORMER
IMPORTANT
MOUNT
TRANSFORMER
OTHER SIDE
M9188A
PLATE
M9163
Fig. 5. Mounting screw and tab hold plate on
transformer.
3 69-0251-3
Page 4

AT120A, AT140A, AT150A, AT175A UNIVERSAL TRANSFORMERS
Mounting Through Outlet Box Knockout
The transformer can be mounted on an outlet box using
the clamp on the primary end bell. The mounting plate is
not used. To mount the transformer on an outlet box:
1. Turn the clamp screw almost all the way out.
2. From outside box, thread the primary leadwires
through suitable 7/8 in. knockout. Fit the clamp and
screw through the knockout. Do not mount the
transformer through a plastic knockout.
3. Tighten the clamp screw securely against the rim
of the knockout. Avoid damaging the leadwires
with the screwdriver.
WIRING
All wiring must comply with local codes and ordinances.
Disconnect power before making wiring connections to
prevent electrical shock or equipment damage.
1. Make primary connections to the line voltage
power supply. On multitap models, be sure to use
correct leads for available power supply. See
Fig. 6.
2. On multitap models, insulate the ends of the
unused leads using wire nuts or capping with a
solderless connector.
3. Make secondary connections to 24 Vac control
circuit.
CHECKOUT
CAUTION
Voltage Check Hazard.
Overload current protection is inherent on
AT120, AT140, and AT150. A fused 3.5 Amp
secondary is used on AT175.
Do not short transformer secondary terminals.
Voltage Check
After installation is complete, turn on power supply and
perform a voltage check:
1. Place controlled equipment in operation and
observe through one complete cycle.
2. Using a voltmeter, check for proper primary and
secondary voltages.
3. If voltage readings are incorrect, be sure primary
voltage connections are made correctly.
4. Measure voltage again:
a. If correct primary voltage is measured and
secondary voltage is significantly less than the
voltage shown on the regulation curves,
transformer winding is damaged. Replace
transformer and repeat checkout procedures.
b. If primary voltage is 0V, be sure power supply
is connected correctly or repair, if necessary.
Repeat checkout procedures.
5. Do not put system into operation unless correct
primary and secondary voltages are measured.
SINGLE VOLTAGE MODELS
2
COMMON
BLACK
3
VOLTAGE
VAR IES
WITH MODEL
120 V - WHITE
208 V - RED
240 V - ORANGE
277 V - BROWN
480 V - BLACK/RED
1
SECONDARY
PRIMARY
120/240 MODELS
2
COMMON
BLACK
PRIMARY
120 V
WHITE
3
240 V
ORANGE
1
SECONDARY
208/240 VAC MODELS
2
BLACK
RED
ORANGE
1
SECONDARY
PRIMARY
3
COMMON
208 V
240 V
120/208/240 VAC MODELS
COMMON
PRIMARY
3
1 SECONDARY CONNECTIONS ARE SCREW TERMINALS, 1/4 INCH
QUICK-CONNECTS OR BLUE AND YELLOW LEADWIRES.
2
BLACK IS COMMON WITH RESPECT TO THE TRANSFORMER
WINDING ONLY AND NOT THE EXTERNAL CIRCUIT.
3
SOME MODELS AVAILABLE WITH 1/4 INCH QUICK CONNECTS.
120 V
208 V
240 V
Fig. 6. Schematics for single and multitap
2
BLACK
WHITE
RED
ORANGE
transformers.
1
SECONDARY
M22974
Automation and Control Solutions
Honeywell International Inc. Honeywell Limited-Honeywell Limitée
1985 Douglas Drive North 35 Dynamic Drive
Golden Valley, MN 55422 Scarborough, Ontario M1V 4Z9
customer.honeywell.com
® U.S. Registered Trademark
© 2005 Honeywell International Inc.
69-0251-3 G.H. Rev. 06-05
 Loading...