

Page 1

33-00040-03
TrueZONE ARD, EARD, and ZD
Series Dampers
INSTALLATION INSTRUCTIONS
APPLICATION
ARD Series Damper
The ARD is a round damper with a 24 Vac, spring-Open
return damper motor used to control circulating air in
heating, cooling, and ventilating systems.
EARD Series Damper
The EARD is a round damper with a 24 Vac poweredopen/spring-closed motor. It is used for fresh air intake for
Ventilation or for combustion makeup air.
ZD Series Damper
The ZD is a power close and spring open damper. It has a
24-volt motor used to control circulating air in HVAC
systems and used when a normally-open damper is
required. The ZD is typically used with the TrueZONE and
other electronic zoning systems.
FEATURES
• Taping Flange and non-interfering set screw
• High Temperature outer plastic for hot environments
• Redesigned all Metal Drive Train Gears
• Front facing display with LED Indication light for
Open and Close.
• Adjustable damper position range stops
• Quiet operation.
ARD Features
• Adjustable close position range stops
• Shipped as power closed/spring return open damper.
• Available in 5 to 10” inch, 12, 14, 16, 18, and 20 inch
diameter sizes.
• Male (crimped) and female (uncrimped) ends to
connect to any rigid or flexible round duct.
• Rated to operate up to 1 in. wc
• Blade closes off tightly against gasket for minimal
leakage.
• Fail-safe, normally open operation
• Simple, easy-to-wire, two-wire installation with a third
wire option M4 for LED open only light
EARD Features
• Adjustable open position range stops
• Shipped as power open/spring return closed damper.
• Blade closes off tightly against gasket for minimal
leakage.
• Galvanized steel
• Rated to operate up to 1 in. wc
• Simple, easy-to-wire, two-wire installation
• Male (crimped) and female (uncrimped) ends to
connect to any rigid or flexible round duct.
ZD Features
• Adjustable closed position range stops
• Rated to operate up to 1 in. wc
• Solid construction using extruded aluminum frame and
blades
• Parallel blade design for low leakage performance
• Simple, easy-to-wire, two-wire installation with a third
wire option M4 for LED open light
• Fail-safe, normally open operation
• Ordering Instructions: Order ZD (dimension 1) x
(dimension 2). (Motor is always mounted on dimension
2 side.) For example, ZD10x8TZ is a 10 in. x 8 in. damper
with the motor on the 8 in. side; but a ZD8x10TZ is a 8
in. x 10 in. damper that has the motor on the 10 in. side.
• Damper can be installed in any orientation (mounting
side can be on either the bottom or the side of the duct).
Page 2
TRUEZONE ARD, EARD, AND ZD SERIES DAMPERS
M35186
4-1/16
(103)
4-41/64
(118)
3-61/64
(100)
4-31/32
(126)
SPECIFICATIONS
IMPORTANT
The specifications given in this publication do not
include normal manufacturing tolerances.
Therefore, this unit may not exactly match the
listed specifications. Also, this product is tested
and calibrated under closely controlled conditions,
and some minor differences in performance can
be expected if those conditions are changed.
Motor Electrical Rating: 24 Vac, 60 Hz, 8VA.
Motor Electrical Connection: Push terminals. Solid (not
stranded) wire is recommend.
Motor Nominal Angular Rotation: 90°.
Motor Torque: Minimum 71 in.-oz. (500 millinewton
meters) output torque available when motor is
energized and device is at the spring return initial start
position.
Nominal Motor Timing at 77°F (25°C) Ambient:
Energized at rated load: 30 seconds.
De-energized (spring return): 10 seconds.
Motor Ambient Temperature Rating: 40° to 140°F (5° to
60°C).
Leakage: Less than 1% at 1/2 in. wc.
Pressure Drop: Maximum at full open: 0.0329 in. wc at
800
ft/min.
Maximum Static Pressure: 1 in. wc for all models except
0.3 in. wc for ARD20.
Motor Shaft Rotation Direction: Clockwise, when
energized and viewed from the base or shaft end.
Motor Mounting Means: Direct connection to damper
shaft.
Motor Mounting Position: Multi-poise.
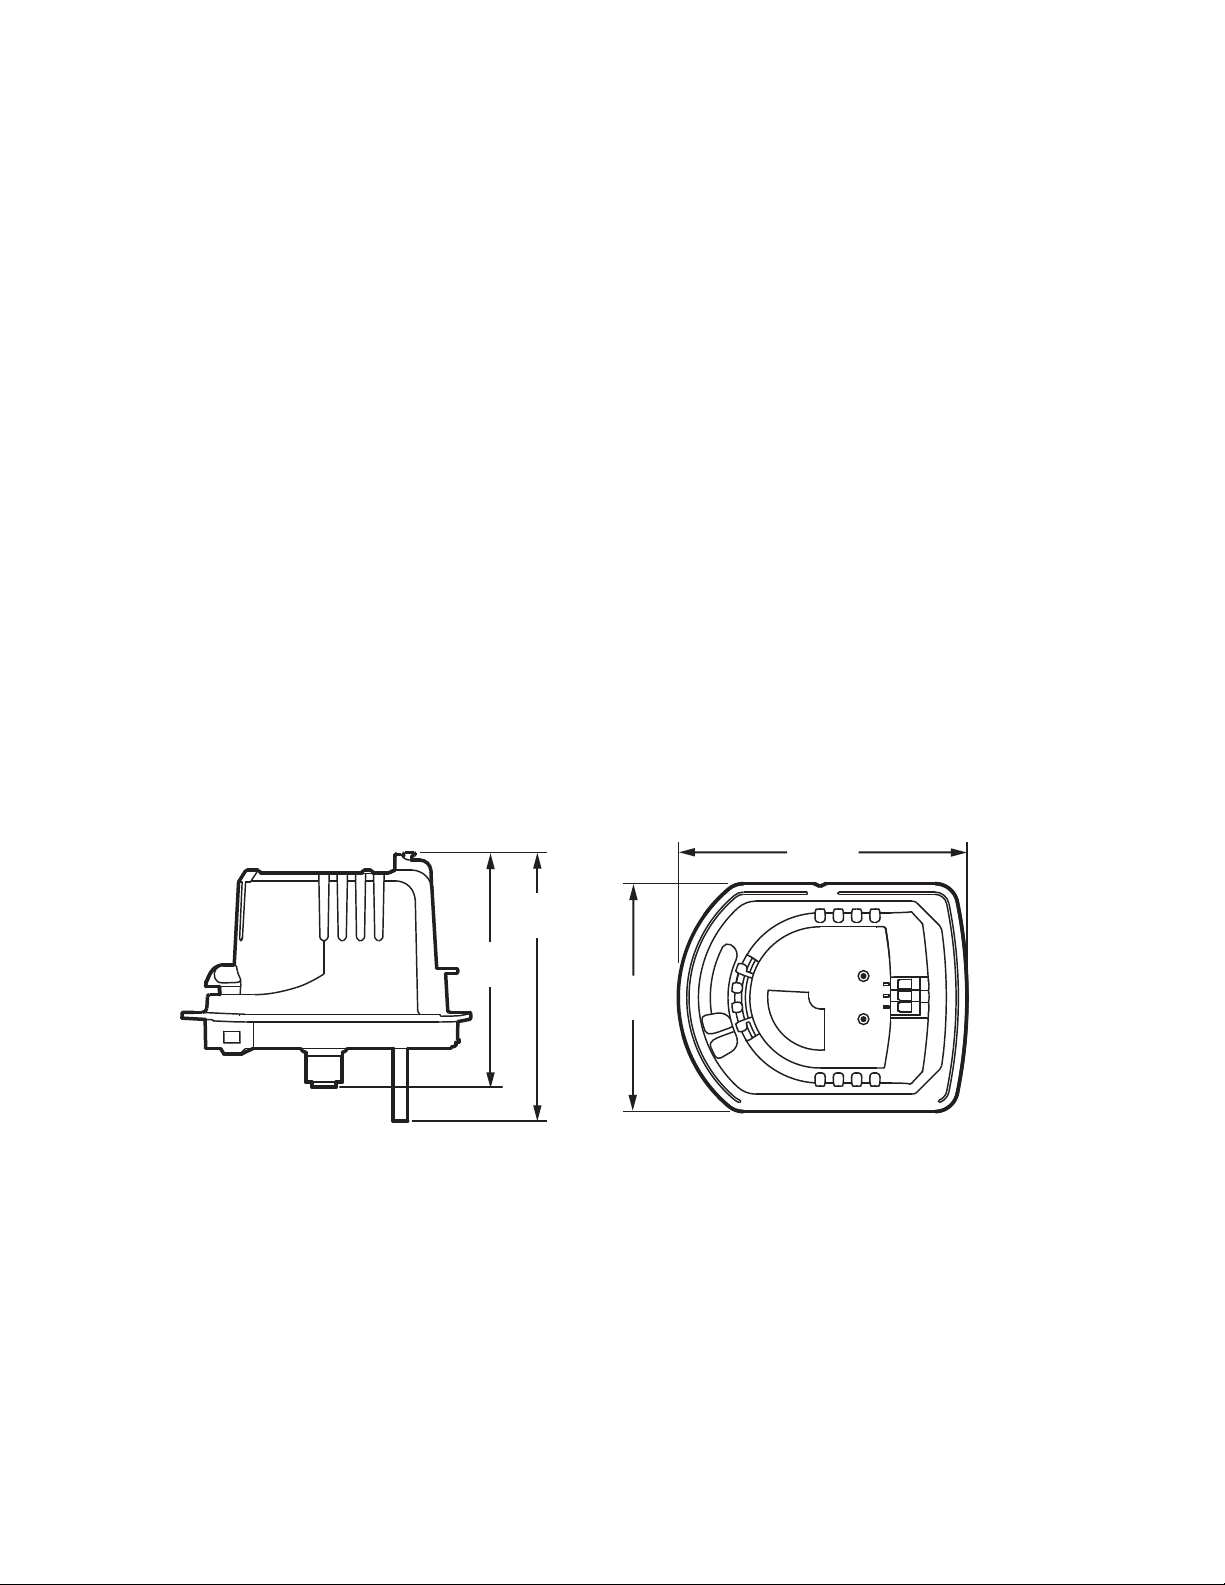
Motor Dimensions: See Fig. 1.
Construction
ARD Dampers
Frame: Galvanized steel spiral duct, crimped on
downstream side.
ARD Sizes: 5 in., 6 in., 7 in., 8 in., 9 in., 10 in., 12 in., 14
in., 16 in., 18 in., and 20 in. diameters.
Gauge: ARD5-ARD12: 24 Gauge frame, and 22 Gauge
Blade: ARD14-ARD20: 22 Gauge frame, and 20
Gauge Blade
EARD Dampers
Frame: Galvanized steel spiral duct
EARD Sizes: 5-, 6-. 7-, and 8-, inch diameter sizes
ZD Dampers
Frame: Solid construction using extruded aluminum
frame and blades
ZD Sizes: Even sizes from 6in. x 6in. up to 36 in x 36 in.
Damper dimensions: All ZD dampers are actually sized
5/32 in. smaller than the listed size to ensure correct
fit.
Fig. 1. Motor and damper dimensions in in. (mm).
INSTALLATION OF ARD AND EARD DAMPERS
Before Installing this Product…
1. Read all instructions before installing this product.
Failure to follow the instructions can damage the
product or cause a hazardous condition.
2. Check the ratings given in the instructions and on
the product to make sure the product is suitable for
your application.
33-00040—03 2
3. Installer must be a trained, experienced service
technician.
4. Install the product in an area that is easily accessible
for checkout and service.
5. After completing installation, use these instructions
to check out the product operation.
Page 3
TRUEZONE ARD, EARD, AND ZD SERIES DAMPERS
M35187A
RANGE STOP
LOCATIONS
Installing the Round (ARD and EARD) Dampers
1. Insert the crimped end of the ARD or EARD into the
uncrimped end of the rigid round duct and secure
with sheet metal screws (not provided). When using
flexible duct, slip the duct over the end of the ARD or
EARD and secure it with duct straps (not provided).
2. When installing the damper in a horizontal
application, make sure the motor actuator is located
on the side or top of the damper. Do not locate the
motor on the bottom of the damper. The damper can
be mounted in a vertical duct.
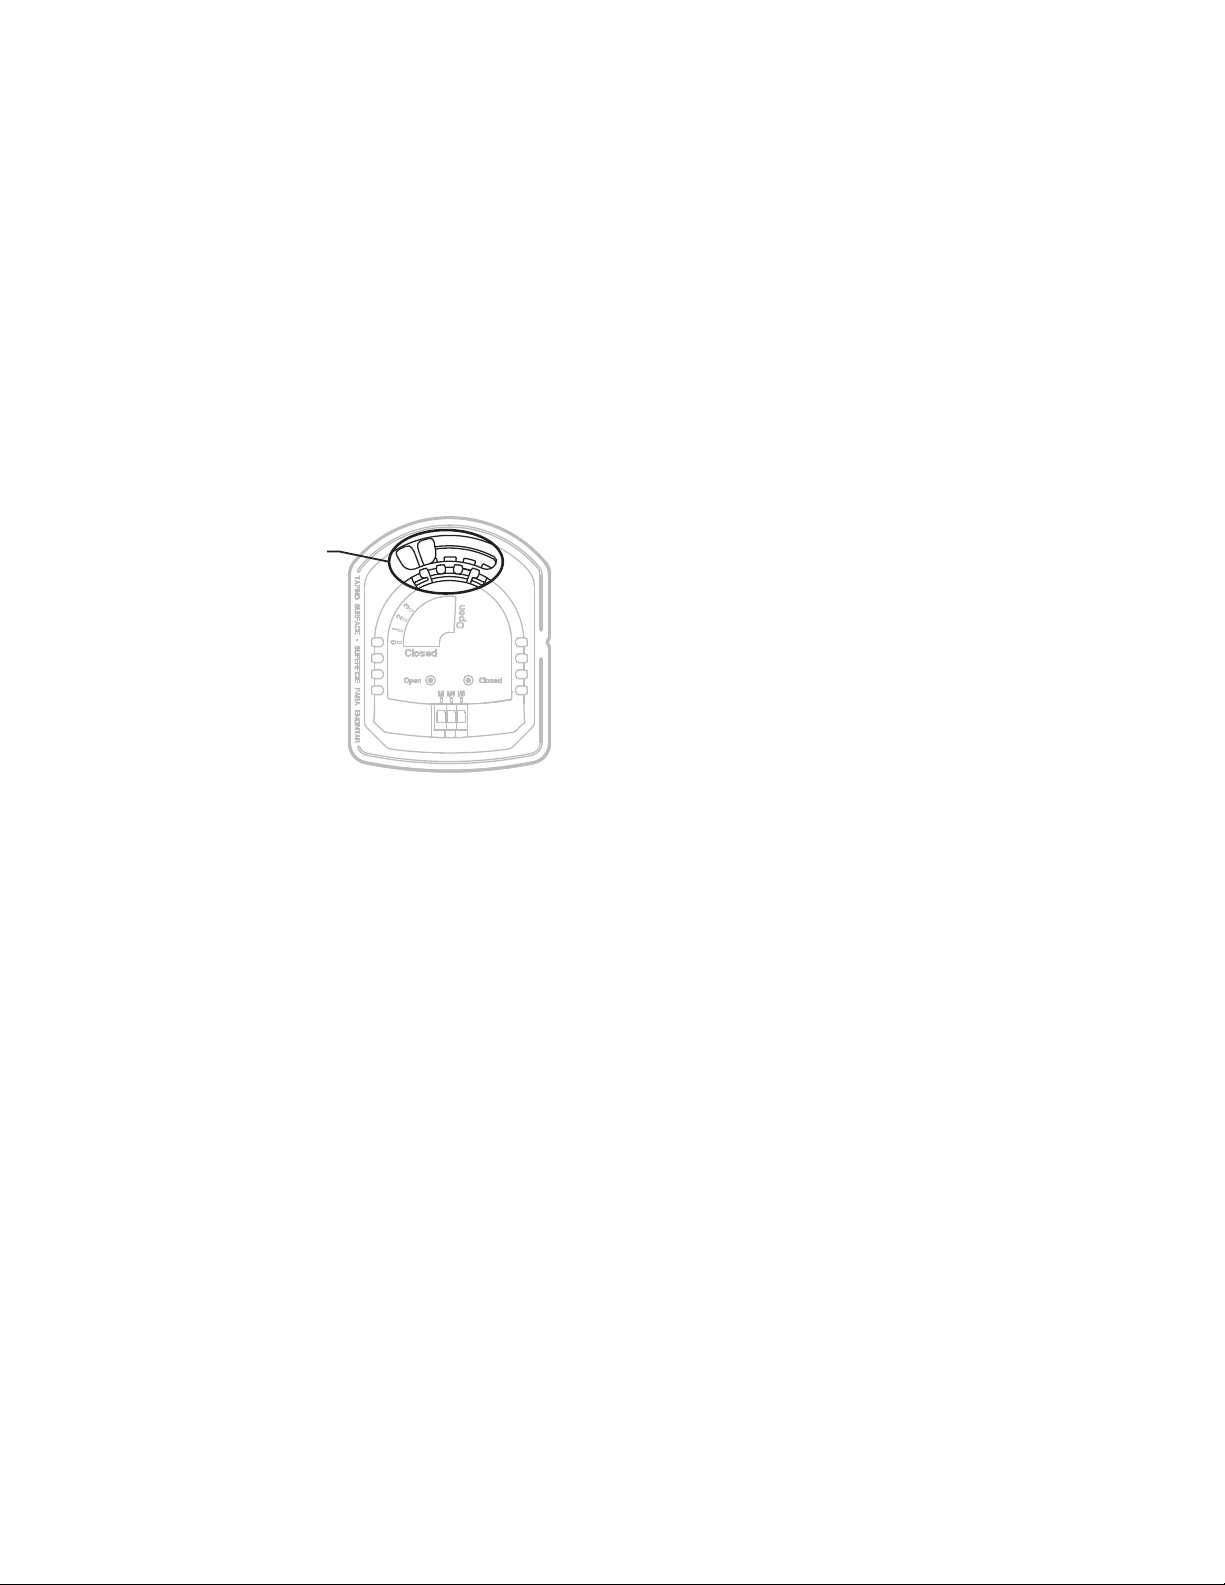
3. Adjust Range stop position to desired closed
positions. ARD and ZD Dampers are completely
closed in position 0. EARD Dampers are completely
open in position 0.
Planning the Installation
Selecting a Location
Select a location for the zone dampers that is at least three
feet from the HVAC unit plenum in the air duct takeoff to
the respective zone and is easily accessible for checkout
and maintenance.
The ZD comes complete and ready for installation. The
motor and linkage are factory-assembled to the damper.
The damper is assembled for installation and wiring to the
control panel.
Selecting Damper Size
To ensure correct operation, be sure to select the correct
zone damper size for the air duct:
IMPORTANT
Be aware that ZD damper sizes are built 5/32 in.
smaller than the listed dimensional sizes.
• If the damper is forced into an undersized air duct, the
excess pressure can jam the damper blades and cause
improper operation.
• When a small percentage of continuous flow is desired
in a zone, even when the damper blades are closed,
adjust motor closed position to be slightly open to
maintain desired air flow.
Fig. 2. TrueZONE Actuator range stop positions.
Wiring Multiple Dampers
When the same zone controls two or more dampers, wire
the dampers in parallel to terminals M1 and M6 on the
zone control panel.
INSTALLATION OF ZD DAMPER
When Installing this Product…
1. Read these instructions carefully. Failure to follow
these instructions can damage the product or cause
a hazardous condition.
2. Check the ratings given in the instructions and on
the product to make sure the product is suitable for
your application.
3. Installer must be a trained, experienced service
technician.
4. All wiring must comply with local electrical codes,
ordinances, and regulations.
5. After completing installation, use these instructions
to check out the product operation.
Selecting Location with Humidifier
Installed
IMPORTANT
Excessive lime or mineral deposits can
accumulate on damper blades and cause
improper operation when spray or atomizing type
humidifiers are installed in the furnace plenum or
air supply duct with the zone dampers.
• Spray or atomizer type humidifiers that are installed in
the furnace plenum or air supply duct are not
recommended.
• Evaporative type humidifiers are recommended.
Installing the Damper
IMPORTANT
— Install dampers into a squared air duct.
— Do not weld dampers to the air ducts.
— Do not force dampers into undersized air ducts.
Excess pressure can damage damper blades.
— Be sure high limit setting is less than 200 °F
(93 °C).
— Higher settings can damage the electric actuator.
1. Be sure the ZD is correctly sized to the air duct (see
Selecting Damper Size section).
2. Select a ZD location that is three feet from the
furnace plenum.
3. Cut a 4-in. (102 mm) opening in the accessible side
of the air duct at the location selected; ensure the
opening of the air duct is cut fully from seam to
seam.
4. Secure the ZD mounting plate to the air duct with the
self-tapping sheet metal screws provided.
3 33-00040—03
Page 4
TRUEZONE ARD, EARD, AND ZD SERIES DAMPERS
CAUTION
WIRING
Personal Electrical Shock Hazard. Can cause
electrical shock or equipment damage.
Disconnect power before beginning installation.
The damper motor has a 24 Vac, 50/60 cycle, 8 VA rating.
The spring-return ARD and ZD damper requires 24 Vac to
M1 and M6 to power the damper closed. The damper then
returns to its normal open position once power is removed.
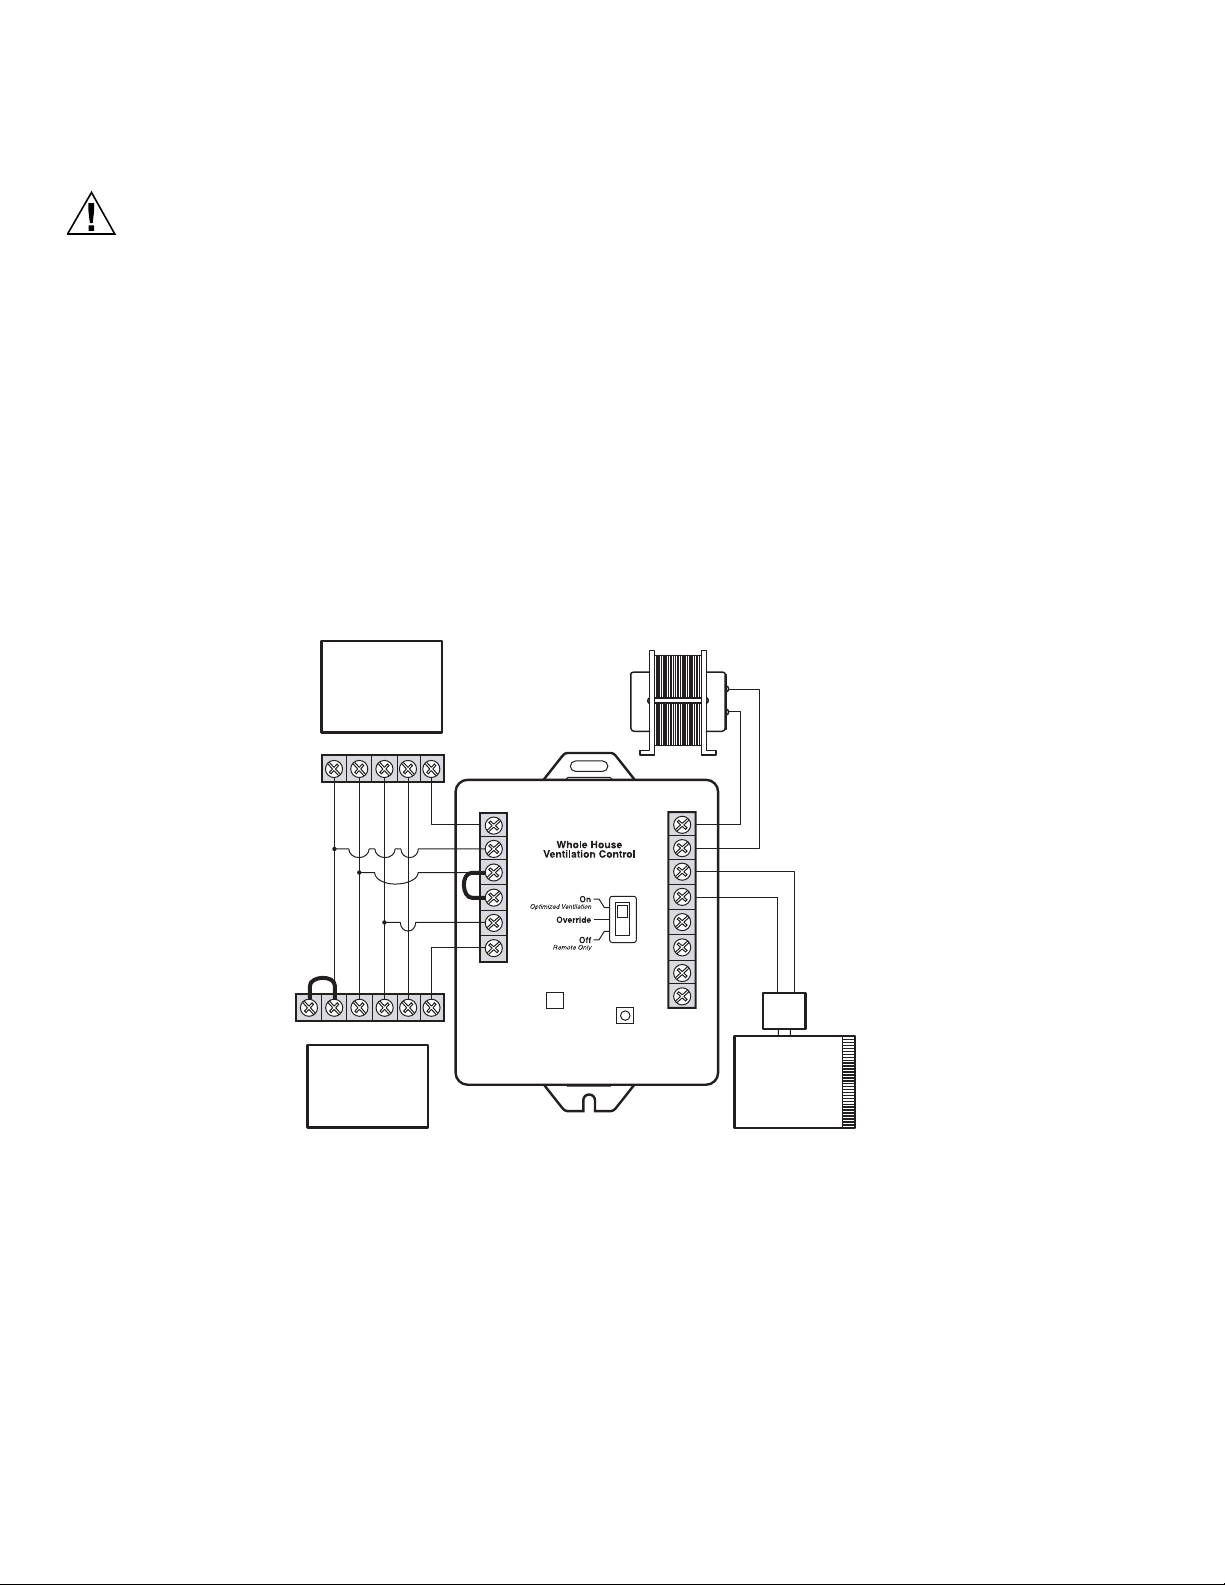
EARD damper requires 24 Vac to the two vent terminals to
power the damper open. The damper then returns to its
normal closed position once power is removed.
NOTE: Multiple dampers can be wired in parallel.
Wiring an EARD to a W8150
HVAC
Wiring a Motor
See Fig. 6 for motor wiring hookups for ARD and ZD
Dampers.
Changing Motor on ARD, EARD and ZD Dampers
1. Disconnect the motor wiring.
2. Loosen the socket head cap set screw located
between the faceplate and the motor coupling.
3. Remove the motor.
4. For ARD and ZD models: Ensure damper blade is in
the open position.
For EARD models: Ensure damper blade is in the
closed position.
5. Attach new motor to the coupling; be sure the
standoff on motor is positioned in the grommet on
the faceplate and the set screw is aligned with the
motor shaft hole.
6. Tighten the set screw.
AT120
WCRC Y G
WCRCRYG
THERMOSTAT
G
R
C
C
C
C
H
W
G
W8150A
R
C
DAMPER
AUX
REMOTE
Fig. 3. EARD and W8150 wiring.
EARD-6
M23547A
33-00040—03 4
Page 5
Wiring TH8321WF or TH8321R without EIM
C
K
RC
R
U1
U1
S1
S1
W
Y
G
W2
Y2
A
TH8321WF OR TH8321R THERMOSTAT
HVAC
C
R
W
Y
G
EARD
M37607
JUMPERS NEEDE D
1
1
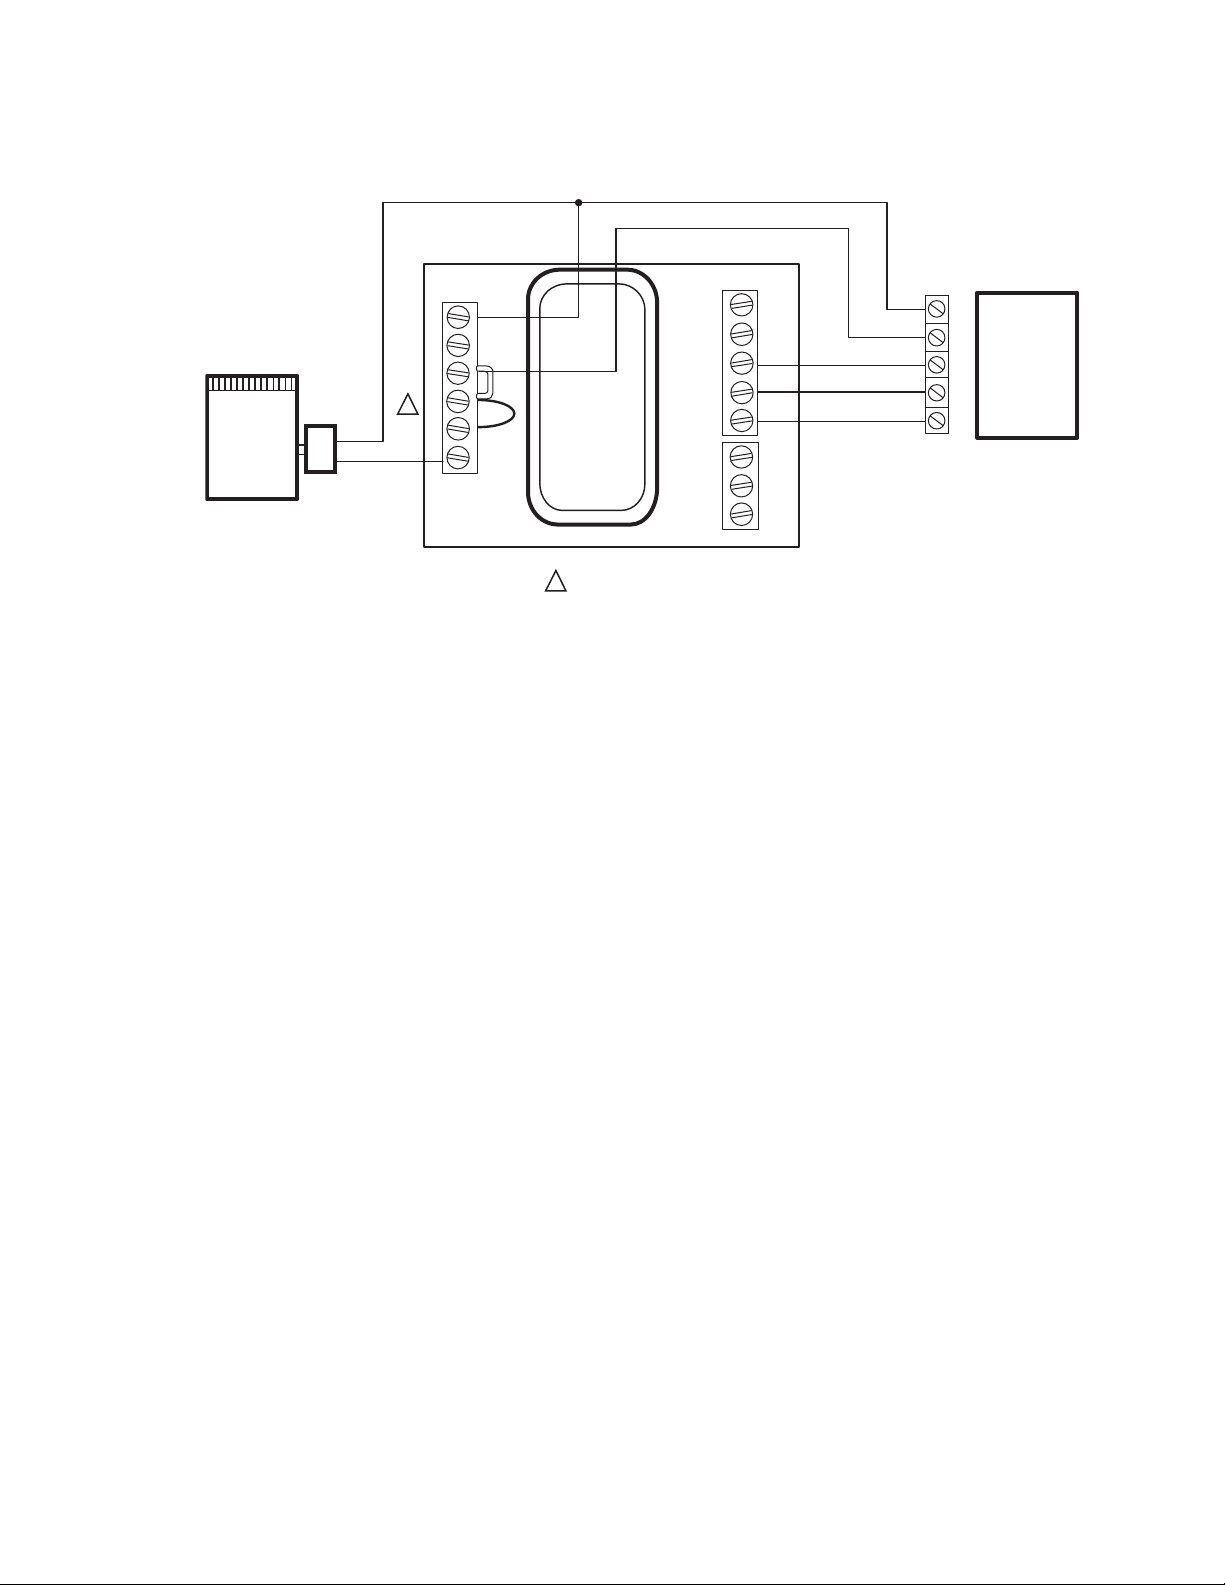
Fig. 4. TH8321WF or TH8321R without EIM controlling EARD damper.
TRUEZONE ARD, EARD, AND ZD SERIES DAMPERS
5 33-00040—03
Page 6
TRUEZONE ARD, EARD, AND ZD SERIES DAMPERS
Wiring TH8321R or Prestige with EIM
TO THERMOSTAT
R
C
CONV
POWER
HEAT
COOL
FAN
U1
U2
U3
A
B
C
D
W2
W3
Y2
RH
W
Y
G
A
U3
U3
U2
U2
U1
U1
RC
R
C
1
*
EARD
W
Y
HVAC
G
R
C
S4
S4
S3
S3
THM5421 R1021 EIM
1
SENSORS
JUMPERS NEEDE D
S2
S2
S1
S1
M37606
Fig. 5. TH8321R or Prestige with EIM controlling EARD damper.
33-00040—03 6
Page 7

TRUEZONE ARD, EARD, AND ZD SERIES DAMPERS
CAUTION
CHECKOUT
To check out the ARD or ZD:
1. With 24 Vac applied to M1 and M6, observe the
motor powering the damper to the closed position.
2. With power removed, observe the damper returning
to the normally-open position.
NOTE: To remove power, disconnect one wire from
the motor.
3. If the motor does not operate smoothly and without
hesitation throughout the complete opening and
closing stroke, examine the damper and the shaft for
free rotation within the duct.
To check out the EARD:
1. With 24 Vac applied to the motor, observe the
indicator window shows the damper opening.
2. When energized, verify that the actuator connection
coupling rotates in a clockwise direction (as viewed
from the operator base end) and that the damper
shaft turns with the coupling.
3. With power removed, observe the damper returning
to the normally-closed position.
NOTE: To remove power, disconnect one wire from
the motor.
4. If the motor does not operate smoothly and without
hesitation throughout the complete opening and
closing stroke, examine the damper and the shaft for
free rotation within the duct.
Wiring ARD or ZD Damper
Personal Electrical Shock Hazard.
Can cause electrical shock or equipment damage.
Disconnect power before beginning installation.
The ARD and ZD has a 24 Vac, 50/60 cycle, .32A motor.
The ARD and ZD is wired to terminals M1 and M6 for
power closed/spring return open, with an option for M4
wire to power LED light only. The ARD and ZD is a spring
return damper that requires 24V to M1 and M6 to power
the damper closed. When power is removed from the
motor, the damper springs back to its normally-open
position.
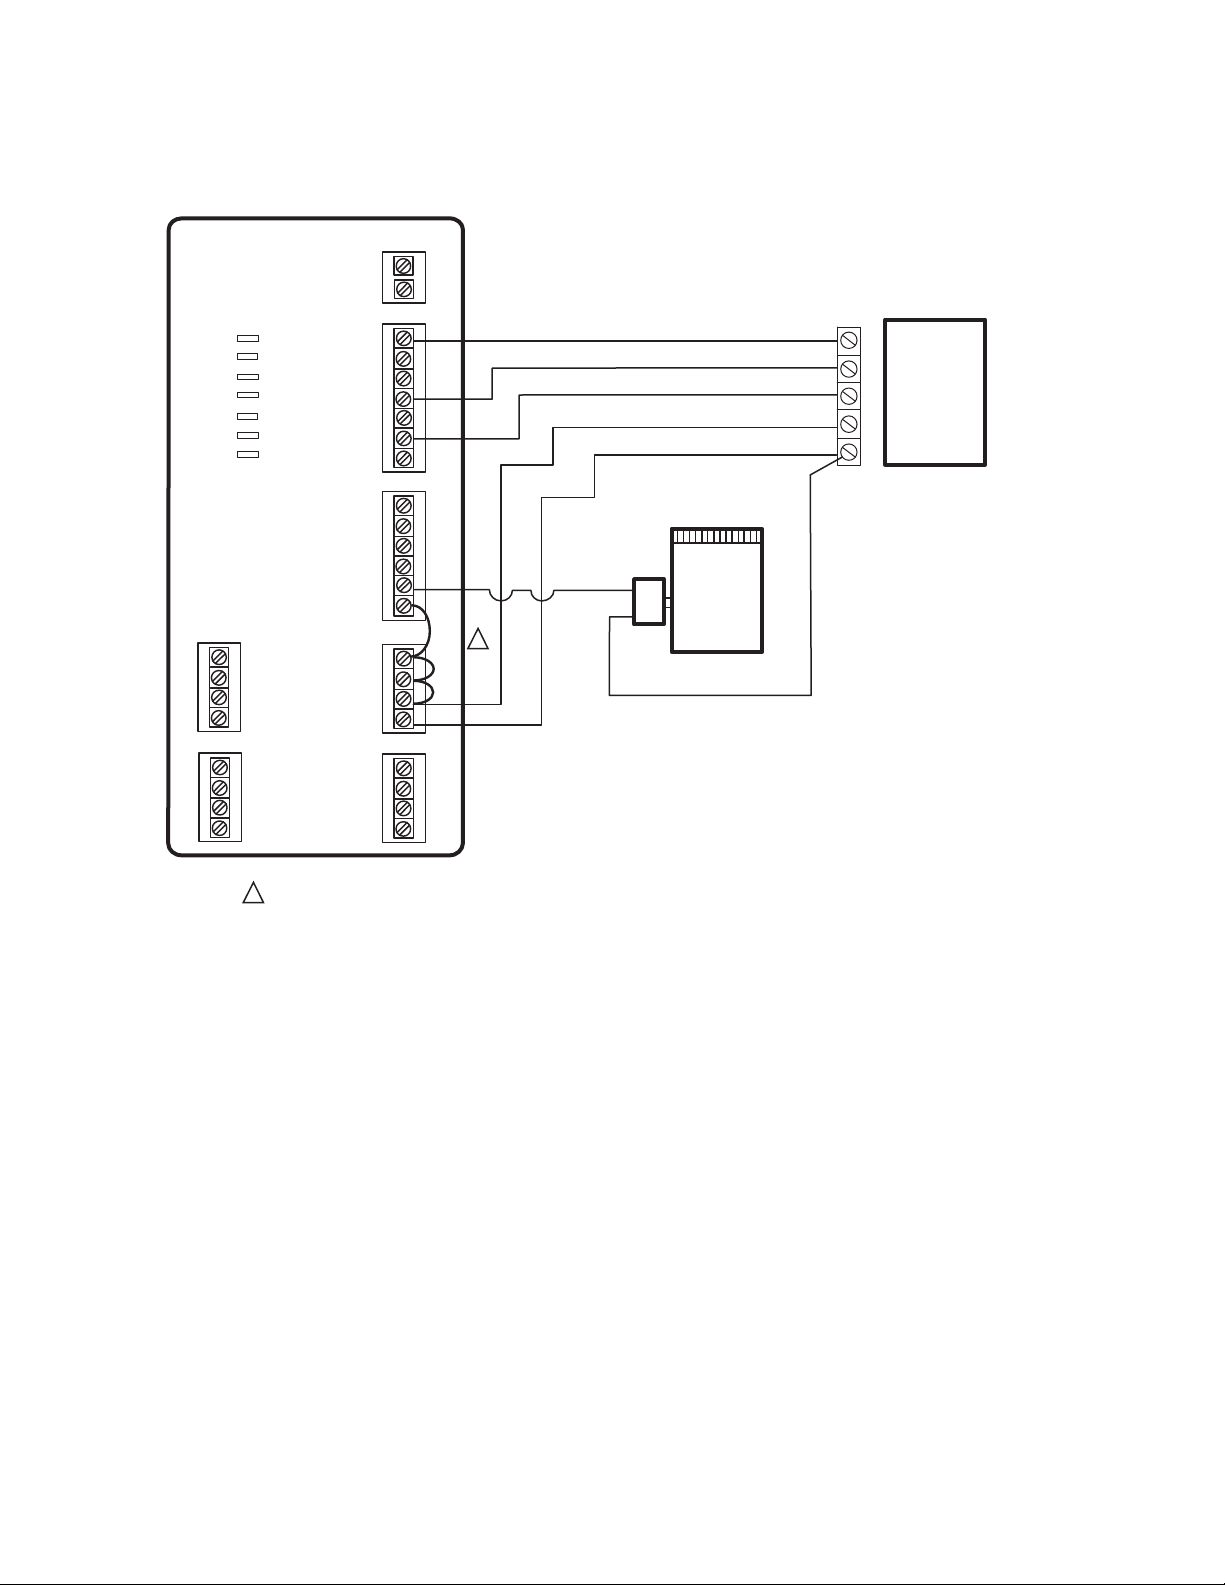
CLOSED M6
OPEN M4
COM M1
NOTE: WHEN INSTALLING ON OLDER MASTERTROL
BOARDS SUCH AS THE MARK V, JUMPER
M2-M5 ON THE PANEL.
Fig. 6. Power closed spring return open
ARD or ZD wiring.
M37925
Wiring Multiple Dampers
When the same zone controls two or more dampers, wire
the dampers in parallel to terminals M1 and M6 on the
zone control panel.
Wiring a Motor
See Fig. 6 for typical motor wiring hookup.
7 33-00040—03
Page 8

TRUEZONE ARD, EARD, AND ZD SERIES DAMPERS
Resideo Inc., 1985 Douglas Drive North,
Golden Valley, MN 55422
www.resideo.com
This product is manufactured by Resideo Technologies, Inc., Golden Valley, MN, 1-800-468-1502
©2019 Resideo Technologies, Inc. The Honeywell Home trademark is used under license from Honeywell International Inc. All r ights reserved.
33-00040—03 M.S. Rev. 04-19 | Printe d in United States
 Loading...