

Page 1
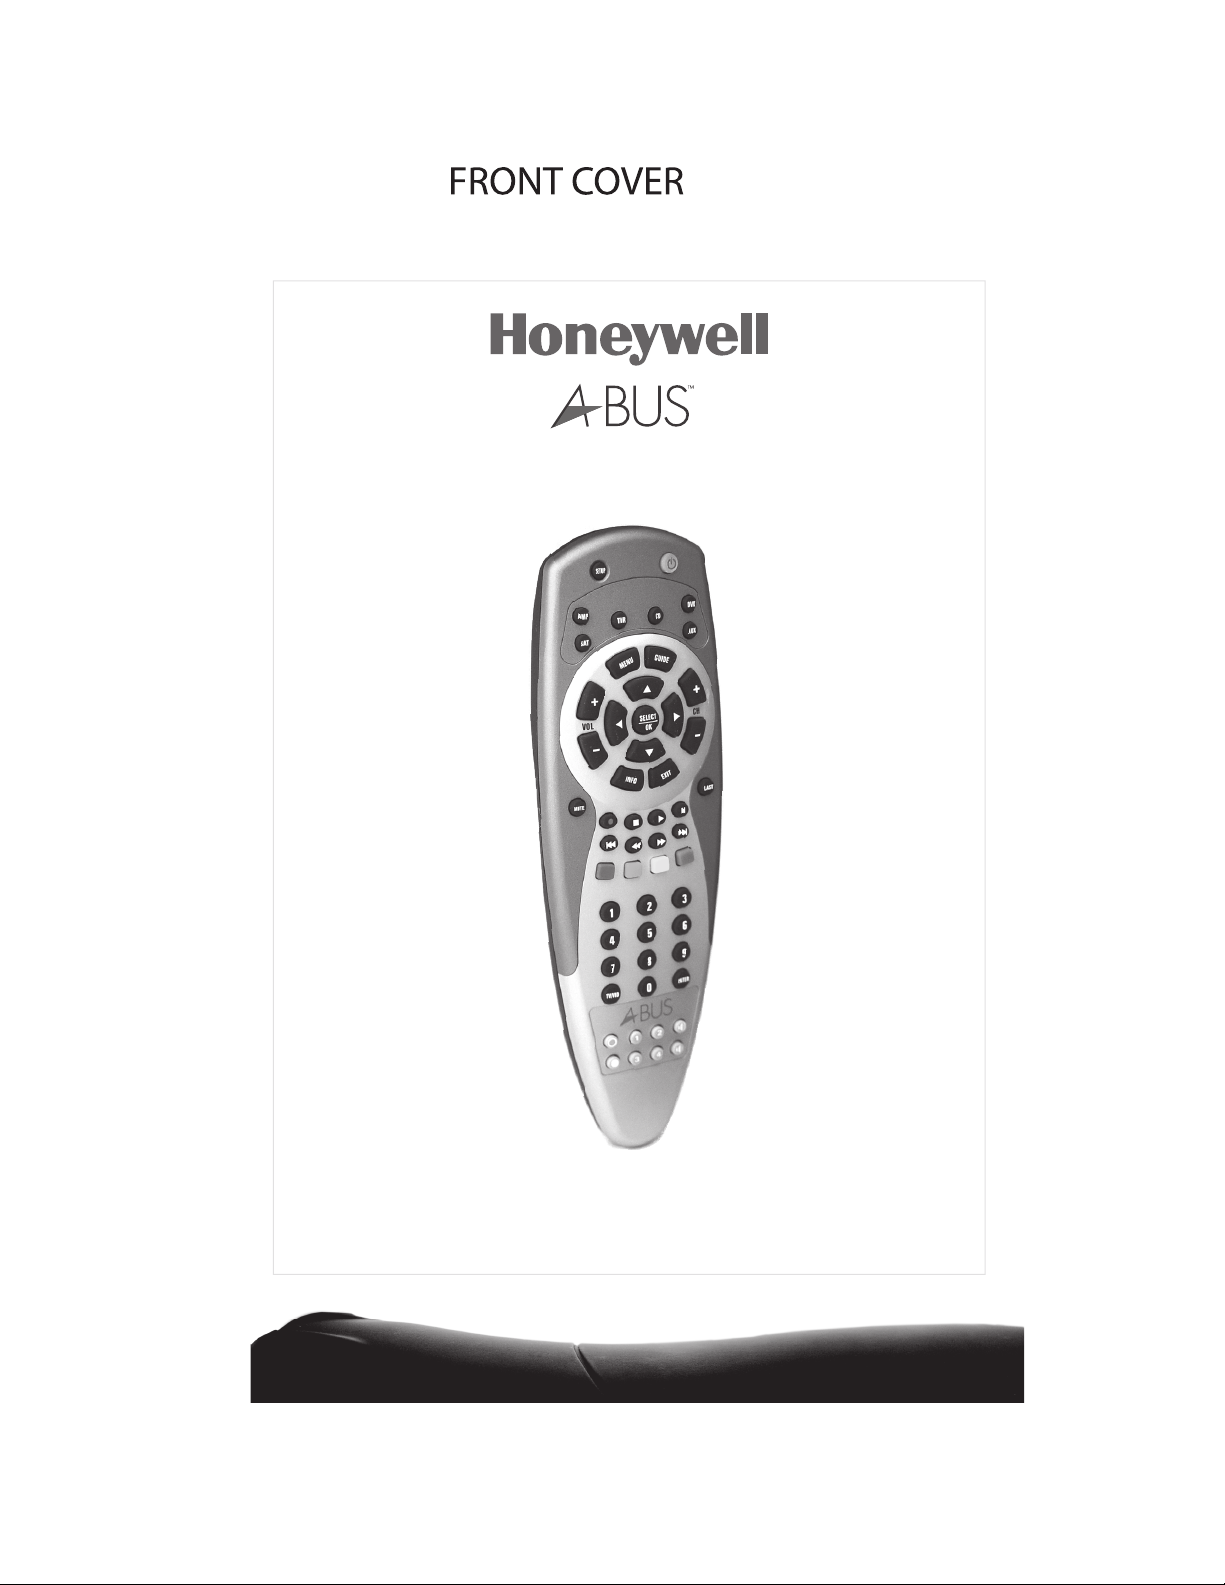
Universal Remote
Operation Manual
Page 2
A-BUS
Universal Remote
Introduction
Thank you for purchasing an A-BUS™ Universal Remote. Your remote has a dedicated A-BUS
bank and six banks of buttons that can be encoded from the library of codes or codes which
you can learn from the handsets belonging to the components you wish to control.
Each button including bank buttons can learn macros (multiple commands). Once set up to
your requirements it should make the operation of your system simple and functional. To
program your devices, follow the instructions in “Programming a Device”. For best results,
please read and follow all the remaining instructions. Also, keep this guide for future reference.
Installing Batteries
3
1
2
Your A-BUS™ Universal Remote requires 2 AA batteries
(Supplied) installed, please remove battery isolation tab
before operation.
11
13
8
6
10
7
17
15
12
9
14
16
Battery Use and Safety
• Use only fresh batteries of the required size and recom
mended type.
• Do not mix old and new batteries, different types of
4
batteries (standard, alkaline, or rechargeable), or
rechargeable batteries of different capacities.
• If you do not plan to use the remote for an extended
period, remove the batteries. They can leak chemicals
5
that can destroy electronic parts.
WARNING: Dispose of old batteries promptly.
Do not burn or bury them.
To Install Batteries:
1. Open the battery compartment cover (located on the
back of the remote).
2. Place the AA batteries in the compartment and match
the + and – polarity symbols inside with the symbols on
the batteries.
3. Replace the cover.
Page 3
1
Select a device.
Turn the selected device on or off.
Program sequences.
3
Select the next or previous channel.
Select next or previous chapter on some
models of DVD players.
Press “LAST” to recall the last-viewed
5
channel.
Raise or lower the sound level.
Press “MUTE” to turn the sound off or on.
7
Move the cursor in the menu screens.
Press “SELECT” to choose the
highlighted menu option.
Skip backward, rewind, fast forward, skip
9
forward, stop, pause, or play tracks on
the current disc.
View the current channel and program
information (if available).
Display the Menu for the selected device.
11
Exit the selected devices menu, guide or
program without making a menu selection.
Display the program guide for the
13
selected device.
2
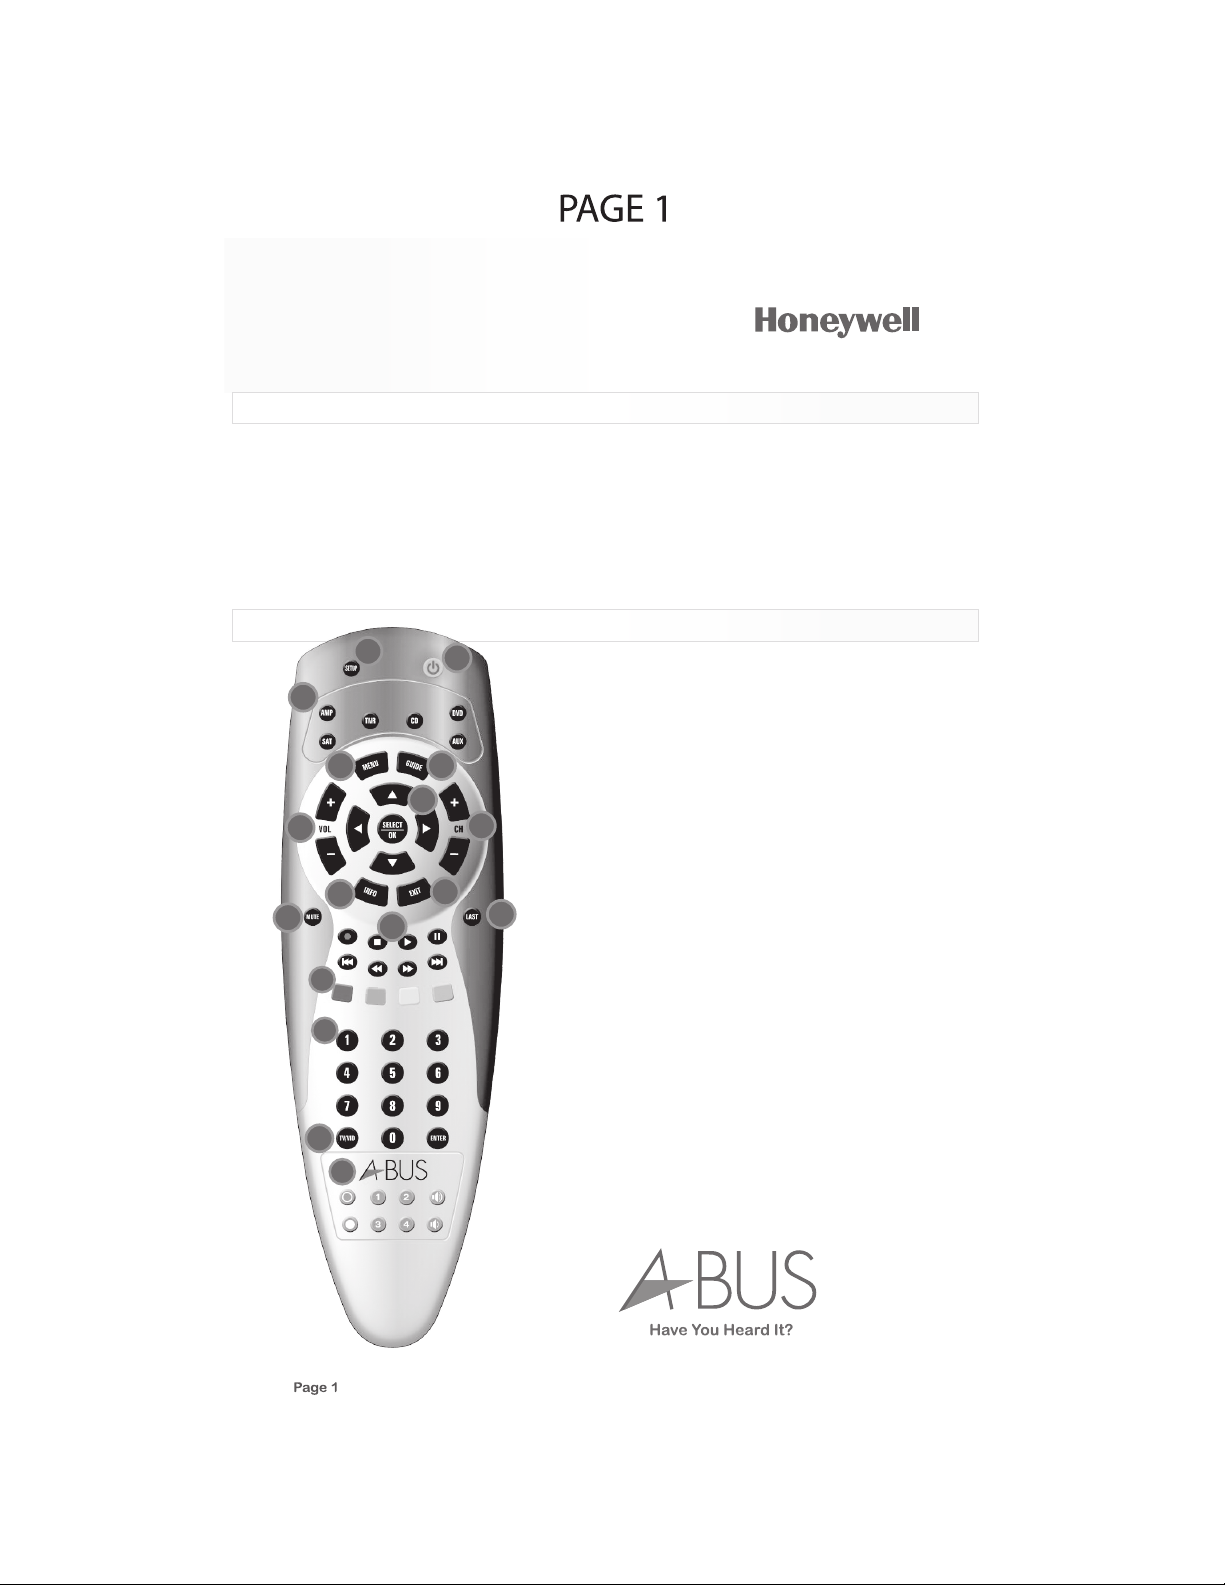
A Quick Look At The Controls
Switch the TV’s, VCR’s, SAT’s or DVD’s
14
input to view TV or video programs.
Directly enter channels (for example, 09
or 31). Press “ENTER” to send channel
15
number entries on some TV models.
Dedicated A-BUS section, “MUTE”, “ALL
16
OFF”, source selection “1”, “2”, “3” and
“4”, volume “UP” and “DOWN”.
In the CBL/SAT, VCR, or DVD modes, the
17
PVR/DVR Keys as follows:
o Press the “RED” button to instantly
replay the last 7 seconds of a program
R
you are watching (if the feature is
available).
o Press the “GREEN” button to switch
between live TV and video program-
G
ming (if the feature is available).
o Press the “YELLOW” button to open
Y
the PVR menu.
o Press the “BLUE” button to skip past
commercials or other uninteresting
B
scenes (if the feature is available).
o In the DVD or CD mode, press the
B
“BLUE” button to change discs.
o The A-BUS™ Universal Remote also
comes with the Australian Foxtel Digital
codes in it’s library which utilizes these
four buttons.
o Also available for easily identifiable
macro buttons.
Programming A Device
To control TV, VCR, DVD and CD players, Cable and Satellite Receivers, and Amp/Tuner, follow
these steps. Before proceeding, find the codes for the devices you wish to program in
“Manufacture’s Codes” on pages 7,8,9 & 10 of this manual and write them down in the section
below or highlight them for your reference.
NOTE : Any device may be set up on any mode key.
1. Turn on the device (for example, DVD player) and, if needed, load media (for example, a DVD).
2. Press a device key (AMP, SAT, TNR, CD, AUX or DVD).
3. Press and hold “SETUP” until the red LED blinks twice, then release.
4. Enter the first five digit code for your device. The LED blinks once as each digit is entered. If the
code is correct, the LED blinks twice.
NOTE: If the LED does not blink twice, repeat steps 2 to 4 and try entering the code again.
5. Aim the remote at the device and press Power. The device should turn off. If it does not, repeat
steps 3-5, trying each code for your brand until you find one that works. If you cannot find a
code that works, see “Searching for Your Code”.
6. Repeat steps 1 to 5 for the other devices you want to control. For future reference, write down
each working device code below:
_ _ _ _ _
_ _ _ _ _
_ _ _ _ _
CD Code:
AUX Code:
DVD Code:
_ _ _ _ _
_ _ _ _ _
_ _ _ _ _
Page 4

3
A-BUS
Universal Remote
Searching For Your Code
If your device does not respond to the remote after trying all codes listed for your brand, or if your
brand is not listed, try searching for your code:
1. Press a device key once.
2. Press and hold “SETUP” until the red LED blinks twice, then release.
3. Enter “991”. The LED blinks twice.
4. Enter the device group number:
Code Device Group
0 Cable (Cable Converters, Video Accessories, Satellite Receivers)
1 TV (TVs)
2 VCR (VCRs, DVD players)
3 Audio (Audio Amplifiers, Audio Amp/Tuners, CD players)
5. Select a test function, such as Power or Play. The remote sends IR codes from its library to the
selected device, starting with the most popular code first.
6. If the device responds, go to step 7. If the device does not respond press “CH+”. The remote will
try the next code. Continue until the device responds.
NOTE: Press “CH-” to try the previous code.
7. To set the code, press “SETUP” once. The LED blinks twice.
8. To search for other device codes, repeat steps 1 to 6.
Checking The Codes
If you have set up the remote using the procedure in “Searching for Your Code”, you may need to
find out which four-digit code is operating your equipment.
For example, to find out which code is assigned to your AMP:
1. Press AMP once.
2. Press and hold “SETUP” until the red LED blinks twice, then release.
3. Enter “990”. The LED blinks twice.
4. To view the code for the first digit, press “1” Count the LED blinks (for example, three blinks = 3),
and write down the number in the appropriate code listing at the bottom of page 2 under “Program
ming a Device”.
NOTE: If a code digit is 0, the LED does not blink.
5. Repeat step 4 for the three remaining digits, using 2 for the second digit, 3 for the third digit, 4 for
the fourth digit and 5 for the fifth digit.
6. To check for other device codes, repeat steps 1-5, substituting the device key for AMP
Changing The Volume Lock
The A-BUS™ Universal Remote comes preset to allow independent volume control of each
selected device (Global Volume Unlock). However, you may change the Volume Lock Setting to
Global Volume Lock so that one device’s volume will control volume in all other modes. After that,
you can perform independent operation or Global Volume Unlock to remove all volume locking.
Locking Volume Control to One Mode (Global Volume Lock)
1. Press and hold “SETUP” until the red LED blinks twice, then release.
Page 5

(cont...)
2. Enter “993” and then press the mode key for the device you want to control volume (for example,
AMP). The LED blinks twice. Now when you press “VOL+”, “VOL-” or “MUTE”, the selected
device (for example, AMP) will control the volume regardless of the current mode.
Unlocking All Volume Control (Restoring Global Unlock)
1. Press and hold “SETUP” until the red LED blinks twice, then release.
2. Enter “993” and then press “VOL+”. The LED blinks four times. Volume is independently
controlled for all programmed devices.
Unlocking a Single Device’s Volume Control
1. Press a device key (AMP, SAT, TNR, CD, AUX and DVD).
2. Press and hold “SETUP” until the red LED blinks twice, then release.
3. Enter “993” and then press “VOL-”, The LED blinks four times. Volume is independently
controlled for the selected devices.
Changing The Volume Lock
System Design
A macro can be used to control a home theatre operation, to set a favorite channel, or for other
multiple functions you would like to control with one key press. You can use any key to activate a
macro. Moreover, each Macro Key can hold up to 32 key presses.
You can program a macro that will operate regardless of what mode you are in, or one that will only
operate when you are in a specific mode.
NOTE: Programming a new macro over an existing one will erase the original macro.
Programming a Mode-Independent Macro:
1. Press and hold “SETUP” until the red LED blinks twice, then release.
2. Press “995”. The LED will blink twice.
3. Press the key you want to use to activate your macro (Power, any unused key, etc.).
4. Enter the series of commands you want the macro to execute (up to 32 commands).
5. Press and hold “SETUP” until the red LED blinks twice, then release.
Now, when you press the Macro key, the remote will send the series of commands you have
entered, regardless of what mode you are in. For example, you could program the Macro key to
turn on both your TV and cable box and select a particular channel.
To clear the macro, repeat steps 1-5 above, but do not enter a series of commands at step 4.
Programming a Mode-Dependent Macro:
1. Press a device key (AMP, SAT, TNR, CD, AUX and DVD).
2. Press and hold “SETUP” until the red LED blinks twice.
3. Press “978”. The LED will blink twice.
4. Press the key you want to use to activate your macro (Power, any unused key, etc.).
5. Enter the series of commands you want the macro to execute (up to 32 commands).
6. Press and hold “SETUP” until the red LED blinks twice, then release.
Now, when you press the Macro key, the remote will send the series of commands you have
entered, but only if you are in the mode you selected in step 1. For example, you could program the
Macro key to turn on both your TV and cable box and select a particular channel, but only if you are
in TV mode. If you are in DVD mode, this key will do nothing.
Page 6

A-BUS
Universal Remote
(cont...)
Clearing a Mode-Dependent Macro:
1. Press and hold “SETUP” until the red LED blinks twice, then release.
2. Press “978”.
3. Press the device key where you programmed the macro (AMP, SAT, TNR, CD, AUX and DVD).
4. Press the macro’s activation key.
5. Press and hold “SETUP” until the red LED blinks twice, then release.
System Design
Using Learning
The A-BUS™ Universal Remote includes a learning feature so you can add functions that are
unique to your home entertainment devices (e.g. VCR Tracking Up or Down).
However, there are some considerations:
Learning Precautions
• Your original remote controls must be in working order for Learning to work properly.
• Learned keys are mode specific, so each one can store a unique function for each mode.
• Learned keys can be used in macros (see Using Macros).
• Do not use the following keys for learning : Device Keys or SETUP Key.
• Learning capacity is approximately 16 to 25 keys, depending on the code being learned.
• Certain device codes are not learnable including multi-frequency types, some high frequency
ones, and other unusual formats.
• For optimum learning, avoid high levels of ambient light such as natural sunlight or energy-efficient
fluorescent lights.
NOTE: Please have your original remote controls handy before programming learning.
Programming a Learned Key
NOTE: If more than 10 seconds pass between key presses, the remote exits programming.
1. Press and hold “SETUP” until LED flashes twice.
2. Press “975”.
3. Press a device key once (i.e., AMP, SAT, TNR, CD, AUX and DVD) to assign a mode for learning.
4. Place the A-BUS™ Universal Remote head-to-head about 2” (5cm) apart from original remote control.
Also locate the key (on your original remote control) that will serve as the teaching function.
5. On the A-BUS™ Universal Remote, press a key where the learned function will be stored.
6. On the original remote, press and hold the key to be learned. The A-BUS™ Universal Remote’s
LED will turn off. Continue holding the key on the original remote until the A-BUS™ Universal
Remote’s LED blinks twice.
NOTE: If the LED displays one long blink, a learning error has occurred. Try repeating this step
again until a successful capture occurs. If the function is still not captured, press and hold “SETUP”
to exit programming and review the “Learning Precautions” above. If needed, also see “Troubleshooting”. After review, start programming again at step 1.
7. Repeat steps 2 through 6 for another device and/or key or press and hold “SETUP” to exit
programming.
Page 7

6
Using Learning
Deleting a Single Learning Key
1. Press and hold “SETUP” until the LED flashes twice.
NOTE: If more that 10 seconds pass between key
presses, the remote exits programming.
9
-/--
Pause
2. Press “976”.
2”
(5cm)
Tx Batt
3. Press the device key once (i.e., AMP, SAT, TNR, CD,
Play FF
Stop
AUX and DVD).
1 2 3
Rew
4 5 6
Eject
4. Press the key containing the learned function to be
deleted twice. The remote LED blinks twice.
5. Repeat steps 2 through 4 for another key or press
and hold “SETUP” to exit programming
Deleting All Learned Keys in a Specific Mode
1. Press and hold “SETUP” until the LED blinks twice.
NOTE: If more than 10 seconds pass between key presses, the remote exits programming.
2. Press “976”.
3. Press a device key twice (i.e., AMP, SAT, TNR, CD, AUX and DVD) to clear all the learned keys
for that mode. The LED blinks twice.
4. Repeat step 3 for another device key or press and hold “SETUP” to exit programming.
PROBLEM: LED does not blink when you press a key.
SOLUTION: Replace battery with two new AA alkaline batteries.
Vol
0
Ch
7 8
Power
Troubleshooting
PROBLEM: LED blinks when you press a key, but device does not respond.
SOLUTION: Make sure the remote is aimed at your device and is not more than 15 feet
(4.5m) away.
PROBLEM: LED blinks one long blink.
SOLUTION: An entry error has occurred (for example, wrong key). Try entry sequence again.
PROBLEM: Remote does not control devices or commands are not working properly.
SOLUTION: Try all listed codes for the device. Make sure the device operates with an infrared
remote control.
PROBLEM: “CH+”, “CH-”, and LAST do not work for your RCA TV.
SOLUTION: Due to RCA’s design from 1983 to 1987, only the original remote control will
operate these functions.
PROBLEM: No volume on a device.
SOLUTION: See “Changing Volume Lock”
PROBLEM: Channels do not change properly.
SOLUTION: If the original remote control required you to press Enter to change channel, press
Enter on this remote after entering the channel number.
Page 8

7
Manufacturer’s Codes
Audio Ampli fiers
Accup hase 3 0382
Acuru s 3076 5
Adcom 31100, 30577
Aiwa 30406
Audio Source 30011
Bel C anto D esign 3158 3
Bose 30674
Carve r 3026 9
Class e 3146 1, 31 462
Curti s Math es 30 300
Denon 30160
Durab rand 3 1561
GE 30 078
Harma n/Kard on 30 892
JVC 3 0331
Kenwo od 303 56
Korsu n 3148 3
Left Coast 30892
Lenox x 3156 1
Linn 30269
Logit ech 31 408
Luxma n 3016 5
Magna vox 30 269
Maran tz 30892 , 30321 ,
30269
Mark Levins on 31 483
Nakam ichi 3 0321
NEC 3 0264
Optim us 303 95, 3 0300
Panas onic 3 0521, 3030 8
Paras ound 3 0246
Phili ps 308 92, 3 0269
Pione er 300 13, 3 0300
Polk Audio 3089 2,
30269
PS Audi o 3152 3
RCA 303 00
Reali stic 3 0395
Sansu i 3032 1
Shure 30264
Sony 3 0689, 30220 ,
30815
Sound esign 30078 ,
30211
Technics 3 0521, 3030 8
Victor 3033 1
Wards 30078 , 3 0211,
30013
Yamaha 3035 4, 3014 3,
30133 , 3050 4
YBA 315 02
Audio Amp/Tune rs
ADC 3 0531
Adcom 3 1616, 3 0616,
31617
Aiwa 31405 , 30 158,
30189 , 31243, 310 89,
31388 , 30121, 304 05,
31321 , 3164 1, 31 347
Akai 3 0224, 30076 ,
31512 , 3125 5
Alco 31390
Amphi on Medi a Works
31615 , 3156 3
AMW 3 1563, 31615
Anam 3 1609, 31074 ,
30281
Apex Di gital 31 430,
31257
Arcam 31120
Audio phase 31387
Audio tronic 31189
Audio vox 31 390, 31627
AVLight 30158
Bel C anto D esign 3158 4
Bose 3 1229, 31253 ,
30639
Brix 31602
Cambr idge Sou ndwork s
31477 , 3137 0
Capet ronic 30531
Carver 31189, 30189,
30042, 31089, 30008,
30360
Casio 30195
Clari nette 30195
Class ic 313 52
Coby 31 513, 31 389,
31263
Compa q 31136
Crite rion 3 1420
Curti s 3159 6
Curti s Math es 30 080
Page 7
Daewo o 3125 0
Dell 31383
Denon 31360 , 3000 4,
31104, 30771, 31311,
30273 , 31142, 30301
Dynam ic Bas s 303 60
Emers on 304 24, 3 0255
Fishe r 3 1409, 30360 ,
30219 , 3180 1, 30 042
Fonmi x 3136 0
Fosga te 314 87
Garra rd 3 0424, 3028 1,
30463 , 3014 6, 30 440
Gatew ay 315 17, 3 1567
GE 31 379
Glory Horse 3126 3
Go Vid eo 31 532
GoldS tar 30 281
GPX 3 1299
Hafle r 3014 6
Harma n/Kard on 30110,
30189 , 3089 1
Hewle tt Pac kard 31181
Hitac hi 318 01, 3 1273
Initi al 314 26
Inkel 30 027, 30062 ,
30502 , 3049 1
Integ ra 301 35, 3 1298
JBL 30110, 3 1306,
30281
JVC 30074, 31282,
31263 , 3149 5, 31 374
Kansa i 3044 0
Kenwo od 31313 , 3 1570,
31569 , 30027, 310 51,
30077 , 30313, 310 27,
30042 , 30239, 305 69,
31052 , 3018 6, 30 314
KLH 3 1412, 31390,
31428
Koss 30424, 3025 5,
31366
Lason ic 317 98, 3 1510
Lenox x 3143 7
Lexic on 310 76
Linn 30189
Liqui d Vide o 3149 7
Lloyd 's 301 95
LXI 3 0181
Magna vox 31189,
31269 , 30189, 301 28,
30391 , 30195, 310 89,
31514 , 3053 1
Maran tz 31189, 31269 ,
30039 , 30189, 310 89,
31289 , 3020 0, 30 128
MCS 3 0039, 30346
Memor ex 315 96
Mitsu bishi 31393
Modul aire 3 0195
Music magic 31089
NAD 3 0320
Nakam ichi 30347 ,
30097 , 3155 5
NEC 3 0235
Norce nt 313 89
Onkyo 3013 5, 31 298,
30842 , 3038 0, 31 531
Optim us 31 023, 30801 ,
31074 , 30080, 301 86,
30531 , 30797, 300 42,
30181 , 30440, 307 38,
30849 , 30177, 302 19,
30670
Oritr on 314 97, 3 1366
Panas onic 31518 ,
30039 , 31548, 317 64,
30518 , 31350, 317 63,
30367 , 3131 6,
31509 , 31633, 303 09,
31288 , 3136 3
Penne y 3019 5
Philc o 3139 0
Philips 31189, 31269,
30189, 31365, 31089,
31266, 31283, 30891,
31368, 30391, 31120,
31268
Pione er 3 1023, 3015 0,
30630 , 31184, 300 80,
30531 , 31084, 313 84,
30244 , 3134 3
Polar oid 31 508
Polk Audio 3018 9,
31289
Prosc an 312 54
Qishe ng 316 09, 3 1390
Quasa r 3003 9
Radio Shack 31263
RCA 31023, 31609,
31254 , 30346, 305 31,
31154, 31511, 300 80,
30530 , 31074, 313 90,
30054 , 3036 0
Reali stic 30 195, 30 181,
30163
Regen t 3143 7
Rio 3 1869, 31383
Saba 31519
Samsu ng 315 00, 3 1295
Sansu i 30189, 303 46,
30193 , 3108 9
Sanyo 308 01, 30360,
31469 , 3021 9, 31 251
Scott 30163 , 303 22
Sharp 31286, 30 186,
31386 , 3136 1
Sharp er Ima ge 31 545,
31556 , 30797, 314 09,
31416 , 31549, 313 85,
31411, 315 46, 317 23,
31263 , 3141 0
Sherwood 30491, 31423,
30062, 31077, 30502, 31653
Shinc o 3139 0
Shins onic 3 1426
Silso nic 30 176, 31426
Sonic 30281
Sonic Bl ue 3 1383,
31869 , 3153 2
Sony 3 1058, 31441 ,
31258 , 31759, 301 58,
31442 , 31529, 317 58,
31371 , 31503, 310 42,
31658 , 31158, 318 58,
31367 , 31406, 314 58,
30168 , 31558 , 31131,
31349 , 3138 2
Sound esign 30670
Stere ophoni cs 31 023
Sunfi re 3 1313, 303 14,
30313 , 3105 2
Tae Kwang 30440
Teac 30163, 31267,
31074, 31528, 30463,
31390
Technics 3130 8, 31518,
30039 , 30518, 303 09,
31309 , 3020 8
Techwood 3 0281
Thore ns 31189
Venture r 3139 0, 30 849
Victor 3007 4
Wards 30158, 30189,
30080 , 3005 4
Yamaha 3017 6, 3008 1,
31176, 313 75, 301 86,
31331 , 3127 6
Yorx 3019 5
Zenit h 3 1293, 30857 ,
30281 , 3186 9
Cable Converte rs
ABC 000 03, 0000 8,
00014 , 00001, 000 07,
00013 , 00011, 00017
Alleg ro 003 15, 0 0153
Ameri cast 0 0899
Antro nix 00 207, 00022
Arche r 00797 , 0020 7,
00153 , 0002 2
Belco r 0005 6
Bell & Howe ll 00 014
Bell South 00899
Cable Star 00056
Cable tenna 00022
Cable view 0 0022
Centu ry 001 53
Citiz en 003 15, 0 0153
Clear master 0088 3
Clear Max 00 883
Colou r Voice 0002 5,
00031
Comtr onics 00040
Conte c 0001 9
Coolm ax 008 83
Daery ung 01 877, 00877 ,
00477 , 0000 8
Digi 00637
Direc tor 00 476
Dumon t 0063 7
Easte rn 000 02
Emers on 007 97
Everq uest 0 0040, 0001 5
Focus 00400
Funai 00019
Garra rd 001 53
GC Elec troni cs 0020 7,
00056
Gehua 00476
Gemin i 0079 7, 00 015
Gener al Instrum ent
00476 , 00810, 002 76,
00003 , 00014 , 00011,
00015
Globa l 0132 7
GMI 0 0015, 00797
GoldS tar 00 144, 00040
Goodm ind 00 797
Hamli n 00009, 00273 ,
00034 , 0002 0, 00 259
Hitac hi 000 14, 0 0011
Hytex 00007
Jasco 00015, 00315 ,
00153
Jebse e 0040 0
Jerro ld 00476, 0 0810,
00276 , 00003, 000 12,
00014 , 00011, 00015
Leon 00015
LG 00 144, 0 0040
Linsa y 0044 0
Magna vox 00 027
Memor ex 000 00
Motorola 00476, 00810,
00276, 01254, 01106,
01376
Movie Time 001 56,
00063
MS 00 015
Multi Vision 00012
Novap lex 00 618
NSC 0 0063, 00156
Oak 0 0019, 00007
Optim us 000 21
Pace 01877, 0023 7
Panas onic 00000 ,
00008 , 00107, 000 40,
00021
Panth er 006 37
Parag on 000 00
Phili ps 0031 7, 0002 7,
00025 , 00153, 000 13,
00031 , 0130 5
Pione er 0 1877, 0087 7,
00144 , 0053 3, 01 021
Popul ar Mech anics
00400
Pulsa r 0000 0
Quasa r 0000 0
Radio Shack 00015,
00883 , 0079 7, 00 315
RCA 000 21
Reali stic 0 0207
Recot on 004 00
Regal 00279, 00273 ,
00259 , 0002 0
Regen cy 000 02
Rembr andt 0 0011
Runco 00000
Samsu ng 0 0000, 001 44,
00040
Scientific Atlanta 01877,
00877, 00477, 00008,
00017
Seam 00510
Signa l 0004 0, 00 015
Signa ture 0 0011
SL Marx 0004 0
Sony 01006
Spruc er 000 21
Starc om 00 003, 00014 ,
00015
Starg ate 000 15, 00 797,
00040
Starq uest 0 0015
Super cable 00276
Super max 00 883
Sylva nia 00 001
Tandy 0025 8
Teleview 0 0040
Texscan 00 001
TFC 0 0310
Timeles s 000 40
Tocom 0001 2, 00 013
Torx 00003
Toshiba 00 000
Trans PX 00276 , 0 0153,
00315
Tristar 0088 3
TS 00 003
Tusa 00 015
TV86 00063
Unika 00207 , 001 53,
00022
Unite d Artist s 000 07
Unive rsal 0015 3, 0 0056,
00207 , 0002 2, 00 191
V2 00 883
Viewma ster 00883
Viewst ar 0006 3, 0002 7,
00258
Vision 0088 3
Vortex View 0 0883
Zenit h 0 0000, 00525 ,
00899
Zente k 0040 0
CD Pl ayers
ADC 3 0018
Adcom 30155 , 302 34
Aiwa 30157 , 30 124,
30012
Akai 30156
Audio Alchemy 3019 4
Audio -Technica 30170
BSR 3 0245, 30194
Burme ster 3 0420
Calif ornia Aud io Labs
30029 , 3030 3
Carre ra 301 94
Carve r 30157, 30437,
30179
Class ic 312 97
Crown 30122
DAK 3 0245
DBX 3 0254
Denon 30873 , 300 03
DKK 3 0000
DMX E lectro nics 30157
Dynam ic Bas s 301 79
Emers on 30305, 30164,
30155 , 3046 9
Fishe r 3 0179, 30174 ,
31325 , 3008 8, 30 342
Garra rd 3 0245, 3042 0,
30393 , 3028 0, 30 425
GE 30 009
Gemin i 3062 5
Genex xa 30032, 30305,
30164
GoldS tar 30 417
GPX 3 1296
Harma n/Kard on 30157,
30173 , 3120 2, 30 426
Hitac hi 300 32, 3 0155
Inkel 30 196, 30180 ,
30437
Integ ra 301 01
JVC 30072, 31294,
30655
Kenwo od 30681 , 3 0826,
30626 , 30028, 300 37,
30036 , 3019 0
KLH 3 1318
Kodak 30287
Korsu n 3148 4
Koss 31317
Krell 30157
Kyoce ra 300 18
LG 31 208
Linn 30157
Luxma n 3009 3
LXI 3 0305
Magna vox 30 157, 30305
Maran tz 30626 , 30029 ,
30157 , 3018 0
Mark Levins on 31 484
McInt osh 30 287
MCS 3 0029, 30043
Miro 30000
Missi on 301 57
MTC 3 0420, 30625
Nakam ichi 3 0147
NEC 3 0043, 30234
Nikko 301 74, 3 0170,
30164 , 3062 5
NSM 3 0157
Onkyo 30868 , 301 01
Optimus 31063, 30000,
Page 9

8
(cont...)
30032, 30037, 30342,
30437, 31075, 30145,
30194, 30305, 30426,
30087, 30179, 30280,
30420, 30468, 30175,
30196
Panas onic 30029 ,
30752 , 3030 3
Parasound 30420, 30194
Phili ps 3062 6, 3015 7,
30287
Pioneer 31063, 31062,
30032, 30305, 30468,
31087
Polk Au dio 30 157
Proto n 3015 7
QED 3 0157
Quad 30157
Quasa r 3002 9
Radio Shack 31075
RCA 31062, 30032,
30305 , 30764, 301 79,
30468 , 30009, 301 55,
30420 , 3005 3
Realistic 30164, 30180,
30155, 30179, 30175,
30420
Rotel 30157 , 304 20
SAE 3 0157
Sansu i 30157, 303 05,
30202
Sanyo 30179 , 300 87
SAST 3 0157
Scott 30305, 30164 ,
30155
Sears 30305
Sharp 30861, 30 037,
30180
Sherw ood 3106 7,
30196 , 3018 0, 30 426
Shure 30043
Silso nic 30 888, 30036
Sonic Front iers 30157
Sony 3 0490, 30000 ,
31364 , 30185, 306 05,
30100 , 3060 4
Soundesign 30425, 30145
STS 3 0018
Symph onic 3 0305
TAG McLa ren 3 0157
Tascam 304 20
TDK 3 1208
Teac 30 393, 3018 0,
30174 , 3042 0
Technics 3002 9, 30207,
30303
Tivoli Au dio 3 1553
Vector Researc h 3019 4,
30417
Victor 3007 2
Wards 3 0157, 3005 3
Yamaha 3088 8, 3003 6,
30187 , 3017 0, 31 292
YBA 306 25
Yorx 3046 1
Zonda 30157
DVD P layers
Adcom 21094
Adven t 2101 6
Aiwa 20641, 2191 2
Akai 2 0899, 20770 ,
21975 , 2108 9
Alleg ro 208 69
Amphi on Medi a Works
22016 , 2200 1
AMW 20872 , 22016,
22001 , 21176
Anam 21913
Apex Di gital 20 672,
20717 , 20797, 210 20,
21100, 207 96, 210 04,
21061 , 21937, 207 94,
20830 , 21056, 219 15,
20755
Aspir e Digi tal 2 1168
Audio logic 20736
Audio vox 21071, 21122,
21041 , 21121, 21072
Axion 21071 , 210 72
B & K 20662 , 206 55
Bel C anto D esign 2157 1
Blaup unkt 2 0717
Blue Parade 2057 1
Broks onic 2 0868, 2069 5
Cambr idge Sou ndwork s
21916
CAVS 210 57
Chang hong 2 0627,
21061
CineVision 20876, 20869
Class ic 219 17
Coby 20778, 21107,
21086, 21923, 20852,
21165
Crite rion 2 2007
Curti s Math es 21 087
CyberHome 21023, 21129,
20816, 21117, 21024
Daewoo 20784, 20869,
20833, 21918, 21172,
20705
Denon 20490 , 206 34
Dual 21085, 2106 8
DVD20 00 205 21
Emers on 20591, 20675,
20821
Enter prise 20591
Fishe r 2067 0, 21 919
Funai 20675
Gatew ay 21077, 21073,
21158
GE 20522, 20815,
20717
Go Video 2074 4, 2 0869,
21099 , 21970, 207 15,
20833 , 21075, 217 30,
20783 , 2104 4, 2114
GPX 2 0699, 20769
Green hill 2 0717
Harma n/Kard on 20582,
20702
Hitac hi 20573, 2 0664,
21919
Hitek er 206 72
Initi al 207 17, 2 1931
Integ ra 206 27, 2 1924
Jamo 22003
Jaton 21078
JBL 219 26, 2 0702
Jense n 2101 6
JVC 20558, 20623,
21940 , 2190 1, 20 867
jWin 21051, 2104 9
Kenwo od 20490 , 2 0534,
21063 , 2068 2
KLH 2 0717, 21939,
21149, 2 1020
Konka 207 20, 20719,
20711, 2 0721
Koss 20651
Lande l 2082 6
Lason ic 207 98, 2 1173
Lenox x 2193 8
LG 20 801, 2 0101
Liqui d Vide o 2198 0
Lite- On 21158 , 2105 8
Loewe 20511
Magna vox 205 03,
20675 , 21976, 219 14,
20821
Malat a 21159, 20782
Maran tz 205 39
Memor ex 206 95
Micro soft 2 0522
Minte k 2083 9, 20 717
Mitsu bishi 21521 , 205 21
Momit su 210 82
NEC 2 0785
Nesa 20717
Next Base 2 0826
Niro 22024
Norce nt 21 003, 2 0872,
21923 , 21107
Onkyo 2050 3, 20 627,
21924 , 2079 2, 21 985
Oritr on 206 51, 2 1980
Panas onic 20490 ,
21462 , 21907, 219 10,
21990 , 21362, 217 62,
21909 , 21986, 206 32,
21490 , 21908, 219 25,
22017
Philc o 2200 0
Philips 20503, 20539,
20646, 20885, 20854,
21914
Pioneer 20525, 20571,
20638, 20632, 20631,
21902
Polar oid 21086 , 21061,
21998 , 2120 0
Polk Au dio 20 539
Portl and 20 770
Prima 21016
Princ eton 2 0674
Prosc an 205 22
ProVis ion 2 0778
Qwest ar 206 51
RCA 20522, 20571,
20717 , 20822 , 21193,
21974 , 21132, 219 65,
21022 , 2191 3
Regen t 2193 8
Rio 2 0869
Rotel 20623
Rowa 20823
Saba 21977
Sampo 20752 , 206 98
Samsu ng 2 0490, 205 73,
20820 , 21932, 210 75,
20899 , 2197 9
Sansu i 2069 5
Sanyo 206 95, 20670,
21967 , 2087 3
Sharp 20630 , 207 52
Sharp er Ima ge 21 995,
21117
Sherw ood 2104 3,
20770 , 2063 3, 21 077
Shinc o 2071 7
Shins onic 20 533, 20 839,
21931
Sigma Desig ns 20 674
Sonic Bl ue 20869,
21970 , 2109 9
Sony 2 0533, 21533 ,
20864 , 21033, 219 04,
22020 , 21903, 219 81,
20772 , 2193 4
Sunga le 210 74
Super scan 2 0821
SVA 20717 , 20 860,
21105
Sylva nia 20 821, 20675
Symph onic 2 0675
Teac 21984 , 208 09
Technics 2 0490
Technosoni c 207 30
Techwood 2 0692
Terapin 21 031
Theta Digit al 20 571
Tivo 21 996
Toshiba 2050 3, 21154,
22006 , 21045, 219 96,
20695 , 2198 8
Tredex 208 03, 20800 ,
20799 , 2080 4
TYT 20 705
Urban Conce pts 2 0503
US Lo gic 20 839
V Inc . 2122 6, 21 064
Vocopro 21027
Xbox 20522
Xwave 21001
Yamaha 2049 0, 2053 9,
20545
Zenit h 2 0503, 20591 ,
21906 , 2086 9, 22 002
Satel lite Rece ivers
Alpha Star 0 0772
Chapa rral 0 0216
Cross digita l 01109
Direc TV 00392 , 00566 ,
00639 , 01639 , 01142,
00247 , 00749, 017 49,
00724 , 00819, 018 56,
01076 , 01109, 000 99,
01444 , 01108, 013 92,
01443 , 01640, 014 42,
01414
Dish Network Syst em
01005 , 00775, 017 75,
01505 , 01170
Dishp ro 0 1005, 0077 5,
01505 , 0177 5
Echos tar 01005, 00775,
01170, 0 1775, 01505
Expre ssvu 0 0775, 0177 5
Foxte l 008 79, 0 1356
Funai 00338
GE 00 566
Gener al Instrum ent
00869
Manufacturer’s Codes
GOI 0 0775, 01775
Goodm ans 01 246
Hisen se 015 35
Hitachi 00819, 01250,
00214, 00491, 00489,
00201
HTS 0 0775, 01775
Hughe s Ne twork
Syste ms 01142, 0074 9,
01749 , 01443, 014 42,
01444
I-Lo 01535
JVC 00775, 01170 ,
00492 , 0177 5
LG 01 414, 0 1226
Magna vox 00 724, 00722
Matsu shita 00340 ,
00214 , 0050 0
Memor ex 007 24
Mitsu bishi 00749 , 004 91
Motor ola 00 869
NEC 0 0496, 01270
Next Level 00869
Panas onic 00247 ,
00701 , 00214, 005 00,
00340
Paysa t 0072 4
Phili ps 01142, 0074 9,
01749 , 00724, 010 76,
00722 , 0009 9, 01 442
Prosc an 003 92, 0 0566
Proto n 0153 5
Radio Shack 00869
RCA 00392, 00566,
00855 , 0014 3, 01 392
Samsu ng 01276 , 01109,
01108
Sanyo 00493 , 012 19
Sharp 00494
SKY 00 856
Sony 0 0639, 01639 ,
00294 , 0164 0, 00 163
Star Choice 0086 9
Tivo 01142, 01444,
01443 , 0144 2
Toshiba 00749, 017 49,
00790 , 0048 6, 01 285
Ultim ateTV 01392,
01640
Unide n 0072 4, 00 722
US Di gital 01535
USDTV 01535
Victor 0049 2
Voom 00 869
Zenit h 0085 6, 01 856
TVs
888 1 0264
A-Mar k 1000 3
Abex 10032
Addis on 11150, 10653 ,
10092
Admir al 100 93, 1 0463
Advent 10761, 10817,
10815, 11933, 10783,
10842
Adven tura 1 0046
Aiko 10092
Aiwa 11914, 1191 0
Akai 10812, 10702, 10030,
10672, 11903, 10264
Alaro n 1017 9
Albat ron 10 843, 10700
Ambas sador 10177
Ameri ca Actio n 101 80
Ampro 10751
Anam 10250, 10180,
10003, 10700, 10161,
10628
Anam Nationa l 10 250,
10161 , 1005 5, 10 650
Anhua 10051
AOC 10451, 10 093,
10180 , 10060, 100 30,
10178 , 10019, 101 85,
11150, 1001 8, 100 52,
10474 , 10003, 100 92,
10179
Aolin pike 1 0264
Apex Digital 10748, 10765,
10767, 11943, 10879
Arche r 1000 3
Audio vox 10451, 1018 0,
10875 , 11952, 108 02,
11951, 1 0092, 10623 ,
11937, 1 0003
Axion 11937
Baihe 10264
Baile 10001 , 103 91
Baohu ashi 1 0264
Baosh eng 10 817
Beiji ng 10812 , 10391,
10264 , 1081 7, 10 001
Belco r 1001 9
Bell & H owell 10 154,
10016
BenQ 11032
Bradf ord 10 180
Brock wood 1 0019
Broks onic 10236 ,
10463 , 11911, 11938,
10003 , 11905, 11935,
11929
Caiho ng 108 17
Caili ng 107 48
Candl e 1 0030, 10046 ,
10186 , 1005 6
Carni vale 1 0030
Carve r 1005 4, 10 170
Celeb rity 1 0000
Celer a 1076 5
Changcheng 10051,
10817, 10001, 10391,
10264
Chang fei 10 817
Chang feng 10817,
10264
Chang hai 10 817
Chang hong 1 0156,
10765 , 10817, 102 64,
10783 , 1076 7, 11910
Cheng du 108 17
Ching Tai 100 03, 10474 ,
10179 , 1009 2
Chun Yun 10 000, 1 0180,
10161 , 1047 4, 11150,
10092 , 10843, 100 03,
10179 , 1070 0
Chunf eng 10 264
Chung Hsin 10180, 10053,
11150, 10036, 10474
Chuns un 108 17
Cinem a 1067 2
Citiz en 10060, 1 0030,
10039 , 10280, 100 56,
10186 , 10046, 100 92,
11928
Clair tone 1 0185
Clari on 101 80
Colt 11906
Conce rto 10 056
Conro wa 10156, 10145,
10264
Conte c 1 0180, 10157 ,
10185
Craig 10180 , 101 61
Crosl ey 100 54
Crown 10180 , 100 39
Curtis Mathes 10047,
10054, 10154, 10451,
10093, 10060, 10702,
10030, 10145, 10166,
10466, 11347, 10039,
10056, 11147, 10016,
11919
CXC 1 0180
Daewo o 1 0154, 10 451,
10180 , 10030, 101 78,
11661, 104 74, 100 03,
10628 , 1003 2, 11150,
10092 , 11928, 106 27,
10700 , 1005 6, 11909 ,
10170 , 10391, 106 23,
10019 , 1067 2, 10 039
Daytr on 100 19
Dayu 10391
Dell 11080
Denon 10145 , 105 11
Dumon t 1001 7, 10 019
Durab rand 1 0463,
10180 , 10178, 101 71,
11034, 1 0003
Dwin 10774, 1072 0
ECE 1 0037
Elect roband 10000 ,
10185
Elect rohome 1038 1
Elekt ra 100 17, 1166 1
Page 8
Page 10

9
(cont...)
Emers on 10154, 10236,
10463 , 10180, 101 78,
10171 , 10280, 106 23,
10038 , 11911, 11944,
10179 , 10019 , 11909,
11929, 101 85, 102 82,
11905, 10039, 11928,
10177
Envis ion 10 030, 10813
Epson 10833 , 108 40
Ether 1 0030, 101 61,
10003
Feilu 10817
Feiya n 1026 4
Feiyu e 1081 7
First ar 102 36
Fishe r 1015 4, 10 159
Fortr ess 10 093
Fujit su 1018 6, 1085 3,
10179 , 1080 9, 10 683
Funai 10180, 10171,
10264, 11904, 10179,
10342
Furi 1014 5, 10817,
10264
Futur etech 10180
Ganxi n 1081 7
Gatew ay 11756 , 11755
GE 11447, 10047,
11454, 100 51, 104 51,
10180 , 10030, 101 78,
10092 , 11147, 11919,
10055 , 10027 , 11917,
10135 , 10282 , 11347,
10021 , 11907, 11922
Gener al 101 86
Gibra lter 100 17, 1003 0,
10019
Ginta i 11150, 10 474
Go Vid eo 10 886
GoldStar 10154, 10030,
10178, 11926, 10019,
10037, 11910, 10001,
10032, 10056, 11150,
10039
Goodm ans 10 360
Grunp y 1018 0, 10 179
Haier 11034, 10768
Haiya n 1026 4, 10 817
Hallm ark 10 178
Hankook 10180, 10030,
10178, 10019, 10056,
10628
Harle y Davidson 11904,
10179
Harma n/Kard on 10 054
Harva rd 101 80
Haver my 100 93
Hello Kitty 1045 1
Himit su 101 80, 1 0628
Hisen se 10156 , 10748 ,
10145
Hitac hi 11256, 101 56,
10030 , 1017 8, 11145,
10145 , 10038 , 11245,
10092 , 10027, 103 81,
10036 , 11150, 100 56,
11904, 101 51, 101 65,
10019 , 10186, 100 32,
10039 , 10157, 100 16,
10179 , 1047 4
Hongm ei 10093, 11910 ,
10817 , 1026 4
Hongy an 108 17, 1 0264
Hua Tun 11150
Huafa 10145
Huang he 108 17
Huang shan 1026 4,
10817
Huany u 11910, 108 17,
10264
Huaqi ang 10 264
Huari 10145 , 102 64
Huoda teji 1 0051
Hyund ai 108 49
Imper ial Crow n 1 0001,
10391 , 1026 4
Infin ity 10 054
Inteq 10017
Janei l 1004 6
JBL 100 54
JCB 1 0000
Jean 10156 , 10 051,
10236 , 10092, 101 79,
10003 , 1047 4
Page 9
Jense n 107 61, 10815,
11933, 1 0817
Jiahu a 1005 1
Jiali cai 10 264
Jinfe ng 100 51, 1 0817
Jinha i 11910
Jinqu e 1081 7, 10 264
Jinta 10264 , 11910
Jinxing 10054, 10156,
10145, 10264, 10037,
10817
Juhua 10817 , 102 64
JVC 10053, 10160, 11923,
11253, 10036, 10653
Kaige 10264 , 108 17
Kangc hong 119 10
Kangl i 1 0001, 10817 ,
10391 , 1026 4
Kangy i 1026 4
Kaypa ni 100 52
KEC 1 0180
Kenwo od 100 30, 1 0019
KLH 1 0765, 10767
KLL 100 37
Kloss 10046 , 100 24
Kolin 10180 , 100 53,
11150, 1003 6, 10 474
Kongq ue 102 64, 1 0817
Konka 106 32, 10707,
11940, 106 28, 107 03,
11939, 1 0638, 10817
KTV 1 0180, 10030,
10185 , 1003 9, 10 280
Kuail e 1026 4
Kunlu n 10051, 10817 ,
10264
LG 10060, 10030,
10178 , 10056, 104 42,
10856 , 10001, 100 38,
10700 , 10019, 100 37,
10474 , 11178, 100 03,
10032 , 1000 6
Lihua 10817
Lloyd 's 11904
Loewe 10136
Logik 10016
Longj iang 1 0264, 1081 7
Luxma n 1005 6
LXI 10047, 1 0054,
10154 , 1015 6, 10 178
Magna sonic 11928,
11913
Magna vox 11454,
10054 , 10030, 107 06,
11904, 10020, 11944,
10036 , 10179, 103 86,
11931, 100 96, 101 87,
11254, 1191 3, 100 24,
10186
Magni n 11907
Majes tic 10 016
Marantz 10054, 10030,
10854, 10704, 11154,
10855
Marum an 106 27, 1 0391
Matsu shita 10250 ,
10650 , 1016 1
Megap ower 1 0700
Megat ron 10178, 101 45,
10003
MEI 1 0185
Meile 10264, 11910,
10817
Memor ex 10154 , 1 0463,
10150 , 10178, 101 79,
11920, 1192 7, 100 16,
11911, 11926, 11924
Merma id 100 37
MGA 101 50, 10030,
10178 , 11907, 10019
Midland 10047, 10017,
10051, 10039, 10135,
10032
Minut z 1002 1
Mitsu bishi 1 0154,
10250 , 10093, 102 36,
10180 , 11250, 101 50,
10030 , 10178, 103 81,
10836 , 10036, 101 79,
10817 , 11150, 104 74,
10019 ,
10868 , 1005 6, 11917
Moniv ision 1 0843,
10700
Motor ola 10 093, 10055
MTC 10060, 10 030,
10185 , 1001 9, 10 056
Mudan 10051, 108 17,
10264
Multi tech 1 0180
NAD 10156 , 10178,
10866
Nanba o 11910, 10264
Nansh eng 10 817, 10264
Natio nal 10 051
NEC 10154 , 10156,
10051 , 10053, 100 30,
10178 , 1004 6, 11150,
10056 , 10165, 101 86,
10474 , 10036, 108 82,
10381 , 10817 , 11704,
10170 , 10264, 100 19,
10497
Newav e 10093 , 10178 ,
11150, 1009 2, 10 161
Nikko 100 30, 1 0178,
10092
Nikon 11910
Norce nt 107 48, 1 0824
Noshi 10018
NTC 1 0092
Onkin g 1028 0
Onwa 10180
Optim us 10 154, 10250 ,
10166 , 11924, 11913,
10650 , 11927
Optom a 1088 7
Opton ica 10 093, 10165
Orion 10 236, 10463 ,
11911, 11905, 101 79,
11463, 1192 9
Panas onic 10054 ,
10250 , 10051, 101 61,
11410, 11927, 11947 ,
10037 , 10055, 106 50,
11924, 11946, 11919 ,
11941
Panda 1005 1, 10 706,
10817 , 1026 4, 11910
Penney 10047, 10156,
10051, 10060, 10030,
10178, 10135, 11347,
11926, 10018, 10027,
10039, 11919, 10003,
10021, 10032, 11907,
10019
Philc o 10054, 1018 0,
10030 , 10178, 106 28,
10474 , 10020, 100 37,
10096 , 10186, 107 74,
10019 , 1003 2, 10 056
Phili ps 11454, 1005 4,
10000 , 10051, 100 30,
10178 , 10474, 100 19,
11154, 1009 2, 101 87,
10774 , 10024, 100 37,
10056 , 10186, 106 90,
10020 , 1003 2
Pilot 10030, 10019 ,
10039
Pione er 1 0166, 1003 8,
10866 , 1067 9
Portl and 1 0092, 10039 ,
10019
Prima 10761, 10815 ,
10783 , 11933, 10817
Princ eton 1 0717, 1070 0
Prism 10051
Prosc an 11447, 10 047,
11347, 1192 2
Proto n 10030 , 1017 8,
10001 , 10039, 104 66,
10003 , 1005 2, 10 474
Pulsa r 1001 7, 10 019
Qingd ao 100 51, 10 817,
10264
Quasa r 1025 0, 10 051,
11924, 10165, 11919,
10055 , 1065 0
Radio Shack 10 047,
10154 , 10180, 100 30,
10178 , 10032, 100 56,
11920, 10165, 11904,
10019 , 1003 9
RCA 11447, 1 0047,
11454, 100 00, 100 30,
10178 , 10679 , 11247,
11917, 10090, 11948,
11147, 100 19, 11907,
11922, 1 0135, 11958,
Manufacturer’s Codes
11047, 1134 7, 100 18,
11547, 10038, 11919,
10092 , 11953
Reali stic 10 154, 10 180,
10030 , 10178, 100 56,
10019 , 10039, 101 65,
10032
Rhaps ody 10 185
Rowa 10748, 1003 7,
10817
Runco 1001 7, 10 030,
10603 , 1049 7
Ruyi 10817
Saige 10817
Sampo 10 154, 10093 ,
10030 , 10178, 101 71,
10032 , 10052, 104 74,
11755, 100 39, 107 00,
10036 , 1009 2, 10 650
Samsu ng 1 0154, 101 56,
10060 , 10812, 107 02,
10030 , 10178, 100 19,
10056 , 11060, 100 92,
10474 , 10774, 100 32,
10817 , 10090 , 11903,
10264 , 10766, 108 14,
11150, 1017 9
Samsu x 1003 9
Sanji an 102 64
Sansu i 10463 , 11904,
11929, 11911
Sanyo 101 54, 10156,
10180 , 10145, 103 76,
10474 , 10036, 108 93,
11907, 101 59, 102 80,
10424 , 1079 9, 11154,
10157 , 10264, 103 81,
10798 , 1008 8, 11150
Sanyu an 100 93, 1 0817
Scimi tsu 10 019
Scotc h 1017 8
Scott 10236, 10180 ,
10178 , 1017 9, 10 019
Sears 10047, 10054 ,
10154 , 10156, 101 78,
10171 , 11926, 11904,
10056 , 1015 9, 10 179
Shanc ha 108 17, 1 0264
Shang hai 1026 4, 11910,
10817
Shaof eng 10 145, 10817
Sharp 10093, 10 030,
10157 , 10386, 106 50,
10720 , 10032, 108 51,
10256 , 10491, 106 89,
10818 , 10039, 101 65,
10474 , 10688, 107 87,
10036 , 11917
Sharp er Ima ge 11950
Shen Ying 1 0092,
10003 , 1047 4, 10 179
Shenc ai 101 45, 1 0264
Sheng Chia 10093, 10236,
10179, 11150, 10474
Sheny ang 10 817, 10264
Shogu n 1001 9
Signa ture 1 0016
Simps on 101 87, 1 0186
Skygi ant 10 180
Skywo rth 10748, 1026 4,
10037 , 1081 7
Sony 11100, 1 0000,
10036 , 10650 , 11300,
10111, 11925, 100 80,
10834 , 11904
Sound esign 10180 ,
10178 , 1017 9, 10 186
Sowa 10156 , 10 051,
10060 , 10178, 100 36,
10092 , 1047 4, 11150
Spect ricon 10003
Squar eview 10171
SSS 1 0180, 10019
Starl ite 10 180
Studi o Experie nce
10843
Supre -Macy 10046
Supre me 100 00
SVA 10748 , 10 587,
10865 , 10872, 107 68,
10871 , 1087 0
Sylva nia 100 54, 10 030,
10171 , 11931, 103 81,
11944, 1 0020, 10096
Symph onic 1 0180,
10171 , 11913, 11904
Synco 10 000, 10451 ,
10093 , 10060, 101 78,
10092 , 1003 6, 10 474
Tacico 1 0178, 10179,
11150, 1009 2, 10 474
Tai Yi 11150
Taishan 10 817, 10391
Tandy 1009 3
Tashiko 11150, 10650,
10092
Tatung 10054 , 10154 ,
10156 , 10051, 100 60,
11150, 1047 4, 100 36,
10055 , 11756, 10003
Technics 1 0250, 1005 1
Technol Ace 10179
Techview 1 0847
Techwood 100 51,
10003 , 1005 6
Teco 10 051, 1009 3,
10178 , 1047 4, 10 036,
10280 , 10092, 102 64,
10653
Teknika 1005 4, 1 0180,
10150 , 10060, 100 19,
10056 , 10186, 100 16,
10092 , 1003 9, 10 179
Telefunken 10702,
10056
Tera 10030 , 1046 6,
10474
Thoma s 11904
Tiane 1 0093, 1081 7
TMK 10178 , 10177,
10056
TNCi 10017
Tobo 10748 , 102 64
Tongguang 10264
Toshiba 1015 4, 11256,
10156 , 10060, 101 45,
11918, 1194 5, 103 81,
10832 , 10036 , 11704,
11936, 102 64, 106 50,
11150, 1165 6, 11935,
10161 , 10509, 108 45,
11356
Tosonic 10 185
Totevision 1003 9
Trical 10157
Tuntex 10 030, 104 74,
10092
TVS 1 0463
Ultra 10391
Unive rsal 1 0027
V Inc. 11756, 10885,
10864
Vector Resear ch 10 030
Victor 1025 0, 100 53,
10160 , 10650, 103 76,
10036 , 1065 3
Vidikr on 10 054
Vidtec h 10178 , 1001 9,
10036
Viewso nic 1085 7,
11755, 1 0885, 10864
Viking 1004 6
Wards 10054, 10030,
10178 , 10020, 100 80,
10165 , 10866, 100 19,
10027 , 1005 6, 10111,
10179 , 10016, 100 21,
10096
Warumai a 103 91
Waycon 10156
Westin ghous e 1088 9
White Westinghouse
10463, 10186, 11909,
10623
Xiahu a 1081 7, 10 264
Xiang yang 1 0264
Xihu 10817, 1026 4
Xingh ai 102 64
Xinri song 119 10
Xueli an 11910
Yamaha 10030, 10838,
10019, 10833, 10769,
10839
Yapshe 1 0250
Yongbao 1191 0
Youlanasi 1081 7
Yousida 1191 0
Zenit h 1 0017, 10463 ,
10178 , 11911, 100 16,
11909, 1 0092, 11904,
Page 11

10
(cont...)
11929
Zonda 10003
VCRs
ABS 2 1972
Admir al 200 48, 2 0209
Adven tura 2 0000
Aiko 20278
Aiwa 20037 , 20 000,
20307 , 20468, 201 24,
20406 , 2034 8, 20 479
Akai 2 0041, 20061 ,
20175 , 2010 6
Alien ware 2 1972
Ameri ca Actio n 202 78
Ameri can Hi gh 20 035
Amois onic 2 0479
Anam 20162, 20037,
20240, 20278, 20226,
21037
Anam Nationa l 20 162,
20226
Asha 20240
Audio vox 20 037, 20278
Beaum ark 20 240
Bell & Howe ll 20 104
Blaup unkt 2 0226
Broks onic 20184 ,
20121 , 20209, 200 02,
20348 , 20295, 214 79,
20479
Calix 20037
Canon 2003 5, 2 1174,
20167
Carve r 2008 1
CCE 2 0072, 20278
Chang hong 2 0048,
20081
Citiz en 20037, 2 0278,
21278
Colt 20072
Craig 2 0037, 200 47,
20240 , 2007 2, 20 271
Curti s Ma thes 20060,
20035 , 20162, 200 41,
20760 , 2103 5
Cyber nex 20 240
Cyber Power 21972
Daewo o 2 0045, 20 104,
20278 , 20210, 203 68,
21278 , 20637, 200 46,
20212 , 2056 1
Dell 21972
Denon 20042
Direc TV 20739 , 21989 ,
21954 , 2194 9
Dish Network System
21943, 21946, 21945,
21944
Dishp ro 219 44, 2 1943
Durab rand 2 0039,
20038
Dynat ech 20 000
Echos tar 21943, 21946,
21945 , 2194 4
Elect rohome 2003 7
Elect rophon ic 20 037
Emere x 2003 2
Emers on 20035, 20037,
20184 , 20240, 200 45,
20000 , 20121, 200 43,
20209 , 20002, 202 78,
20295 , 20036, 206 37,
21593 , 20561, 214 79,
20068 , 20208, 204 79,
21278 , 2006 1, 20 212
Euro1 21962
Expre ssvu 2 1944
Fishe r 2 0047, 20104 ,
20066 , 2005 4
Fuji 20035, 2003 3
Fujit su 2004 5, 2005 2,
20366
Funai 200 00, 2 0593,
21593
Garra rd 200 00
Gatew ay 219 72
GE 20060, 20035,
20240 , 21060, 202 02,
20760 , 21035, 208 07,
20226 , 2076 1
Gener al 2004 5, 203 66,
20052
Go Video 2064 3, 2 0526,
20432
GOI 2 1944
GoldStar 20037, 20209,
20038, 20226, 20225,
21237
Gradi ente 2 0000
Haoji e 2024 0
Harle y Davi dson 20000
Harma n/Kard on 20081,
20038
Harwo od 200 72, 2 0068
Haupp auge 2 1992
Headq uarter 2004 6
Hewle tt Pac kard 21972
HI-Q 20047
Hitac hi 20037, 2 0000,
20042 , 20041, 201 66,
20105 , 2008 9
Howar d Computer s
21972
HP 219 72
HTS 2 1944
Hughe s Ne twork
Syste ms 2004 2, 2194 9,
20739
Hyund ai 219 51
iBUYP OWER 2 1972
Jense n 2004 1
JVC 20045, 20067,
20041 , 21945, 200 08,
21944 , 2038 4, 20 366
KEC 2 0037, 20278
Kenwo od 20067 , 2 0041,
20038 , 2038 4
KLH 2 0072
Kodak 20035 , 200 37
Kolin 20043 , 200 41
LG 20037, 20045,
20042 , 20209, 200 38,
22010 , 2103 7, 20 040
Lloyd 's 200 00, 2 0208
Logik 20072
LXI 2 0037
Magna sonic 21 278,
20593
Magna vox 200 35,
20039 , 20081, 200 00,
20593 , 20563 , 20110,
21781
Magni n 2024 0
Maran tz 20035 , 20081 ,
21381
Marta 20037
Matsu shita 20035 ,
20162 , 20226 , 21162,
20367 , 2022 7
Media Cente r PC 21972
MEI 2 0035
Memor ex 20035 , 2 0162,
20037 , 20048, 200 39,
20047 , 20240, 200 00,
20104 , 20209, 212 37,
20046 , 20479 , 21162,
20348 , 21048, 212 62,
20307 , 2103 7
MGA 202 40, 20043,
20061
MGN Techno logy 2 0240
Micro soft 2 1972
Mind 21972
Minol ta 200 42, 2 0105
Mitsubishi 20067, 20043,
20041, 20061, 20807, 20173
Motor ola 20 035, 20048
MTC 2 0240, 20000
Multi tech 2 0000, 2007 2
NAD 2 0058
Natio nal 20 226
NEC 20035 , 20037,
20048 , 20104, 200 67,
20041 , 20038, 200 40,
20008 , 2037 0
Newav e 2003 7
Nikko 20037
Nikon 20253 , 200 34
Noble x 2024 0
North gate 2 1972
Olymp us 20035, 20226,
21046
Onkyo 20222
Optim us 21 062, 20162 ,
20037 , 20048, 201 04,
21048 , 21262, 205 93,
21162, 2 0058, 20432
Opton ica 20 062
Orion 20184, 20209, 20002,
20479, 20295, 21479
Panar ex 219 50
Panas onic 21062 ,
20035 , 20162, 200 77,
20226 , 20616 , 21162,
20225 , 20367, 202 27,
21035 , 2126 2
Pansa t 2195 0
Penne y 2 0035, 20 037,
20240 , 20042, 200 38,
21035 , 20040, 200 54,
21237
Penta x 2004 2, 20 105
Philc o 20035, 2000 0,
20226 , 2047 9
Phili ps 2003 5, 2008 1,
20000 , 20226, 207 39,
21381 , 20110, 206 18,
21181, 205 63, 210 81,
21949 , 2006 2
Pilot 20037
Pione er 2 0042, 2006 7,
20058
Polk Au dio 20 081
Profi tronic 2024 0
Proscan 20060, 20760,
21954, 20202, 21060,
20761
Prote c 2007 2
Pulsa r 2003 9
Qishe ng 200 60
Quart er 200 46
Quart z 2004 6
Quasa r 2003 5, 20 162,
21035 , 2007 7, 21162
Radio Shack 20 000,
21037
Radix 20037
Rande x 2003 7
RCA 20060, 20035,
20240 , 20000, 200 42,
20807 , 21060, 219 89,
20106 , 20761, 210 35,
20058 , 21964, 201 05,
20226 , 20760, 208 80,
21954 , 20077, 202 02,
20453
Reali stic 20 035, 20 037,
20048 , 20047, 200 00,
20104 , 20066, 200 46,
20062
Repla yTV 20 614, 20616
Ricoh 20253 , 200 34
Runco 20039
Sampo 20037 , 200 48
Samsu ng 2 0240, 200 45,
20212 , 20760, 202 10,
20432 , 2101 4
Samtr on 206 43
Sanky 20048 , 200 39
Sansu i 20000, 200 67,
20209 , 20041, 204 79,
20271 , 2147 9
Sanyo 200 47, 20240,
20104 , 20046, 201 59,
20369 , 2036 8
Scott 20184, 20045,
20121, 20043, 20210,
20212
Sears 20035, 20037 ,
20047 , 20000, 200 42,
20104 , 20046, 200 66,
21237 , 2005 4, 20 105
Sharp 20048, 20 209,
20363 , 20848, 208 07,
20062 , 2073 8, 21 048
Shinc o 2000 0
Shint om 200 72
Shogu n 2024 0
Singe r 2007 2
Sonic Bl ue 20614,
20616
Sony 2 0035, 20032 ,
20033 , 20000, 202 53,
20639 , 21232, 219 72,
20636 , 21032, 219 57,
20034 , 20586, 206 40,
21956
STS 2 0042
Sunpa k 2025 3
Sylva nia 200 35, 20 081,
20000 , 20043 , 20110,
21781 , 2159 3, 20 593
Symph onic 20000,
21593 , 2059 3
Manufacturer’s Codes
Syste max 21 972
Tagar Syst ems 2 1972
Tashiko 20 037
Tatung 20045 , 20067 ,
20041 , 2036 6, 20 008
Teac 20000 , 200 41
Technics 2 0035, 2016 2
Teco 20035, 20037, 20048,
20041, 20038, 20040
Teknika 2003 5, 2 0037,
20000 , 2005 2
Thoma s 2000 0
Tivo 20739, 21957, 20636,
21956, 20618, 21503
TMK 20240 , 20208,
20036
Toshiba 20045, 200 67,
20043 , 20041, 202 10,
20384 , 21008, 219 72,
20366 , 20845, 215 03,
20066 , 20212, 208 28,
21145, 2 0008
Totevision 2003 7, 20 240
Touch 2197 2
Ultim ateTV 21989
Unite ch 202 40
Vector 20045
Vector Researc h 2003 8,
20040
Victor 2006 7, 200 41,
20008 , 2038 4
Video Conc epts 2004 5,
20040 , 2006 1
Videom agic 20037
Videos onic 20240
Viewso nic 2 1972
Villai n 200 00
Wards 20060, 20035,
20048, 20047, 20081,
20240, 20000, 20042,
20072, 20062, 20212,
20760
White Westingho use
20209 , 2007 2, 20 637
XR-10 00 20035, 20000,
20072
Yamaha 2 0041, 20038
Zenit h 2 0039, 20033 ,
20000 , 20209, 200 34,
20479 , 21479 , 21139,
20637
ZT Gro up 21 972
Video Accessories
ABS 0 1272
Alien ware 0 1272
Cyber Power 01272
Gatew ay 012 72
Hewle tt Packard 01272,
01267
Howar d Computer s
01272
HP 012 72
iBUYP OWER 0 1272
Inter Video 01393
Jense n 01165
JVC 0 1384
Keysp an 013 44
KWorld 0140 3
LG 01 415
Links ys 013 65
Macro Image
Technology 0138 3
Media Cente r PC 01272
Micro soft 0 1272
Mind 01272
Motor ola 01 363
MyHD 01383
North gate 0 1272
Panas onic 0 1120
Pinna cle Sy stems 0126 8
Pione er 010 10
Princ eton 0 0113, 00 295
Rabbi t 0008 1
Roku 01486
Samsu ng 01190 , 0149 0
Senso ry Sci ence 01126
Sharp 01010
SMC 0 1456
Sony 0 1272, 01324 ,
01364
Strea mzap 0 1309
Syste max 01 272
Tagar Syst ems 0 1272
TeleCaptio n 001 71
Toshiba 01 272
Touch 0127 2
Viewso nic 0 1272, 01329
ZT Gro up 01 272
Page 10
Page 12

Specifications
Dedicated A-BUS Control buttons plus 6 Banks with Code Library and
Learning Capabilities
A-BUS Buttons:
Banks:
Buttons:
Range:
Code Library:
Macros:
Batteries:
Size (H x W x D):
4 x Source Input, Volume Up/Down Off and All Off
6 (All Bank Buttons will Learn Macros)
39 Keys per Bank (Not Including A-BUS)
< 50 feet (15m) (Depending on Source Component)
Extensive Infrared Code Library for Audio Video Products
Any Button (Up to 32 Commands from any Other Button)
2 x AA batteries (Supplied)
1.4" (35 mm) x 2.6" (66 mm) x 8.4" (214 mm)
Additional Information
• Keep the remote dry. If it gets wet, wipe it dry immediately.
• Use and store the unit only in normal temperature environments.
• Handle the remote gently and carefully. Don’t drop it.
• Wipe the remote with a damp cloth to keep it looking like new.
The A- BUS™ Universal Rem ote does not con tain any user -serv iceab le p arts. Ope ning the cas e, e xcept for th e b attery co ver,
may cause p ermane nt damag e t o your A -BUS™ Un ivers al Remote. Modify ing or tamp ering wi th the inte rnal parts c an cause
damag e and inval idate the w arran ty. If y our r emote is no t per formin g as it sh ould, pleas e con tact y our p lace of pur chase .
SPECI FICATION S
Power : (2) AA
Size: (H x W x D ) 8.4 3 x 2. 64 x 1.38 in
(214 x 66 x 35 m m)
Weight : (w/ o batt eries ) 5.6 oz (1 58.76 g)
Speci ficati ons a re ty pical; indi vidua l unit s mig ht va ry. Spec ificat ions are s ubject to c hange and i mprov ement witho ut an y not ice.
FCC N OTICE
This equipment has been tested and found to comply with the limits for a class B digital device, pursuant to part 15 of the FCC Rules.
These limits are designed to provide re asonable protection against harmfu l interference in a resident ial installation. This equipment
generates, uses and can radiate rad io frequency energy and if not installed and used in accordance with the instructi ons, may cause
harmful interference to radio communications. However, there is no guarantee that interference will not occur in a particular
installation. If this equipment does cause harmful interference to radio or television reception, which can be determined by turning the
equipment off and on, the user is encouraged to try to correct the interference b y one or more of the following measures:
• Reo rient or re locat e the recei ving antenn a.
• Inc rease the s epara tion b etwee n the equip ment and r eceive r.
• Con nect t he eq uipme nt int o an outle t on a circ uit d iffere nt fro m tha t to which the r eceiv er is conne cted.
• Con sult t he de aler or an exper ience d radi o/TV techn ician for h elp.
This equip ment has been verified to c omply with the lim its f or a cla ss B computing devi ce, pursua nt t o FC C Rul es. In o rder to
maint ain complianc e with FCC r egula tions, s hield ed cabl es must be u sed with t his equipment . Opera tion with non-a pproved
equip ment or uns hield ed ca bles is lik ely t o res ult i n int erfere nce t o rad io an d TV r ecepti on. The use r is cauti oned that c hange s
and modi ficati ons made to the equ ipmen t w ithout th e a pprov al o f m anufa cturer co uld void the us er's authority to ope rate this
equip ment.
07A02 M6640 0
A-BUS is a reg istered t rademark o f Leisure Tech El ectronics Pty Ltd.
All f eatures a nd specif ications a re subjec t to chan ge withou t notice.
All t rademarks property of their respectiv e owners.
 Loading...