

Page 1

Dolphin® eBase
Communication Cradle for the
Dolphin
®
9700 Mobile Computer
User’s Guide
Page 2

Page 3

Introduction
!
The Ethernet Base (eBase) enables a single Dolphin 9700
computer to communicate with a host device over an
Ethernet network.
We recommend use of Honeywell peripherals, power
cables, and power adapters. Use of any non-Honeywell
peripherals, cables, or power adapters may cause
damage not covered by the warranty.
Unpacking the eBase
Open the shipping box and inspect the package to see
that the following standard items are included:
• One Dolphin eBase Ethernet cradle
• One universal AC/DC power adapter for the
Dolphin eBase
• One power cord
• One Dolphin eBase User’s Guide
You will also need to provide a standard CAT-5 Ethernet
network cable. These items are needed to set up,
configure, and operate the eBase. If any items are missing
or anything appears to be damaged, contact your
Customer Account Representative.
Keep the original packaging in case you need to return the
eBase for service or to store the eBase while not in use.
1
Page 4

Software Requirements
Before you connect the Dolphin terminal to the eBase,
make sure you have the most current software installed.
To check the terminal’s system information, tap Start >
Power Tools > SysInfo.
• The Kernel version must be 20.01 or later in terminals
running Windows Mobile 6.5 Classic. In terminals
running Windows Mobile 6.5 Professional, the kernel
version must be 21.01 or later.
• The Power Tools version must be 4.12 or later.
Applications on the Dolphin Terminal
Applications running on the Dolphin terminal when it is
connected to the eBase should be designed specifically
for a partially connected network. For more details, please
refer to the
Networks
www.honeywellaidc.com.
Best Practices for Partially Connected
document available at
2
Page 5
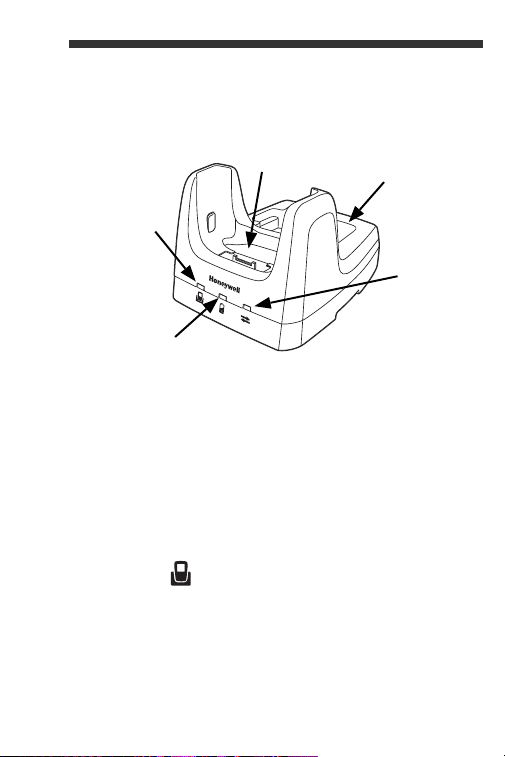
Hardware Overview
COMM
LED
Dock LED
Terminal Well
AUX
Battery LED
Auxiliary
Battery Well
Front Panel
Terminal Well
Place the terminal in this well to communicate with a
host device, power the terminal, and charge the
installed battery pack. The eBase completely
charges the main battery in a Dolphin terminal in
4 hours.
Auxiliary Battery Well
See Auxiliary Battery Well on page 6.
DOCK LED
The Dock LED turns solid green when the terminal is
properly seated in the eBase.
3
Page 6

AUX Battery LED
The AUX Battery LED indicates the status of the
battery charging in the auxiliary battery well; see
Back Panel on page 6.
This color means…
Orange The auxiliary battery is charging.
Green The auxiliary battery has completed
charging and is ready for use.
COMM LED
The COMM LED indicates the status of data transfer
between the Dolphin terminal and the eBase.
Ethernet Communication
When the Dolphin terminal is not docked:
This color and status means…
Red Flashing The eBase has power
but no Ethernet
connection.
Orange Flashing The eBase is acquiring
an IP address.
Solid An Ethernet connection
has been established
between the network
and eBase.
4
Page 7

When the Dolphin terminal is docked:
This color and status means…
Red Solid No connection is
established between
the eBase and
terminal.
Orange Solid RASMan is attempting
Green Solid RASMan has
USB Communication
to establishing a
connection between
the eBase and the
terminal.
established a
connection between
the ebase and the
terminal.
When the Dolphin terminal is not docked:
This color and status means…
Red Flashing The eBase has power
Green Solid A USB connection has
but no USB connection.
been established
between the ebase and
the host workstation.
5
Page 8
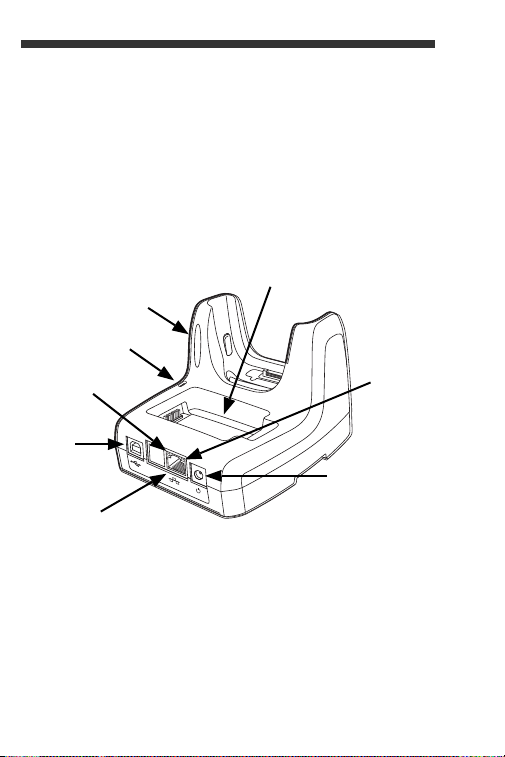
When the Dolphin terminal is docked:
Auxiliary Battery Well
DC Power Jack
RJ45
Ethernet Port
USB
Port
Stylus Slot
Fastener
for the Sylus
Green
LED
Red LED
This color and status means…
Green Flashing Data is being
transferred between
the Dolphin terminal
and the host terminal
via the eBase.
Back Panel
Auxiliary Battery Well
The eBase enables you to charge an additional Li-ion
battery pack independently of the terminal well in
4 hours. This feature ensures that you can always
have a fully charged battery for your terminal.
6
Page 9

USB Port
This USB Port is full-speed and 2.0 compliant. Using
a USB cable, you can connect the eBase to a USB
compliant device to facilitate USB communication to
and from the terminal. USB communication occurs
through Microsoft ActiveSync (v4.5 or higher) or
Microsoft Windows Mobile Device Center (WMDC)
depending on the host workstation’s operating
system. When the terminal is seated in the terminal
well, it is connected to the peripheral device via the
eBase.
Note: ActiveSync on your Dolphin terminal works with
WMDC on host workstations running Windows Vista
or Windows 7 and with ActiveSync on host
workstations running Windows XP. For detailed
information on ActiveSync and WMDC visit
Microsoft's Windows Mobile Web site.
RJ45 Ethernet Port
Use a standard CAT-5 Ethernet cable; you can
connect the ebase to an Ethernet-compliant device
to facilitate Ethernet communication to and from the
terminal.
This color and status means…
Green Flashing Network activity
Orange Solid Ethernet link active
DC Power Jack
Use the power cable from Honeywell that comes with
the ebase to supply power to this power jack. For
more information, see Power on page 9.
7
Page 10
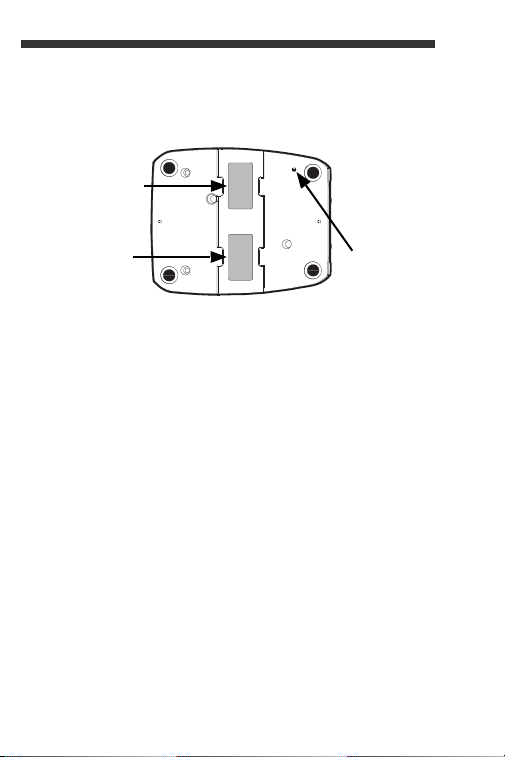
Bottom Panel
Reset
Button
Compliance
Label
Serial Number
Label
For details on how to mount the eBase, see Mounting on
page 25.
8
Page 11

Power
!
Power Cable
A/C Power Cord
Power
Adapter
The terminal requires 9.5 Volts DC input for
communications and battery charging; the power adapter
on the power cable converts the voltage from the power
source to 9.5 volts DC. Only the Honeywell 9.5 VDC, 4A
power supply provided with the ebase converts the
voltage appropriately.
Honeywell recommends that you leave the eBase
connected to its power source at all times, so that it is
always ready to use.
1. Plug the A/C power cord into the power adapter.
2. Plug the power cable into the power connector on the
3. Plug the A/C power cord into a standard wall outlet.
We recommend use of Honeywell peripherals, power
cables, and power adapters. Use of any non-Honeywell
peripherals, cables, or power adapters may cause
damage not covered by the warranty.
back of the eBase.
The ebase is now powered. The COMM LED on the
eBase flashes red.
9
Page 12

Charging the Main Battery in the
!
!
Terminal
We recommend use of Honeywell Li-Ion battery packs.
Use of any non-Honeywell battery may result in damage
not covered by the warranty.
The eBase provides power to the
Dolphin terminal and allows the
charging of the terminal’s main
battery. The intelligent battery
charging system incorporated into
all Dolphin terminals prevents
overcharging, which means that
Dolphin terminals may be stored
in the eBase indefinitely without
damage to the terminals, battery
packs, or the eBase.
1. Install the Li-ion battery pack
into the back panel of the
terminal; see the
9700 User’s Guide
installation instructions.
2. Slide the Dolphin terminal into the terminal well until
the Dock LED lights green. Charging by the Dolphin
terminal begins immediately if required by the
Dolphin terminal.
Make sure the terminal is dry before placing it in the
eBase. Do NOT place a wet terminal in the eBase! Doing
so may cause damage not covered by the warranty.
Dolphin
for battery
10
Page 13

Ethernet Communication
Setting up the eBase
1. Plug the power cord into the power adapter.
2. Plug the power connector cable into the power
connector on the back of the eBase.
3. Plug the A/C power cord into a standard wall outlet.
The COMM LED flashes red.
Note: When searching for a network, the 9700 terminal looks for
a USB connection first, and then an Ethernet connection. If
you only require an Ethernet connection, Honeywell
recommends disconnecting the USB cable from the eBase.
Remove the Dolphin terminal from the eBase before
connecting or disconnecting the USB cable.
4. Plug the CAT-5 Ethernet cable into the RJ45
connector on the back of the eBase.
5. Plug the Ethernet cable into the network.
6. The COMM LED flashes orange while the eBase
attempts to acuire an IP address. The COMM LED
will change to a solid orange when a network
connection has been established.
Connecting the Dolphin Terminal to the eBase
After the eBase is installed, configured, and connected to
the host computer, you must connect the Dolphin terminal
to the eBase.
1. Remove the Dolphin terminal from the eBase if it is
docked.
Start
>
2. On the Dolphin terminal, tap
Menu > Connections
ActiveSync >
11
Page 14

3. Remove the check from the box next to,
“
Synchronize all PCs using this connection”
Tap OK.
4. Insert a Dolphin terminal into the terminal well. The
DOCK LED lights green.
Start
5. On the Dolphin terminal, tap
6. Click the
RASMan
icon once. The terminal starts
>
.
Power Tools
searching for a connection.
Note: During the connection process, the following error
message appears. This error message requires no
action. The message disappears when the
connection process is complete.
12
Page 15

7. When the connection is established between the
x
x
Dolphin terminal and the eBase, the terminal plays a
sound, and the COMM LED on the eBase lights
green. The connection icon in the Dolphin’s
navigation bar changes from to .
8. Upon connection, the Dolphin terminal shares the
eBase IP address. This IP address can be used by
any application on the Dolphin terminal.
9. When you disable RASMan or remove the terminal
from the eBase, the terminal plays a sound and the
disconnected icon appears in the Navigation
bar. The COMM LED on the ebase lights orange.
Note: A soft or hard reset of the terminal disables RASMan and
the Ethernet connection. Tap Start > Power Tools >
RASMan to restart the program and restore the
connection.
To start RASMan automatically after each soft or hard
reset, enable the RASMan Program section of the
Autorun.exm file (see AutoRun RASMan on page 15).
Troubleshooting
If the COMM LED lights red while browsing a web page,
refresh the page and RASMan will automatically
reconnect and the LED light green.
13
Page 16

Displaying the eBase and Terminal IP Address
Once the Dolphin terminal has be successfully connected
to the eBase, the terminal shares the eBase IP address.
Start > Power Tools > Network Utilities >
1. Tap
IPConfig
2. On the Input tab, tap the
button.
3. The Dolphin terminal retrieves and displays the IP
configuration for the entire terminal and eBase.
Locate the
.
IpAddress
Display full configuration
field in the IP configuration list.
DeviceConfig and RASMan Settings
If your application requires frequent connecting and
docking/undocking to the Ethernet, and USB
communication is not required, Honeywell recommends
modifying the Dolphin's DeviceConfig.exm and
RASMan.exm files to the following settings.
Modifying the DeviceConfig.exm ActiveSync Setting
1. Tap
Start > Power Tools > EZConfig Utilities >
DeviceConfig
2. Locate
3. Tap and hold the stylus on
4. Select
5. Tap twice on
6. Select
on the Navigation bar.
.
ActiveSync
under the
Connections
ActiveSync
Enable
from the pop-up menu.
AutoConnect
OFF
from the value pull down menu. Tap
in the Key column.
list.
.
OK
14
Page 17

7. Tap on
8. Tap
Connection
File > Disable
OK,
and then tap
in the Key column, and then tap
.
Yes
to save your changes.
Modifying the RASMan AutoActiveSync Setting
1. Tap
Start > Power Tools > EZConfig Utilities >
RASMan
2. Select
AutoActiveSync
3. Tap
4. Select
5. Tap
6. Tap
.
Settings
Edit > Modify
Disable
OK
OK
from the folder tree, and then tap
under the Key column.
.
from the Value pull down menu.
on the Navigation bar.
, and then tap
Yes
to save your changes.
AutoRun RASMan
To start RASMan automatically after each soft or hard
reset, enable the
RASMan Program section of the Autorun.exm file.
Start > Power Tools > EZConfig Utilities >
1. Tap
AutoRun
2. Locate
3. Tap and hold the stylus on
4. Select
5. Tap
6. Tap
.
RASMan
Enable
OK
Yes
under the Programs list.
from the pop-up menu.
on the Navigation bar.
to save your changes.
RASMan
.
15
Page 18

Configuring the Network
By default, the eBase is configured to obtain IP addresses
automatically via DHCP server. This means that in most
cases you would simply plug-and-play the unit. If
necessary, you can use the Cradle Manager configuration
utility for dynamic network configuration.
Accessing the eBase Cradle Manager from a Host Workstation
1. Connect the host workstation Ethernet cable to a port
on the same
Ethernet subnet as the eBase. If the eBase is
connected to a hub (or router), connect the host
workstation to an available port on the same hub.
2. On your host workstation, open the web browser.
3. In the Address line, type the IP address assigned to
the eBase, see Displaying the eBase and Terminal IP
Address on page 14. Press
4. A login prompt displays on the host workstation.
Enter the user name <
password <Dolphin>.
Note: The user name and password are case-sensitive. For
information on how to change the password, see page 18.
ENTER
Admin>
.
and default login
16
Page 19

5. The Cradle Manager window opens.
Note: Under General Settings, the HTTP Port defaults to 80.
17
Page 20

Changing the Password
You can change the password from the Cradle Manager
window.
1. Under
2. Enter the new password in the
3. Click
General Settings,
to, “
Change Password”
Apply
at the bottom of the screen.
select the check box next
.
New Password
field.
18
Page 21

Changing the Dynamic Network Settings
You can modify the Dynamic Network settings from the
Cradle Manager window.
1. Under
2. Enter the new settings in the fields supplied.
3. Click
IP Settings,
Note: The default reboot time if missing an IP address is
60 seconds.
Apply
select Dynamic.
at the bottom of the screen.
Changing the Static Settings
You can modify the Static Settings from the Cradle
Manager window.
1. Under
2. Enter the new settings in the fields supplied.
3. Click
IP Settings,
Apply
select
Static
.
at the bottom of the screen.
19
Page 22

USB Communication
Dolphin terminal’s support USB communication out of the
box. The eBase also supports USB communications using
the USB port located on the back panel of the eBase. The
eBase acts as a USB device by interfacing the USB
signals of the Dolphin terminal to the USB of the host
workstation. Using a standard USB cable, the ebase’s
USB interface allows the Dolphin terminal to communicate
with a host workstation.
Setting Up and Connecting the Dolphin Terminal to the eBase
1. Plug the power cord into the power adapter.
2. Plug the power connector cable into the power
connector on the back of the eBase.
3. Plug the A/C power cord into a standard wall outlet.
The COMM LED flashes red.
4. Plug the USB communication cable into the USB port
on the back of the eBase.
Note: The Dolphin terminal should always be removed
from the eBase when connecting or disconnecting
the USB cable.
5. Connect the other end of the USB cable to the host
workstation. The COMM LED changes to steady
green.
6. Insert the Dolphin terminal in the eBase terminal well.
The DOCK LED illuminates green.
7. The Dolphin terminal activates and automatically
opens ActiveSync to establish a connection. The
COMM LED flashes green.
20
Page 23

8. The connection icon in the Dolphin’s navigation bar
x
changes from to it indicate a successful
connection. The eBase can now transfer data
between the terminal and the host device.
Switching from an Ethernet to USB ActiveSync Connection
If you have trouble switching from Ethernet to USB
ActiveSync mode, then RASMan may have disabled
ActiveSync. Take the following steps to recover
ActiveSync.
1. Remove the Dolphin terminal from the eBase.
2. Connect the USB cable to the host workstation and
then the eBase.
3. On the Dolphin terminal, tap
Menu > Connections...
4. Select the check box next to,
workstation's using this connection.”
5. Choose
6. Tap
7. Insert the terminal in the terminal well. ActiveSync
USB
from the drop down menu.
OK
on the Navigation bar to exit the ActiveSync
applet.
automatically initializes synchronization.
Start > ActiveSync >
“Synchronize all host
Restoring the eBase Factory Defaults
To return the eBase to the factory defaults:
1. Unplug the power cable on the eBase.
21
Page 24

2. Locate the reset button on the bottom of the eBase.
Reset Button
3. Push in and hold down the reset button.
4. While holding down the reset button, plug in the
power cable.
5. Wait 15 seconds, and then release the button.
Note: When the factory defaults are restored, the password
reverts to the default password, <Dolphin>.
Upgrading the eBase Firmware
To upgrade the firmware on the 9700 eBase, you will first
need a computer running TFTP server software that
stores the firmware upgrade file.
Using the Cradle Manager to Upgrade the eBase Firmware
1. Verify the eBase is connected to Ethernet network.
Note: Firmware upgrades for the eBase do not require a
Dolphin terminal be installed in the eBase.
22
Page 25

2. Connect the host workstation Ethernet cable to a port
on the same Ethernet subnet as the eBase. If the
eBase is connected to a hub (or router), connect the
host workstation to an available port on the same
hub.
3. On your host workstation, open the web browser.
4. In the Address line, type the IP address assigned to
the ebase, see Displaying the eBase and Terminal IP
Address on page 14. Press
5. Enter the user name <
password <Dolphin>.
Note: The user name and password are case-sensitive. For
information on how to change the password, see page 18.
ENTER
Admin>
.
and default login
6. The Cradle Manager window appears.
7. In the Cradle Manager window, check the box next to
Firmware upgrade.
23
Page 26

8. Enter the IP address of the server in the
Server IP Address
9. Under
File Name
field.
, enter the eBase firmware upgrade
TFTP
file name.
Apply
10. Click
11. Click
bridge. The COMM LED on the eBase flashes red
during the reboot process.
12. The COMM LED flashes orange during IP verification
and the firmware upgrade.
13. The eBase automatically reboots and the COMM
LED illuminates green when the eBase auto-
.
OK
, when prompted to reboot the EULink
connects to the network.
Note: If the eBase does not auto-connect and COMM LED
illuminates solid red after the upgrade process,
remove and then reinsert the Dolphin terminal in the
eBase. The COMM LED illuminates solid green
when the eBase connects to the network.
24
Page 27

Mounting
DIN Rail
(7.5 X 35 mm)
Set the eBase on a dry, stable surface, such as a desktop
or workbench near an electrical outlet. Be sure to provide
enough workspace with good lighting for the user to view
and operate the Dolphin terminal while it is in the eBase.
When choosing a location, bear in mind that:
• the mounting location must allow users easy access to
the Auxiliary Battery Well, and
• the Ethernet and USB ports as well as the power jack
face straight out of the rear panel, and you will most
likely want easy access to them in the future.
Installation Hardware
Screw: 3/16 in. dia x 5/8 in. long pan head screw
Washer: 1/2 in. OD x 7/32 in. ID x 3/64 in. thick
Nut: 3/16 in. dia
Using the DIN Rail
The DIN rail slot (7.5 X 35 mm) may be mounted on the
bottom to allow for secure desk attachment of the unit if
desired.
1. Slide the DIN rail
slot along the
bottom panel.
2. Then, using the
appropriate nuts
and bolts, secure
the DIN rail to the
desk or flat surface.
25
Page 28

Technical Assistance
Contact information for technical support, product service
and repair can be found at www.honeywellaidc.com.
Limited Warranty
Refer to www.honeywellaidc.com/warranty_information
for your product’s warranty information.
Disclaimer
Honeywell International Inc. (“HII”) reserves the right to
make changes in specifications and other information
contained in this document without prior notice, and the
reader should in all cases consult HII to determine
whether any such changes have been made. The
information in this publication does not represent a
commitment on the part of HII.
HII shall not be liable for technical or editorial errors or
omissions contained herein; nor for incidental or
consequential damages resulting from the furnishing,
performance, or use of this material.
This document contains proprietary information that is
protected by copyright. All rights are reserved. No part of
this document may be photocopied, reproduced, or
translated into another language without the prior written
consent of HII.
Web Address: www.honeywellaidc.com
26
Page 29

Trademarks
Dolphin, eBase are trademarks or registered trademarks
of Hand Held Products, Inc. or Honeywell International
Inc.
Microsoft, Windows, Windows Mobile, Windows XP,
Windows Vista, Windows 7, ActiveSync, Windows Mobile
Device Center, Outlook, and the Windows logo are
trademarks or registered trademarks of the Microsoft
Corporation.
Other product names mentioned in this manual may be
trademarks or registered trademarks of their respective
companies and are the property of their respective
owners.
Patents
Please refer to the product packaging for a list of patents.
©2010 Honeywell International Inc. All rights reserved.
27
Page 30

Page 31

Page 32

Honeywell Scanning & Mobility
9680 Old Bailes Road
Fort Mill, SC 29707
www.honeywellaidc.com
97-EBASE-UG Rev A
6/10
 Loading...