

8
Wireless PAN (WPAN) C ommun ications with Bluetooth
Overview
Dolphin terminals are available with a Bluetooth radio for WPAN (Wireless Personal Area Network) usage. When the Dolphin is
first initialized, the *.cab file and module for Bluetooth are installed.
Enabling the Bluetooth Radio
Before using the radio, make sure that the Bluetooth radio is enabled. When the radio is enabled, the Bluetooth icon appears in
the task tray on the Today screen.
Note: Radios are enabled in the Radio Manager; tap Start > Settings > Connections tab > Radio Manager.
Setting Up Your Bluetooth Card
Note: If you use the Get Connected! Wizard, which is recommended for normal usage, then this step is not necessary. This step
would be used to change the friendly name of your device.
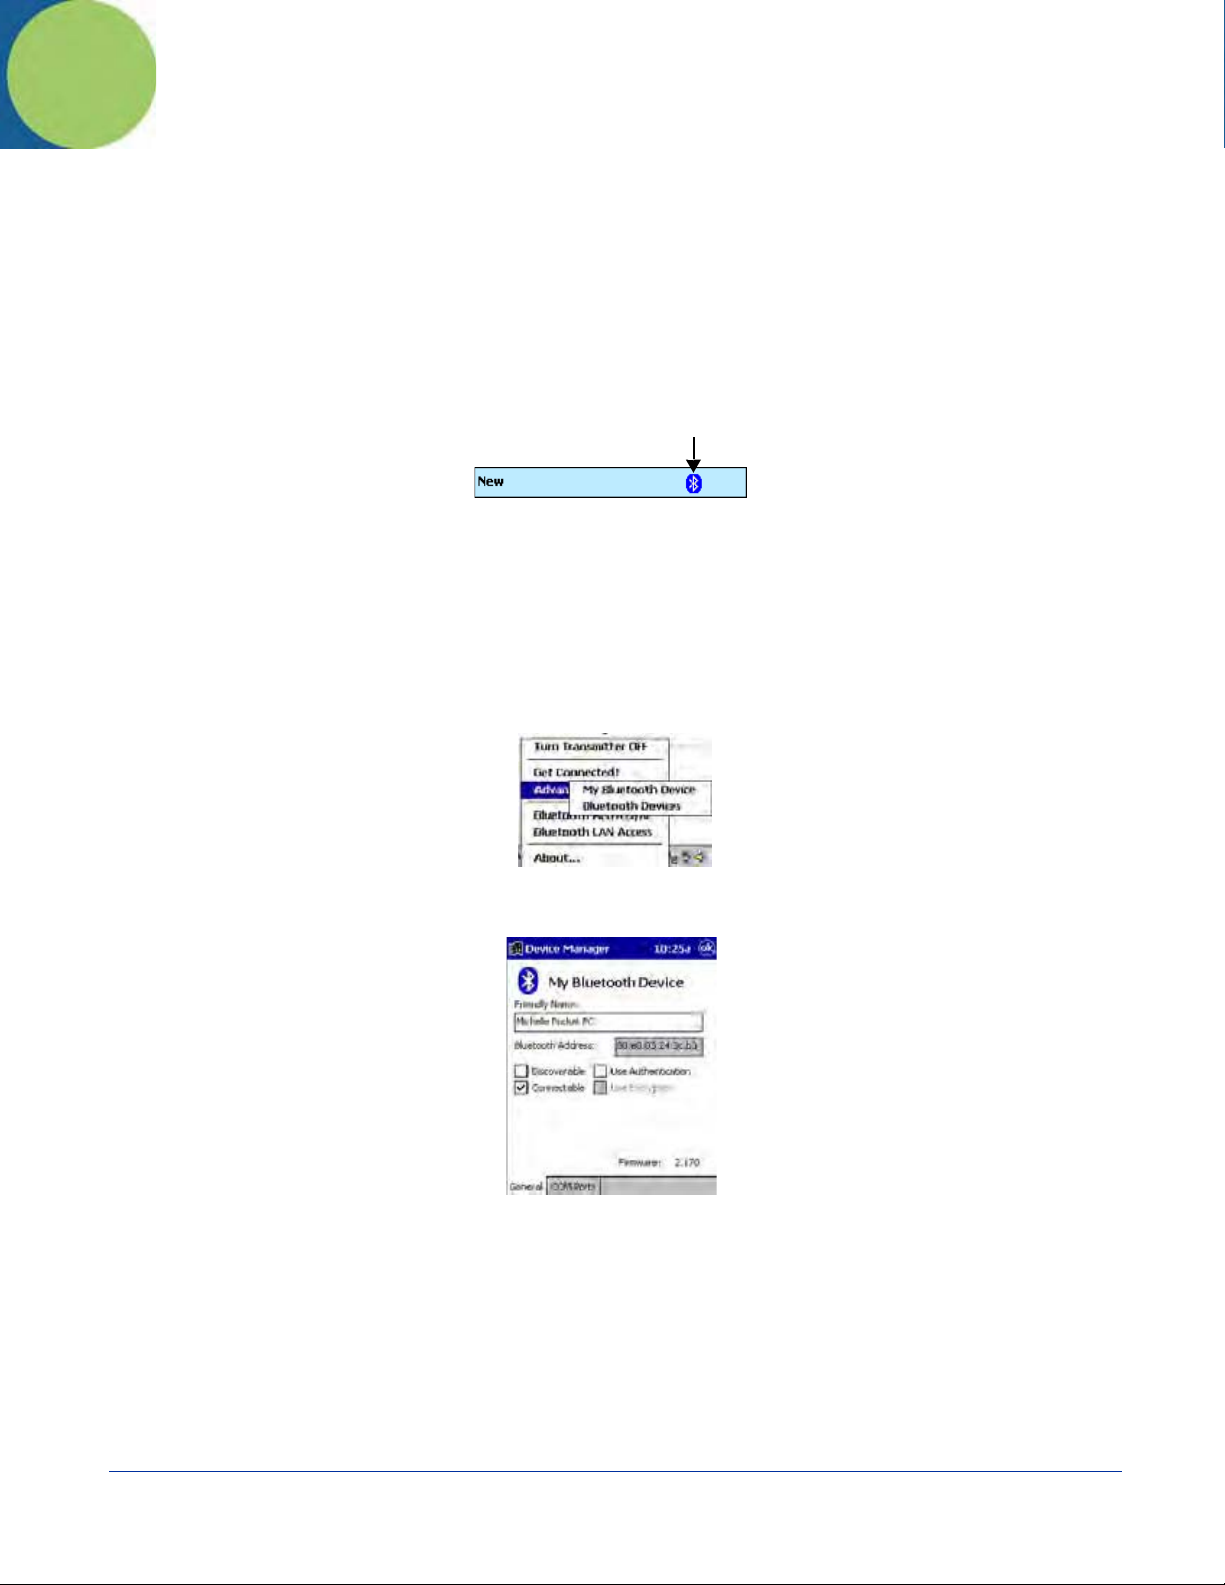
1. Tap the Bluetooth icon that appears in the task tray on the Today screen.
2. In the pop-up menu, select Advanced Features, then My Bluetooth Device. (If you installed OBEX, the menu also lists
Transfer via Bluetooth.)
3. In the My Bluetooth Device screen, you can modify the Friendly Name and make any desired configuration changes.
When done, tap OK.
• In normal phone connect operation, Discoverable mode is not needed and should be disabled.
• If you do enable Discoverable mode (e.g., for ActiveSync), note that it does not shut off by itself. To save power, remember
to disable it when not needed.
• Connectable, Use Authentication, and Use Encryption are also not required for printing or dial-up networking applications.
• Check Use Authentication to enable the Use Encryption option.
Assign COM Ports
Follow these steps to view and/or modify the Bluetooth COM ports.
Dolphin® 9500 Series User’s Guide-Preliminary
Rev (d)
7/10/06
8 - 1
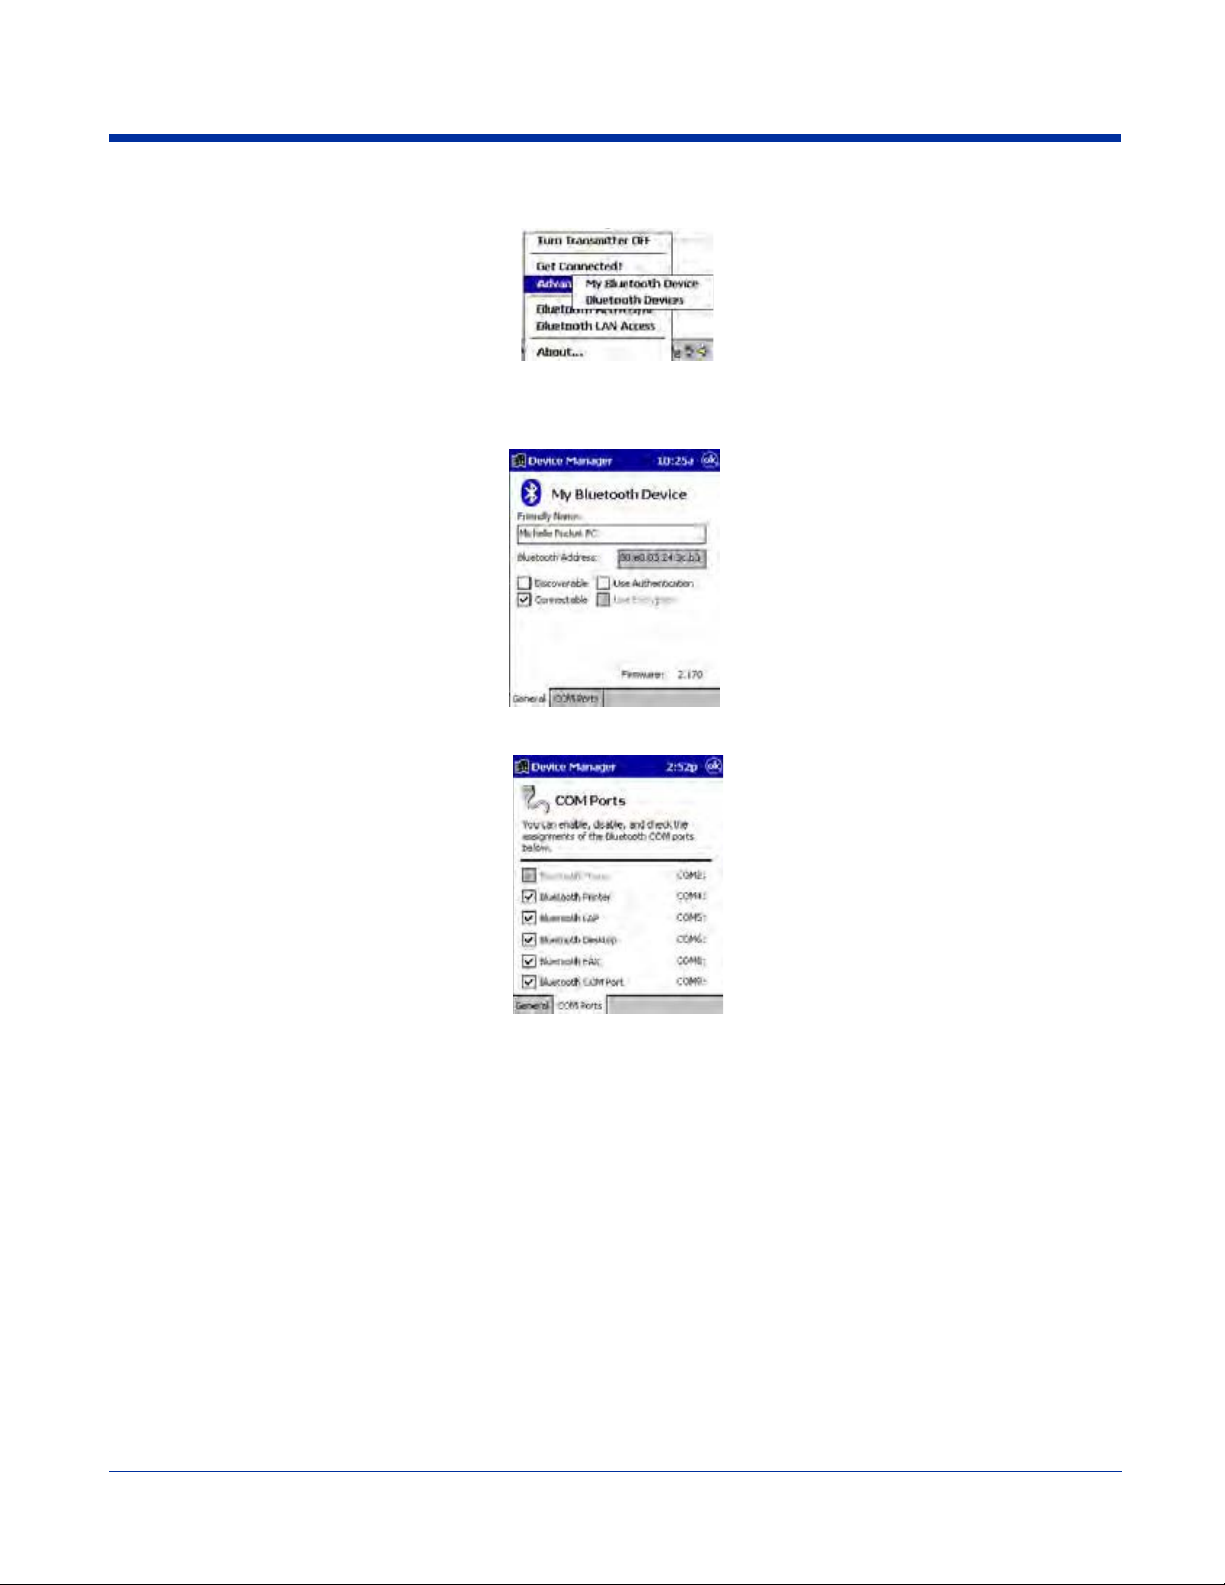
1. Tap on the Bluetooth icon on the Today screen. Select Advanced Features then My Bluetooth Device.
Note: If you installed OBEX, the menu also lists Transfer via Bluetooth.
2. The My Bluetooth Device screen appears. Tap on the COM Ports tab.
3. As needed, view and/or enable/disable the Bluetooth COM port assignments. Tap OK.
You can also disable the IrDA port to free up a port for Bluetooth devices. Tap Start > Settings > Connections tab > IrDA and
select Disable IrDA Port.
Note: The Bluetooth Phone port cannot be disabled.
Discover Bluetooth Device(s)
Follow these steps to discover other Bluetooth devices nearby, including non-phone devices. The Device Discovery Wizard is a
more detailed alternative to using the Bluetooth “Get Connected!” Wizard or Bluetooth ActiveSync or Bluetooth LAN Access
options. The Device Discovery Wizard allows you to discover any type of Bluetooth device.
1. If not open, launch the Bluetooth Devices folder. Tap on the Bluetooth icon on the Today screen. Select Advanced
Features then Bluetooth Devices.
2. In the Bluetooth Devices Folder, tap on the Device Discovery icon. Or you can tap on Tools. In the pop-up menu, select
Device Discovery.
8 - 2 Rev (d)
7/10/06
Dolphin® 9500 Series User’s Guide-Pre-
liminary
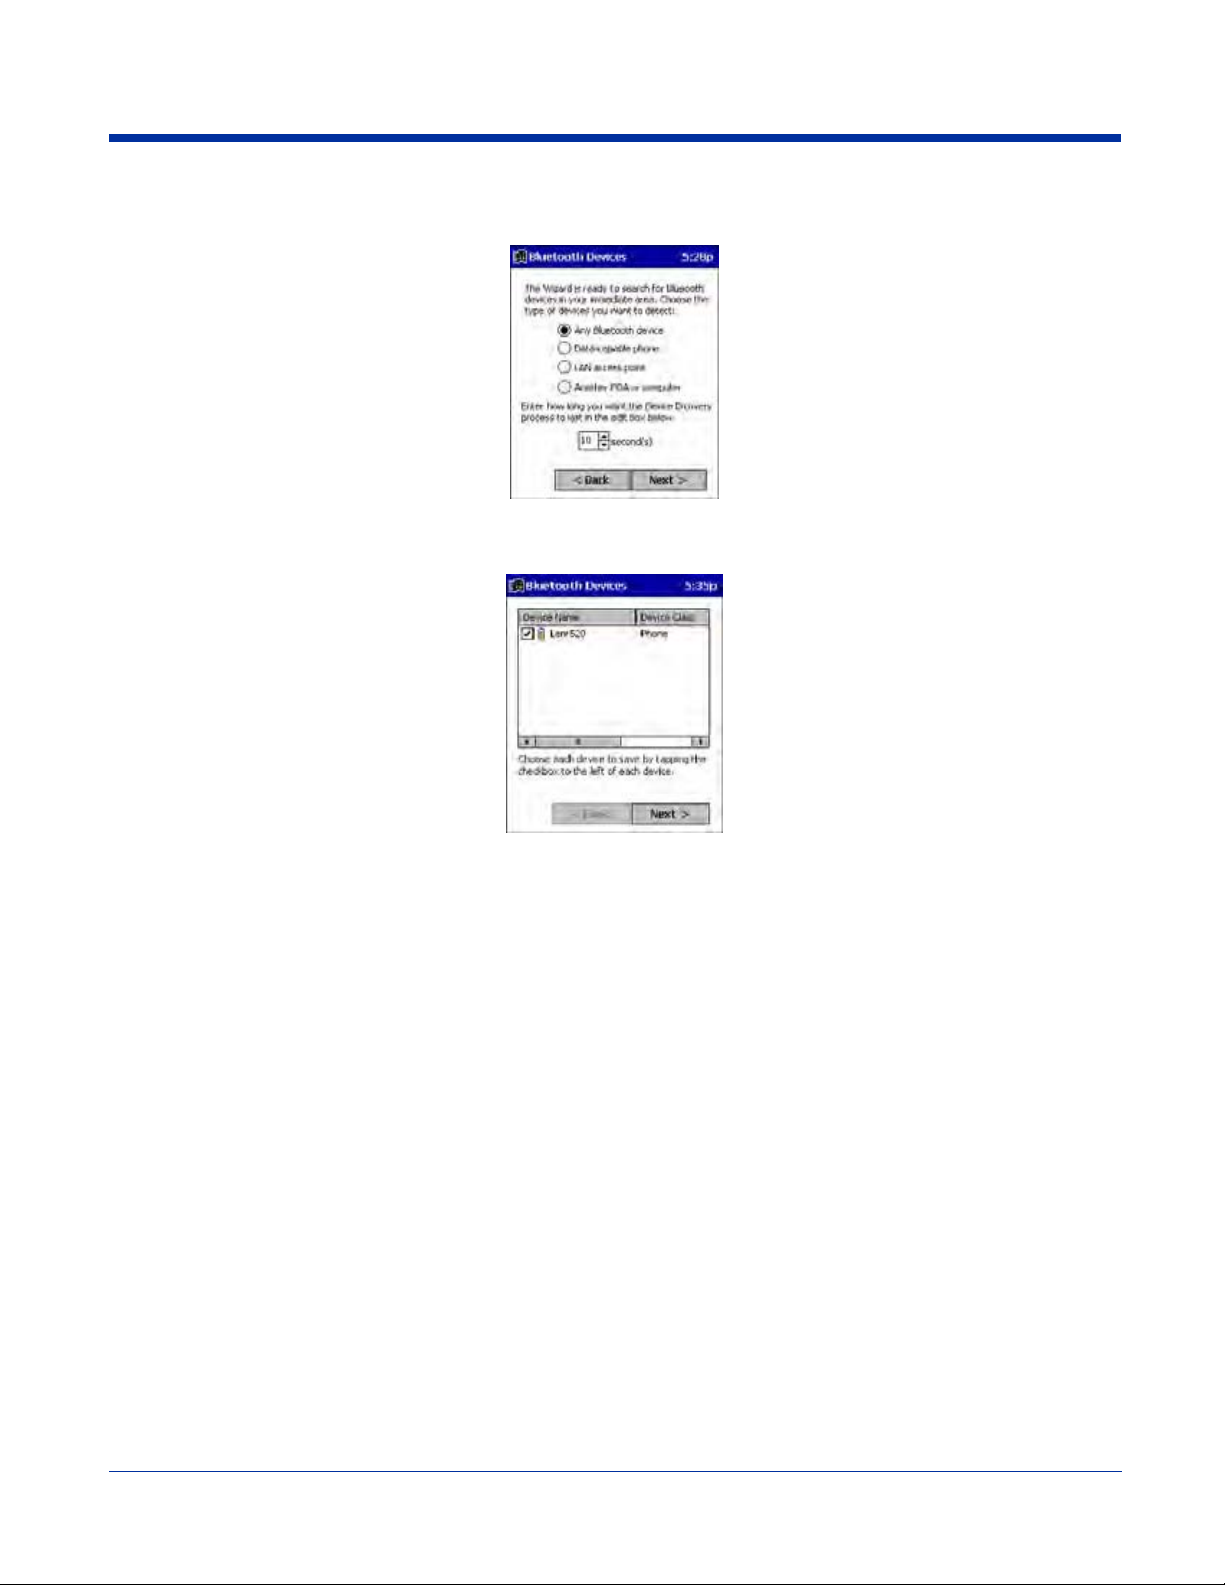
3. Follow the Bluetooth Device Discovery Wizard to search for Bluetooth devices nearby. When prompted, select the device
type you seek.
4. When the search is complete, a screen reports the discovered Bluetooth devices. Check the box next to any device you
wish to save information about, (i.e., any devices you wish to connect to). Tap Next.
5. A service discovery phase begins, 5-10 seconds per chosen device.
6. In the next screen, tap Finish.
Bond With Discovered Device(s)
Follow these steps to bond with an already discovered Bluetooth device. In most cases, bonding is for establishing secure
communications with a Bluetooth-enabled phone. This is a more detailed alternative to using the Bluetooth “Get Connected!
Wizard.”
Important!
• Do not try to bond with a Motorola Timeport 270C or Nokia 6310!
• Do not use this method to bond with a printer! The third-party printing software included on the installation CD also handles
bonding.
1. If not open, launch the Bluetooth Devices folder. Tap on the Bluetooth icon in the Today screen. Select Advanced
Features, then Bluetooth Devices.
Dolphin® 9500 Series User’s Guide-Preliminary
Rev (d)
7/10/06
8 - 3
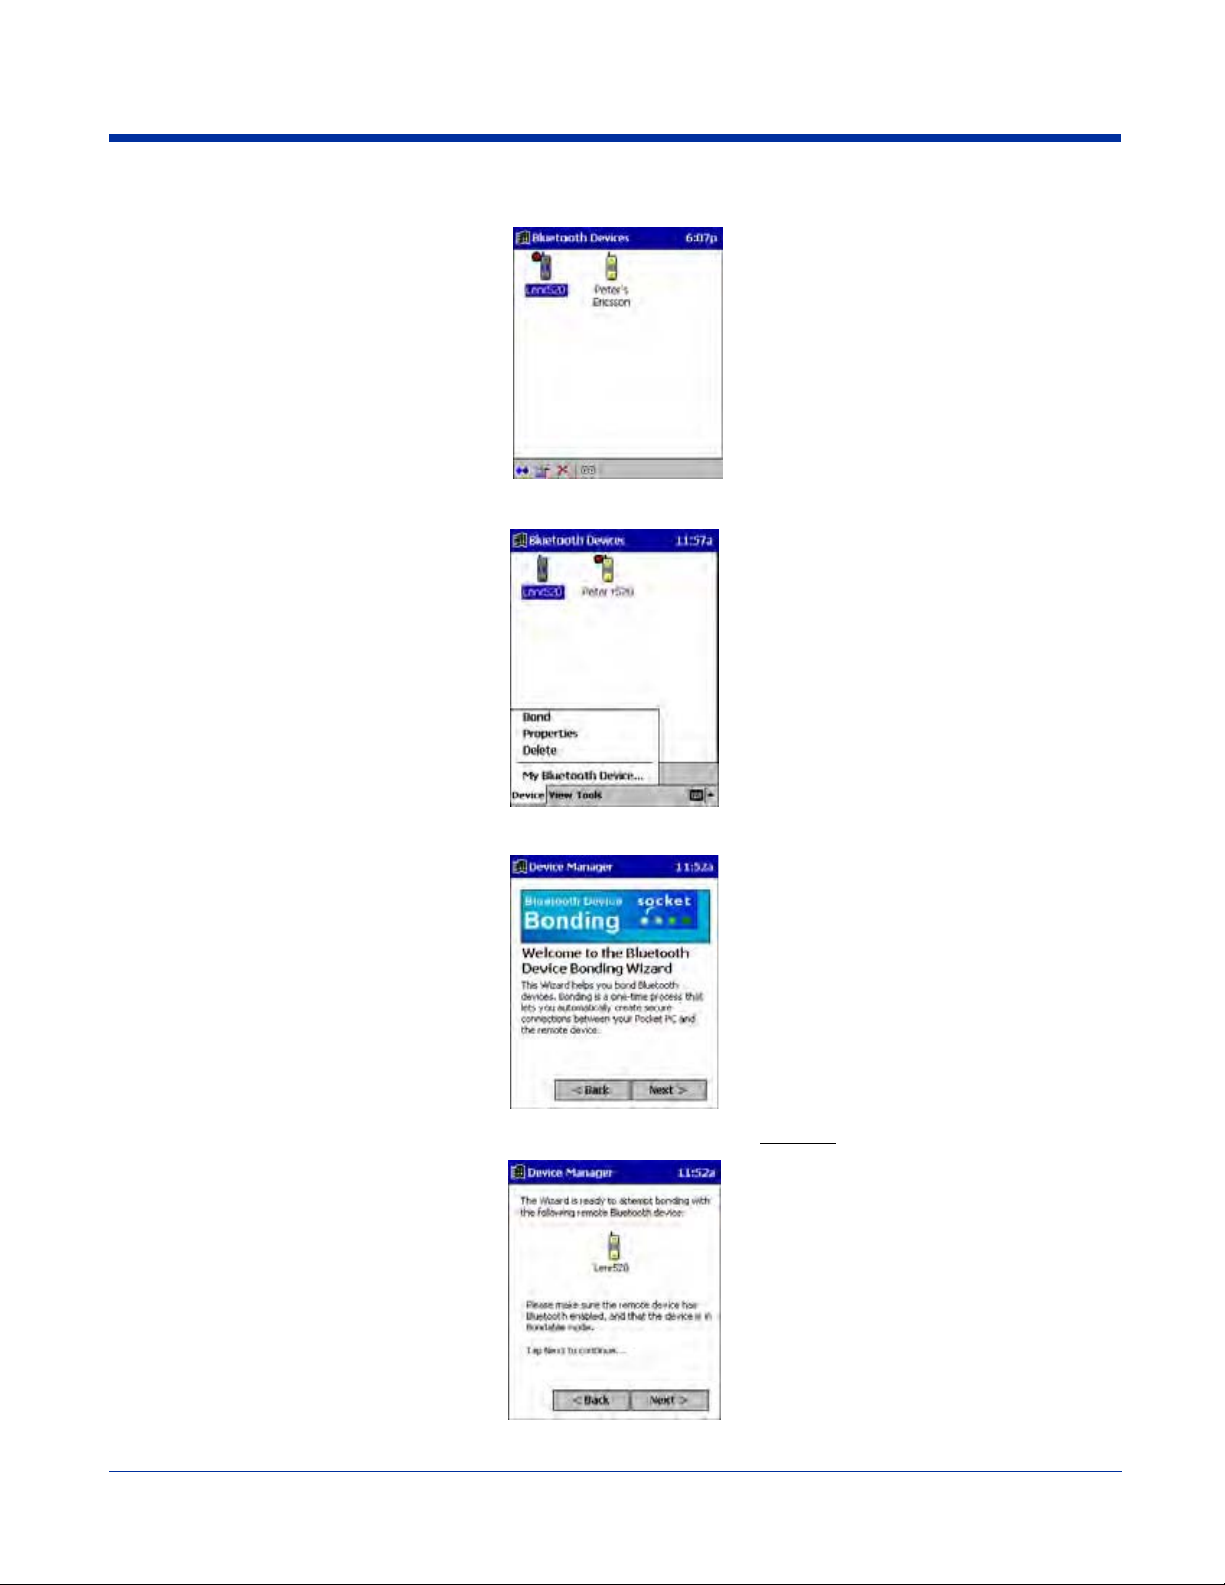
2. Tap and hold your stylus on the Bluetooth device you want to bond with. In the pop-up menu, select Bond.
3. Alternatively, after selecting a device, tap on the Bond icon. Or tap on Device, then select Bond.
4. The Bluetooth Device Bonding Wizard launches. Follow the wizard to bond with your selected device.
5. As prompted, make sure the Bluetooth device that you want to bond with is in Bondable mode.
8 - 4 Rev (d)
7/10/06
Dolphin® 9500 Series User’s Guide-Pre-
liminary
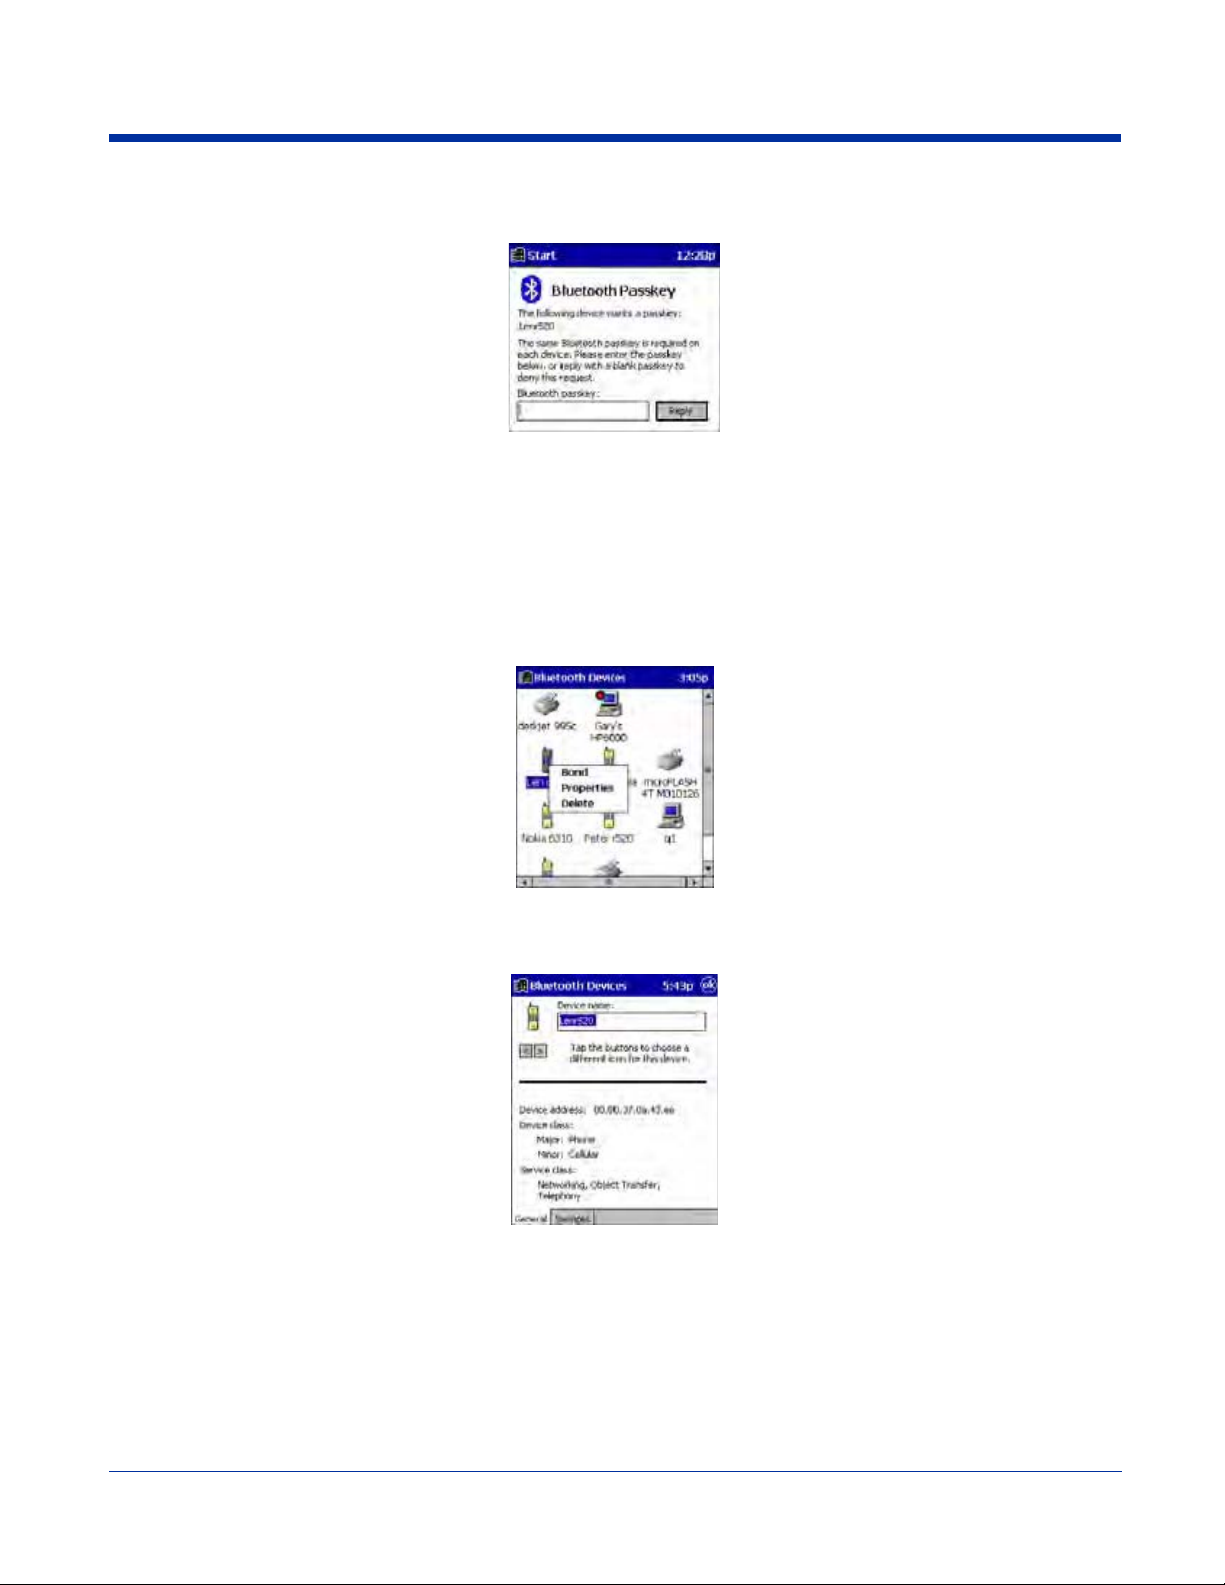
6. If the remote device is set up to accept bonding, a Bluetooth Passkey screen appears. To contin ue bonding, enter the
correct passkey and tap Reply.
7. When you have successfully bonded with the other device, tap Finish.
View Device Properties
Follow these steps to view the properties of an already discovered device.
1. If not open, launch the Bluetooth Devices folder. Tap on the Bluetooth icon on the Today screen. Select Advanced
Features then Bluetooth Devices.
2. Select a device. Tap on the Properties icon, or tap on Device then select Properties. Alternatively, you can tap and hold
your stylus on the Bluetooth device you want to view information about. In the pop-up menu, select Properties.
3. Use the General and Services screens to research device properties. If needed, assign a new device type icon by tapping
on the arrow buttons in the General screen. You can also use the Device name field to rename the device. When done, tap
OK for the setting to take effect.
Set Up Your Favorite Device
Follow these steps to set up default devices in the Bluetooth Devices folder. Please note that the Get Connected! Wizard
automatically assigns the favorite phone.
1. Tap Tools > My Favorites.
Dolphin® 9500 Series User’s Guide-Preliminary
Rev (d)
7/10/06
8 - 5
2. Tap on the tab for the type of device you would like to set a favorite for. If needed, use the arrow buttons to scroll and find
the tab you need.
Note: Tabs appears only for COM ports you have enabled. To enable a port, refer to the “Assign COM Ports” section earlier in
this chapter.
3. To select a favorite device, select Use the favorite selected above. In the drop-down list, select your device. Tap OK.
4. After setting a device as your favorite, its icon appears in the Bluetooth Devices folder with a heart next to it.
Change Views
You can switch between the Large Icons or Details views for the Bluetooth Devices folder.
1. In Bluetooth Devices, tap on View.
2. In the pop-up menu, choose between Large Icons or Details.
Large Icons Details
Note: In Details view, you can see the Device Class and scroll right to see the current Bonded status.
Delete a Device From the Folder
If you no longer plan to connect with it, you can delete a device from the Bluetooth Devices folder.
1. If not open, launch the Bluetooth Devices folder.
8 - 6 Rev (d)
7/10/06
Dolphin® 9500 Series User’s Guide-Pre-
liminary
2. Tap and hold your stylus on the device you wish to delete. In the pop-up menu, select Delete.
Turn Radio Transmitter ON/OFF
You may want to turn off the radio transmitter to save power or if you are entering an area with radio restrictions (e.g., an airplane).
1. Tap on the Bluetooth icon in the task tray on the Today screen.
2. In the pop-up menu, select Turn Transmitter OFF.
3. The Bluetooth Card radio transmitter shuts off. The Bluetooth icon and menu options becomes gray.
4. To turn the radio transmitter back on, tap on the gray Bluetooth icon. In the pop-up-menu, select Turn Transmitter ON.
Bluetooth ActiveSync
This section explains how to quickly and easily ActiveSync to a notebook or desktop computer with Microsoft ActiveSync.
1. Tap on the Bluetooth icon. In the pop-up menu, select Bluetooth ActiveSync.
2. The next screens varies depending on if your Bluetooth Devices folder contains any computers, and if one is chosen as your
favorite. Please refer to the appropriate scenario:
SCENARIO #1: Your Bluetooth Devices folder contains a favorite desktop computer.
(a) When you tap Bluetooth ActiveSync, your device automatically tries to connect to your favorite computer.
(b) The Connect To screen appears, reporting that it is trying to connect to Wireless ActiveSync.
(c) After a successful connection is made, the status screen reports Connected. Now you are ready to synchronize files, if
desired.
SCENARIO #2: Your Bluetooth Devices folder contains no favorite desktop computer.
Dolphin® 9500 Series User’s Guide-Preliminary
Rev (d)
7/10/06
8 - 7
(a) When you tap on Bluetooth ActiveSync, a screen appears that allows you to choose which computer to connect to in
your Bluetooth Devices folder. Choose a computer from the list and tap Select, or tap Find to search for another computer.
Note: If the computer you want to connect to is not listed, tap Find to begin a search. Proceed as described in Scenario #3 on
page 8-8.
(b) Your device attempts to connect to your selected computer.
(c) After a successful connection is made, the status screen reports Connected. Now you are ready to synchronize files, if
desired.
SCENARIO #3: Your Bluetooth Devices folder contains no computers.
(a) When you tap on Bluetooth ActiveSync, a Bluetooth Device Search automatically begins.
Note: You can also start the device search by tapping Find in the Bluetooth Devices screen.
(b) After the search is complete, select the computer you wish to ActiveSync with and tap Select. If the computer is not listed,
make sure the computer is discoverable and tap Refresh to search again.
(c) After you tap Select, a service discovery phase begins.
8 - 8 Rev (d)
7/10/06
Dolphin® 9500 Series User’s Guide-Pre-
liminary
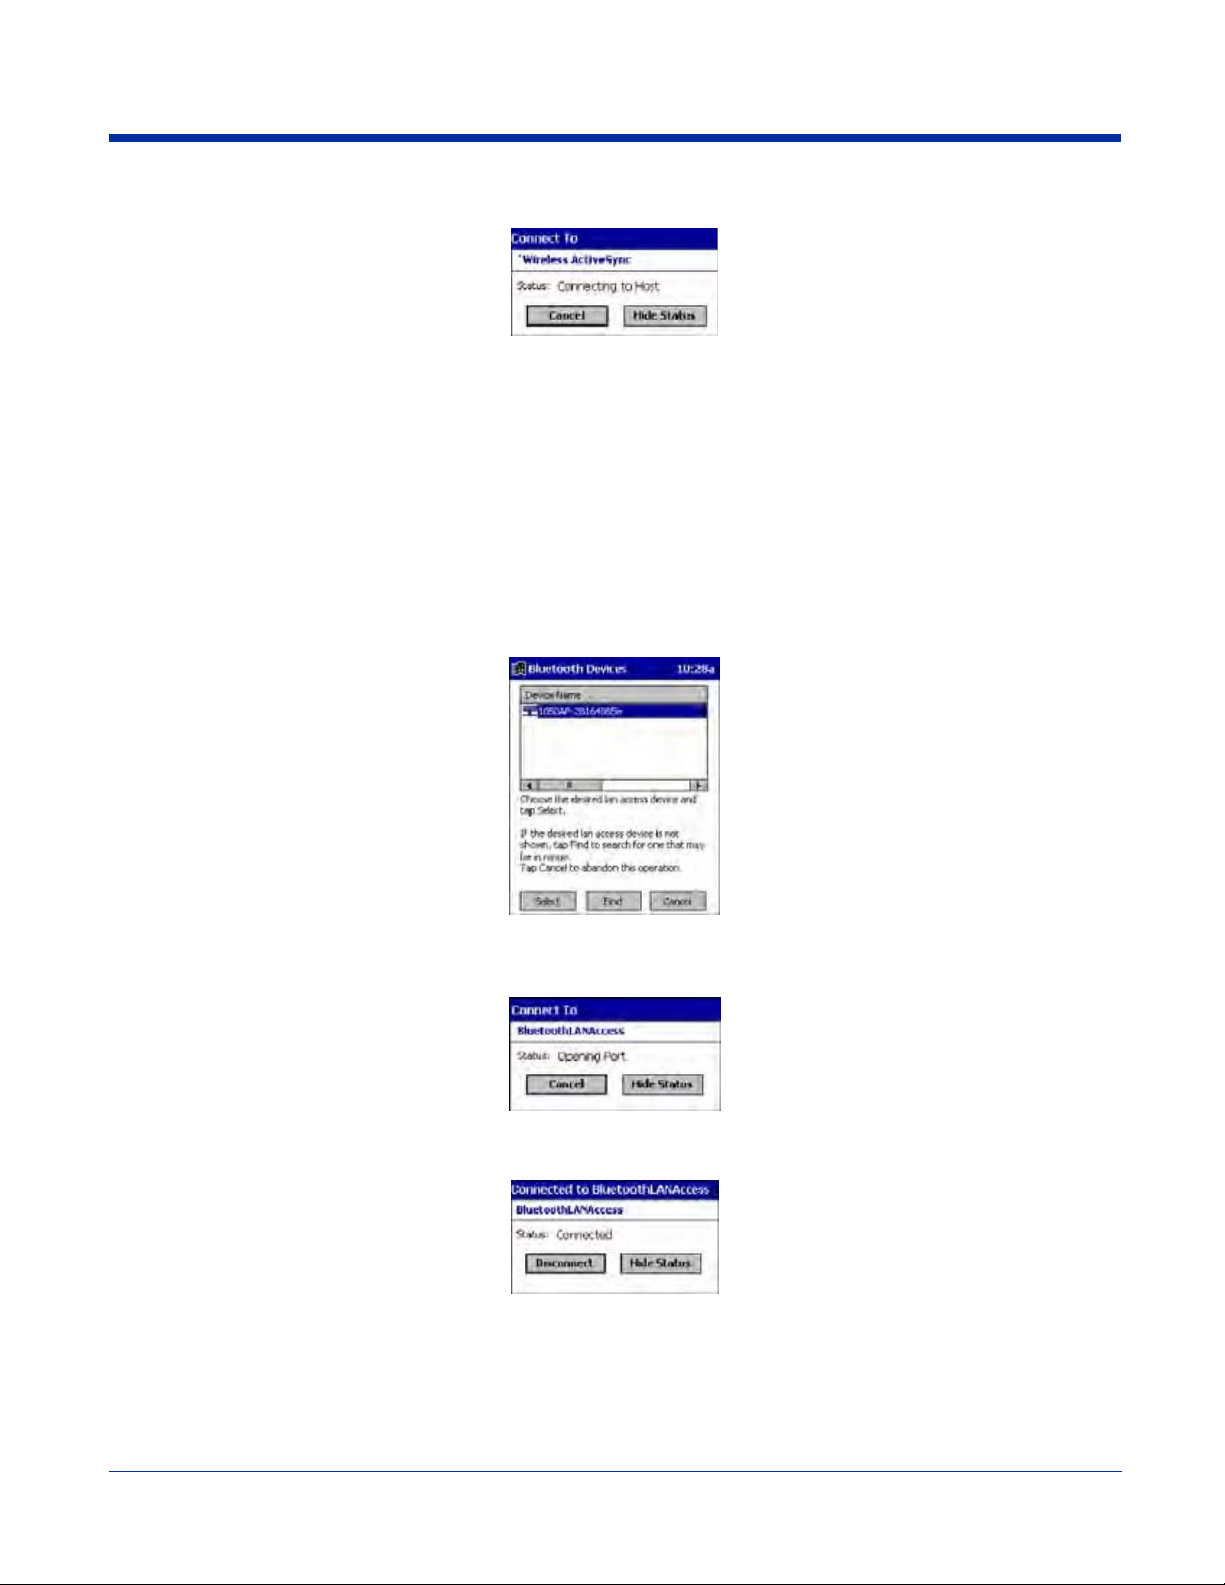
(d) The Connect To screen appears, reporting that it is trying to connect to Wireless ActiveSync.
(e) After a successful connection is made, the status screen reports Connected. Now you are ready to synchronize, if desired.
Bluetooth LAN Access
This section explains how to use the Bluetooth LAN Access feature to quickly and easily connect to a Bluetooth-enabled LAN
access point.
1. Tap on the Bluetooth icon. In the pop-up menu, select Bluetooth LAN Access.
2. The next screens varies depending on if your Bluetooth Devices folder contains any access points, and if one is chosen as
your favorite. Please refer to the appropriate scenario:
SCENARIO #1: Your Bluetooth Devices folder contains no favorite access point.
(a) When you tap Bluetooth LAN Access, a screen appears that allows you to choose which access point to connect to in
your Bluetooth Devices folder. Choose an access point from the list and tap Select.
Note: If your access point is not listed, tap Find and proceed as described in Scenario #3.
(b) Your device tries to connect to the selected access point.
(c) If your LAN requires a passkey, a screen appears asking for the passkey. Enter the passkey, then tap OK.
(d) After a successful connection is made, the status screen reports Connected.
(e) Now you are ready to access your LAN for Internet access, files, etc.
SCENARIO #2: Your Bluetooth Devices folder contains a favorite access point.
Dolphin® 9500 Series User’s Guide-Preliminary
Rev (d)
7/10/06
8 - 9
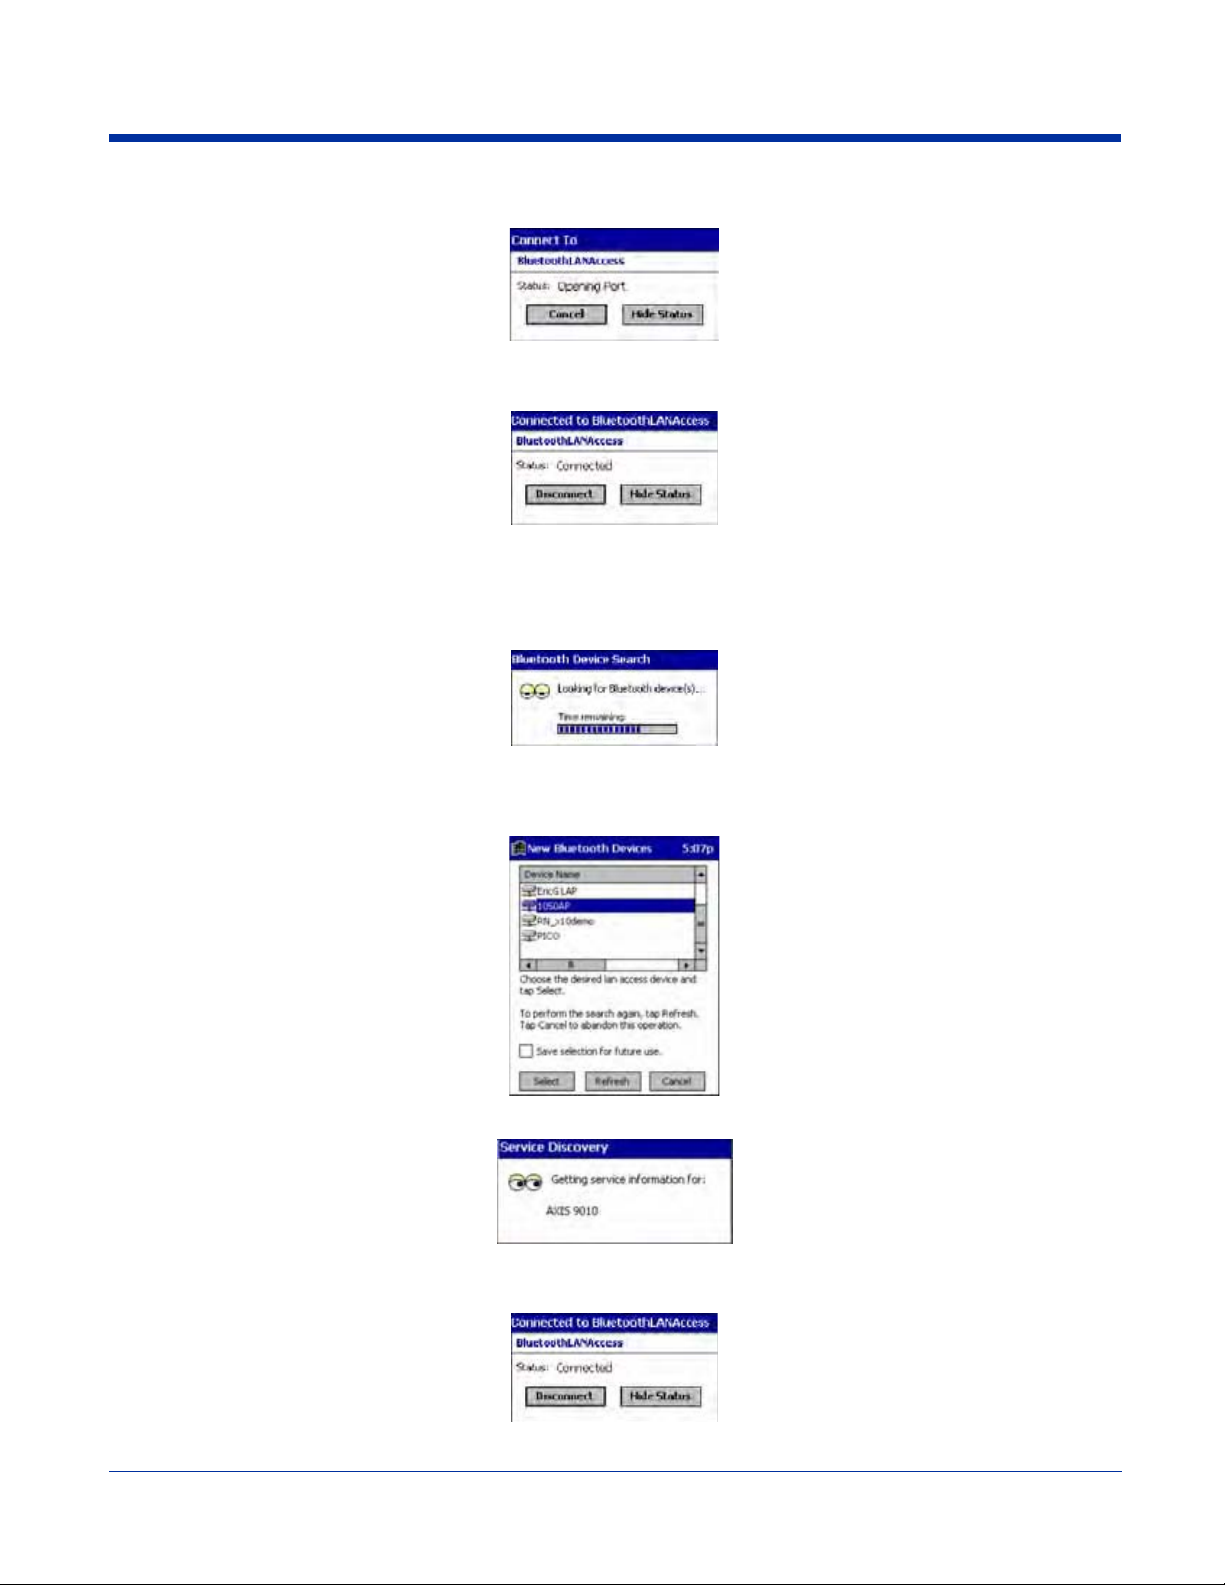
(a) When you tap Bluetooth LAN Access, the device automatically tries to connect with your favorite access point.
(b) If your LAN requires a passkey, a screen appears, asking for the passkey. Enter the passkey, then tap OK.
(c) After a successful connection is made, the status screen reports Connected.
(d) Now you are ready to access your LAN for Internet access, files, etc.
SCENARIO #3: Your Bluetooth Devices folder has no access points.
(a) When you tap Bluetooth LAN Access, the device automatically begins to search for new Bluetooth devices.
Note: You can also start the device search by tapping Find in the Bluetooth Devices screen. See Scenario #2.
(b) After the search is complete, select the access point you wish to connect to. Tap Select. If the access point is not listed,
tap Refresh to search again.
(c) After you tap Select, a service discovery phase begins.
(d) If the LAN requires a Passkey, a screen appears, asking for the Passkey. Enter the passkey, then tap OK.
(e) After a successful connection is made, the screen reports Connected.
(f) Now you are ready to access your LAN for Internet access, files, etc.
8 - 10 Rev (d)
7/10/06
Dolphin® 9500 Series User’s Guide-Pre-
liminary
OBEX
This section explains how to use the OBEX (object exchange) application to trade business cards, contacts or files with another
Bluetooth device that supports OBEX.
Bluetooth OBEX application supports five operations:
• Exchange Business Cards
• Send a Contact
• Send a File
• Browse Remote Device
• Receive Contact or File
• Enable File Sharing
The first four operations - exchange business cards, send a contact, send a file, and browse remote device - are client-oriented.
They involve initiating an object exchange.
The last two operations - receive contact or file and enable file sharing - are server-oriented. They involve accepting objects in
an exchange initiated by another Bluetooth device.
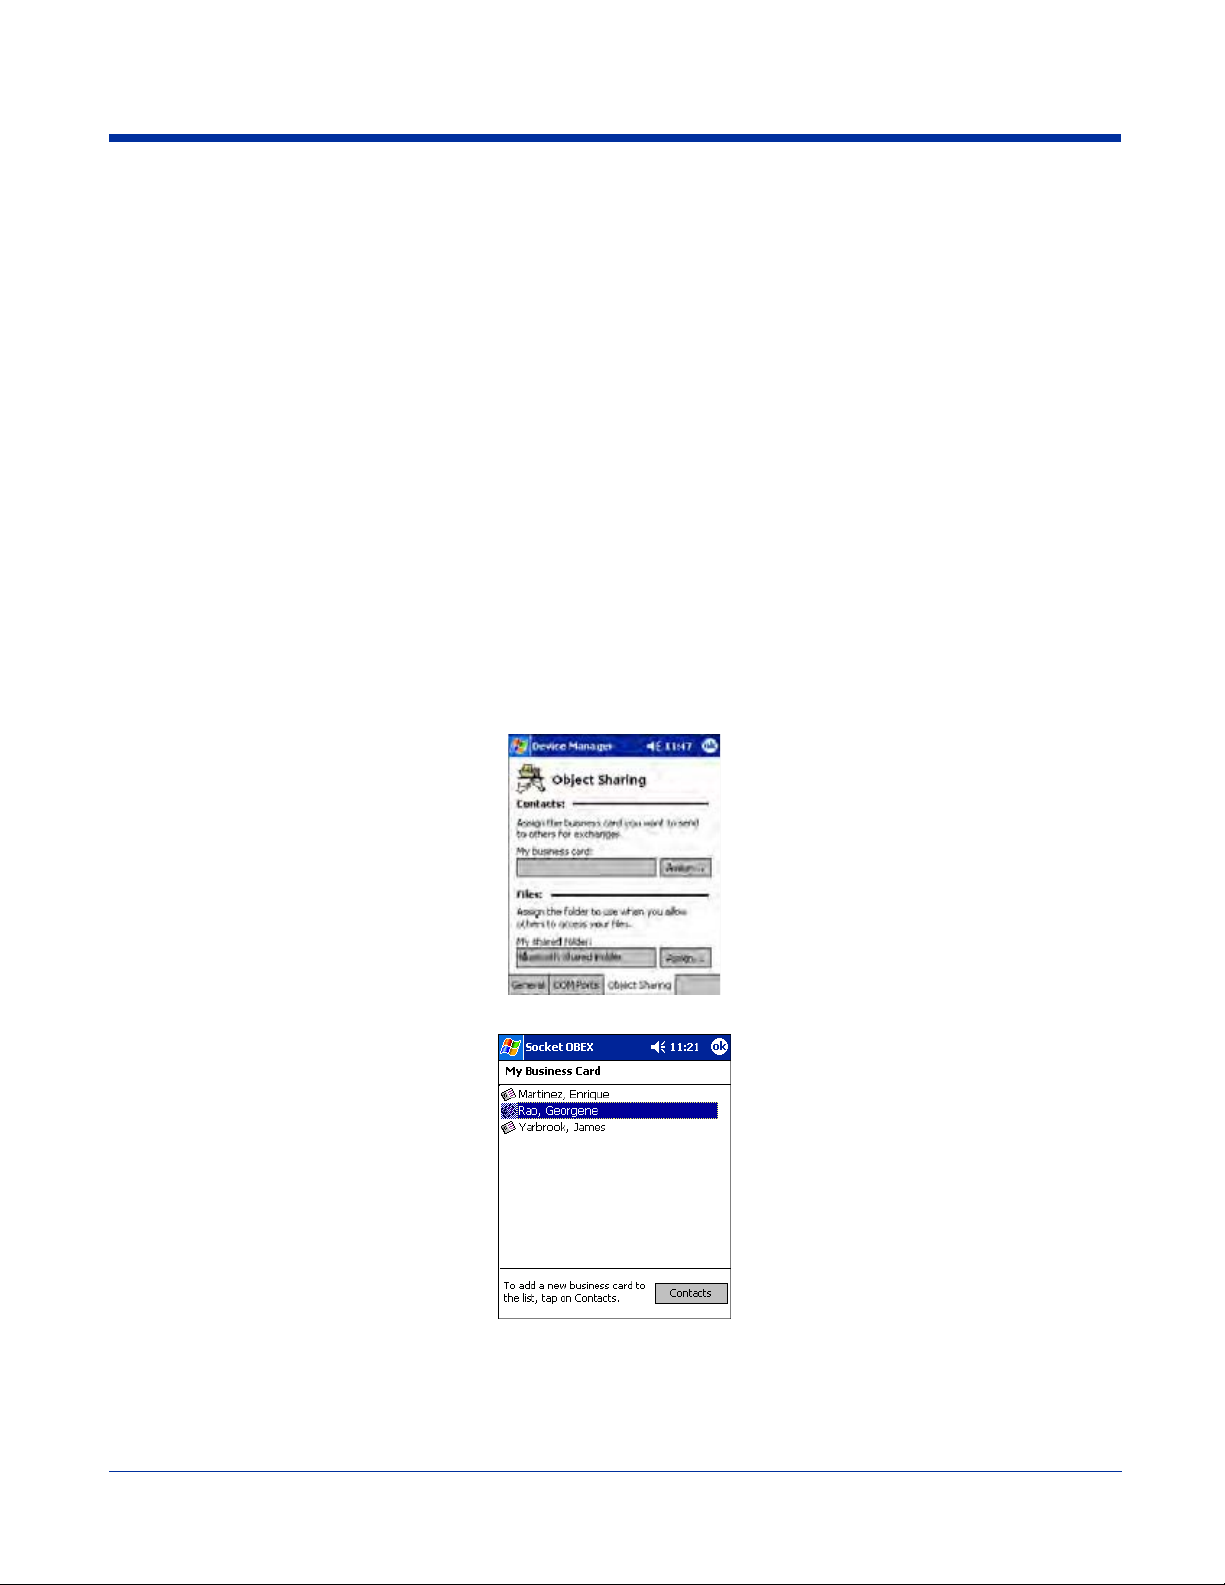
Exchange Business Cards
1. Make sure both Bluetooth devices have a business card assigned to them.
If each device does not have a business card assigned to it, you cannot exchange business cards.
To assign a business card to your device, do the following:
• Tap on the Bluetooth icon. In the pop-up menu, tap Advanced Features > My Bluetooth Device.
• Tap on the Object Sharing tab. Under My business card, tap Assign
• In the next screen, select your business card and tap OK. If your business card is not listed, tap Contacts to create one.
When you return to the Object Sharing screen, tap OK.
2. Make sure the other Bluetooth device is set up to receive a contact. The device must support the OBEX Object Push profile.
Note: If the other device is also using the Bluetooth Connection Kit, you can set it up to receive a contact by tapping the Bluetooth
icon. In the pop-up menu, tap Transfer via Bluetooth > Receive Contact or File.
Dolphin® 9500 Series User’s Guide-Preliminary
Rev (d)
7/10/06
8 - 11
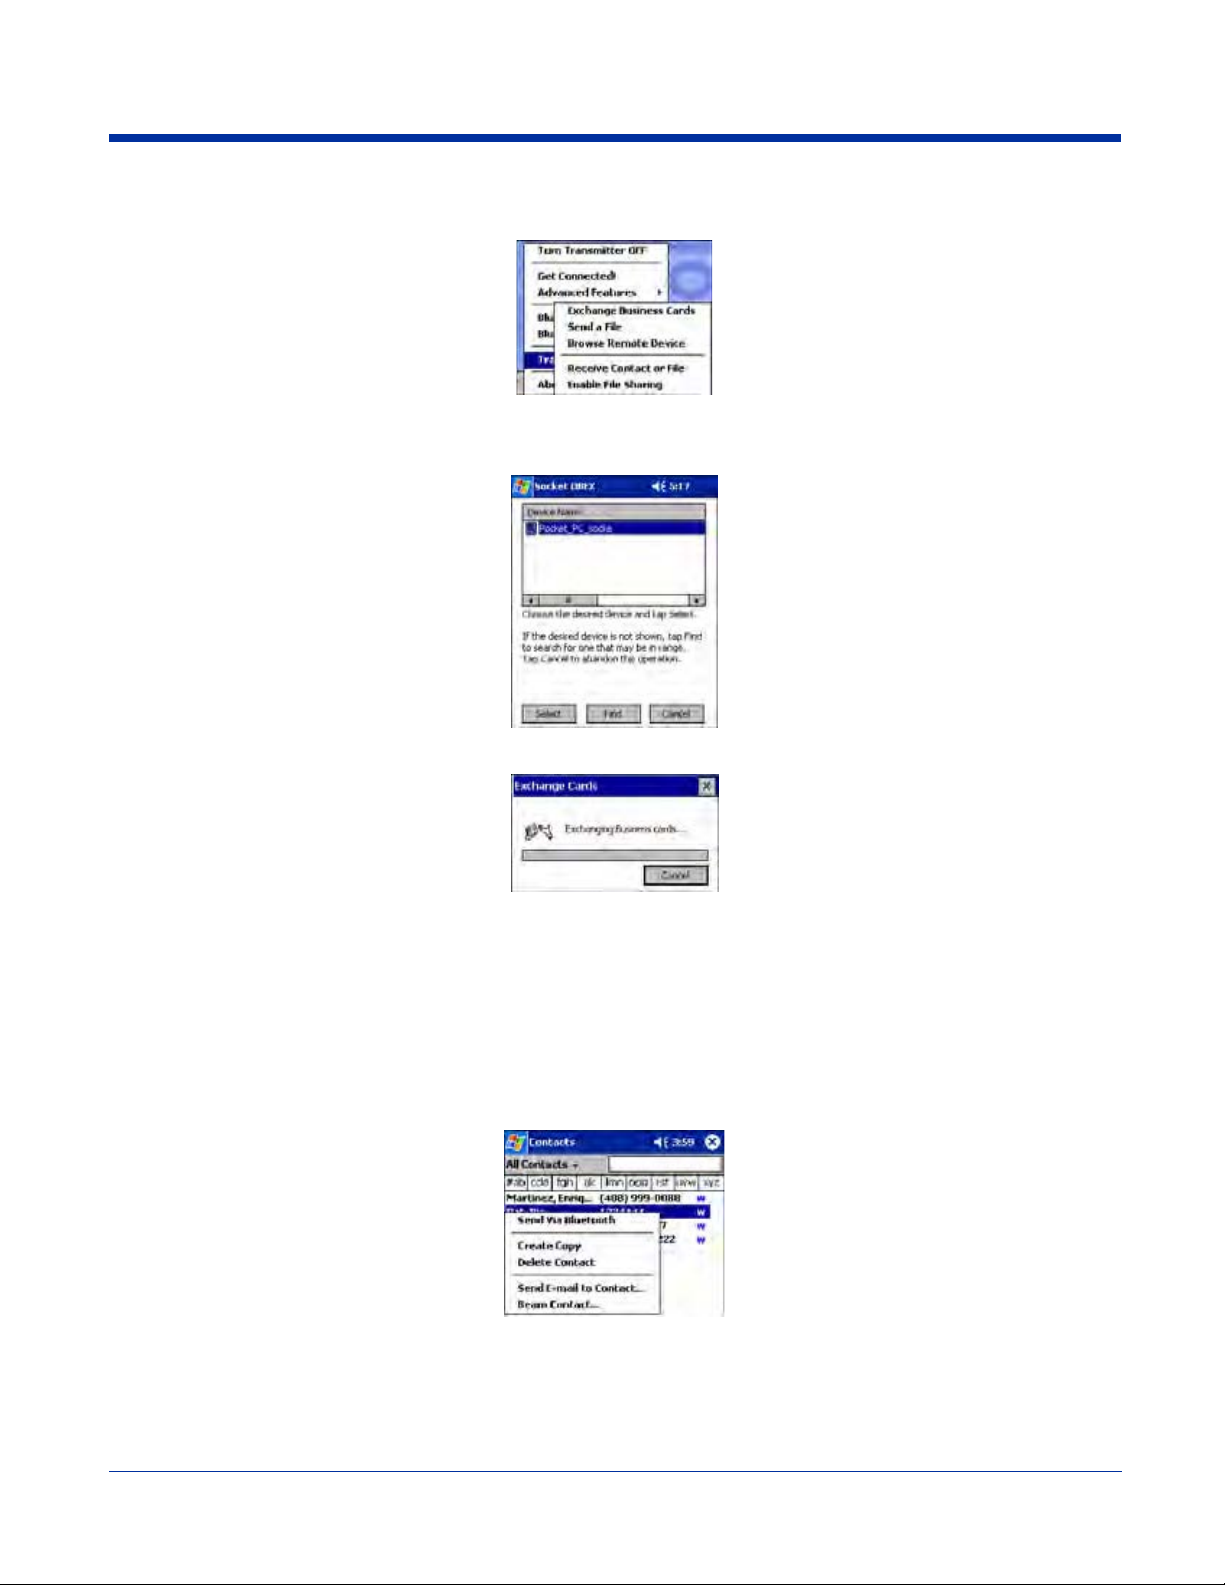
3. Now you are ready to exchange business cards. Tap on the Bluetooth icon. In the pop-up menu, tap Transfer via
Bluetooth > Exchange Business Cards.
4. If your device has no devices in the Bluetooth Devices Folder, then it begins to search for Bluetooth devices nearby.
5. Select the Bluetooth device you wish to exchange business cards with. If the device is not listed, tap Find.
6. Your device begins exchanging business cards. After the exchange, the new business card should appear in your Contacts
Send a Contact
1. Make sure the other Bluetooth device is set up to receive a contact. It must support the OBEX Object Push server profile.
Refer to the documentation that came with the device for instructions.
Note: If the other device is also using the Bluetooth Connection Kit, you can set it up to receive a contact by tapping the Bluetooth
icon. In the pop-up menu, tap Transfer via Bluetooth > Receive Contact or File.
2. Now you are ready to send a contact. Go to your Contacts folder.
3. Tap and hold your stylus on the contact(s) you would like to send. In the pop-up menu, select Send Via Bluetooth .
8 - 12 Rev (d)
7/10/06
Dolphin® 9500 Series User’s Guide-Pre-
liminary
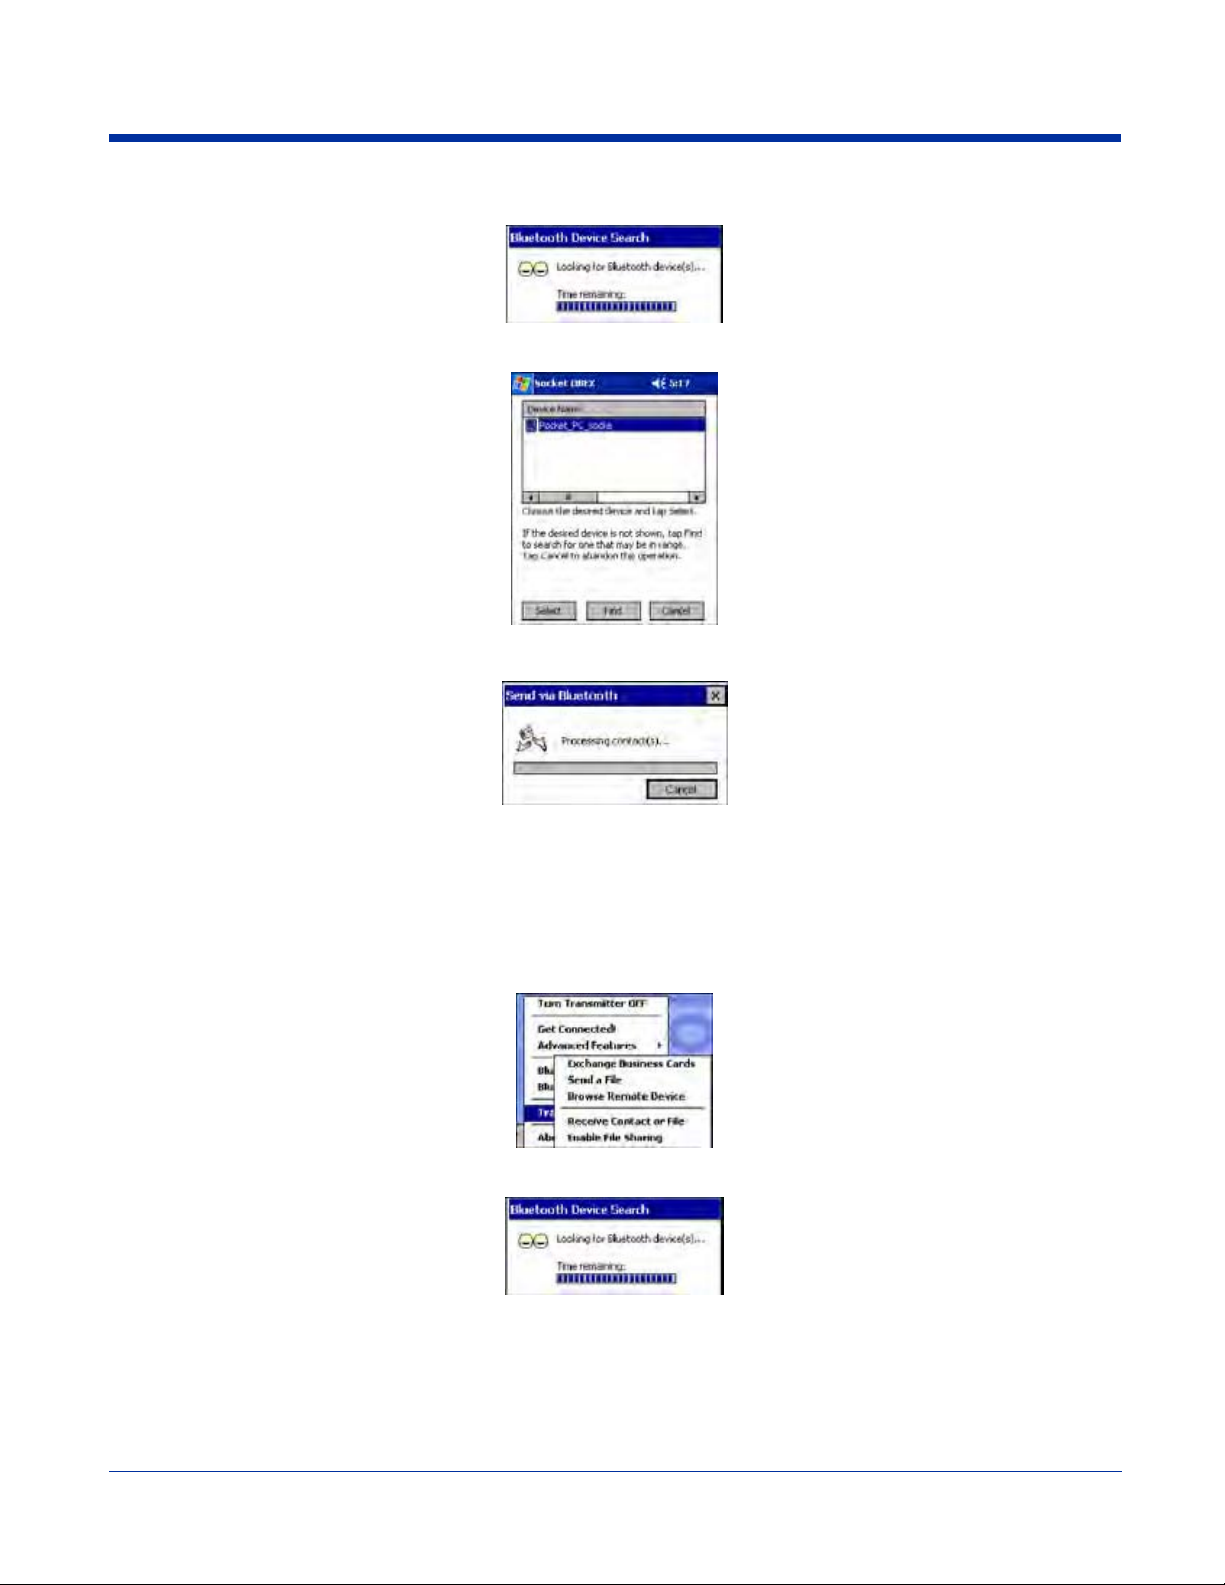
4. If your device has no devices in the Bluetooth Devices Folder, then it begins to search for Bluetooth devices nearby.
5. Select the Bluetooth device you wish to send the contact(s) to. If the desired device is not listed, tap Find.
6. Your device processes and sends the contact(s).
Send a File
1. Make sure the other Bluetooth device can receive a file; that device must support the OBEX Object Push server profile.
Note: If the other device is also using the Bluetooth Connection Kit, you can set it up to receive a file by tapping the Blueto o th
icon. In the pop-up menu, tap Transfer via Bluetooth > Receive Contact or File.
2. Now you are ready to send a file. Tap the Bluetooth icon. In the pop-up menu, tap Transfer via Bluetooth > Send a File.
3. If your device has no devices in the Bluetooth Devices Folder, then it begins to search for Bluetooth devices nearby.
Dolphin® 9500 Series User’s Guide-Preliminary
Rev (d)
7/10/06
8 - 13
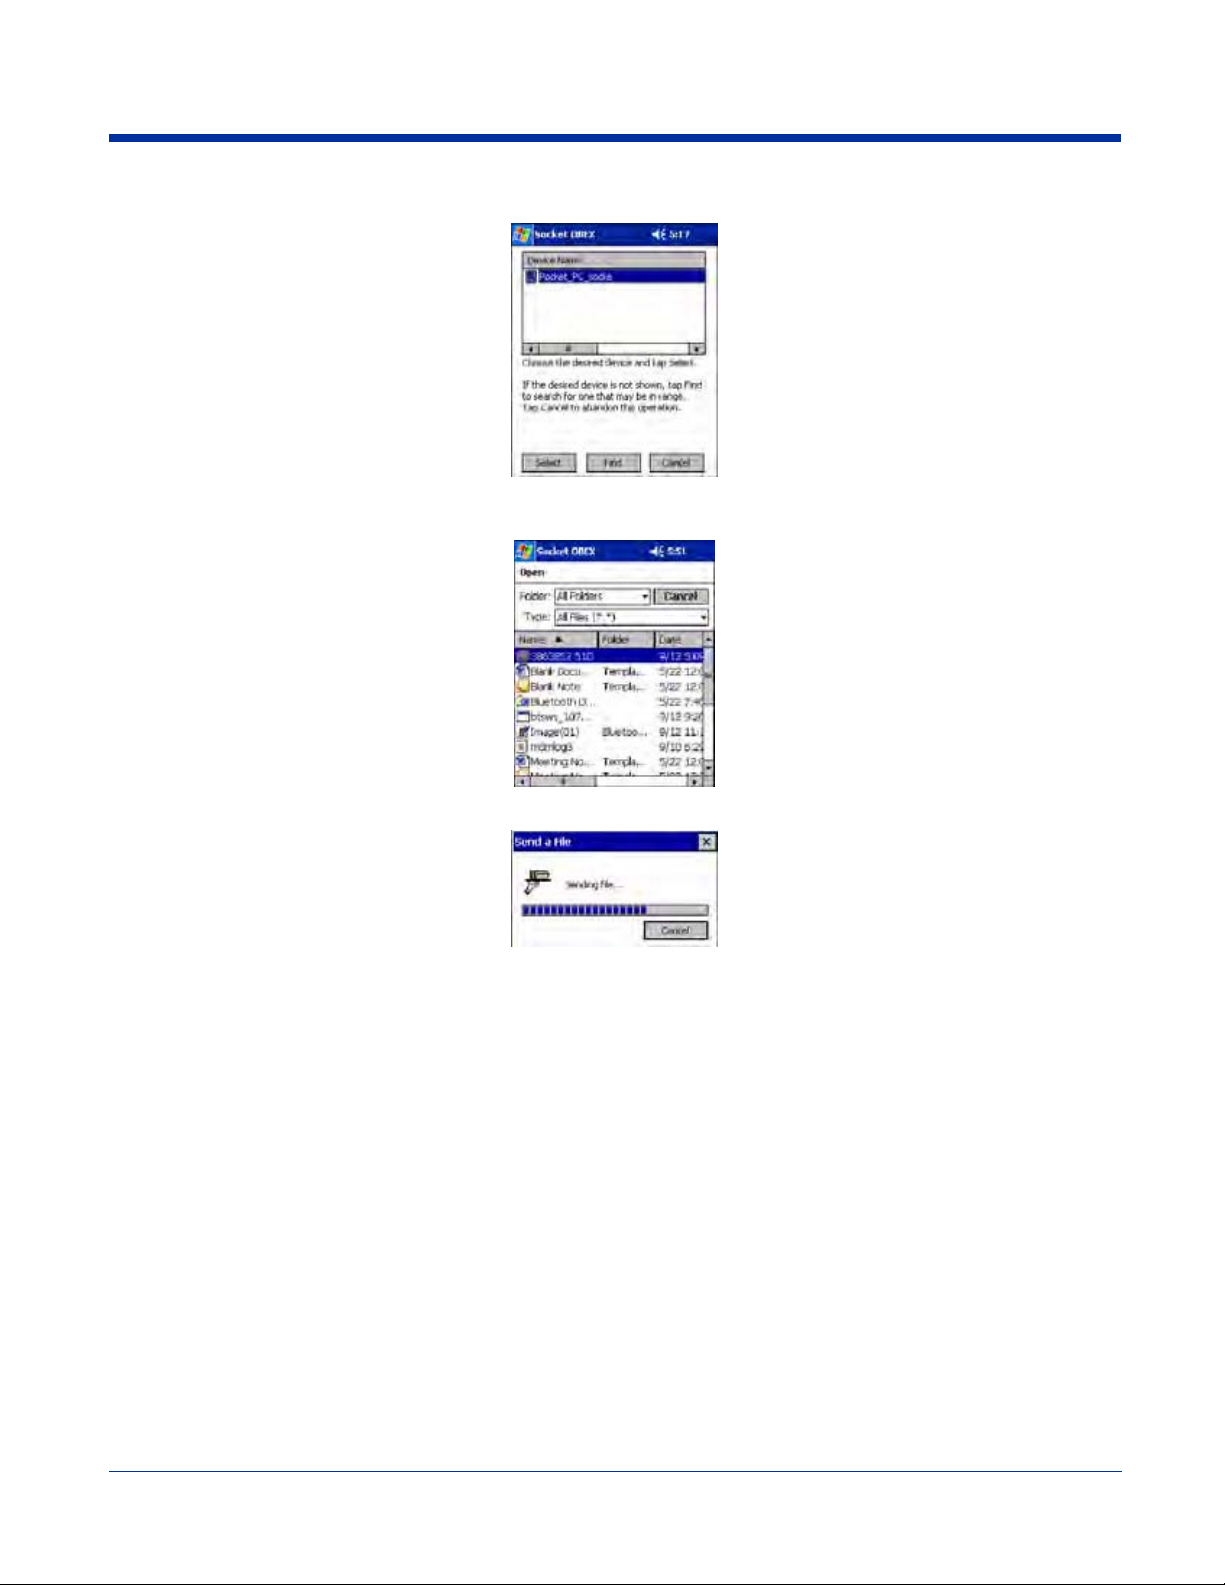
4. Select the Bluetooth device you wish to send a file. If the desired device is not listed, tap Find.
5. In the next screen, tap on the file you wish to send. You can use the Folder and Type drop-down menus to search for your
file. Also, you can scroll horizontally to view the folder, date, size, type, and location of each file.
6. Your device sends the file.
Browse Remote Device
The Bluetooth File Explorer lets your device share files with another Bluetooth device. The other device must support the OBEX
File Transfer server profile.
This section covers the following file transfer operations:
• Prepare for file transfer
• Send/receive file(s) or folder(s)
• Create a folder
• Delete file(s) or folder(s)
• Refresh remote view
• Connect/disconnect
• Exit the program
Note: “Local device” refers to the device you are running the OBEX from. “Remote device” refers to the Bluetooth device you
are trying to transfer files with.
Prepare for File Transfer
1. Make sure the remote device has file sharing enabled. It must support the OBEX File Transfer server profile.
Note: If the other device is also using the Bluetooth Connection Kit, you can enable file sharing by tapping the Bluetooth icon.
In the pop-up menu, tap Transfer via Bluetooth > Enable File Sharing.
8 - 14 Rev (d)
7/10/06
Dolphin® 9500 Series User’s Guide-Pre-
liminary
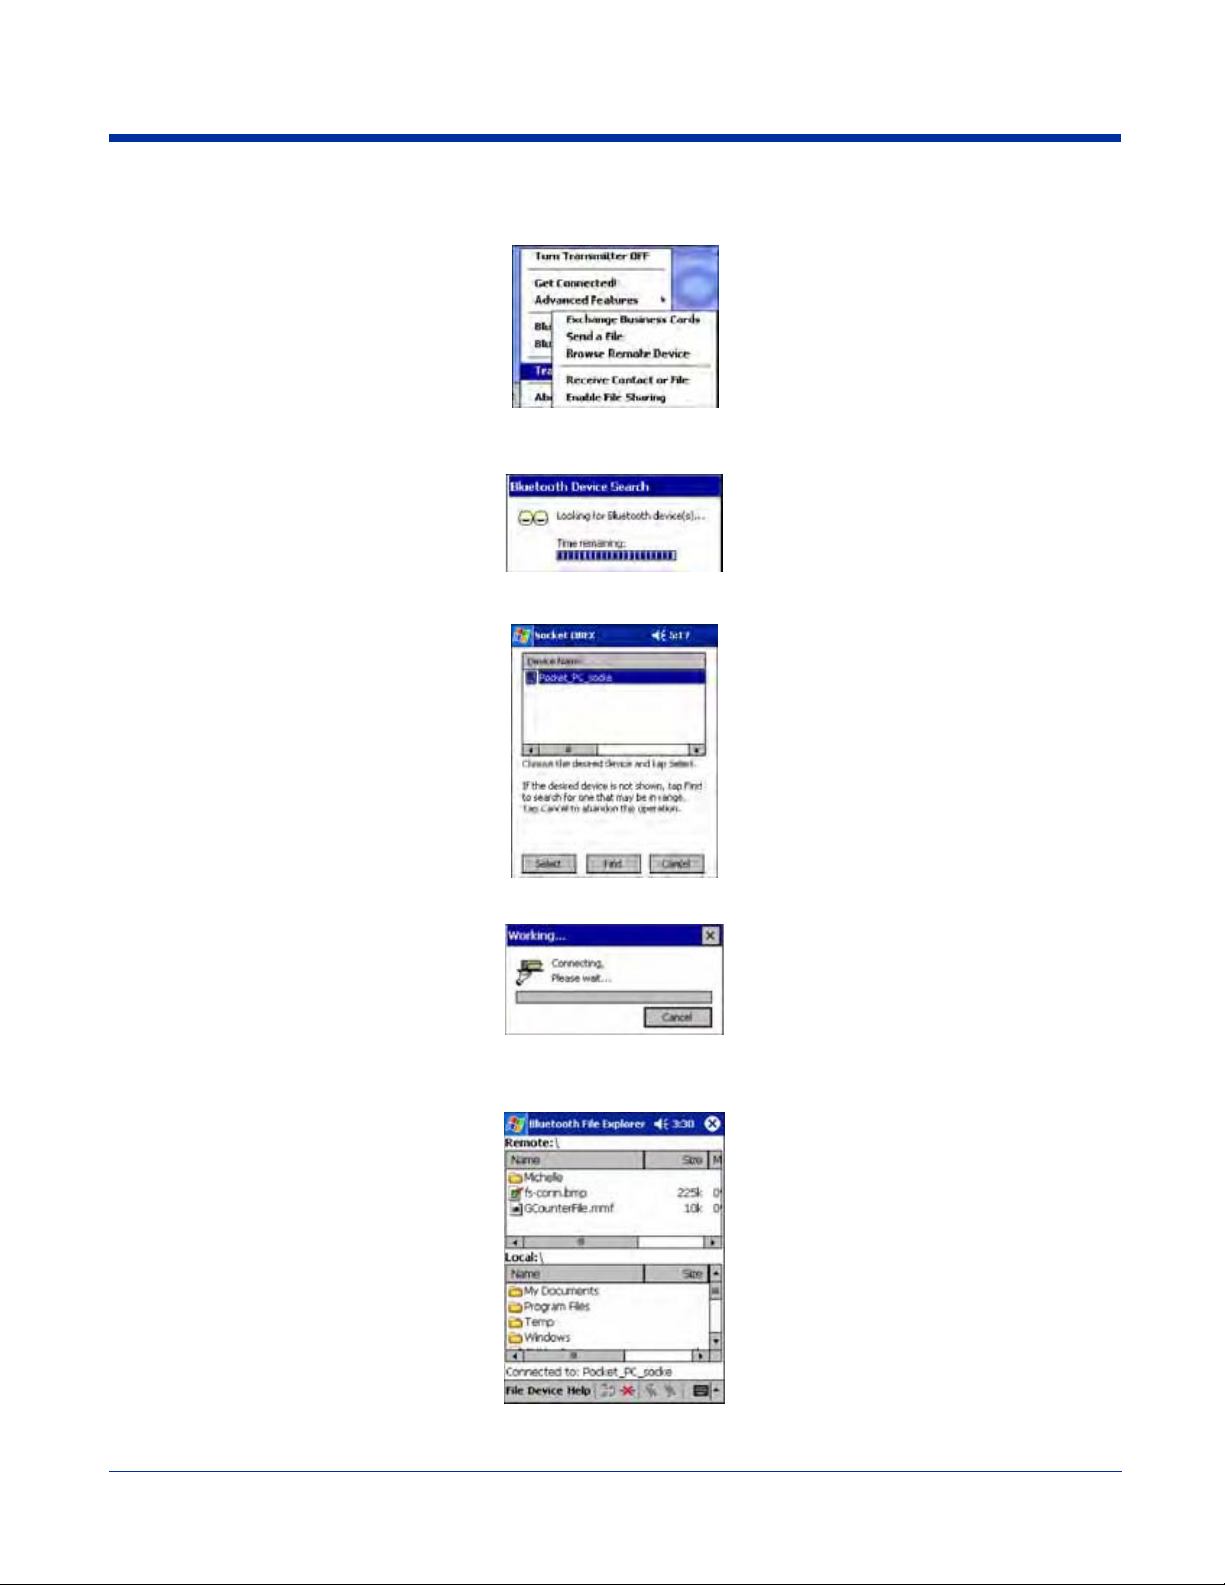
2. Now you are ready to browse the remote device. Tap on the Bluetooth icon. In the pop-up menu, tap Transfer via
Bluetooth > Browse Remote Device.
3. If your device has no devices in the Bluetooth Devices Folder that supports OBEX File Transfer, then it begins to search for
Bluetooth devices nearby.
4. Select the Bluetooth device you wish to browse. If the desired device is not listed, tap Find.
5. Your device begins to establish a file sharing connection.
6. After the devices successfully connect, the Bluetooth File Explorer appears. Half of the screen shows contents of the remote
device, while the other half shows contents of your device (the local device). The very bottom of the screen reports the
connection status.
Dolphin® 9500 Series User’s Guide-Preliminary
Rev (d)
7/10/06
8 - 15
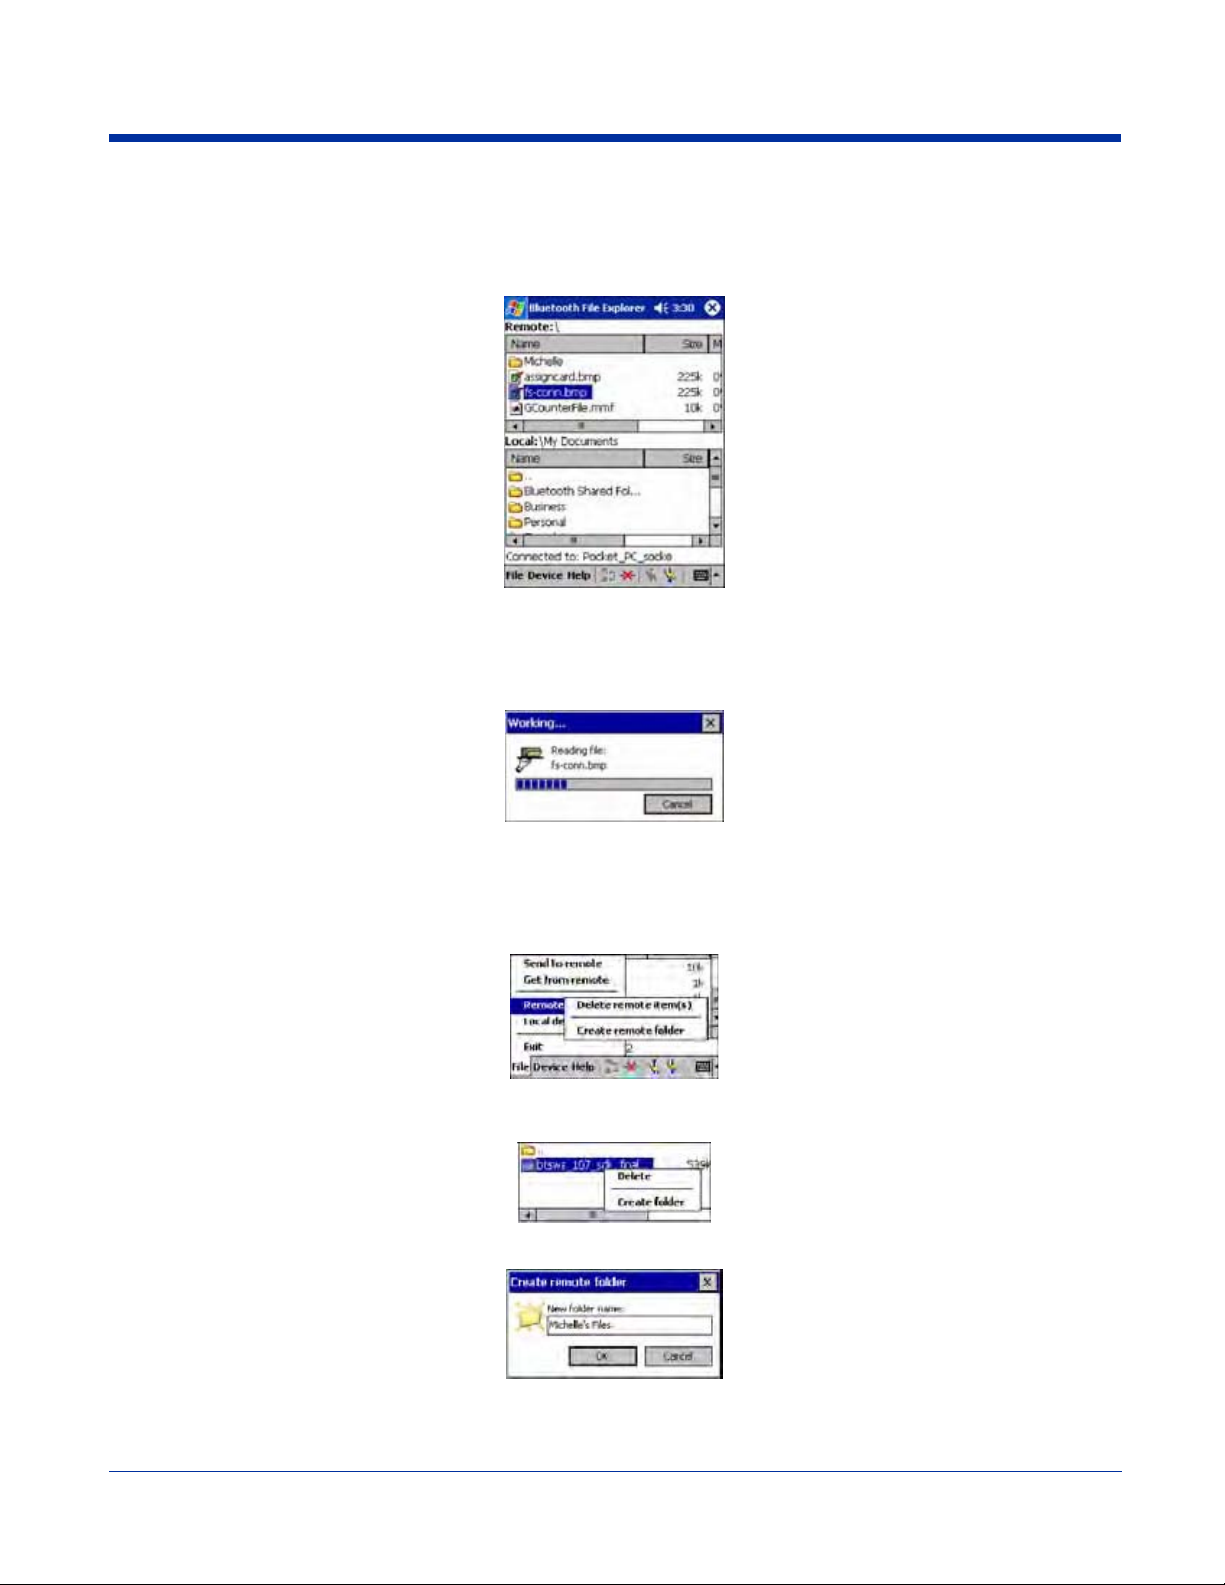
Send/Receive File(s) or Folder(s)
• Single-tap items to select them for transfer.
• Double-tap on a folders to open it and see its contents.
1. Select the file(s) or folder(s) that you wish to transfer. You can select items from only one device per transfer session.
2. There are two different ways to initiate the transfer:
• Tap File > Send to remote or Get from remote, as applicable. The inappropriate option should be gray.
• Tap on the Send to remote icon or Get from remote icon, as applicable. The inappropriate icon should be gray.
3. A screen reports the status of the transfer.
4. After the transfer, a copy of each selected item should appear in the other device.
Create a Folder
1. Tap on the File menu. Select Remote device or Local device, wherever you want to create a folder, then tap Create
remote folder or Create local folder, as applicable.
2. You can also tap and hold your stylus on an item in either the remote or local device that you wish to put in a new folder. In
the pop-up menu, select Create folder.
3. In the next screen, enter a name for your new folder. Tap OK.
4. The new folder should be listed under the appropriate device.
8 - 16 Rev (d)
7/10/06
Dolphin® 9500 Series User’s Guide-Pre-
liminary
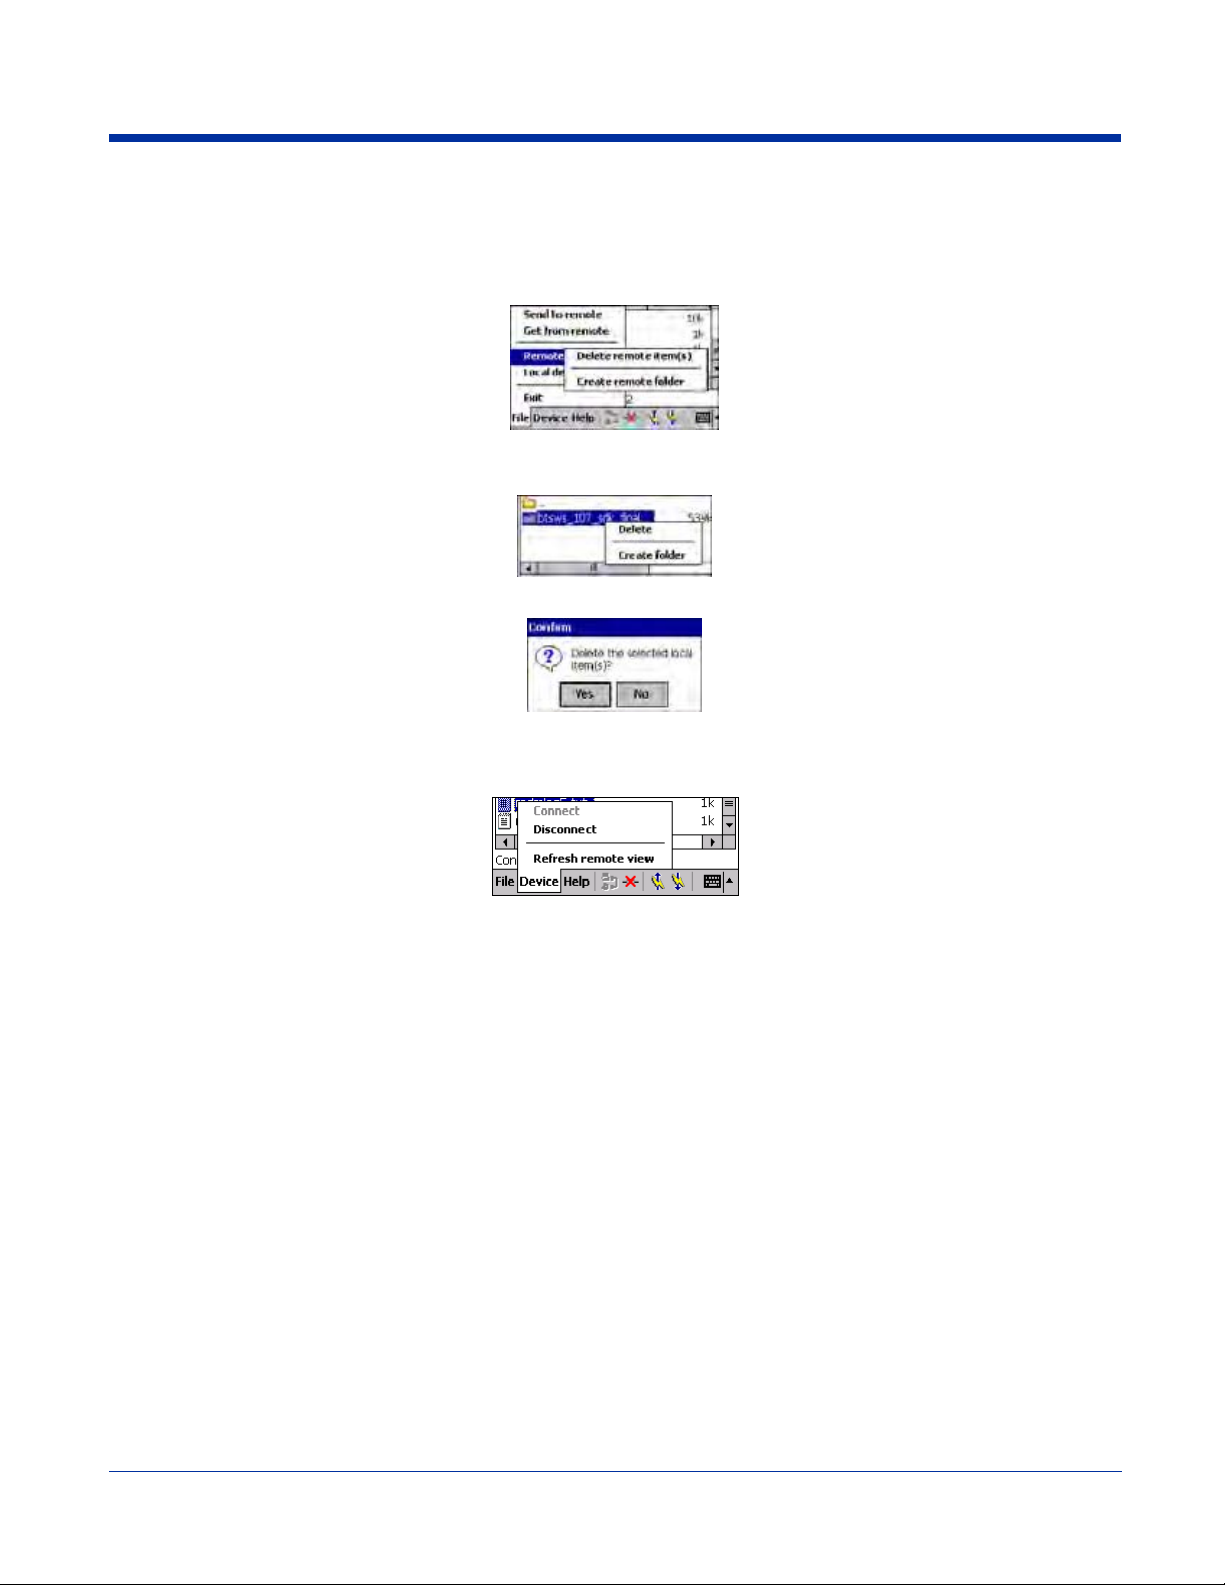
Delete File(s) or Folder(s)
1. Select the items you wish to delete. You can only delete items from one device at a time.
2. Tap on the File menu. Select Remote device or Local device, wherever the items are located, then tap Delete remote
item(s) or Delete local item(s), as applicable.
3. Tap and hold your stylus an item in either the remote or local device that you wish to put in a new folder. In the pop-up
menu, select Delete folder.
4. In the Confirm screen, tap Yes.
Refresh Remote View
1. Tap on the Device menu. Select Refresh remote view.
2. Your local device begins to read the contents of the remote device.
3. After a few seconds, the contents view of the remote device is refreshed.
Connect/Disconnect
To connect to the remote device, do the following:
1. Make sure the remote device has file sharing enabled.
2. Start the connection process by either of two methods:
• Tap Device > Connect.
• Tap the Connect icon.
3. On the next screen, select the device you wish to connect to and tap Select. Your device attempts to connect to the
selected device.
To disconnect from the remote device, do the following:
1. Start the disconnection process by either of two methods:
• Tap Device > Disconnect.
• Tap the Connect icon.
2. Your device disconnects from the remote device. Afterwards, no contents are listed for the remote device.
Dolphin® 9500 Series User’s Guide-Preliminary
Rev (d)
7/10/06
8 - 17

Exit Bluetooth File Explorer
To exit the Bluetooth File Explorer, tap File > Exit.
Receive Contact or File
1. Tap on the Bluetooth icon. In the pop-up menu, tap Transfer via Bluetooth > Receive Contact or File.
2. The Receive Contact or File status screen appears. Your device waits two minutes for the contact or file.
3. After successfully connecting to the remote device, the screen reports Connected then disappear. The new contact or file
should now be on your device.
4. If two minutes passes before you receive the item, tap Wait Again.
5. After you receive the file or contact, the “Receive Contact or File” feature is automatically disabled.
Enable File Sharing
1. Tap on the Bluetooth icon. In the pop-up menu, tap Transfer via Bluetooth > Enable File Sharing.
2. The Enable File Sharing status screen appears. Your device waits two minutes for the remote device to connect.
3. After successfully connecting to the remote device, the screen reports that you are connected.
4. If two minutes passes before you connect, tap Wait Again.
5. File sharing is enabled until you end it by tapping Cancel.
Using the Dialer
This section explains how to assign a dialing prefix and use the Dialer to dial a number directly from your Contacts list. The Dialer
makes it quick and easy to perform dial-up networking.
Note: The Dialer has been verified to work with Nokia and Ericcson phones and is known not to work with the Motorola 270c,
NTT Docomo Paldio 633S or Sony au C413S phone. Results may vary with other phones that are not listed as being
supported by the Bluetooth system.
8 - 18 Rev (d)
7/10/06
Dolphin® 9500 Series User’s Guide-Pre-
liminary

Assign a Dialing Prefix
If you have not already assigned a dialing prefix during the install process, you can do so by following these ste ps:
1. Tap Start > Settings > System tab > Dialer.
2. Select the appropriate Dialing Prefix, then tap OK.
Using the Dialer
1. To use the dialer, the device must already be connected to the Bluetooth phone. You can use the Get Connected! Wizard to
do this. Also, the Bluetooth phone must be selected as your favorite.
2. Tap Start > Contacts.
3. Tap and hold your stylus on the contact you wish to dial to. In the pop-up menu, select Dial Contact. Alternatively, you can
tap on Tools and select Dial Contact.
4. If you have multiple phone numbers for a contact, a screen appears listing them, including any dialing prefix you may have
assigned. Select the phone number you wish to dial.
Dolphin® 9500 Series User’s Guide-Preliminary
Rev (d)
7/10/06
8 - 19
5. Your device connects to your phone and begins dialing.
The Dialer can dial a phone number containing any of the following non-numeric characters:
*#+./!@-\space A B C D T P W
The following string can also be included in a phone number: (',')
The Dialer cannot dial a phone number containing non-numeric characters other than those listed above. Hand Held Products
recommends that you follow the standard Microsoft Outlook format for phone numbers.
Get Connected Wizard
The Get Connected! Wizard guides you through a one-time setup process that prepares the device and phone for Bluetooth
connections. The wizard varies depending on what phone you want to connect to.
Ericcson, Nokia 6210, NTT DoCoMo, Sony Phones
1. Tap on the Bluetooth task tray icon. In the pop-up menu, select Get Connected!
2. Follow the Bluetooth “Get Connected!” Wizard. In the second screen, use the drop-down list to select your Bluetooth phone.
The wizard provides tailored instructions based on your selection.
3. Follow the next screen(s) to prepare your specific phone for Bluetooth connections. You may need to do 1, 2 or all of the
following steps:
(a) Naming your Bluetooth phone
(b) Setting your Bluetooth phone in Discoverable mode
8 - 20 Rev (d)
7/10/06
Dolphin® 9500 Series User’s Guide-Pre-
liminary
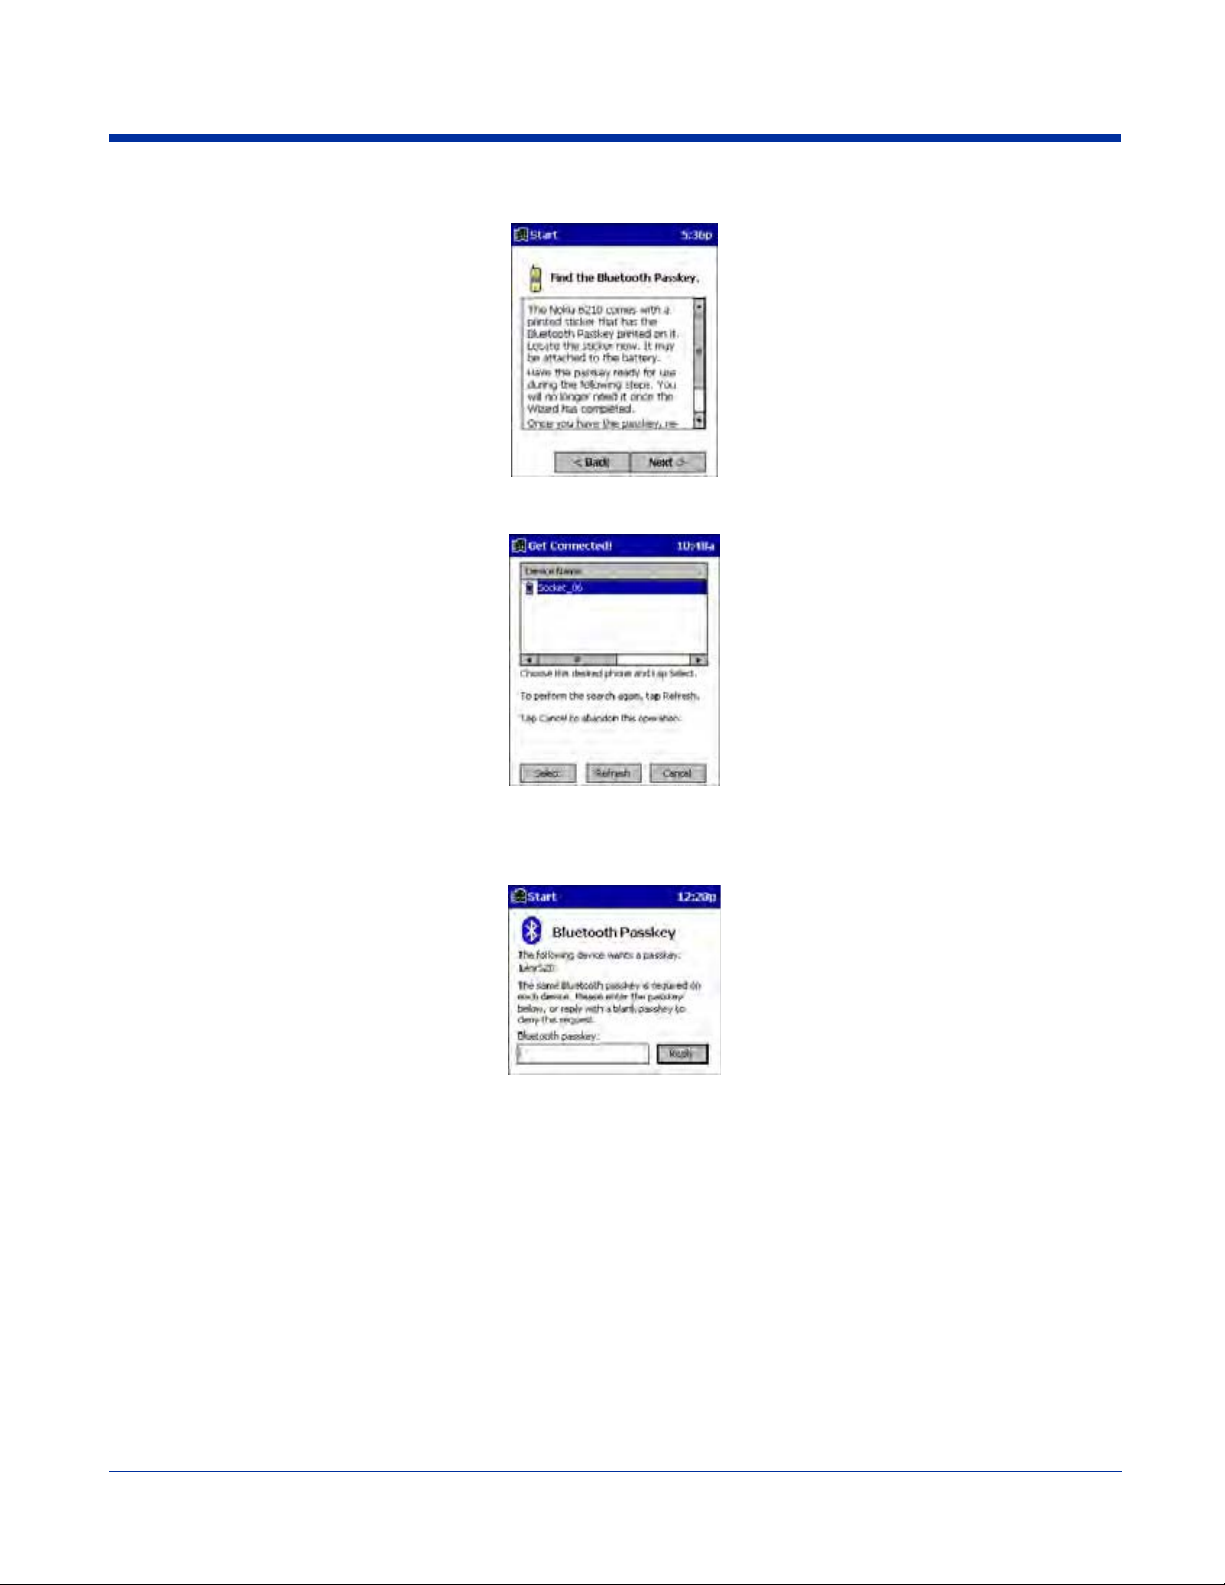
(c) Preparing your Bluetooth passkey.
4. When the search is complete, a list of the discovered Bluetooth phones appears. Choose the phone you wish to connect to,
and tap Select. A service discovery phase begins, about 5-10 seconds.
5. As prompted in the next screen, prepare your phone for bonding. For instructions on setting your phone to “Bondable” or
“Pairable” mode, refer to your phone manual. Have your passkey ready, then tap Next>.
6. In the next screen, enter the passkey. Tap Reply.
7. The mobile phone may then either automatically accept the passkey or ask you to enter one. If prompted for a passkey, use
the same one you entered on the mobile computer.
Note: Ericsson T68/T68i only: When the phone asks you if you want to bond, select 2: Add to paired devices. Do not tap
ACCEPT.
8. Tap Finish. After successfully connecting, the phone appears in the Bluetooth Devices folder. On the Today screen, the
Bluetooth icon blinks. You do not need to run the Get Connected! Wizard again unless you plan to switch between different
phones.
Note: You may also switch between different phones by assigning a new “favorite phone” in the Bluetooth Devices folder.
Motorola Timeport 270C, Nokia 3650/6310/7650/8910/8910i
1. Tap on the Bluetooth task tray icon. In the pop-up menu, select Get Connected!
2. Follow the Bluetooth “Get Connected!” Wizard. In the second screen, use the drop-down list to select your Bluetooth phone.
The wizard provides tailored instructions for your phone.
Note: The screens below are for the Nokia 7650.
Dolphin® 9500 Series User’s Guide-Preliminary
Rev (d)
7/10/06
8 - 21

3. As directed on the next two screens, assign the phone a unique name, set the phone to Discoverable mode, and tap Next.
4. The device searches for the phone. When the search is over, a list of the discovered Bluetooth phones appears.
5. Choose the phone you want to connect to, and tap Select. A service discovery phase begins, about 5-10 seconds.
6. The next two screens describe procedures you complete outside of the wizard. Read through each screen bu t do not
complete the described procedures until you exit the wizard.
Bonding with your phone - This must be completed to establish the Bluetooth connection and involves dial-up
networking.
Automatic Connections - This procedure is optional but makes future Bluetooth connections more convenient.
7. Continue to the last screen of the wizard and tap Finish. Now proceed to STEP 6 to complete the bonding process and, if
desired, set up automatic connections.
Dial Up Connection
Complete the following steps to create a new Bluetooth internet connection via an ISP. Before setting up dial-up networking,
prepare yourself with dial-up information and other necessary settings from your office network or isp. Also, refer to Microsoft’s
connection manager for additional information.
8 - 22 Rev (d)
7/10/06
Dolphin® 9500 Series User’s Guide-Pre-
liminary
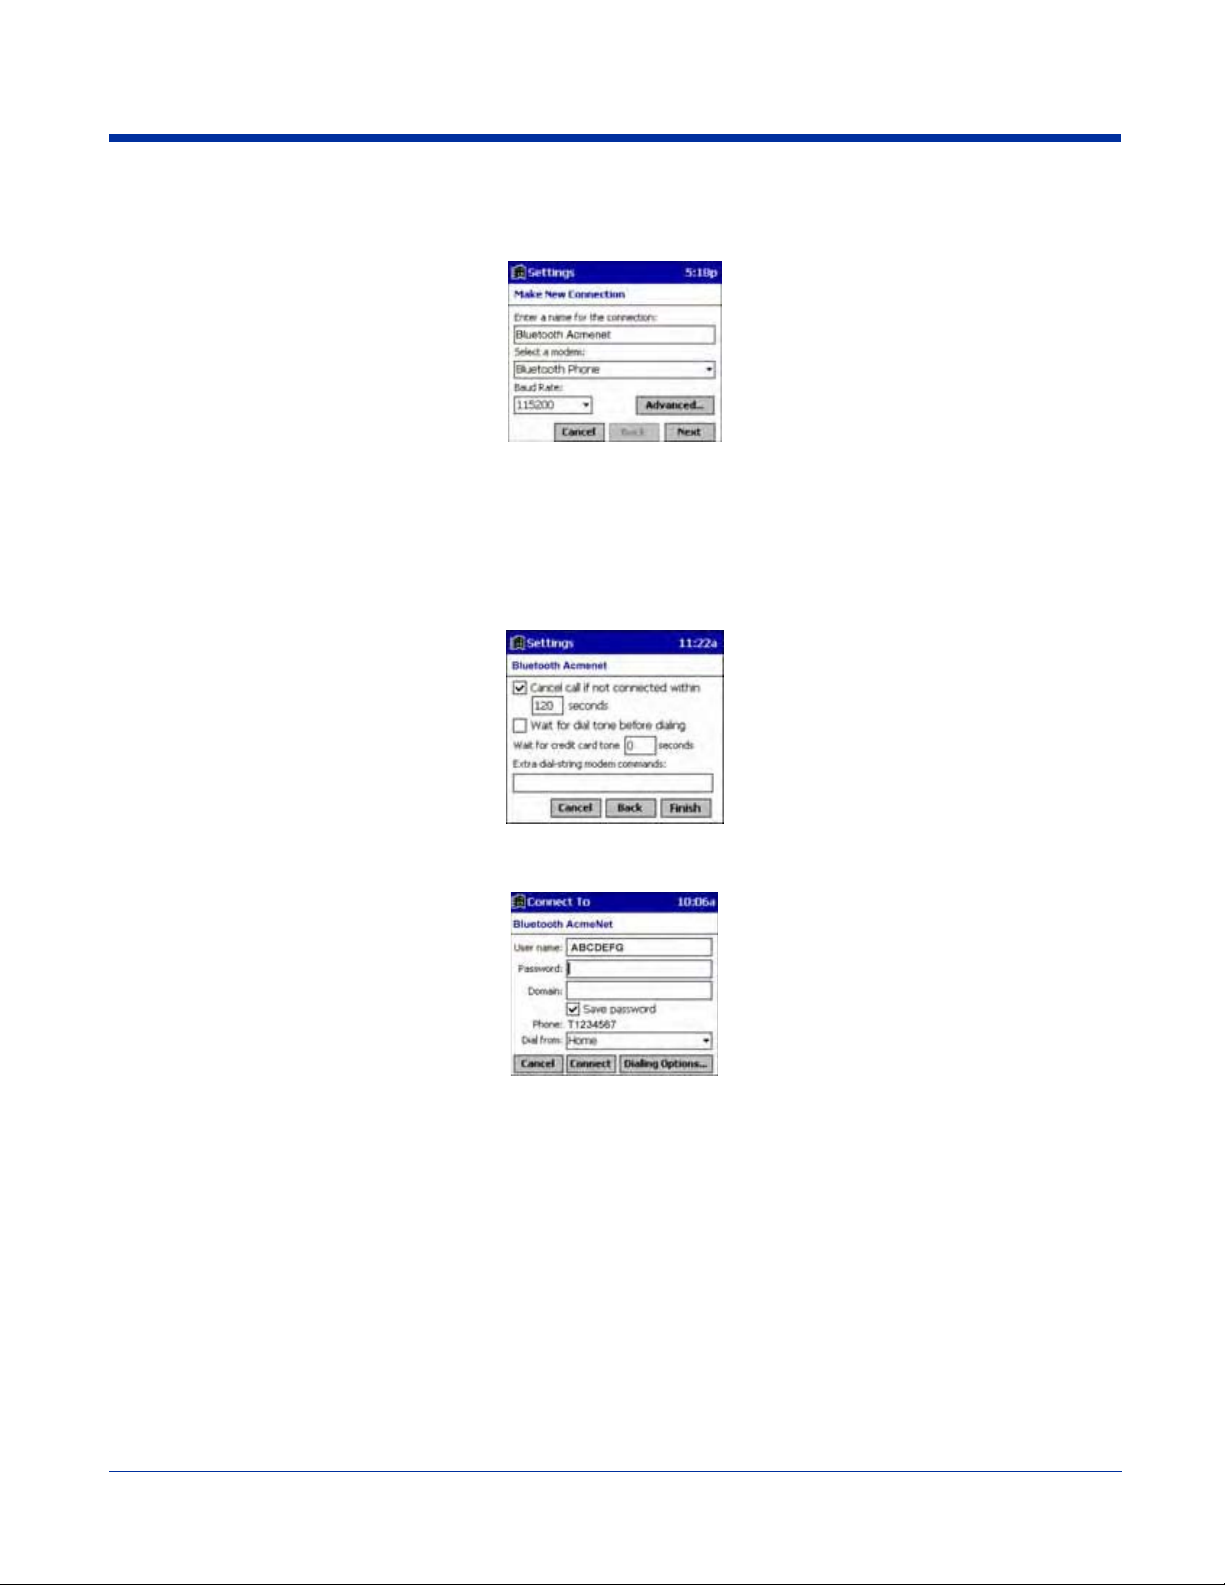
1. Tap Start > Settings > Connections tab > Connections.
2. In the top field, select Internet Settings and tap Modify. Then, tap New.
3. Name=A name that you will remember for future connections.
Modem=Bluetooth Phone.
Baud Rate=115200.
4. Tap Next.
5. In the Phone number field, enter the dial-up number. Tap Next.
6. Uncheck Wait for dial tone before dialing. Tap Finish.
7. Now you are ready to start the connection. In the Connections screen, under Internet Settings, tap Connect. In Network Log
On, verify the dialing settings. Tap OK.
Automatic Connections for Motorola Timeport 270C:
• On the phone, press MENU.
• Scroll to Settings, then press SELECT.
• Scroll to Connection, then press ON.
• On Bluetooth Link, press SELECT.
• Scroll to Devices, then press SELECT.
• Choose your mobile computer, then press EDIT.
• Scroll to Access:Ask, then press CHANGE.
• Scroll to Automatic, then press SELECT. Press DONE.
Automatic Connections for Nokia 3650/7650:
• On the phone, press MENU.
• Scroll to Connectivity, then press OPTIONS.
• The Open option should be highlighted. Press SELECT.
• The Bluetooth option should be highlighted. Press OPTIONS.
• The Open option should be highlighted. Press SELECT.
Dolphin® 9500 Series User’s Guide-Preliminary
Rev (d)
7/10/06
8 - 23

• Scroll to the right tab to access the Paired devices list. Highlight your mobile computer, then press OPTIONS.
• Scroll to Set as authorized, then press SELECT.
• In the confirmation screen, press YES.
Automatic Connections for Nokia 6310/8910/8910i:
• On the phone, press MENU.
• Scroll to 10 Bluetooth, then press SELECT.
• Scroll to 4 View Paired Devices, then press SELECT.
• Highlight the Dolphin terminal, then press OPTIONS.
• Scroll to 3 Request Connection Authorization, then press NO.
To use a different Bluetooth phone for dial-up networking, you can use the same connection setup, but you must make the new
phone your favorite. Just run the Get Connected! Wizard again, select the new phone, and make it your new Favorite when
prompted.
8 - 24 Rev (d)
7/10/06
Dolphin® 9500 Series User’s Guide-Pre-
liminary
9
Wireless WAN (WWAN) Communications with GSM/GPRS
Note: The Dolphin 9500 is the only terminal in the Dolphin 9500 Series that can be configured with an integrated Siemens
GSM/GPRS tri-band radio module for WWAN communications.
®
Overview
GSM Short for Global System for Mobile communications, GSM is an open, non-proprietary wireless WAN system
that is constantly evolving and growing. One of its great strengths is internatio nal roaming capability, which
provides standardized dialing in more than 170 countries.
GPRS Short for General Packet Radio Service, GPRS is a non-voice value added service that allows packet-
switched data to be instantly sent and received across mobile telephone networks.
Enabling the GSM/GPRS Radio
The radio driver for GSM is installed and enabled by default after each hard reset. Before using the radio, make sure that the
GSM radio is enabled. For details, see Using the Radio Manager on page 4-15.
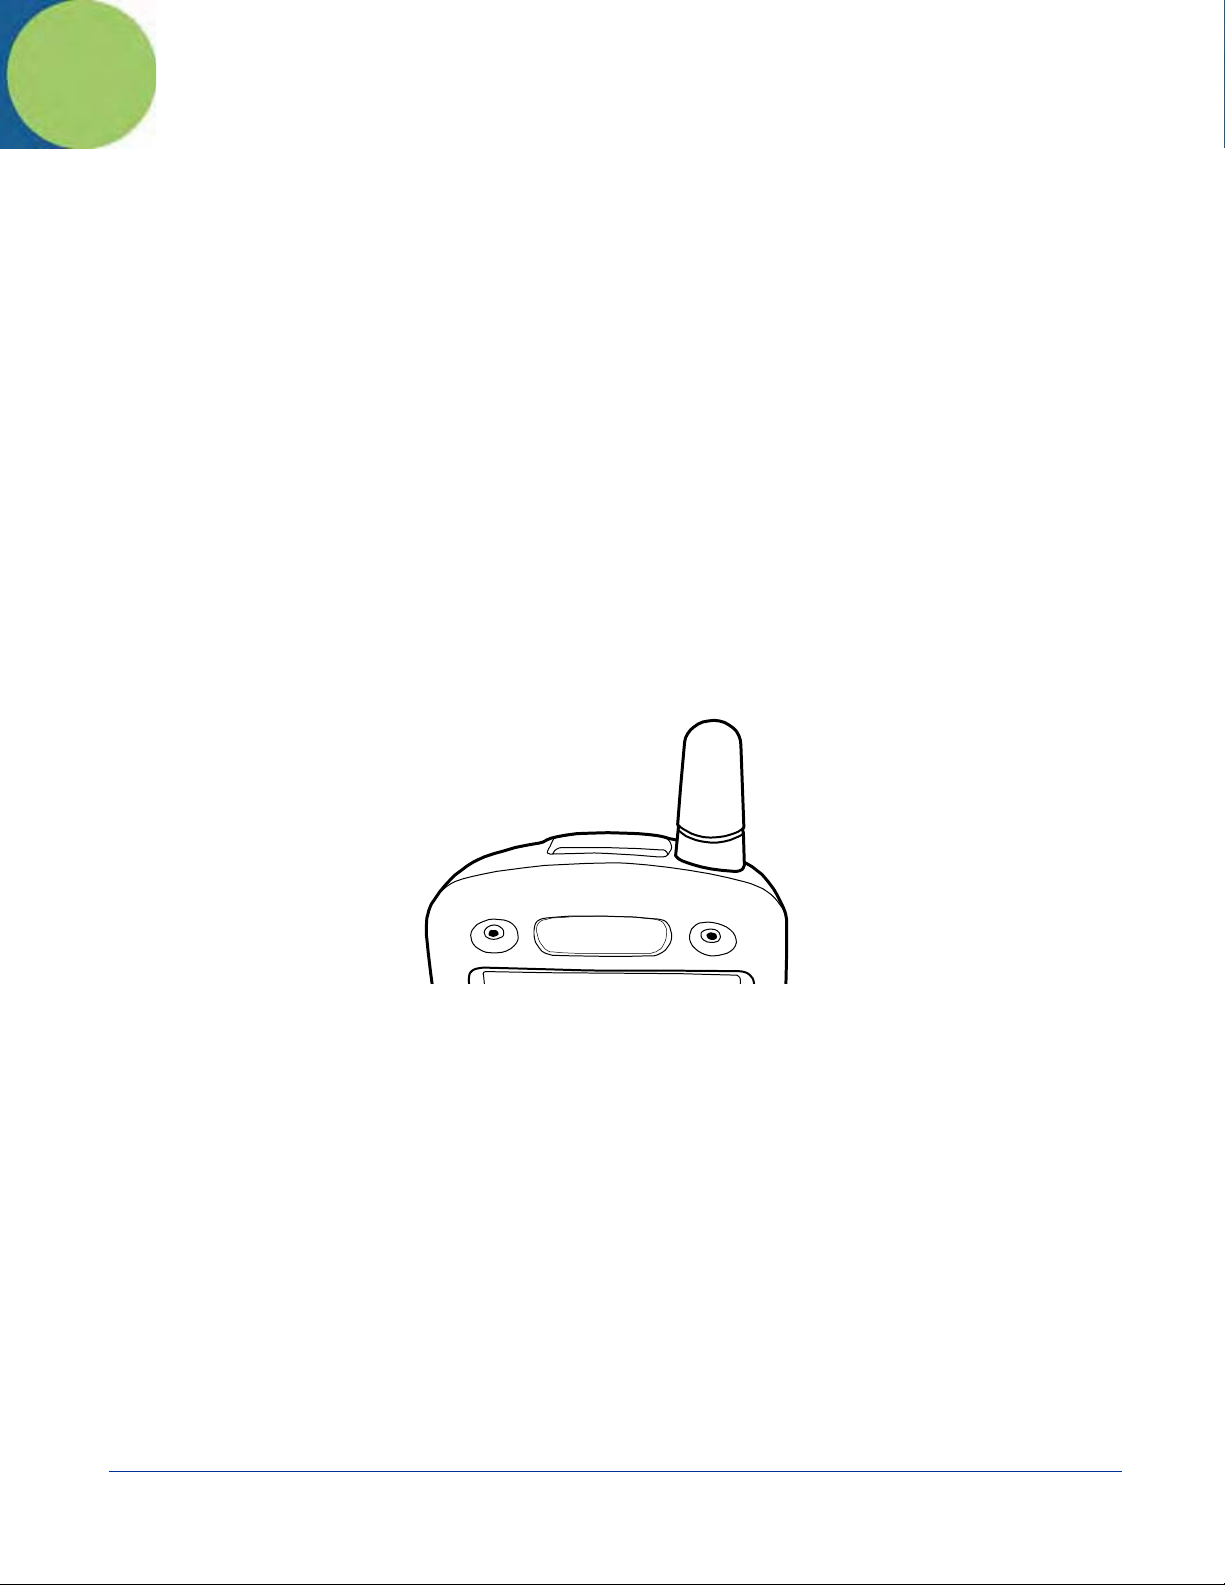
Tri-Band Antenna
Dolphin terminals configured with a GSM/GPRS radio feature a tri-band antenna that supports 900, 1800 and 1900 MHz
frequencies for worldwide mobile applications.
Requirements
Using GMS/GPRS on a Dolphin terminal requires a:
• Network subscription to a GSM/GPRS network (you need to know what service providers are in your geographic area), and
• SIM card that has been activated by the network service provider installed on the terminal.
Capabilities
Dolphin terminals with integrated GSM/GPRS radios are optimized for the following two-way voice and data communications:
• GSM voice data ("dial-up")
• SMS (Short Message Service) text messages
• GPRS Class 10 - data transmissions average 40-60 Kbps (wireless network carrier dep endent)
Dolphin® 9500 Series User’s Guide-Preliminary
Rev (d)
7/10/06
9 - 1
SIM Card Installation
Short for Subscriber Information Module, a SIM card stores the subscriber's personal information, GSM/GPRS radio settings,
security keys, contacts, etc. SIM cards are installed in compatible mobile devices, enabling you to switch devices without losing
personal and setup information.
SIM Card Requirements
Before installing the SIM card:
• The SIM card must be activated by the service provider.
• The terminal must be powered down.
Note: If no SIM card is installed, you can still make emergency phone calls such as 9-1-1, for example.
To Install a SIM Card
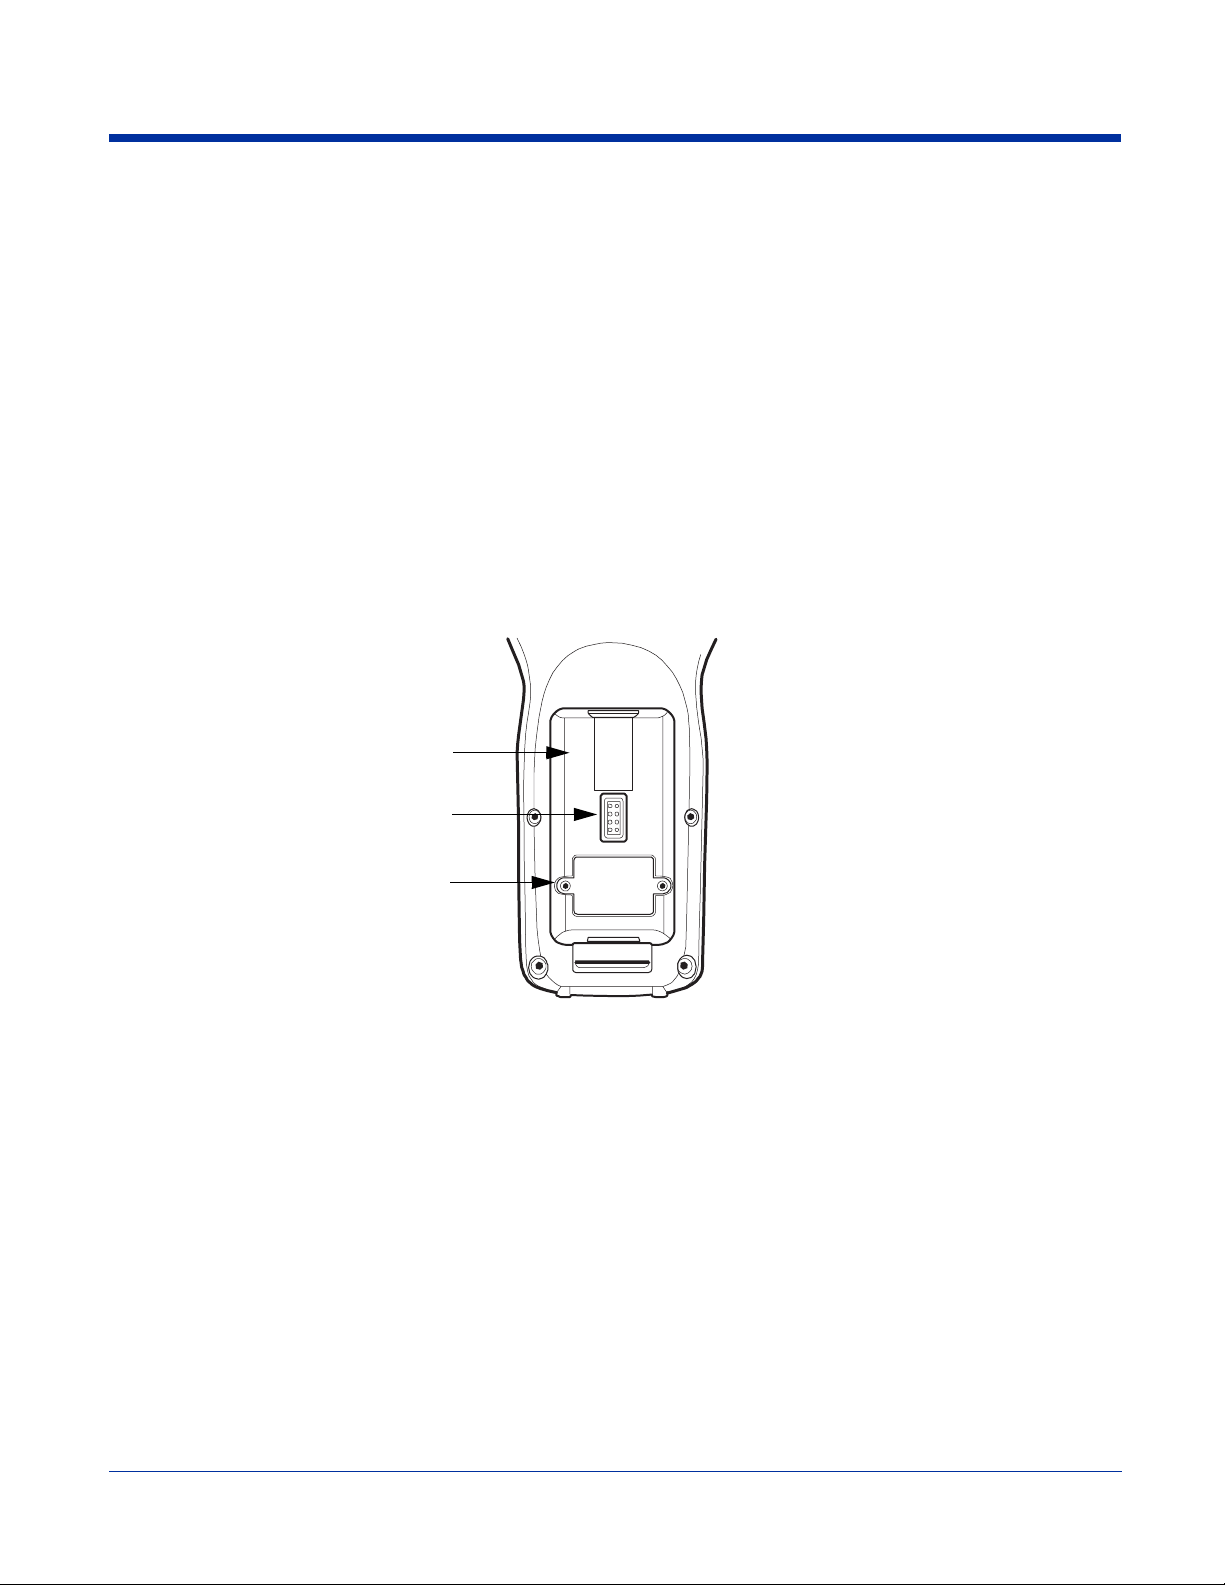
On the Dolphin 9500 terminal, access to the SIM card is located under the battery well, which enables easy access to the SIM
card while securing it under an installed battery.
1. Turn off your terminal and lay it face-down on a flat surface.
2. Remove the battery pack; see To Remove the Main Battery Pack on page 2-7.
Battery Well
Battery Interface
SIM Card Door
3. Unscrew the faceplate of the SIM card door. You must use a Torx T6 wrench. You can purchase this wrench from Hand
Held Products, part number 100001700.
4. Insert your SIM card. Make sure the interface on the card is connected to the SIM Card interface in the slot; the beveled
corner is in the upper right corner.
9 - 2 Rev (d)
7/10/06
Dolphin® 9500 Series User’s Guide-Pre-
liminary
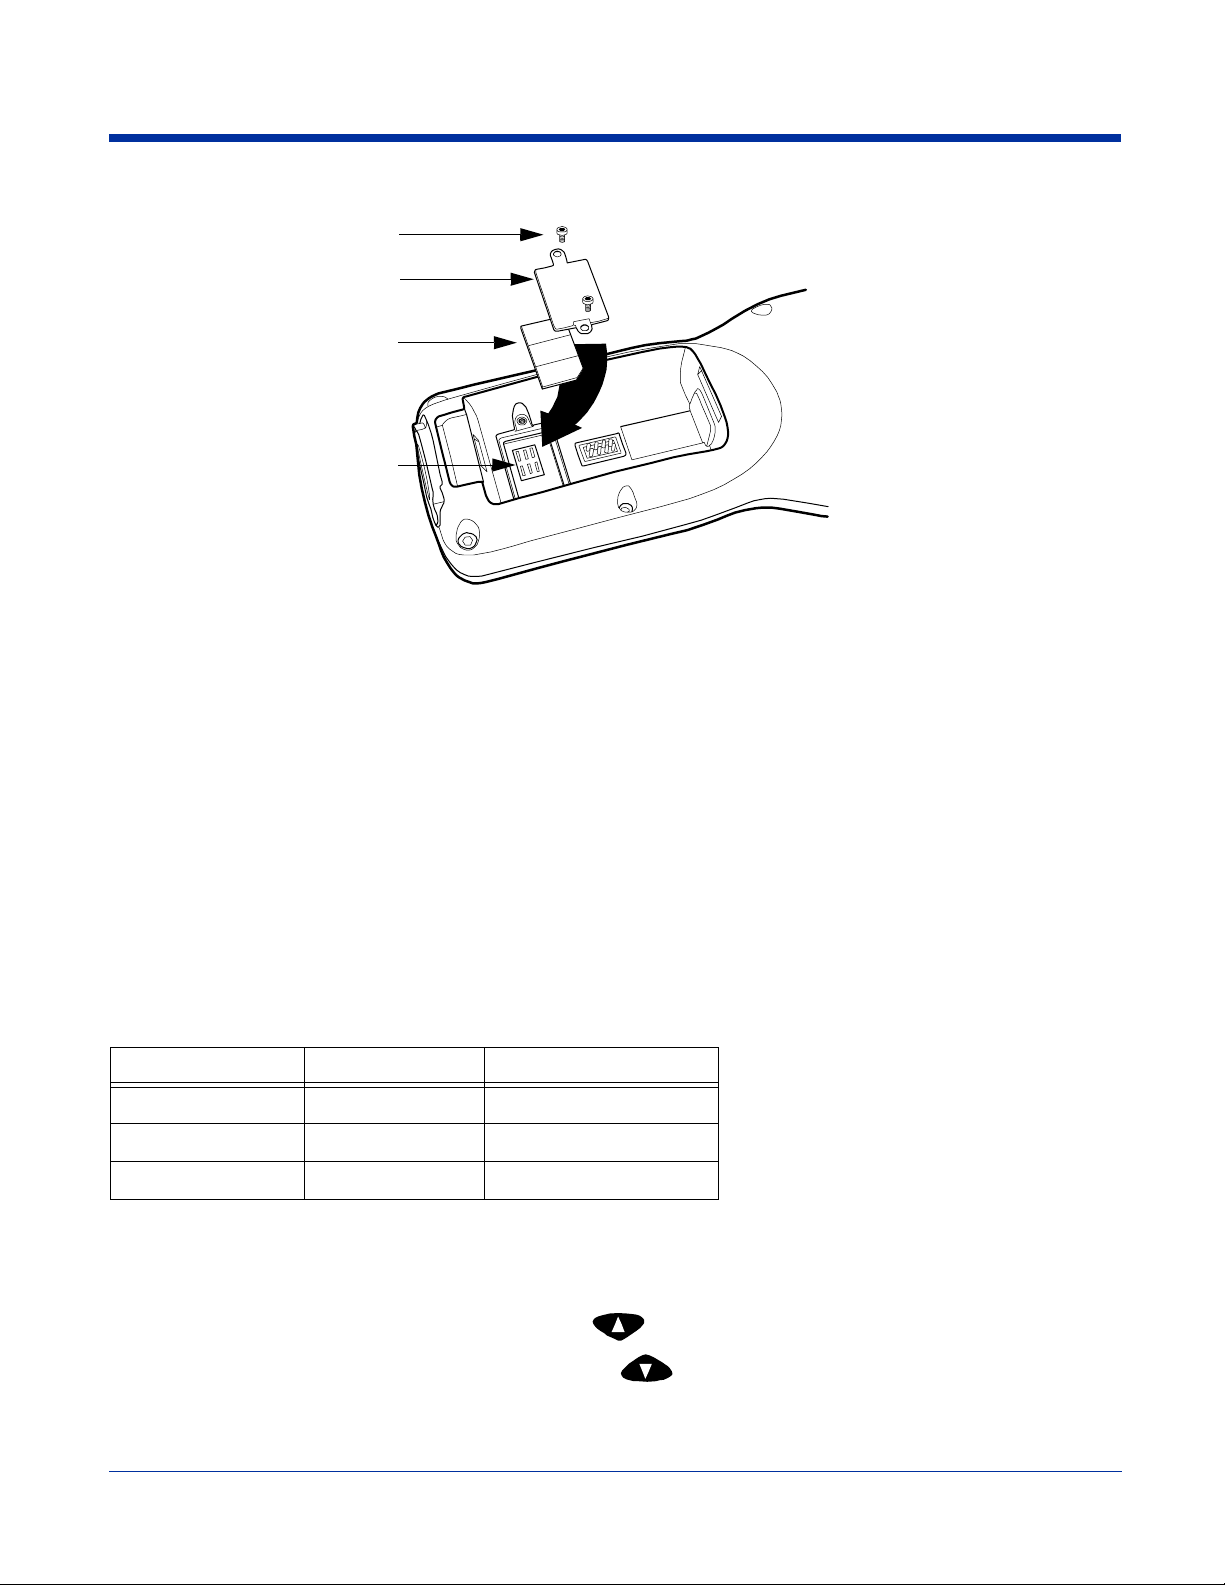
5. Place the SIM card door over the secured SIM card and fasten the screws.
Screws
SIM Card Door
SIM Card
SIM Card Interface
6. Install the battery pack and turn on the terminal.
Audio Modes
The back panel of the Dolphin 9500 contains both a speaker and a microphone that you can use to send and receive audio
signals over the GSM network; see Back Panel Features on page 3-4.
There are three audio modes:
Handset Handset mode is when you use the use the back panel of the terminal just as you would a cell phone,
Headset Headset mode is when you plug a headset into the audio jack and speak into the microphone. You
Hands-Free Hands-free mode is when you use the back panel of the Dolphin 9500 as a speakerphone. To switch
holding the speaker to your ear to receive audio information and the your mouth over the microphone
to send audio information. This is the default audio mode.
must use a 2.5mm plug; no other audio plug will fit.
the back panel to speakerphone, in the Dialler, tap Settings > Speakerphone. The audio levels
adjust appropriately for speakerphone use.
Keyboard Combinations for Calls
Each keyboard option contains a key combination to send and end a call using the Red modifier key.
Keyboard To Send, Press… To End (reject), Press…
35-key keyboard Red + SP Red + DEL
43-key keyboard Red + D Red + H
56-key keyboard Red + 3 Red + 6
Volume Control
Use the Dolphin keyboard to manually adjust the volume.
To raise the volume, press the Blue modifier key + up arrow
To lower the volume, press the Blue modifier key + down arrow
Dolphin® 9500 Series User’s Guide-Preliminary
Rev (d)
7/10/06
9 - 3
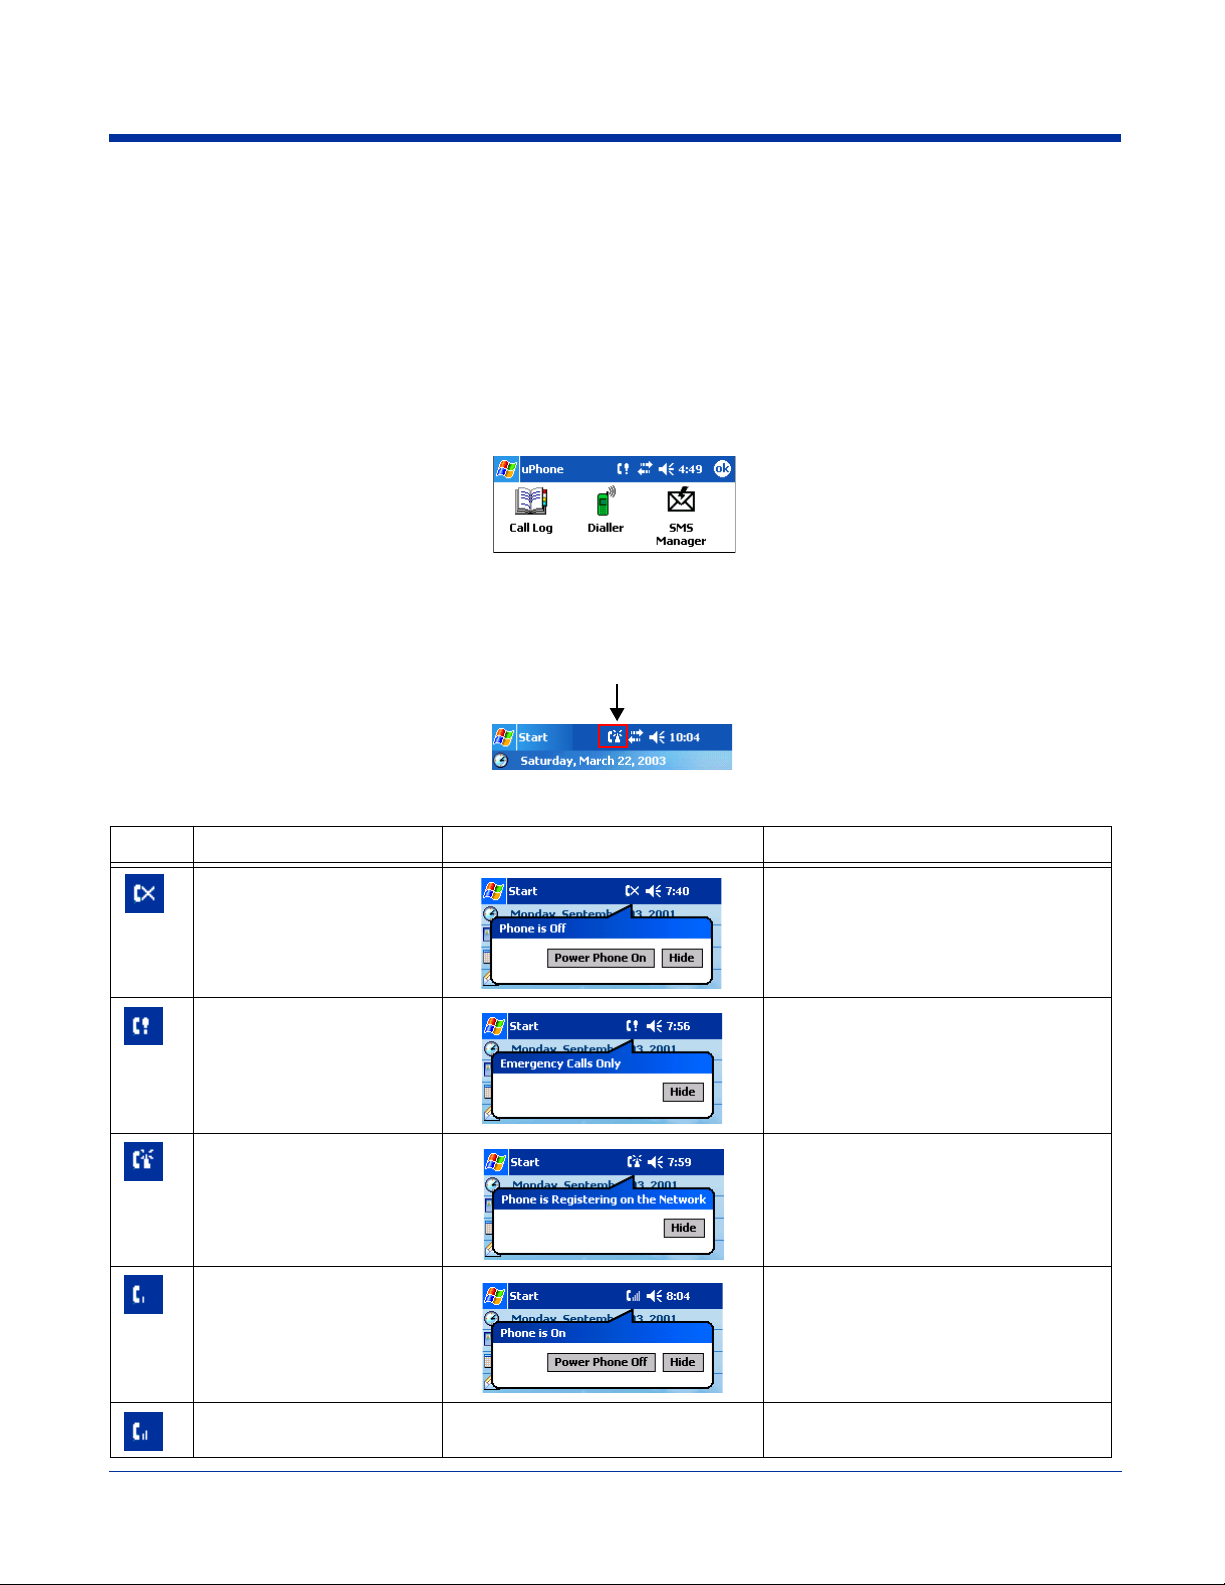
Using uPhone
The uPhone Application Suite contains three programs that function together to provide a complete voice, data, and text
messaging solution for a mobile device fitted with a radio modem:
• Dialler emulates a mobile phone and is used to make and receive telephone calls.
• Call Log displays a list of the most recent calls.
• SMS Manager is a text messaging program.
Accessing uPhone
Tap Start > Programs > uPhone. Tap one of the icons to launch the program.
Navigation Bar Icons
When the Dialler or SMS Manager applications are not open, the icons in the Navigation bar at the top of the screen indicates
the status of the phone and messaging system. Each icon indicates s specific action and, when tapped, displays a bubble window
that lets you know what is happening.
Icons and Bubble Messages
Icon Description Tap this icon to display: Bubble Options
The phone is off.
The phone can only make
emergency calls. This usually means there is no SIM
card installed or PIN number established.
The phone is registering on
the network.
The phone is on and registered.
T o the right of the phone is a
bar that indicates signal
strength.
Tap Power Phone On to turn the phone
on and close the bubble.
Tap Hide to leave the phone off and
close the bubble.
Tap Hide to dismiss the bubble.
This icon will appear in the Navigation bar
until a SIM card is installed or a PIN is
entered.
Tap Hide to dismiss the bubble.
This is a temporary state. This icon
appears only until the phone is registered
on the network.
Tap Hide to dismiss the bubble.
Tap Power Phone Off to turn off the
phone. The icon in the Navigation bar
changes to indicate the phone is now off.
Medium signal strength.
9 - 4 Rev (d)
7/10/06
Dolphin® 9500 Series User’s Guide-Pre-
liminary
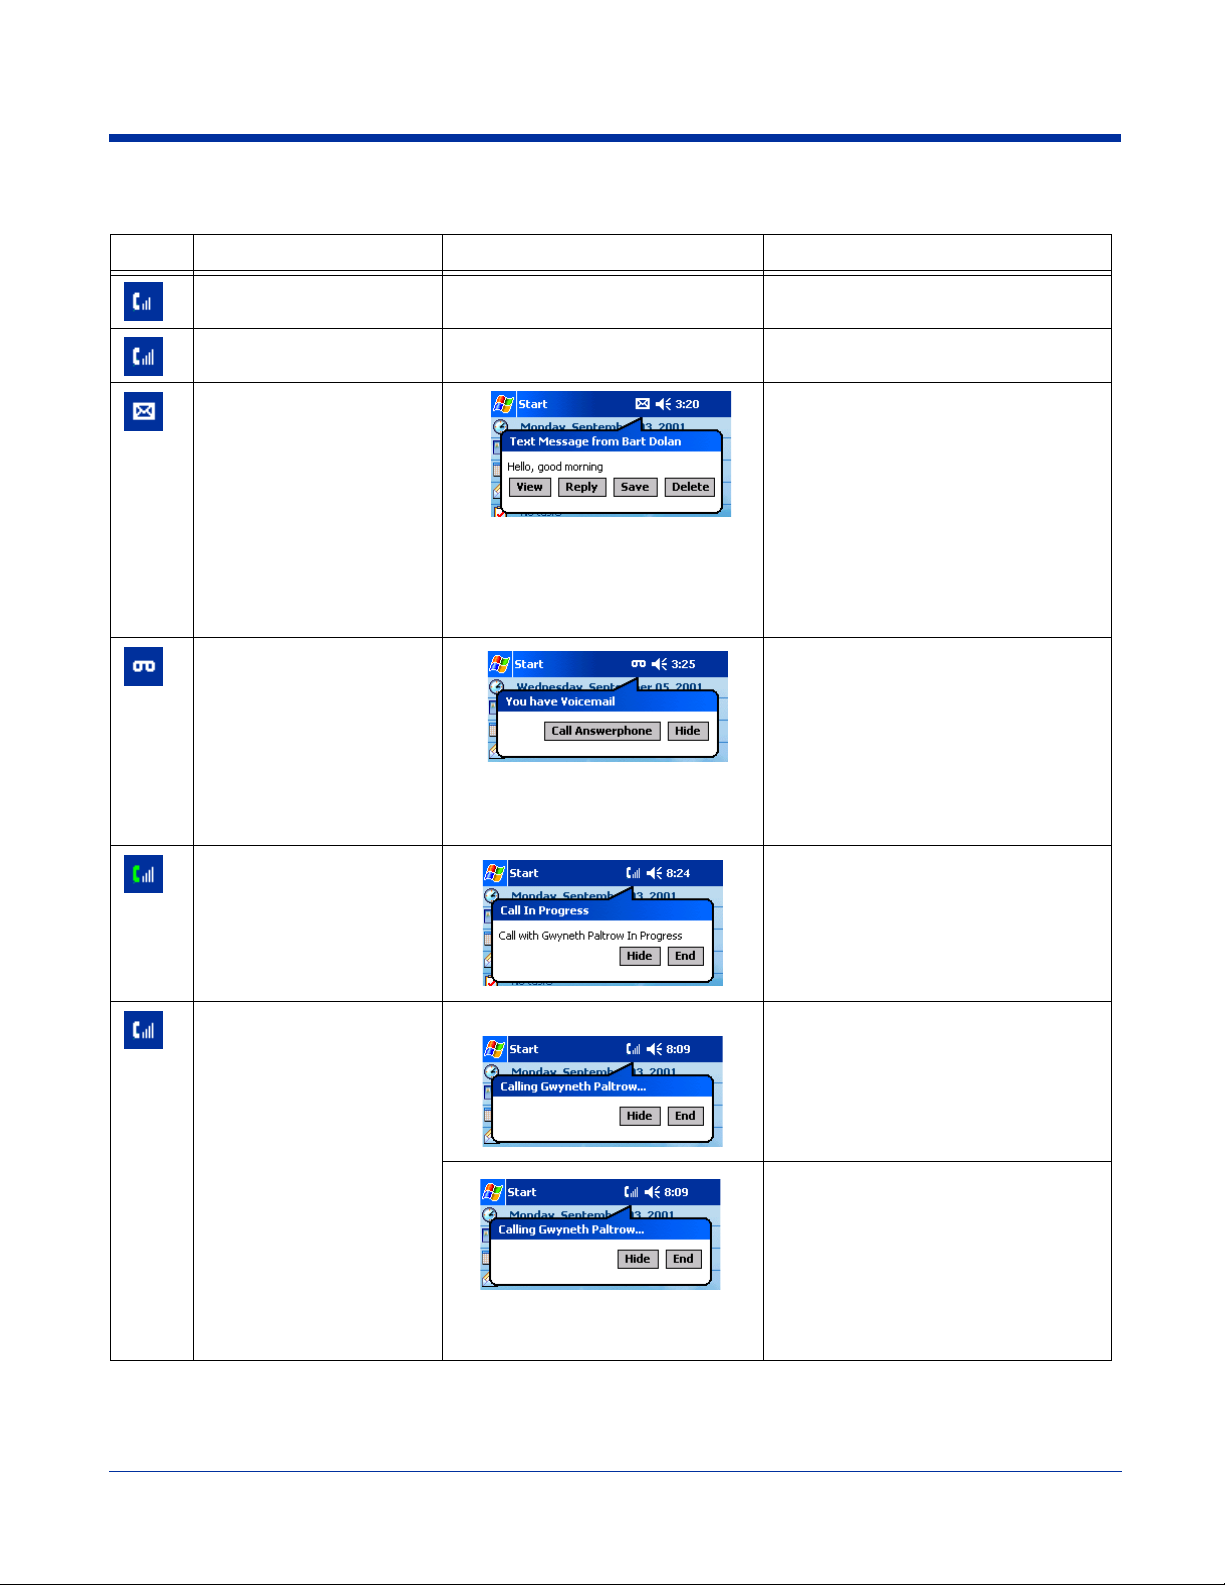
Icons and Bubble Messages
Icon Description Tap this icon to display: Bubble Options
Good signal strength.
Full signal strength.
Incoming SMS message
available.
A new voicemail message is
available.
There is a call in progress to
the name or number shown
in the bubble.
This bubble appears automatically
when a new SMS message is
received. It contains the sender’s
information and the first line of the
text message.
This bubble appears automatically
when a voicemail notification is
received.
Tap View to display the full message in
SMS Manager.
Tap Reply to switch to the SMS Manager
Compose screen. The 'To:' field is autofilled with the sender’s address.
Tap Save to put the message in the SMS
Manager Inbox.
Tap Delete to delete the message.
Tapping each button closes the bubble.
Tap Call Answerphone to dial the
Answerphone service and retrieve
voicemail messages.
Tap Hide to close the bubble.
Tap Hide to close the bubble.
Tap End to end the call.
This icon appears when
there is a call coming in or
going out.
A different bubble displays
for each circumstance.
If the incoming call is a conference call, a different bubble displays.
Dolphin® 9500 Series User’s Guide-Preliminary
For a call going out
This bubble appears automatically
when a call comes in and while the
ringtone sounds.
Rev (d)
7/10/06
Tap Hide to close the bubble.
Tap End to end the call.
If the caller is in the Phonebook, the
name displays. If not in the Phonebook,
the caller’s number displays; if the
number can’t be read, “no number”
displays.
Tap Answer to answer the call; this
places any current call on hold.
Tap Reject to reject the call.
9 - 5
Using the Dialler
The Dialler is the is the program that manages your GSM/GPRS cell phone calls.
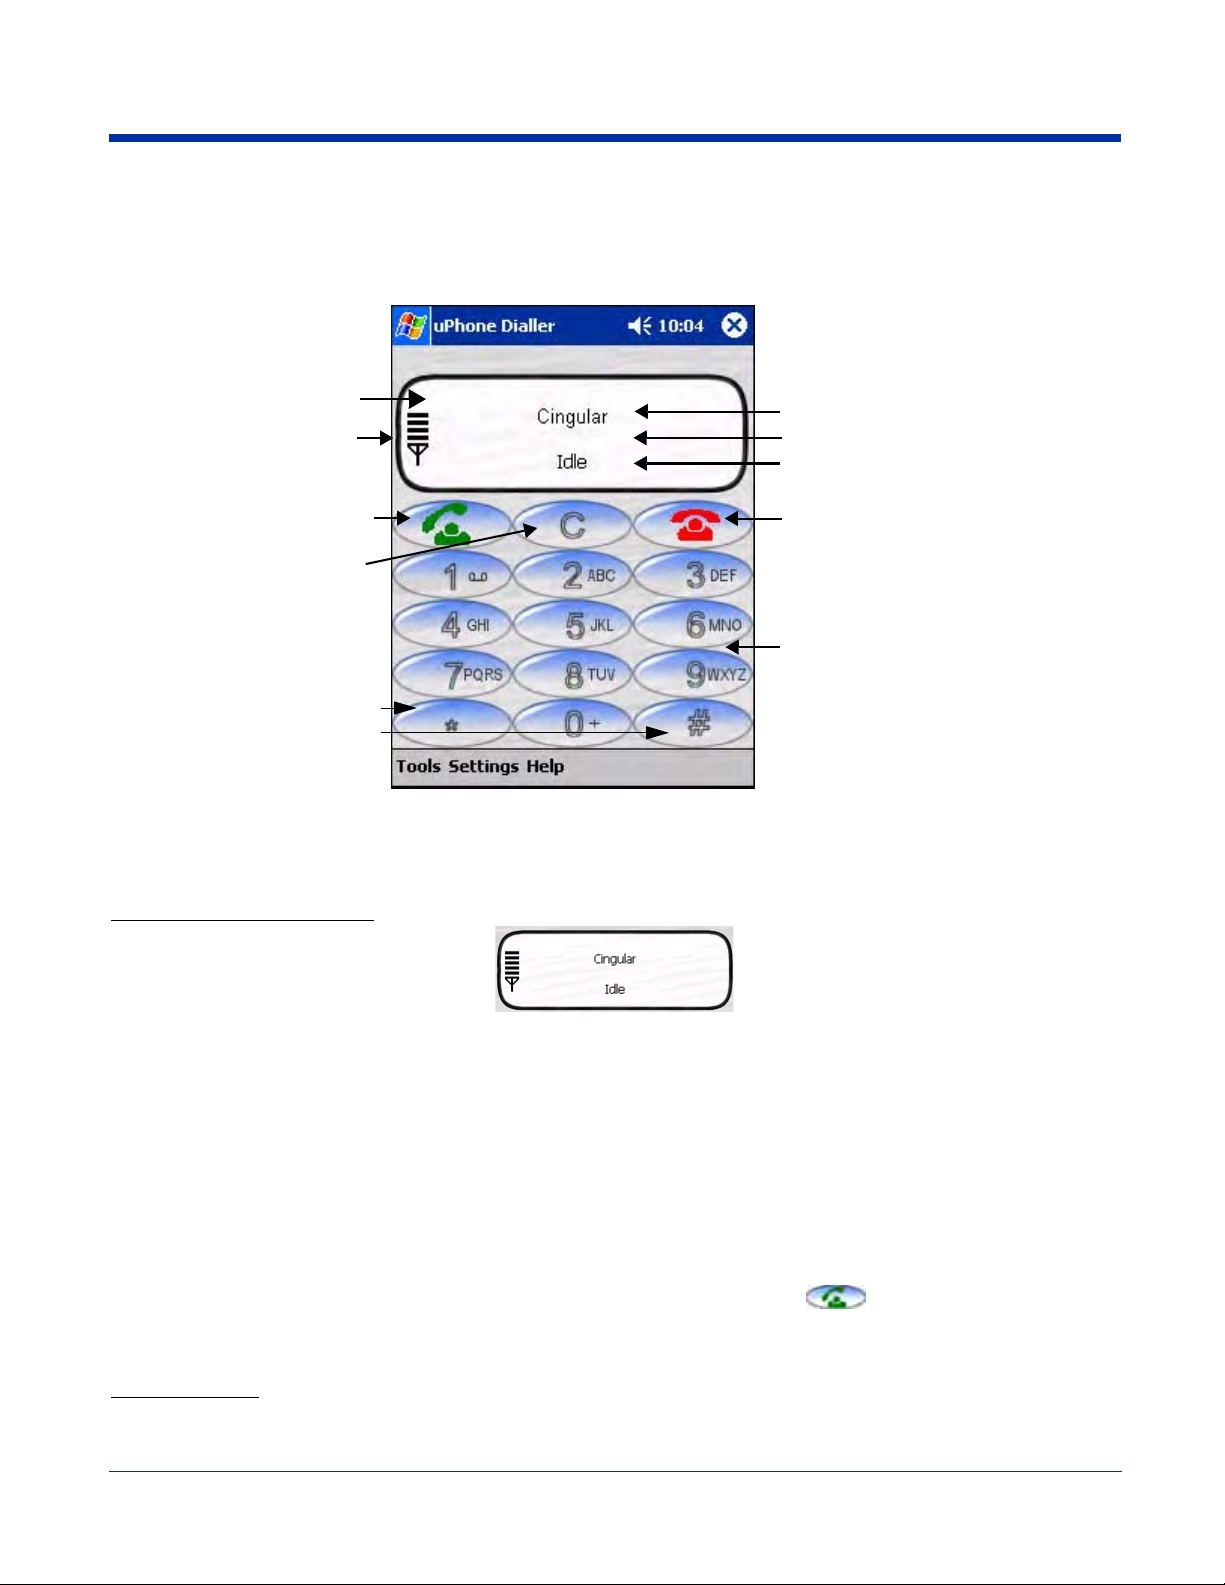
To launch the Dialler, tap Start > Programs > uPhone > Dialler. The program launches and the uPhone Dialler screen opens:
Three information lines:
Dialler screen
Signal Strength -
Four bars is optimal.
Network–name of service provider.
Number/Name–dialed, incoming, and
outgoing calls.
Status–status of the phone.
Tap to send a call or
accept an incoming call
Tap to clear the Dialler screen
Tap * and # buttons for
interactive voice systems;
i.e., touchtones.
Tap to end a call
Phone keypad - tap the numbers to dial
Making a Call
Entering a Phone Number
You can:
• Enter the numbers manually using the phone keypad on the Dialler screen, the SIP, or the Dolphin keyboard.
• As you enter each number, the digits appears on the Dialler screen in the Name/Number line. If a contact matching
the entered number is found in the Phonebook, the name of the contact appears in the Name/Number line as you
type; tapping on the name enters the rest of the number automatically.
• Use the Phonebook to
• Select an existing contact.
Tap Tools > Phonebook, select a name or number in the list, and tap OK (you can also tap and hold on the entry).
The number is automatically entered in the Dialler and appears on the screen.
• Use speed dial.
Tap and hold on the list to see a popup menu of speed dial numbers.
• Use the Call Log
• When the phone is in Idle status, you can tap the Send button on the screen , press the ENTER key, or tap
Tools > Call Log to see a list of the last 20 calls made or received. Tap and hold on an entry in the list and select Dial.
Pressing the Send button or ENTER key performs this function only when the phone is in an Idle Status.
Sending a Call
You can:
9 - 6 Rev (d)
7/10/06
Dolphin® 9500 Series User’s Guide-Pre-
liminary
 Loading...