

Page 1

8650 8-Bay Battery Charger
Quick Start Guide
Rev A
4/16
Page 2

Unpacking your Battery Charger
After you open the shipping carton containing the product, take the
following steps:
• Check for damage during shipment. Report damage immediately
to the carrier who delivered the carton.
• Make sure the items in the carton match your order.
• Save the shipping container for later storage or shipping.
Introduction
The 8650 8-Bay Battery Charger simultaneously charges eight
rechargeable lithium ion batteries. The time required for charging is
dependent upon the battery internal temperature and condition. The
battery charger should be located in an area that is well ventilated
and not in high traffic areas. It should have enough clearance to
allow easy access to the power port on the back of the device, and
be protected from rain, dust, direct sunlight or inclement weather.
The charger is not approved for use in hazardous locations.
This device is intended for indoor use only and requires an indoor
AC power source. The AC cord should not be stepped on, tripped
over or subjected to damage or stress.
Page 3
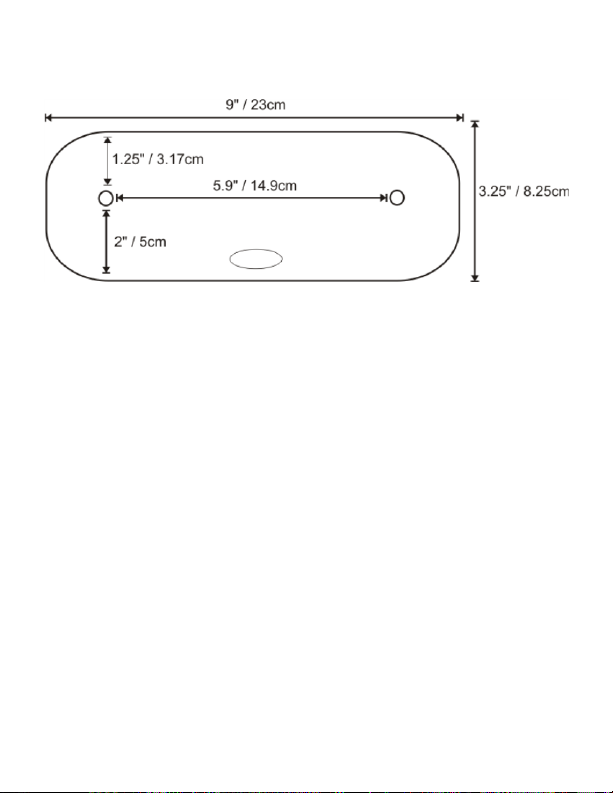
Mounting the 8650 8-Bay Battery Charger
Place the charger on a horizontal, hard surface or fasten securely to
a wall using the mounting holes. Mounting hardware is not supplied
by Honeywell.
Page 4
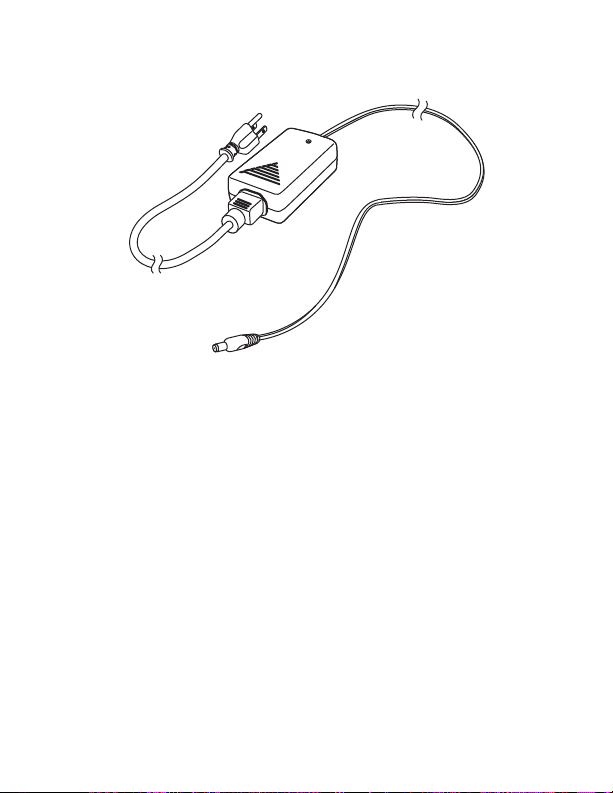
Assembling the Power Supply
The AC power supply for the battery charger is shipped with the battery charger. For non-US models a power cord is required.
1. Plug the A/C power cord into the power adapter.
2. Plug the power cable into the power connector on the back of the
8650 8-Bay Battery Charger.
3. Plug the A/C power cord into a grounded power source. The
charger is now powered.
The charge pocket LEDs flash while the battery charger enters and
exits the startup check. The battery charger is ready for use once
the charge pocket LEDs are no longer illuminated.
Page 5
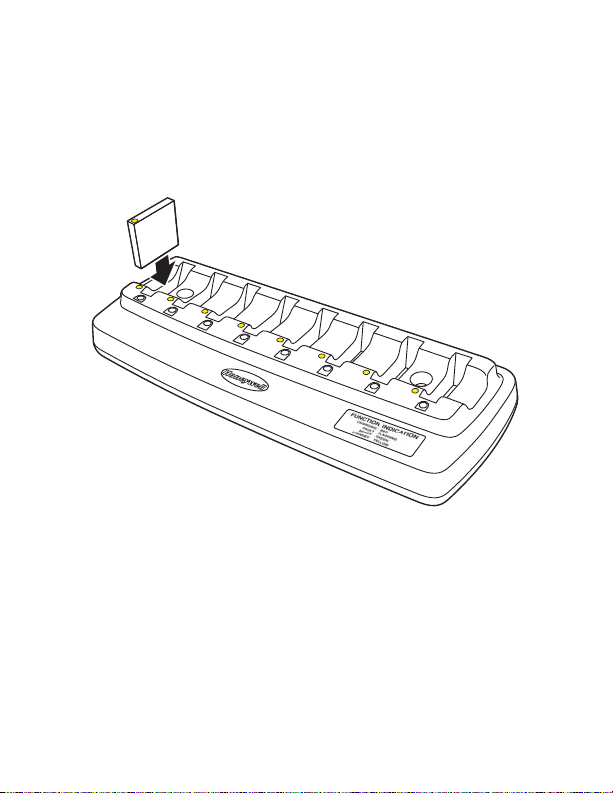
Charging Batteries
Hold the battery with its three charging contacts in line with the three
charging contacts in the charging pocket. Use the direction of the
arrow on the battery label as a guide and align the yellow dot on the
battery with the yellow dot on the charger. Firmly press the battery
straight down into the battery charging pocket.
It is important that batteries are inserted into the charging pocket
correctly. Inserting the battery incorrectly could result in damage to
the battery or the charger. Do not “slam” or slide the battery into the
pocket. This could damage the charger.
When a battery is placed in a charging pocket, the battery charger
begins charging the battery. There is a slight delay while the charger evaluates the condition of the battery before charging begins.
While charging, the charger and battery will generate enough heat
to feel warm. This is normal and does not indicate a problem. The
red LED on the 8-Bay Charger indicates the battery is charging. A
green LED indicates the battery has been fully charged and can be
removed.
Page 6

Interpreting the Charging Pocket LEDs
The battery pocket timers are dynamic and based upon the capacity
of the battery. There is a timeout period for the soft start and
another timeout period for the overall time required to charge the
battery to full capacity.
LED Indication
Red continuous Battery is charging.
Red flashing Battery charger fault or failure.
Charging pocket timeout
period has expired.
Green continuous Battery charge is complete.
Yellow/Amber continuous Battery pocket is in standby
No light on a charge pocket No battery in pocket.
mode while warming up or
cooling down.
Battery is inserted incorrectly.
Make sure charging terminals
on battery and charger are
aligned.
Battery is not fully inserted.
Battery or charger is defective
or damaged.
Page 7

LED Indication
No light on all charge pockets No power to charger.
No batteries in any pocket.
Battery Charger Help
Issue Cause Solution
Battery does not
fit in charging
pocket
No battery in
charger, but an
LED is on
Different manufacturer's battery.
There is an
object in the
charging
pocket.
Dirt or foreign
objects are in
the charging
pocket.
Use only Honeywell lithium ion batteries, model
number HNP-40, in this
charger.
Unplug charger from AC
supply. Remove any dirt
or foreign objects from
the charging pocket.
Unplug charger from AC
supply. Remove any dirt
or foreign objects from
the charging pocket. If
the LEDs continue to
remain ON, the charger
may be defective. Contact Support at
www.honeywellaidc.com.
Page 8

Issue Cause Solution
Charger is
plugged into a
live outlet, battery is inserted,
but all LEDs are
off
Battery is not
making contact
with terminals in
the pocket.
Faulty battery. Replace battery. If this
Push battery in firmly. Do
not “slam” the battery into
the charging pocket.
does not correct the situation, contact Support at
www.honeywellaidc.com.
Red LED comes
on when a fully
charged battery
is inserted
During the first
few minutes, the
battery charger
checks the battery for correct
voltage and
charge state.
During this time
the LED is red.
There is nothing wrong
with the battery or charger. Do not “top off” a
fully charged battery by
repeatedly placing it in
the charging pocket. The
battery may overheat and
become damaged.
Page 9

Issue Cause Solution
Red LED is
flashing on any
pocket
Current could
not be sourced
through the battery due to age,
exhaustion, or
damage to the
cell(s).
The charger’s
timeout period
has expired.
Contact Support at
www.honeywellaidc.com
for battery replacement
options.
Make sure that the battery temperature is within
specification and try
charging again. If this
does not correct the situation, contact Support at
www.honeywellaidc.com
for battery replacement
options.
Page 10

Issue Cause Solution
Ye l l o w / A m b e r
LED when battery is inserted
in the charging
pocket
The battery is
too hot or too
cold to charge.
Battery is
inserted backwards.
Remove the battery from
the charging pocket and
allow it to adjust to room
temperature. If the battery is left in the charging
pocket, it will cool down
or warm to a temperature
upon which the charger
will begin the charge
cycle. However, depending on the temperature of
the battery, it may take 23 hours to adjust. The
cool-down / warm-up of a
battery is much quicker if
the battery is not in the
charging pocket.
Remove the battery, line
up the charging terminals
on the battery with the
charging terminals in the
charging pocket and
insert the battery again.
Cleaning and Storage
Cleaning a Battery
The battery should not require cleaning unless it has become
heavily soiled. Use only mild detergent with a slightly damp
cloth to clean the outside of the battery. Do not use solvents or
flammable cleaners. Allow the case to dry fully before using
again.
Page 11

Cleaning the Battery Charger
Use only mild detergent with a slightly damp cloth to clean the
outside of the charger. Do not use solvents or flammable cleaners. Allow the case to dry fully before using again.
Do not allow cleaning agents of any kind to contact the battery
charging contacts or they may be damaged. If necessary, clean
them with a soft-bristle, dry brush or compressed air.
Unplug the charger from the power source before cleaning or
removing debris from the charging pockets. Disconnect the
charger from AC power by pulling the plug, not the cord.
Keep dirt and foreign objects out of the battery pocket. Do not
short circuit any of the contacts in the battery pocket. This
could result in injury or property damage.
Storage
Remove all batteries from the charging pockets and disconnect
AC power before placing the 8650 8-Bay Battery Charger in
storage. It should be stored in a cool, dry place, protected from
weather and airborne debris.
Page 12

Cautions and Warnings
!
!
Warning: Use only Honeywell lithium ion batteries, model
number HNP-40, rated 3.7 Vdc, 2.77Whr in this device. Use
of any non-Honeywell battery may result in damage not covered by the warranty.
Warning: Use the provided AC power supply only. Using
any other type of AC power supply is prohibited.
Do not disassemble or perform modifications to the charger. There
are no user serviceable components in the charger.
Battery Recommendations
The battery is a lithium ion cell and can be used without a full
charge, and can also be charged without fully discharging, without
impacting the battery life. There is no need to perform any charge/
discharge conditioning on this type of battery.
Replace a defective battery immediately since it could damage the
scanner.
Do not leave the battery in a non-operating charger. The battery
may discharge through the charger rather than hold its charge.
Although your battery can be recharged many times, it will eventually be depleted. Replace it after the battery is unable to hold an
adequate charge.
If you are not sure if the battery or charger is working properly, send
it to Honeywell International Inc. or an authorized service center for
inspection.
Page 13

Safety Precautions for Lithium Batteries
• Batteries should be stored, charging contact side up, in a cool dry
place, protected from weather and airborne debris, whenever
possible.
• Do not place batteries in fire or heat the batteries.
• Do not store batteries near fire or other high temperature
locations.
• Do not store or carry batteries together with metal objects.
• Do not expose batteries to water or allow the batteries to get wet.
• Do not co nnect (short) the positive and negative terminals, of the
batteries, to each other with any metal object.
• Do not pierce, strike or step on batteries or subject batteries to
strong impacts or shocks.
• Do not disassemble or modify batteries.
• Do not leave the battery in a non-operating charger. The battery
may discharge through the charger rather than hold its charge.
Page 14

Technical Assistance
Contact information for technical support, product service, and repair can be
found at
www.honeywellaidc.com.
Limited Warranty
For warranty information, go to www.honeywellaidc.com and select
Resources>Warranty.
Patents
For patent information, refer to www.hsmpats.com.
User Documentation
For localized versions of this document, go to www.honeywellaidc.com.
Disclaimer
Honeywell International Inc. (“HII”) reserves the right to make changes in
specifications and other information contained in this document without prior
notice, and the reader should in all cases consult HII to determine whether
any such changes have been made. The information in this publication does
not represent a commitment on the part of HII.
HII shall not be liable for technical or editorial errors or omissions contained
herein; nor for incidental or consequential damages resulting from the
furnishing, performance, or use of this material. HII disclaims all responsibility
for the selection and use of software and/or hardware to achieve intended
results.
This document contains proprietary information that is protected by copyright.
All rights are reserved. No part of this document may be photocopied,
reproduced, or translated into another language without the prior written
consent of HII.
Copyright 2016 Honeywell International Inc. All rights reserved.
Web Address: www.honeywellaidc.com
 Loading...