

Honeywell 85606065 User Manual

Image Kiosk 8560
with Microsoft® Windows® CE
User’s Guide-
Preliminary CP4
Draft

Disclaimer
Hand Held Products, Inc. (“Hand Held Products”) reserves the right to make changes in specifications and other information
contained in this document without prior notice, and the reader should in all cases consult Hand Held Products to determine
whether any such changes have been made. The information in this publication does not represent a commitment on the part of
Hand Held Products.
Hand Held Products shall not be liable for technical or editorial errors or omissions contained herein; nor for incidental or
consequential damages resulting from the furnishing, performance, or use of this material.
This document contains proprietary information that is protected by copyright. All rights are reserved. No part of this document
may be photocopied, reproduced, or translated into another language without the prior written consent of Hand Held Products.
© 2006 Hand Held Products, Inc. All rights reserved.
Web Address: www.handheld.com
Trademarks
Microsoft, Windows, Windows CE, Windows NT, Windows 2000, Windows ME, Windows XP, ActiveSync, Outlook, and the
Windows logo are trademarks or registered trademarks of Microsoft Corporation.
Intel is a registered trademark of Intel Corporation.
Other product names mentioned in this manual may be trademarks or registered trademarks of their respective companies and
are the property of their respective owners.

Table of Contents
Chapter 1 - Agency Information
Required Safety Labels .................................................... ..................................................... ..............1-1
Safety Label, non-RF....................................................................................................................1-1
Safety Label, 802.11b Radio ........................................................................................................1-1
Regulatory and Safety Approvals for all IK8560 Devices .................................................................1-2
FCC Compliance.................................................................................................................................1-2
Chapter 2 - Getting Started
IK8560 Features............................................................................................... .... ...............................2-1
Connect the Power and Communication Cables.................................................................................2-1
Boot the IK8560..................................................................................................................................2-1
Start Screen .........................................................................................................................................2-1
Task Tray......................................................................................................................................2-2
Setting the Time and Date...................................................................................................................2-2
Using the Soft Input Panel (SIP).........................................................................................................2-3
Adjusting the Backlight.................................................................. .... .................................................2-3
Adjusting the Contrast..................................................................................................... .............2-4
Using Windows Explorer................................................................................. .... ...............................2-4
Selecting Text......................................................................................................................................2-4
Selecting Programs..............................................................................................................................2-4
Chapter 3 - Hardware Overview
Front Panel..........................................................................................................................................3-1
Back Panel................................................................................. ..... .... .................................................3-2
Connectors....................................................................................................................................3-3
Connecting the Power and Communication Cables............................................................................3-4
USB Cable....................................................................................................................................3-4
Standard RS-232 Cable ................................................................................................................3-5
RS-232 Pass-Through Cable ........................................................................................................3-5
Rebooting the Device..........................................................................................................................3-6
Warm Boot ...................................................................................................................................3-6
Cold Boot......................................................................................................................................3-6
Using the Reset Switch.................................................................................................................3-6
Screen Protector Replacement ............................................................................................................3-7
Maintenance........................................................................................................................................3-8
IK8560 Technical Specifications............... .... ..... .......................................................... ......................3-9
Chapter 4 - Communication
Installing Additional Software............................................................................................................4-1
Microsoft ActiveSync .........................................................................................................................4-2
Exploring the Device from the Host Workstation........................................................................4-5
Adding Programs Using ActiveSync............................................................................................4-6
Synchronizing...............................................................................................................................4-7
Wired Ethernet Communication—IK8560E.......................................................................................4-8
Adding Programs from a Network......................................................................................................4-8
Image Kiosk 8560 User’s Guide- Preliminary CP4 Draft
Rev (a)
6/27/06
iii

USB Host Port.....................................................................................................................................4-9
Chapter 5 - IK8560C—Wireless LAN with 802.11b
Overview .............................................................................................................................................5-1
Configuring the 802.11b Radio ...........................................................................................................5-1
802.11b with Wireless Zero Config..............................................................................................5-1
Disabling Encryption ....................................................................................................................5-2
Editing Radio Configuration.........................................................................................................5-2
Wireless Information Tab .............................................................................................................5-3
Preferred Networks .......................................................................................................................5-4
Wireless Properties Window.........................................................................................................5-5
Advanced Wireless Settings..........................................................................................................5-6
IP Addresses..................................................................................................................................5-7
802.11b Wireless Security........................................................................................ .... .......................5-8
Opening the Client ........................................................................................................................5-9
Main Window ...............................................................................................................................5-9
Setup Screens..............................................................................................................................5-12
Saving Your Settings ..................................................................................................................5-12
Configuring Client Authentication..............................................................................................5-13
Configuring a Port.......................................................................................................................5-17
Configuring a Network ...............................................................................................................5-19
Installing Certificates..................................................................................................................5-22
Chapter 6 - Imaging
Overview .............................................................................................................................................6-1
Supported Bar Code Symbologies.......................................................................................................6-1
Default Bar Code Symbologies.....................................................................................................6-1
Scanning a Bar Code ...........................................................................................................................6-2
Omni-Directional Aiming.................................................................. ..................................................6-2
Sample Bar Codes ...............................................................................................................................6-3
Depth of Focus (DOF) Specifications.................................................................................................6-3
Scan Demo...........................................................................................................................................6-4
Auto-Send .....................................................................................................................................6-7
Chapter 7 - Mounting
Overview .............................................................................................................................................7-1
Back Panel Mounting Dimensions ......................................................................................................7-1
Connector Slots....................................................................................................................................7-2
Side Panel Dimensions........................................................................................................................7-2
Chapter 8 - Customer Support
Product Service and Repair .................................................................................................................8-1
Online Product Service and Repair Assistance.............................................................................8-1
Technical Assistance ...........................................................................................................................8-2
Online Technical Assistance.........................................................................................................8-2
Limited Warranty ................................................................................................ ..... ...........................8-3
iv Rev (a)
6/27/06
Image Kiosk 8560 User’s Guide-
Preliminary CP4 Draft
1
Agency Information
Required Safety Labels
Image Kiosk 8560 (IK8560) devices meet or exceed the requirements of all applicable standards organizations for safe operation.
However, as with any electrical equipment, the best way to ensure safe operation is to operate them according to the agency
guidelines that follow. Please read these guidelines carefully before using your IK8560.
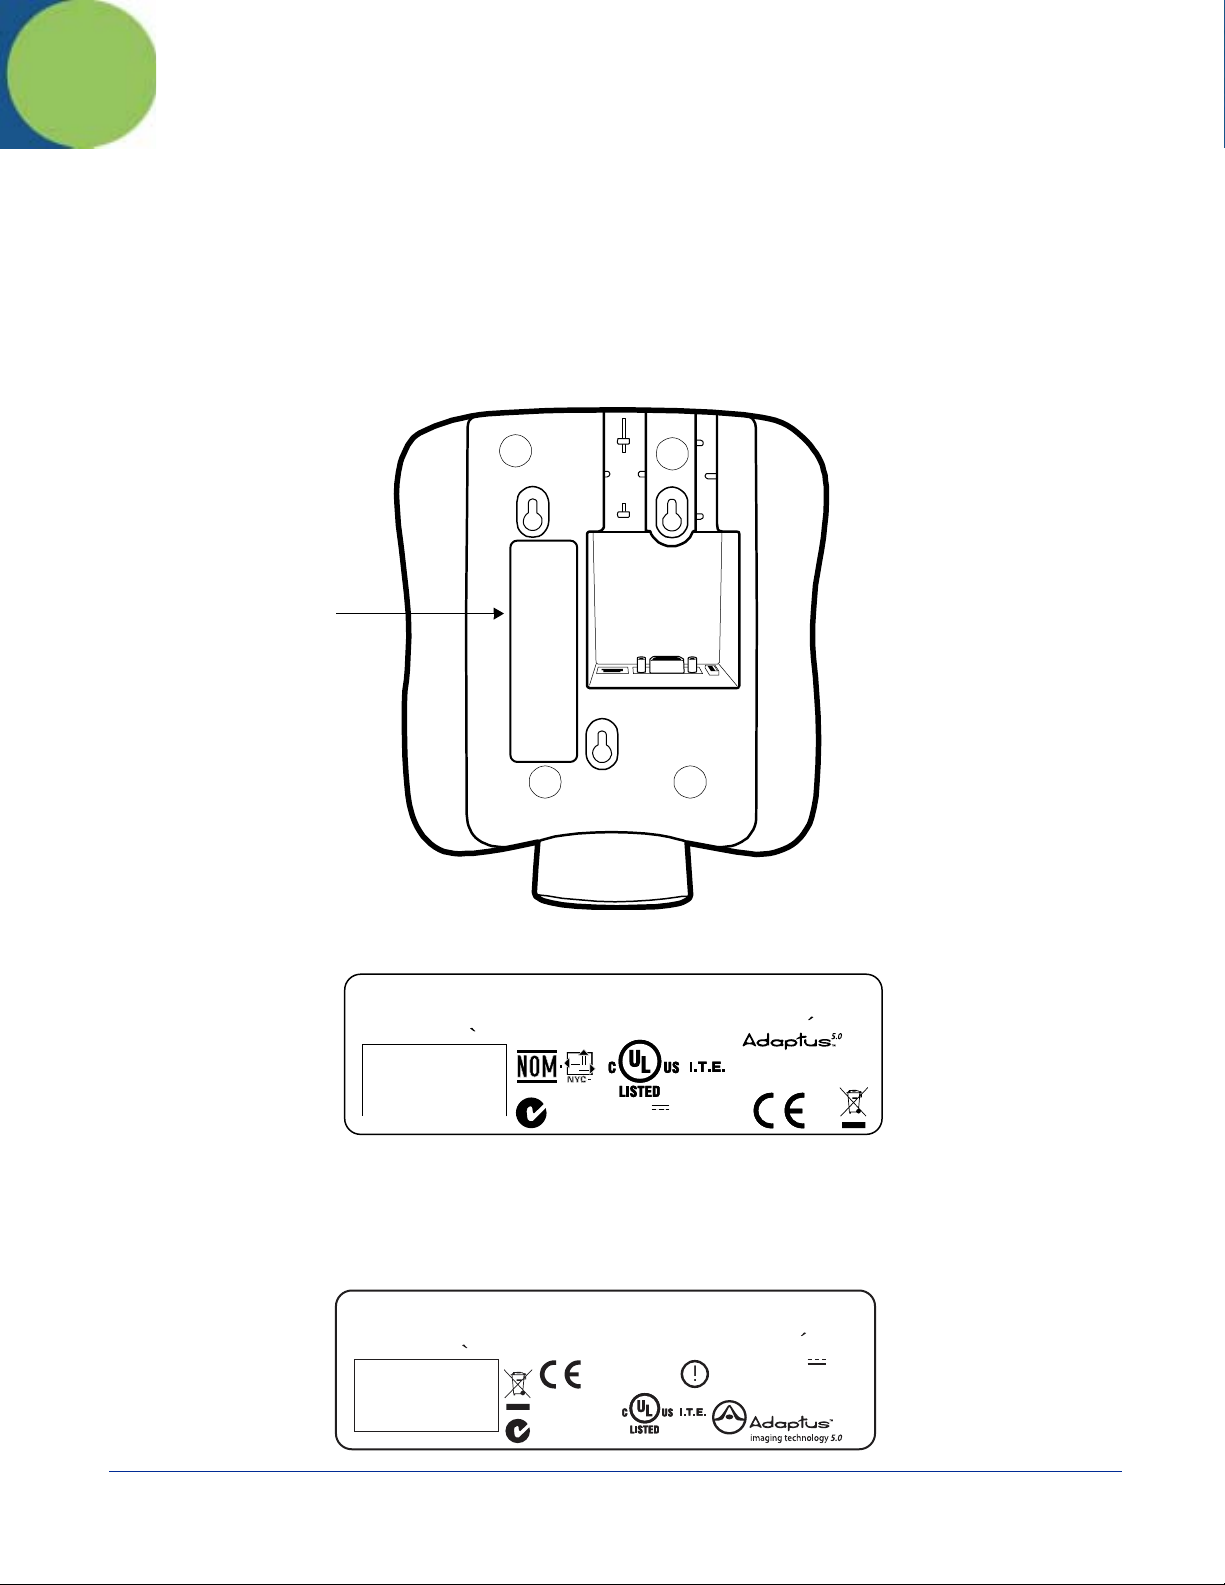
Location
Safety label
Safety Label, non-RF
7KLVGHYLFHFRPSOLHVZLWK3DUWRIWKH)&&5XOHV2SHUDWLRQLVVXEMHFWWRWKHIROORZLQJ
WZRFRQGLWLRQV7KLVGHYLFHPD\QRWFDXVHKDUPIXOLQWHUIHUHQFHDQGWKLVGHYLFH
PXVWDFFHSWDQ\LQWHUIHUHQFHUHFHLYHGLQFOXGLQJLQWHUIHUHQFHWKDWPD\FDXVHXQGHVLUHG
RSHUDWLRQ
&ODVVH$HVWFRQIRUPHDODQRUPH10%GX&DQDGD
7KLV&ODVV$GLJLWDODSSDUDWXVFRPSOLHVZLWK&DQDGLDQ,&(6&HWDSSDUHLOQXPHULTXHGHOD
0DGHLQ7DLZDQ
(QWUDGD9P$
1
(
ZZZKDQGKHOGFRP
'
+DQG+HOG3URGXFWV,QF
6NDQHDWHOHV)DOOV1<
86$
Safety Label, 802.11b Radio
IK8560 RF devices are designed to comply with the most current applicable standards on safe levels of RF energy developed
by the Institute of Electrical and Electronics Engineers (IEEE) and the American National Standards Institute (ANSI) and has
been recommended for adoption by the Federal Communications Commission (FCC).
This device complies with Part 15 of the FCC Rules. Operation is subject to the following
two conditions: (1) This device may not cause harmful interference, and (2) this device
must accept any interference received, including interference that may cause undesired
operation.
Classe A est conforme a la norme NMB-003 du Canada.
Image Kiosk 8560 User’s Guide- Preliminary CP4 Draft
This Class A digital apparatus complies with Canadian ICES-003. Cet appareil numerique de la
Made in Taiwan
N10410
Terminal de captura para Punto de Ventas
Hand Held Products, Inc.
1317
FCC ID: HD585606065 IC: 1693B-85606065
!!
E153740
7D21
Skaneateles Falls, NY
13153 USA
Rev (a)
6/27/06
Entrada:
12 V 800mA
,
www.handheld.com
1 - 1

Regulatory and Safety Approvals for all IK8560 Devices
Parameter Specification
U.S.A. FCC Part 15, Class A
Canada ICES-003
European Community EN 55022 (CISPR 22) Class A; 1998 +A1:2000; +A2:2003
EN60950
EN60825-1
EN55024:1998; +A1:2000; +A2:2003
The CE Mark on the product indicates that the system has been tested to and conforms with the provisions noted within
the 89/336/EEC Electromagnetic Compatibility Directive and the 73/23/EEC Low Voltage Directive.
For further information, please contact:
Hand Held Products, Inc.
Nijverheidsweg 9
5627 BT Eindhoven
The Netherlands
Hand Held Products, Inc. shall not be liable for use of our product with equipment (i.e., power supplies, personal computers, etc.)
that is not CE marked and does not comply with the Low Voltage Directive.
FCC Compliance
IK8560 devices meet or exceed all applicable standards and have been manufactured to the highest level of quality.
IK8560 Batch Device
IK8560 Batch devices comply with part 15 of the FCC rules. Operation is subject to the following two conditions: (1) this device
may not cause harmful interference, and (2) this device must accept any interference received, including interference that may
cause undesired operation.
IK8560 RF Device With an 802.11b Radio
This equipment has been tested and found to comply with the limits for a Class A digital device, pursuant to Part 15 of the FCC
Rules. These limits are designed to provide reasonable protection against harmful interference when the equipment is operated
in a commercial environment. This equipment generates, uses, and can radiate radio frequency energy and, if not installed and
used in accordance with the instruction manual, may cause harmful interference to radio frequencies. Operation of this
equipment in a residential area is likely to cause harmful interference, in which case the user will be required to correct the
interference at his own expense.
In accordance with FCC 15.21, changes or modifications not expressly approved by the party responsible for compliance could
void the user’s authority to operate the equipment.
This device and its antenna must not be co-located or operating in conjunction with any other antenna or
transmitter. To maintain compliance with FCC RF exposure guidelines, use only the accessories specified by the
!
manufacturer.
Canadian Compliance for IK8560 RF Devices With an 802.11b Radio
This Class A digital apparatus complies with Canadian ICES-003. Operation is subject to the following two conditions: (1) this
device may not cause harmful interference, and (2) this device must accept any interference received, including interference that
may cause undesired operation.
To prevent radio interference to the licensed service, this device is intended to be operated indoors and away from windows to
provide maximum shielding. Equipment (or its transmit antenna) that is installed outdoors is subject to licensing.
Cet appareil numérique de la Classe B est conforme à la norme NMB-003 du Canada.
1 - 2 Rev (a)
6/27/06
Image Kiosk 8560 User’s Guide-
Preliminary CP4 Draft

RF, Regulatory, and Safety Agency Approvals for 802.11b
Parameter Specification
RF Approvals
U.S.A. FCC Part 15-247
Canada RSS 210, RSS GEN
Europe EN300328-1, V.1.6.1:2004-11
EN301489-1, V.1.6.1:2005-09
EN301489-17, V.1.2.1:2002-08
This product is marked with
Directive, 1999/5/EC.
The equipment is intended for use throughout the European Community. Its authorization for use in France is restricted as
follows:
PAN European Frequency Range: 2.402 - 2.480 GHz
Restrictions in France are as follows:
• Indoor use - Maximum power (EIRP*) of 100 mW for the entire 2400-2483.5 MHz
• Outdoor use - Maximum power (EIRP*) of 100 mW for the 2400-2454 MHz band and maximum power (EIRP*) of 10 mW for
the 2454-2483 MHz band
in accordance with the Class II product requirements specified in the R&TTE
Pacemakers, Hearing Aids and Other Electrically Powered Devices
Most manufacturers of medical devices adhere to the IEC 601-1-2 standard. This standard requires devices to operate properly
in an EM Field with a strength of 3V/m over a frequency range of 26 to 1000MHz.
The maximum allowable field strength emitted by the IK8560 is 0.3V/m according to Subpart B of Part 1 of the FCC rules.
Therefore, the IK8560 RF has no effect on medical devices that meet the IEC specification.
Microwaves
The radio in the IK8560 RF device operates on the same fre quency band as a microwave oven. Therefore, if you use a
microwave within range of the IK8560 RF device you may notice performance degradation in your wireless network. However,
both your microwave and your wireless network will continue to function.
The IK8560 batch device does not contain a radio, and therefore, is not affected by microwave ovens.
Care and Cleaning
When needed, clean the image engine window and the LCD display with a clean, non-abrasive, lint-free cloth. The device can
be cleaned with a damp cloth.
For European Community Users
Hand Held Products complies with Directive 2002/69/EC OF THE EUROPEAN PARLIAMENT AND OF THE COUNCIL of 27
January 2003 on waste electrical and electronic equipment (WEEE).
Waste Electrical and Electronic Equipment Information
This product has required the extraction and use of natural resources for its production. It may contain hazardous substances
that could impact health and the environment, if not properly disposed.
In order to avoid the dissemination of those substances in our environment and to diminish the pressure on the natural resources,
we encourage you to use the appropriate take-back systems for product disposal. Those systems will reuse or recycle most of
the materials of the product you are disposing in a sound way.
The crossed out wheeled bin symbol informs you that the product should not be disposed of along with municipal waste
and invites you to use the appropriate separate take-back systems for product disposal.
Image Kiosk 8560 User’s Guide- Preliminary CP4 Draft
Rev (a)
6/27/06
1 - 3

If you need more information on the collection, reuse, and recycling systems, please contact your local or regional waste
administration.
You may also contact your supplier for more information on the environmental performances of this product.
1 - 4 Rev (a)
6/27/06
Image Kiosk 8560 User’s Guide-
Preliminary CP4 Draft

2
Getting Started
IK8560 Features
The IK8560 comes in two standard versions: the IK8560C with an on-board 802.11b radio and the IK8560E with a wired ethernet
connection. Here is a list of the standard features:
• Microsoft Windows CE 5.0 operating system
• Intel® XScale PXA 255 200MHz processor
• 5.7" 320X240 backlit color display
• Touch screen and protective overlay
• 64 MB SDRAM and 32 MB Flash ROM of on-board memory
• Support for RS-232, RS-485, USB, and powered USB interfaces
• Ethernet 10/100 Base-T communications port (IK8560E)
• 802.11b wireless radio (IK8560C)
• USB host communications port
• Adaptus Imaging Technology
• Beeper
Connect the Power and Communication Cables
The IK8560 has a number of power and communication cables. Use one to apply power to the device.
For more information, see Connecting the Power and Communication Cables on page 3-4.
Boot the IK8560
1. The IK8560 begins booting as soon as power is applied from the cable.
2. The splash screen appears as the system cold boots (see Cold Boot on page 3-6). The software version numbers for both
the bootloader and the kernel appear on the splash screen.
3. The device begins loading software; this is Autoinstall. A status bar appears for each program that loads. Do NOT interrupt
Autoinstall!
4. Autoinstall completes and the splash screen appears again as the system warm boots (see Warm Boot on page 3-6).
5. When the warm boot is complete, you end on the Start screen.
Start Screen
The Start screen is your Desktop for the IK8560. The boot process ends on this screen.
Image Kiosk 8560 User’s Guide- Preliminary CP4 Draft
Rev (a)
6/27/06
2 - 1
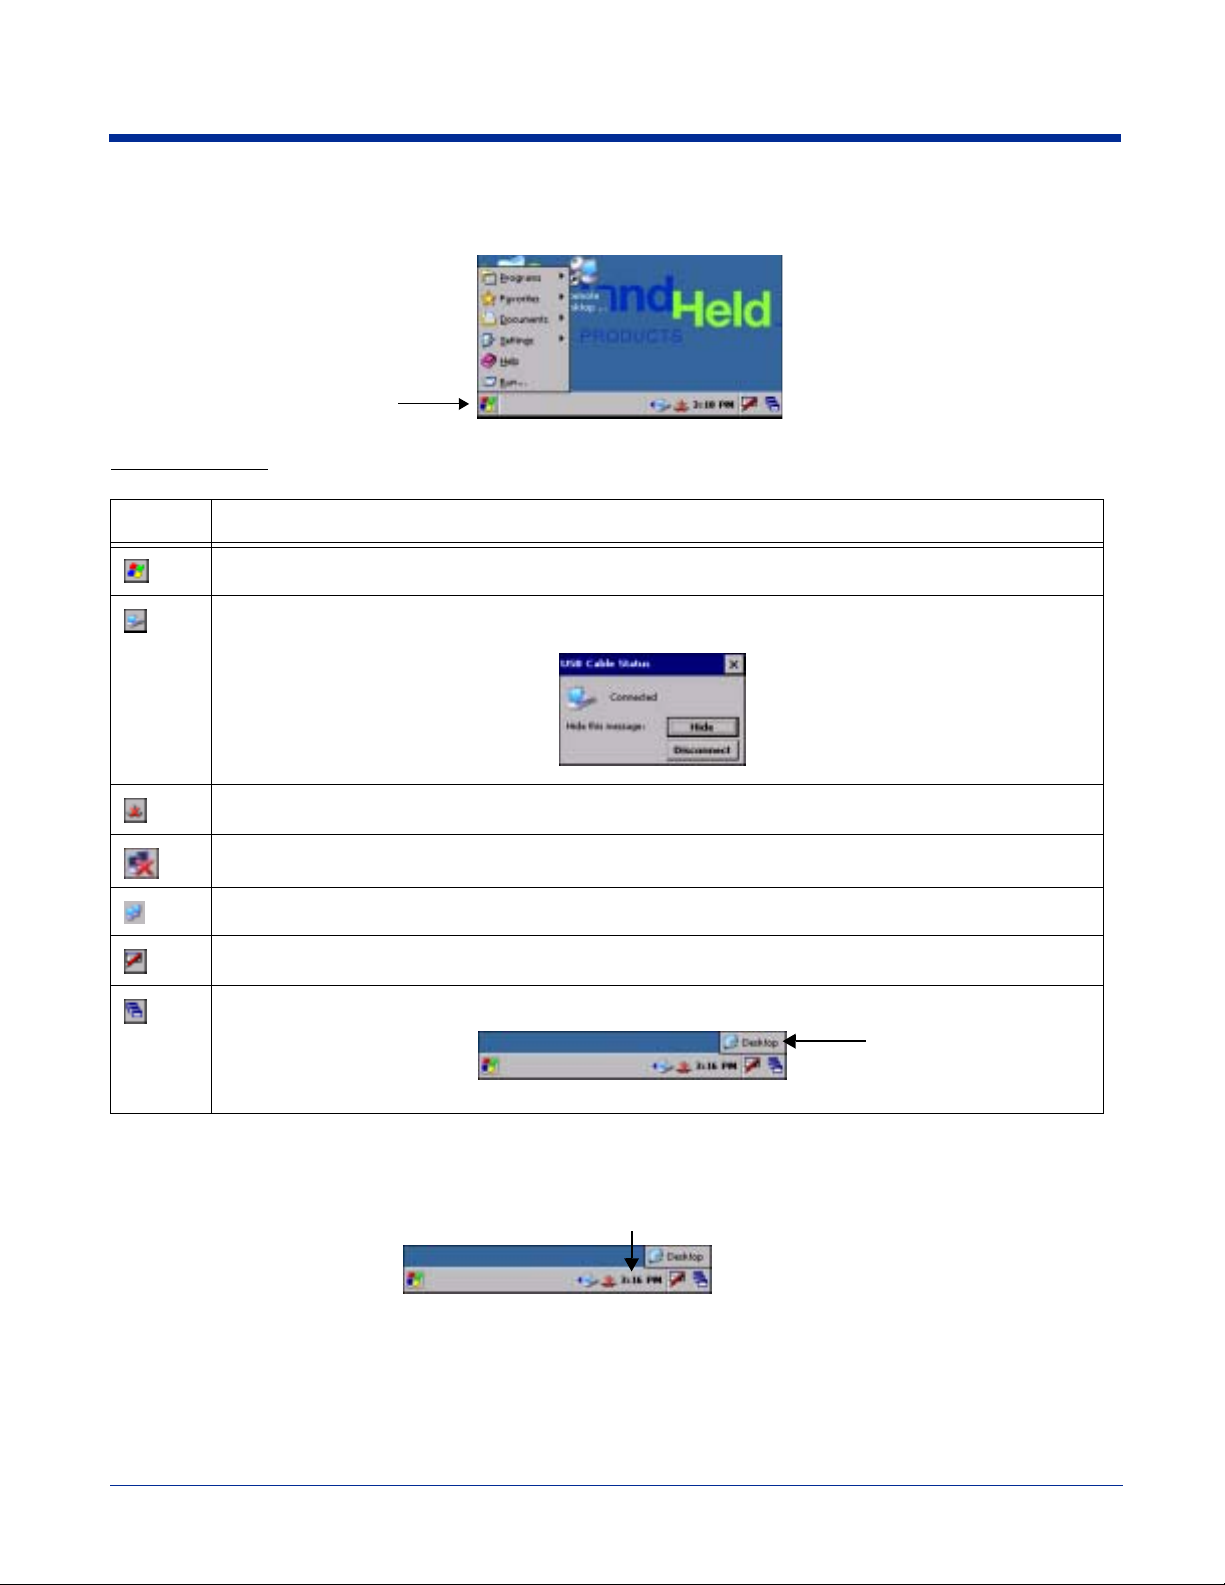
Task Tray
The task tray is located at the bottom of every application window and provides access to the Start menu.
Task Tray Icons
Icon Description
Opens the Start menu.
The communication cable is connected. Double-tapping this icon displays the cable type and connection
status.
Wired ethernet cable is not connected.
802.11b radio is not connected
802.11b radio is connected.
Displays the Soft Input Panel (SIP); see Using the Soft Input Panel (SIP) on page 2-3.
Tapping this button enables you to return to the Desktop.
The pop-up menu that appears will also show two programs or windows currently open.
Setting the Time and Date
After the device boots up, set the time and date to set the system clock to real-time.
Double-tap the time on the taskbar
OR
2 - 2 Rev (a)
6/27/06
Image Kiosk 8560 User’s Guide-
Preliminary CP4 Draft
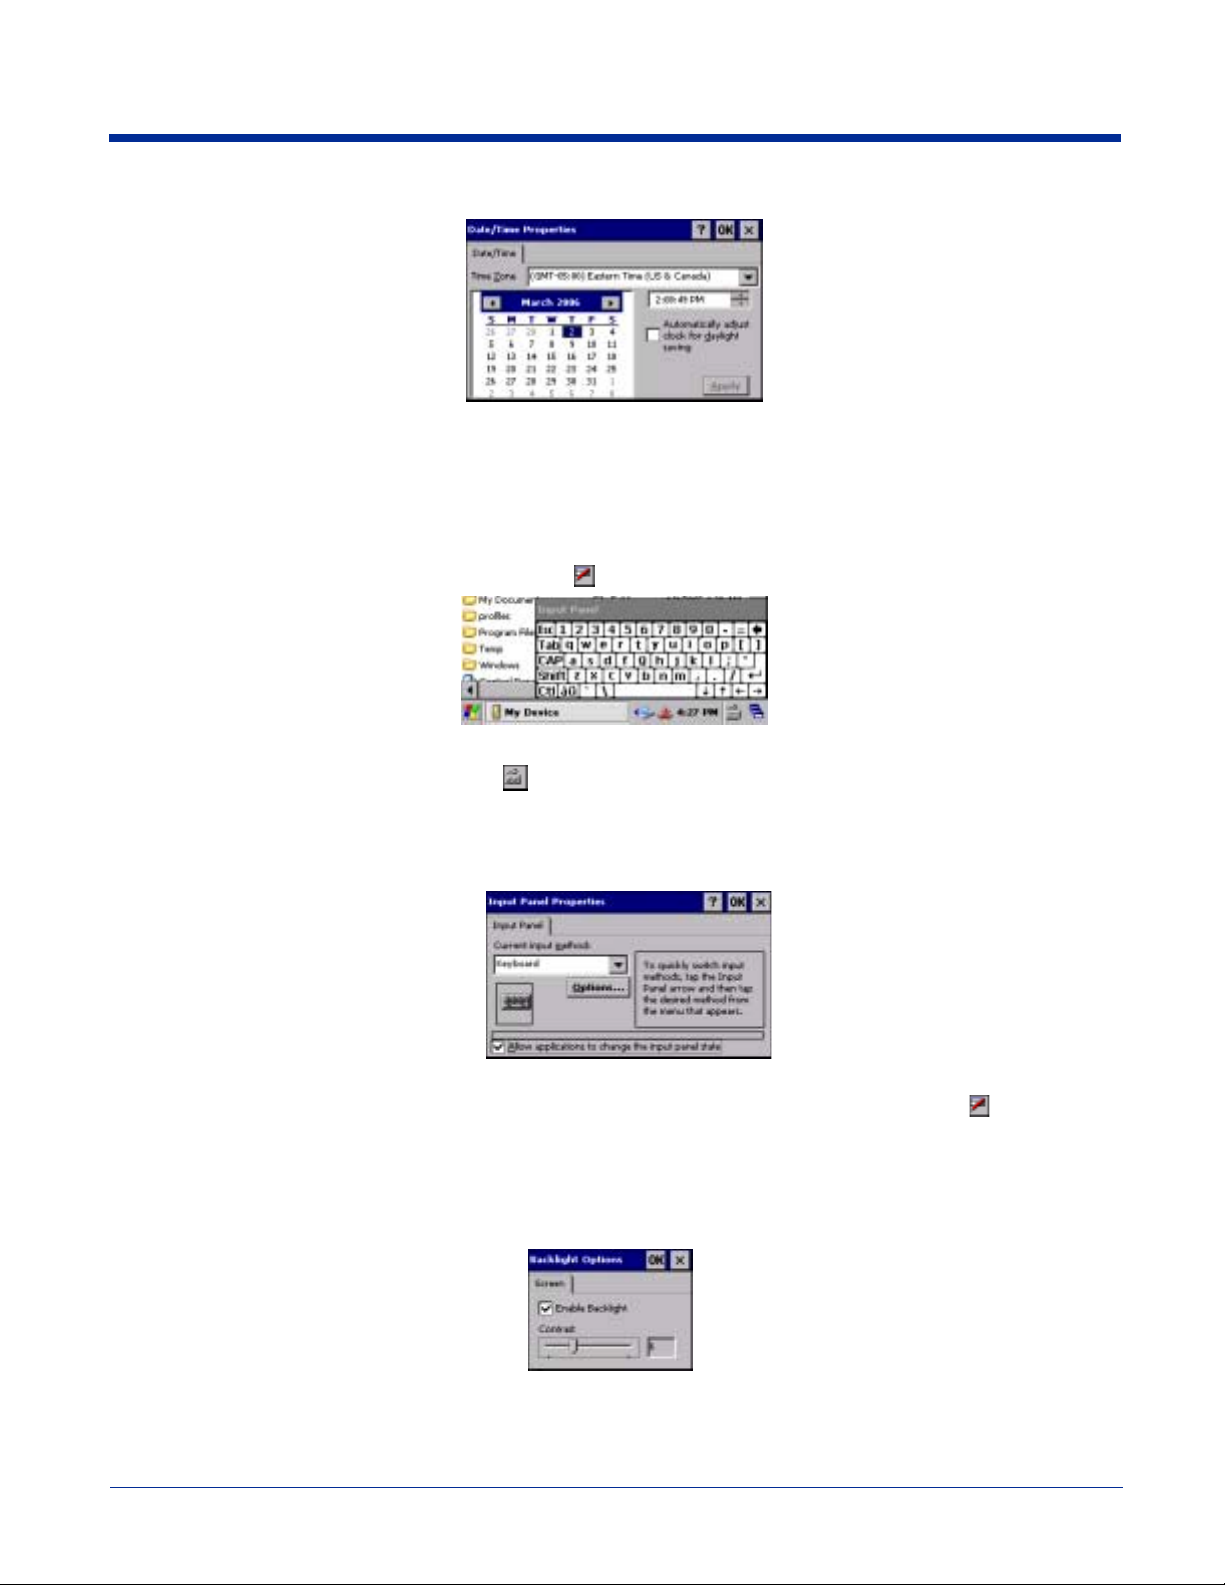
Tap Start > Control Panel > Date/Time.
The date and time saved here sets the system clock. Any scheduled function runs off the system clock.
Using the Soft Input Panel (SIP)
The SIP is a soft keyboard that enters text into fields and screens. The SIP pops up automatically over certain screens that
require text entry. You can also manually open the SIP when needed.
To open the SIP, tap the Input Panel icon in the task tray and select Keyboard on the pop-up menu.
On the soft keyboard that displays, tap the character keys to enter them on the screen.
To close the SIP, tap the Input Panel icon again and select Hide Input Panel.
SIP Settings
You can adjust SIP panel settings by tapping Start > Settings > Control Panel > Input Panel.
Allow applications to change the input panel state is selected by default and makes the SIP appear automatically in
applications when text needs to be typed. If you de-select this option, you must manually tap the SIP button
want to use the SIP.
every time you
Adjusting the Backlight
Tap Start > Settings > Control Panel > Display > Backlight tab > Advanced. The Backlight Options window opens.
The backlight is on by default (and enabled after each re-boot).
Image Kiosk 8560 User’s Guide- Preliminary CP4 Draft
Rev (a)
6/27/06
2 - 3

To turn off the backlight, de-select the Enable Backlight option (not recommended except for test purposes). Because the
screen goes completely dark, the best way to enable the backlight again is to power cycle, which re-boots the unit. While the
screen is dark, the Enable Backlight option is still there but can’t be seen to be selected accurately.
Adjusting the Contrast
On the Backlight Options window, use the Contrast slider to adjust the contrast.
Using Windows Explorer
You can access Windows Explorer by
Double-tapping the My Device icon on the start screen .
OR
Tapping Start > Windows Explorer.
Windows Explorer opens to the root folder level.
Use Windows Explorer to find and move files.
Selecting Text
To edit or format typed text, select it by dragging your finger across the text. Tap and hold the selection, then use the commands
on the pop-up menu to cut, copy, and paste the selected text.
Selecting Programs
To launch a program, tap Start > Programs and select a program from the list.
2 - 4 Rev (a)
6/27/06
Image Kiosk 8560 User’s Guide-
Preliminary CP4 Draft
3
Hardware Overview
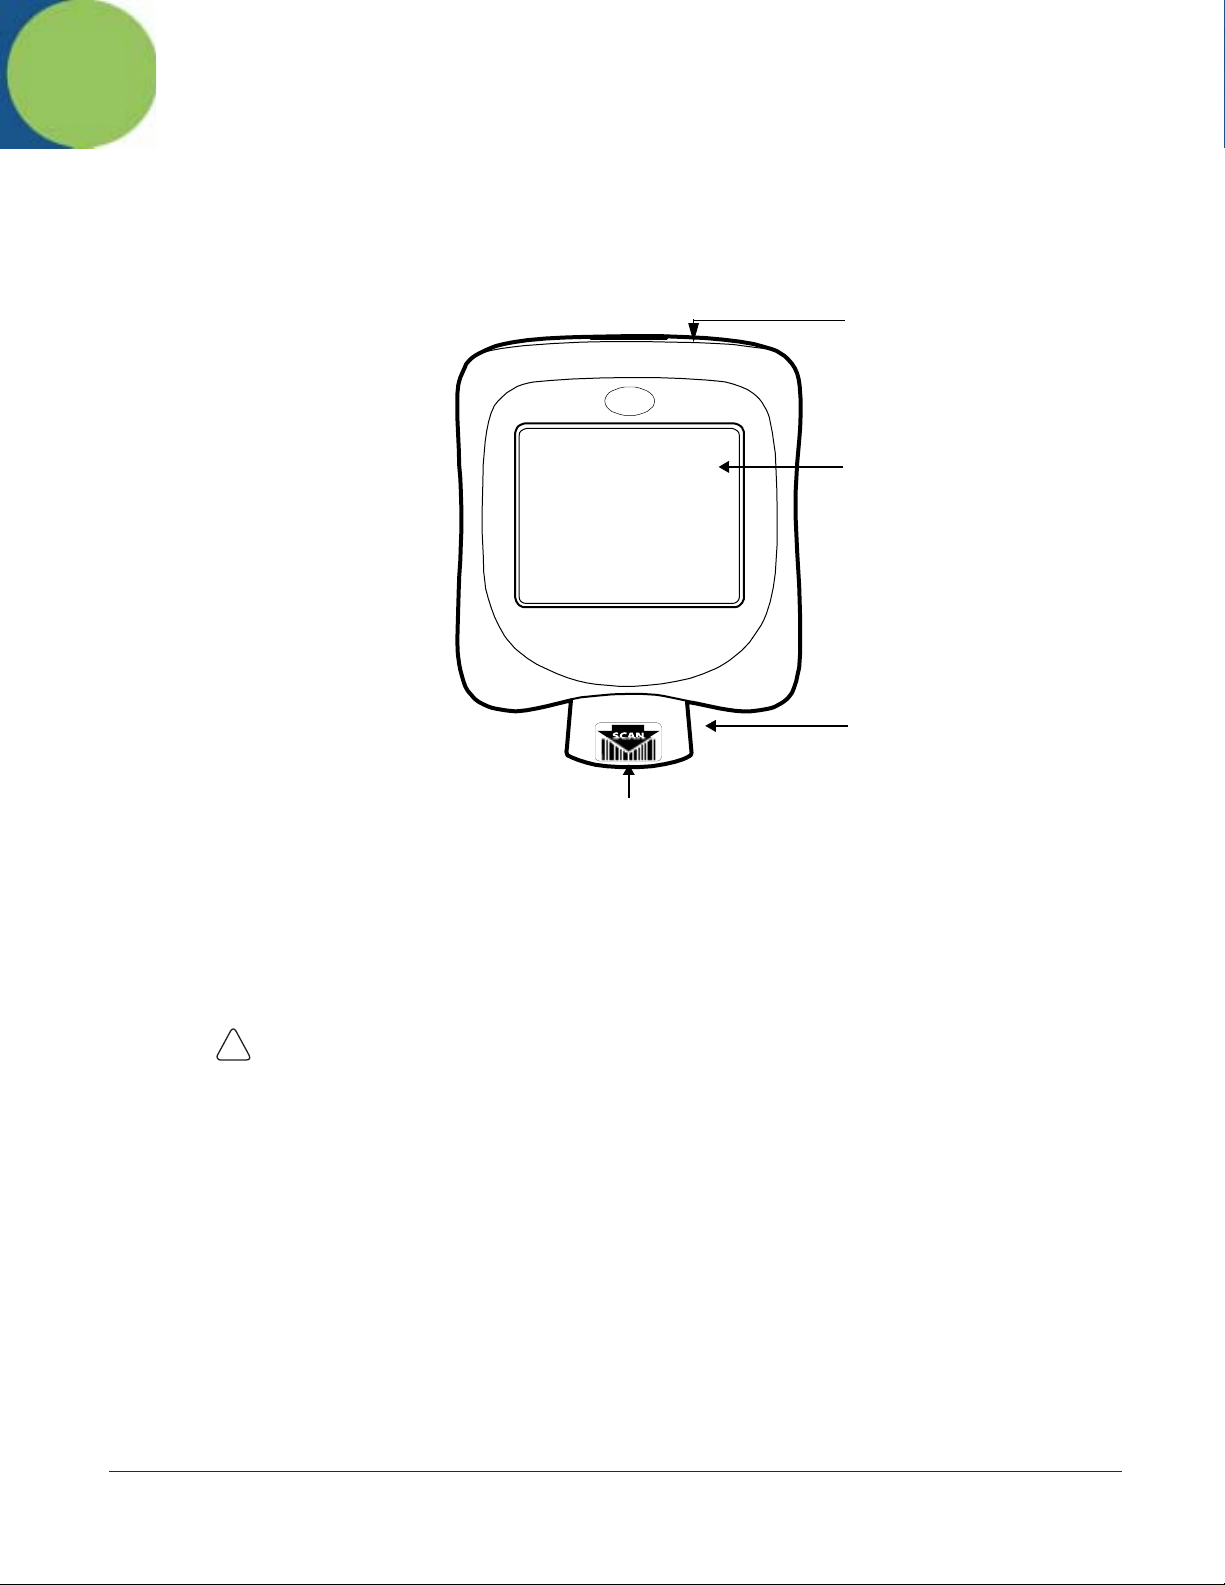
Front Panel
This section describes features on the front panel of the IK8560 device.
Reset Switch
Touch Screen Display
Reset Switch
This switch performs a cold boot without removing power from the unit. For details, see Using the Reset Switch on
page 3-6.
Touch Screen Display
The device features a 5.7" QVGA transmissive LCD color display that is backlit for maximum viewability, then
covered with an industrial touch screen protector for maximum durability. The touch screen resolution is 903 x 1238
points per inch (PPI). For touch screen input, use your finger.
Use of objects, such as paper clips, pencils, or ink pens on the touch screen can damage the input panel
and will void the warranty.
!
Screen Protectors—Hand Held Products requires screen protectors to protect the touch screen; especially when
used with applications that require high-volume interfacing with the touch screen. Screen protectors help prevent
damage to the touch screen display and are easily installed.
Screen protectors can be purchased at any major computer retail store or directly from Hand Held Products (p/n
100000583). You can replace the touch screen protector; see Screen Protector Replacement on page 3-7.
Beeper
The internal beeper generates a tone for successful decoding.
Illumination Cone
Projecting downward from the front panel, the image engine cone houses the image engine. Slide the bar code
underneath this slot to scan a bar code or take an image.
Illumination Cone
Image Engine
See Scanning a Bar Code on page 6-2.
Image Engine
The red illumination LEDs project out from the image engine at all times. For more information about imaging, see
Imaging on page 6-1.
Image Kiosk 8560 User’s Guide- Preliminary CP4 Draft
Rev (a)
6/27/06
3 - 1
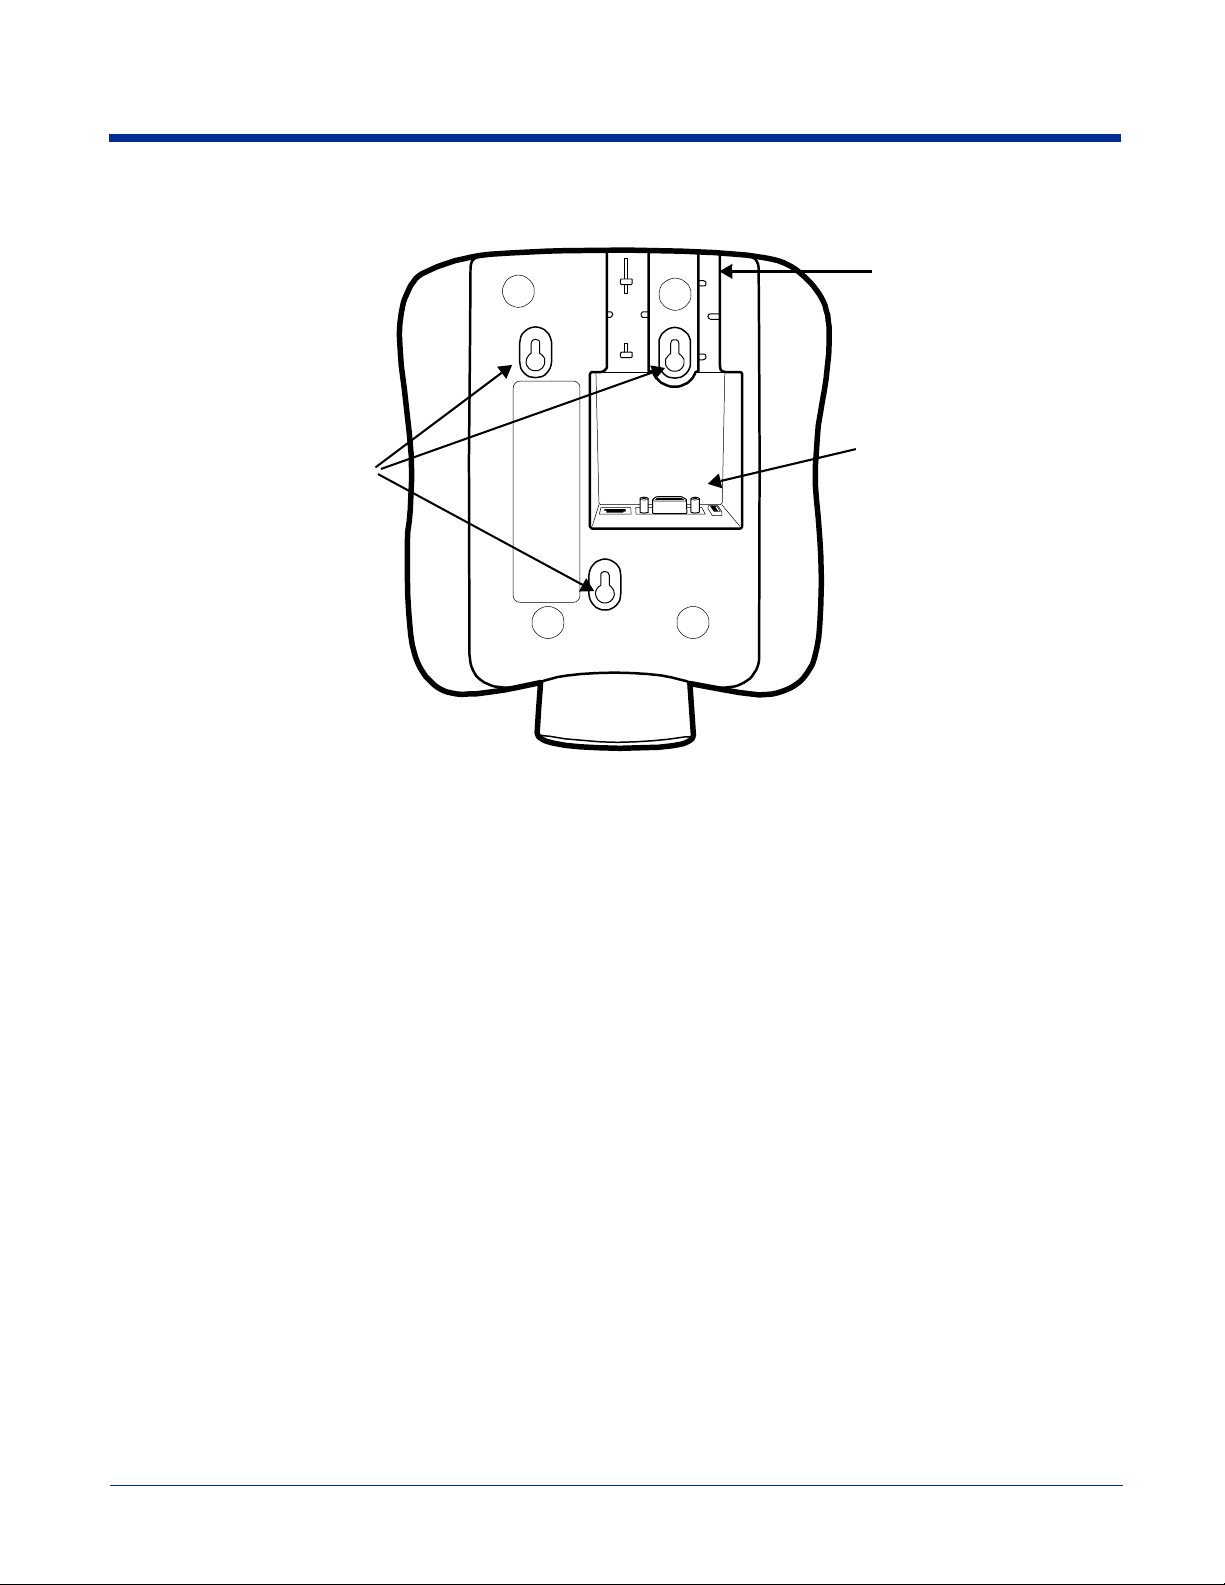
Back Panel
Wire Slots
Mount Slots
The back panel is designed for easy mounting, either to a wall or stand.
Wire Slots
These two slots are designed to hold the wires of the connecting cables.
Connectors
There are three connectors in a slot inside the back panel; see Connectors on page 3-3.
Mount Slots
Use these slots to mount the IK8560 to a flat surface or bracket. For mounting specifications, see Mounting on page
7-1.
Connectors
3 - 2 Rev (a)
6/27/06
Image Kiosk 8560 User’s Guide-
Preliminary CP4 Draft
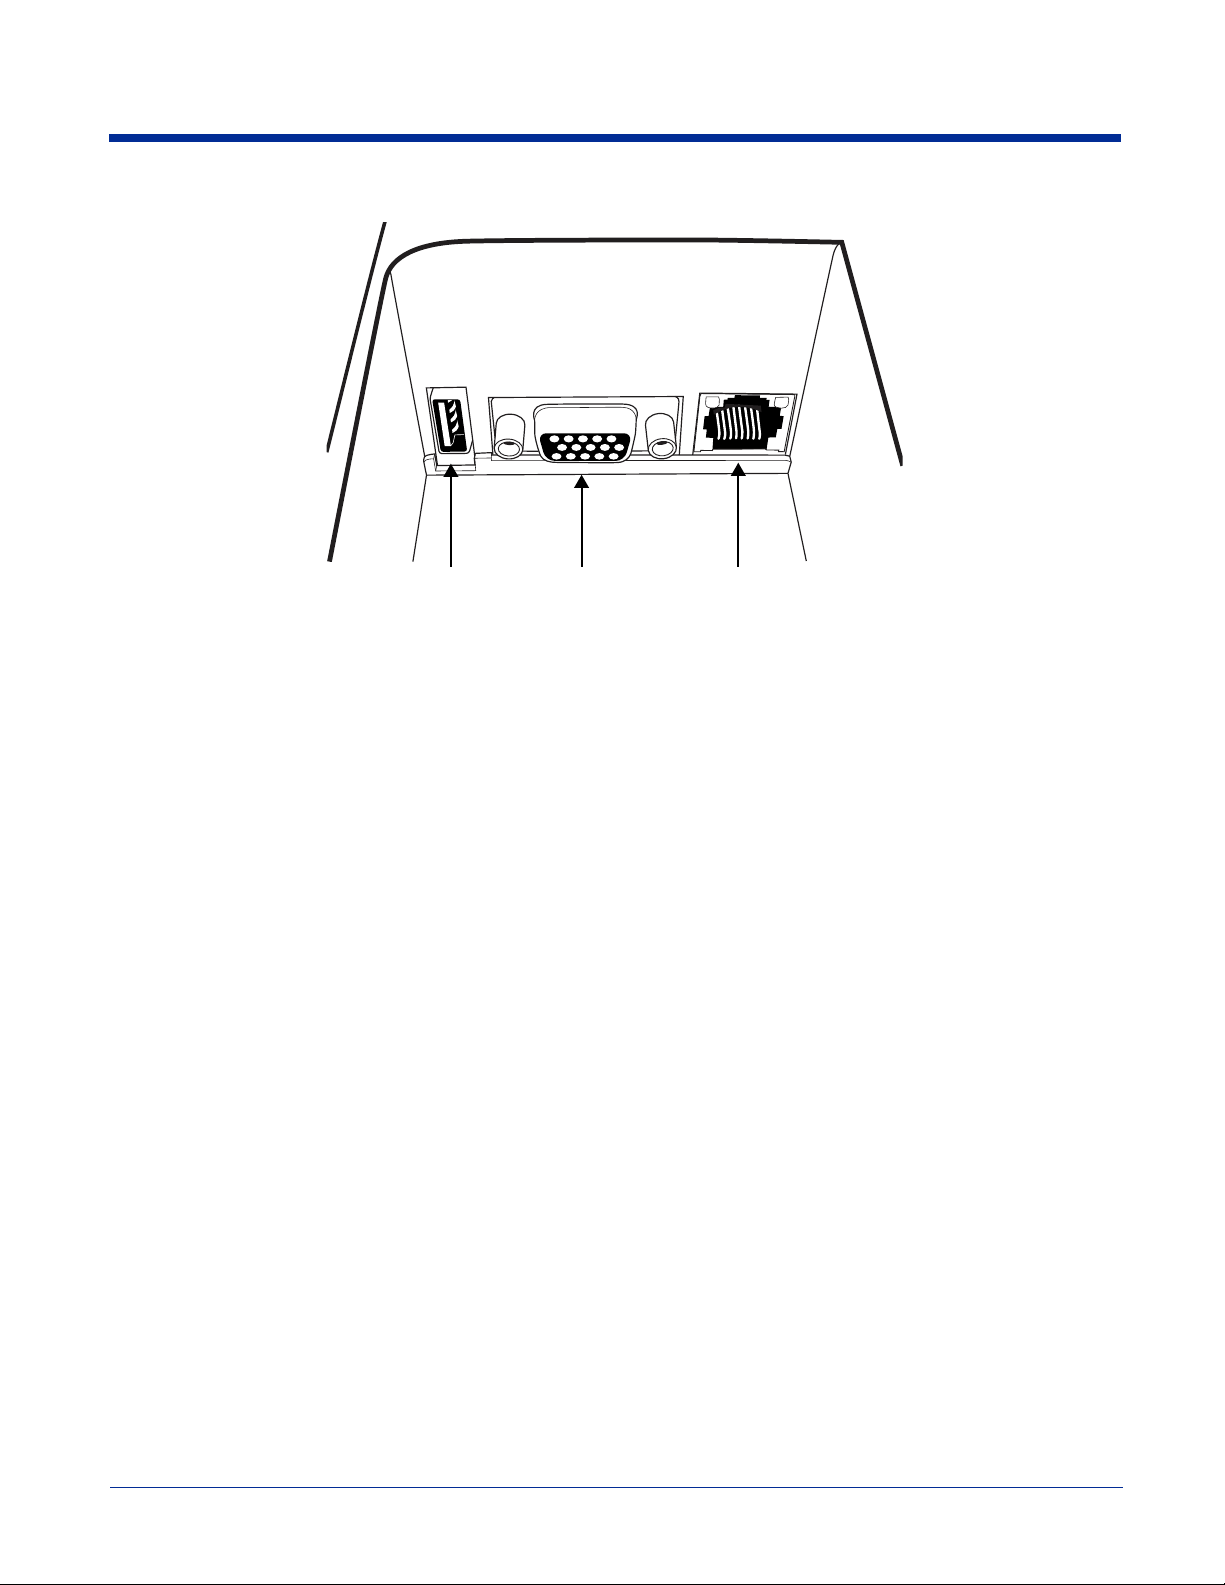
Connectors
USB Host Port
The USB Host port features a 5V DC power pass-through and can host supported USB client devices. Multiple USB
devices can be accommodated by plugging a USB HUB into the USB Host port. This is a four-pin connector and
supports USB 1.1 communication. USB 2.0 devices that are backwards compatible with USB 1.1 may be connected
to this port but will operate at USB 1.1 speeds.
For more information, see USB Host Port on page 4-9.
RJ45 JackDB15 ConnectorUSB Host Port
DB15 Connector
This is a single 15-pin, D-style, high-density female connector. All power cables have a connector that matches this
pin configuration. This connector powers the device (by receiving power from the cable) and communicates with a
host workstation using ActiveSync (USB only).
For more information, see Microsoft ActiveSync on page 4-2.
RJ45 Jack
IK8560E—On the IK8560E unit, this is a 10/100 Base-T communications port that supports wired ethernet
communications with a standard RJ45 ethernet cable. Cable must be purchased separately. You cannot power the
device through the ethernet cable. For more information,
4-8.
IK8560C—On the IK8560C unit, this connector is not enabled.
see Wired Ethernet Communication—IK8560E on page
Image Kiosk 8560 User’s Guide- Preliminary CP4 Draft
Rev (a)
6/27/06
3 - 3

Connecting the Power and Communication Cables
The IK8560 features a standard power cable that connects to a number of communication cables to suit your environment.
Standard Power Cable
The standard power cable powers the device and with an AC power adapter to convert the voltage from the power source to the
voltage required by the device. The IK8560 device must be connected to external power to run.
Communication Cables
The IK8560 offers the following communication options:
• USB Cable (four feet)
• Standard RS-232 Cable (12 feet)
• RS-232 Pass-Through (Y cable)
Note: You can verify the status of the communication cable by the icon in the task tray; see Task Tray Icons on page 2-2.
USB Cable
The USB communication cable is four feet long and supports USB 1.1. You can connect USB 2.0 devices that are backwards
compatible with USB 1.1 with this cable but data transfer will occur 1.1 speeds.
It features a single, 15-pin male connector that plugs into the DB15-pin female port on the back panel. The other end features a
standard Type A USB (1.1 or higher) connector designed to fit standard USB ports.
Note: Make sure the power switch is
turned off on the computer where
you will be installing the IK8560.
1. Plug the 15-pin connector (HDB15) of
the communication cable into the back
of the IK8560.
2. Plug the USB connector into the port
on your host workstation.
3. Plug the power plug into the pod on
the communication cable.
4. Plug the AC power supply into a power
outlet.
Hardware installation is now complete.
Your IK8560 powers on and autoconfigures to USB.
1
4
H
o
s
t
2
When you power on the host workstation,
you need to complete the Found New
Hardware wizard and install the IK8560
driver to configure the workstation for
ActiveSync communication; see Microsoft
ActiveSync on page 4-2.
If you want to power the device without communicating, simply disconnect the USB connector from the host workstation.
3 - 4 Rev (a)
6/27/06
3
Image Kiosk 8560 User’s Guide-
Preliminary CP4 Draft
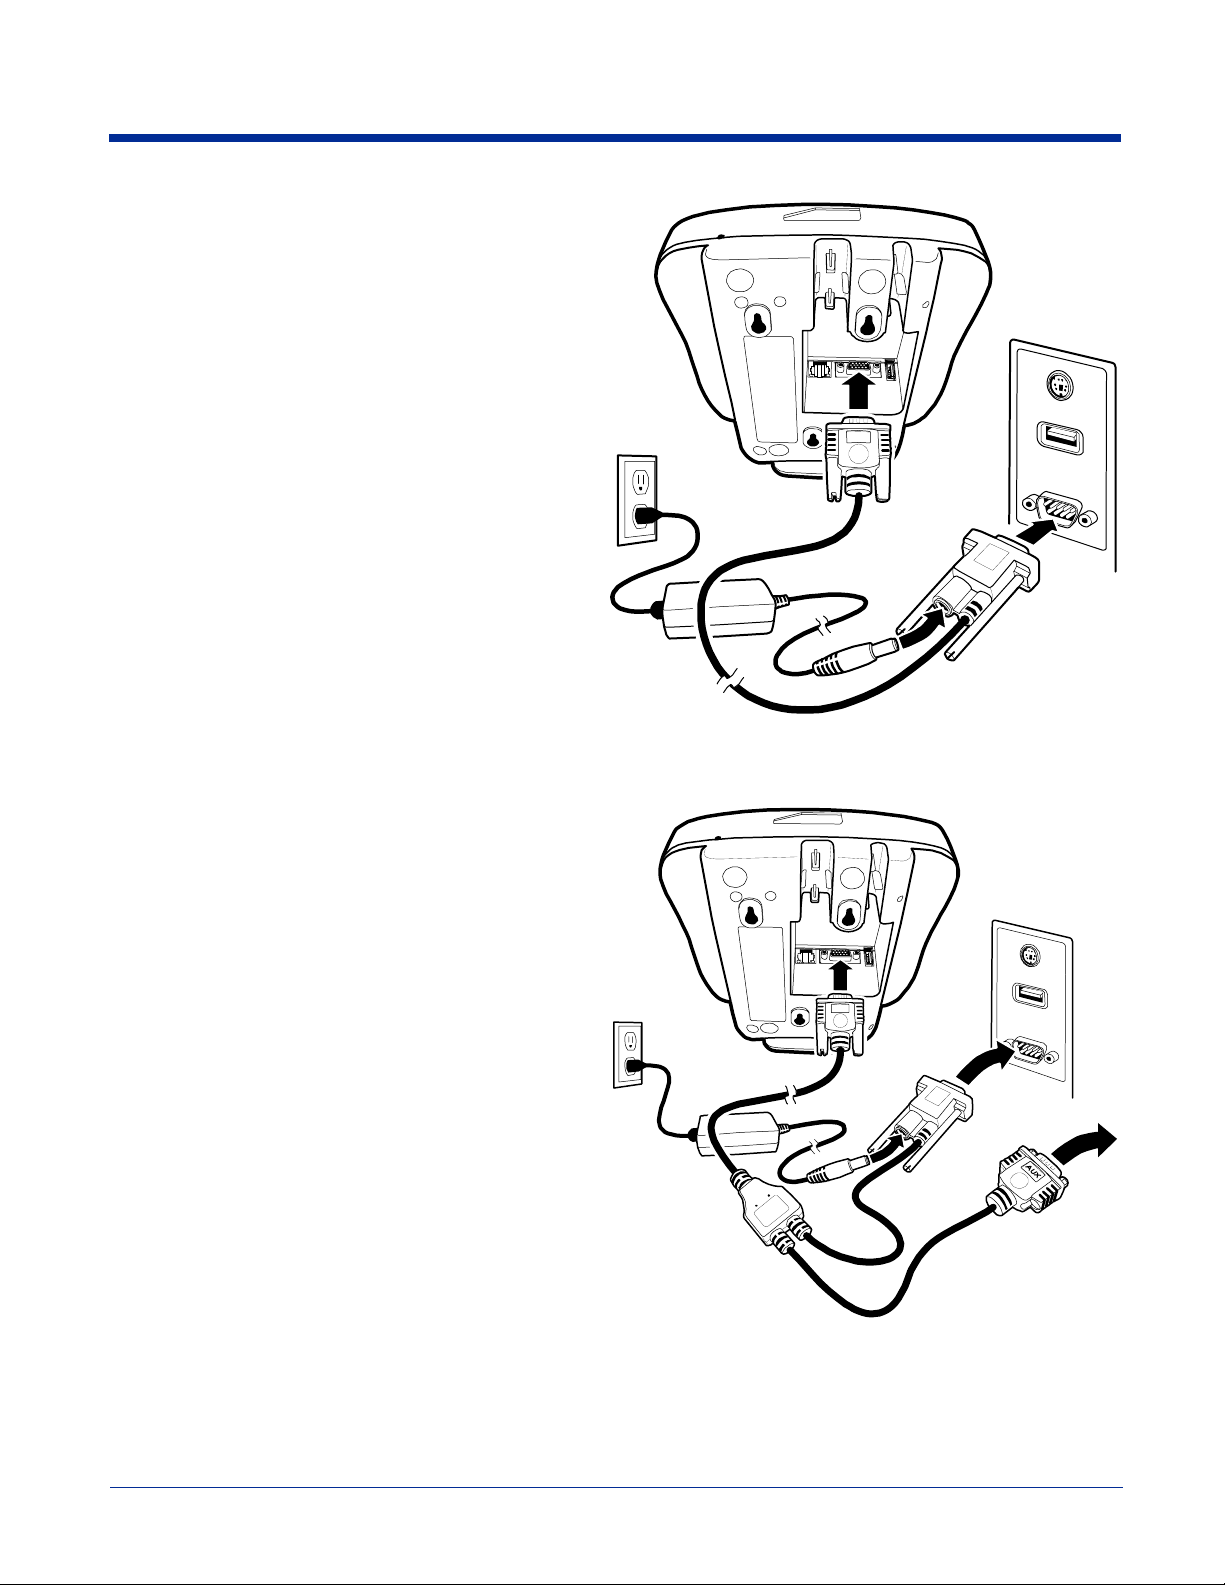
Standard RS-232 Cable
The standard RS-232 cable is 12 feet long and can connect to
multiple devices but does not support ActiveSync
communication.
Note: Make sure the power switch is turned off on the device
where you will be installing the IK8560.
1. Plug the 15-pin connector (HDB15) of the serial cable into
the underside of the IK8560.
2. Plug the 9-pin connector (DB9) of the serial cable into an
available serial port on the device.
3. Plug the male connector of the AC power supply cable into
the socket on the back of the DB9-pin serial cable
connector, which is plugged into the back of your host
device.
4. Plug the AC power supply into a power outlet.
Installation is now complete. Your IK8560 powers on and
auto-configures to RS-232. You may now turn on your host
device.
Note: If your computer has a 25-pin serial port, you will need
to obtain a 25-pin to 9-pin adapter from your local
computer store or other source.
RS-232 Pass-Through Cable
1
1
H
o
s
4
2
t
3
The RS-232 pass-through cable uses a Y cable with AC power
adapter.
Note: Make sure the power switch is turned off on the device
where you will be installing the IK8560.
1. Plug the 15-pin connector (HDB15) of the serial cable into
the underside of the IK8560.
2. Plug the Host DB9 connector into your host workstation.
3. Plug the Aux DB9 connector into the other RS-232 device.
4. Plug the male connector of the AC power adapter cable
into the socket on the back of the DB9-pin serial cable
connector, which is plugged into the back of your host
device.
5. Plug the AC power supply into a power outlet.
Installation is now complete. Your IK8560 powers on and
auto-configures to RS-232. You may now turn on your host
device.
1
H
o
s
5
2
t
4
3
Image Kiosk 8560 User’s Guide- Preliminary CP4 Draft
Rev (a)
6/27/06
3 - 5
Rebooting the Device
There are two types of reboots: a warm boot and a cold boot.
Warm Boot
A warm boot reboots the device without erasing data and applications stored in RAM memory.
To launch a warm boot, tap Start > Programs > Power Tools > Reboot > Warm Boot.
Cold Boot
A cold boot reboots the device and re-installs the .cab files stored in the Autoinstall folder.
To launch a cold boot, you can
• Power cycle
• Perform a hard reset with the reset switch
Cold boots erase data and applications stored in RAM memory.
!
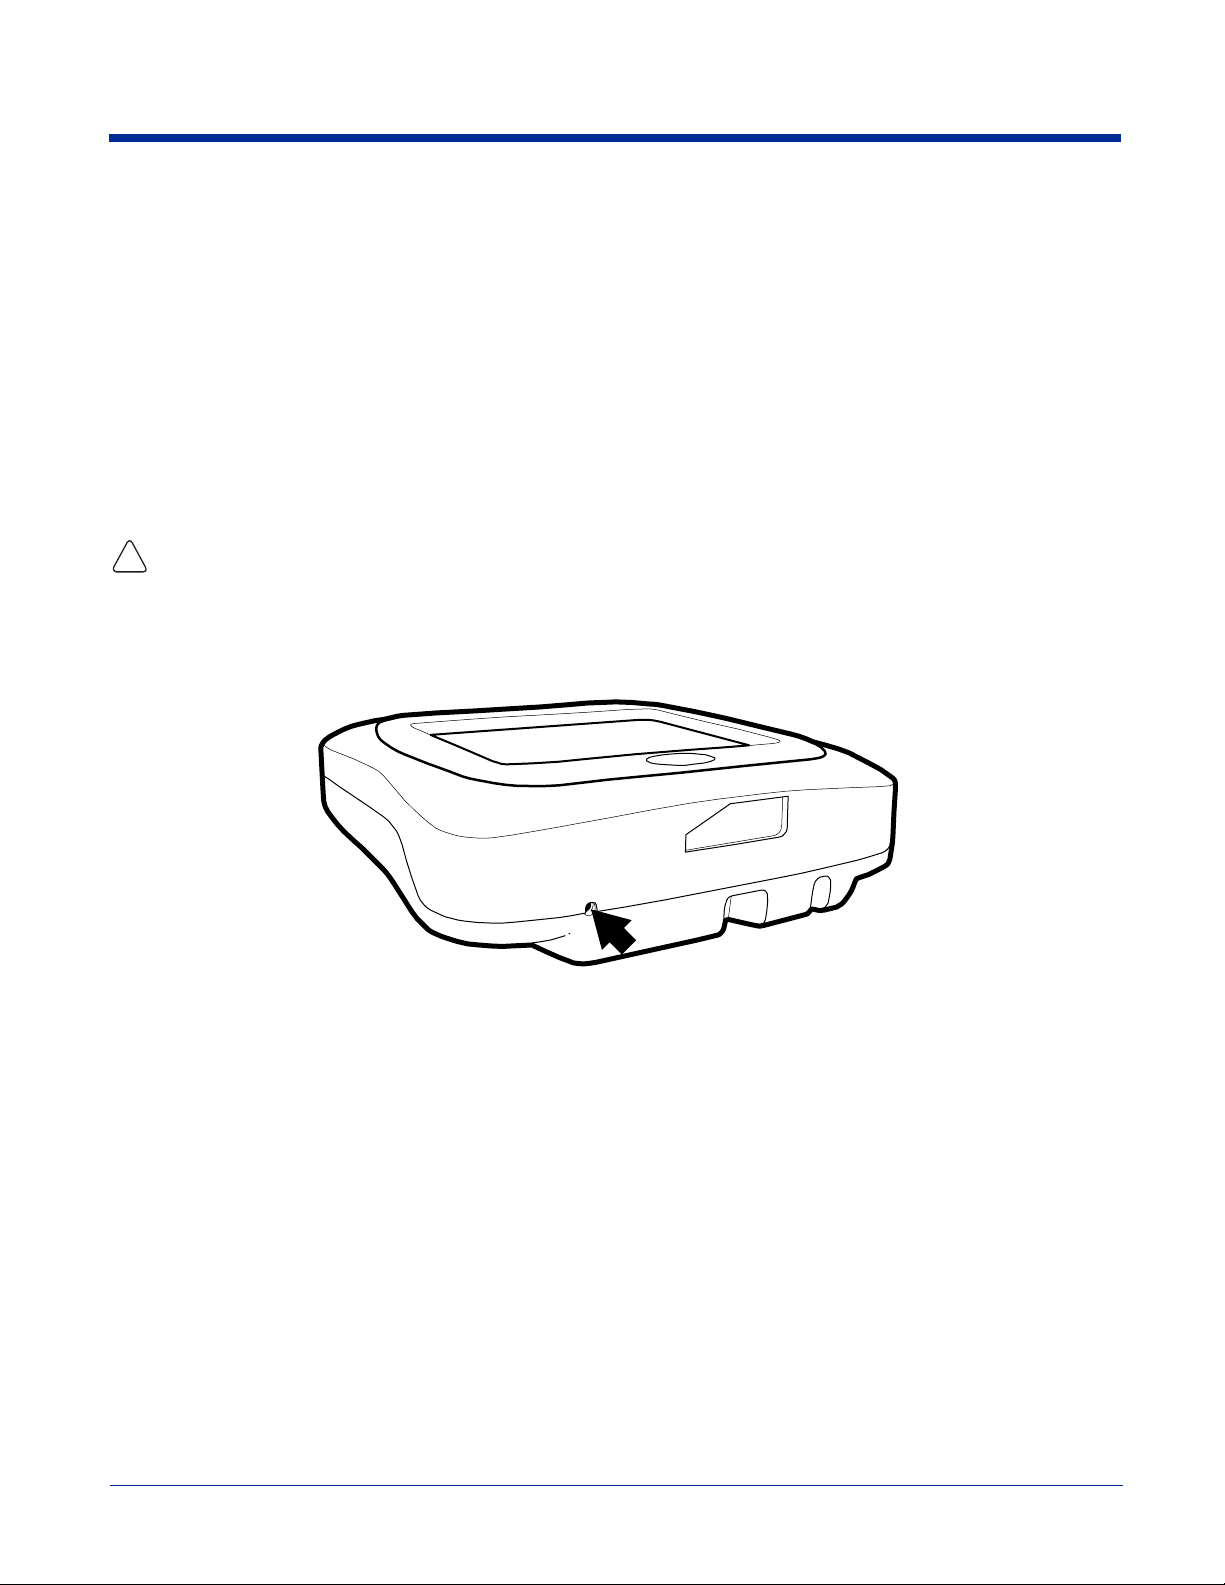
Using the Reset Switch
Power can be cycled (which performs a cold boot) by using the end of a straightened paper clip to push the reset switch on the
top panel.
3 - 6 Rev (a)
6/27/06
Image Kiosk 8560 User’s Guide-
Preliminary CP4 Draft
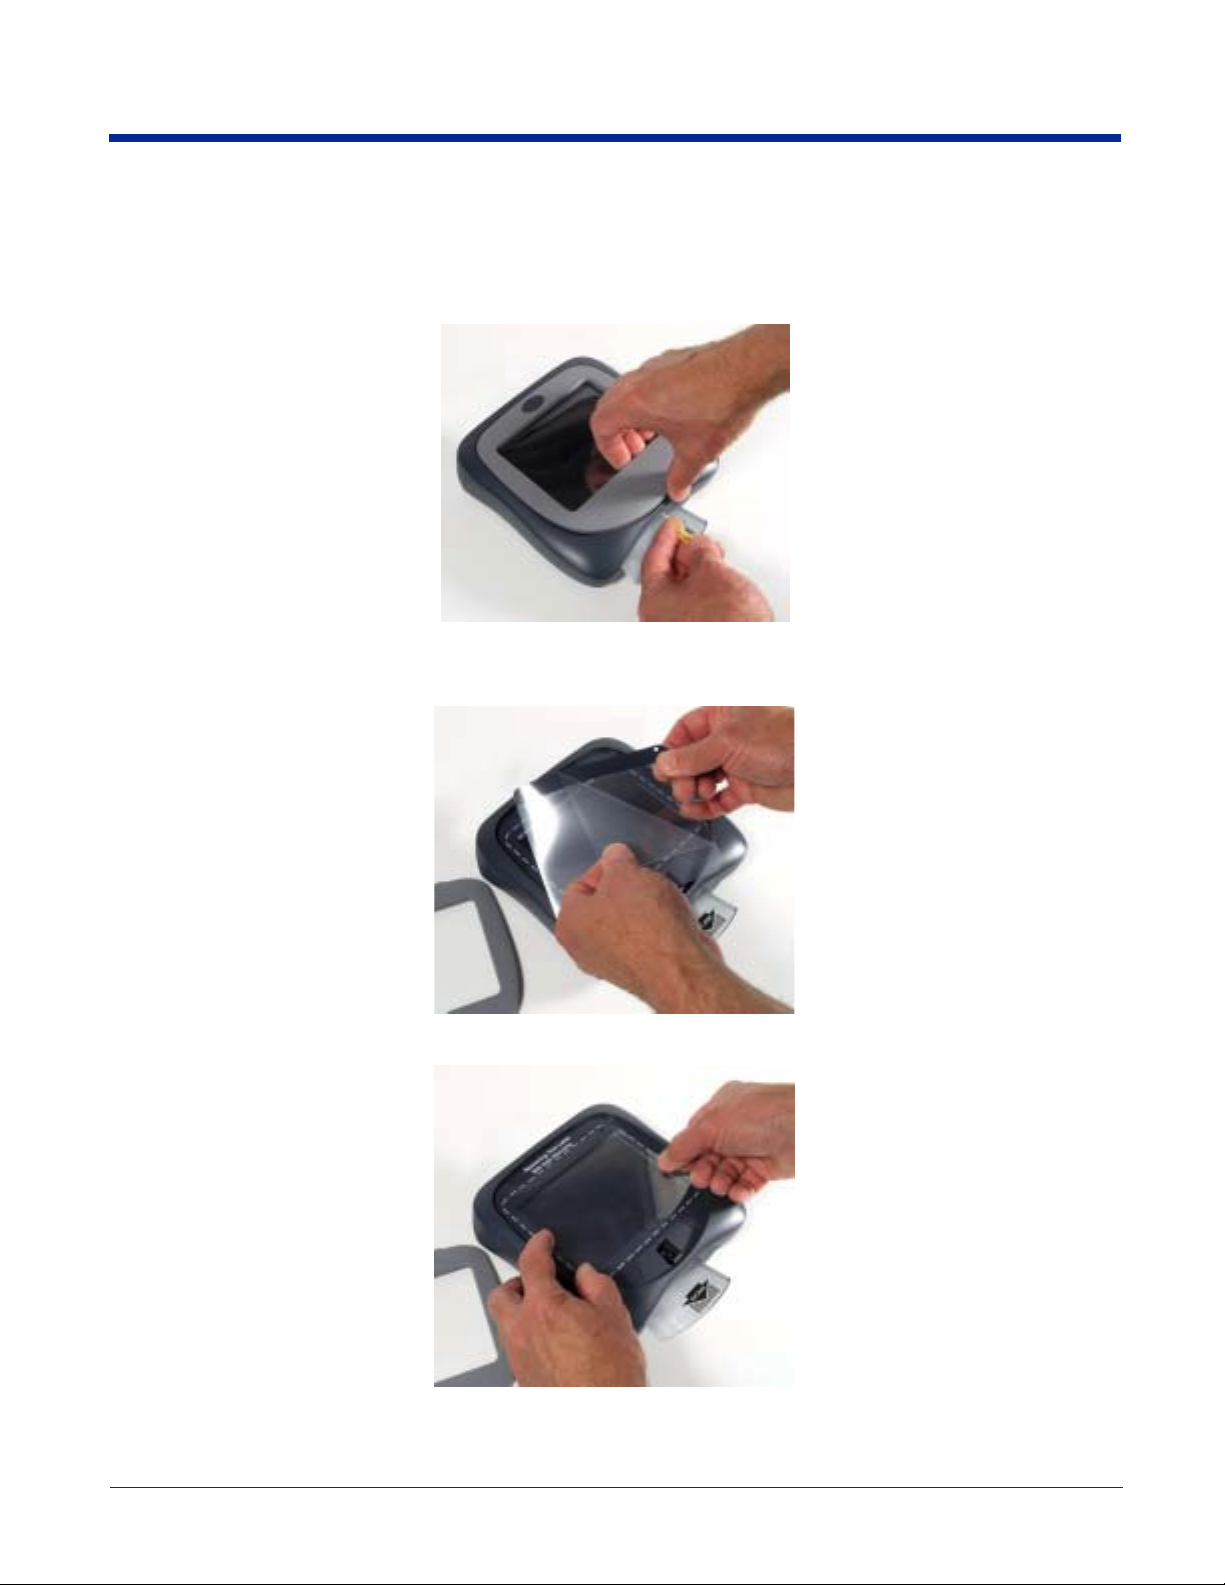
Screen Protector Replacement
Screen protectors can be purchased at any major computer retail store or directly from Hand Held Products (p/n 100000583).
1. To remove the old screen protector frame, insert a straightened paper clip into the small hole in the front of the IK8560. This
releases the protector frame which can now be lifted off.
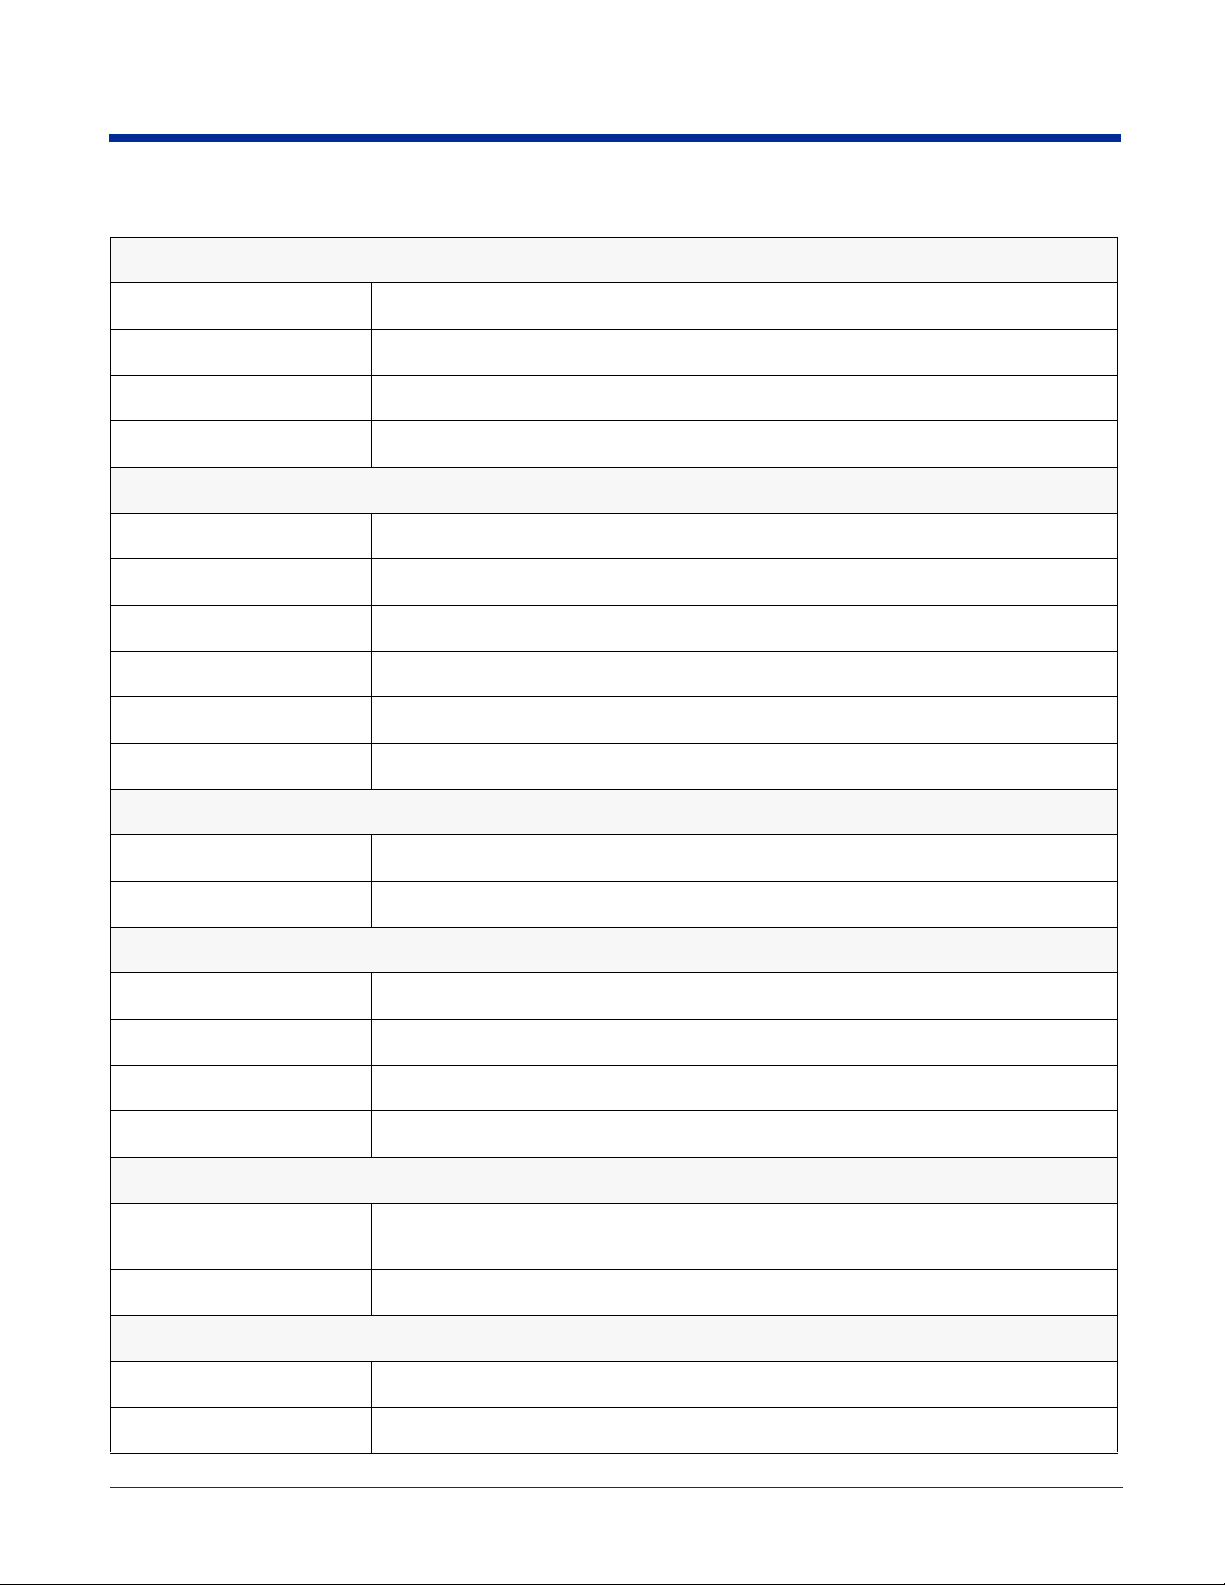
2. Clean any smudges or dirt from the IK8560 touch screen using glass cleaner or water. Wipe the surface dry.
3. Remove the protective film from the back of the new screen protector.
4. Line up the holes in the protector with the pins on the IK8560 screen.
Image Kiosk 8560 User’s Guide- Preliminary CP4 Draft
Rev (a)
6/27/06
3 - 7

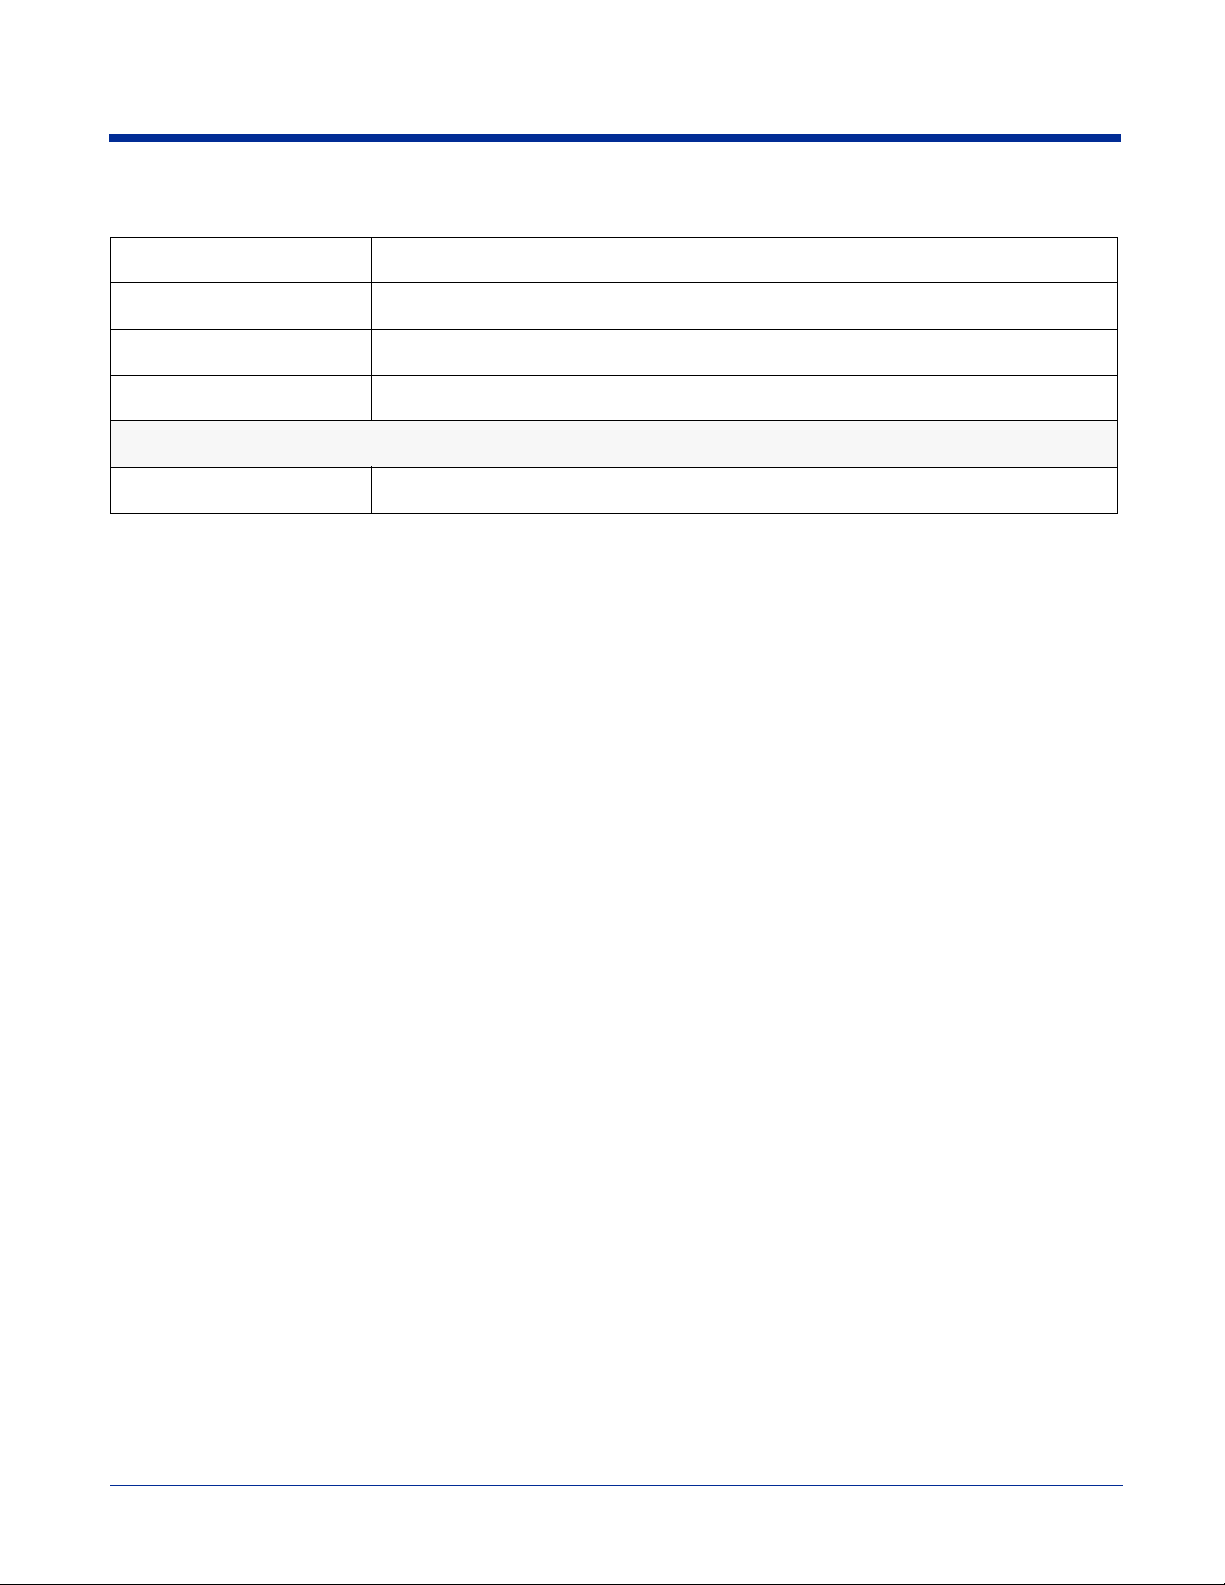
5. Use a tissue or soft cloth to wipe the front of the scr een protector. (This makes the protector lie flat.)
6. Place the protector frame back in place and press down until it snaps shut.
Maintenance
To clean your IK8560, use a soft cotton cloth lightly dampened with isopropyl alcohol. This removes any ink, fingerprint smudges,
or dirt.
3 - 8 Rev (a)
6/27/06
Image Kiosk 8560 User’s Guide-
Preliminary CP4 Draft
IK8560 Technical Specifications
Display Window
Window Resistive, transparent, pressure-sensitive touch screen
LCD Size 4.5 x 3.3 in. (11.3 x 8.4 cm) (Active area)
LCD Resolution 320 x 240 dot, 16-bit color
Touch Pad Resolution 903 x 1238 ppi
Communications
RS-232 4800 to 115.2 Kbps
RS-232 Pass-Through Using Aux. Y cable with AC power adapter
PC USB AC power adapter required
USB Hub Host 5V DC power pass-through, support for USB 1.1 for up to 10 devices
Ethernet 10/100 BaseT Optional port. Cable not supplied.
Radio Frequency 802.11b, optional (AC power adapter and power supply required; not included)
Memory
Flash 32 MB non-volatile synchronous Flash standard
SDRAM 64MB
Dimensions (reference)
Width 7.3 in. (18.5 cm)
Depth 7.6 in. (19.2 cm)
Height 3.2 in (8.03 cm)
Weight 2 lb. (.9 kg)
Power Requirements
Current Draw IK8560E (non-RF): 800mA @ 12V DC
IK8560C (RF): 860mA @ 12V DC
Source 120V AC adapter or powered host terminal port
System Architecture
Processor Intel XScale PXA255 200 Mhz
Development Environment Supports Visual Studio 2005 for C++, C#, and VB.net development
Image Kiosk 8560 User’s Guide- Preliminary CP4 Draft
Rev (a)
6/27/06
3 - 9
IK8560 Technical Specifications
Operating Platform Microsoft Windows CE 5.0
Third Party Software Hand Held Products Mobile Systems Manager
Graphics Supported BMP, CGM, DIB, EPS, MF, PCL, PCX, PLS, JPG, and TIF
RF Security WEP (64 and 128 bit), EAP, WPA
Approvals and Certifications
Agency Conformance FCC Class A, CE (LVD), UL 1950, CSA 22.2
3 - 10 Rev (a)
6/27/06
Image Kiosk 8560 User’s Guide-
Preliminary CP4 Draft
 Loading...