

Page 1
Operation & Installation GuideOperation & Installation Guide
Operation & Installation Guide
Operation & Installation GuideOperation & Installation Guide
HM-HFS-DKE
ENGLISHENGLISH
ENGLISH
ENGLISHENGLISH
Model
Model
Model
ONE-HOUR
ONE-HOUR
DIGITAL
DIGITAL
FIRESAFES
FIRESAFES
2054D2054D
2054D
2054D2054D
2084D2084D
2084D
2084D2084D
2118D2118D
2118D
2118D2118D
with Key Lock
Read These Instructions Very Carefully!
Customer Service Customer Service
Customer Service
Customer Service Customer Service
1-800-223-8566 1-800-223-8566
1-800-223-8566
1-800-223-8566 1-800-223-8566
(USA & Canada)(USA & Canada)
(USA & Canada)
(USA & Canada)(USA & Canada)
Page 2

IndexIndex
Index
IndexIndex
Overview of Your Safe Overview of Your Safe
Overview of Your Safe
Overview of Your Safe Overview of Your Safe
Programming Preparation Programming Preparation
Programming Preparation
Programming Preparation Programming Preparation
Step 1. Installing BatteriesStep 1. Installing Batteries
Step 1. Installing Batteries
Step 1. Installing BatteriesStep 1. Installing Batteries
Step 2. Opening Safe with Override KeyStep 2. Opening Safe with Override Key
Step 2. Opening Safe with Override Key
Step 2. Opening Safe with Override KeyStep 2. Opening Safe with Override Key
Programming a Passcode Programming a Passcode
Programming a Passcode
Programming a Passcode Programming a Passcode
LCD Display MenuLCD Display Menu
LCD Display Menu
LCD Display MenuLCD Display Menu
Step 3. Programming a PasscodeStep 3. Programming a Passcode
Step 3. Programming a Passcode
Step 3. Programming a PasscodeStep 3. Programming a Passcode
Opening & Closing Digital Safe Opening & Closing Digital Safe
Opening & Closing Digital Safe
Opening & Closing Digital Safe Opening & Closing Digital Safe
Open Safe with Passcode & KeyOpen Safe with Passcode & Key
Open Safe with Passcode & Key
Open Safe with Passcode & KeyOpen Safe with Passcode & Key
Close SafeClose Safe
Close Safe
Close SafeClose Safe
Open Safe with Override KeyOpen Safe with Override Key
Open Safe with Override Key
Open Safe with Override KeyOpen Safe with Override Key
Additional Features: ShelvesAdditional Features: Shelves
Additional Features: Shelves
Additional Features: ShelvesAdditional Features: Shelves
Additional Features: Bolt-Down Kit Additional Features: Bolt-Down Kit
Additional Features: Bolt-Down Kit
Additional Features: Bolt-Down Kit Additional Features: Bolt-Down Kit
Customer Support Customer Support
Customer Support
Customer Support Customer Support
Use, Care and Maintenance Use, Care and Maintenance
Use, Care and Maintenance
Use, Care and Maintenance Use, Care and Maintenance
..................................................................................
.........................................
..................................................................................
..................................................................
.................................
..................................................................
......................................................................
...................................
......................................................................
............................................
......................
............................................
..........................................................
.............................
..........................................................
....................................................................................................
..................................................
....................................................................................................
..........................................................
.............................
..........................................................
..........................
.............
..........................
Page Page
Page
Page Page
Page Page
Page
Page Page
Page Page
Page
Page Page
Page Page
Page
Page Page
Page Page
Page
Page Page
Page Page
Page
Page Page
Page Page
Page
Page Page
Page Page
Page
Page Page
11
1
11
22
2
22
33
3
33
44
4
44
55
5
55
66
6
66
88
8
88
1010
10
1010
For Your ProtectionFor Your Protection
For Your Protection
For Your ProtectionFor Your Protection
• Do not remove the serial number tag from the safe.
• Always store keys away from (AND NEVER INSIDE) safe.
• Record all safe identification #’s on I.D. Form (last page).
• Save this manual and NEVER keep it inside the safe.
Page 3
Overview of Your SafeOverview of Your Safe
Overview of Your Safe
Overview of Your SafeOverview of Your Safe
Congratulations!Congratulations!
Congratulations!
Congratulations!Congratulations!
Your new Honeywell Firesafe will provide years of safe and secure
storage for valuables and important documents. Your safe has been built with
the highest manufacturing standards to ensure maximum user satisfaction
under a variety of conditions. We have also created this comprehensive and
easy-to-use set of operation and installation instructions to give you complete
understanding and confidence in the use of your safe.
Package ContentsPackage Contents
Package Contents
Package ContentsPackage Contents
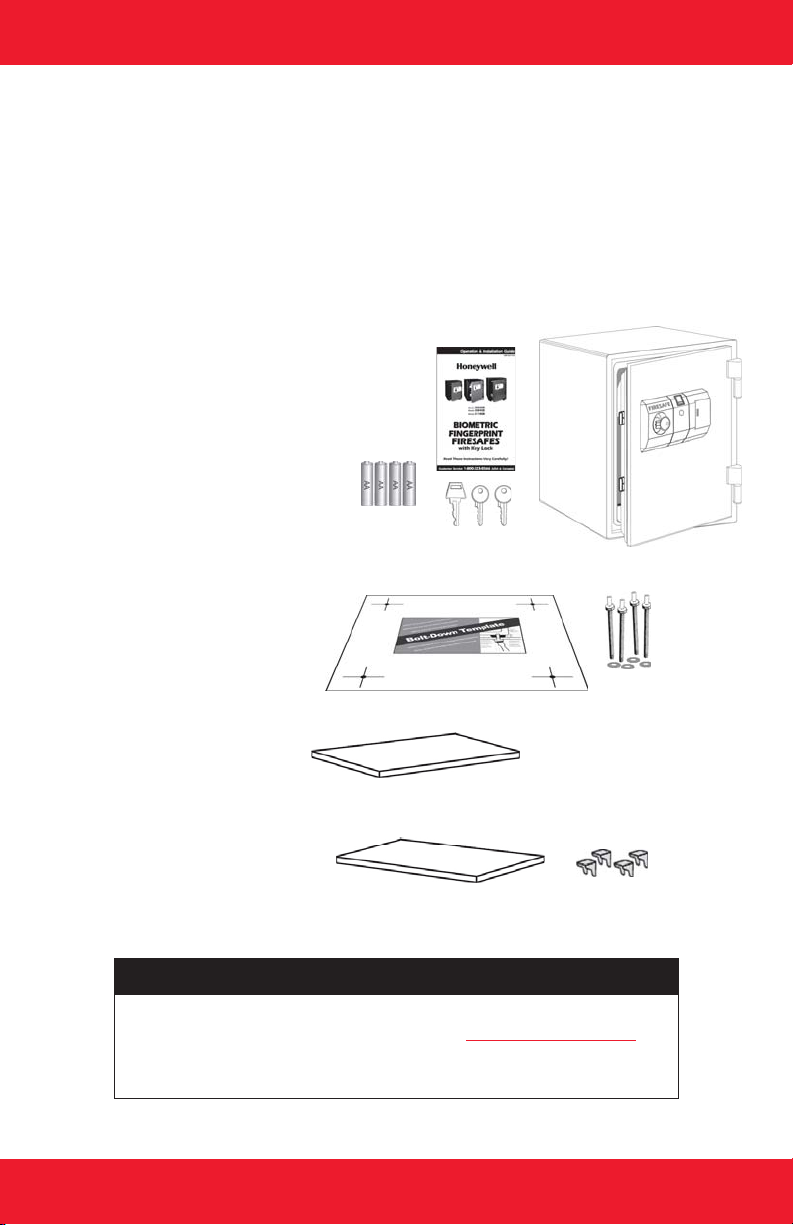
All ModelsAll Models
All Models
All ModelsAll Models
1 – Honeywell Digital Firesafe
1 – Operation & Installation Guide
1 – Emergency Override Key
2 – Companion Entry Keys
4 – AA Batteries
Models 2054D (only)Models 2054D (only)
Models 2054D (only)
Models 2054D (only)Models 2054D (only)
1 – Bolt-Down Kit Including:
1 – Mounting Template
4 – Break-off Bolts
4 – Washers
Models 2054D (only)Models 2054D (only)
Models 2054D (only)
Models 2054D (only)Models 2054D (only)
1 – Removable Shelf
Models 2084D & 2118DModels 2084D & 2118D
Models 2084D & 2118D
Models 2084D & 2118DModels 2084D & 2118D
1 – Adjustable Shelf
4 – Shelf Support Clips
Important: Important:
Important:
Important: Important:
If you have difficulty programming the safe or any other
questions pertaining to proper use,
your safe to the store. Please Contact Customer Service
at 1-800-223-8566 (USA & Canada) for assistance.
DO NOT RETURN SAFE TO STOREDO NOT RETURN SAFE TO STORE
DO NOT RETURN SAFE TO STORE
DO NOT RETURN SAFE TO STOREDO NOT RETURN SAFE TO STORE
Home and Office Security Safes
DO NOT RETURNDO NOT RETURN
DO NOT RETURN
DO NOT RETURNDO NOT RETURN
11
1
11
Page 4

Programming PreparationProgramming Preparation
Programming Preparation
Programming PreparationProgramming Preparation
Step 1.Step 1.
Step 1.
Step 1.Step 1.
The digital keypad is powered by 4 “AA” batteries which
must be installed before you can begin programming
your personal code. For your convenience, we have
provided you with 4 “AA” batteries.
depending on use, we recommend replacing the
batteries at least once a year.
1. Locate battery compartment to the right of the
digital keypad.
2. To open the compartment, press firmly in on the
battery cover and slide it to the right for removal.
3. Install 4 new “AA” batteries in the battery
compartment. Make sure they are installed in the
correct direction as marked on the inside of the
battery compartment.
4. Once the batteries are installed properly, replace
the cover by sliding it back on from the left.
Installing Batteries Installing Batteries
Installing Batteries
Installing Batteries Installing Batteries
For best results and
Important: Important:
Important:
Important: Important:
If the batteries are removed or fail, the
keypad memory will
BATTERY REMOVALBATTERY REMOVAL
BATTERY REMOVAL
BATTERY REMOVALBATTERY REMOVAL
NOTNOT
NOT
be erased.
NOTNOT
BATTERY
COMPARTMENT
Step 2. Step 2.
Step 2.
Step 2. Step 2.
You will need access to the inside of the safe door to begin
programming. You must use the Emergency Override Key
(square top) to open the door for the first time.
1. Insert the Emergency Override Key (square top) in the
lock, turn to the
22
2
22
Open Safe with Override Key (square top)Open Safe with Override Key (square top)
Open Safe with Override Key (square top)
Open Safe with Override Key (square top)Open Safe with Override Key (square top)
left left
left (counterclockwise) and pull the door open.
left left
Important: Important:
Important:
Important: Important:
When using the Emergency Override Key, you
ONLY TURN IT TO THE LEFTONLY TURN IT TO THE LEFT
must
ONLY TURN IT TO THE LEFT. Turning it
ONLY TURN IT TO THE LEFTONLY TURN IT TO THE LEFT
to the right may cause key to become stuck in
the cylinder and may cause damage to the lock.
TURN OVERRIDE KEY TO LEFT ONLYTURN OVERRIDE KEY TO LEFT ONLY
TURN OVERRIDE KEY TO LEFT ONLY
TURN OVERRIDE KEY TO LEFT ONLYTURN OVERRIDE KEY TO LEFT ONLY
Page 5
Programming A PasscodeProgramming A Passcode
Programming A Passcode
Programming A PasscodeProgramming A Passcode
LCD Display MenuLCD Display Menu
LCD Display Menu
LCD Display MenuLCD Display Menu
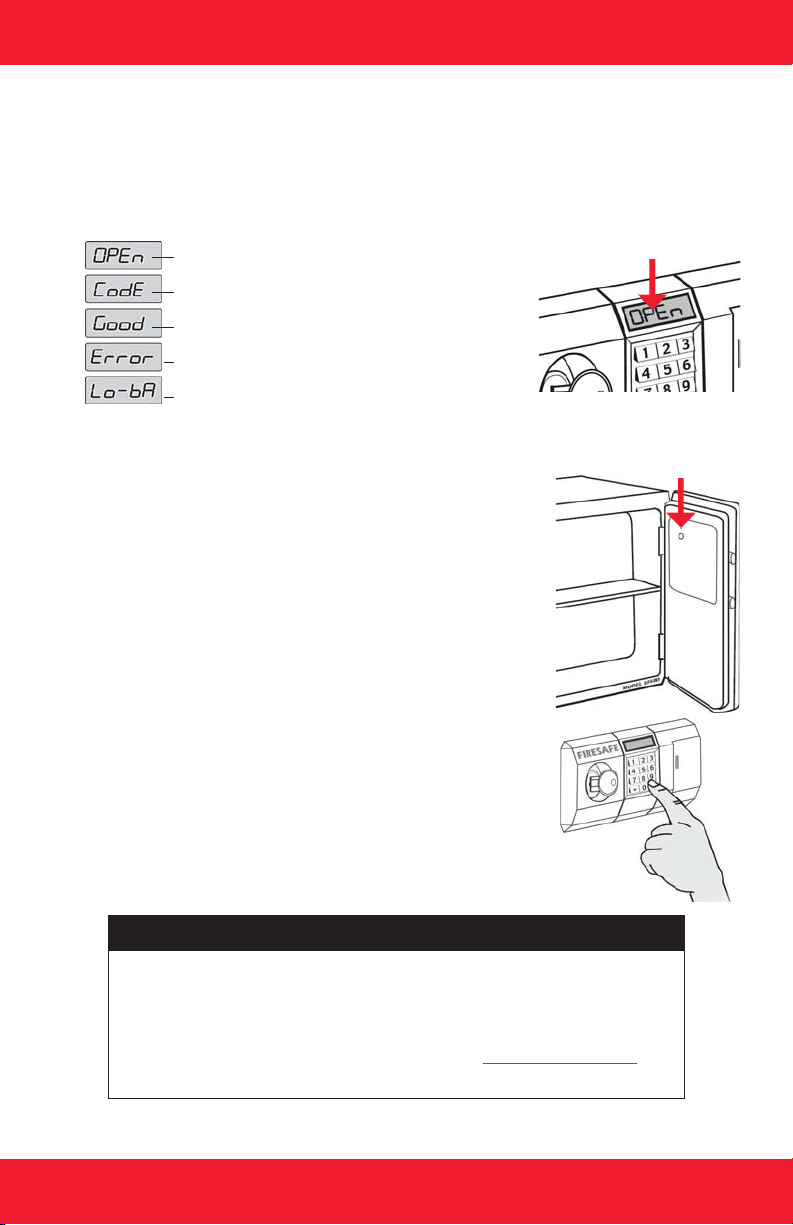
Your new Digital Firesafe features an LCD display to assist in programming
and operating your safe. A menu of the codes is as follows:
Ready to enter your passcode
Passcode successfully programmed
Correct passcode entered
Incorrect passcode entered
Batteries (“AA”) must be replaced
Step 3. Step 3.
Step 3.
Step 3. Step 3.
Use the digital keypad to program your own 2 to 8
digit passcode. You may choose or change your
personal passcode at any time by following these steps:
1. Locate the memory button marked on the
inside of the door.
Programming a PasscodeProgramming a Passcode
Programming a Passcode
Programming a PasscodeProgramming a Passcode
LCD
DISPLAY
MEMORY
BUTTON
2. Using a pen or other blunt tip, quickly push
and release the memory button.
3. After you hear a “
“OPEN” and you may begin entering your personal
code (from 2 to 8 numbers) followed by the
button.
4. Next, you will hear a longer “
display will read “CODE”, indicating that your
personal code has been successfully programmed
and can now be used to open your safe.
Important: Important:
Important:
Important: Important:
For added security, the safe will automatically “Lockout”
entry for 5 minutes after three attempts to open with an
invalid passcode. After three more invalid attempts within
this time period, a one-hour “lockout” period will begin.
During these “Lockout” periods, entry
using the emergency override key.
beepbeep
beep”, the LCD display will read
beepbeep
beepbeep
beep” and the LCD
beepbeep
SECURITY LOCKOUT PERIODSSECURITY LOCKOUT PERIODS
SECURITY LOCKOUT PERIODS
SECURITY LOCKOUT PERIODSSECURITY LOCKOUT PERIODS
Home and Office Security Safes
##
#
##
MUST BE MADEMUST BE MADE
MUST BE MADE
MUST BE MADEMUST BE MADE
33
3
33
Page 6

Opening & Closing Digital SafeOpening & Closing Digital Safe
Opening & Closing Digital Safe
Opening & Closing Digital SafeOpening & Closing Digital Safe
Open Safe with Passcode & KeyOpen Safe with Passcode & Key
Open Safe with Passcode & Key
Open Safe with Passcode & KeyOpen Safe with Passcode & Key
Once your passcode has been entered into the memory,
the safe can be opened by following these simple steps:
1. Insert one of the Companion Entry Keys (round
top) into the lock cylinder but,
2. Press the
by your personal code and the
3. The LCD display will read “GOOD” and you will hear
a tone indicating that the safe door is unlocked.
4. To open, turn the Companion Entry Key (round top)
RIGHTRIGHT
to the
RIGHT.
RIGHTRIGHT
Note:Note:
Note: You must open the safe door within 3 seconds
Note:Note:
or the electronic lock automatically engages.
button on the keypad, followed
**
*
**
DO NOT TURN KEYDO NOT TURN KEY
DO NOT TURN KEY.
DO NOT TURN KEYDO NOT TURN KEY
# #
# button.
# #
Important: Important:
Important:
Important: Important:
When using the Companion Entry Key, you
ONLY TURN IT TO THE RIGHTONLY TURN IT TO THE RIGHT
must
ONLY TURN IT TO THE RIGHT. Turning
ONLY TURN IT TO THE RIGHTONLY TURN IT TO THE RIGHT
it to the left may cause key to become stuck in
the cylinder and may cause damage to the lock.
Close SafeClose Safe
Close Safe
Close SafeClose Safe
1. Make sure the key is in the open position:
(round top), and
2. Close the door and turn the key to the locked position.
3. Remove the key from the lock.
Open Safe with Override KeyOpen Safe with Override Key
Open Safe with Override Key
Open Safe with Override KeyOpen Safe with Override Key
If unable to gain access using your passcode and Companion
Entry Key (round top), you may use the Emergency
Override Key (square top) to open the door at anytime.
1. Insert the Emergency Override Key (square top) in the lock,
turn to the
left left
left (counterclockwise) and pull the door open.
left left
TURN ENTRY KEY TO RIGHT ONLYTURN ENTRY KEY TO RIGHT ONLY
TURN ENTRY KEY TO RIGHT ONLY
TURN ENTRY KEY TO RIGHT ONLYTURN ENTRY KEY TO RIGHT ONLY
Right Right
Right for Companion Entry Key
Right Right
left left
left for Emergency Override Key (square top).
left left
44
4
44
Page 7

Additional Features: Removable ShelvesAdditional Features: Removable Shelves
Additional Features: Removable Shelves
Additional Features: Removable ShelvesAdditional Features: Removable Shelves
ShelvesShelves
Shelves
ShelvesShelves
Removable Shelf (Removable Shelf (
Removable Shelf (
Removable Shelf (Removable Shelf (
To remove the shelf, simply lift it up and tilt it on a sufficient angle to provide
clearance for removal.
Adjustable & Removable Shelves (Adjustable & Removable Shelves (
Adjustable & Removable Shelves (
Adjustable & Removable Shelves (Adjustable & Removable Shelves (
These models are designed with 5 position adjustable shelves to allow greater
flexibility and further accommodate your particular security storage needs.
To Install:To Install:
To Install:
To Install:To Install:
Your Shelf and Shelf Support Clips have been
shipped inside your safe and wrapped for protection
from damage during shipping.
1. Remove Shelf and (4) Shelf Support Clips
from protective wrapping.
2. Determine the desired position of your shelf
To change the position of the shelf:To change the position of the shelf:
To change the position of the shelf:
To change the position of the shelf:To change the position of the shelf:
Simply remove the shelf and reposition the (4) shelf
support clips by sliding them up and out of the
support slots and reinstalling them into the new
positions. Then reinstall shelf as described above.
and note the corresponding Support Guide
Slots (2 on each side of interior walls) that
are best suited to support the shelf in that
position.
3. Install the (4) Shelf Support Clips in the same
position on all four support guides.
4. Install shelf into position by placing it inside
the safe (tilting if necessary) at a point
above the desired position.
5. Once inside, lower it into position until
resting on Shelf Support Clips.
Model 2054D onlyModel 2054D only
Model 2054D only
Model 2054D onlyModel 2054D only
Models 2084D & 2118DModels 2084D & 2118D
Models 2084D & 2118D
Models 2084D & 2118DModels 2084D & 2118D
))
)
))
))
)
))
SUPPORT
GUIDES
Important: Important:
Important:
Important: Important:
If you remove the shelf, it is strongly
recommended that you
DISCARDDISCARD
DISCARD
DISCARDDISCARD
flat in the bottom of the safe to
assure full flexibility in the future.
REMOVING SHELFREMOVING SHELF
REMOVING SHELF
REMOVING SHELFREMOVING SHELF
DO NOTDO NOT
DO NOT
DO NOTDO NOT
it. You may lay the shelf
Home and Office Security Safes
55
5
55
Page 8

Additional Features: Bolt-Down KitAdditional Features: Bolt-Down Kit
Additional Features: Bolt-Down Kit
Additional Features: Bolt-Down KitAdditional Features: Bolt-Down Kit
Models 2054D (only)Models 2054D (only)
Models 2054D (only)
Models 2054D (only)Models 2054D (only)
Installing Your SafeInstalling Your Safe
Installing Your Safe
Installing Your SafeInstalling Your Safe
Certain models include a Bolt-Down kit with break-off bolts and a mounting
template for permanent mounting to a flat surface. Once the safe is installed
using the break-off bolts, it is permanent and cannot be easily removed.
Tools RequiredTools Required
Tools Required
Tools RequiredTools Required
4 – Break-off Bolts (Supplied)
4 – Washers(Supplied)
1 – Mounting Template (Supplied)
1 – Drill
1 – Screwdriver
66
6
66
Important: Important:
Important:
Important: Important:
Many consumers prefer to bolt their safe to the floor to
increase protection from theft and resistance to tipping. If
your safe was manufactured with bolt down holes predrilled in the floor of the safe, bolting your safe to the
floor may provide additional theft deterrence.
If you have
this, or are uncomfortable using the tools necessary to
complete this project, please check with your local retailer,
home center, or independent contractor.
SECURING TO FLOORSECURING TO FLOOR
SECURING TO FLOOR
SECURING TO FLOORSECURING TO FLOOR
ANY QUESTIONSANY QUESTIONS
ANY QUESTIONS
ANY QUESTIONSANY QUESTIONS
about how to accomplish
Page 9

Additional Features: Bolt-Down KitAdditional Features: Bolt-Down Kit
Additional Features: Bolt-Down Kit
Additional Features: Bolt-Down KitAdditional Features: Bolt-Down Kit
Installation ProcedureInstallation Procedure
Installation Procedure
Installation ProcedureInstallation Procedure
1. Choose a mounting location that is easily
accessible from both above and below.
2. Carefully position the template on the location
that you want to mount the safe.
3. Create the guide marks by pressing a sharp
tool through the circles at the four corners of
the template and into the mounting location.
4. Drill a hole (the diameter of the break-off bolt
shaft) through each guide mark.
Models 2054D (only)Models 2054D (only)
Models 2054D (only)
Models 2054D (only)Models 2054D (only)
Important: Important:
Important:
Important: Important:
Do not drill into the feet, bottom or
any other part of safe! Doing so will
ELIMINATE THE FIRE PROTECTIONELIMINATE THE FIRE PROTECTION
ELIMINATE THE FIRE PROTECTION
ELIMINATE THE FIRE PROTECTIONELIMINATE THE FIRE PROTECTION
that has been designed into your safe
and invalidate all stated warranties.
5. Before attaching the safe, you should check
carefully that the 4 holes you have drilled
match up precisely with the holes that have
been pre-drilled in the bottom of the safe.
Note: On certain models, It may be necessary
to remove the rubber foot pads that are
screwed into the bolt-down holes at the
factory.
6. Once you have confirmed that the holes are
aligned and in the location you desire, install
the break-off bolts and washers from
underneath the mounting location (through
the furniture or shelf), and into the pre-drilled
holes in the safe.
7. Turn bolts until the screw heads break off.
DON’T DRILL SAFEDON’T DRILL SAFE
DON’T DRILL SAFE
DON’T DRILL SAFEDON’T DRILL SAFE
Home and Office Security Safes
77
7
77
Page 10

Customer SupportCustomer Support
Customer Support
Customer SupportCustomer Support
Your Safe’s Unique Identification NumbersYour Safe’s Unique Identification Numbers
Your Safe’s Unique Identification Numbers
Your Safe’s Unique Identification NumbersYour Safe’s Unique Identification Numbers
When contacting Customer Service, you should be prepared to supply some
important information that specifically identifies your safe. This information is
extremely important to assuring prompt and accurate assistance.
It is strongly recommended that you identify and record the following
information in the “Identification Record” form located on the inside back
cover of this manual.
Model #Model #
Model #
Model #Model #
The Honeywell Home and Office Security Safes product line consists of many
different models, each identified by a specific model #. Every model is
manufactured with unique capabilities and features that may require specific
solutions to a variety of difficulties that occasionally occur.
Serial #Serial #
Serial #
Serial #Serial #
Each Individual safe is assigned a unique serial # when it is manufactured.
This # allows our Customer Service Specialists to define many unique factors
that will enable them to provide you with the best assistance.
Key #Key #
Key #
Key #Key #
The key # is necessary to identify the specific configuration of the key and lock
cylinder components of your safe. If a key becomes damaged or misplaced,
the key # is absolutely required to provide you with a replacement key.
Locating Serial # & Model #Locating Serial # & Model #
Locating Serial # & Model #
Locating Serial # & Model #Locating Serial # & Model #
Most Honeywell safes include a metallic or gray tag (with numbers and or
letters) affixed to one of the external surfaces (most often on front or right
side). This tag contains the serial # and selected models include a similar tag
containing the model #. If your safe does not include a model # tag and you
have not discarded the package, you can find the model # located near the
bottom of the front label.
Locating Key #Locating Key #
Locating Key #
Locating Key #Locating Key #
The key numbers are engraved on the keys and around the lock cylinder.
88
8
88
Important: Important:
Important:
Important: Important:
PLEASEPLEASE
PLEASE
PLEASEPLEASE
other identification tags or warning labels from the safe.
You may need these numbers for future reference.
DO NOT REMOVE TAGSDO NOT REMOVE TAGS
DO NOT REMOVE TAGS
DO NOT REMOVE TAGSDO NOT REMOVE TAGS
do not remove the serial # or model # tags or any
Page 11

How to Contact UsHow to Contact Us
How to Contact Us
How to Contact UsHow to Contact Us
Customer SupportCustomer Support
Customer Support
Customer SupportCustomer Support
Phone:Phone:
Phone:
Phone:Phone:
Monday through Friday, 8:00 am to 4:00 pm Pacific Standard Time
Email:Email:
Email:
Email:Email:
In addition to the required information regarding your safe, you must include
the best time and proper telephone number to reach you during our normal
Customer Service hours. You should receive a reply response via e-mail or
phone within 24 business hours or the following business day.
Mail:Mail:
Mail:
Mail:Mail:
Internet: Internet:
Internet:
Internet: Internet:
Ordering Replacement KeysOrdering Replacement Keys
Ordering Replacement Keys
Ordering Replacement KeysOrdering Replacement Keys
If a key becomes misplaced or you would like additional keys for your safe, you
may conveniently purchase them from our Customer Service department.
1-800-223-85661-800-223-8566
1-800-223-8566
1-800-223-85661-800-223-8566
CustomerService@HoneywellSafes.com CustomerService@HoneywellSafes.com
CustomerService@HoneywellSafes.com.
CustomerService@HoneywellSafes.com CustomerService@HoneywellSafes.com
Attn: Customer Service Dept.Attn: Customer Service Dept.
Attn: Customer Service Dept.
Attn: Customer Service Dept.Attn: Customer Service Dept.
SISCOSISCO
SISCO
SISCOSISCO
2835 E. Ana Street2835 E. Ana Street
2835 E. Ana Street
2835 E. Ana Street2835 E. Ana Street
Rancho Dominguez, CA 90221Rancho Dominguez, CA 90221
Rancho Dominguez, CA 90221
Rancho Dominguez, CA 90221Rancho Dominguez, CA 90221
www.HoneywellSafes.comwww.HoneywellSafes.com
www.HoneywellSafes.com
www.HoneywellSafes.comwww.HoneywellSafes.com
Payment and DeliveryPayment and Delivery
Payment and Delivery
Payment and DeliveryPayment and Delivery
In the US, replacement keys are available for $6.95 each and credit card
orders are accepted by telephone and through our website. Checks or
money orders are required for orders received by mail and should be made
payable to “SISCO”. Orders paid via money order or credit card typically
ship within 72 hours. Orders placed with a personal or business check
typically ship within 14 days.
You must supply the following information to assure accurate and prompt
processing:
Name / Address / TelephoneName / Address / Telephone
•
Name / Address / Telephone
Name / Address / TelephoneName / Address / Telephone
• Safe model number / Serial number• Safe model number / Serial number
• Safe model number / Serial number
• Safe model number / Serial number• Safe model number / Serial number
• Type of keys requested (Companion or Override)• Type of keys requested (Companion or Override)
• Type of keys requested (Companion or Override)
• Type of keys requested (Companion or Override)• Type of keys requested (Companion or Override)
• Number of keys requested• Number of keys requested
• Number of keys requested
• Number of keys requested• Number of keys requested
• Key number (located on the lock)• Key number (located on the lock)
• Key number (located on the lock)
• Key number (located on the lock)• Key number (located on the lock)
Terms subject to change without notice
Home and Office Security Safes
99
9
99
Page 12

Use, Care & MaintenanceUse, Care & Maintenance
Use, Care & Maintenance
Use, Care & MaintenanceUse, Care & Maintenance
Appropriate Use of Your SafeAppropriate Use of Your Safe
Appropriate Use of Your Safe
Appropriate Use of Your SafeAppropriate Use of Your Safe
Honeywell fire safes protect paper records and many other valuables.
Testing shows that the interior temperature remains below 350°F
(177°C) for 1 or 2 hours (depending on model) during a fire up to
1700°F (927°C) when used properly. Your safe must be closed and
latched in order to properly protect its contents from fire.
Your safe is guaranteed not to develop mildew from moisture
originating in the safe’s insulating material for five years. However, if
the safe is stored in an area of high moisture content (such as near the
ocean or in a tropical climate), moisture from the environment may
become trapped inside the safe. If this applies to you, it is
recommended that you open the safe on a regular basis to promote
air circulation.
Safe Care and MaintenanceSafe Care and Maintenance
Safe Care and Maintenance
Safe Care and MaintenanceSafe Care and Maintenance
When properly maintained, your safe will continue to accurately read the
authorized passcode for many years. In order to ensure optimum
performance of your safe, please follow these simple precautions:
1010
10
1010
Replace BatteriesReplace Batteries
Replace Batteries
Replace BatteriesReplace Batteries
recommend that the batteries be replaced at least once a year.
Clean Hands Clean Hands
Clean Hands
Clean Hands Clean Hands
have excessive dirt, debris, or liquids on them. Under normal
circumstances It is not necessary to wash your hands before using the
safe.
Clean Safe Clean Safe
Clean Safe
Clean Safe Clean Safe
recommended that you use a mild cleaner (i.e. window cleaner) to
avoid scratching or discoloring the surface. Do not use abrasive
cleansers.
- For best results and performance, we
- -
- Do not attempt to operate digital keypad if your hands
- -
- -
- To clean the outside surface of your safe, it is
- -
Page 13

Model #
Serial #
Key #
Digital Passcode Record
Safe Identification RecordSafe Identification Record
Safe Identification Record
Safe Identification RecordSafe Identification Record
Your Passcode must be
AT LEAST AT LEAST
AT LEAST 2 digits and
AT LEAST AT LEAST
NO MORE NO MORE
NO MORE than 8 digits
NO MORE NO MORE
Home and Office Security Safes
Page 14

Limited WarrantyLimited Warranty
Limited Warranty
Limited WarrantyLimited Warranty
LIFETIME AFTER FIRE REPLACEMENT GUARANTEELIFETIME AFTER FIRE REPLACEMENT GUARANTEE
LIFETIME AFTER FIRE REPLACEMENT GUARANTEE
LIFETIME AFTER FIRE REPLACEMENT GUARANTEELIFETIME AFTER FIRE REPLACEMENT GUARANTEE
If your Honeywell Firesafe is ever damaged by a fire, SISCO will replace it
with a comparable model at no charge to the consumer. A photo of the
damaged safe and a Fire Department report will be required as proof of
loss. Freight on the replacement unit is not included in the guarantee and
must be paid by the user.
LIMITED WARRANTYLIMITED WARRANTY
LIMITED WARRANTY
LIMITED WARRANTYLIMITED WARRANTY
If your Honeywell safe fails to operate because of a manufacturing defect,
any time up to five (5) years from the date of original purchase, we will, at
our discretion, repair or replace the unit at no charge to the original owner
provided you return the product, shipping prepaid, to SISCO, or to a service
center or locksmith of our choice. Prior authorization must be obtained
from SISCO in advance.
WHAT IS NOT COVEREDWHAT IS NOT COVERED
WHAT IS NOT COVERED
WHAT IS NOT COVEREDWHAT IS NOT COVERED
This warranty does not apply if the product has been damaged by
improper installation, neglect, accident, misuse, exposure to extremes of
heat or humidity, terrorism, war, acts of God, or as a result of service or
modification by other than an authorized Honeywell service center. Sisco is
not responsible for any costs associated with removing or installing this
product. SISCO is also not responsible for damage or loss of the contents of
the safe nor for the unauthorized removal of contents.
This warranty does not apply to the finish of any metal portions of the
product. No other expressed warranty is given. The repair or replacement
of the product is your exclusive remedy. Any implied warranty of salability
or fitness is limited to the duration of this written warranty. Some states do
not allow limitations on how long an implied warranty lasts, so the above
limitations may not apply to you. In no event shall SISCO be liable for
consequential or incidental damages. Some states do not allow the
exclusion or limitation of incidental or consequential damages, so the
above limitation or exclusion may not apply to you. This warranty gives you
specific rights and you may also have other rights which vary from state to
state.
The Honeywell trademark for Home/ Office Safes is used with permission.
Honeywell Safes are distributed exclusively by SISCO. Honeywell makes no
representations or warranties with respect to this product or service, The
Honeywell Trademark is used under license from Honeywell Intellectual
Properties Inc. by SISCO.
Home and Office Security Safes
 Loading...