

Page 1
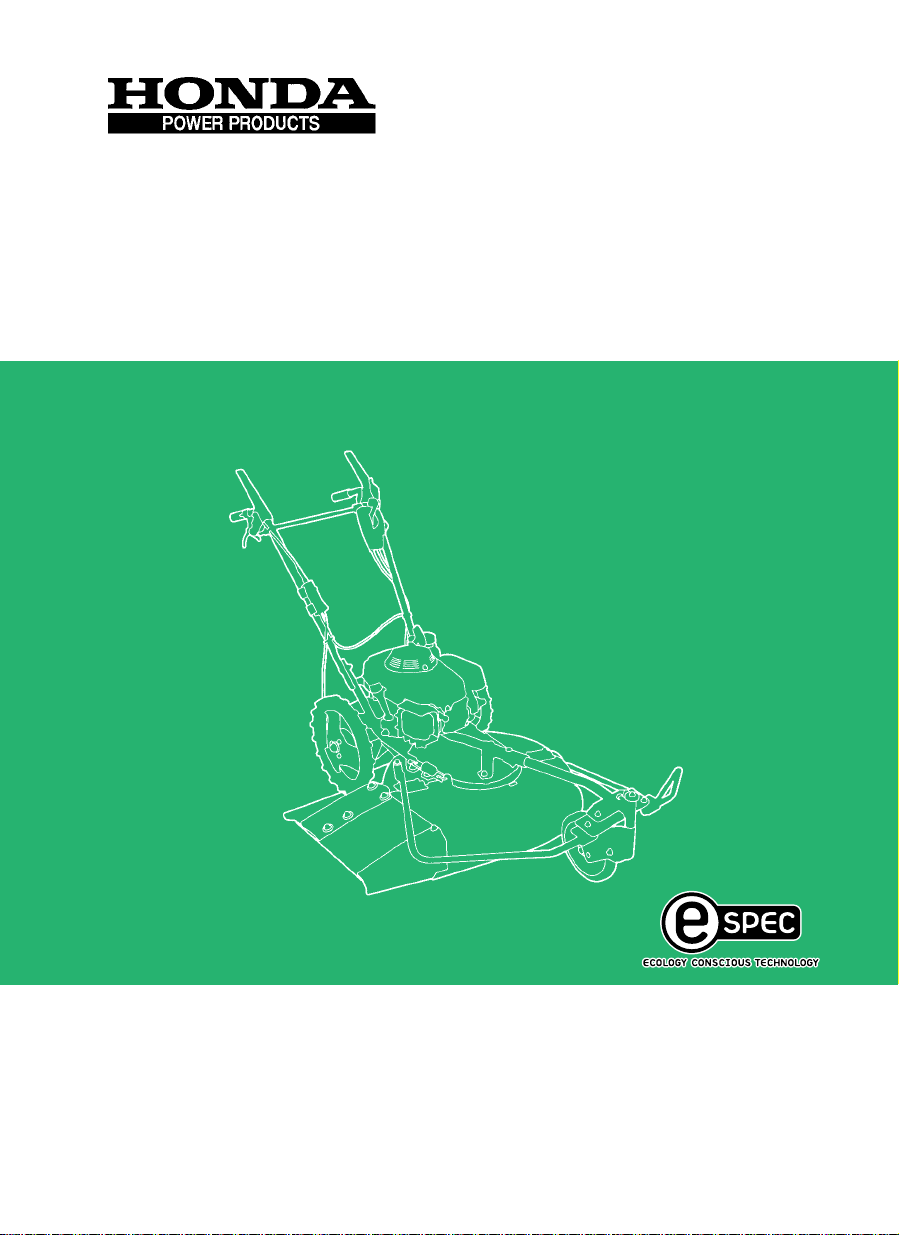
WEED MOWER
Black
DIC649
UM536•UM616
OWNER'S MANUAL
MANUEL DE L'UTILISATEUR
BEDIENUNGSANLEITUNG
MANUAL DE EXPLICACIONES
Page 2

CONTENTS
........................................................................................4. CONTROLS . 14
High altitude operation
.......................................................................................7. OPERATION . 30
...........................................................................................8. MOWING . 35
...................................................................1. SAFETY INSTRUCTIONS . 3
...........................................................2. SAFETY LABEL LOCATIONS . 10
...............................................................................CE mark location . 11
......................................................3. COMPONENT IDENTIFICATION . 12
...............................................................5. PRE-OPERATION CHECKS . 20
..................................................................6. STARTING THE ENGINE . 27
..................................................................9. STOPPING THE ENGINE . 38
................................................................................10. MAINTENANCE . 39
............................................................11. TRANSPORTING/STORAGE . 54
.......................................................................12. TROUBLESHOOTING . 57
..............................................................................13. SPECIFICATIONS . 58
..................................14. MAJOR Honda DISTRIBUTOR ADDRESSES . 59
2
Page 3

Honda UM536/UM616
OWNER’S MANUAL
The ‘‘e-SPEC’’ mark symbolizes environmentally
responsible technologies applied to Honda power
equipment, which contains our wish to ‘‘preserve
nature for generations to come’’.
Page 4
Thank you for purchasing a Honda weed mower.
This manual covers the operation and maintenance of the Honda
WEED MOWER
Honda Motor Co., Ltd. reserves the right to make changes at any time
without notice and without incurring any obligation.
No part of this publication may be reproduced without written
permission.
This manual should be considered a permanent part of the weed
mower and should remain with it if it is resold.
Pay special attention to statements preceded by the following words;
death if instructions are not followed.
damage if instructions are not followed.
Gives helpful information.
If a problem should arise, or if you have any questions about the weed
mower, consult an authorized Honda dealer.
UM536/UM616.
Indicates a strong possibility of severe personal injury or
Indicates a possibility of personal injury or equipment
Honda weed mowers are designed to give safe and dependable
service if operated according to instructions.
Operating a weed mower requires special effort to ensure the safety
of the operator and the safety of others. Read and understand this
Owner’s Manual before operating the weed mower; failure to do so
could result in personal injury or equipment damage.
Honda Motor Co., Ltd. 2007, All Rights Reserved
The illustrations may vary according to the type.
1
Page 5
SAFETY INSTRUCTIONS1.
To ensure safe operation
For your safety and safety of others, pay special attention to these
precautions:
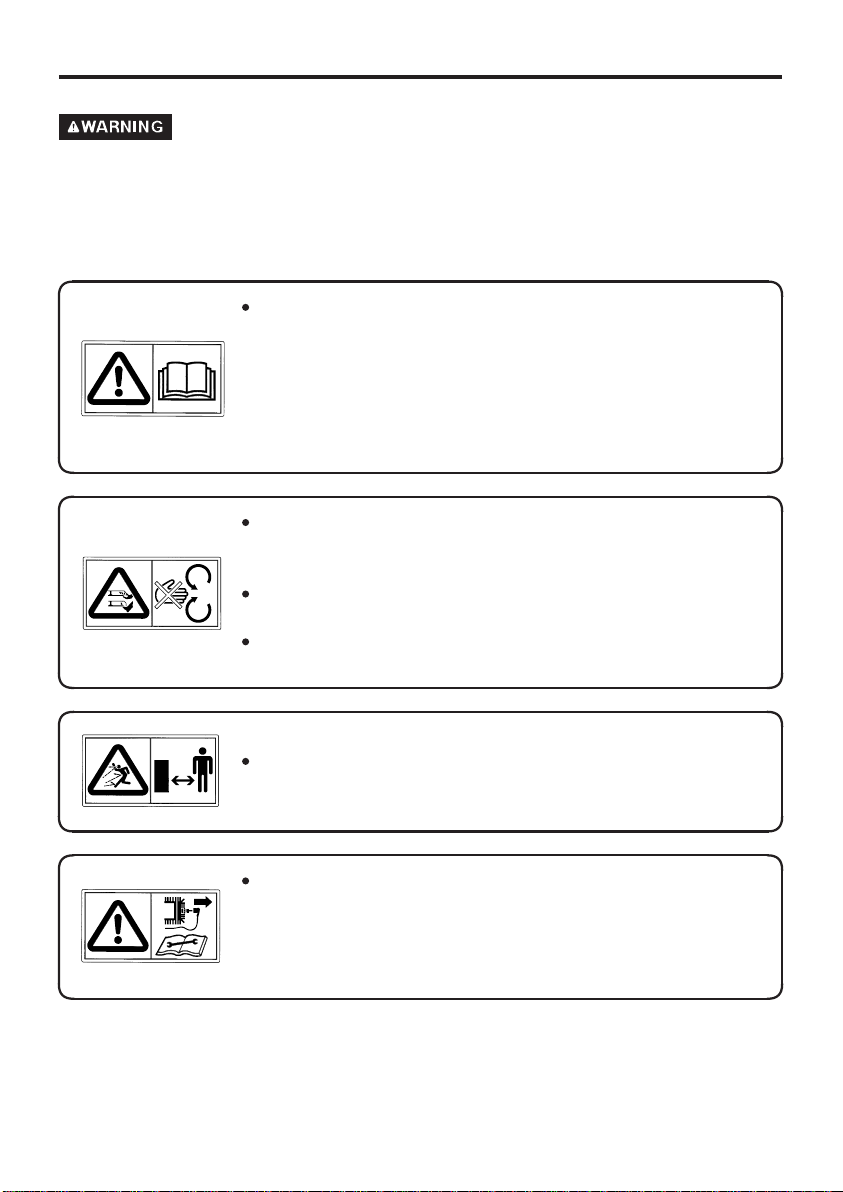
Honda weed mower is designed to give safe and
dependable service if operated according to
instructions.
Read and understand the Owner’s Manual
before operating the weed mower. Failure to do
so could result in personal injury or equipment
damage.
The rotating blade are sharp and turns at high
speed. Accidental contact can cause serious
injury.
Keep your hands and feet away from the blade
while engine is running.
Stop the engine and disengage the blade clutch
before inspection or maintenance of blade.
Keep all persons and pets away from the weed
mower area.
Disconnect the spark plug cap to prevent any
possibility of accidental starting. Wear heavy
gloves to protect your hands from the blade
when cleaning the blade or when inspecting or
replacing the blade.
3
Page 6
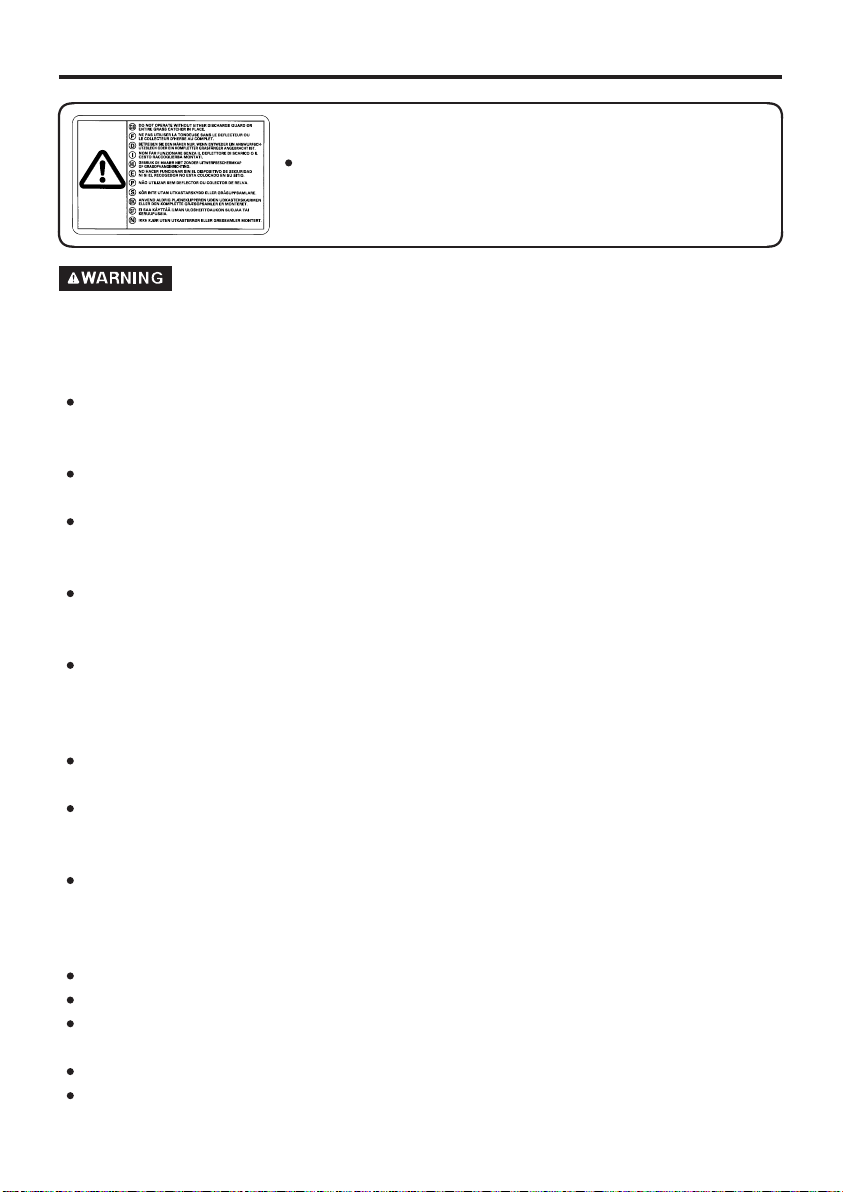
Do not operate the weed mower with the
foot guard bar removed.
To ensure safe operation
Operator Responsibility
Any part from the machine is a potential source of danger if the
machine is used in abnormal conditions or if the maintenance is not
done correctly.
Read the owner’s manual carefully. Be familiar with the controls and
proper use of the equipment. Know how to engine rapidly.
Use the weed mower for the purpose it is intended for, that is
mowing. Any other use could be dangerous or damage the
equipment.
Never allow children or people unfamiliar with this owner’s manual
to use the weed mower. Local regulations may restrict the age of the
operator.
Never mow while:
−
people, especially children or pets are nearby.
−
user is under medication or has swallowed substances known to
affect judgement or reactions.
Keep in mind that the operator or user is responsible for accidents or
hazards occurring to other people or their property.
While mowing, always wear substantial footwear, long trousers and
eye protection. Do not operate the equipment when barefoot or
wearing open sandals.
Before using always visually inspect the machine, especially to see
that the blade, blade bolts and cutter assembly are not worn or
damaged. Replace worn or damaged blades and bolts in sets to
preserve balance.
Mow only in daylight or in good artificial light.
Avoid operating the equipment in wet grass, where feasible.
While mowing, always keep the safety distance to the blade, which
is provided by the handle length.
Walk, never run. Do not let yourself be pulled by the weed mower.
Always be sure of your footing on slopes. Mow across the face of
slopes, never up and down.
4
Page 7

To ensure safe operation
Operator Responsibility
Exercise extreme caution when changing direction on slopes.
Use extreme caution when pulling the weed mower towards you.
Stop the blade if the weed mower has to be tilted for transportation
when crossing surfaces other than grass, and when transporting the
weedmowertoandfromtheareatobemowed.
Never operate the weed mower with defective guard or housings, or
without safety devices such as deflectors.
Do not change the engine governor settings or overspeed the
engine.
Disengage all blade and drive clutches before starting the engine.
Start the engine carefully according to instructions and with feet
well away from the blade.
Do not tilt the weed mower when starting the engine. Start the weed
mower on a level surface, free of high grass or obstacles.
Keep hands and feet away from the rotating parts. Do not start the
engine when standing in front of the discharge opening.
Never pick up or carry a weed mower while the engine is running.
Stop the engine and disconnect the spark plug cap in the following
cases:
Before any operation under the cutter housing or the protector.
−
Before checking, cleaning or working on the weed mower.
−
After striking a foreign object. Inspect the weed mower for
−
damage and make repairs before restarting and operating the
weed mower again.
If weed mower starts to vibrate abnormally. Check immediately
−
the cause of the vibration and perform the necessary repair.
Stop the engine in the following cases:
Whenever you leave the weed mower unattended.
−
Before refuelling.
−
Stop the blade or the engine in the following case:
Before adjusting the cutting height.
−
Move the fuel valve to the OFF position when not using the mower.
Keep all nuts, bolts and screws tight to be sure the equipment is in
safe working condition. Regular maintenance is an essential aid to
user’s safety and retaining a high level of performance.
5
Page 8

To ensure safe operation
Operator Responsibility
Do not use the machine with worn or damaged parts. Parts must be
replaced, not repaired. Replace worn or damaged parts with Honda
genuine parts. Blades must always bear the mark Honda and the
reference number. Non equivalent quality parts may damage the
machine and be prejudicial to your safety.
Wear thick gloves when removing or installing the blade.
Always make sure the blade is balanced correctly.
When a climbing plant or any other foreign object has been
entangled in the rear wheel, immediately release the drive clutch
lever and stop the engine. Then remove the climbing plant or the
foreign object.
Operating the weed mower without removing the climbing plant or
foreign object could result in a damaged transmission and/or ratchet.
Do not raise the weed mower by the foot guard bar.
Do not step on the foot guard bar.
Child Safety
Always keep children indoors and supervised when power
equipment is being used nearby. Young children move quickly and
are attracted especially to the weed mower and mowing activity.
Never assume children will remain where you last saw them. Be
alert and turn the weed mower off if children enter the area.
Children should never be allowed to operate the weed mower, even
under adult supervision.
6
Page 9

To ensure safe operation
Thrown Object Hazard
Objects hit by the rotating blade can be thrown from the weed mower
with great force, and may cause serious injury.
Thoroughly inspect the area where the equipment is to be used and
remove all objects which may be thrown by the machine (stones,
branches, wires, bones, etc...).
Always inspect the weed mower for damage after striking a foreign
object.
Repair or replace any damaged parts before continued use.
Pieces thrown from a worn or damaged blade can cause serious
injury. Always inspect the blade before using the weed mower.
Fire and Burn Hazard
Gasoline is extremely flammable, and gasoline vapor can explode.
Use extreme care when handling gasoline. Keep gasoline out of reach
of children.
Store fuel in containers specifically designed for this purpose.
Refuel outdoors only, and do not smoke while refuelling or handling
fuel.
Add fuel before starting the engine. Never remove the cap of the
fuel tank or add petrol while the engine is running or when the
engine is hot.
If gasoline is spilled, do not attempt to start the engine but move the
machine away from the area of spillage and avoid creating any
source of ignition until gasoline vapors have dissipated.
Tighten all fuel tanks and container caps securely.
7
Page 10

To ensure safe operation
Never store the equipment with gasoline in the tank inside a
building where fumes may reach an open flame, spark or high
temperature source.
Allow the engine to cool before storing in any enclosure.
To prevent a fire hazard, keep the weed mower clean and free of
grass, leaves or excessive grease. Pay special attention to the
engine, muffler, upper cutter deck surfaces and the belt and pulley
areas. Also pay attention to gasoline storage areas. Do not leave
containers of vegetable matter in or near a building.
If the fuel tank has to be drained, this should be done outdoors, with
a cold engine.
Carbon Monoxide Poisoning Hazard
Exhaust contains poisonous carbon monoxide, a colorless and
odorless gas. Breathing exhaust can cause loss of consciousness and
may lead to death.
If you run the engine in an area that is confined or even partially
enclosed, the air you breathe could contain a dangerous amount of
exhaust gas. To keep exhaust gas from building up, provide
adequate ventilation.
Replace faulty muffler.
Do not operate the engine in a confined space where dangerous
carbon monoxide fumes can collect.
8
Page 11

To ensure safe operation
Operation on Slope
When mowing on slopes, keep the fuel tank less than half full to
minimize fuel spillage.
Mow across the slope (At equally spaced intervals) rather than up
and down it.
Be very careful when changing the direction of the weed mower on
a slope.
Do not mow slopes of more than 20°.
Before starting the engine, check that the weed mower is not
damaged and in good condition. For your safety and the safety of
others, exercise extreme care when using the weed mower up or
down hill.
9
Page 12
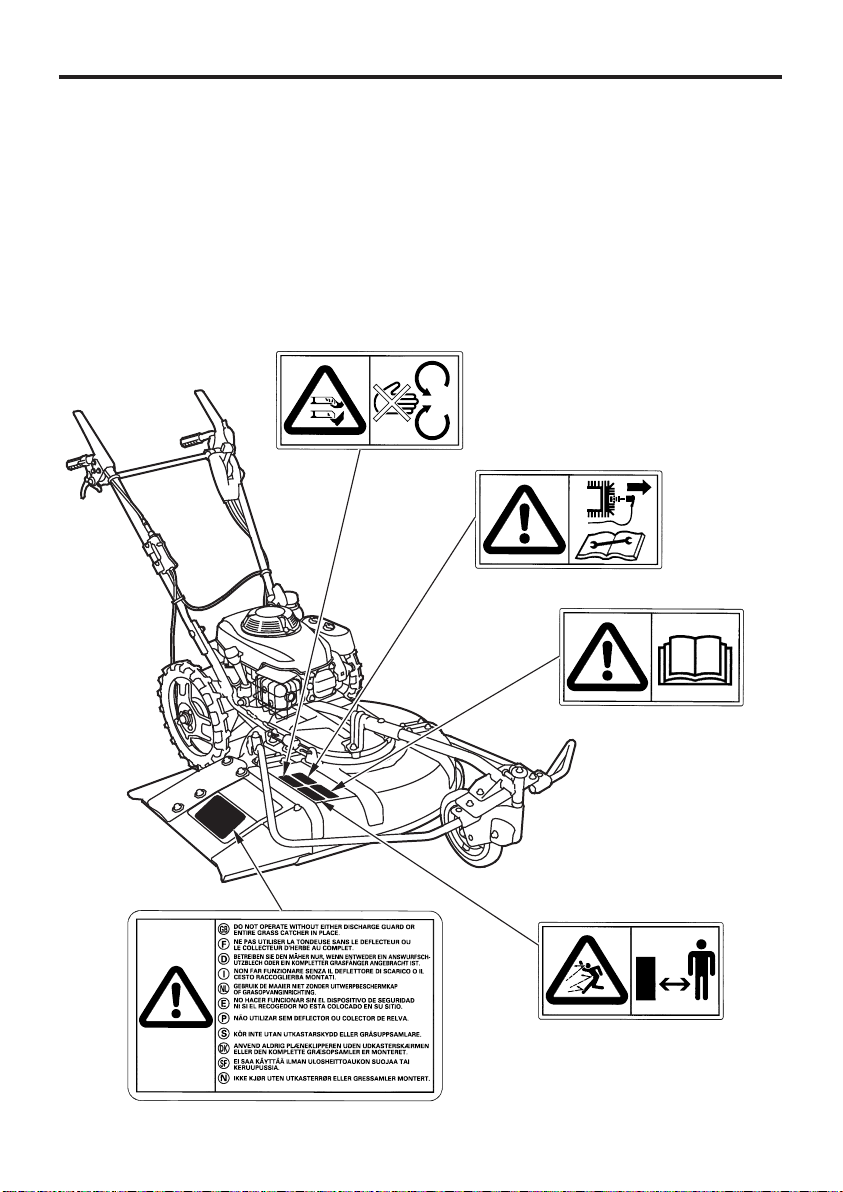
SAFETY LABEL LOCATIONS2.
Your weed mower must be used with care. Therefore, decals have
been placed on the machine, to remind you pictorially of main
precautions to take during use. Their meaning is explained below. (see
page ).
3
These decals are considered as a part of the weed mower. Should one
become detached or unreadable, contact your Honda dealer for its
replacement.
CUTTING DANGER
PLUG CAUTION
10
DISCHARGE CAUTION
READ OWNER’S
MANUAL
HOUSING DANGER
Page 13
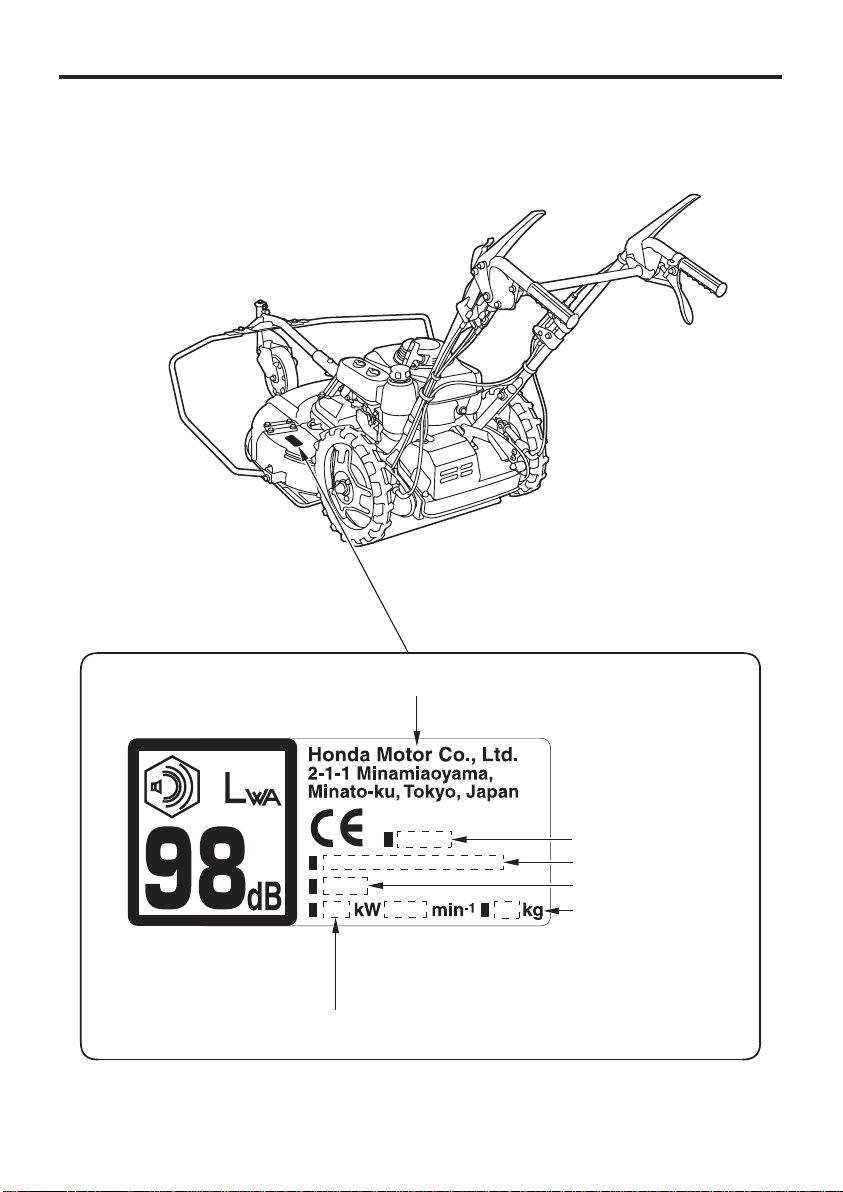
NOISE LABEL and CE mark location
NOISE LABEL and CE MARK
Manufacturer and address
NOISE LABEL
Description code
Frame serial number
Year of manufacture
Machine mass
Net power
11
Page 14
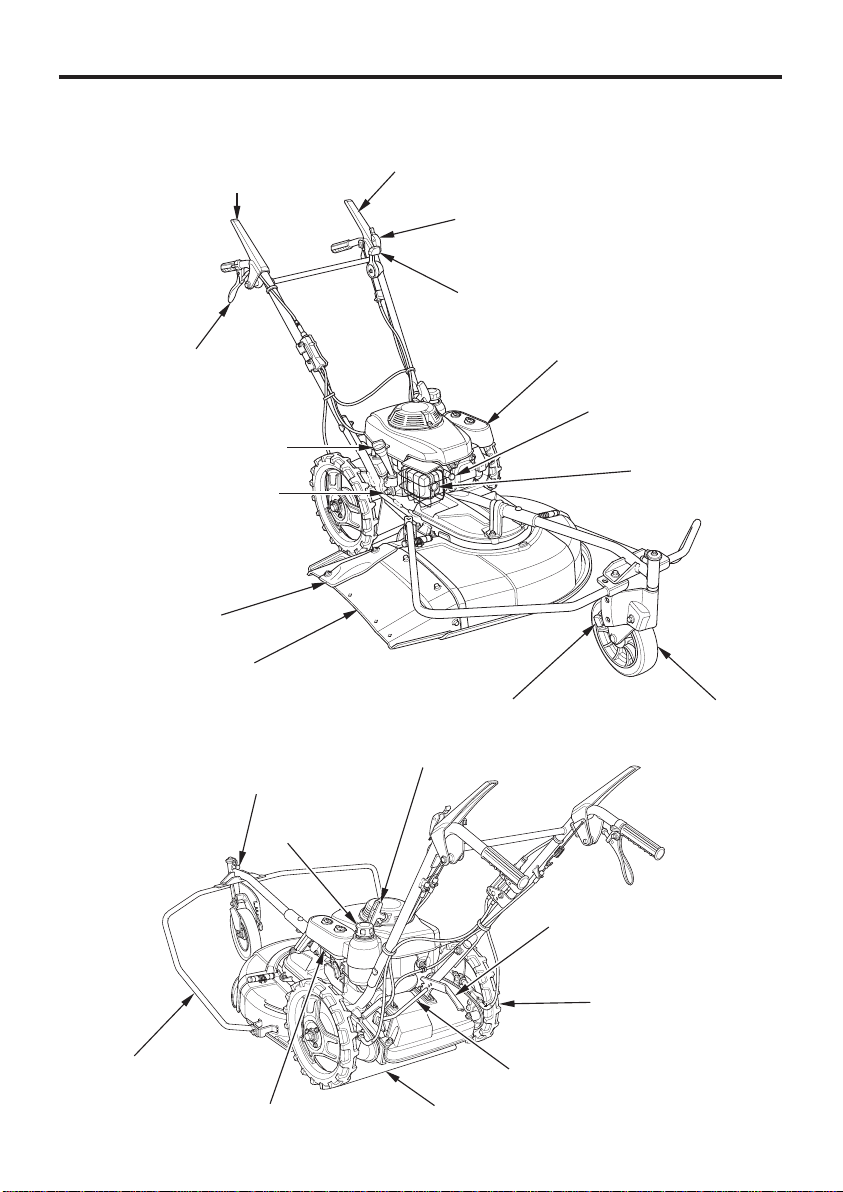
COMPONENT IDENTIFICATION3.
UM536:
BLADE CLUTCH LEVER
DRIVE CLUTCH LEVER
LOCK LEVER
THROTTLE LEVER
BRAKE LEVER
(EBE type)
ENGINE OIL FILLER CAP
ENGINE OIL DRAIN BOLT
SIDE RUBBER
DISCHARGE ADAPTER
FRONT WHEEL LOCK PIN
CUTTING HEIGHT
ADJUSTING LEVER (FRONT)
STARTER GRIP
FUEL FILLER
CAP
AIR CLEANER
SPARK PLUG CAP
MUFFLER
FRONT WHEEL
CUTTING HEIGHT
ADJUSTING LEVER (REAR)
FOOT GUARD BAR
12
FUEL VALVE
REAR WHEEL
GEAR SHIFT LEVER
REAR SHIELD
Page 15
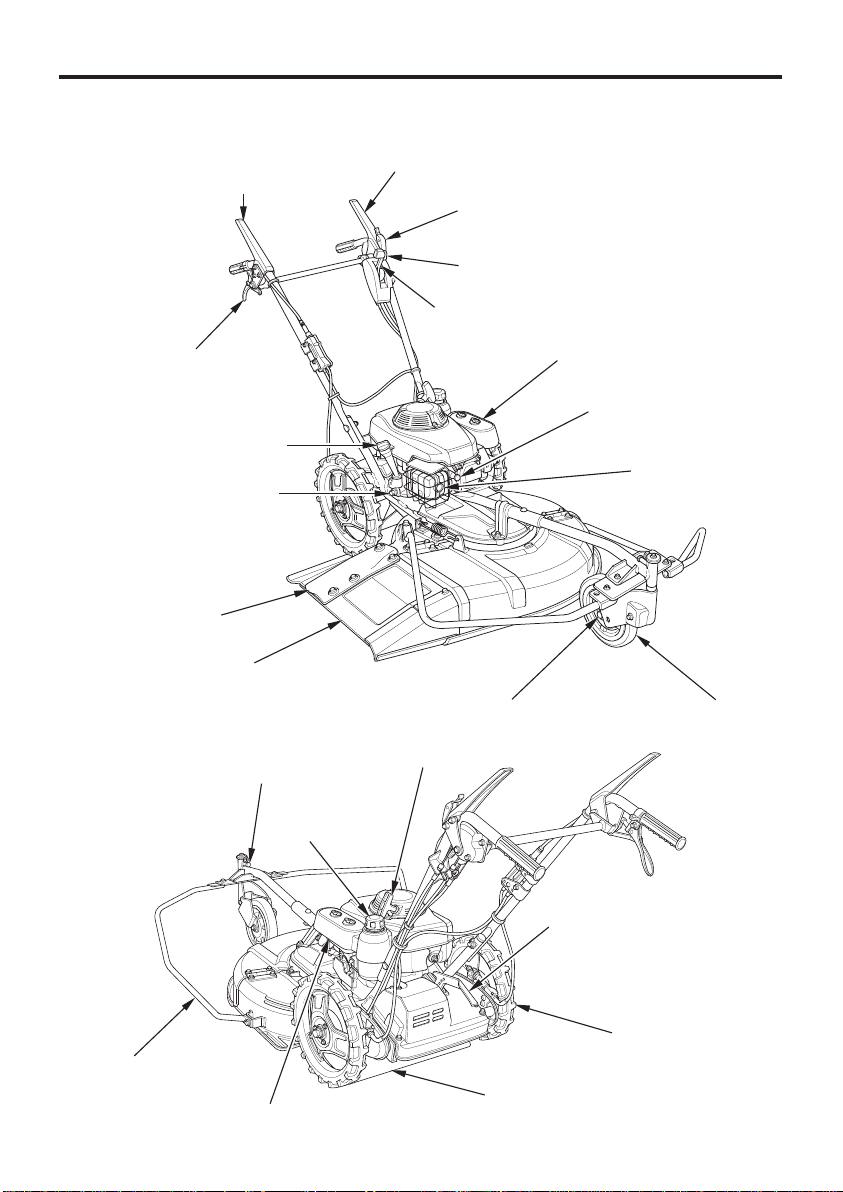
UM616:
BLADE CLUTCH LEVER
DRIVE CLUTCH LEVER
LOCK LEVER
THROTTLE LEVER
SHIFT LEVER
BRAKE LEVER
(EBE type)
ENGINE OIL FILLER CAP
ENGINE OIL DRAIN BOLT
SIDE RUBBER
DISCHARGE ADAPTER
FRONT WHEEL LOCK PIN
CUTTING HEIGHT
ADJUSTING LEVER (FRONT)
STARTER GRIP
FUEL FILLER
CAP
AIR CLEANER
SPARK PLUG CAP
MUFFLER
FRONT WHEEL
CUTTING HEIGHT
ADJUSTING LEVER (REAR)
FOOT GUARD BAR
REAR WHEEL
REAR SHIELD
FUEL VALVE
13
Page 16
CONTROLS4.
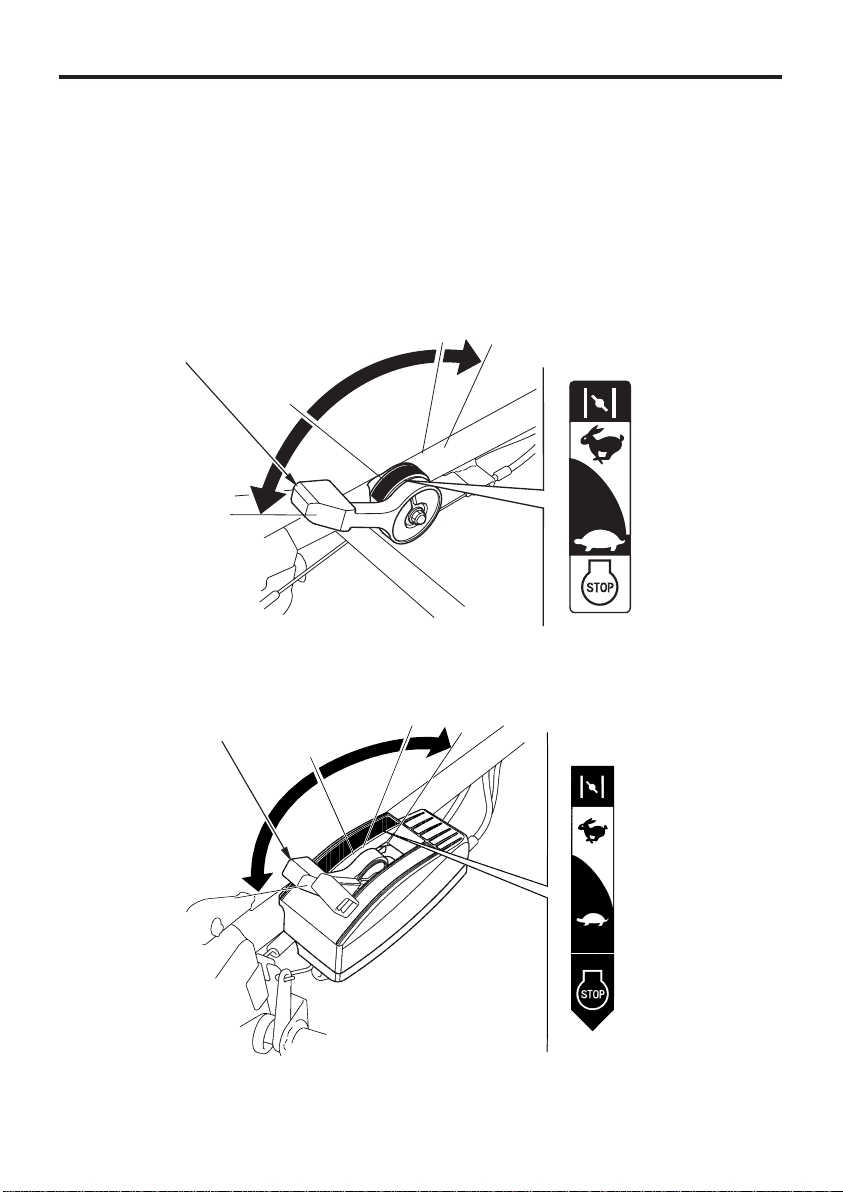
Throttle lever (Engine speed)1.
The throttle lever controls engine speed from LOW (idle) to HIGH (max.
speed).
Use when starting the engine, while operating the weed mower, or
when stopping the engine.
CHOKE is for starting a cold engine.
THROTTLE LEVER
LOW
THROTTLE LEVER
LOW
HIGH
UM536
HIGH
CHOKE
CHOKE
······
CHOKE
·······
HIGH
······
LOW
······
STOP
······
CHOKE
······
HIGH
······
LOW
14
UM616
·····
STOP
Page 17
Blade clutch lever2.
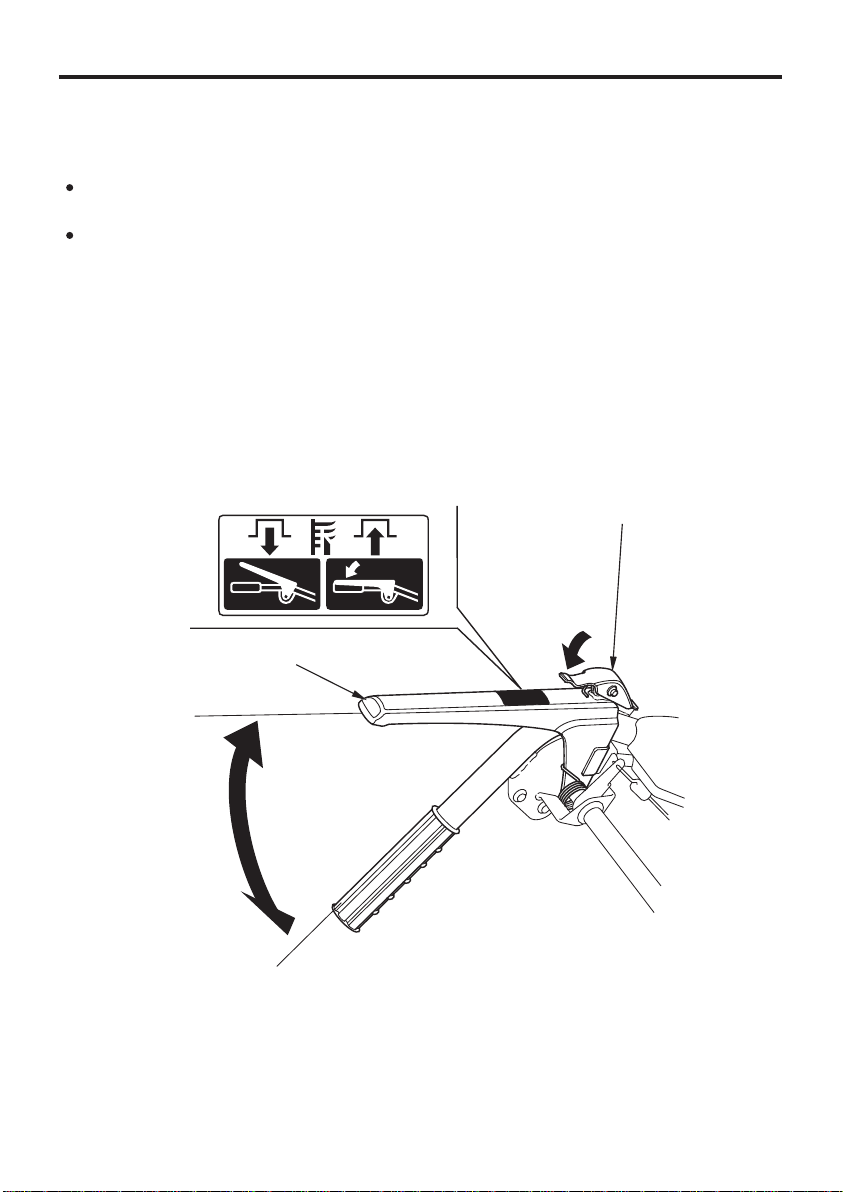
The blade clutch lever is operated in two ways:
The blade will start to rotate when the blade clutch lever is squeezed
while squeezing the lock lever (yellow mark).
Releasing the clutch lever will cause the blade to stop rotating,
allowing the lock lever to return to the LOCK position automatically.
(UM616)
When the drive clutch lever is gripped, the blade clutch lever is locked
up. If the blade clutch lever is operated single, it is disengaged when
the hand is removed from it.
STOP
BLADE CLUTCH LEVER
STOP
ROTATE
······
ROTATE
······
LOCK LEVER
15
Page 18
Drive clutch lever
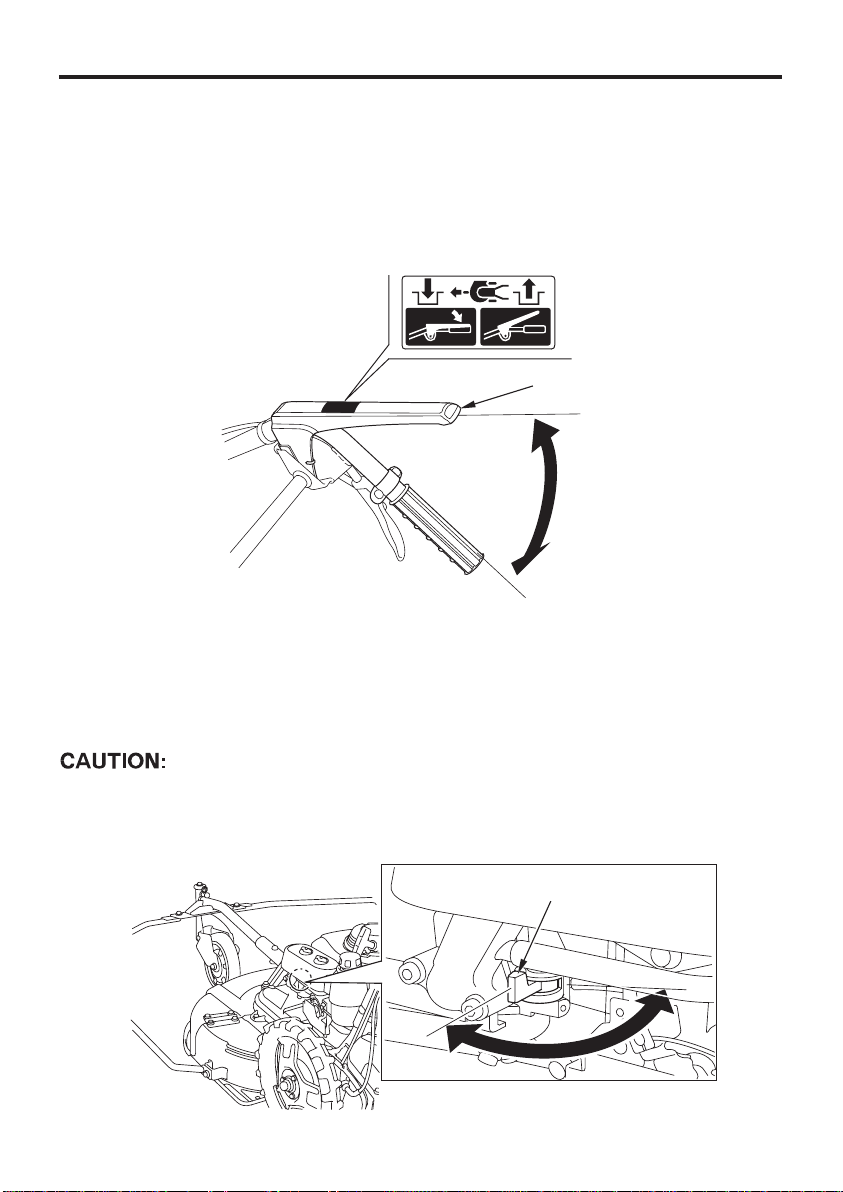
3.
The mower will start to move when the drive clutch lever is squeezed
and will stop when the lever is released.
MOVE
STOP
Fuel valve
4.
·······
·······
DRIVE CLUTCH LEVER
STOP
MOVE
The fuel valve is used to open or close the fuel passage from the fuel
tank to the carburetor. Always move the lever completely to either the
ON or OFF position.
When transporting or storing the weed mower, put the valve in the
OFF position to prevent any possibility of fuel leakage.
16
FUEL VALVE
OONN
OOFFFF
Page 19
Cutting height adjusting levers
5.
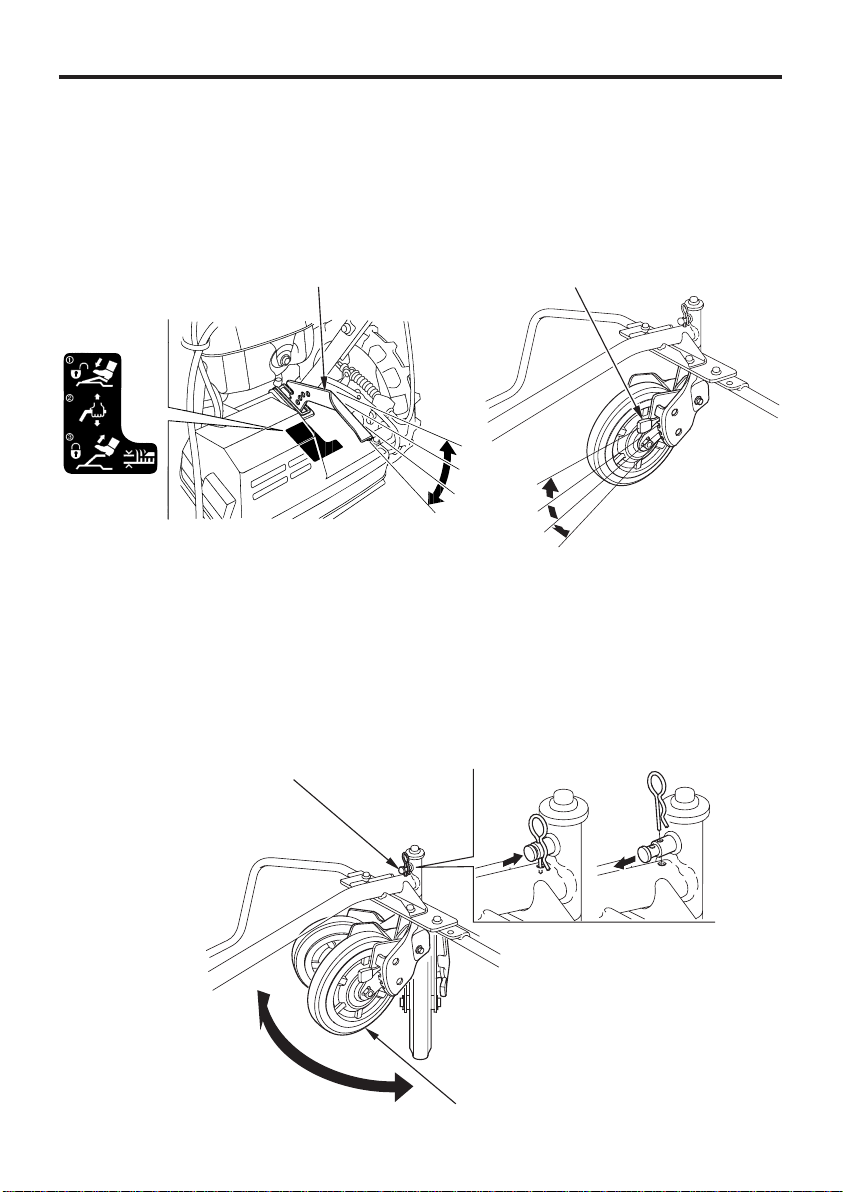
Cutting height can be adjusted in 4 stages by changing the height of
the front and rear wheels. Adjust the cutting height by operating these
levers before mowing.
CUTTING HEIGHT
ADJUSTING LEVER
FREE
·····
·····
LOCK
Front wheel lock pin
6.
CUTTING HEIGHT
ADJUSTING LEVER
(Rear) (Front)
This pin is used to lock the front wheel when mowing on slopes. (see
page )35
LOCKED NORMAL
WHEEL LOCK PIN
(FREE)
FRONT WHEEL
17
Page 20
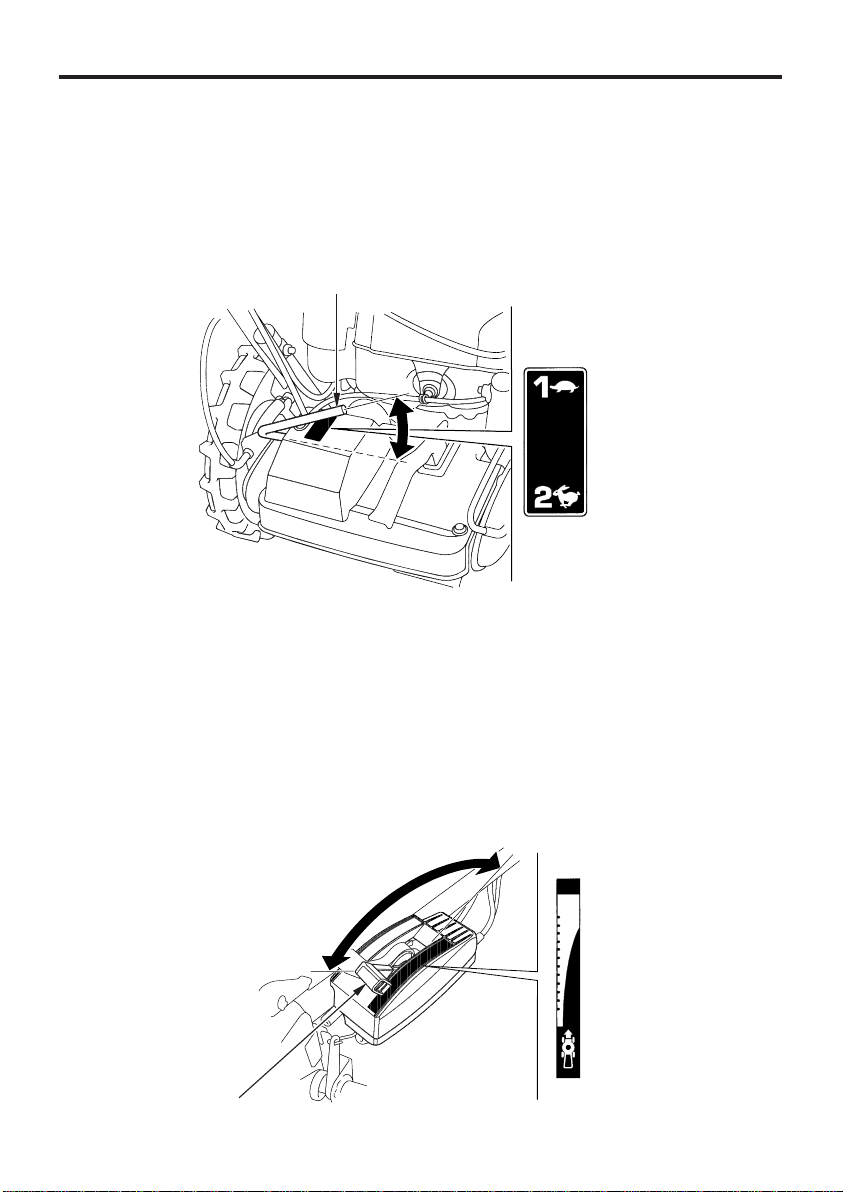
Gear shift lever
7.
(UM536)
This lever is used to change mower speed in forward. It has two
positions.
1st: 0.5 m/sec
2nd: 0.8 m/sec
GEAR SHIFT LEVER
····
1st
····
2nd
Shift lever
8. (UM616)
The shift lever controls the mower’s maximum drive speed. Move the
shift lever to select the pace at which you normally mow in open areas.
If you wish to momentarily slow the mower during operation, partially
release the drive clutch lever, then resume your normal speed by
squeezing the drive clutch lever. It is not necessary to move the shift
lever for momentary speed reduction.
SLOW: 0.4 m/sec
FAST: 1.0 m/sec
SHIFT LEVER
18
SLOW
FAST
········
FAST
·······
SLOW
Page 21
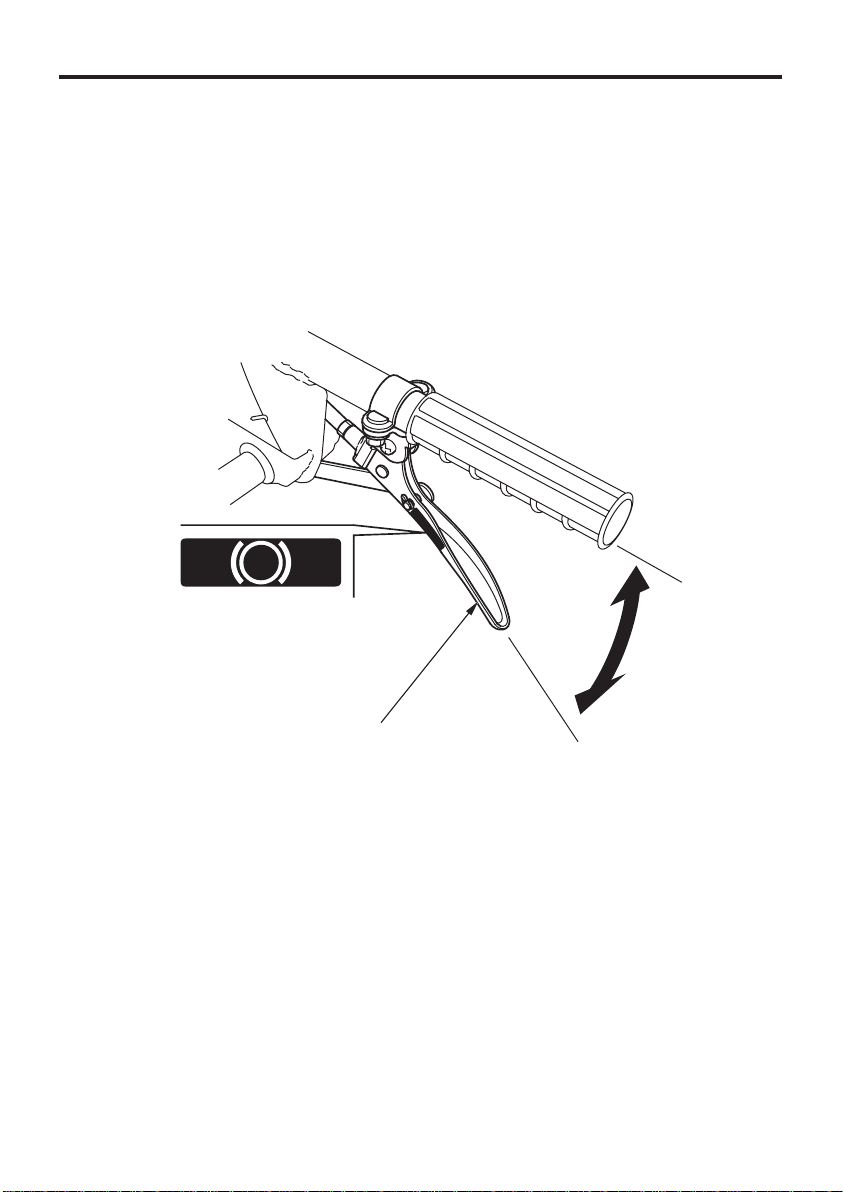
Brake lever9. (EBE type)
The brake is provided to aid in changing direction or adjusting speed
when mowing up and down the face of the grade or driving down a
slope.
BRAKE LEVER
19
Page 22
PRE-OPERATION CHECKS5.
For safe and efficient mowing, always make a pre-operation inspection
before operating:
Perform a pre-operation inspection on a firm, level surface with the
engine stopped and spark plug cap removed from the spark plug.
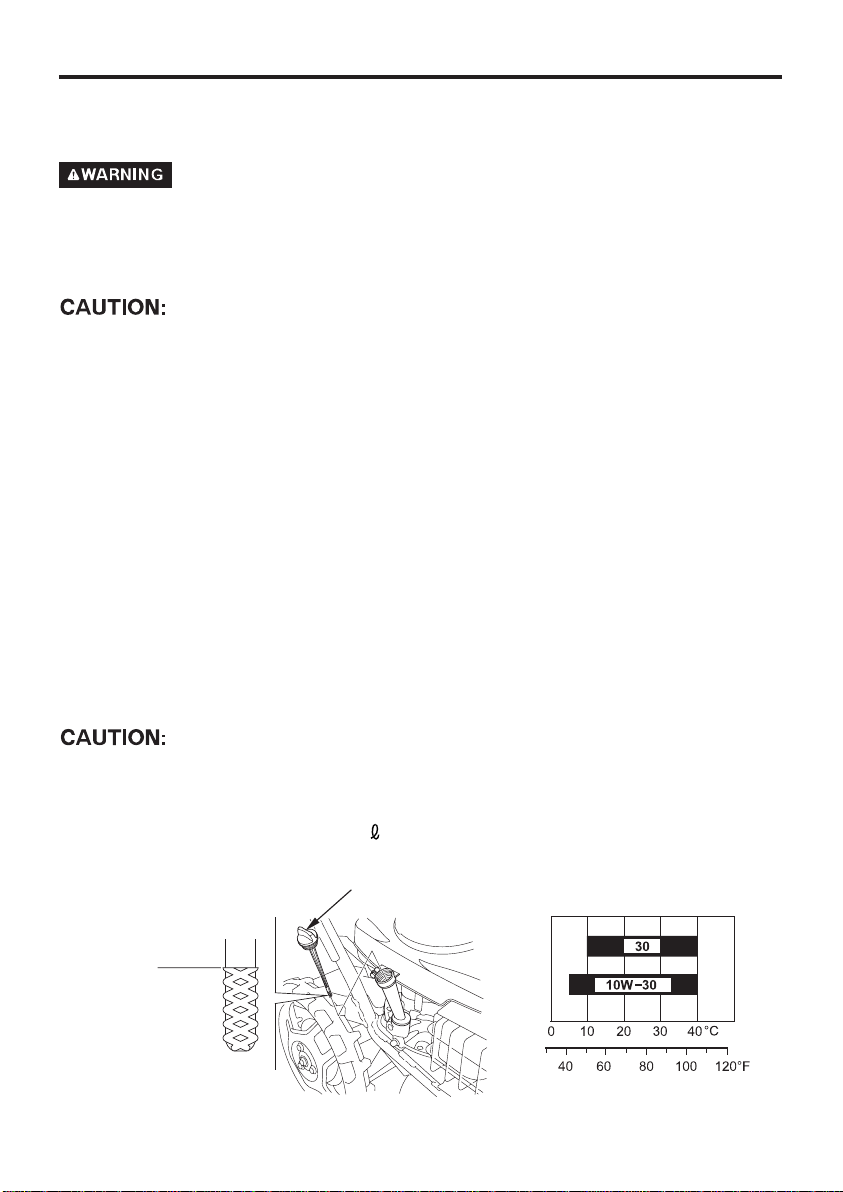
Check the engine oil level
1.
Running the engine with low oil level will cause serious engine
damage.
Place the weed mower on a level surface.
a.
Remove the oil filler cap and wipe the dipstick clean.
b.
Insert the dipstick into the oil filler neck, but do not screw it in.
c.
Check the oil level shown on the dipstick. If near the lower level, fill
d.
to the upper level with the recommended oil.
Recommended oil
Use 4-stroke motor oil that meets or exceeds the requirements for API
service classification SE or later (or equivalent). Always check the API
service label on the oil container to be sure it includes the letters SE or
later (or equivalent).
SAE 10W-30 is recommended for general use. Other viscosities shown
in the chart may be used when the average temperature in your area is
within the indicated range.
Using nondetergent oil or 2-stroke engine oil could shorten the
engine’s service life.
ENGINE OIL CAPACITY:
UPPER OIL
LEVEL
0.65
(0.69 US qt , 0.57 Imp qt)
OIL FILLER CAP
AMBIENT TEMPERATURE
20
Page 23
Check the fuel level
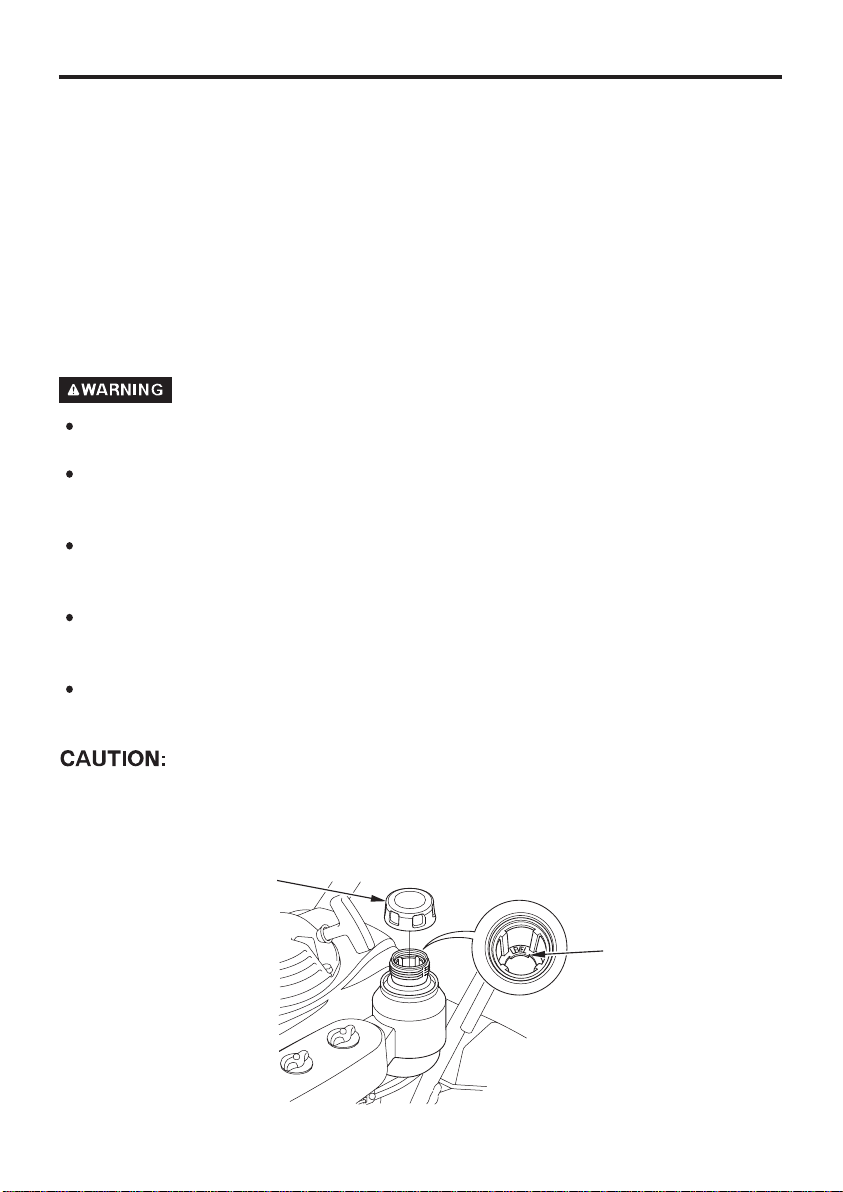
2.
Remove the fuel tank cap and check that the fuel tank is filled to the
upper limit of fuel level. If the level is low, fill up the fuel tank to the
upper level.
Use automotive unleaded gasoline with a Research Octane Number of
91 or higher (a Pump Octane Number of 86 or higher).
Never use stale or contaminated gasoline or an oil/gasoline mixture.
Avoid getting dirt or water in the fuel tank.
Gasoline is extremely flammable and is explosive under certain
conditions.
Refuel in a well-ventilated area with the engine stopped. Do not
smoke or allow flames or sparks in the area where the engine is
refueled or where gasoline is stored.
Do not overfill the fuel tank (there should be no fuel above the fuel
level upper limit mark). After refueling, make sure the tank cap is
closed properly and securely.
Be careful not to spill fuel when refueling. Spilled fuel or fuel vapor
may ignite. If any fuel is spilled, make sure the area is dry before
starting the engine.
Avoid repeated or prolonged contact with skin or breathing of
vapor. KEEP OUT OF REACH OF CHILDREN.
Gasoline substitutes are not recommended; they may be harmful to
fuel system components.
FUEL TANK CAP
FUEL LEVEL
UPPER LIMIT
21
Page 24

Gasoline spoils very quickly depending on factors such as light
exposure, temperature and time.
In worst cases, gasoline can be contaminated within 30 days.
Using contaminated gasoline can seriously damage the engine
(carburetor clogged, valve stuck).
Such damage due to spoiled fuel is disallowed from coverage by the
warranty.
To avoid this please strictly follow these recommendations:
Only use specified gasoline (see page ).
Use fresh and clean gasoline.
To slow deterioration, keep gasoline in a certified fuel container.
If long storage (more than 30 days) is foreseen, drain fuel tank and
carburetor (see page ).
Gasolines containing alcohol
If you decide to use a gasoline containing alcohol (gasohol), be sure it’s
octane rating is at least as high as that recommended by Honda. There
are two types of ‘‘gasohol’’: one containing ethanol, and the other
containing methanol. Do not use gasohol that contains more than 10%
ethanol. Do not use gasoline containing methanol (methyl or wood
alcohol) that does not also contain cosolvents and corrosion inhibitors
for methanol. Never use gasoline containing more than 5% methanol,
even if it has cosolvents and corrosion inhibitors.
55
21
Fuel system damage or engine performance problems resulting
from the use of fuels that contain alcohol is not covered under the
warranty. Honda cannot endorse the use of fuels containing
methanol since evidence of their suitability is as yet incomplete.
Before buying fuel from an unfamiliar station, try to find out if the
fuel contains alcohol, if it does, confirm the type and percentage of
alcohol used. If you notice any undesirable operating symptoms
while using a gasoline that contains alcohol, or one that you think
contains alcohol, switch to a gasoline that you know does not
contain alcohol.
22
Page 25
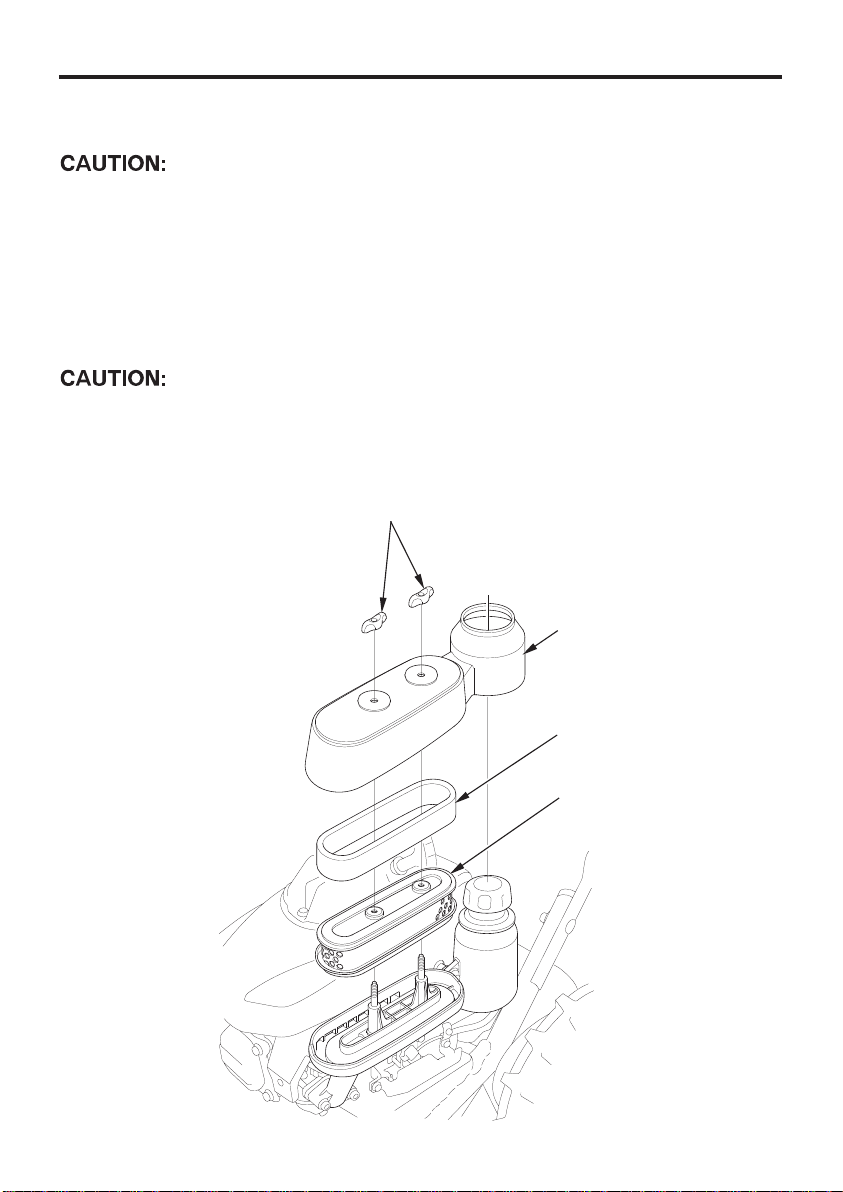
Check the air cleaner elements
3.
Never run the engine without the air cleaner; rapid engine wear will
result.
Remove the wing nuts to remove the air cleaner cover.1.
Remove the air cleaner elements.
2.
If the elements are dirty, follow the cleaning procedure described on
page .
44
After servicing the air cleaner elements, reinstall the air cleaner cover
securely. Failure to tighten the cover securely may cause the cover to
come out of position or some sort of engine malfunction.
WING NUTS
AIR CLEANER COVER
FOAM ELEMENT
PAPER ELEMENT
23
Page 26
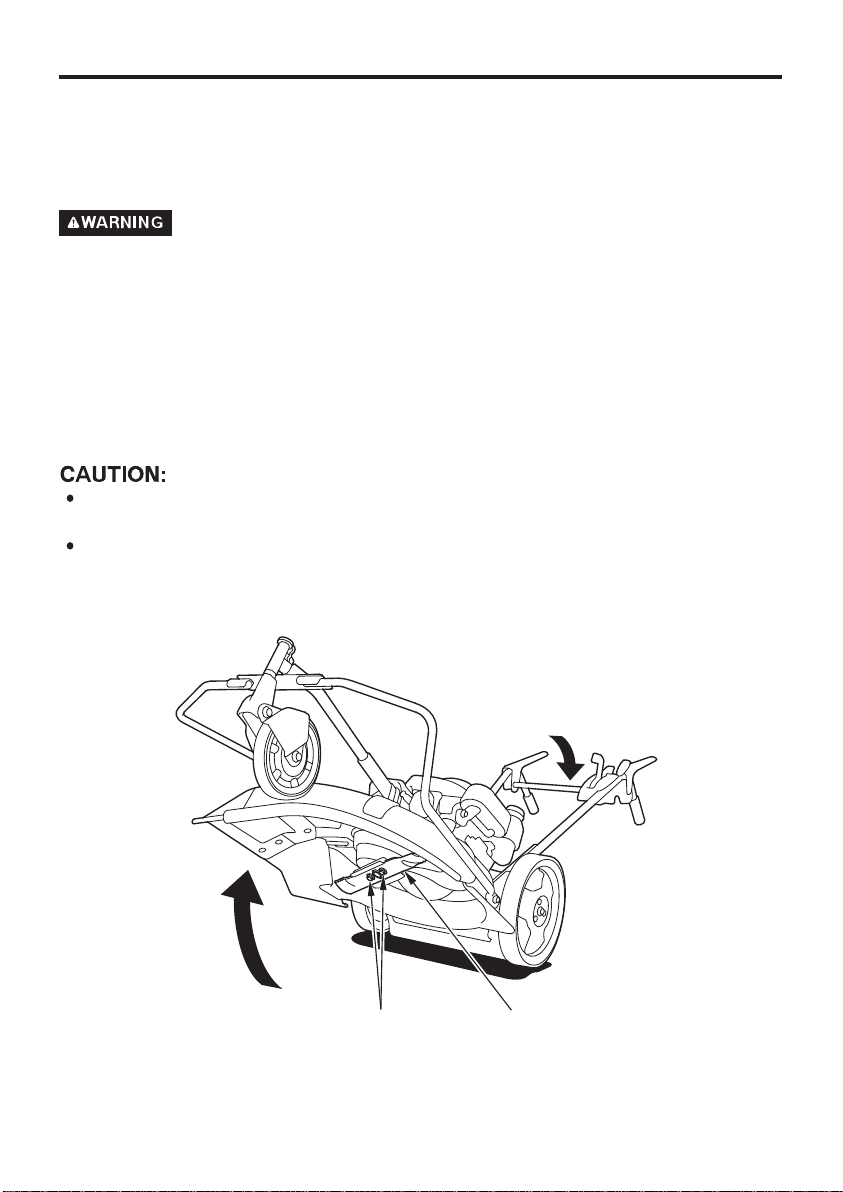
Check the cutting blade
4.
Before each use, check the cutter blade for damage or excessive wear.
To avoid severe personal injury, disconnect the spark plug cap to
prevent accidental starting, and wear heavy gloves to protect your
hands from the cutter blade.
Stop the engine and set the fuel valve in the OFF position.
1.
Remove the spark plug cap from the spark plug.
2.
Set the rear cutting height adjusting lever in the HIGHEST position,
3.
then tilt the mower backward.
Perform this operation with two people, with one person holding
the handle securely.
Do not leave the mower tilted for an extended period of time, or the
engine may not be started easily.
24
BLADE BOLTS
BLADE
Page 27
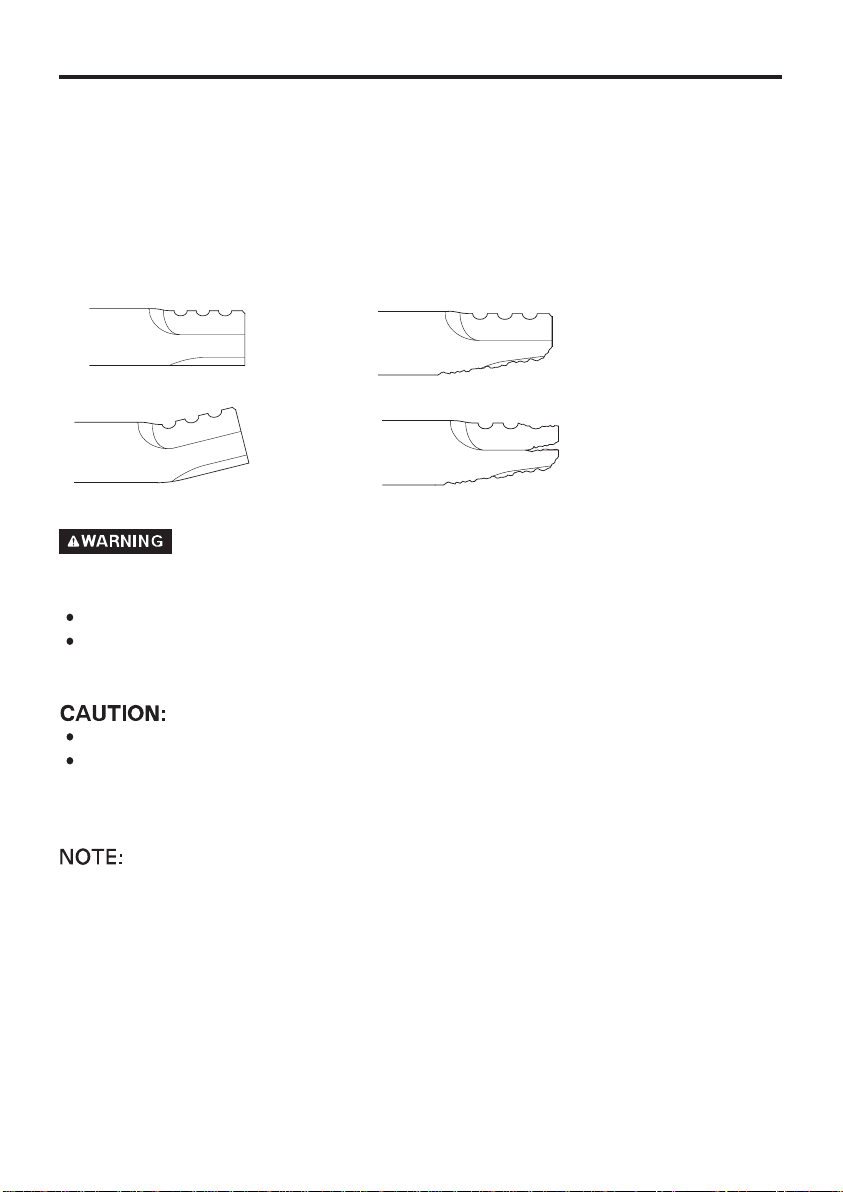
Inspect the blade for signs of wear or damage.
4.
A dull blade can be sharpened, but a blade that is worn out, bent,
cracked, or otherwise damaged must be replaced. If the blade needs
sharpening or replacement, take the cutter deck to your authorized
Honda weed mower dealer. Or, if you have the proper tools, you can
remove and install the blades yourself. (see blade removal and
installation instructions on pages , ).
45 46
NORMAL
BENT
EXCESSIVELY WORN
CRACKED
Severe personal injury can result if a piece of blade breaks off and is
thrown from under the cutter deck.
Never operate the weed mower with a worn or damaged blade.
Never operate the weed mower with a blade that is cracked or
notched at the base of its upturned rear edge.
Use a genuine Honda replacement blade, or equivalent.
To reduce the possibility of weakening the blade, or causing
imbalance or poor cutting performance, sharpening should be
performed by an authorized Honda weed mower dealer.
Blade wear will be accelerated when operating the mower in
conditions where sand or loose soil are present. Frequent blade
inspection should be performed when a mower is operated under
these conditions.
Check that the blade bolts are properly tightened.
5.
Blade bolt torque:
54 N·m (5.5 kgf·m , 40 lbf·ft)
25
Page 28
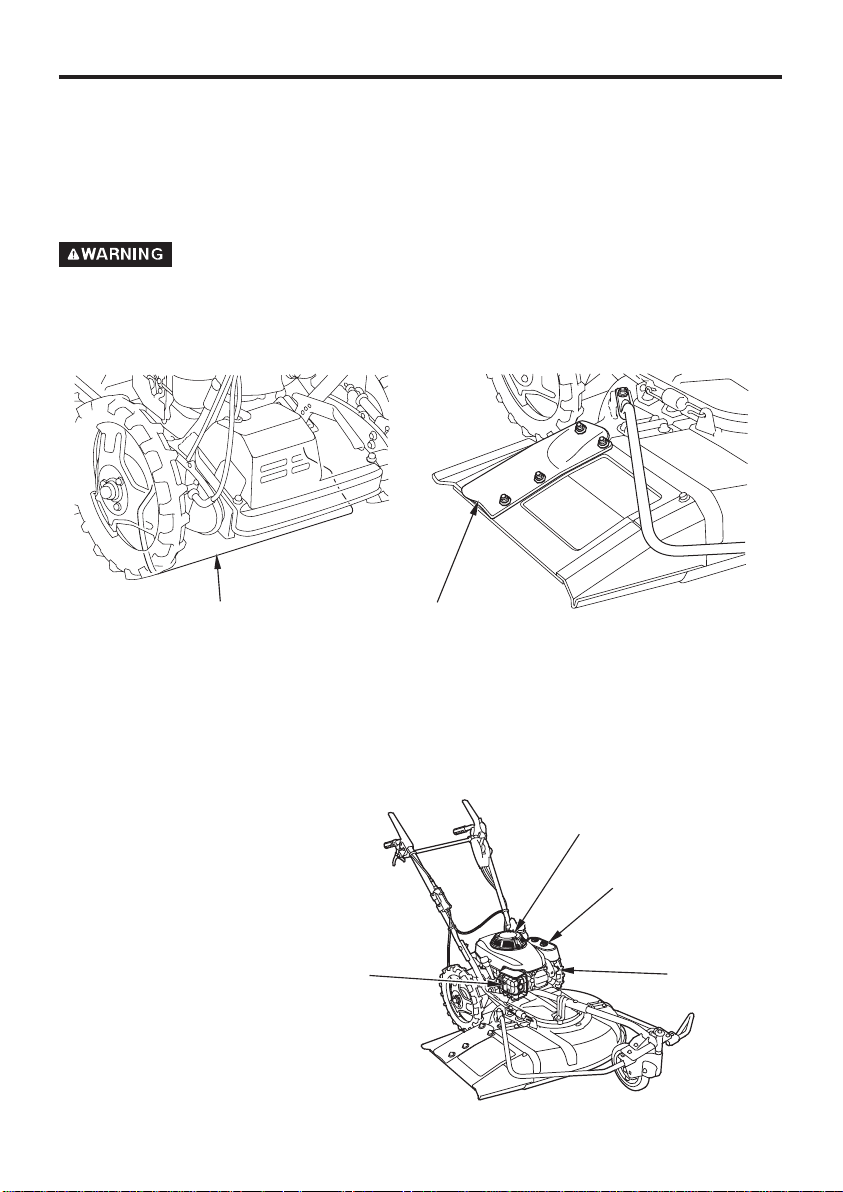
Check all protectors and guards
5.
Inspect the protectors and guards to be sure that they are correctly
1.
installed and are not damaged. If a protector or guard is damaged,
replace it before using the weed mower.
Never use the weed mower without its protector. Stones or other
foreign objects thrown outward by the cutting blades could cause
personal injury or property damage.
REAR SHIELD
Inspect and clean as necessary
6.
SIDE PROTECTOR
Inspect the weed mower (particularly the specified portions shown
below) to see if cut grass or dirt is adhering to it. If the weed mower is
dirty, clean it thoroughly.
(1) Carburetor and control
mechanism
(2)
Vicinity of muffler and
exhaust port
(2)
RECOIL STARTER
COVER
AIR CLEANER
(1)
26
Page 29
6.
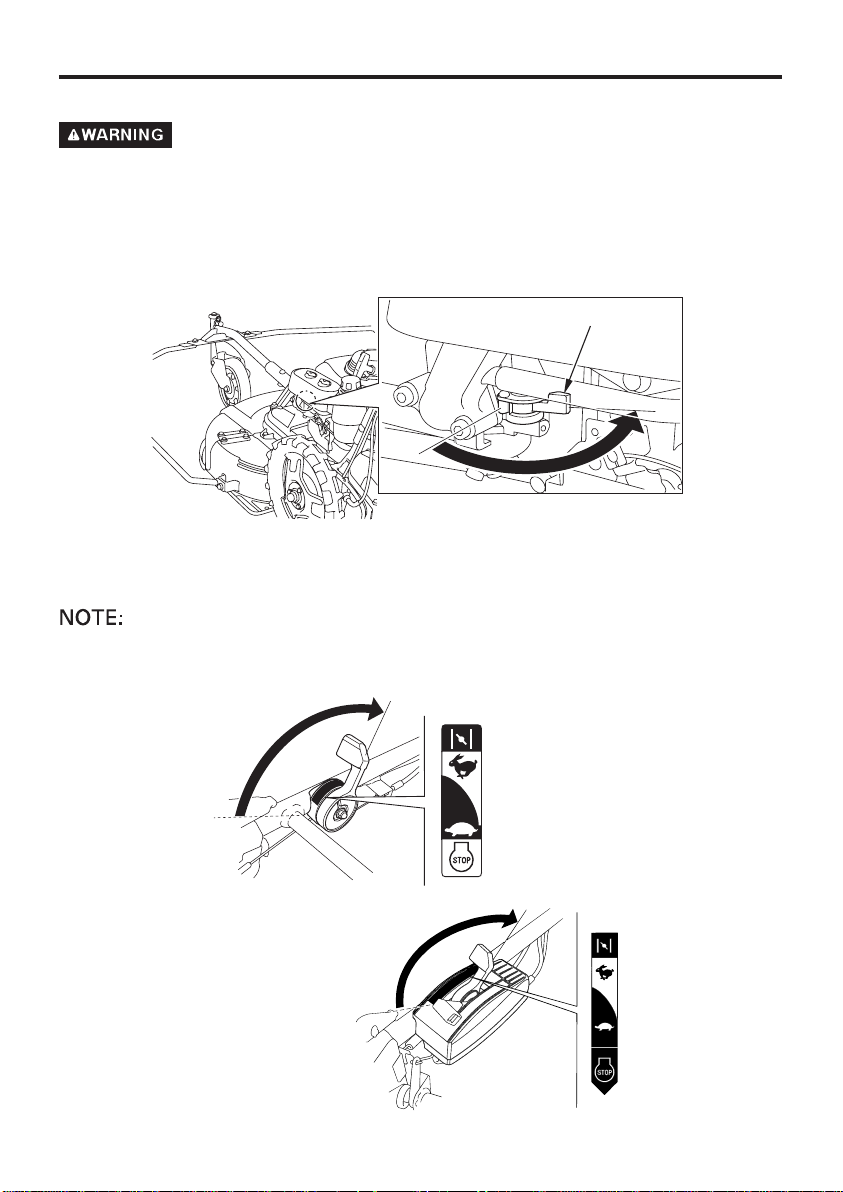
STARTING THE ENGINE
Exhaust gas contains poisonous carbon monoxide. Never run the
engine in an enclosed area. Be sure to provide adequate ventilation.
1.
Be sure the blade clutch lever and drive clutch lever are released.
2.
Turn the fuel valve ON.
FUEL VALVE
OONN
Move the throttle lever to the CHOKE position.3.
When the engine is warm or the air temperature is high, move the
throttle lever to LOW.
CHOKE
······
CHOKE
LOW
UM
536
LOW
CHOKE
UM616
······
CHOKE
27
Page 30
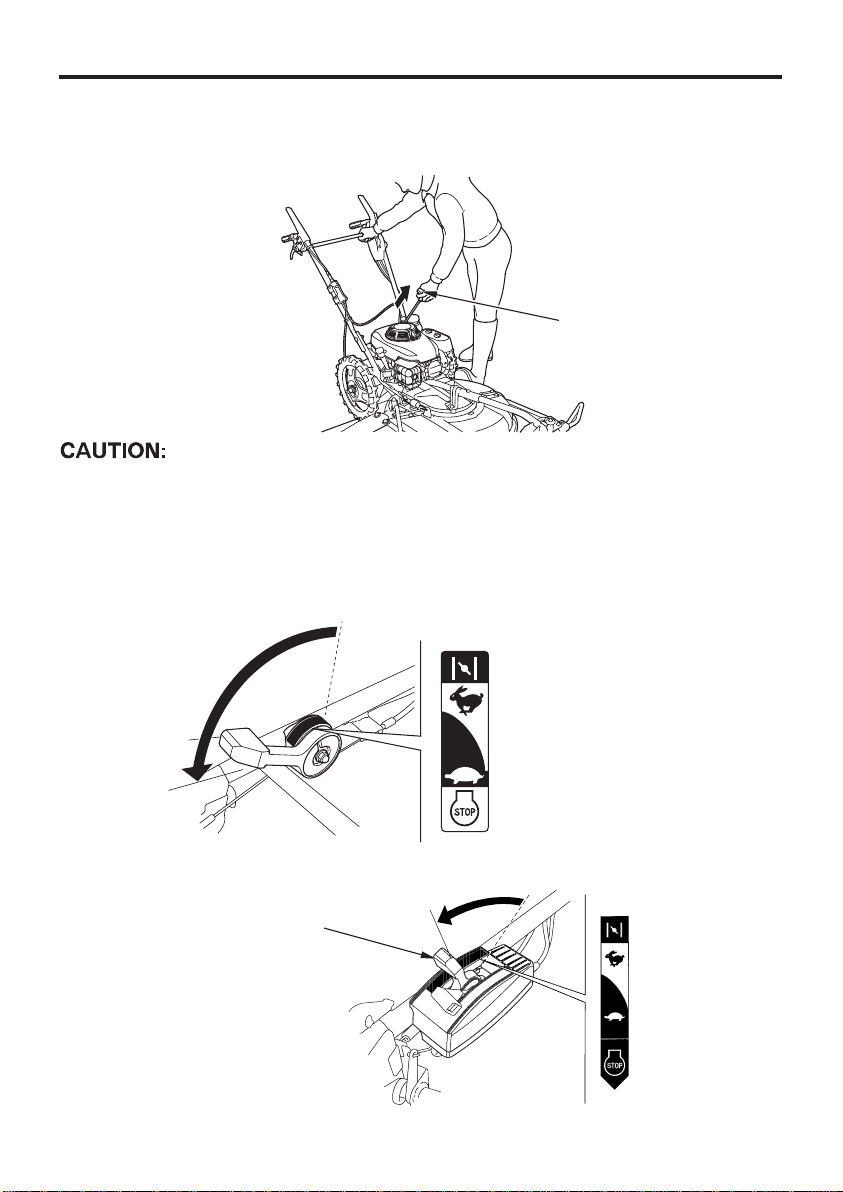
Pull the starter grip lightly until you feel resistance, then pull briskly
4.
in the direction of the arrow as shown below.
DDiirreeccttiioonn ttoo ppuullll
STA
RTER GRIP
Don’t allow the rope to snap back; return it gently by hand. Otherwise,
the starting mechanism might be damaged. While the engine is in
operation, don’t pull the starter grip or damage may result.
As the engine warms up, move the throttle lever to the LOW position.
5.
28
LOW
THROTTLE LEVER
UM536
LOW
·······
UM616
LOW
·······
LOW
Page 31

High altitude operation
At high altitude, the standard carburetor air-fuel mixture will be
excessively rich. Performance will decrease, and fuel consumption will
increase.
High altitude performance can be improved by specific modifications
to the carburetor. If you always operate the rotary mower at altitude
higher than 1,500 m (5,000 feet) above sea level, have your authorized
Honda dealer perform these carburetor modifications.
Even with suitable carburetor jetting, engine horsepower will decrease
approximately 3.5 % for each 300 m (1,000 foot) increase in altitude.
The effect of altitude on horsepower will be greater than this if no
carburetor modification is made.
Operation of the rotary mower at an altitude lower than the
carburetor is jetted for may result in reduced performance,
overheating, and serious engine damage caused by an excessively
lean air/fuel mixture.
29
Page 32
OPERATION7.
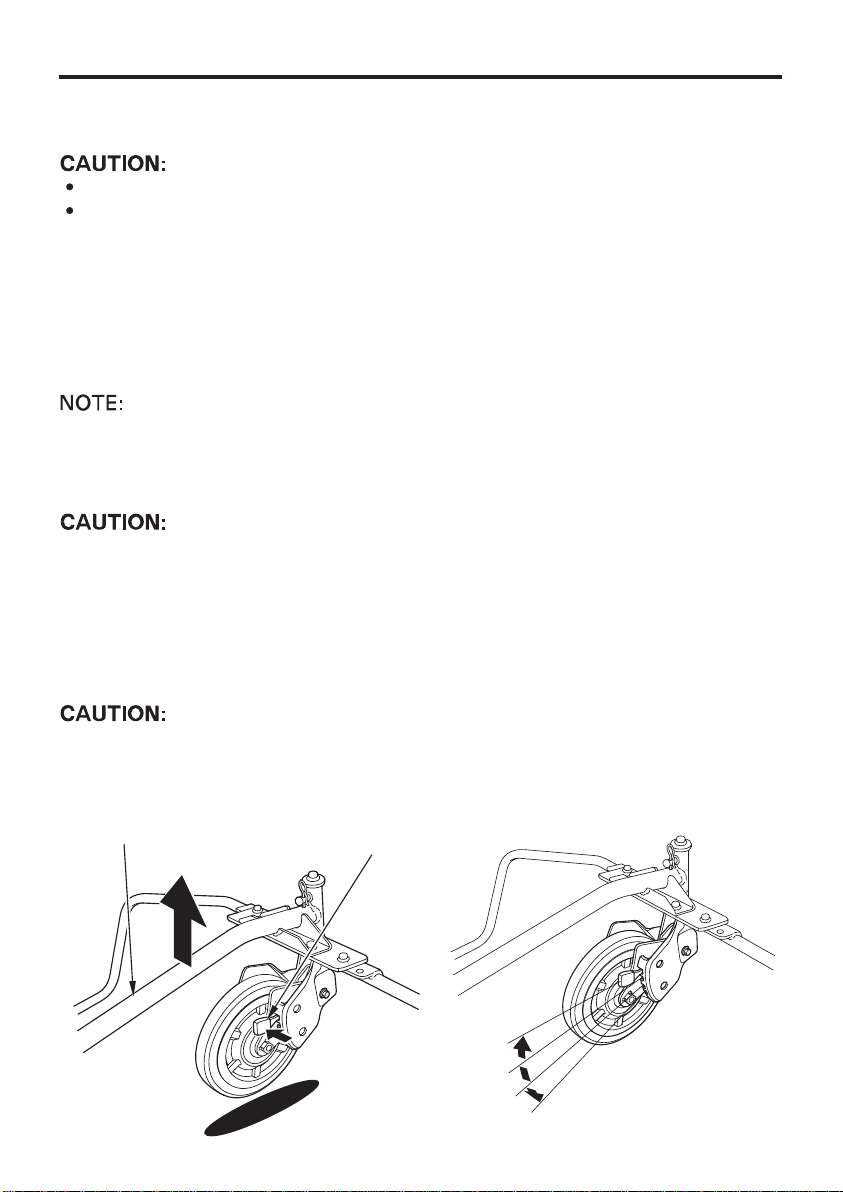
Cutting height adjustment.
1.
Before adjustment, be sure to stop the engine.
Before moving the weed mower from one place to another, stop
the engine and raise the cutting height to the highest position.
Cutting height can be adjusted in 4 stages by operating the front and
rear cutting height adjusting levers; 15 mm, 30 mm, 50 mm and 75 mm.
(Cutting height is subject to change according to the condition of the
ground surface.)
Adjust the front and rear cutting height adjusting levers to the same
position. Failure to adjust the levers to the same position can result in
loss of control or uneven finish of cutting.
Stop the engine before adjusting the cutting height.
Front wheel:
Raise the front wheel slightly off the ground by pulling up on the front
wheel stay to support weight of the mower, before setting the cutting
height adjusting lever to the desired position.
The front part of the mower will be snapped back to the lowest
position by the weight of the mower on the wheel if the weight is not
supported, resulting in personal injury.
FRONT WHEEL STAY
CUTTING HEIGHT
ADJUSTING LEVER
15 mm
30 mm
50 mm
75 mm
30
Page 33
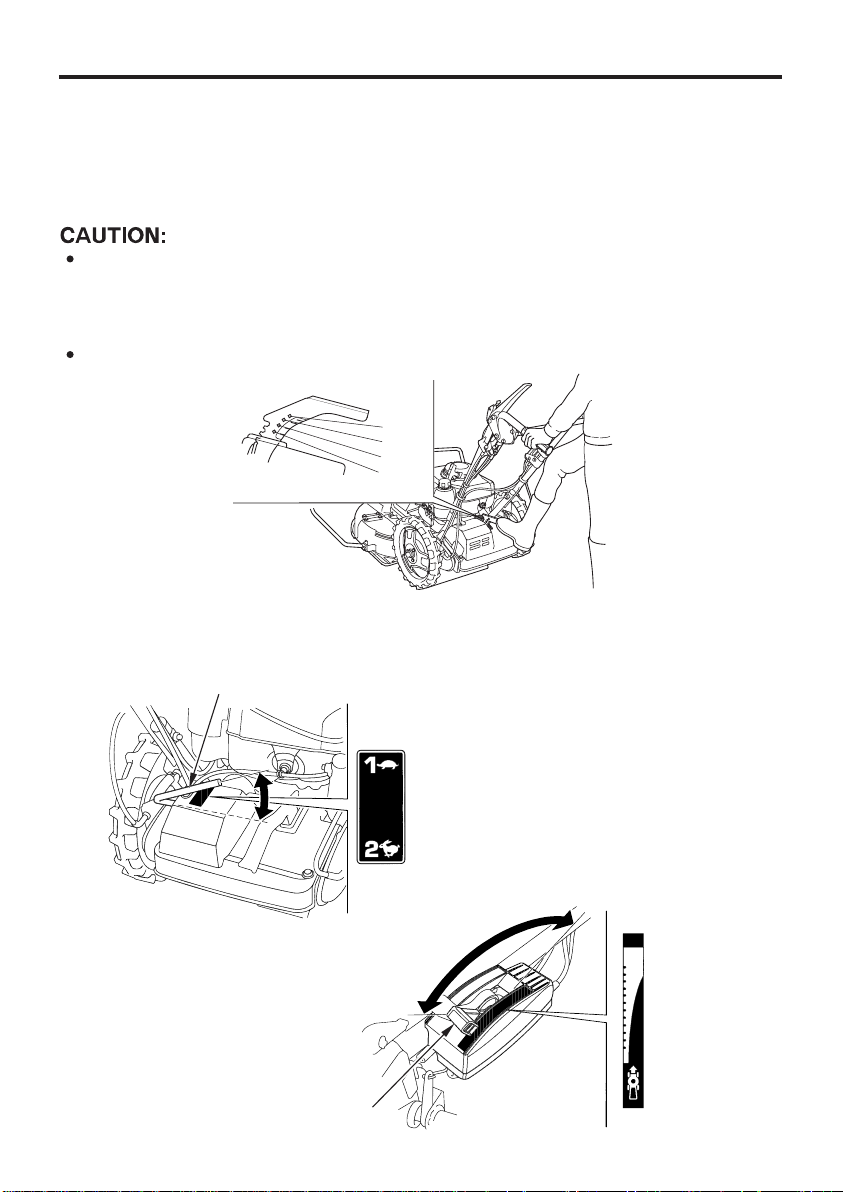
Rear wheels:
Move the handle up or down until the correct cutting height is
obtained while pressing down on the cutting height adjusting lever
fully.
Be sure to hold the handle with both hands when operating the
cutting height adjusting lever. The rear of the mower will be
snapped back to the lowest position if the handle is not held by
hand.
Do not perform this operation on slopes or on loose or uneven
surfaces.
75 mm
50 mm
30 mm
15 mm
Move the shift lever to the desired shift lever position.2.
GEAR SHIFT LEVER (UM536)
SHIFT LEVER (UM616)
SLOW
······
······
1st
2nd
FAST
······
······
FAST
SLOW
31
Page 34
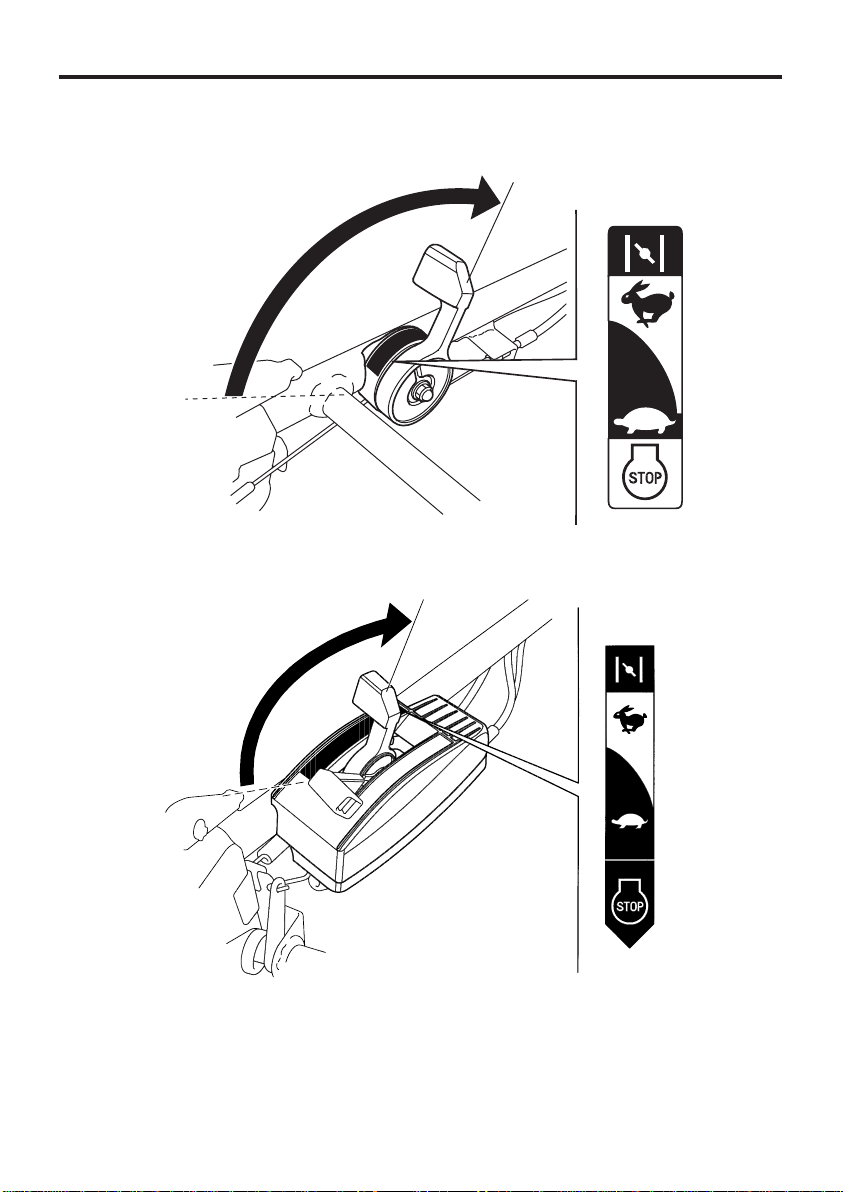
Move the throttle lever to the HIGH position.3.
HIGH
HIGH
·····
UM536
HIGH
32
UM616
·····
HIGH
Page 35
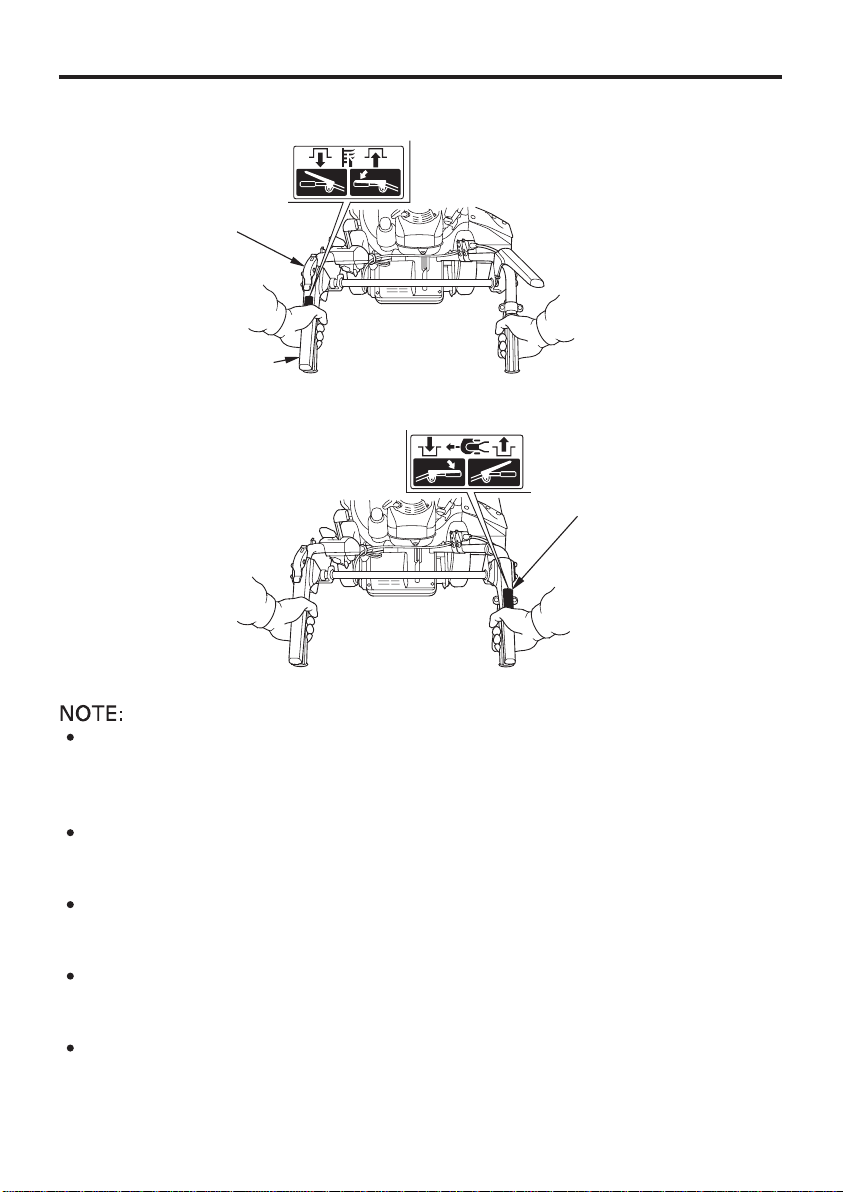
Unlock the lock lever then squeeze the blade clutch lever.4.
LOCK LEVER
BLADE CLUTCH LEVER
Squeeze the drive clutch lever.
5.
MOVE
··············
··········
ROTATE
DRIVE CLUTCH LEVER
By squeezing the drive clutch lever, the blade clutch lever will be
fixed and you can operate it without holding the blade clutch lever
with your right hand. The blade and mower will stop moving when
the drive clutch lever is released.
(UM616)
To move the machine without engaging the cutting blade
mechanism, squeeze the drive clutch lever only. Do this when
moving the machine to and from the area to be moved.
To use the cutting blades without engaging the drive mechanism,
squeeze the blade clutch only. Do this if you wish to maneuver the
machine manually while mowing.
To propel the machine and mow at the same time, squeeze the
blade clutch lever, let the blade come up to speed, and then squeeze
the drive clutch lever.
When running the mower in one hand, do not walk along with your
body stepped out of the right side of the weed mower.
To stop the blades and drive wheels, release both clutch levers.
6.
33
Page 36
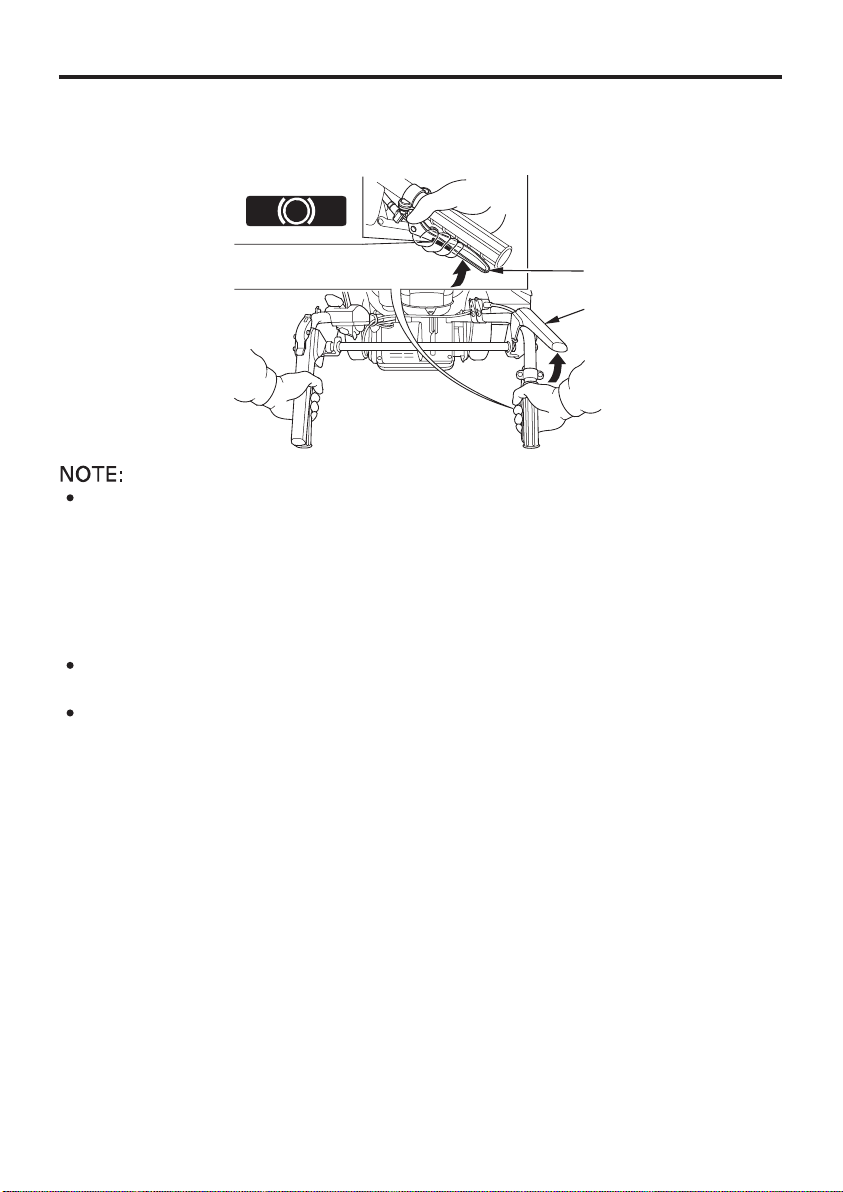
To stop the mower on a down slope, release the drive clutch lever
7.
and squeeze the brake lever (EBE type only).
BRAKE LEVER
DRIVE CLUTCH LEVER
Be sure to disengage the drive clutch before applying the brake.
Damage to the transmission mechanism could result if the brake
and drive clutch levers are operated simultaneously. On EBE type
the driver clutch will be disengaged automatically when the brake
lever is operated. Should the drive clutch be disengaged
automatically, release the drive clutch lever once, then squeeze it, to
drive again.
Severe damage to the transmission mechanism would result if the
mower is started with the brake lever applied.
Be sure to disengage the drive clutch before the mower starts to go
down a slope. Then adjust speed by operating the brake lever
carefully.
34
Page 37
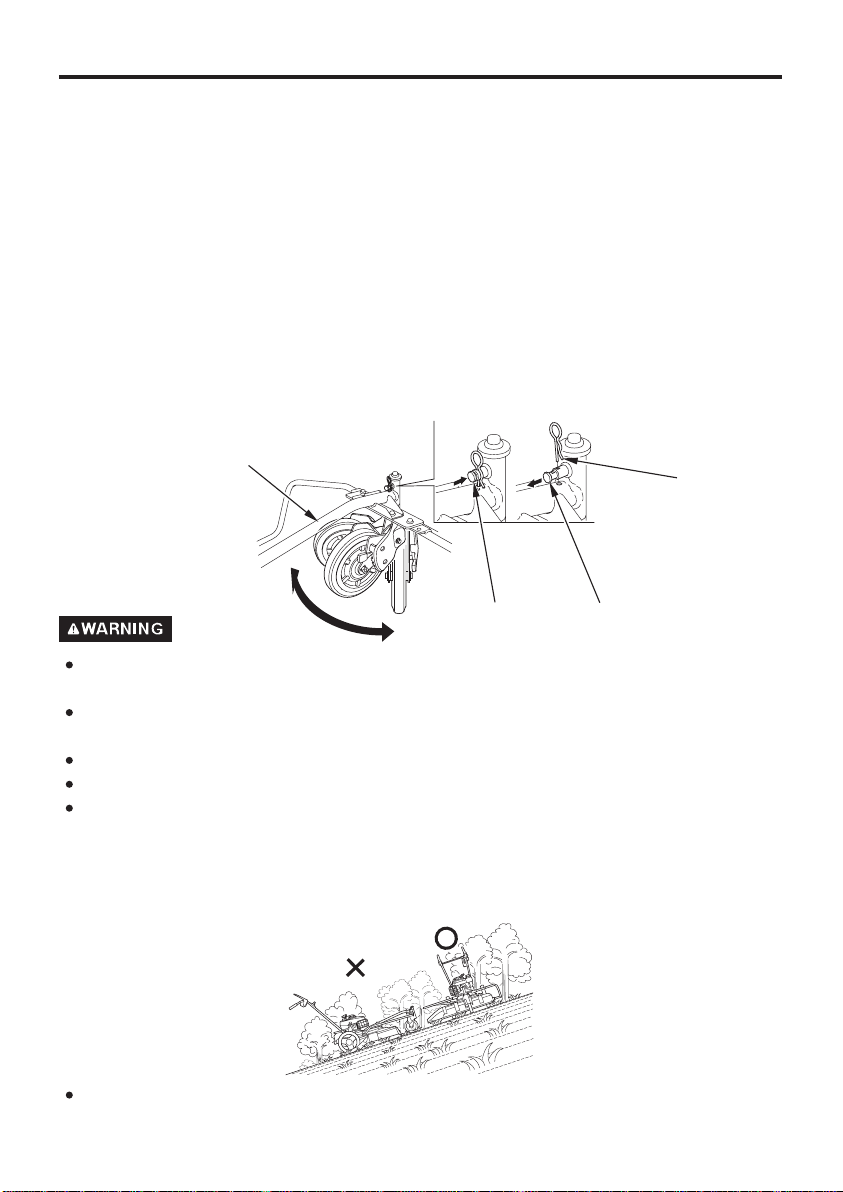
MOWING8.
On slopes
When mowing on a slope, be sure to lock the front wheel securely with
the wheel lock pin so that it cannot move from side to side. To ease
mowing on a slope, it is recommended to equip an optional brake
system (EE type) or to use a mower that is equipped with the system
as standard (EBE type).
To lock the wheel:
Position the front wheel so it is right beneath the wheel stays. Remove
the clip and press the lock pin into place. If difficulty is encountered in
inserting the lock pin, move the wheel right or left to align the pin hole.
Be sure to install the clip securely.
NORMAL (FREE)
FRONT WHEEL STAY
TO LOCK LOCK PIN
CLIP
When mowing on a slope, cut across the slope (at equally spaced
intervals) rather than up and down it.
Be very careful when changing the direction of the weed mower on
a slope.
Do not use the weed mower on a slope of more than 20°.
Always reduce speed on a slope.
On an ascending slope, it may happen that the mower does not go
back, due to locking of wheels, even if the drive clutch lever is
released. In this case, unlock the wheels by slightly pressing the
mower forward. If you are not careful doing this, the mower may
move abruptly causing you danger.
When mowing on an uneven surface, always reduce the ground
speed, grip the mower’s handles firmly and watch your step.
35
Page 38
<>
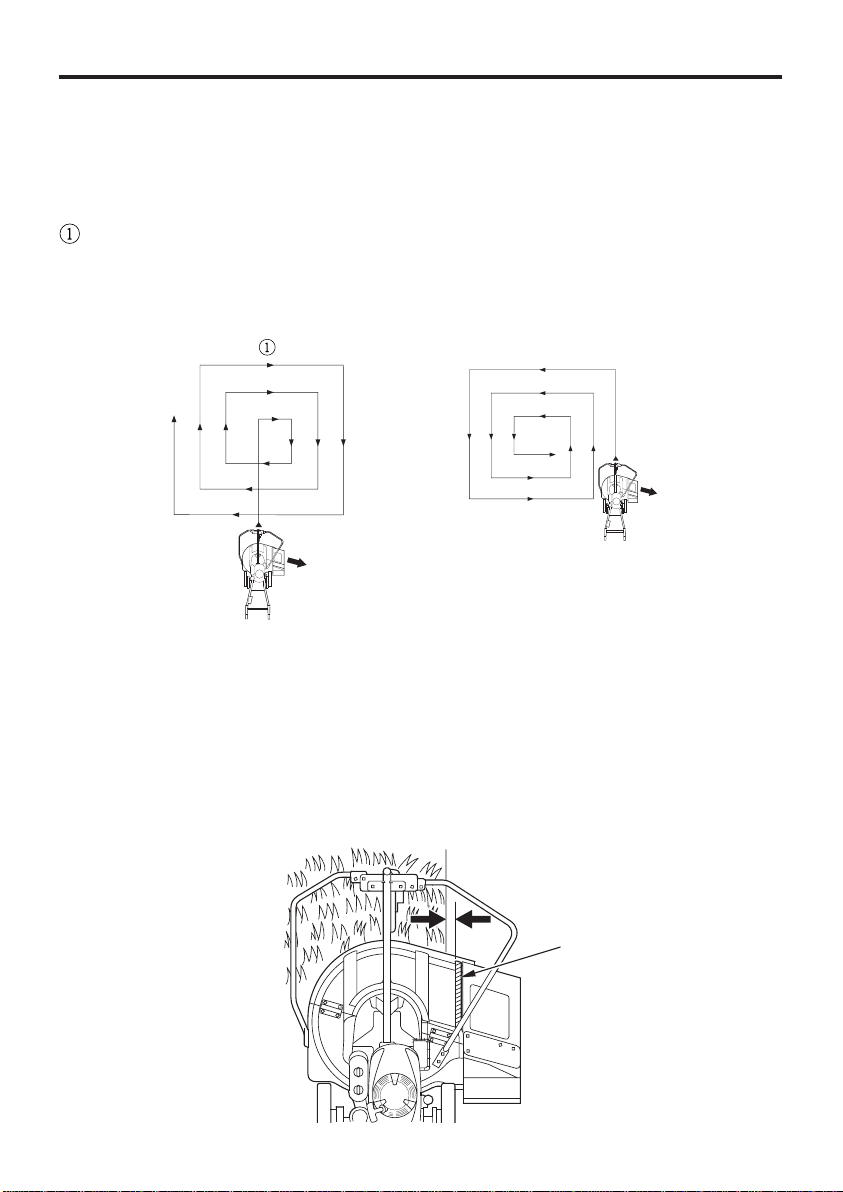
Cutting pattern
In order to discharge the cuttings as efficiently as possible, use one of
the following recommended patterns.
(CLOCKWISE)
*
When using this pattern, the mower will begin to discharge the
*
cuttings more efficiently after it has cleared the central area.
(COUNTERCLOCKWISE)
Discharge
direction
Disch
arge direction
When mowing under a tree, or near a fence or hedge, only grip the
blade clutch lever and push the mower by hand.
<>
Cutting width
The mower will cut well up to a point 50 mm from the rid on the
housing. Use this point as a guideline for lining up the mower with the
area you want to cut thoroughly.
36
5500 mmmm
RIB
Page 39
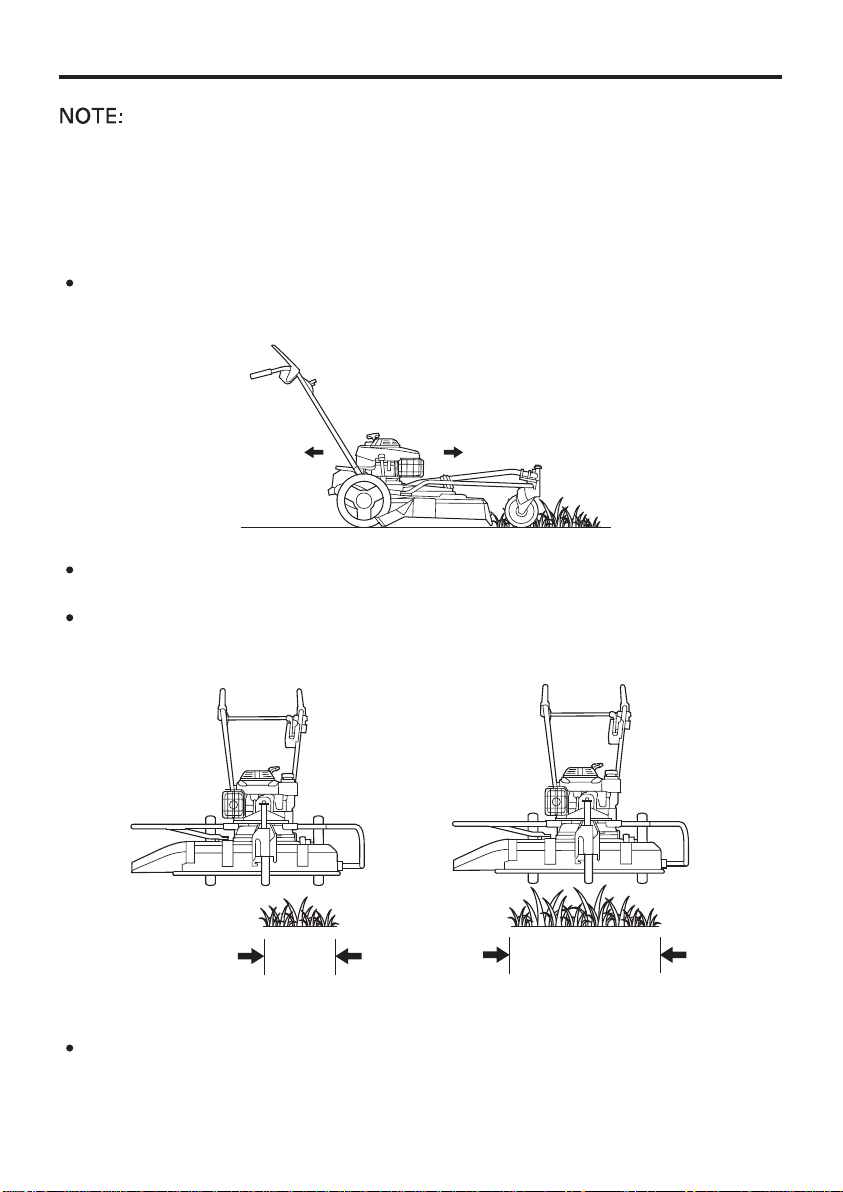
When mowing, it is important to keep the blade turning rapidly. Be
sure to take the type of grass and the nature of the terrain into account
when selecting engine speed and transmission settings.
If the engine slows down while mowing, use one of the following
procedures.
Release the drive clutch lever, and wait for the engine to regain
operating speed before proceeding.
Push the mower by hand at a speed that will not cause the engine to
slow down.
Reduce the width of the cutting path.
Example Half cutting width Full cutting width
WIDTH WIDTH
Increase the cutting height (See page ).30 31
−
37
Page 40
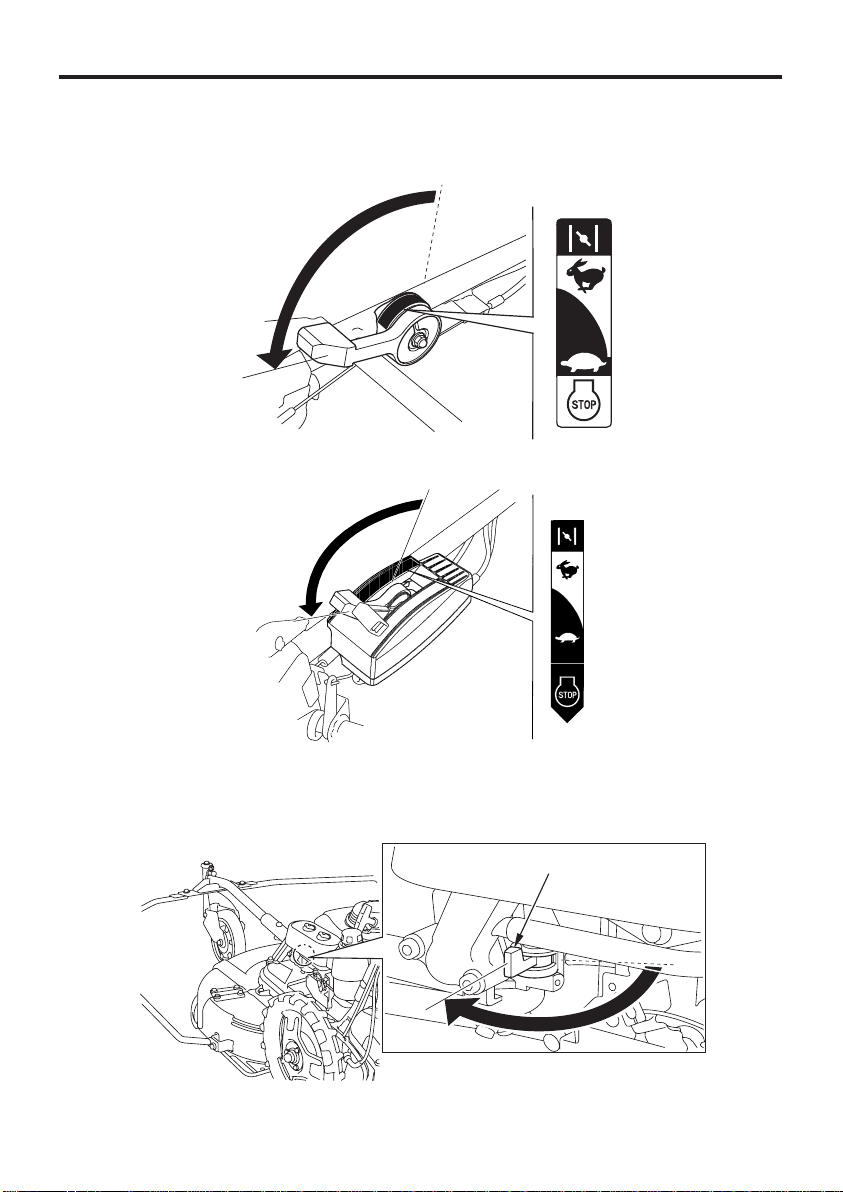
STOPPING THE ENGINE9.
Release both clutch levers.
1.
Move the throttle lever to STOP.
2.
UM536
·····
STOP
UM616
Move the fuel valve to the OFF position.
3.
OOFFFF
38
EL VALVE
FU
·····
STOP
Page 41

MAINTENANCE
10.
Before performing any maintenance, stop the engine and remove the
spark plug cap to be certain the engine will not start accidentally.
Use only genuine Honda parts or their equivalent for maintenance or
repair. Replacement parts which are not of equivalent quality may
damage the mower.
Periodic inspection and adjustment of the Honda UM536/UM616 are
essential if high level performance is to be maintained. Regular
maintenance will also help to extend service life. The required service
intervals and the kind of maintenance to be performed are described
in the chart on the following page.
For longer service and efficiency, keep the underside of the mower
housing clean and free of accumulated grass clippings by washing it
down with a hose after use and/or cleaning it with a wire brush and
scraper.
39
Page 42
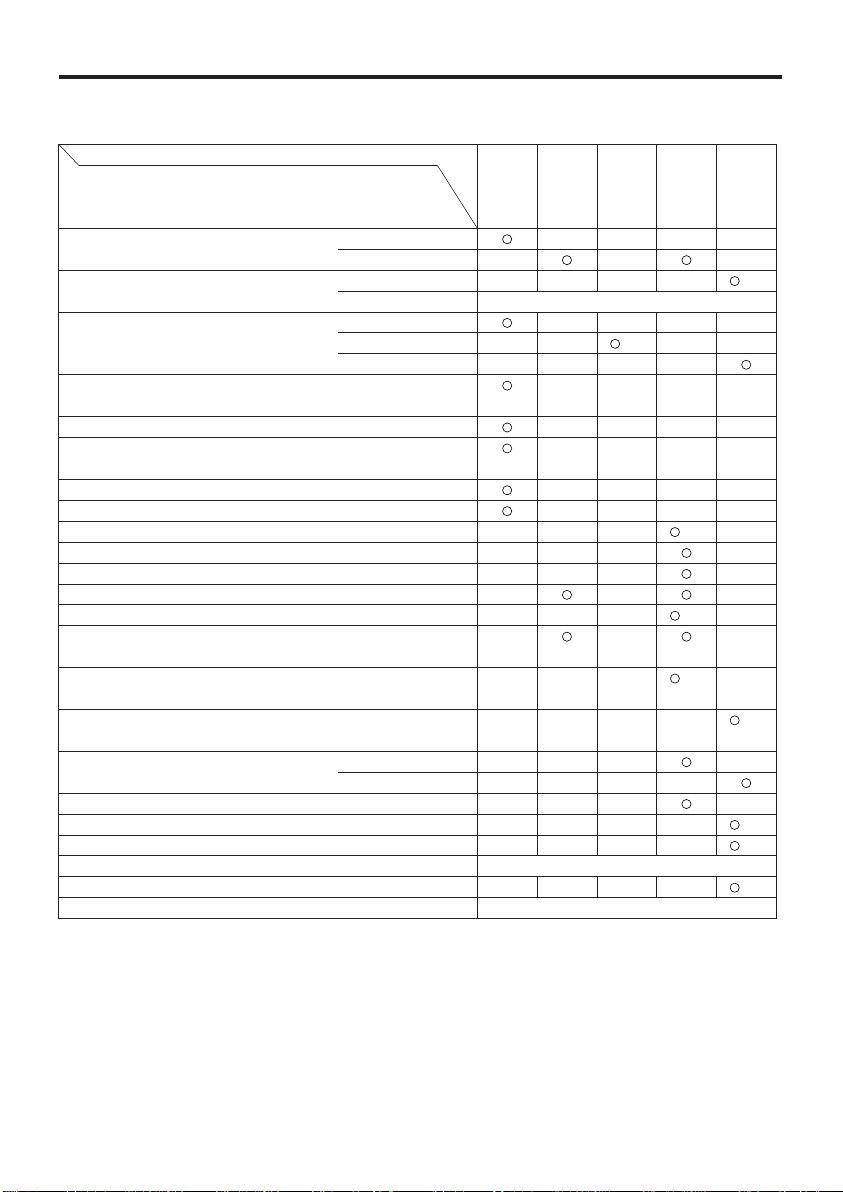
Maintenance schedule
REGULAR SERVICE PERIOD
ITEM
Perform at every indicated month or operating
hour interval, whichever comes first.
Engine oil
Transmission oil (UM616)
Air cleaner
Blade and blade holder bolt
tightness check blade condition
Side protector rubber
Side rubber &
discharge adaptor
Rear protector rubber
Outer surface under housing
Blade belt
Blade clutch cable
Drive clutch cable (UM536)
Shift cable (UM616)
Throttle cable
Brake cable
(Brake type)
Drive clutch lever cancel system
(Brake type)
Brake drum and brake shoe
lining wear (Brake type)
Spark plug
Spark arrester (optional parts)
Idle speed
Valve clearance
Combustion chamber
Fuel tank & filter
Fuel line
(3)
Check level
Change
Check level
Change
Check
Clean
Replace
Check
Check
Check
Check
Clean
Check-adjust
Check-adjust
Check-adjust
Check-adjust
Check-adjust
Check-adjust
Check-adjust
Check
Check-adjust
Replace
Clean
Check-adjust
Check-adjust
Clean
Clean
Check
Every 6
Every 3
First
Months
Months
Month
Each
or
Use
Every 2 years (Replace if necessary)(2)
or
100 Hrs.
50 Hrs.
20 Hrs.
Every 1000 hrs. (2)
(1)
After every 250 hrs. (2)
Every
Year
or
or
200 Hrs.
(2)
(2)
(2)
(2)
(2)
(2)
(2)
(2)
(1)
Service more frequently when used in dusty areas.
(2)
These items should be serviced by your servicing dealer, unless you have the proper tools
and are mechanically proficient. Refer to Honda shop manual for service procedures.
(3)
For commercial use, log hours of operation to determine proper maintenance intervals.
40
Page 43
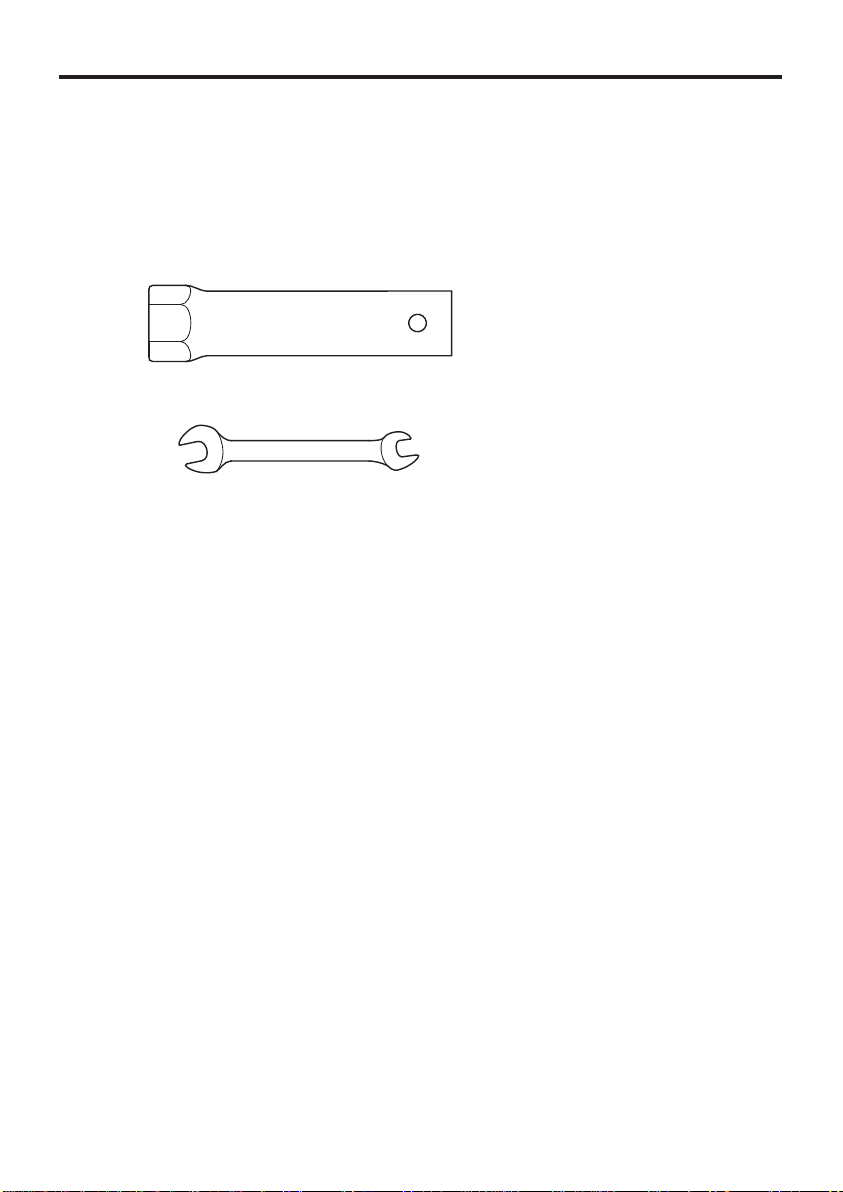
Tool kit
The tools supplied are necessary for performing some periodic
maintenance, simple adjustments and repairs.
SPARK PLUG WRENCH
×
10 12 mm WRENCH
41
Page 44
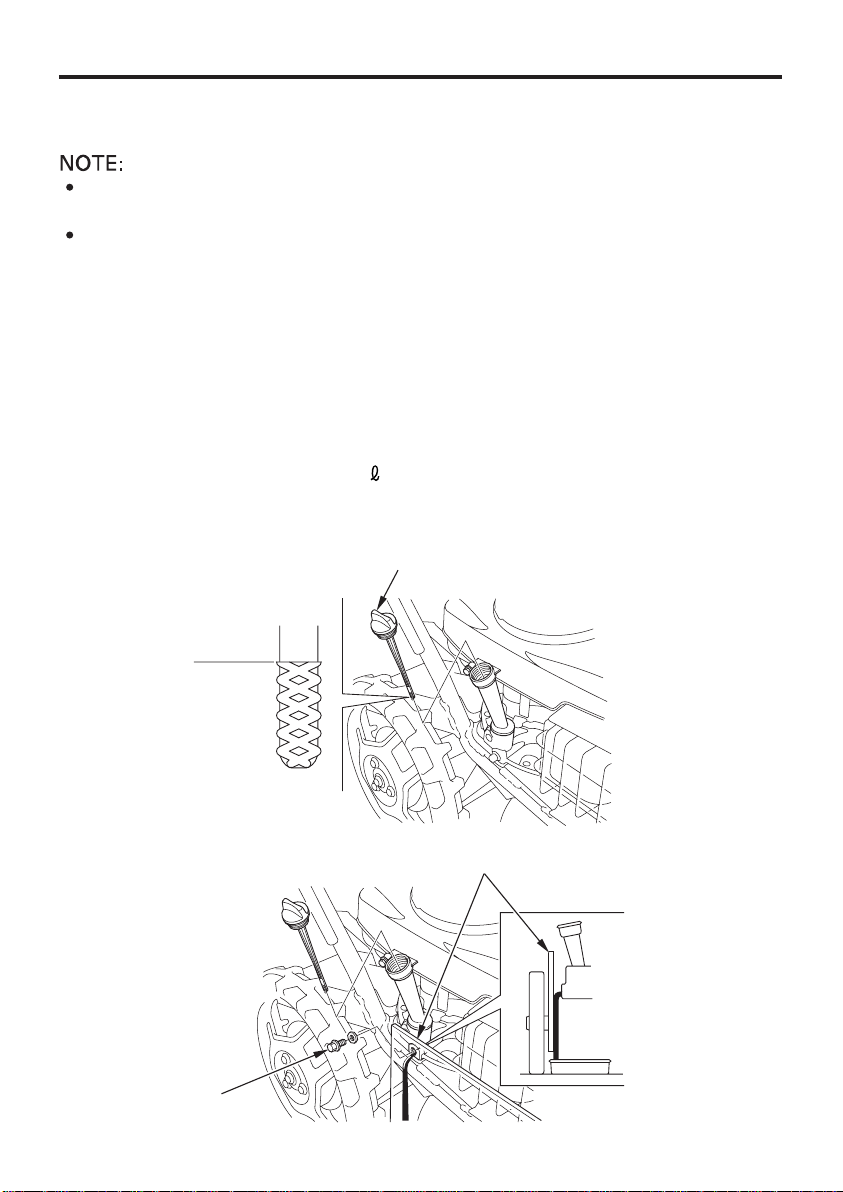
Engine oil change
1.
Drain the oil while the engine is still warm to assure rapid and
complete draining.
Before draining the oil, set the cutting height adjusting levers in the
highest position. Do not let the oil spill onto the rubber tires. Cover
the tires with a rag or wooden plate if necessary.
Remove the oil filler cap and the drain bolt, and drain the oil into a
1.
suitable container.
2.
Retighten the drain bolt securely.
3.
Refill to the upper level mark on the dipstick with the recommended
oil (see page ). Tighten the oil filler cap securely.
20
ENGINE OIL CAPACITY:
0.65
(0.69 US qt , 0.57 Imp qt)
Wash your hands with soap and water after handling used oil.
OIL FILLER CAP
UPPER OIL
LEVEL
PLATE
42
DRAIN BOLT
Page 45

Please dispose of used motor oil in a manner that is compatible with
the environment. We suggest you take it in a sealed container to your
local service station for reclamation. Do not throw it in the trash or
pour it on the ground.
43
Page 46
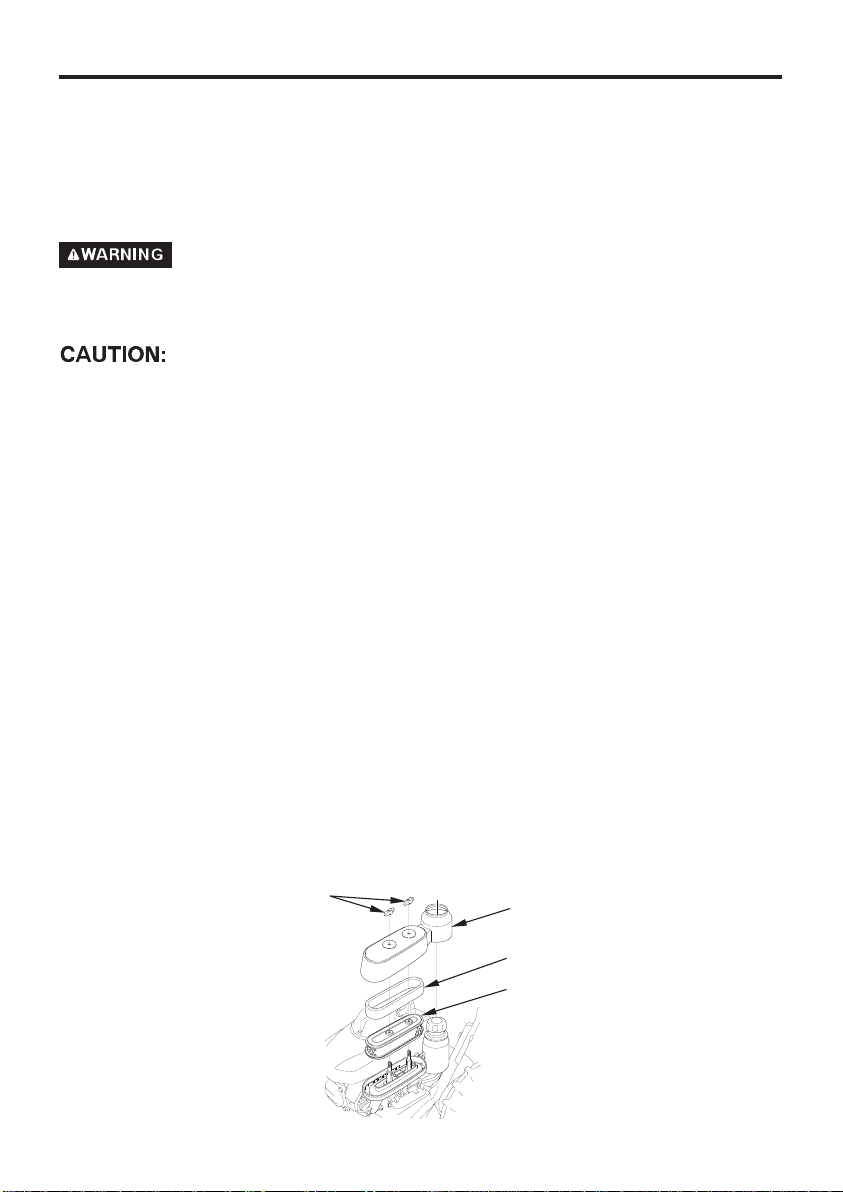
Air cleaner service
2.
A dirty air cleaner will restrict air flow to the carburetor. To prevent
carburetor malfunction, service the air cleaner regularly. Service more
frequently when operating the mower in extremely dusty areas.
Never use gasoline or low flash point solvents for cleaning the air
cleaner element. A fire or explosion could result.
Never run the engine without the air cleaner. Rapid engine wear will
result.
Inspection:
Remove the elements from their holder. Separate the foam and paper
elements of the engine side filter.
Carefully check the elements for holes or tears and replace if damaged.
Cleaning:
Foam element
Clean in warm soapy water, rinse and allow to dry thoroughly. Or
clean in high flashpoint solvent and allow to dry. Dip the element in
clean engine oil and squeeze out all the excess. The engine will smoke
during initial startup if too much oil is left in the foam.
Paper element
Tap the element lightly several times on a hard surface to remove
excess dirt, or blow compressed air through the filter from the inside
out. Never try to brush the dirt off; brushing will force dirt into the
fibers.
If you cannot unclog the element with the above procedure, replace it.
WING NUTS
AIR CLEANER COVER
FOAM ELEMENT
PAPER ELEMENT
44
Page 47
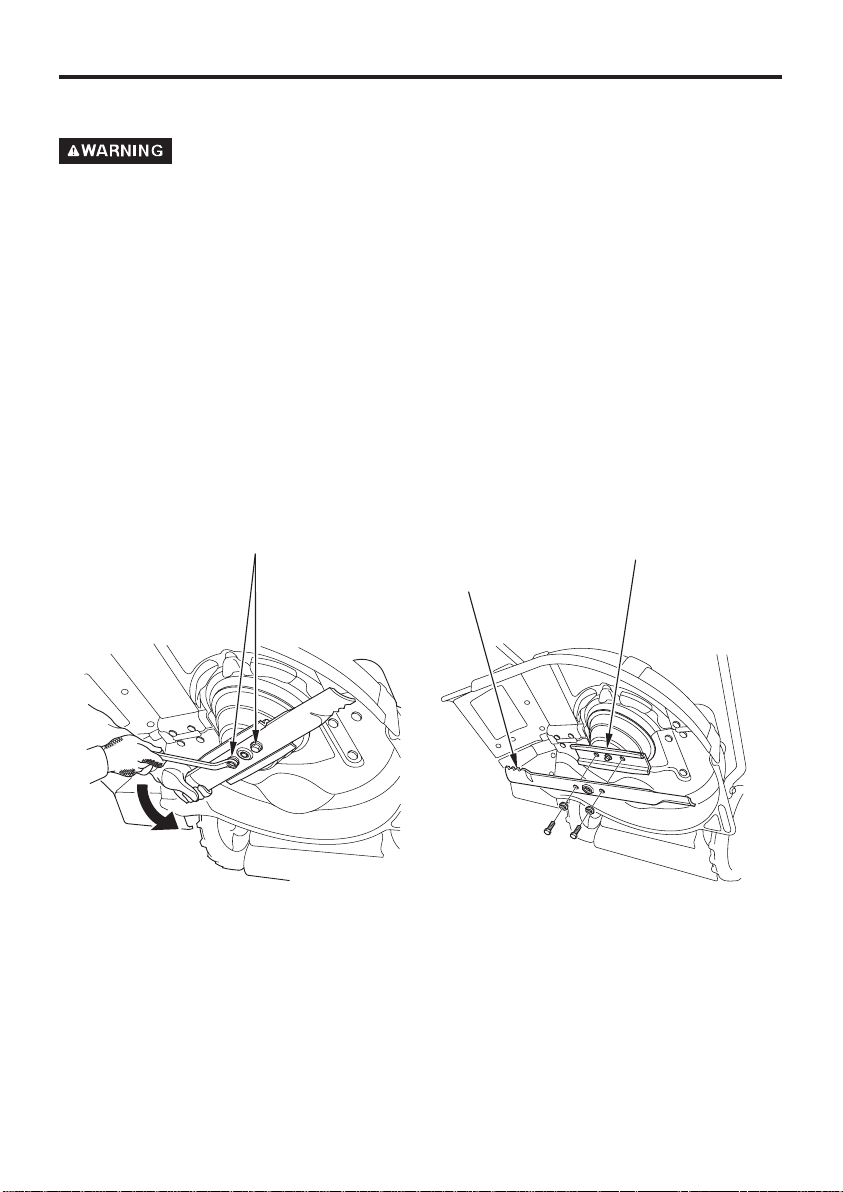
Blade replacement
3.
To avoid severe personal injury, disconnect the spark plug cap to
prevent accidental starting, and wear heavy gloves to protect your
hands from the cutter blade.
Removal:
Tilt the mower backward (see page ).
1.
Hold the blade firmly, and remove the two blade bolts.
2.
Remove the blade.
3.
24
The illustrations show the mower with the blade bolt positions and
with the bolts removed.
BLADE BOLTS
BLADE HOLDER
BLADE
45
Page 48
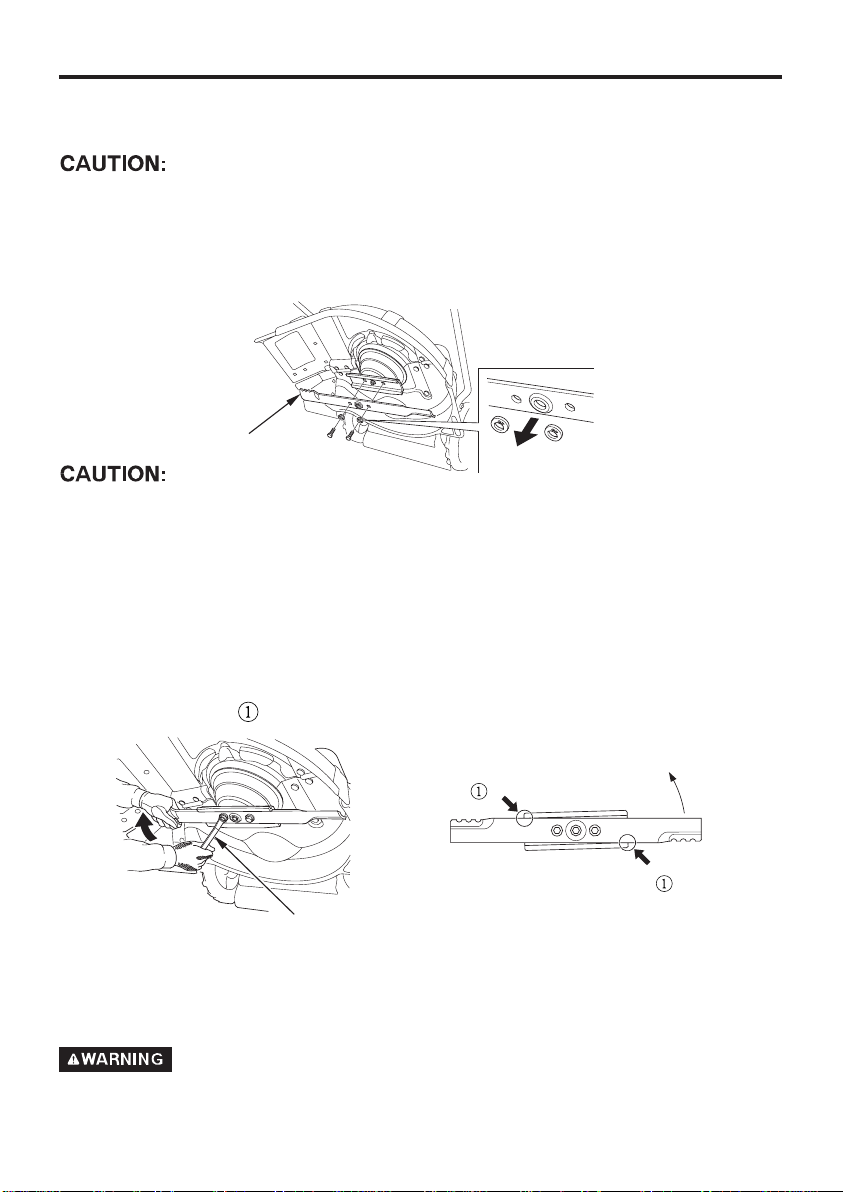
Installation:
Use a genuine Honda replacement blade or equivalent.
Clean dirt and grass from the blade, blade holder, and the inside of
1.
the mower deck.
Install the blade as described below.
2.
BLADE
OUTSIDE
The blade bolts are specially designed for this application and must
not be replaced with any other bolts.
Hold the end of the blade by hand, tighten the blade bolts to the
3.
specified torque.
Blade bolt torque:
(There should be no clearance between the blade and blade
(1)
54 N·m (5.5 kgf·m , 40 lbf·ft)
holder at the points indicated by arrows)
BLADE ROTATING DIRECTION
TORQUE WRENCH
After installing the blade, check that it does not interfere with the
4.
housing. If the blade contacts the housing, consult your authorized
Honda mower dealer.
A bent blade can be the cause of serious personal injury or accident.
46
Page 49
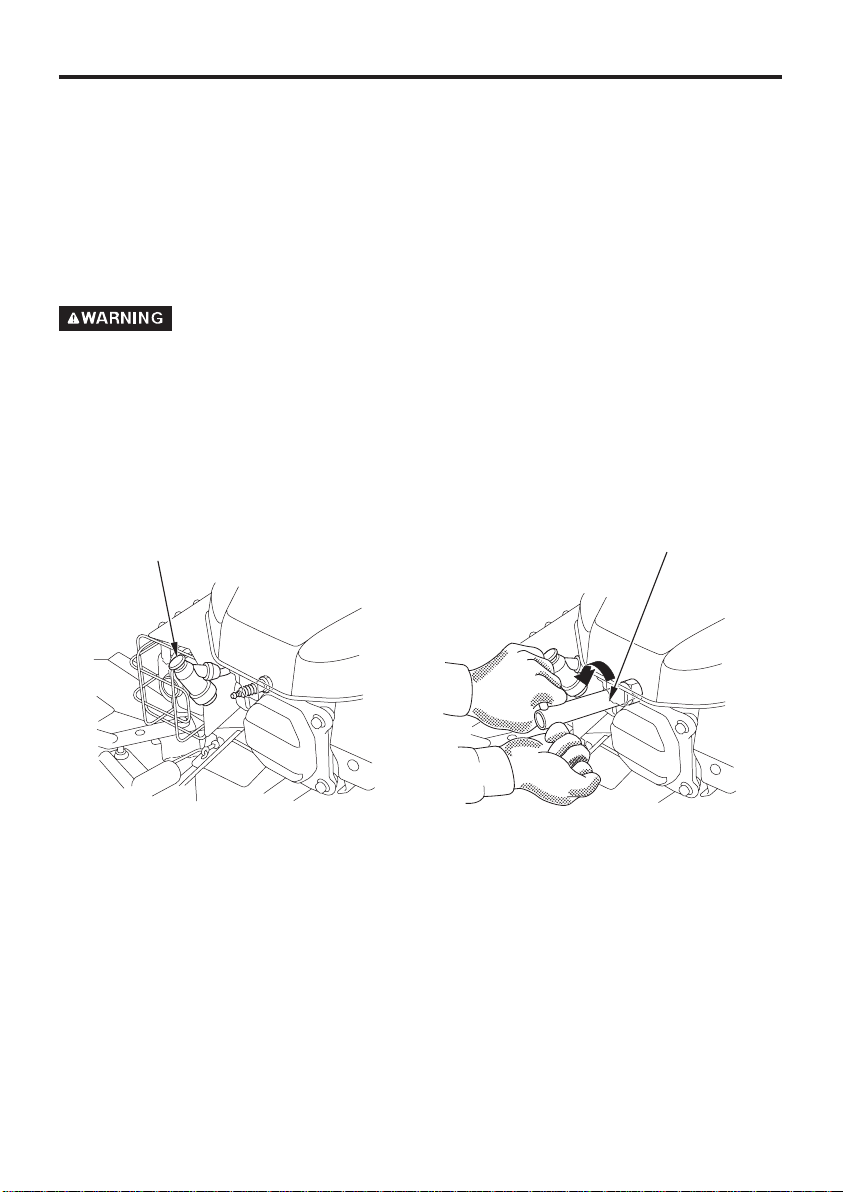
Spark plug service
4.
Recommended spark plug:
BPR5ES (NGK)
W16EPR-U (DENSO)
To ensure proper engine operation, the spark plug must be properly
gapped and free of deposits.
If the engine has been running, the muffler will be very hot, be careful
not to touch the muffler.
Remove the spark plug cap.
1.
Clean any dirt from around the spark plug base.
2.
Use a spark plug wrench to remove the spark plug.
3.
SPARK PLUG CAP
SPARK PLUG WRENCH
Visually inspect the spark plug. Discard it if there is apparent wear or
4.
the insulator is cracked or chipped. Clean the spark plug with a wire
brush if it is to be reused.
47
Page 50
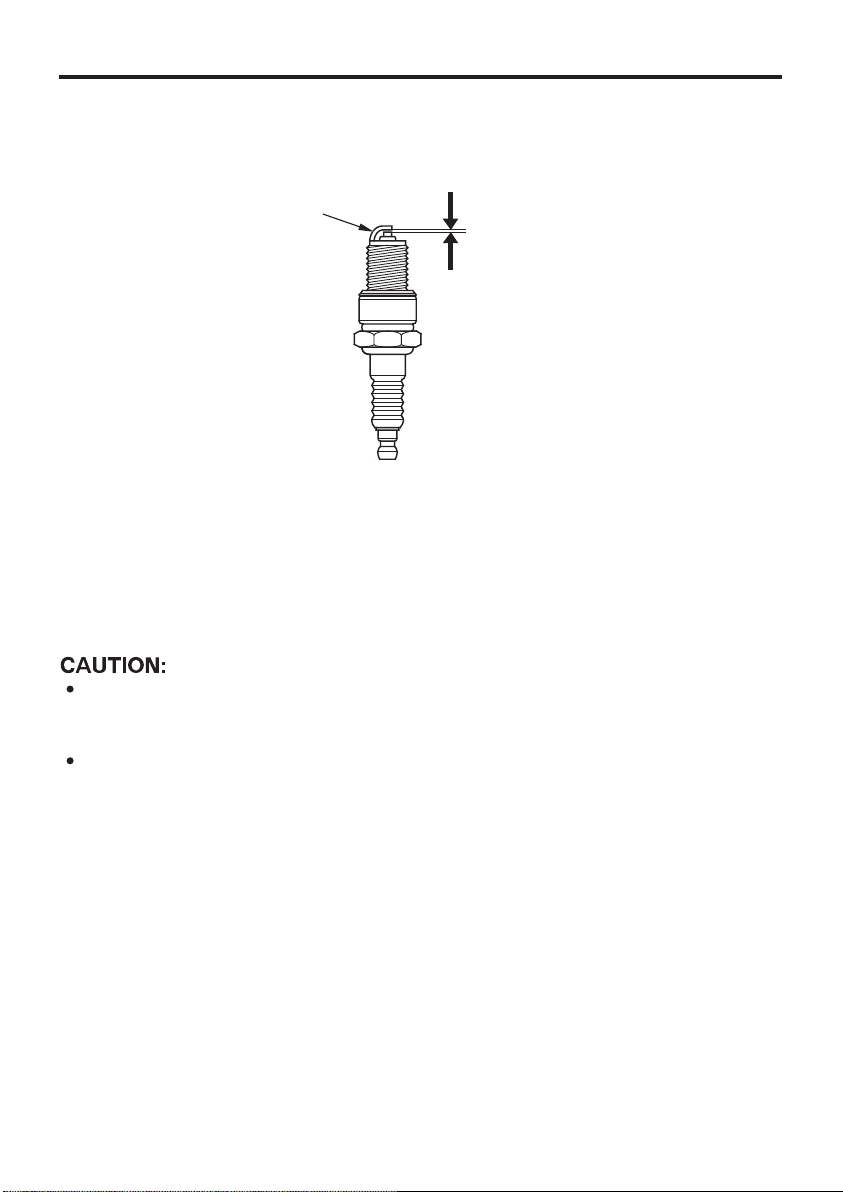
Measure the plug gap with a feeler gauge.
5.
Correct as necessary by carefully bending the side electrode.
The gap should be:0.70 0.80 mm (0.028 0.031 in)
−−
SIDE ELECTRODE
Thread the plug in by hand to prevent cross threading.
6.
After a new spark plug has been seated by hand, it should be
7.
0.70 0.80 mm
−
tightened 1/2 turn with a wrench to compress its washer.
If a used plug is being reinstalled, it should only require 1/8 to 1/4
turn after being seated.
The spark plug must be securely tightened. An improperly
tightened plug can become very hot and possibly damage the
engine.
Never use a spark plug with an improper heat range.
48
Page 51
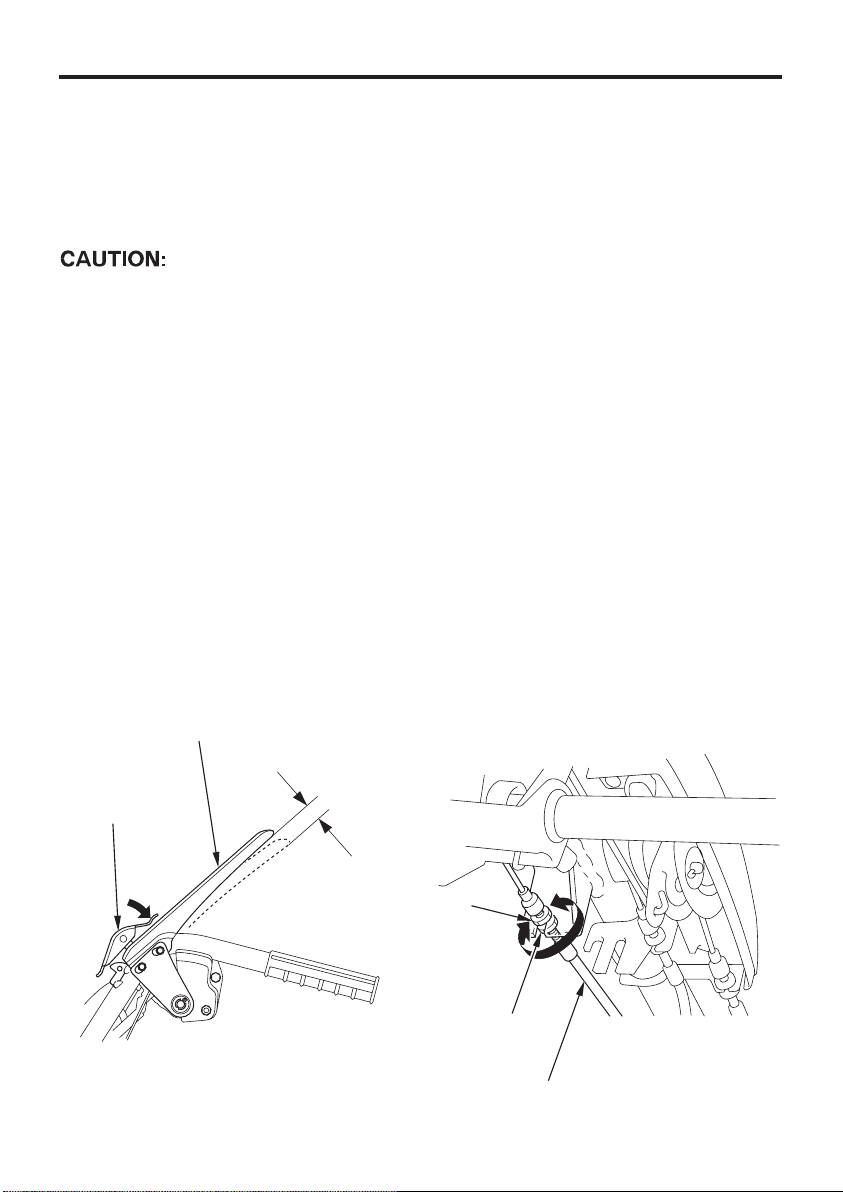
Blade clutch cable check and adjustment
5.
The blade drive belt will slip on the pulleys, or the blade clutch will not
be disengaged (the blades will not be stopped even if the clutch is
disengaged) if the blade clutch cable is not adjusted properly.
Adjust the cable when the lock lever is not returned to the LOCK
position completely. Premature belt life will result due to slippage
when the weed mower is operated with the lock lever not returned to
the LOCK position completely.
(Inspection and adjustment)
Inspect the blade clutch cable and adjust as necessary every 100 hours
of operation.
(Inspection)
Check the blade clutch lever free play at the tip of the lever. The correct
free play is:
−−
5.0 10.0 mm (0.20 0.39 in)
(Adjustment)
Loosen the lock nut and turn the adjust nut in or out until the correct
1.
free play is obtained.
Tighten the lock nut securely.
2.
BLADE CLUTCH LEVER
LOCK LEVER
FREE PLAY
LOCK NUT
ADJUST NUT
BLADE CLUTCH CABLE
49
Page 52
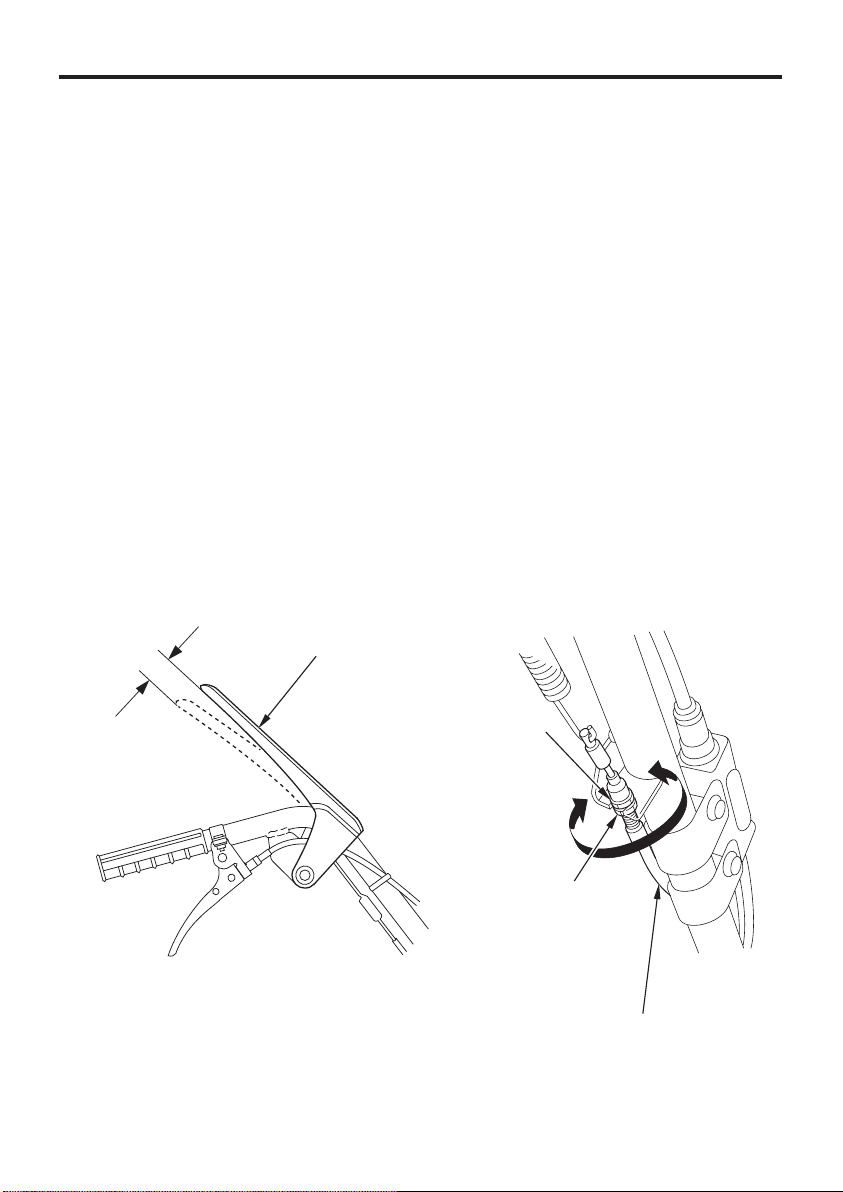
Drive clutch cable check and adjustment6. (UM536)
The drive clutch will slip or will not be disengaged if the clutch cable is
not adjusted properly.
(Inspection and adjustment)
Inspect the drive clutch cable and adjust as necessary every 100 hours
of operation.
(Inspection)
Check the drive clutch lever free play at the tip of the clutch lever. It
should be: 5.0 10.0 mm (0.20 0.39 in)
−−
(Adjustment)
Loosen the lock nut and turn the adjust nut in or out until the correct
1.
free play is obtained.
Tighten the lock nut securely.
2.
FREE PLAY
50
DRIVE CLUTCH LEVER
LOCK NUT
ADJUST NUT
DRIVE CLUTCH CABLE
Page 53
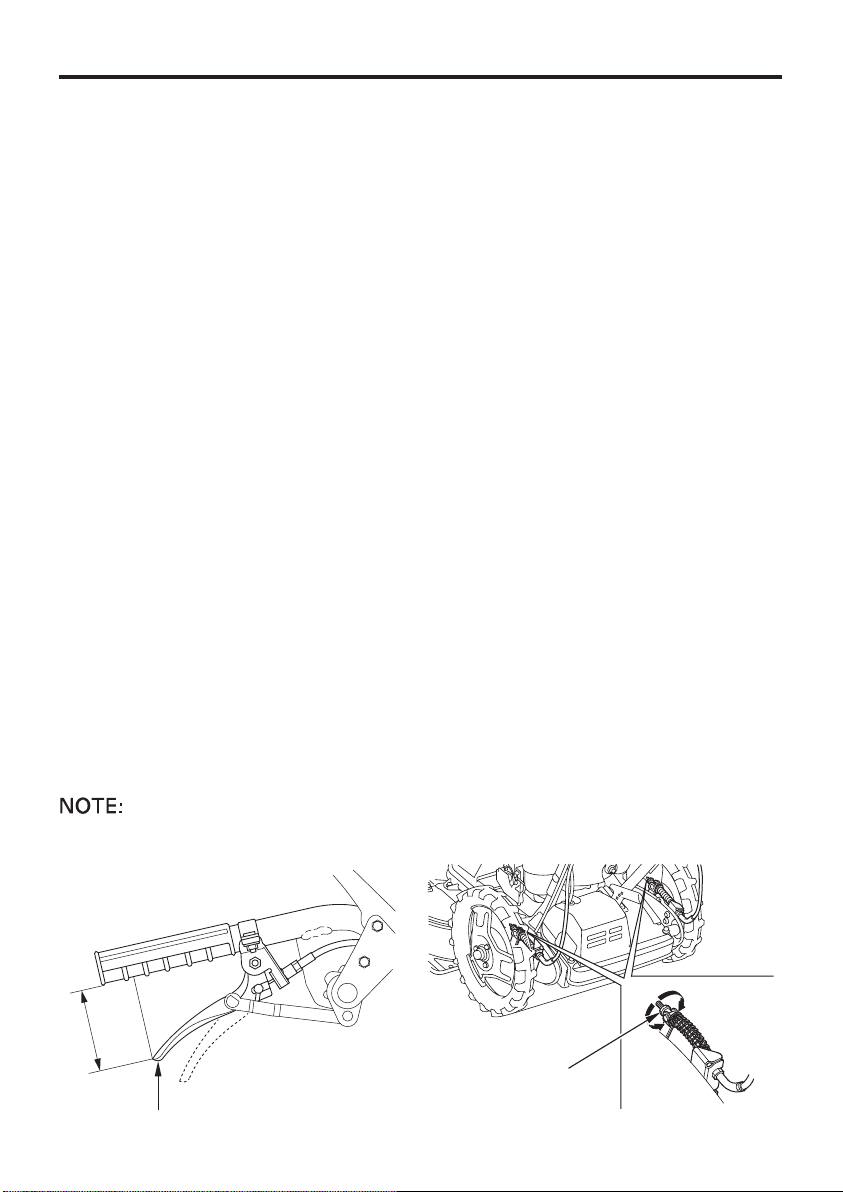
Brake cable check and adjustment
7. (EBE type)
The proper brake adjustment should always be maintained.
(Inspection and adjustment)
The brake lever should be inspected and adjusted when the first 20
hours of operation time has passed. Thereafter, it should be inspected
every 100 hours.
(Inspection)
Perform this check on a dry, paved surface. Pull the handle cross bar
horizontally toward the rear with your left hand (do not raise the front
wheel off the ground), then squeeze the brake lever gradually until the
rear wheels lock. Measure the distance ‘‘L’’ at the point where the
wheels lock. The measurement from the tip of the brake lever to the
handle should be above:
35.0 mm (1.38 in)
Adjustment is necessary if distance is below:
35.0 mm (1.38 in)
(Adjustment)
Make adjustments by turning the adjusting nuts on both brake arms
equally.
−−
Distance (L):
50.0 60.0 mm (1.97 2.36 in)
Apply the brake several times and check for free rotation after the
brake lever is released.
If proper adjustment cannot be obtained by this method, see your
authorized Honda dealer.
L
ADJUST NUT
BRAKE LEVER
51
Page 54
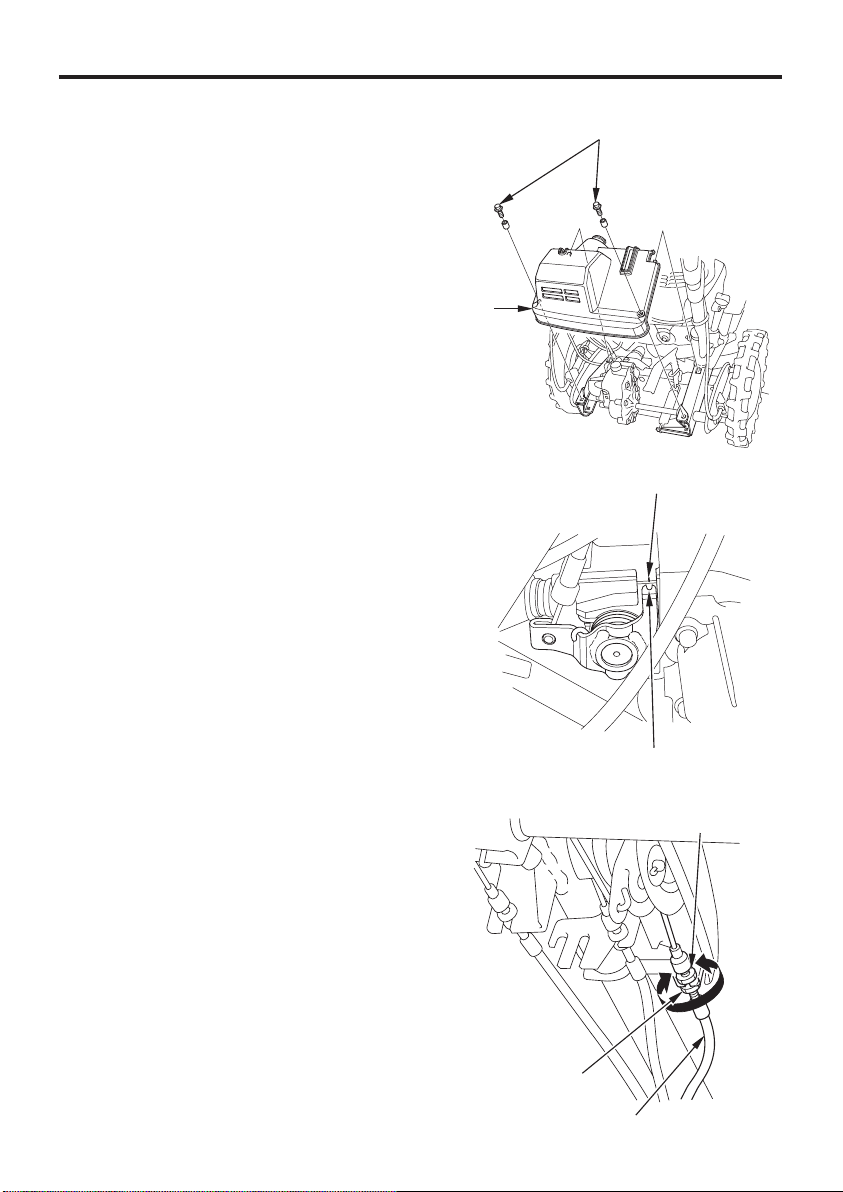
Shift cable check and adjustment (UM616)8.
Remove the bolts from the
1.
transmission cover, using a 10
mm socket wrench. Remove the
transmission cover.
TRANSMISSION
COVER
While holding the drive clutch
2.
lever, check the position of the
transmission arm.
The notch on the transmission
arm should align with the index
mark on the transmission case.
If adjustment is necessary, loosen
3.
the shift cable lock nut with a 10
mm wrench, and move the adjust
nut up or down as required.
Tighten the lock nut, and recheck
transmission arm alignment.
BOLTS
INDEX MARK
After the transmission arm is
4.
precisely aligned, start the engine
and operate the drive clutch lever.
Check to be sure the drive clutch
lever operates properly. If the
drive clutch lever does not
operate properly after the cable is
correctly adjusted, take the
mower to an authorized Honda
weed mower dealer for repair.
52
TRANSMISSION
ARM NOTCH
LOCK NUT
ADJUST NUT
SHIFT CABLE
Page 55
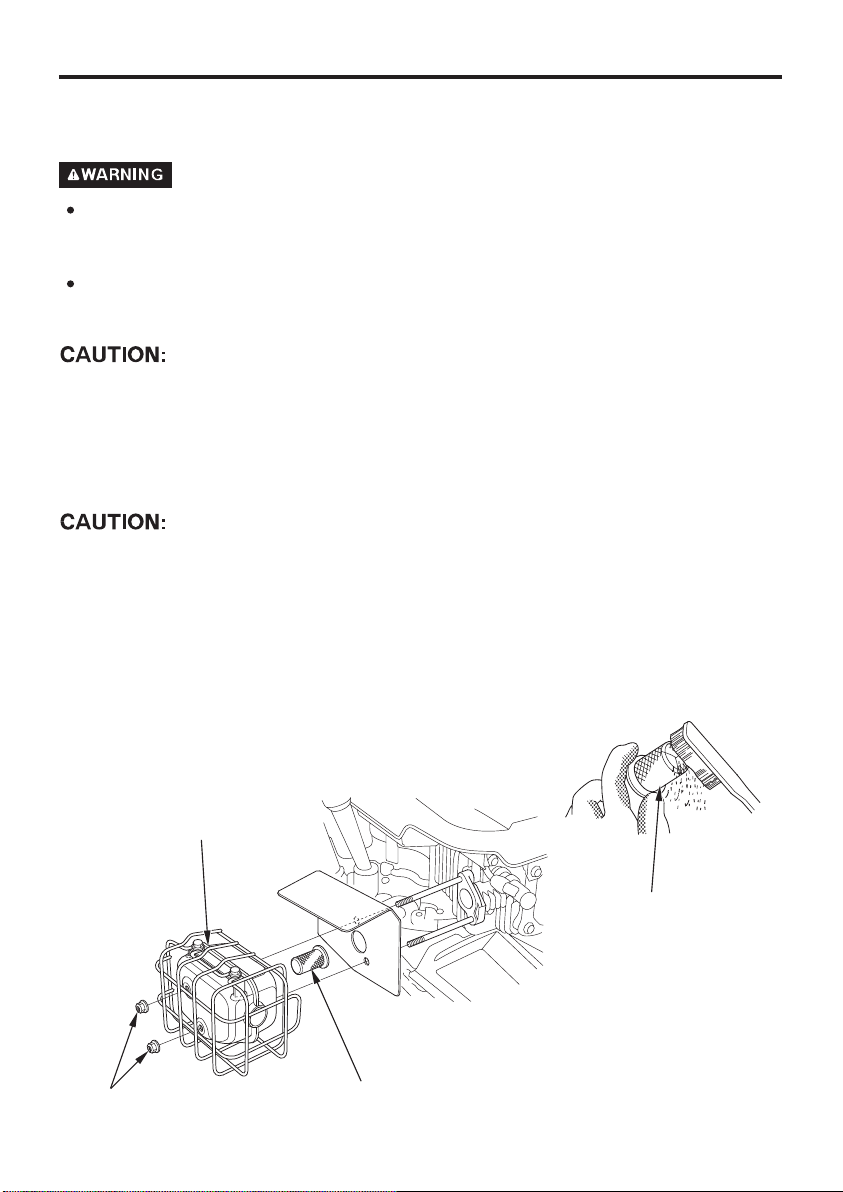
Spark arrester maintenance (Optional parts)9.
It is illegal in some areas to operate an engine without a spark
arrester. Check local laws and regulations before operating. An
optional spark arrester is available from Honda dealers.
If the mower has been running, the muffler will be very hot. Allow it
to cool before proceeding.
The spark arrester must be serviced every 100 hours to maintain its
efficiency.
Remove the two 6 mm nuts and remove the muffler.
1.
Remove the spark arrester from the muffler.
2.
Be careful not to damage the spark arrester screen.
Check for carbon deposits around the exhaust port and the spark
3.
arrester, and clean if necessary.
Install the spark arrester in the muffler.
4.
Install the muffler then tighten the two 6 mm nuts securely.
5.
MUFFLER
6 mm NUT (2)
SPARK ARRESTER
SCREEN
SPARK ARRESTER
(Optional)
53
Page 56
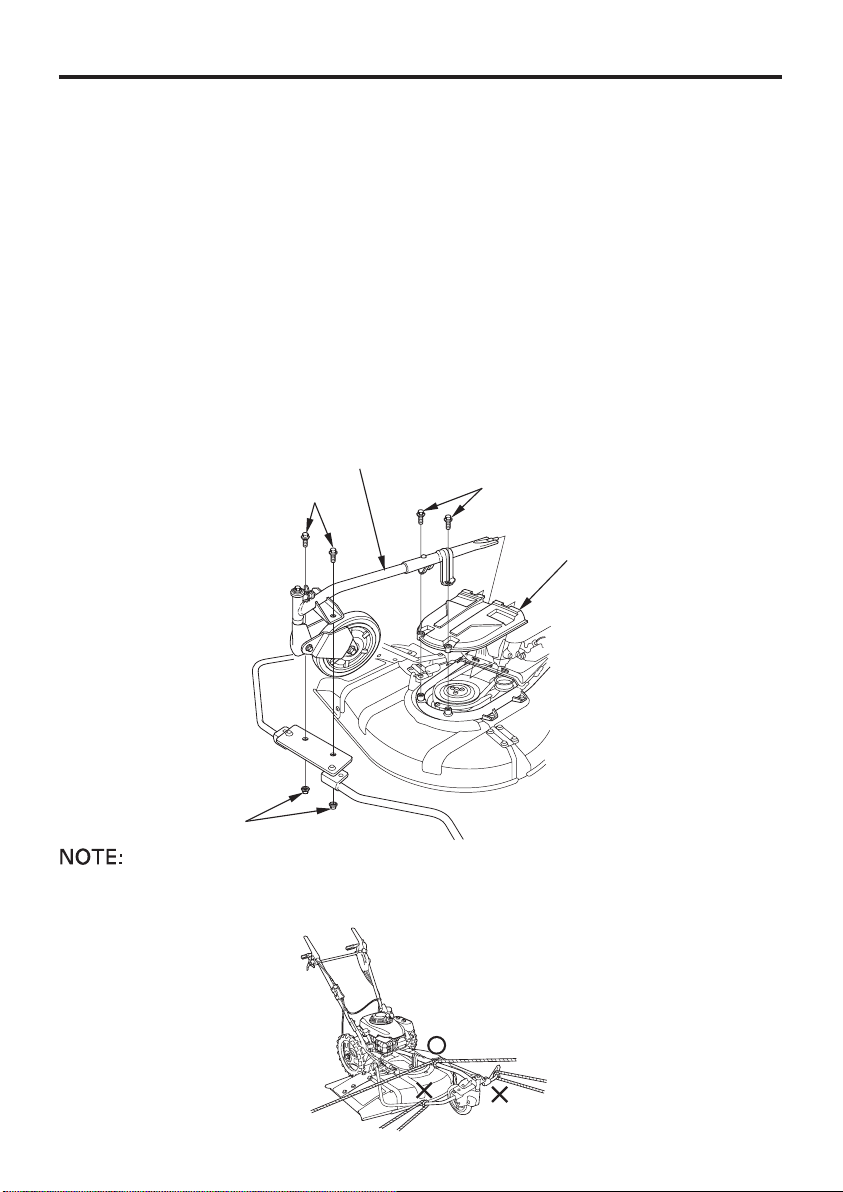
TRANSPORTING/STORAGE11.
Transporting
To prevent fire hazard, turn the fuel valve to OFF and drain fuel from
the fuel tank before loading the weed mower on a trailer for
transportation.
Cleaning of parts behind belt cover.
When the mower is to be stored or left standing for an extended
period of time, remove the belt cover and clean the parts behind the
cover as follows:
Remove the two 8 14 mm bolts, two 8 16 bolts and 8 mm
1.
nuts securing the front wheel stay, and remove the stay and belt
cover.
−
Clean off the dirt and grass from the brake, driven pulley,
2.
tensioner roller and belt.
×
816mmBOLT(2)
××−
FRONT WHEEL STAY
×
814mmBOLT(2)
BELT COVER
8 mm NUT (2)
Do not attach a rope to the foot guard bar to secure it to the trailer or
truck bed for transportation.
54
Page 57
Preparation for storage
If the weed mower has been running, the engine and muffler will be
very hot; allow them to cool before proceeding.
The following steps should be taken to protect the weed mower
whenever it will be stored for longer than 30 days.
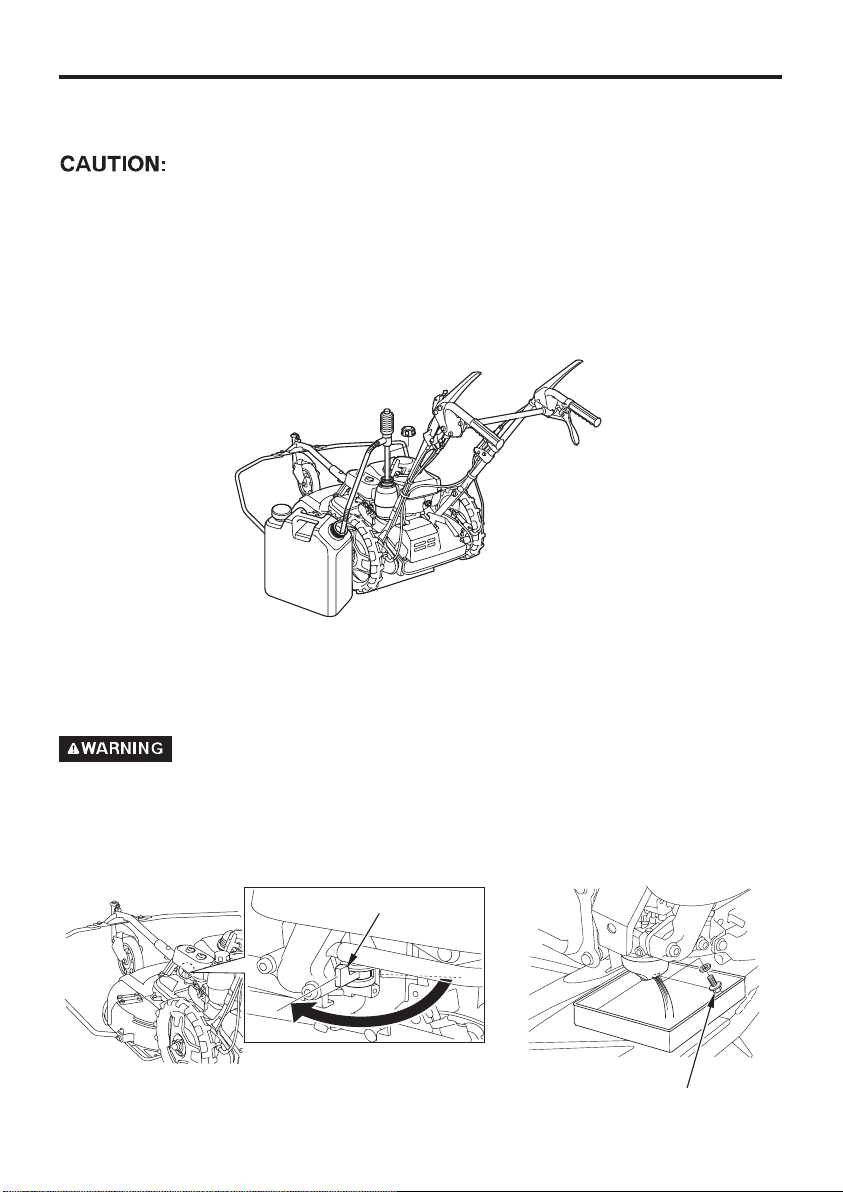
Drain all gasoline from the fuel tank into an approved gasoline
1.
container.
Turn the fuel valve ON, loosen the carburetor drain bolt, and drain the
fuel into an approved gasoline container. After draining, tighten the
drain bolt securely. Turn the fuel valve OFF.
Gasoline is extremely flammable and explosive under certain
conditions. Do not smoke or allow flames or sparks in the area.
FUEL VALVE
OOFFFF
DRAI
N BOLT
55
Page 58
Change the engine oil (see page ).
2.
42
If the weed mower will be stored for longer than 3 months, remove the
spark plug and pour three tablespoons (approximately 1 oz.) of clean
motor oil into the cylinder. Pull the recoil starter rope gently to
distribute the oil, and then reinstall the spark plug.
Clean the air cleaner (see page ).
3.
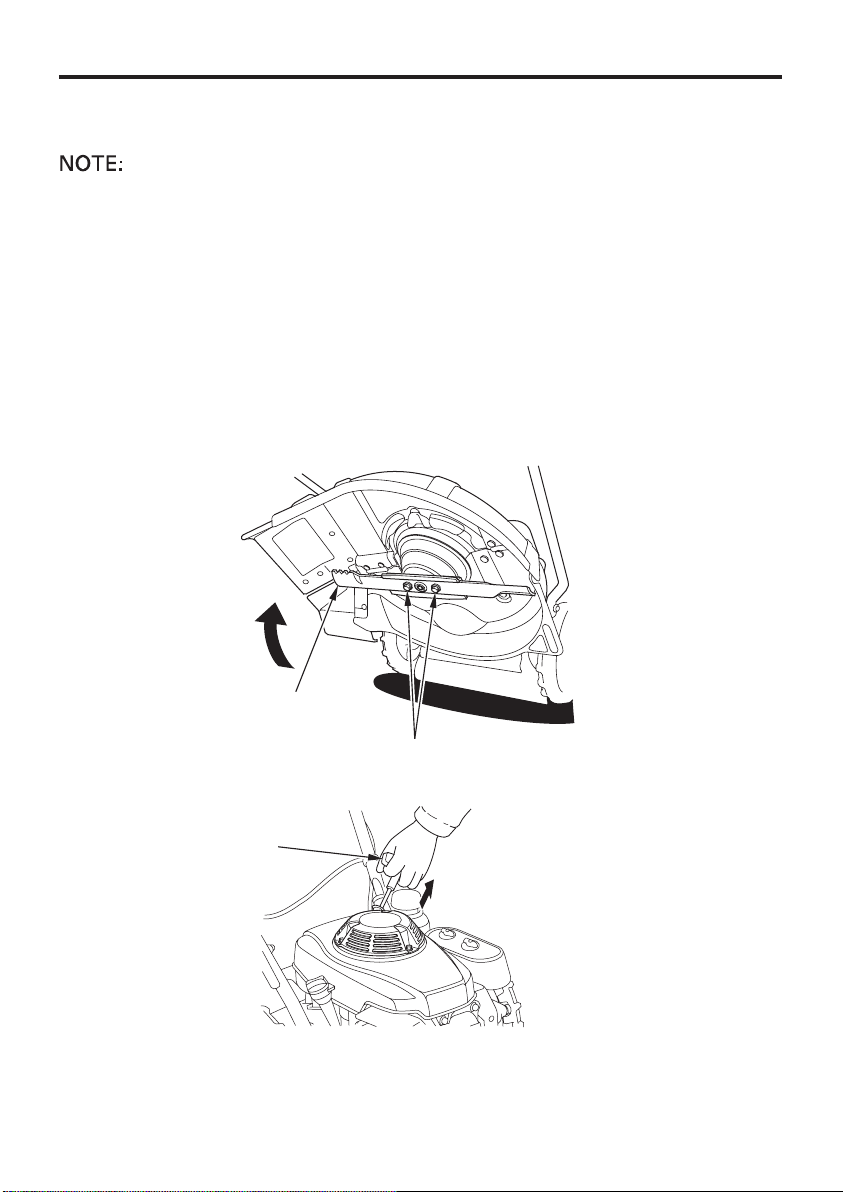
Clean the cutting blades and the various other parts of the weed
4.
44
mower, then check nuts and bolts, etc., for tightness. Coat the
cutting blade with engine oil.
If the paint has come off the inside of the blade cover, remove rust
5.
from such portions, and apply a coating of rust prevention.
BLADE
BLADE BOLTS
Pull the starter grip until resistance is felt.
6.
STARTER GRIP
Place a cover over the weed mower or store it in a well-ventilated
7.
location with a roof.
56
Page 59
Engine fails to start:
No fuel.
1.
Spark plug faulty or
2.
improperly gapped.
Spark plug cap loose or
3.
disconnected.
Fuel not reaching
4.
carburetor.
Engine loses power:
Spark plug faulty or
1.
improperly gapped.
Engine overloaded.
2.
Engine overheats:
Low engine oil level.
1.
Spark plug improperly
2.
gapped.
TROUBLESHOOTING12.
Add fuel.
Regapplugorreplace(seep. ).
Check spark plug cap.
Check the position of the fuel valve
(see p. ). If that’s not the problem,
see your authorized Honda dealer.
Regap plug or replace. (see p. ).
Shift to lower speed.
Fill with recommended oil
(see p. ).
Regapplugorreplace(seep. ).
27
20
47
47
47
Erratic operation:
Dirty fuel.
1.
Dirty air cleaner elements.
2.
Spark plug faulty or
3.
improperly gapped.
Excessive vibration:
Loose blade or engine
1.
mounting hardware.
Blade damaged.
2.
Uneven mowing:
Dull blades.
1.
Blade does not rotate or stop:
Blade belt worn or broken. See your authorized Honda dealer.
1.
See your authorized Honda dealer.
Clean air cleaner elements.
(see p. ).
Regapplugorreplace(seep. ).
Retighten blade bolts or engine
mounting hardware.
Replace blade as a set.
See your authorized Honda dealer.
44
47
57
Page 60
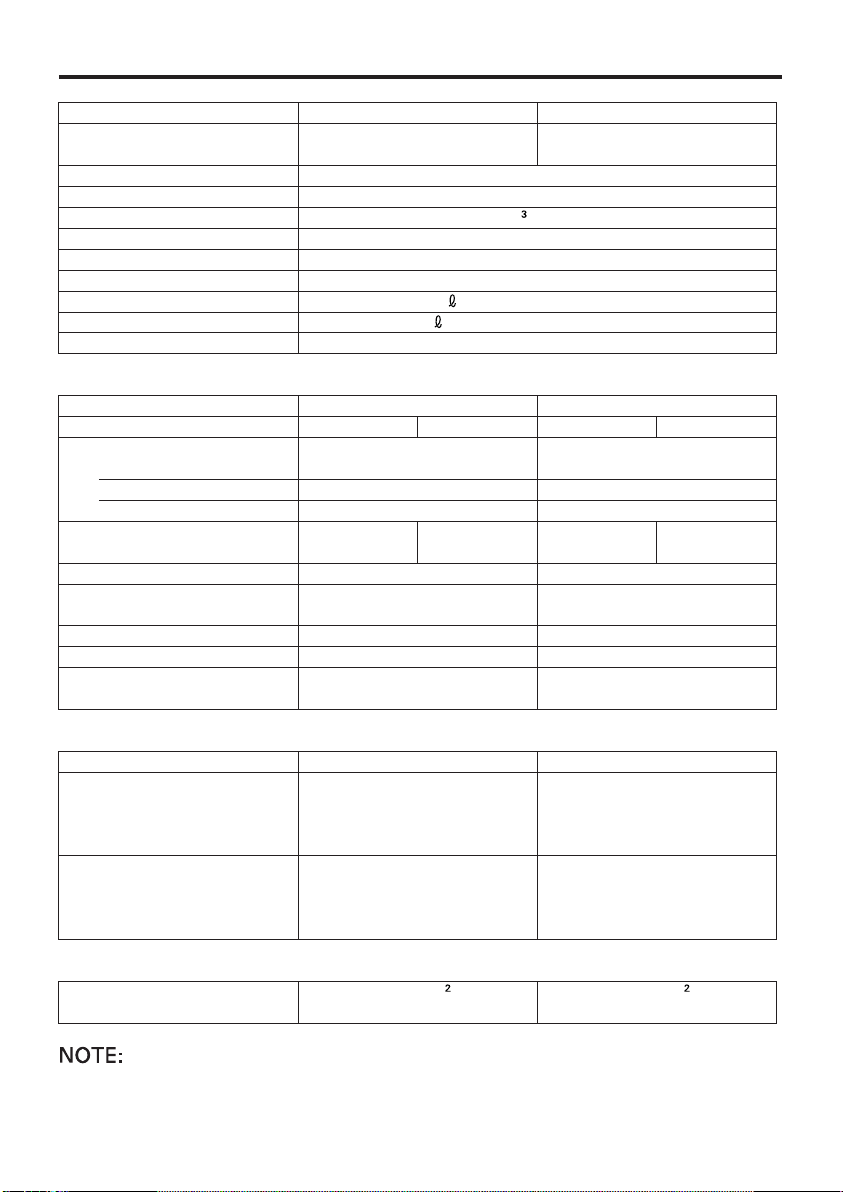
SPECIFICATIONS13.
MODEL
Power equipment
description code
ENGINE
Type
Displacement
Bore and stroke
Ignition timing
Ignition system
Engine oil capacity
Fuel tank capacity
Spark plug
Frame
MODEL
TYPE
Dimensions
Length
Width
Height
Dry mass
[Dry weight]
Cutting width
Cutting height
Shift lever
Blade belt
Travel speed
UM536 UM616
KZAG KZAH
GXV160
4-stroke, overhead valve, 1 cylinder
163 cm
××
68.0 45.0 mm (2.7 1.8 in)
Transistor magneto
(0.69 US qt , 0.57 Imp qt)
0.65
(0.42 US gal , 0.35 Imp gal)
1.6
BPR5ES (NGK) W16EPR-U (DENSO)
EE EBE EE EBE
1,770 mm (69.7 in)
860 mm (33.9 in)
1,080 mm (42.5 in)
62 kg
(137 lbs)
530 mm (20.9 in) 610 mm (24.0 in)
−− −−
15 75 mm (0.6 3.0 in) 15 75 mm (0.6 3.0 in)
(4 positions) (4 positions)
Direct change
SB-42
1st (0.5 m/sec), 2nd
(0.8 m/sec)
66 kg
(146 lbs)
(9.9 cu-in)
20° BTDC
,
Slow (0.4 m/sec) Fast
(1.0 m/sec)
UM616UM536
1,780 mm (70.1 in)
970 mm (38.2 in)
1,080 mm (42.5 in)
72 kg
(159 lbs)
Remote change
(168 lbs)
SB-40
76 kg
〜
Sound pressure levels
MODEL
Sound Pressure Level
PA
(L )
Tested by EN836
(At 3,600 rpm)
Guaranteed sound
power level (L )
Tested by 2000/14/EC
(At 3,600 rpm)
WA
UM536 UM616
85 dB 85 dB
98 dB 98 dB
Vibration
Tested by EN836
(At 3,600 rpm)
5.3 m/s
Specifications are subject to change without notice.
58
5.0 m/s
Page 61

For European
(COMPANY)
MAJOR Honda DISTRIBUTOR ADDRESSES
14.
TEL: FAX:ADDRESSNAME OF FIRM
Honda (U.K.) Limited
Honda Europe Power
Equipment S.A.
Honda Motor Europe
(North) GmbH.
Honda Belgium H.V.
Honda Italia Industriale
S.P.A.
Honda (Suisse) S.A.
Honda Nederland B.V.
Honda Austria G.M.B.H.
470 London Road, Slough,
Berkshire, SL38QY,
United Kingdom
Pole 45 Rue des Chataigniers
45140 Ormes
France
Sprendlinger, Landstraße 166
D-63069 Offenbach/Main
Germany
Wijngaardveld 1, 9300 Aalst
Belgium
Via della Cecchignola, 5/7
00143 ROMA
Route des Mouliéres 10
Case Postale Ch 1214
Vernier-Geneve, Switzerland
Nikkelstraat 17
2984 AM Ridderkerk
Netherlands
Honda Strasse 1 A-2351
Wiener Neudorf
Austria
Tel: 01753-590-590
Fax: 01753-590-000
Tel: 2-38-65-06-00
Fax: 2-38-65-06-02
Tel: 069-83-09-0
Fax: 069-83-09-519
Tel: 053-725-111
Fax: 053-725-100
Tel: 06-54928-1
Fax: 06-54928-400
Tel: 022-341-22-00
Fax: 022-341-09-72
Tel: 0180-491777
Fax: 0180-491889
Tel: 223-66-900
Fax: 223-66-4130
Honda Power
Equipment Sweden AB
Honda Produtos De
Força, Portugal, S.A.
Berema A/S
Västkustvägen 17
202 15 Malmö,
Sweden
Lugar da Abrunheira
S. Pedro de Penaferrim
2710 Sintra, Portugal
Berghagan 5, Langhus
Box 454, 1401 Ski
Norway
Tel: 040-600 23 00
Fax: 040-600 23 19
Tel: 351-1-9150374
Fax: 351-1-9111021
Tel: 64-86-05-00
Fax: 64-86-05-49
59
Page 62

For European (continued)
NAME OF FIRM
(COMPANY)
OY Brandt AB Tuupakantie 4
SF-01740, Vantaa
Finland
TIMA PRODUCTS A/S
Greens
Automocion Canarias
S.A. (AUCASA)
The Associated Motors
Company Ltd.
Two Wheels Ltd.
General Automotive Co.,
S.A.
Tårnfalkevej 16, Postboks 511
DK 2650 Hvidovre
Denmark
Polig. Industrial Congost
08530, La Garriga
(Barcelona), Spain
Apartado de Correos, num 206
SantaCruzdeTenerife
Canary Islands
148, Rue D’Argens, Msida
Malta
Crosslands Business Park,
Ballymount Road, Dublin 12,
Ireland
P.O. Box 1200, 101 73 Athens
Greece
ADDRESS TEL: FAX:
Tel: 90-895-501
Fax: 90-878-5276
Tel: 31-49-17-00
Fax: 36-77-16-30
Tel: 93-871-84-50
Fax: 93-871-81-80
Tel: 922-61-13-50
Fax: 922-61-13-44
Tel: 356-333001
Fax: 356-340473
Tel: 4602111
Fax: 4566539
Tel: 346-5321
Fax: 346-7329
BG Technik s.r.o. Radlická 117/520
158 01 Praha 5
Czech Republic
Aries Power Equipment
Ltd.
MO.TOR.PEDO Ltd. 2040 Buda-rs, Kamaraerdei-t 3.
01-493 Warszawa,
ul Wroclawska 25a
Poland
Hungary
60
Tel: 2-5694 573
Fax: 2-5694 571
Tel: 22-685 17 06
Fax: 22-685 16 03
Tel: 23-444-971
Fax: 23-444-972
Page 63

36VD8626
Black
DIC649
00X36-VD8-6260
K3
oHonda Motor Co., Ltd. 2002
efgsY1500.2007.06
Printed in Japan
 Loading...