

Page 1

201
Navigation Manual
(Unlinked)
This document does not contain hyperlinks and may be formatted for printing instead of
web use. This is due to changes in content and specifications of the vehicle that happen
throughout the model year. This manual will be replaced with a hyperlinked version at the
end of the model year.
© 2011 Honda Motor Co., Ltd. P/N 00X31-TK4-8200
2 TL
Page 2

Table of Contents
Navigation System
1
Introduction .................................4
Manual Overview............................4
System Overview ...........................4
Accessories Precautions .................5
Important Safety Information ........5
Map Overview.................................6
Current Street ................................... 6
Verifi ed/Unverifi ed Street ............... 6
User Agreement ...........................8
Getting Started ...........................10
System Controls ............................ 10
Voice Control Basics ....................13
Using the Voice Control System ....14
Improving Voice Recognition ........14
Selecting an Item (Button) on the
Screen ......................................15
Selecting an Item in a List ...........15
Entering Information ...................16
System Start-up ............................ 18
System Language Selection ..........18
Bluetooth
®
HandsFreeLink® ..... 19
Map Screen Legend ......................20
Map Screen Description ................21
Zoom In/Out .................................. 21
Map Scrolling ................................ 21
Displaying Current Location .........21
Traffi c Display Legend ..................22
AcuraLink Real-Time Traffi c
™
.....23
Traffi c Status Indicator ..................23
Viewing Flow Data ........................24
Viewing Incident Reports .............. 25
System Function Diagram ............27
Entering a Destination ...............28
By Address ....................................29
Selecting the State or Province ..... 29
Selecting the ZIP Code ................. 30
Selecting the City ...........................30
Selecting the Street ........................32
Entering the Street Number .......... 33
By Address Book ..........................34
Adding Addresses to the Personal
Address Book ........................... 35
By Previous Destinations ..............35
By Place Name ..............................36
By Place Category ........................37
Subcategories ................................ 37
Place Name ....................................40
City Vicinity ..................................40
Sort by Distance to Travel .............41
Search by Keyword ........................41
Sort by Zagat Rating .....................42
By Place Phone Number ...............43
By ZAGAT® 2010 .......................... 43
By Coordinate ...............................44
By Intersection .............................. 45
By Map Input ................................46
Showing the Map of Current
Position ......................................46
Showing the Map of City ............... 47
Show Map of State ......................... 49
Show Map of Continental USA,
Canada and Mexico ...................50
By Go Home 1 or 2 .......................50
Driving to Your Destination ......52
Driving to Your Destination .......... 52
Calculate Route to Screen ............ 52
Changing the Routing Method ...... 53
Viewing the Routes ....................... 53
Viewing the Destination Map ........ 54
Map Screen .................................. 55
Route Line ..................................... 55
Voice Guidance Prompts ............... 55
Map Screen Legend ......................57
Guidance Screen .......................... 58
Guidance Screen Legend .............. 58
Distance and Time to Destination 59
Map Menu .....................................59
Guidance Menu .............................60
Page 3

Table of Contents
2 Navigation System
Directions ....................................... 60
EXIT INFO (Freeway Exit
Information) ..............................61
Guidance Mode .............................. 62
Map Information ...........................62
Showing Icons on the Map.............63
Map Orientation ............................64
Current Location ............................ 65
Map Legend ................................... 65
Map Scale .....................................66
Destination Icon ............................67
Various Other Icons ......................68
Landmark Icons ............................. 68
Incident Icons ................................. 69
Weather Icons ................................ 69
Going Off the Route .....................72
Off-road Tracking .........................72
Viewing/Saving the Current
Location ....................................73
Pop-ups and Disclaimers ..............74
Traffi c Rerouting ........................... 75
Changing the Route ......................76
DEST Screen (Route) ...................76
Destination Lists ............................ 78
Changing Your Destination ..........79
Find Nearest (Voice command) .... 79
Go Home (Voice command) ......... 79
Using Interface Dial to Change
Destination ...............................80
Entering a Destination from the
DEST Screen (while en route) .. 81
Continue Trip to Screen ............... 81
AcuraLink Messages ..................... 81
Information Features .................83
INFO Screen (Main Info) .............83
Cellular Phone................................ 83
Messages ........................................84
Traffi c Incidents .............................84
AcuraLink Weather .......................84
Voice Info ...................................... 88
Setup .............................................. 89
INFO Screen (Other) ....................90
Calendar ........................................ 90
Scenic Road Information ...............92
Calculator ...................................... 92
System/Device Information ........... 93
Map Update Status ......................... 94
Roadside Assistance.......................94
Key to Zagat Ratings ....................94
Show Wallpaper ............................. 95
System Setup ...............................96
SETUP Mode ................................96
SETUP Screen (Main Set up) .......96
Brightness ...................................... 96
Contrast .......................................... 96
Black Level ....................................96
Volume ..........................................97
Interface Dial Feedback ................ 97
Personal Information ....................97
Address Book ................................ 97
Home Address ..............................101
PIN .............................................. 102
Previous Destinations .................. 103
Music Search ...............................104
Song By Voice™ (SBV) ............... 104
Phonetic Modifi cation .................. 105
SET UP Screen (Other) .............. 106
Basic Settings .............................106
Units (mile or km) ...................... 107
Voice Recognition Tutor .............107
Verbal Reminders ........................ 107
Routing & Guidance ..................107
Rerouting .................................... 107
Unverifi ed Area Routing ............. 108
Traffi c Rerouting ...........................112
Edit Avoid Area ............................112
Edit Waypoint Search Area .........114
Guidance Mode ............................115
Street Name Guidance ..................115
Page 4

Table of Contents
Navigation System
3
Clock Adjustment ........................ 116
Auto Daylight ...............................116
Auto Time Zone ...........................116
Time Adjustment...........................117
Vehicle ........................................117
Off-road Tracking ........................117
Correct Vehicle Position ..............118
Color ..........................................119
Map Color ....................................119
Menu Color ..................................119
Switching Display Mode
Manually ................................. 120
Switching Display Mode
Automatically ..........................121
Language .....................................122
Wallpapers Setting ...................... 122
Importing Pictures from USB ...... 123
Selecting Wallpaper Pictures ....... 123
Delete Pictures on HDD .............. 124
Reset Factory Default Settings ....124
Clear Personal Data ....................125
AcuraLink/Messages ..................126
Traffi c & Weather Status ............126
Rearview Camera ........................127
Rearview Camera Brightness
Adjustment ............................. 127
Rearview Camera Image .............127
System Initialization .................128
System Initialization .................. 128
Entering the Security Code .........128
GPS Initialization .......................129
Map Matching ............................129
System Limitations ...................131
GPS Reception Issues ..................131
Database Limitations ...............132
Client Assistance ......................134
Coverage Areas .........................136
Map Coverage .............................136
U.S. Detailed Coverage Areas .... 136
Canada Detailed Coverage Areas 142
Operation in Alaska, Hawaii,
Canada, Puerto Rico,
and Mexico .............................152
Alaska, Hawaii, Canada, Puerto Rico,
and Mexico ...............................153
Other Map Issues ..........................153
INFO Screen Differences .............153
Shipping a Vehicle To or From
Alaska, Hawaii, Canada, Puerto
Rico, and Mexico ....................154
Frequently Asked Questions ....155
Troubleshooting ........................163
Glossary ....................................164
Glossary ......................................164
Voice Command Index .............167
Global Commands ......................167
Navigation General Commands .. 167
Navigation Display Commands... 168
Find Place Commands ................ 169
Climate Control Commands ....... 170
Radio Voice Commands ............. 171
Disc Voice Commands ............... 172
HDD Voice Commands ..............172
AUX Voice Commands .............. 172
USB Voice Commands ...............173
iPod Voice Commands ................ 173
Bluetooth
®
Audio Commands .. 173
Song By Voice™ Commands . 174
Cellular Phone Commands ......... 174
SETUP Screen (Main Set up)
Commands .............................. 17 4
On-Screen Commands ................ 175
On-Screen Spelling Assist ......... 175
INDEX .......................................179
Others ........................................183
Page 5

Introduction
4 Navigation System
Manual Overview
The manual is divided into the
following sections:
• Getting Started - A basic introduction
that discusses the controls and how to
communicate with the system.
• Entering a Destination - How to enter
an address or locate a point of interest
(POI).
• Driving to Your Destination - An
explanation of the map features,
guidance, and cautions.
• Information Features - An
explanation of the information
features, voice command help, and
other acessories.
• System Setup - How to set up and
tailor the system for your personal
use and use the Address Book.
The back of this manual contains:
• Map Coverage (page 136 )
• Cities with Traffi c Coverage (pag e 150)
• Frequently Asked Questions (FAQs)
(page 155 )
• Troubleshooting Guide (page 163 )
• Glossary of Terms (page 164 )
• Voice Command List (page 167 )
• Operation Specifi c to Alaska, Hawaii,
Canada, Puerto Rico, and Mexico
(page 152 )
System Overview
Your navigation system is a highly
sophisticated location system with
voice control that uses satellites and a
map database to show you where you
are and to help guide you to a desired
destination.
The navigation system receives signals
from the global positioning system
(GPS), a network of 24 satellites in
orbit around the earth. By receiving
signals from several of these satellites,
the navigation system can determine the
latitude, longitude, and elevation of your
vehicle. In addition, a gyroscopic yaw
sensor and a vehicle speed sensor in
your vehicle keep track of the direction
and speed of travel at all times.
Page 6

Introduction
Navigation System
5
The navigation system applies location,
direction, and speed information to
the maps and calculates a route to the
destination you enter. As you drive to
that destination, the system provides
map and voice guidance.
The navigation system is easy to
use. The locations of many places of
business and entertainment are already
entered in the system. You can select
any of them as a destination by using
the Interface Dial or voice control.
There are several ways to enter a
destination, such as by point of interest
(POI), by address, by phone number,
and by selecting it from the map. The
last 50 destinations are saved for reuse
at a later date. The system also allows
you to store a home address to simplify
returning home from your destination.
Accessories Precautions
If you have aftermarket front or side
window tinting installed, be aware that
if the tint has metallic properties, it
can seriously degrade or prevent GPS
reception. This is because the GPS
antenna is located behind the navigation
display in the center of the dashboard.
If you plan to install electronic
components such as radar detectors,
vehicle tracking devices, remote
starters, additional amplifi ers, or other
audio components, ensure that they are
not located near the navigation display
in the center of the dashboard, or near
the GPS antenna behind the navigation
display. Signal noise emanating from
these devices can cause intermittent
disruption of the navigation system.
Important Safety Information
The navigation system can distract your
attention from the road if you focus
on the screen or operate the system’s
controls while driving.
Enter as much information as possible
into the system before you begin
driving, or when the vehicle is stopped.
Then, as you drive, listen to the audio
instructions and use voice commands
when possible.
Page 7
Introduction
6 Navigation System
WARNING
Using the navigation system
while driving can take your
attention away from the road,
causing a crash in which you
could be seriously injured or
killed.
Only operate system controls
when the conditions permit you
to safely do so.
While driving, do not look at the screen
or operate the system controls for more
than a second or so at a time, and only
after deciding you can do so safely. Pull
to the side of the road if you need more
time to look at the screen or operate the
controls.
The navigation system is designed to
provide route information to help you
reach your destination. However, this
route guidance may sometimes confl ict
with current road conditions such as
street closures, road construction,
detours, and out-of-date map data.
Additionally, the system itself has
certain limitations (see page 131 ).
Therefore, you must verify the audio
and visual route information provided
by the system by carefully observing
the roadway, signs and signals, etc. If
you are unsure, proceed with caution.
Always use your own good judgment,
and obey traffi c laws while driving.
Map Overview
Current Street
The current street on which your vehicle
is located appears at the bottom of the
map screen (see page 20 ). A message
saying “No t o n a di gi tized road” may
appear instead when you drive half a
mile awa y from a mapped road. F or
more details, see O f f - r o a d Tr a c k i n g on
page 72 .
Verifi ed/ Unverifi ed Street
Your navigation system has two kinds
of streets: verifi ed (red, gray, and pink)
and unverifi ed (purple). The differences
between the two types of streets are
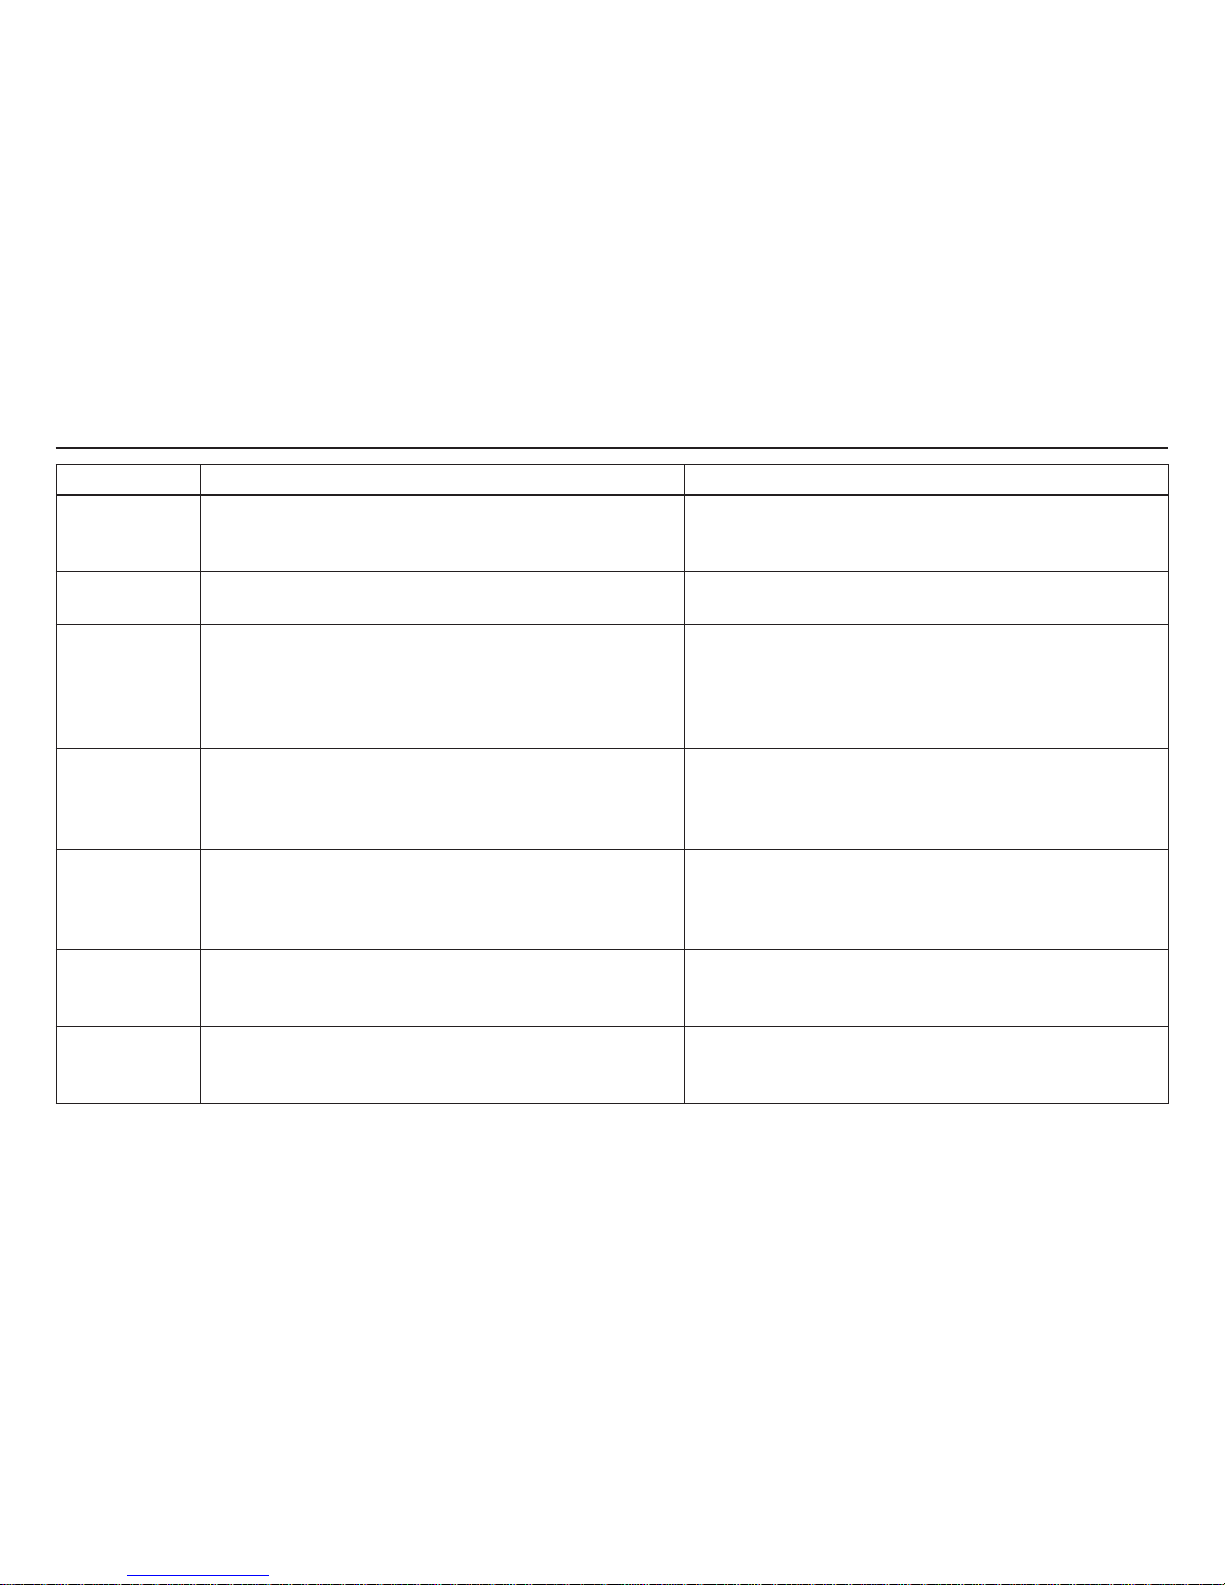
contrasted in the chart on page 7 .
Verified street
Unverified street
Page 8
Introduction
Navigation System
7
Ve r i fi ed streets Unverifi ed streets
When
displayed
These roads are found within metropolitan areas, and
include interstate freeways and major roads connecting
cities.
These roads are found in rural areas, and typically include
residential streets away from the center of a town.
Street color
Shown as red (freeways), pink (state routes), or gray
(verifi ed streets) on the daytime map screen.
Shown on the daytime map screen as purple.
Map quality
The database vendor has verifi ed these streets.
Information like turn restrictions, average speed, and
whether it is a one-way street have been gathered and used
when creating your route to a destination.
These streets have not been verifi ed by the database
vendor. The system does not contain information on oneway streets, turn restrictions, or the road’s average speed.
They are shown on the map for reference and may have
errors in map location, naming, and address range.
Routing
differences
While driving to your destination, the displayed route line
is solid blue. The system provides voice and map guidance
to your destination.
Your route line is either a purple dotted “vector line,” or
a dashed pink/blue line. For information on selecting this
option, and the routing differences, see Unverifi ed Area
Routing on page 108 .
Cautions
There are no pop-up boxes urging extra caution during
a route. However, because roads constantly change, you
are urged to use common sense, and always obey posted
traffi c restrictions.
Regardless of whether the user chooses route guidance,
there are cautionary screens before and during the route
urging the user to be extra cautious, and obey all traffi c
restrictions. See Unverifi ed Area Routing on page 108 .
Guidance
voice
Voice guidance issues instructions such as “In a half-mile,
make a right turn.”
The phrase “if possible” is added to each guidance
instruction. For example: “In a half-mile, make a right
turn, if possible.”
Time and
distance
“to go”
The time and distance “to go,” displayed while en route to
a destination, is based on the average speed and distance
for the roads used for your route.
The time and distance “to go,” displayed while en route to
a destination, is based on the average speed and distance
for the roads used for your route.
Page 9

User Agreement
8 Navigation System
In using this HDD “Satellite Linked
Navigation System” (the “HDD”),
which includes HONDA MOTOR
CO., LTD. software, PIONEER
CORPORATION software, and
NAVTEQ database contents
(hereinafter referred to as “Licensors”),
you are bound by the terms and
conditions set forth below. By using
your copy of the HDD, you have
expressed your Agreement to the terms
and conditions of this Agreement. You
should, therefore, make sure that you
read and understand the following
provisions. If for any reason you do not
wish to be bound by the terms of this
Agreement, please return the HDD to
your dealer.
• The HDD may not be copied,
duplicated, or otherwise modifi ed, in
whole or in part, without the express
written permission of the Licensors.
• The HDD may not be transferred or
sublicensed to any third party for
profi t, rent or loan, or licensed for
reuse in any manner.
• The HDD may not be decompiled,
reverse engineered or otherwise
disassembled, in whole or in part.
• The HDD may not be used in a
network or by any other manner of
simultaneous use in multiple systems.
• The HDD is intended solely for
personal use (or internal use where
the end-user is a business) by the
consumer. The HDD is not to be used
for commercial purposes.
• The Licensors do not guarantee to the
client that the functions included in
the HDD meet the specifi c objectives
of the user.
• Licensor shall not be responsible for
any damages caused by the use of
the HDD to the actual user or to any
third party.
• The warranty on the HDD shall not
extend to an exchange or refund due
to misspelling, omission of letters, or
any other cosmetic discrepancy in the
contents of the HDD.
• The right to use the HDD shall expire
either when the user destroys the
HDD or software, or when any of the
terms of this Agreement are violated
and the Licensors exercise the option
to revoke the license to use the HDD
or software.
Page 10

User Agreement
Navigation System
9
• The terms and conditions hereof
apply to all subsequent users and
owners as well as to the original
purchaser.
• The logos of oil companies, hotels,
convenience stores, and other
businesses are displayed for your
information and convenience, and
in no way imply any sponsorship,
approval or endorsement of these
companies, or their products.
The logos are trademarks of their
respective owners.
• The marks of companies displayed
by this product to indicate business
locations are the marks of their
respective owners.
• The use of such marks in this product
does not imply any sponsorship,
approval, or endorsement by such
companies of this product.
The user shall indemnify and save
harmless the Licensors, and their
offi cers, employees and agents, from
and against any claim, demand or
action, irrespective of the nature of the
cause of the claim, demand or action,
alleging loss, costs, expense, damages
or injuries (including injuries resulting
in death) arising out of the use or
possession of the HDD or software.
Use, duplication, or disclosure of this
HDD by or on behalf of the United
States government is subject to
“Restricted Rights” as set forth at FAR
52.227-14, -19 or DFARS 252.2277013, as applicable. Manufacturers
are the Licensors, including HONDA
MOTOR CO., LTD., 2-1-1 Minami
Aoyama Minato-Ku Tokyo 107-8556
JAPAN., PIONEER CORPORATION,
1-4-1 Meguro Meguro-ku Tokyo 1538654 Japan., NAVTEQ Corporation,
425 W Randolph St. Chicago, IL
60606, USA.
Page 11
Getting Started
10 Navigation System
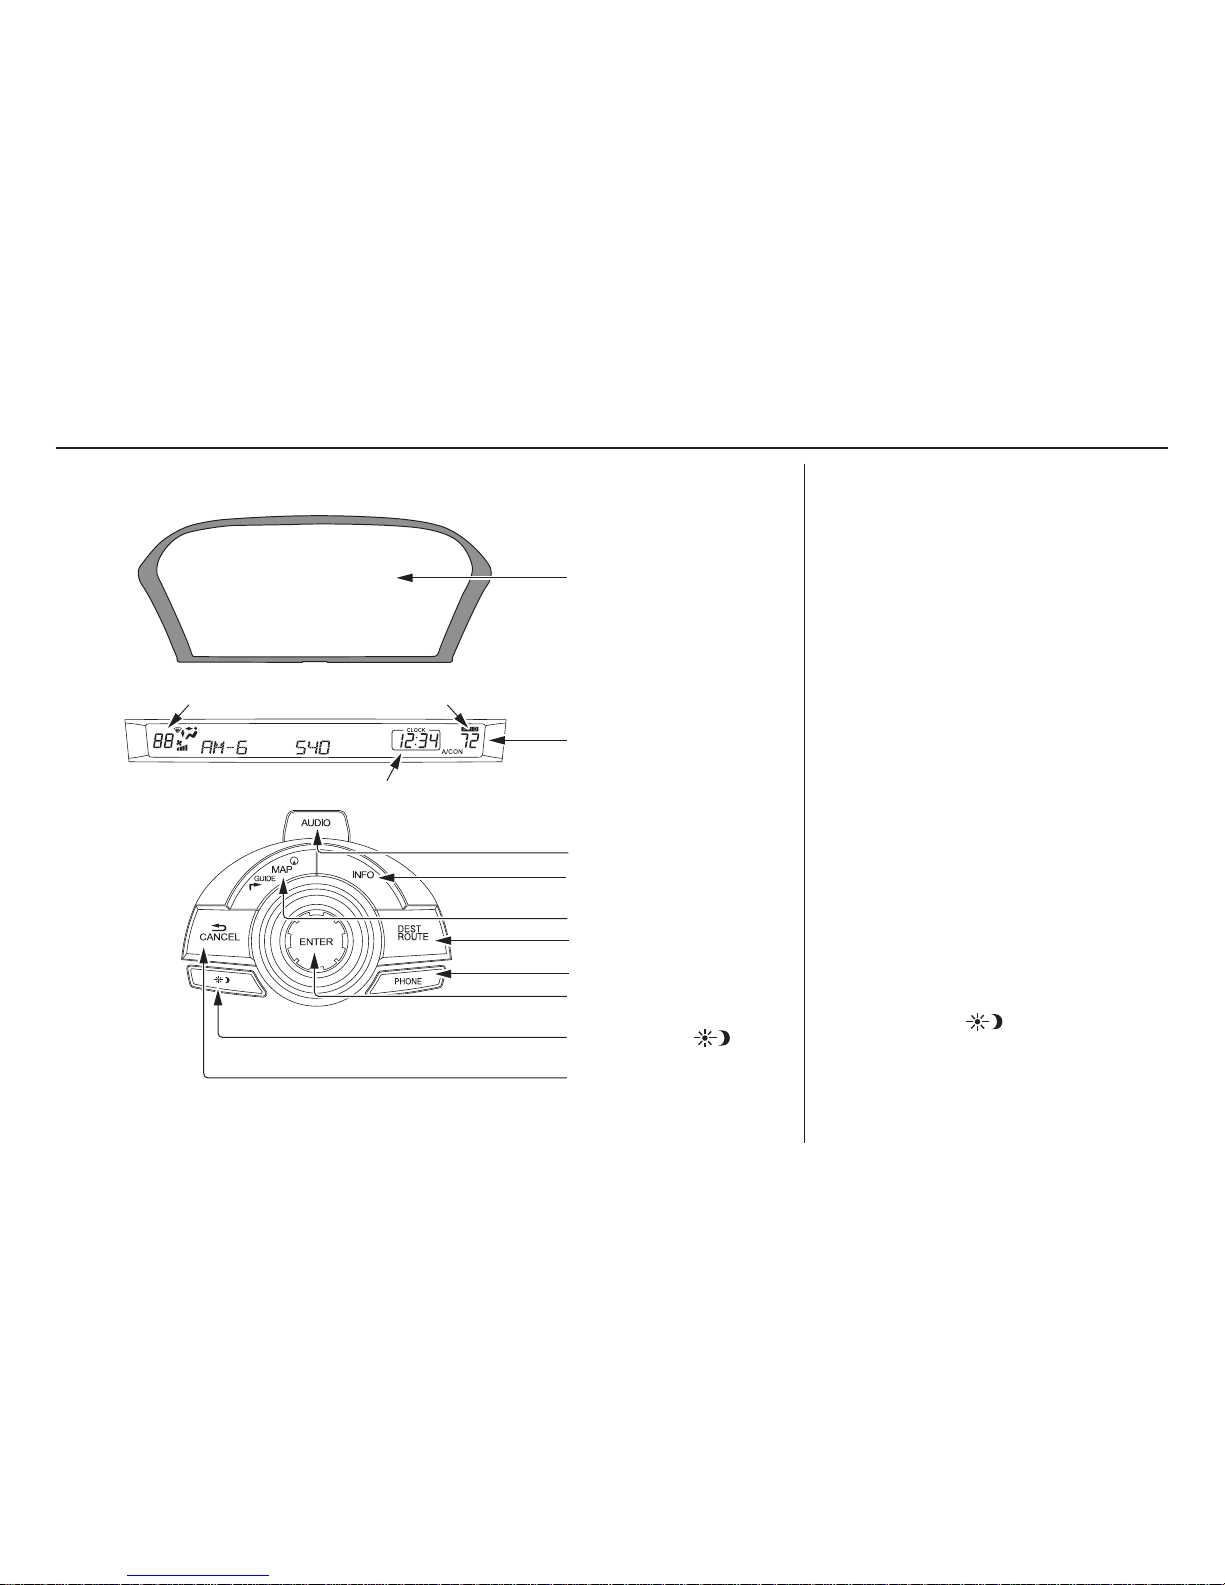
AUDIO button
Press to display the audio screen.
For more information on audio system
features, see the Audio section of your
owner’s manual.
INFO button
Displays the “Main Info” options
(including the Cellular Phone option)
on the INFO screen. When selecting
the “Other” tab, displays the “Other”
options on the INFO screen. See page 83 .
MAP/GUIDE button
Displays the map. When en route,
switches between the map and
Directions screens. See page 20 or 57 .
DEST/ROUTE button
Displays the “Dest. MENU 1” options
on the DEST screen. When en route,
displays the “Route” options on the
DEST screen. See page 28 or 76 .
Display Mode
button
Adjusts the screen brightness for Day
or Night mode, or turns the screen OFF.
See page 120 .
CANCEL button
INFO button
Interface Dial/
ENTER button
PHONE button
AUDIO button
MAP/GUIDE button
Lower Display
Screen
Display Mode
button
Passenger’s TemperatureDriver’s Temperature
Time (set by navigation system)
DEST/ROUTE button
System Controls
Page 12
Getting Started
Navigation System
11
PHONE button
Press to display the Cellular phone
screen.
For more information, see the
Bluetooth
®
HandsFreeLink® section of
your owner’s manual.
CANCEL button
Cancels the current screen and returns
to the previous screen display.
NOTE:
The BA CK button on the steering
wheel performs the same basic
function. See BACK button o n p a g e 1 3 .
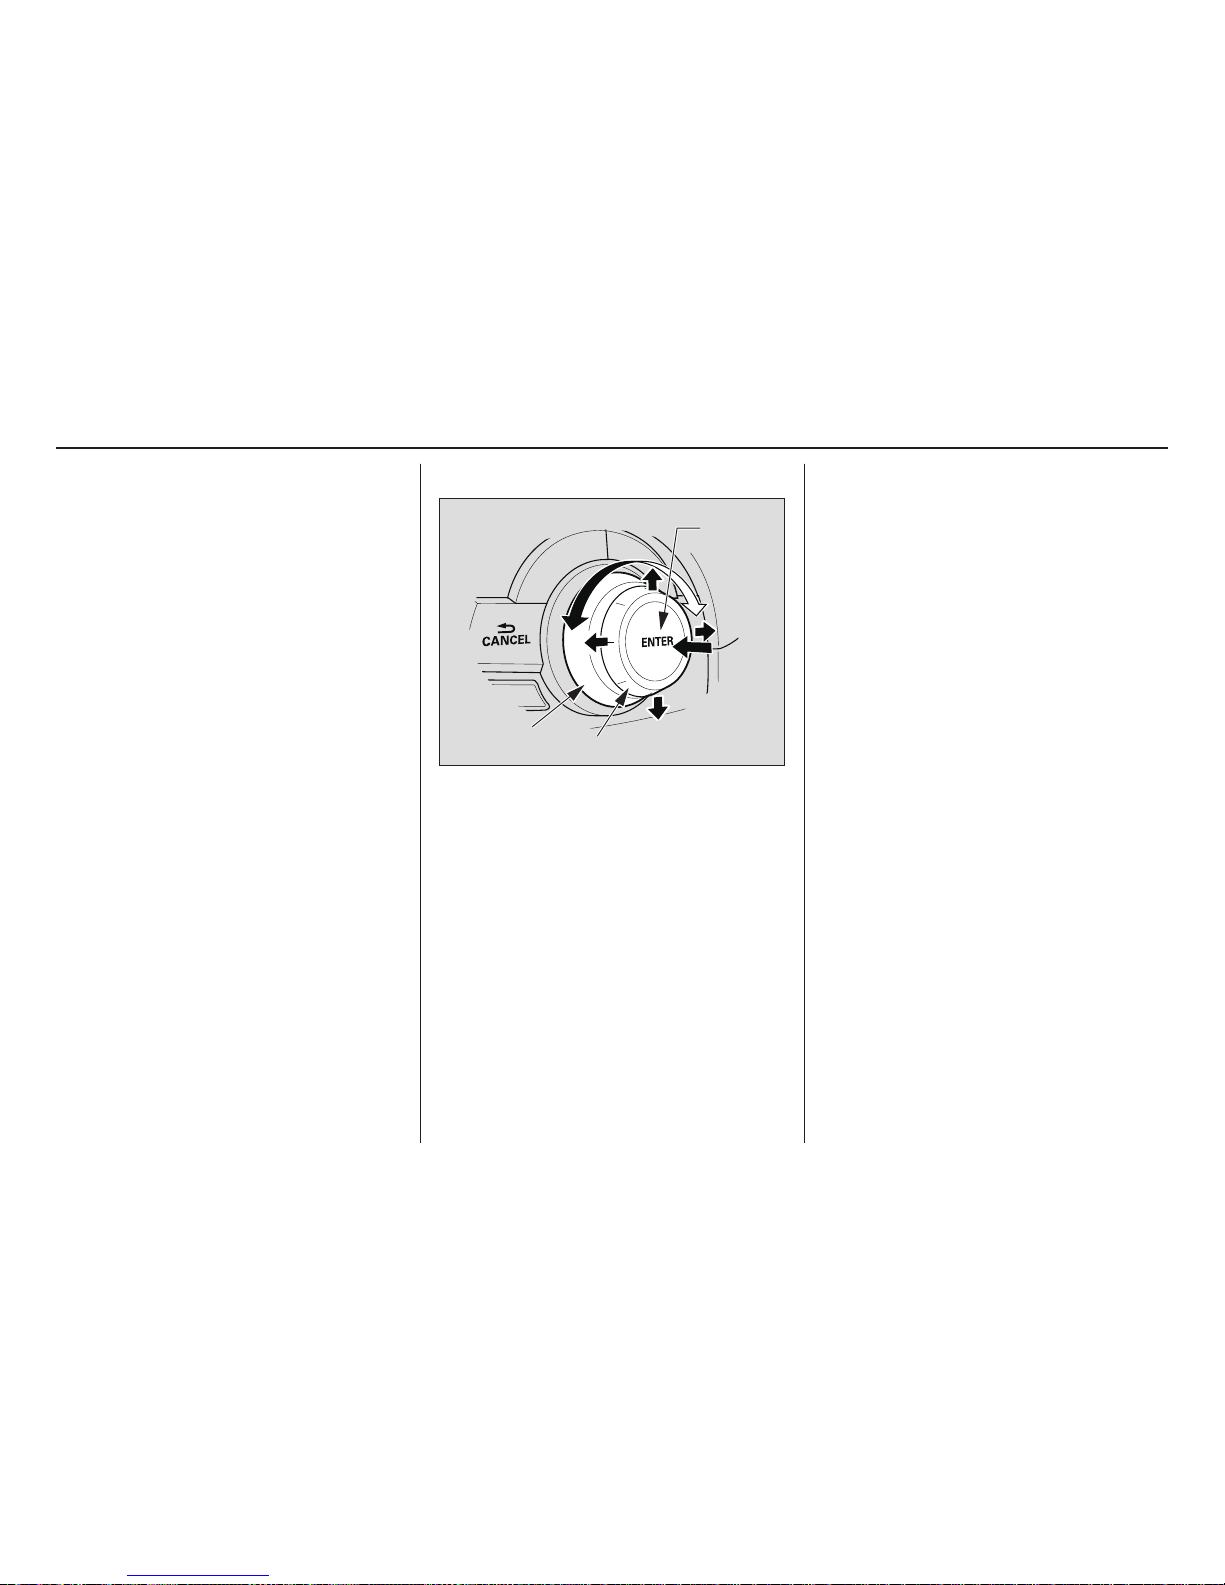
Interface Dial/ENTER button
SELECTOR
ENTER
KNOB
To see areas beyond the map that is
displayed, you can move the Interface
Dial left, right, up, or down. Rotating
the Interface Dial knob allows
you to change the scale. Rotating it
clockwise reduces the scale, showing
less area with greater detail. Rotating
it counterclockwise increases the scale,
showing more area with less detail.
You can also rotate the Interface
Dial knob to scroll through a list
or highlight items in a list to select.
After making a selection in a menu
or list, push in on the Interface Dial
(ENTER button) to enter the selection
into the system.
In almost all cases, you can enter a
selection into the system by pushing in
on the Interface Dial.
Page 13

Getting Started
12 Navigation System
Screen
All selections and instructions are
displayed on the screen. The display
is not a “touch screen” - you enter
information into the system either by
voice or by using the Interface Dial.
Clean the screen with a soft, damp
cloth. You may use a mild cleaner
intended for use on computer screens.
NOTE:
Whenever you shift to R (Reverse), the
rear view behind the vehicle is shown
on the navigation system screen. See
page 127 .
Lower Display
Shows a summary of the audio and
climate control information, as well as
the time. This summary is helpful as a
confi rmation when adjusting audio or
climate by voice.
The audio summary consists of the
radio band, frequency, and volume. For
XM radio, a brief description of the
station and current music is displayed.
The climate status consists of the
driver’s and passenger’s temperature,
fan speed, ON/OFF (A/C), and vent
setting. The time is automatically set
by the navigation system. Settings
can be adjusted in SETUP (see T i m e
Adjustment on page 117 ).
Page 14

Getting Started
Navigation System
13
Voice Control Basics
Your vehicle has a voice control system
that allows hands-free operation of most
of the navigation system functions. You
can also control the audio system and
the climate control system. The voice
control system uses the TALK and
BACK buttons on the steering wheel
and a microphone near the map lights
on the ceiling.
TALK button
BACK button
PICK-UP
button
HANG-UP
button
NOTE:
While using the voice control system,
all of the speakers are muted.
Microphone (on the ceiling)
TALK button
This button activates the voice control
system. Press and release it when you
want to give a voice command. See
Voice Command Index on page 167 for a
list of voice commands.
BACK button
This button has the same function as
the CANCEL button. When you press
and release it, the display returns to the
previous screen. When the previous
screen appears, the system replays the
last prompt.
When you press this button during
voice recognition, voice recognition is
ended. (The display does not return to
the previous screen.)
Page 15

Getting Started
14 Navigation System
Using the Voice Control System
You should use the voice control system
as much as possible, and consider
manual entry using the Interface Dial
as a backup method.
Most of the system’s functions can be
controlled by voice commands activated
with the TALK button. To control your
navigation system by voice:
• Press and release the TALK button on
the map screen. A voice recognition
screen will be displayed. Or press and
release the TALK button on a screen
other than the map screen. A popup voice icon
will appear in the
upper left corner of the screen.
• Wait for the beep.
• Give a voice command. (Voice
commands that the system recognizes
are highlighted.)
Once the microphone picks up your
command, the system changes the
display in response to the command
and prompts you for the next command.
Using the TALK button, answer the
prompts as required.
If the system does not understand a
command or you wait too long to give
a command, on the Voice Recognition
Example Commands screen, it responds
with “Pardon? No command was heard.
Please press the TALK button and say
a command. To return to the previous
screen, press the BACK button.” On
any other screen, it responds with
“Pardon? No command was heard.
Please press the TALK button and
say a command.” If the system cannot
perform a command or the command is
not appropriate for the screen you are
on, a beep will sound.
You can fi nd out which voice
commands are available for a particular
screen by saying “Help.” The system
will display and read the list of
available commands to you. (When
Help is grayed out, this feature cannot
be used.)
When you speak a command, the
system generally either repeats the
command as a confi rmation or asks you
for further information. If you do not
wish to hear this feedback, you can turn
it off.
However, hearing the feedback will
familiarize you with the way the system
expects commands to be phrased. See
the Voice Recognition Tutor setting
in SET UP.
If you hear a prompt such as “Please
use the Interface Dial to...” or “Please
choose an area with the Interface
Dial,” the system is asking for input that
cannot be performed using the voice
control system.
Improving Voice Recognition
To achieve optimum voice recognition
when using the navigation or Bluetooth
®
HandsFreeLink
®
voice control system,
the following guidelines should be
followed:
NOTE:
Make sure the correct screen is
displayed for the voice command that
you are using. See Voice Command
Index on page 167 .
• It is best if the windows and sunroof
are closed. If they are open, speak
a little louder to overcome the wind
noises.
Page 16

Getting Started
Navigation System
15
• The fan speed automatically lowers
when the TALK button is pressed.
Adjust the airfl ow from both the
dashboard and side vents so air does
not blow against the microphone on
the ceiling.
• If more than one person is speaking
at the same time, the system may
misinterpret your command.
• After pressing and releasing the
TALK button, wait for the beep, then
give a voice command.
• Give a voice command in a clear,
natural speaking voice without
pausing between words.
• Try to reduce any background noise.
• If you are still having trouble with the
voice control system, refer to Voice
Info on the INFO screen (Main
Info).
NOTE:
The voice control system can only be
used from the driver’s position. The
microphone does not recognize voice
commands from anywhere else in the
vehicle.
Selecting an Item (Button)
on the Screen
On most screens, there are items that
can be selected (like buttons with titles
such as OK or Return). To select
an item on any screen, do one of the
following:
• Use the voice control system and
say the name of the desired item.
Almost all selectable items on the
screen, including some listed items,
are recognized by the voice control
system.
• Move the highlighting to the desired
item with the Interface Dial or its
knob, then push in on the Interface
Dial.
Tip:
If items are grayed out, this means that
they cannot be selected.
Selecting an Item in a List
To scroll through a list, do one of the
following:
• Rotate the Interface Dial knob to
scroll one item at a time.
• Use the voice control system to scroll
page by page. For example, to scroll
up, say “Up” or “Previous.” To scroll
down, say “Next” or “Down.”
If you cannot fi nd the desired name,
or have made an error, return to
the previous screen by pressing the
CANCEL or the BACK button.
To select the desired item in the list, do
one of the following:
• Use the voice control system, and say
the item number of the desired item.
• Rotate the Interface Dial knob to
move the highlighting to the item,
then push in on the Interface Dial.
Page 17

Getting Started
16 Navigation System
Entering Information
When the system needs input from you,
the display changes to a screen similar
to the one on the next page. You can
then use the displayed letters, numbers,
or symbols to enter information. You
can enter your keyboard input in either
of the following ways:
• Say the desired letter, number, or
symbol on the screen if you are
entering a city or street name.
• Move the highlighting to the desired
letter, number, or symbol by rotating
the Interface Dial knob, then push
in on the Interface Dial.
Each entered letter will appear at the
top of the display. To enter a space
between words, say “Space” or move
the Interface Dial to the right. To
delete an entry, say “Delete” or move
the Interface Dial to the left.
If a letter has options (such as accent
marks or symbols), they will appear
in gray next to the selected letter on
the upper row. Move the Interface
Dial up to select OPTION, and use
the Interface Dial knob to select the
letter.
To enter symbols, rotate the Interface
Dial Knob and select # or @, then
move the Interface Dial up to select
OPTION.
When entering an address, the system
searches the database for words that
match the letters you are entering. As a
result, you will notice that some letters
are no longer available.
When the system fi nds only one entry
that matches, it completes the name
entry for you. If the system fi nds more
than one entry that matches your input,
a list of these matches is displayed.
Tip:
When entering a name of a city, street,
or place, or if you are unsure of the
spelling of the name, enter the letters
that you are sure of, then move the
Interface Dial down to select LIST.
The system will display a list of names
that most closely match your input. For
each letter that is entered, the number
of corresponding choices is displayed
on the right-hand side.
Page 18
Getting Started
Navigation System
17
NOTE:
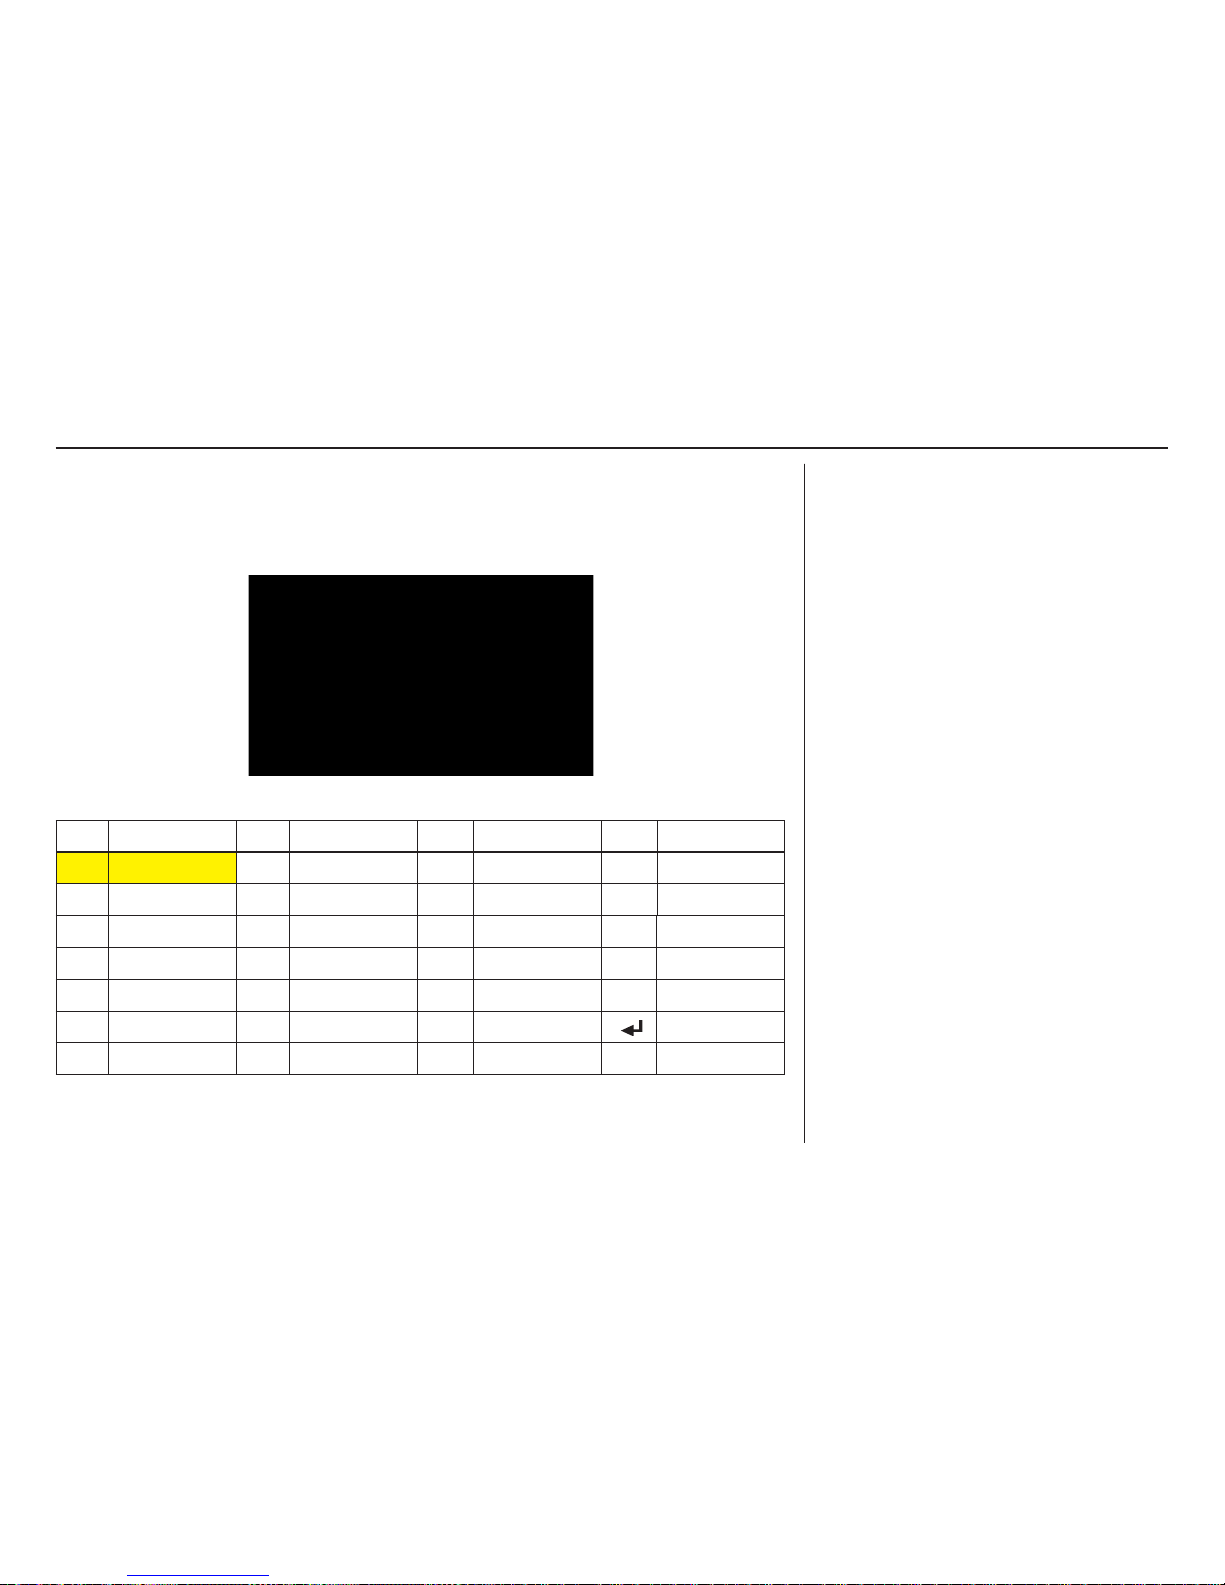
The voice command names that can be used for each letter are shown below. For
additional keyboard symbols, see page 176 .
Say Or say “...” Say Or say “...” Say Or say “...” Say Or say “...”
A
Alpha/Apple
H
Hotel/Henry
O
Oscar
V
Victor
B
Bravo/Boy
I
India/Igloo
P
Papa/Paul
W
Whiskey/William
C
Charlie
J
Juliet/John
Q
Quebec/Queen
X
X-ray
D
Delta/Dog
K
Kilo/King
R
Romeo/Robert
Y
Yankee /Yellow
E
Echo/Edward
L
Lima/ L arry
S
Sierra/Sam
Z
Zulu/Zebra
F
Foxtrot/Frank
M
Mike/Mary
T
Tango/Tom Enter
G
Golf/George
N
November/Nancy
U
Uniform/Uncle
Page 19

Getting Started
18 Navigation System
System Start-up
When you change the power mode to
the ON mode, it takes about 10 seconds
for the navigation system to boot up.
The fi rst screen to appear is the
navigation system globe screen.
The screen then changes to the
Disclaimer screen:
NOTE:
Driver information will display on the
upper right hand side of the screen.
If there are any unread messages, the
Message icon wi l l display on the bottom
left hand side of the screen.
See page 20 .
System Language Selection
Move the Interface Dial to the right
to select CHANGE LANGUAGE. On
the
Select a language screen, you
can select the language to be used by
the entire system by choosing from the
language choices that are displayed.
After you have changed the language
settings, you will be returned to the
Disclaimer screen.
Read this disclaimer carefully so you
understand it before continuing. Push
in on the Interface Dial to select OK,
and the map screen will appear on the
display. The “OK” cannot be activated
by voice.
If you do not push in on the Interface
Dial, the screen will go dark after 30
seconds. (You can also display the
Wallpaper screen. See page 122 .)
To return to the Disclaimer screen,
press any navigation or voice control
button.
Page 20

Getting Started
Navigation System
19
If you have entered any Calendar
reminders, they are displayed after you
select OK. See Calendar on page 90 .
The Calendar reminder screen
remains displayed until you select OK
or Remind Later by rotating the
Interface Dial knob and pushing in
on the Interface Dial, or press the
CANCEL button.
If you select OK and push in on the
Interface Dial, the reminder will not
show up again. (It will be deleted from
the Calendar.)
If you select Remind Later and push
in on the Interface Dial, the reminder
will show up again the next time you
start the vehicle. If there are several
reminders, the next reminder will be
displayed.
If you press the CANCEL button, the
system will skip all the reminders. The
reminders will show up again the next
time you start the vehicle.
NOTE:
The system will display the current
message and any older or previously
unread messages, with the newest
message appearing fi rst and the
remaining messages appearing in date
order.
If you turn off the engine during route
guidance and then restart the vehicle,
the Continue Trip to screen will be
displayed. For more information, see
Continue Trip to Screen on page 81 .
Bluetooth® HandsFreeLink®
If you have a Bluetooth-compatible cell
phone that is paired with the system,
then CALL on the Calculate route to
screen will be enabled.
When you select CALL, the system
dials the number shown on the screen.
For more information on Bluetooth®
HandsFreeLink®, see your owner’s
manual and the offi cial website (www.
acura.com/handsfreelink).
Page 21
Getting Started
20 Navigation System
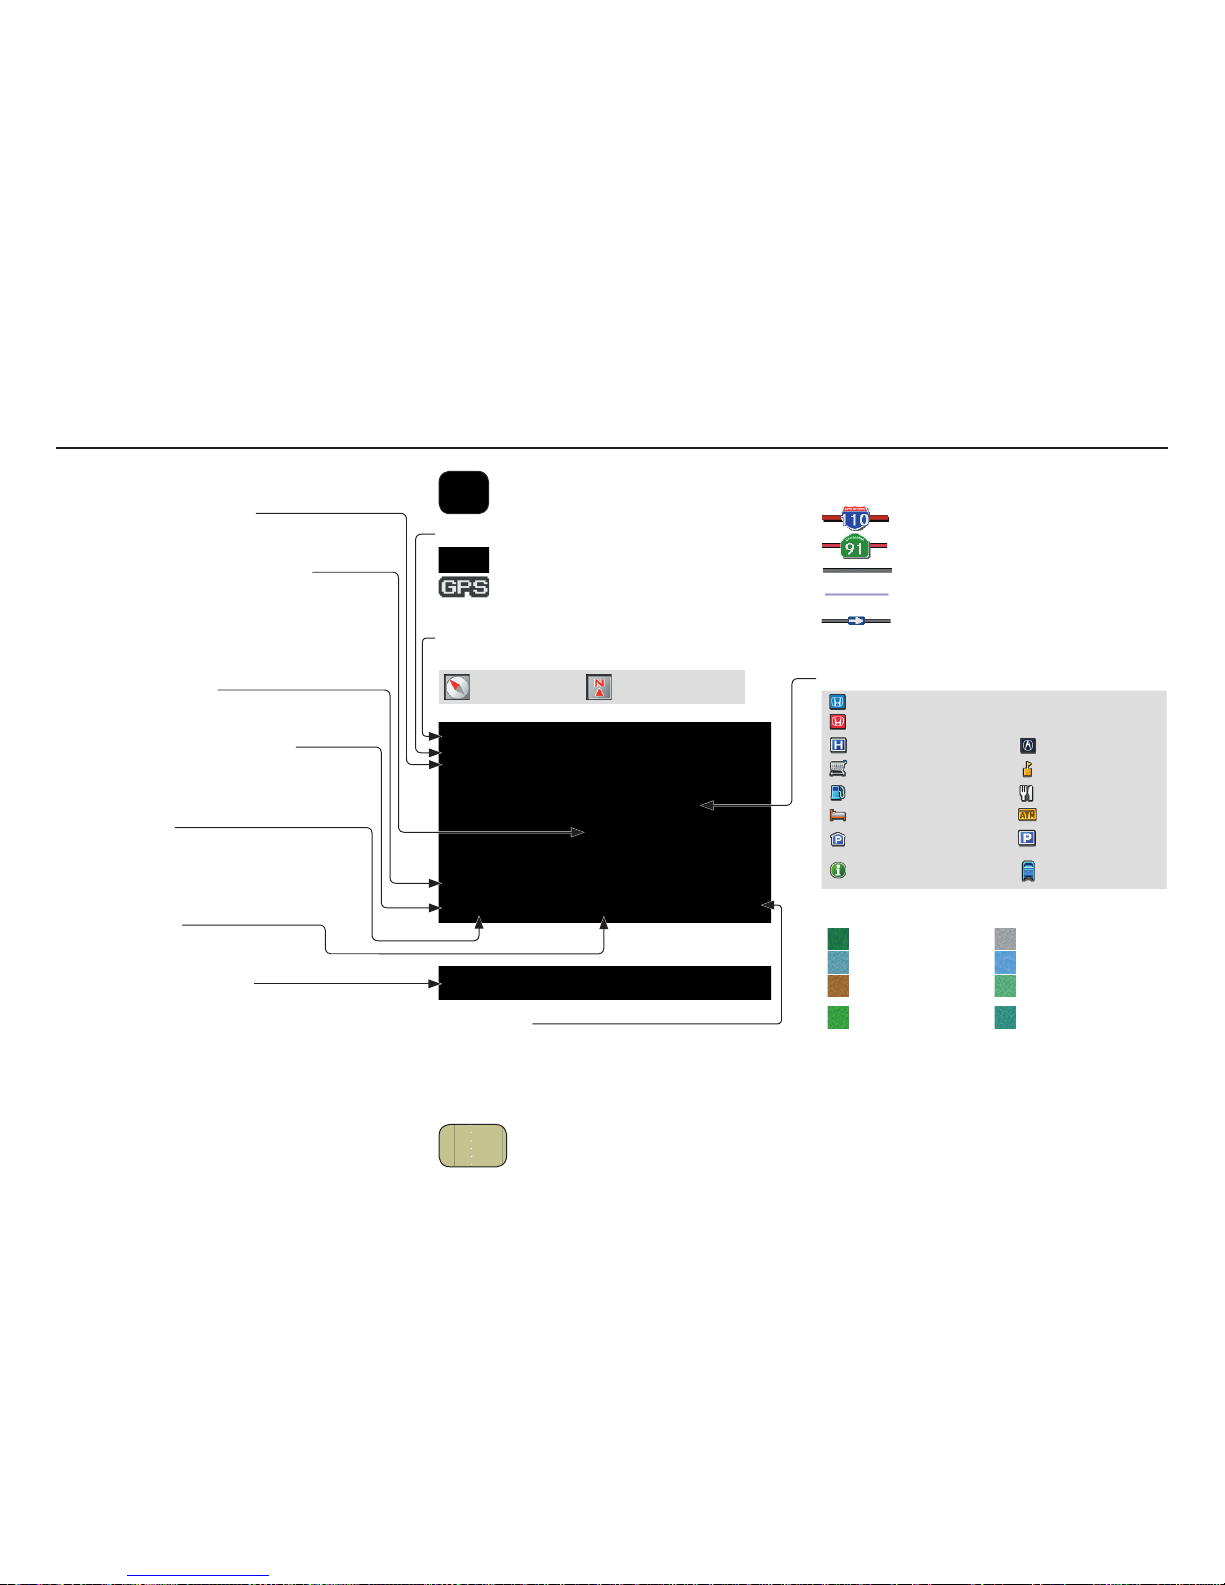
Map Screen Legend
Traffi c Status Indicator
(See page 23 .)
Vehicle Position (see page
73 )
(Use voice command “Display
current location” or use the
Interface Dial to show current
location.)
Current Map Scale
(see page 66 )
Message Icon (
see page 81 )
Indicates that you have an
AcuraLink message.
Warning Icon
Indicates that there are weather
warnings. To check the warning
list, see page 87 .
Current Street
(see page
6 )
Map Scale Adjustment
(Mile or km per half-inch appears only
when you zoom in or out by rotating the
Interface Dial knob.)
NOTE:
See Map Legend in the Map
Information on the MAP MENU
screen for further explanation.
Streets
(see Map Overview on page 6 )
: Freeways (Red)
: State Routes (Pink)
: Verifi ed Streets (Gray)
: Unverifi ed Streets (Purple)
: One-Way Streets (see page 68 )
(1/20 mile scale only)
Landmark Icon - Generic (see page 68 )
Honda Dealer (USA)
Honda Dealer (Canada, Mexico)
Hospital Acura Dealer
Grocery Store School
Gas Station Restaurant
Hotel/Lodging ATM
Parking Garage Parking Lot
Freeway Exit
Information
Post Offi ce
Map Features
Park Airport /Business
Hospital Body of Water
Shopping Mall Cemetery
Golf Course/
Stadium
University
NOTE:
If you move the Interface Dial over
an area (map features shown above),
the name is displayed at the top of the
screen.
No Entry Icon
GPS Signal Strength
: Best Reception
: Good Reception
(Missing): Poor/No Reception
Map Orientation
(see page 64 )
“Heading Up” “North Up”
Map Menu
(see page 59 )
(Push in on the Interface Dial to view.)
“ Breadcrumbs”
(see Off-road Tracking on page 72 )
Page 22

Getting Started
Navigation System
21
Map Screen Description
Zoom In/Out
Rotate the Interface Dial knob to
change the map scale. Zooming in
increases the detail, while zooming
out gives you a wide area view. After
changing the scale, give the system a
few moments to update the display.
Map Scrolling
To view other map areas, move the
Interface Dial left, right, up, or down.
The map will shift in that direction. To
return the map to your current location,
press either the MAP/GUIDE, the
CANCEL, or the BACK button on the
steering wheel.
Displaying Current Location
You can see the current address,
latitude, longitude, and elevation at any
time by doing one of the following:
• Use the voice control system and say
“Display the current location.”
• Push in on the Interface Dial
while displaying the map of the
current location, and select Map
Information. Rotate the Interface
Dial knob to select CURRENT
LOCATION.
The Current location screen will
appear on the display.
NOTE:
The elevation will not appear when the
system is temporarily lacking proper
GPS information. The system elevation
may not agree with elevations shown
on roadside elevation signs, and may
fl uctuate plus or minus 100 feet or
more.
You can save the current location in
your Address Book by doing one of the
following (if an Address Book PIN has
been set, you need to enter your PIN.):
• Use the voice control system and say
“Save.”
• Select SAVE by rotating the
Interface Dial knob and push in on
the Interface Dial.
Say “Register the current location” on
the map screen, and you can register
the current location without displaying
the Current Location screen.
Select Return to return to the previous
screen.
Page 23
Getting Started
22 Navigation System
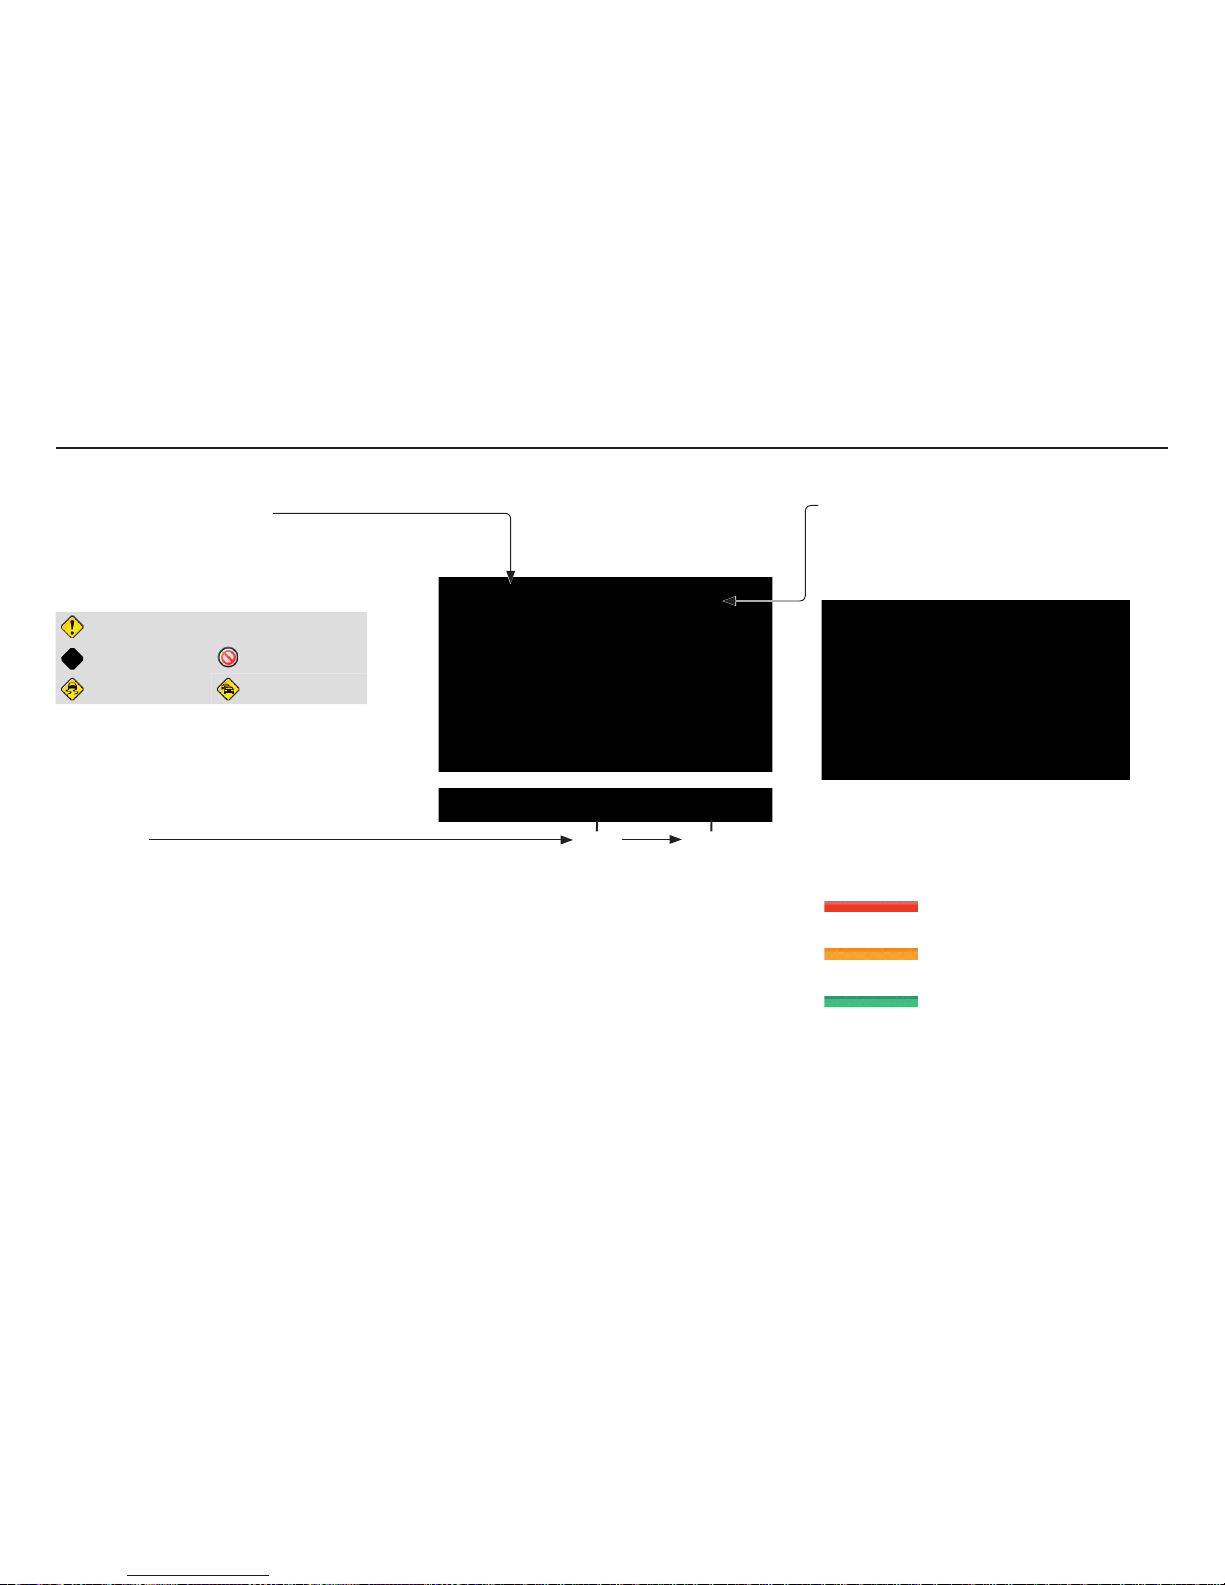
Traffi c Display Legend
Viewing Incident Details:
To view incident details, use the Interface
Dial to position the cursor (round red circle)
over an incident icon and push in.
Incident Icons
Accident / Incident (other)
Construction Road Closed
Weather Congestion
Incident Icon Update Details:
• Typically M–F, 5:00 AM – 7:00
PM (varies by metropolitan area)
• Continuously updated signal is
received.
Map Scale
Traffi c fl ow and incident icons are
displayed on the 5 mile (8 km) or
less map scale
Hearing Incident Details:
If this screen is displayed, the system will
start reading incident details.
To view the message on the screen, push
in on the Interface Dial.
To return to current position, press the
MAP/GUIDE button.
Traffi c Flow Data
(colored lines parallel to road)
(red)
Heavy traffi c: 0 – 24 mph
(approx.)
(orange)
Moderate traffi c: 25 – 52 mph
(approx.)
(green)
Free fl ow traffi c: 53 + mph
(approx.)
(shown for both sides of the freeway where
available)
Traffi c Flow Data Update Details:
• Available 24 hours a day, 7 days a week
• Continuously updated
5 mi 1/20 mi
Scales
NOTE:
When driving to a destination on freeways that have traffi c fl ow data, the route line
is used to display moderate and heavy traffi c fl ow status instead of the colored bands
on the side of the road. The route line color indicates the following conditions:
• Free Flow Traffi c - A section of the blue route line will be bordered with a light
green line (this may be diffi cult to see).
• Moderate Traffi c Flow - A section of the rou te line will change from green to orange.
• Heavy Traffi c Flow - A section of the route line will change from green to red.
• Unknown Traffi c Flow - A section of the route will not be bordered with traffi c
fl ow.
Page 24
Getting Started
Navigation System
23
AcuraLink Real-Time
Traffi c
™
The navigation screen can display
continuously updated traffi c
information when available, including
fl ow (t ra ffi c speed), incidents, and
construction on freeways in major
metro areas.
The display of traffi c fl ow and incidents
on your map screen is optional and
can be turned On/Off by selecting
the “Traffi c” icon on the Icon bar (see
Showing Icons on the Map on page 63 ).
The current metropolitan areas that
have traffi c coverage can be seen on
page 150 . For more current metro coverage
information, go to
www.ac u ra.co m/realt imetra ffi c. This
link offers the following:
• The latest list of metro areas that
have AcuraLink Real-Time Traffi c
cove rage
• Detailed coverage information for
each metro area showing what roads
have traffi c speed, traffi c icons, or
both
• An AcuraLink Real-Time Traffi c
demonstration
• Frequently asked questions (FAQs)
NOTE:
• AcuraLink Real-Time Traffi c relies
on a satellite signal. It will not work
in Hawaii, Alaska, Canada, Puerto
Rico, and Mexico.
• AcuraLink Real-Time Traffi c is only
available if you have a current traffi c
subscription with XM
®
. See page 126 .
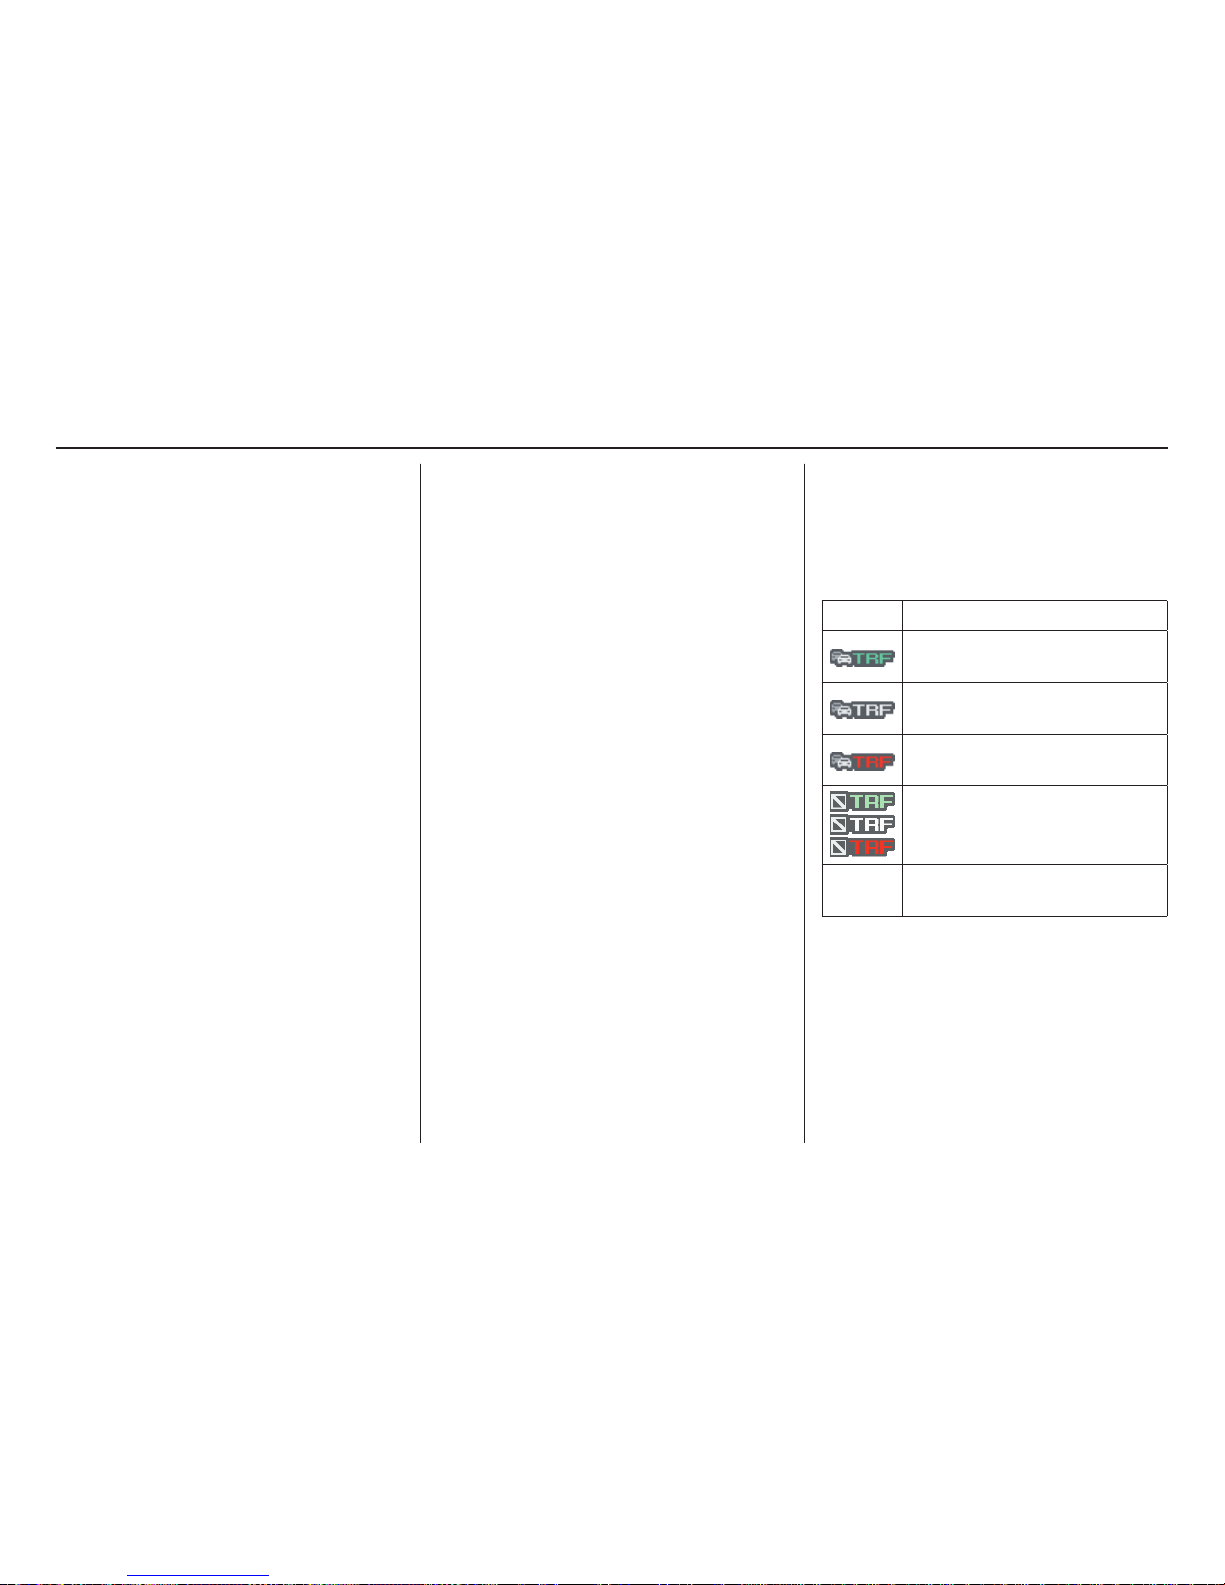
Traffi c Status Indicator
You can confi rm the reception status
of traffi c information (traffi c fl ow and
incidents). The “TRF” icon indicates
the following status:
Icon Status
Traffi c speed and incidents are
available.
Traffi c speeds or incidents are
not available.
Traffi c speeds and incidents are
not available.
• Traffi c display turned off.
• Traffi c not displayed on this
map scale.
Missing
No traffi c information available.
(Out of coverage area).
NOTE:
• Traffi c information can be turned on
or off. See Showing Icons on the Map
on page 63 .
• Traffi c information can be displayed
on the 5 miles (8 km) or more map
scale.
Page 25

Getting Started
24 Navigation System
Viewing Flow Data
Traffi c fl ow data is displayed as colored
bands on either side of the freeway (see
Traffi c Display Legend on page 22 ).
The different colored bands represent
the average road speeds as determined
by under-road sensors and other probes.
While driving to your destination on
a road that has traffi c fl ow data, your
route line color is used to display the
traffi c fl ow data. This means that
when the map scale is set to one of
the traffi c scales (1/20 through 5 mile
scale), your blue route line may appear
as alternating orange, red, or green
segments (see Traffi c Display Legend
on page 22 ).
NOTE:
A blue route line segment on a freeway
can mean one of two things:
• Under-road sensors, GPS probes,
cell phone probes, and other
methods used to collect traffi c speed
information indicate free-fl ow traf fi c.
• The road has no sensors, and traffi c
conditions are unknown (they could
be congested).
Naturally, only roads with these sensors
will show traffi c information. The
amount of fl ow data varies considerably
from one city to another. This map
display is refreshed continuously.
You can only view traffi c information
from within 200 miles of the vehicle’s
location.
NOTE:
• Traffi c fl ow and incident icons are
displayed on the 5 miles (8 km) or
less map scale.
• Not all freeways within a
metropolitan area have traffi c fl ow
data (colored bands on the side of
the freeways) - this is normal, and
you cannot assume that a lack of
data implies no traffi c.
• Not all cities have traffi c fl ow
information. See cities listed on page
150 .
• Due to freeway maintenance and
construction, traffi c fl ow may be
available only for one side of a
road, or be missing entirely for some
portion of the freeway.
• The displayed traffi c fl ow may
confl ict with other audio- or Internetbased traffi c information.
• If traffi c fl ow is not showing, verify
that the “TRAFFIC” selection for
the Icon Bar is ON, and that the icon
options for traffi c are both ON (see
page 63 ).
Page 26

Getting Started
Navigation System
25
Viewing Incident Reports
Incident reports appear as small
diamond- or circle-shaped icons (see
Traffi c Display Legend on page 22 for
examples). There are four ways to view
traffi c incidents:
• By voice control, say “Display traffi c
incidents.”
• Select “Traffi c Incidents” from the
Map menu.
• Select “Traffi c Incidents” on the
INFO screen (Main Info).
• Select an incident icon from the map
screen.
NOTE:
The fi rst method is recommended
because it works on any scale and
requires the minimum input.
Listing Traffi
c I
ncidents by Voice
Control
From the map screen (any scale), say
“Display traffi c incidents” or “Display
traffi c list.” The Traffi c Incidents
screen will be displayed, which includes
the “All” and “On Route” tabs.
When you select the “All” tab, a list
of all incidents within 200 miles from
the vehicle’s location will be displayed.
When you select the “On Route” tab, a
list of all incidents on the current route
within 200 miles from the vehicle’s
location will be displayed.
Incidents are listed by distance from
your current position outward in all
directions.
To view incident details, say the
number of the incident you want to
select. A map showing the location of
the incident will be displayed, and the
message will be read to you.
NOTE:
The “On Route” tab can be selected
only when you are en route.
Page 27

Getting Started
26 Navigation System
No Traffi c Incidents
If you say “Display traffi c incidents”
or select Traffi c Incidents, but
there are no incidents within less than
200 miles from the vehicle’s location,
the following screen will be displayed.
Selecting an Incident Icon from the
Map Screen
Zoom in or out so that you are between
the 1/20 and 5 mile scales. (The map
must be on the 1/20 to 5 mile scales to
view the incident icons). To view the
details of a specifi c incident, use the
Interface Dial to position the cursor
(round red circle) over the incident icon
you are interested in. Push in on the
Interface Dial and select “Traffi c” to
view a pop-up box summary describing
the incident.
To see the incident details, push in on
the Interface Dial. To return to your
current position map screen, press the
MAP/GU IDE button. To continue
viewing incidents in your “scrolled to”
location, press the CANCEL button.
NOTE:
• Incident reports can only be selected
between the 1/20 to 5 mile scales.
• Incident reports may be displayed on
roads that have no traffi c fl ow data
available.
• Freeway incident reports can lag
behind the actual incident, or
remain displayed after an incident
has cleared. This is normal, and is
dependent on the reporting agency
and the speed at which the data is
updated.
• The displayed incidents may confl ict
with other audio- or Internet-based
traffi c information .
Page 28

Getting Started
Navigation System
27
System Function Diagram
This diagram shows the navigation
system features, starting at the center
and working outward in layers. The
navigation program starts at “Key
ON,” and then displays the globe
screen (blue). If OK is selected on the
Disclaimer screen, the functions in the
yellow segments of the diagram become
available in the SET UP and INFO
screens.
The items above the map screen show
various methods to begin driving to
your destination (orange). You are
provided with map/voice guidance,
routing cautions, and a direction list.
While driving to your destination, use
the voice control system as much as
possible to interact with the navigation,
audio, and climate control systems
(green).
I
N
F
O
B
U
T
T
O
N
T
H
E
M
A
P
S
C
R
E
E
N
R
E
M
I
N
D
E
R
S
(pg. 19)
C
A
L
E
N
D
A
R
(
M
A
P
/
V
O
I
C
E
G
U
I
D
A
N
C
E
,
R
O
U
T
I
N
G
C
A
U
T
I
O
N
S
,
D
I
R
E
C
T
I
O
N
S
L
I
S
T
)
-
D
R
I
V
I
N
G
T
O
Y
O
U
R
D
E
S
T
I
N
A
T
I
O
N
-
IOV :EC
"PLEH"
)LLA(
(pg.89)
:ECIOV
NOITAMROFNI"
"NEERCS
(pg.83)
:ECIOV
ot( "UNEM"
)etuor egnahc
(pg.76)
:ECIOV
F WOH"GNOL RO RA
NITSED EHT OT "?NOITA
(pg.59)
VOICE:
"DISPLAY (OR SAVE)
CURRENT LOCATION"
(pg.21)
:ECIOV
EMIT TAHW"
"?TI SI
(pg.167)
IOV:EC
"OIDUA"
(pg.171)
IOV:EC
ETAMILC
PMET ,NAF
(pg.170)
RETNE
YAWSTNIOP
)77 .gp(
WEIV
CIFFART
(pg.25)
IOV :EC
O MOOZ/NI MOOZ""TU
(pg. 168)
IOV :EC
"SNOCI YALPSID/EDIH"
(pg.168)
CIFFART WEIV
(pg.25)
CALL (pg.83)
INICIDENT LIST (pg.25)
FORECAST
WARNING (pg.85)
READ (pg.82)
LIST (pg.89)
CONTRAST (pg.96)
BLACK LEVEL (pg.96)
VOLUME (pg.97)
PERSONAL
INFORMATION (pg.97)
INTERFACE
DIAL FEEDBACK (pg.97)
CLOCK ADJUSTMENT
(pg.116)
ROUTING GUIDANCE
(pg.107)
BASIC
(pg.106)
LIST
(pg. 89)
ENTER (pg. 91)
LIST
(pg. 92)
(pg. 92)
MATH
VERSION
(pg. 94)
DOWNLOAD
(pg. 94)
CALL
(pg. 94)
SSERP
KO
CALENDAR
SCENIC
ROAD INFO
CALCULATOR
SYSTEM/DEVICE
INFO
MAP DATA
UPDATE
STATUS
ROADSIDE
ASSISTANCE
/DNAB TCELES
YCNEUQERF
ECNALAB LOV
DC
SNOITCNUF
REHTO
DUA OI
SSENTHGIRB
TUO/NI MOOZ
T
H
E
D
I
S
C
L
A
I
M
E
R
S
C
R
E
E
N
(
p
g
.
1
8
)
VOICE: "FIND
NEARES
T..."
ATM , ET C.
(pg. 60)
A TCELES
ANITSED NOIT
HTIW
FRETNI LAID ECA
(pg. 46)
:ECIOV
"EMOH OG"
(pg. 50)
:ECIOV
ROF "UNEM"
RETNE
NOITANITSED
NEERCS
(pg. 28)
EUNITNOC
EHT OT
NOITANITSED
)EMUSER(
TRATSER RETFA
(pg. 81)
G
L
O
B
E
S
C
R
E
E
N
KEY
ON
CELLULAR
PHONE
TRAFFIC
WEATHER
MESSAGE
VOICE INFO
BRIGHTNESS (pg.96)
SET UP
(MAIN)
V
O
I
C
E
C
O
M
M
A
N
D
S
OFNI
NEERCS
pg. 167)
(
DUA
pg. 171)
( OI
RTNOC ETAMILC LO
pg. 170)(
COLOR (pg.119)
ACULALINK (pg.126)
LANGUAGE (pg.122)
WALLPAPER (pg.122)
RESET FACTORY DEFAULT (pg.124)
CLEAR PERSONAL DATA (pg.125)
TFC & WTHR STATUS (pg.126)
VEHICLE
(pg.117)
SET UP
(OTHER)
CHECK
(pg. 92)
For more information,
see your owner’s
manual.
OIDUA
NOTTUB
(pg. 10)
(
p
g
.
8
3
)
(
p
g
.
8
3
)
I
N
F
O
B
U
T
T
O
N
Page 29

Entering a Destination
28 Navigation System
When you press the DEST/ROUTE
button, the display changes to:
To display the “Dest. MENU 1” tab
or the “Dest. MENU 2” tab, move the
Interface Dial to the left or right.
NOTE:
If you press the DEST/ROUTE button
while en route, the DEST screen
(Route) will be displayed. To enter the
destination, select the “Dest. MENU
1” tab by moving the Interface Dial to
the right.
Address (see page 29 )
You can enter the street, city, state, or
ZIP code to search for your destination.
Address Book (see page 34 )
You can select locations stored in the
Address Book as destinations. The
addresses of these locations can also
be saved. The system can store up to a
combined total of 200 DRIVER 1 and
DRIVER 2 addresses.
Previous Destinations (see page 35 )
When you enter a destination with
any of the available selections (except
Address Book, Go Home 1 and Go
Home 2), the last 50 destinations are
saved by the system. Use this selection
to choose a destination again.
NOTE:
If Previous Destinations is grayed
out, there are no Previous Destinations
entered.
Place Name (see page 36 )
You can input the names of places to
search for your destination.
Place Category (see page 37 )
The system has been programmed
with the locations of many businesses,
parks, hospitals, etc. This selection lets
you search these by category, name, or
Zagat 2010 (for restaurant information).
Go Home 1 (see page 50 )
This selection allows you to select Home
Address 1 as a destination.
NOTE:
If you have no home address entered,
the system prompts you for one.
Place Phone No. (See page 43 )
You can search for the destination by
inputting a place’s phone number.
Page 30

Entering a Destination
Navigation System
29
ZAGAT 2010 (see page 43)
This selection allows you to fi nd a
restaurant by the ZAGAT Rating
information.
Coordinate (See page 44 )
You can search for the destination by
inputting the latitude and longitude for
the destination.
Intersection (see page 45 )
This selection allows you to enter the
names of two intersecting streets in
a city. This is useful if you know the
general location of your destination, but
not the exact address.
Map Input (See page 46 )
You can select a destination from the
MAP screen.
Go Home 2 (See page 50 )
If you select this feature, you can select
Home Address 2 as a destination.
By Address
After you select Address from the
DEST screen (Dest. MENU 1), the
display changes to:
Tip:
• When entering an address by voice, it
is more effi cient to say the city name
fi rst, then the street name.
• When entering an address by the
Interface Dial, it is usually easier
to enter the street fi rst. A city or cities
that the street appears in will be
displayed. For your convenience, you
do not have to enter both city and
street.
NOTE:
• If you fi nd that your city is not listed,
it may be part of a larger metropolitan
area. Try entering the street fi rst.
• Prior to departure, you can set areas
to avoid. The system then includes
them in its calculations for the
destination you have entered. See
Edit Avoid Area on page 112 .
Selecting the State or Province
The state you are in is displayed at
the top of the screen. If your desired
destination is in another state, select
CHANGE STATE by moving the
Interface Dial to the left or right.
The display then changes to the
Select a state screen. Use the voice
control system and say the name or
corresponding number of the state, or
rotate the Interface Dial knob to
select the state.
You can select either of the Canada/
AK, USA, or Mexico tab by moving
the Interface Dial to the left or right.
If you select Canada/AK, Canada and
Alaska will be displayed. If you choose
USA, the American mainland, Hawaii,
Puerto Rico will be displayed. If you
select Mexico, the states of Mexico
will be displayed.
Page 31

Entering a Destination
30 Navigation System
Selecting the ZIP Code
If you rotate the Interface Dial knob
and select ZIP code while on the Find
address by screen, the Enter ZIP
Code screen will display.
Use the Interface Dial to input the
ZIP code. If the ZIP code is found, the
Select a city screen will appear, listing
all cities with that ZIP code.
If you only know the partial ZIP code,
input the fi rst few digits, move the
Interface Dial down, and select List.
Tip:
This system is enabled for both
American and Canadian ZIP codes.
Selecting the City
This is helpful if the street runs through
several cities, and you know what city
includes the street. The city you are in
is displayed on the screen.
By Voice Control:
Say “City” on the Find address by
screen, and the display changes to the
Say city name screen. Say the city
name and the searching will begin.
If the city you want is displayed on the
screen, say “Select current city.” If your
desired destination is in another city,
say or enter that city.
NOTE:
To improve voice recognition when
saying the city name, pronounce the
syllables as clearly as possible.
The Say city name screen will not
display when Puerto Rico or Mexico
has been chosen, or when a language
other than English has been selected.
You will have to enter the city name
using the Interface Dial.
To enter the city name by voice
spelling, say CHANGE TO SPELL
MODE on the Say city name screen,
and the display will change to the Enter
city name screen.
Say the city name by saying individual
letters, or words that represent the
letters, one at a time.
Page 32

Entering a Destination
Navigation System
31
The system has a talk back function.
If your spoken letter is not recognized,
the system will talk back to you. For
example, if you say “E” but the system
does not recognize the command, it
will ask you, “Please select the number
of the input letter from the list,” and the
following pop-up box will appear:
You should select a letter by saying the
number.
Alternatively, to improve voice
recognition, you can say “Echo” or
“Edward” instead of “E.” See pag e 17 for
a list of available words for each letter.
By Interface Dial:
Select City, and the display then
changes to the Enter city name screen.
Tip:
After the display has been changed
to the Enter city name screen, the
name of the city where your vehicle is
currently located will be displayed.
Vehicle position may not be displayed
when the automobile is traveling off
road, you can select the City that is
currently displayed and conduct a
Street search by moving the Interface
Dial down.
Use the Interface Dial to enter the
name of the city.
The system will display a list of city
names, with the closest match to the
name you entered at the top of the list.
Select the number (1-6) of the desired
city from the list.
You can also enter part of the name and
look for the name you want from the
list that appears.
Tip:
For name input, you don’t need to enter
spaces and symbols (&, -, %, etc.). The
system is also enabled for partial match
searches. For example, when you
search “LOS ANGELES,” it is on the
list of search results if you input “LOS”
or “ANGELES.”
Listings of cities and towns in the nondetailed coverage area may have an
asterisk “*” next to their names. If you
select one, a pop-up box is displayed
saying, “No detailed street data...”, and
a street address cannot be entered (see
Map Coverage on page 136 ). Try entering
the street fi rst, and then select the city if
available.
Page 33

Entering a Destination
32 Navigation System
Select DESTINATION MAP and use
the Interface Dial to select an icon,
approximate area, or street you wish to
choose as your destination. Otherwise,
a central location of the city will be
selected. If you select a point of interest
(POI) or road in an unverifi ed area, you
may or may not have routing in these
areas. See Map Overview on page 6 .
Selecting the Street
By Voice Control
After you have selected the city, or if
you say “Street” on the Find address
by screen, the display changes to the
Say street name screen. Say the street
name and the searching will begin.
The Say street name screen will not
display when Puerto Rico or Mexico
has been chosen.
To enter the street name by voice
spelling, say or select CHANGE TO
SPELL MODE on the Say street
name screen, and the display will
change to the Enter street name
screen.
Say the street name by saying
individual letters or numbers, or words
that represent the letters, one at a time.
The system has a talk back function.
If your spoken letter is not recognized,
the system will talk back to you. For
example, if you say “E” but the system
does not recognize the command, it
will ask you, “Please select the number
of the input letter from the list”, and the
following pop-up box will appear:
Page 34

Entering a Destination
Navigation System
33
You should select a letter by saying the
number.
Alternatively, to improve voice
recognition, you can say “Echo” or
“Edward” instead of “E.” See pag e 17 for
a list of available words for each letter.
By Interface Dial:
After you have selected the city, or if
you selected Street in the beginning,
the display changes to the Enter street
name screen. Use the Interface Dial
to enter the name of the street (e.g.,
ELM or 42ND) that is your destination.
When entering the names of major
freeways, it is possible to use the
following abbreviations. For interstates,
use an “I” (I-10). For U.S. freeways,
use “US” (US-18). For state freeways,
use the two character state designation
(CA-101). For county roads, use the
appropriate designation (G-2, for
example).
Tip:
When entering a street, you do not need
to enter the direction (N, S, E, W) or
the type (St, Ave, etc.). The system will
automatically determine that for you,
based on your entered city and street
number.
The system will display a list of street
names, with the closest match to the
name you entered at the top of the list.
Select the number (1-6) of the desired
street from the list.
Entering the Street Number
After you have completed the street
name, the display changes to the Enter
street number screen. Use the voice
control system and say the address
number as a continuous string of
numbers. For example, the address 1527
should be spoken as “One, fi ve, two,
seven.” You can also use the Interface
Dial to enter the street number.
Some address numbers may not be
available on the selected street. For
example, let’s say the individual address
ranges for a selected street name are
1 - 20 and 9,000 - 10,000, with an
overall range shown on the display of 1
to 10,000. If you try to enter a number
outside the individual address ranges
such as 500, the system will show this
number as unavailable (grayed out).
• When using the Interface Dial, the
system only allows you to choose
available address numbers.
• When using voice control, the
system beeps if you try to select an
unavailable (grayed out) address
number.
Page 35

Entering a Destination
34 Navigation System
If you did not select a city in the
beginning, the street name you selected
might appear in more than one city. The
system will give you a list of cities that
the street appears in. Select the desired
city from the list. The system then
displays the Calculate route to screen
(see Driving to Your Destination on
page 52 ).
Tip:
If the particular address you want
cannot be found, select Map Input on
the DEST screen (Dest. MENU 2) and
use the Interface Dial to select the
appropriate location on the map (see
By Map Input on page 46 ).
Select DESTINATION MAP and use
the Interface Dial to select an icon,
approximate area, or street you wish to
choose as your destination. Otherwise,
a central location of the street will be
selected. If you select a point of interest
(POI) or road in an unverifi ed area, you
may or may not have routing in these
areas. See Map Overview on page 6 .
By Address Book
This selection allows you to choose a
personal address entry for a destination.
After you select Address Book from
the DE ST screen (Dest. MENU 1), the
display changes to:
If an Address Book PIN has been set
in SETUP, the system prompts you to
enter your PIN. Say or enter your PIN.
If the PIN has not been entered, the
system displays the list.
To switch the list between Driver 1 or
Driver 2, move the Interface Dial
down.
NOTE:
When changing settings related to the
PIN, please see Address Book PIN
on page 102 .
The system then displays a list of the
places entered in your personal Address
Book. Using the Interface Dial, you
can sort the displayed addresses by
ALL, BUSINESS, PERSONAL,
UNFILED, or by other categories you
may create.
Scroll through the list to fi nd your
desired destination. After you select it,
the system then displays the Calculate
route to screen (see Driving to Your
Destination on page 52 ).
Tip:
If you select New Address in the
list, you can store a new address
in the personal Address Book. For
information on inputting New Address,
see Address Book on page 97 .
Page 36

Entering a Destination
Navigation System
35
Adding Addresses to the
Personal Address Book
There are three ways to enter addresses
to the personal Address Book:
• Selecting New Address on the
Select an address screen (see page
98 ).
• Entering them to the personal
Address Book feature in SET UP (see
page 98 ).
• Adding them to the Address Book
directly from the Calculate route to
screen (see page 52 ).
NOTE:
• Destinations chosen from the
Address Book do not show up in
Previous Destinations.
• Prior to departure, you can set areas
to avoid. The system then includes
them in its calculations for the
destination you have entered. See
Edit Avoid Area on page 112 .
• For information on the available
Voice Command Index , see on page
167 .
By Previous Destinations
Every time you route to a destination,
that destination is saved by the system.
Up to 50 destinations can be stored.
Select Previous Destinations from
the DE ST screen (Dest. MENU 1) to
choose one of those destinations.
After you select Previous
Destinations, the display lists the last
50 destinations entered, with the most
recent appearing fi rst.
NOTE:
• If Previous Destinations is
grayed out, there are no Previous
Destinations entered.
• Neither your home address nor the
personal Address Book is displayed
on the Previous Destinations list.
Scroll through the list and say the line
number (1-6) of the destination, or
select the desired destination you want.
Once you select the desired destination,
the system then displays the Calculate
route to screen (see Driving to Your
Destination on page 52 ).
NOTE:
• Prior to departure, you can set areas
to avoid. The system then includes
them in its calculations for the
destination you have entered. See
Edit Avoid Area on page 112 .
• For information on the available
voice commands, see Voice
Command Index on page 167 .
Page 37

Entering a Destination
36 Navigation System
By Place Name
If you select Place Name from the
DEST screen (Dest. MENU 1), the
display will switch to the Enter a
place name screen. Use the Interface
Dial to input the location name. You
can input this place name by spelling
out the word one letter at a time.
Well-known facilities and other
businesses known by more than one
name can be searched for by multiple
name queries.
If you select a restaurant name with a
icon next to it, move the Interface
Dial to the right to view the Zagat
information.
NOTE:
• Prior to departure, you can set areas
to avoid. The system then includes
them in its calculations for the
destination you have entered. See
Edit Avoid Area on page 112 .
• ZAGAT information is not displayed
by fi nding destination in Mexico.
The place name closest to what you
input will be displayed at the top of
the list. If the place falls into multiple
categories, the categories are listed
after making a selection. If you move
the Interface Dial down while the list
is displayed, the display will switch to
SORT BY DISTANCE or SORT BY
NAME.
NOTE:
When there are more than 20,000
destinations, the ordering of the items
in the list cannot be sorted by distance
or name.
When you select a location, the system
displays the Calculate route to screen.
(See Driving to Your Destination o n
page 52 .)
Page 38

Entering a Destination
Navigation System
37
By Place Category
After you select Place Category from
the DE ST screen (Dest. MENU 1), the
display changes to:
If you select a category from the list,
you can select even more detailed subcategories.
Let’s assume you want to fi nd a coffee
shop (restaurant) called “Bucks.”
• If you know the phone number of the
coffee shop, select Place Phone
No., then enter the 10-digit number
with area code. This is the quickest
way to fi nd it. See By Place Phone
Number on page 43 .
• The second best method is to select
Place Category, then Restaurant,
then CAFÉ/COFFEE SHOP, and
then enter the keyword “Bucks.” The
list will include all restaurants that
have the letters “bucks” anywhere in
the name.
• You can try to enter “Bucks” using
Place Name, but you may have
to search through a list that might
include Bucks Welding, Bucks
Surplus, etc.
NOTE:
• Prior to departure, you can set areas
to avoid. The system then includes
them in its calculations for the
destination you have entered. See
Edit Avoid Area on page 112 .
• You can enter the desired destination
using the voice control system. For
information on the available voice
commands, see Voice Command
Index on page 167 .
Subcategories
If you select a subcategory and move the
Interface Dial down, the subcategory
is stored to “My Favo r i tes.” A
maximum of 30 subcategories may be
stored.
Tip:
If you are not sure of the spelling of
a place, the best way to fi nd it is to
use the keyword search. Select Place
Category, choose a category and
subcategory from the menus, then
select Search by Keyword, and
enter the partial name.
Page 39
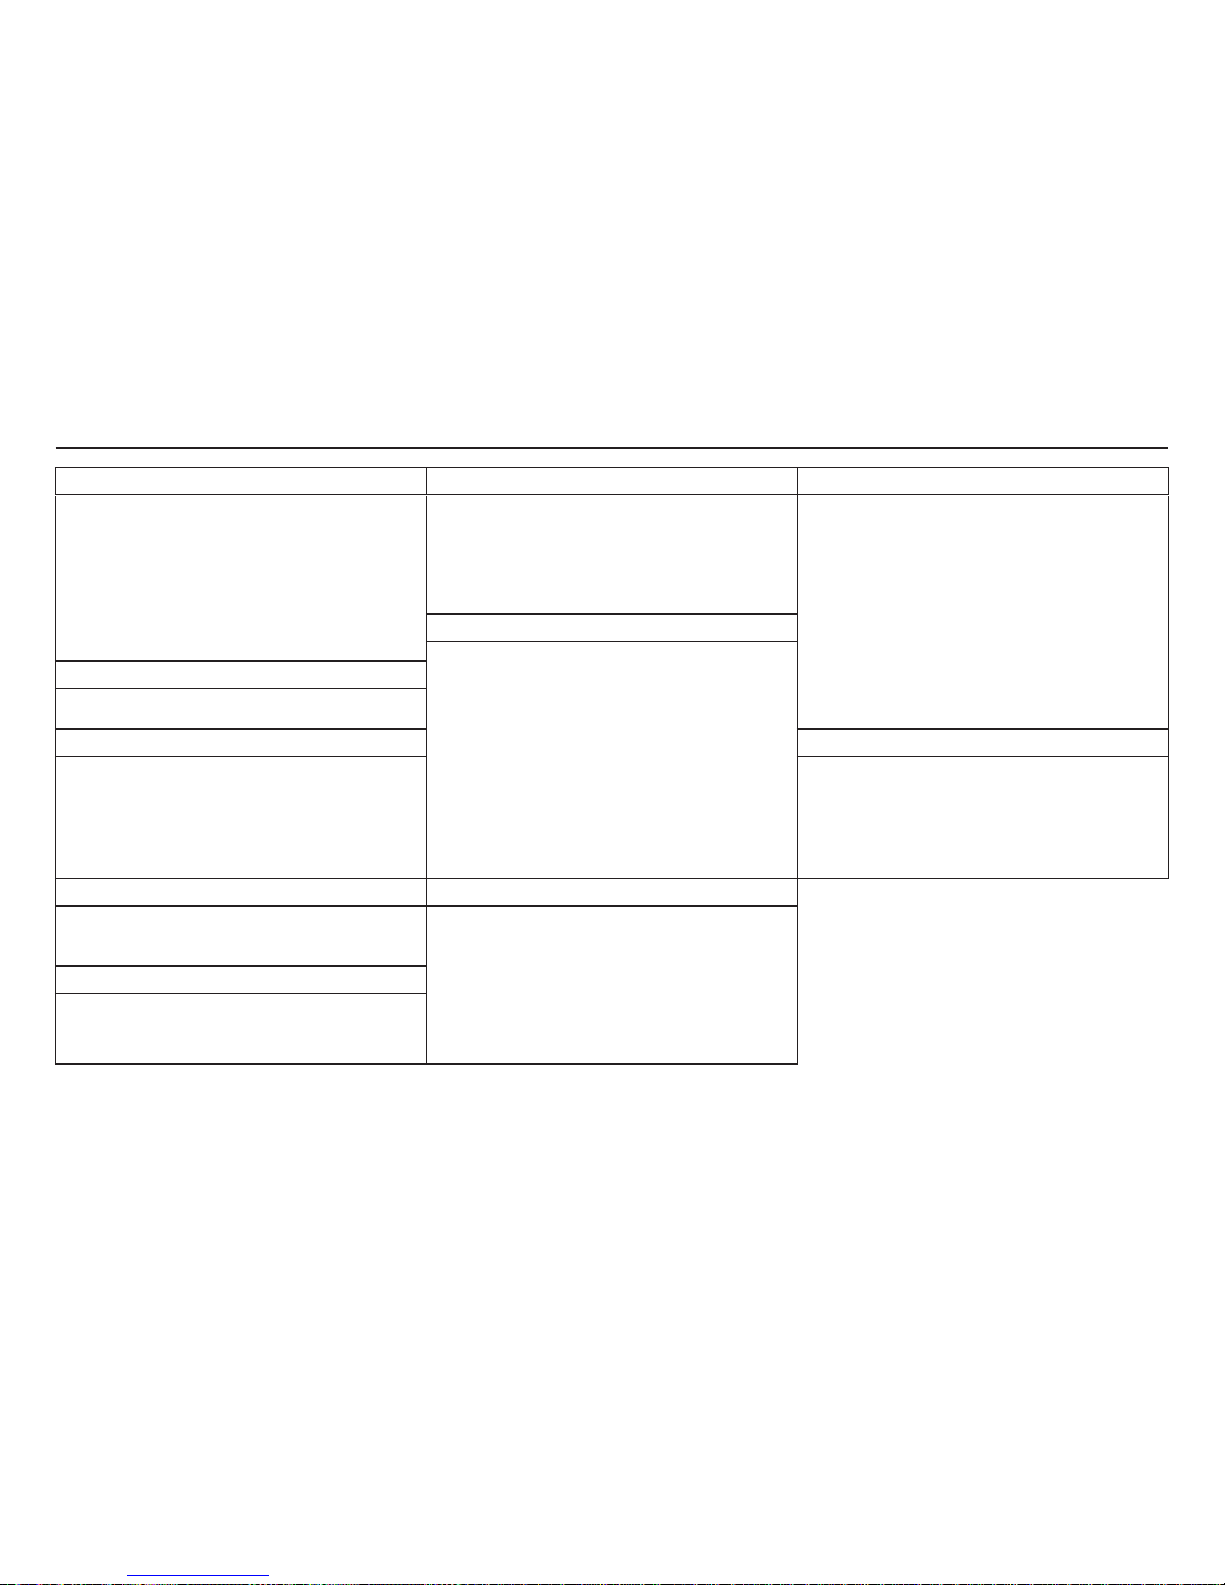
Entering a Destination
38 Navigation System
Auto Service Leisure Travel
ALL TYPES(AUTO SERVICE)*
1
ACURA DEALERS
ACURA ROADSIDE ASSISTANCE
HONDA DEALERS
GAS STATION
HYDROGEN STATION
AUTO PARTS & ELECTRONICS
AUTO REPAIR & MAINTENANCE
CAR WASH & DETAILING
MOTORCYCLE DEALERS
OTHER CAR DEALERS
PAR KING GARAGE/HOUSE
PARKING LOT
RENTAL CAR AGENCY
ROADSIDE ASSISTANCE
ALL TYPES(LEISURE)*
1
AMUSEMENT PARK
GOLF COURSE
HISTORICAL MONUMENT
MARINA
MOVIE THEATER
MUSEUM
PAR K /REC REATION AREA
PERFORMING ARTS
SPORTS COMPLEX
TOURIST ATTRACTION
ALL TYPES(TRAVEL)*
1
AIRPORT
AUTOMOBILE CLUB
BED & BREAKFAST
BUS STATION
CAMPING
COMMUTER RAIL STATION
FERRY TERMINAL
HOTEL/MOTEL
NAMED PLACE
PARK & RIDE
PAR KING GARAGE/HOUSE
PARKING LOT
RENTAL CAR AGENCY
REST AREA
SKI AREA
TOURIST ATTRACTION
TOURIST INFORMATION
TRAIN STATION
TRAVEL AGENCY
TRUCK STOP/PLAZA
Restaurant
*2
ALL TYPES(RESTAURANT)*
1
ALL TYPES(ZAGAT ONLY)*
3
AMERICAN
CHAIN RESTAURANT
CAFÉ/COFFEE SHOP
CALIFORNIAN
CHINESE
CONTINENTAL
FAST FOOD
FRENCH
GERMAN
GREEK
ICE CREAM/DESSERT
INDIAN
ITALIAN
JAPANESE
KOREAN
MEXICAN
PIZZA
SEAFOOD
THAI
VEGETARIAN
VIETNAMESE
OTHER FOOD
Banking
ALL TYPES(BANKING)*
1
ATM
BANK
CHECK CASHING / MONEY TRANSFER
Community Advanced
ALL TYPES(COMMUNITY)*
1
BUSINESS
CITY HALL
CIVIC/COMMUNITY CENTER
CONVENTION/EXHIBITION CENTER
COURT HOUSE
HIGHER EDUCATION
LIBRARY
POST OFFICE
SCHOOL
If the category you want is not listed, you can try to fi nd it with a
keyword. When you select this option, the display changes to the Enter
a category name screen. If the system fi nds any categories with the
keyword you entered, the display changes to the Select a category
screen. Select the desired category.
Emergency Shopping
ALL TYPES(EMERGENCY)*
1
ACURA ROADSIDE ASSISTANCE
HOSPITAL
POLICE STATION
ROADSIDE ASSISTANCE
VETERINARIAN
ALL TYPES(SHOPPING)*
1
ACCESSORIES/JEWELRY
AUTO PARTS & ELECTRONICS
BOOKS/MUSIC/VIDEO
CLOTHING/SHOES/BAGS
FURNITURE/HOME FURNISHING
GROCERIES/SUPERMARKET
HOME IMPROVEMENT
MALL/DEPARTMENT STORE
OFFICE SUPPLIES/ELECTRONICS
PHARMACY/DRUG STORE
PET FOOD/SUPPLIES
SEWING/LINEN
SPORTING GOODS
TOYS/ARTS/CRAFTS
Lodging
ALL TYPES(LODGING)*
1
BED & BREAKFAST
HOTEL/MOTEL
*1: When trying to fi nd a specifi c subcategory, select the category ALL TYPES. Some subcategories may be miscategorized.
*2: See page 43 additional information on Restaurants.
*3: For information on the Zagat-surveyed restaurants, see Key to Zagat Ratings on page 94.
Page 40
Entering a Destination
Navigation System
39
Finding a restaurant
The ZAGAT SURVEY for some
restaurants is available in the system.
See the INFO screen (Other), “Key to
ZAGAT Rating” for an explanation of
these ratings (see page 94).
NOTE:
Restaurant information in Mexico
cannot be searched with ZAGAT2010.
On the Select a place screen,
restaurants with a Zagat Rating have
a
icon at the end of the line. To list
only restaurants with Zagat Reviews,
say “Zagat” or select ZAGAT 2010.
You can view the complete Zagat
Review for a selected restaurant by
selecting the
tab.
By voice, select the
tab by saying
“Zagat list number X” (where X is the
line number 1-3). Alternatively, use the
Interface Dial to fi rst select the line
item, and move the Interface Dial to
the right to view the survey.
Say “Read List” or push in on the
Interface Dial, and the review will be
read to you. Move the Interface Dial
down to display the Calculate route to
screen.
NOTE:
Scrolling through the Zagat Review is
disabled when the vehicle is moving.
“Food,” “Decor,” and “Service”
categories (red frame) are rated using
numbered values (e.g., 22, 21, 20 etc.)
“Cost” (white frame) is the average cost
of a meal (including drink and tip). If
unavailable then estimated cost symbols
are shown:
“VE”: Very Expensive
“E”: Expensive
“M”: Moderate
“I”: Inexpensive
The symbols, if displayed (blue frame),
indicate the following information:
open on Sunday
open on Monday
open for lunch
serving after 11 PM
no credit card accepted
Page 41

Entering a Destination
40 Navigation System
After selecting a subcategory, the
system will give you the options of
Place Name, Sort by Distance to
Travel, City Vicinity, or Search by
Keyword with the following screen:
If you selected Restaurant as a
category, Sort by ZAGAT Rating
will be included as an option.
Place Name
When you select this option, the display
changes to Enter a place name
screen. Enter the place name, using
the Interface Dial. After entering the
place name, if you move the Interface
Dial down while the list is displayed,
the display will switch to SORT BY
DISTANCE or SORT BY NAME.
Once you select a place, the system then
displays the Calculate route to screen
(see Driving to Your Destination on
page 52 ).
NOTE:
When there are more than 20,000
destinations, the ordering of the items
in the list cannot be changed to listing
by order of distance or alphabetical
order
City Vicinity
The system allows you to fi nd points of
interest in the vicinity of the city you
entered. When you select this option,
the display changes to Enter city name
screen. Enter the name of the city using
the Interface Dial. If the system does
not fi nd an exact match, select LIST
when you fi nish entering the name of
the city. Select a desired city from the
list.
Once you have selected the city, the
display changes to Enter a place
name screen. Enter the name of the
place using the Interface Dial.
The system searches within a 20-mile
radius of the city center. If more than
1000 POIs are located, only the fi rst
1000 are displayed.
Once you select a place, the system then
displays the Calculate route to screen
(see Driving to Your Destination on
page 52 ).
Page 42

Entering a Destination
Navigation System
41
Sort by Distance to Travel
When you select this option, the system
gives you a list of all the places in the
subcategory. This list is arranged by
distance from your current location,
with the closest at the top of the list.
The distance and direction to the
destination at the cursor position in
the list are shown on the screen. The
distance shown is straight line distance
(as the crow fl ies), not driving distance.
Say or select the number (1-4) of the
desired destination from the list.
Once you select a place, the system then
displays the Calculate route to screen
(see Driving to Your Destination o n
page 52 ).
Search by Keyword
If you do not know the exact name of
the destination, you can fi nd the place
with a keyword. When you select this
option, the display changes to:
You can fi nd your destination with a
keyword using the Sort by Distance
to Travel option or City Vicinity
option.
If you select the Sort by Di s tance
to Travel optio n, the Enter keyword
for place screen appears. Enter the
keyword us in g the Interface Dial. If
the system does not fi nd an exact match,
select LIST when y o u fi nish ente ring the
keywor d. The sy s tem starts searching for
places that match the entered keyword. If
you see y o ur desired place , se lect it from
the list. If not, scroll through the list to
fi nd the desired place.
If you mo ve the Interface Dial down,
the scope of the search can be increased.
When there are a large number of search
results, the number of locations will
increase to 100, 200, and up to 1 000
locations. When the number of locations
is 100 or less , you can increase the scope
to 500 miles, 1000 miles, or the entire
U.S . by using Search radius.
If you select the City Vicin ity option,
the Enter city name screen appears.
Enter the name of the city using the
Interface Dial. The sys te m will disp l ay
a list of city names, with the closest
match to the name you entered at the top
of the list. Select your desired city name
from the list. Once you have selected
your desired city name, the Enter
keyword for place screen appears.
Enter the keyword using the Interface
Dial to specify the desired place.
Once you select a place, the system then
displays the Calculate route to screen
(see Driving to Your Destination on
page 52 ).
Page 43

Entering a Destination
42 Navigation System
Sort by Zagat Rating
This item appears on the Select one
of the Following screen only when
“Restaurant” has been selected as the
category.
When you use this option, you can
search for restaurants using the Zagat
Ratings information.
Food, Décor, Service - When you
select Food, Décor, or Service, the
restaurant will be listed by rating value.
Cost - When you select Cost, the
restaurant will be listed by the average
cost of a meal (including drink and tip).
When you select a sorting method, the
list of restaurants will appear.
Copyright© 201 0 Zagat Survey, LLC. All rights reserved.
You can see the survey for a listed item
by selecting the “Z” tab, or by saying
“Zagat list number X” (where X is the
number 1-3).
Once you select a restaurant, the system
then displays the Calculate route to
screen (see Driving to Your Destination
on page 52 ).
NOTE:
• Selecting this sorting method will
show you Zagat’s highest-rated
restaurants by the options, and not
necessarily by distance from your
current location.
• For details on the ratings and
symbols, say “Key to Zagat rating”
or select the “?” tab using the
Interface Dial.
• Restaurant information on Mexico
cannot be search with ZAGAT2010.
Page 44

Entering a Destination
Navigation System
43
By Place Phone Number
You can select a destination by phone
number. Only phone numbers saved
in the system are recognized. The
phone numbers of private residences
and numbers entered in your private
address book are not in the system. If
you select Place Phone No. on the
DEST screen (Dest. MENU 2), the
display will switch to the Enter Phone
Number screen. Use the Interface
Dial to enter the phone number.
NOTE:
Prior to departure, you can set areas to
avoid. The system then includes them in
its calculations for the destination you
have entered. See Edit Avoid Area on
page 112 .
When you edit the phone number,
continue pushing in on Interface Dial
more than three seconds to display
the Edit Mode screen. You can move
the position of the cursor by rotating
Interface Dial knob. To return the
Enter phone number screen, move
Interface Dial down.
After entering the number, move the
Interface Dial down and select OK.
Multiple listings for the same phone
number may be shown.
Tip:
When using the voice control system,
the entry should be spoken as a
continuous string of numbers. For
example, the telephone number (310)
555-4000 should be spoken as “Three,
one, zero, fi ve, fi ve, fi ve, four, zero, zero,
zero. ”
By ZAGAT
®
2010
The ZAGAT 2010 option allows you to
fi nd a restaurant by the ZAGAT Rating
information. When you select ZAGAT
2010 on the DEST screen (Dest.
MENU 2), the system lets you select
the metro area, neighborhood, and food
type to search the restaurant you like.
After you select the food type, the
following display appears:
Page 45

Entering a Destination
44 Navigation System
By Coordinate
If you select Coordinate from the
DEST screen (Dest. MENU 2),
the display will change to the Enter
Latitude screen. Use the Interface
Dial to input the latitude.
NOTE:
Latitude and longitude must be entered
up to the seconds’ value.
NOTE:
Prior to departure, you can set areas to
avoid. The system then includes them in
its calculations for the destination you
have entered. See Edit Avoid Area on
page 112 .
After entering the latitude, move the
Interface Dial down and select OK.
The display will change as indicated in
the following paragraph.
On the Enter Longitude screen,
use the Interface Dial to input the
longitude.
With the selection of Coordinate, it
is assumed that you are searching for
the destination within the area that is in
the closest proximity. The display will
change as indicated on the next page.
Move the Interface Dial to fi nd the
desired destination. The map and
crosshairs move in the same direction.
If so desired, you can also rotate the
Interface Dial knob and change the
scale of the map. When the crosshairs
are on the desired icon, map location,
or road, push in on the Interface Dial.
The address for this location will be
displayed at the very top of the screen.
The yellow box (shown in scales above
1 mile) denotes the area that can be
viewed with the Interface Dial when
the current map is clicked.
Page 46

Entering a Destination
Navigation System
45
NOTE:
Information icons are displayed at
scales from 1 mile to 1/4 mile, POI
icons are displayed at 1/8 mile or less,
and roads are displayed at 1/4 mile or
less.
When you fi nd the desired address,
press on the Interface Dial again. If
it is not the desired address, change
the location of the crosshairs with
the Interface Dial. Push in on the
Interface Dial again to display a new
address.
If you select a single icon or a section
of road within the crosshairs, the
following screen appears. Select Set
as Dest. and calculate the route for the
destination that you selected.
By Intersection
After you select Intersection from
the DE ST screen (Dest. MENU 2), the
display changes to:
To select an intersection outside the
state you are currently in, select the
state. For details of how to select
a state, see Selecting the State or
Province on page 29 .
Next, select the city where the
intersection is located. For details of
how to select a city, see Selecting the
City on page 30 .
Last, select the two streets which
intersect. For details of how to select a
street, see Selecting the Street on page 32 .
If the two streets that you have selected
do not intersect, no intersection will
appear.
Tip:
When entering an address, it is usually
easier to enter the street fi rst. A cit y
or cities that the street appears in will
be displayed. For your convenience,
you do not have to enter both city and
street.
NOTE
• If you fi nd that your city is not
listed, it may be part of a larger
metropolitan area. Try entering the
street fi rst.
• Prior to departure, you can set areas
to avoid. The system then includes
them in its calculations for the
destination you have entered. See
Edit Avoid Area on page 112 .
Page 47

Entering a Destination
46 Navigation System
By Map Input
After you select Map Input from the
DEST screen (Dest. MENU 2), the
display changes to:
Select Current Position, City, State,
or USA, Canada, and Mexico to
display the map.
NOTE:
• Prior to departure, you can set areas
to avoid. The system then includes
them in its calculations for the
destination you have entered. See
Edit Avoid Area on page 112 .
• For information on the available
voice commands, see Voice
Command Index on page 167 .
Showing the Map of Current
Position
The Current Position selection
assumes that you are looking for a
destination in the immediate area. The
display changes to:
The red arrow indicates your vehicle
position. Find your desired destination
by moving the Interface Dial up and
down and to the left and right. The map
and crosshairs will move in the same
direction.
The yellow box indicates the area you
will see when you click on the current
map with the Interface Dial. The
scale will decrease each time you push
in the Interface Dial.
If desired, rotate the Interface Dial
knob to change the map scale. When
you have the crosshairs on the desired
icon, polygon, or road, push in on the
Interface Dial. The address of the
location will appear at the top of the
screen (at scales less than 1 mile).
NOTE:
Information icons are displayed at
scales from 1 mile to 1/4 mile, POI
icons are displayed at 1/8 mile or less,
and roads are displayed at 1/4 mile or
less.
If this is the desired address, push in
on the Interface Dial again. If not,
use the Interface Dial to reposition
the crosshairs, then push in on the
Interface Dial again to display the
new address.
If you select a single icon or road
segment within the target mark, the
following screen appears. Select Set
as Dest. to calculate a route to the
selected destination.
Page 48

Entering a Destination
Navigation System
47
If you select multiple icons within the
cursor radius, the following screen
appears.
Select an item from the list.
Then select OK to calculate a route to
the selected destination.
Showing the Map of City
You can search for a city name in all
coverage areas.
By Voice Control:
Say “City” on the Show map of
screen, and the display changes to the
Say city name screen. Say the city
name and the searching will begin.
NOTE:
To improve voice recognition when
saying the city name, pronounce the
syllables as clearly as possible.
Page 49

Entering a Destination
48 Navigation System
The Say city name screen will not
display when Puerto Rico or Mexico
has been chosen, or when a language
other than English has been selected.
To enter the city name by voice
spelling, say CHANGE TO SPELL
MODE on the Say city name screen,
and the display will change to the Enter
city name screen.
Say the city name by saying individual
letters, or words that represent the
letters, one at a time.
The system has a talk back function.
If your spoken letter is not recognized,
the system will talk back to you. For
example, if you say “E” but the system
does not recognize the command, it
will ask you “Please select the number
of the input letter from the list” and the
following pop-up box will appear:
You should select a letter by saying the
number.
Alternatively, to improve voice
recognition, you can say “Echo” or
“Edward” instead of “E.” See pag e 17 for
a list of available words for each letter.
By Interface Dial:
With the City selection, the display
changes to the Enter city name screen.
For instructions on entering the city
name, see Selecting the City on page 30 .
When you have entered the desired
city, the display changes to a map. The
starting location will be the central
position in the selected city.
See Showing the Map of Current
Position on page 46 for instructions
on fi nding and entering your desired
destination.
Page 50

Entering a Destination
Navigation System
49
Show Map of State
By Voice Control:
Say “State” on the Show map of
screen, and the display changes to the
Select a state screen. Say the state
name (e.g., California or CA) or the
state number (1-7).
You can select either the Canada/AK,
USA, or Mexico tab by moving the
Interface Dial to the left and right.
If you select Canada/AK, Canada and
Alaska will be displayed. If you choose
USA, the American mainland, Hawaii,
and Puerto Rico will be displayed. If
you select Mexico, the states of Mexico
will be displayed.
Say the state name by saying individual
letters, or words that represent the
letters, one at a time.
By Interface Dial:
With the State selection, the display
changes to the Select a state screen.
After you select the desired state, the
display changes to a map of the state,
with the crosshairs located near the
middle.
The yellow box indicates the area you
will see when you click on the current
map with the Interface Dial. The
scale will decrease each time you push
in on the Interface Dial.
Use the Interface Dial to move the
crosshairs to the area of the state close
to your intended destination. If desired,
rotate the Interface Dial knob to
change the map scale. When you have
the crosshairs in the desired area, push
in on the Interface Dial. The address
of the location you have selected will
appear at the top of the screen.
NOTE:
Information icons are displayed at
scales from 1 mile to 1/4 mile, POI
icons are displayed at 1/8 mile or less,
and roads are displayed at 1/4 mile or
less.
If this is the desired address, push in
on the Interface Dial again. If not,
use the Interface Dial to reposition
the crosshairs, then push in on the
Interface Dial again to display the
new address.
If you selected a sing l e i co n or ro ad
segment, select Set as Dest. to
calculate a route to the selected
destination. If you selected multi p l e i co ns
within the cursor radius, select an item
from the list. Then select OK to calculate
a route to the selected destination.
Page 51

Entering a Destination
50 Navigation System
Show Map of Continental USA,
Canada and Mexico
With the USA, Canada/AK and
Mexico selection, the display changes
to:
The yellow box indicates the area you
will see when you click on the current
map with the Interface Dial. The
scale will decrease each time you push
in on the Interface Dial.
Use the Interface Dial to move the
crosshairs to the area of the country
close to your intended destination.
Then push in on the Interface Dial.
If desired, rotate the Interface Dial
knob to change the map scale. When
you have the crosshairs on the desired
icon, polygon, or road, push in on the
Interface Dial. The address of the
location you have selected will appear
at the top of the screen.
NOTE:
Information icons are displayed at
scales from 1 mile to 1/4 mile, POI
icons are displayed at 1/8 mile or less,
and roads are displayed at 1/4 mile or
less.
If this is the desired address, push in
on the Interface Dial again. If not,
use the Interface Dial to reposition
the crosshairs, then push in on the
Interface Dial again to display the
new address.
If you selected a single icon or road
segment, select Set as Dest. to
calculate a route to the selected
destination. If you selected multi p l e i co ns
within the cursor radius, select an item
from the list. Then select OK to calculate
a route to the selected destination.
By Go Home 1 or 2
Selecting Go Home 1 or 2 from the
DEST screen (Dest. MENU 1 or 2)
takes you to the address you have set as
“home.”
If a Go Home 1 or 2 PIN has been
set, the system prompts you to enter
your PIN.
Say or enter your PIN. The system will
then display the Calculate route to
screen (see Driving to Your Destination
on page 52 ).
If a Go Home 1 or 2 PIN has not been
set, the system displays the Calculate
route to screen after you select Go
Home 1 or 2 (see Driving to Your
Destination on page 52 ).
Page 52

Entering a Destination
Navigation System
51
NOTE:
• To edit Home Address, see Home
Address on page 101 .
• When no Home Address 1 or 2 has
been set, the SETUP screen will be
displayed. For details, see Home
Address on page 101 .
• Prior to departure, you can set areas
to avoid. The system then includes
them in its calculations for the
destination you have entered. See
Edit Avoid Area on page 112 .
• PINs are optional. If you choose to
use a PIN, make sure you remember
it. If you forget your PIN, your dealer
will have to reset it for you , and all
PINs will be cleared.
• If a PIN is desired, enter it using the
PIN feature in SET UP. See page
102 for information on entering your
PIN.
Page 53

Driving to Your Destination
52 Navigation System
Driving to Your Destination
A route typically has three phases.
• Initial route calculation (Calculate
route to screen) (see page 52 )
• Change the route while en route (see
page 76 ).
• Resume the route when restarting the
engine (see Continue Trip to Screen
on page 81 ).
Calculate Route to Screen
Say or select OK. The system calculates
the route (see Map Screen on page 55 ).
NOTE:
• Prior to departure, you can set areas
to avoid. The system then includes
them in its calculations for the
destination you have entered. See
Edit Avoid Area on page 112 .
• For information on the available
voice commands, see Voice
Command Index on page 167 .
Further selections from the Calculate
route to screen include:
ADD TO Address Book
Allows you to add the destination to
your Address Book. See By Address
Book on page 34 .
NOTE:
If EDIT Address Book is displayed,
the destination is already stored in your
Address Book. You can edit the address
in your Address Book by selecting this
button. For information on editing your
Address Book, see Destination Lists on
page 78 .
ADD TO Dest. Lists
Allows you to add a location to the
Destination Lists as a destination
or waypoint. While on the Calculate
route to screen, rotate the Interface
Dial knob and select ADD to Dest.
List. The Add to Dest. List screen
appears and the destination is added.
CALL
Dials the number on the screen
when available. See Bluetooth
®
HandsFreeLink
®
on page 19 .
Page 54

Driving to Your Destination
Navigation System
53
Changing the Routing Method
The system lets you select the way you
want to drive to your destination. Select
Route Pref. on the Calculate route
to screen by rotating the Interface
Dial knob.
• You can choose MAX or MIN for
three settings: Use Freeways, Use
Toll Roads, and Use Ferries. The
route calculations for the current
selection will be displayed in the
upper right-hand corner of the screen.
The generated route may not be the
route you would choose. For safety
reasons, the system generally applies
the following rules to your route:
• Shortcuts through residential areas
are avoided.
• Right turns are favored over left turns
or U-turns.
• Restricted turns (turns that cannot be
made during or at certain times of the
day) are not used.
Viewing the Routes
If you select View Routes on the
Calculate route to screen, you can
view three possible routes to your
destination. You can also use the
Interface Dial to verify the areas
peripheral to the map. If you select
View Routes, the display changes to:
These different routes are shown and
calculated based on the setup options in
Route Preference.
You can select one of the three routes
(1-3) by rotating the Interface Dial
knob. The system will calculate the
selected route and display the map
screen.
Page 55

Driving to Your Destination
54 Navigation System
NOTE:
• The driving distance and time
estimated for the various routes is
displayed.
• It is not unusual for the different
methods to pick the same route.
Voice commands cannot be used
while the system is calculating.
• Zoom IN/OUT to view route details
or traffi c conditions is not available
on the View Routes screen. After
moving the Interface Dial and
scrolling through the map, you can
then zoom in or out on the map
screen to view your route in details.
Based on the route data, you can change
the routing method by rotating the
Interface Dial knob.
Once you confi rm your selection, say
the number of the desired routing
method or push in on the Interface
Dial.
The calculated route will be highlighted
as a blue line, and a voice prompt
will tell you how to proceed along the
highlighted route.
Push in on the Interface Dial and
select Voice to have the guidance
repeated.
Viewing the Destination Map
If you move the Interface Dial down
and select DESTINATION MAP while
on the Calculate route to screen,
a map of the destination vicinity is
displayed. Press the CANCEL or
BACK button, or select Return to
return to the previous screen. You can
view the destination map anytime while
en route by saying “Display destination
map.”
Page 56

Driving to Your Destination
Navigation System
55
Map Screen
When you select OK on the Calculate
route to screen, the map screen
appears, showing your highlighted route
(blue line) in real time.
Route Line
When driving on unverifi ed streets
(purple), the route line changes to either
a purple dotted “vector line” pointing
to your destination, or a blue-pink line.
See Unverifi ed Area Routing on page
108 for a detailed explanation of how
to enable unverifi ed routing, and the
related cautions and disclaimers.
NOTE:
• You can always view the entire route
by simply saying, “Display entire
route. ”
• When your route line uses streets
that display traffi c information, the
route line may consist of orange or
red segments. This is normal. See
T raffi c Display Legend on page 22 , and
Viewing Flow Data on page 24 .
“Vector line” (unverifi ed routing off)
Blue-pink unverifi ed route line
(unverifi ed routing on)
Voice Guidance Prompts
As you get near the guidance point,
you will hear a voice reminder and
see a pop-up window showing you the
guidance point. You will typically hear
three prompts:
• The fi rst is about 1/2 mile from the
guidance point if you are traveling on
an ordinary road or street, or about 2
miles from the guidance point if you
are traveling on a freeway.
• The next is about 1/4 mile from the
guidance point if you are traveling on
an ordinary road or street, or about 1
miles from the guidance point if you
are traveling on a freeway.
• The fi nal prompt is close to your
actual turn.
If the distance between the next two
guidance points is very small, both of
them are displayed on the screen in
a single window, and the voice will
remind you of them at the same time.
Page 57

Driving to Your Destination
56 Navigation System
NOTE:
• You can say “Voice” at any time, or
select Voice after pushing in on the
Interface Dial to be reminded of the
next guidance point.
• Typically, a pop-up guidance window
shows your next turn, and a voice
guidance is heard. The timing of
guidance varies depending on the
type of road you are on and the
distance to the next guidance point.
When the guidance in unverifi ed areas,
the phrase “if possible” is inserted
before each guidance prompts. See
Unverifi ed Area Routing on page 106
for more detailed information on the
unver ifi ed routing.
Page 58
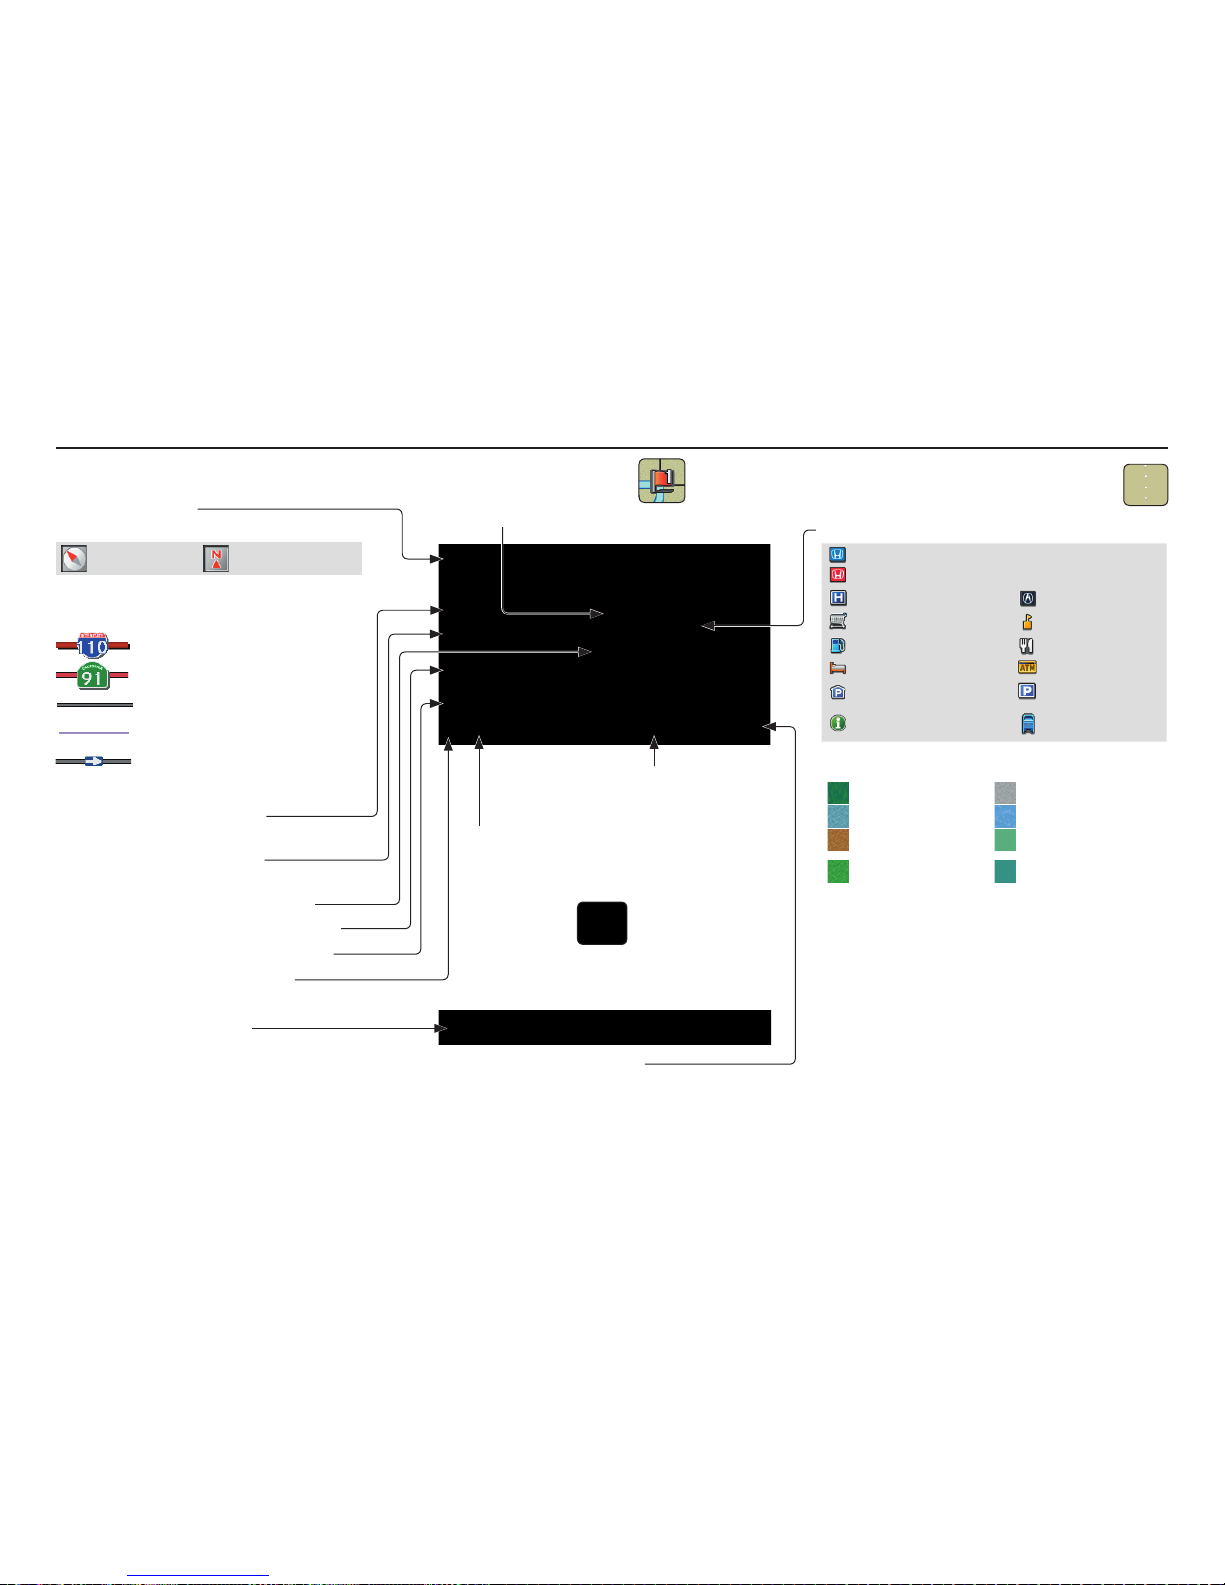
Driving to Your Destination
Navigation System
57
Map Screen Legend
Map Orientation
(see page 64 )
“Heading Up” “North Up”
Streets
(see Map Overview on page 6 )
: Freeways (Red)
: State Route (Pink)
: Verifi ed Street (Gray)
: Unverifi ed Street (Purple)
:
One-Way Streets (see page 68 )
(1/20 mile scale only)
Direction of Destination
(when en route)
Distance to Destination
(see page 59 )
Vehicle Position (see page 73 )
Time to Destination (see page 59 )
Current Map Scale (see page 66 )
Message Icon (see page 81 )
Indicates that you have an AcuraLink message.
Map Scale Adjustment
(Mile or km per half-inch appears only when
you zoom in or out by rotating the Interface
Dial knob.) (see page 66 )
Waypoint (see page 77 )
Blue Line Calculated route (see page 55)
Current Street
(see page 73 )
Warning Icon
Indicates that there are weather warnings.
T o check the warning list, see page 87 .
No Entry Icon
Map Menu (see page 59 )
(Push in on the Interface Dial to view.)
“Breadcrumbs”
(see Off-road Tracking on page 72 )
Landmark Icon - Generic (see page 68 )
Honda Dealer (USA)
Honda Dealer (Canada, Mexico)
Hospital Acura Dealer
Grocery Store School
Gas Station Restaurant
Hotel/Lodging ATM
Parking Garage Parking Lot
Freeway Exit
Information
Post Offi ce
Map Features
Park Airport /Business
Hospital Body of Water
Shopping Mall Cemetery
Golf Course/
Stadium
University
NOTE:
If you move the Interface Dial over an
area (map features shown above), the
name is displayed at the top of screen.
NOTE:
See Map Legend in the Map Information on the MAP MENU screen for further explanation.
Page 59
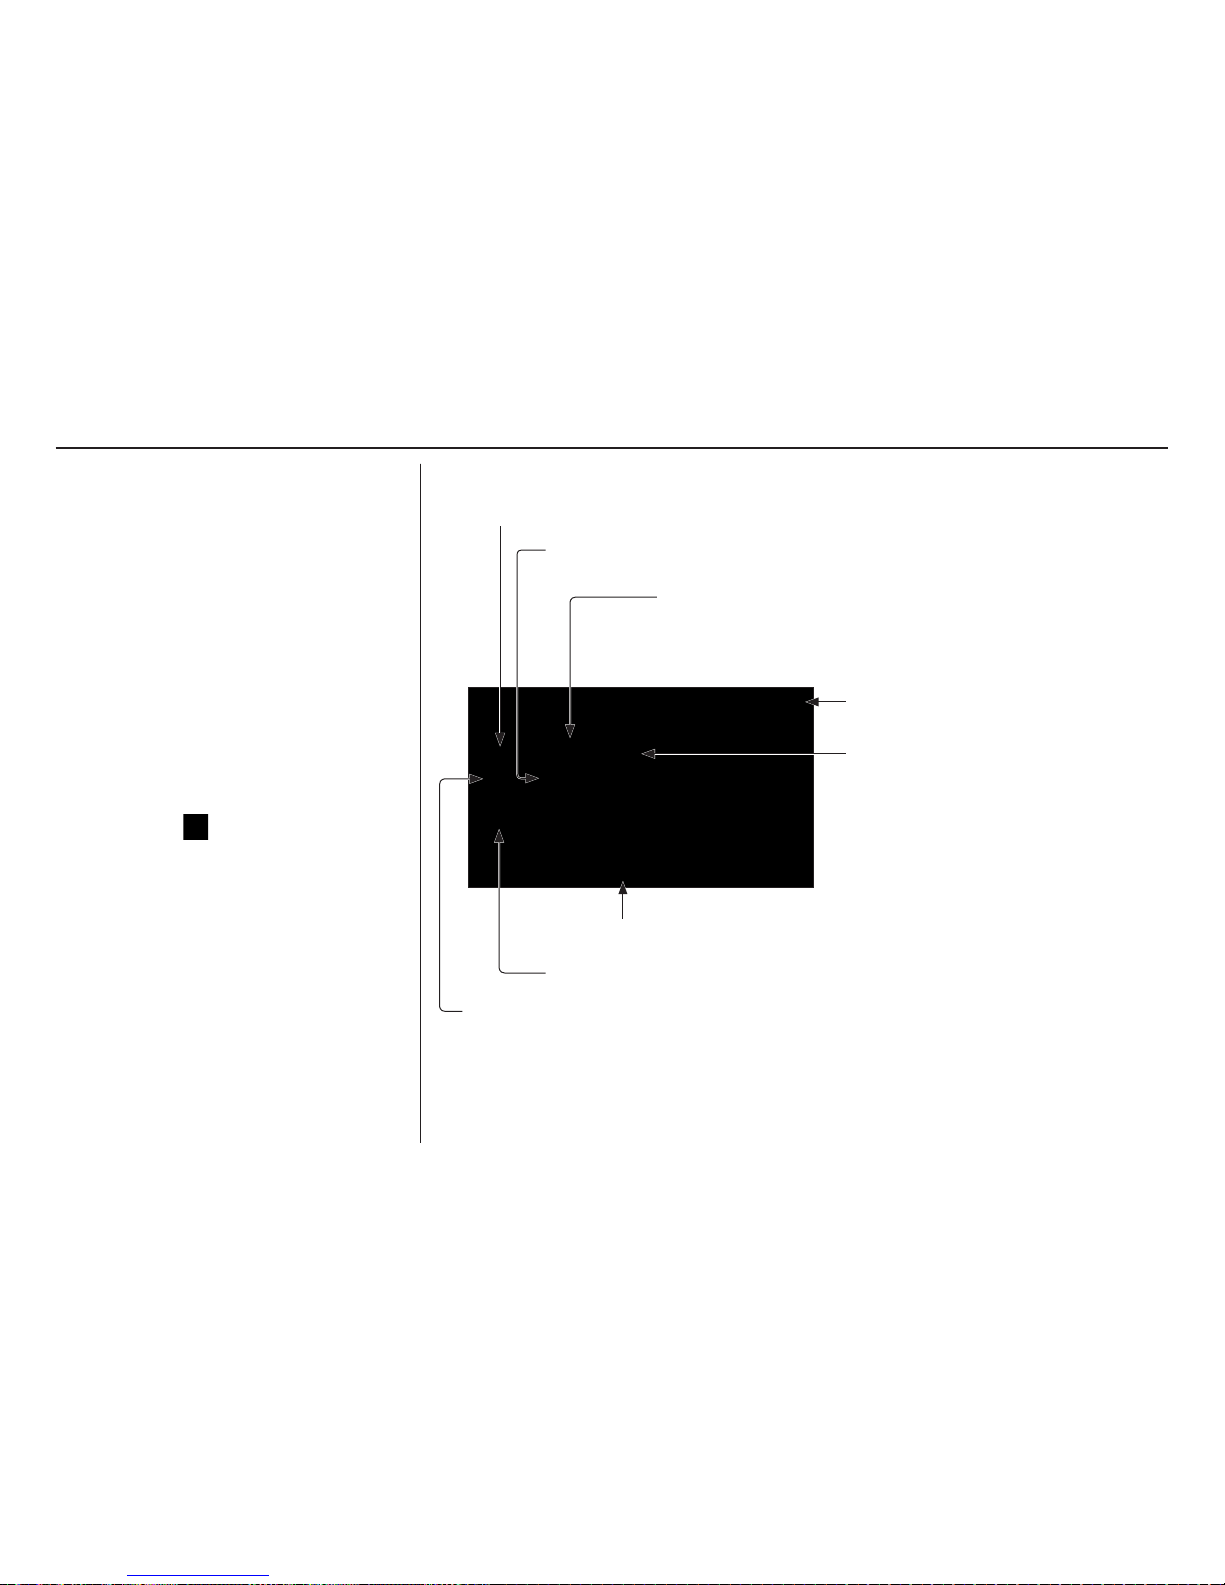
Driving to Your Destination
58 Navigation System
Guidance Screen
The guidance screen offers an
alternative way to view your route
information. Many of the icons and
screen features are similar to those on
the map screen. While driving to your
destination, press the MAP/GUIDE
button to switch between the map and
guidance screens. The guidance
screen shows you:
Milestone to Destination - The
position of the small circular icon
shows your trip progress. As you get
closer to your destination, the indicator
will approach
.
NOTE:
• The map and voice guidance in
unverifi ed areas differ from those in
verifi ed a reas.
• Current maneuvers and those
within 1000 feet will show on the
Countdown bar, indicating the
distance until the next maneuver.
• Lane information is not displayed
while driving on the road in Mexico.
Guidance Screen Legend
Time to Destination (see page 59 )
Milestone to Destination (see page 58 )
Direction of Destination, “as the crow fl ies”
Distance of Next Driving Maneuver
Street Name to Next Driving
Maneuver
Scroll: to view guidance maneuvers
(rotate Interface Dial knob)
Current Street (see page 6 )
Distance to Destination (see page 59 )
Page 60

Driving to Your Destination
Navigation System
59
Distance and Time to
Destination
When you select a destination, the
distance to the destination is the actual
road distance of the calculated route,
and not “as the crow fl ies.” W hen
viewing a list of destinations (points
of interest), such as restaurants, the
distance is “as the crow fl ies” (see Sort
by Distance to Travel on page 41 ).
The displayed time to the destination
may differ from the actual travel time
because the time is calculated based
on the posted road speed data and your
current speed.
NOTE:
If you are en route and the Interface
Dial is moved, the “Time to
Destination” and “Distance to
Destination” indications are replaced
with an indicator showing distance
from the current vehicle location.
Map Menu
When the map screen is displayed,
pressing in on the Interface Dial
displays the Map menu. If the map is
scrolled, the Map menu will not appear.
Press the MAP/GUIDE button, the
BACK button, or the CANCEL button
to return to the basic map screen.
Voice - Button shown if currently en
route. Select to hear the next guidance
maneuver.
New Messages - Indicates that there are
AcuraLink messages for you to read.
These messages consist of quick tips
and other information communicated
to you by Acura. If the button is grayed
out, you have no messages. For detailed
information on this feature, see page 81 .
Traffi c Incidents - Displays a list of
the traffi c incidents around your current
position or on your current route.
You can view this same list by saying
“Display traffi c incidents.” For detailed
information on this feature, see page 25 .
Weather Info - A
l
lows you to view the
weather forecast, warning list, warning
map, and radar map. See AcuraLink
Weather on page 84 .
Guidance Menu - Allows you to
confi rm Directions and Freeway Exit
information en route. You also can
change Guidance Mode (single screen/
split screen). For detailed information
on this feature, see Directions on
page 60 , EXIT INFO (Freeway Exit
Information) on page 61 , or Guidance
Mode on page 62 .
Page 61
Driving to Your Destination
60 Navigation System
Find Nearest … - Selects a subcategory
from the list to search the nearest
POI from your current location. For
detailed information on this feature, see
Subcategories on page 37 .
Map Information - Allows you to
confi rm information on the map or
change the settings of displaying a
map. For detailed information on this
feature, see Map Orientation on page
64 , Showing Icons on the Map on page 63 ,
Viewing/Saving the Current Location
on page 73 or Map Legend on page 65 .
Cancel Route - Cancels your current
route. The map screen will display y our
current position.
Guidance Menu
When you select Guidance Menu
from the Map menu, the Guidance
menu screen appears.
Directions - Select to confi rm the
directions (guidance points) to your
destination (see page 59).
Exit Info. - Allows you to set a new
destination or waypoint located near a
freeway exit when you are en route (see
page 60).
Guidance Mode - Allows you to select
the guidance mode (single screen or
split screen) (see page 61).
Directions
You can display a list of the maneuvers
on your route and confi rm the distance
between them.
If you select Guidance Menu from
the Map menu and then select
Directions, the display changes to:
NOTE:
• When you select a maneuver from the
list, a map of the maneuver is shown.
• Maneuvers that occur at freeway
exits or contain freeway exit
information will show the exit info
icon (
).
Page 62
Driving to Your Destination
Navigation System
61
Press the CANCEL button or the
BACK button, or move the Interface
Dial down to return to the previous
screen.
You can scroll one maneuver at a time
by rotating the Interface Dial knob.
The route guidance display disappears
and guidance ends when you reach your
destination. Press the DEST/ ROUTE
button to return to the DEST screen
(Dest. MENU 1 or 2).
EXIT INFO (Freeway Exit
Information)
You can search freeway exit
information (gas stations, restaurants,
ATMs, etc.) and add new destinations
or waypoints to the calculated route.
Select the Guidance Menu from the
Map menu screen. Select Exit Info,
and a list of freeway exits for the route
is displayed.
If you select the freeway exit you plan
on taking, a list of businesses in the
area will be displayed. You can choose
a listing to set as a new destination or
waypoint, and say or select OK.
On the map screen, you can display
Freeway Exit information using the
Interface Dial. The Exit Info icon will
only be displayed on the map screen if
there is any freeway exit information
available. Choose the 1/4, 1/2, or 1
mile scale, then move the crosshairs
to the desired Exit Info icon and push
in on the Interface Dial. Choose a
place from the list and set it as a new
destination or waypoint.
NOTE:
• To turn on “Freeway exit
information” on the map screen,
display the icon bar and select the
icon (see page 63 ).
• Exit Info, cannot be selected when
the freeway exit is in Mexico.
Page 63

Driving to Your Destination
62 Navigation System
Guidance Mode
When en route to a destination, you
have two display options: single-screen
mode (the factory default) or splitscreen mode.
If you select the Guidance M
enu on
the Map menu screen and then select
Guidance Mode, the Selection
screen will appear.
Single-screen mode - While the map
screen is displayed, only the map is
shown with occasional guidance pop-up
windows as you approach a maneuver.
When you press the MAP/GUIDE
button and switch to the Guidance
screen, only the Directions screen is
displayed.
Split-screen mode - While the map
screen is displayed, the map is on
the left of the screen, and the next
maneuver is on the right side of the
screen. You will see the same screen
setup when you press the MAP/GUIDE
button.
Map Information
When you select Map Information
from the Map menu, the Map
information screen appears.
Show Icon on Map - Allows you to
select the icons displayed on the map
(see page 63).
North-up/Heading-up - Select North-
up or Heading-up to change map
orientation (see page 63). On scales
greater than 1 mile, this button is
grayed out (North-up only mode).
Current Location - Allows you
to display and/or save your current
location (see page 64).
Map Legend - Allows you to learn the
meaning of map features (see page 65).
Guidance mode can be changed in SET
UP (see Showing Icons on the Map on
page 63 ).
When you get near the maneuver, the
map screen changes to:
On the map screen, the location of the
maneuver is marked with a small y ellow
square. The guidance window is simply
an enlargement of the next maneuv er
area. After you comp lete the maneuver,
the display returns to a full map screen
when single-screen mode is se t, or to a
map and direction list screen when spli tscreen mode is set.
Page 64

Driving to Your Destination
Navigation System
63
Showing Icons on the Map
Selecting Show Icon on Map from
Map Information on the Map menu
(see page 59 ) displays the following
screen:
The screen consists of the following
items:
Icon Bar
The icon bar allows you to manually
select the icons that are displayed on the
map (see page 70 f or a list of these icons ).
In the screen shown, traffi c, gas
stations, and restaurants are selected.
Rotate the Interface Dial knob
and push in to select (blue with box
checked) or remove them (black with
box unchecked). You can also display
or hide the same icons by using the
“Display” or “Hide” voice commands
on the map screen (see page 165 ).
ICON OPTIONS
This feature allows you to “fi ne tune”
some of the icons on the Icon bar.
If you move the Interface Dial down
and select ICON OPTIONS, the
following screen will be displayed:
The fi ve icon choices – Parking,
Restaurant, Other Icon, Traffi c
Information, and Weather – can
each be tailored to your needs.
For instance, let’s assume that your
hospital is not displayed on the map,
and you want to make sure that your
settings are correct. You would do the
following:
• First, ensure that the Other Icon
button on the Ic
on Ba
r is selected.
• Second, select Other Icon and
verify that the hospital option is
on (blue with box checked). This
procedure is explained below.
If you select Other Icon from the
Select category for icon settings
screen, the other icon options are
displayed:
Page 65

Driving to Your Destination
64 Navigation System
In the example shown, only POST
OFFICE and SCHOOL are selected
and will show up on the map. To also
see HOSPITAL on the map, this would
need to be turned on by fi rst selecting it
and then pushing in on the Interface
Dial to select it so it appears as below.
Exit, and save your settings by moving
the Interface Dial down (OK).
NOTE:
When viewing the map screen, you can
turn some icons on using voice control.
See the Voice Command Index on page
165 for the available “Display” and
“Hide” icon commands.
Map Orientation
The map can be orientated two ways:
• North-up: North pointing up as you
would normally view a paper map.
• Heading-up: The map constantly
rotates so the road you are driving on
always points up (as you see the road
through your front windshield).
“North Up”
“Heading Up”
NOTE:
The red arrow in both heading symbols
always shows the direction north.
Page 66

Driving to Your Destination
Navigation System
65
Push in on the Interface Dial when
you are on the map screen, and select
Map Information. Select Northup or Heading-up, or say “Display
heading up” or “Display north up.”
In the larger map scales (above 2 mile
or 3 kilometer), the map is always
oriented with north facing upward. You
cannot change the orientation.
NOTE:
For information on the available voice
commands, see Voice Command Index
on page 167 .
Current Location
Whenever you are on a map screen, you
can always obtain your current location
either by pushing in on the Interface
Dial, selecting Current Location
from Map Information, or by using
the voice control system and saying
“Display current location.” A screen
pops up which shows the address of
your current location, as well as the
latitude, longitude, and elevation.
Map Legend
You can use the Map legend screens
to learn the meaning of map features,
icons, colors, etc. used in this system.
When you say or select Map Legend,
the display changes to:
Say or select the desired item or item
number to view each section of the map
legend.
Page 67

Driving to Your Destination
66 Navigation System
Map Scale
Rotate the Interface Dial knob or a voice command such as “Display 1/2 mile scale” (see page 168 ) to change the scale of the
map. Zooming in increases the detail, while zooming out gives you a view of a wider area. After changing the scale, give the
system a few moments to update the display.
Functions available at various map scales
Map Scale (English and Metric) For
selecting units, see page 63 .
1/20mi. 1/8 mi. 1/4 mi. 1/2 mi. 1 mi. 2 mi. 5 mi. 15 mi. 50 mi. 150 mi. 350 mi. 1000 mi.
80 m 200 m400 m800 m
1.6 km
3 km 8 km 24 km 80 km
240 km 560 km
1600 km
POI icon symbols (like ATM) page 68
XX
Breadcrumbs (off-road tracking dots) page 72
XXXX
Freeway exit information icons page 68
XXX
One-way traffi c icon page 68
X
Unverifi ed road display (purple)
page 6
XXXXXXXX
Map orientation “Heading up” page 64
XXXXX
Map orientation “North up” page 64
XXXXXXXXXXXX
Map features (park, golf course) page 57
XXXXXXXXXXX
Avoid area shown on map
page 112
XXX
Avoid area scales (when creating)
page 112
XXX
Waypoint “fl ag” icons page 77
XXXXXXXXXXXX
Traffi c speed / incident page 22
XXXXXXX
Weather information page 84
XXXXXXXXXXXX
NOTE:
• You can change between miles or kilometers in SETUP (see Units on page 107 ).
• For information on the available voice commands, see Voice Command Index on page 167 .
Page 68

Driving to Your Destination
Navigation System
67
Destination Icon
The destination icon only shows the
approximate location of the destination.
This occurs because a city block can
have as many as 100 possible addresses
(for example, the 1400 block is followed
by the 1500 block.) Since most cities
use only a portion of the 100 possible
addresses (for example, in the 1400
block, the addresses may only go up to
1425 before the 1500 block starts).
Therefore, the address 1425 will be
shown a quarter of the way down the
block by the system instead of near the
end of the block where the destination
is actually located.
Tip:
When en route, you can view a map
showing your destination. Using voice
control, say “Display destination
map.”
Page 69
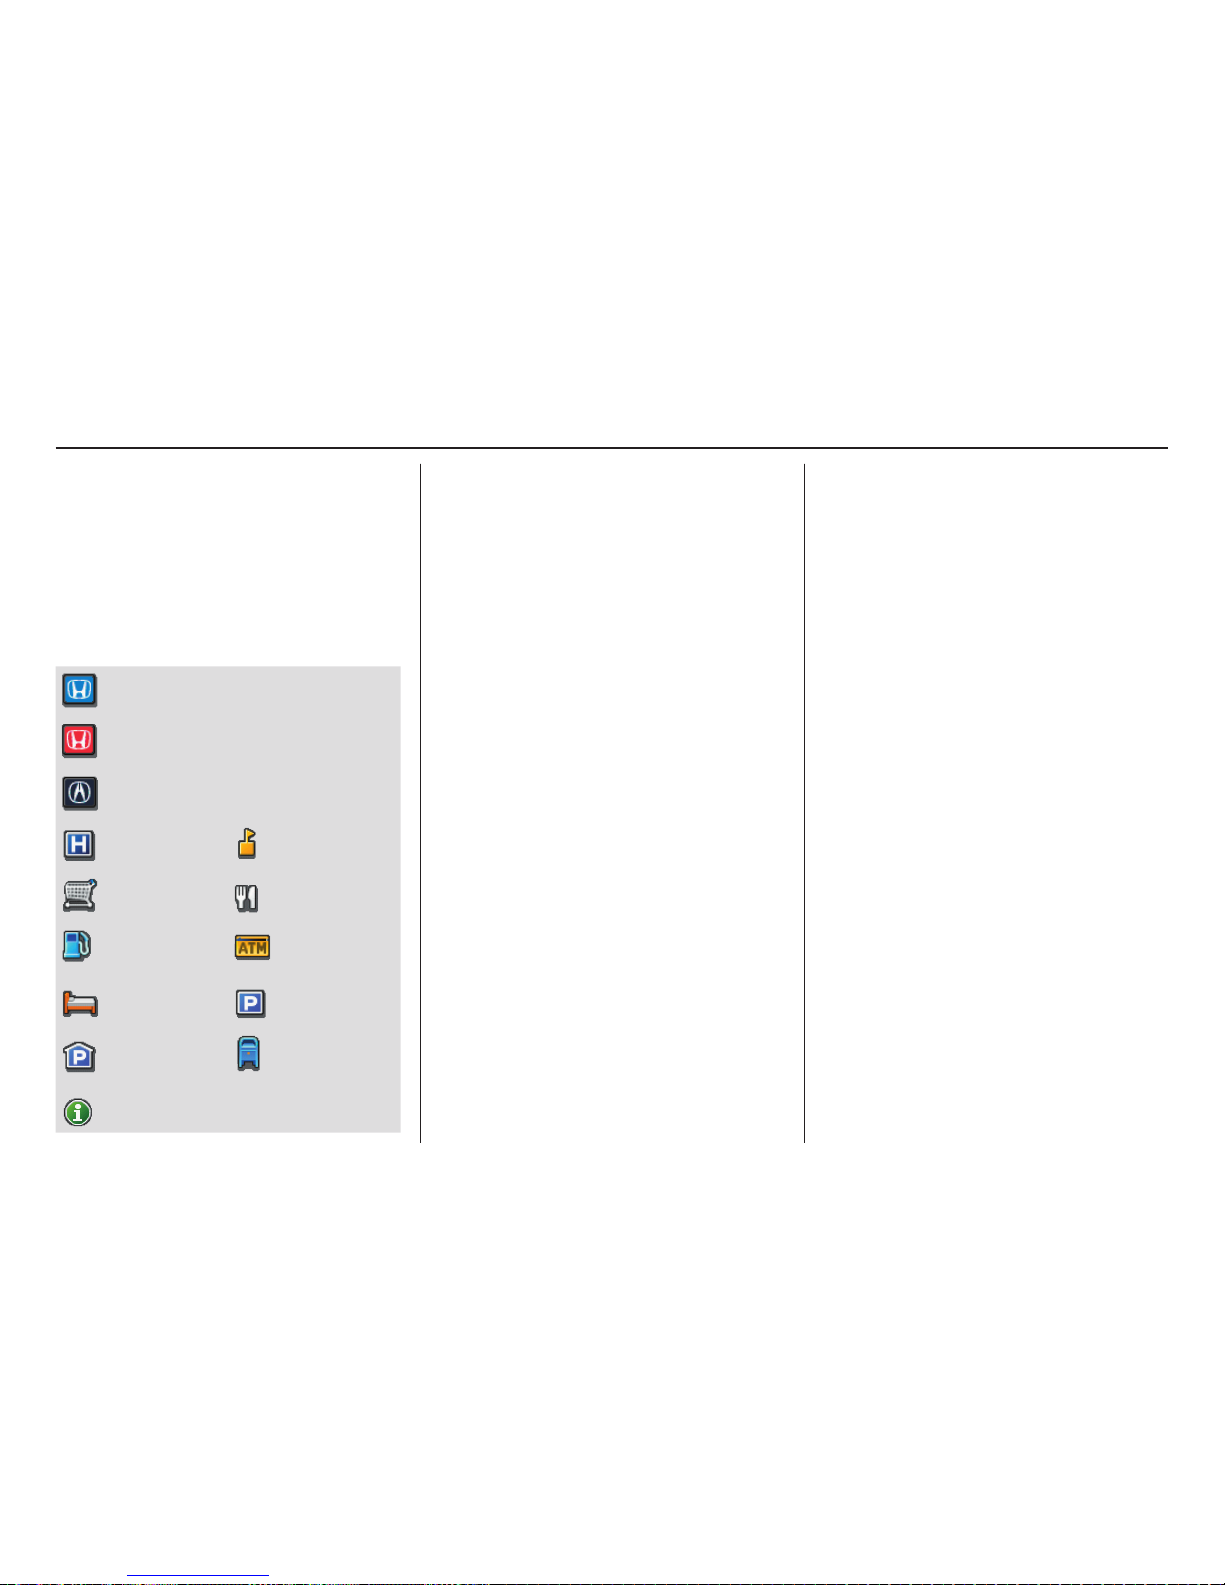
Driving to Your Destination
68 Navigation System
Various Other Icons
Landmark Icons
Landmark icons are shown in the map
screen on 1/20 and 1/8 mile scale, or 80
and 200 meter scale. The Freeway exit
information is displayed on the 1/4, 1/2,
and 1 mile scales. The icons are:
Honda Dealer (USA)
Honda Dealer
(Canada, Mexico)
Acura Dealer
Hospital School
Grocery
Store
Restaurant
Gas
Station
ATM
Hotel/
Lodging
Parking
Lot
Parking
Garage
Post Offi ce
Freeway Exit Information
One-Way Traffi c I
con
The one-way traffi c icons (see Map
Screen Legend on page 57 ) are only
shown on the 1/20 mile scale.
Some icons can be turned on or off. To
hide or display icons, use the Interface
Dial to select Map Information from
the Map menu, and select Show Icon
on Map (see page 63 ). You can also
hide or display icons by using voice
commands (see page 168 ).
You can select most landmark, traffi c,
or weather icons with the Interface
Dial to display the icon’s information.
See the table on page 70 for exceptions.
NOTE:
• The same icon list can be viewed on
the screen by selecting Map Legen d
from the Map Information screen in
the MAP menu.
• When there are overlapping
landmark icons, a list of the points
of interest (POIs) is displayed when
selected.
• For information on the available
voice commands, see Voice
Command Index on page 167 .
Page 70
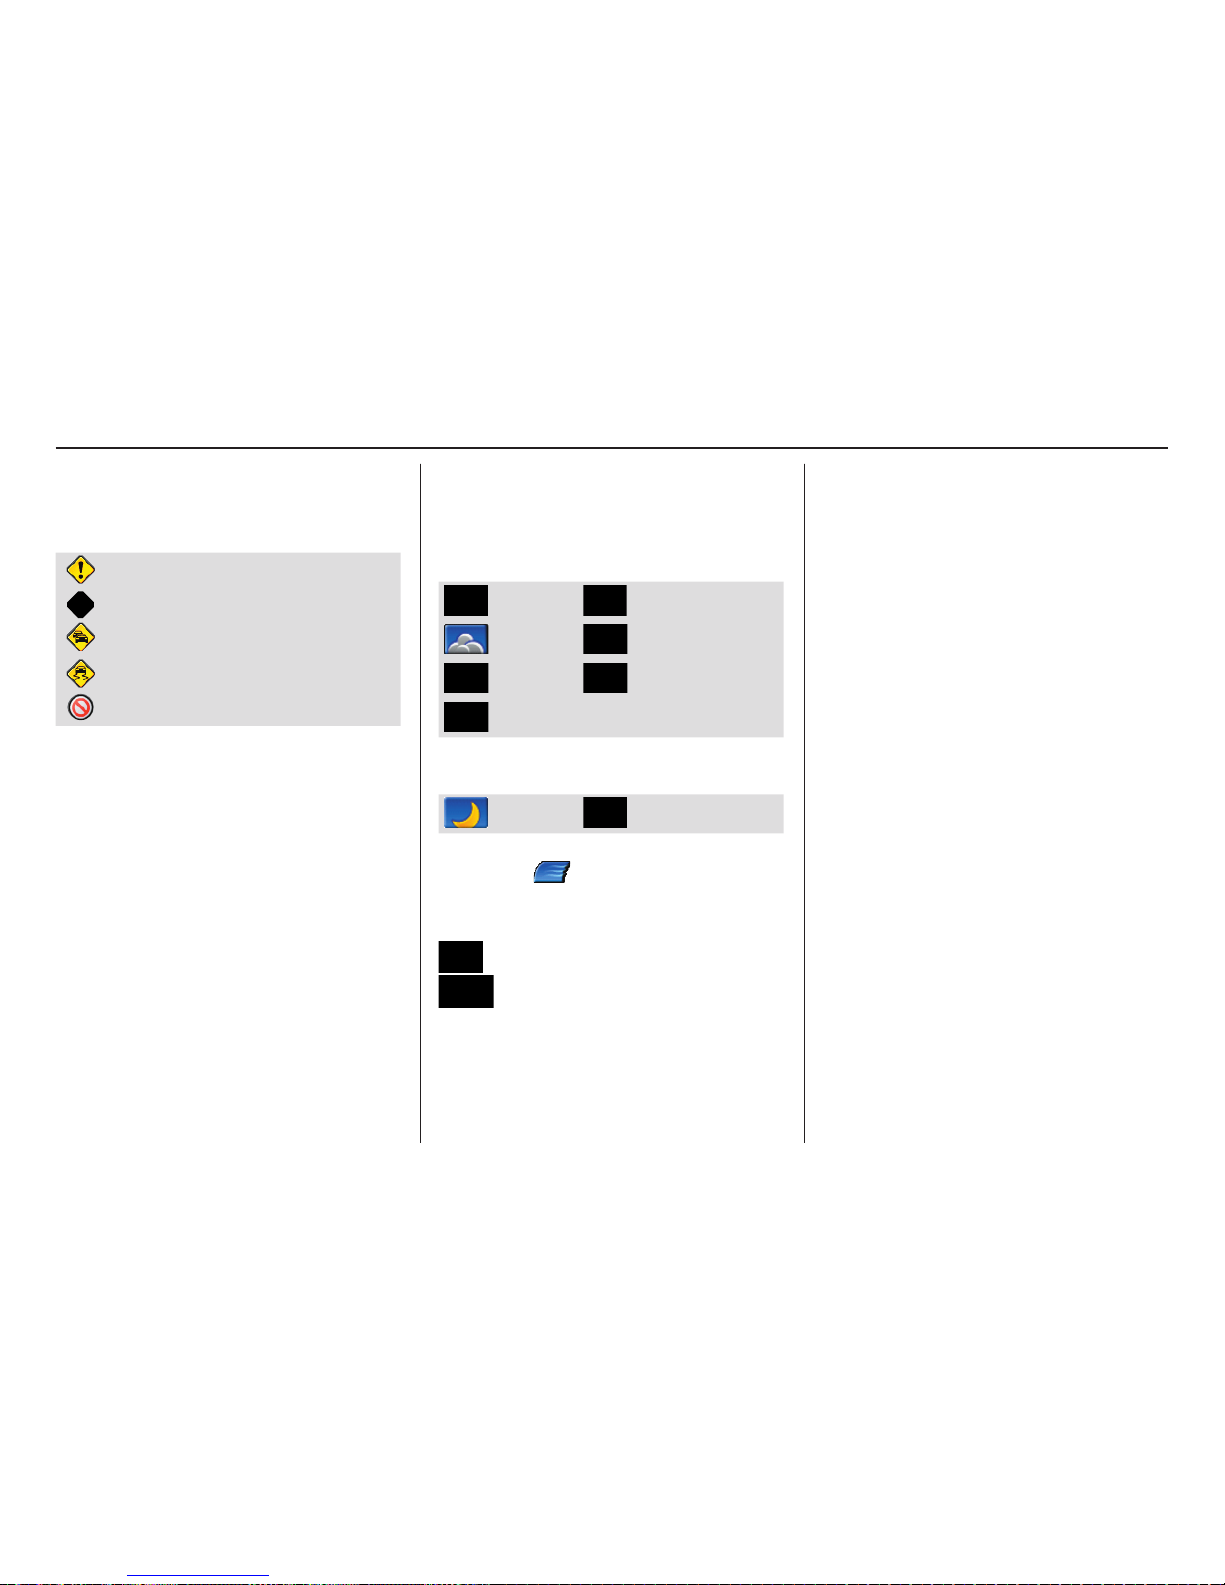
Driving to Your Destination
Navigation System
69
Incident Icons
Incident icons are displayed on the 1/20
through 5 mile scales. The icons are:
Accident/Incident
Construction
Congestion
Weather
Road Closed
Weather Icons
Weather icons are displayed on all map
scales. The icons are:
Daytime mode
Clear Partly Cloudy
Cloudy Fog
Rain Freezing Rain
Snow
Night mode
Clear Partly Cloudy
Icons with
indicate a possibility for
high wind.
For example:
Rain
Rain with high wind
NOTE:
Weather icons are only visible if
you have a current traffi c/weather
subscription with XM. See page 126 .
Page 71

Driving to Your Destination
70 Navigation System
For some ico ns, you can choose to sho w or hide them o n the map, w hile others like Honda Dealers are alwa y s sh o wn. The table be l ow
show s the f eatures for each i con type. So me P oints o f Interest (POIs ) like Po lice S tations are not shown as an icon, but y ou can still
locate the nearest one with the voice command, “Find nearest Police station .” See Find Place Commands on page 169 .
Landmark icon
POI type
Icon can be
manually
displayed
Icon can be
manually
hidden
Icon selection
by voice
Icon can be selected
as a destination on
the map screen with
the Interface Dial
POI can be found
on the map
screen using voice
command “Find...”
Honda/Acura dealer Yes, always No No Yes Yes
Hospital Yes Yes Yes Yes Yes
School Yes Yes Yes Yes Yes
ATM Yes Yes Yes Yes Yes
Gas station*1 Yes Yes Yes Yes Yes
Restaurants*1*2 Yes Yes Yes Yes Yes
Post offi ce Yes Yes Yes Yes Ye s
Grocery store*1 Yes Yes Yes Yes Yes
Hotel*1/ Lodging Yes Yes Yes Yes Yes
Police station No icon No icon No icon No icon No icon
Shopping, Tourist attraction, Bank No icon No icon No No Yes
Parking garage Yes Yes Yes Yes Yes
Parking lot Yes Yes Yes Yes Yes
Freeway exit information Yes Yes Yes Yes (choose POI) No
One-way traffi c icon Yes Yes No No No
*1. When these types are selected for view on the map, some icons are shown as “brand icons.”
*2. When selecting Restaurant on the Select category for icon settings screen (see Icon Options on page 63 ), specialty types
of restaurants, like Chinese or Italian, can be individually displayed or hidden. See Showing Icons on the Map on page 63 .
Also see the Voice Command Index on page 167 for the “Display,” “Hide,” and “Find” commands.
Page 72

Driving to Your Destination
Navigation System
71
Incident icon
Icon can be
manually
displayed
Icon can be
manually
hidden
Icon selection
by voice
Icon can be selected
as a destination on
the map screen with
the Interface Dial
POI can be found
on the map
screen using voice
command “Find...”
Traffi c speed Yes Yes Yes No No
Traffi c incident Yes Yes Yes No Yes *1
*1 You can display the list of the nearest traffi c incidents by saying, “Display traffi c incidents.”
Weather icon
Icon can be
manually
displayed
Icon can be
manually
hidden
Icon selection
by voice
Icon can be selected
as a destination on
the map screen with
the Interface Dial
POI can be found
on the map
screen using voice
command “Find...”
Weather information Yes Yes Yes No No
Page 73

Driving to Your Destination
72 Navigation System
Going Off the Route
If you leave the calculated route,
“Recalculating...” is displayed at the
top of the screen. The system will
recalculate the route from your current
location and direction to the desired
destination then give you a new route
instruction. This is done automatically
if you have set Rerouting to
AUTOMATIC on the SET UP screen
(Other) (see page 63 ).
If the Rerouting option in SET UP is
set to MANUAL, “Off route” appears
at the top of the screen when you leave
the calculated route. Say “Recalculate,”
or select Recalculation whenever
you want the system to perform a
recalculation.
Off-road Tracking
If you drive away from a mapped road,
“Not on a digitized road” appears at the
bottom of the screen.
The map screen starts displaying a
series of dots ( breadcrumbs) to show
the path you have taken if Off-road
Tracking on the SET UP screen
(Other) is set to ON (see page 117 ).
By following the dots, you can
backtrack to the mapped road you
originally left. “Breadcrumbs” may
occasionally be displayed in urban
areas, such as large parking lots in
shopping malls, or in new subdivisions
where the roads are not yet in the
database. In other cases, you may see
dots if the system temporarily goes off
route, like in a parking garage where
the GPS signal is unavailable.
These dots appear only in the 1/20,
1/8, 1/4, and 1/2 mile (or 80, 200, 400,
and 800 meter) map scales. Rotate the
Interface Dial knob to change scales
if necessary.
Off-road tracking continues for
approximately 150 miles; dots at
the beginning of the trail will start
disappearing when you exceed that
distance. When you reach a mapped
road, the system stops displaying dots.
Page 74

Driving to Your Destination
Navigation System
73
Viewing/ Saving the Current
Location
Whenever you are on a map screen,
you can always obtain your current
location either by pushing in on the
Interface Dial, selecting Current
Location from Map Information, or
by using the voice control system and
saying “Display current location.” A
screen pops up which shows the address
of your current location, as well as the
latitude, longitude, and elevation.
NOTE:
The elevation will not appear when the
system is temporarily lacking proper
GPS information. The system elevation
may not agree with elevations shown
on roadside elevation signs, and may
fl uctuate plus or minus 100 feet or
more.
You can store the current location for
later use. It does not change or cancel
your current route.
For example, you are following
the system’s directions to get to a
destination. While sitting at a stoplight
you notice a store on the corner, but do
not have time to visit it right now.
You can save the location to select as a
destination at a later date.
To save the location, say “Save current
location” or select Save on the Current
location screen. The Edit address
book screen with the current location
data will appear. You can edit the name,
phone number, or category name to be
saved in your personal Address Book.
Select Return and you will be returned
to the Map Information screen.
You can then use Address Book from
the DE ST screen (Dest. MENU 1) to
select the saved location, and return to
the same spot.
Page 75

Driving to Your Destination
74 Navigation System
• Your route includes traffi c restrictions
in the vicinity of the departure point
or destination.
• Your route passes through unverifi ed
areas (see Unverifi ed Area Routing
on page 108 ).
• Your route includes unverifi ed areas
(see Unverifi ed Area Routing on page
108 ).
• You are about to enter an unverifi ed
area (see Unverifi ed Area Routing on
page 108 ).
Pop-ups and Disclaimers
When you say “OK” in the Calculate
Route to screen, or if you change your
route, the system checks your route and
provides you with pop-up messages for
the following situations:
• Your route takes you into an area that
you previously set as an “Avoid Area”
(see Edit Avoid Area on page 112 ).
Page 76

Driving to Your Destination
Navigation System
75
• You actually entered an unverifi ed
area (see Unverifi ed Area Routing on
page 108 ).
Traffi c Rerouting
When driving en route to your
destination with Traffi c Rerouting is
ON, the system can fi nd a faster route
based on traffi c fl ow information or
detect a Road Closed incident and fi nd
a detour route. In either case, the system
automatically recalculates and displays
a pop-up box to signify that the route
has changed.
You can also calculate the detour route
manually by choosing to avoid specifi c
incidents and/or congestion on your
route. Say “Display traffi c incidents” or
“Display traffi c list,” and select the “On
Route” tab on the Traffi c Incidents
screen.
Select an incident from the list,
and push in on the Interface Dial
twice. The system will display the
con
fi rmation screen:
Page 77

Driving to Your Destination
76 Navigation System
When you say or select Avoid, the
display returns to the list screen. When
you move the Interface Dial down
on the list screen to select Reroute,
the system recalculates a detour route
avoiding the road.
You can choose to avoid up to 10 traffi c
incidents.
NOTE:
• When you select the “All” tab, Avoid
is not displayed.
• To activate this function, you need to
set Traffi c Rerouting to ON in the
Routing & Guidance settings (see
page 112 ).
• Because the criterion for whether
the traffi c event is to be detoured or
not is included in the traffi c event
data itself, the traffi c rerouting is not
performed for all the traffi c incidents
ahead on the route.
• Even when the route recalculation is
performed for a traffi c event, if the
system cannot fi nd any detour route
or a quicker detour route, the event
location is not always avoided.
• Traffi c rerouting is available only if
you have a current traffi c/weather
subscription with XM. See page 126 .
Changing the Route
While en route, you may wish to alter
your route, add an interim “Waypoint”
(pit stop), choose a different destination,
or cancel your current destination. To
change your present route, you can do
any of the following:
Say “Menu,” or press the DEST/
ROUTE button to view the DE ST
screen (Route):
• Cancel Route (page 77 )
• Detour (page 77 )
• Avoid Streets (page 77 )
• Change Route Preference (page 77 )
• Waypoint (page 77 )
• Destination List (page 77 )
Choose a different destination (other
methods) by:
• Saying, “Find nearest...” to fi nd a POI
(page 79 ).
• Saying, “Go home” (page 79 ).
• Using the Interface Dial to select a
different POI or address on the map
(page 80 ).
• Pressing the DEST/ROUTE button
and selecting the “Dest. MENU 1 or
2” tab on the DEST screen (page 81 ).
DEST Screen (Route)
Pressing the DEST/ROUTE button
displays the DEST screen (Route):
NOTE:
The “Route” tab can be selected only
when you are en route.
Page 78

Driving to Your Destination
Navigation System
77
Cancel Route
Cancels the current route (and any
waypoints) and returns you to the map
screen.
D e t o u r
Calculates a detour route for you if
you encounter an unexpected obstacle
such as a closed road or extremely
heavy traffi c congestion. If a detour
is selected, the system will attempt to
recalculate a new route, avoiding the
next 5 miles (while on a freeway) or 1
mile (while on a surface street).
Avoid Streets
From the DEST screen (Route), if
you say or select Avoid Streets, the
system displays a list of streets that will
get you to your destination. This feature
allows you to avoid a street or streets
along your route. This is helpful if you
know of road construction, closures,
or excessive traffi c along the route.
Simply select the street or streets you
wish to avoid. You can store up to 10
streets to be avoided. You cannot avoid
your current street or the streets of
your waypoint(s) or destination (system
beeps if selected).
NOTE:
Although you can choose streets to
avoid, you cannot choose specifi c
streets you want to use.
Change Route Preference
From the DEST screen (Route), if you
say or select Change Route Pref.,
then the Route Preference screen is
displayed. See Changing the Routing
Method on page 53 for details.
Wa y p o i n t
Waypoints allow you to add an
interim “pit stop” while traveling to
a destination. For instance, you may
want to stop for gas or food, and then
continue on to your destination.
Although you can enter up to fi ve pl aces
including the destination at a time,
typically you may never use more than
one at a time.
Waypoints are routed to in the order
they were entered (number 1 fi rst, etc.),
with your fi nal destination routed to
last.
When you enter waypoints, they appear
on the map screen as small red fl ags
numbered 1-4.
Page 79

Driving to Your Destination
78 Navigation System
Adding Waypoint
From the DEST screen (Route),
if you say or select Waypoint, the
Add Waypoint screen is displayed.
Select either SEARCH AROUND
or SEARCH ALONG by rotating
Interface Dial knob.
Next, select the category from the
“Originals” or “My Favorites” tab on
the Category screen, then follow the
menu prompts to select a destination.
When the system performs a search
from SEARCH ALONG, it displays
matches that lie within a corridor on
either side and in front of your route.
From SEARCH AROUND, the system
displays matches that are a uniform
distance from the departure point/
waypoint/destination.
The search “corridor” distance value
can be changed in Edit Waypoint
Search A rea in SET UP (see page 114 ).
If you add a waypoint, the Dest List
screen will be displayed. If you move
the Interface Dial down and select
OK, the addition is completed and
rerouting begins. Press the MAP/
GUIDE button to return to the map
screen without adding the waypoint.
To add another waypoint, press the
DEST/ROUTE button and repeat the
procedure.
If Waypoint is grayed out, the
maximum of fi ve places (including the
destination) has been entered.
NOTE:
The system does not allow you to select
the roads you want to use to get to a
destination. However, after you enter a
destination, you can select intersections
or POI waypoints that the system will
use to tailor your route.
Destination Lists
If you select Destination Lists from
the DE ST screen (Route ), you can
store four w aypoints and one destination
simultaneously. If you cancel the route,
everything will be deleted.
Page 80

Driving to Your Destination
Navigation System
79
Verifying Destination Lists
If you select Destination Lists from
the DE ST screen (Route), the display
will change to the Dest. List screen.
If you move the Interface Dial to the
left to select Map, you will be able to
see all the destinations on the map.
NOTE:
Prior to departure, you can set areas to
avoid. The system then includes them in
its calculations for the destination you
have entered. See Edit Avoid Area on
page 112 .
Editing Destination Lists
I
f y
ou move the Interface Dial to
the right to select Edit on the Dest.
List screen, the Select an edit menu
screen will appear. If you select
Delete, you can select which items to
delete. If you select Edit Order, you
can change the order of items in the list.
Changing Your Destination
There are four methods by which you
can change or add a waypoint to your
route. These are:
Find Nearest (Voice command)
From the map screen, say one of the
“Find Nearest...” voice commands to
locate the nearest gas station, ATM,
restaurant or other point of interest. See
the “Find Nearest” voice commands
listing on page 169 .
Go Home (Voice command)
From the map screen, say “Go Home
1” or “Go Home 2.” If an address has
been entered in both Home Address
1 and Home Address 2, say “Go
Home” and the system will give
preference to Home Address 1 and
display the confi r mation screen.
Page 81

Driving to Your Destination
80 Navigation System
Using Interface Dial to Change
Destination
While following a calculated route, you
can select a new destination with the
map screen and the Interface Dial.
With the map screen displayed,
use the Interface Dial to move the
cursor. It will change to crosshairs.
Use the Interface Dial to position
the crosshairs on your desired new
destination, street, or icon, then push in
on the Interface Dial. The Select an
item screen or a pop-up menu may be
displayed if there are multiple POIs in
the vicinity.
NOTE:
The Select an item screen will be
displayed when the crosshairs are
positioned near multiple icons or
locations. A pop-up menu will be
displayed when the crosshairs are
positioned on a particular street.
If this is not your desired new
destination, press the CANCEL button
or the BACK button to return to the
map screen. Reposition the crosshairs
with the Interface Dial, then push in
on the Interface Dial again to see the
new address.
When the Select an item screen is
displayed, select an item from the list,
and the Calculate route to screen is
displayed. Then select OK and push in
on the Interface Dial.
When the pop-up menu is displayed,
select New Dest. to set your location
as a replacement destination, or
Waypoint to set as a waypoint.
The system will return to the map
screen and recalculate the route to your
new destination or waypoint.
Page 82

Driving to Your Destination
Navigation System
81
Entering a Destination from the
DEST Screen (while en route)
If you say “Menu”, or press the DEST/
ROUTE button and select the “Dest.
MENU 1” or “Dest. MENU 2” tab,
the system displays the DEST screen.
Follow the procedure described in
Entering a Destination, which begins
on page 28 .
When the Calculate route to screen is
displayed, select OK and push in on the
Interface Dial.
When the pop-up menu is displayed,
select New Dest. to set your location
as a replacement destination, or
Waypoint to set as a waypoint.
The system will return to the map
screen and recalculate the route to your
specifi ed new destination or waypoint.
Continue Trip to Screen
If you restart the vehicle without having
completed your prior trip, you will see
the following screen:
• To continue to your destination or
other waypoints, say or select OK.
• To cancel your destination, press
the CANCEL button or the BACK
button on the steering wheel, or
using the voice control system, say
“Cancel” or “Back.”
• If you wish to change the routing
method, select Route Pref. by using
the Interface Dial.
• For additional information on
changing the routing method, see
Changing the Routing Method on
page 53 .
AcuraLink Messages
AcuraLink enhances your ownership
experience by providing a direct
communication link between you
and Acura. AcuraLink messages are
displayed on the navigation screen.
Working through XM
®
Satellite Radio,
AcuraLink works in conjunction with
your vehicle’s navigation, Bluetooth
®
HandsFreeLink
®
(HFL), and audio
systems to send and receive several
kinds of message. These include:
• Operating tips and information on
your vehicle’s features.
• Important recall and safety
information.
• Maintenance information to keep
your vehicle in top condition.
• Diagnostic information to provide
information about any problems with
your vehicle.
• Planned appointments with your
Acura dealer.
Page 83

Driving to Your Destination
82 Navigation System
NOTE:
See your owner’s manual for more
details on this feature.
When service information is received
from your vehicle or AcuraLink, an
envelope icon is displayed in the bottom
left corner of the navigation screen.
To view messages, press the INFO
button and select or say “Message.” You
can also push in on the Interface Dial
on the map screen to get to the Map
menu, and select “New Messages.”
The Interface Dial controls most
AcuraLink functions. For more
information on AcuraLink, refer to:
• The Advanced Technology Guide for
features and a function overview.
• Your owner’s manual for a detailed
explanation of the system.
Page 84

Information Features
Navigation System
83
The INFO function consists of two
main screens. To display the INFO
screen (Main Info), say “Information”
or press the INFO button. To change it
to the INFO screen (Other), select the
“Other” tab. You can switch screens by
selecting the tab.
You can use the voice control system to
select any item on the INFO screen.
NOTE:
For information on the available voice
commands, see Voice Command Index
on page 167 .
INFO Screen (Main Info)
When you sa y “Info rmation” or press
the INFO button, the display changes to:
Move the Interface Dial to the left
and right to display Main Info or
Other.
Cellular Phone
The Cellular Phone option (available
on some phones) allows you to import
up to 1,000 entries (up to 10 phone
numbers per entry) to the phonebook of
Bluetooth® HandsFreeLink® (HFL).
Up to six phones can have their
phonebooks imported. With HFL, you
can then automatically dial any name or
number in the phonebook.
Say or select Cellular Phone from
the INFO screen (Main Info), and the
display changes to:
NOTE:
• For more information on this feature,
see your owner’s manual.
Page 85

Information Features
84 Navigation System
• For questions about the HFL
Cellular Phonebook, call
HandsFreeLink customer support at
(888) 528-7876, or (888) 9-HONDA9 in Canada, or go to www.acura.
com/handsfreelink.
Messages
See A c u r a L i n k M e s s a g e s on page 81 .
Traffi c Incidents
When you say or select Traffi c
Incidents, you can view a list of the
traffi c incidents near your current
position or along your calculated route.
See Viewing Incident Reports on page 25
and Traffi c Rerouting on page 75 .
NOTE:
To receive traffi c information, your XM
traffi c/weather subscription must be
paid. See page 126 for details.
If you select an incident from the list
and push in on the Interface Dial, the
detailed information and the map of the
surrounding area will appear.
NOTE:
When information regarding Traffi c
Incidents cannot be received, this
feature cannot be selected. After
a period of 15 minutes, Traffi c
Incidents may be selected but the
message “Traffi c information could not
be received” will be displayed. For an
explanation regarding the verifi cation
of reception status, please see Traffi c &
Weather Status on page 126 .
AcuraLink Weather
The Weather Info option allows you
to view the weather forecast, warning
list, warning map, and radar image
map. When you say or select Weather
Information on the Map menu or
INFO screen, the following screen
appears:
NOTE:
• You can view the same screen by
selecting Weather Info. from the
Map menu (see page 59 ).
• To receive weather information, your
XM traffi c/weather subscription must
be paid. See page 126 for details.
Page 86

Information Features
Navigation System
85
• When you cannot receive Weather
Info, this feature cannot be
selected. After a period of 15
minutes, Weather Info. may be
selected but the message “Weather
information could not be received”
will be displayed. For information
regarding the verifi cation of
reception status, please see Traffi c &
Weather Status on page 126 .
Weather Forecast
You can view the weather forecast
for the current position or the city
you selected. Say or select Weather
Forecast, and the display changes to:
When you select Current Position,
the Forecast scree
n will be displayed.
When you select City Vicinity,
the Enter city name screen will be
displayed. Enter the name of the city
using the Interface Dial. If the system
does not fi nd an exact match, select
LIST when you fi nish entering the
name of the city. Select a desired city
from the list. The Forecast screen will
be displayed.
When you select the “1 day” tab, you
can view the one-day forecast and get
information about the current weather,
forecast, and temperature. When you
select the “3 day” tab, you can view the
three-day forecast (day/night).
NOTE:
• When the GPS signal or weather
information cannot be received,
“NA” or “No Data” will be
displayed.
• You can view the same information
by selecting the weather icon for a
city on the map screen.
Warning List
Y
o
u can view a list of all weather
warnings in the United States. Say
or select Warning List Sorted by
Distance, and the display changes to:
Page 87
Information Features
86 Navigation System
You can view three types of lists by
selecting a sorting method from “All
US,” “Within 500mi,” or “On Route.”
A warning icon in the list indicates that
your vehicle is in the warning area, or
the calculated route runs through the
area. When you select a listed item by
pushing in on the Interface Dial, the
detailed information will be displayed.
Say “ Read List” or push in on the
Interface Dial, and the information
will be read to you.
NOTE:
• The “On Route” tab can be selected
only when en route.
• Scrolling through the Weather
Warning screen is disabled when the
vehicle is moving.
Warning Map
Y
o
u can view the warning map, which
contains different colors according
to the type of warning. Say or select
Warning Map, and the display
changes to:
Select the colored area by moving the
Interface Dial. If desired, rotate the
Interface Dial knob to change the
map scale (15, 50, or 150 miles). When
you have the crosshairs in the desired
area, push in on the Interface Dial.
The Weather Warning screen will be
displayed.
Radar Map
To view a radar image map displaying
rain or other weather systems, say or se lect
Radar Map. The display changes to:
:heavy rain
:moderate rain
:light rain
:heavy freezing rain
:light freezing rain
:heavy snow
:light snow
Move the Interface Dial to scroll the
map. To change the scale (50, 1 5 0 , or 350
miles), turn the Interface Dial knob.
NOTE:
• Moving the cursor does not display
the detailed information.
• Changes to the scale of the Radar
Map are not refl ected on the original
map screen.
Page 88

Information Features
Navigation System
87
Weather Information on Map
Weather Icons
W eather icons can be displayed on the
map screen when turned on (see page
69 ). They appear next to the city names
on all map scales.
When you scroll through the map using
the Interface Dial, the weather icon is
displayed at the top right of the screen.
This shows you the weather at the
cursor position.
When you select the weather icon
next to a city name and push in the
Interface Dial, the Forecast screen
will be displayed. To return to the map
screen, press the CANCEL button.
Warning Icon
The warning icon indicates that a
weather warning area exists near
your current location or along your
calculated route. To check the weather
warnings, see Warning Map on page 86 .
Weather Information for Destination
When you select a destination from the
DEST screen, the Calculate route to
screen will be displayed. Weather icons
for the destination will display on the
right side of the screen.
Page 89

Information Features
88 Navigation System
You can also view the weather
information for your destination when
you select the destination directly from
the map screen (use the Interface
Dial to position the target mark on your
desired destination, and then push in on
the Interface Dial).
NOTE:
When the GPS signal or weather
information cannot be received, “NA”
will be displayed.
When the system calculates a route
and there is a warning on the route, the
following screen will be displayed when
you are within 10 miles of the warning
area.
Select Check Info., and the warning
list will be displayed (see page 85 ).
Voice Info
When you say or select Voice Info on
the INFO screen (Main Info), you will
see t
he following screen:
You can select the “MAP,” “DEST”, or
“AUDIO” tab by moving the Interface
Dial to the left or right.
NOTE:
You can select an item by saying either
the line number or the item name.
Page 90

Information Features
Navigation System
89
There is a tutorial available for the
voice command help. Say or select
Getting started, and the display
changes to:
Select the line number of the desired
tutorial you want to view, and the
tutorial will automatically be read.
To stop the reading, push in on the
Interface Dial and select STOP. To
resume the reading, push in on the
Interface Dial again.
When you make a command help
selection under any of the help screens,
you will see the help commands that
can be used with voice control. You
can say “Read List” or push in on the
Interface Dial to select Using the
talk button, and the system will read
the list to you.
For a listing of all voice commands, see
Voice Command Index on page 167 .
Setup
When you select Setup, you will see
the following screen:
For detailed information on the SETUP
screen, see System Setup on page 96.
Page 91

Information Features
90 Navigation System
INFO Screen (Other)
Select the “Other” tab to view
additional information, and the
following screen appears:
NOTE:
Map Data Update Status can be
selected only during the update of map
data.
Calendar
The Calendar option allows you
to enter events and be reminded of
them in the future. When you say
or select Calendar from the INFO
screen (Other), the system shows the
calendar with the current calendar day
highlighted.
Dates with an icon indicate there is a
scheduled entry for that date.
NOTE:
Entries may be stored in the calendar
for 10 years.
You can scroll through the calendar day
by day by rotating the Interface Dial
knob, or select the day by voice. When
you move the Interface Dial up or
down, you can also scroll through the
calendar week by week. To change the
month, say “Next month” or “Previous
month,” or move the Interface Dial
right or left.
Page 92

Information Features
Navigation System
91
Entering Your Schedule
Set your schedule b y selecting the day on
the calendar, and the display changes to:
Reminder
The default for Reminder is ON. This
allows the system to remind you of the
calendar item the next time you start the
vehicle. See S y s t e m S t a r t - u p on page 18 .
Edit Date
This allows you to move your calendar
entry to a different date. If you say or
select Edit Date, the Edit Date screen
is displayed with existing entries grayed
out. When you select a new date, the
display will return to the Schedule
screen.
Edit Title
Say or select Edit Title, then enter the
name of your title using the Interface
Dial. Once you have entered the title,
say or select OK. The title will be
displayed on the specifi ed date on the
Calendar screen and the display will
return to the Schedule screen.
Edit Message
Say or select Edit Message, and the
system will show the Edit Message
screen. You can enter a message on two
lines. Use
to change the line.
Once you have entered the message,
say or select OK. The message will be
displayed on the specifi ed date on the
Calendar screen and the display will
return to the Schedule screen.
Message Icon
Say or select Message Icon, and
the system displays a list of icons you
can select to help identify the type of
message you entered. The message icon
you choose will be displayed alongside
the specifi ed date on the Calendar
screen.
Delete
Say or select Delete to display the
confi rmation screen. If you select
YES, the entry that is displayed will be
deleted.
Page 93

Information Features
92 Navigation System
Back to Calendar View
Once you have fi nished entering the
schedule, say or select BACK TO
CALENDAR VIEW by moving the
Interface Dial down. The Calendar
screen will appear and display the
scheduled entry.
NOTE:
• Only one entry can be stored for
each calendar day.
• A maximum of 50 entries can be
stored in the calendar. After you
reach 50 entries, a warning message
will appear telling you that the limit
has been reached. You can clear any
older entries as needed.
• The system displays active calendar
entries only after you answer OK on
the Disclaimer screen.
• For more information, see System
Start-up on page 18 .
Scenic Road Information
Say or select Scenic Road
Information while on the INFO
screen (Other), and the display will
change as indicated below.
The number of scenic roads for each
state will be listed.
Select a state and a list of the scenic
roads in that state will be displa yed.
After making a selection, the scenic road
will display on the Map Click screen
at a scale, where its main portion is the
focal point of the map . You can then set
this as a destination or waypoint.
If you select a scenic road that runs
through multiple states, only the portion
of the road in the selected state will be
displayed.
NOTE:
You cannot select state that exists in
Mexico on this screen.
Calculator
When you say or select Calculator on
the INFO screen (Other), the display
changes to:
Use the Interface Dial and Knob to
use the following features:
Calculator
The calculator function operates like a
standard handheld calculator.
Page 94

Information Features
Navigation System
93
U n i t C o n v e r s i o n
Values entered on the calculator can be
converted from one unit to another (e.g.,
inches to millimeters).
To perform a conversion:
1. Enter a numeric value to be converted
(for example, 100).
2. Mov e the Interface Dial down to
select UNIT CONVERSION. The
screen changes to:
3. Ro tate the Interface Dial knob to
select the type of unit you want to
convert (for example, weight) and
push in on the Interface Dial to
select. The screen for that conversion
type appears (see illustration in step
4).
4. Select the base unit (e.g., pounds)
that you wish to convert to some
other unit. All other units will change
automatically depending on the base
unit value. In the example below,
1000 mm converts to 100 cm, 1 m
(U.S.), etc.
NOTE:
• If you do not enter a value to be
converted, only “Temperature” units
are selectable.
• Conversions using negative values
may produce meaningless or
physically impossible values.
• To return the Calculator screen,
select CALC. by moving the
Interface Dial to the right.
System/Device Information
Say or select System/Device
Information while on the INFO
screen (Other), and the display will
change as indicated below.
You will need this information when
ordering an update DVD. See page 1 35 for
more information.
Page 95

Information Features
94 Navigation System
Map Update Status
During data updates, you can check
the update status for map data for each
state.
During the update of map data, say
or select Map Update Status while
on the INFO screen (Other), and the
display will change as indicated below.
NOTE:
• This operation can only be carried
out during a disc update.
• You can check the data update status
with the status bar that is displayed
on the screen.
• If you say “Question” or select the ?
tab, you can refer to the Map Update
Status explanation.
Roadside Assistance
Acura Roadside Assistance is provided
as a service to Acura clients. When
paired with a Bluetooth-enabled
cell phone, the system can call for
assistance as long as the setting is
switched ON.
Say or select Roadside Assistance
while on the INFO screen (Other), an d t h e
display will change as indicated below.
When you select the country, the phone
number for Roadside Assistance and
vehicle position information will be
displayed.
Say “Call” or select CALL with the
Interface Dial, and then select Yes
from the confi r mation screen.
Key to Zagat Ratings
By saying or selecting Key to Zagat
Ratings on the INFO screen (Other),
you can see the explanation of the
data displayed for the Zagat-surveyed
restaurants.
NOTE:
Restaurant information on Mexico
by Key to Zagat Ratings is not be
displayed.
• “Food,” “Décor,” and “Service”
categories are rated using numbered
values (e.g., 0-9, 10-15, etc.)
• “Cost” is the average cost of a meal
(including drink and tip).
The code displayed has the following
meaning:
“VE”: Very Expensive
“E”: Expensive
“M”: Moderate
“I”: Inexpensive
Page 96
Information Features
Navigation System
95
• The symbols, if displayed, indicate
the following information:
open on Sunday
closed on Sunday
open on Monday
closed on Monday
open for lunch
lunch not served
serving after 11 PM
no credit card accepted
Use the Interface Dial to scroll
through the Key to Zagat Ratings
screens.
Copyright© 2010 Zagat Survey, LLC. All rights reserved.
Show Wallpaper
If you say or select Show wallpaper
from the INFO screen (Other), the
wallpaper that is currently selected will
be displayed on the screen. If you push
in on the Interface Dial, the original
screen will return. For instructions on
changing Wallpapers Setting , see page
122 .
Page 97

System Setup
96 Navigation System
SETUP Mode
The SET UP function consists of two
main screens that allow you to change
and update information in the system.
NOTE:
For information on the available voice
commands, see Voice Command Index
on page 174 .
SETUP Screen (Main Set up)
Select Set up from the INFO screen
(Main info), and the following screen
will display.
Brightness
The screen brightness has 11 settings.
To change the brightness, use the voice
control system and say “Brightness up”
or “Brightness down.” You can also
select Brightness and change the
setting by rotating the Interface Dial
knob.
Tip:
If you are having trouble viewing the
screen in bright lighting conditions, try
increasing the brightness.
Contrast
The screen contrast has 11 settings.
To adjust the contrast, use the voice
control system and say “Contrast up”
or “Contrast down.” You can also select
Contrast and change the setting by
rotating the Interface Dial knob.
Black Level
The screen black level has 11 settings.
To change the black level, use the voice
control system and say “Black level up”
or “Black level down.” You can also
select Black Level and change the
setting by rotating the Interface Dial
knob.
NOTE:
You can have separate daytime and
nighttime settings for Brightness,
Contrast, and Black Level. Adjust each
setting when the display is in either
daytime or nighttime mode. Use the
Display Mode button (page 10 and 120 )
to select Daytime or Nighttime mode.
Page 98

System Setup
Navigation System
97
Volume
The navigation voice volume has 11
settings and can be adjusted by:
• Using the voice control system and
saying “Volume up” or “Volume
down.”
• Selecting Volume and changing the
setting by rotating the Interface
Dial knob.
• Saying “Volume Off,” or selecting
Volume and then OFF.
NOTE:
If you turn the volume off, you will not
hear route guidance or voice command
confi rmations.
If you then select Voice in the Map
menu, you will hear route guidance at
the default volume.
Interface Dial Feedback
This setting allows you to control
when (and if) the system will read the
current selection you choose with the
Interface Dial. The purpose of this
feature is to minimize the need to look
at the screen while operating the dial.
You can set the one of the three settings
explained in the following table. The
factory default is AUTO.
Setting Degree of assistance
ON
When selection is made,
the system always reads
what is selected.
AUTO
(factory default)
The system reads
selection only when
moving
OFF
No voice assistance
when selecting.
Personal Information
From the SET UP screen (Main
Set up), say or select Personal
Information and the following screen
appears:
Address Book
The Address Book allows up to a
total of 200 address entries. After
200 entries, no more entries can be
added. The 200 addresses are shared
between DRIVER 1 and DRIVER 2.
For example, if DRIVER 1 has 150
addresses, DRIVER 2 can only have 50.
You can add, modify, and delete
information in the personal Address
Book list.
Page 99

System Setup
98 Navigation System
You may choose to use a Personal
Identifi cation Number (PIN) to protect
your privacy. However, PINs are
optional, and if you decide to use one,
record it in case you forget the number
(see page 102 ).
NOTE:
If you forget your PIN, your dealer will
have to reset it for you, and all of your
stored information will be cleared.
You can do the following functions in
the address book:
• Enter an address (see page 98 )
• Edit an existing address (see page 99 )
• Delete an existing address (see page
101 )
Accessing the Address Book List
After selecting the Address Book,
move the Interface Dial down while
on the Select an address screen to
change to DRIVER 1 or DRIVER 2.
If an Address Book PIN has been set,
the system prompts you to enter your
PIN. Verify that the correct user is
displayed, then enter your PIN. After
entering your PIN correctly by voice
or by using the Interface Dial, the
system displays your Address Book.
If no Address Book PIN has been set,
the system displays your Address Book
after selecting DRIVER 1 or DRIVER
2.
NOTE:
Personal information cannot be backed
up or moved to another navigation
system.
Entering an Address
Select New Address by pushing in on
the Interface Dial when beginning to
build your Address Book list.
If you move the Interface Dial down,
you can change to DRIVER 1 or
DRIVER 2.
Page 100

System Setup
Navigation System
99
Edit Name
You may use the “Name” fi eld to give
the entry a name or title that you will
recognize later, such as “Doctor Smith”
or “Broadway Theatre.” If you do not
give the address a name, the system will
assign one (Address 001, etc.).
Say or select Edit Name. Then use the
Interface Dial to enter the name.
Select OK when fi nished.
NOTE:
You can always re-enter, edit, or make
changes to any entry. “Address” is the
only required fi eld.
E d i t A d d r e s s
When you say or select Edit Address,
the display changes to:
Current Position - Allows you to use
your current position as the address.
Address - Requires you to enter the
city and address you wish to store. The
operation is the same as selecting
Address from the DEST screen
(Dest. MENU 1). See page 28 .
Previous Destinations - Allows you
to choose one of the locations in the
Previous Destination list for your
Address Book list. This operation
is the same as selecting Previous
Destinations from the DEST screen
(Dest. MENU 1). See page 35 .
Place Name - Allows you to select one
of the Point of Interest (POI) locations
already stored in the system as one of
your personal addresses. This is the
same as selecting Place Name from
the DE ST screen (Dest. MENU 1).
See page 36 .
Place Category - Allows you to select
a point of interest (POI) that has been
saved in the system as one individual
address. This is the same as selecting
Place Category from the DEST
screen (Dest. MENU 1). See page 37 .
Place Phone Number - This feature
is very convenient when you know the
phone number of a place or business
that you want to save. This is the same
as selecting Place Phone No. from
the DE ST screen (Dest. MENU 1).
See page 43 .
 Loading...