


TECHNOLOGY
REFERENCE
GUIDE
2014
owners.honda.com
2014 Honda Odyssey EX-L with Navigation
31TK8C30 Technology Reference Guide
00X31-TK8-C300 ©2013 American Honda Motor Co., Inc. — All Rights Reserved Printed in U.S.A.
Voice Recognition...................................................................................................18
Navigation.................................................................................................................22
Bluetooth
®
HandsFreeLink®(HFL)........................................................................25
SMS Text Messaging and E-Mail............................................................................29
Basic Audio Operation ..........................................................................................30
iPod
®
or USB Flash Drive .....................................................................................31
Hard Disc Drive (HDD) Audio ...........................................................................32
Song By Voice
™
(SBV) ............................................................................................33
Pandora
®
...................................................................................................................34
HondaLink featuring Aha
™
....................................................................................35
Bluetooth
®
Audio......................................................................................................36
Honda Owners .......................................................................................................37
Safety Reminder......................................................................................................37
Fuel Recommendation...........................................................................................38
Smart Entry with Push Button Start.....................................................................2
Instrument Panel Indicators ...................................................................................4
Information Display..................................................................................................6
Tire Pressure Monitoring System (TPMS)...........................................................7
Auto Door Locks .....................................................................................................8
Settings for Your Vehicle...........................................................................................9
Multi-View Rear Camera ......................................................................................10
One-Touch Turn Signal...........................................................................................11
Auto Headlights with Wiper Integration...........................................................11
LaneWatch
TM
.............................................................................................................12
Lane Departure Warning (LDW)........................................................................13
Forward Collision Warning (FCW) ....................................................................14
Cool Box ..................................................................................................................15
HomeLink
®
..............................................................................................................16
Intelligent Multi-Information Display (i-MID)...................................................17
TECHNOLOGY REFERENCE GUIDE
This Technology Reference Guide is designed to help you
get acquainted with your 2014 Honda Odyssey EX-L with
Navigation and provide basic instructions on some of its
technology and convenience features.
This guide is not intended to be a substitute for the
Owner’s Manual. For more detailed information on vehicle
controls and operation, please refer to the respective
sections in the Owner’s Manual or Navigation Manual.
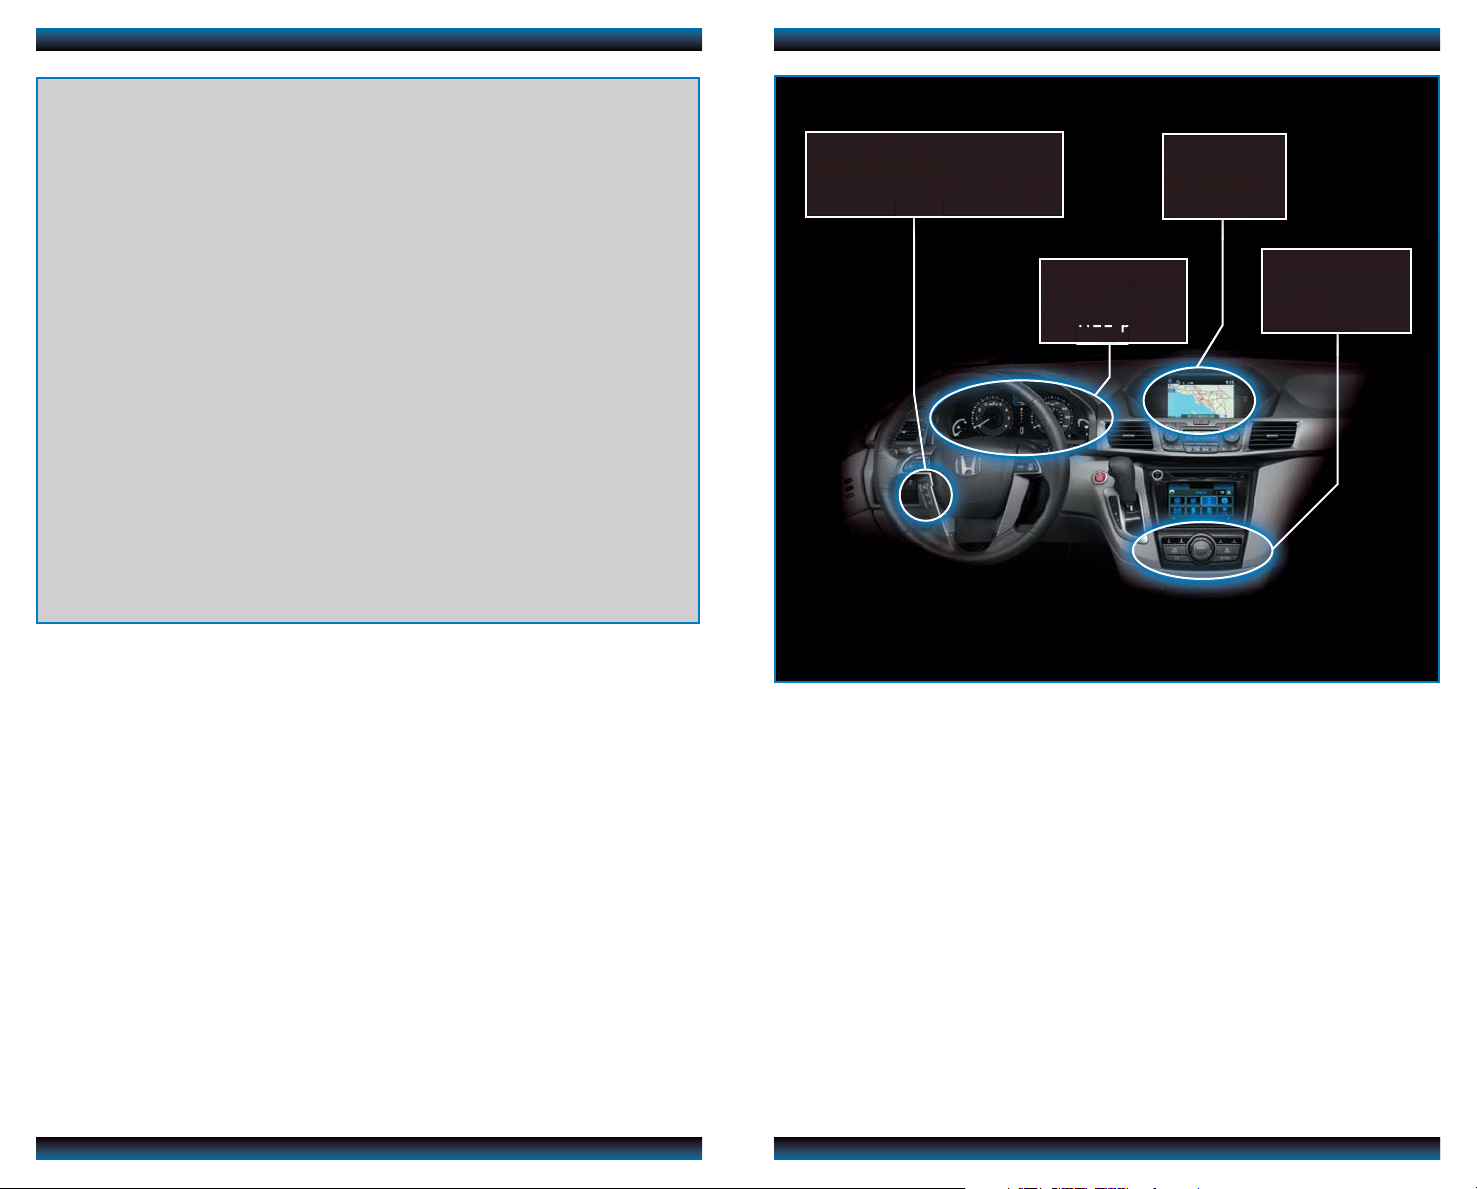
NAVIGATION
p.22
BLUETOOTH
®
HANDSFREELINK®p.25
INSTRUMENT
PANEL p.4
i-MID p.17
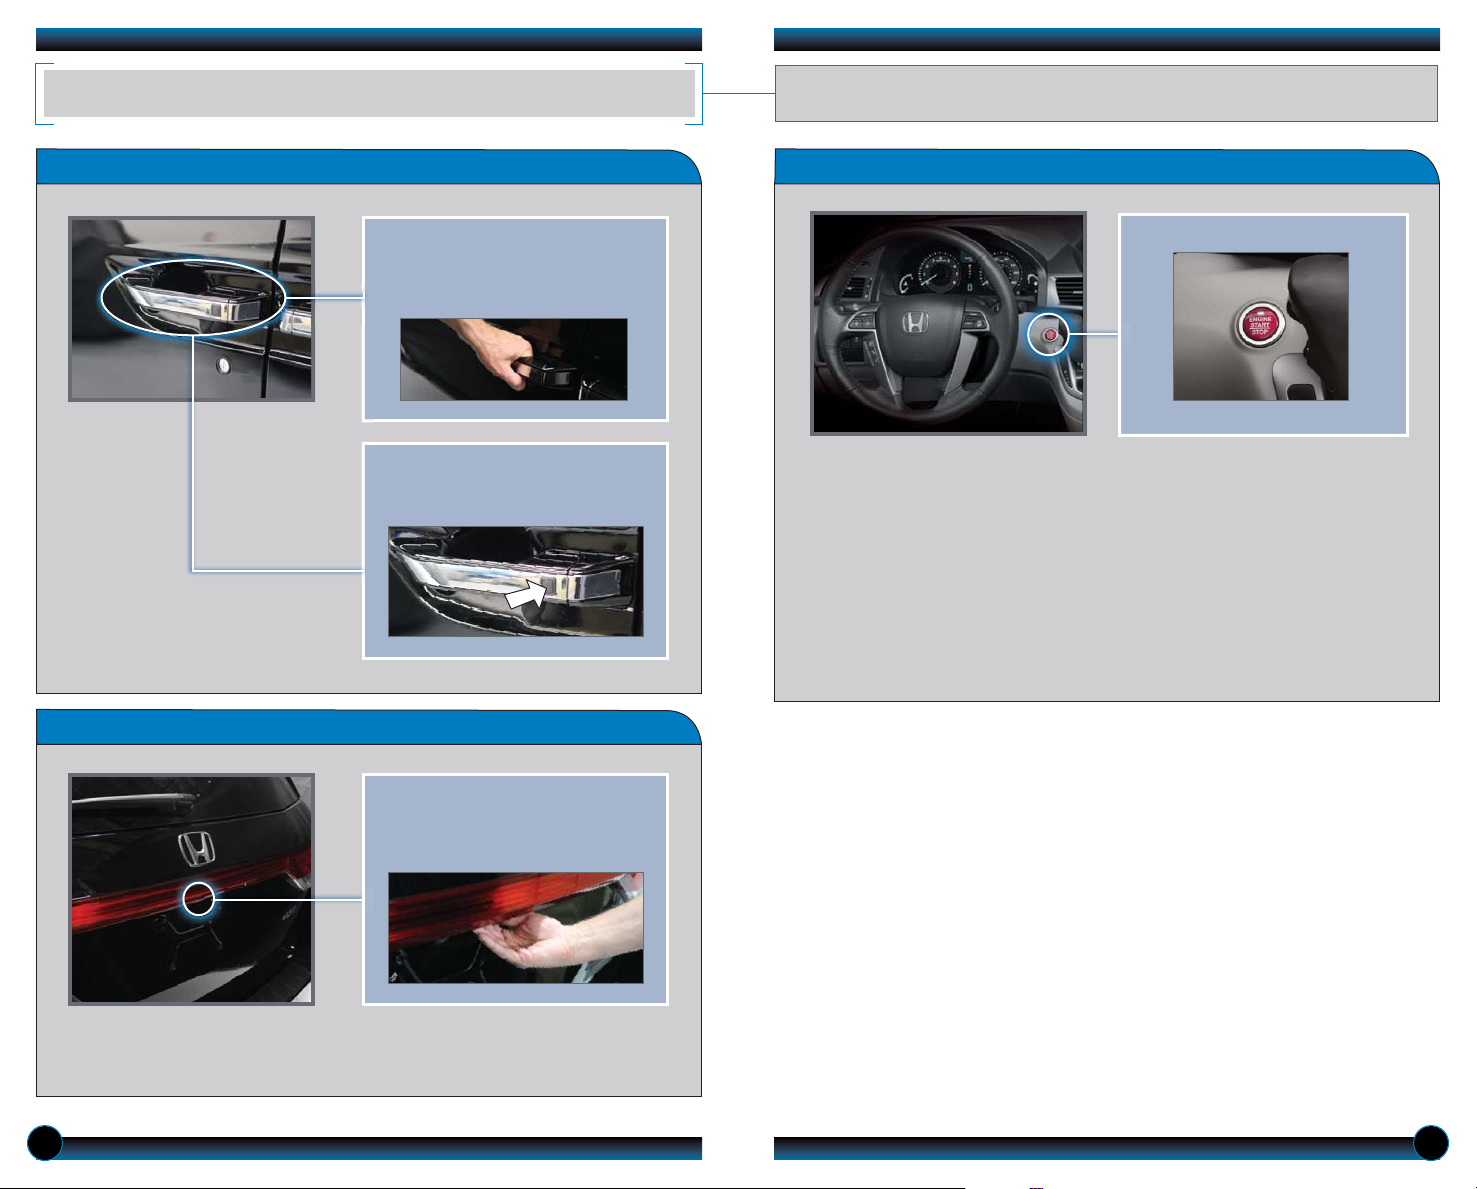
Accessory or On Mode
Press ENGINE START/STOP once without pressing the brake pedal for Accessory
mode. Press it again for ON mode.
Starting the Engine
Press and hold the brake pedal, then press ENGINE START/STOP.
Turning the Vehicle Off
Shift to Park, then press ENGINE START/STOP.
Note: If you press the button when the vehicle is stopped and the shift lever is
not in Park, the vehicle goes into Accessory mode.
SMART ENTRY WITH PUSH BUTTON START
Operate certain functions of your vehicle by simply having the remote within
operating range.
Engine Start/Stop Button
2 3
Unlocking/Locking the Doors
Opening the Tailgate
To lock, press the door lock button
on either front door handle when
the vehicle is off.
Press the tailgate release button
under the tailgate handle when all
doors are unlocked. The vehicle
can be on or off.
Note: If there is not enough clearance for the tailgate to fully open, press and
hold the tailgate release button until you hear two beeps. The tailgate unlatches,
and you can open it manually.
To unlock, grab any of the door
handles when the vehicle is off.
Wait until the doors unlock, then
pull the handle to enter.
4 5
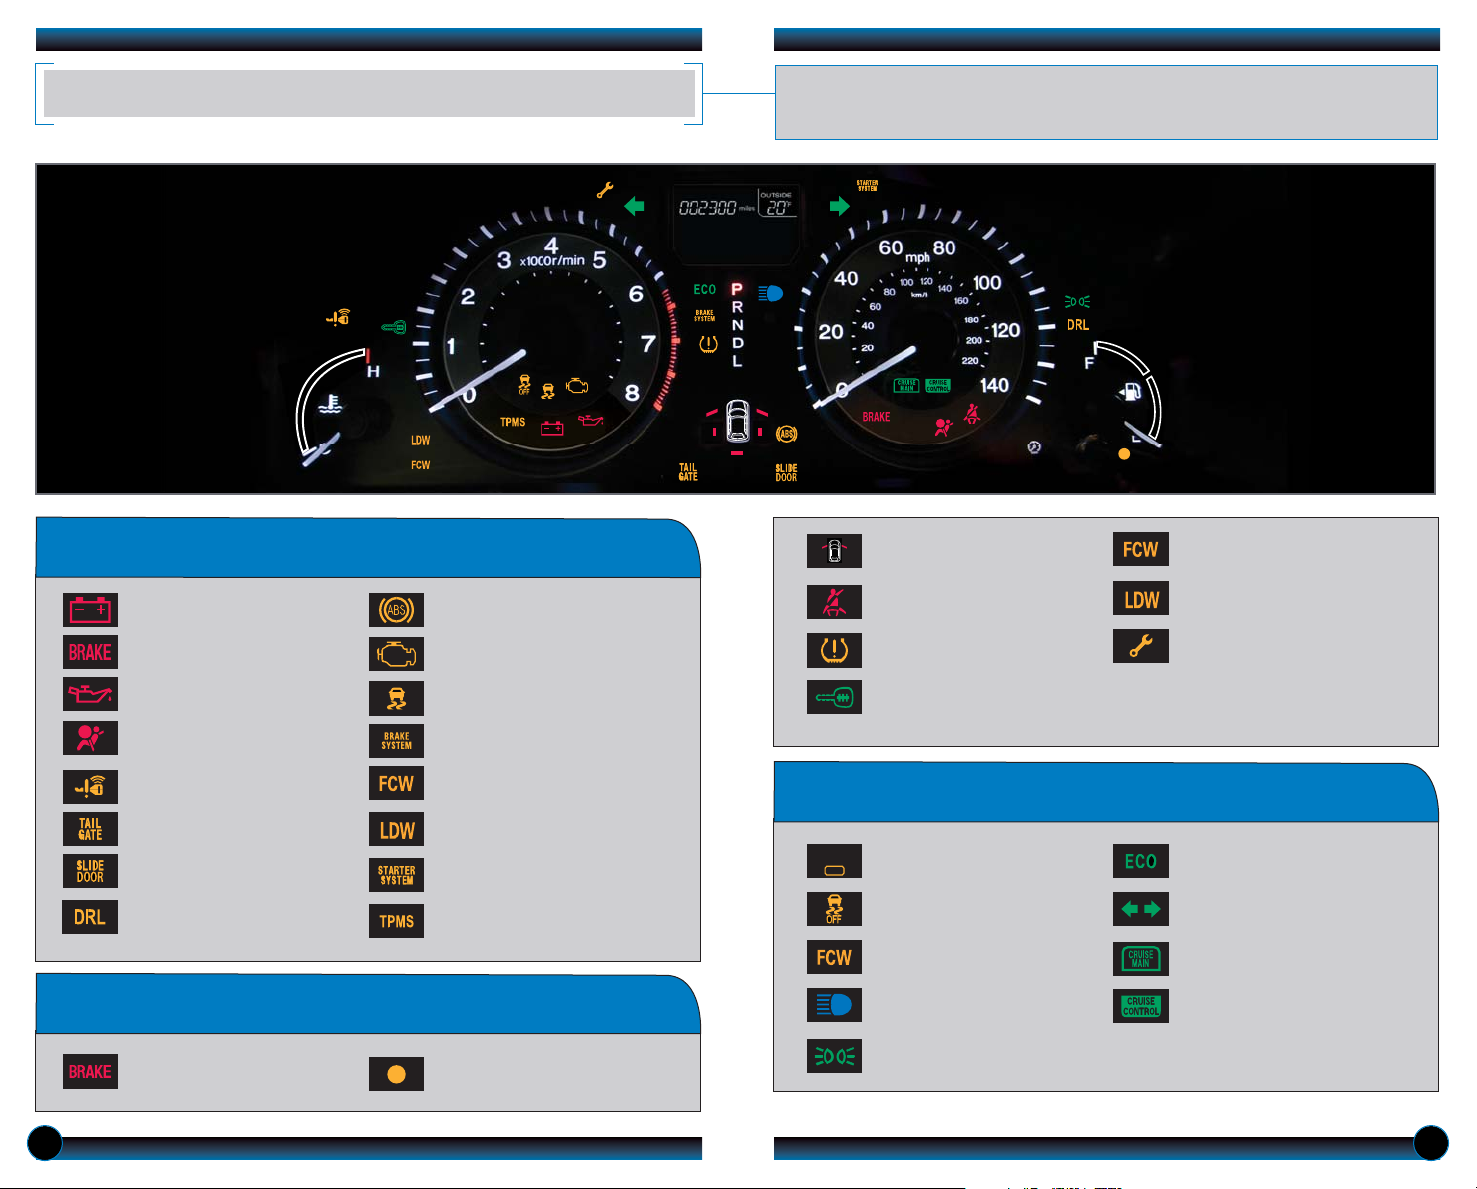
INSTRUMENT PANEL INDICATORS
Briefly appear with each engine start. Red and amber indicators are most critical. Blue
and green indicators are used for general information. See your Owner’s Manual for
more information.
Malfunction Indicators
If an indicator remains on, there may be a problem; see your dealer
Condition Indicators
Action is needed by driver
Charging system
Low brake fluid, brake system
Low oil pressure
Anti-Lock Brake System (ABS)
Malfunction lamp
(check engine light)
Vehicle Stability Assist
®
(VSA)
Supplemental Restraint System
(SRS)
Parking brake on:
Release
Low fuel:
Refill
Brake override system
Smart Entry system
Power tailgate
Power sliding door
Forward Collision Warning (FCW)
Lane Departure Warning (LDW)
Starter system
Daytime running lights (DRL)
Tire Pressure Monitoring System
(TPMS)
On/Off Indicators
PASSENGER AIRBAG OFF
(located on center panel)
CRUISE CONTROL on
VSA OFF
Exterior lights on
Turn signals/hazards on
High beams on
Door/Tailgate open:
Close door(s)/tailgate
Low tire pressure:
Add air
Immobilizer (blinks):
Use other vehicle key
and see your dealer
CRUISE MAIN on
Fuel economy on
Seat belt reminder:
Fasten seat belt(s)
FCW off
FCW (blinks):
Brake or change lanes
LDW (blinks):
Steer to stay in lane
Maintenance MinderTM:
Make dealer appointment
PASSENGER
AIRBAG
OFF
6 7
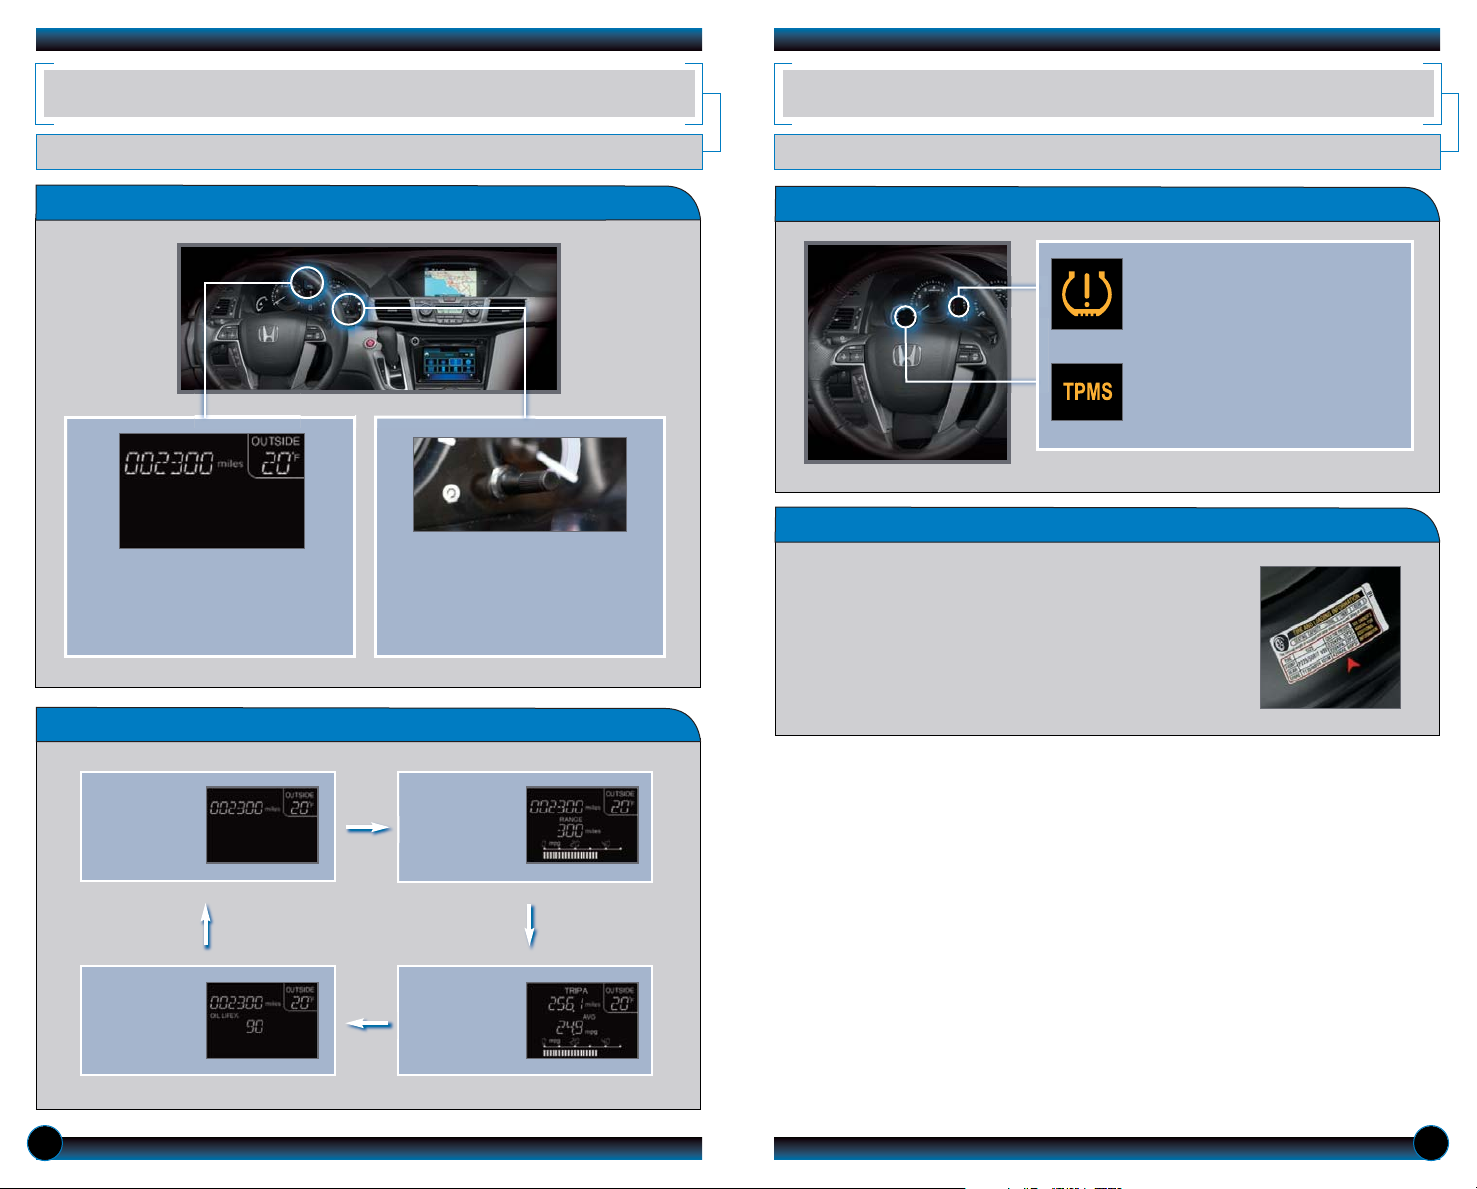
Accessing the Information Display
Information Displays
INFORMATION DISPLAY
Consists of several displays that provide you with useful information.
When you start the engine,
the display shows your last
active selection from the
previous drive cycle.
Odometer,
Outside
temperature
Fuel range,
Instant fuel
economy
Oil life
Trip meter
A/B, Average
fuel economy
To toggle between the different
displays, press and release the
select/reset knob repeatedly.
What to Do
How It Works
TIRE PRESSURE MONITORING SYSTEM (TPMS)
Monitors the vehicle’s tire pressures.
When the tire pressure drops
significantly below recommended
levels, the low tire pressure
indicator comes on.
If the TPMS indicator appears, there
may be a problem with the system.
See your dealer.
1. Visually inspect the tires for damage.
2. Use a tire air pressure gauge to check which tire(s)
have low pressure.
3. Inflate the tire(s), if necessary, to the recommended
pressures listed on the label on the driver’s doorjamb.
8 9
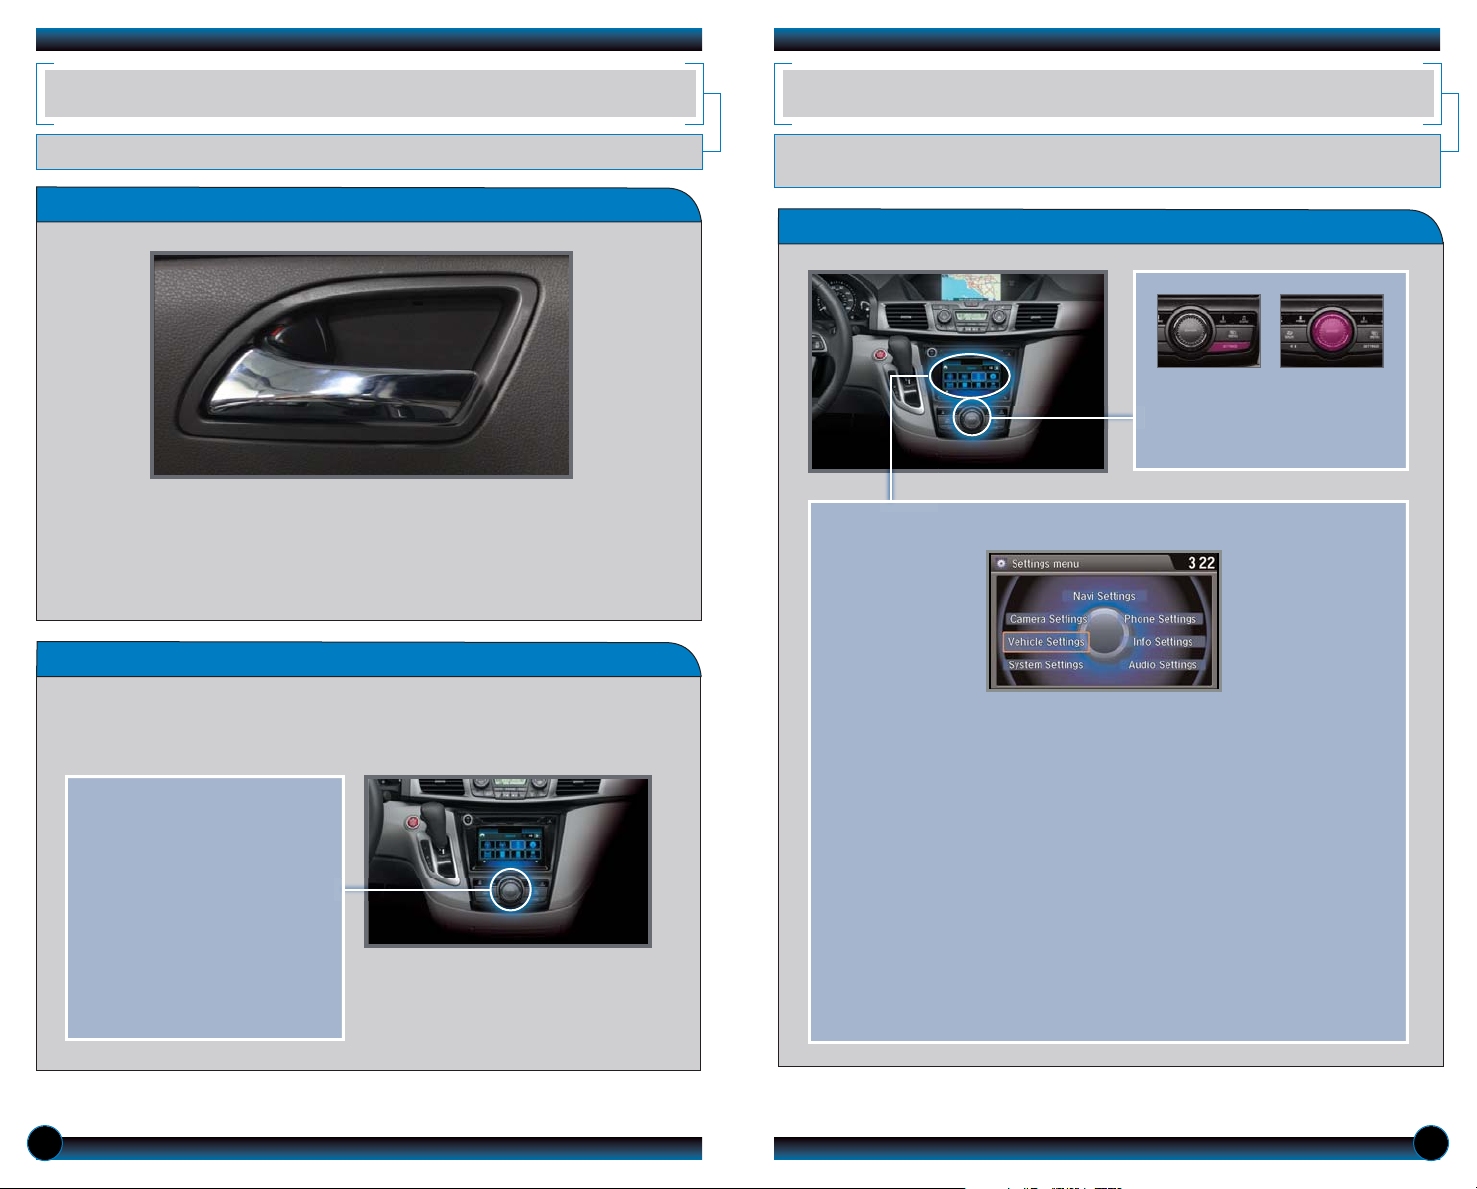
SETTINGS FOR YOUR VEHICLE
Change different settings for many features in your vehicle. See your Owner’s Manual
for detailed information on settings and options.
Adjusting Vehicle Settings
AUTO DOOR LOCKS
Program how and when the vehicle doors automatically lock and unlock.
Changing Settings
Follow the steps below to change your door settings. Make sure you are using the
key you want to change the settings for (Driver 1 or Driver 2) and the vehicle is in
On mode. See your Owner’s Manual for complete setting options.
1. Press SETTINGS. Use the
interface dial to make and
enter selections.
2. Select Vehicle Settings.
3. Select Door Setup.
4. Select Auto Door Lock or
Auto Door Unlock.
5. Select from the options.
6. Press BACK to exit the menu.
Press SETTINGS to enter the
Settings Menu. Use the
interface dial to make and
enter selections.
Choose from the available options:
Navi Settings
Change navigation, routing, and
map settings.
Camera Settings
Change LaneWatch settings and
rear camera guidelines.
Vehicle Settings
Change lighting and door setup,
and more.
System Settings
Adjust the display, clock, system
language, and more.
Phone Settings
Pair a phone, change call options,
and more.
Info Settings
Import wallpaper and select
clock type.
Audio Settings
Adjust the sound, and change
various settings for audio modes.
Door Lock Operation
Default Lock Setting
All doors and the tailgate are
preset to lock when your vehicle
reaches about 10 mph.
Default Unlock Setting
Only the driver’s door is preset to
unlock when you shift into Park (P).
10 11
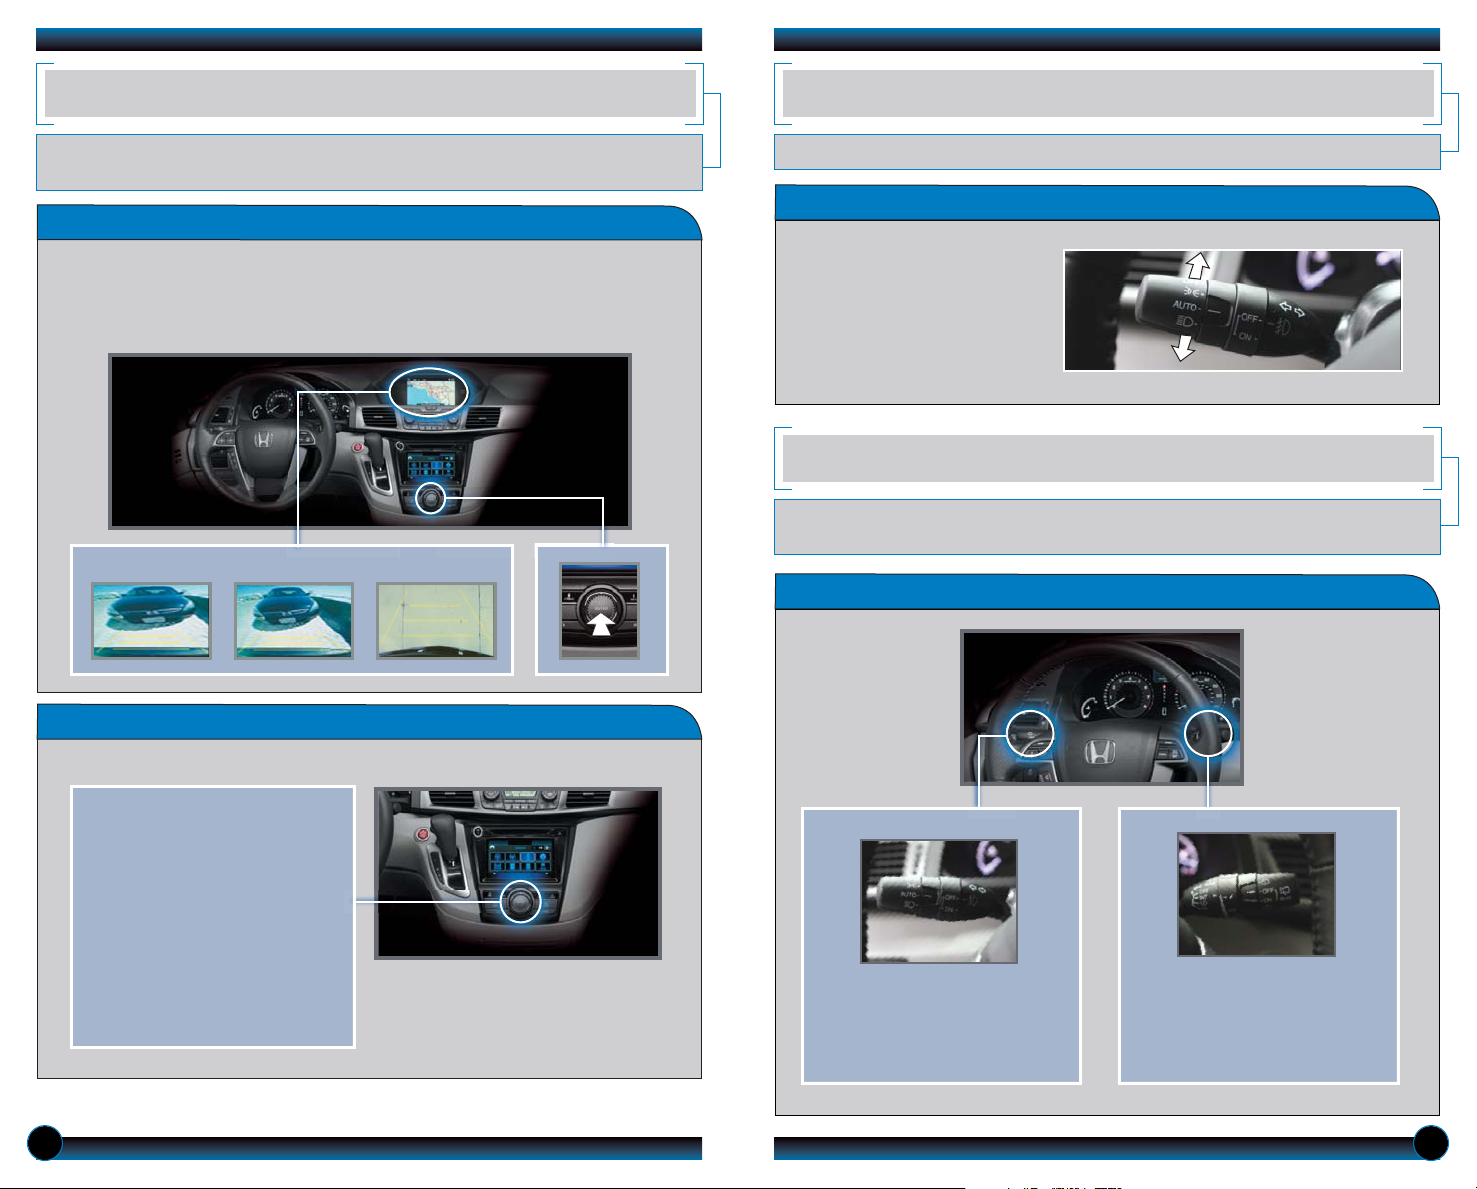
MULTI-VIEW REAR CAMERA
For added convenience, the area behind your vehicle is displayed to help you navigate
while backing up.
How It Works
• When you shift into Reverse (R), a real-time image of the area behind your
vehicle is shown in the navigation display, along with helpful parking guidelines.
• Press the interface dial to toggle between views.
• The display turns off when you shift out of Reverse.
Changing Settings
Turn the guidelines on or off.
Normal Top downWide (default)
1. Press SETTINGS. Use the
selector knob to make and
enter selections.
2. Select Camera Settings.
3. Select Rear Camera.
4. Select Fixed Guidelines.
5. Select On or Off.
6. Press BACK to exit the menu.
How It Works
ONE-TOUCH TURN SIGNAL
Use this quick and convenient method to signal a lane change.
• Lightly push the turn signal
lever up or down for a threeblink sequence.
• For a continuous signal, push
the lever up or down until it
locks into place.
AUTO HEADLIGHTS WITH WIPER INTEGRATION
For your convenience, your vehicle’s headlights automatically turn on when you activate
the windshield wipers.
How It Works
Make sure your headlights are in
the AUTO position.
Turn on your windshield wipers.
The headlights also turn on.
When you turn off the windshield
wipers, the headlights turn off
shortly after.
 Loading...