

Honda MB5 (1982) Owner's Manual
.--------
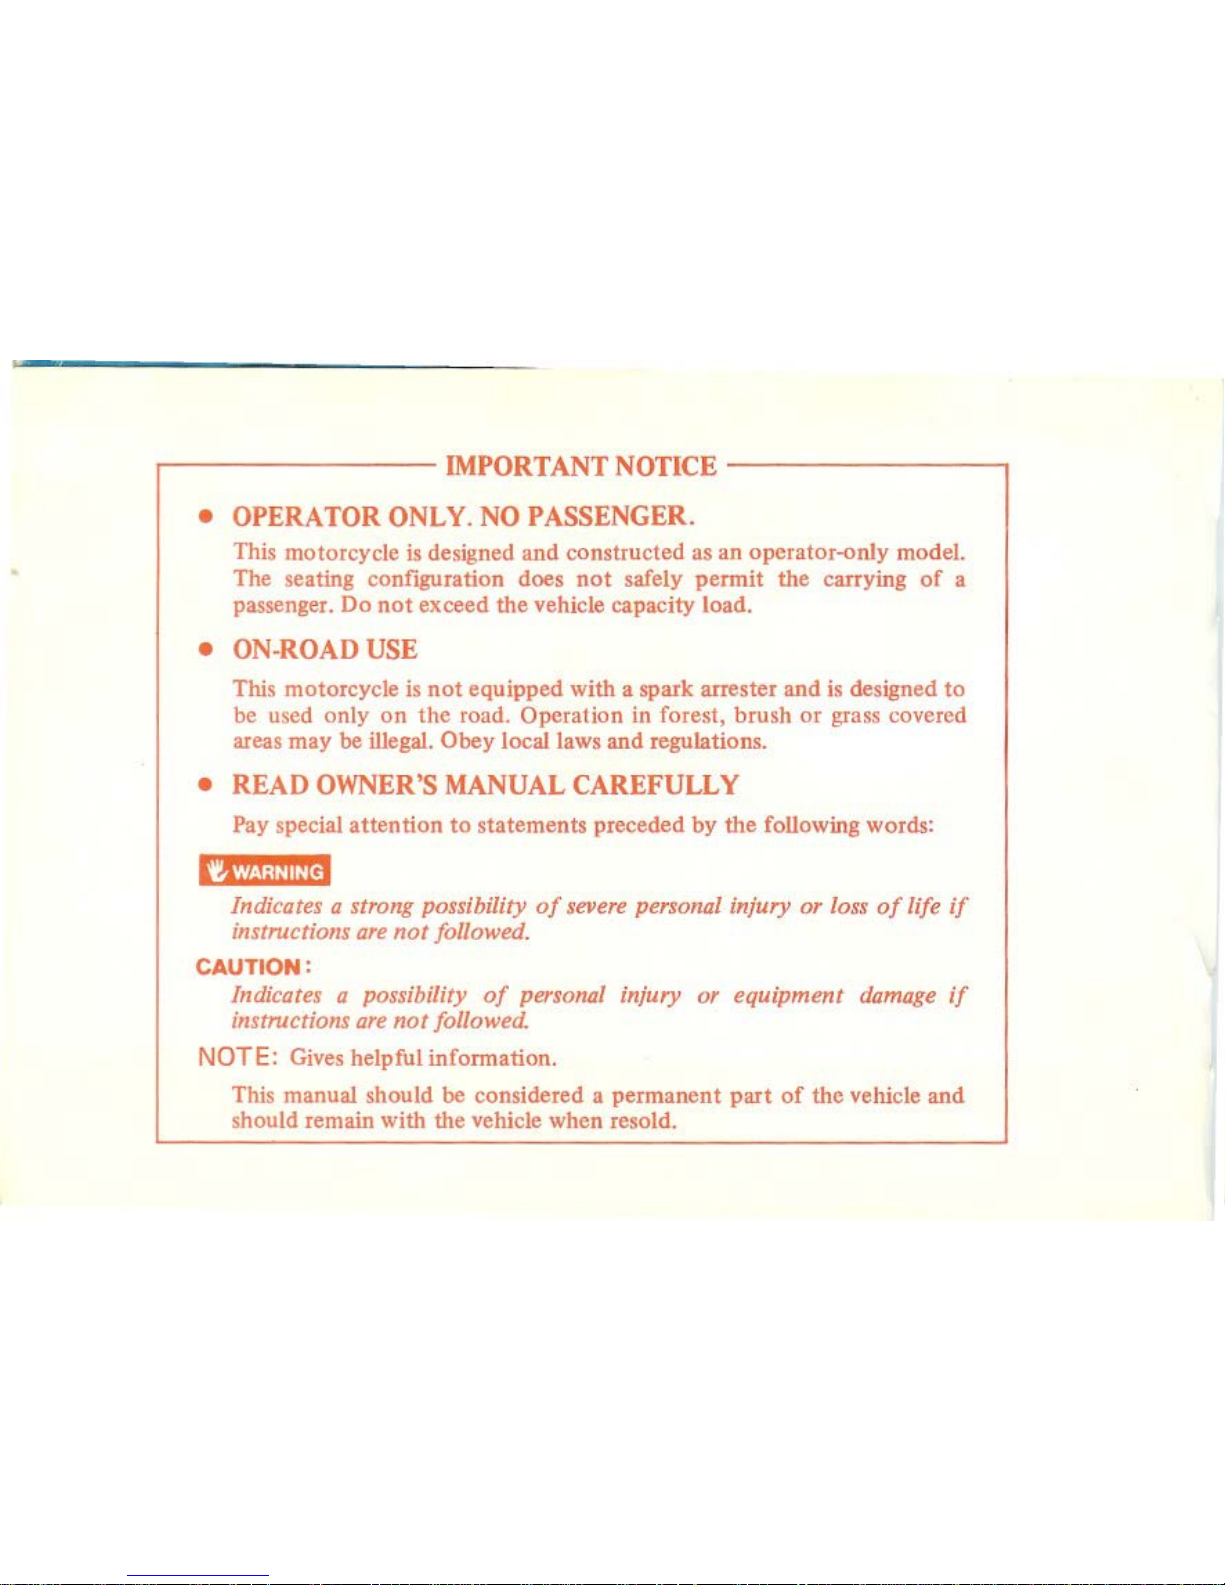
IMPORTANT
NOTICE
-------.,
•
OPERATOR
ONLY.
NO PASSENGER.
This motorcycle is designed
and
constructed as an operator-only model.
The seating configuration does
not
safely permit the carrying
of
a
passenger.
Do
not
exceed the vehicle capacity load.
•
ON-ROAD
USE
This motorcycle is
not
equipped with a spark arrester and is designed
to
be used only
on
the
road. Operation in forest, brush or grass covered
areas
may
be illegal. Obey local laws and regulations.
•
READ
OWNER'S
MANUAL
CAREFULLY
Pay special
attention
to
statements preceded by the following words:
Indicates a strong possibility
of
severe personal injury or loss
of
life
if
instructions
are
not
followed.
CAUT
ION:
Indicates a possibility
of
personal injury or equipment damage
if
instructions are
not
followed.
NOTE:
Gives
helpful information.
This manual should be considered a permanent
part
of
the vehicle
and
should remain with the vehicle when resold.
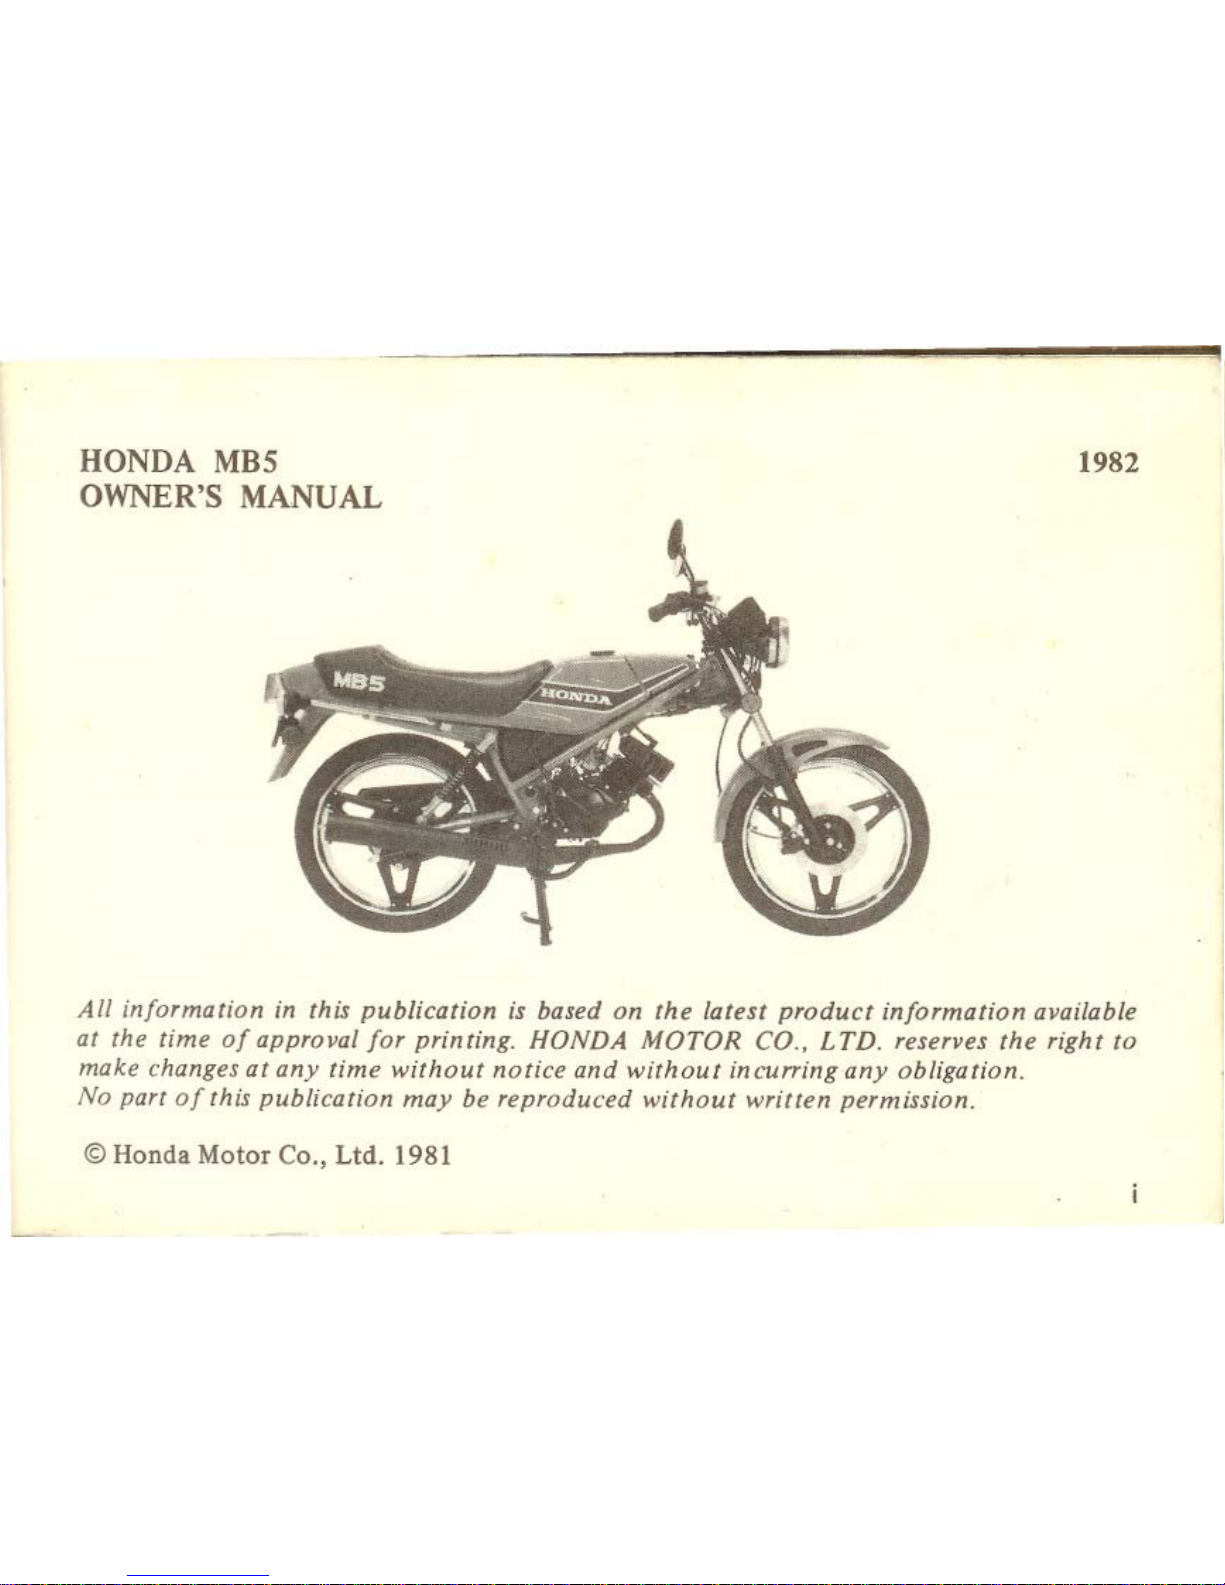
HONDA
MBS
OWNER'S
MANUAL
1982
All
information
in this publication is based
on
the
latest
product
information
available
at
the
time
of
approval
for
printing. HONDA
MOTOR
CO.,
LTD.
reserves
the
right
to
make changes
at
any
time
without
notice
and
without
incurring
any
obligation.
No part
of
this publication
may
be
reproduced
without
written
permission.
©Honda
Motor Co., Ltd. 1981
WELCOME
Your
new
motorcycle
presents
you
with
an
invitat
ion
to
adventure
and
a challenge
to
master
the
machine.
Your
safety
depends
not
only
on
your
ow
n al
ertness
and
familiarity with
the
machine,
but
also
the
machine's
mechanical condition. A pre-ride
inspection
before
every
outing
and
regular
maintenance
are
essential.
To
help
meet
the
challenges safely
and
enjoy
the
adventure
fully,
become
thoroughly
familiar with this
Owner's
Manual
BEFORE
YOU
RIDE
THE
MOTORCYCLE. Also,
for
your
own
and
your
Honda's
sake, please
read
all
the
written
material
which
came
with
your
new
Honda.
These items
include;
*
Honda
Owner's
Identification
Card
* Set-up
and
Predelivery Checklist
*
Honda
Motorcycle,
Distributor's
Limited
Warranty
When service
is
required,
remember
that
your
Honda
dealer
knows
what
it
takes
to
keep
your
Honda
going
strong.
If
you
have
the
required
mechanical
"know-how"
and
tools,
your
dealer
can
supp
ly
you
with
an official
Honda
Shop
Manual
to
help
you
perform
many
maintenance
and
repair
tasks.
Pleasant
riding
and
thank
you
for
choosing
a Honda!
iii
CONTENTS
MOTORCYCLE
SAFETY
Page
1
1
2
2
3
4
4
8
Safe Riding Rules . . . . . . . . . . .
Protective Apparel . . .
......
.
Loading
and
Accessories . . . . . .
Modifications . . . . . . . . . . . . . .
DESCRIPTION . . . .
..
.......
.
Parts
Location
.....
....
...
.
Serial Numbers .
..
....
.....
.
· Parts
Function ...
. .
.......
.
Fuel .
....
...
.
....
. .
....
.
Injector oil . . . . . . . . . . . . . . .
Tires
..................
.
OPERATION
.....
..
. .
......
.
Pre-ride Inspection
......
.
..
.
Starting
the
Engine . . . . . . .
..
.
Break-in
..
. .
..
...
.
......
.
Riding
..
...............
.
Braking
...............
..
.
Parking
......
. . . .
....
.
..
.
Anti-theft Tips .
..
. .
.......
.
iv
10
18
20
22
24
24
25
27
28
30
31
31
Pa
ge
SPECIAL
PROCEDURES
. . . . . . .
32
Tool
Kit
. . . . . . . . . . . . . . . . .
33
Front
Wheel Removal . . . . . . . .
34
Rear Wheel Removal . . . . . . . . . 3 5
Fuse
Replacement
. . . . . . . . . .
37
MAI
NTENANCE
. . . . . . . . . . . . .
39
Maintenance
Schedu
le . . . . . . . . 41
Maintenance
Record
. . . . . . . . .
43
Transmission oil . . . . . . . . . . . .
44
Spark
Plug . . . . . . . . . . . . . . . . 4 7
I
dle
speed
. . . . . . . . . . . . . . . .
48
Air Cleaner . . . . . . . . . . . . . . .
49
Front
Brake . . . . . . . . . . . . . . .
50
Rear
Brake . . . . . . . . . . . . . . .
52
Drive Chain . . . . . . . . . . . . . . . 54
Clutch
. . . . . . . . . . . . . . . . . .
57
Battery
. . . . . . . . . . . . . . . . . .
59
CL
EANING
. . . . . . . . . . . . . . . . . 61
ST
ORAGE
GUIDE
. . . . . . . . . . . .
62
CONSUMER
INFORMATION
. . . .
64
SPECIFICATIONS
.....
.
..
. . . .
65
• - - - - - - - - - - MOTORCYCLE
SAFETY-
- - - - - - - - -
..
1)!4.1;@#6
•
Motorcycl~
riding
r~quir~s
sp~ciDI
~!forts
on
your
part
to
ensure
your
sof~ty.
Know
th~s~
r~quir~m~nts
b~fon
you
rid~.
SAFE RIDING RULES
1.
Always make a pre-ride inspection
(page
24)
before
you
start
the
engine.
You may prevent an accident
or
equip-
ment
damage.
2. Many accidents involve inexperienced
riders. Most states require a special
motorcycle riding test
or
license. Make
sure
you
are qualified before you ride.
NEVER lend
your
motorcycle
to
an
inexperienced rider.
3. Many automobile/motorcycle
accidents happen because the automobile
driver does
not
"see"
the
motorcyclist.
Make yourself conspicuous
to
help
avoid
the
accident
that
wasn't
your
fault:
• Wear bright
or
reflective clothing.
•
Don't
drive in another motorist's
"blind
spot."
4. Obey all federal, state, and local laws
and regulations.
• Excessive speed
is
a factor in many
accidents.
Obey
the
speed limits,
and
NEVER travel faster
than
con-
ditions warrant.
• Signal before
you
make a
turn
or
lane change.
Your
size and maneu-
verability
can
surprise
other
motor-
ists.
5.
Don't
let
other
motorists surprise you.
Use extra cauti
on
at
intersections,
parking
lot
entrances and exits, and
driveways.
6. Keep
both
hands
on
the
handlebars
and
both
feet
on
the
footpegs while
riding.
PROTECTIVE APPAREL
1. Most motorcycle accident 'fatalities are
due
to
head injuries: ALWAYS wear a
helmet.
You should also wear a face
shield
or
goggles, boots, gloves, and
protective clothing.
2. The exhaust system becomes very
hot
during operation, and
it
remains
hot
after operation. Never
touch
any
part
of
the
hot
exhaust system. Wear cloth-
ing
that
fully covers
your
legs.
3. Do
not
wear loose clothing which
could catch on
the
control levers,
kickstarter, footpegs, drive chain,
or
wheels.
2
LOADING AND ACCESSORIES
• A motorcycle
is
sensitive
to
changes in
weight distribution. Addition
of
accessories or cargo can impair the motorcycle's stability
and
performance. To
prevent
an
accident, use extreme care
when adding
and
riding with cargo and
accessories. These general guidelines
may
help
you
decide whether,
or
how
to equip
your
motorcycle.
Loading
The vehicle capacity load
is
220
pounds.
The combined weight
of
the
rider, cargo,
and
all accessories
must
not
exceed this
limit.
1.
Keep cargo and accessory weight low
and
close
to
the
center
of
the
motor-
cycle. Load weight equally on
both
sides
to
minimize imbalance.
As
weight is located farther from
the
motorcycie's center
of
gravity, han-
dling
is
proportionally affected.
2. All cargo and accessories must be
secure for stable handling. Recheck
cargo security and accessory
mounts
frequently.
3. Do
not
attach large
or
heavy
items
(such
as
sleeping bag
or
tent)
to
the
handlebars, front forks,
or
fender.
Unstable handling
or
slow steering
response may result.
Accessories
You are personally responsible for
proper
selection, installation and use
of
acces-
~ories.
Always follow
the
guidelines
under
loading above, and these:
1. Carefully inspect
the
accessory
to
make sure
it
does
not
reduce ground
clearance,
or
obscure lights,
or
limit
suspension travel, steering travel
or
control operation.
2.
Do
not
add electrical equipment
that
will exceed
the
motorcycle's electrical
system capacity. An electrical failure
could cause a dangerous loss
of
lights
or
engine power
at
night
or
far from
help.
MODIFICATIONS
• Modification
of
the motorcycle,
or
removal
of
original
equipment
may
render the vehicle unsafe or
illegal.
Obey all federal, state
and
local equip-
ment
regulations.
3
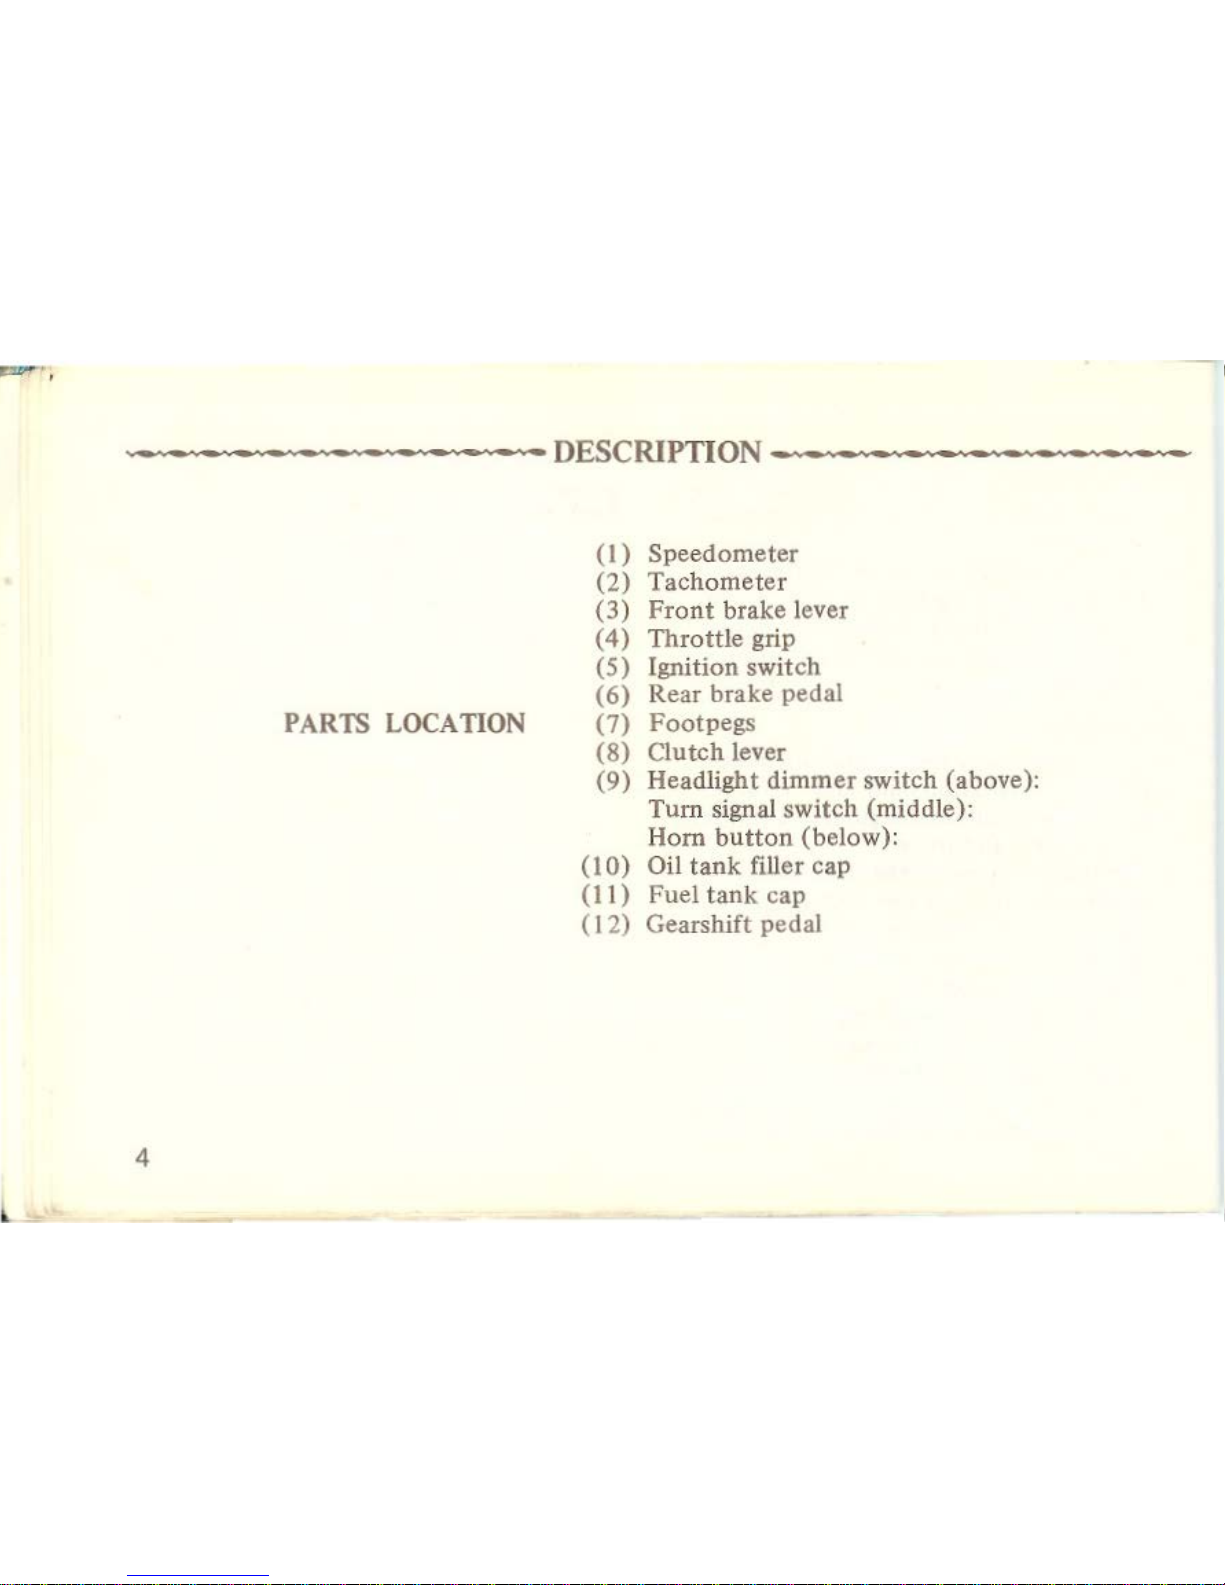
PARTS
LOCATION
4
(1)
Speedometer
(2)
Tachometer
(3)
Front
brake lever
(4)
Throttle
grip
(5)
Ignition switch
(6)
Rear
brake pedal
(7)
Footpegs
(8)
Clutch
lever
(9)
Headlight
dimmer
switch (above):
Tum
signal switch (middle):
Hom
button
(below):
(1
0)
Oil
tank
filler cap
(II
) Fuel
tank
cap
( 12) Gearshift pedal
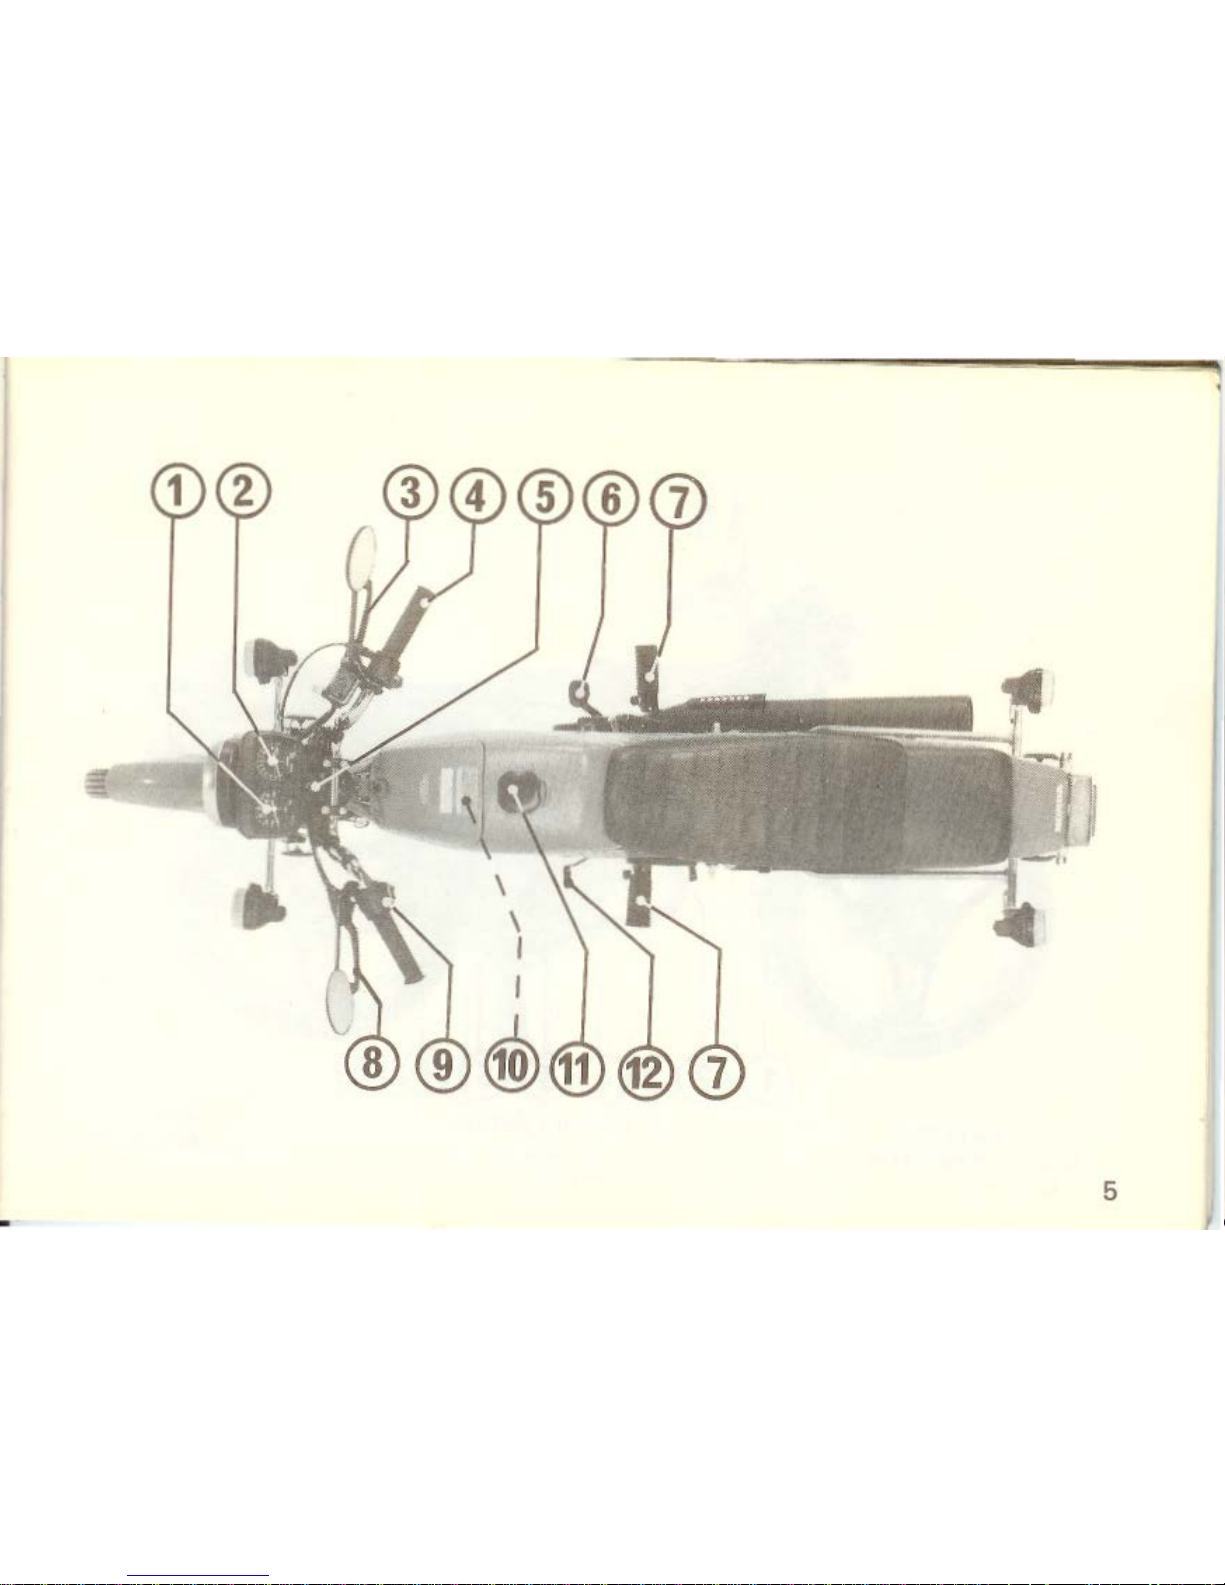
5
(1) Steering lock
(2)
Oil level sight glass
6 (3) Choke knob
(4)
Gearshift pedal
(5)
Fuel valve
(6) Footpeg
(7)
Battery
(8) Helmet holder
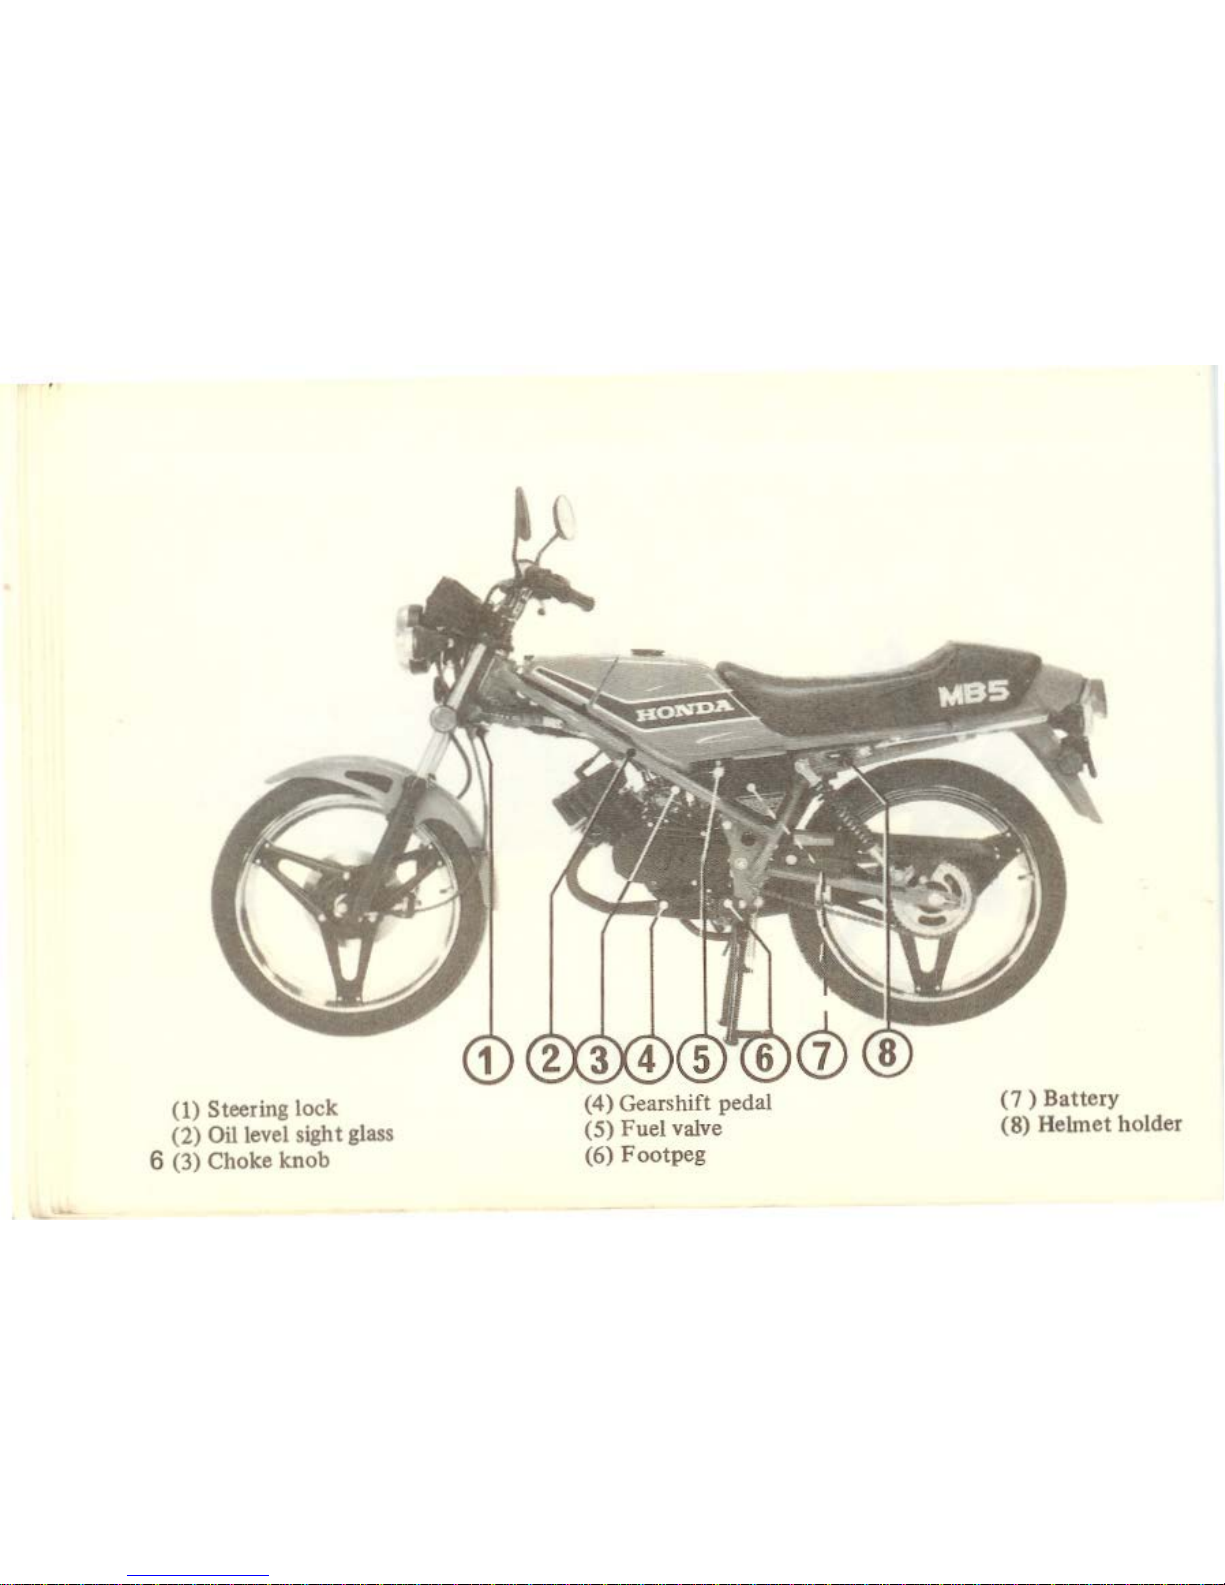
(1)
Air cleaner
(2) Kickstarter pedal
(3) Center
stand
(4)
Footpeg
(5) Rear brake pedal
(6)
Front
brake fluid reservoir
7
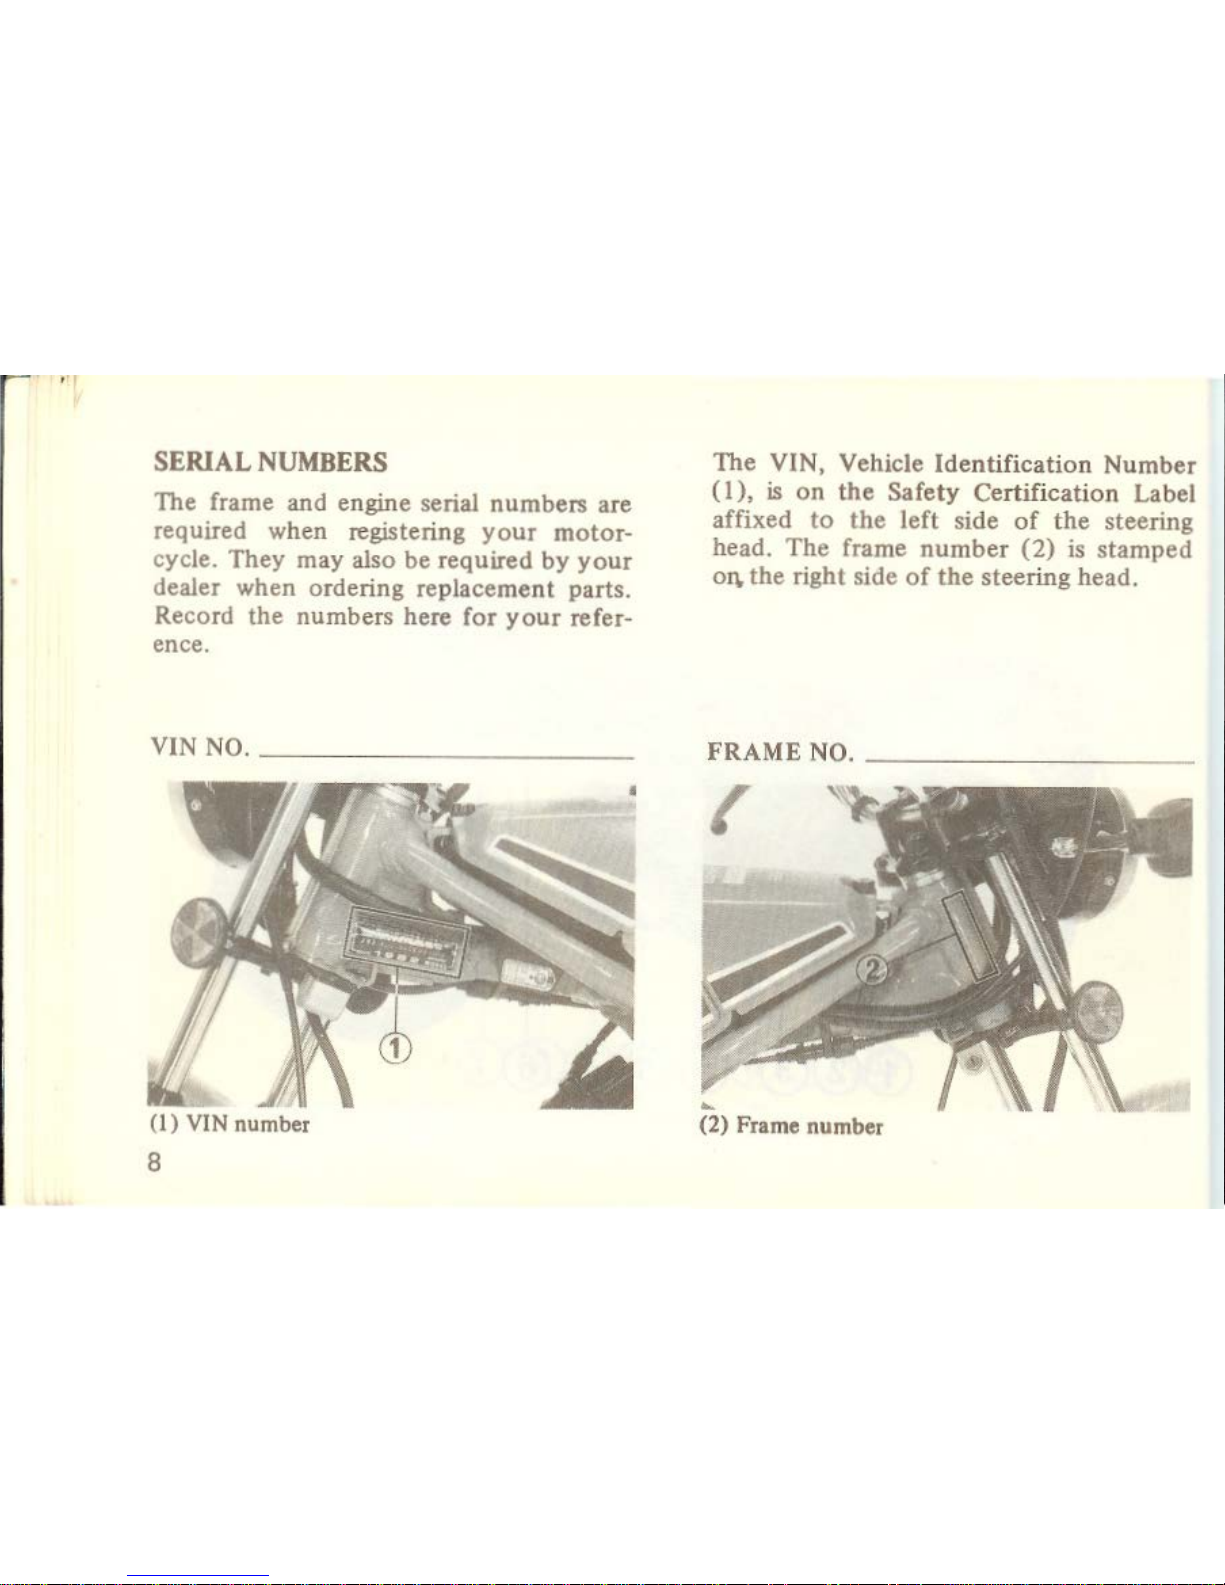
SERIAL
NUMBERS
The frame and engine serial numbers are
required when registering
your
motor-
cycle. They may also be required by
your
dealer when ordering replacement parts.
Record
the
numbers here for
your
refer-
ence.
8
The YIN, Vehicle Identification Number
(I),
is
on
the
Safety Certification Label
affixed
to
the
left side
of
the
steering
head. The frame
number
(2)
is stamped
OJ'\.
the
right side
of
the
steering head.
...
(2) Frame number
I
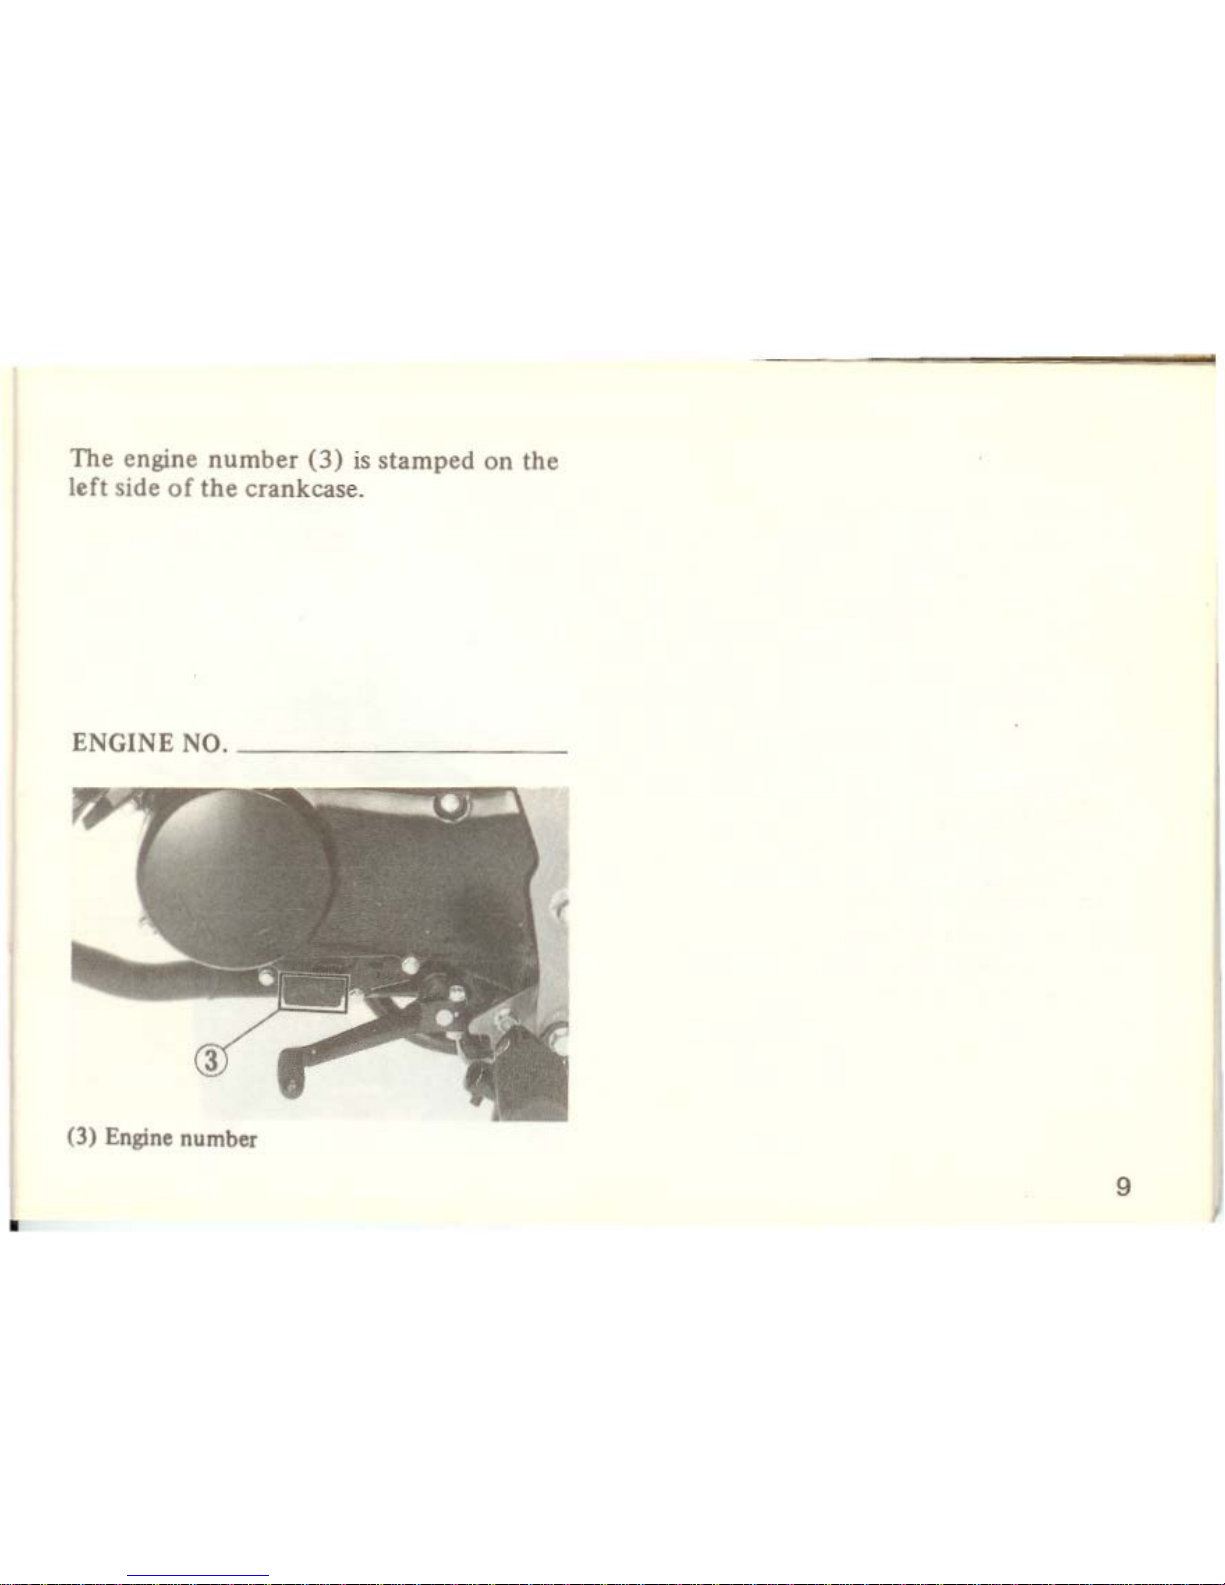
The
engine
number
(3)
is
stamped
on
the
left
side
of
the
crankcase
.
ENGINE
NO.-------
--
(3)
Engine
number
9
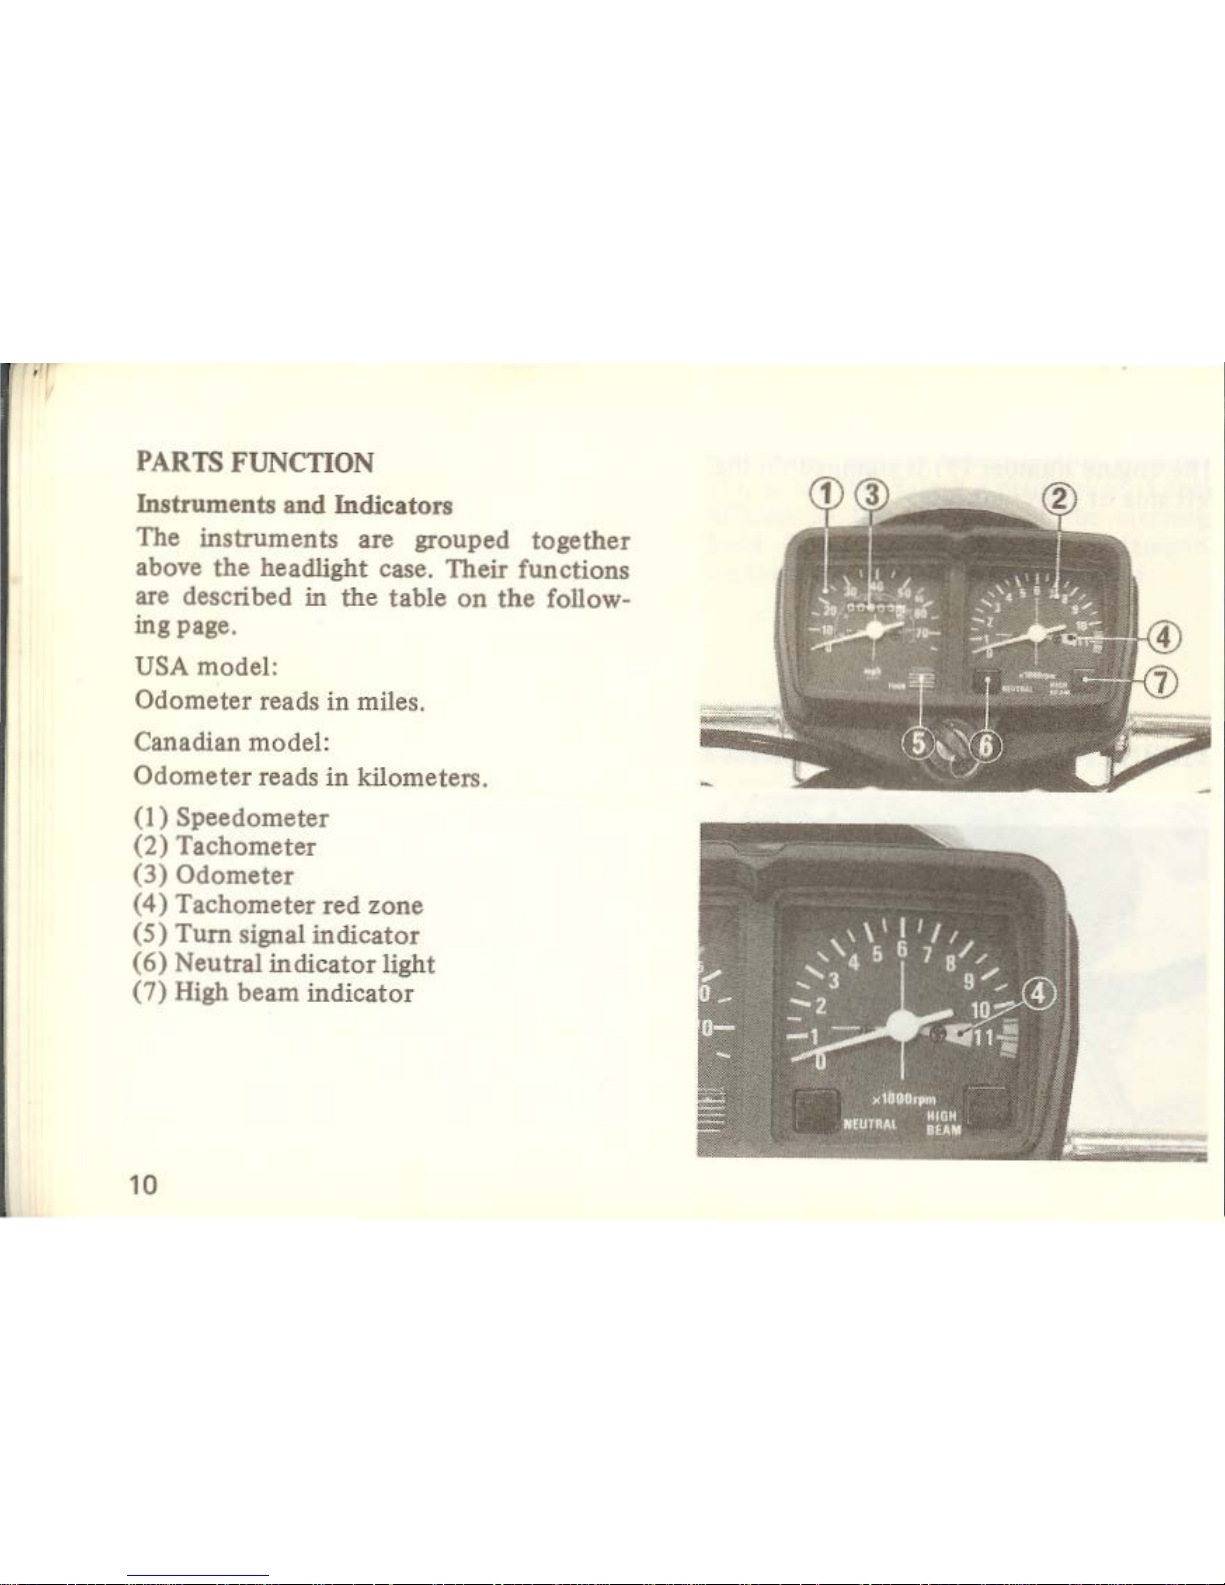
PARTS
FUNCTION
Instruments and Indicators
The instruments are grouped
together
above the headlight case. Their functions
are described in the table
on
the
follow-
ing page.
USA model:
Odometer reads
in
miles.
Canadian model:
Odometer reads
in
kilometers.
(1)
Speedometer
(2) Tachometer
(3)
Odometer
(4)
Tachometer
red
zone
(5) Turn signal indicator
(6) Neutral indicator light
(7) High beam indicator
10
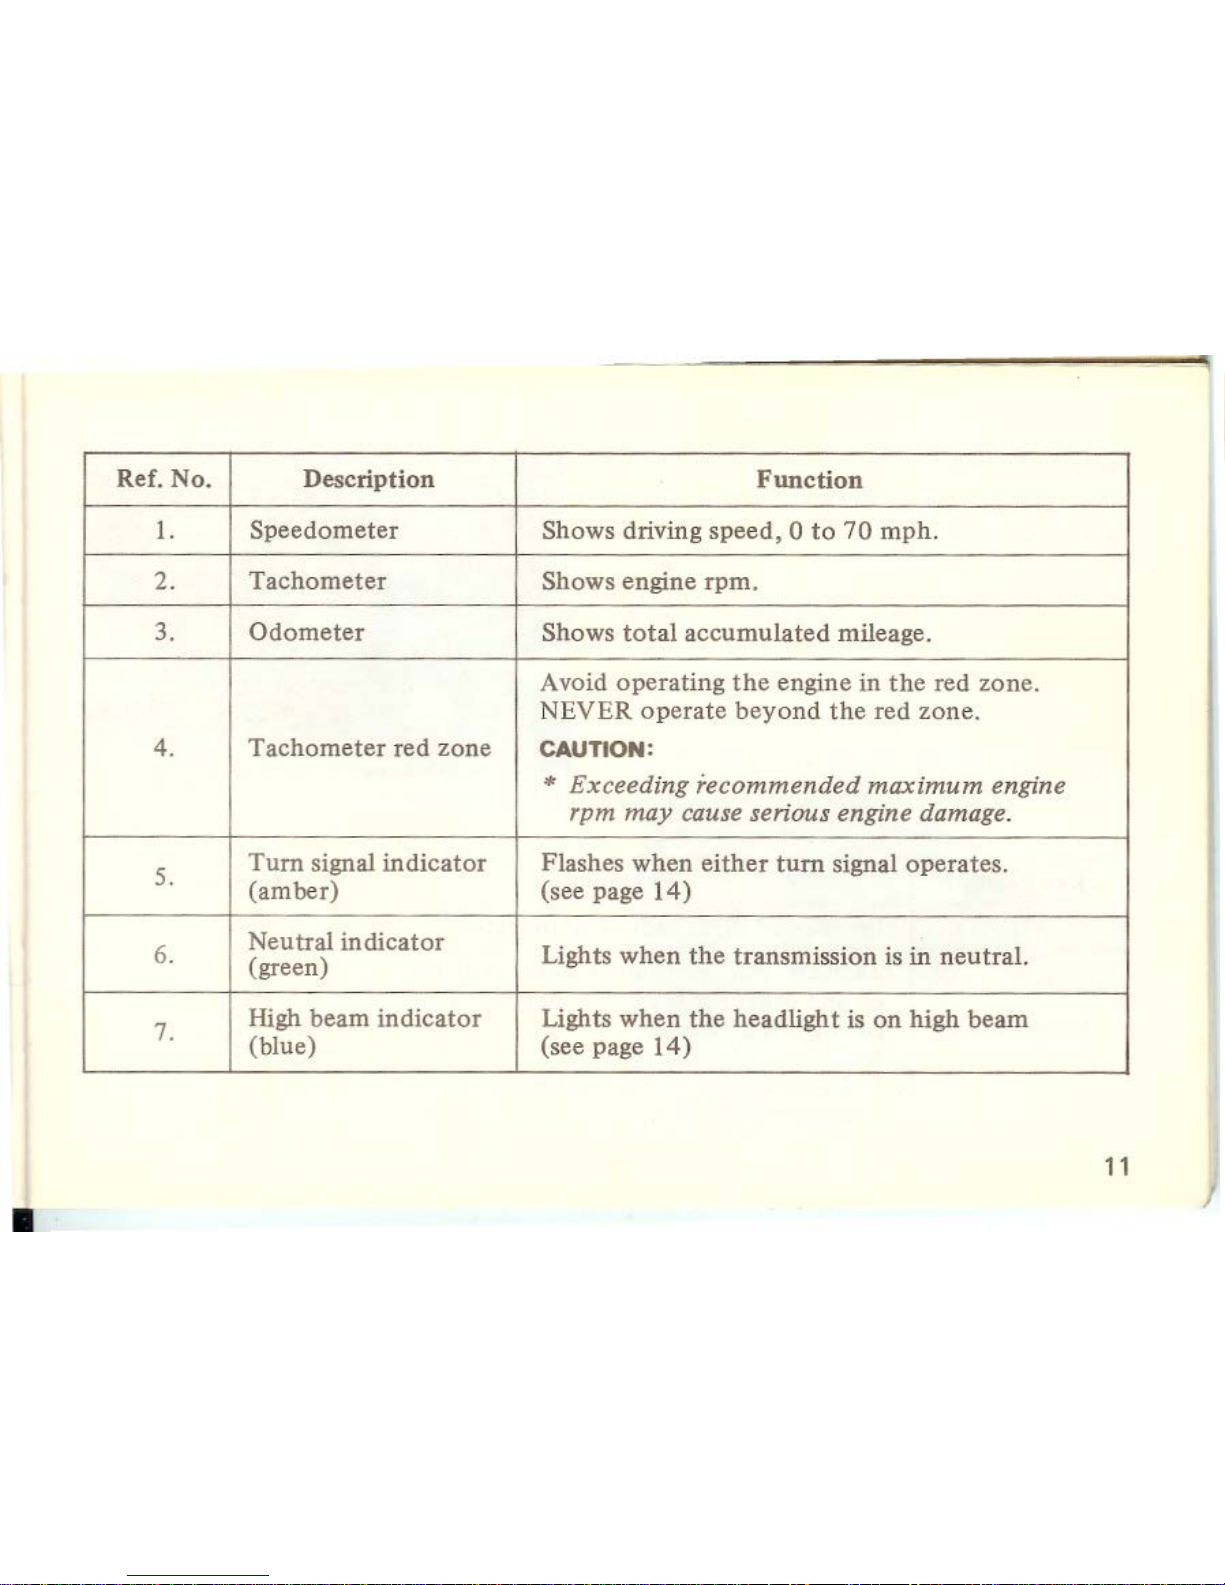
Ref.
No.
Description
Function
1.
Speedometer
Shows driving
speed, 0 to
70
mph
.
2.
Tachometer
Shows
engine
rpm.
3.
Odometer
Shows
total
accumulated
mileage.
Avoid
operating
the
engine in
the
red zone.
NEVER
operate
beyond
the
red
zone.
4.
Tachometer
red
zone
CAUnON:
*
Exceeding
recommended
maximum
engine
rpm
may
cause serious engine damage.
5.
Turn
signal
indicator
Flashes
when
either
turn
signal operates.
(amber)
(see page
14)
6.
Neutral
indicator
Lights
when
the
transmission
is
in
neutral.
(green)
7.
High beam
indicato
r Lights
when
the
headlight
is
on
high
beam
(blue) (see page
14)
11
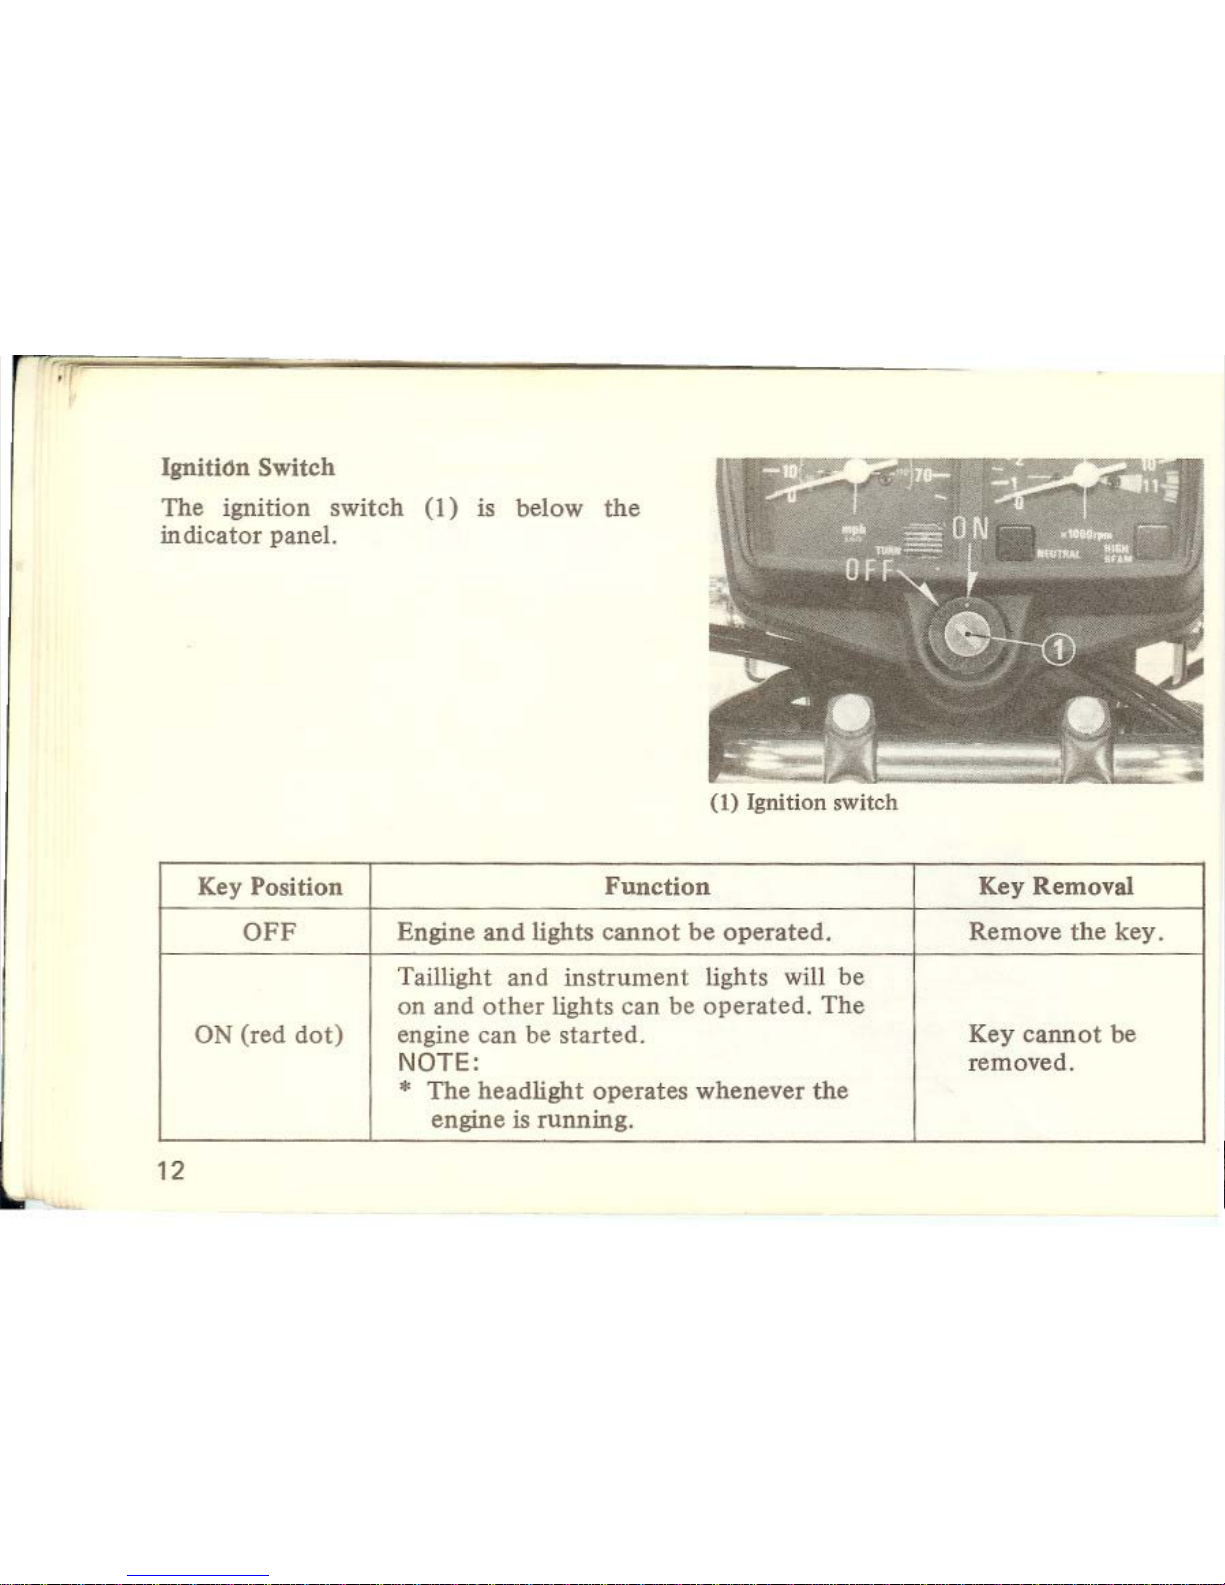
lgniti<'n Switch
The ignition switch
(1)
is below
the
indicator panel.
(1)
Ignition switch
Key Position
Function
OFF
Engine
and
lights
cannot
be
operated.
Taillight
and
instrument lights will be
on
and
other
lights can be
operated.
The
ON (red
dot)
engine can be started.
NOTE:
*
The
headlight operates whenever
the
engine is running.
12
Key Removal
Remove
the
key.
Key
cannot
be
removed.
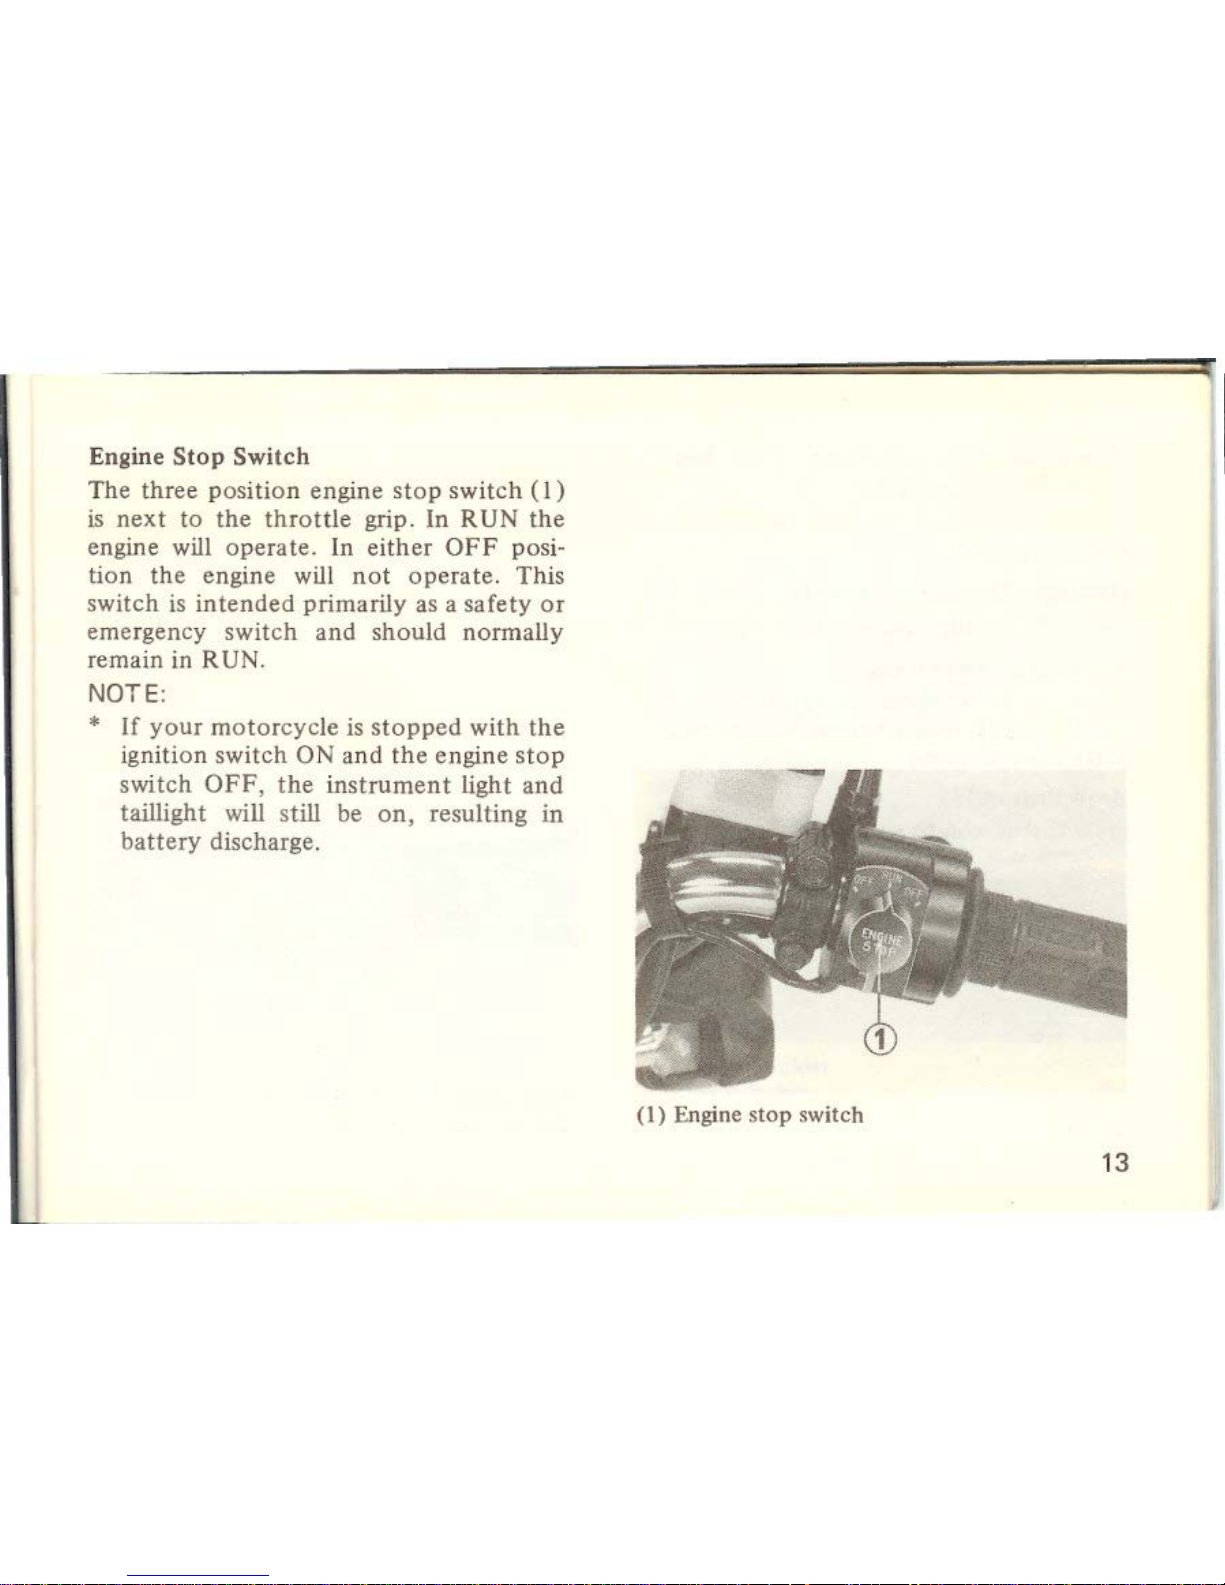
Engine Stop Switch
The three position engine
stop
switch ( 1)
is
next
to
the
throttle
grip.
In
RUN
the
engine will operate. In
either
OFF
posi-
tion
the
engine will
not
operate. This
switch is intended primarily as a safety
or
emergency switch
and
should normally
remain in
RUN.
NOTE:
*
If
your
motorcycle is
stopped
with
the
ignition switch ON and
the
engine
stop
switch
OFF,
the
instrument
light
and
taillight will still
be
on,
resulting
in
battery discharge.
(1)
Engine
stop
switch
13
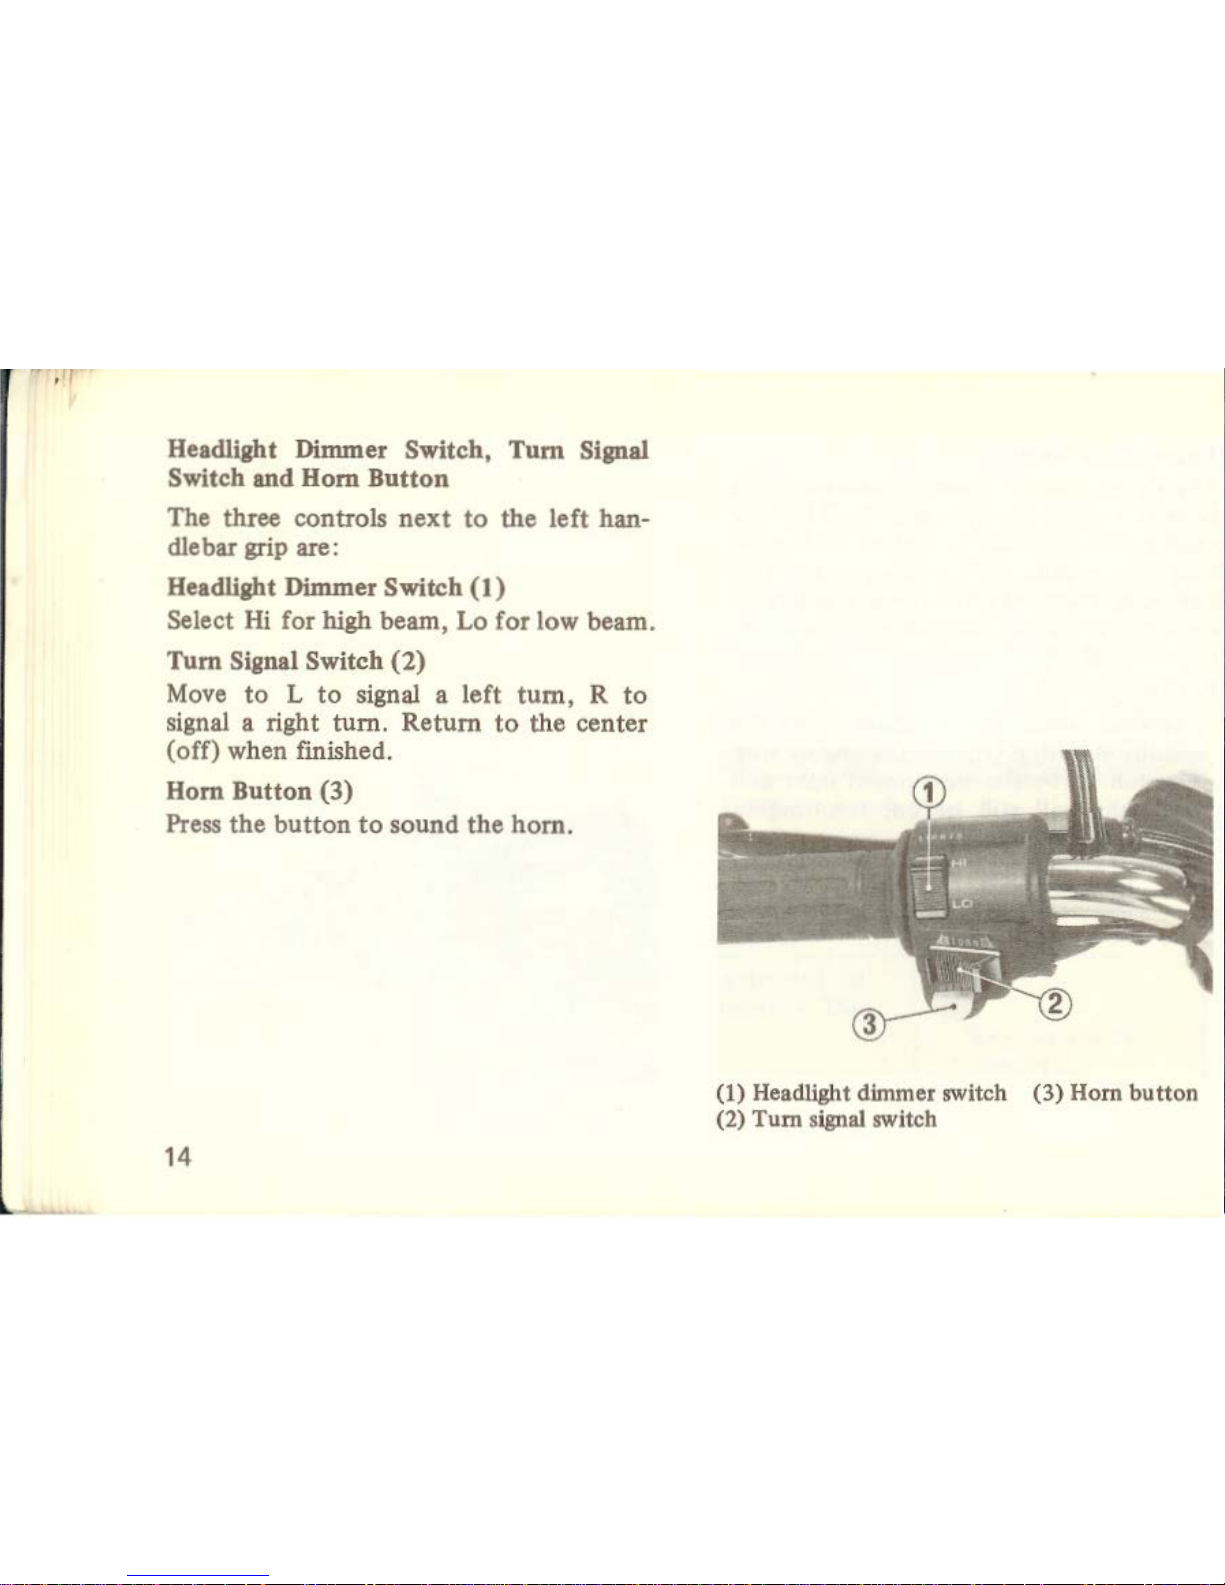
Headlight Dimmer Switch,
Tum
Signal
Switch
and
Hom
Button
The three controls
next
to
the left han-
dlebar grip are:
Headlight Dimmer Switch
(1)
Select
Hi
for
high
beam, Lo
for
low beam.
Tum
Signal Switch
(2)
Move
to L to
signal a left
tum,
R
to
signal a right
tum.
Return
to
the
center
(off) when fmished.
Hom
Button
(3)
Press
the
button
to
sound the horn.
14
(1) Headlight dimmer switch
(3)
Hom button
(2)
Tum
signal switch
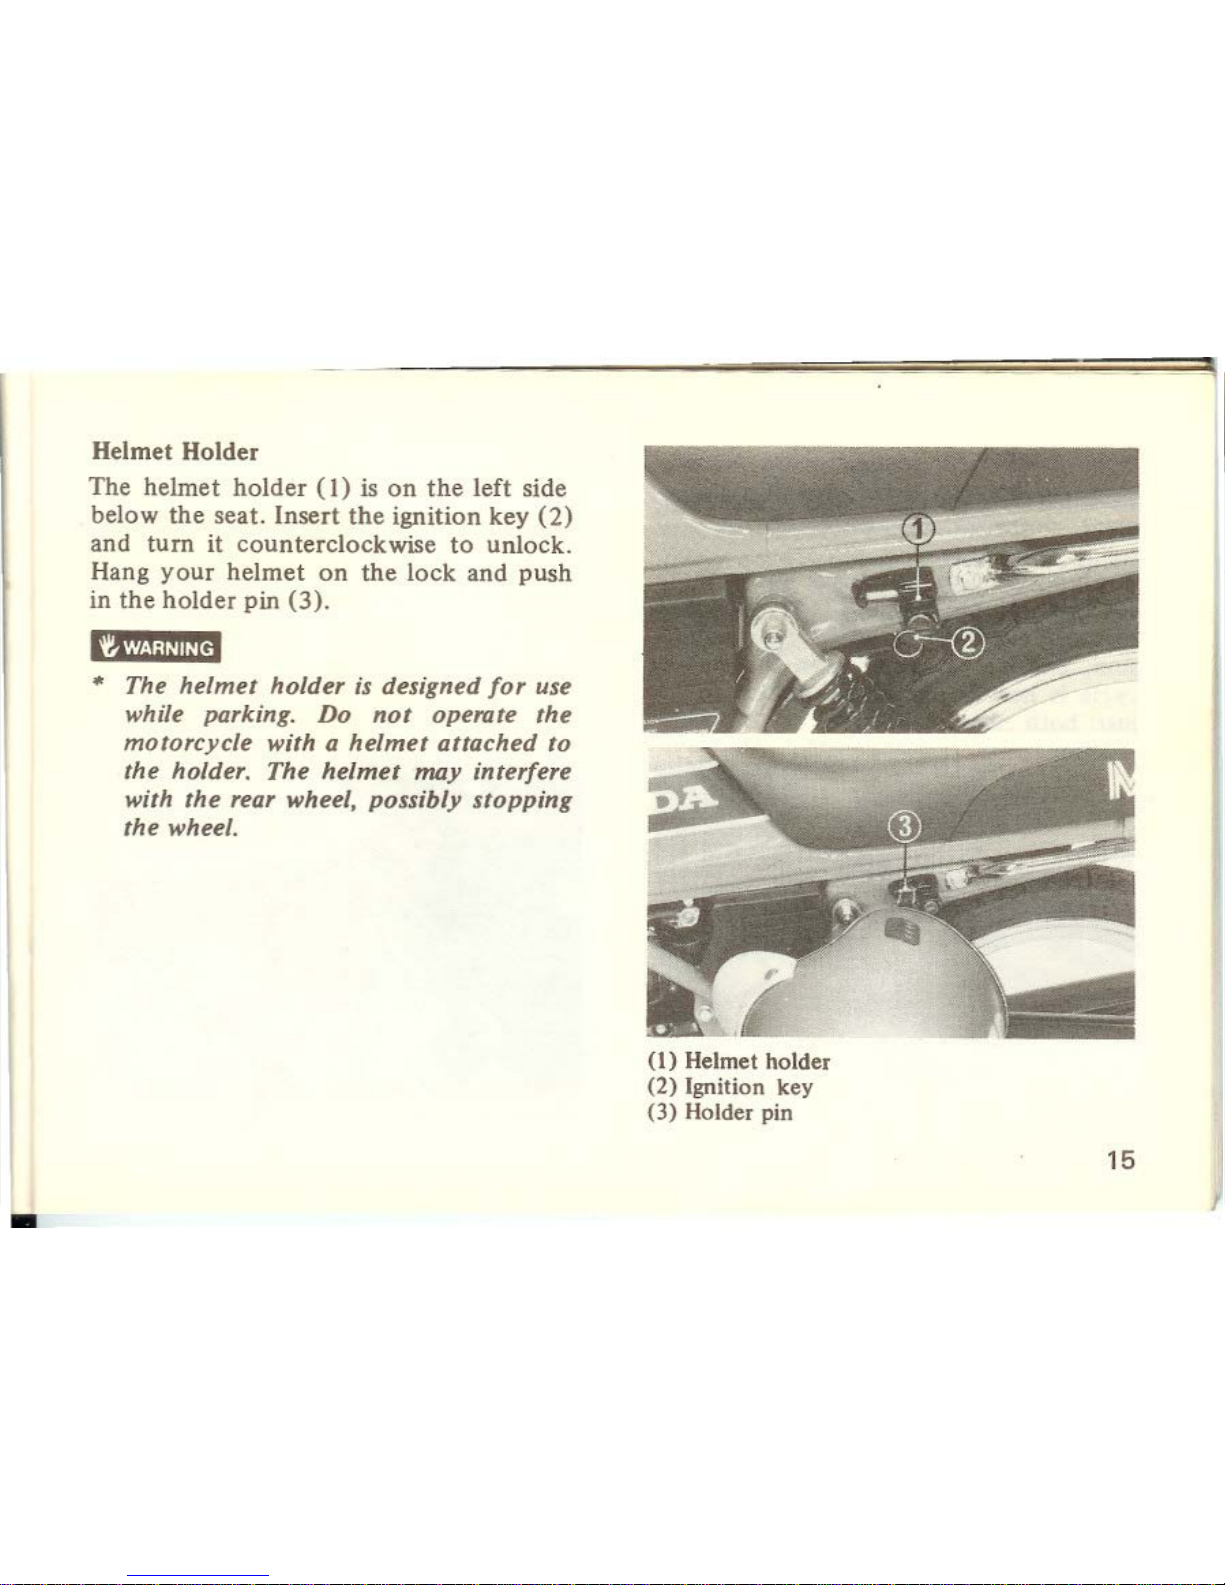
Helmet Holder
The
helmet
holder
(I)
is
on
the
left
side
below
the
seat.
Insert
the
ignition key
(2)
and
turn
it counterclockwise
to
unlock.
Hang
your
helmet
on
the
lock and push
in
the
holder
pin
(3).
OW!@@j
• The
helmet
holder
is designed
for
use
while parking. Do
not
operate
the
motorcycle
with a
helmet
attached
to
the
holder.
The
helmet
may
interfere
with
the
rear wheel, possibly
stopping
the
wheel.
(1)
Helmet holder
(2) Ignition key
(3)
Holder pin
15
'I
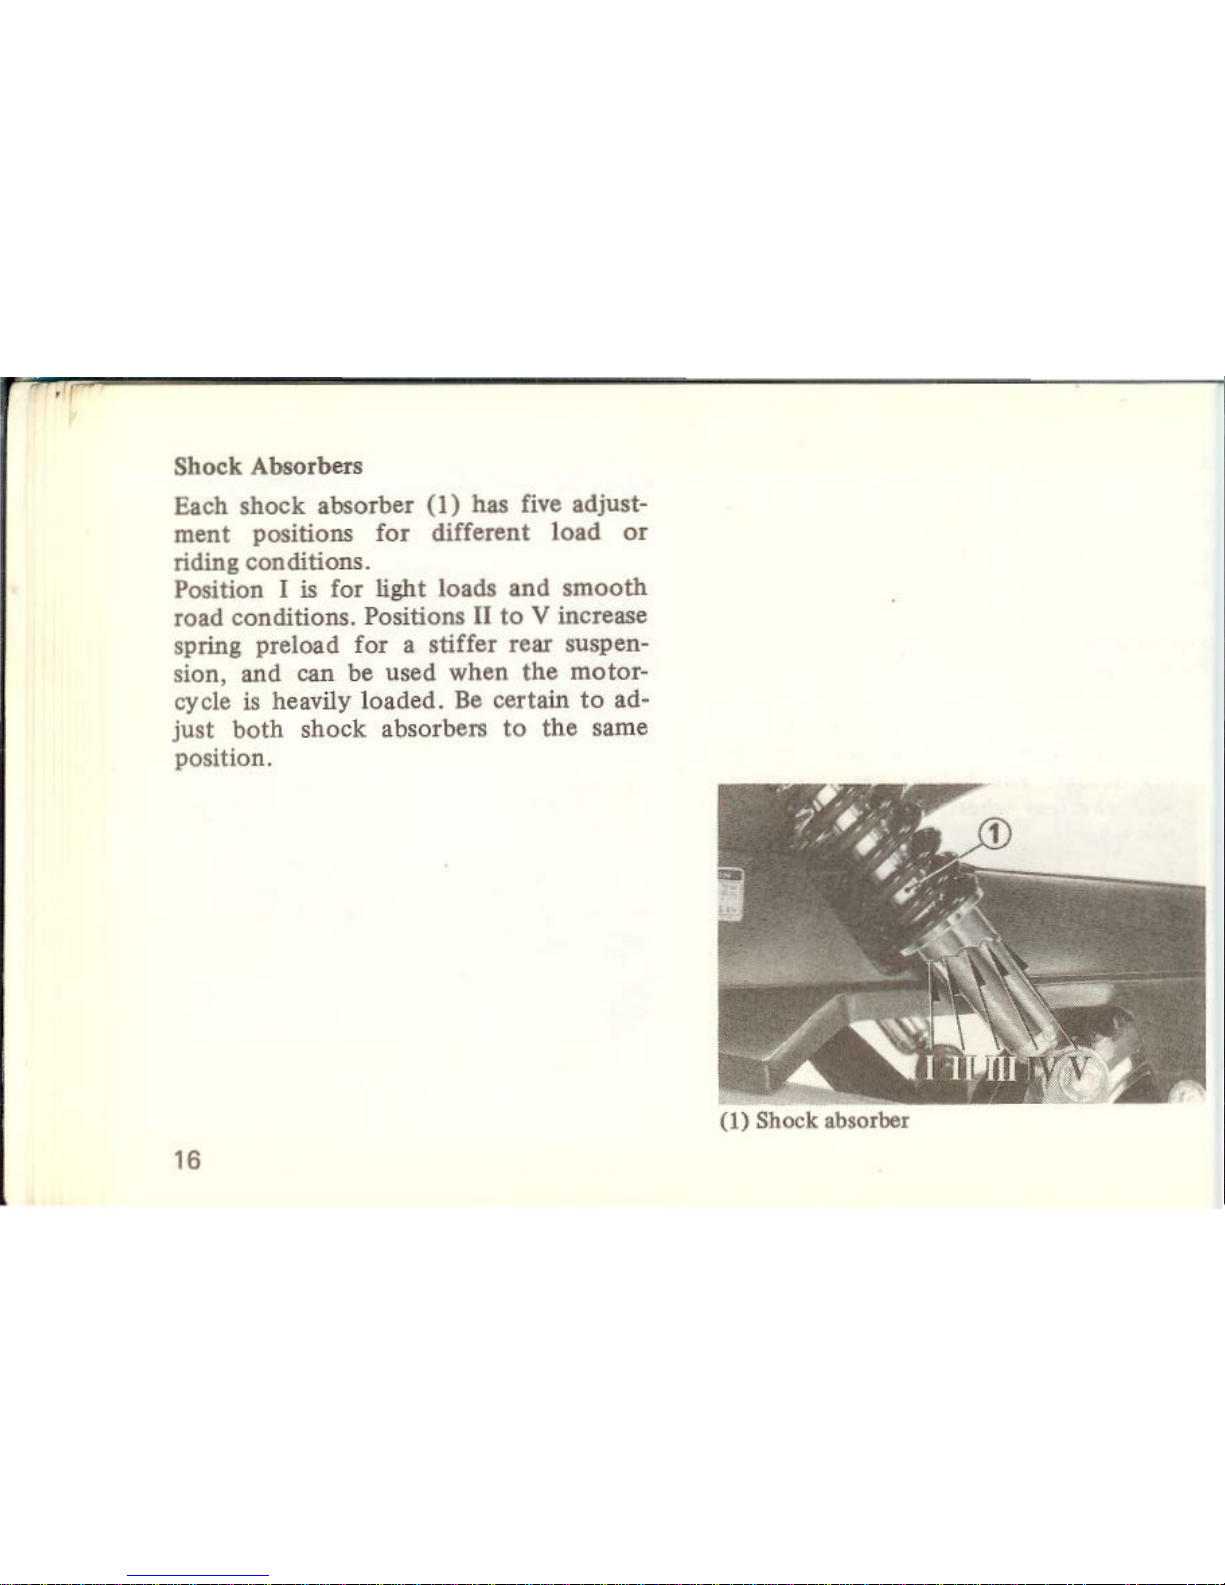
Shock
Absorbers
Each shock absorber
(1)
has five adjust-
ment
positions for different load
or
riding conditions.
Position I
is for light loads and
smooth
road conditions. Positions
II
to
V increase
spring preload for a stiffer rear suspen-
sion, and can be used when
the
motor-
cycle
is heavily loaded. Be certain
to
ad-
just
both
shock absorbers
to
the
same
position.
16
(1)
Shock absorber
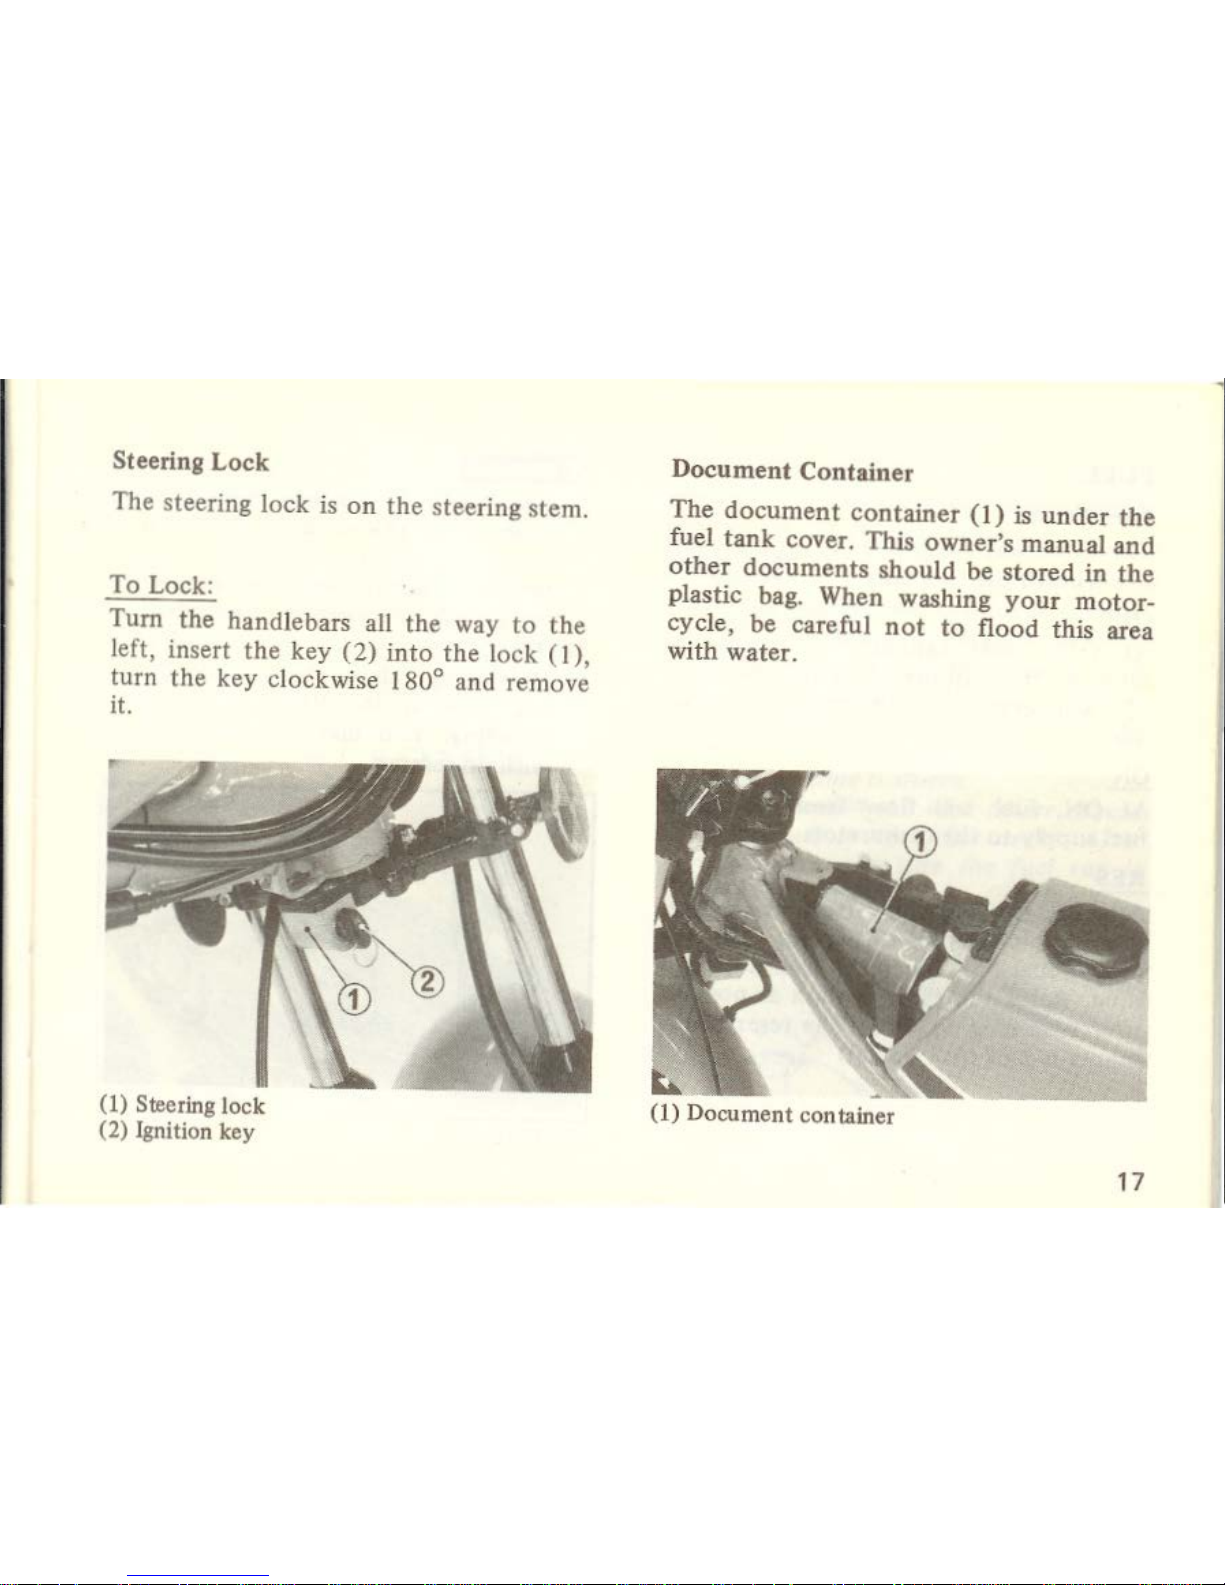
Steering
Lock
The steering lock is
on
the
steering stem.
To
Lock:
Tum
the handlebars all the way
to
the
left, insert the
key
(2)
into
the
lock
(I),
turn the
key
clockwise 180° and remove
it.
(1)
Steering lock
(2)
Ignition key
Document
Container
The
document
container
(I)
is
under
the
fuel
tank
cover. This
owner's
manual
and
other
documents
should be
stored
in
the
plastic bag. When washing
your
motor-
cycle, be careful
not
to
flood this area
with water.
(1) Document container
17
FUEL
Fuel Valve
The three way fuel valve (
1)
is
on
the
left
underneath
the
fuel tank.
OFF
At OFF, fuel
cannot
flow from
the
tank to
the
carburetor.
Tum
the
valve
off
whenever
the
motorcycle is
not
in
use.
ON
At
ON
, fuel will flow from
the
main
fuel supply to the carburetor.
RES
At RES, fuel will flow from
the
reserve
fuel supply
to
the
carburetor. Use
the
reserve fuel only when
the
main supply
is
gone. Refill the tank
as
soon
as possible
after switching
to
RES.
The
reserve fuel
supply is
2.0£ (0.5
US
gal)
18
• Know
how
to operate
the
fuel valve
while riding
the
motorcycle. You may
avoid a
sudden ·
stop
in traffic.
• Be careful
not
to
touch any
hot
engine
ports while operating
the
fuel valve.
NOTE:
• Do
not
operate
the
machine with
the
fuel valve in
the
RES position
after
refueling. You may
run
out
of
fuel,
with
no
reserve.
ON
Off
RES
(1) Fuel valve
 Loading...