

Page 1

Element
2010
Technology Reference Guide
Page 2
Indicators/Info
Display/TPMS
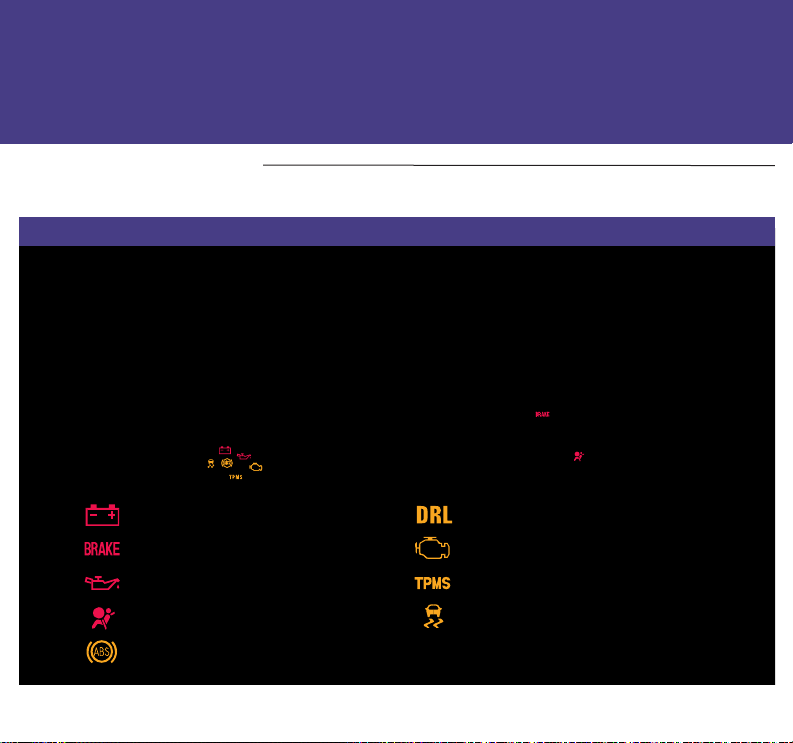
Instrument Panel Indicators
Indicators briefly appear with each engine start. Red and amber indicators are most critical. Blue and
green indicators are used for general information.
Malfunction Indicators: If an indicator remains on, there may be a problem; see your dealer.
DRL
Charging system
Low brake fluid
Low oil pressure
SRS (supplemental restraint system)
ABS (anti-lock brake system)
2010 Element
DRL (daytime running lights)
Malfunction lamp (check engine light)
TPMS (tire pressure monitoring system)
VSA (vehicle stability assist)
Page 3
PASSENGER
AIRBAG
OFF
2010 Element
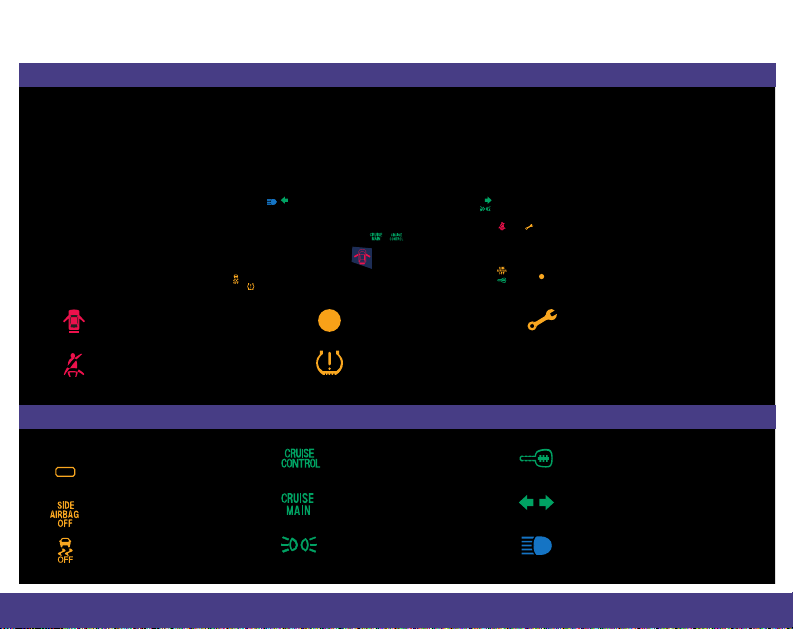
Condition Indicators: Action needed by driver.
Door/Tailgate open:
Close door(s) / tailgate
Seat belt reminder:
Fasten seat belt(s)
PASSENGER AIRBAG
OFF
(above audio panel)
SIDE AIRBAG OFF
Blinks: VSA activated
Solid: VSA off
Low fuel: Refill
Low tire pressure:
Add air
On/Off Indicators
CRUISE CONTROL on
CRUISE MAIN on
Headlights on
Maintenance minder:
Make appointment
Immobilizer
Flashes: improperly coded key;
use correct key
Turn signals/hazards on
High beams on
Page 4
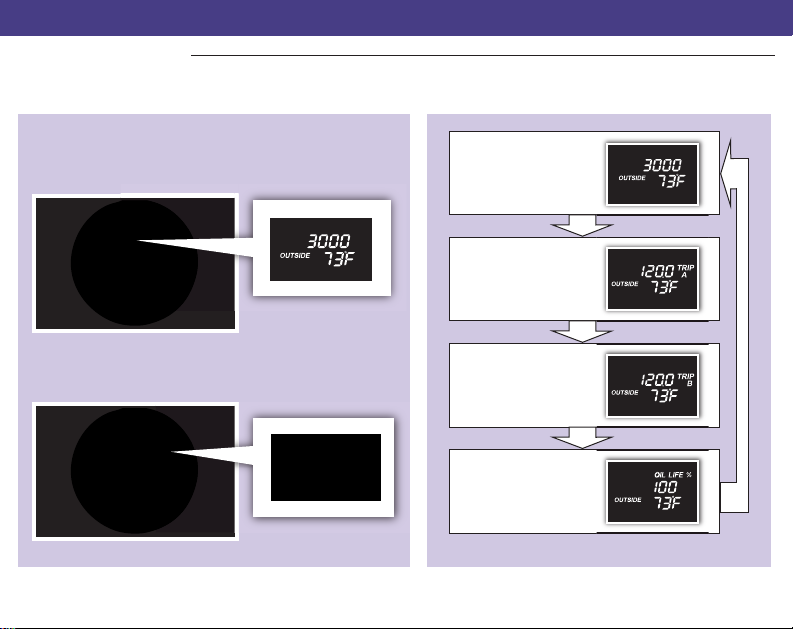
Information Display
Consists of several displays that provide you with useful information.
Information DisplaysAccessing the Information Display
When you start the engine, the information
display shows your last active selection from the
previous drive cycle.
Odometer, Outside
temperature*
Trip A, Outside
temperature*
To toggle between the different displays, press
and release the select/reset knob repeatedly.
2010 Element
Trip B, Outside
temperature*
Oil life, Outside
temperature*
* if equipped
Page 5
2010 Element
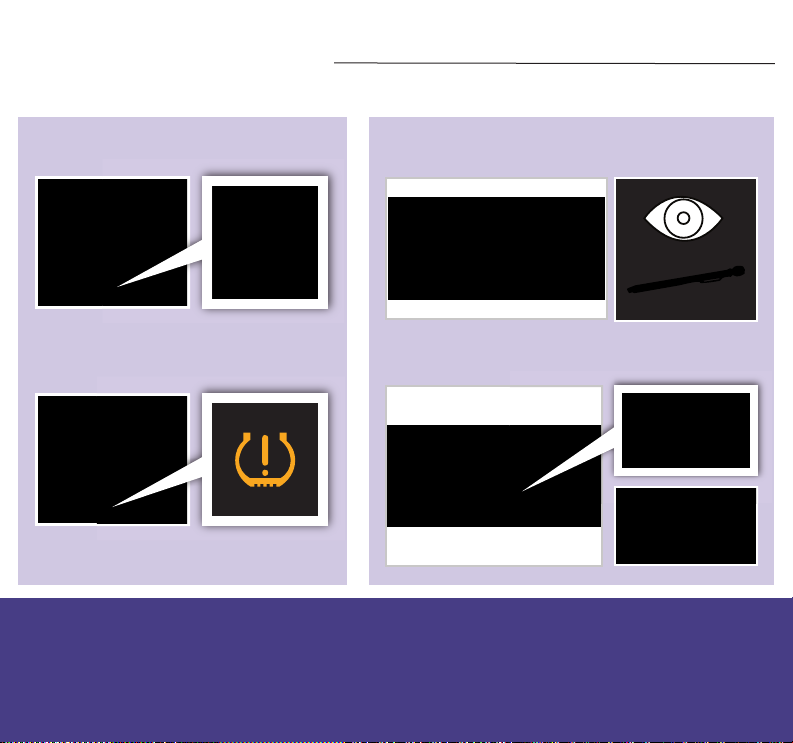
Tire Pressure Monitoring System (TPMS)
Monitors the vehicle’s tire pressures.
How It Works What to Do
Each tire valve stem contains a TPMS
sensor.
When the tire pressure drops
significantly below recommended levels,
the low tire pressure indicator comes on.
Indicators/Info
Display/TPMS
Visually inspect the tires and use a tire air pressure
gauge to check which tire(s) have low pressure.
P
E
S
C
N
T
I
and
Inflate the tire(s) to the recommended pressures
listed on the label on the driver’s doorjamb.
Page 6

Voice Command/
Navigation
Voice Command (if equipped)
Using the Voice Command System
To reduce driver distraction, use voice commands for navigation and audio functions. A full list of these
commands is in the navigation system manual.
NAVI Talk button:
Give navigation and
audio commands.
NAVI Back button:
Cancel a command or
return to the previous
screen.
Voice Command Tips:
Press and release the NAVI Talk button, wait for a beep,
•
then give a command.
• For a list of available navigation commands, press and
release the NAVI Talk button and say “Help.”
• Speak in a clear, natural voice.
• Reduce all background noise.
• Adjust the dashboard and side
vents away from the microphone in
the ceiling.
• Close the windows.
2010 Element
Page 7

2010 Element
Navigation (if equipped)
Entering a Destination Using Voice Commands
Press and release the NAVI Talk button before you give a command.
Say “Display menu.”
1
Say “Address.”
2
Say “City” (or “Change state” if
3
necessary).
Say the name of the city you want, or
4
say “Current city” to select the city
currently shown.
A list of city names appears. Say
5
the number listed next to the city you
want to select.
Say the street name. Do not include
6
the direction (N, S, E, W) or type
(St., Ave., Blvd., etc.).
A list of street names appears. Say
7
the number listed next to the street
you want to select.
Say the entire street address number.
8
For example, “1-2-5-0.”
The system calculates the route
9
and displays the “Calculate route to”
screen. Say “OK” to set the route.
Note: Entering destinations can also be done manually
from the Menu screen.
Page 8

Entering a Destination Using the “Find Nearest” Command
Try these simple steps to find a nearby point of interest, such as a gas station, movie theater, restaurant, etc.
Press and release the NAVI Talk button before you give a command.
1. Say “Find nearest ATM.”
3. Say the number you want to select.
2. A list of the nearest ATMs are
displayed by shortest distance to
destination.
4. The system calculates the route and
displays the “Calculate route to” screen.
Say “OK” to set the route.
2010 Element
Page 9

2010 Element
Commonly Used Voice Commands
Here are some examples of commonly used voice commands. Try some of these to familiarize yourself with
the voice command system.
Press and release the NAVI Talk button before you give a command.
Look for Restaurants in Your Location
Say a command like “Display restaurant” to see
restaurant icons appear on the map.
Make Audio Selections
Say a command like “Radio 97.1 FM” or “CD play
track 5” to select that station or song.
Adjust the System Volume
Say “Display setup” then “Volume up” to increase
the volume of the system voice response.
Get Estimated Distance to Destination
After a destination is entered, say “How far to
destination?” to hear the remaining distance.
Page 10

Commonly Used Voice Commands (continued)
Press and release the NAVI Talk button before you give a command.
General Commands
(Accepted on most screens
to change displays)
Navigation Commands
(Accepted on Map screen
after a destination is entered)
• Display map
• Display menu
• Setup
Find Place Commands
(Accepted on Map screen)
• Find nearest:
- ATM
- gas station
- Mexican
restaurant
- post office
• Information
• Display audio screen
• What time is it?
- bank
- Honda dealer
- airport
- hospital
• How long/far to the destination?
• Display destination
• Display entire route
• Display (or hide):
- ATM
- gas station
- restaurant
- post office
2010 Element
Display Commands
(Accepted on Map screen)
• Display north up/
heading up
• Zoom in/out
• Go home
• Display current
location
Page 11

2010 Element
Commonly Used Voice Commands (continued)
Press and release the NAVI Talk button before you give a command.
Audio Commands
(Accepted on most screens)
Help Commands
(Accepted on most screens)
Radio Commands
• Radio on
• Radio # FM/AM
• Radio preset
1/2/3/4/5/6
• Radio seek up
• Radio seek down
XM Commands
• XM channel #
• XM channel up
• XM channel down
• XM preset
1/2/3/4/5/6
CD Commands
• CD play
• CD play track/disc #
• CD skip forward/back
• CD track random
• CD track repeat
PC Card Commands
• Card play
• Card play track #
• Card skip forward
• Card skip back
Auxiliary Commands
• Auxiliary (AUX) play
Voice Command/
Navigation
• Help (list of available commands for current
screen)
• Voice command help (from INFO screen - list
of all available navigation, audio, and climate
control commands)
Setup Commands
(Accepted on the Setup screen)
• Brightness up/down
• Volume up/down/
min/max/off
• Guidance prompts
min/max/normal
Page 12

Audio
Components
Playing an iPod®or USB Flash Memory Device (models with navigation)
Some of the same controls used to operate your in-dash CD player are used to operate an iPod or USB
flash memory device.
Connecting and Beginning Play
1. Open the glove box, and pull out the USB
adapter cable.
USB
Adapter
Cable
USB Connector
2. Connect your USB connector to your flash
drive or iPod dock connector.
iPod is a registered trademark of Apple Computer, Inc.,
registered in the U.S. and other countries. iPod not included.
3. Touch the AUX icon to play.
2010 Element
Page 13

2010 Element
PC Card Instructions (models with navigation)
Connecting and Beginning Play
1. Press OPEN.
3. Insert the PC card into the slot and press
CLOSE.
PC card
slot
CLOSE
Button
2. If necessary, insert your PC card into a PC
card adapter.
4. Press AUDIO to show the audio display. Use
|
the
and |buttons to skip through
tracks on the card.
Audio
Components
Page 14

About This Technology Reference Guide
This Technology Reference Guide has been prepared to help you
get quickly acquainted with your new Honda, and to provide reference instructions on driving controls and convenience items.
However, this guide is not intended as a substitute for the
Owner’s Manual. For complete information on operating the
vehicle safely, please refer to the Owner’s Manual.
As with the Owner’s Manual, this guide covers all models of the
Honda Element. Therefore, you may find descriptions of
equipment and features that are not on your particular model.
Safety Reminder
Your vehicle is equipped with airbags. Airbags do not replace
your seat belts; they add to the protection offered by seat belts.
Airbags can help protect you in some types of collisions, but they
do not provide protection in all collisions.
Always make sure you and your passengers wear seat belts, and
that young children are properly secured in a child seat or
booster in the rear seat. Never place an infant seat in the front
passenger’s seat as the force of a deploying airbag can seriously
injure an infant.
Fuel Recommendation
• Use only unleaded gasoline of
87 octane or higher.
• Some gasoline in North Amer ica
contains MMT, a manganese-based
fuel additive. Prolonged and consistent
use of gasoline containing MMT can
deteriorate your vehicle’s performance,
fuel economy, and the emissions
control system. Always use MMT-free
gasoline if alternatives exist. Failures
caused by use of gasoline containing
MMT may not be covered under
warranty.
• For further impor tant information on
fuel and lubricants for your car and
information on gasoline that does
not contain MMT, contact your
dealer or visit Owner Link at
www.hondacars.com.
31SCVQ70
00X31-SCV-Q700
2010 Honda Element Technology Reference Guide
©2009 American Honda Co., Inc.
-
All Rights Reserved
Printed in U.S.A.
 Loading...