

Page 1

T E C H N O L O G Y
R E F E R E N C E
G U I D E
o w n e r s . h o n d a . c o m
31TP6Q20 201 2 Ho n da Cr osst o ur Techn o logy Ref e r ence Gui d e
00X31-TP6-Q200 ©2011 American Honda Motor Co., Inc . — Al l Rights Re serve d Printed in U. S. A .
2 0 1 2 C R O S S T O U R
Page 2
TE C HN OLO GY REF ERE NC E GUID E
INSTRUMENT PANEL p.4
The Technology Reference Guide is designed to help you get
acquainted with your new Honda and provide basic
instructions on some of its technology and convenience
features.
This guide is not intended as a substitute for the Owner’s
Manual. For complete information on vehicle controls and
operation, please refer to the respective sections in the
Owner’s Manual.
As with the Owner’s Manual, this guide covers all trim levels
of the Crosstour. Therefore, you may find descriptions of
equipment and features that are not on your particular
BLUETOOTH
®
HANDSFREELINK®p.20
VOICE RECOGNITION p. 12
AUDIO p.23
NAVIGATION p.18
vehicle.
Auto Door Locks .....................................................................................................2
Instrument Panel Indicators ...................................................................................4
Information Display..................................................................................................6
Tire Pressure Monitoring System (TPMS)...........................................................7
Driving Position Memory System (DPMS)
Rearview Camera .....................................................................................................9
ReverseTilt Door Mirrors
HomeLink
Voice Recognition...................................................................................................12
*
®
..............................................................................................................11
*
..................................................................................10
*
.........................................................8
Navigation*...............................................................................................................18
Bluetooth
iPod
Fuel Fill Door...........................................................................................................24
Hidden Removable Utility Box............................................................................25
Compact Spare Tire ...............................................................................................26
Owner Link..............................................................................................................28
Safety Reminder......................................................................................................29
Fuel Recommendation...........................................................................................29
®
HandsFreeLink®(HFL)........................................................................20
®
or USB Flash Drive .....................................................................................23
*if equipped
Page 3
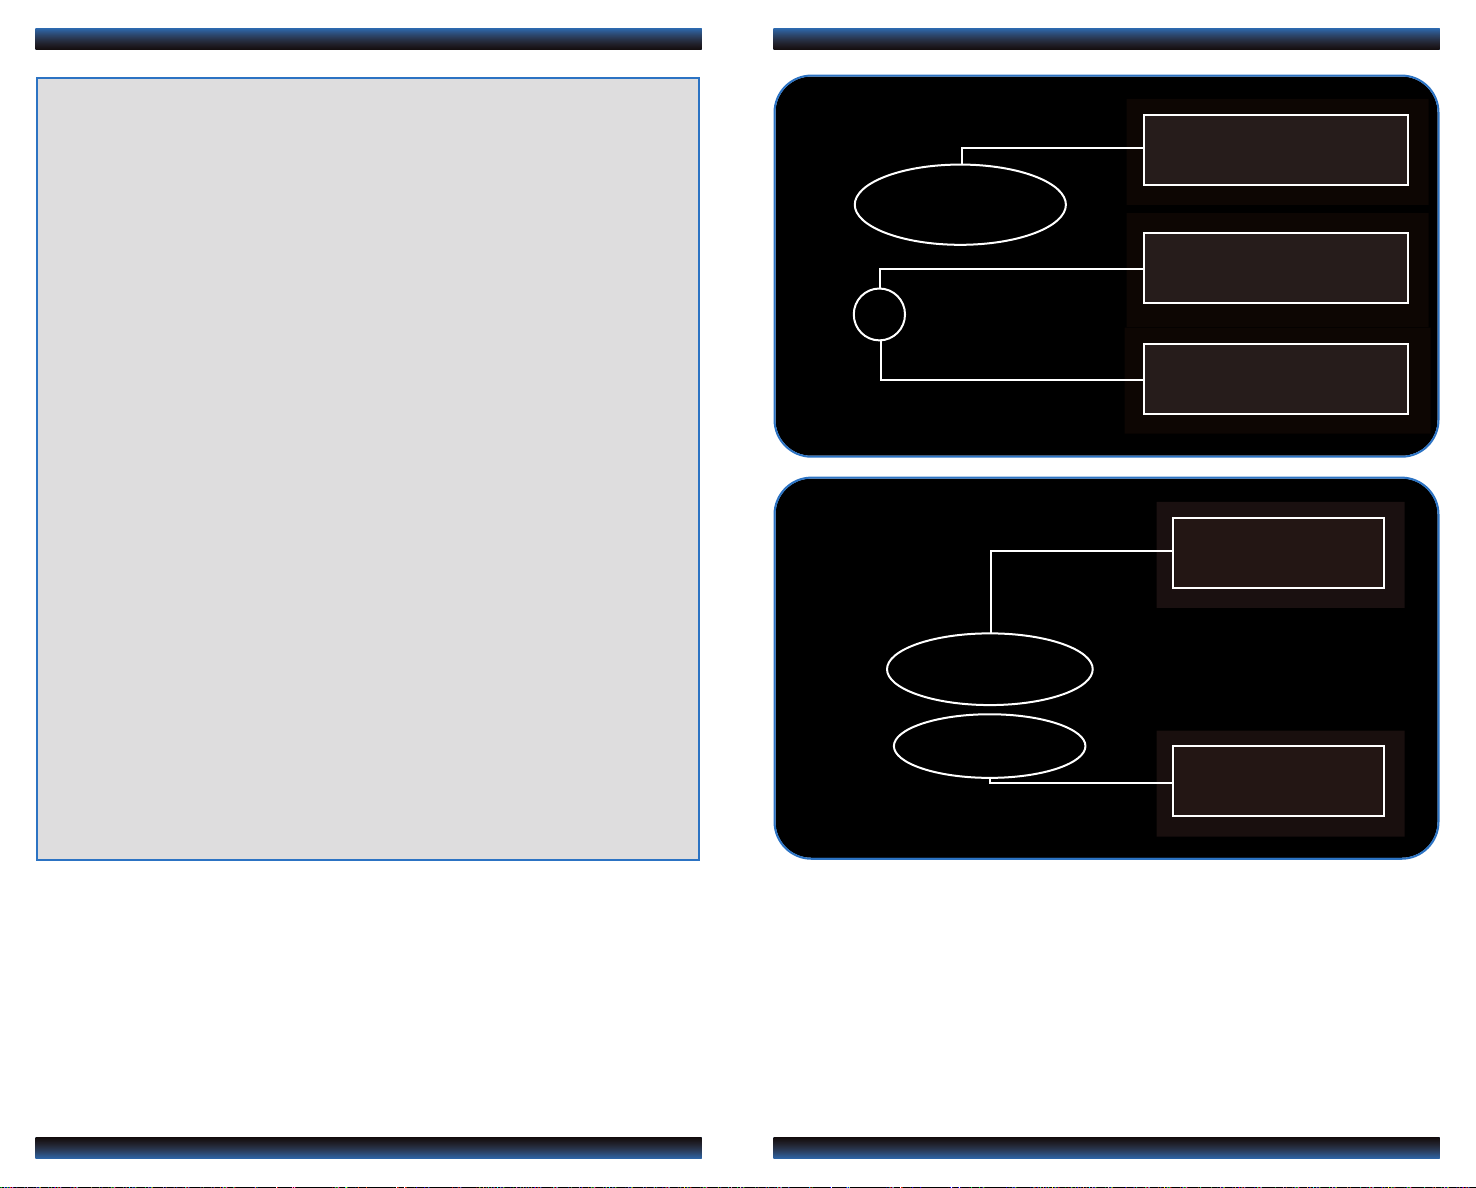
AUTO DOOR LOCKS
Program how and when the vehicle doors automatically lock and unlock.
Default Lock Setting Programming the Auto Door Unlock Setting
To program all doors to unlock when you shift to Park:
1. Close the driver’s door. Shift into
Park.
3. Press and hold the unlock side of
the master lock switch for about 10
seconds. In that time, you will hear
three clicks.
Default Unlock Setting
The doors are preset to
lock when your vehicle
reaches about 10 mph.
Only the driver’s door is
preset to unlock when
you shift into Park (P).
2. Turn the ignition switch to ON (II). 4.Within 5 seconds, turn the ignition
switch to LOCK (0).
Programmable Auto Door Lock/Unlock Settings
Below are the options you can choose.See Auto Door Locking/Unlocking in your Owner’s
Manual for instructions on programming these settings.
AUTO DOOR UNLOCK
(all doors)
the ignition OFF
door)
the ignition OFF
Turn off
When you turn
When you turn
When you shift
into Park
When you shift
into Park
Auto Lock
Turn off
Auto Lock
AUTO DOOR LOCK
When you
reach 10 mph
Operate manually
When you shift
out of Park
Auto Unlock
Auto Unlock
(only driver’s
Auto Unlock
Operate manually
2 3
Page 4
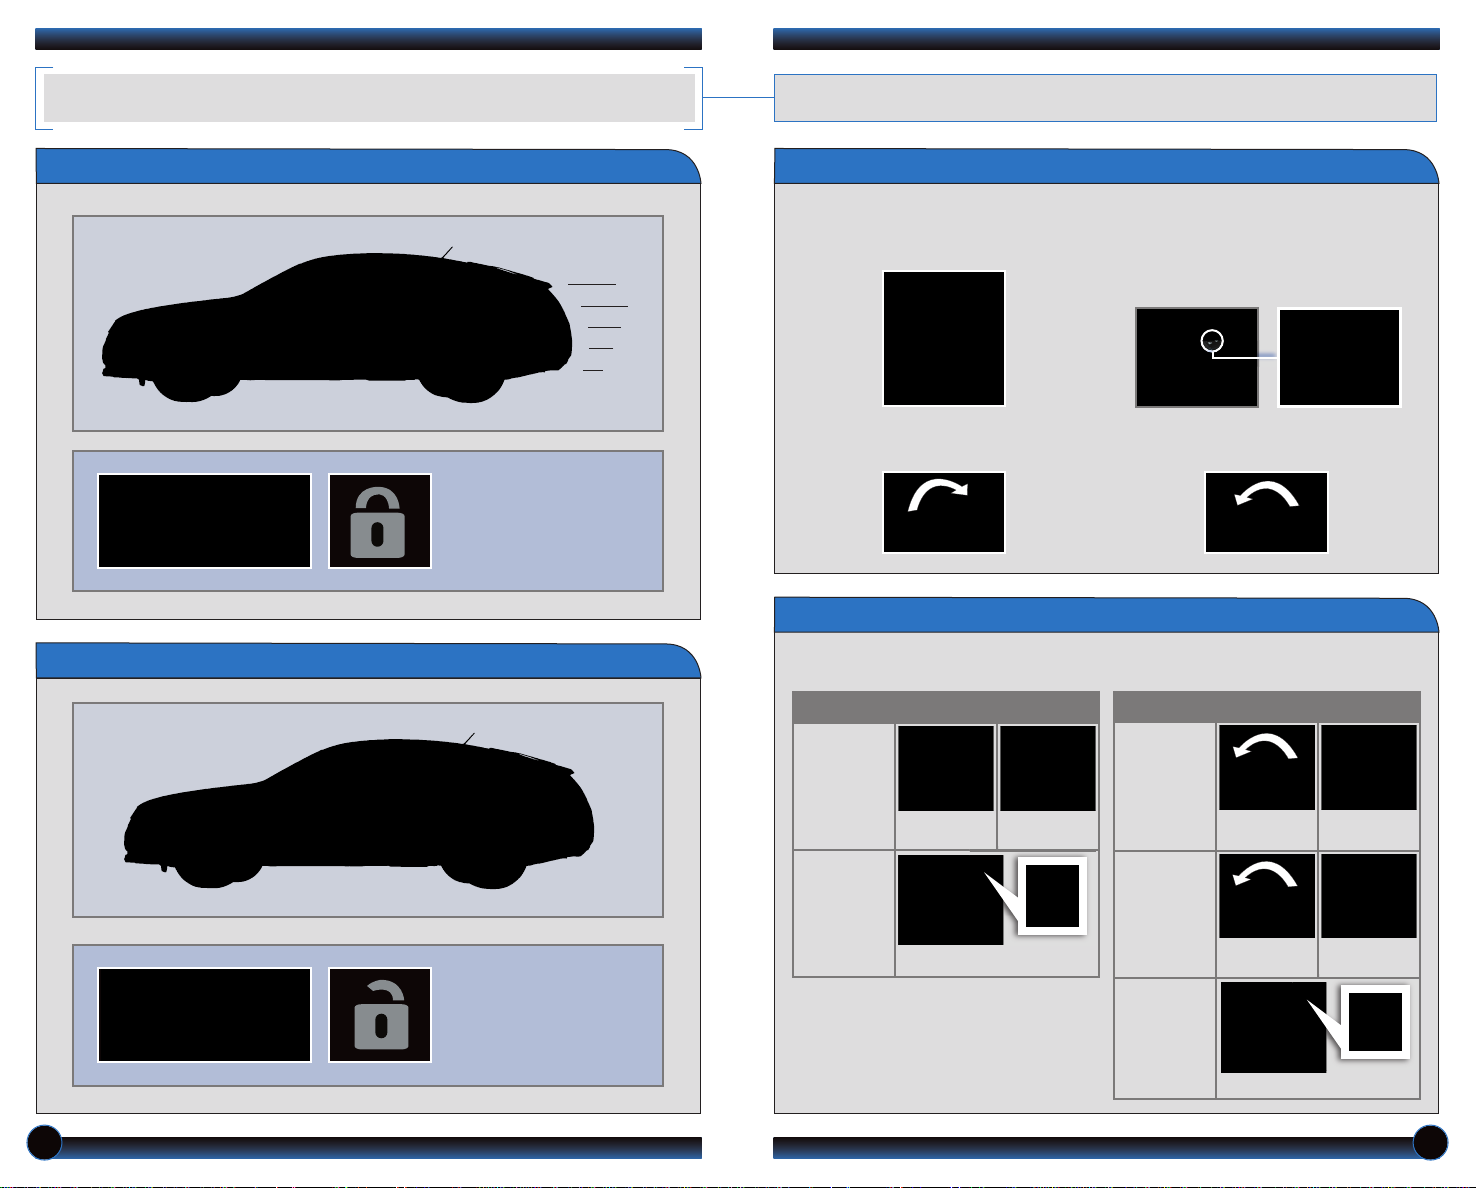
ECO
INSTRUMENT PANEL INDICATORS
Briefly appear with each engine start. Red and amber indicators are most critical.
Blue and green indicators are used for general information.
If an indicator remains on, there may be a problem; see your dealer
Charging system
Low brake fluid, Brake system
Low oil pressure
SRS (supplemental restraint system)
ABS (anti-lock brake system)
DRL (daytime running lights)
Malfunction indicator lamp
(check engine light)
(tire pressure monitoring system)
TPMS
®
VSA
(vehicle stability assist)
Condition Indicators
Action is needed by driver
Malfunction Indicators
Parking brake on:
Release
Door/Tailgate open:
Close door(s) / tailgate
Seat belt reminder:
Fasten seat belt(s)
Low fuel:
Refill
Low tire pressure:
Add air
Maintenance MinderTM:
Make dealer appointment
PASSENGER AIRBAG OFF
(above HazardWarning button)
SIDE AIRBAG OFF
VSA OFF
CRUISE CONTROL on
CRUISE MAIN on
Fuel economy on
On/Off Indicators
Fog lights*on
Immobilizer
Flashes: improperly coded key;
use correct key
Headlights on
Turn signals/hazards on
High beams on
*
if equipped
4 5
Page 5
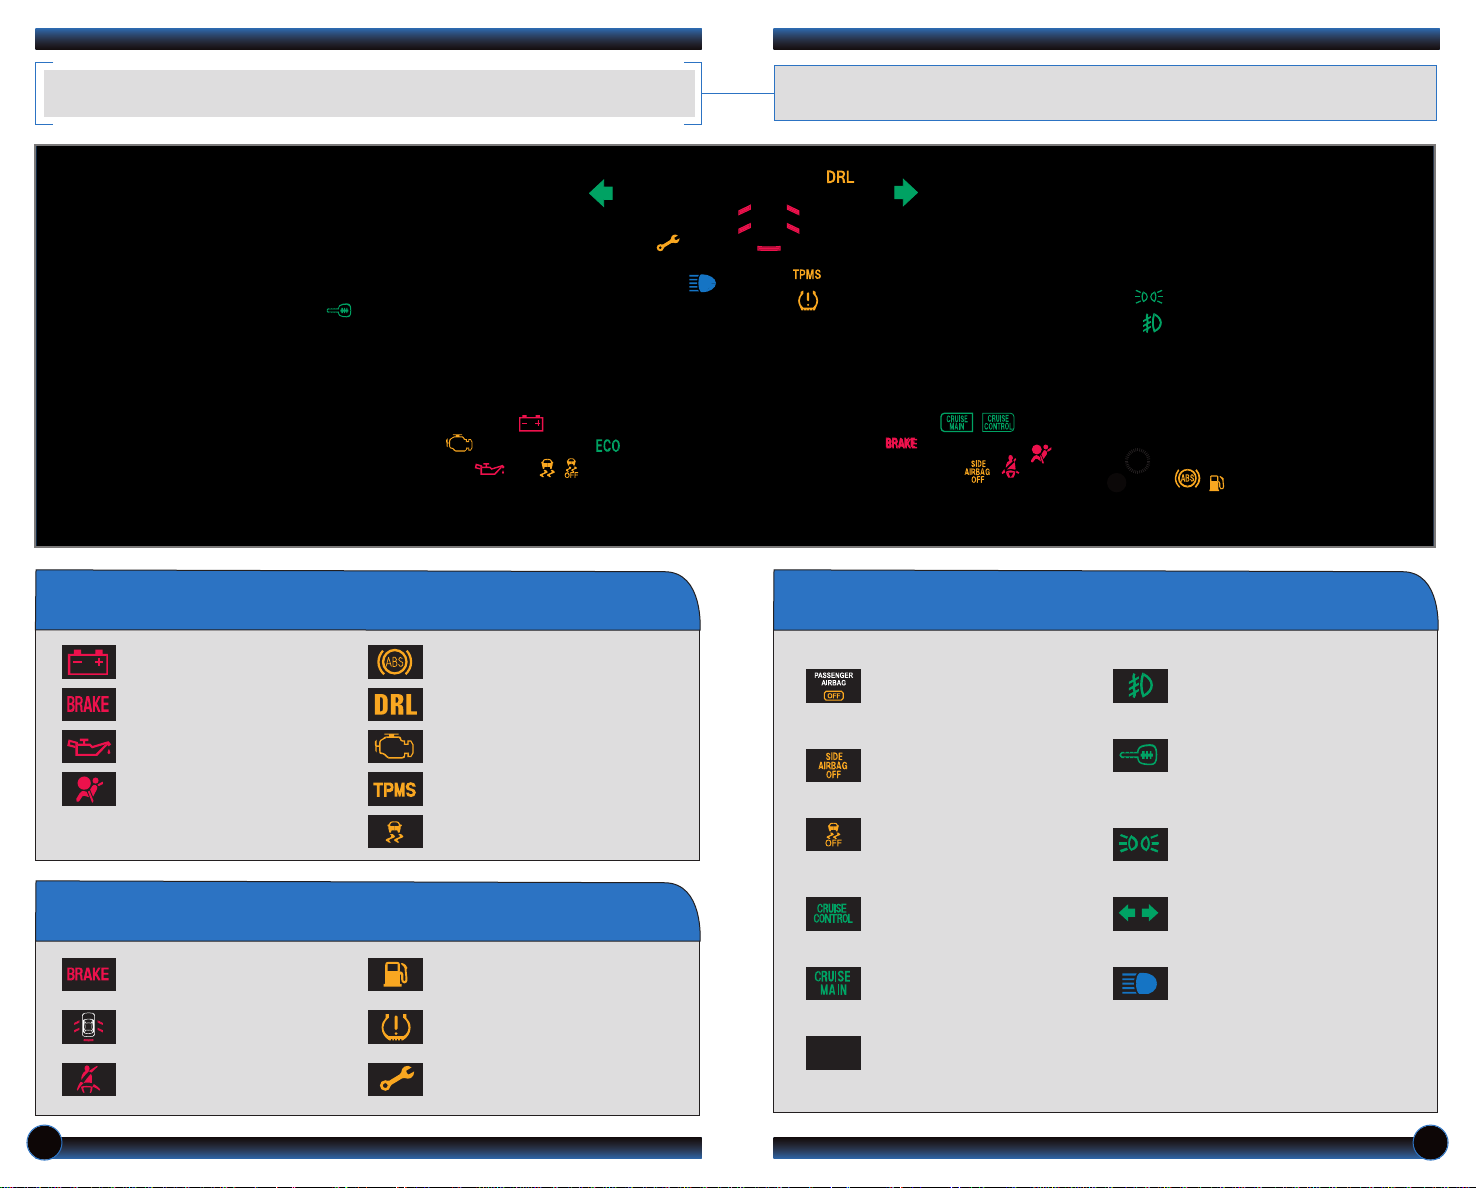
INFORMATION DISPLAY
TIRE PRESSURE MONITORING SYSTEM (TPMS)
Consists of several displays that provide you with useful information.
Accessing the Information Display
When you start the engine, the
information display shows your
last active selection from the
previous drive cycle.
To toggle between the different
displays, press and release the
select/reset knob repeatedly.
Information Displays
Monitors the vehicle’s tire pressures.
How It Works
Each tire valve stem
contains a TPMS sensor.
When the tire pressure drops
significantly below recommended
levels, the low tire pressure
indicator comes on.
If the TPMS indicator appears,
there may be a problem with
the system. See your dealer.
What to Do
1. Visually inspect the tires for
damage.
Odometer, Trip meter A
Oil life
Outside temperature*,
Trip meter A
Outside temperature*,
Trip meter B
*
if equipped
2. Use a tire air pressure gauge to
check which tire(s) have low
pressure.
3. Inflate the tire(s), if necessary,
to the recommended pressures
listed on the label on the
driver’s doorjamb.
6 7
Page 6

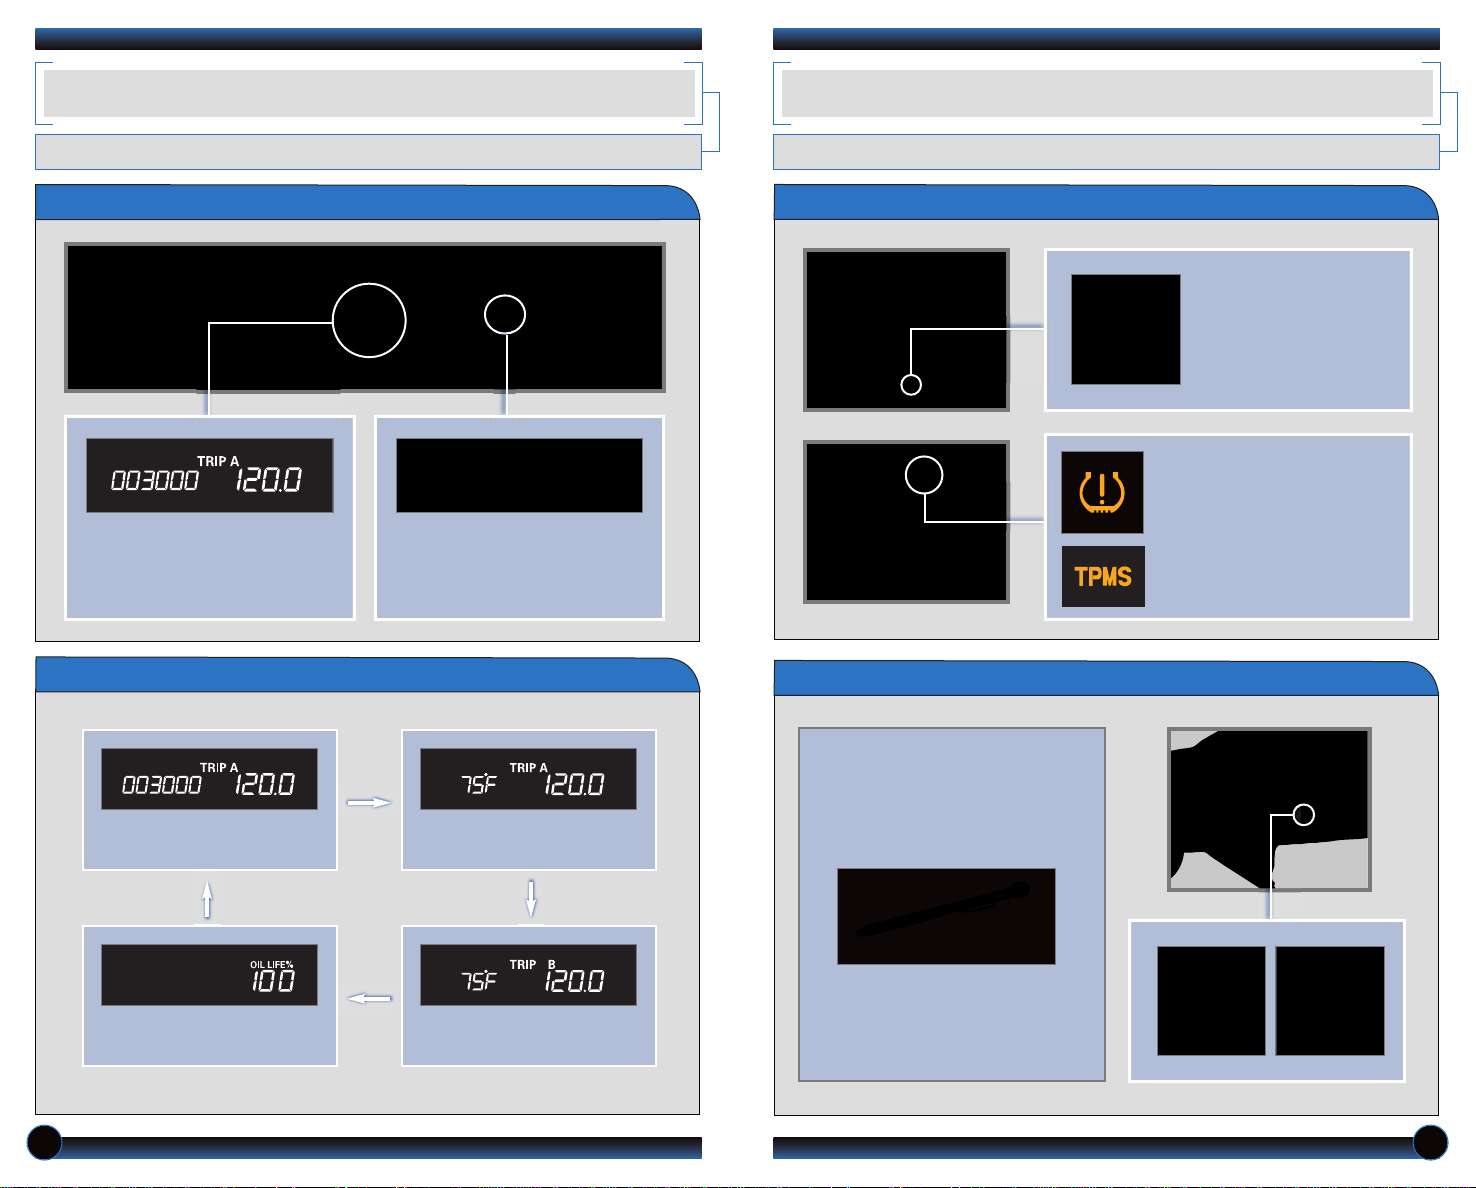
DRIVING POSITION MEMORY SYSTEM (DPMS) (if equipped)
REARVIEW CAMERA
Store a driver's seat and mirror position into memory for each remote transmitter.
Programming DPMS
1. Turn the ignition switch to ON (II).
Shift into Park (P).
2. Adjust your preferred seat and
outside mirror settings.
3. Press the SET button. You will
hear a beep.
4. Press the memory button
corresponding to the remote
(1 or 2) you are using. You will
hear two beeps.
For added convenience, the area behind your vehicle is displayed to help you navigate
while backing up.
How It Works
• When you shift into Reverse (R), a real-time image of the area behind your
vehicle is shown in the navigation display,along with helpful parking guide lines.
• The display turns off when you shift out of Reverse.
Models without navigation
Models with navigation
Turning the Guide Lines On or Off
Models without navigation Models with navigation
Press and hold the power button for
3 seconds. Repeat to turn back on.
Press and hold CANCEL for 3
seconds. Repeat to turn back on.
Note: A stored memory position is linked to the corresponding keyless remote (1 or 2).
Each item begins to adjust when you unlock the driver’s door with the remote and enter
the vehicle.
8 9
Page 7

Press and hold the button on the
remote and the HomeLink buttonat
the same time. Then, while
continuing to hold the HomeLink
button, press and release the button
on the remoteevery2 seconds.
Does the LED blinkat a faster rate within 20
seconds?
Press and hold
the HomeLink
button again.
Training
complete
YESNO
HomeLink indicator
flashes for 2 seconds,
then remains on.
HomeLink LED
remains on.
YESNO
YESNO
Position the remote transmitter you
wish to link 1–3 inches from the
HomeLink buttonyouwant to program.
1
Press and hold the desired
HomeLink button and the button on
the remote transmitter.
Does the HomeLink indicator(LED) blink at a
faster rate after about10 seconds?
2
a
The remote has a rolling code.
Press the “learn” button on the
remote-controlled device (e.g.,
garage door opener).
Press the programmed HomeLink
button again; the remote-controlled
device should operate.
Within 30 seconds, press and
hold the programmed HomeLink
button for 2 seconds.
a
Press and hold the programmed
HomeLink button for about a
second.
Does the device (garage dooropener) work?
3
b
4
5
REVERSE TILT DO OR MI RRO RS (i f equipped)
HOMELINK®(if e qui ppe d)
When you shift into Reverse (R), you can tilt either outside door mirror down slightly
to improve your view as you parallel park. Shifting out of Reverse returns the tilted
mirror to its original position.
How It Works
• To tilt the driver’s door
mirror, move the
mirror selector switch
to the left (L) position.
• To tilt the passenger’s
side door mirror,move
the mirror selector
switch to the right (R)
position.
• To turn the feature off,
move the switch to the
middle position.
The HomeLink Universal Transceiver can be programmed to operate up to three
remote-controlled devices around your home, such as garage doors, lighting,or home
security systems.
Training a Button
If you have any problems programming HomeLink, see the owner’s manual included
with the device you are trying to program, call HomeLink at (800) 355-3515, or
visit www.homelink.com.
10 11
Page 8

VOICE RECOGNITION
Key Functions by Voice Command
To keep your eyes on the road and hands on the wheel, use voice commands for
hands-free calling, navigation, audio, and climate control. For a full list of commands,
say “Information” and “Voice Command Help.”
Control four different systems with the steering wheel buttons and the ceiling
microphone.
HFL Talk button: Give HFL commands or
answer incoming calls.
NaviTalk button: Give navigation, audio,
and climate control commands.
Navi Back button: Cancel a command or
return to the previous screen.
HFL Back button: End a call, go back to
the previous command, or cancel an
operation.
N A V I G A T I O N
B L U E T O O T H
*
p. 16
®
H A N D S F R E E L I N K
A UD I O
*
p. 15
®
p. 18
Voice Command Tips
• Press and release the HFL or Navi Talk button, wait for a beep, then give a
command.
For a list of available HFL commands, press and release the HFL Talk button
•
and say “Hands-free help.”
• For a list of available navigation commands, press and release the Navi Talk
button and say “Help.”
• Speak in a clear, natural voice.
• Reduce all background noise.
• Adjust the dashboard and side vents away from the microphone in the ceiling.
• Close the windows.
*These systems can be controlled by voice if your vehicle is equipped with a navigation system.
C L I M A T E
12 13
*
p. 15
Page 9

Commonly Used Voice Commands
Here are some examples of commonly used voice commands.Try some of these to
familiarize yourself with the voice command system.
Press and release the Navi Talk button before you give a command.
Locate Points of Interest
Say a command like “Display
restaurant” to see restaurant
icons appear on the map.
Say a command like “Display gas
stations” to see gas station icons
appear on the map.
Press and release the Navi Talk button before you give a command. Press and release the Navi Talk button before you give a command.
Get Navigation Route
Information
After a destination is entered,
say “How far to the destination?”
to hear the remaining distance.
Press and release the Navi Talk button before you give a command.
Make Audio Selections
Say a command like “Radio 97.1
FM” to select that station.
Say a command like “CD play
track 1” to hear that song on a
currently inserted CD.
Adjust the Vehicle’s
Climate Setting
Say a command like “Air
conditioner on” to start the
air conditioning system.
Say “Display entire route” to see
the routing method the system
mapped for your destination.
Say a command like “Fan speed
4” to adjust the fan speed.
14 15
Page 10

Commonly Used Voice Commands (Continued)
Here are some examples of commonly used voice commands.Try some of these
to familiarize yourself with the voice command system.
Press and release the Navi Talk button before you give a command.
G e n e r a l C o m m a n d s
(Accepted on most screens to change
displays)
• Display map
• Display menu
• Information
• Display audio screen
• What time is it?
F i n d P l a c e C o m ma n d s
(Accepted on Map screen)
• Find nearest:
- ATM - Honda dealer
- gas station - airport
- Mexican - hospital
restaurant - bank
- post office
N a v i g a t i o n C o m m a n d s
(Accepted on Map screen)
• How long/far to the destination?
• Display destination map
• Display entire route
D i s p l a y C o m m an d s
(Accepted on Map screen)
• Display (or hide):
- ATM
- gas station
- restaurant
- post office
• Display north up/heading up
• Zoom in/out
• Go home
• Display current location
Press and release the Navi Talk button before you give a command.
A u d i o C o m m a n d s
(Accepted on most screens)
• Radio on
• Radio # FM/AM
• Radio preset 1/2/3/4/5/6
• XM channel #
• XM preset 1/2/3/4/5/6
• CD play
• CD play track/disc #
• CD skip forward/back
• Auxiliary (AUX) play
S e t u p C o m m a n d s
(Accepted on Setup screen)
• Brightness up/down
• Volume up/down/min/max/off
• Interface dial feedback on/off
• Guidance prompts
min/max/normal
Climate Control Comm ands
(Accepted on most screens)
• Air conditioner on/off
• Rear defrost on/off
• Climate control recirculate/
fresh air
• Fan speed up/down
• Temperature # degrees
(# = 57–87)
• Temperature max hot/cold
H e l p C o m m a n d s
(Accepted on most screens)
• Help (list of available commands
for current screen)
• Voice command help - from
INFO screen (list of all
available navigation,audio, and
climate control commands)
16 17
Page 11

NAVIGATION ( if equipped)
Real-time navigation system uses GPS and a map database to show your current
location and help guide you to a desired destination.
Entering a Destination Using Voice Commands Using the Find Nearest Command
Set a destination using a street address. For other destination options, see your
Navigation Manual.
Press and release the Navi Talk button before you give a command.
1. Say “Display menu.”
Say “Address.”
4. Say the entire street address
number. For example, “1-2-3-4.”
Find a nearby point of interest, such as a gas station, movie theater, restaurant, etc.
Press and release the Navi Talk button before you give a command.
1. From the map screen, say “Find
nearest ATM.”
3. Say the number next to the
destination you want to select.
2. Say “Street,” then say the street
name on the next screen. Do
not include the direction (N, S, E,
W) or type (St.,Ave., Blvd., etc.).
3. A list of street names appears.
Say the number next to the
street you want to select.
5. If the street address is in more
than one city, a list of city names
appears. Say the number next to
the city you want to select.
6. The system displays the
“Calculate route to” screen. Say
“OK” to set the route.
2. A list of the nearest ATMs in
your area is displayed by
shortest distance to destination.
Map Screen Legend
Direction of destination
Distance to go
Time to go
Calculated route
Current vehicle
location
4. The system displays the
“Calculate route to” screen.
Say “OK” to set the route.
18 19
Page 12

BLUET OOT H
®
HANDSFREELINK
®
Place and receive phone calls through your vehicle’s audio system. Visit
handsfreelink.honda.com to check if your phone is compatible.
Pairing Your Phone
HFL Talk button: Give HFL
commands or answer incoming calls.
HFL Back button: End a call, go back
to the previous command, or cancel an
operation.
Press and release the HFL Talk button before you give a command.
1. Enable “Discovery” or
“Search” mode on your
compatible phone.
2. Say “Phone setup,” then say
“Pair.”
*model with navigation shown
4. Search for HandsFreeLink
from your phone, and enter
the code when prompted.
Connect to HFL.
Making a Call
Press and release the HFL Talk button before you give a command.
1. Press the HFL Talk button.
2. Say “Call” or “Dial” and the
desired phone number.
Receiving a Call
1. A notification is heard and
the incoming phone number
appears on the audio display.
3. Say “Call” or “Dial” to continue.
4. The call is connected and heard
through the vehicle’s speakers.
2. Press the HFL Talk button to
accept the call.
3. HFL gives you a four-digit
code that appears on the
audio display.
5. HFL asks you to name the
phone. For example, say
“Mary’s phone.”The phone is
now added.
3. Press the HFL Back button to
end or decline the call.
20 21
Page 13

HFL Phonebook
Store up to 50 names and their phone numbers, which can be used
as speed dials.
Press and release the HFL Talk button before you give a command.
1. Say “Phonebook.”
3. Say the name of the contact,
and then the phone number.
IPOD®OR USB FLASH DRIVE
Play audio files from your compatible iPod or USB flash drive through your vehicle’s
audio system.
Connecting Devices and Playing Audio Files
2. Say “Store.”
4. To call a contact once an entry
is stored, say “Call Mike.”
Cellular Phonebook* (models with navigation)
Import your entire cell phone’s address book to the navigation system.
Press and release the Navi Talk button before you give a command.
1. Say “Display information.”
Say “Cellular phone.”
3. HFL begins to import your
contacts to the system.
1. Open the center console, and pull
out the USB adapter cable.
2. Connect the USB connector to your
iPod dock connector or flash drive.
3. Press AUX to begin playing.
4. To change tracks, press the SKIP ()
or () buttons.
2. Say “Import Cellular Phonebook.”
4. To call a contact, say “Search
Imported Phonebook” and select
the name and number.
iPod is a registered trademark of Apple Computer, Inc., registered in the U.S. and other countries. iPod not included.
*not available on all phones
22 23
Page 14

FUEL FILL DOOR
HIDDEN R EMO VAB LE UTILITY BOX
Easy-to-use locking fuel door keeps your fuel cap secure.
Opening the Fuel Fill Door
When you unlock the driver’s door,
the fuel door unlocks.
To open, push and release the fuel
door in the area shown until it pops
open.
Closing the Fuel Fill Door
Removable and washable utility box provides extra storage and access to tool kit and jack.
Removing the Utility Box
1. Lift the removable tray using
the handle.
2. Remove the side anchors attached
to the tray.
3. Secure the anchors to the
designated hooks located on the
side panels.
4. Lift the utility box out from its
compartment using the side handles.
Push the fuel door until it is flush
with the body.
When you lock the driver’s door, the
fuel door locks.
NOTE: If you lock the doors while
the fuel door is open, you must
unlock the doors to close the fuel
door.
The utility box also includes two
removable dividers for added storage
options, located behind each handle.
24 25
Page 15

COMPACT S PAR E TI RE
Temporary replacement tire located underneath the rear cargo area. Have your regular
tire repaired or replaced by your dealer as soon as possible.
Removing the Spare Tire
1. Open the tailgate. Raise the
removable tray and flip it over so the
carpeted side faces you.
2. Remove the hook,and hook it to the
cargo side panel to hold the tray in
place. Remove the utility box to access
the wheel nut wrench in the tool kit.
4. Attach the short end of the wheel
nut wrench to the spare tire holder
bolt. Turn the wrench
counterclockwise until the bolt
loosens.
5. Attach the long end of the wrench,
and turn it approximately 70 times.
Stop when you feel resistance and can
see the spare tire under the vehicle.
NOTE:Turning the wrench any
further may cause damage.
7. Place the spare tire holder back on
the hook.
NOTE: Do not place the flat tire in
the spare tire holder. This can damage
the holder.
Storing the Flat Tire
1. Remove the plastic bag from the
tool kit case, and place the flat tire
inside. Knot the top of the bag to
secure the tire.
2. Puncture the bag, and pass the
holding belt through and around
one of the tire spokes.
3. Remove the plastic cover on the cargo
area lining using your key to access the
bolt for the spare tire holder.
6. Unhook the spare tire holder, and
remove the spare tire.
8. Turn the wrench clockwise to
retighten the bolt and raise the holder
back into place.
NOTE: If the holder is not raised, it
will be damaged during driving.
3. Place the flat tire in the cargo
area. Thread the belt through
the cargo hook. Pass the belt
through the ring, and tighten the
belt to secure the flat tire in
place.
26 27
Page 16

OWNER LINK
SAFETY R EMI NDE R
Owner Link allows you to explore features and technologies specific to your vehicle,
schedule service appointments, obtain and update maintenance and service records,
manage your financial services account, and access other useful information. Register
at owners.honda.com to ensure that you continue to enjoy the experience of owning a
Honda.
Your vehicle is equipped with airbags. Airbags do not replace seat belts; they add to
the protection offered by seat belts. Airbags can help protect you in some types of
collisions, but they do not provide protection in all collisions.
Always make sure you and your passengers wear seat belts, and that young children
are properly secured in a child seat or booster in the rear seat. Never place an infant
seat in the front passenger’s seat as the force of a deploying airbag can seriously
injure an infant.
FUEL RECOMMENDATION
• Only use unleaded gasoline of 87 octane or higher.
• Some gasoline in North America contains MMT, a manganese-based fuel additive.
Prolonged and consistent use of gasoline containing MMT can deteriorate your
vehicle’s performance, fuel economy, and the emissions control system. Always use
MMT-free gasoline if available. Failures caused by use of gasoline containing MMT may
not be covered under warranty.
• “TOP TIER Detergent Gasoline” meets a new gasoline standard jointly established by
leading automotive manufacturers to meet the needs of today's advanced engines. In
most cases, qualifying gasoline retailers will identify their gasoline as having met “TOP
TIER Detergent Gasoline” standards at the retail location. This fuel is guaranteed to
contain the proper level of detergent additives and be free of metallic additives. This
helps avoid build-up of deposits in your engine and emission control system. Because
the level of detergency and harmful metallic additives (such as MMT) in gasoline vary
in the market, Honda endorses the use of “TOP TIER Detergent Gasoline” where
available to help maintain the performance and reliability of your vehicle. For more
information, visit www.toptiergas.com.
• For further important information on fuel and lubricants for your car and information
on gasoline that does not contain MMT, contact your dealer or visit Owner Link at
owners.honda.com.
28 29
 Loading...