

Honda CM400E (1981) Owner's Manual
-----IMPORT ANT NO'l'h~I'
• OPERATORANDPASSENGER
This motorcycle is designed to
CU"Y
1111..
",1,,1'),
'-"'ilrllit!
ptlUtlotl;CI.
Never exceed the vehicle capacity load
.1\
,11,,\\
II 'lIl
11",
Ilrl) lIill"iJl!llio)ll
label. .
• ON-ROAD USE
This motorcycle is not equipped with "
~I""~
be used only on the road. Opcrat io u
III
I""!~I. 10'11.1,
,'II
areas may be illegal. Obey local laws
:lIld 11'1'.111,011""
• READ OWNER'S MANUAL CAREFlJI I
Pay special attention to statements
pll·\('tkoi
It
I'
1111
I"II"
Ilip
wOI;1
[:I1j.'i!
:"Utl
Indicates a strong possibility 01
$('V/'II'
/"'''''1,11/
tll/lll
I' ",'
Iii.!.! j·f
Ii(!'
If
instructions are not followed,
CAUTION:
Indicates a possibility of
/11'1"'1/1111
III/III)' "" e,/lli/lliiOll
ilWt!,/!
instructions are not fotlowcd.
NOTE: Gives helpful infounatlou.
This manual should be
l'0I1Nilh"l·d II
1"",,1"11' III
1',1,1
III I
ill] \',
lill 11I11I1t1
should remain with the velurle
WIl"11
1I'~"ltI
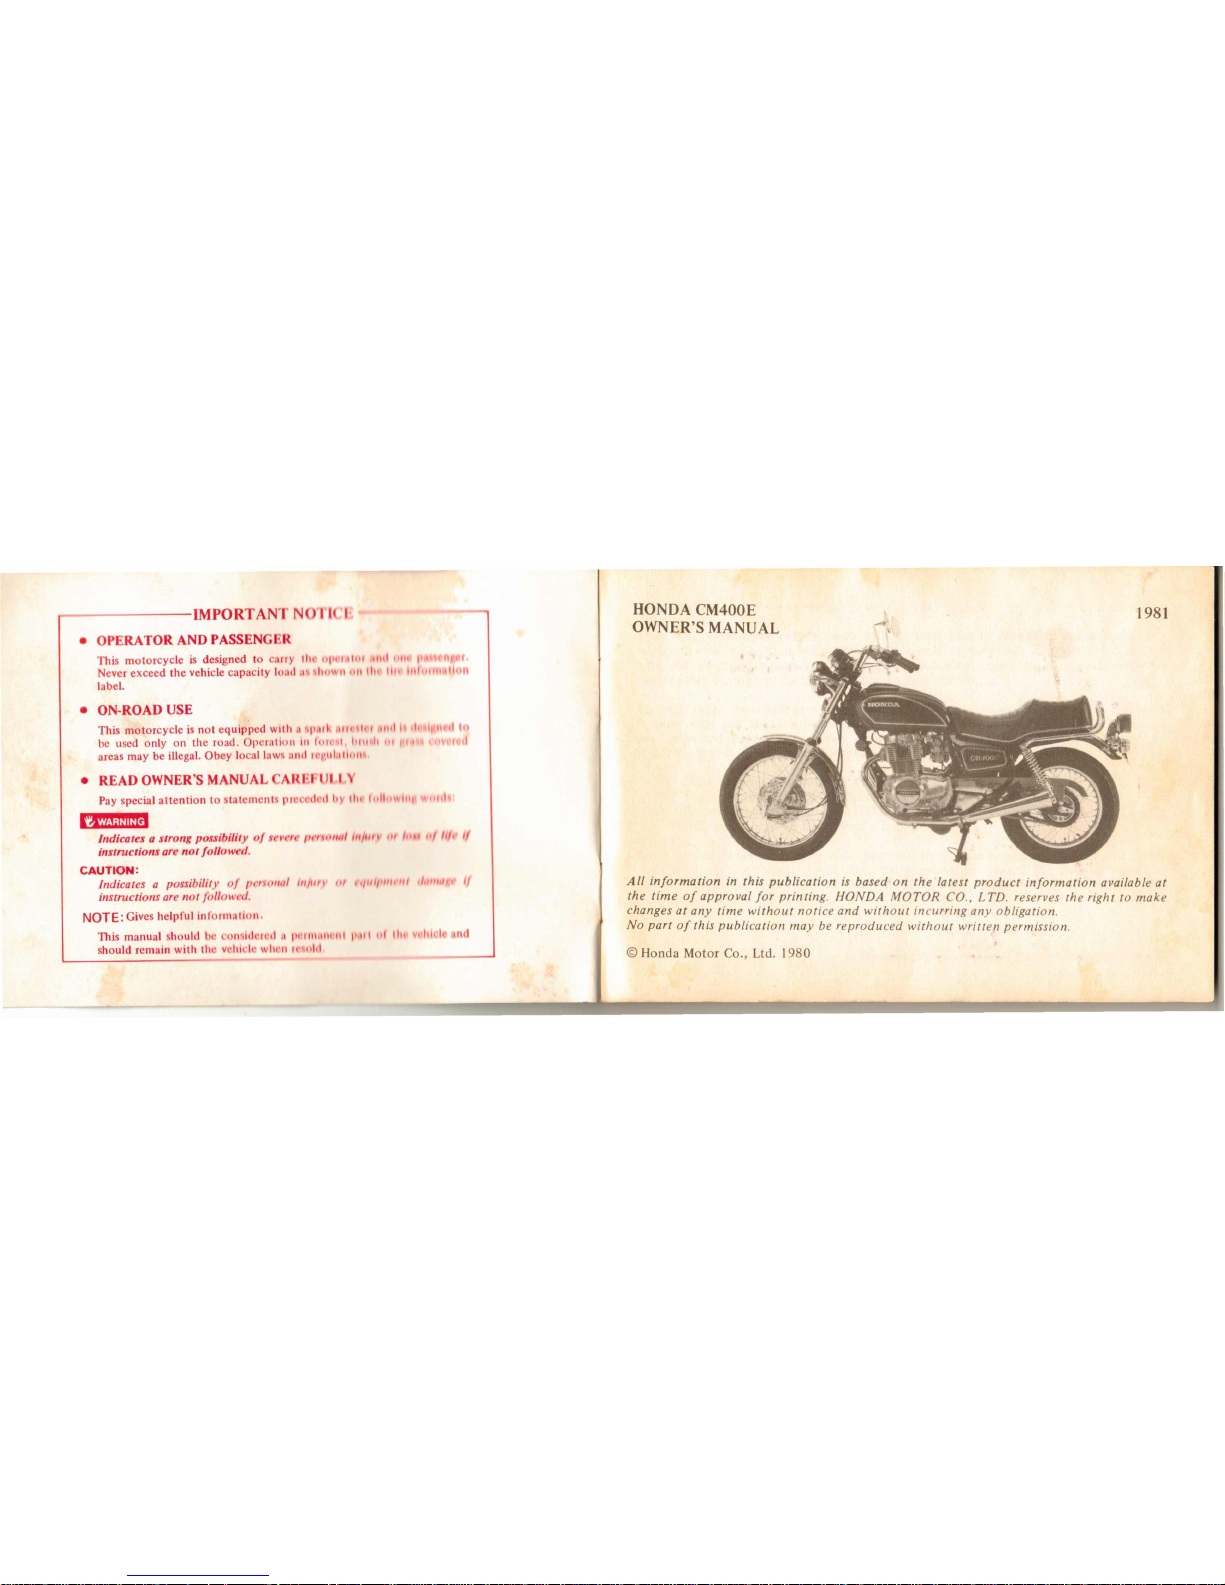
HONDACM400E
OWNER'SMANUAL
,_..-
\
1981
All information in this publication is based on the latest product information available at
the time of approval for printing. HONDA MOTOR CO" LTD. reserves the right to make
changes at any time without notice and without incurring any obligation.
No part of this publication may be reproduced without writte,n permission.
©
Honda Motor Co., Ltd. 1980
WELCOME,
Your new motorcycle presents you with an invitation to adventure and a challenge to
master the machine. Your safety depends not only on your own alertness and familiarity
with the machine, but also the machine's mechanical condition. A pre-ride inspection
before every outing and regular maintenance are essential.
To help meet the challenges safely and enjoy the adventure fully, become thoroughly
familiar with this Owner's Manual BEFORE YOU RIDE THE MOTORCYCLE. Also, for
your own and your Honda's sake, please read all the written material which came with
your new Honda. These items include;
*
Honda Owner's Identification Card
*
Set-up and Predelivery Checklist
*
Honda Motorcycle Emission Control System, Distributor's Warranty
*
Honda Motorcycle, Distributor's Limited Warranty
When service is required, remember that your Honda dealer knows what it takes to keep
your Honda going strong.Ifyou have the required mechanical "know-how" and tools,
your dealer can supply you with an official Honda Shop Manual to help you perform many
maintenance and repair tasks.
Pleasant riding, and thank you for choosing a Honda!
Page
MOTORCYCLE SAFETY. . . . . . . .. 1
Safe Riding Rules . . . . . . . . . . . .. 1
Protective Apparel 2
Loading and Accessories . . . . . . .. 3
Tires . . . . . . . . . . . . . . . . . . . . . .. 5
Modifications 7
DESCRIPTION , 8
Parts Location. . . . . . . . . . . . . . .. 8
Serial Numbers 12
Parts Function 14
Fuel 23
Engine Oil . . . . . . . . . . . . . . . . . .. 25
OPERATION 27
Pre-ride Inspection 27
Starting the Engine 28
Break-in 31
Riding : 32
Braking 34
Parking 35
Anti-theft Tips 35
SPECIAL PROCEDURES 36
Tool Kit 37
Front Wheel Removal , 38
Page
Rear Wheel Removal 40
Fuse Replacement 42
MAINTENANCE 44
Maintenance Schedule 46
Maintenance Record 48
Engine Oil . . . . . . . . . . . . . . . . . . . 49
Oil Filter 50
Spark Plugs 51
Idle Speed . . . . . . . . . . . . . . . . . .. 52
Air Cleaner 53
Crankcase Breather 54
Clutch 55
Front Brake 57
Rear Brake 59
Drive Chain 61
Side Stand 64
Battery 65
CLEANING 67
STORAGE , , ., 67
EMISSION CONTROL SYSTEM 68
CONSUMER INFORMATION 71
SPECIFICATIONS 72
...._._....-~..-.-.--._._.. MOTO RCYCLE SAFETY
rid.i;piiBii
.~~
....
~~
.........
~
...
* Motorcycle riding requires special efforts on your part to ensure your safety. Know
these requirements before you ride.
SAFE RIDING RULES
1. Always make a Pre-ride Inspection
(page 27) before you start the engine.
You may prevent an accident or equip-
ment damage.
2. Many accidents involve inexperienced
riders. Most states require a special
motorcycle riding test or license. Make
sure you are qualified before you ride.
NEVER lend your motorcycle to an
inexperienced rider.
3. Many automobile/motorcycle acci-
dents happen because the automobile
driver does not "see" the motorcyclist.
Make yourself conspicuous to help
avoid the accident that wasn't your
fault:
• Wear bright or reflective clothing.
• Don't drive in another motorist's
"blind spot."
4. Obey all federal, state and local laws
and regulations.
• Excessive speed is a factor in many
accidents. Obey the speed limits,
and NEVER travel faster than con-
ditions warran t.
• Signal before you make a turn or
lane change. Your size and maneu-
verability can surprise other motor-
ists.
5. Don't let other motorists surprise you.
Use extra caution at intersections,
parking lot entrances and exits, and
driveways.
6. Keep both hands on the handlebars
and both feet on the foot pegs while
riding. A passenger should hold on to
the motorcycle or the operator with
both hands and keep both feet on the
passenger foot pegs.
PROTECTIVE APPAREL
1. Most motorcycle accident fatalities are
due to head injuries: ALWAYS wear a
helmet. You should also wear a face
shield or goggles as well as boots,
gloves, and protective clothing. A pas-
senger needs the same protection.
2. The exhaust system becomes very hot
during operation, anditremains hot
after operation. Never touch any part
of the hot exhaust system. Wear cloth-
ing that fully covers your legs.
3.
Do not wear loose clothing which
could catch on the control levers,
foot pegs, drive chain or wheels.
2
LOADING AND ACCESSORIES
1'?i''?·!;I:i1Ua
* To prevent an accident, use extreme
care when adding and riding with
accessories and cargo. Addition of
accessories and cargo can reduce a
motorcycle's stability, performance and
safe operating speed. Never ride an
accessory-equipped motorcycle at spe-
eds above 80 mph. And remember that
this 80 mph limit may be reduced by
installation of non-Honda accessories,
improper loading, worn tires and over-
all motorcycle condition, poor road or
weather conditions, etc. These general
guidelines may help you decide wheth-
er or how to equip your motorcycle,
and how to load it safely.
Loading
The combined weight of the rider, pas-
senger, cargo and all accessories must not
exceed
420
Ibs, the vehicle capacity load.
Cargo weight alone should not exceed
401bs.
I. Keep cargo and accessory weight low
and close to the center of the motor-
cycle. Load weight equally on both
sides to minimize imbalance. As
weight is located farther from the
motorcycle's center of gravity, handl-
ing is proportionally affected.
2. Adjust tire pressure (TIRES, page 5)
and shock absorber springs (SHOCK
ABSORBERS, page 22) to suit load
weight.
3.
Luggage racks are for light weight
.items. Do not carry more than20Ibs.
of cargo on a luggage rack behind the
seat. Bulky items too far behind the
rider may cause wind turbulence that
impairs handling.
4.
All cargo and accessories must be
secure for stable handling. Re-check
cargo security and accessory moun ts
freq uen tly.
5.
Do not attach large, heavy items to the
handlebars, front forks, or fender.
Unstable handling or slow steering
response may result.
3
Accessories
Genuine Honda accessories have been
specifically designed for and tested on
this motorcycle.
Because the factory cannot test all other
accessories, you are personally respon-
sible for proper selection, installation
and use of non-Honda accessories. Always
follow the guidelines under Loading
above, and these:
1. Carefully inspect the accessory to
make sure it does not obscure any
lights, reduce ground clearance and
banking angle or limit suspension
travel, steering travel or control oper-
ation.
2. Large fork-mounted fairings or wind-
shields, or poorly designed or improp-
erly mounted fairings can produce
aerodynamic forces that cause unsta-
ble handling. Do not install fairings
that decrease cooling air flow to the
engine.
3. Accessories which alter your riding
position by moving hands or feet away
from controls may increase reaction
time in an emergency.
4. Do not add electrical equipment that
will exceed the motorcycle's electrical
system capacity. A blown fuse could
cause a dangerous loss of lights or
engine power at night or in traffic.
5. This motorcycle was not designed to
pull a sidecar or trailer. Handling may
be seriously impaired if so equipped.
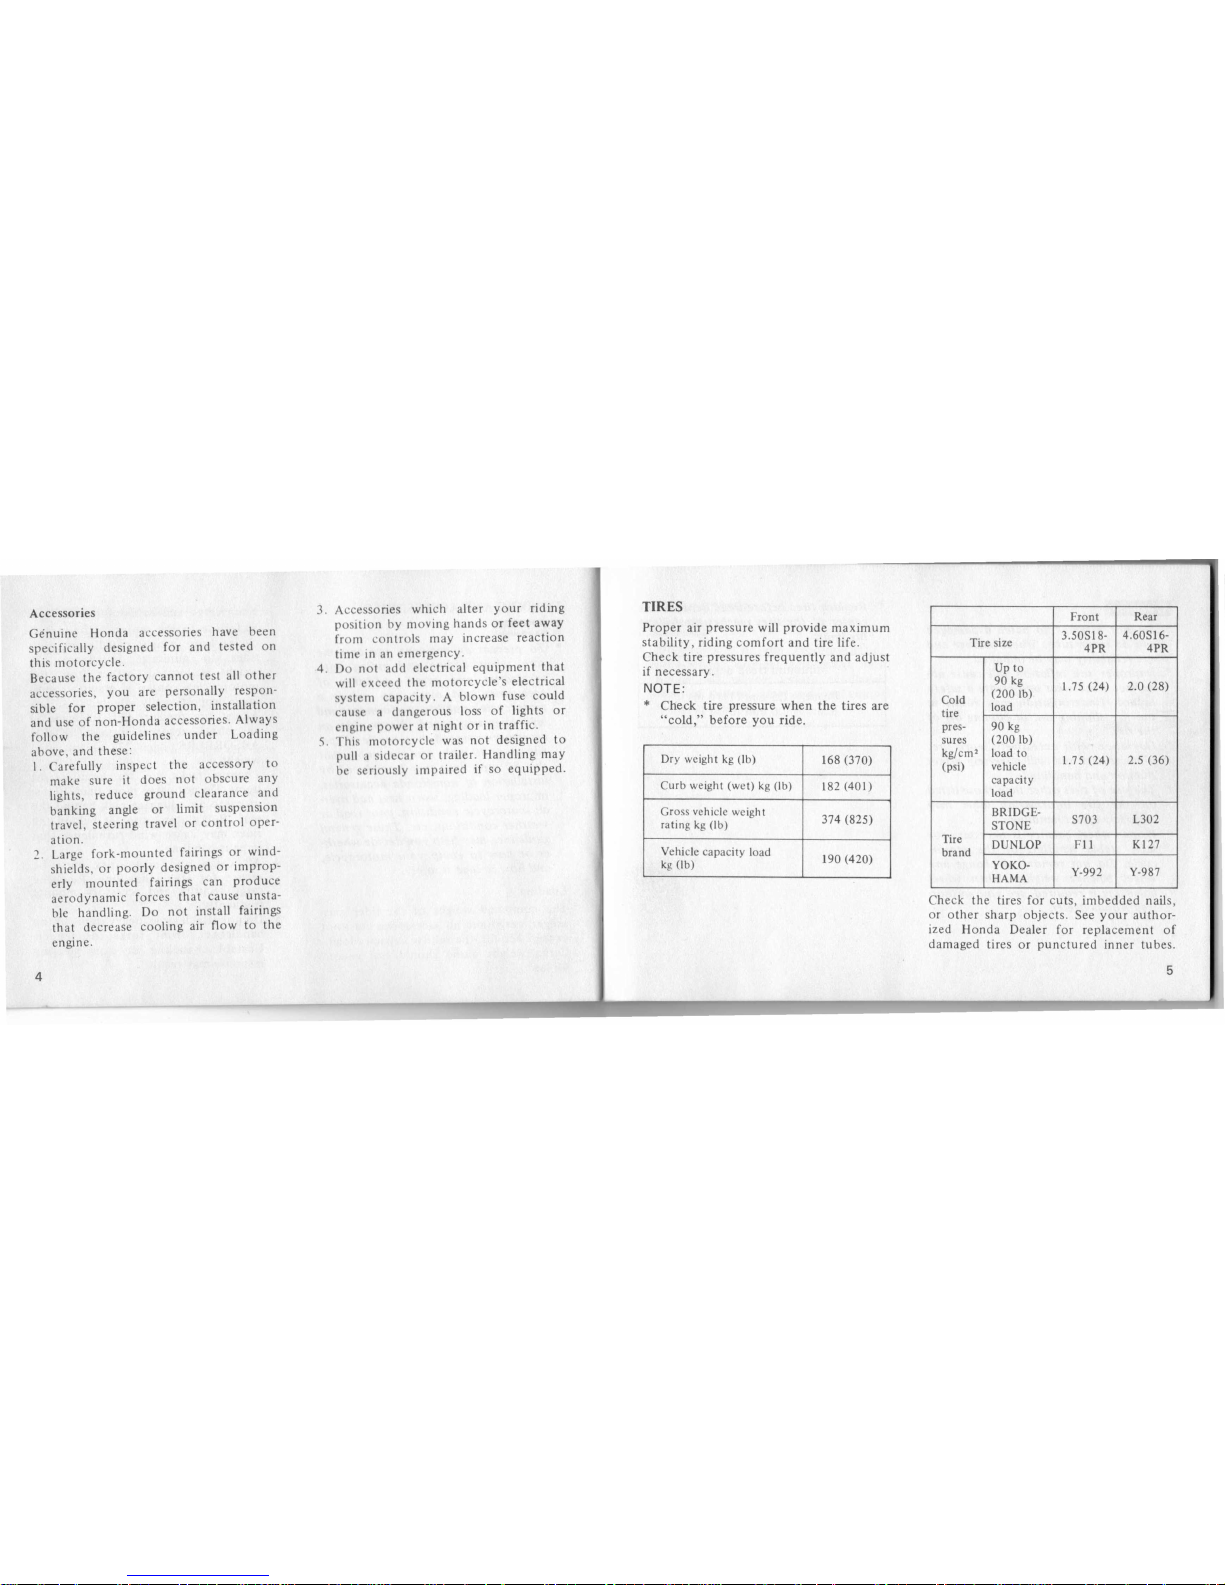
TIRES
Proper air pressure will provide maximum
stability, riding comfort and tire life.
Check tire pressures frequently and adjust
if necessary.
NOTE:
*
Check tire pressure when the tires are
"cold," before you ride.
t;
Front Rear
-
Tire size
3.50S18-
4.60SI6-
4PR 4PR
Up to
90 kg
1.75 (24)
Cold
(200Ib)
2.0 (28)
tire
load
pres- 90 kg
sures
(200 Ib)
kg/em'
load to
(psi) vehicle
1.75 (24)
2.5 (36)
capacity
load
BRIDGE-
STONE
S703
L302
Tire
DUNLOP
brand
Fll
K127
YOKO-
HAMA
Y-992
Y-987
Dry weight kg (Ib)
168 (370)
Curb weight (wet) kg (lb)
182 (401)
Gross vehicle weight
374 (825)
rating kg (lb)
Vehicle capacity load
190 (420)
kg (lb)
Check the tires for cuts, imbedded nails,
or other sharp objects. See your author-
ized Honda Dealer for replacemen t of
damaged tires or punctured inner tubes.
5
4
f?tn"i
l
:II
UtJ
*
Do not attempt to patch a damaged
tire or inner tube. Wheel balance and
tire reliability may be impaired.
* Improper tire inflation will cause ab-
normal tread wear and create a safety
hazard. Underinflation may result ·in
the tire slipping on, or coming off of
the rim.
*
Operation with excessively worn tires
is hazardous and will adversely affect
traction and handling.
* The use of tires other than those listed
on the tire information label may
adversely affect handling.
*
Proper wheel balance is necessary for
safe, stable handling of the motor-
cycle. Do not remove or change any
wheel balance weights. When wheel
balancing is required, see your author-
ized Honda dealer.
6
* Replace tires before tread depth at the
center of the tires reaches the follow-
ing limit:
Minimum tread depth
Front:
Rear:
1.5 mm (1/16 in)
2.0mm(3/32
in)
MODIFICA nONS
fmt<'l
* Modification of the motorcycle, or
removal of original equipment may
render the vehicle unsafe or illegal.
Obey all federal, state and local equip-
ment regulations.
7

PARTS LOCATION
(1) Horn button
(2) Turn signal switch
(3) Headlight dimmer switch
(4) Clutch lever
(5) Choke knob
(6) Speedometer
(7) Ignition switch
(8) Indicator and warning lights
(9) Engine stop switch
(10) Front brake lever
(11) Throttle grip
(12) Starter button
(13) Fuel cap cover
8
9
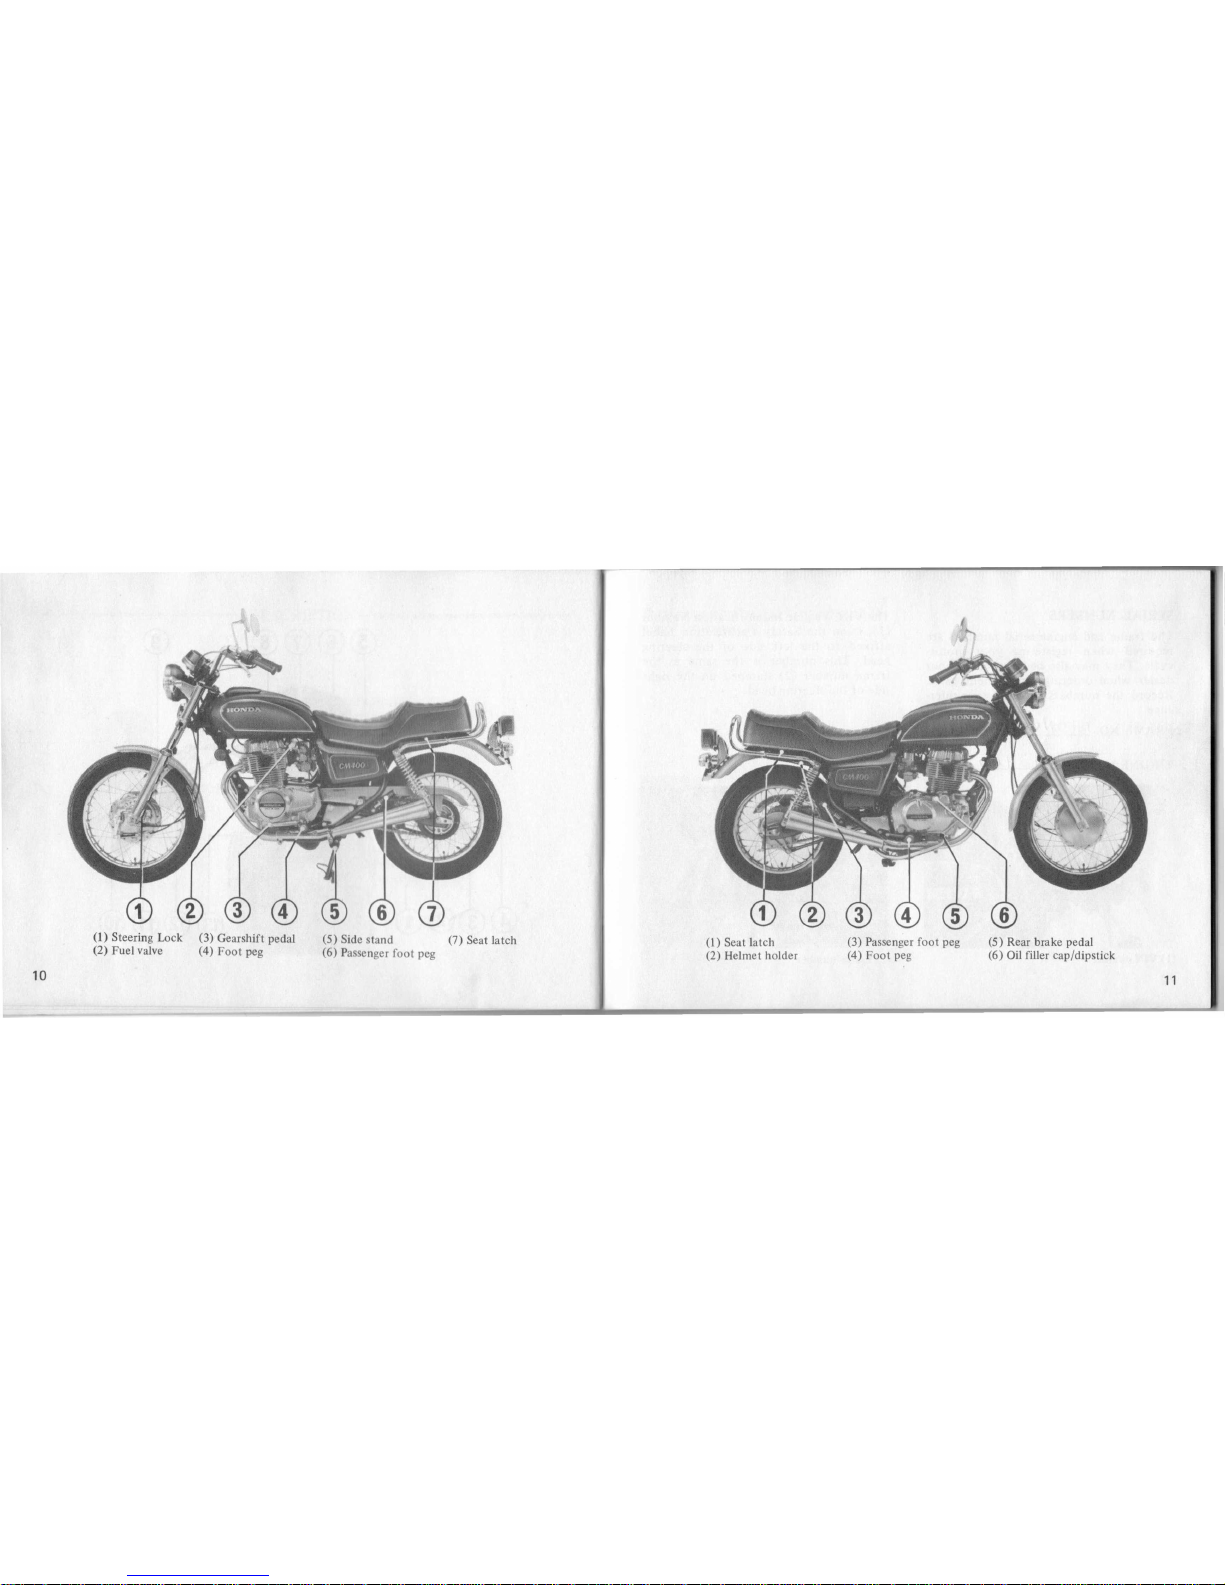
(1)
Seat latch
(2) Helmet holder
!~~
(1)
Steering Lock
(2) Fuel valve
(3) Gearshift pedal
(4) Foot peg
(5) Side stand (7) Seat latch
(6) Passenger foot peg
(3) Passenger foot peg
(4) Foot peg
(5) Rear brake pedal
(6)
Oil
filler cap/dipstick
10
11
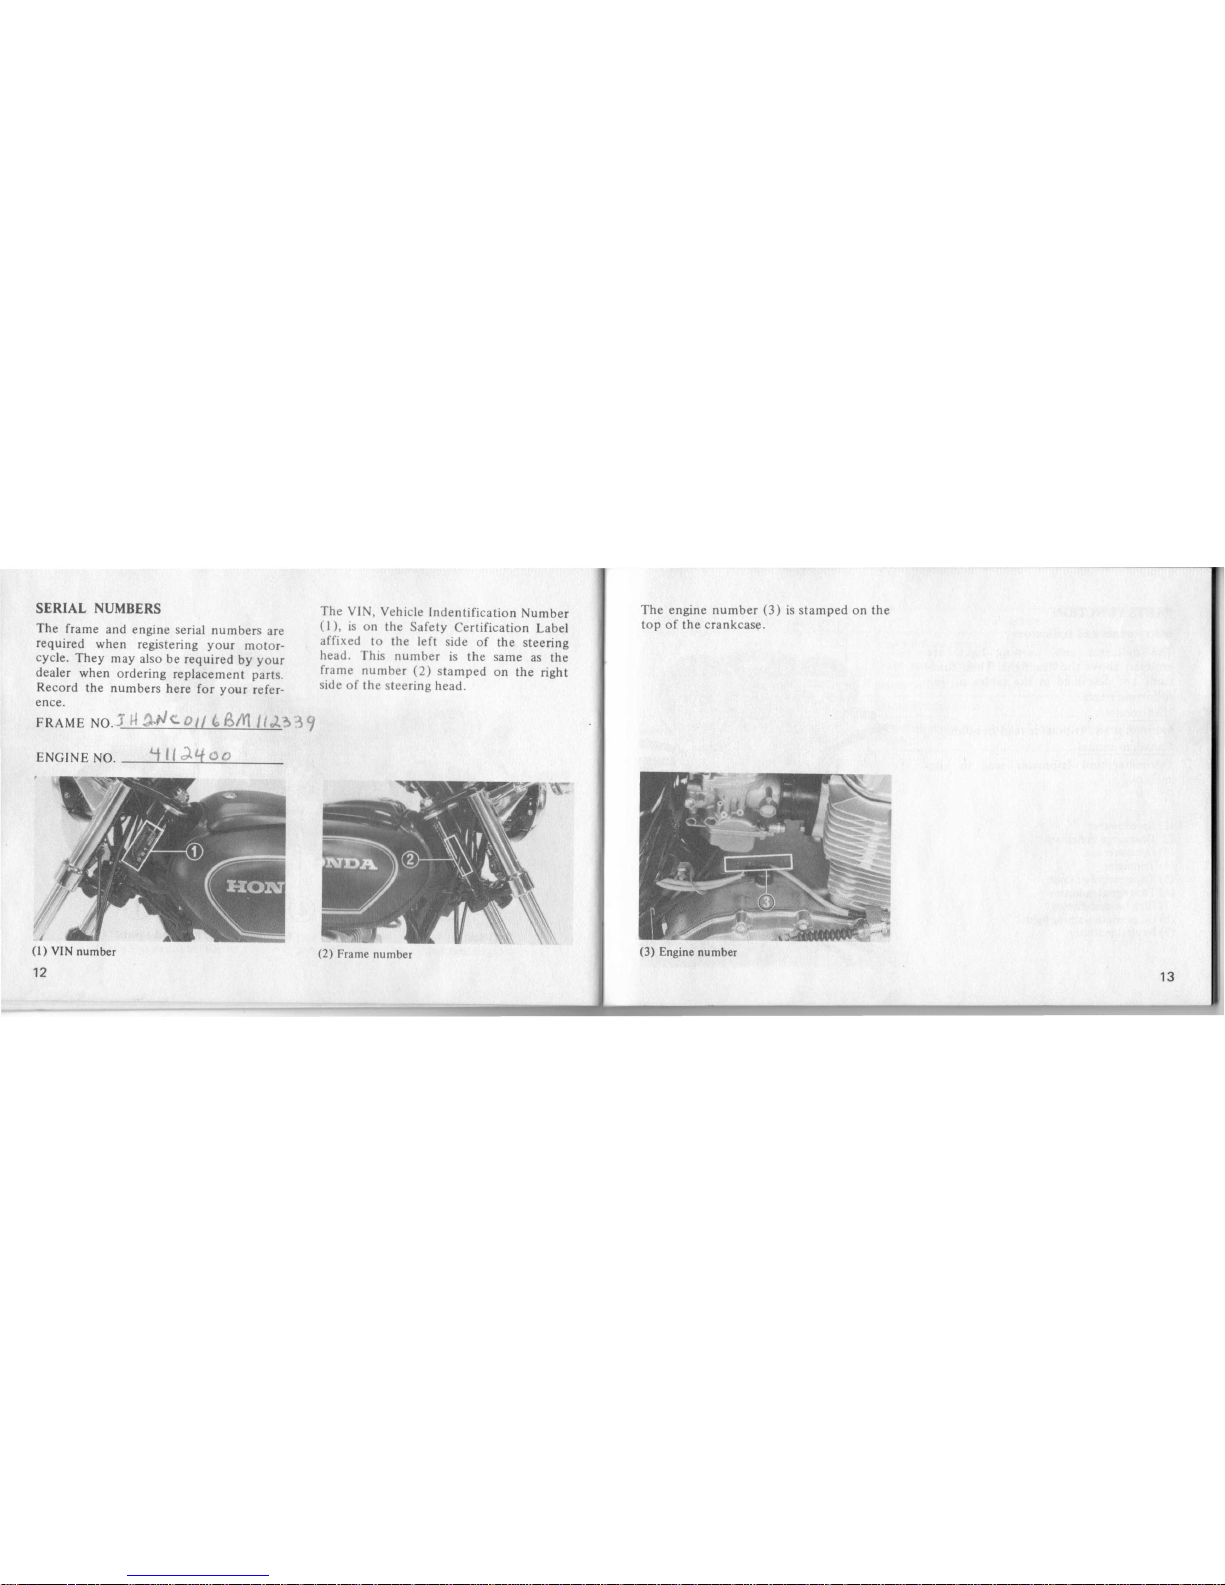
SERIAL NUMBERS
The frame and engine serial numbers are
required when registering your motor-
cycle. They may also be required by your
dealer when ordering replacement parts.
Record the numbers here for your refer-
ence.
FRAME NO.3
H
t).,J(!.
0
II ~
SlY!
If
J..~"3
9
ENGINE NO.
'i
".;).4-
00
(1)
YIN number
12
The VIN, Vehicle Indentification Number
(1), is on the Safety Certification Label
affixed to the left side of the steering
head. This number is the same as the
frame number
(2)
stamped on the right
side of the steering head.
(2) Frame number
The engine number
(3)
is stamped on the
top of the crankcase.
(3) Engine number
13
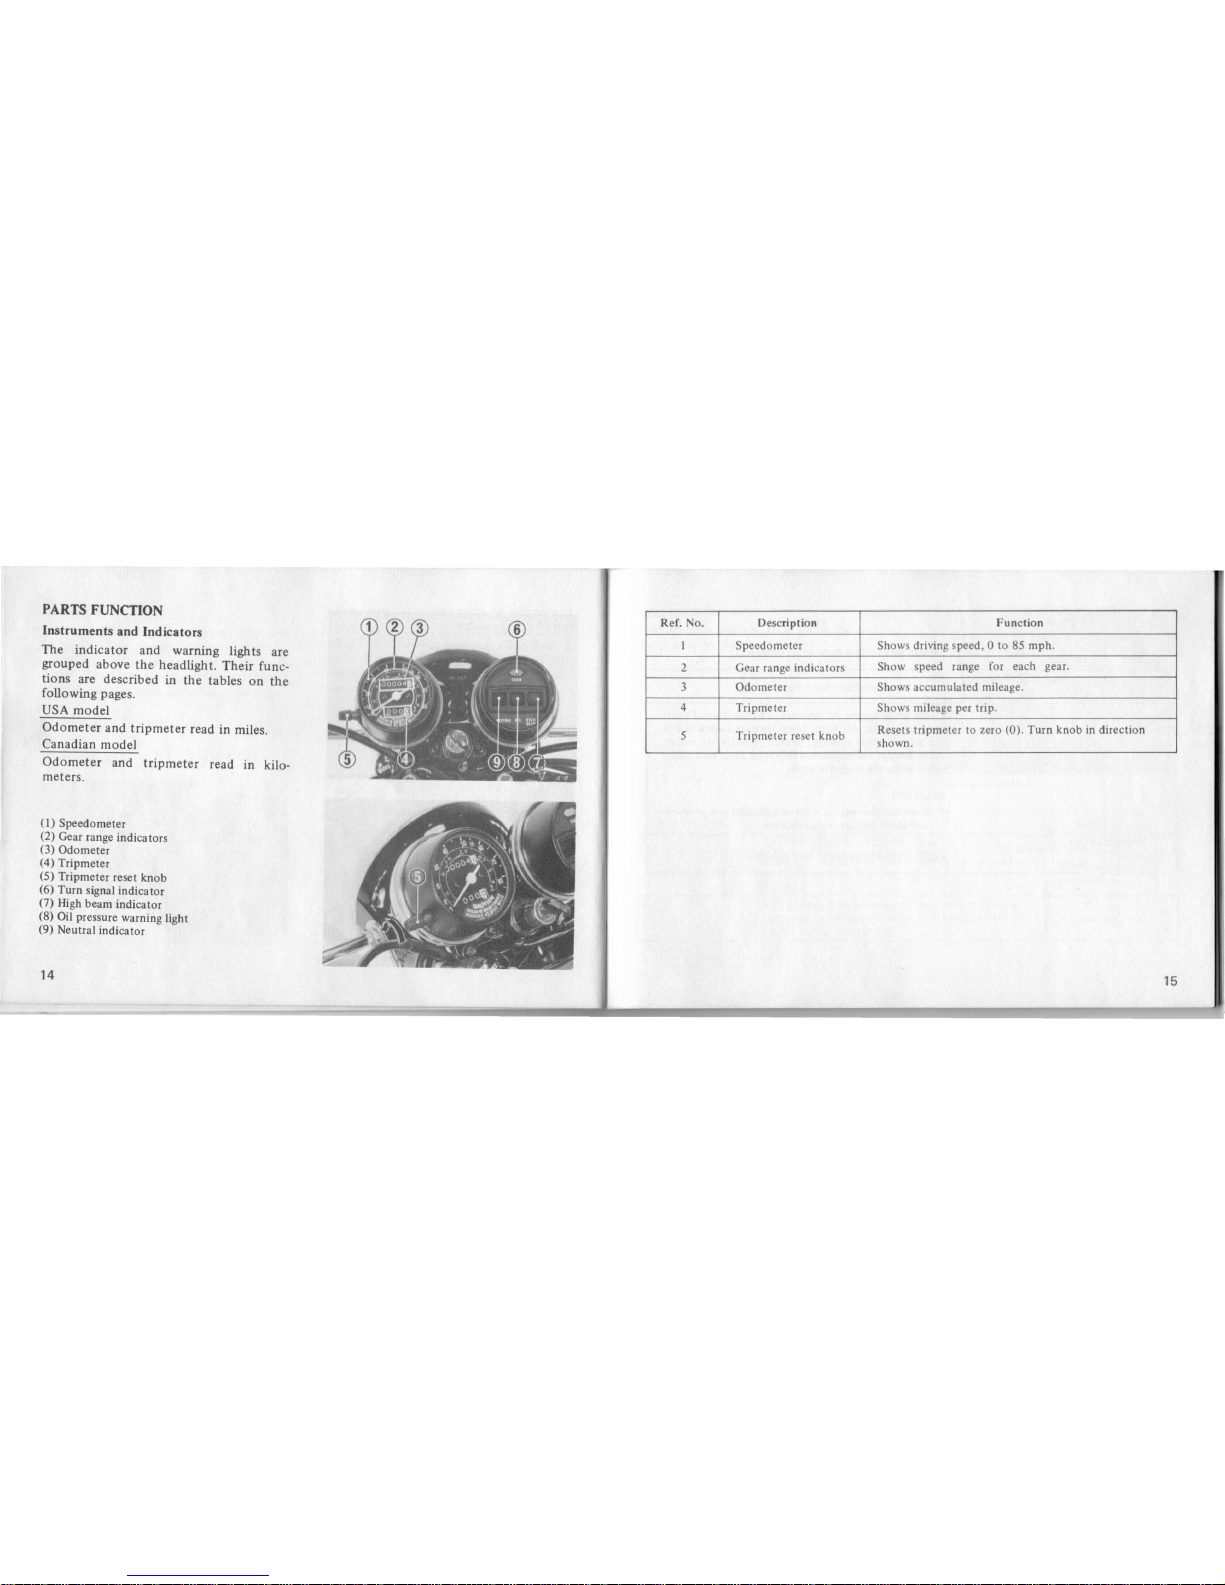
PARTS FUNCTION
Instruments and Indicators
The indicator and warning lights are
grouped above the headlight. Their func-
tions are described in the tables on the
following pages.
USA model
Odometer and tripmeter read in miles.
Canadian model
Odometer and tripmeter read in kilo-
meters.
(l)
Speedometer
(2) Gear range indicators
(3) Odometer
(4) Tripmeter
(5) Tripmeter reset knob
(6) Turn signal indicator
(7) High beam indicator
(8) Oil pressure warning light
(9) Neutral indicator
14
Ref. No. Description Function
I
Speedometer
Shows driving speed, 0 to 85 mph.
2
Gear range indicators
Show speed range for each gear.
3
Odometer
Shows accumulated mileage.
4 Tripmeter Shows mileage per trip.
5 Tripmeter reset knob
Resets tripmeter to zero (0). Turn knob in direction
shown.
15
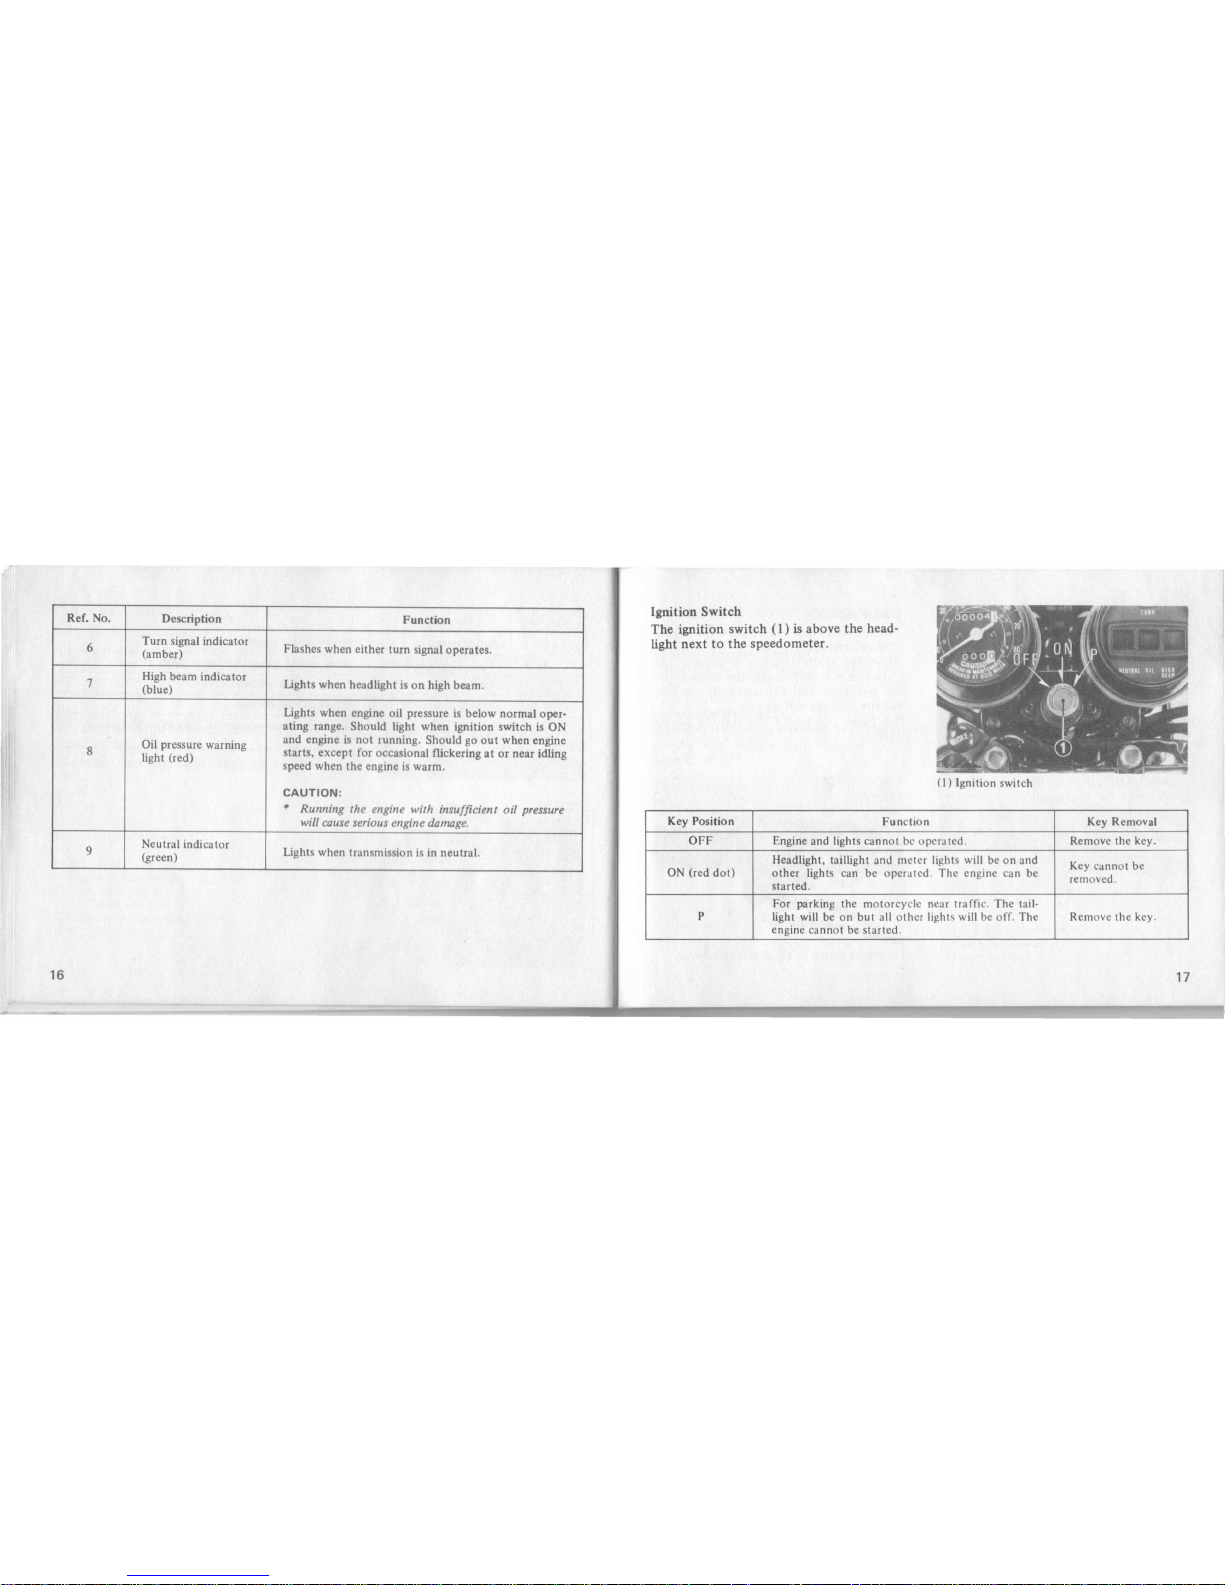
Ref. No.
Description
Function
I
I
6
Turn signal indicator
Flashes when either turn signal operates.
(amber)
7
High beam indicator
Lights when headlight is on high beam.
(blue)
Lights when engine oil pressure is below normal oper-
ating range. Should light when ignition switch is ON
Oil pressure warning
and engine is not running. Should go out when engine
8
light (red)
starts, except for occasional flickering at or near idling
speed when the engine is warm.
CAUTION:
*
Running the engine with insufficient oil pressure
will cause serious engine damage.
9
Neutral indicator
Lights when transmission is in neutral.
(green)
16
Ignition Switch
The ignition switch (1) is above the head-
light next to the speedometer.
(I)
Ignition switch
Key Position
Function Key Removal
OFF Engine and lights cannot be operated. Remove the key.
Headlight. taillight and meter lights will be on and
Key cannot be
ON (red dot)
other lights can be operated. The engine can be
removed.
started.
For parking the motorcycle near traffic. The tail-
P
light will be on but all other lights will be off. The Remove the key.
engine cannot be started.
17
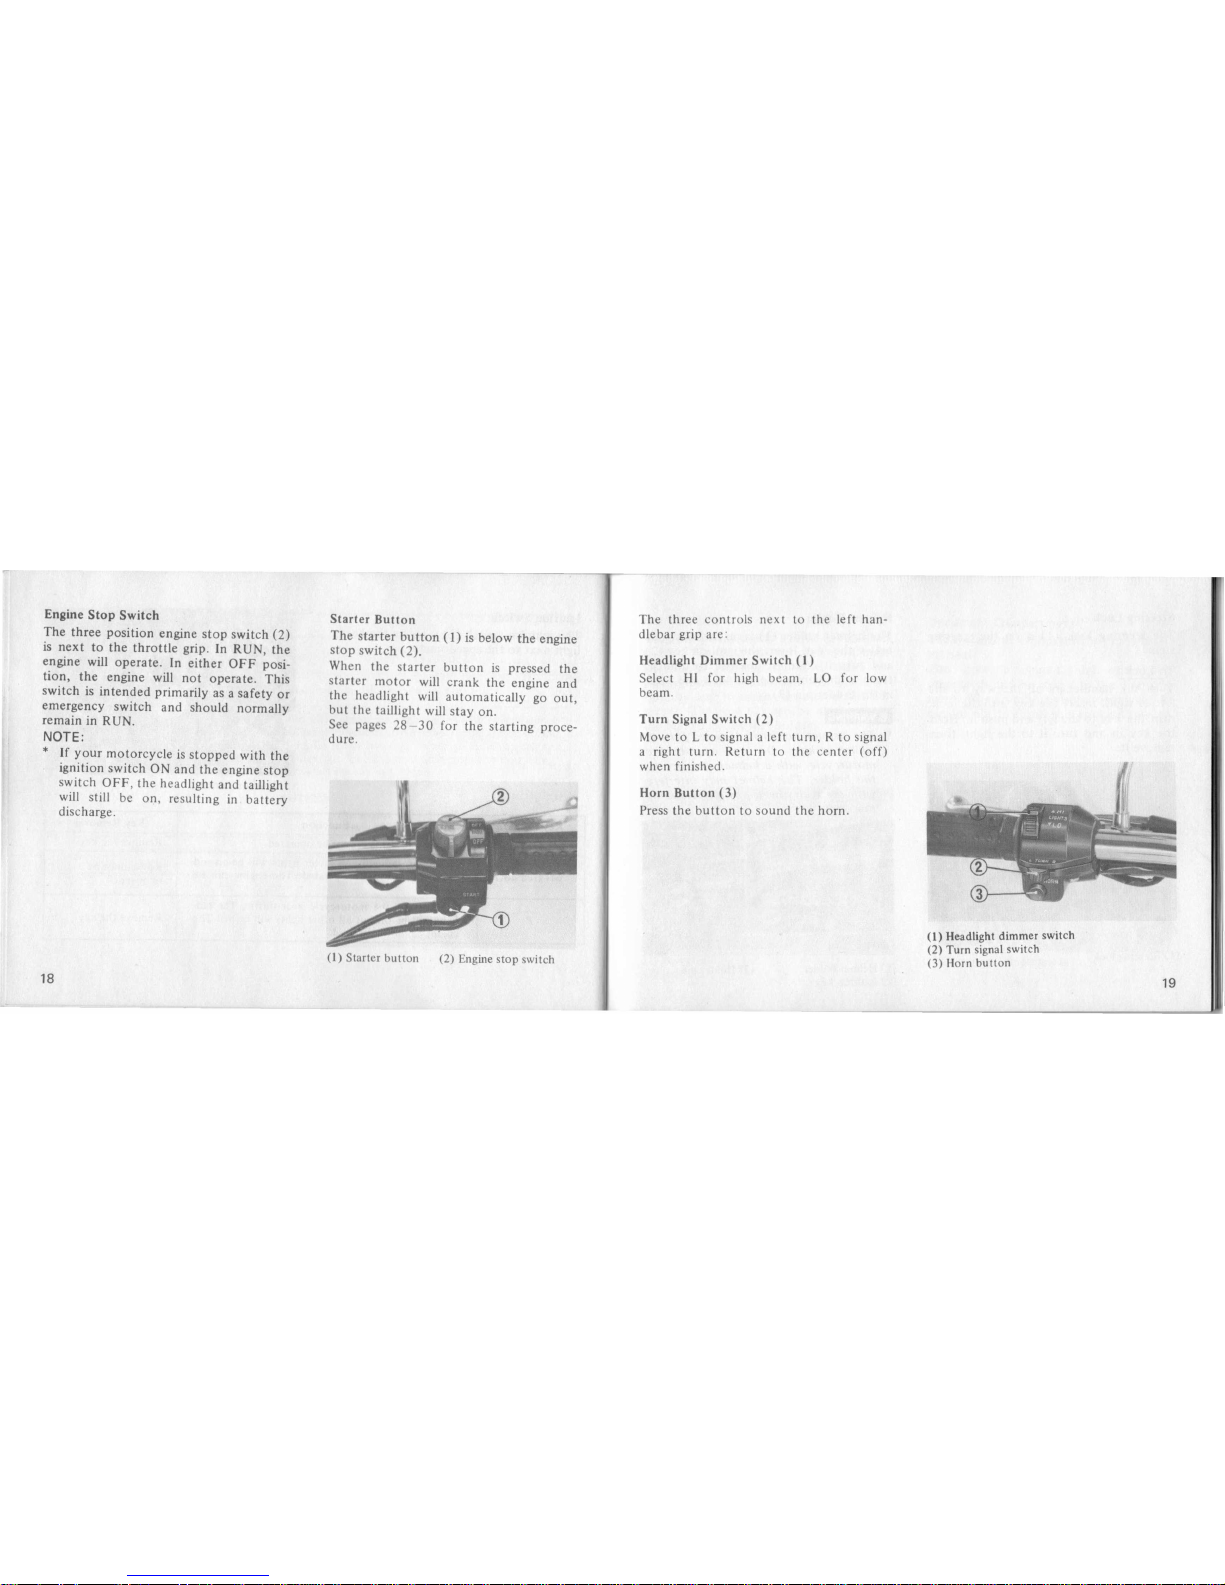
Engine Stop Switch
The three position engine stop switch (2)
is next to the throttle grip. In RUN, the
engine will operate. In either OFF posi-
tion, the engine will not operate. This
switch is intended primarily as a safety or
emergency switch and should normally
remain in RUN.
NOTE:
*
If
your motorcycle is stopped with the
ignition switch ON and the engine stop
switch OFF, the headlight and taillight
will still be
OD,
resulting in battery
discharge.
18
Starter Button
The starter button
(I)
is below the engine
stop switch (2).
When the starter button is pressed the
starter motor will crank the engine and
the headlight will automatically go out,
bu t the tailligh t will stay on.
See pages
28-30
for the starting proce-
dure.
(1)
Starter button
(2)
Engine stop switch
The three controls next to the left han-
dlebar grip are:
Headlight Dimmer Switch
(l)
Select HI for high beam, LO for low
beam.
Turn Signal Switch (2)
Move to L to signal a left turn, R to signal
a right turn. Return to the center (off)
when finished.
Horn Button (3)
Press the button to sound the horn.
(1)
Headlight dimmer switch
(2)
Turn signal switch
(3)
Horn button
19
 Loading...