

Honda Civic Wagon 1990 Owner's Manual

1990 Civic Wagon 4WD Online Reference Owner's Manual
Use these links (and links throughout this manual) to navigate through this reference.
For a printed owner's manual, click on authorized manuals or go to www.helminc.com.
Contents
Owner's Identification
Features & Safety ................................................................................................................................ 2
What you should know before driving your car.
Starting & Driving............................................................................................................................. 40
What gas to use, how to change gears, etc.
Maintenance ....................................................................................................................................... 60
The Required Maintenance Schedule and some items you can service.
Emergency Service .......................................................................................................................... .. 99
Changing a flat, jump starting, towing.
Specifications ................................................................................................................................... 109
Dimensions, weights and capacities.
Consumer Information .................................................................................................................... 111
Reporting Safety Detects, warranty service, vehicle identification numbers, etc.
Index ................................................................................................................................................ 119
Gas Station Information
This Owner's Manual should be considered a permanent part of the
Main Menu
vehicle, and must remain with the vehicle at time of resale.
OWNER'S I.D.
OWNER
ADDRESS
CITY
STATE
ZIP CODE
V.I.N.
DELIVERY DATE
(Date sold to original retail purchaser)
DEALER NAME
DEALER NO.
ADDRESS
CITY
STATE
ZIP CODE
OWNER'S SIGNATURE
DEALER'S SIGNATURE
The information and specifications included in this publication were
in effect at the time of approval for printing. Honda Motor Co., Ltd.
reserves
the
right
however,
to
discontinue
or
change specifications
or design at any time without notice and without incurring any
obligation whatever.
Introduction
Main Menu
This manual contains important information about the safe
operation and maintenance of your Honda CIVIC Wagon and CIVIC
Wagon with Real Time
We urge you to read it carefully, become familiar with the controls it
describes, and follow its recommendations, to help make your
driving trouble-free and enjoyable.
Statements or labels on the product preceded by the following
words are of special significance:
indicates severe personal injury or death will result if
instructions are not followed.
indicates a strong possibility of severe personal
injury or death if instructions are not followed.
means hazards or unsafe practices which could
cause minor personal injury or product or property
damage.
NOTE: gives helpful information.
Break-in Period
During the first 600 miles (1,000 km) of driving, avoid full throttle
starts and cruising for extended periods at a constant speed.
®
Four-Wheel Drive (4WD).
NOTE:
This break-in procedure also applies to exchanged or overhauled
engines.
During and after the break-in period, drive the car at moderate
speeds until the engine is fully warmed up.
CAUTION:
(4WD:) Although 4WD provides better traction on poor road
surfaces or when driving in snow or mud, this car is not designed
for off-road use.
During the first 200 miles (300 km), try to avoid severe braking.
Brake misuse during this period will reduce future braking efficiency.
Remember, your Honda Automobile Dealer knows your car best,
and should be consulted for service assistance and advice.
Keys and Locks
Main Menu
Keys
Two identical keys come with your car. You should keep one of
them in a safe place, away from the car, as a spare. Also write
down the number stamped on the key and keep it in your wallet or
purse in case you ever need to have a duplicate made. The key fits
the ignition switch, door locks, and tailgate lock. The key can be
inserted into the locks with either edge up.
Door Locks
You can lock the doors by pushing the tabs down.
The doors must be unlocked before you can open them from the
inside. The passenger door can be locked when open, and will stay
locked when you close it; the driver's door cannot be locked when
open unless you hold the door handle open. Both doors can be
locked and unlocked from the outside with the key.
Lock
Unlock
Unlock
Lock
(cont'd)
Keys and Locks (cont'd)
Main Menu
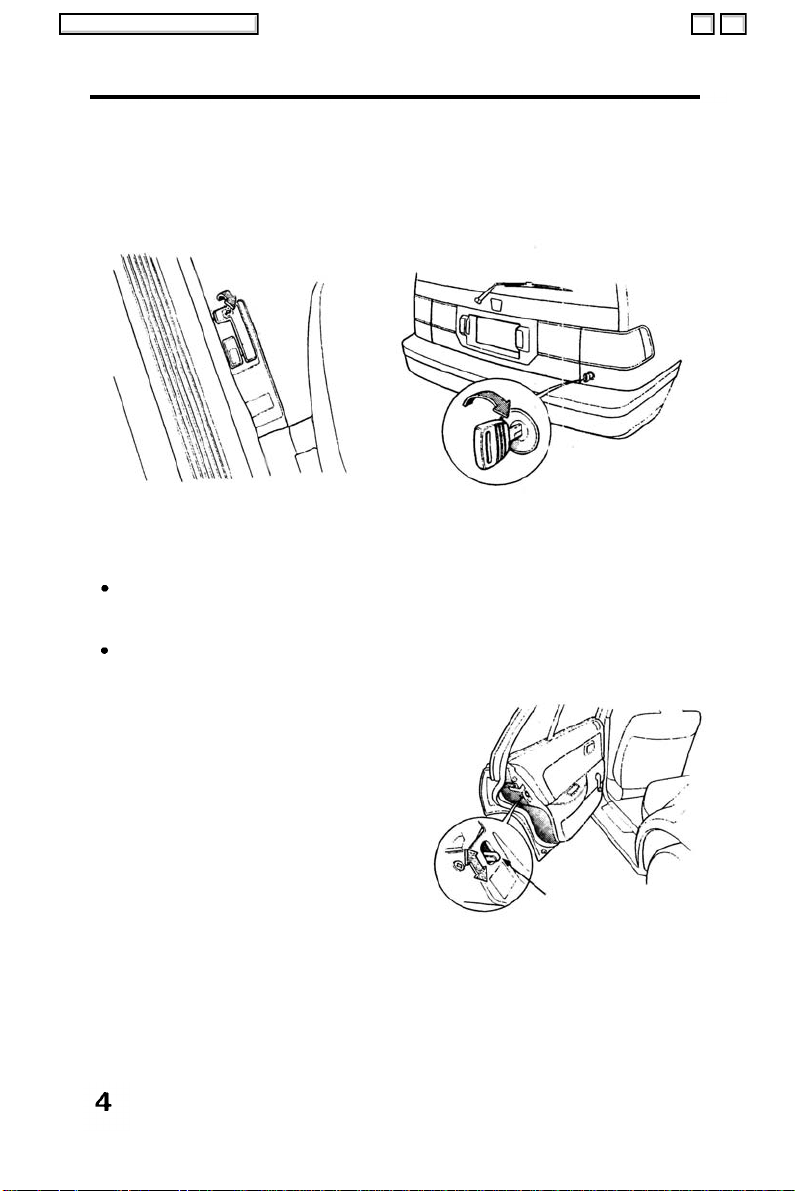
Tailgate Lock
To open the tailgate from outside, put the ignition key in the lock
and turn clockwise.
The tailgate can also be opened inside the car by pulling the tailgate
release lever up at the left side of the driver's seat. It locks
automatically when closed.
Pull up
Open
Keep the tailgate closed while driving, to keep poisonous carbon
monoxide exhaust fumes out of the interior; prolonged exposure
can cause unconsciousness that may lead to death.
Weight limits shown on the label located in the glove box must
be observed.
The total weight of passengers and cargo must not exceed the
total weight limit on the label.
Child Proof Door Locks
The child proof door locks are
designed to prevent accidental
opening of the rear doors. To
activate the locks, push down the
lock tabs located on each door, then
close the doors. When the doors are
locked in this way, they can only be
opened from the outside.
Unlock
Lock
LOCK TAB
Seats
Main Menu
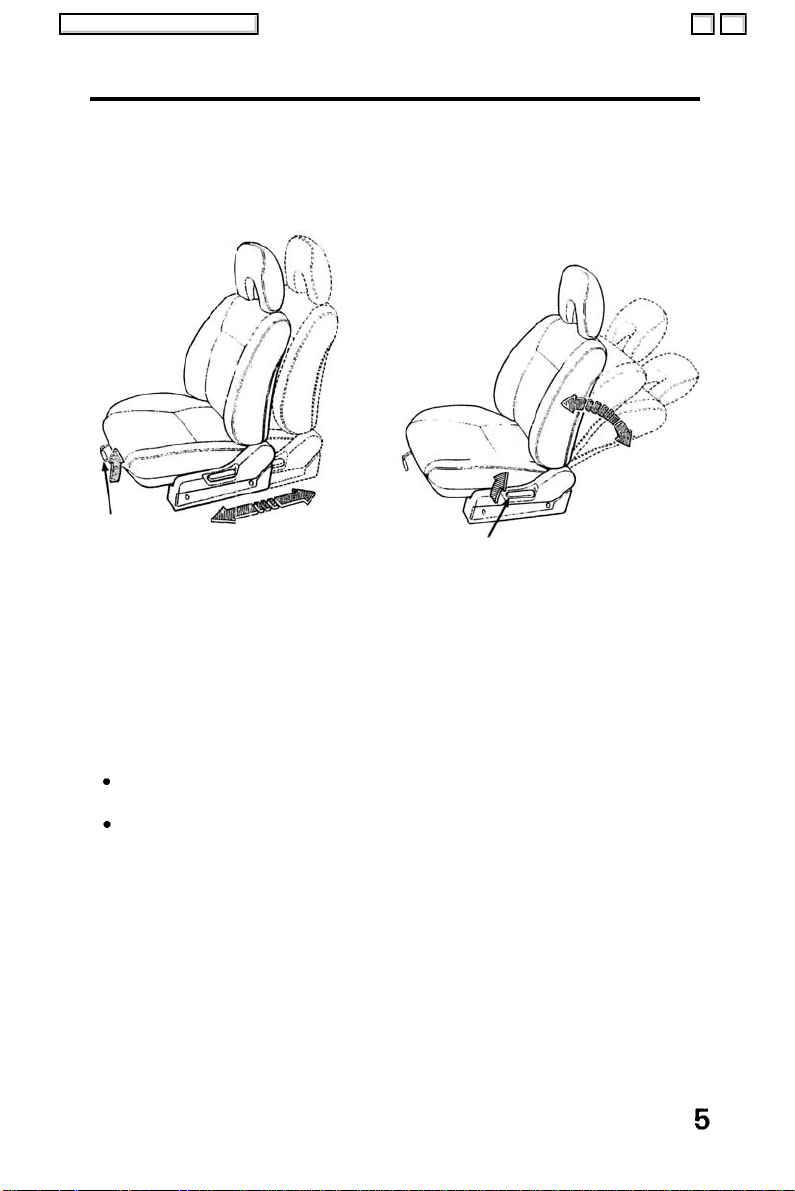
Front Seat
Adjust the seat position by pulling up on the adjustment lever under
the front edge of the seat cushion, and sliding the seat to the
desired position. Then release the lever and make sure the seat is
locked in position by moving it back and forth.
Pull up
Pull up
ADJUSTMENT
LEVER
The angle of the seat-back can be changed by pulling up on the lever
at the outside edge of the seat and leaning forward or back. Release
the lever and let the seat lock into place when it reaches the desired
angle.
Seat belts are most effective when the driver and passenger are
sitting up straight and well back in each seat.
RELEASE LEVER
Do not adjust the driver's seat while the car is moving; the seat
could move suddenly, causing loss of vehicle control.
To reduce the risk of sliding under the seat belts in a collision,
the seat-backs should be reclined no more than is necessary for
comfort.
(cont'd)
Seats (cont'd)
Main Menu
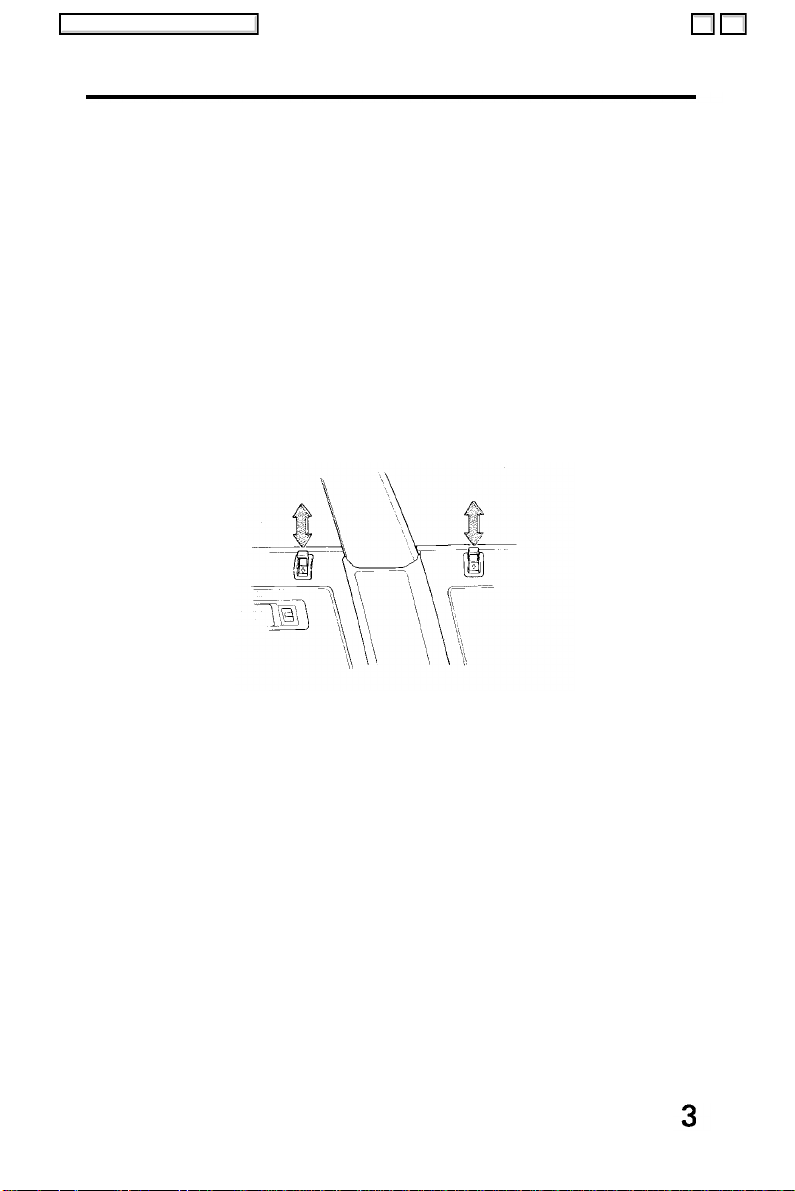
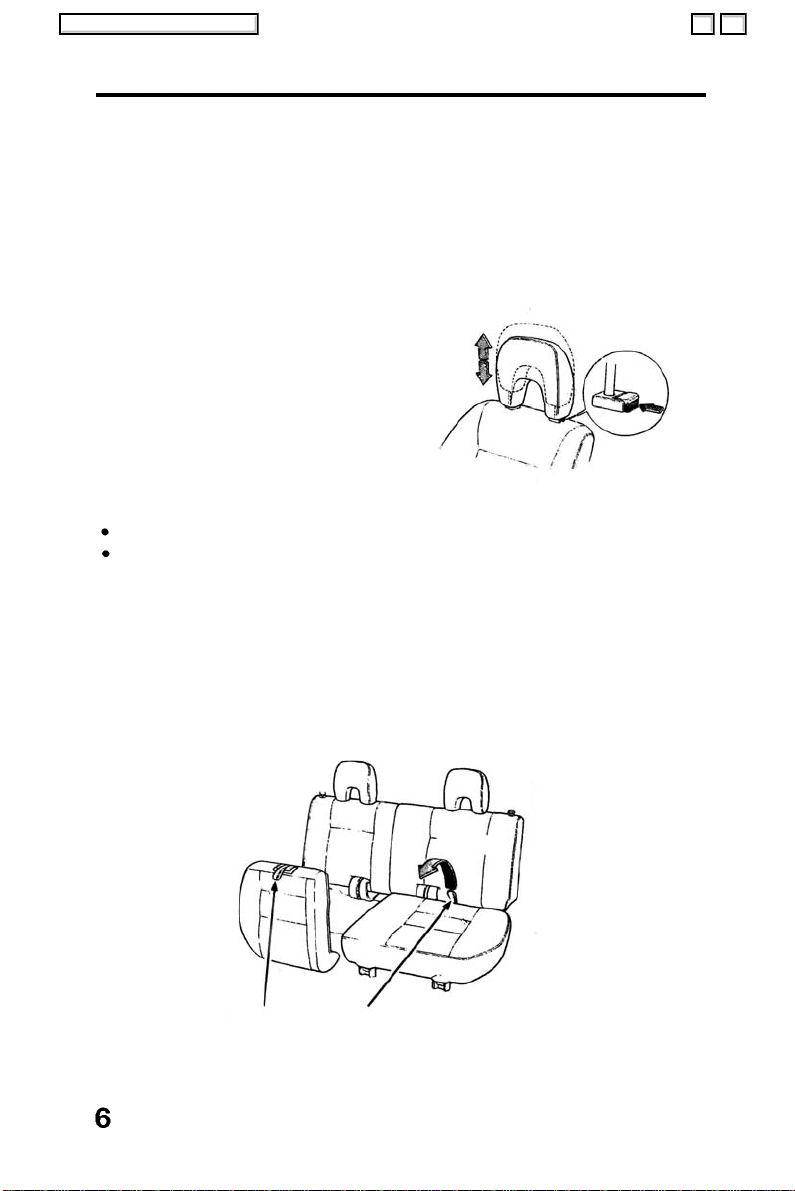
Head Restraints
The head restraints provided for the front and rear seats are
designed to help reduce injuries due to whiplash. They are located at
the top fo the each seat-back and have several height positions.
They can be adjusted by pulling up to the restraint' sheight bar,while
pushingthe restraint down.
Adjust so the top of the restraint is approximately level with the
tops of your ears. That relative position may reduce injury due to
whiplash in an accident.
If a head restraint must be removed
(for cleaning, fabric repair, etc.) pull
the restraint up to its highest
position, then slide the button while
pulling the restraint out.
To reinstall, reverse the above
procedure.
Do not drive the car with head restraints removed.
Do not try to adjust head restraints while driving.
Folding Rear Seat
The rear seat-back can be folded down to provide more luggage
space.
Each of the rear seats can be folded separately.
Slide
1. Move the front seat-backs fully forward.
STRAP
STRAP
Pull up
2. Pull up the strap at the center of the seat and lift the seat cushion
Main Menu
up and forward.
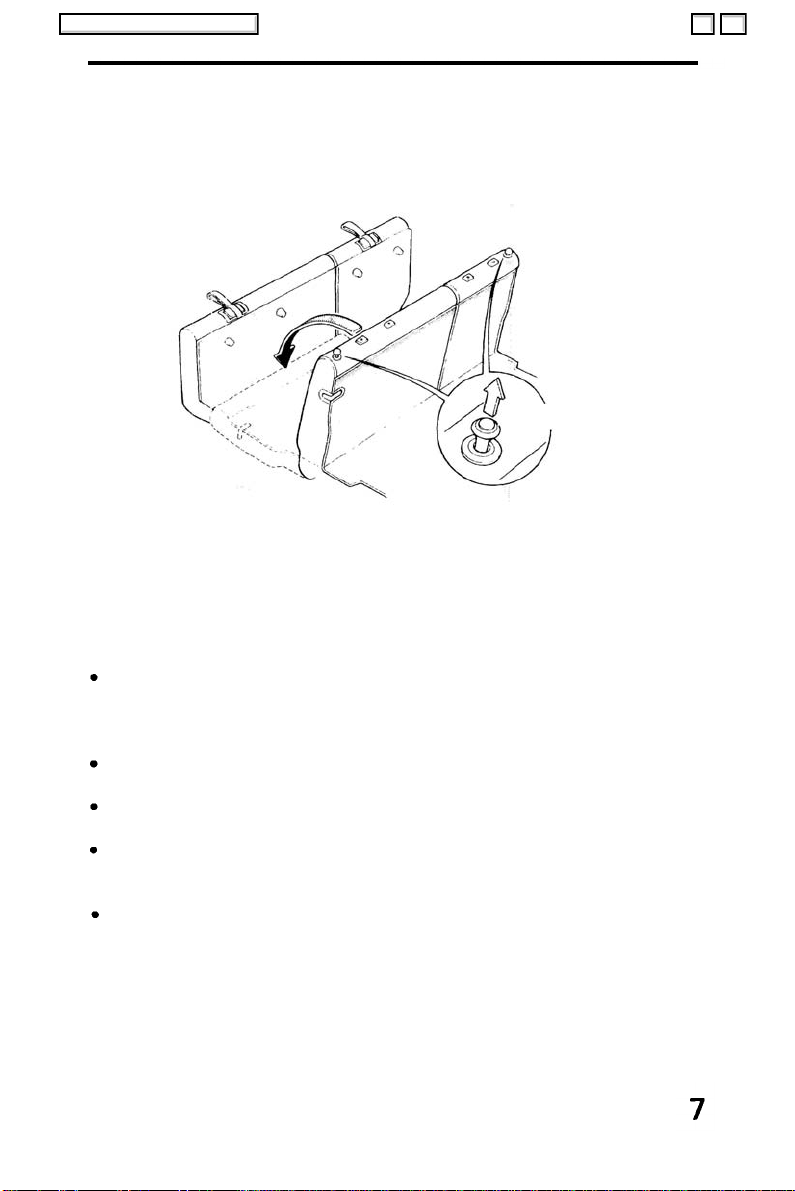
3. Remove the head restraints while pushing the button next to the
head restraint's height bar. Pull up the release knob on the upper
edge of each seat-back, then fold the seat-backs forward.
Pull up
CAUTION:
Make sure to fold the front seat-back forward whenever you
attempt to fold up or down the rear seat-back, or you may damage
the release located on top of the rear seat-back.
Weight limits shown on the label located in the glove box must
be observed.
The total weight of passengers and cargo must not exceed the
total weight limit on the label.
Make sure the seat-back latches engage securely when the
seat-back is returned to its normal position.
Always replace the head restraints when the seat-back is
returned to upright position. (CIVIC WAGON and 4WO)
When transporting luggage or other cargo, do not pile it higher
than the front seats. This precaution will help prevent such
items from becoming dangerous projectiles in an accident.
Cargo weight should be distributed as far forward as possible
for better vehicle handling.
Seat Belts
Main Menu
Your Honda is provided with seat belts to minimize the chance of
injury to yourself and your passengers in a sudden stop or accident.
For precautions on using seat belts for children babies and pregnant
women, see page 14 and 16.
Seat belts are most effective when the driver and passengers are
sitting up straight and well back in the seat.
In the event of a collision, occupants not wearing seat belts could
be seriously or fatally injured. Make sure you and all your
passengers ALWAYS put on the seat belts before driving away.
CAUTION:
Be careful the seat belts are not damaged by catching or
entangling in the door or seat mechanism.
Front Seat Belts
The front seats have an automatic ("passive") restraint system
consisting of a shoulder belt, and a knee bolster, as well as a manual
lap belt. The belts have emergency locking retractors designed to
lock only during a sudden stop or impact. Otherwise, they allow you
some freedom of movement in the seat.
Always wear the lap belt in addition to the shoulder belt for full
protection. The shoulder belt portion should remain permanently
latched.
Operation
1.Enter the car and close the door
completely. Move the seat a
comfortable distance from the
steering wheel, sit as straight up
as possible and well back in the
seat.
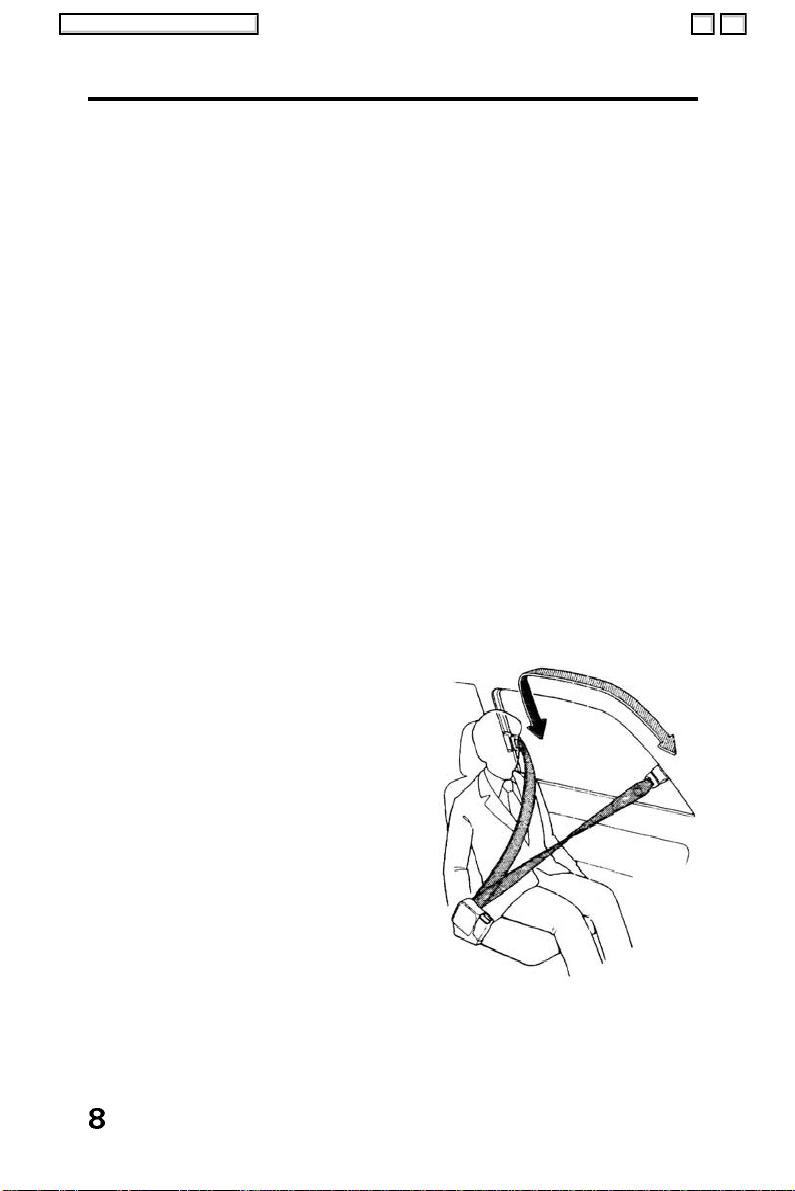
2.Turn the ignition ON. The
shoulder belt buckle will move to
its rear locked position. The
length of the shoulder belt will
adjust automatically to your body
and seating position.
Normal movement of the shoulder belt buckle may cause injury.
Main Menu
Be sure all parts of your body, especially fingers and hands, are
clear of the shoulder buckle while it is moving.
NOTE:
If the door is not closed completely, the shoulder belt buckle will
not move and the door warning light will come on (see page 11).
If the door is opened with the ignition on, the buckle will release
itself from its locked position and move forward.
If the shoulder belt buckle stops halfway or does not move at all,
see page 107 for shoulder belt buckle operation.
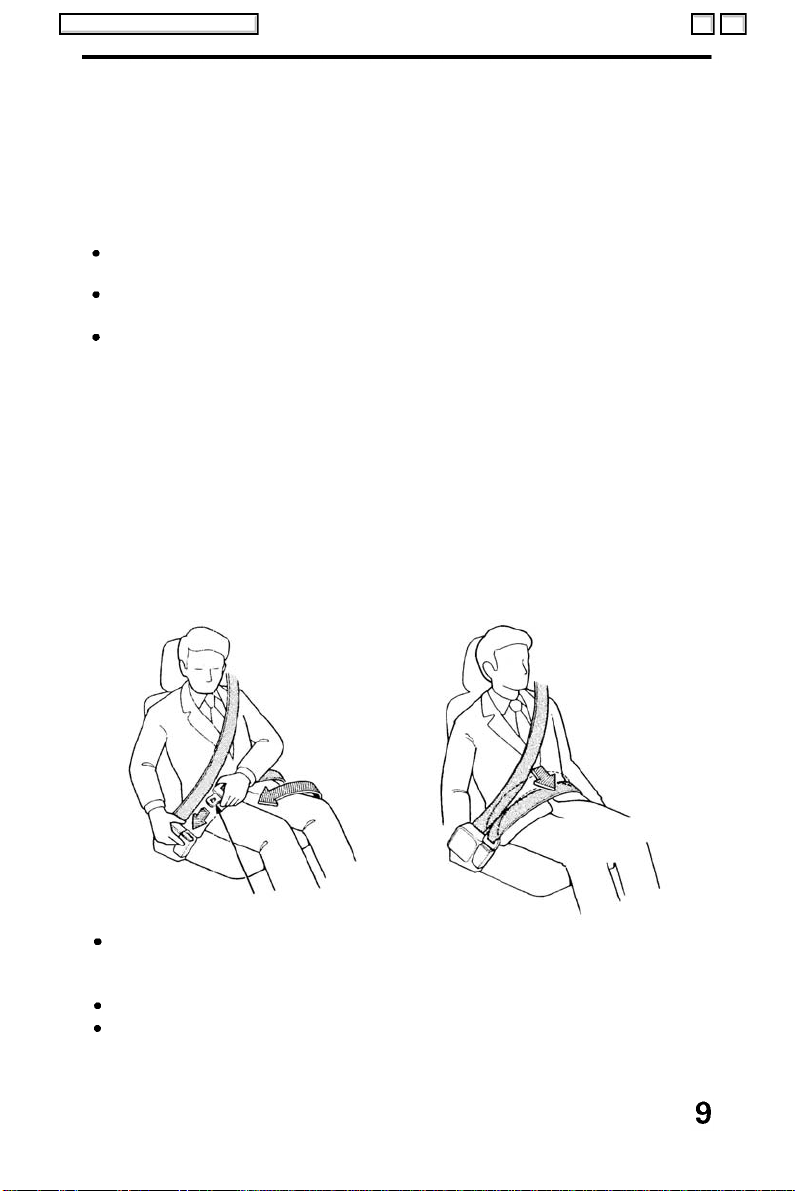
3. Take hold of the tongue plate of the lap belt and pull it from its
retractor. Be sure the belt is not twisted or caught on anything.
NOTE:
If pulled too fast, the belt will lock. If this happens, allow the belt to
retract then pull it out more slowly.
4. Push the tongue plate into the buckle until it clicks locked.
Position the belt across your lap, not your abdomen, as low on
your hips as possible.
Pull the belt
across your
lap
Keep below
hip bone
TONGUE PLATE
Avoid placing the lap belt across your abdomen. In the event of
a collision, the pressure of the belt on the abdomen may
increase the extent of injury.
Never use one belt for more than one person, child or adult.
Comfort clips sold on the open market are not recommended
since they could impair the function and safety of the belts.
(cont'd)
Seat Belts (cont'd)
Main Menu
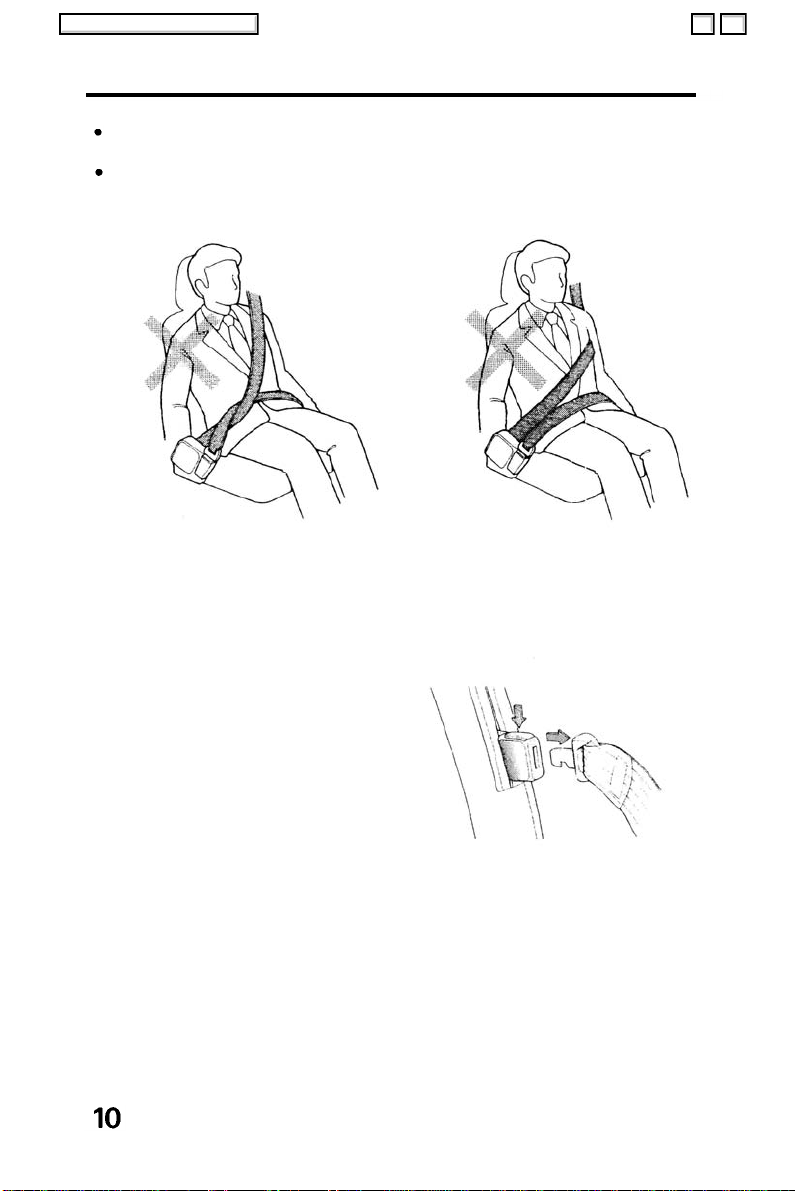
Make sure the strap of the shoulder belt and the lap belt are not
crossed.
Do not wear the shoulder portion of the belt under your arm or
out of position. Such use could increase the chance and amount
of injury in an accident.
Releasing the Seat Belts
1.To release the manual lap belt, push the "PRESS" button in the
buckle, the belt should retract automatically when released.
2.The driver's shoulder belt buckle will release and travel to its off
position when the key is removed from the ignition.
3. The shoulder belt buckle will also release and travel to its off
position when the door is opened.
Emergency Belt Release
Push
The shoulder belt should always
remain buckled. In case of an
emergency, however, the shoulder
belt can be released from the
shoulder belt buckle by pushing the
button.
Relatch the shoulder belt before operating the car, making sure the
belt is not twisted.
Driving with a twisted seat belt can increase your chance and
extent of injury during a collision. Be sure the shoulder belt is not
twisted before driving the car.
Fasten Seat Belt Warning Light and Warning Beeper
Main Menu
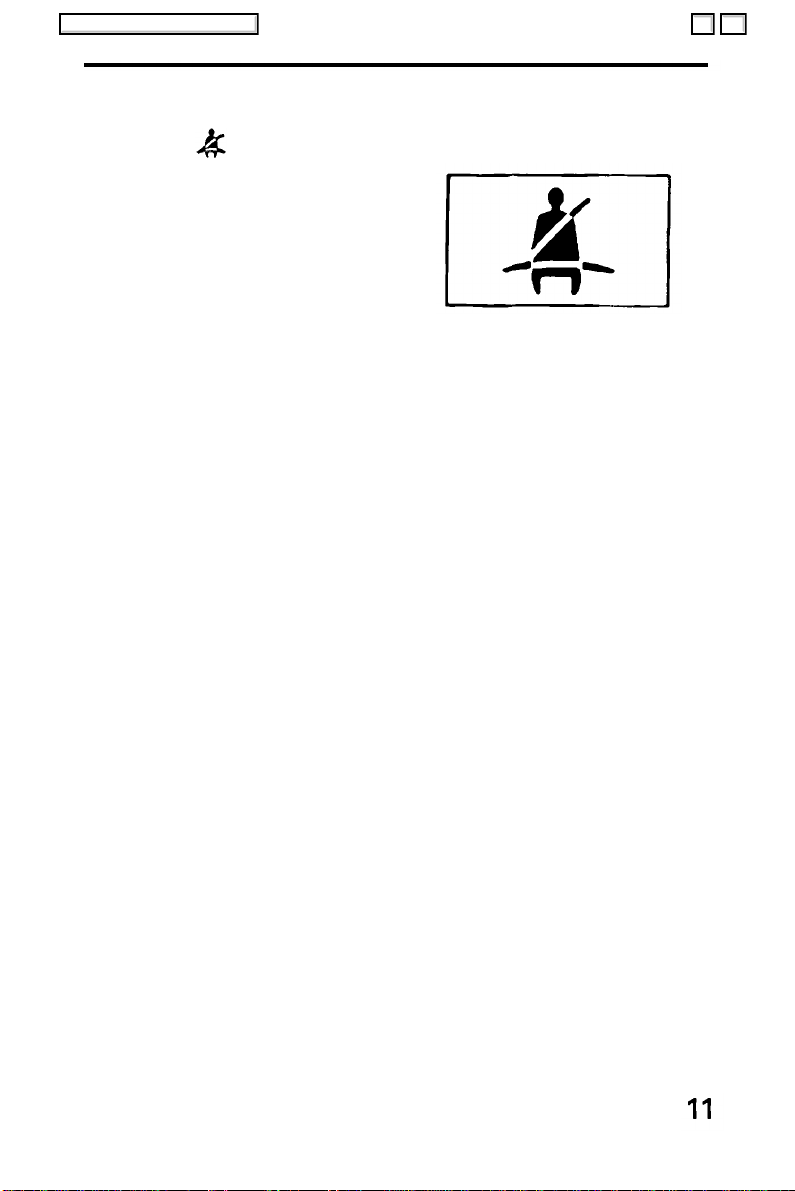
Lap Belt Warning Indicator:
Both the light and the
warning beeper will go on for about
six seconds if the ignition switch is
turned on when the driver's lap belt
is not fastened. The beeper will not
go on if the driver's lap belt is
fastened, but the warning light will
come on for about six seconds each
time, to remind the driver to have
passengers put their belts on.
Automatic Shoulder Belt Warning Indicator:
The warning light will come on if either of the automatic shoulder
belts is unlatched with the ignition ON. The beeper will sound for
approximately six seconds while the warning light is ON. Relatch the
belt: the light should go off when the belt is latched.
The warning light will also come on while the shoulder belt buckle
moves from its front off position to its rear locked position.
Automatic Shoulder Belt Malfunction Indicator:
The warning light will flash and the beeper will sound rapidly if either
shoulder belt buckle stops before completing its full cycle (see page
107 for normal operation).
NOTE:
If the shoulder belt's tensioner mechanism locks and prevents the
buckle from moving fully forward when you want to get out,
recycle the system by closing the door and reopening it.
The buckle should move fully forward; if it does not, recline the seat
— back and use Emergency Belt Release (see page 10).
When the system does not function by either method, have the
system checked by an authorized Honda dealer.
If the light and beeper do not function at all, or if they come on
even with the belts latched and doors fully closed, it indicates a
malfunction in the seat belt system. In the event of a collision,
severe personal injury could result. The system should be checked
immediately by an autholized Honda dealer.
(cont'd)
Seat Belts (cont'd)
Main Menu
Buckling the Rear Seat Belts
In the rear seat, there are two one-piece combination lap/shoulder
belts and a center lap belt.
The seat-backs and seat belts provide best restraint when the
occupants are sitting well back and straight up in the seat.
The right and left rear seat belts are one-piece combination lap/
shoulder belts with an emergency locking retractor designed to lock
only during a sudden stop or impact. Otherwise, they allow you
some freedom of movement in the seat.
NOTE:
The emergency locking system of the rear seat bells will also be
activated if you pull the belt too fast. If this happens, release the
belt slightly then pull it out more slowly.
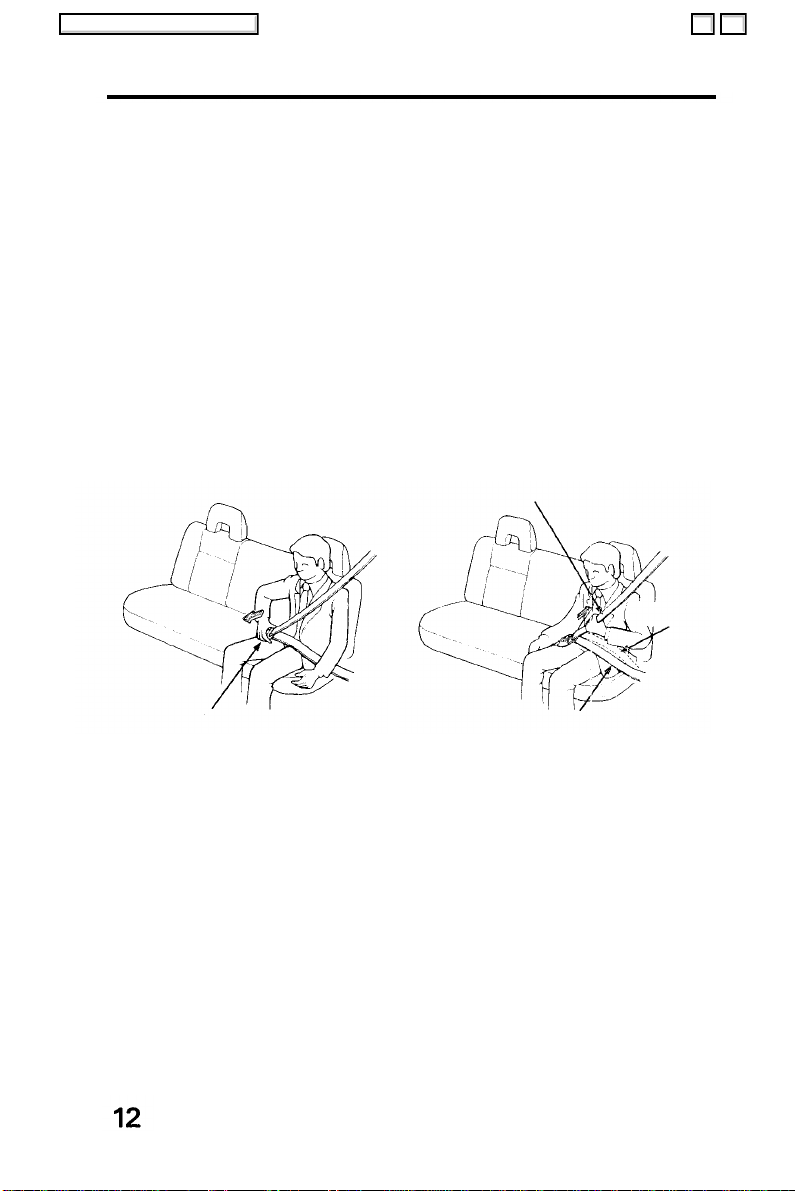
1. Take hold of the tongue plate and pull the belt across your lap. Be
sure the belt is not twisted or caught on anything.
Pull the belt across your lap
Take up slack
Too high
TONGUE PLATE
Keep below hipbone
2. Push the tongue plate into the buckle until it clicks locked.
Position the belt across your lap, not your abdomen, as low on
your hips as possible.
Avoid placing the lap belt across your abdomen. In the event of a
collision, the pressure of the belt on the abdomen may increase
the extent of injury.
3.To release the seat belt, push the "PRESS" button in the buckle;
the belt should retract automatically when released. If the belt
does not fully retract, pull it out and check for kinks or twists.
CAUTION:
Make sure both rear shoulder belts are positioned in front of the
rear seat-backs whenever the seat-backs are in their upright
position.

Rear Center Seat Belt
Main Menu
Adjust the center lap belt length to fit snugly but comfortably when
buckled.
A slack belt will greatly reduce the protection afforded to the
wearer. Hold the tongue plate perpendicular to the belt as shown.
* To shorten, pull the end of the belt away from the tongue plate.
* To lengthen, pull the tongue plate.
Push the tongue plate into the buckle until it clicks locked. Position
the belt across your lap, not your abdomen, as low on your hips as
possible.
Avoid placing the lap belt across your abdomen. In the event of a
collision, the pressure of the belt on the abdomen may increase
the extent of injury.
BUCKLE
To shorten
To lengthen
TONGUE PLATE
(cont'd)
Seat Belts (cont'd)
Main Menu
Child Restraint
Children riding in the car should be restrained to minimize the risk of
injury in an accident, sudden stop or sudden maneuver.
According to accident statistics provided to the National Highway
Traffic Safety Administration (NHTSA), children are safer when
properly restrained in the rear seating positions than in the front
seat. Larger children should use one of the seat belts provided.
For smaller children, we strongly recommend the use of a
commercially available child restraint system that meets the Federal
Motor Vehicle Safety Standard (FMVSS) because it offers the most
protection against injury. All states now have laws which require
that small children must be seated in a child passenger seat restraint
system. Check local laws.
Before buying a particular child restraint system, make sure it fits
your car seat and seat belts, and fits your child. Follow all the
instructions that come with the system.
Children should never ride unrestrained in an automobile.
Never use an infant carrier or child safety seat that "hooks"
over a seat-back; it may not provide adequate security in an
accident.
Never allow a child to be held in a person's arms while they are
in the moving vehicle. Holding a child in a moving vehicle does
not provide the child with any means of protection during an
accident, even if the person holding the child is wearing a seat
belt.
Installation of Child Seat
Main Menu
All child restraint systems are designed to be secured by lap belts or
the lap belt portion of a lap-shoulder belt. The automatic shoulder
belt system at the front passenger seat should not be used to
secure the child restraint system. If a child seat must be installed on
the front seat, place the shoulder portion of the belt behind the child
seat and secure the child seat with the lap belt only.
Children could be endangered in a crash, if their child restraints are
not properly secured. Follow the child seat manufacturer's
instructions when installing the seat.
Your Honda automobile is equipped with attachment points
specifically for a rear seat mounted child restraint system which
uses a top tether.
The tether attachment points are located on the rear panel, below
the tailgate.
When the child restraint system is not in use, remove it from the
car or secure it with the seat belt to keep it from becoming a
projectile in the event of an accident.
NOTE:
See your Honda dealer for installation of the child restraint system.
(cont'd)
Seat Belts (cont'd)
Main Menu
Pregnant Women
A pregnant woman should use the shoulder and lap belts to help
lessen the chance of injury and/or the amount of injury in an
accident.
It is desirable that a pregnant woman ask her doctor at each
medical check-up if she can drive, and also ask about the most
appropriate way of wearing the lap/shoulder belt.
Lap belts should be worn as low and snugly as possible over the
hips.
Inspection
All parts of the seat belts, including the belt fabric, should be
regularly inspected for fraying, loosening, wear and other damage.
Keep the belts in good condition at all times to reduce the chance of
being injured in an accident, and to minimize any injuries that do
occur. Make sure the buckles, retractors, tongue plates, guides and
anchors all work properly.
Don't let anything get inside the buckle or the retractor; it could
cause latch or retractor failure.
Cleaning
The belts should always be kept clean and dry; wet or damp belts
can cause rewinding problems. To clean the belts, pull them all the
way out of their retractors and use warm water and a mild soap;
then let them air-dry fully extended, in the shade, with the car
windows open.
Never bleach, dye or clean the belts with chemical solvents; it
will weaken the fabric.
Do not remove the seat belts from the car to wash them.
Replacement
Main Menu
Replace the seat belt if:
1 .The belting is cut, punctured, burned, etc.
2. The buckle or retractor does not work properly.
3. It was being worn at the time of a collision (also check for
deformation damage at all seat belt anchor points).
4. Its condition is questionable.
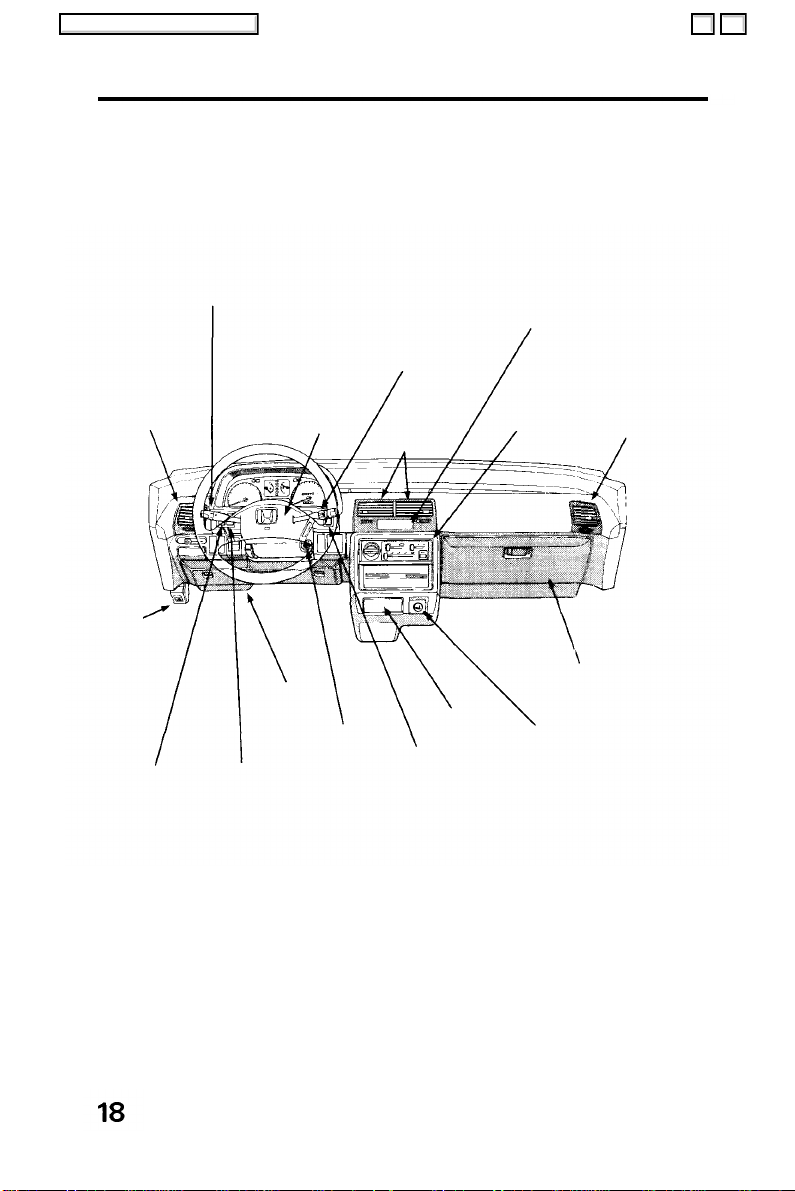
Instrument Panel
Main Menu
LIGHT SWITCH/
TURN SIGNAL/
HI/LO BEAM SWITCH
DASH
CORNER
VENT
HOOD
RELEASE
HANDLE
REAR
WINDOW
DEFOGGER
SWITCH
PANEL
BRIGHTNESS
CONTROL
DIAL
HORN
BUTTON
FUSE
BOX
IGNITION
SWITCH
WIPER/
WASHER
SWITCH
CENTER
VENTS
ASHTRAY
HAZARD
WARNING
LIGHT
SWITCH
DIGITAL
CLOCK
HEATING/
COOLING
CONTROL
PANEL
GLOVE BOX
CIGARETTE
LIGHTER
DASH
CORNER
VENT
CIVIC WAGON
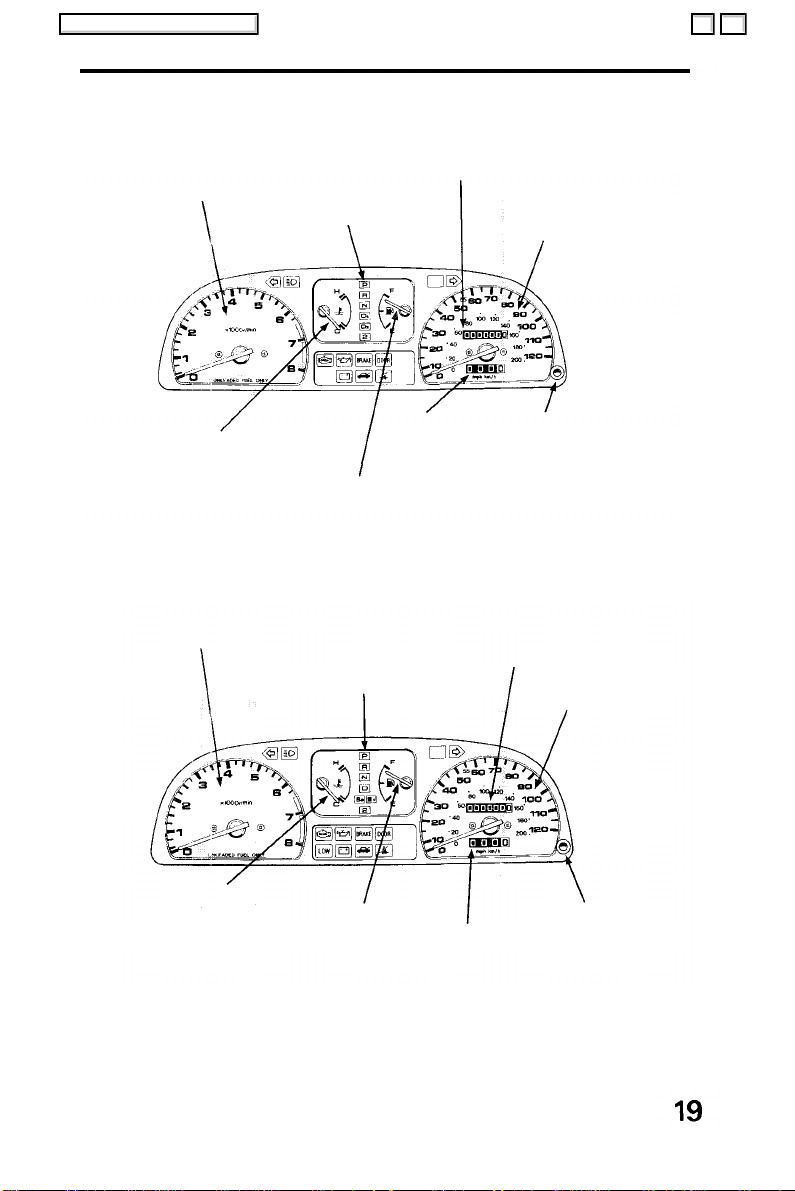
Main Menu
TACHOMETER
COOLANT
TEMPERATURE
GAUGE
4WD
TACHOMETER
SHIFT LEVER
POSITION
INDICATOR
(Automatic Trans only)
TRIP METER TRIP METER
FUEL GAUGE
SHIFT LEVER
POSITION
INDICATOR
(Automatic Trans.only)
ODOMETER
SPEEDOMETER
RESET BUTTON
ODOMETER
SPEEDOMETER
COOLANT
TEMPERATURE
GAUGE
FUEL GAUGE
TRIP
METER
TRIP METER
RESET BUTTON
Gauges
Main Menu
Speedometer
The speed is indicated in miles per hour (outside scale) and
kilometers per hour (inside).
Odometer
The numbers on the odometer indicate miles.
The odometer registers total distance traveled, and serves as your
guide for determining when periodic maintenance is due. Federal law
makes it illegal to alter the odometer of any motor vehicle with the
intent to change the number of miles indicated.
Trip Meter
The numbers on the trip meter indicate miles.
The trip meter can be returned to zero by pushing in the reset
button. Use it for checking fuel consumption or distance traveled
per trip.
Tachometer
The tachometer indicates engine speed in revolutions per minute.
The beginning of the RED ZONE indicates the maximum allowable
engine R.P.M. Do not run the engine with the tachometer indicator
needle in the RED ZONE.
Fuel Gauge
FUEL TANK CAPACITY: 45 (11.9 US gal, 9.9 Imp gal)
As a convenience, the gauge continues to show the same fuel level
as when the ignition was last on. After refueling, the gauge will
slowly change to the new fuel level when the ignition is switched on.
When the needle first indicates E (empty), you have a usable
reserve left in the tank of about:
4 (1.1 US gal, 0.9 Imp gal)
Coolant Temperature Gauge
CAUTION:
The needle should stay within the white range. If the needle
reaches the red line at "H" (Hot), pull safely off the road, stop the
engine and check the coolant level in the reserve tank on the
passenger side of the radiator under the hood.
Do not remove the radiator cap when the engine is hot. The
coolant is under pressure and may blow out and scald you.
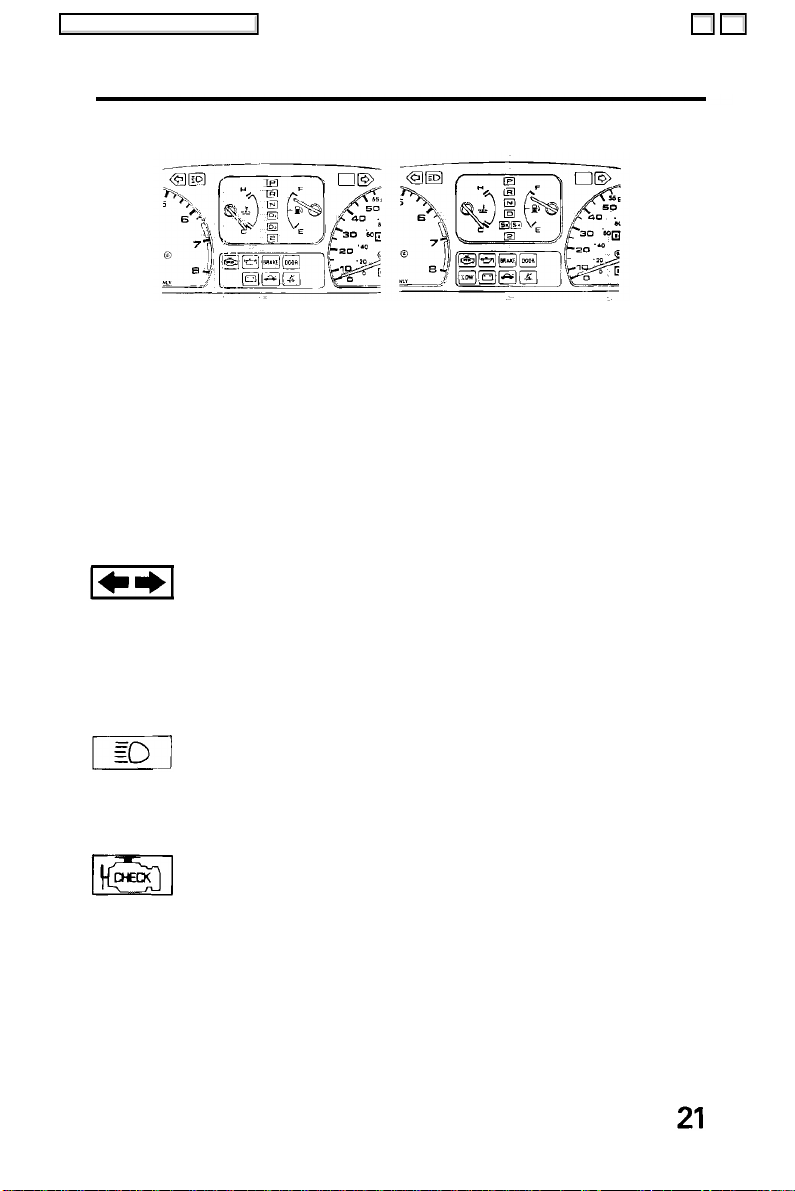
Warning and Indicator Lights
Main Menu
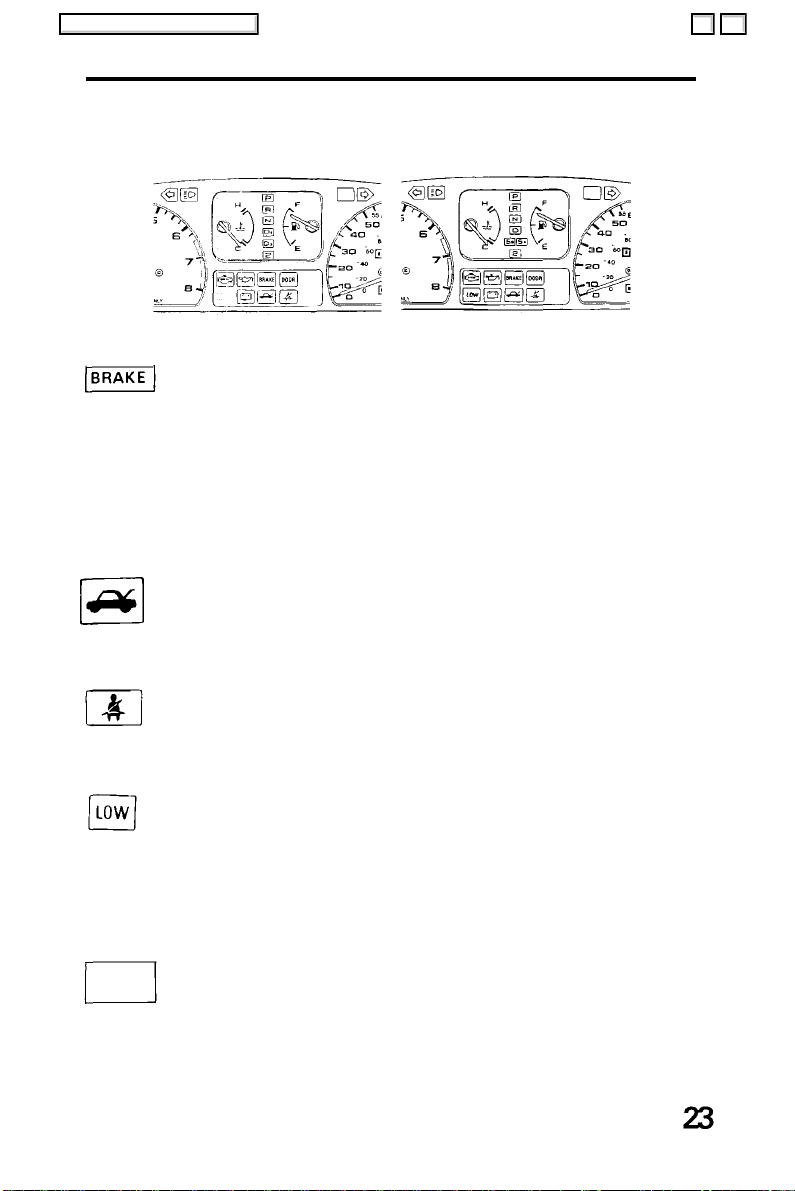
CIVIC WAGON
4WD
Shift Lever Position Indicator (Automatic Transmission only)
An indicator between the fuel and coolant temperature gauges
shows which gear you have selected.
NOTE:
(4WD Automatic only)
The S
indicator light in the instrument panel also serves a second
3
function. If the light flashes while driving (in any gear range) it
indicates a possible malfunction in the transmission; avoid rapid
acceleration and have the transmission checked by an authorized
Honda dealer as soon as possible.
Turn Signal/Hazard Warning Indicator Lights
When the turn signal lever is pushed for left or right turns, the
appropriate green indicator arrow on the instrument panel will blink
along with the signal. Turning on the hazard warning switch, will
make all 4 turn signals and both arrows blink (see pages 28 and 29).
Headlight High Beam Indicator Light
This blue indicator light will go on whenever the high beams are
switched on (see page 28).
Check Engine Warning Light
This light comes on for a couple of seconds each time the ignition is
turned on. It will also come on, and remain on, if there is a
malfunction in the emission control system. If the light comes on
while driving, avoid driving at high speed, and have the system
checked by a Honda dealer as soon as possible.
(cont'd)
Warning and Indicator Lights (cont'd)
Main Menu
Oil Pressure Warning Light
The oil pressure warning light will come on, and remain on, if there is
insufficient oil pressure or when the ignition switch is turned on
with the engine not running. If the light should stay on while driving,
get the car off the road as soon as you can, turn the engine off and
check the engine oil level (see page 67).
Even if the oil level is correct, the engine should be checked by a
Honda dealer before the car is driven again.
NOTE:
The oil pressure warning light will only light as a result of low oil
pressure. It is not directly an oil level indicator.
CAUTION:
Running the engine while the oil pressure warning light is on
constantly may cause immediate and severe engine damage.
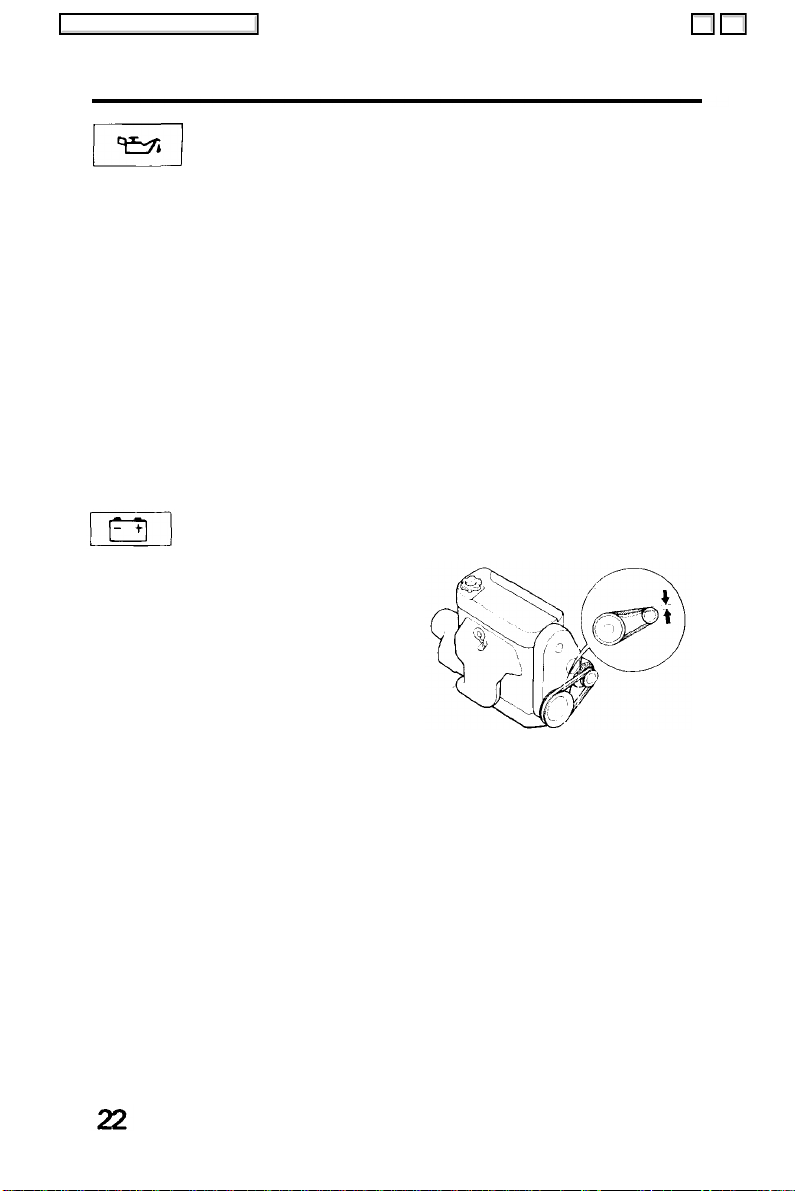
Charging System Warning Light
The charging system warning light
comes on when there is a problem
with the electrical charging system
or when the ignition switch is
turned on with the engine not
running. If the light comes on while
driving, stop the car and check to
see if the alternator belt is loose or
broken.
To check the belt tension, stop the engine and push with about 98N
(22 Ib) of force on the middle of the belt as shown. The belt should
deflect about:
9 -
11
mm (0.3 - 0.4 in)
If the engine has been running, some engine components may be
hot enough to burn you.
NOTE:
If necessary, have the charging system checked by an authorized
Honda dealer.
CIVIC WAGON
Main Menu
4WD
Parking Brake/Brake Failure Warning Light
Check the brake warning light every time you start the car.
With the parking brake set, the warning light should go on when the
ignition switch is turned to II or III. With the parking brake released,
the light should go on when the ignition switch is turned to III. If the
light goes on at any other time, it means the brake fluid level in the
master cylinder reservoir is too low; add fluid and have your dealer
check for leaks and brake pad wear immediately. See page 78.
Tailgate-open Indicator Light
This light will go on when you turn on the ignition switch if the
tailgate is not fully closed.
Seat Belt Warning Light
The seat belt warning light comes on for about six seconds when
the ignition switch is turned on (see page 11).
LOW Indicator Light (4WD Automatic only)
This indicator light is on while you are driving in the LOW mode (see
page 56).
When the ignition switch is turned to the "II", this indicator light
comes on for a couple of seconds; this is normal.
DOOR
Door Warning Light
If a door is open when the ignition is switched on, this light will go
on and stay on until the door is closed.
Tilt Steering
Main Menu
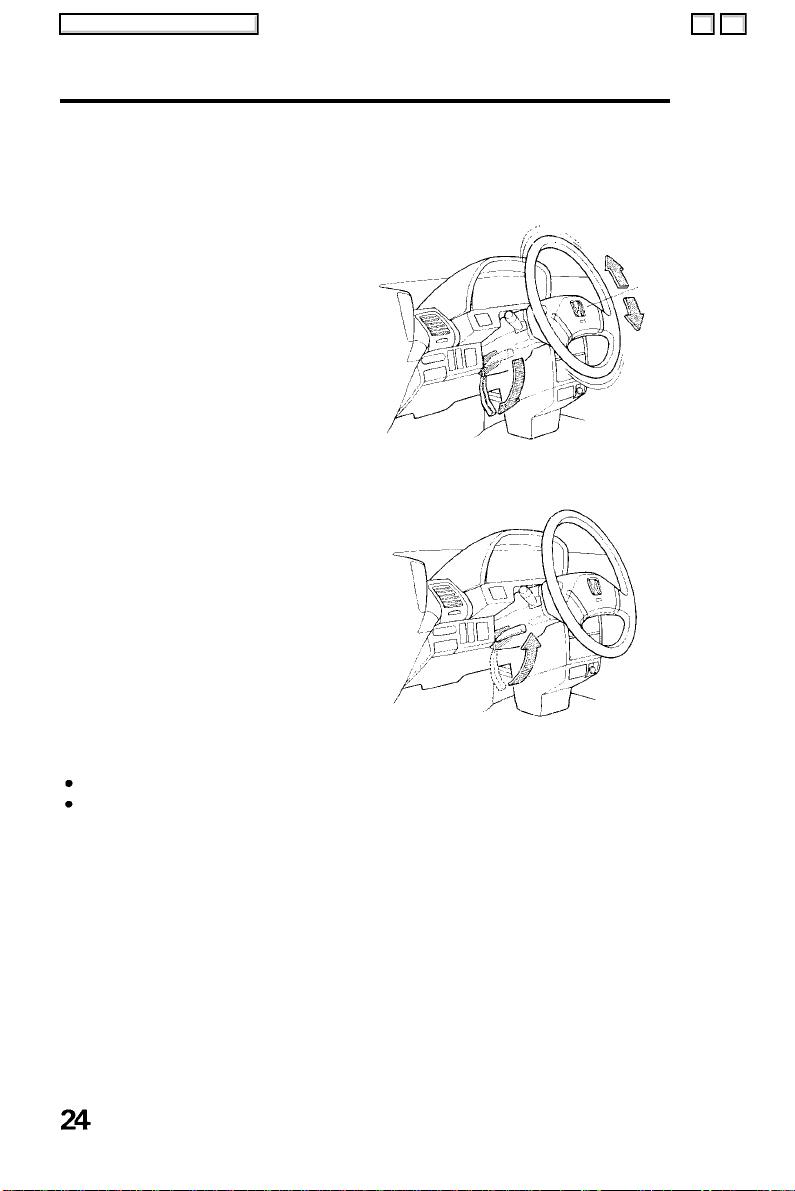
Tilt Steering
The steering wheel position can be adjusted to suit driver
preference.
1. Push the lever located on the
left side of the steering column
all the way down and hold it
while adjusting the steering
wheel to the desired position.
Push down
2. To lock the steering wheel, hold it
in the desired position and pull the
lever all the way up.
Pull up
Do not adjust the steering wheel position while driving.
After adjusting the steering wheel position, make sure it is
securely locked in place by "rocking" it up and down slightly.
Windshield Wipers/Washer/Defogger
Main Menu
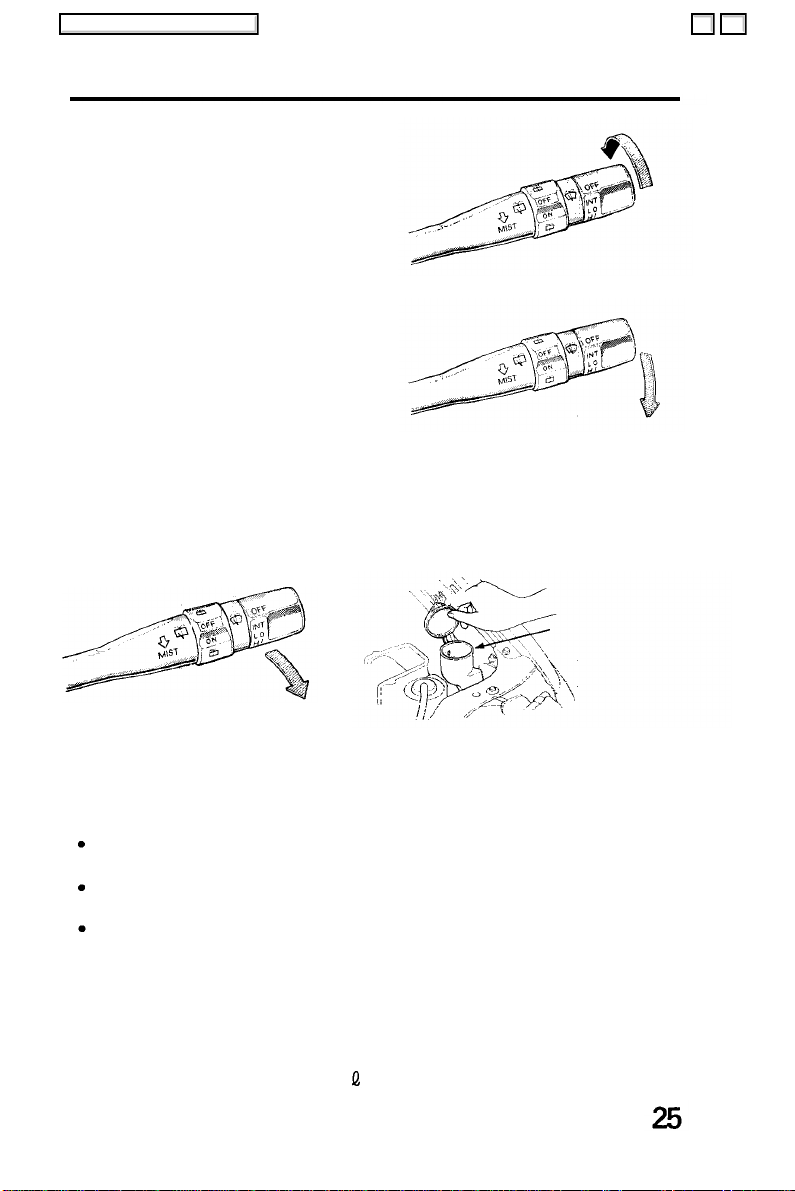
Windshield Wipers
Switch the wipers to INT for
intermittent operation; LO for low
speed operation; and HI for high
speed operation.
In fog or very light rain, push the
lever down to the MIST position
for temporary high speed
operation of the wipers. The
wipers will return to the "rest"
position and the motor will shut
off as soon as you release the
lever.
Windshield Washer
Pull the wiper switch lever toward you to turn on the washer.
Check the washer fluid regularly, especially during bad weather or
whenever the washer has been in frequent use.
Push down
WASHER FLUID
RESERVOIR
PULL
Use a good quality commercial washer fluid for all-weather cleaning.
CAUTION:
Do not use radiator antifreeze in the windshield washer; it will
damage the paint.
Do not use a vinegar/water combination in the windshield
washer; it will damage the pump.
Prolonged operation of the washer without fluid may damage
the pump.
In freezing weather, warm the windshield with the defrosters
before using the washer. This will help prevent icing which could
seriously impair visibility.
WINDSHIELD WASHER
RESERVOIR CAPACITY: 2.5 (2.6 US qt,
2.2
Imp qt) (cont'd)
Windshield Wipers/Washer/Defogger (cont'd)
Main Menu
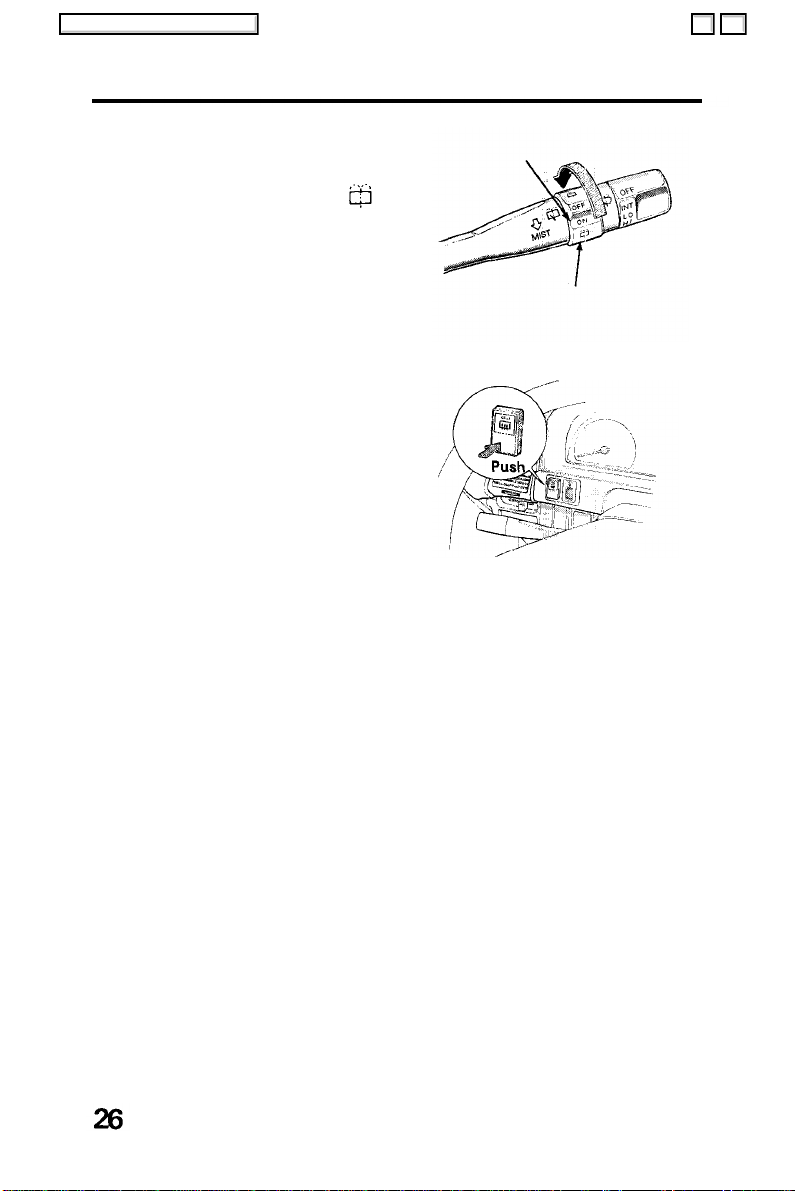
Rear Window Wiper/Washer
Switch to "ON" to activate the rear
WIPER
wiper. Turn and hold the switch one
more step clockwise to " " to
activate the washer and wiper; or
turn and hold the switch one step
counterclockwise from "OFF" to
activate to washer only. The rear
washer uses the same fluid
WASHER
reservoir as the front washer.
Rear Window Defogger
Push the switch to turn the
defogger on or off. The indicator will
light when the defogger is on. The
defogger will turn off automatically
24 minutes after it is turned on.
CAUTION:
When cleaning the inside of the rear window, be careful not to
damage the printed heater wires on the rear window. Wipe the
window horizontally along the wires, not up and down.
Parking Brake and Mirrors
Main Menu
Parking Brake
To apply the parking brake, pull up
Pull up
on the lever. To release it, pull up
slightly, push the button, and lower
the lever; when fully released, the
BRAKE warning light will go out.
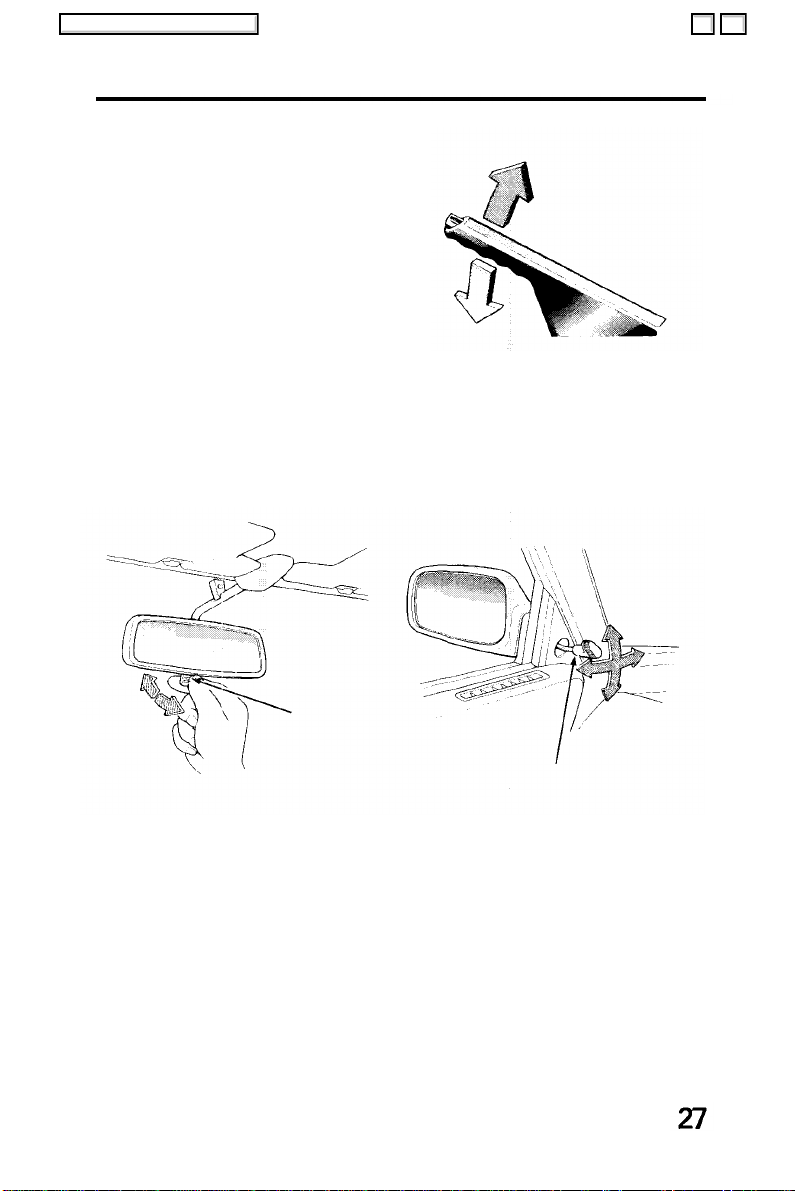
Rearview Mirrors
Keep the inside and outside mirrors clean and adjusted for best
visibility. Be sure to adjust mirrors before you start.
The outside mirror can be adjusted by moving the knob on the
inside of the driver's door.
DAY/NIGHT
ADJUSTMENT
TAB
ADJUSTMENT
KNOB
The inside mirror has day and night positions. The night position
reduces glare from the headlights of vehicles behind you. Flip the
small tab on the bottom of the mirror forward or backward to select
day or night position.
Lights
Main Menu
Turn Signals
Push the turn signal lever down
to signal a left turn, and up for a
FIRST
STOP
RIGHT
TURN
right turn. The indicator and
appropriate signal lights will
blink. The lever will return
automatically to its original
position when the steering
wheel is returned to straight
FIRST
STOP
LEFT TURN
ahead.
For lane changing, you can signal by pushing the lever part way up
or down (to the first stop) and holding it there; the lever will return
to its original position when you release it. If either turn signal
indicator lights up but does not blink, blinks faster than usual, or
does not light up at all, check for a burned out bulb or fuse.
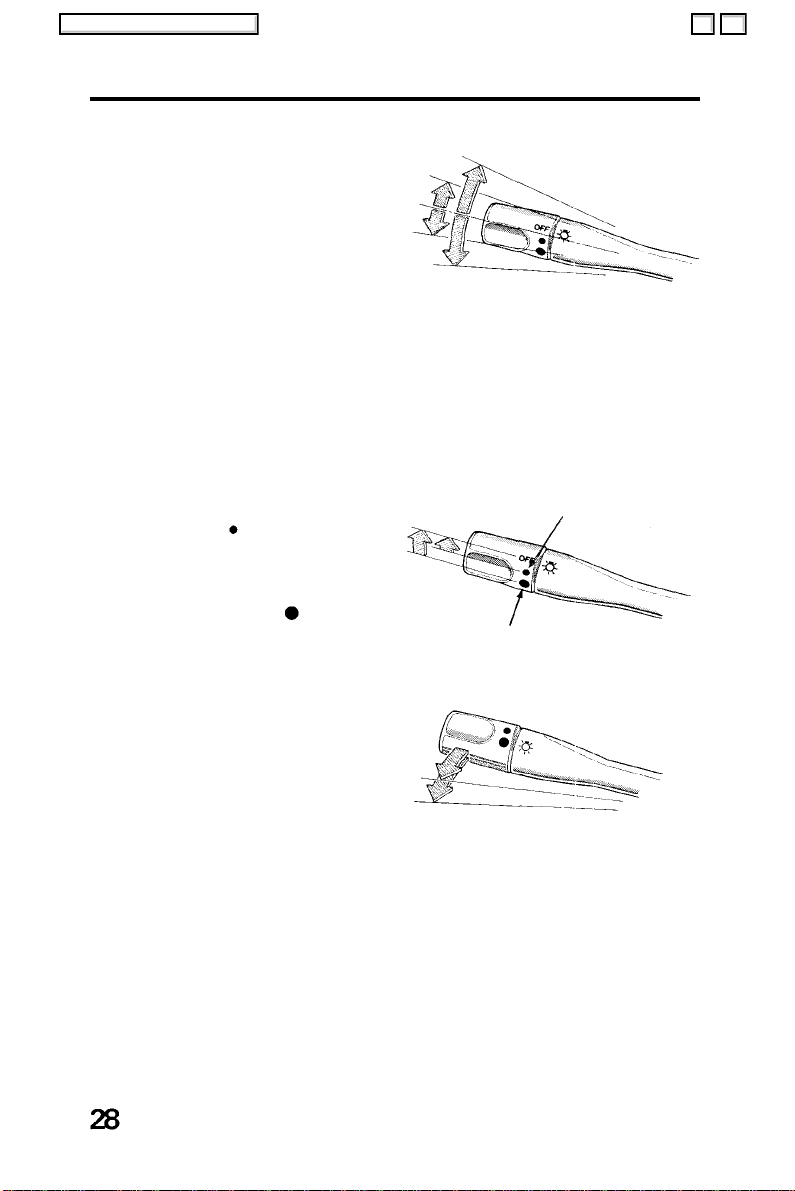
Headlights
Turn the light switch to the
Turn
FIRST POSITION
first position ( ) for taillights,
side marker lights, position
lights, license plate lights, and
instrument panel lights. Turn to
the second position ( ) to add
the headlights.
SECOND
POSITION
High Beam/Low Beam Switch
The headlights may be
switched between low beam
and high beam by pulling the
turn signal lever towards you
until a click is felt. The blue high
beam indicator light will be on
Pull and release
when the high beam is on.
Headlight Flasher
To use the headlights as a
passing signal, pull lightly on the
turn signal lever and release.
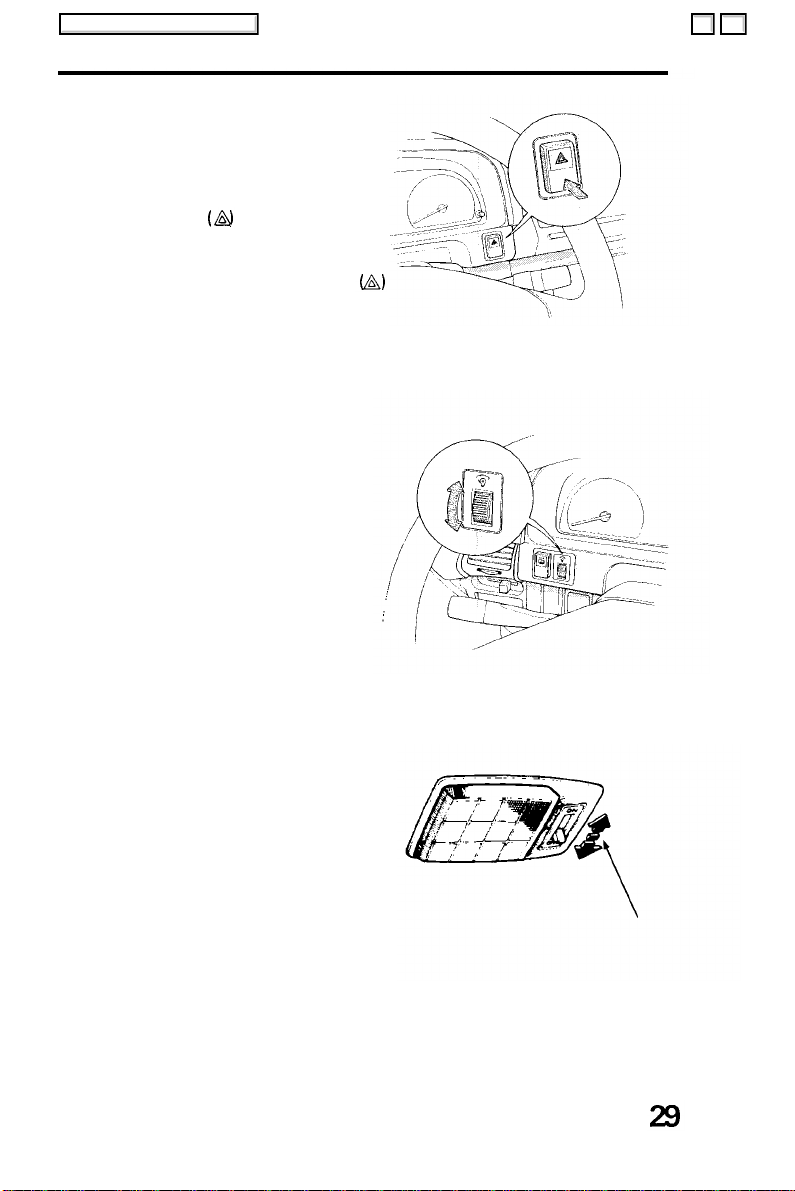
Hazard Warning System
Main Menu
This system should be used only
when your car is stopped under
emergency or hazardous conditions.
To activate push the hazard
warning switch . The front and
rear turn signals will blink
simultaneously and both indicator
lights will flash. Push the switch
again to turn the system off.
Panel Brightness Control
When the light switch is in either of
the two "ON" positions, the
intensity of the instrument lights
can be adjusted by turning the panel
brightness control dial.
Push
Interior Light
The interior light has a three
position switch. The light is off all
the time in the OFF position. In the
middle position, it goes on only
when a door is opened. In the ON
position, it is on all the time.
ON
OFF
DOOR
ACTIVATED
(cont'd)
 Loading...