

Homelite 150 Owner's Manual

HOMELITE'
HCDiITLITE
ol.J4
O9ML-,r
---:
Dl.l''ll|lg
0!,6 O@
dLd
q\,*
n@ O@
6e
it will
pay
you
to familiarize
yourself
with
the
saw
and
a
few simple
operating
and maintenance
principles.
Top
performance
and long
life
ol
this saw depends
on
using
it
correctly
right from
the
start,
This
manual
tells
you
how
to do
lhis, and also how
to mainlain lhe saw.
NEW SAW
WARRANTY
AND SAW
REGISTRATION
Be sure
to record
the saw
model and serial
numbers,
name of dealer,
date of
purchase
and
invoice number so
DEALER'S
COPY
FILL OUT
AND MAIL
THIS CARD
you
can
refer
to
them
whenever
necessary.
Our
FtOueufe
warranty
is
printed
on
page
23
of
this man-
ual.
HOMELTTE
will repair
or replace
HOMELITE
SAW
CHATN
free of
charge
if it is
lound delective either
in
material
or workmanship.
Fill out
the
two-part
registration
card as completely
as
possible.
One
part
should
be
given
to
your
dealer.
The
bther
part
is a
questionnaire
to be mailed
to HOMELITE
as
sodn as
possible.
We
study
your
comments
on lhis
card.
lt
is one way
we have
of
improving ourproducts,
and
part
of our
research to
develop
better
products.
CONTENTS
PREPARATION
SECTION
NEW
SAWWARRANTY
AND REGISTRATION
. .. . ...
2
LISTOFSAFE
OPERATINGRULES
. .. ....
... 3
PREPARINGYOURNEWSAW
........3
OiltoUseandHowOftentoFillUp
.........
3
TestingChainOiletOutput
.....
'..3
FuelingtheSaw
......4
FuelGaplsValved
..'.4
FuelandHowtoPreparelt.....
.....4
RecommendedOilsandGasolines
... ............
4
GuideBarandChainAssembly
......5
Pre-SoakChaininOil
...
.....5
DirectionofChainRotation
.........5
MountingChainonGuideBar
.......5
Engaging
Tensigning
Pinin BarHole
. . .
.. .. 5
ChainTensionAdiustment.....
.....5
MaintainingTensionDuringBreak-ln
....... 5
DailyAltentionto
Chain
and
Guide Bar . .
. .. . . .... 6
Lubricationof
SprocketNose
Bars
. .. . .
.. .. 6
OPERATITVG
SECT'OIV
LOCATIONOFSAWCONTROLS
.....,6
HOWTO
START,
STOPAND
HOLD
THE
SAW .
.. .. .
. 6
SgnceandGrip
DuringCranking
. . . ..
.. ...
7
Gripand
Balance
When SawlsRunning
. .'
.. .
"..
7
StartingandStoppinS....
.........7
MakingContactwiththeWood.
....
'7
CARBURETOR
ADJUSTMENT
..
..,...
8
AdjustmentlsNota"Cure-all"
..... 8
Adjustment
Range
..........8
FineAdjustmentofCarburetor.
.....8
Adjustment
to Stop Chain
from Turning
' . ' . . I
AIR FILTER
REQUIRES
FREQUENT
CLEANING
. ..
.. 8
Filter
Eventually
Should
Be
Replaced
. ....
. 8
WOODCUTTING
INSTRUCTIONS
.....9
GlossaryolTerms
..
'.. 9
Equipment
.....9
Personal
Protective
Equipment
I
WARRANTY
.
Work
Area Precautions
Basic Sawing
Techniques
.10
Overbucking
and
Underbucking
.
.........
10
NotchingandFellingTrees.
......10
ProtectingAgainstKick-Backof
Saw
....
'.
11
BoringwiththeNose.
'....'
11
Stressed
Log and
Limb Situations
....
....
11
MAINTENANCE
AND ADJUSTMENT
SECT'ON
HOMELITE
SAW CHAIN
.. ..12
HowtoFileCutters
.........12
FilingDepthGaugeClearance
.....13
GUIDE
BAR
AND SPROCKET
MAINTENANCE
. . . 13
Installing
Sprocket
Kit in Sprocket
Nose
Bar .
. . . . .13
FUELTANKANDFUELFILTER
.......1'
IGNITION,
COOLING
AND
EXHAUST
SYSTEM
MAINTENANCE
. .
,. ... 1'I
SparkPlugTypeandGap..
.......14
Conditionof
PlugTellsaStory.
....14
TestingforlgnitionSpark.
........
15
CleaningtheGoolingSystem
.....15
STORINGTHESAW
....15
REPAIR
SECT'ON
HOMELITE
ALL-TEMP
REMOVAL
OF
POWER
AND
REASSEMBLY
.
Multi-Purpose
GREASE
. . . .
16
HEAD
FROM ENGINE
COVER
STARTER
REPAIRS
To Re-tension
Starter
To Replace
Starter
. .
To
Replace
Starter
SPring
To Replace
Starter
RoPe .
EXPLODED
VIEW
ASSEMBLY
DRAWING
OF
SAW
. .
TOOLS
&
ACCESSORIES
.
MAINTENANCE
SCHEDULE
. . .
Rope .
16
17
17
17
17
17
18
20
22
23
FOR
YOUR
SAFETY
Although
this
bookret
rater
on
telrs
you
how
to
use
the
saw
safery
and
correcily,
here
are
some
or
rhe
importinip6iriis-to
o-Jkbi
il:r";iriin
mino:
O
Pgl"g_"-11_ting,
sready
the
saw
with
the
side
of
your
Knee
agatnst
the
rear
handle
and
hold
saw
Aown
tiim-
ly^on
the
ground
with
one
trana
on
ifre
ironrr,andie
Dar.
3
Alway_s
keep
both
hands
on
the
saw
when
it
is
run-
ning.
Be
sure
to
use
the
ptopei
grip
inlhe
nanOle
bar
(9ee
page
7)
and
mainriin
voui
6iliiiie
and
conrrol
ol
the
saw.
1
Never
let
the
chain_
contact
any
obstacle
other
than
lhe
work
at
hand.
Never
tet
il cbniacioiier
timbs
or
louch
lhe
ground.
1
Helpers
and
bystanders
must
be
kept
a
safe
distance
from
lhe
operator
and
the
cuttinl
chlin.
--
O Keep
clear
of
a
moving,chain.
Do
not
touch
it.
Shut
engine
off
before
making
anv
Jaw
i6piirs
or
ad-
justments.
O
Afler
completing
a
cut,
don.t
move
away
until
chain
stops.
Shrir
or
ihe
"n6tne
oeloi"-"1'rrling
rhe
saw
between
cuts.
put
a sdaobaro
ovliitrti'olaoe
wten
transporting
the
saw.
3
Select a path
of safe
retreat
before
making
a felling
cul
O
Ecrrre
of falling
limbs.
Wear
a
,,hard
hat,,
in
the
Fdr.nd
ourin!'relins
oiiiise'ire;;:
-'
j
lf
there
is
anything-wrong
with
the
saw,
get
it
fixed
betore
rurrheiuse.ieep
ifie
ilijin
!-niipL;a
il;fi;;;
tensioned.
A
dull,
misfiied
or
loose
ctrtn
wili
ctr'attei
and
buck,
and
can
cause
saw
to
ficfbicf.
3
Keep
fuel
in clearly
-labeled
safety
type
cans.
Fuel
your
saw_over
ground
that
presents
nd
hazard
of
lire.
Move
at teast
i0 teet
awayi
from
fueiintlpot
uefore
starting
up
the
saw.
1
Avoid.spitlagg
of
fue_|,
.and
wipe
saw
down
if fuel
is
spilled
on
it-
Do
not
bring
tuei
wtrJre
itrere
is
fire
oi
any
kind.
3
Keep-the
saw
clean
and
free
of
leaves,
sawdust,
pitch
and
oil.
j
Do
not
operate
with
fuet
cap
loose
or
muffter
or
lilters
removed.
Use
spark
arreiters
unoei-:;lry
woods,l
conditions
and
always
where
requiieC'Oy
iaw.
3
Use.only
lhe
correct
fuel
mixtures
made
from
the
in-
gredients
recommended
in
rhii
m;;;;i.
'
1
Keep
a
fire
extinguisher
handy.
j
For
15
minutes
after
stopping
work,
check
the
area
lo
be sure
rhere
are no_
snidroeitns;.,biiJ.'p"r
ouiirii
ftres
and
lgpol!
rhem,
tisring
ia-uiijJir
iirlwn,
ro
the
proper
authorities.
t
$Am;"offiil?.tn"
rarr
or
a tree
or
prevent
.
fj:il":lJ."ill1lt?,rf
rearn
rhe
besr
and
saresr
ways
ro
PE,AHNGYOUN
NEW
SAW
Study
the
anblv
instructions
and
lamiliarize
yourself
with
the-bacc
consrruction-oi*ii-i"ii.'fnis
saw
is
a
high-performance
righrweigrti
m-6Jeilngi;eered
to
at-
l?H":f
owner
to
m-ake
ir,t
iriiiolitvtiyrino,
repairs
CHAIN
OIL
SYSTEM
The
cha_in
oil
filler
cap
is
located
on
top
of the
saw
to
the
lelt
of
the guide
bar'mounting-p;
1.
J|T
qF.OtL:
HOMEL|TEo
Bar
and
Chain
Oit
shoutd
be
used
just
as
it
gom.es
trom
tfre
c6iitlin"r,
as
it
is
formulated
to
ftow
freely
even_
at
betowzero
tempera_
g1r19s.
n1v
brand
of
m.oior;ii
i;;,rJiffieprocessed
moror
oit
mav
be
u::d-3"
"
"rdltitujd.'Tire
weighr
of
the
oil
to
be-used
rito;;4d"-F:ff
;iE.i'ffi
!f#!'",'l;fi
'""?:!illi:i
ro
sA
E-
1 0
or
eve n
.
a.
I is
rr
te
i
-ridiJrril'J'r
rli
nii"iiiiv
add
kerosene
to
whatevl,
*"ighTJil'y-ou'i,"n"
until
it
flows
freety.
No
dirty
or
useO
oiiCn6ufi'Ol
put
inro
the
chain
oiteras
it
may
aam"G
th;;i;L;;.
2.
!.OW
OFTEN
TO
FTLLTHE_
CHATN
OtL
RESERVOTR:
The
reservoir
shoutd
te
riiled-iliiib''il'li
rhe
srarr.
The
votume
of
oit
discharsla
ogf!1{aI'Li.!n"
ensine
speed.
However,
atw.ays
tiit
up-ttri-ita-ii
bir
reservoir
every
time
you
fuel
th-e
saw.
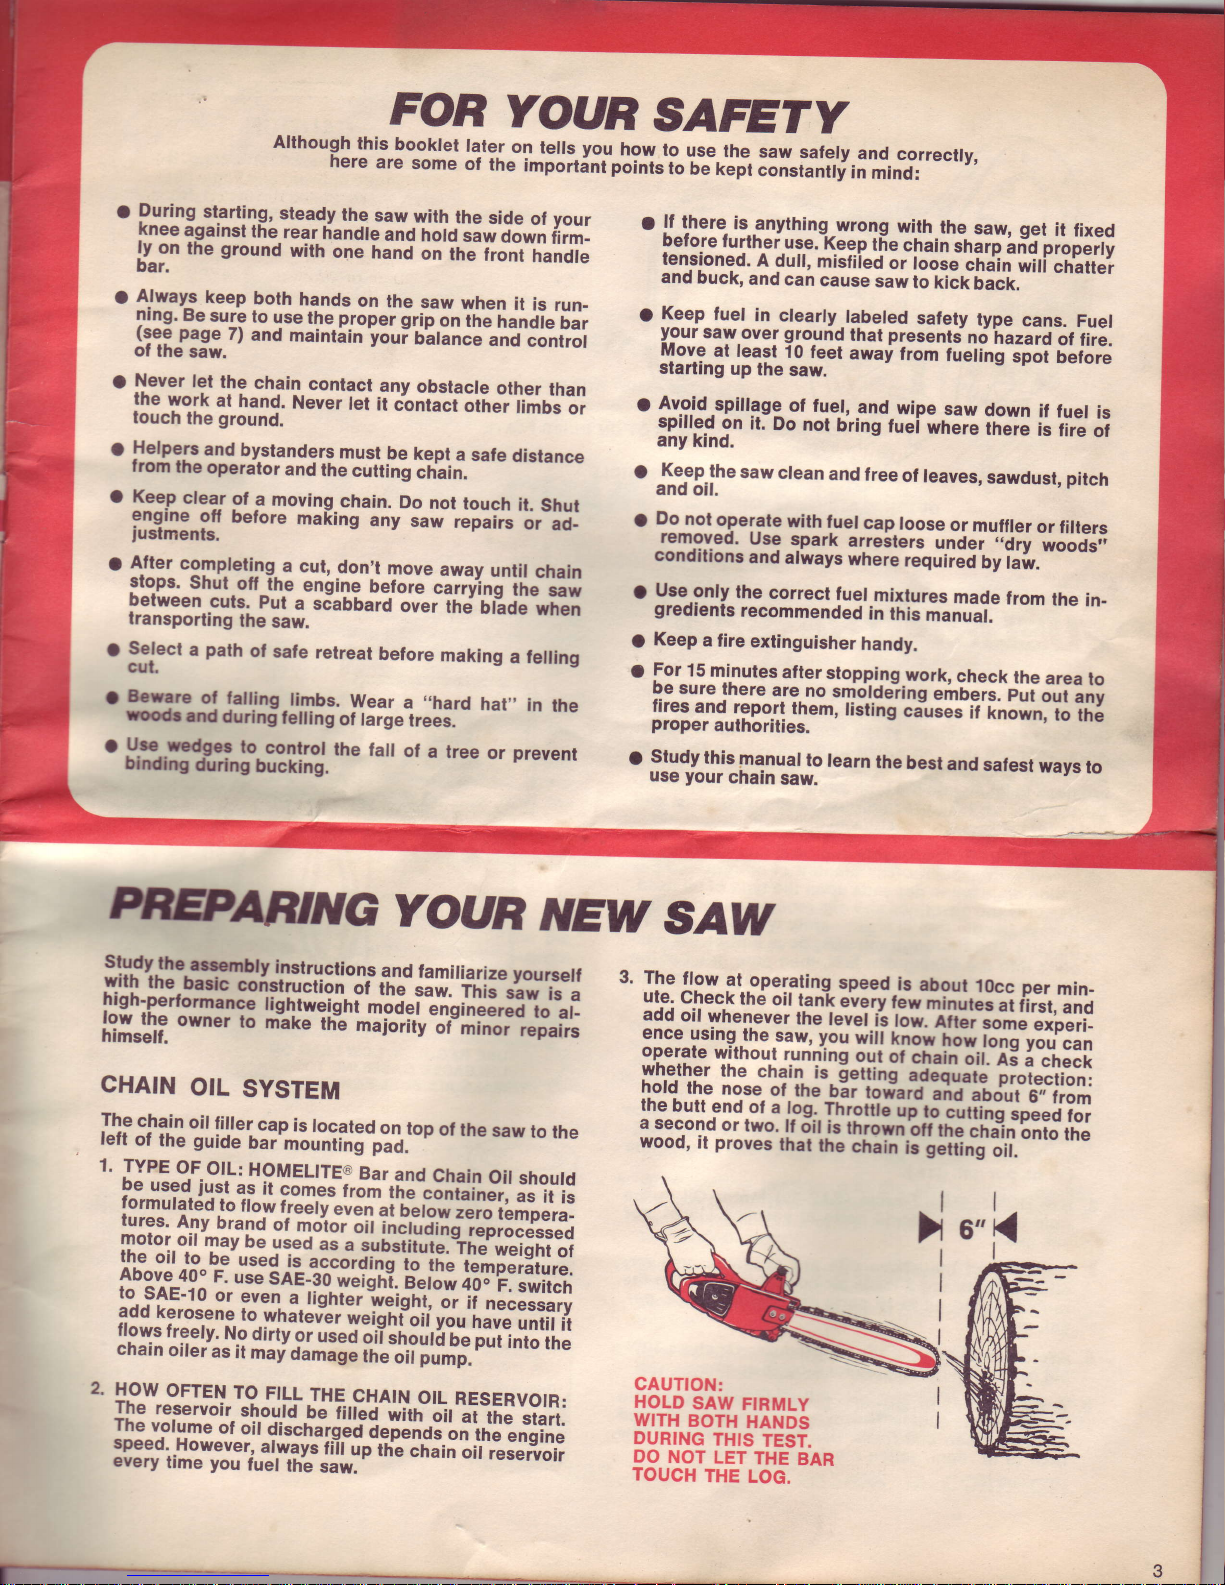
3.
The
flow
at
ooerating
speed_is
about
10cc
per
min-
ute.
Check
rh6
oit
rarit<
e-verv
Gw-iiririrel'at
tirsr,
ana
add
oit
whenever
rhe
tevet
isj";.;iG;me
experi-
9199_ysin-S.Jhe
saw, you
wiil
tnow
tiii
t-ong you
"an
operate
without
running
out
ot
chain
6irji
i
crrecii
!'vh_ether
rhe
chain
is.
leiling
;i"di;
prorecrion:
hotd
rhe
nose
ot
rhe
glr
roJaraiio
i-Udur
0,,
trom
the
buil
end
of
a
tos..
ThrotriJ
r-p
r.i
i-rrii,i!
speed
tor
a second
or
rwo.
tt;itis
rh6un:rril;iiia=in
onto
t
e
wood,
ir
proves
rhat
rhe
crrain
ii-idir'l,id'lir.
6"!
CAUTION:
HOLD
SAW
FTRMLY
WITH
BOTH
HANDS
DURING
THIS
TEST.
DO
NOT
LET
THE
BAR
TOUCH
THE
LOG.
h
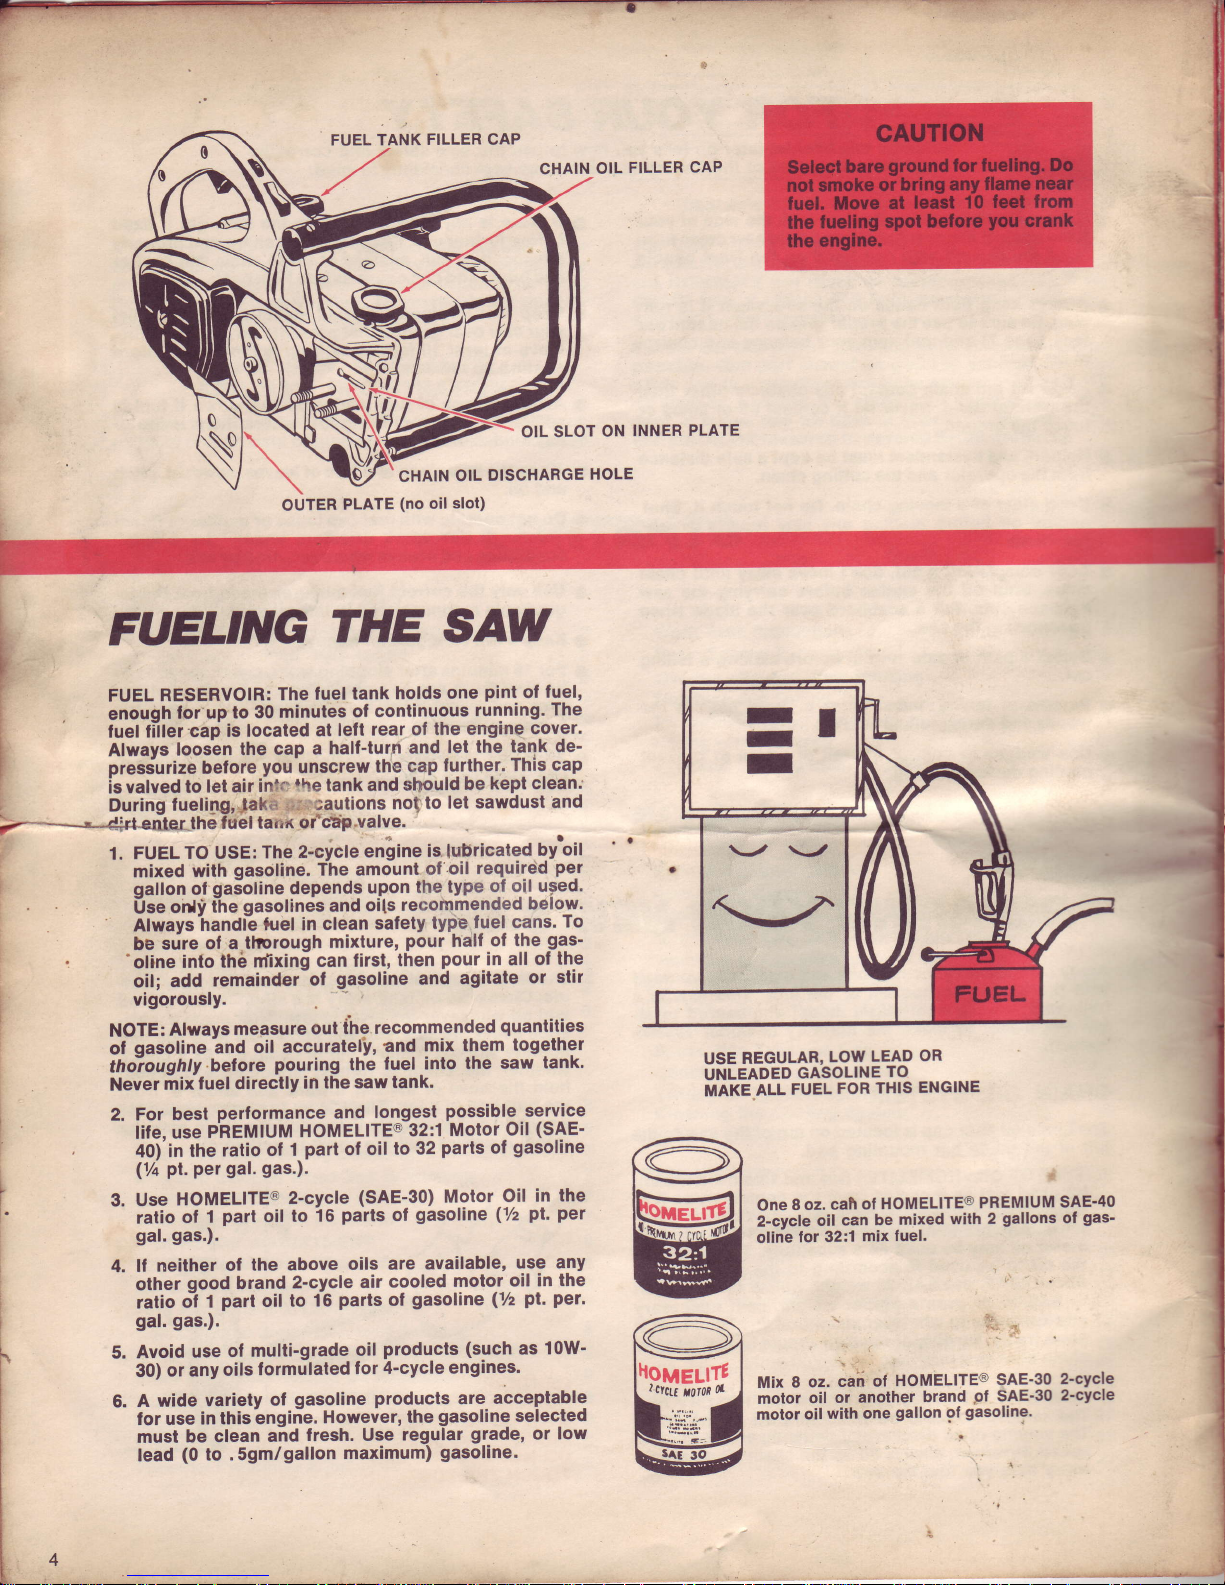
FUEL
TANK
FILLER CAP
,a
CHAIN
OIL
FILLER
CAP
OIL
SLOT ON
INNER PLATE
CHAIN
OIL
DISCHARGE
HOLE
FUEL'NG
T'IE
SAW
I
fUEL
RESERVOIR:
The
fuel
tank holds
one
pint
of fuel,
i enouqh
lor up
to 30
minutes
of
continuous
running.
The
i
fuel tiiler
cad
is located
at
lelt
rear of
the engine
cover.
I
nlways
loos'en
the cap
a
half-turn
and
let the
tank de-
I
presdurize
before
you
unscrew
the
cap
further.
This cap
I
is valved to
let air
ihtc
the
tank
and
should
be
kept clean;
'
During
fuelilg,faka
;i.'
'tautions
nof to
let sawdust
and
the
luel
tanx or'dair.valve.
1.
FUEL
TO USE:
The
2-cycle
"niin"
is
lubricated
by'oil
mixed
with
gasoline.
The
amount
of
'oil
required
per
gallon
of
ga5oline
depends
upon
the
type
of oil u.sed'
Use
olti
ihe
qasolines
and
oils
recommended
below'
Always
handte
luel in
clean
safety
type
fuel cans.
To
be srire
of a
tlrcrough
mixture,
pour
hall
of
the
gas-
"oline
into
th6
nfixing
can first,
then
pour
in all
of
lhe
oil;
add
remainder-ol
gasoline and
agitate
or
slir
vigorously.
NOTE:
Always
measure
out
ihe recommended
quantities
of
qasoline
-and
oil accuratel'y,
and
mix them
logether
thoioughty
before
pouring
the
fuel into
the
saw tank'
Never
mixfuel
directly
in the
saw
tank.
2. For
best
performance
and
longest
possible
service
life.
use
PhEMluM
HOMELITE@
32:1
Motor
oil
(sAE'
40)'in
the
ratio
of 1
part
of oil
to 32
parts
of
gasoline
(1/q
pl. pet
gal' gas.).
3.
Use
HOMELITE@
2-cycle
(SAE-30)
Motor
Oil
in the
ratio
ot 1
part
oil
to 16
parts
of
gasoline
(Vz
pl.per
gal.
gas.).
4. lf
neither
of
the above
oils
are
available'
use any
other
good
brand
2-cycle
air
cooled
motor
oil in
the
ratio
o-i
1
part
oil
to 16
parts
ol
gasoline
(1/2
Pl.
per.
gal.
gas.).
5. Avoid
use
of multi-grade
oil
products
(such
as
10W-
30)
or any
oils
formulated
lor 4'cycle
engines.
6.
A wide
variety
of
gasoline
products
are
acceptable
for use
in this'engine.
However,
the
gasoline
selected
must
be clean
and
fresh. Use
regular
grade,
or low
lead
(0
to .Sgm/gallon
maximum)
gasoline.
USE
REGULAR,
LOW
LEAD
OR
UNLEADED
GASOLINE
TO
MAKE
ALL
FUEL
FOR
THIS
ENG]NE
@
w
/;^\
lv1
lhoueutT, I
ru;
W
One
8 oz.
cah
of HOMELITE@
PREMIUM
SAE-40
2-cycle
oil
can
be mixed
with
2
gallons
of
gas-
oline tor
32:1
mix fuel.
Mix
8 oz.
caii
of
HOMELITE@
SAE-30
2-cycle
motor
oil or
anolher
brand
gl
SAE-30
2-cycle
motor
oil
with
one
gallon
ol
gasoline'
OUTER
PLATE
(no
oil
slot)
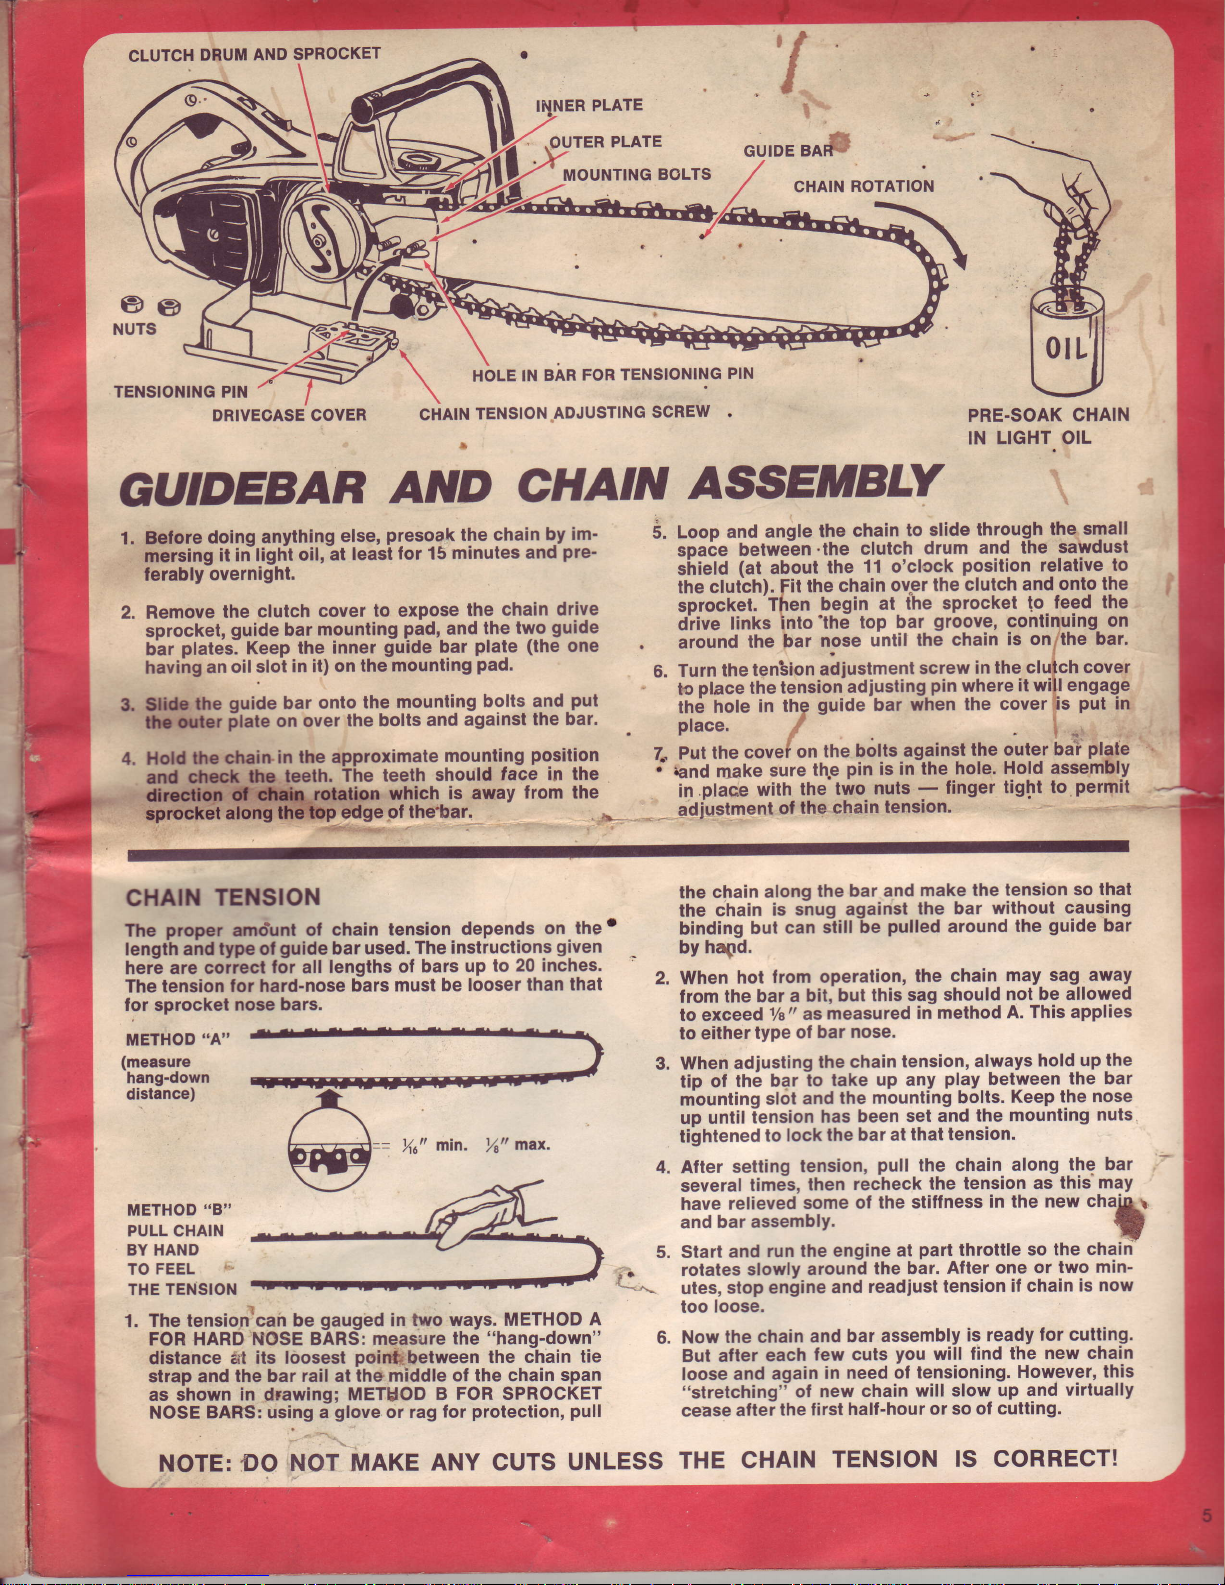
CLUTCH
DRUM
AND
SPROCKET
,i
OUTER
PLATE
ouo,
"os
MOUNTING
BOLTS
o.-
CHAIN
ROTATION
@el
NUTS
TENSIONING
PIN
DR]VEGASE COVER
HOLE IN
BAR
FOR TENSIONING
PIN
TENSION
ADJUSTING
SCREW
CHAIN
PRE.SOAK
CHAIN
IN LIGHT. OIL
of
the'bar.
in.place
with
the
two
nuts
-
finger
tight to
adfustment
of
the chain
tension.
GT''DEBA,R
AND
CHAIN
ASSEMBD.
1.
Belore
doing anything
else,
presoak
the chain
by
im'
mersing
it in ligh-t
oil,
at least
for 15
minutes and
pre-
ferably
overnight.
2. Remove
the
clutch
cover to expose
lhe
chain
drive
sprocket,
guide
bar
mounting
pad,
and
the
two
guide
b-ar
platesl
Keep
the inner
guide
bat
plate (the
one
having
an
oil slot
in it)
on the
mounling
pad.
&
Slb
the
guide
bar
onto
the
mounting
bolts
and-put
f,ltrler
Flate
on
over
the bolts
and
against
the bar.
4. Hold lhe
cfrainin
the approximate
mounting
posilion
The
teeth
should
face
in the
which
is auvay
from the
'
,Ir-.
6.
toop and
anqle
the
chain
to
slide lhrough
the
small
soaie
between'the
clutch
drum
and the
sawdust
sirlela
(at
about
the
11 o'clcck
position
relative
to
the clutbh).
Fit
the
chain
ovpr
the clutch
and onto
the
sprocket.-Then
begin
at the
sprocket
!o
feed the
d'rive
links into'the
top
bar
groove'
continuing
on
.
around
the
bar
nose
until
the chain
is
onllhe bar'
6.
Turn
the
tenbion
adiustment
screw
in
the clufch cover
tc
place
the
tension-adiusting
pin
where
it wift engage
tn6
hole
in
thg
guide
bar when
the
cover
ris
put
in
t
l';ffi"
.ou"{onthe
b6tts asainst
tt " out"rL#plate
"
''
€nd make
sure
tlle
pin
is in the
hole.
Hold assembly
in.place
with
the
two
nuts
-
finger
tigl-tt to
permit
CHAIN
TEttlSlON
The
proper
amoiunt
ol chain
tension
depends
on
the'
length and type ol
guide
bar used.
The instructions
given
here are
correct
for all
lengths
of bars
up to
20 inches.
The lension
for hard-nose
bars
must be
looser than
that
for sprocket
nose bars.
the
chain
along
the bar and
make the
tension so
that
the
chain
is
snug against
the bar
without
causing
binding
bul
can still
be
pulled
around
the
guide
bar
by hapd.
When
hot
from operation,
the
chain
may sag away
from
the bar
a bit,
but this
sag should
not be allowed
to exceed Va"
as
measured
in
method
A. This applies
to either
type
of
bar nose.
When
adjusting
the chain
tension,
always
hold
up the
tip of
the bar
lo
take up any
play
between
the bar
mounting
slot
and
the
mounting bolts.
Keep
the
nose
up until
iension
has been
set and
the
mounting
nuls
tightened
to lock
the bar
at that
tension.
After
setting
tension,
pull
the chain
along
the
bar
several
time-s,
then
reiheck
the tension
as this"may
have
relieved
some of
the stiffness
in
the new
chaial
and
bar assembly.
t
Start
and
run
the engine
at
part
throttle
so the
chain
rotates
slowly
around
the
bar. Alter
one
or two
min-
utes,
stop engine
and
readiust
tension
if chain
is
now
too
loose.
Now
the
chain
and bar
assembly
is ready
for culting'
But after
each
few cuts
you
will find
the
new chain
loose and
again
in
need of tensioning.
However,
this
"stretching'i
of new
chain
will slow
up and
virtually
cease
aftei
the first
half-hour
or so of
cutting.
THE CHAIN
TENSION
IS CORRECT!
2.
METHOD
"A''
(measure
hang-down
distance)
==
l(rt,
min'.
r/a,,max,
METHOD
"B''
PULL CHAIN
BY HAND
TO
FEEL
THE TENSION
1. The tension'cah
be
gauged
in
two ways. METHOD
A
FOR HARD'NOSE BARS:
measure
the
"hang-down"
6.
distance
&t its loosest
pointbetween
the chain
tie
strap and
the bar rail at the
middle ol the chain
span
as shown
in
drawing;
METHOD
B FOR SPROCKET
NOSE BARS: using a
glove
or rag
lor
protection, pull
NOTE: DO
NOT MAKE
ANY CUTS UNLESS
l'
I
r
E
t
h.'.
F.
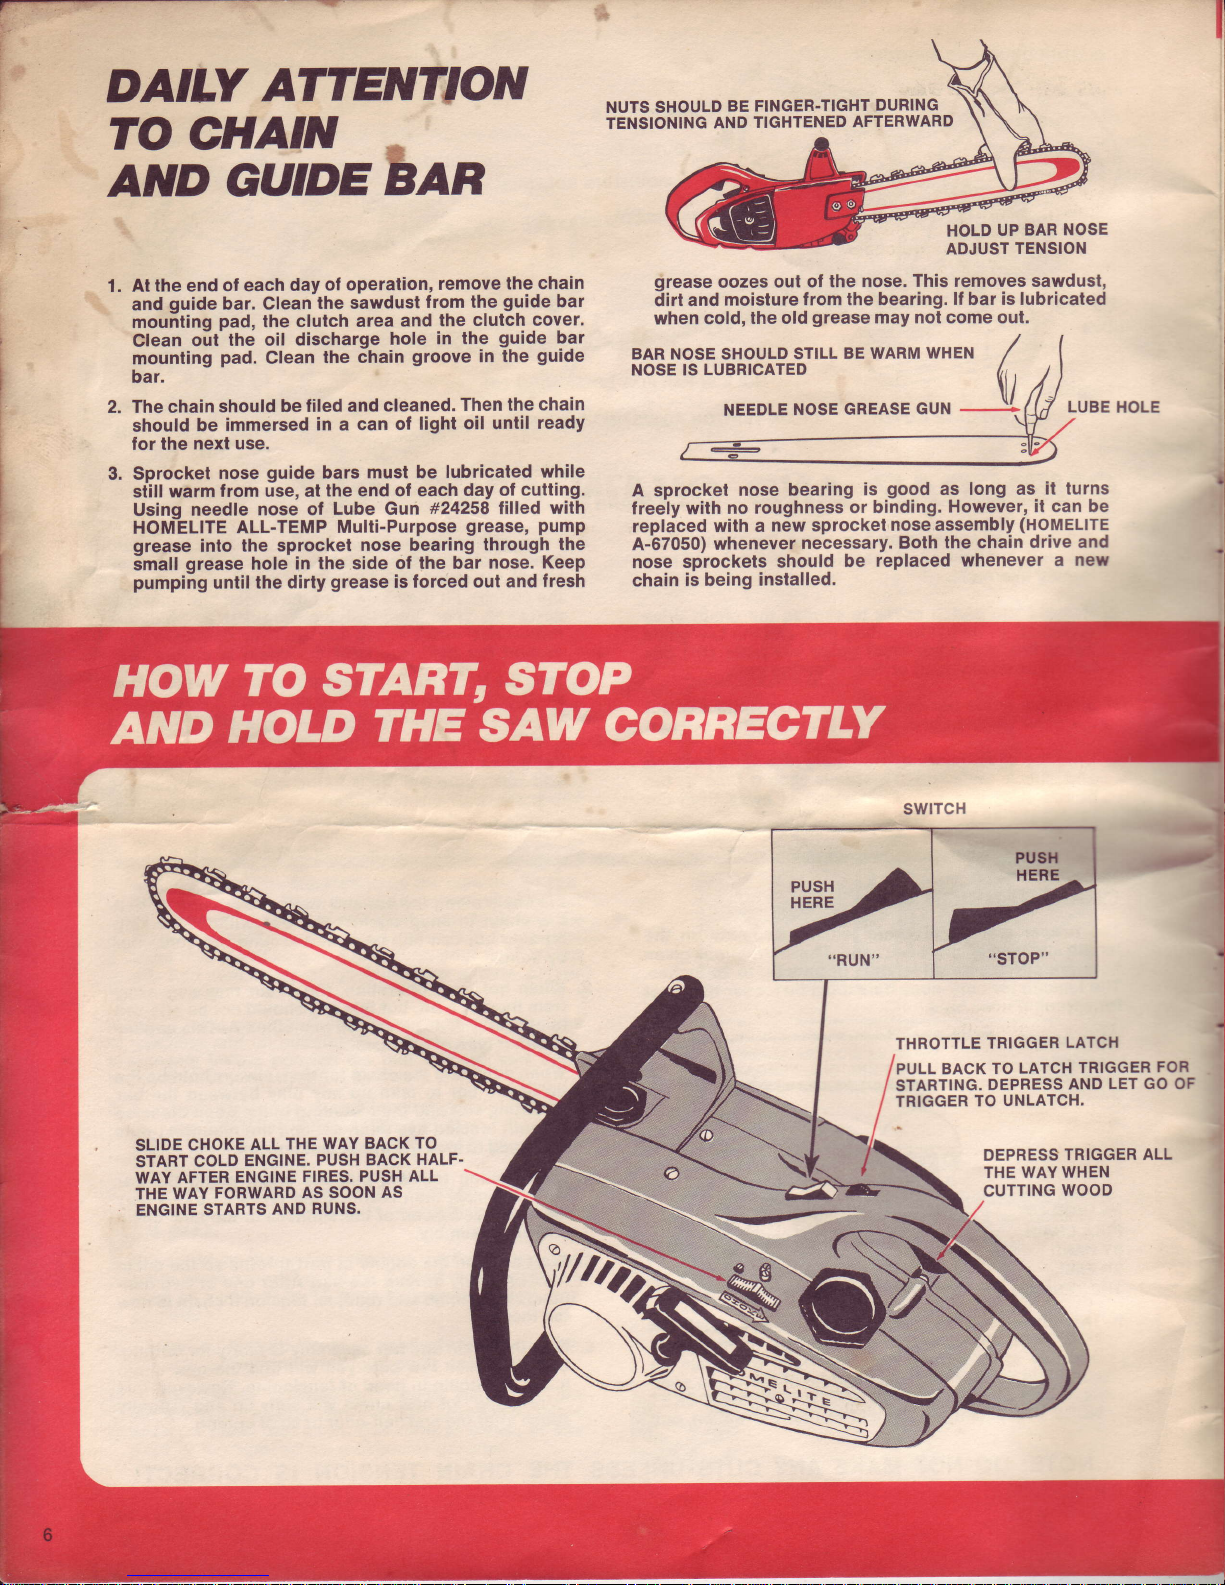
DAILY
ATTENTTON
n?Ki!;,ban
At the end
of each
day
ol operation,
remove
the chain
and
guide
bar. Clean
the sawdust
from the
guide
bar
mounting
pad,
the
clutch area
and
the clutch
cover.
Clean
out'the
oil discharge
hole
in the
guide
bar
mounting
pad.
Clean
the
Chain
groove
in the
guide
bar.
The chain
should
be liled and
cleaned.
Then the
chain
should
be immersed
in a can
of light
oil until
ready
for the
next use.
Sprocket
nose
guide
bars
must be
lubricated while
siill warm
lrom use, at
the end of each
day of
cutting.
Using
needle
nose of
Lube Gun
#24258
filled
with
HOMELITE
ALL-TEMP
Multi-Purpose
grease'
pump
grease
into the
sprocket
nose bearing
through_ the
-mall
grease
hole
in the side of
the bar
nose. Keep
pumping
until the
dirty
grease
is forced out
and
fresh
1.
grease
oozes out
of the nose,
This removes sawdust,
dirt and
moisture
trom the bearing.
ll
bar
is lubricated
when cold,
the old
grease
may not come out.
BAR NosE sHouLD stLL
BE *ARM
*HEN
/
NOSE IS
LUBRICATED
1,,
[/
\,
3.
LUBE
HOLE
swlTcH
THROTTLE
TRIGGER
LATCH
PULL BACK
TO
LATCH
TRIGGER
FOR
STARTING.
DEPRESS
AND
LET GO
OF
TR]GGER
TO
UNLATCH,
DEPRESS
TRIGGER
ALL
THE WAY WHEN
CUTTING
WOOD
A sprocket
nose
bearing
is
good
as
long as it
turns
freeiy with
no roughness
or binding.
However, it can be
replaced
with a
new sprocket
nose assembly
(Ho[,lELlTE
A--67050)
whenever
necessary. Both
the chain
drive and
nose sprockets
should
be
replaced
whenever a
neu
chain
is being installed.
NUTS SHOULD
BE FINGER.TIGHT
DURING
TENSIONING
AND
TIGHTENED
AFTERWARD
HOLD
UP
BAR NOSE
ADJUST
TENSION
SLIDE
CHOKE
ALL
THE WAY
BACK
TO
START
COLD
ENGINE.
PUSH BACK
HALF.
WAY AFTER
ENGINE
FIRES. PUSH ALL
THE
WAY
FORWARD
AS SOON
AS
ENGINE
STARTS
AND RUNS.
r
I
I
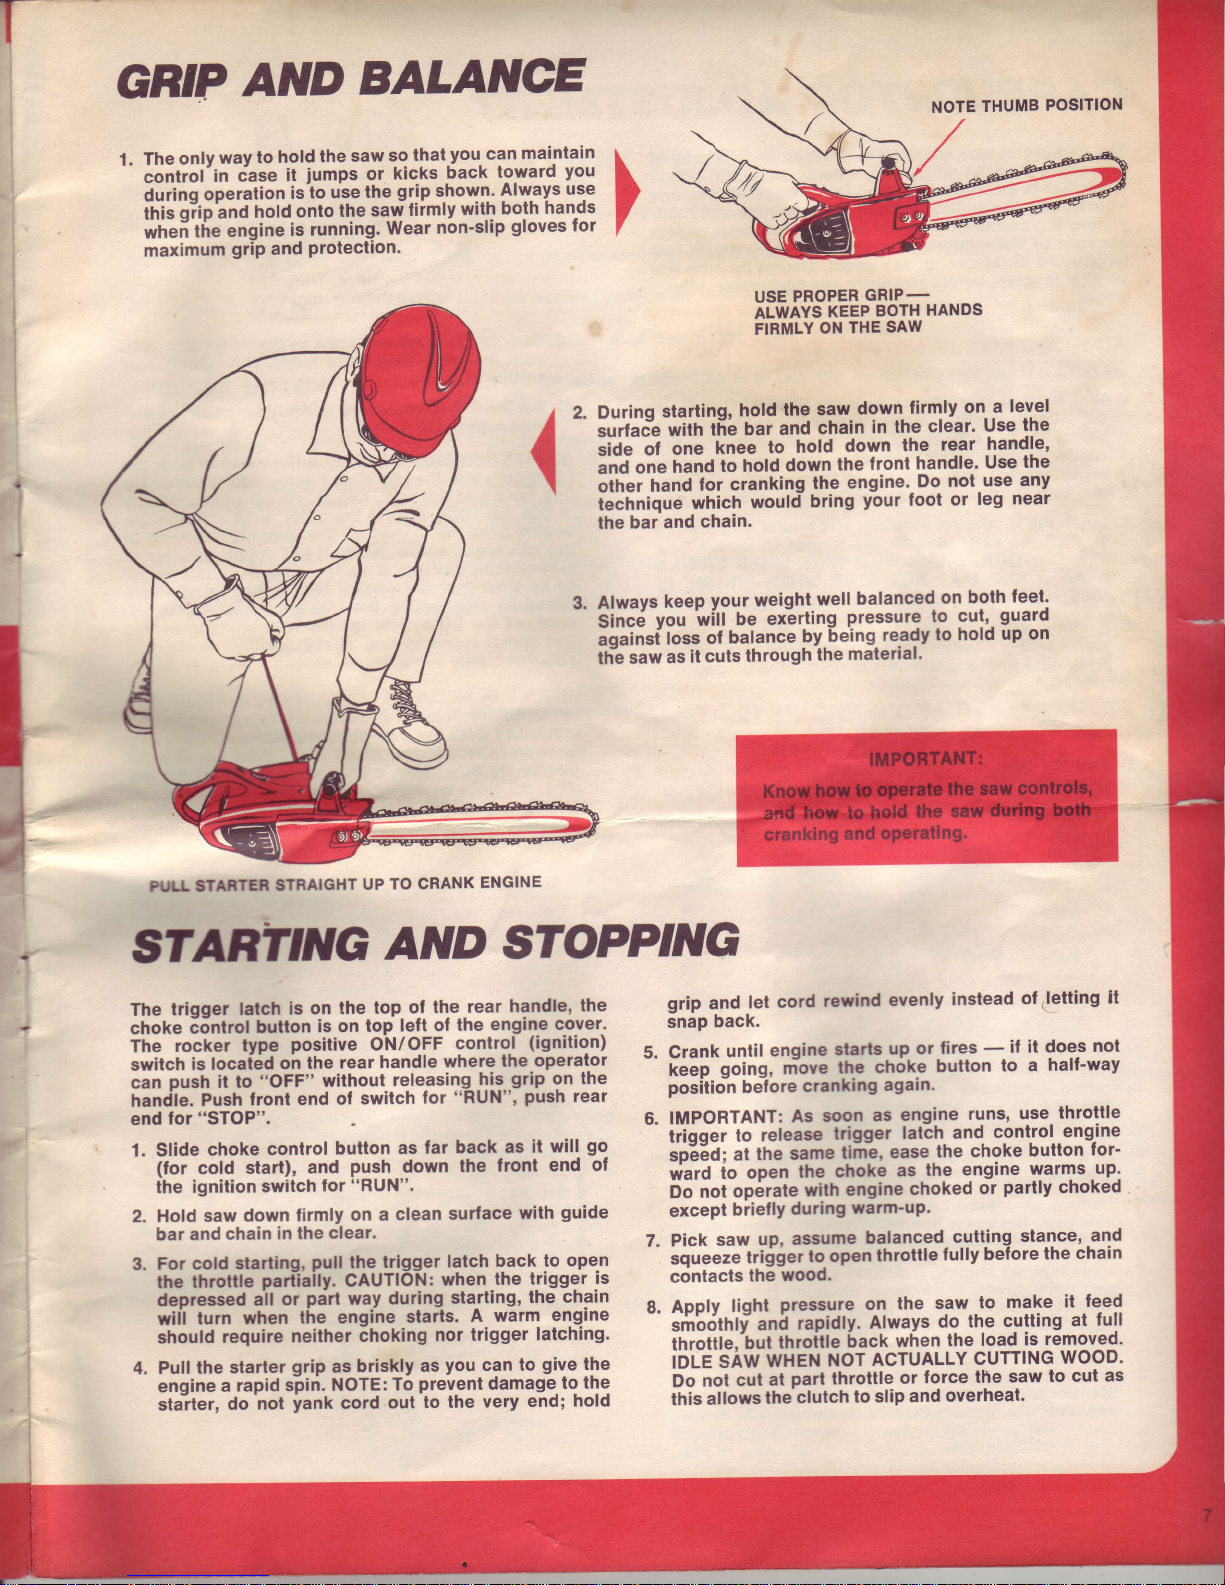
Gmp
AND
BALANoE
1.
The
only
way
to
hold
the
saw
so
that
you-
can
maintain
'-
control'in
iase
it
jumps
or
kicks
back
toward
you
durinq
operation
isio
u-se
the
grip
shown'
Always
us-e
ilriJqiip
ina
hold
onto
the
saw
tiimly
with
both
hands
*nei
tfie engine
is running.
Wear
non'slip
gloves for
maximum
griP
and
Protection.
']
USE
PROPER
GRIP-
ALWAYS
KEEP
BOTH
HANDS
FIRMLY
ON
THE
SAW
Durinq
startinq,
hold
the
saw
down
lirmly
on a
level
Jurfic.e
with
t66
bar
and
chain
in
the
clear.
Use
the
iiCe
of
one
knee
to
hotd
down
the
rear
handle,
ana
one
hand
to hold
down
the
front
handle.
Use
the
other
hand
for
cranking
the
engine'
Do
not,use
any
technique
which
would
bring
your
foot
or
leg
near
the
bar and
chain.
Always
keep
your
weight
well
balanced
on
both
feet'
CinC,i vou
wi'll
oe
ex-eriing
pressure to cut,-
guard
ioainsf
loss
ol
balance
by
being
ready
to
hold
up
on
th-e
saw
as
it
cuts
through
the
material.
3.
.+
PTTT
ATARTER
STRAIGHT
UP
TO CRANK
ENGINE
1
START'NG
AND
STOPPTNG
The
triqqer latch
is
on
the top
of
the rear
handle,
the
choke
d6ntrol
bulton
is
on top
lelt of
the
engine
cover.
The
rocker
type
positive
ON/OFF
control
(ignition)
6
switch
is loca[dd
oh
the
rear
handle
where
the
operator
can
push
it lo
"OFF"
without
releasing-his..grip
on
the
handle.
Push
front
end of
switch
for
"RUN",
push
rear
end
for
"STOP".
-
6.
1. Slide
choke
control button
as
far back
as it
will
go
(for
cold
start),
and
push
down
the
front end
of
the
ignition
switch
tor
"RUN".
2.
Hold saw
down
firmty
on a
clean
surface
with
guide
bar and
chain
in
the
clear.
7.
3.
For cold
starling,
pull
the
trigger
latch
back
to ope.n
the
throtlte
part-iaily.
CAUTION:
when-the
trigger
is
depressed
ail
or
pdrt
way
during
starting,
the chain
a
wiil
turn when
the engine
starts.
A
warm
engine
should
require
neither
choking
nor trigger
latching.
4.
Pull the
starter
grip
as
briskly
as
you
can
to
give
the
engine
a
rapid
spii. XOte:
To
prevent
damage-to
the
stalter,
do-not
lank
cord
out
to the
very
end;
hold
grip
and
let
cord
rewind
evenly
instead
of
,letting
il
snap
back.
Crank
until
engine
starts
up or-fires
-
if
it does
not
ie-p
golng,
niove
thc
ch6ke
button
to a
half-way
position
belore
crankang
agaln.
IMPORTANT:
As
soon
as
engine
runs'
use
throttle
iriqqer
to
release
lrigger
latCh
and
control
engine
sp66A:
at
the
same
timl,
ease
the choke
button
for-
rriard
io open
the
choke
as
the
engine
warms
up'
do
not
op6rate
with
engine
choked
or
partly choked
except
brielly
during
warm'uP.
Pick
saw
up,
assume
balanced-
cytting
stance,
and
iqueeze
triller
to
open
throttle
lully
before
the
chain
contacts
the
wood.
Aoolv lioht
pressure
on
the
saw
to
make
it
leed
srhbdttrti
and
rapidly'
Always
do
the
cutting
at
full
throttle,'but
throitle
back
when
the
load
is
removed.
]DLE
SAW
WHEN
NOT
ACTUALLY
CUTTING
WOOD.
Do
not
cut
at
part
throttle
or
force the
saw
to cut
as
this
allows
the-clutch
to
slip and
overheat'
7
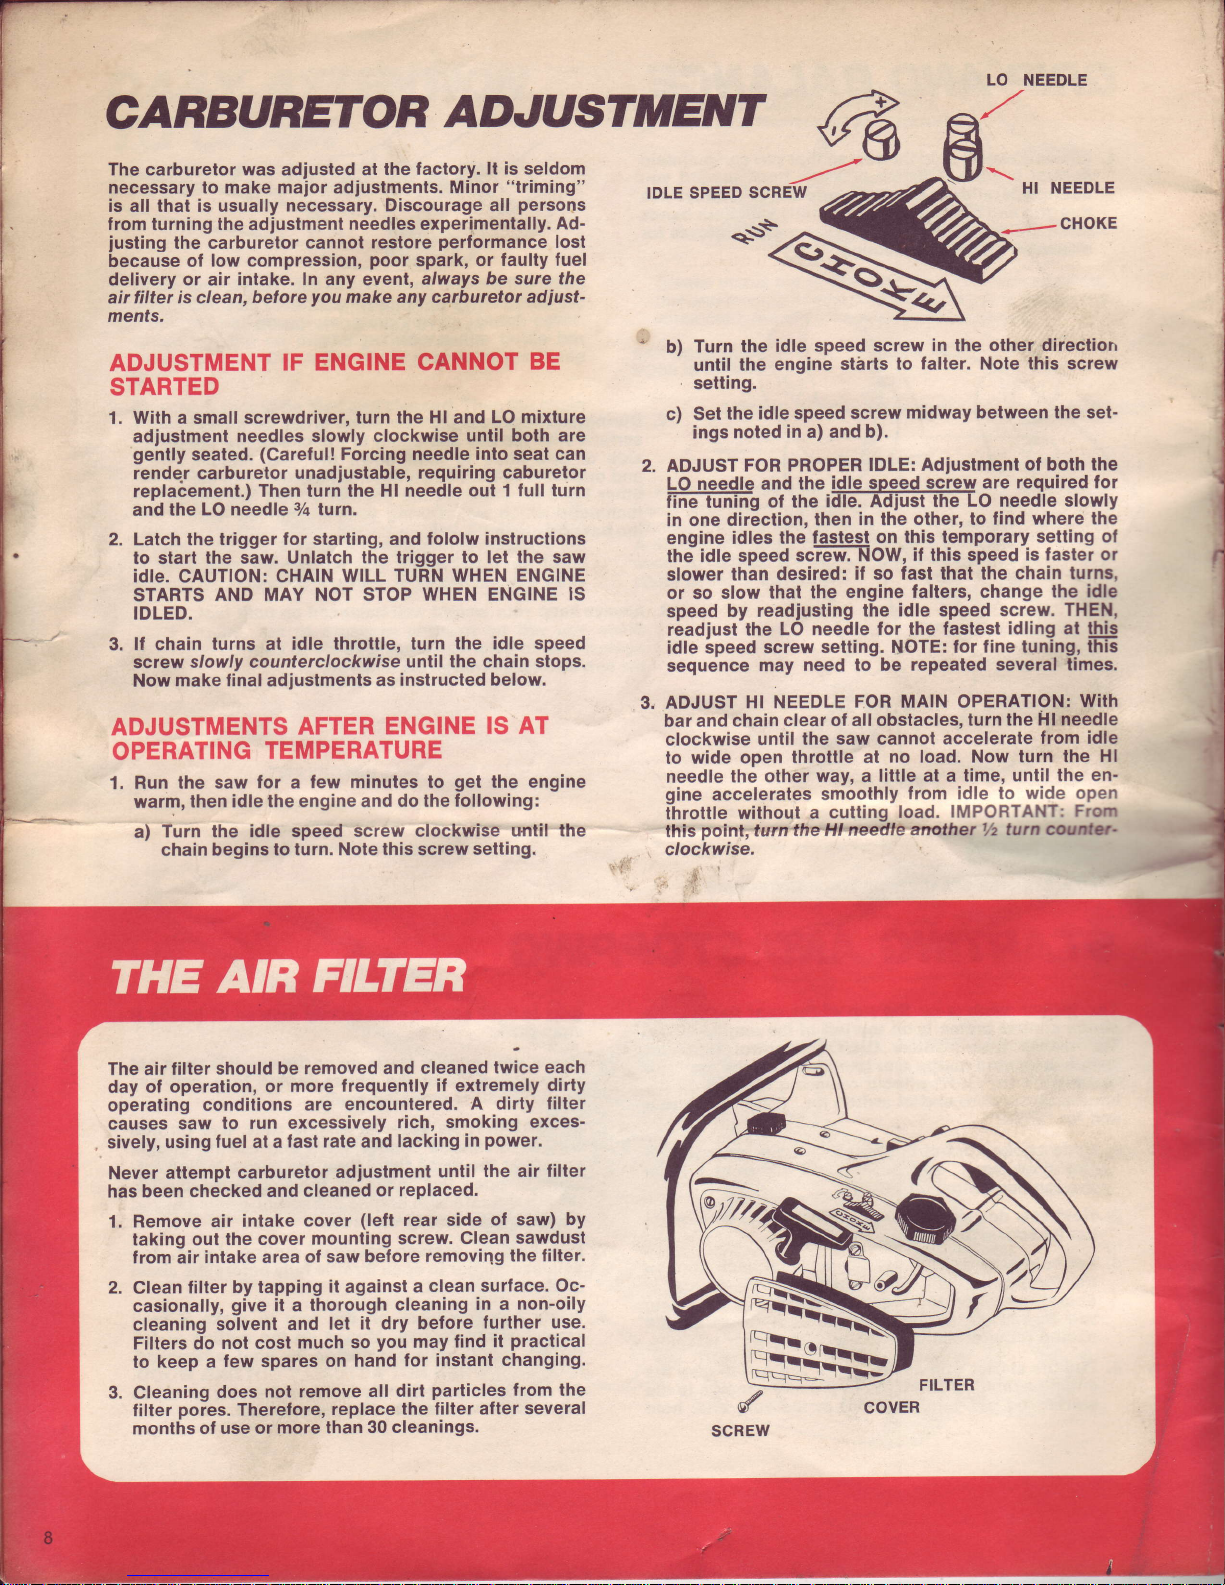
CARBURET
OR
ADJ U
STNilENT
fr
The carburetor was adjusted at
the factory.
lt is
seldom
necessary to make
major
adjustments.
Minor
"triming"
is all that is usually
necessary. Discourage all
persons
from
turning
the
adjustment
needles experimentally.
Ad-
justing
the carburetor
cannot restore
performance
lost
because
of
low compression,
poor
spark, or
faulty fuel
defivery or air intake. In any evenl,
always
be sure the
air
filter is clean,
belore
you
make any carburetor adiust-
ments.
ADJUSTMENT
IF
ENGINE
CANNOT
BE
STARTED
With a small screwdriver,
turn the Hl and
LO mixture
adjustment needles slowly
clockwise until
both
are
gently
seated.
(Careful!
Forcing
needle
into seat can
rende-r carburetor
unadjustable, requiring
caburetor
replaiement.)
Then turri the Ht
ireedle ou-i 1 full turn
and the
LO needle
3/+
lurn.
Latch the
trigger for starting, and
lololw instructions
lo start
the saw. Unlatch
the trigger to let
the
saw
idle. CAUTION: GHAIN
WILL TURN WHEN ENGINE
STARTS
AND MAY NOT STOP WHEN ENGINE
IS
IDLED.
3. lf chain
turns al idle throttle, turn
lhe idle speed
screw
slowly counterclockwise until
the chain stops.
Now
make linal adjustments as
instructed below.
ADJUSTMENTS
AFTER ENGINE
IS AT
OPERATING
TEMPERATURE
1.
Run the saw
for a few
minules to
get
the engine
warm,
then idle the engine
and do the lollowing:
a)
Turn the idle speed
sclew clockwise
until the
chain begins
to turn. Note
this
screw
setting.
+ts+
*
b)
Turn the
idle speed
screw in the
other
direction
until the
engine
starts to
falter.
Note
this screw
'
setting.
c) Set
the
idle speed
screw
midway between the set-
ings noted
in a) and b).
2. ADJUST
FOR PROPER
IDLE:
Adiustment
ol
both
the
LOrcedte
and
the
idle speed screw
are required for
iiFe tuning
of the
iiiiiltiir5TThEl,o
needie slowly
in one
direction,
then in the
other, to find where
the
engine
idles the
fastest on
this temporary setting
of
th;idle
speed
sciffiNOw,
il this speed-is
fastei or
slower
than
desired:
if so fast thal the
chain turns'
or so slow that
lhe
engine falters, change
the idle
speed
by readjusting
the idle speed
screw.
THEN,
readjust the
LO needle
for
lhe
fastest
idling at
!!!9
idte
speed screw
setting.
NOTE:
for
line tuning, lhis
sequence
may
need to be repeated
several limes.
3, ADJUST
Hl NEEDLE
FOR
MAIN OPERATION:
With
bar and
chain clear
of all obstacles,
turn the Hl needle
clockwise until
the saw cannot
accelerate
flom idle
to wide
open
throttle at
no
load. Now
turn the
Hl
needle
the other
way, a little at a
time, until the
en-
gine
accelerates
smoothly
lrom
idle
to wide open
throttle
without a
cutting
load.
IMPORTANT:
Frqn
this
point,turntheltffittanother
th
turn oo*s
clockwise.
IDLE
SPEED SCREW
1.
The air filter
should be removed
and cleaned
twice each
day
of operation, or
more
frequently if extremely
diriy
operating
condilions
are encountered.
A dirty lilter
causes
saw
to run excessively
rich,
smoking exces-
sively, using
luel at a
fast rate
and
lacking
in
power.
Never
attempt
carburetor
adiustment
until
the air filter
has
been checked
and cleaned
or replaced.
1.
Remove air
intake
cover
(left
rear side
of saw)
by
taking
out
the cover
mounting screw.
Glean sawdust
from air
intake area ol
saw belore
removing
the filter.
2. Clean
filter by
tapping
it
against
a
clean surface. Oc-
casionally,
give
it a
thorough
cleaning
in a
non'oily
cleaning
solvent and
let it dry befote
further use.
Filters do
not cost
much so
you
may
lind it
practical
to keep
a
few
spares
on
hand
lor instant
changing.
3.
Cleaning
does
not remove
all dirt
particles
lrom the
filter
pores.
Therefore,
replace
the lilter after
several
months of
use or
more than
30 cleanings'
 Loading...